

On this page
- Find a member of staff and read their profile
- Add an employee
- Set an employee’s PIN
- Change an employee’s status or archive them
- Set up positions, departments, leave types and rules
- Clock in and out at the time clock
- Correct attendance and approve overtime
- Ask for leave
- Approve or reject leave
- Read staff performance and tips
- Connect a fingerprint or card clock
Everything about the people who work in the restaurant: who they are, when they came and left, their leave, their figures and their tips. Managers find it under Team in the menu — Employees (the Staff directory, Staff set-up and Attendance devices tabs), Work Schedules (the roster), Staff Attendance (Attendance, Time clock and My time & leave), Leave & Overtime, Tips & Commissions and Staff Performance. Every member of staff uses Time clock at work and My time & leave for their own hours and leave. The roster and the trading shift have their own manual (see Work Schedules).
Who sees what:
| Information | You need |
|---|---|
| The directory: name, photo, numbers, position, department, branches, who is in now | employees.view |
| Phone, e-mail, address, date of birth, national ID (last 4), emergency contact, HR notes | employees.personal |
| Pay basis and rate, and labour cost on shift reports | employees.pay |
| Other people’s performance and tips | performance.view |
| Your own profile, hours, leave and figures | everyone |
What you may not see is not sent to your browser at all. A manager limited to one branch sees the staff of that branch only.
The screens are the demo business at Kampala — Kololo on Friday 2 October 2026; the branch manager is Moses Kigozi and Brian Mugisha is a waiter — the names of their staff records, which these screens show. They sign in as Moses Manager and Brian Waiter, the names the top bar and the tills show. The PIN of every demo employee is 2468.
Find a member of staff and read their profile
Purpose
Find someone quickly — their number, where they work, whether they are in right now — and open everything about them in one place.
Role / permission required
Managers and supervisors: employees.view. Personal details need
employees.personal, pay needs employees.pay.
Prerequisites
- None.
Steps
- Open Team › Employees in the menu. The Staff directory opens.
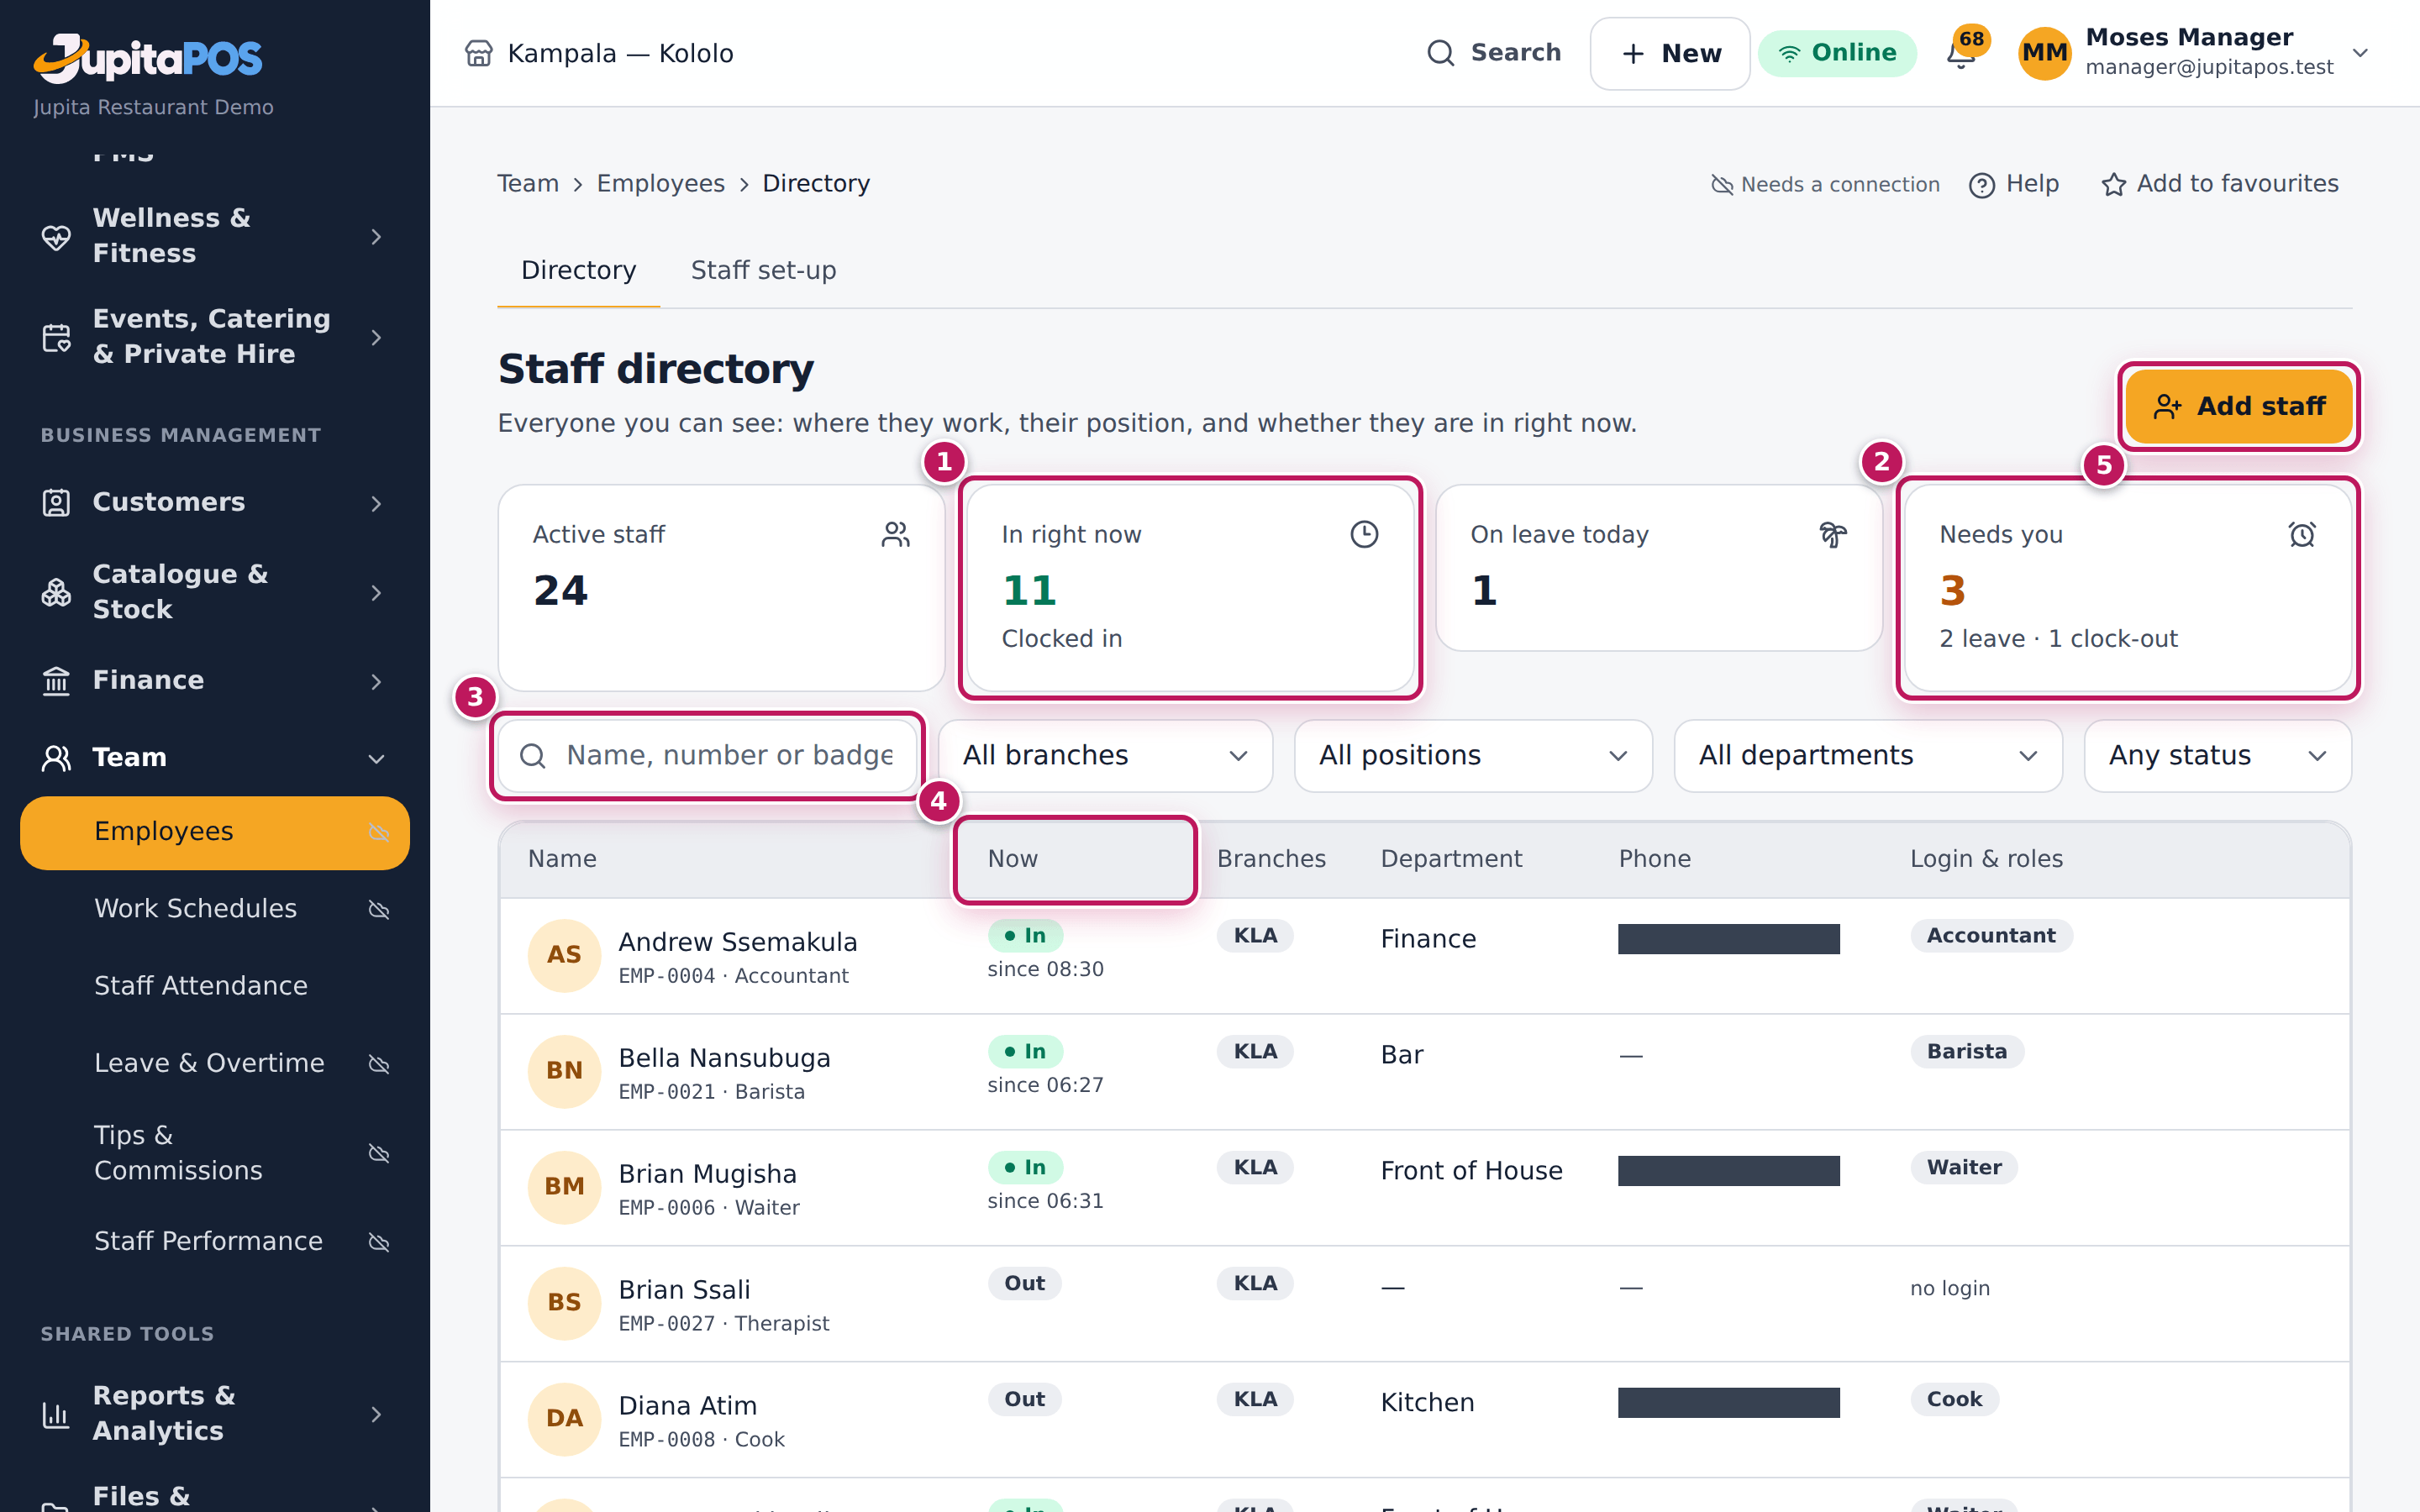
- Read the cards at the top: Active staff, In right now (1), On leave today and Needs you (2) — leave to decide and clock-outs to enter.
- Type in the search box (3) a name — first, last or full, in either order (Sarah Nakato, nakato sarah) — a staff number or a badge number, or use the filters for branch, position, department and status.
- Read Now (4) for each person: In, On break, On leave, or No clock-out from an earlier shift.
- Click a row to open the profile.
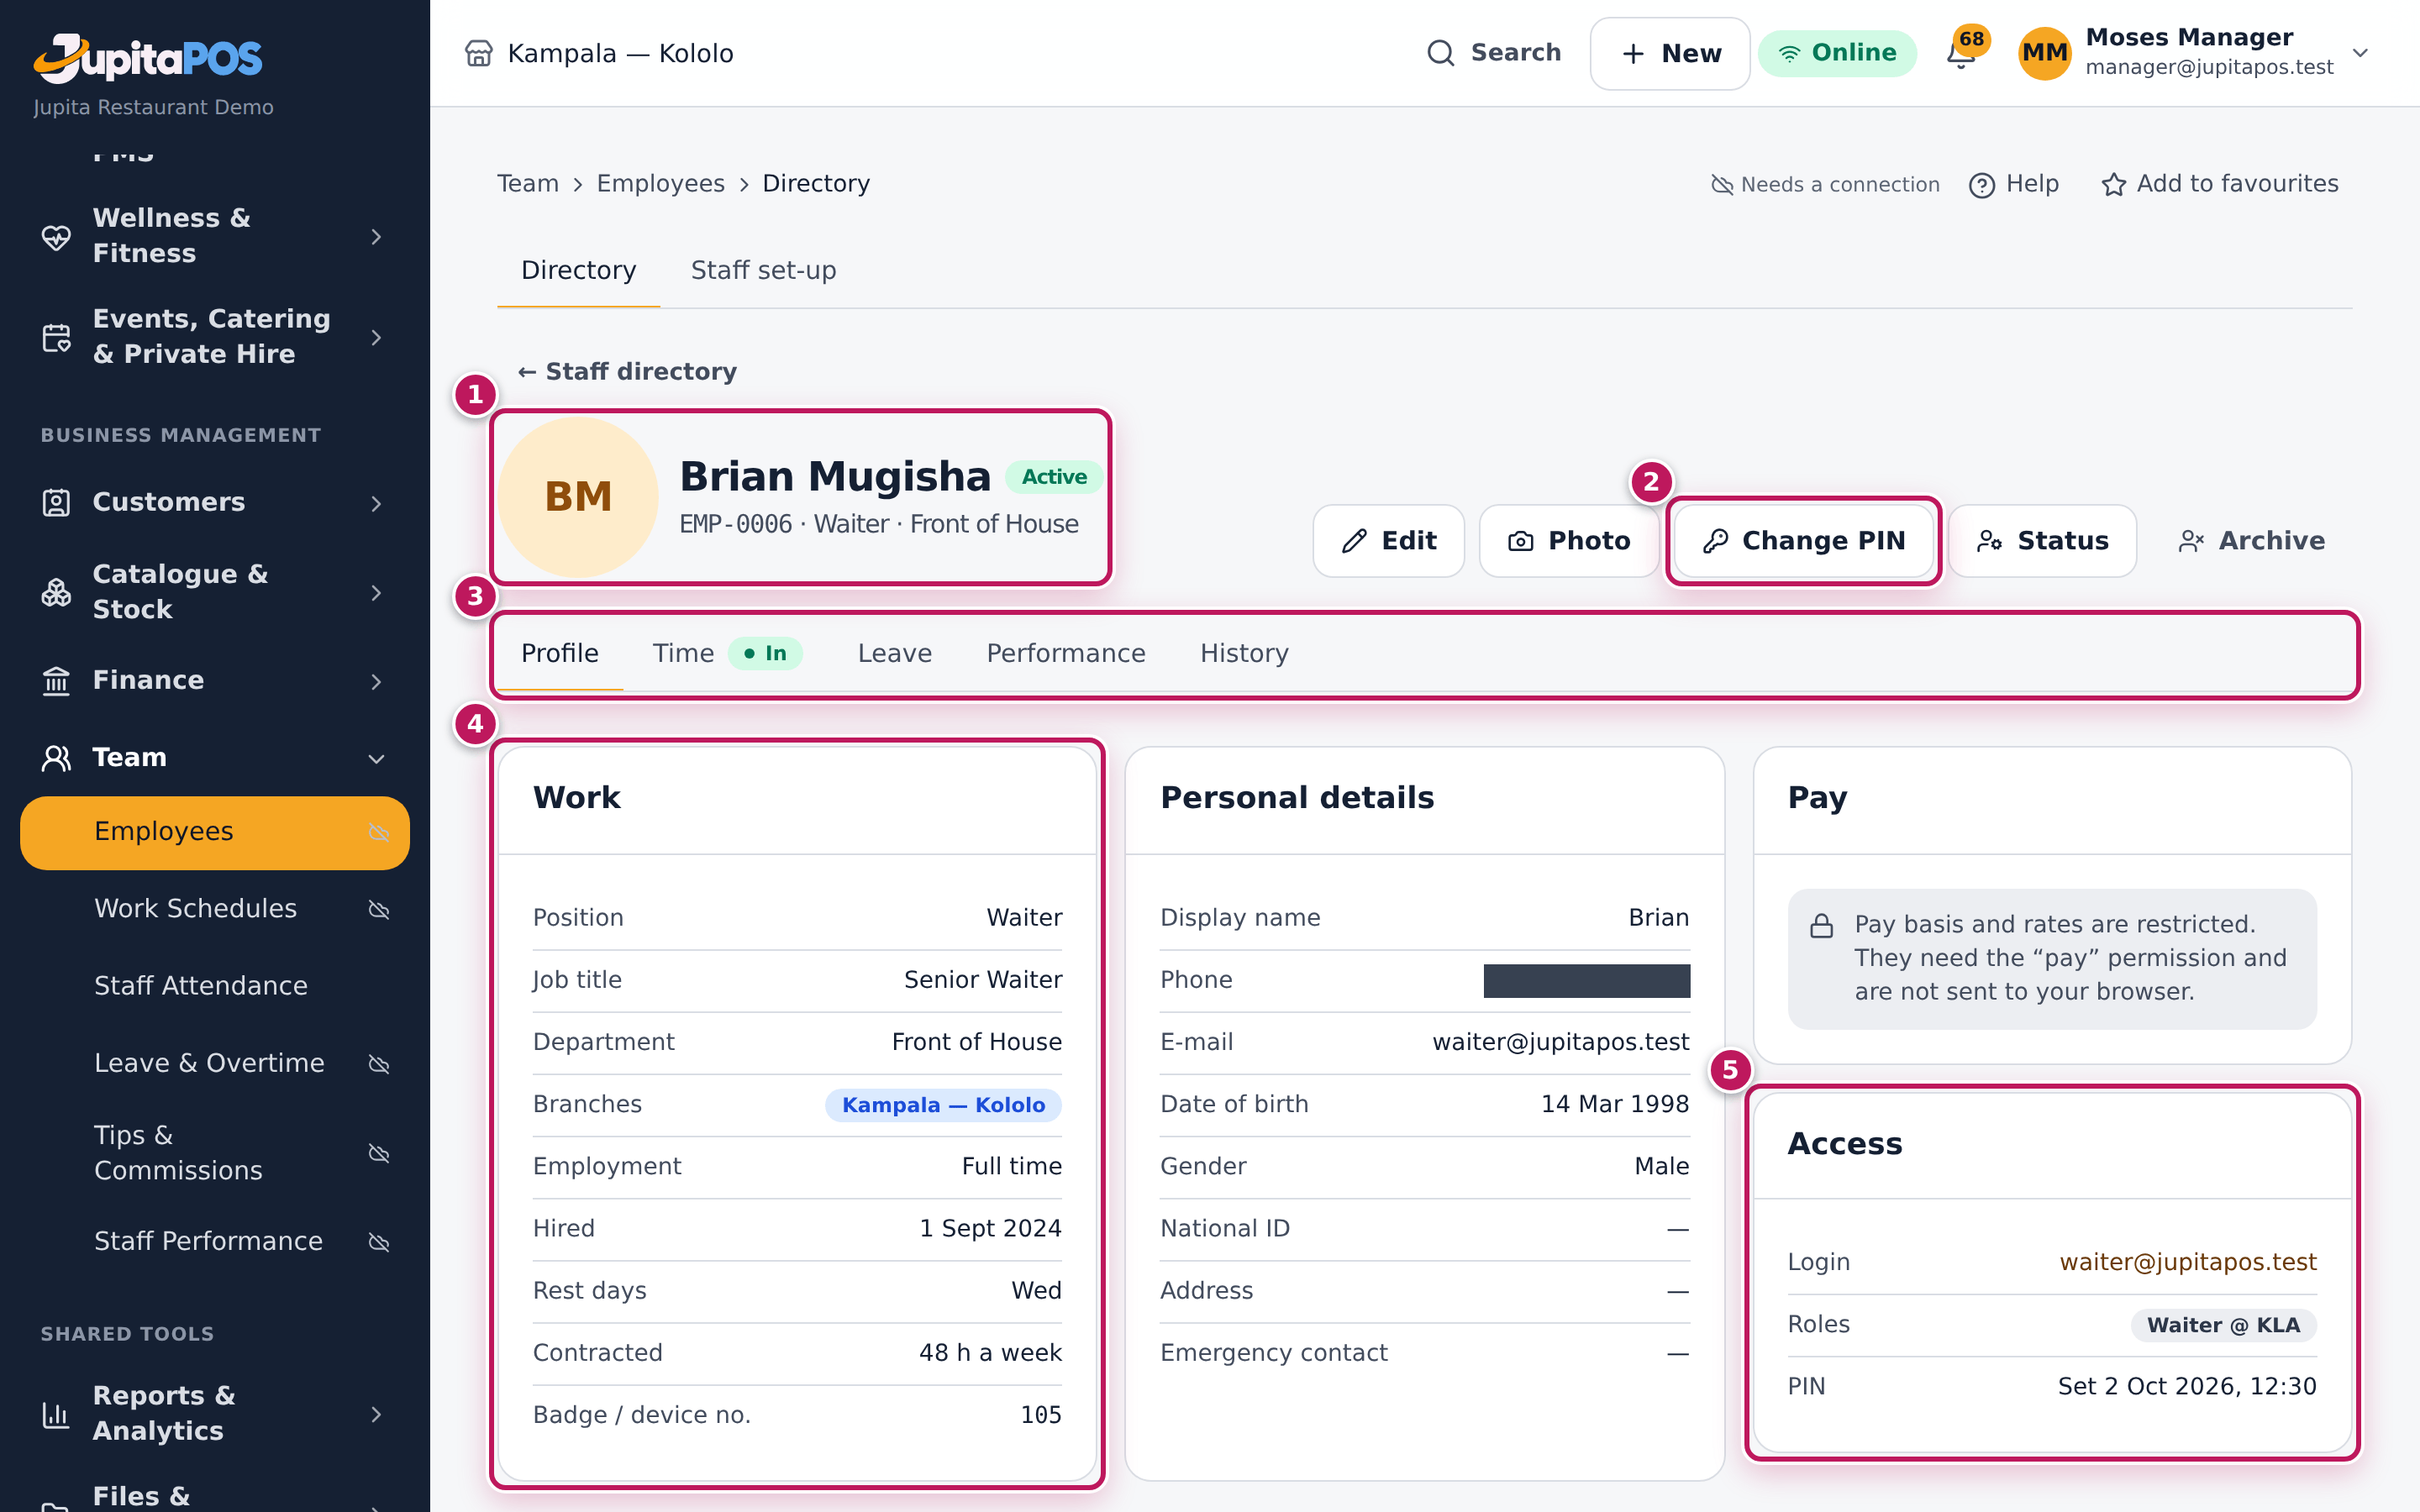
- The profile (1) shows the staff number, position and department. The buttons (2) are Edit, Photo, Change PIN, Status and Archive.
- Use the tabs (3): Profile (work (4), personal details, pay and access (5)), Time (in now, the next shifts, the last 14 days of timecards), Leave (balances and requests), Performance (the last 30 days) and History (status changes and the profile’s audit trail).
Expected result
Searching Brian shows Brian Mugisha, EMP-0006, Waiter, Front of House,
In since 06:31. His profile shows his work details, his login and roles,
and whether his PIN is set.
Screenshot
Common mistakes
- Counting someone with “No clock-out” as in. They forgot to clock out of an earlier shift; they are not counted in In right now. Enter the clock-out (see Correct attendance).
- Looking for someone who left. Archived people are hidden. Use the status filter.
Troubleshooting
- “Contact details, date of birth and emergency contacts are restricted.” Your role does not include
employees.personal. - Nobody from the other branch shows. Your role covers your branch only.
Add an employee
Purpose
Put a new person on the staff list so they can be rostered, clock in and, if they need one, get a login.
Role / permission required
Branch manager, administrator or owner: employees.manage. Personal
details need employees.personal; pay needs employees.pay.
Prerequisites
- The positions and departments exist (see Positions, departments and rules).
Steps
- Open Staff directory and click Add staff.
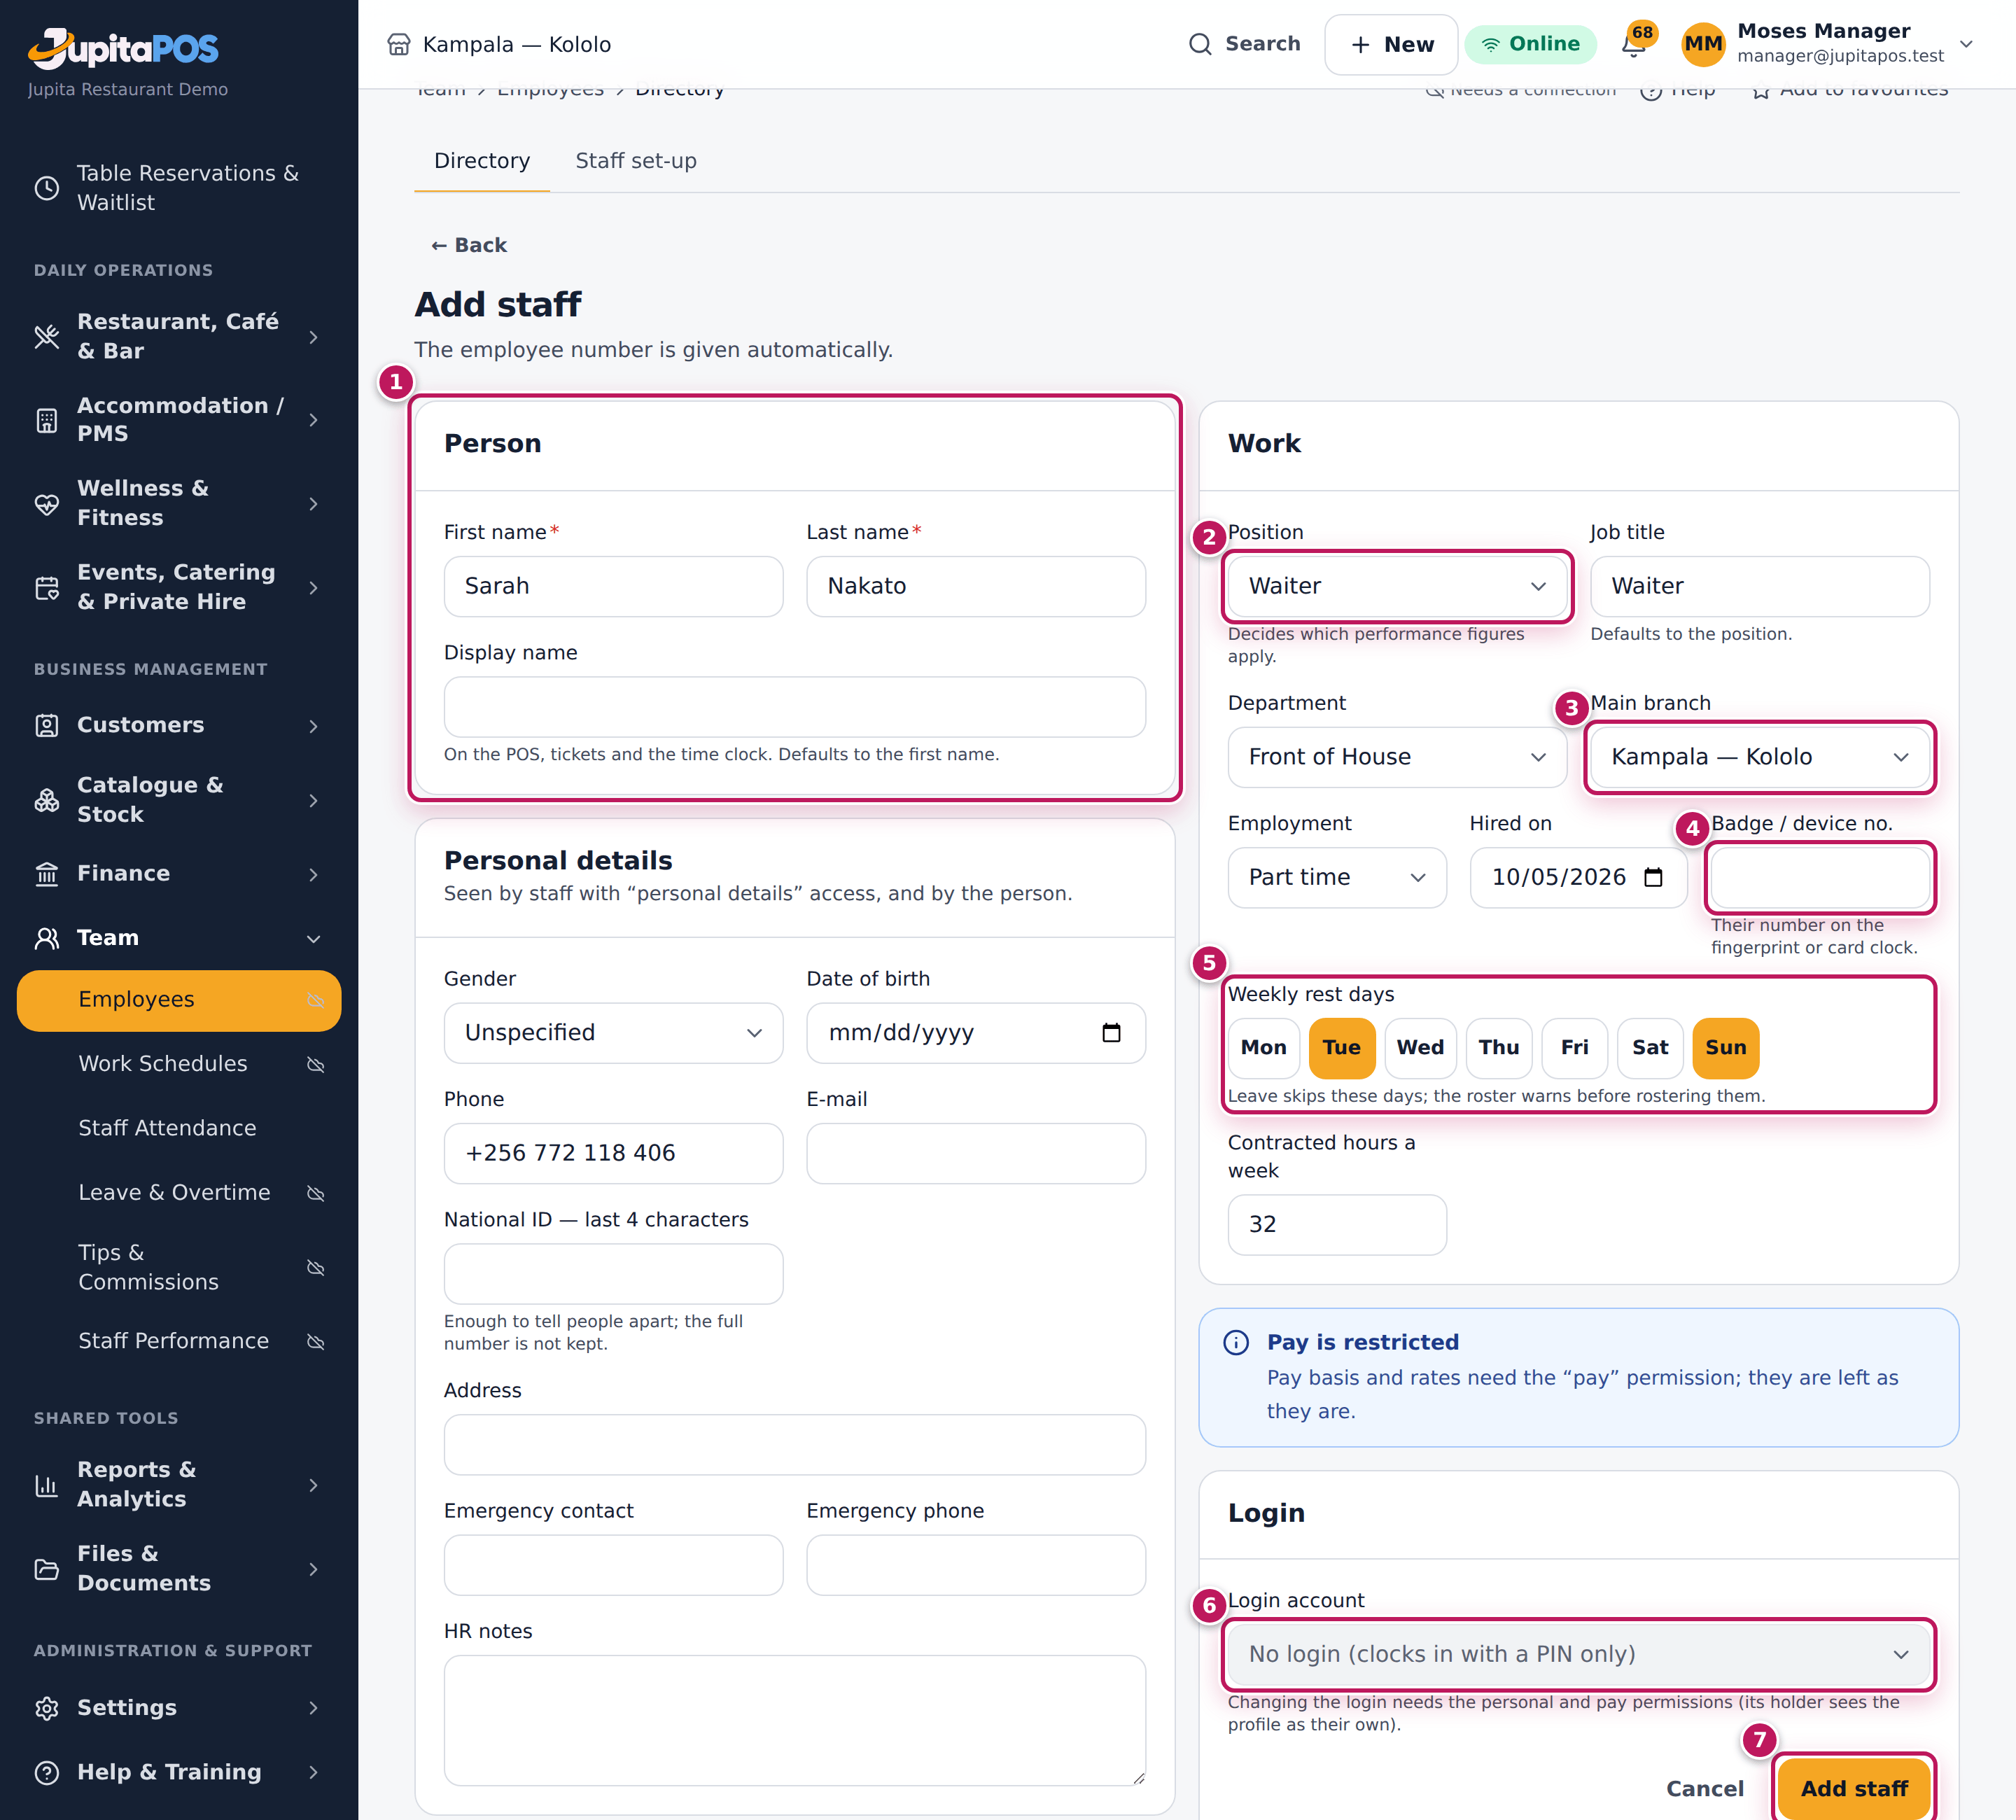
- Under Person (1), type the First name and Last name. The Display name (on the tills and tickets) defaults to the first name.
- Fill in the Personal details you have: phone, e-mail, address, emergency contact.
- Under Work, choose the Position (2). It fills the Job title and the Department.
- Choose the Main branch (3), and tick Also works at for others.
- Choose the Employment (full time, part time…) and the Hired on date.
- If the venue has a fingerprint or card clock, type the Badge / device no. (4): the number they are enrolled under on the device.
- Tap their Weekly rest days (5) and type the Contracted hours a week.
- If you may see pay, set the Pay basis and rate.
- Leave Login account (6) as No login (clocks in with a PIN only), or choose their login (see Add a user).
- Click Add staff (7).
Expected result
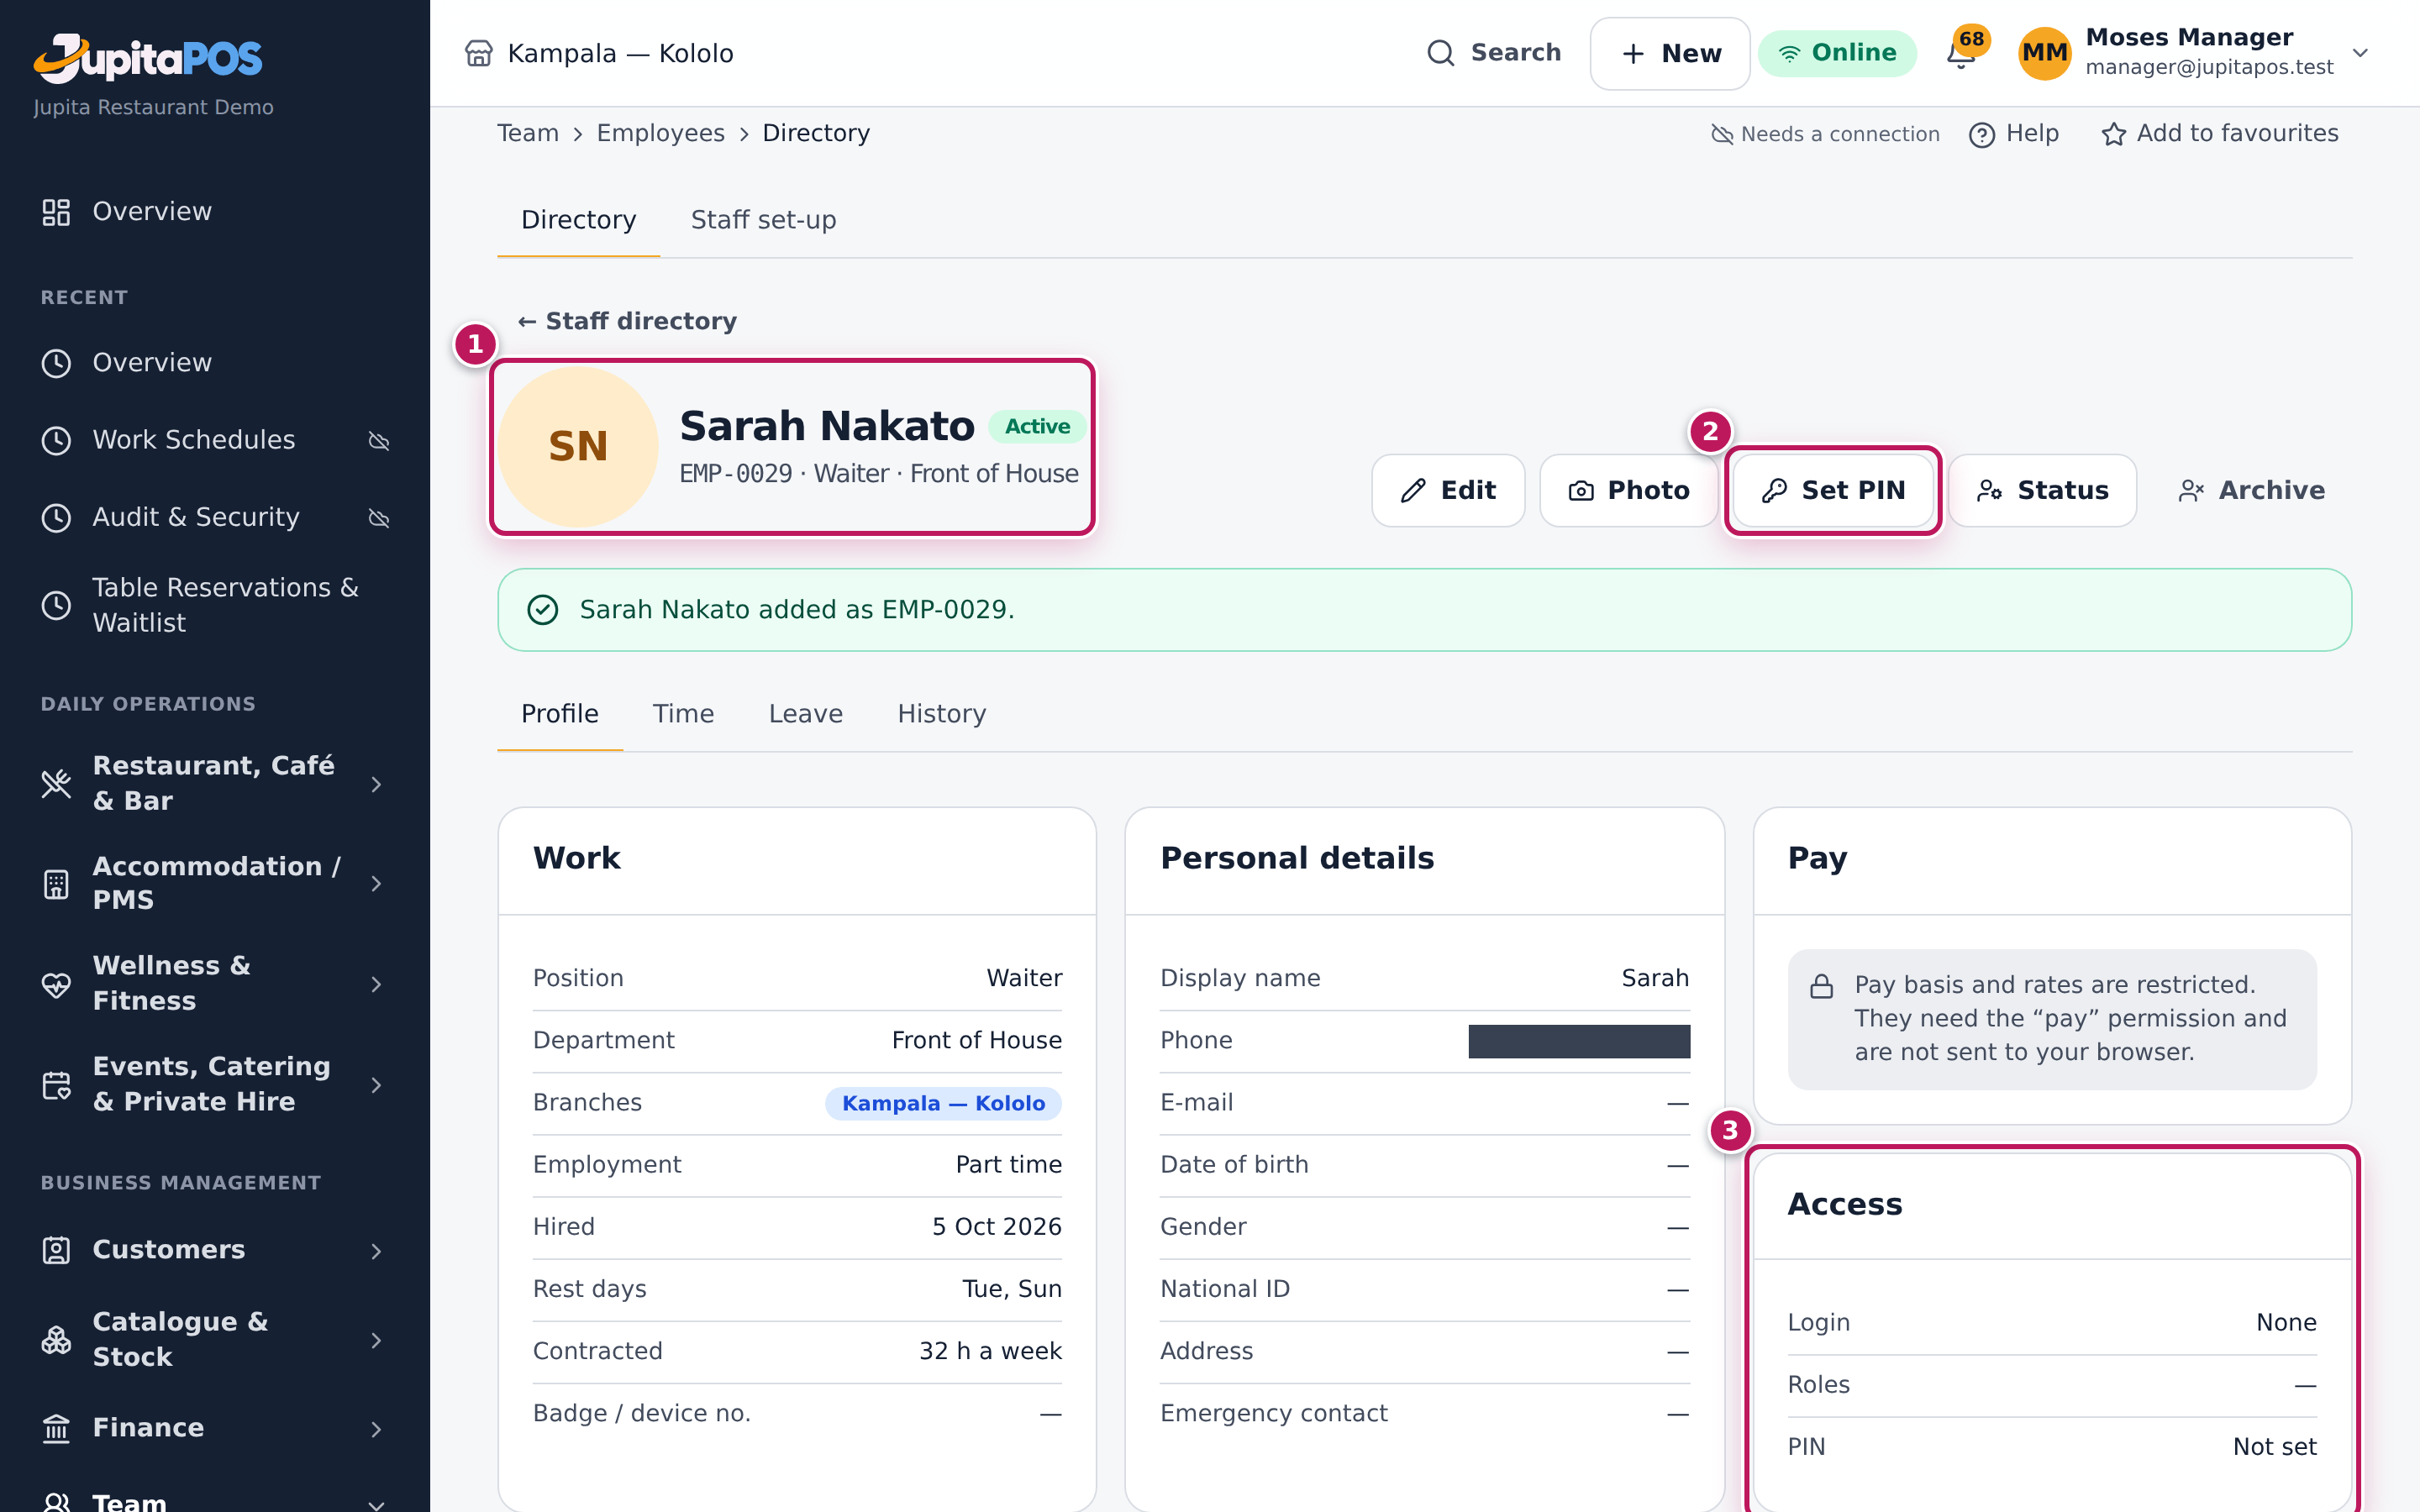
The profile opens with the message Sarah Nakato added as EMP-…: the next free employee number, given automatically, is under the name with the position and department — Waiter · Front of House (1). Their PIN is not set yet (3): set it next (2) (see Set an employee’s PIN).
Screenshot
Common mistakes
- Typing the job title instead of choosing a position. The position decides which performance figures apply and what the roster needs.
- Giving two people the same badge number. The device could not tell them apart; the number must be unique in the business.
- Creating a login “just in case”. A login gives access to the system. Staff without one clock in with their number and PIN.
Troubleshooting
- “Pay is restricted” instead of the pay fields. Your role does not
include
employees.pay; someone who does sets the pay. - The badge number is refused. Another person has it. Check the directory search.
Set an employee’s PIN
Purpose
Give someone the 4-digit PIN they use on the time clock, to unlock a till and to approve at the till.
Role / permission required
Branch manager, administrator or owner: employees.manage.
Prerequisites
- The person has a profile (see Add an employee).
- They are next to you, to type the PIN themselves.
Steps
- Open the person’s profile.
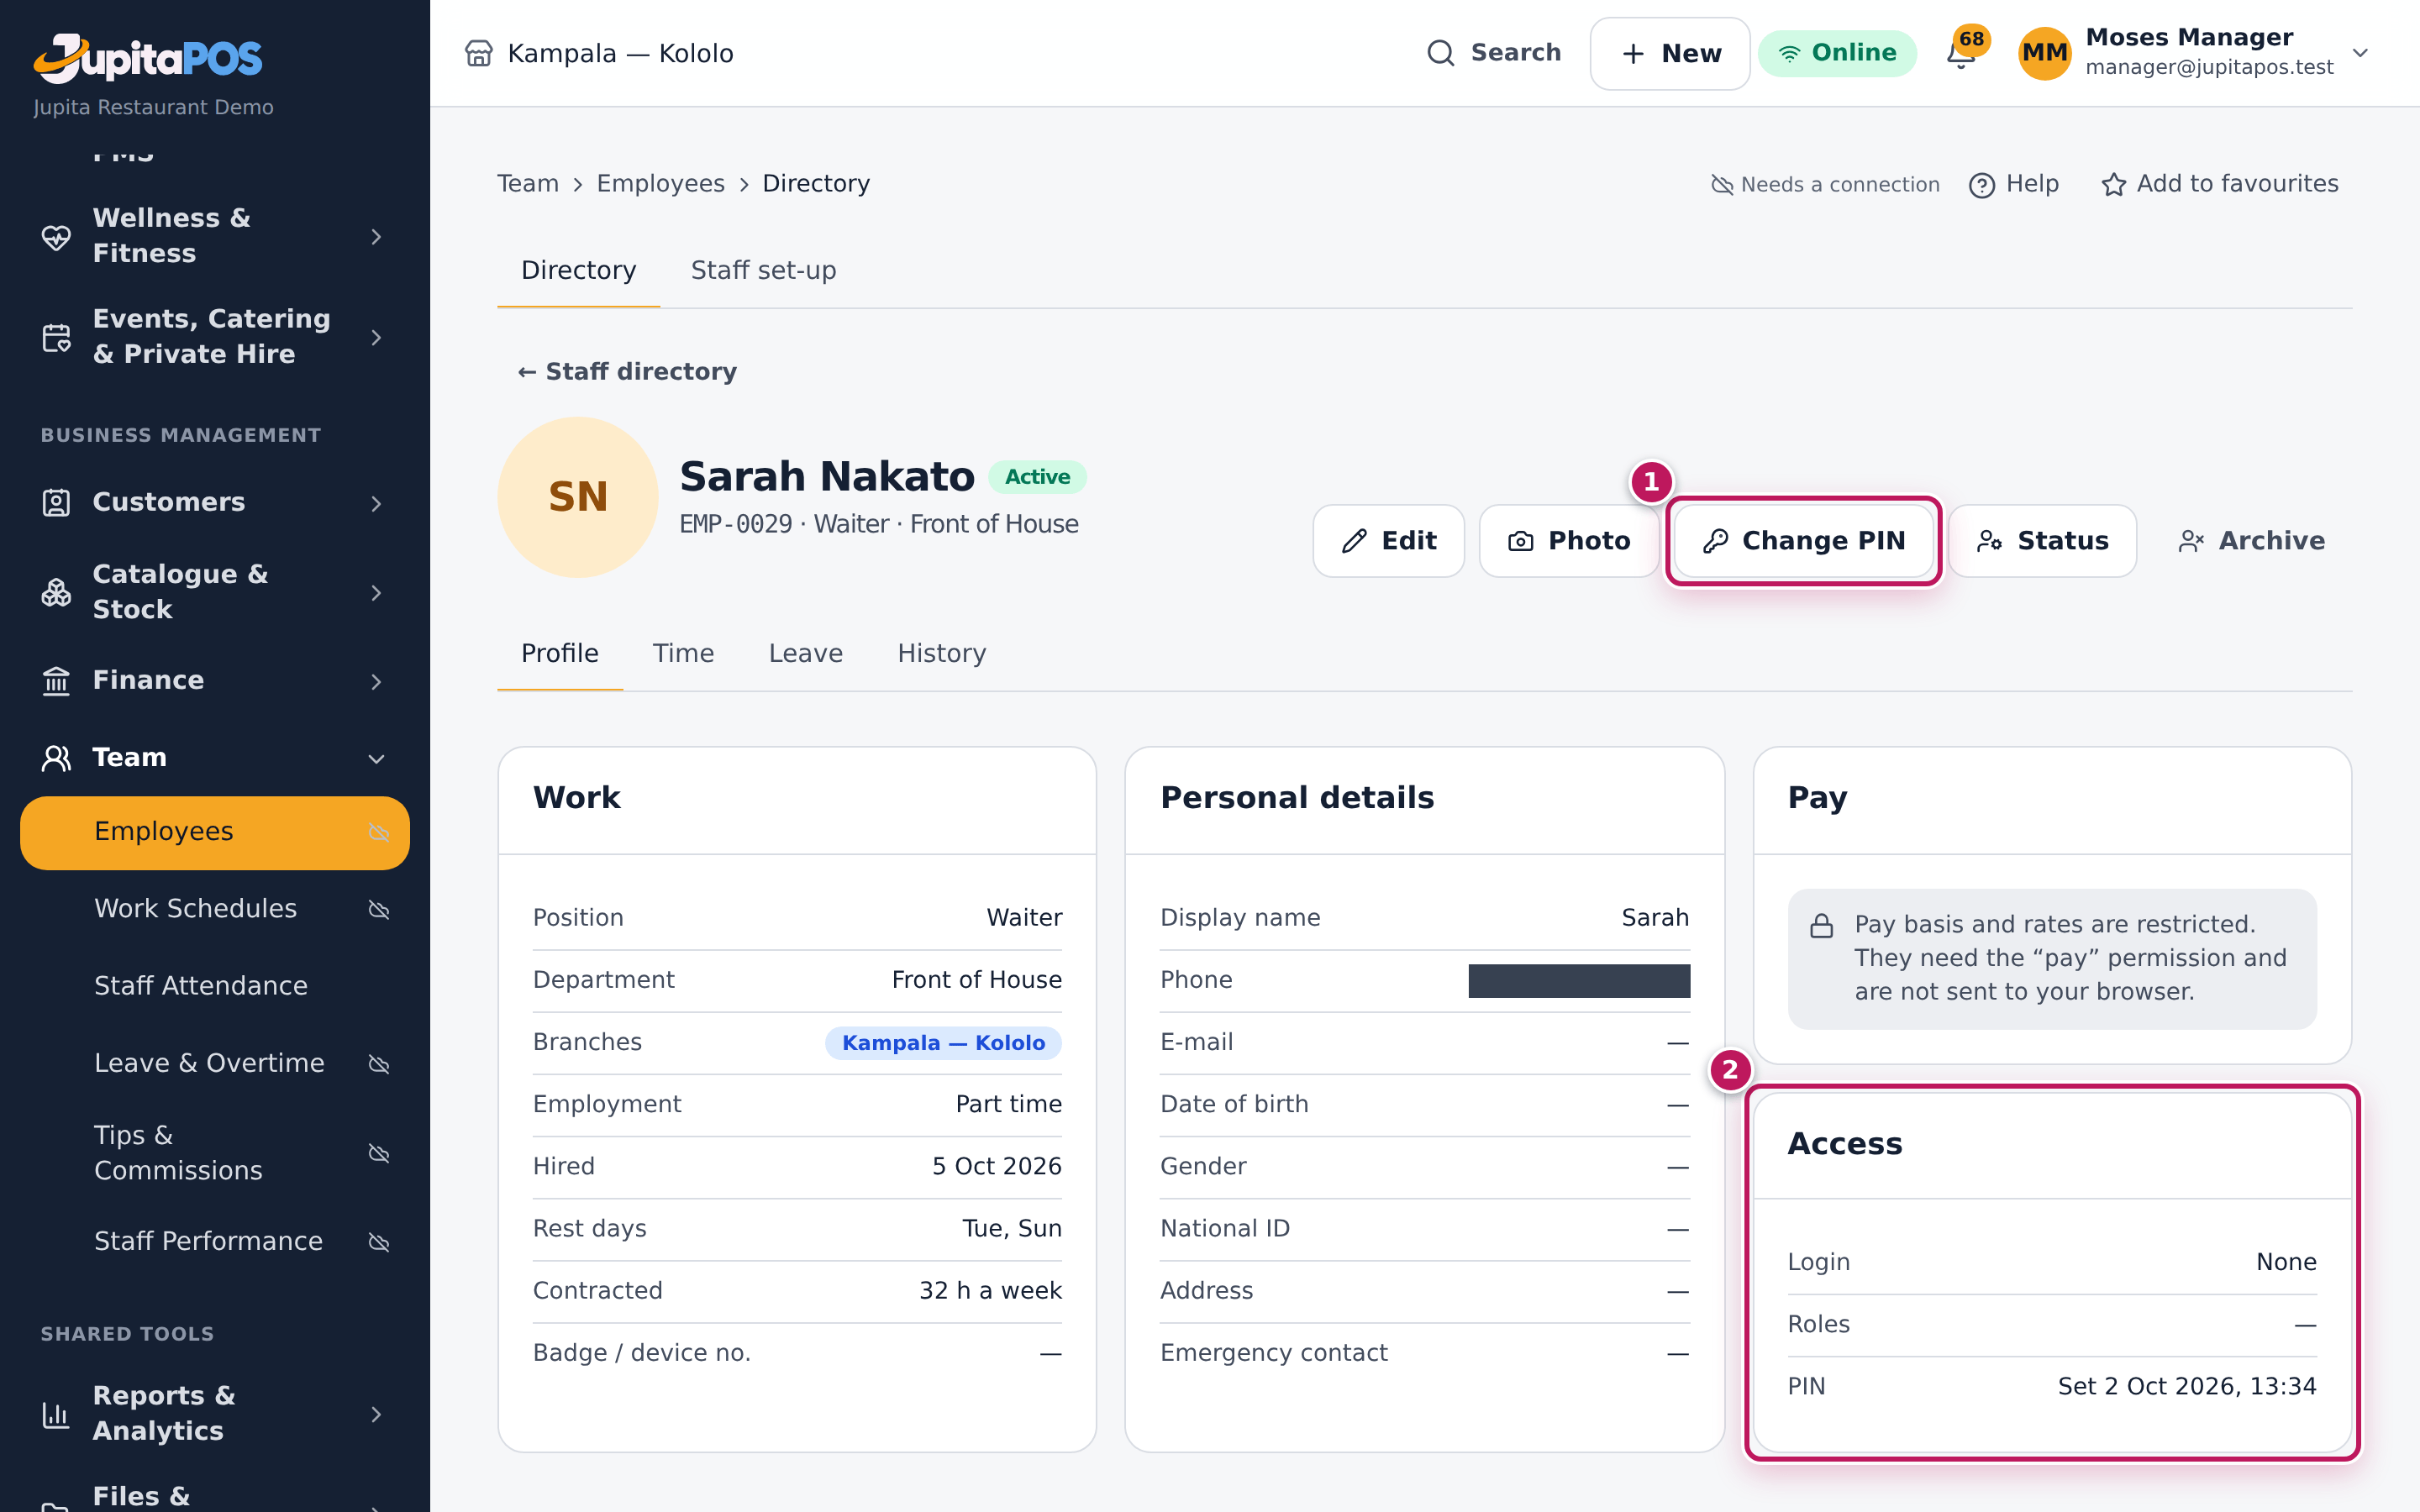
- Click Set PIN (or Change PIN when they have one).
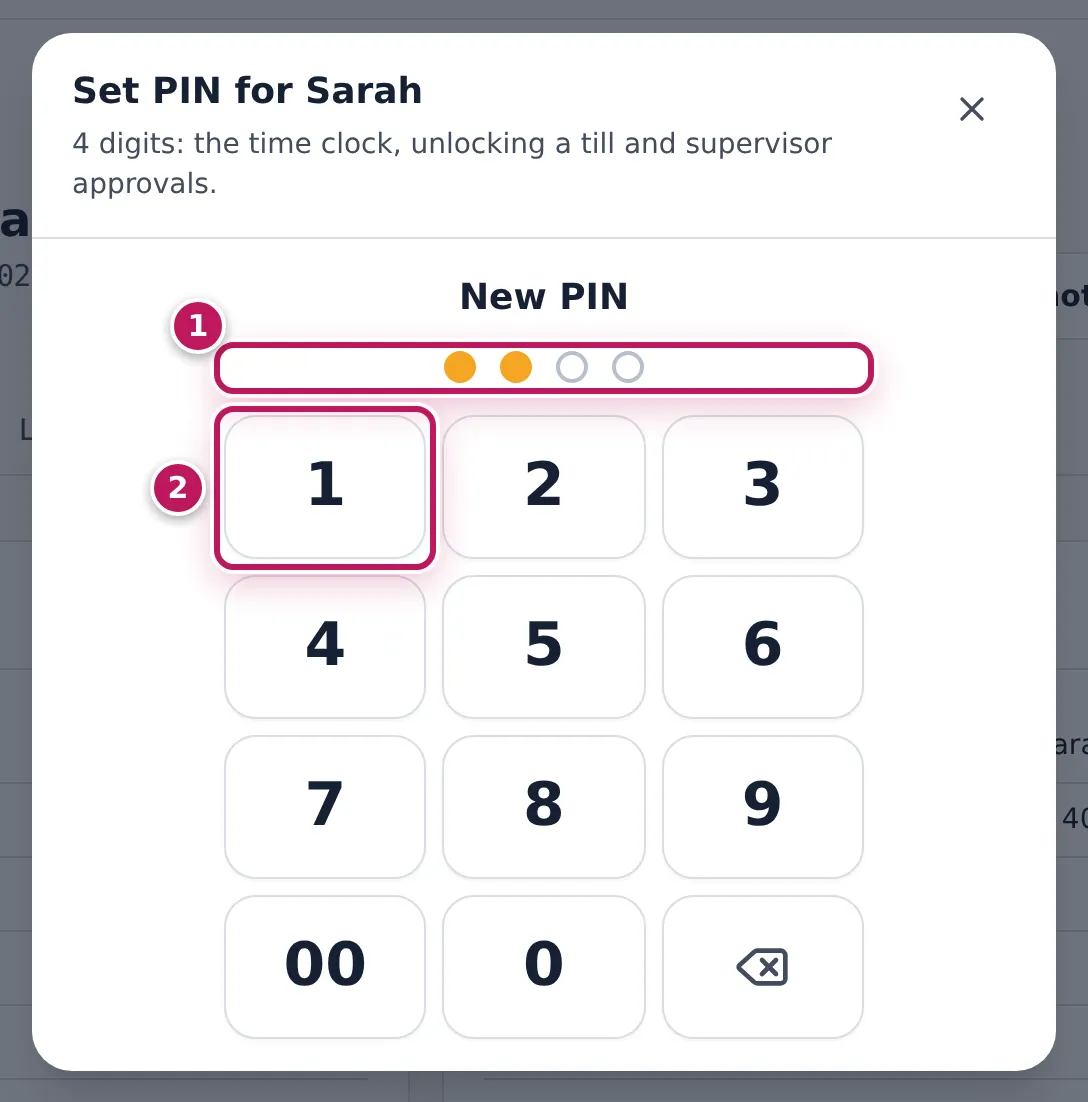
- Let the person type 4 digits on the keypad. The dots (1) show how many are entered; the keypad (2) takes the digits.
- After the fourth digit the PIN is saved.
Expected result
The dialog says PIN saved. Close it: the button is now Change PIN (1) and Access (2) shows PIN: Set with the date.
Screenshot
Common mistakes
- Choosing the PIN for them and writing it down. A PIN is a signature: their approvals and punches are theirs. Let them type it.
- Using 1234 or a birth year. Easy to guess.
Troubleshooting
- “PIN temporarily locked after repeated wrong attempts.” They typed a wrong PIN too often. Set a new PIN; the lock clears.
- They forgot their PIN. Set a new one; the old one stops working.
Change an employee’s status or archive them
Purpose
Record that someone is on long leave, suspended or has left — so they cannot clock in, be rostered or use a PIN — and keep the reason.
Role / permission required
Branch manager, administrator or owner: employees.manage. Nobody changes
their own status.
Prerequisites
- Someone who is clocked in must be clocked out first.
Steps
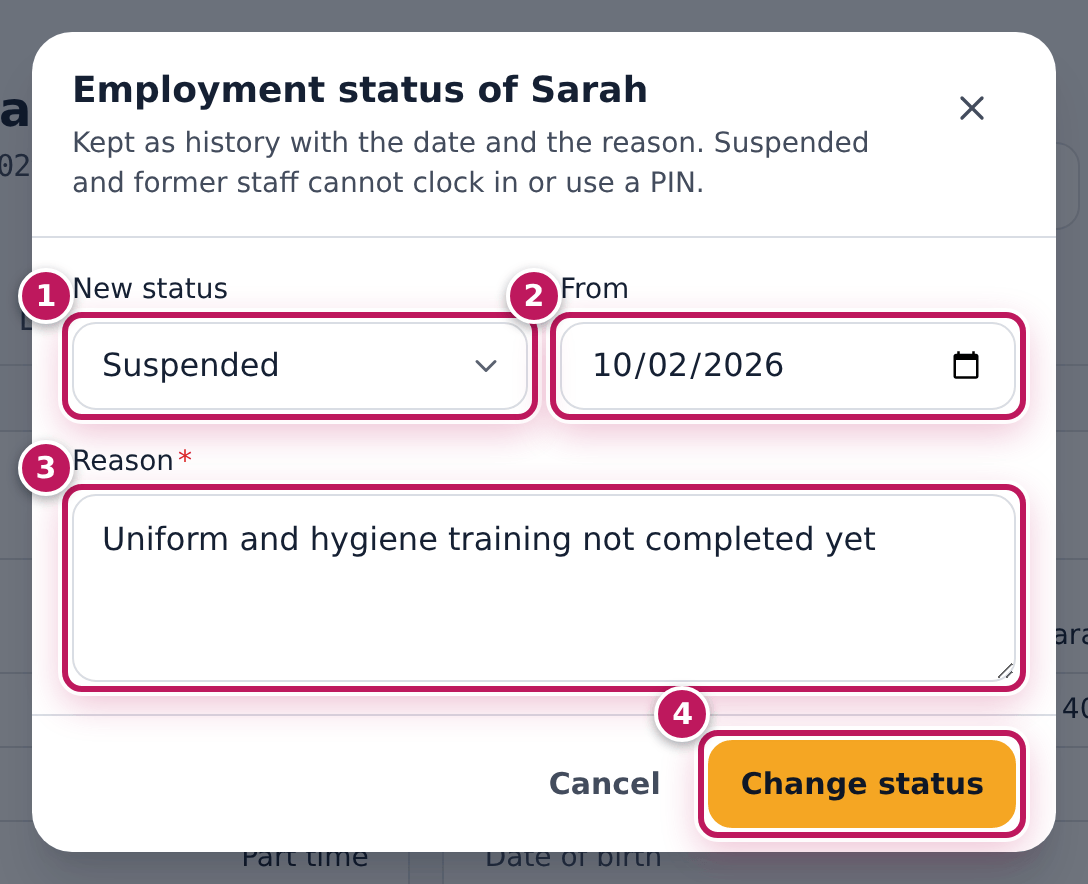
- Open the person’s profile and click Status.
- Choose the New status (1): Active, On leave, Suspended or Terminated.
- Set From (2): the date it starts.
- Type the Reason (3).
- Click Change status (4).
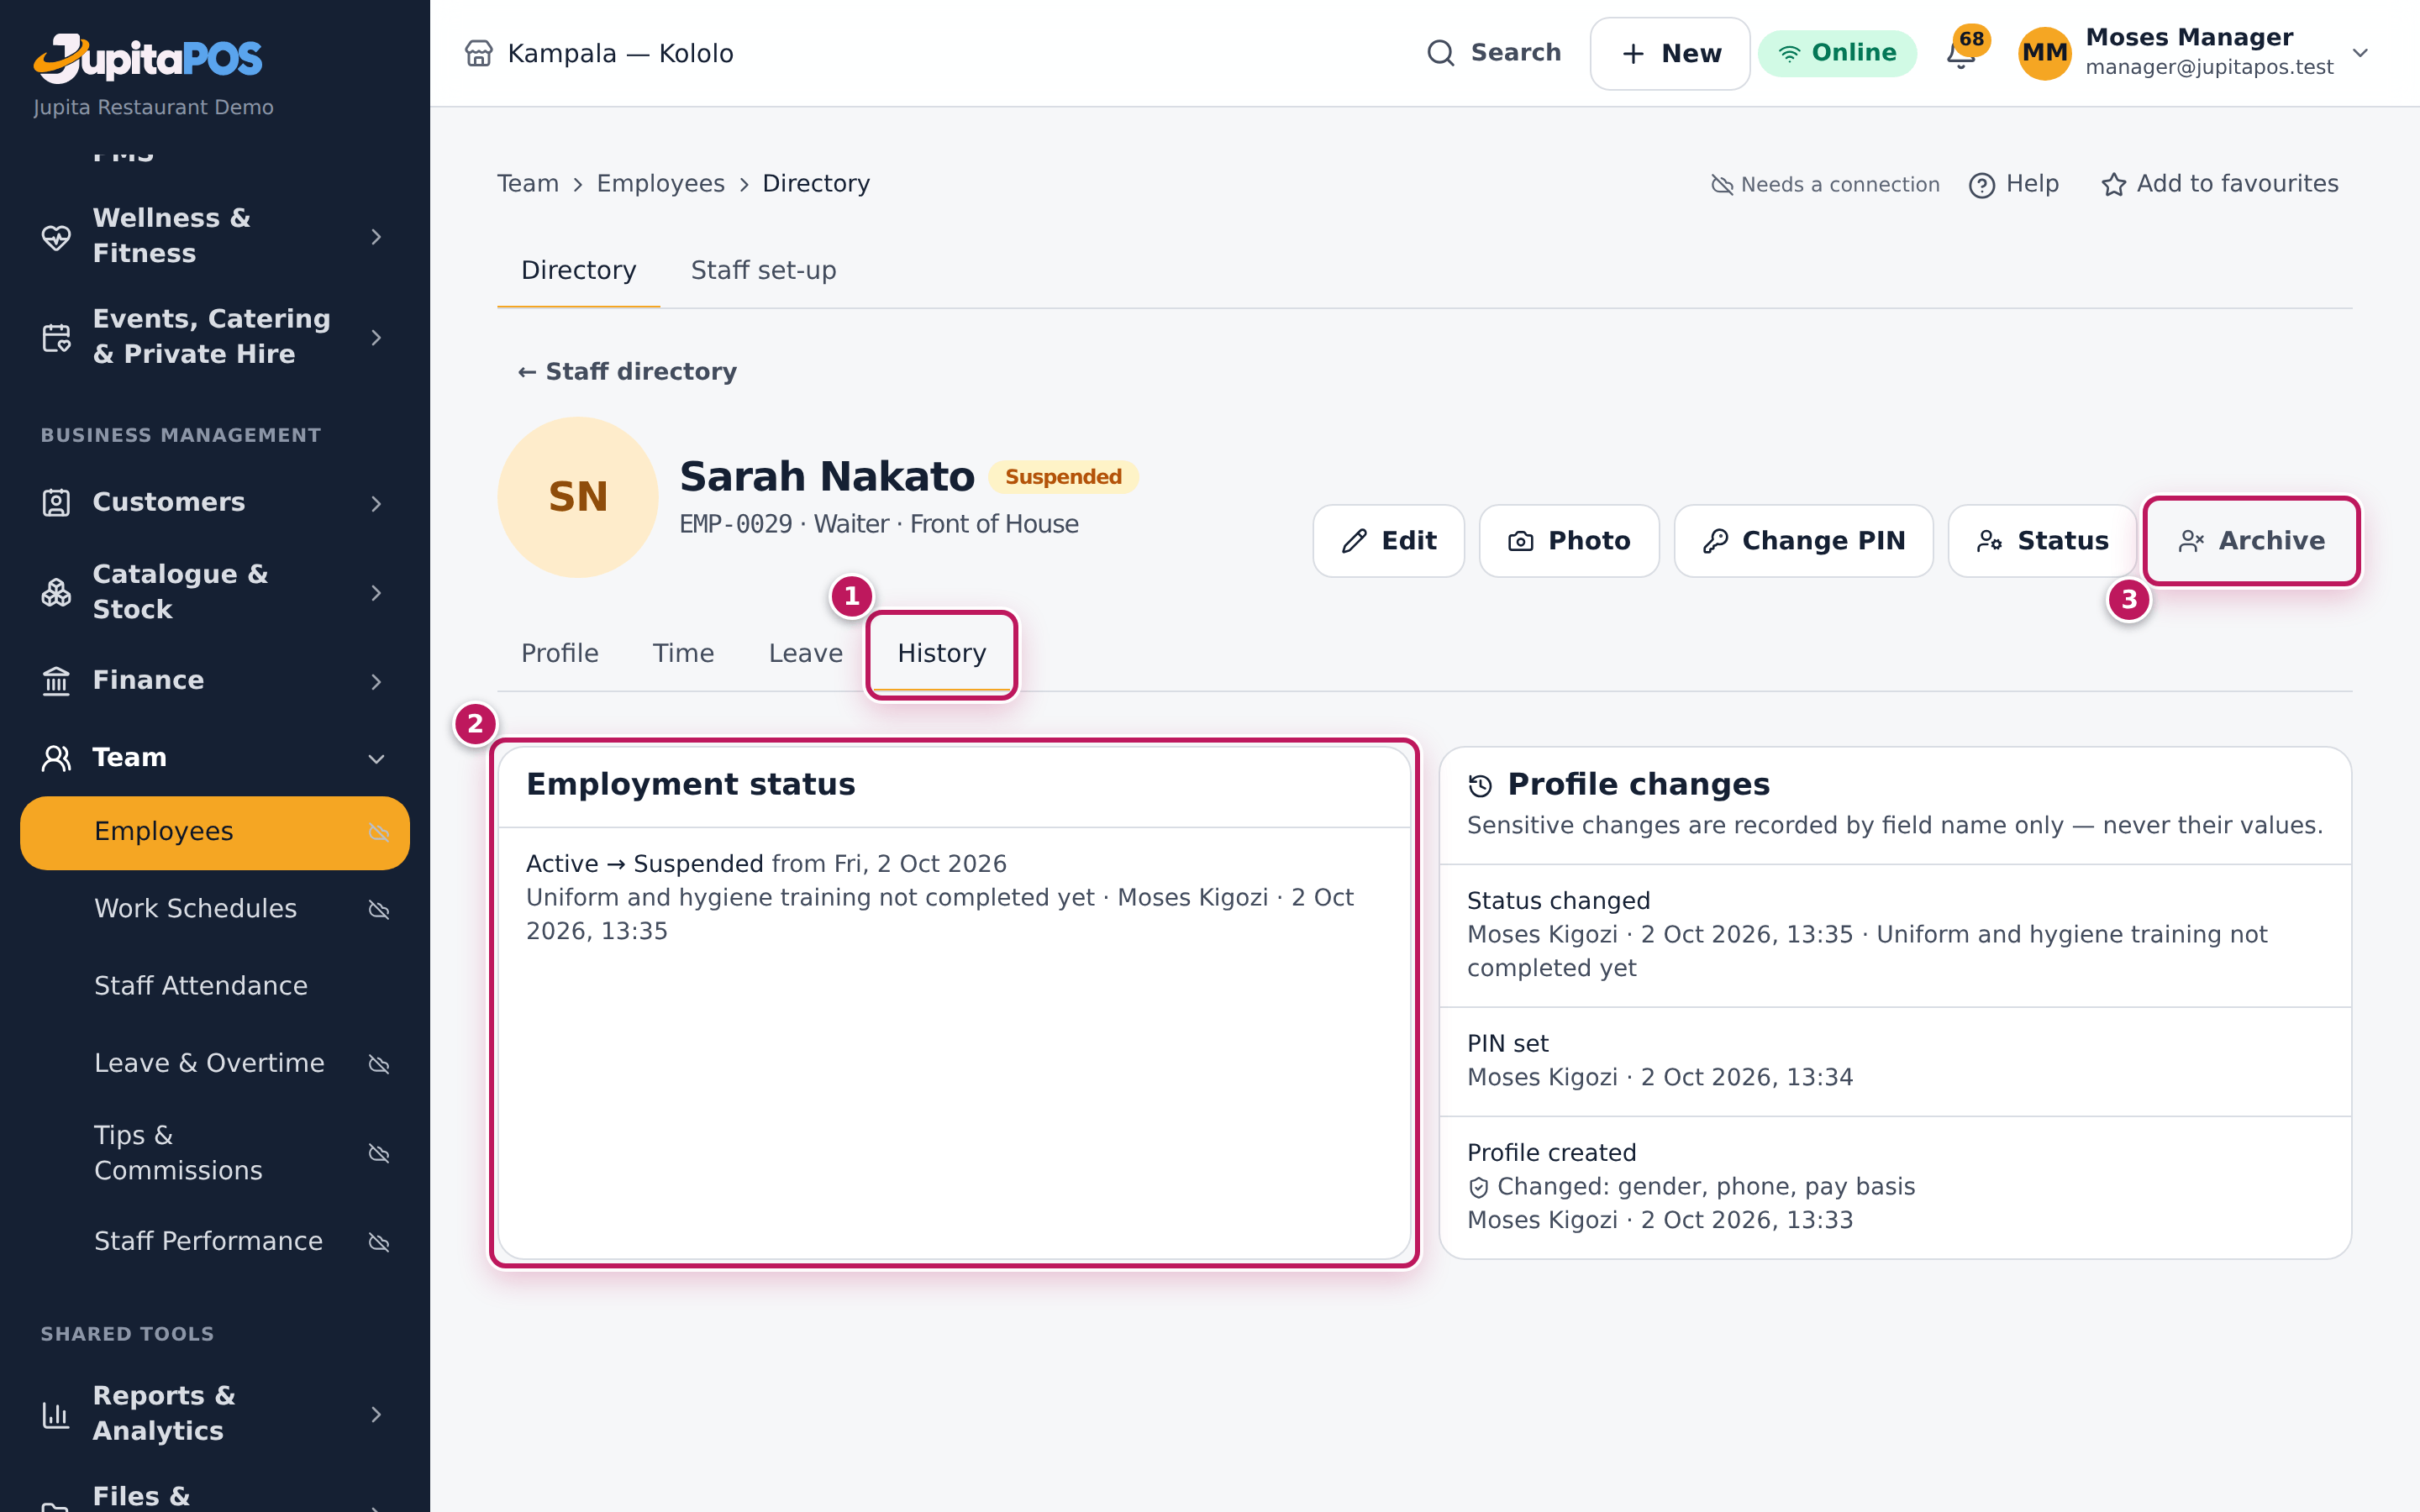
- For someone who has left for good, click Archive and confirm.
Expected result
The message Status changed appears. The History tab (1) lists the change with its date and reason (2). A suspended or terminated person cannot clock in, be rostered or use a PIN, and their login is refused. Archive (3) hides the profile; their timecards, sales and history are kept.
Screenshot
Common mistakes
- Archiving someone who is only on leave. Use On leave; archive only those who will not come back.
- Suspending the login but not the employee. Change the status here: the clock and the PIN follow the employee, not the login.
Troubleshooting
- The status cannot be changed. They are clocked in: enter their clock-out first (see Correct attendance).
Set up positions, departments, leave types and rules
Purpose
Decide the positions people hold, the departments, the kinds of leave and their days, and the attendance rules — once, for the whole business.
Role / permission required
Owner, administrator or branch manager: employees.manage (positions),
departments.manage (departments), leave.manage (leave types).
Prerequisites
- None.
Steps
- Open Staff setup.
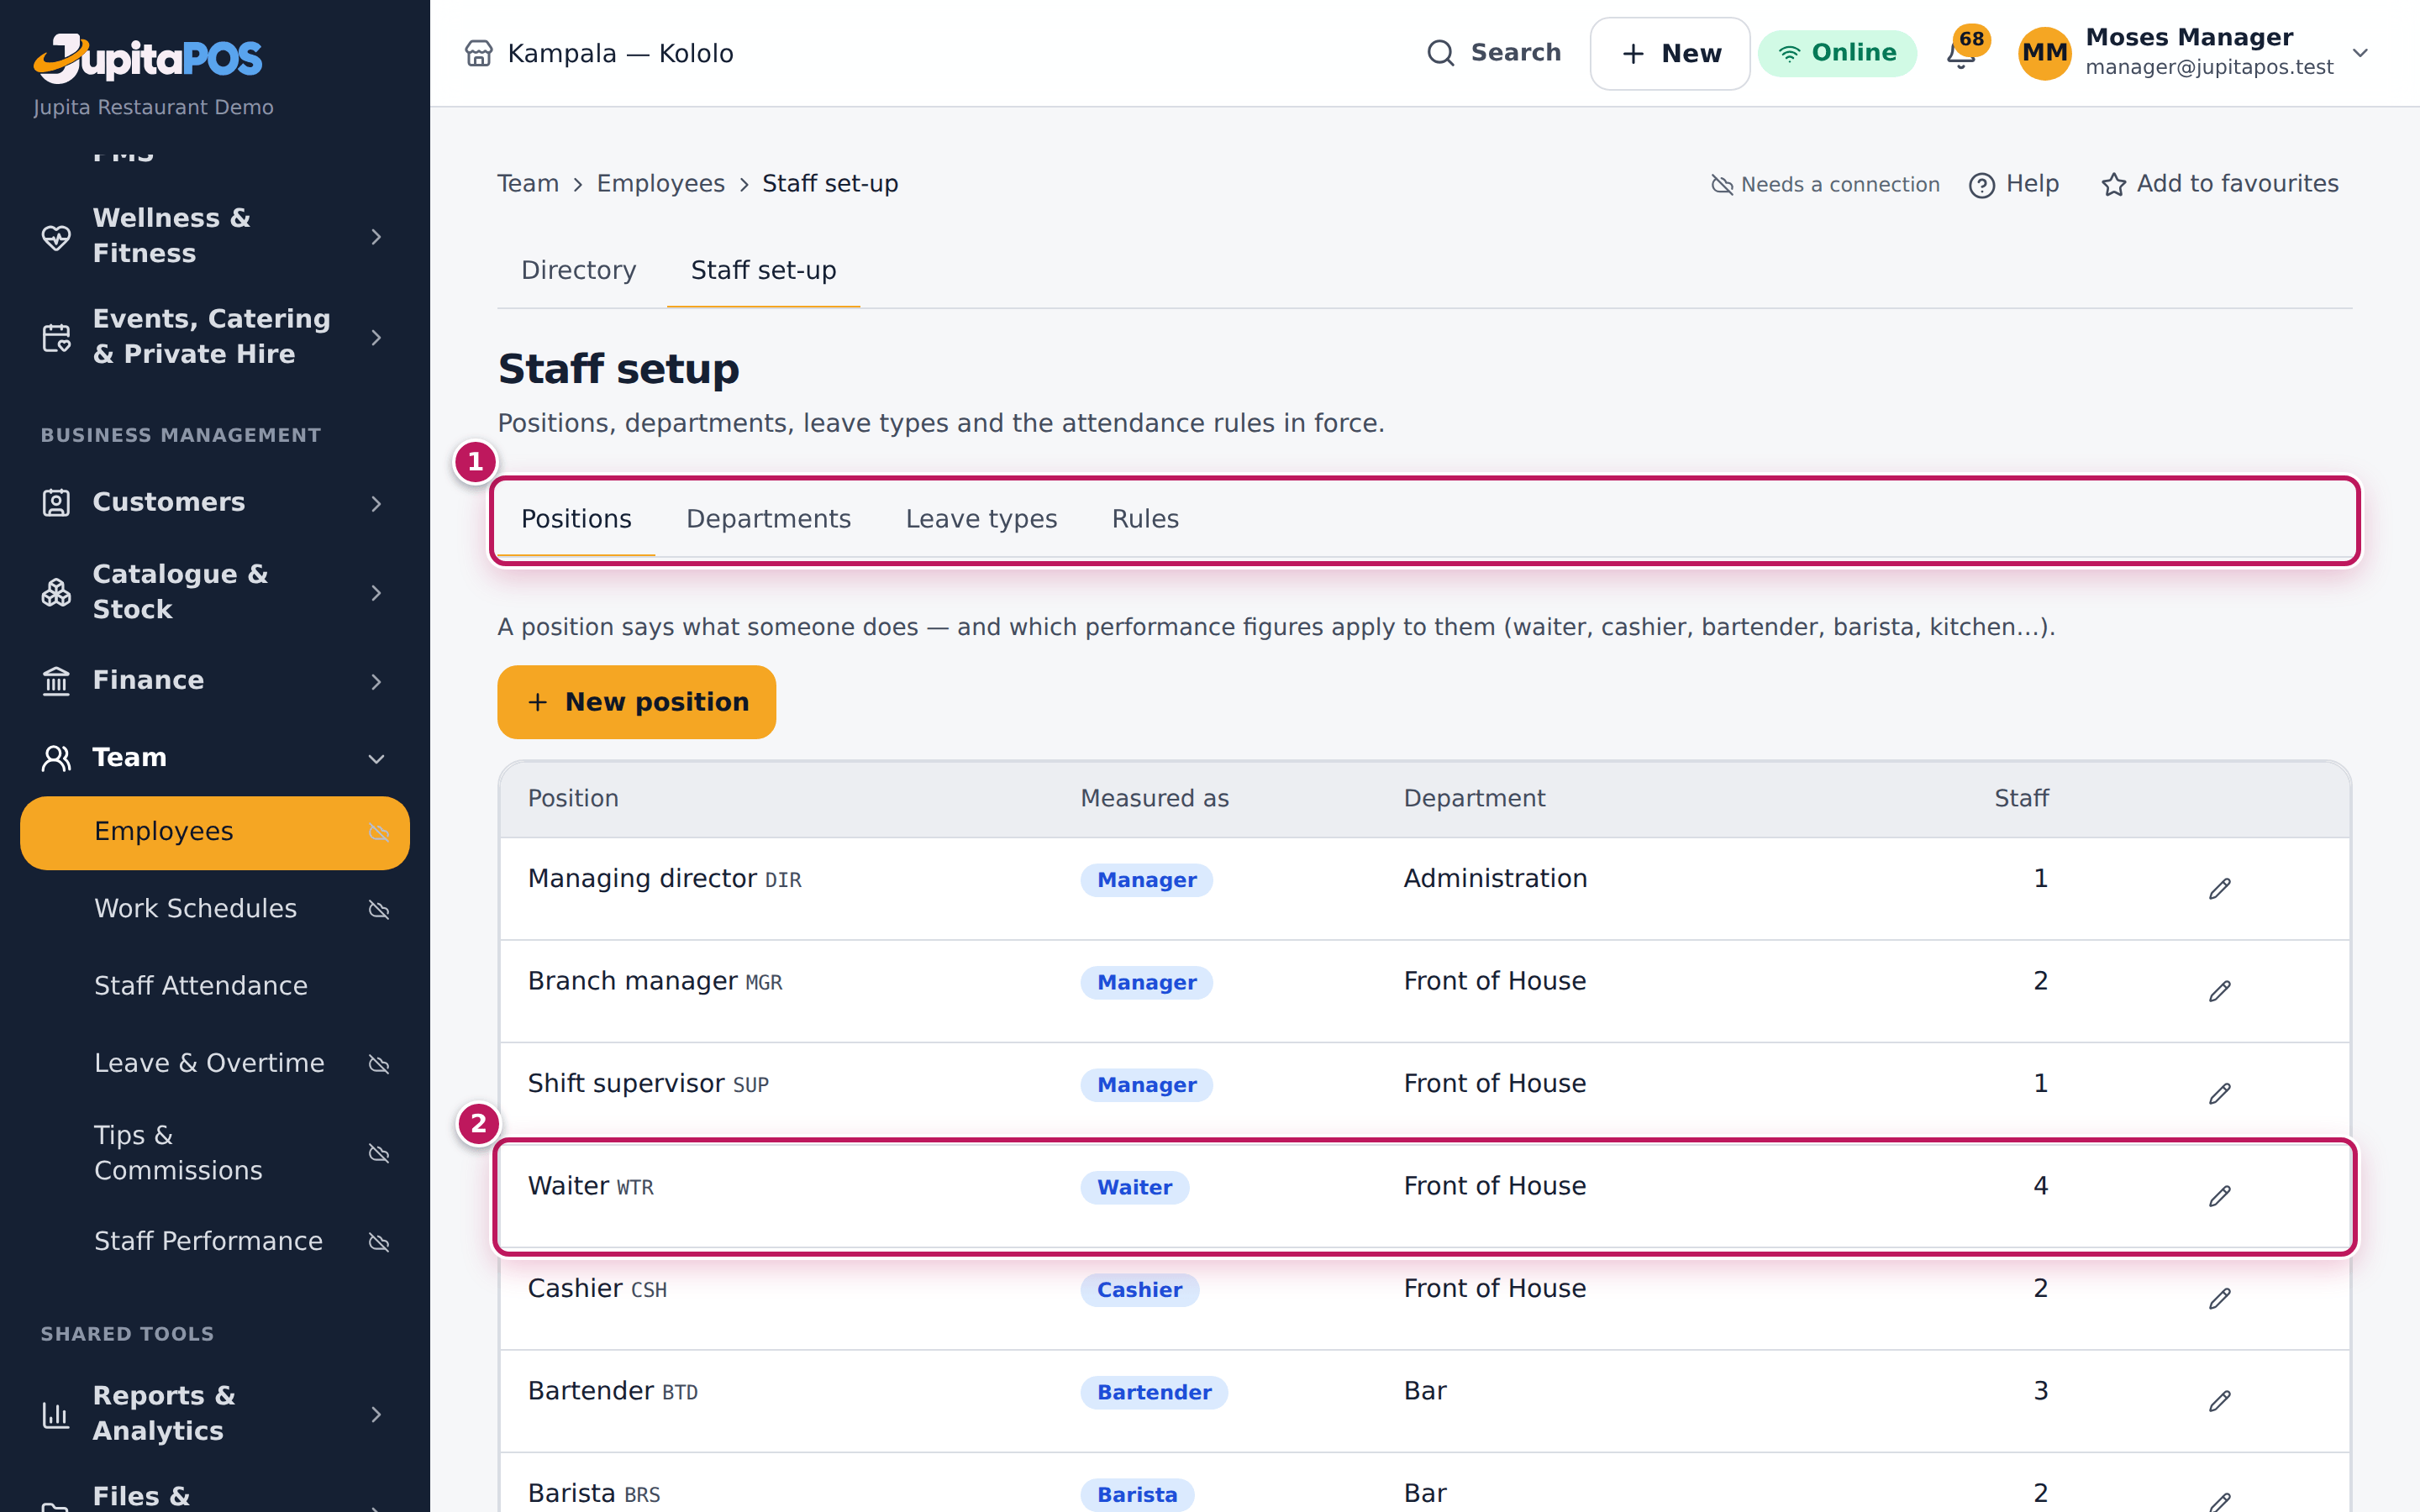
- Use the tabs (1): Positions, Departments, Leave types and Rules.
- On Positions, each position shows what it is Measured as (2) — waiter, cashier, bartender, barista, kitchen, manager, delivery, other — and its department. Click the pencil to change one, or add a new one.
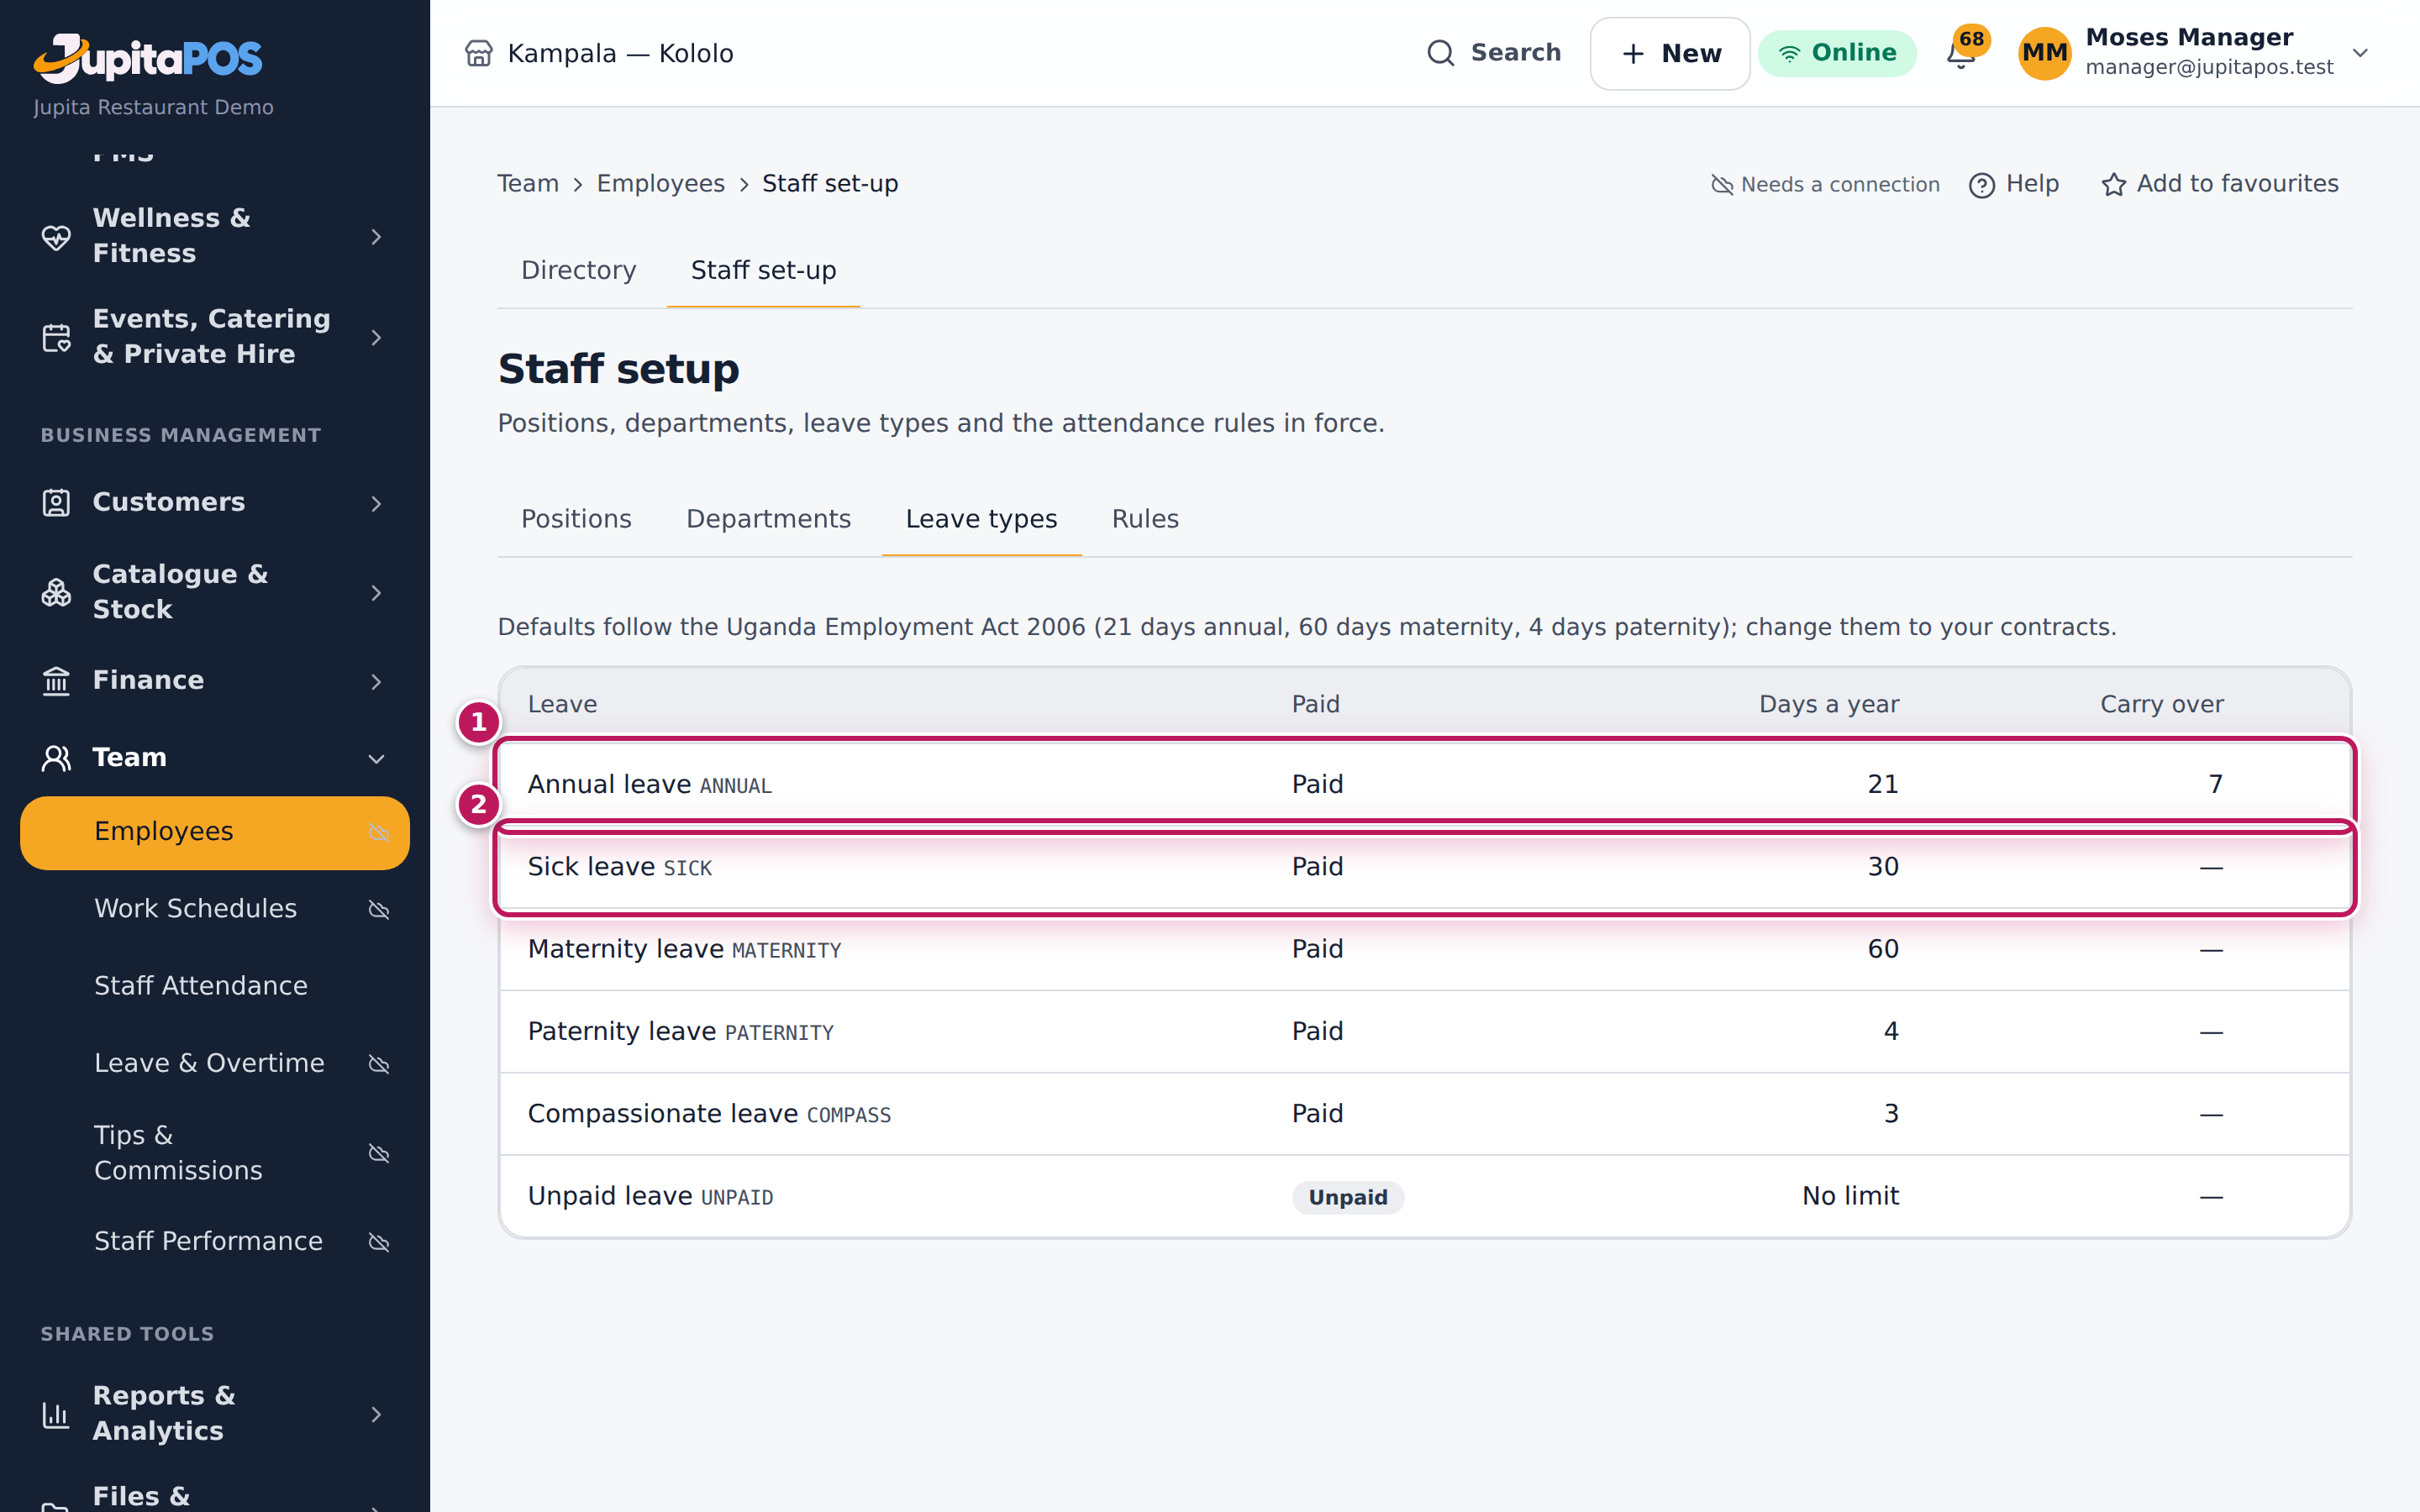
- On Leave types, each type shows its Days a year, how much may Carry over at most and whether it is Paid (1, 2).
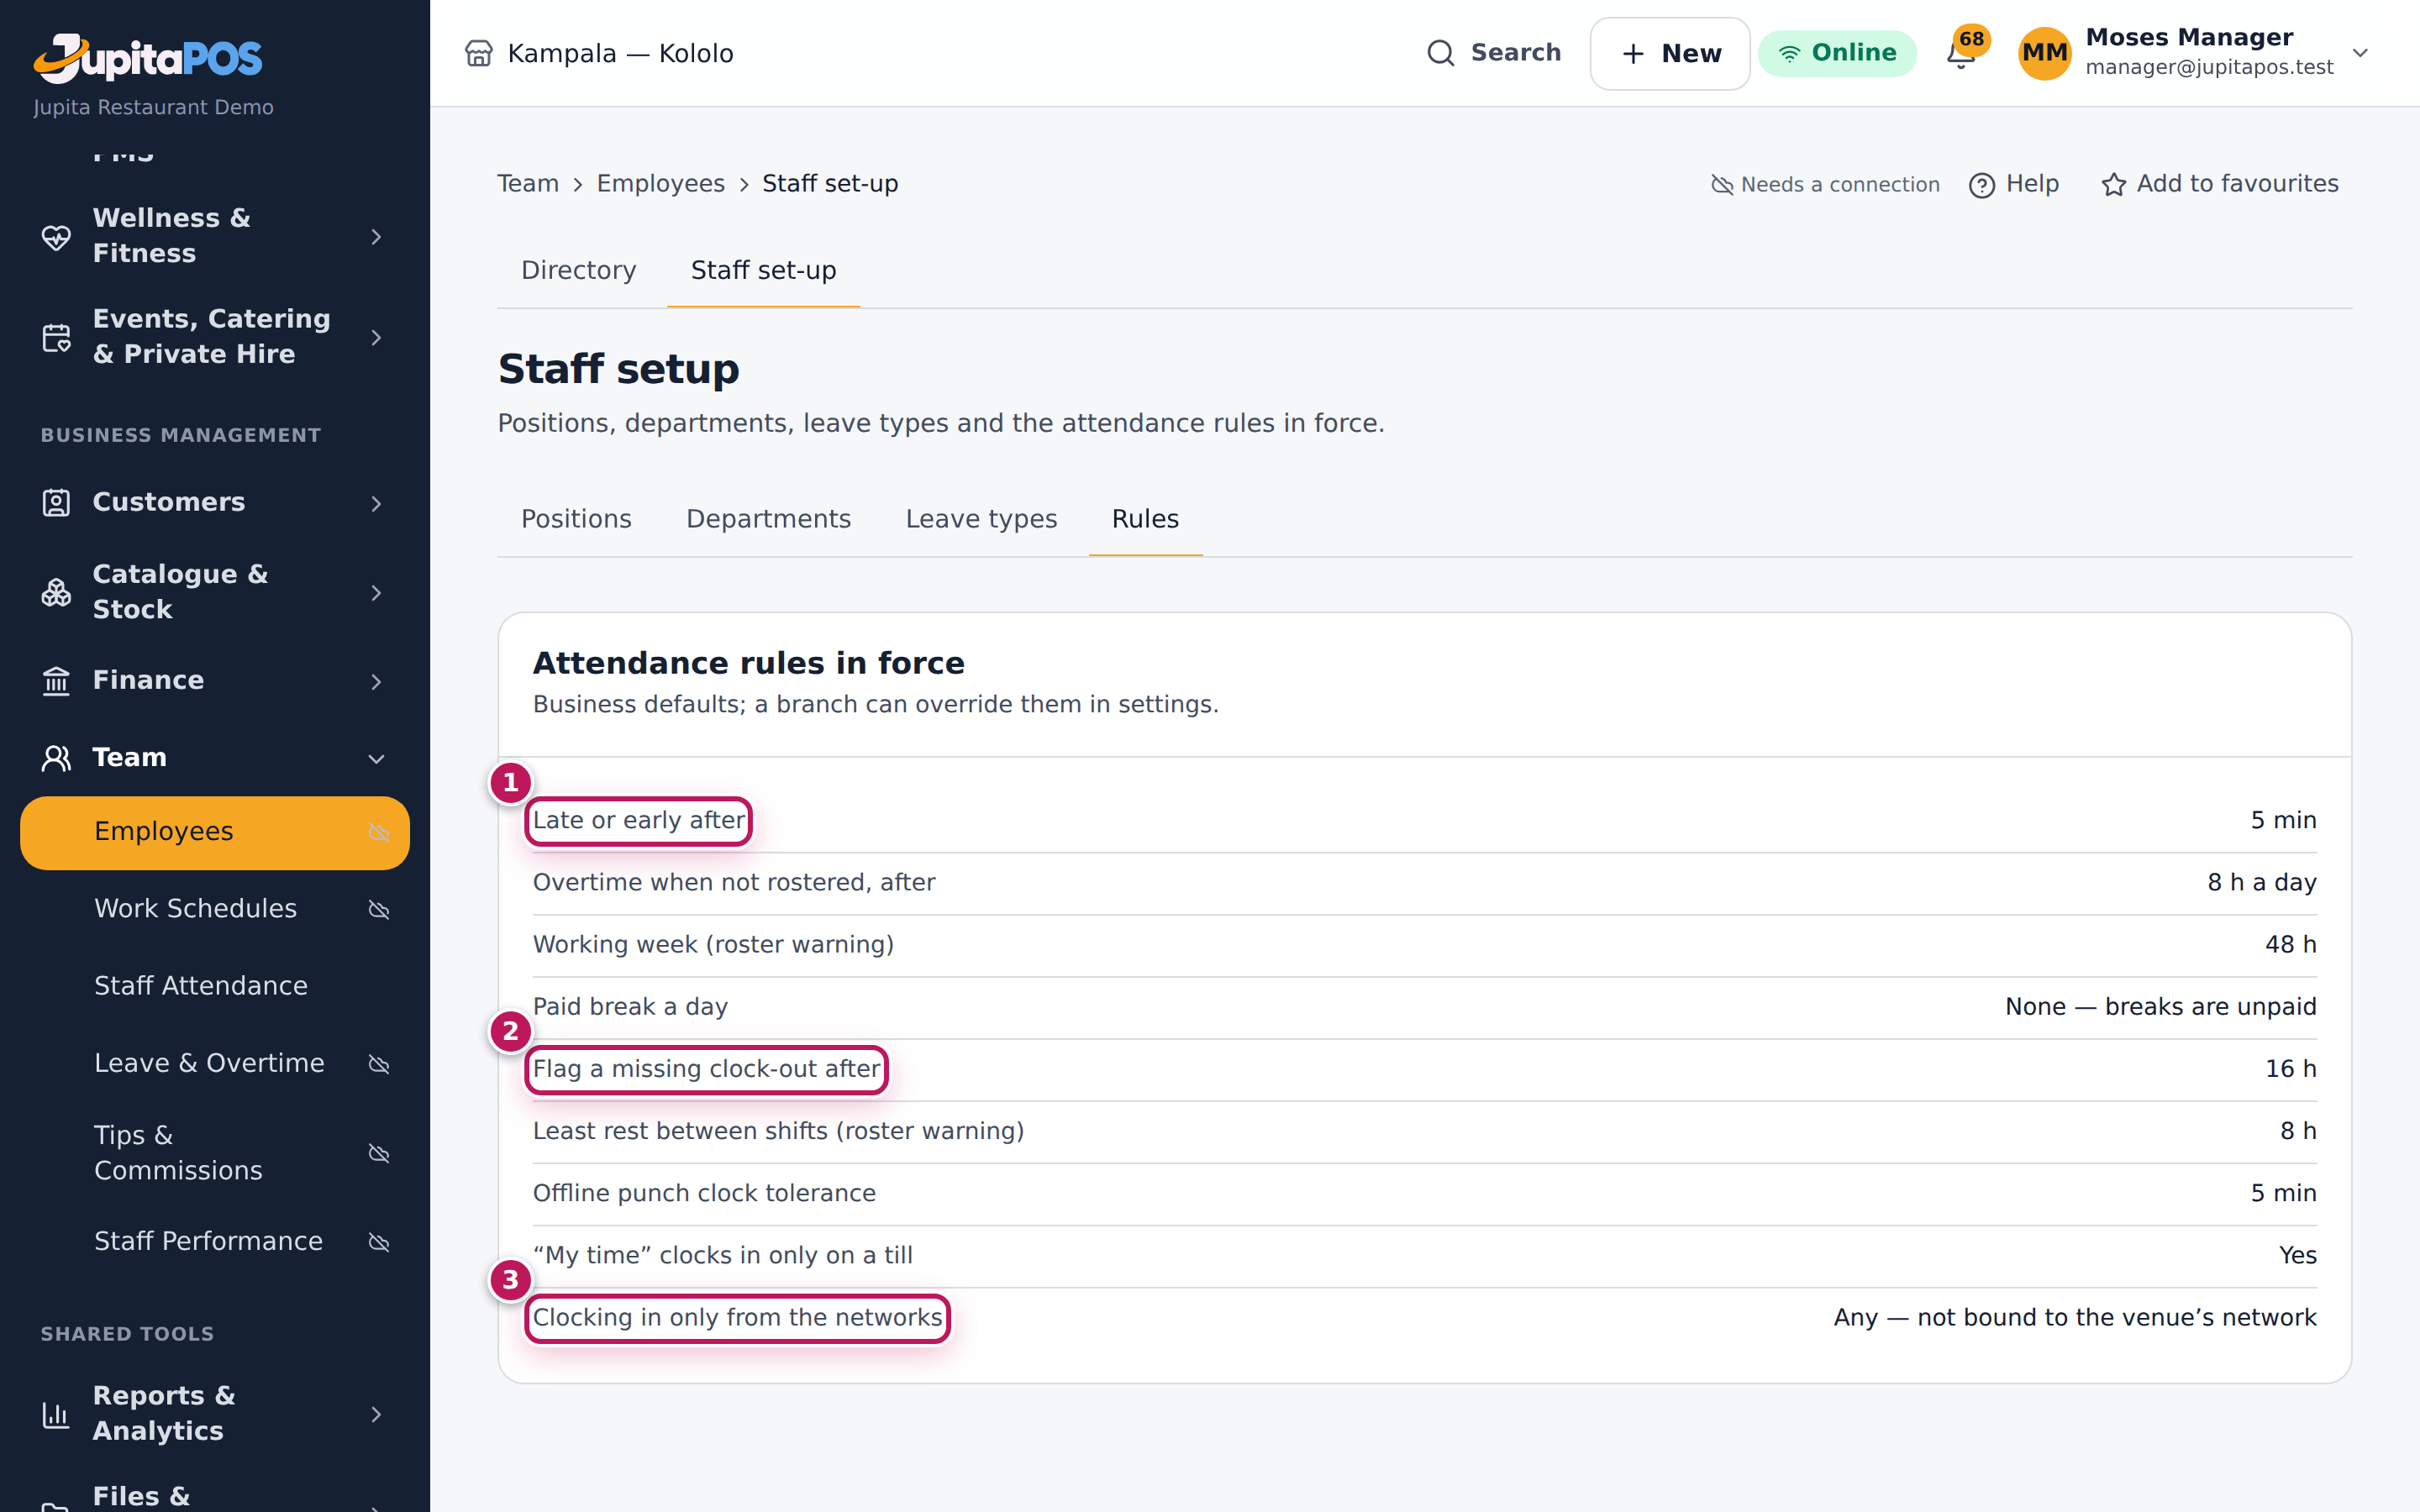
- On Rules read the rules in force: Late or early after (1), the overtime and break rules, Flag a missing clock-out after (2) and Clocking in only from the networks (3).
Expected result
New positions and leave types appear in the staff form, the roster and the leave dialogs straight away. The demo uses the Uganda defaults: annual leave 21 days, sick leave 30, maternity 60, paternity 4, compassionate 3, and unpaid leave.
Screenshot
Common mistakes
- Measuring a head waiter as “manager”. The figures follow what the position is measured as; a head waiter is measured as a waiter.
- Deleting a leave type in use. Make it inactive instead.
Troubleshooting
- A rule cannot be changed here. The rules are shown for reference; ask your administrator to change them.
Clock in and out at the time clock
Purpose
Record when you start and finish work and take your breaks, so your hours, lateness and overtime are right.
Role / permission required
Everyone who works: attendance.clock. The time clock runs only on an
approved till at the venue.
Prerequisites
- You know your staff or badge number and your PIN (see Set an employee’s PIN).
- The till is approved (see Approve a till).
Steps
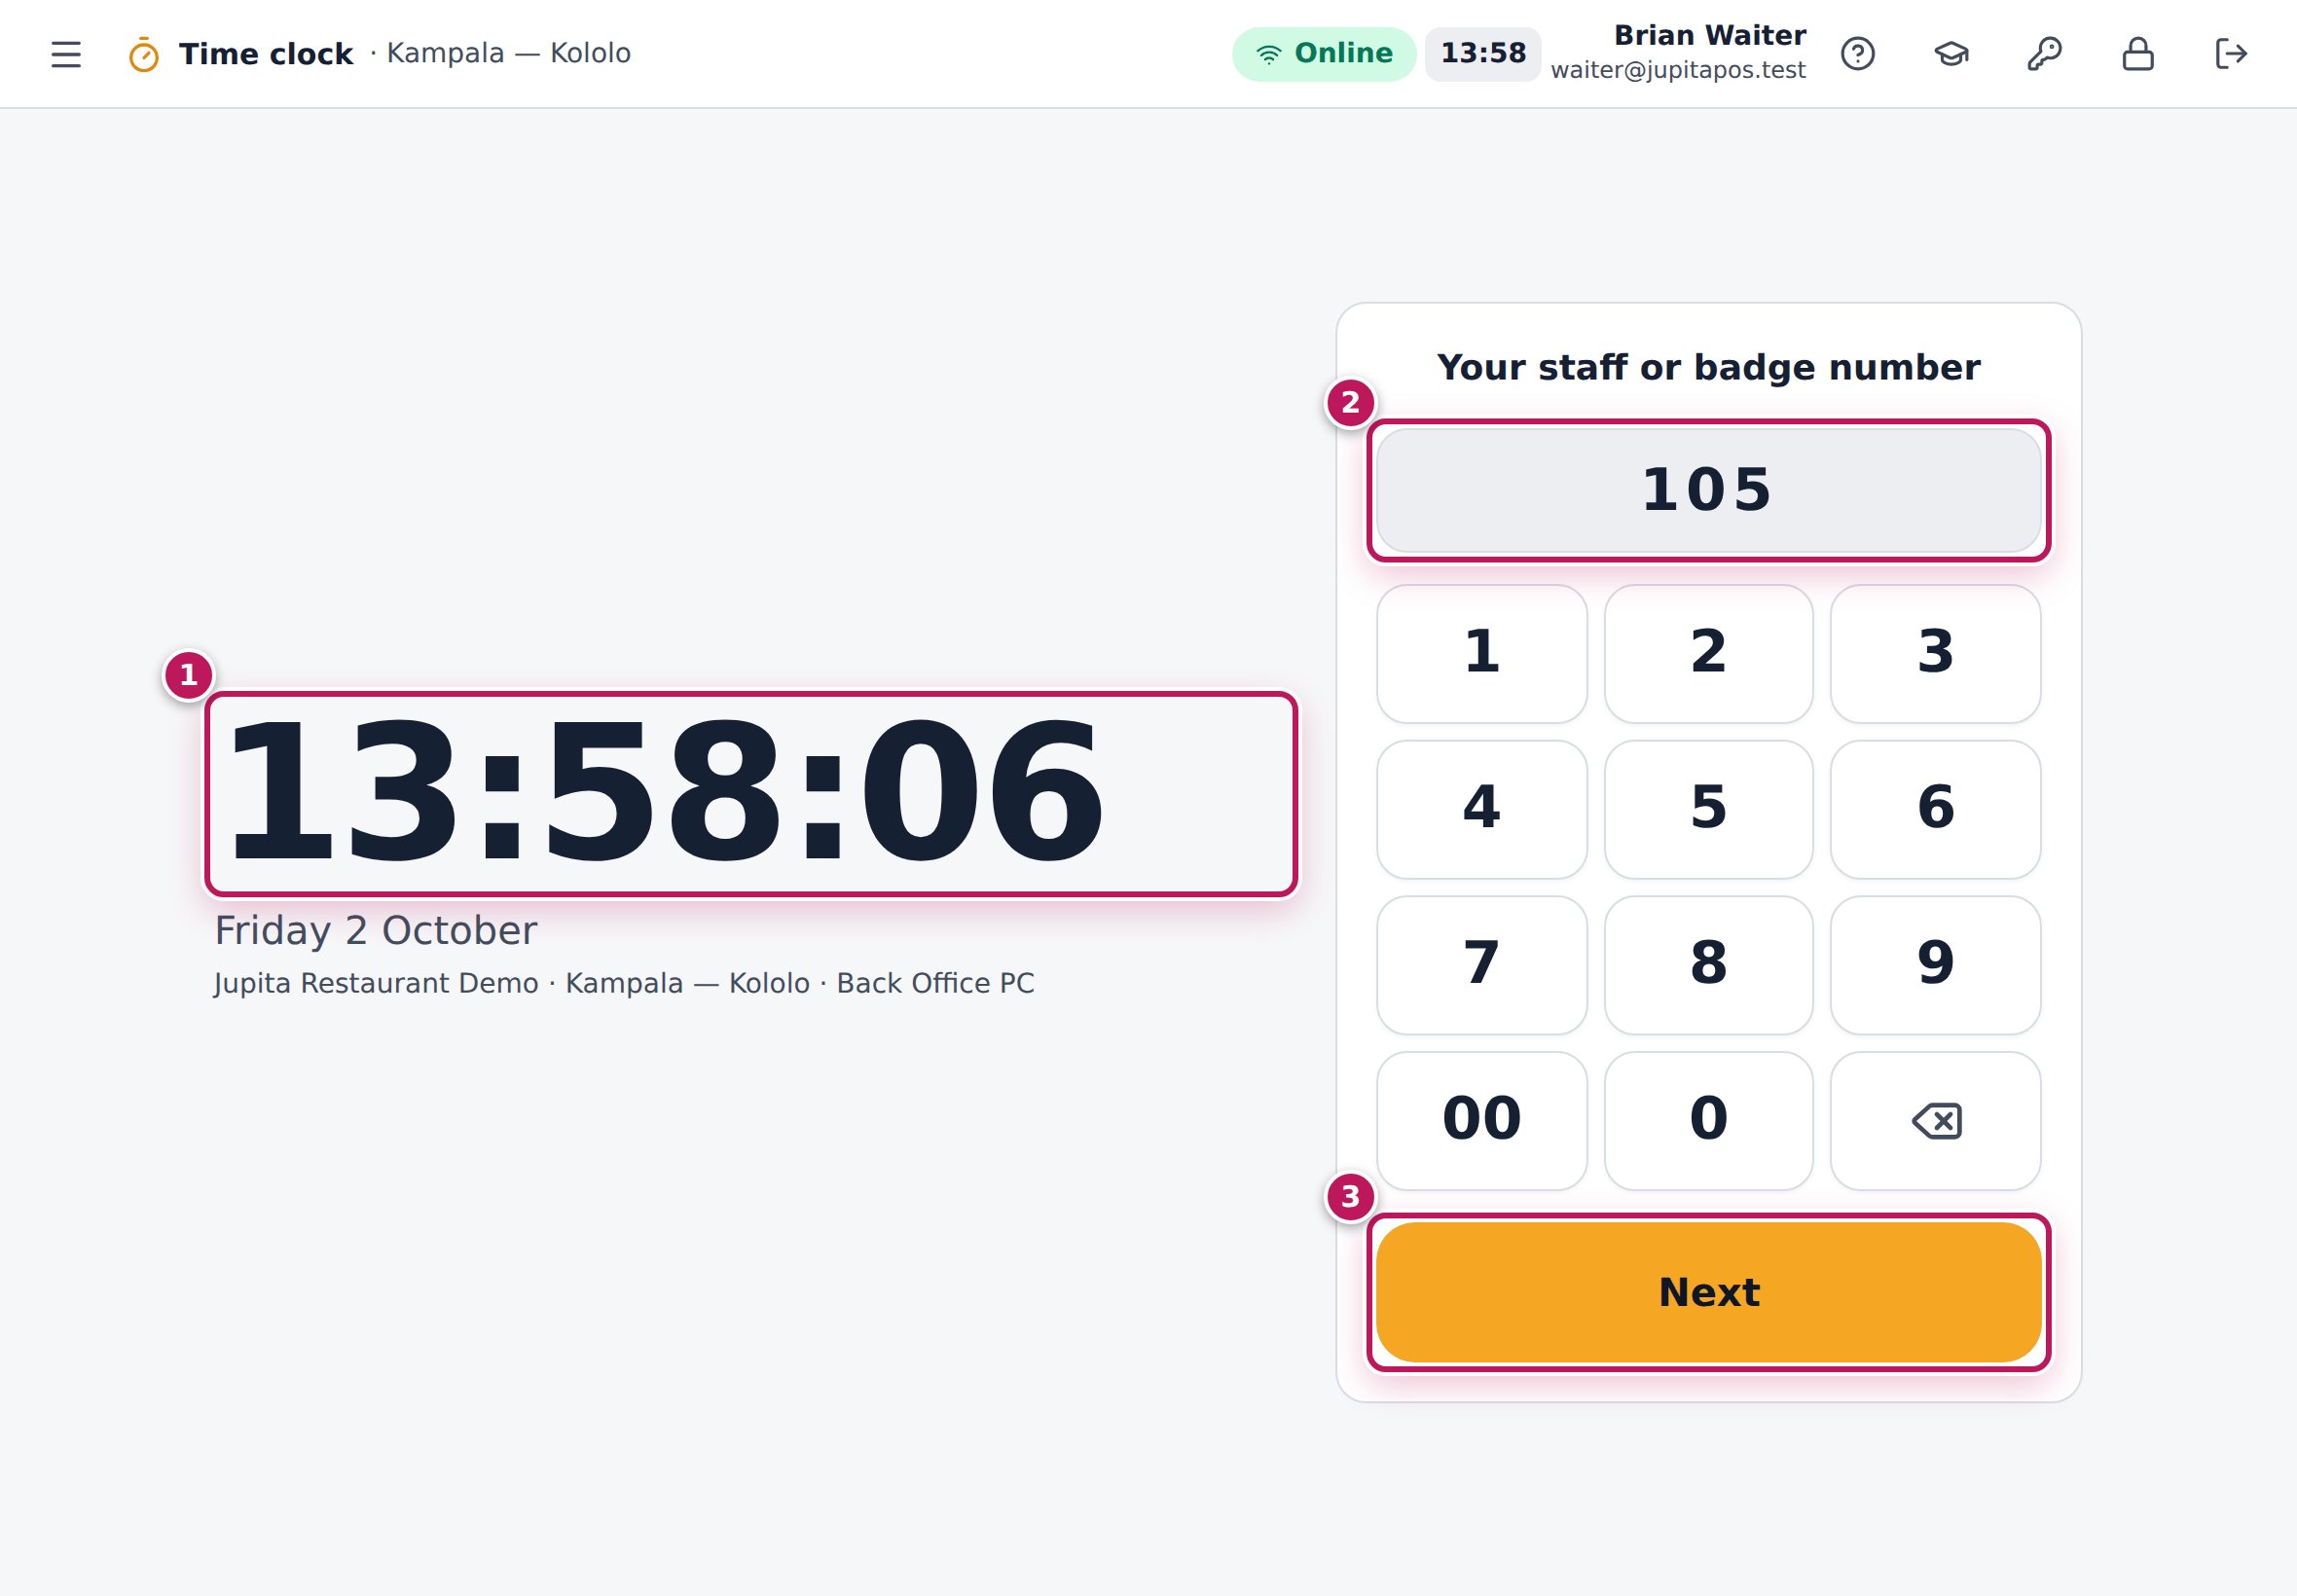
- On the till, open Time clock (on a locked till: Clock in or out).
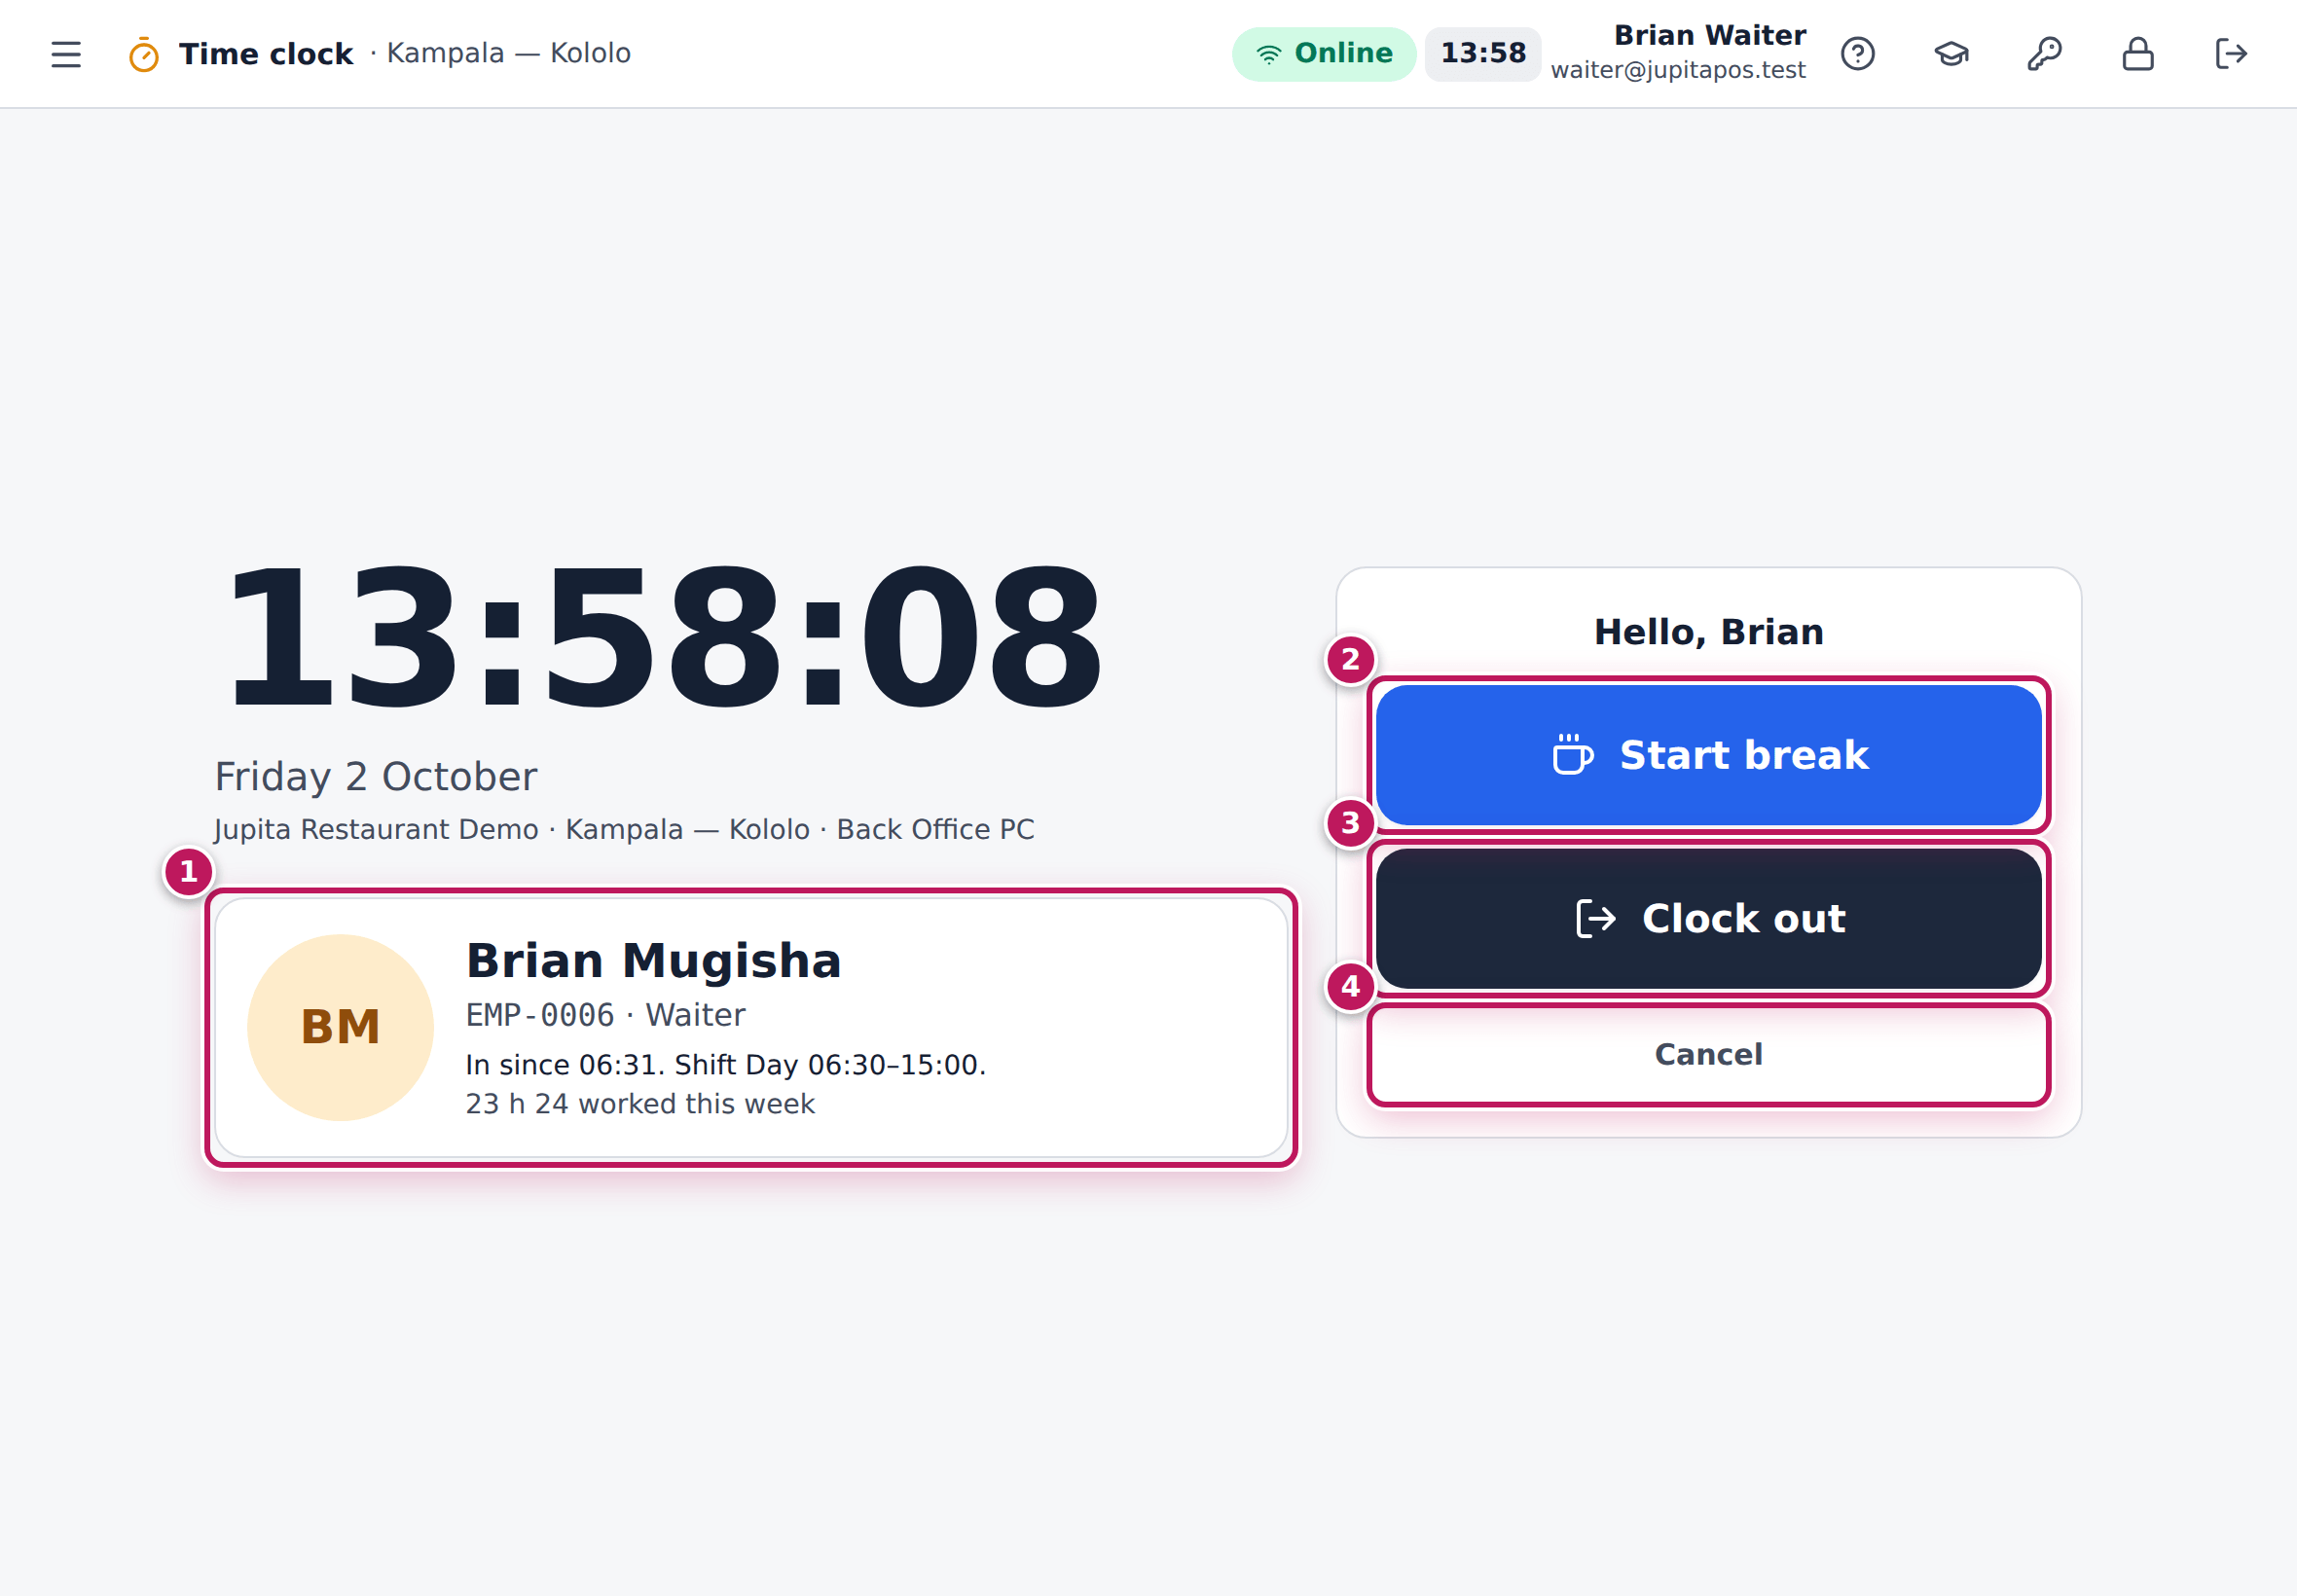
- Type your staff or badge number (2) on the keypad — the time (1) shows above — and tap Next (3).
- Type your PIN.
- Your card (1) shows your name, whether you are in and since when, your shift and your hours this week.
- Tap what you are doing: Clock in, Start break (2), End break or Clock out (3). Cancel (4) if it is not you.
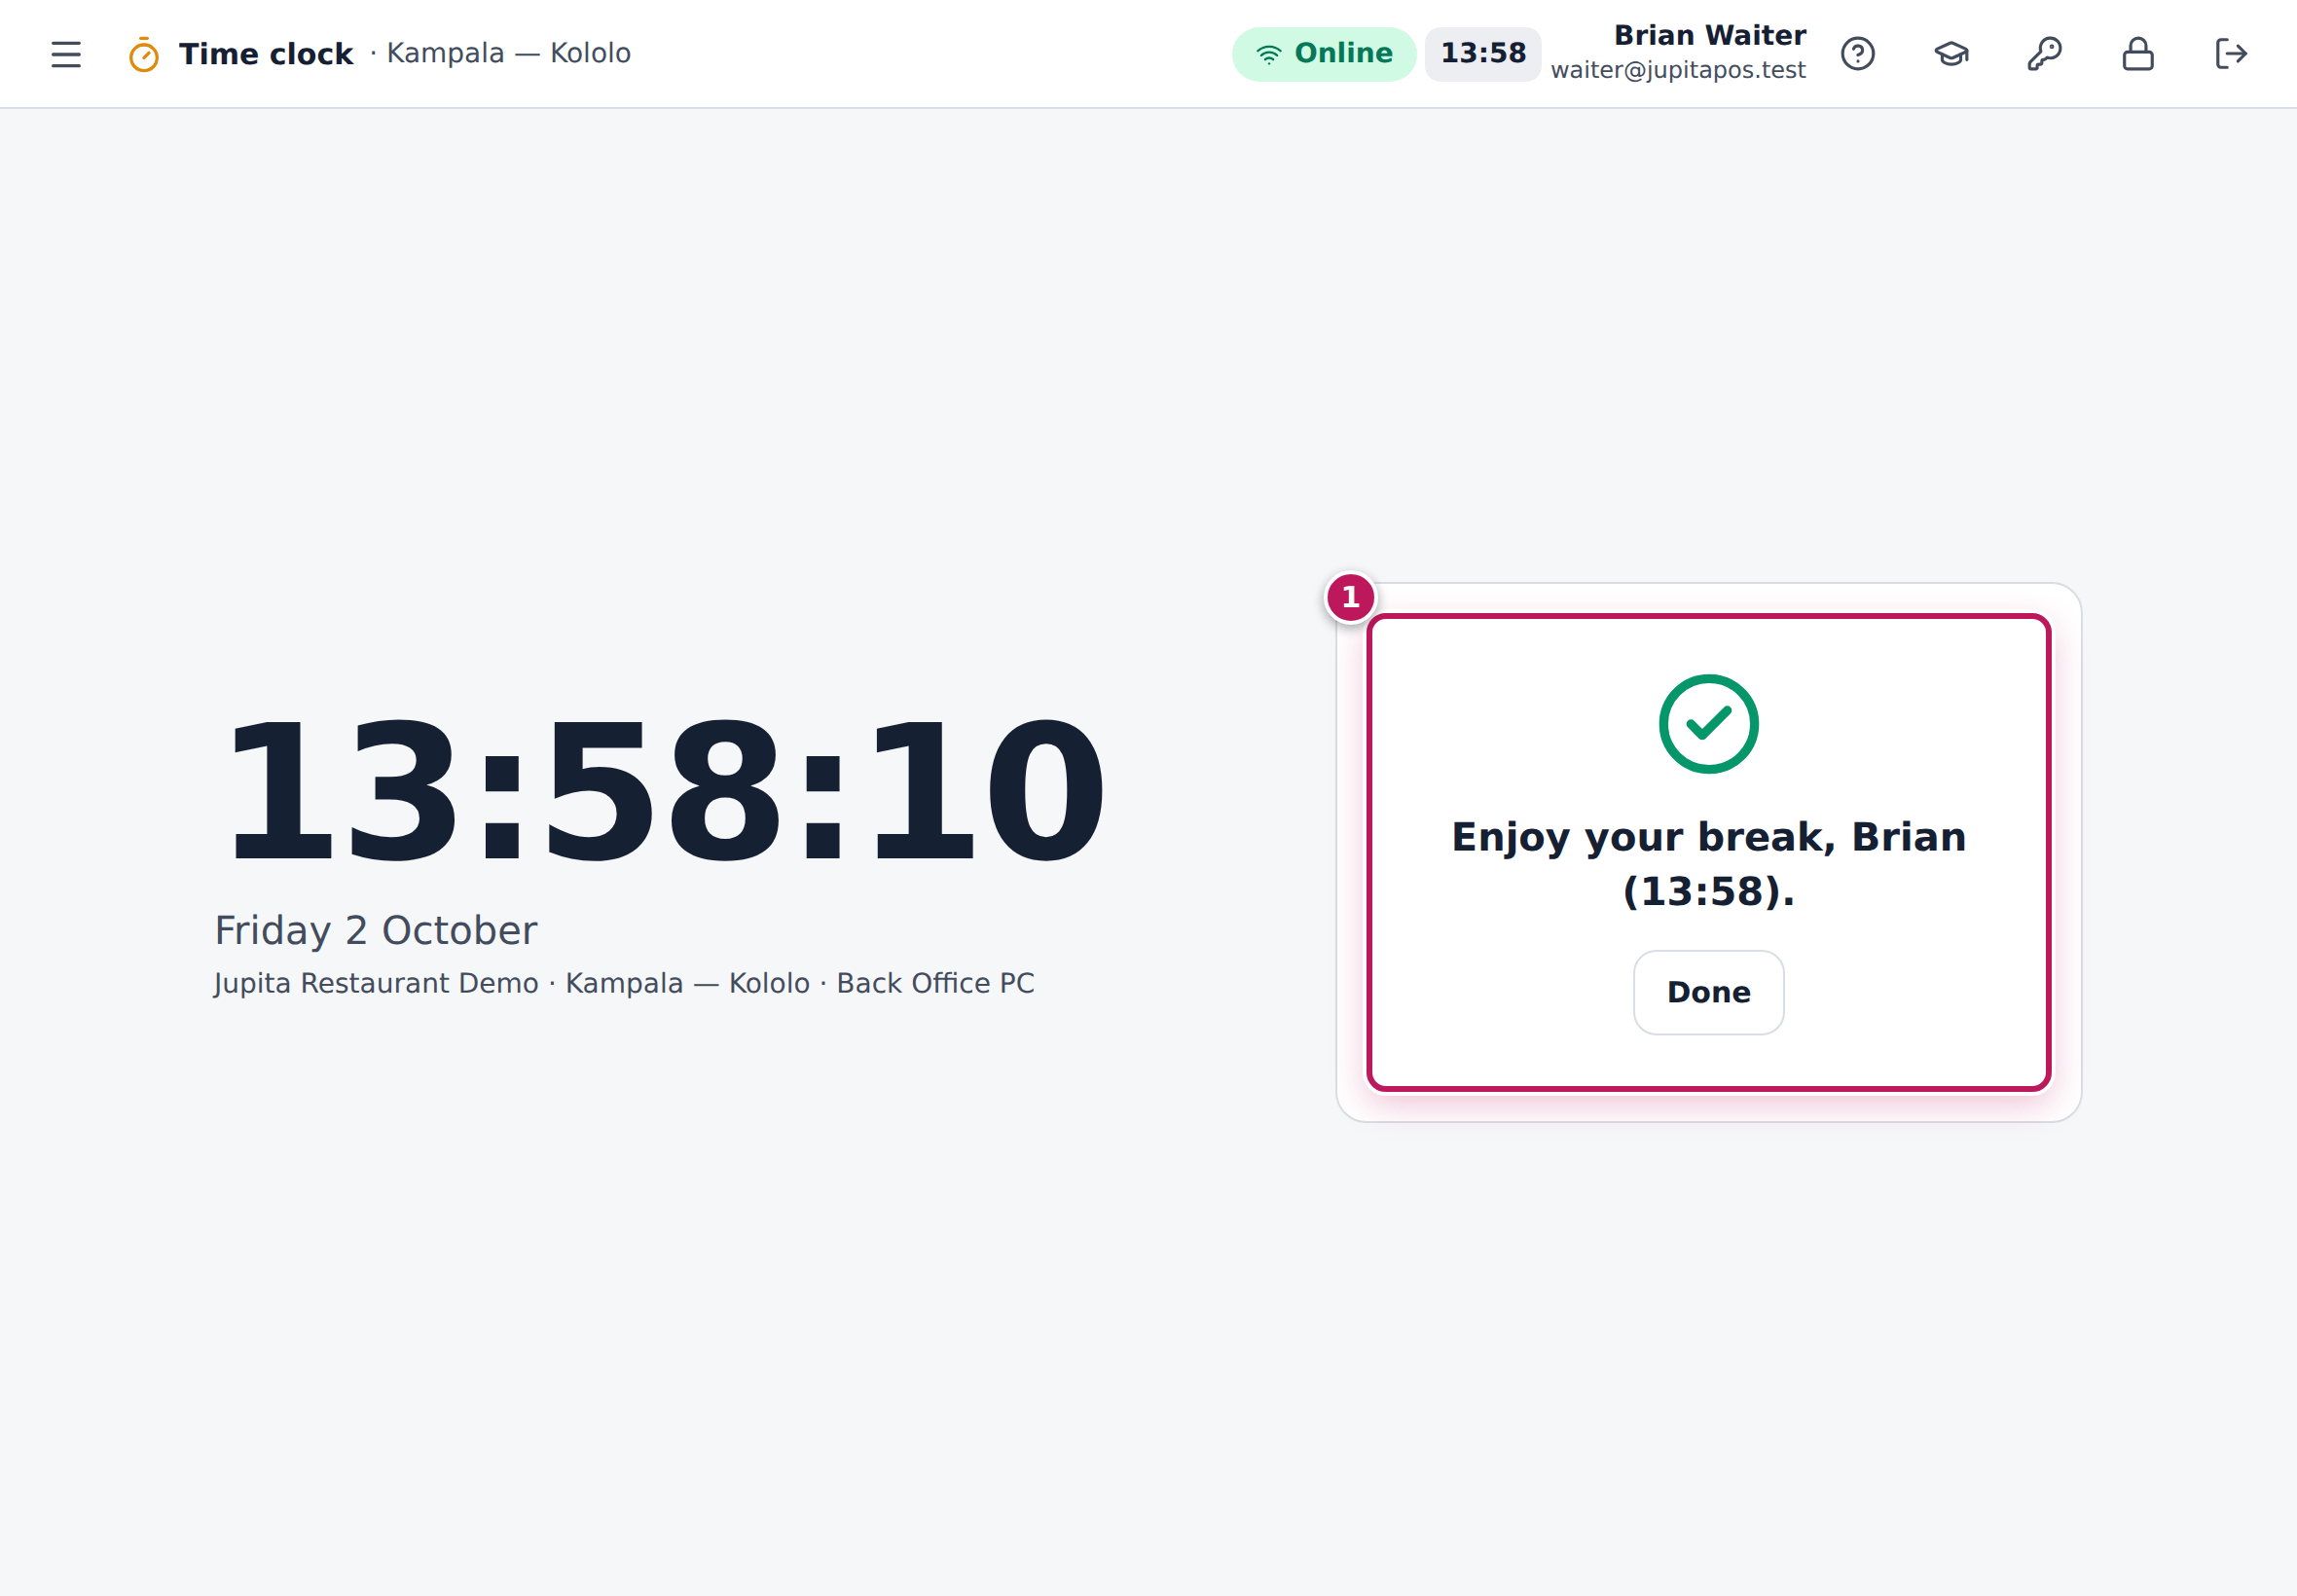
- Read the message (1) and tap Done, or leave it: it clears itself.
Expected result
The message says what was recorded and at what time: Welcome, Brian — clocked in at 06:31., Enjoy your break, Brian (13:05)., Welcome back, Brian (13:20). or Goodbye, Brian — clocked out at 15:02. 7 h 43 worked today. Your manager sees it at once in Attendance, and you see it on My time & leave.
Screenshot
Common mistakes
- Clocking in for a friend. The PIN is personal and every punch says which till it came from.
- Forgetting to clock out. Your timecard stays open and a manager has to enter the time you left.
- Clocking in on your phone. My time & leave clocks you in only from a till at work.
Troubleshooting
- “Wrong employee number or PIN.” One of them is wrong — the clock does not say which. Too many tries lock the till’s clock for a few minutes.
- “This device is not a registered till”. Use a till that is approved.
- No connection. The till still takes your punch without checking the PIN (Offline — punches are saved and sent later); your manager sees it was taken offline.
Correct attendance and approve overtime
Purpose
Keep timecards right — a forgotten clock-out, a missed punch — and decide the overtime, so hours and pay are true.
Role / permission required
Branch manager or owner: attendance.view to see; attendance.manage to
correct and to approve overtime. You never decide your own.
Prerequisites
- None.
Steps
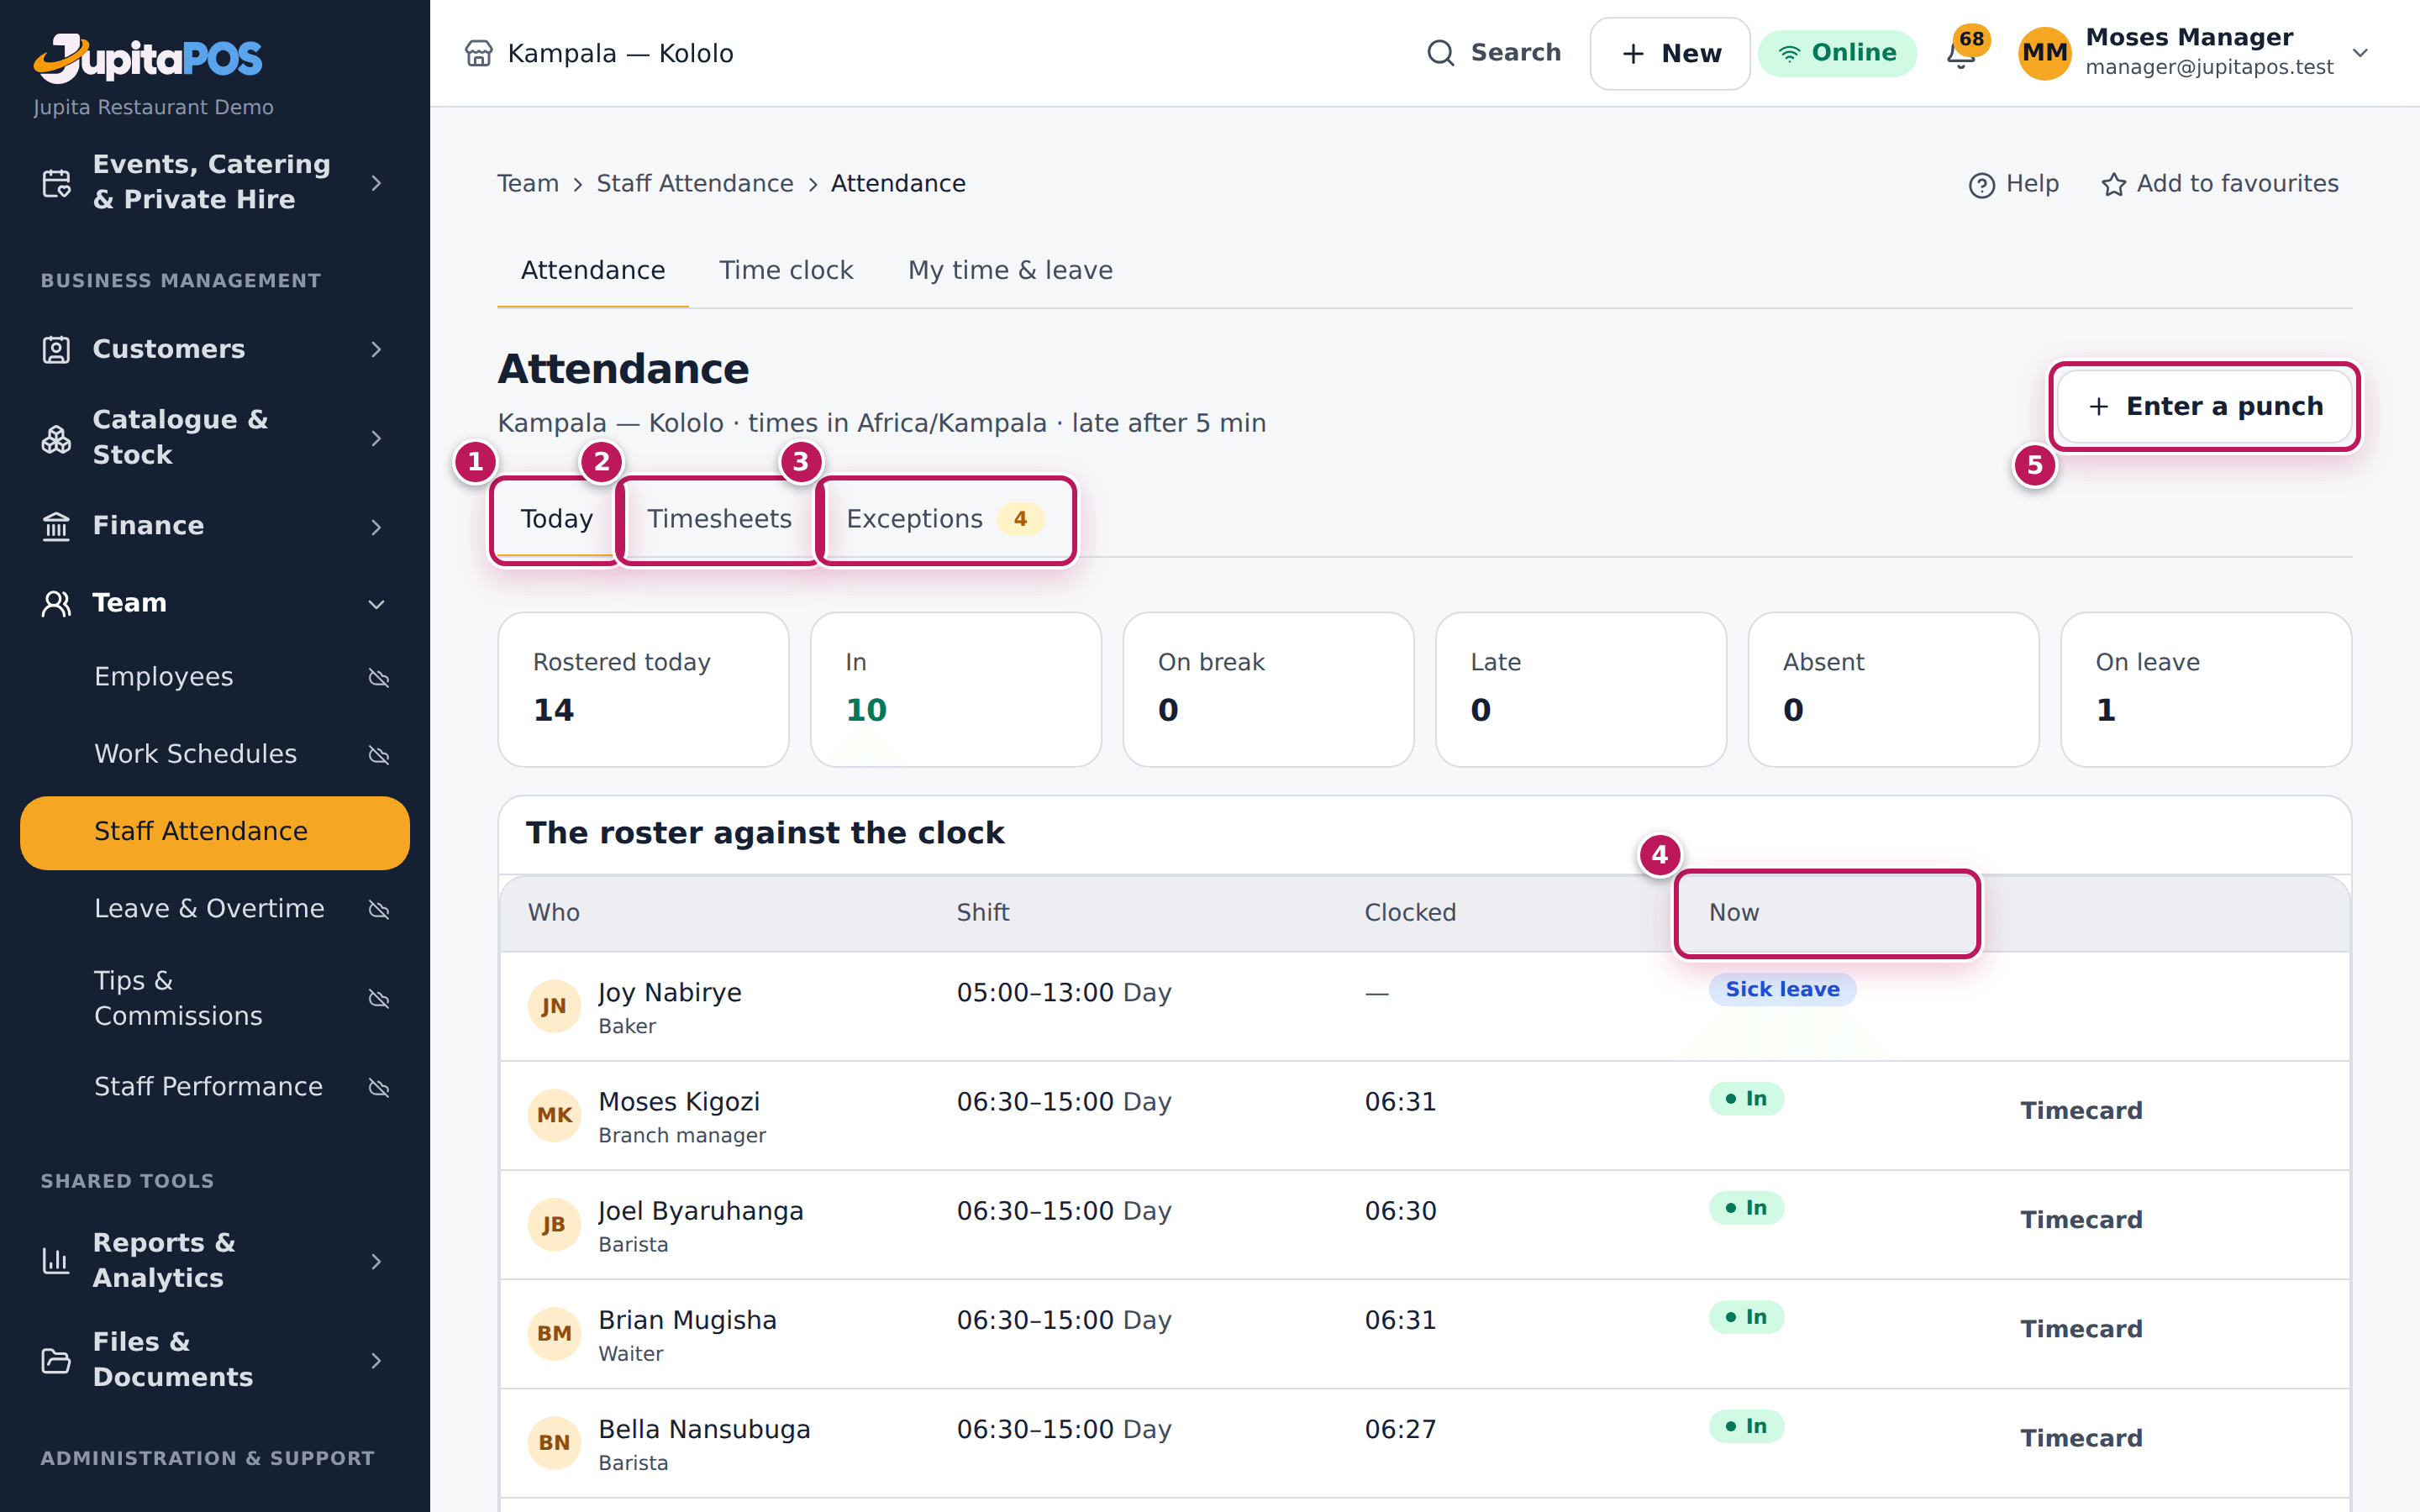
- Open Attendance. Today (1) shows the roster against the clock: who is due, in, on a break, late, done, absent or on leave (4). Timesheets (2) totals a period and exports a CSV.
- Click Exceptions (3).
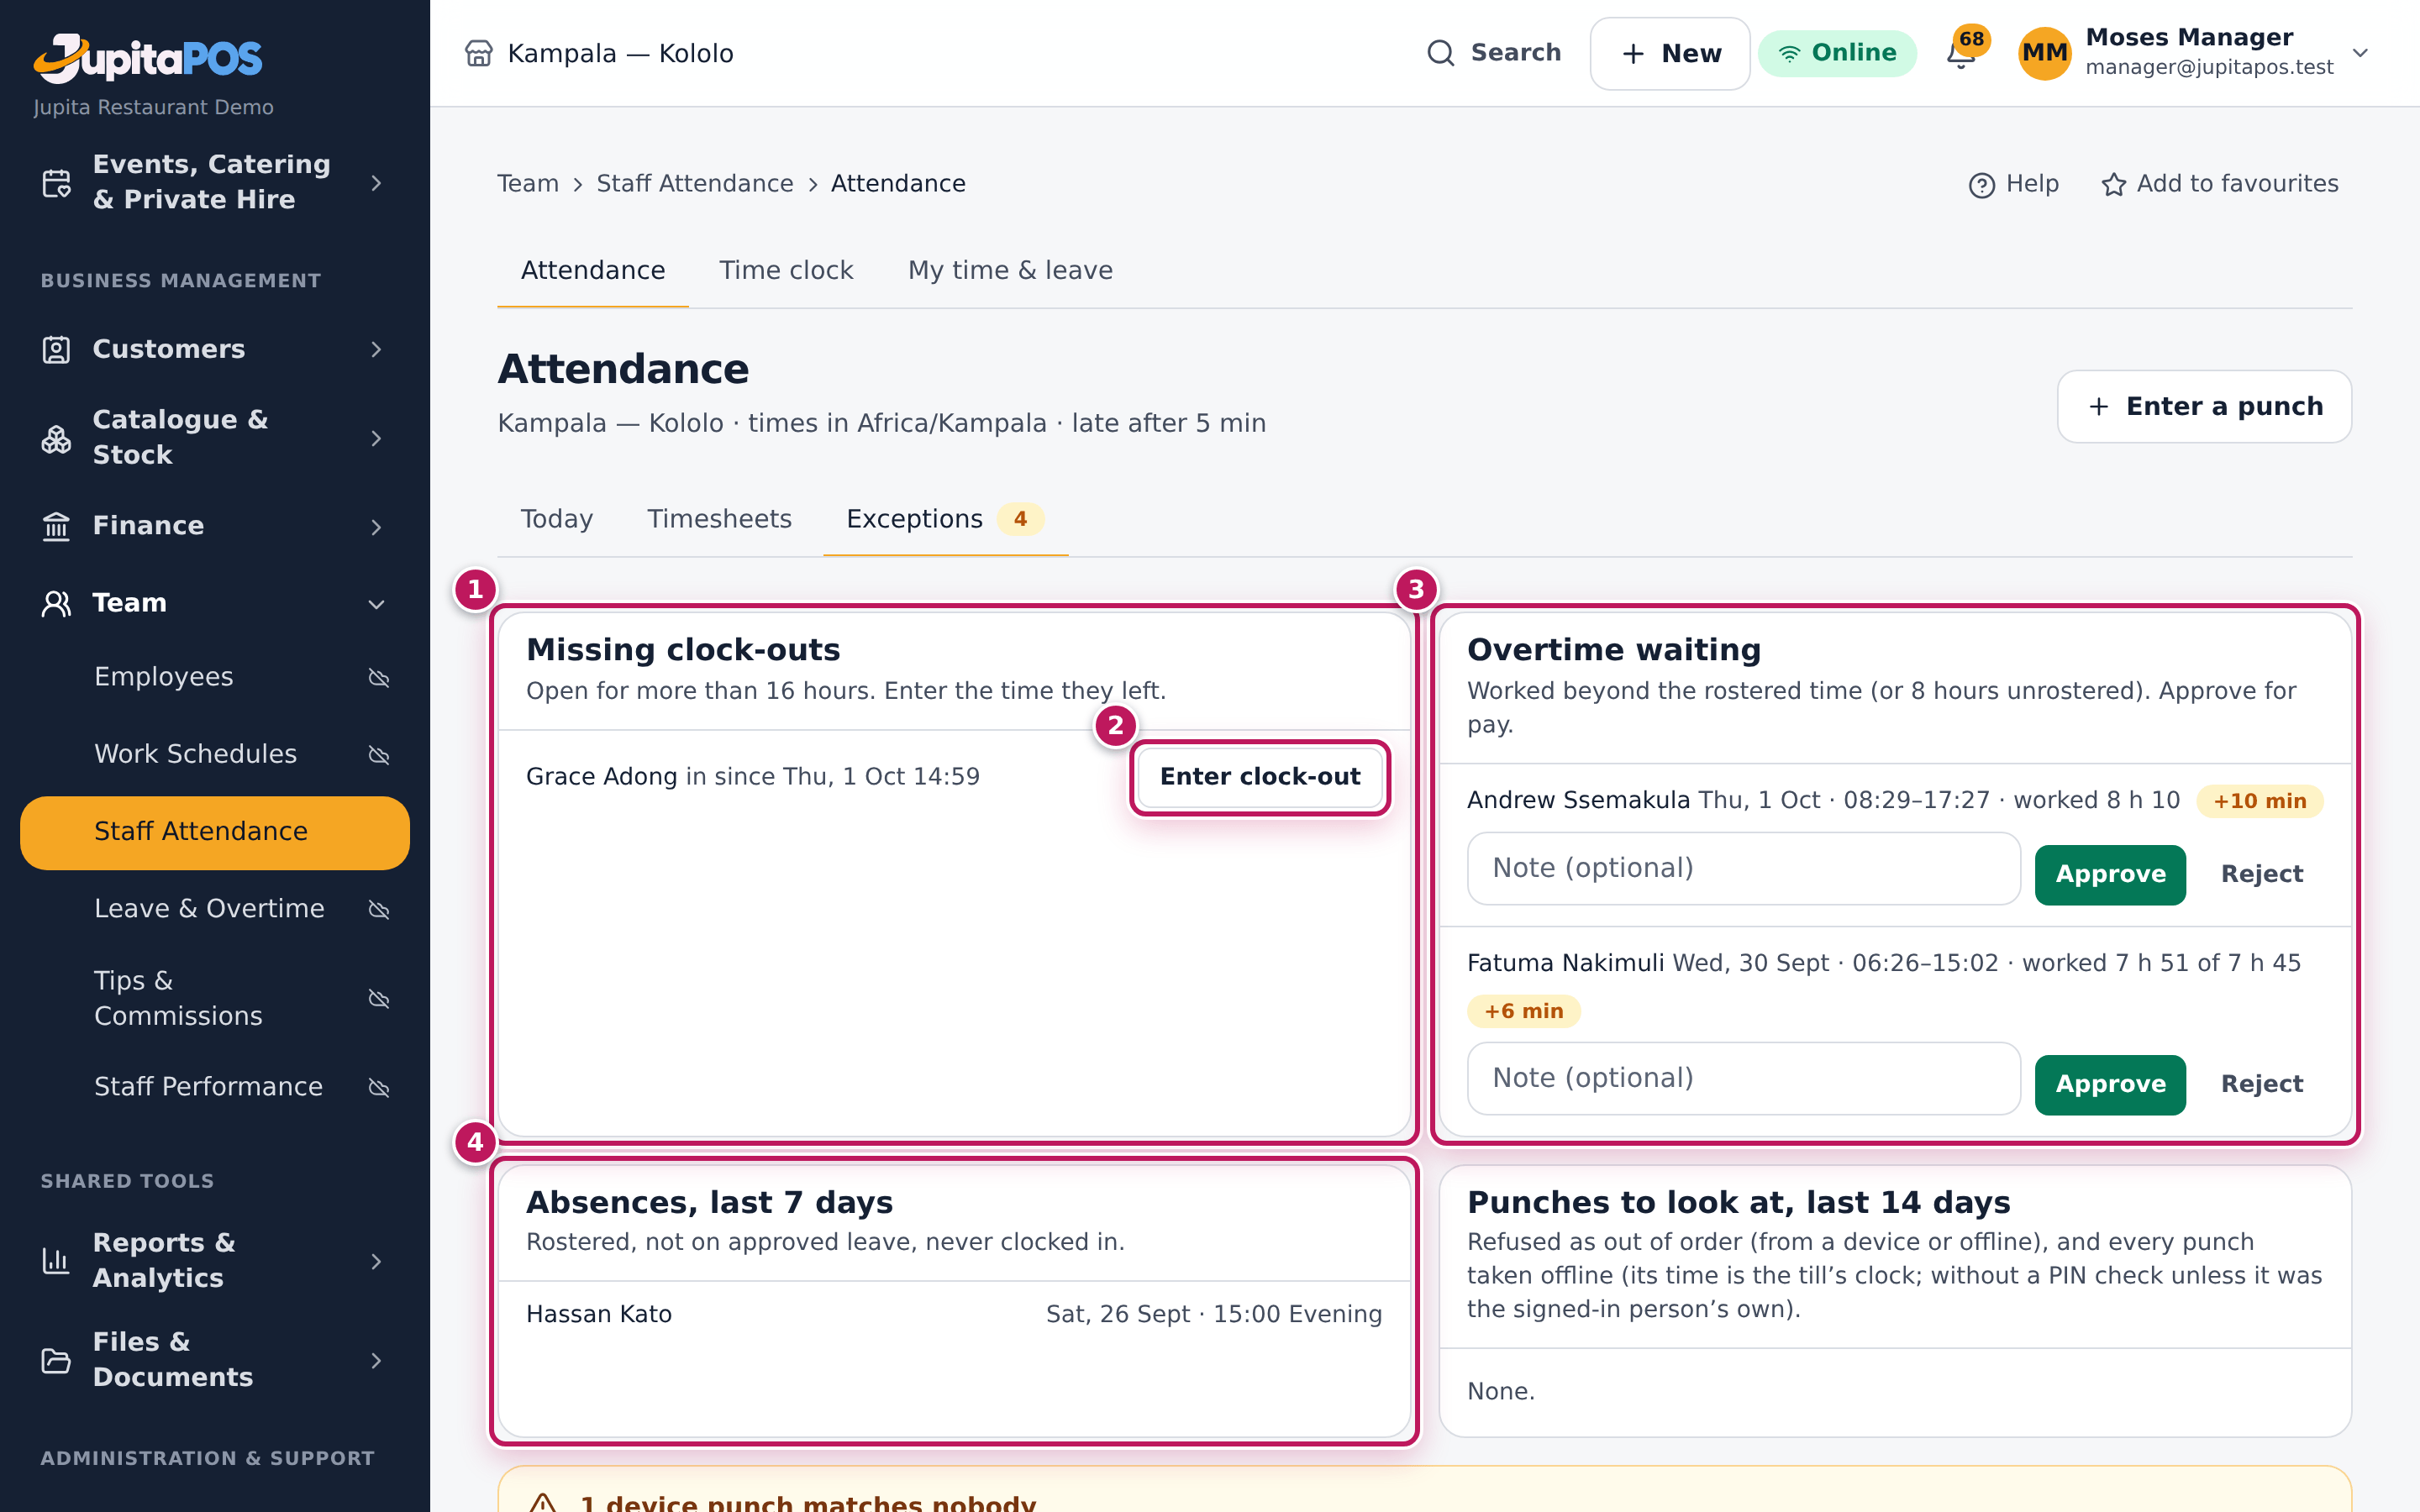
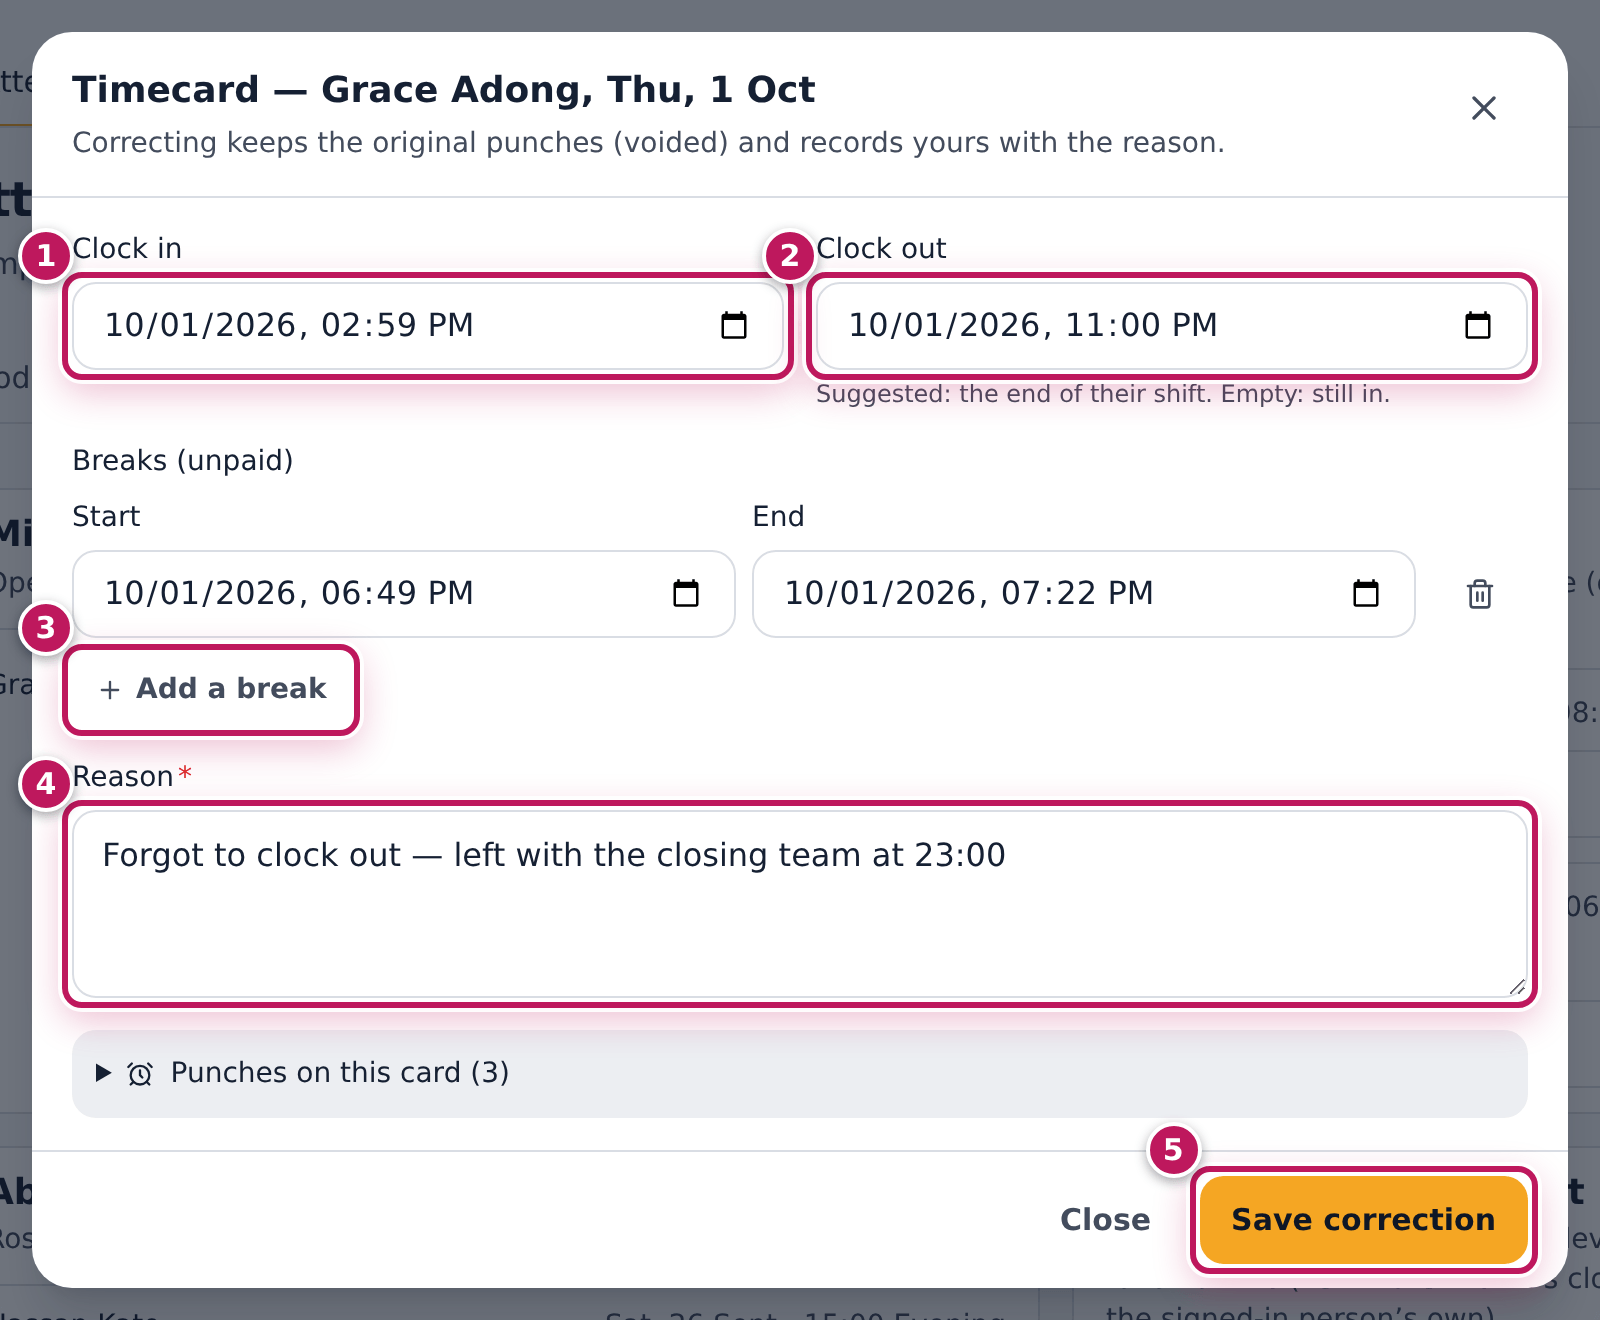
- Under Missing clock-outs (1), click Enter clock-out (2) for the person.
- The timecard opens. Check Clock in (1). Clock out (2) suggests the end of their shift; change it to when they really left.
- Add or correct breaks with Add a break (3).
- Type the Reason (4) and click Save correction (5).
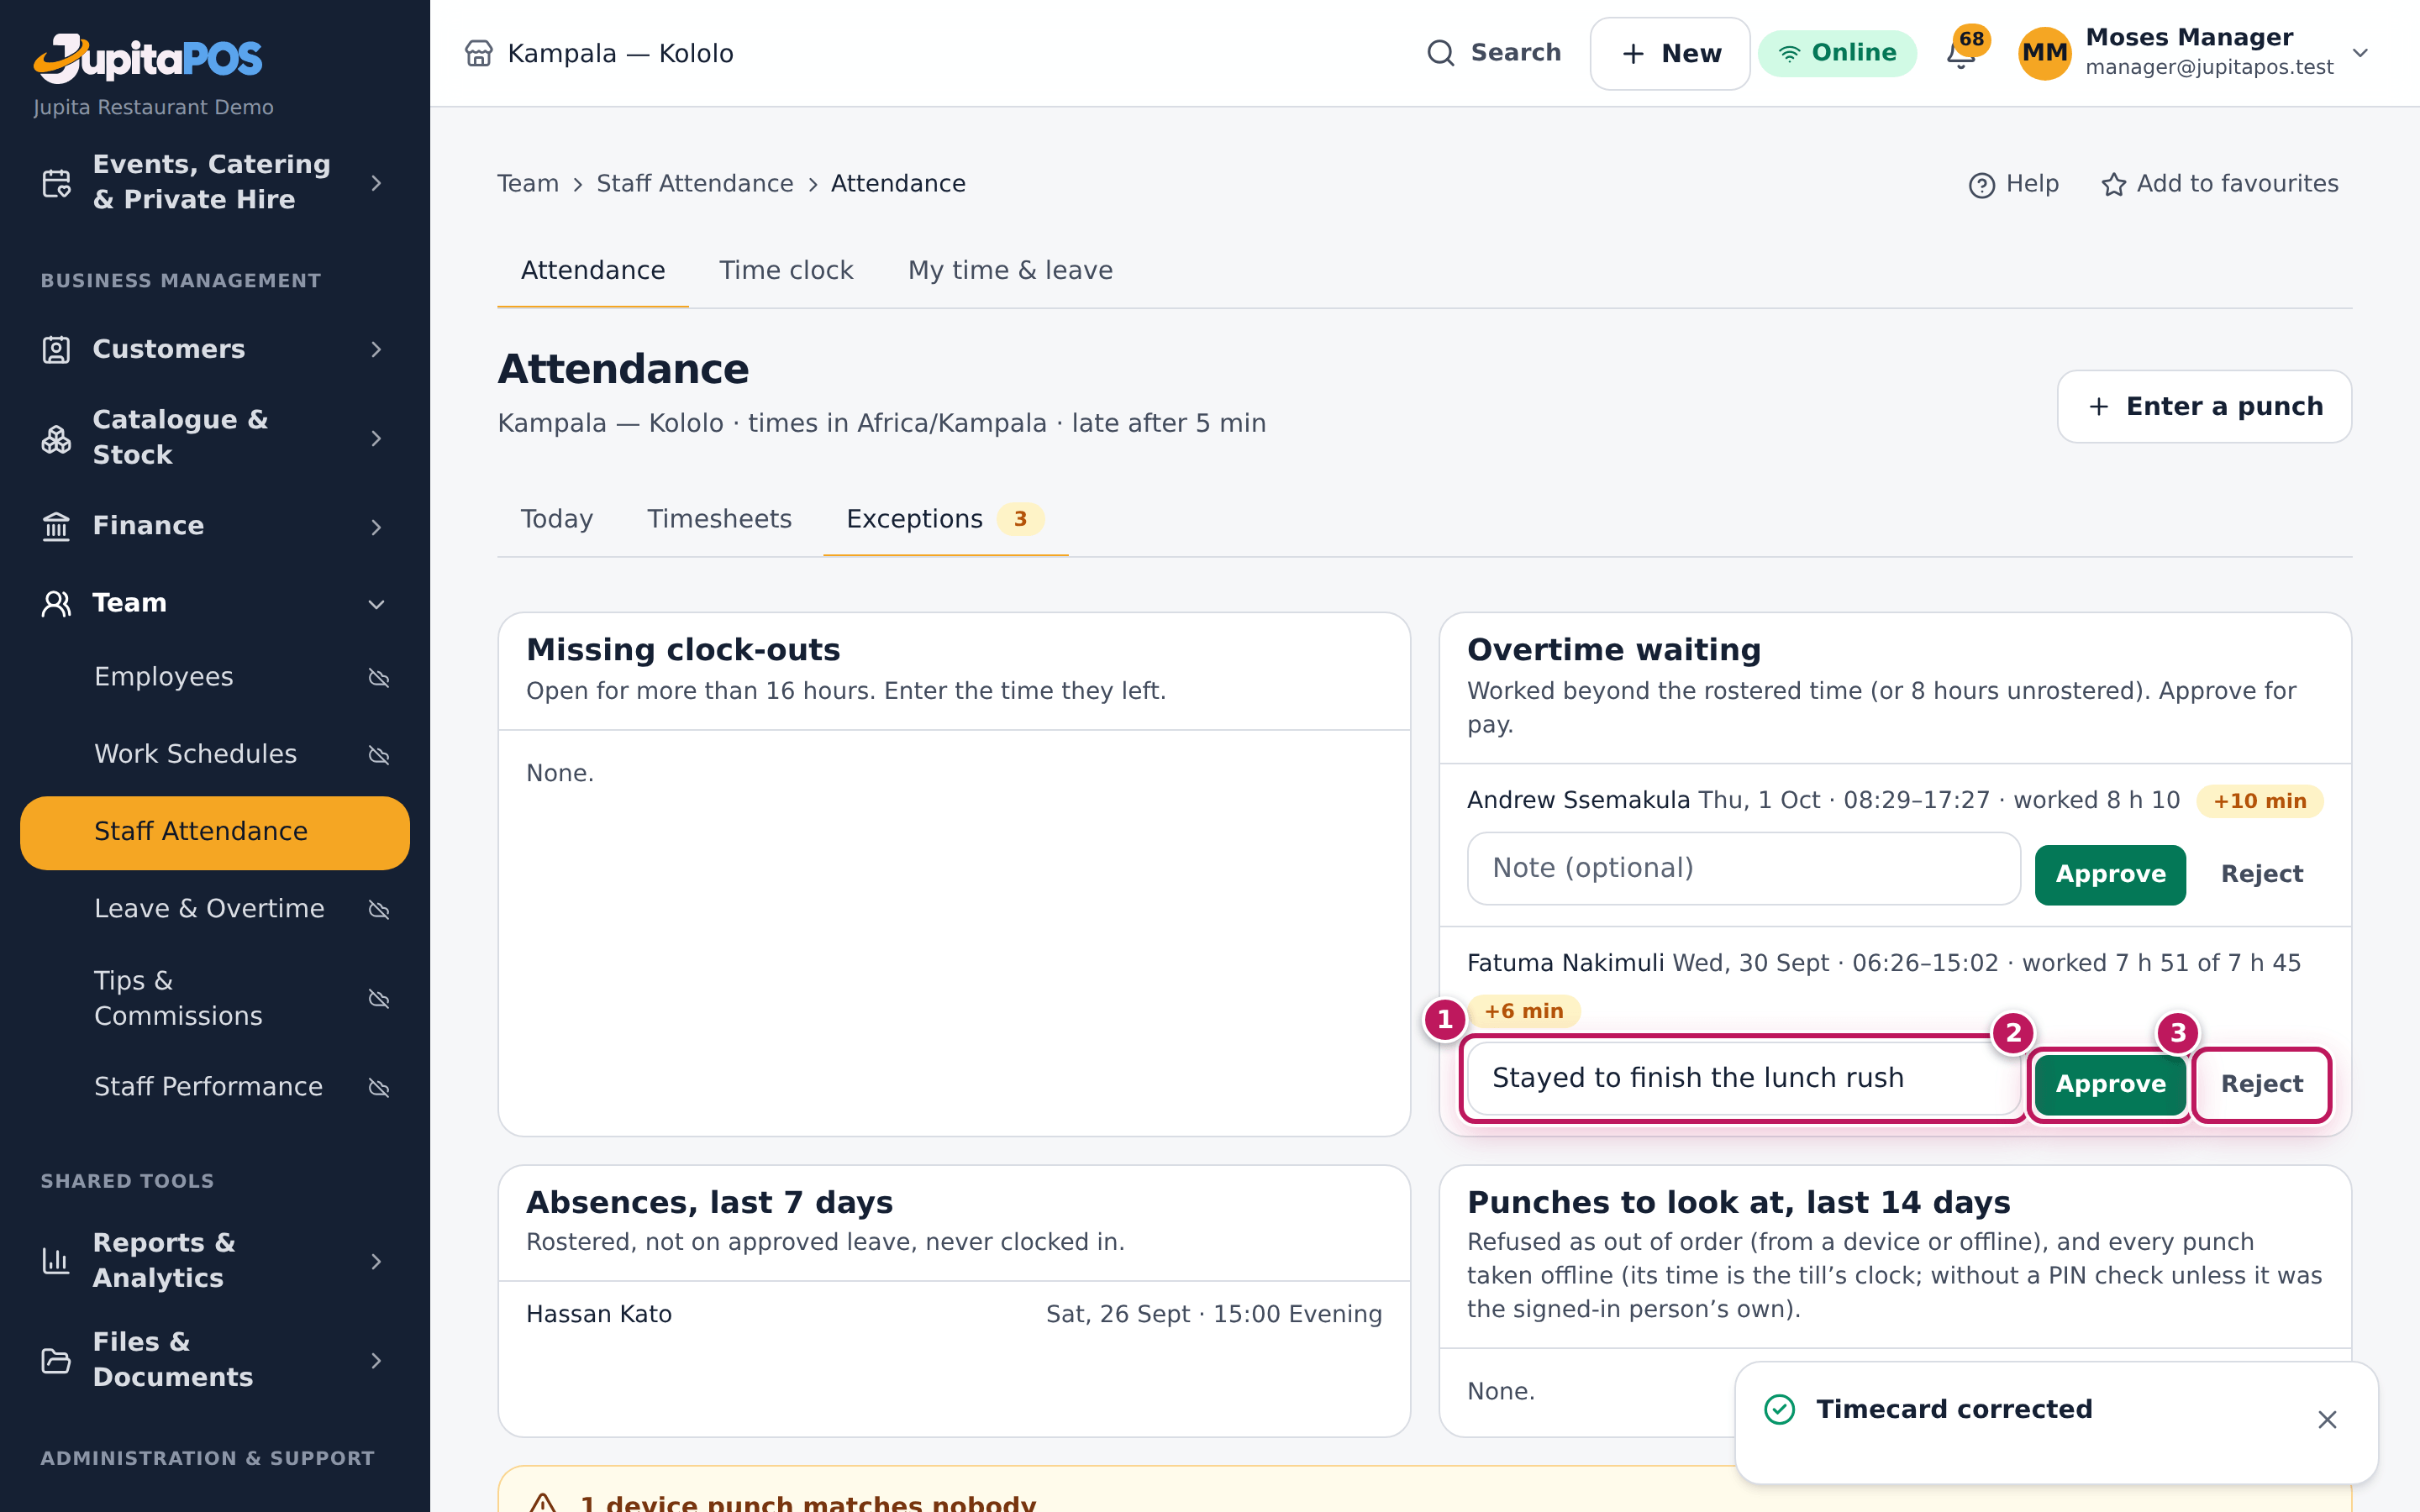
- Under Overtime waiting (3 in the second picture), type a note (1 in the fourth picture) and click Approve (2) or Reject (3). Absences, last 7 days (4 in the second picture) lists who was rostered, not on leave, and never clocked in.
- To record a punch someone missed, click Enter a punch (5 in the first picture), choose Who, the Punch and When, and give a Reason.
Expected result
Timecard corrected appears: the missing clock-out leaves the list and the hours count. The original punches are kept, marked as replaced, with your name and reason. Overtime approved appears and the overtime becomes payable; the person sees it on their timecards.
Screenshot
Common mistakes
- Approving overtime without checking the shift report. Overtime is the time worked beyond the rostered end (or beyond 8 hours when not rostered). Check they really stayed.
- Correcting a timecard to match the roster. Enter when they really came and left; lateness counts after the grace of 5 minutes.
Troubleshooting
- There is no Approve button on someone’s overtime. It is yours, or you
do not have
attendance.manage. Another manager decides it. - “Punches to look at”. Punches taken offline (without a PIN check) or refused as out of order from a device. Check them with the person.
Ask for leave
Purpose
Ask your manager for days off — annual leave, sick leave or another kind — and see the answer on your phone.
Role / permission required
Every member of staff: leave.request.
Prerequisites
- Your login is linked to your staff profile.
Steps
- Open My time & leave.
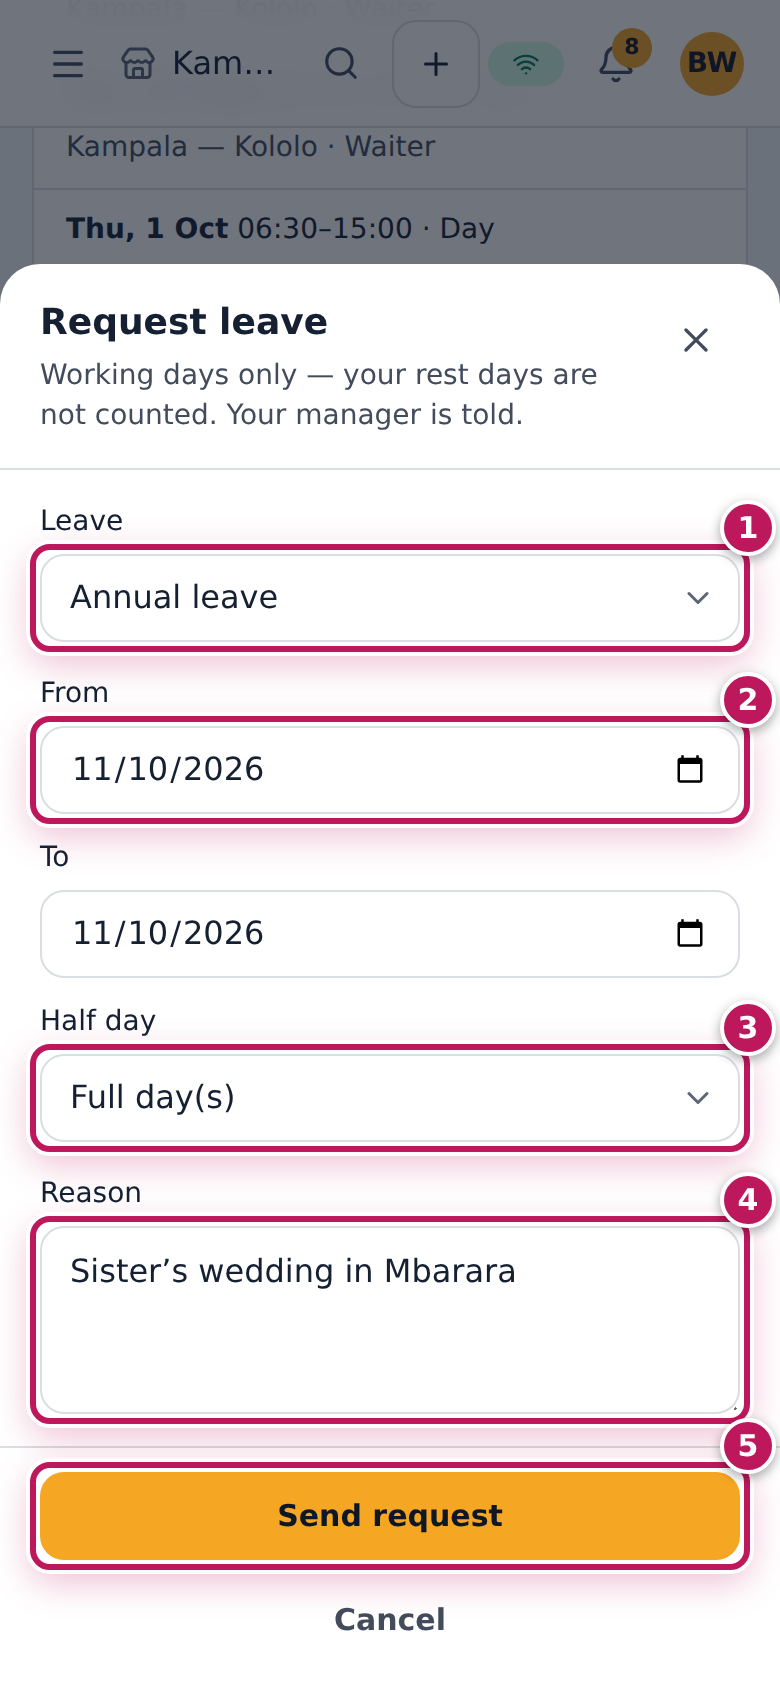
- Under My leave, tap Request leave.
- Choose the Leave (1): Annual leave, Sick leave…
- Set From and To (2). For half a day choose Half day (3): Morning or Afternoon.
- Type a Reason (4).
- Tap Send request (5).
Expected result
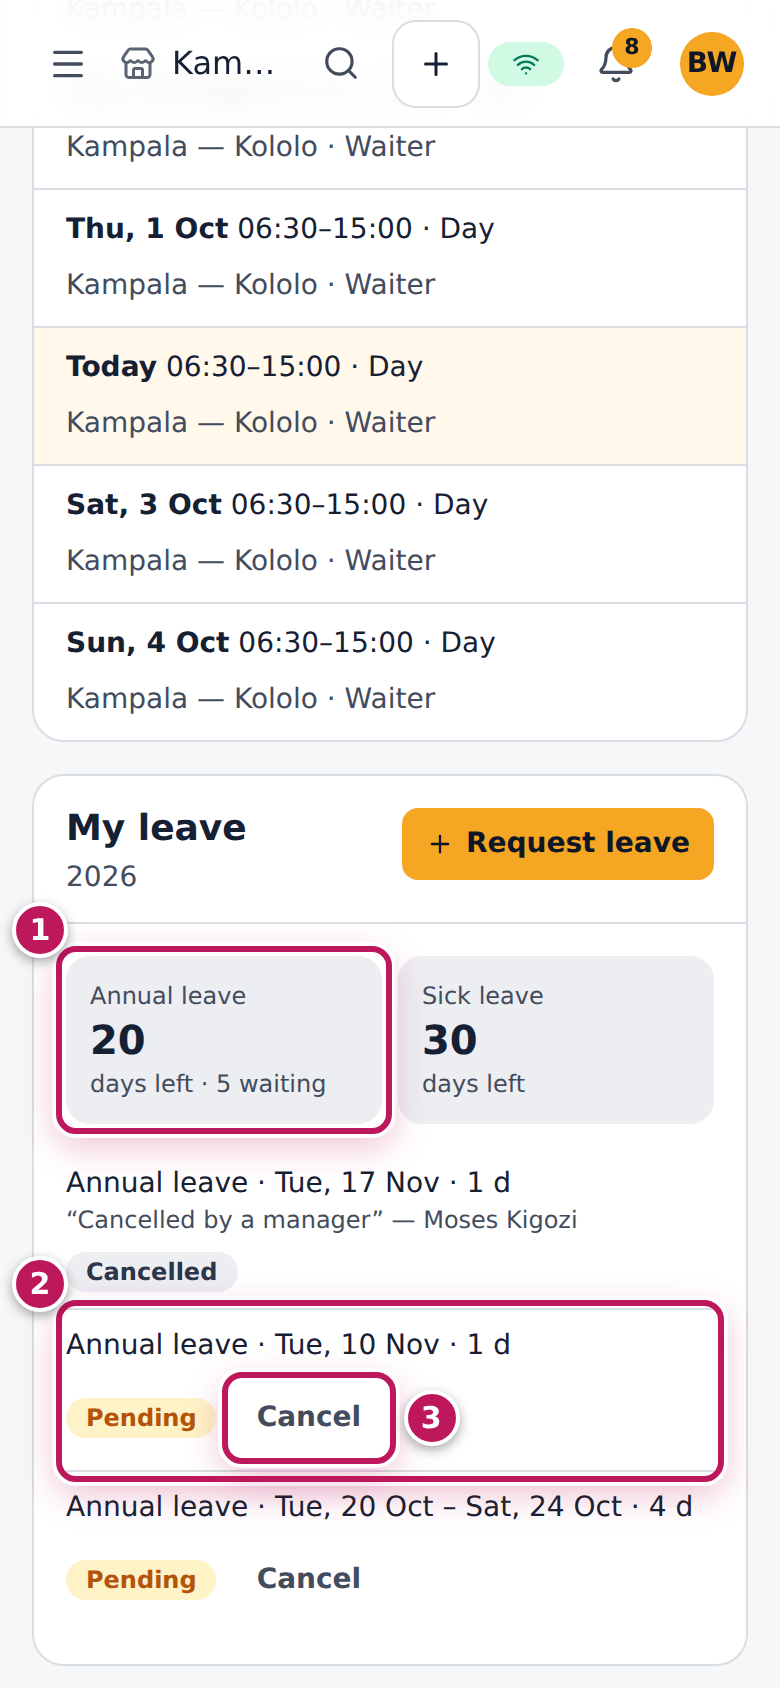
Leave requested appears. The request is listed under My leave as Pending (2) with the days it takes — Tue, 10 Nov · 1 d — and your days left (1). You are notified when a manager decides; you can Cancel (3) a request that is still waiting, or approved leave that has not started.
Screenshot
Common mistakes
- Asking for your rest days. Days are counted on your working days: your rest days are skipped.
- Asking twice for the same days. A request that overlaps another is refused.
Troubleshooting
- “Your login is not linked to a staff profile”. Ask your manager to link your login on your profile.
- The request is refused. It asks for more days than you have left, or overlaps another request.
Approve or reject leave
Purpose
Decide leave requests quickly and fairly, with the calendar in view, so the roster and attendance know who is away.
Role / permission required
Branch manager or owner: leave.approve. You never decide your own leave or
one you recorded for someone.
Prerequisites
- A request is waiting. Needs you on the staff directory counts them, and you are notified.
Steps
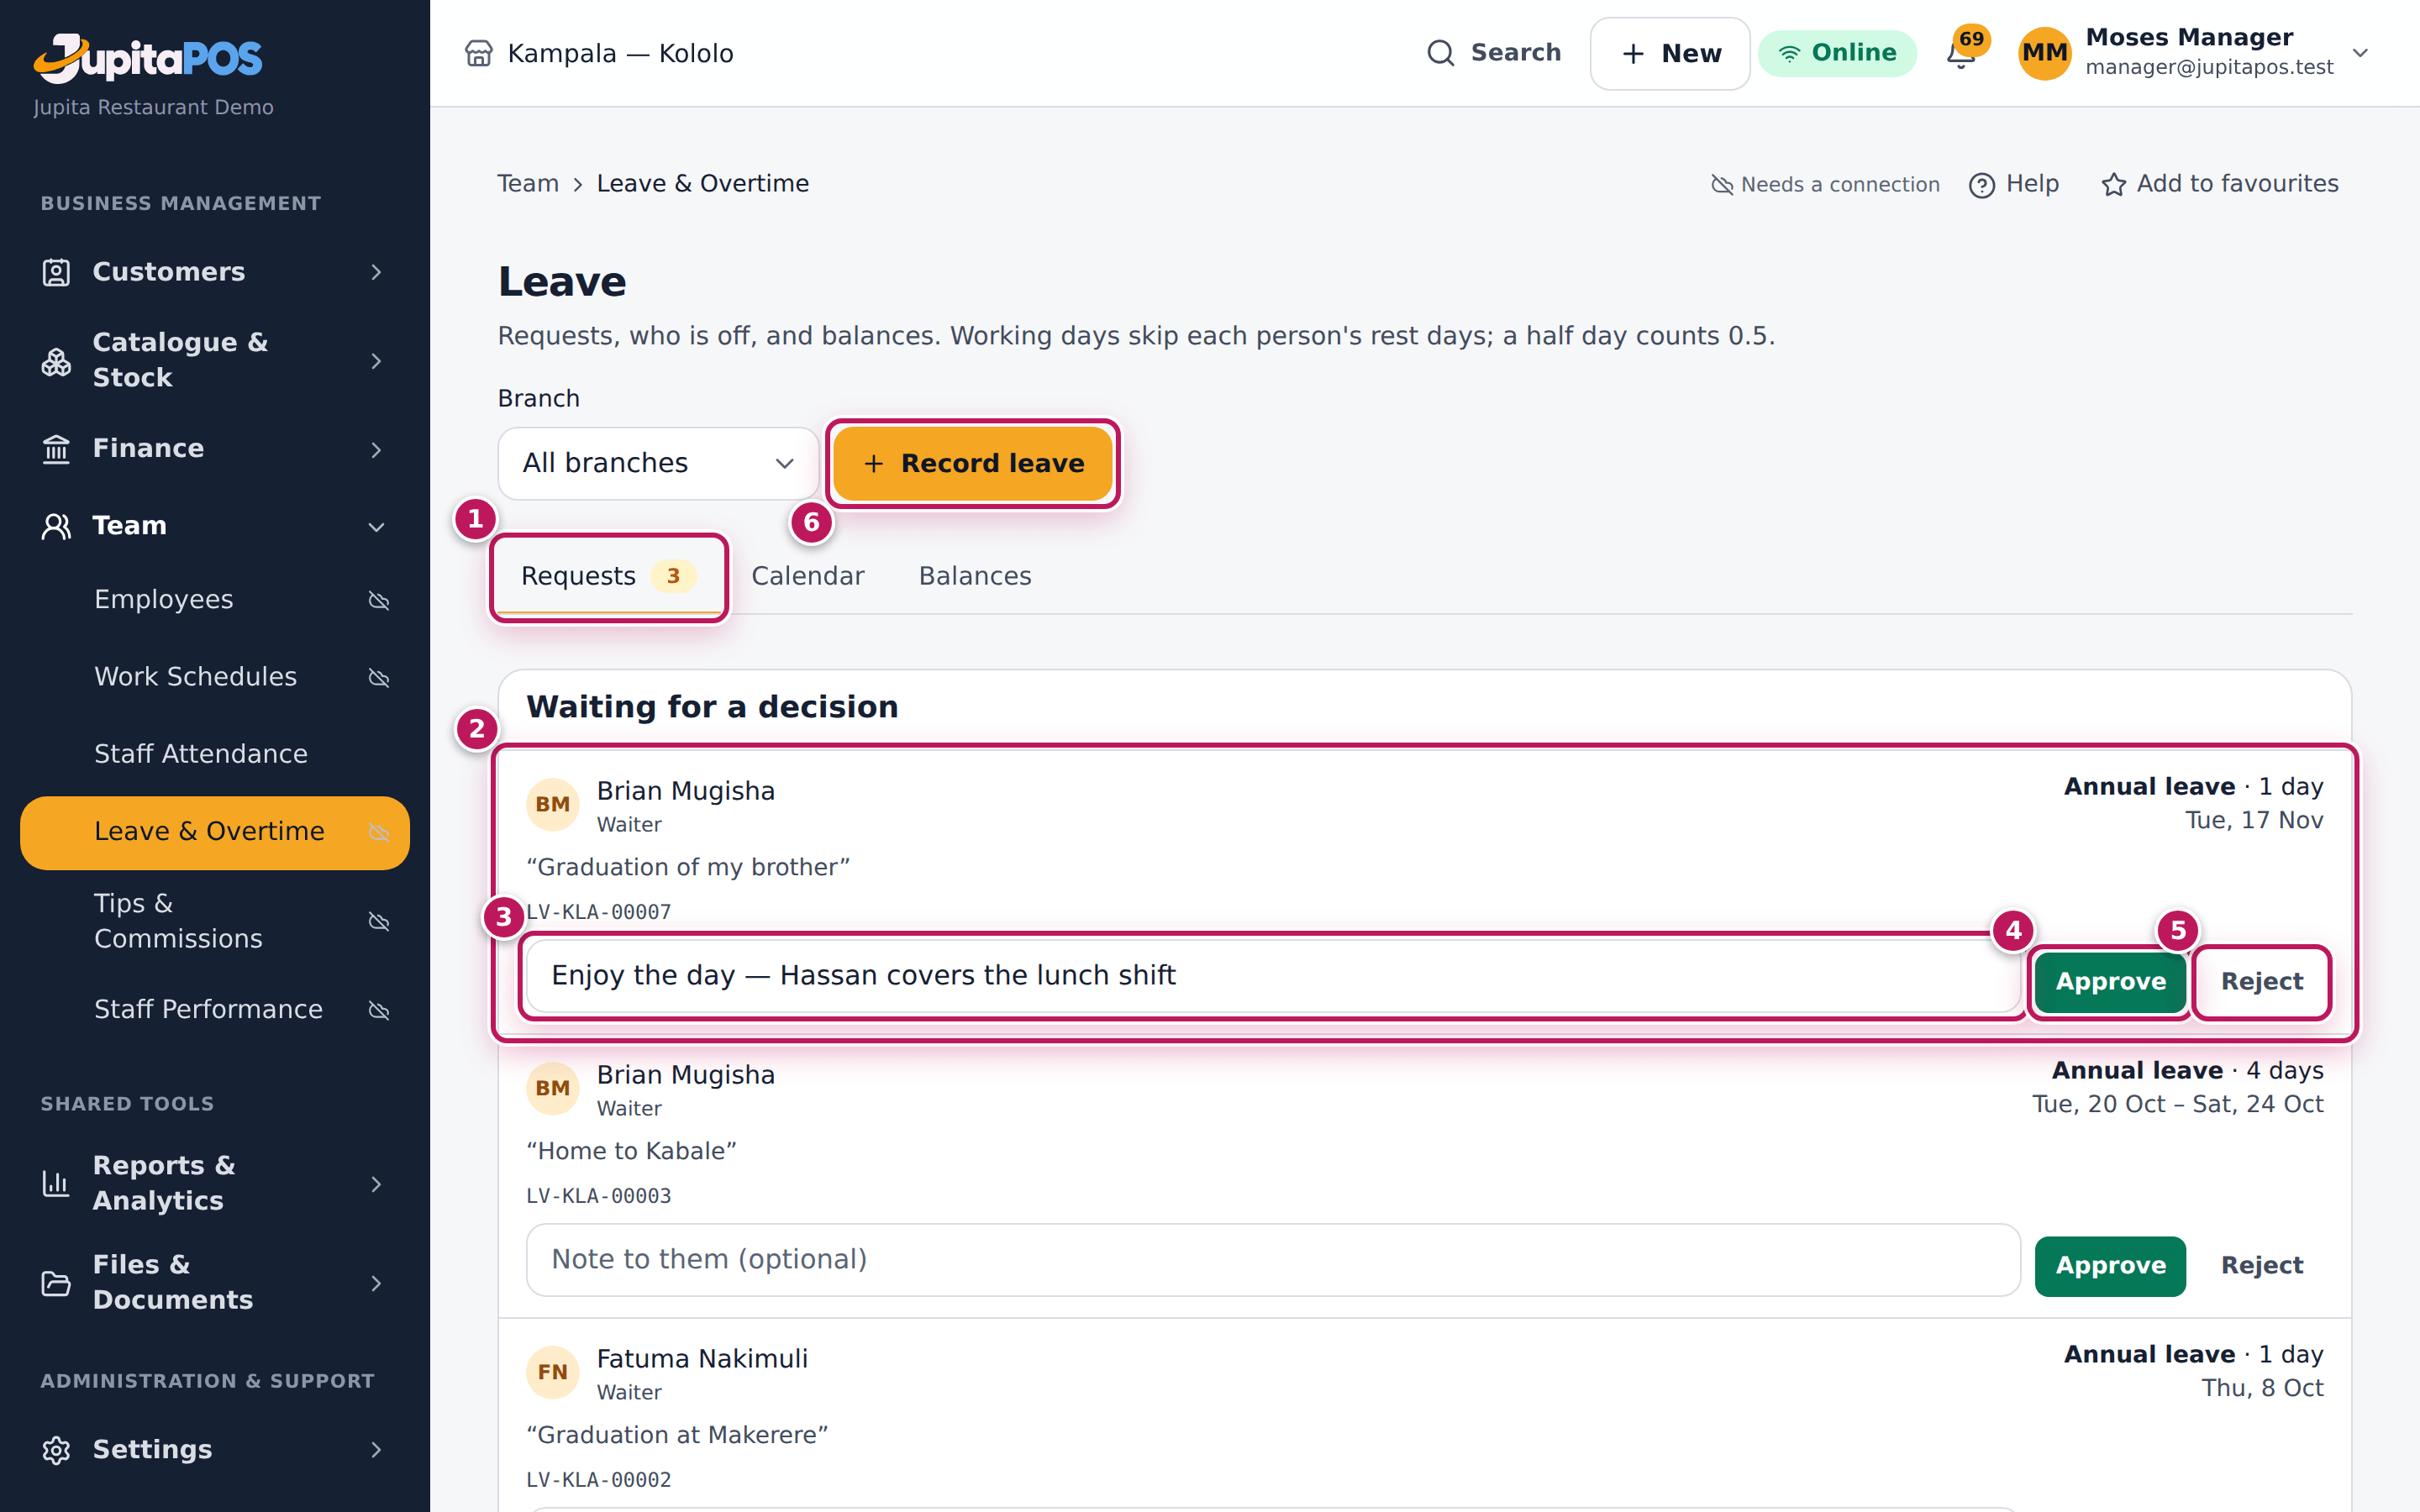
- Open Leave. Requests (1) is open.
- Under Waiting for a decision, read the request (2): who, the type, the days, the dates and the reason.
- Type a Note to them (optional) (3).
- Click Approve (4) or Reject (5).
- To file a request for someone (a sick call), click Record leave (6); another manager decides it.
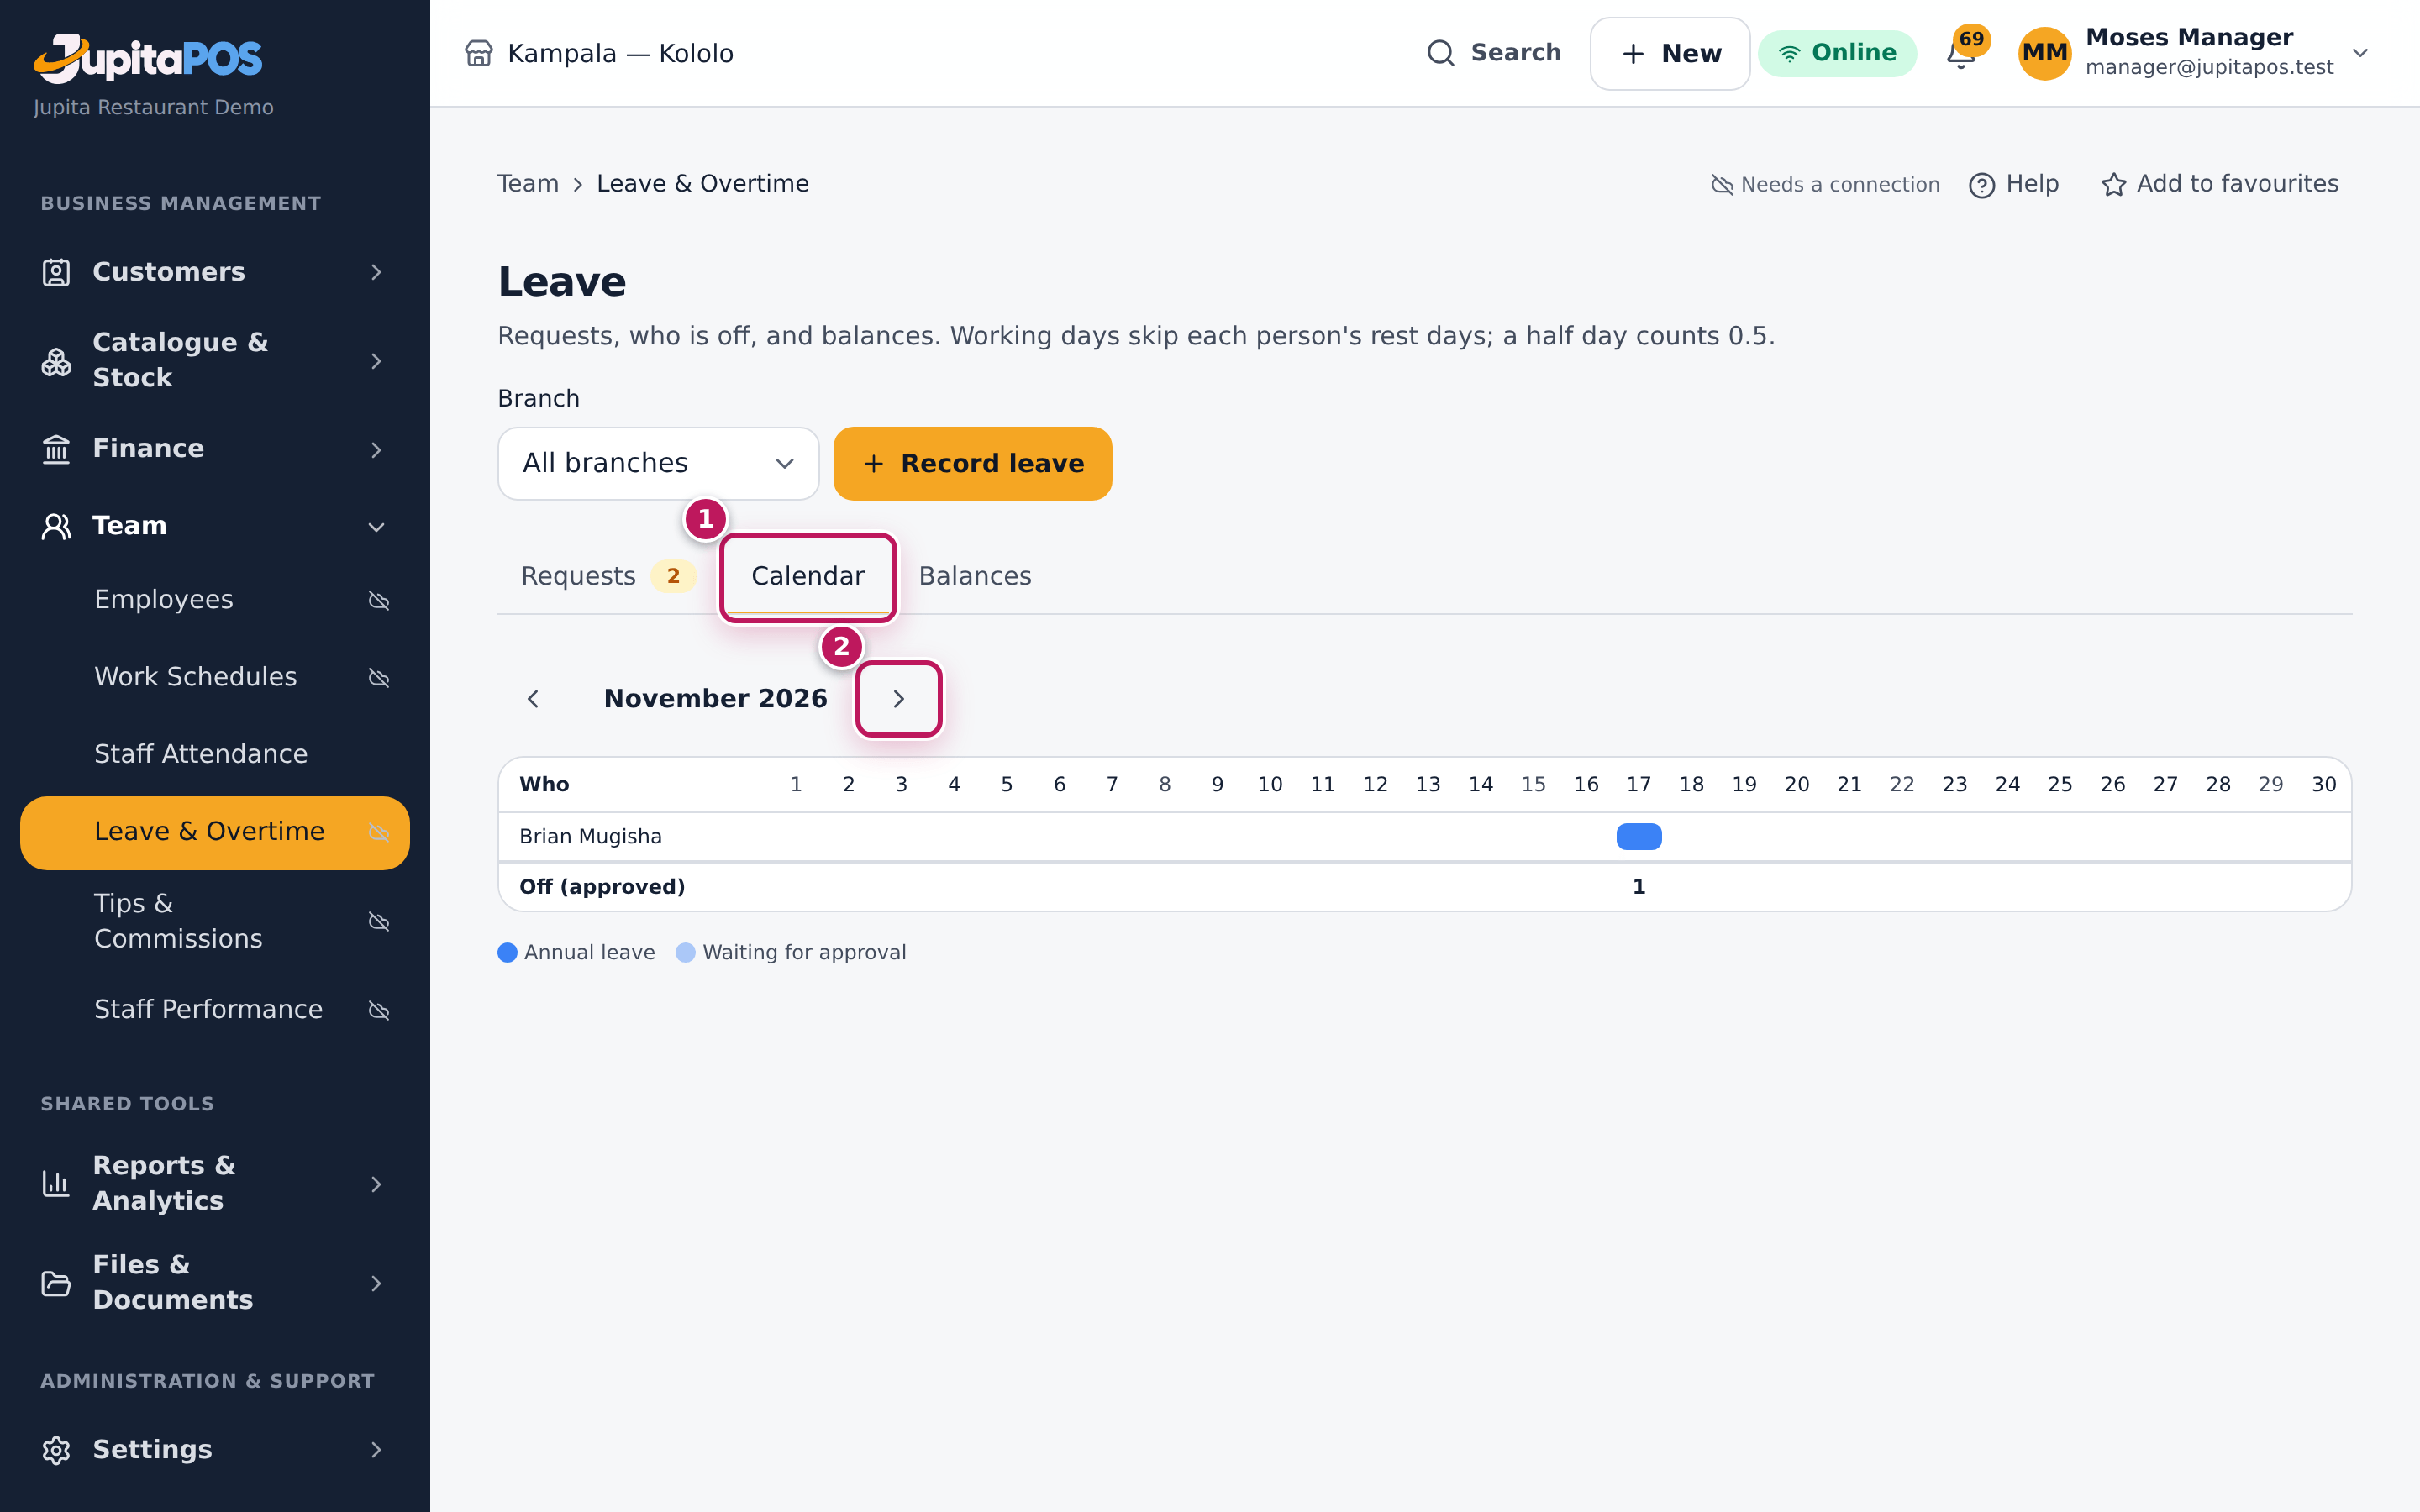
- Check the Calendar (1 in the third picture) to see who else is off; Next month (2) moves on.
Expected result
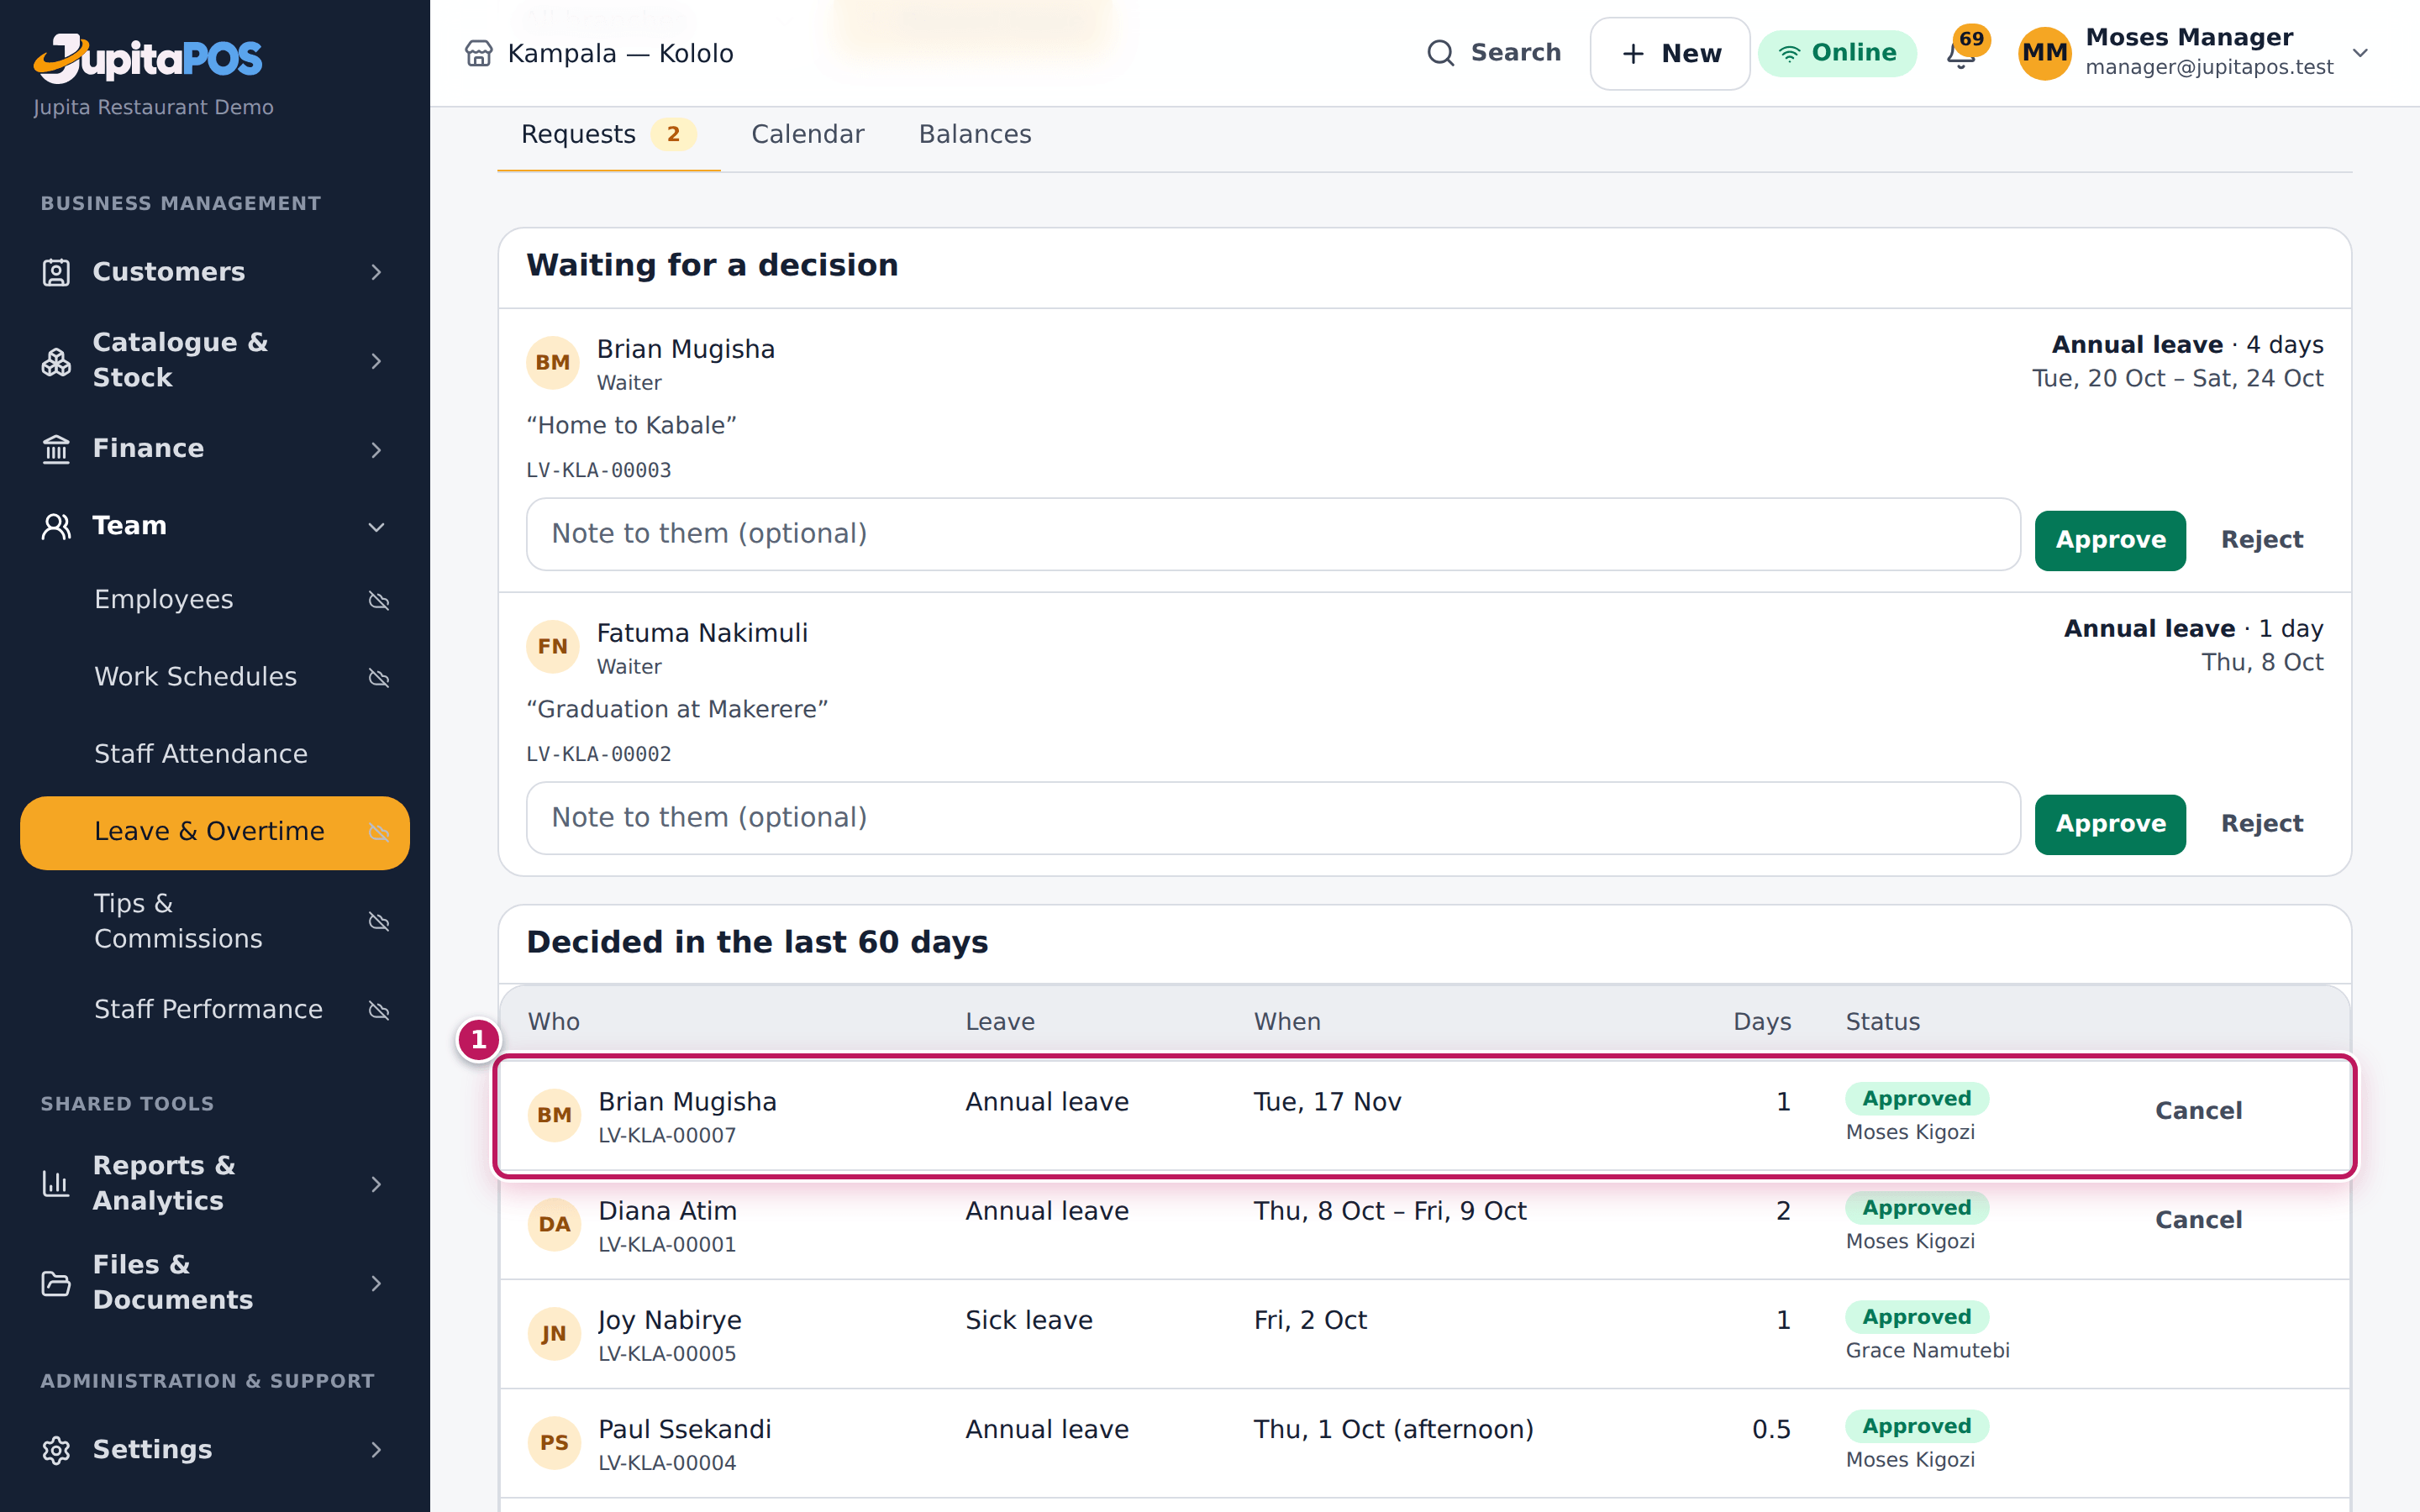
A message such as LV-KLA-00007 approved appears. The request moves to Decided in the last 60 days (1) as Approved, with who decided it. The person is notified, shows on leave (not absent) in attendance, and the roster will not put them on a shift those days. An approved request can still be cancelled with Cancel.
Screenshot
Common mistakes
- Approving without looking at the calendar. Two cooks off on the same Saturday leaves the kitchen short.
- Rejecting without a note. Say why, so they can ask for other days.
Troubleshooting
- “Another manager decides this one (yours, or one you recorded).” Ask another manager or the owner.
- A balance looks wrong. Open Balances; Adjust a balance
(
leave.manage) adds or removes days with a reason.
Read staff performance and tips
Purpose
See who sells, serves and makes what, how fast, and what tips each person is owed — from the orders, payments, tickets and timecards themselves.
Role / permission required
Owner or branch manager: performance.view; the CSV needs
performance.export.
Prerequisites
- None. Nothing is typed in: every figure comes from what was recorded.
Steps
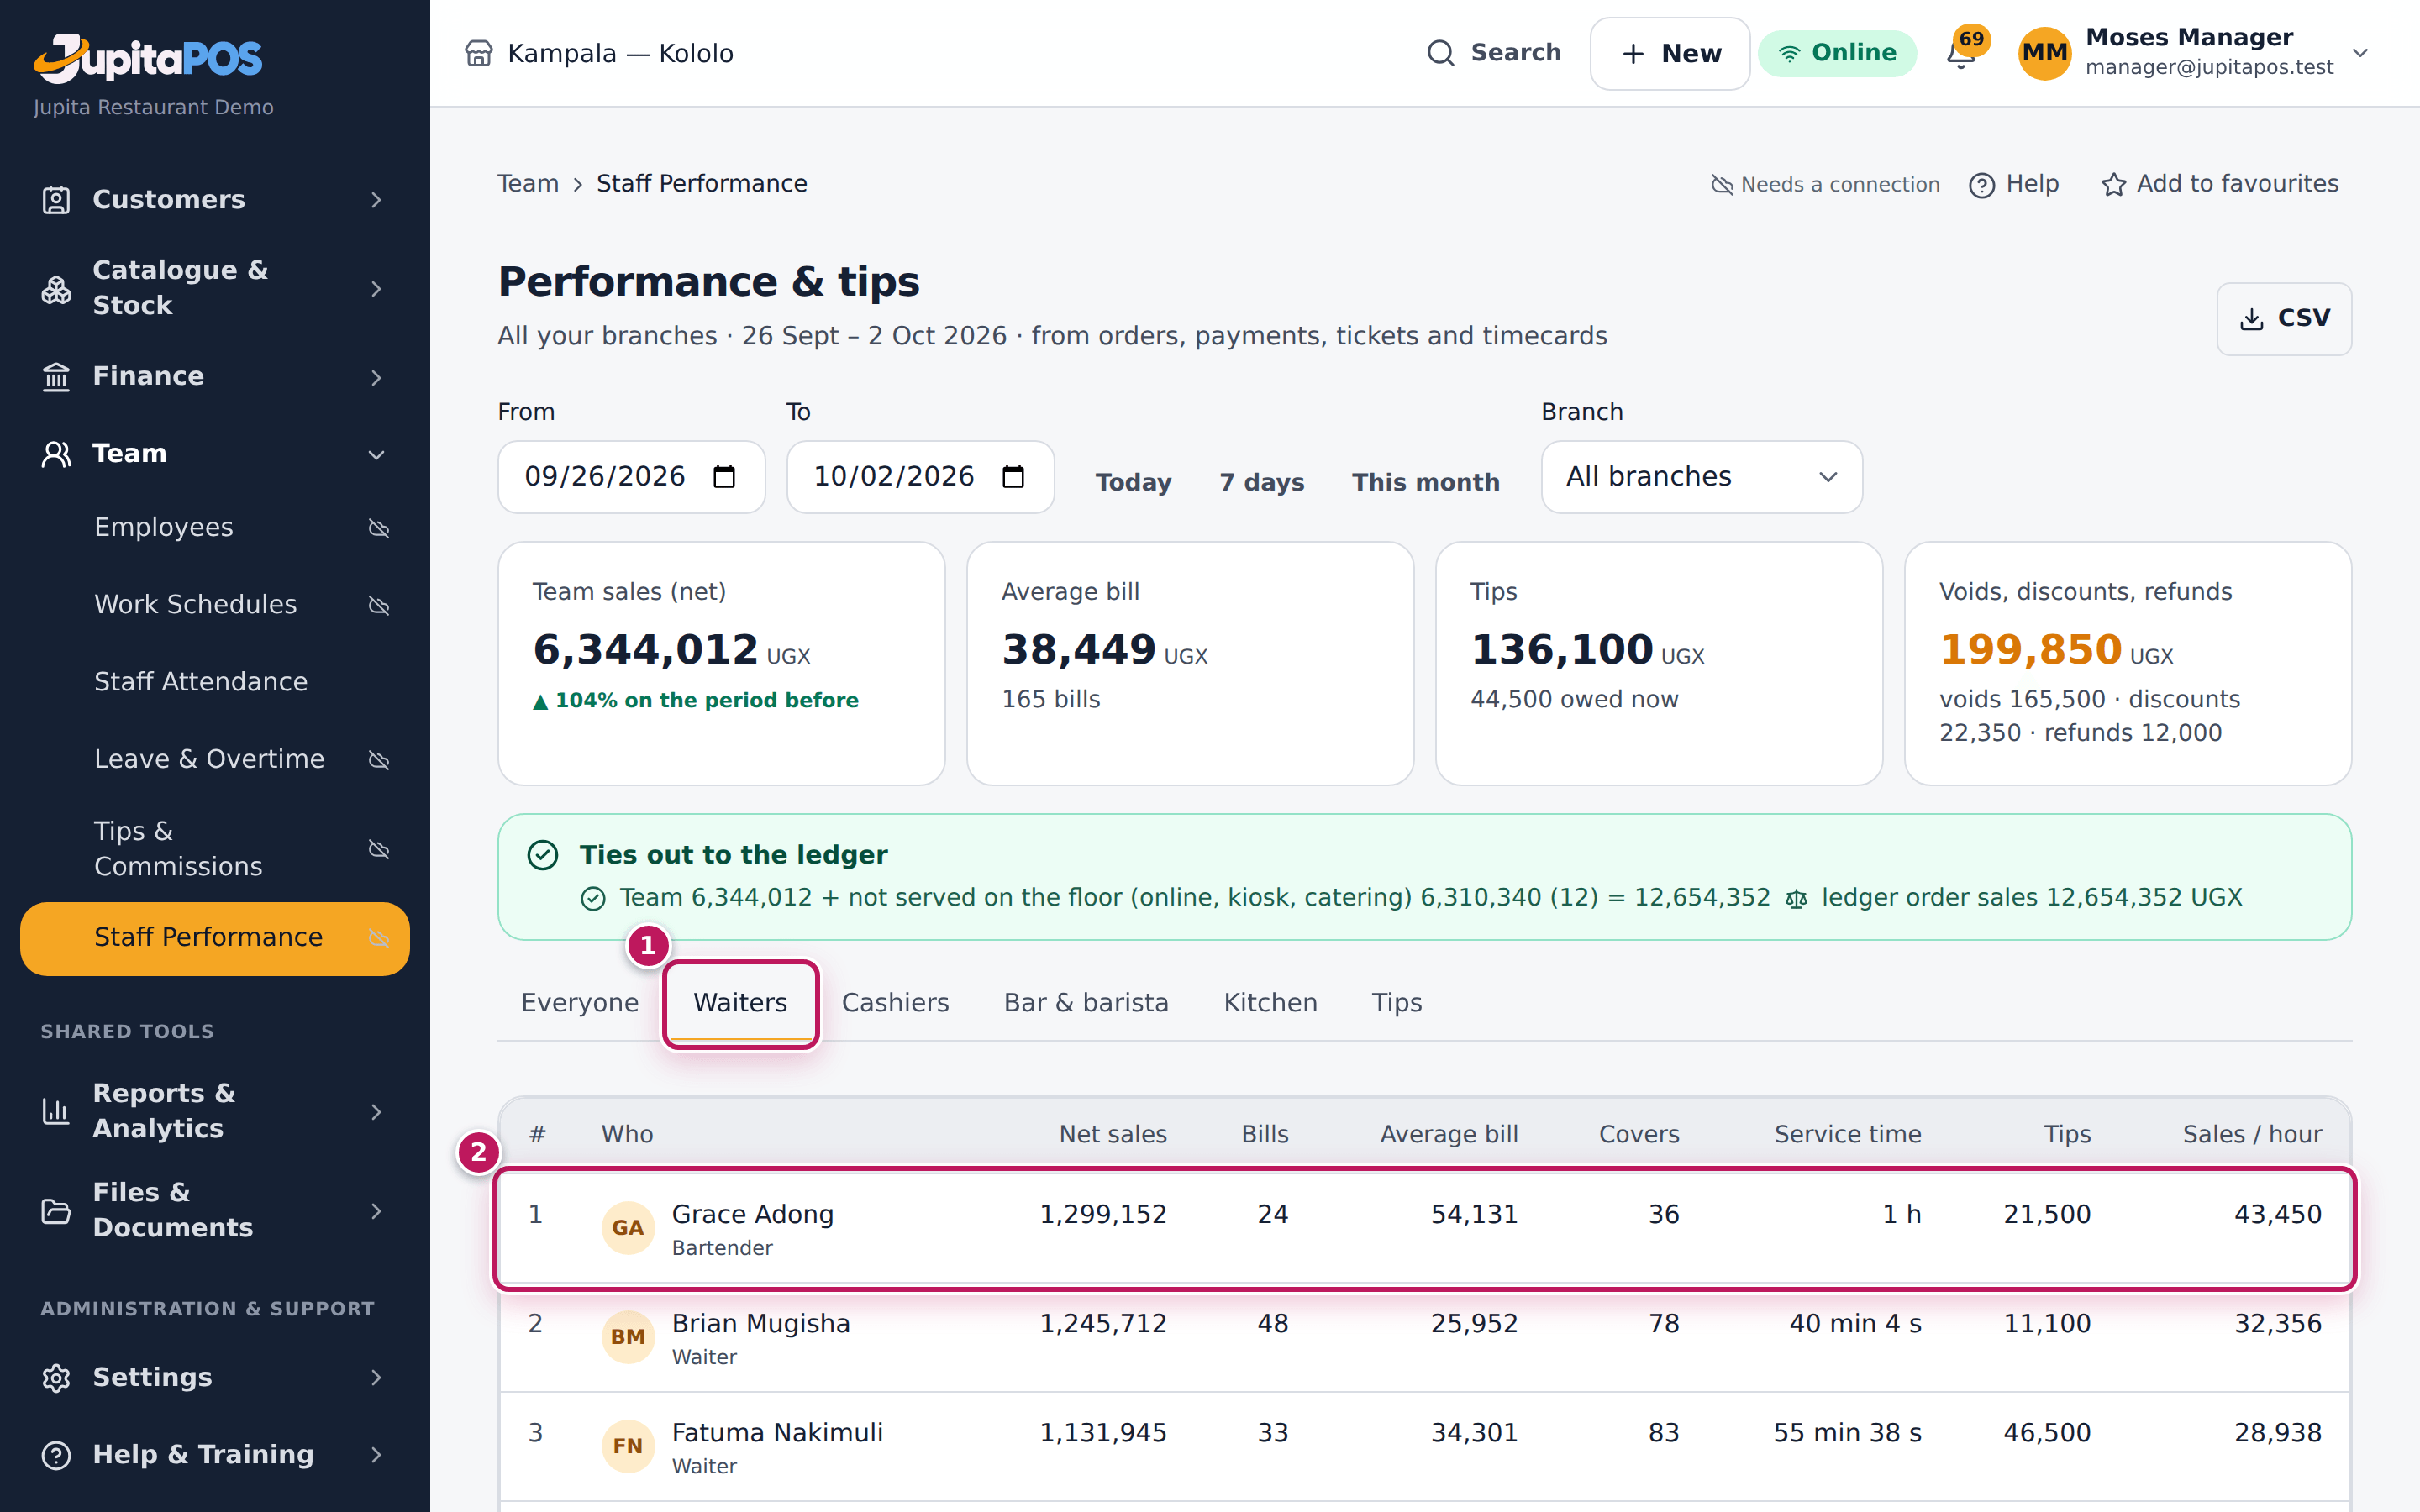
- Open Performance & tips.
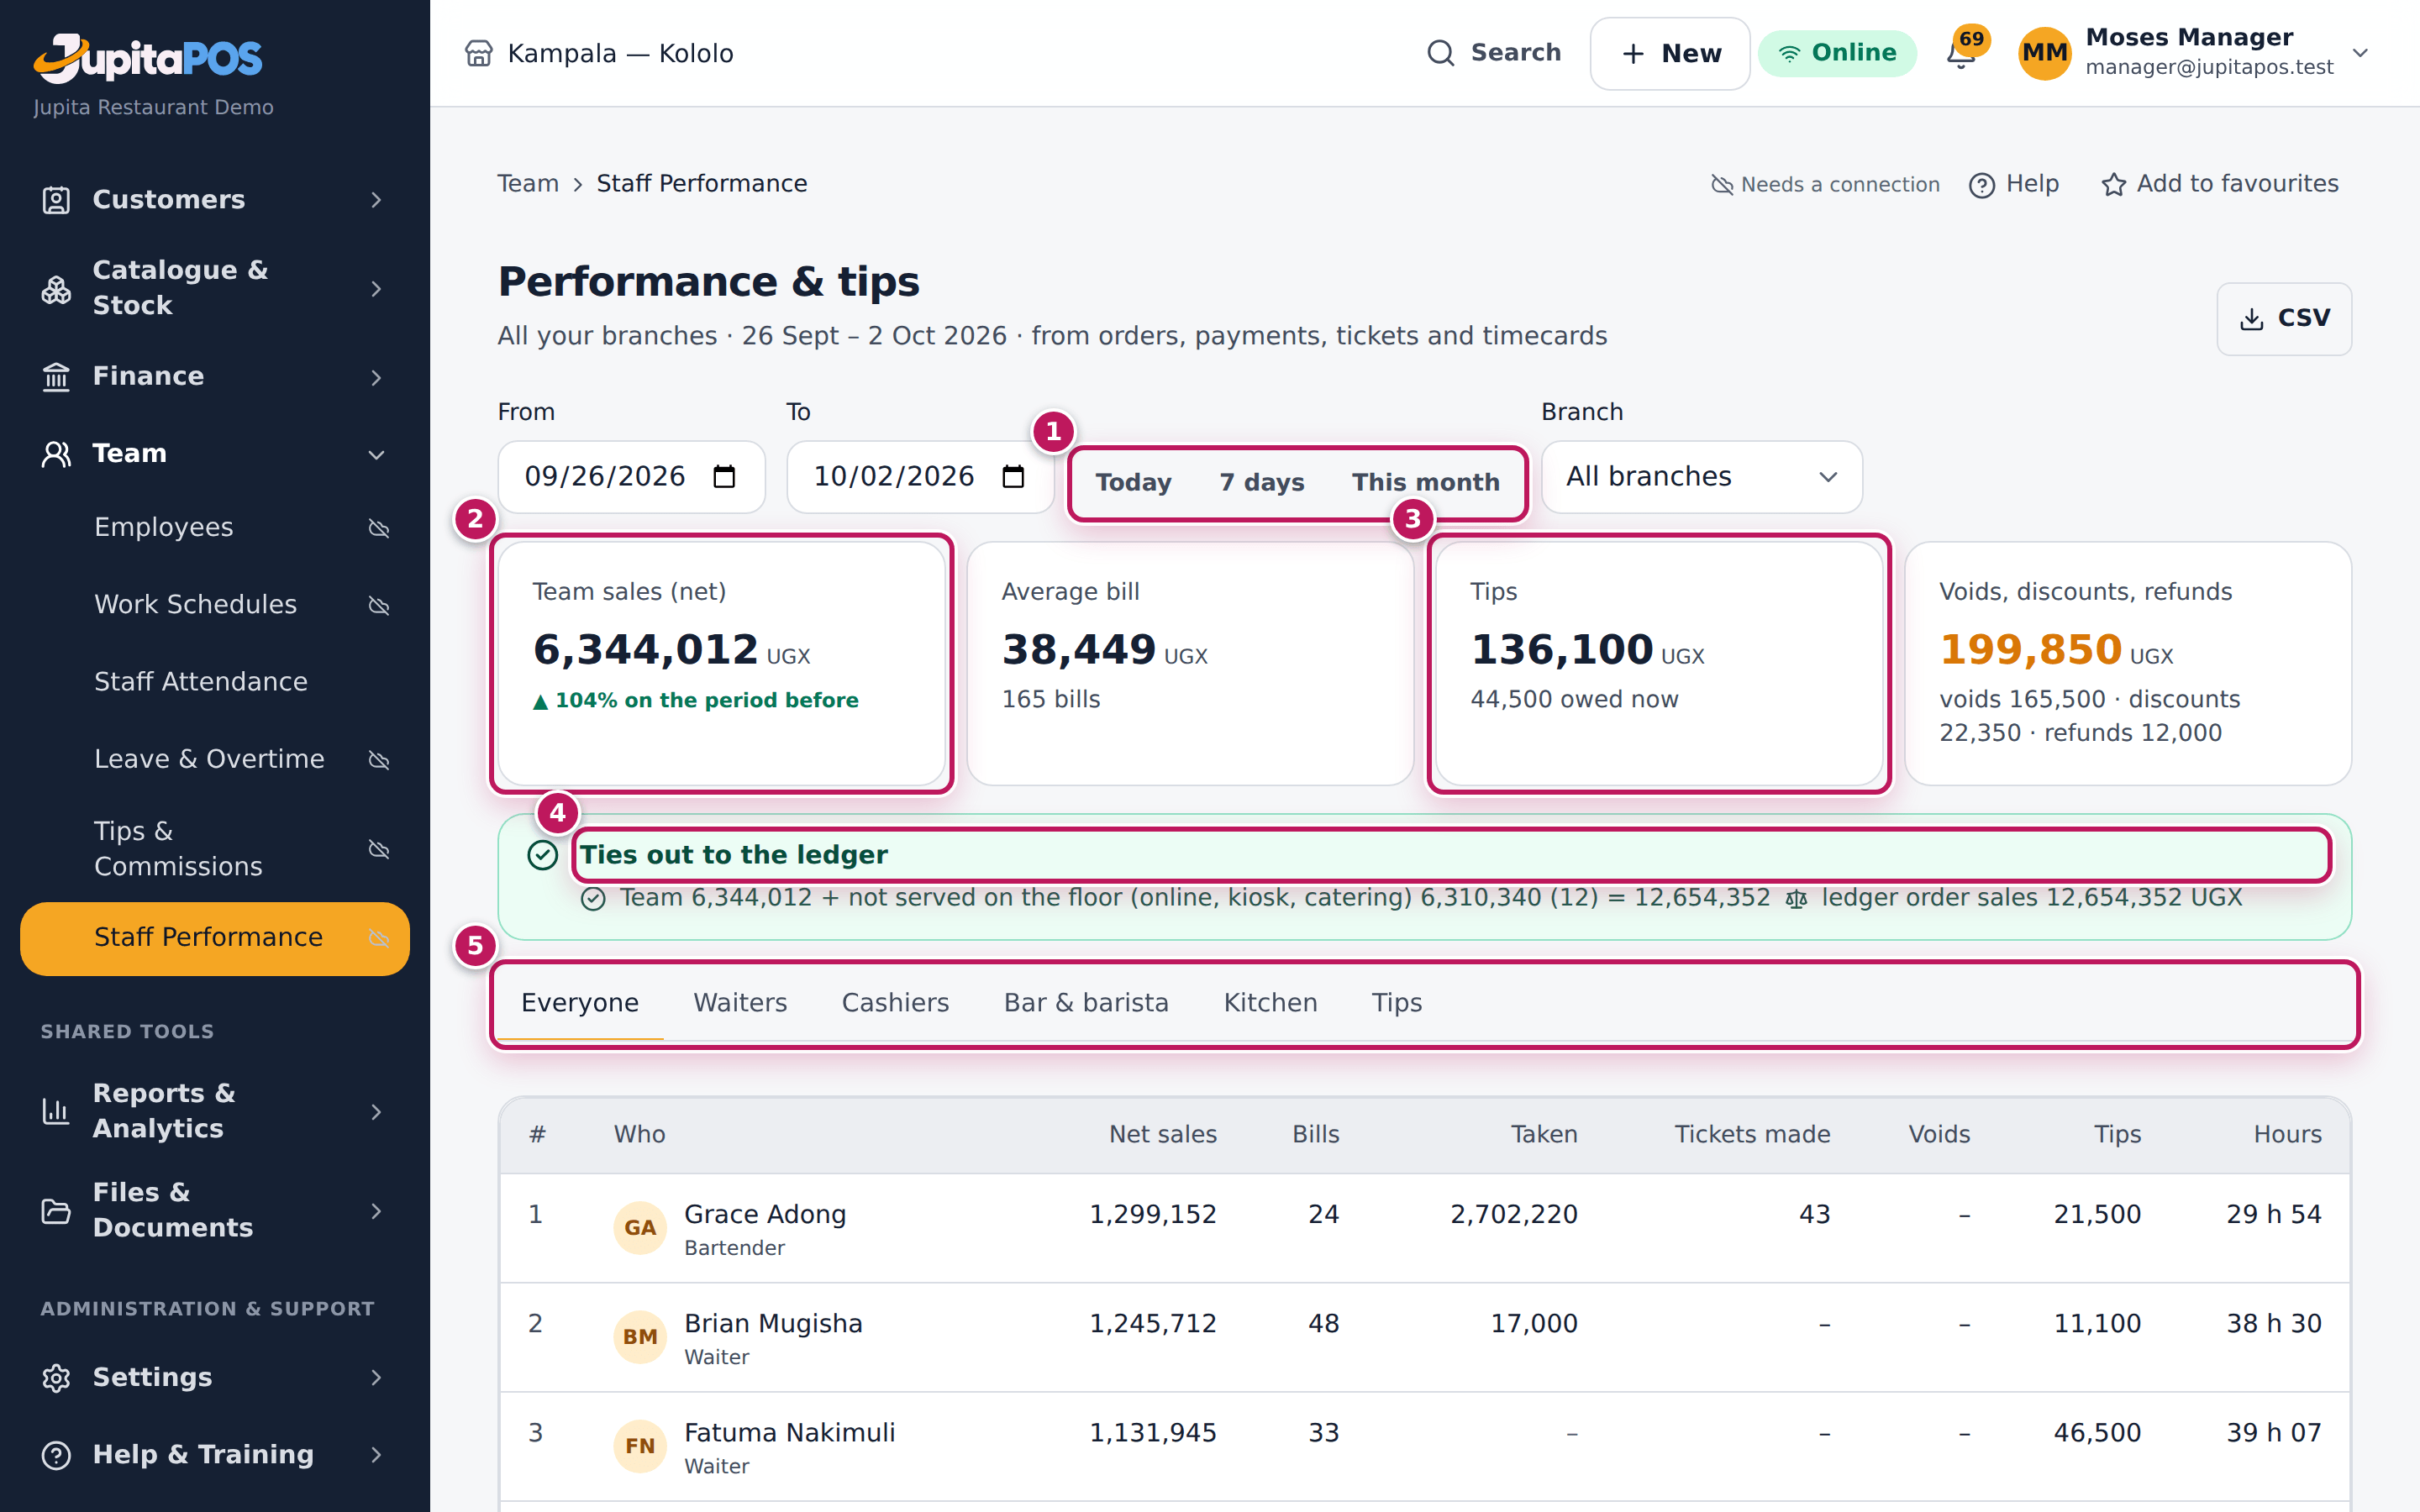
- Choose a period (1): Today, 7 days, This month, or dates in From and To (up to 93 days), and a branch.
- Read the figures at the top: Team sales (net) (2), Average bill, Tips (3) and Voids, discounts, refunds.
- Check the tie-out (4). The team’s sales plus the sales not served on the
floor (online, kiosk, catering) are compared with the ledger’s order
sales. Days before the books start are left out, and the line says from
which date it compares. It says one of:
- Ties out to the ledger — they agree.
- Ties out to the ledger, allowing for invoices — the difference is orders invoiced on another day, or invoiced and not closed in the period; the amounts are named.
- Does not tie out to the ledger yet — sales still to post (the ledger catches up within a minute), or a difference to look up in the general ledger.
- Before the books start — the whole period is before the books start: those sales are in the opening balances.
- Open a tab (5): Everyone, Waiters, Cashiers, Bar & barista, Kitchen, Tips.
- On Waiters (1), click a row (2) for the person’s full figures.
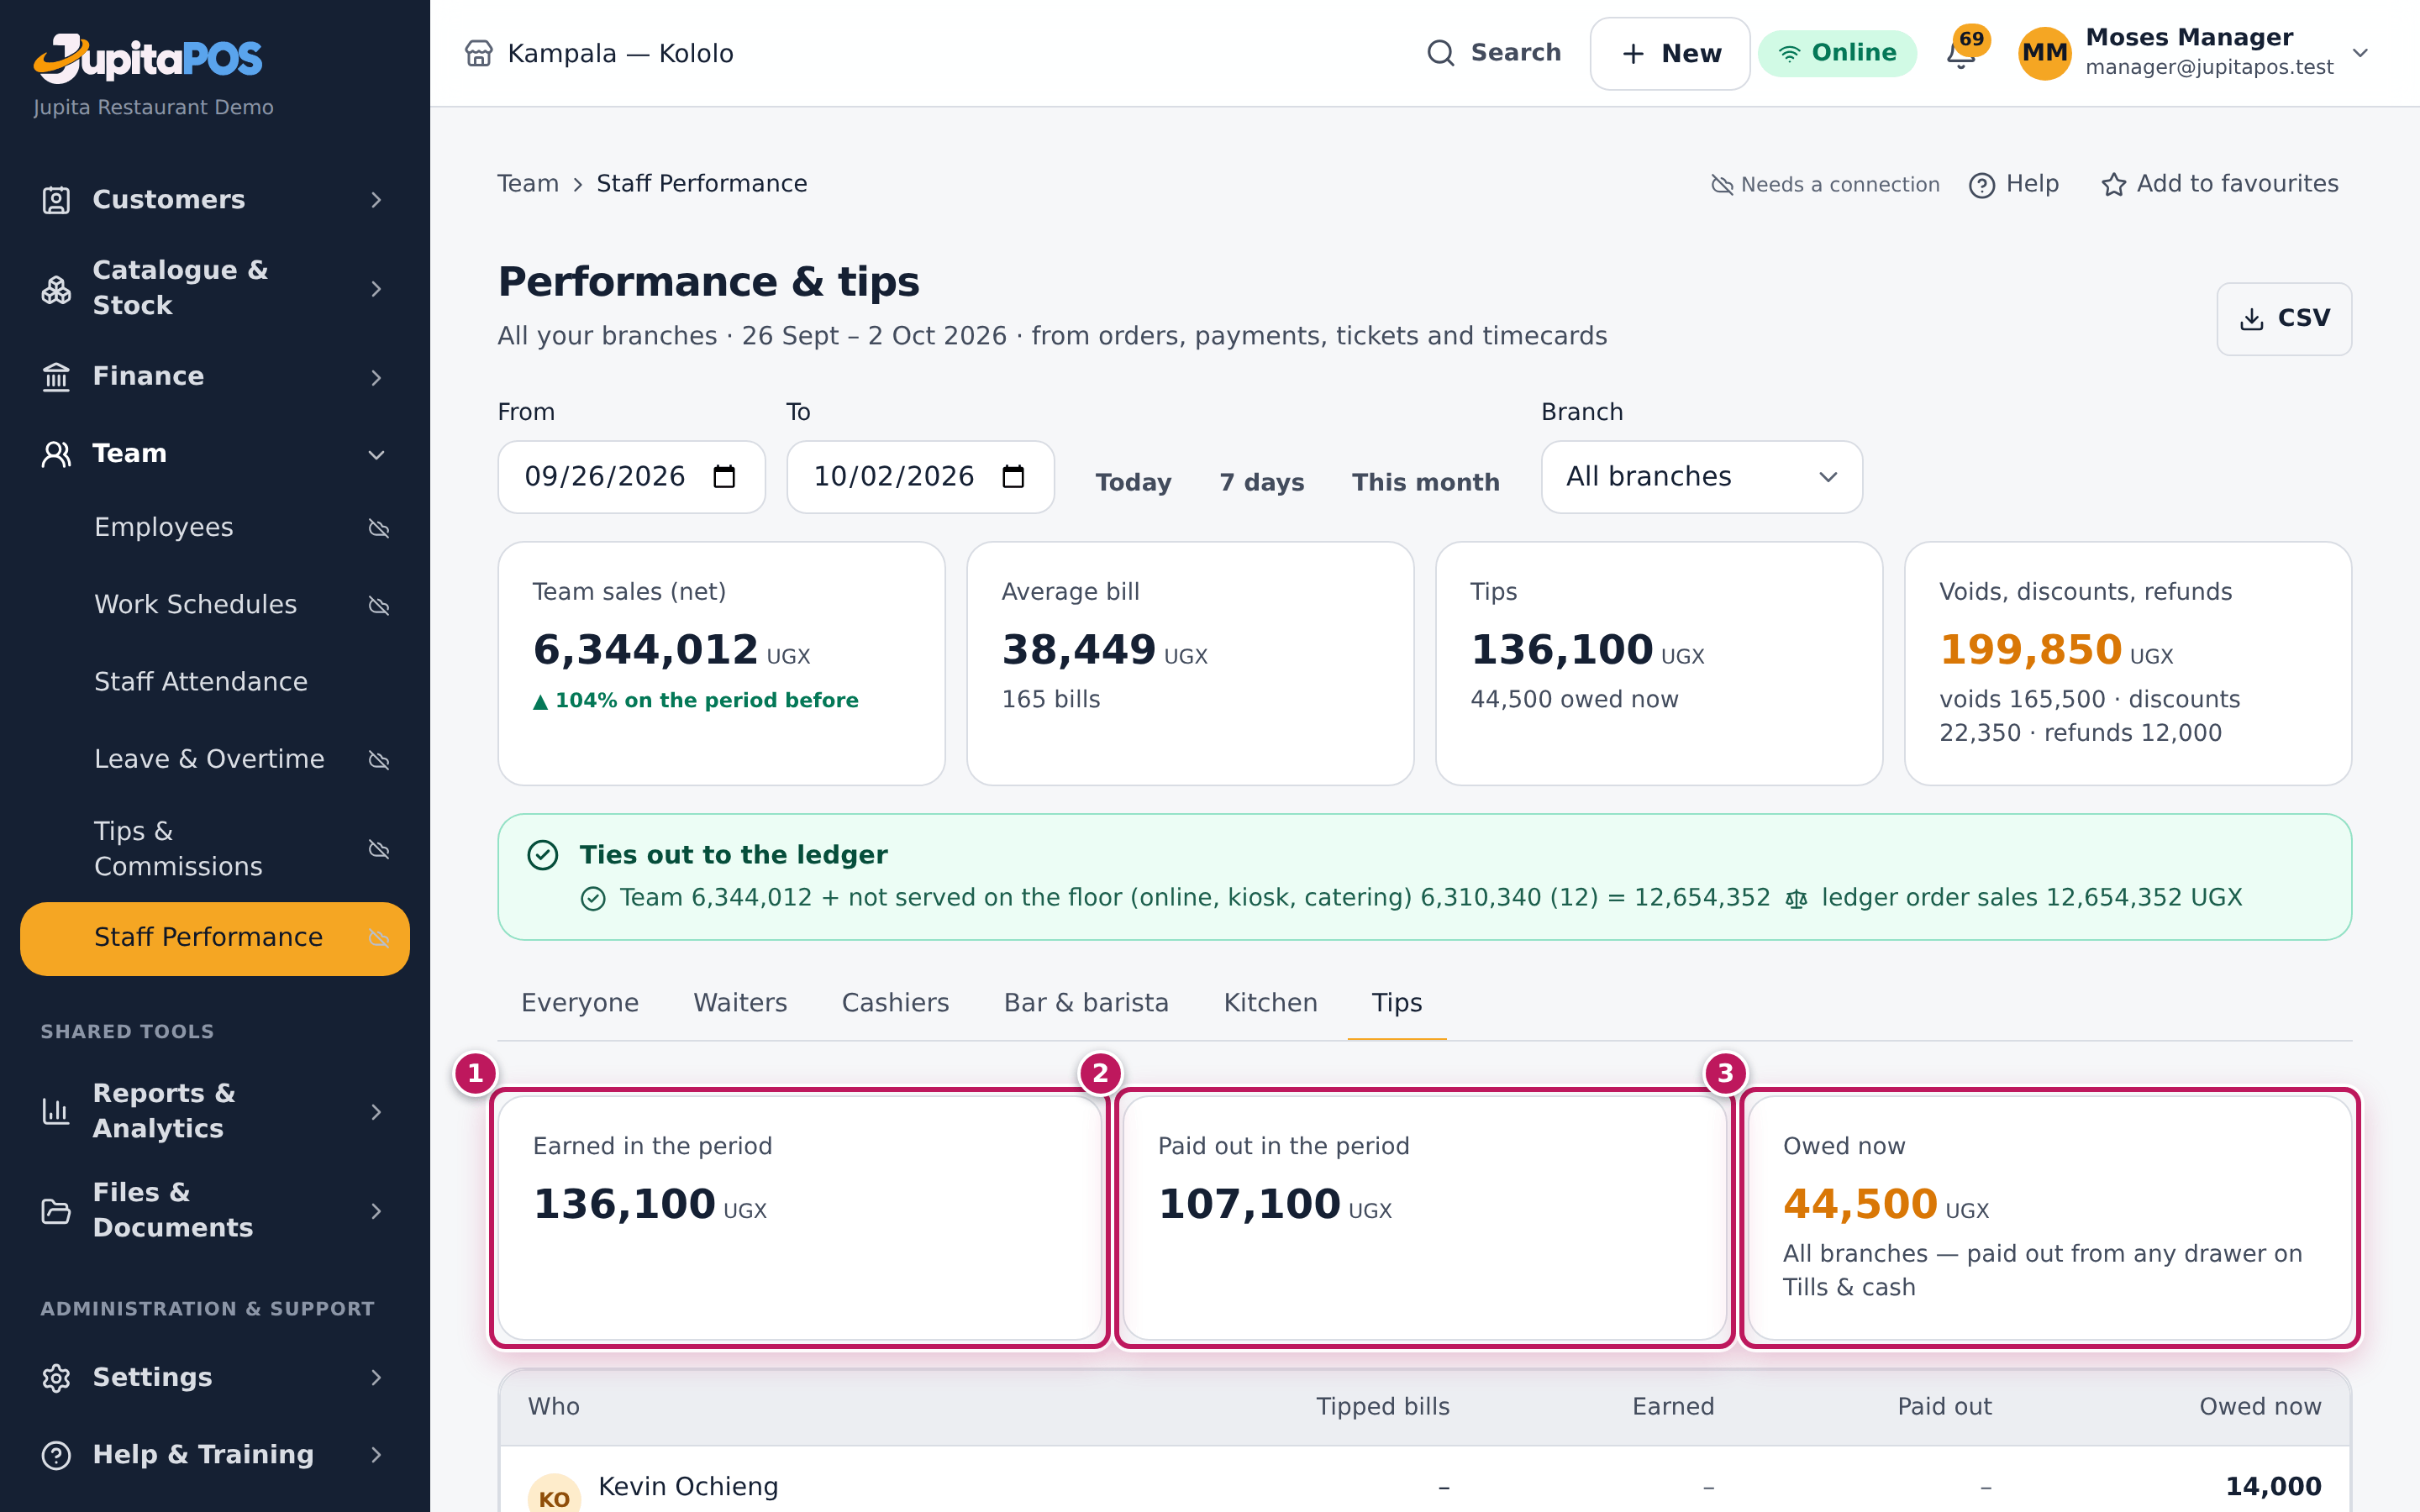
- On Tips, read what was Earned in the period (1), Paid out in the period (2) and what is Owed now (3) to each person.
Expected result
For the last 7 days you see each waiter’s net sales, bills, covers, average bill, discounts, voids, tips and sales per hour worked. The CSV ends with the totals and the tie-out: the sales not served on the floor, the ledger’s order sales, the date compared from when the books start, and any invoiced amounts that explain a difference. Tips owed are paid out from a drawer on Tills & cash with Pay out tips, never more than the person is owed.
Screenshot
Common mistakes
- Taking refunds off a waiter’s sales. Refunds are counted against who asked for and who approved them, not the waiter, so a waiter’s day never changes when a refund is paid later.
- Paying tips in cash from the safe. Pay them from a drawer with Pay out tips, so the books and the tips owed agree.
Troubleshooting
- “Does not tie out to the ledger yet”. When it says sales are still to post, refresh in a minute. When it says nothing is waiting to post, compare the sale entries of those days in the general ledger (see Look up an account).
- Someone has no figures. Figures follow the login: a person without a login is only in attendance.
FAQ
Who gets a ticket’s credit? Whoever bumped it ready. A discount goes to whoever applied it; a void of a sent line counts at its value before the void.
Can staff see their own figures? Yes: My figures on My time & leave, with the tips owed to them.
Connect a fingerprint or card clock
Purpose
Let staff clock in on a fingerprint, face or card clock at the staff entrance, with the punches arriving in JupitaPos by themselves.
Role / permission required
Administrator or owner: attendance.devices.
Prerequisites
- The device is on the venue’s internet and you know its serial number.
- Each person is enrolled on the device under their badge number (see Add an employee).
Steps
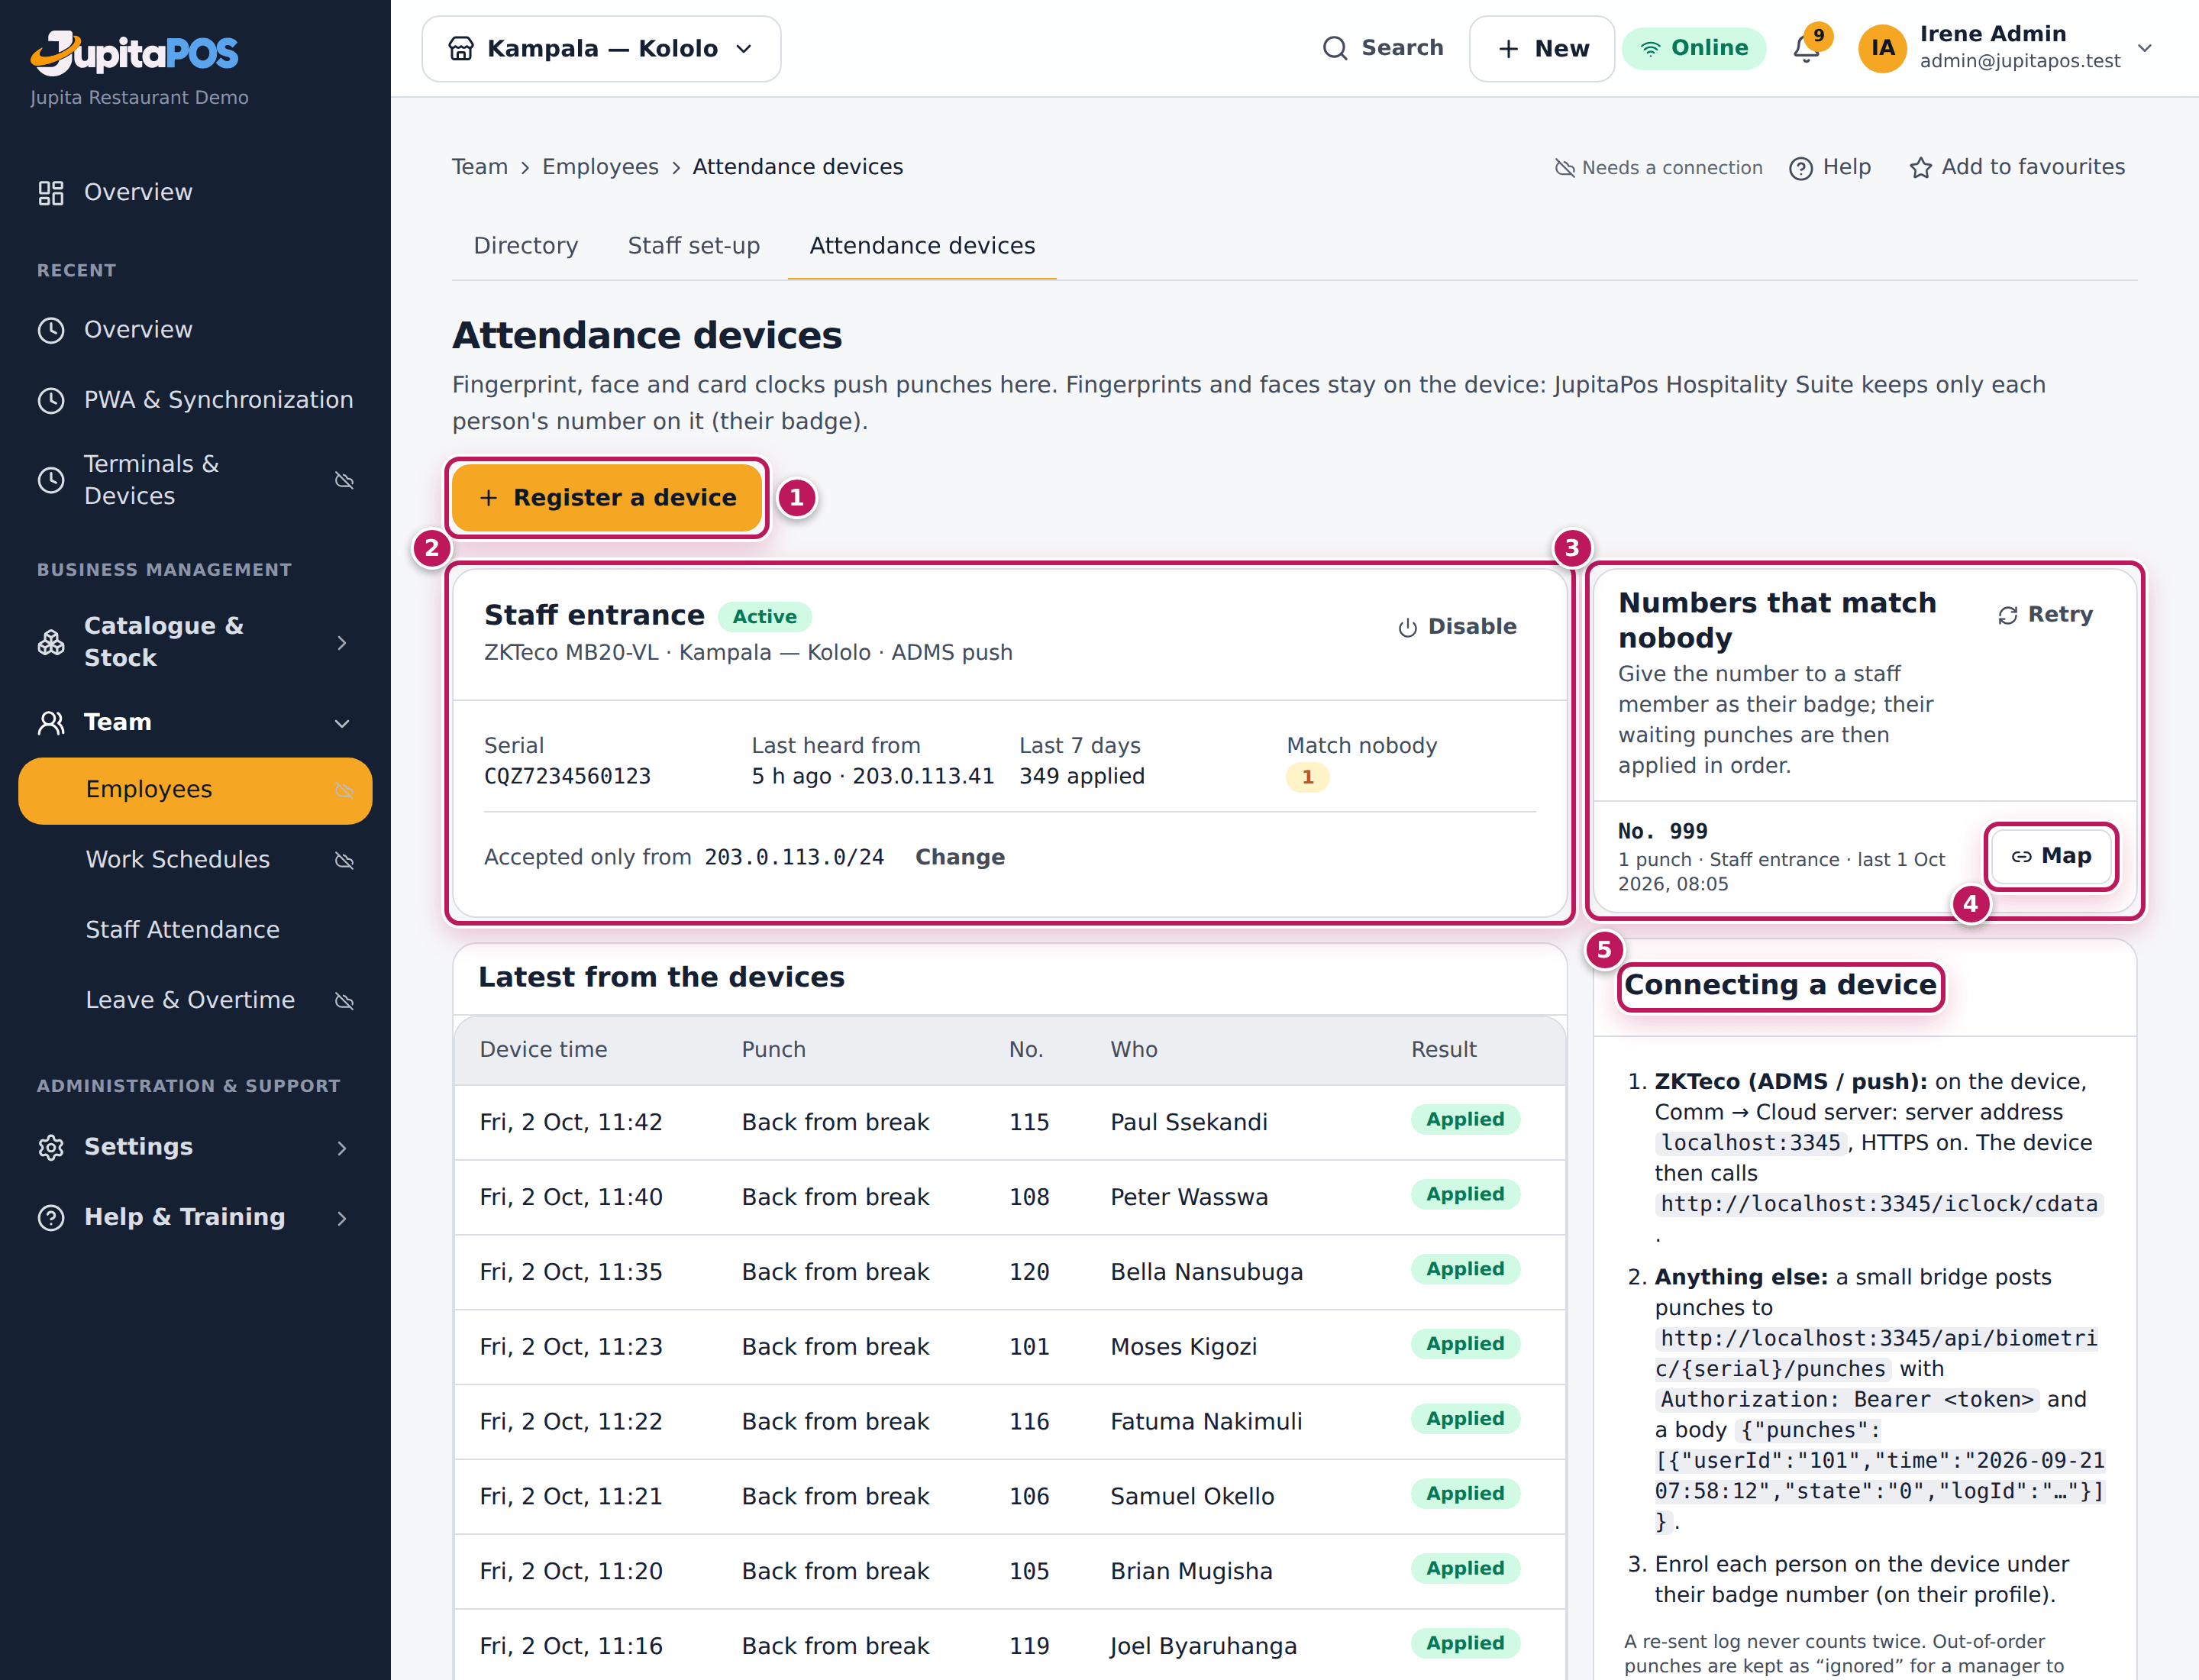
- Open Attendance devices (
/staff/devices). Each registered device (2) shows its serial, when it was last heard from and its punches. - Click Register a device (1).
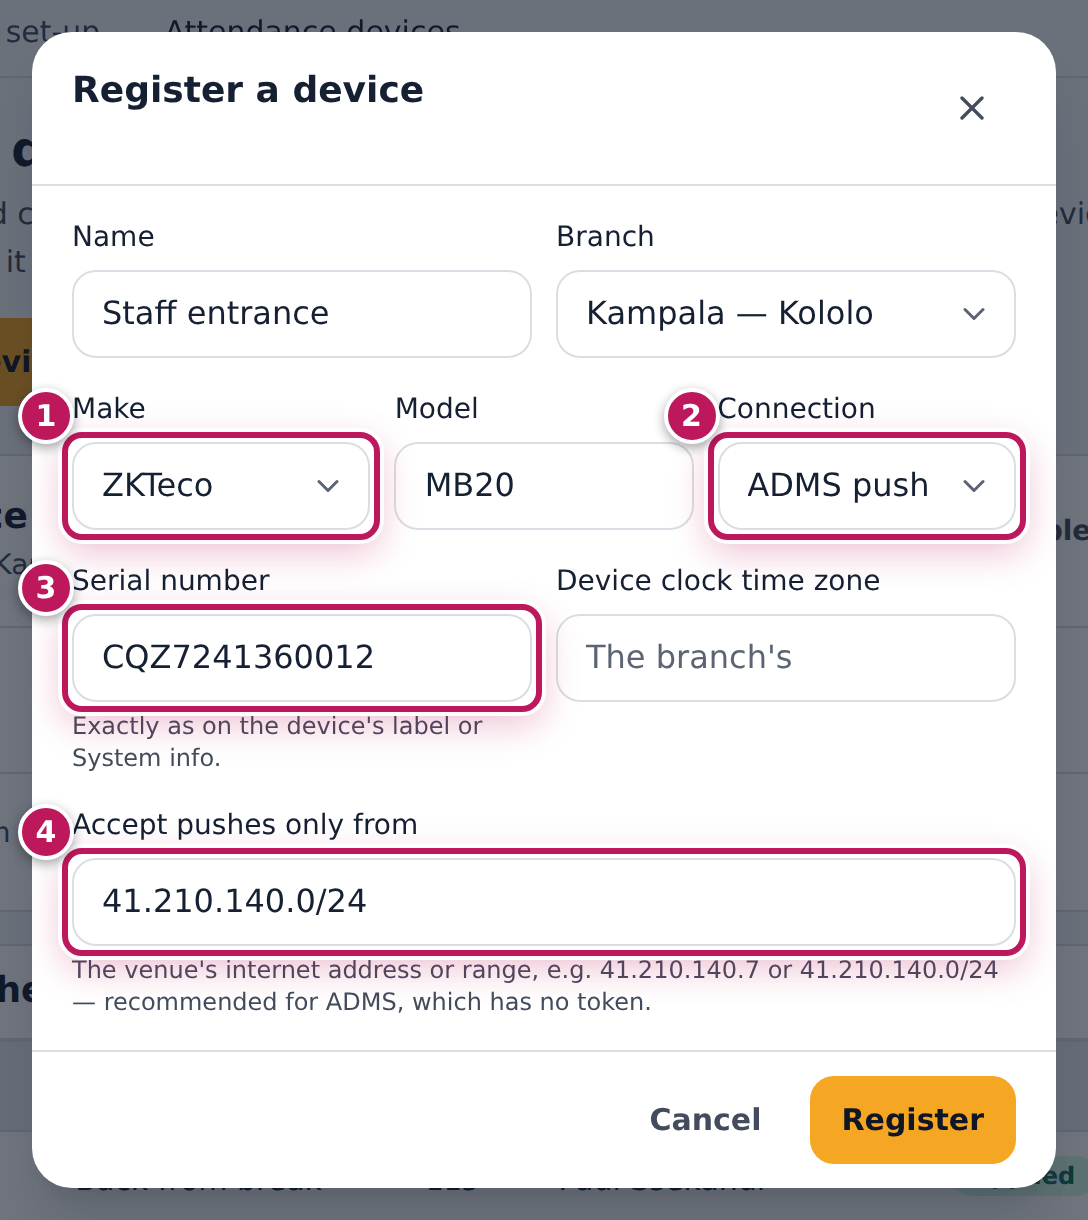
- Type the Name (Staff entrance) and choose the Branch.
- Choose the Make (1) and type the Model.
- Choose the Connection (2): ZKTeco and compatible clocks use ADMS push; others post JSON with a token.
- Type the Serial number (3) exactly as on the device’s label.
- Type the venue’s internet address in Accept pushes only from (4).
- Click Register. A JSON device shows its token once: copy it into the device.
- On a ZKTeco clock, open Comm → Cloud server and enter this server’s address with HTTPS on.
- When Numbers that match nobody (3 in the first picture) lists a number, click Map (4), choose the Staff member and click Map and apply: their waiting punches are applied in order.
Expected result
The device is listed with Last heard from a moment after it connects, and its punches appear in Attendance. Connecting a device (5) repeats these steps on the page.
Screenshot
Common mistakes
- Leaving Accept pushes only from empty for ADMS. An ADMS device is known only by its serial number, so it is heard only once the network is set — until then everything it sends is refused.
- Enrolling people under a different number. The device’s number must be the badge number on their profile.
Troubleshooting
- The device is never heard from. Check the server address and HTTPS on the device, the serial number, and the network in Accept pushes only from.
- The token leaked. Click New token on the device’s card; the old one stops working.
- A device is lost or replaced. Click Disable on its card.
FAQ
Are fingerprints stored in JupitaPos? No. Fingerprints and faces never leave the device; JupitaPos keeps only the badge number.