

On this page
Your customers can pay with mobile money to your business’s merchant code — MTN MoMo Pay, Airtel Money or FlexiPay — at every till: the restaurant or hotel POS, the shop and pharmacy tills (also when offline), and on the road, for vehicle sales and collections.
The customer pays from their own phone. The cashier tells them the merchant code, then types the Transaction ID from the payment message. Each transaction ID is accepted once in your business — at any till, on any network — so the same payment message cannot pay for two sales.
By default the sale completes at once and the payment waits in Mobile money to verify, where someone other than the cashier checks it against the network’s merchant statement. You can choose instead to hold the goods until the payment is verified.
The money goes to your own merchant account. JupitaPOS never takes, splits or deducts anything from it; your JupitaPOS subscription is paid separately, in the Client Area.
| Page | Where | What it is for |
|---|---|---|
| Merchant codes | Settings → Merchant codes | your codes, and whether goods wait until a payment is verified |
| Mobile money to verify | Finance → Mobile money to verify | every payment to your codes, to check against the statement |
| Payment providers | Settings → Payment providers | your own MTN MoMo and Airtel Money keys, for the prompt on the buyer’s phone |
There is a second way to take mobile money: the prompt. The cashier types the buyer’s number, MTN MoMo or Airtel Money shows a prompt on the buyer’s phone, the buyer approves it with their PIN, and the sale is paid when the network confirms it — nothing to verify by hand.
Pictures are from a practice pharmacy with made-up data: the codes and transaction IDs are not real.
Set up your merchant codes
Purpose
Show the right code at every till, so customers pay into your merchant account.
Role / permission required
payments.methods.manage — the Owner.
Prerequisites
Your merchant code from MTN MoMo Pay, Airtel Money or FlexiPay (on your merchant account’s welcome message or statement).
Steps
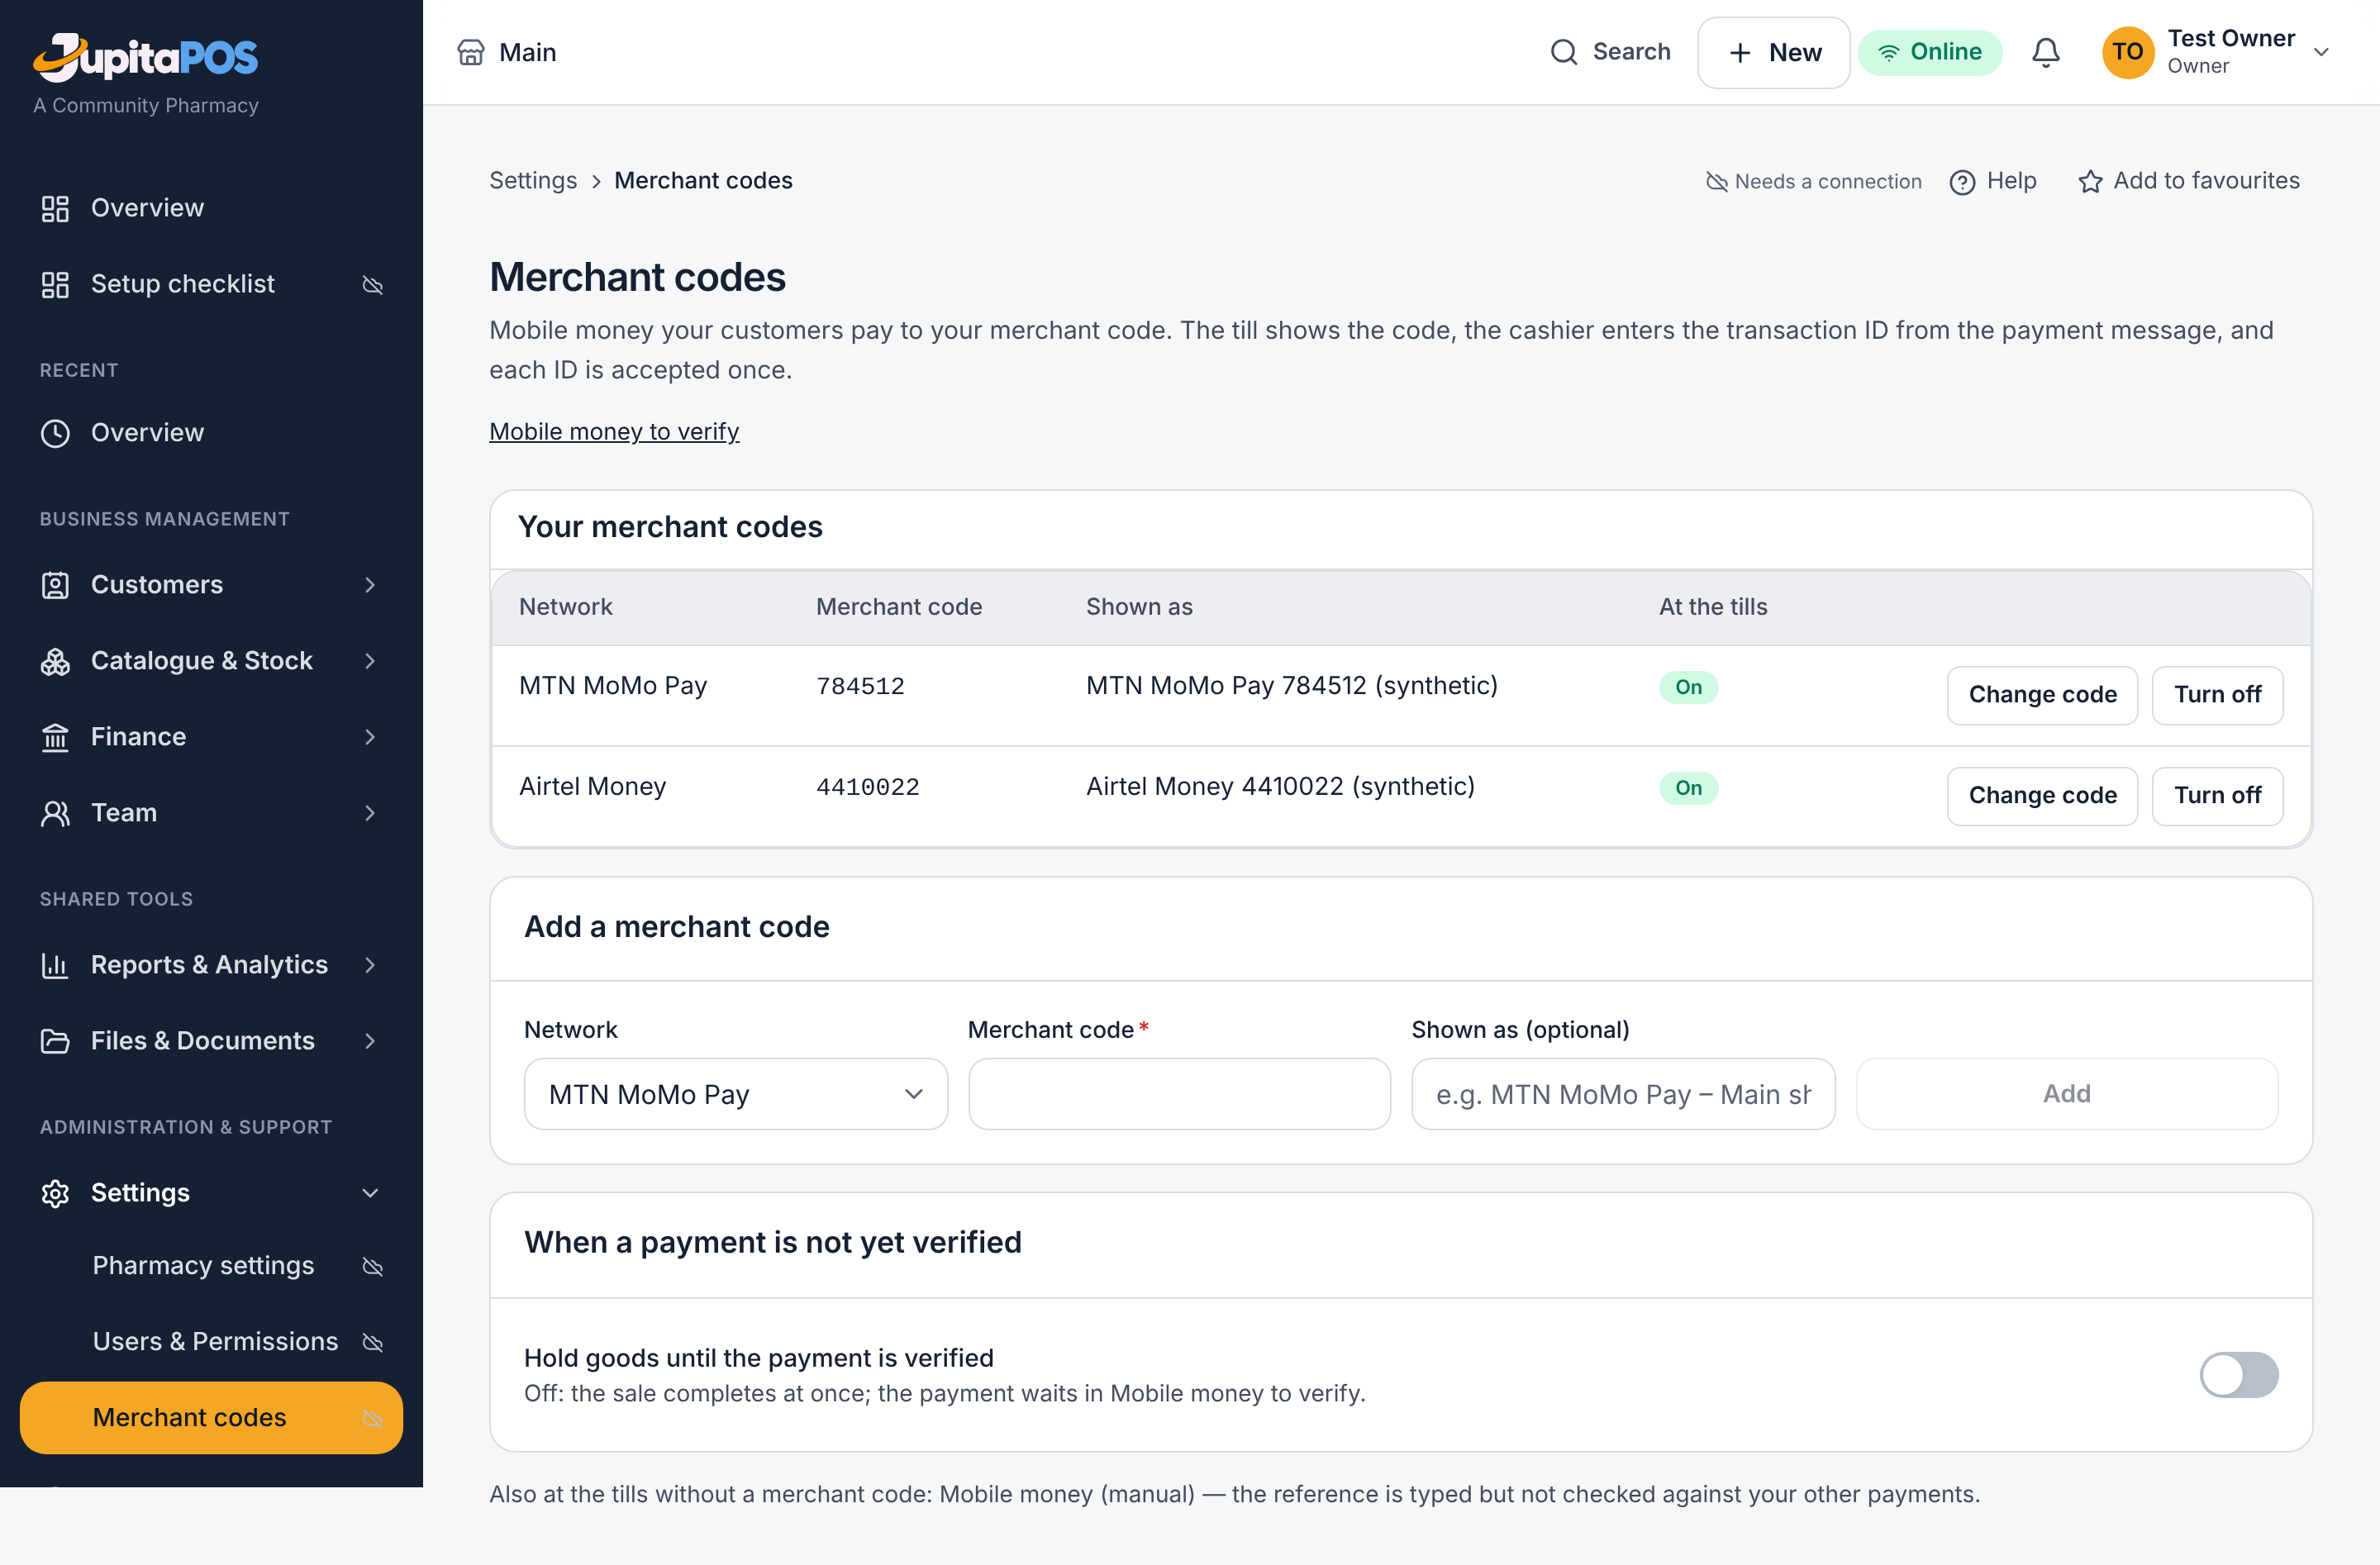
- Open Settings → Merchant codes.
- Under Add a merchant code, choose the Network and type the Merchant code. Optionally type how the tills show it in Shown as (optional).
- Press Add. Add one for each network you use.
- To change a code later, press Change code; to stop offering one, press Turn off.
- Choose whether to Hold goods until the payment is verified. It is off at first: sales complete at once.
Expected result
The code is listed with On under At the tills. Every till shows it as a payment button, and the till tells the cashier the code to give the customer.
Screenshot
Common mistakes
- Adding the same code twice: refused — it is already set up.
- Changing the network of a code: add a new merchant code for the other network instead (past payments keep the network they were made on).
Troubleshooting
The till does not show the code: check it is On, and that the cashier’s screen has been reloaded since it was added.
Take a payment to your merchant code
Purpose
Record a customer’s mobile money payment against the sale, with its transaction ID.
Role / permission required
payments.take — cashiers, waiters, pharmacists and agents who take
payments.
Prerequisites
A merchant code is set up. The customer has their phone.
Steps
- Ring up the sale and press Pay (on the road: the sale form’s mobile money box).
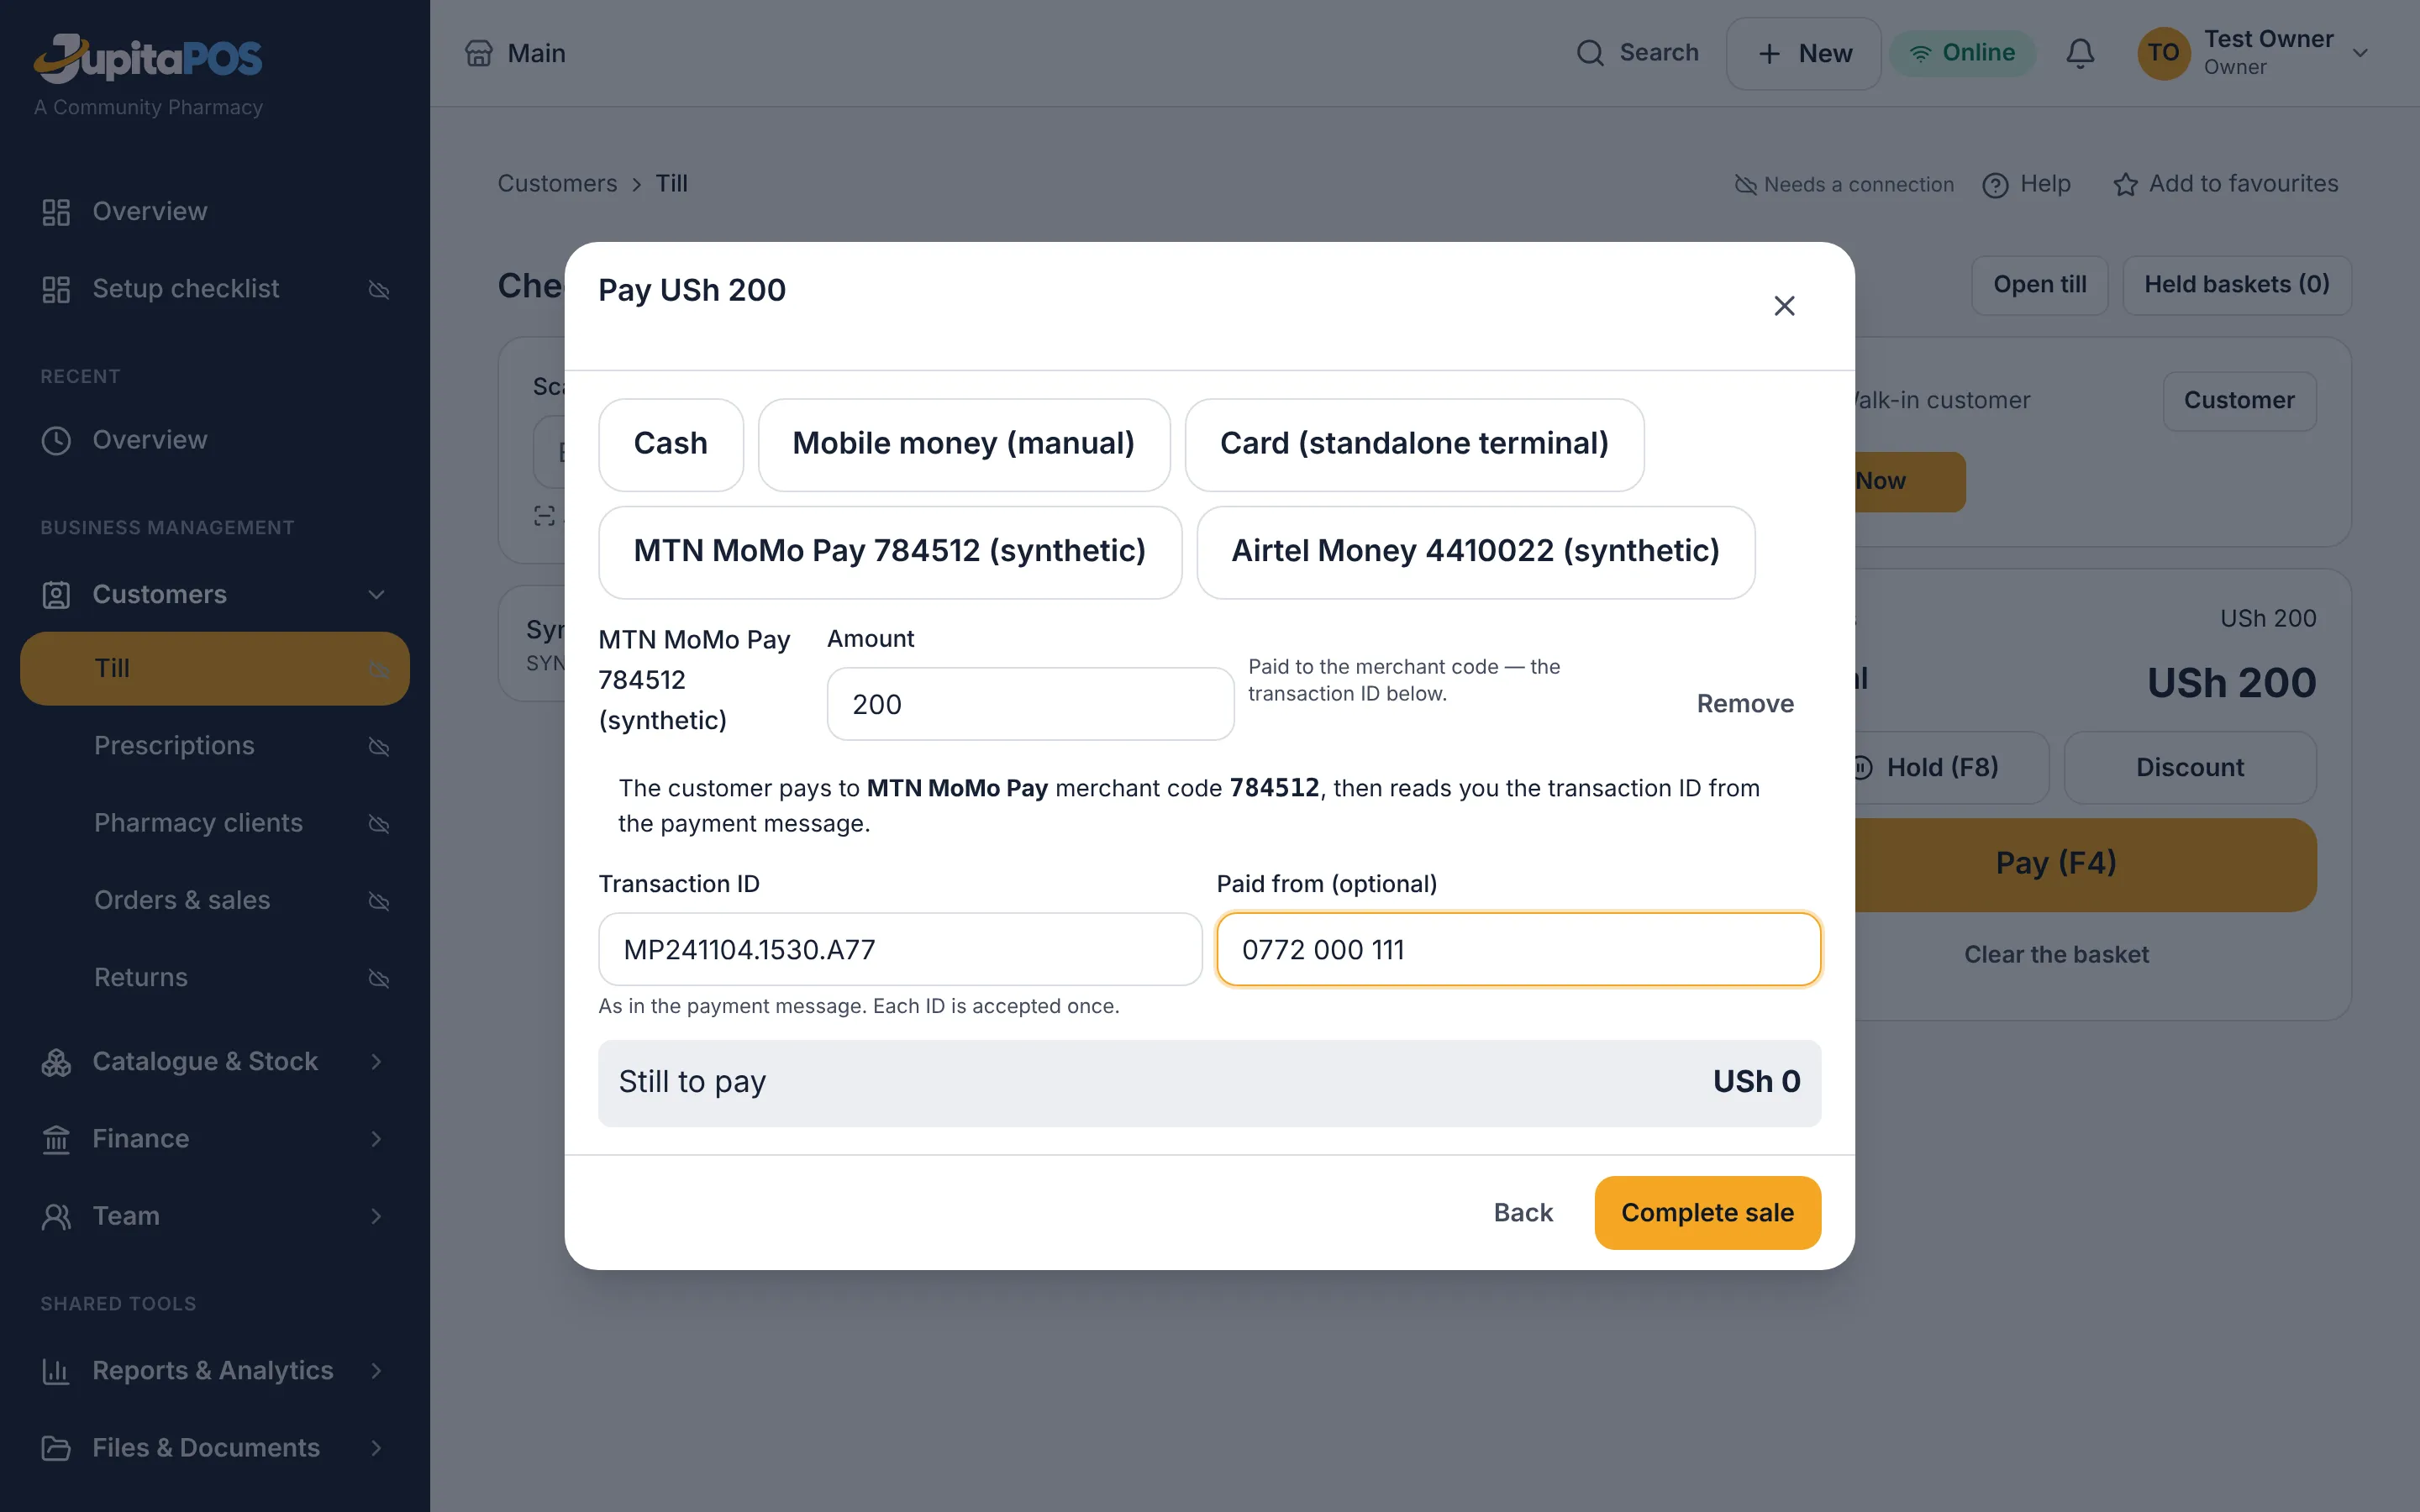
- Press the merchant-code button, e.g. MTN MoMo Pay 784512.
- Tell the customer the merchant code shown on the screen. They pay it from their phone and receive a payment message.
- Type the Transaction ID from the message exactly as it is, and, if you like, the number they paid from in Paid from (optional).
- Complete the sale as usual.
Expected result
The sale completes (or, when goods are held, waits for the check). The receipt shows the merchant code and the transaction ID. The payment appears in Mobile money to verify.
Screenshot
Common mistakes
- Transaction ID … was already used: that payment message has paid for another sale already (the message names which). Ask the customer for the message of this payment.
- Typing the customer’s phone number as the transaction ID: the ID is in the payment message, usually letters and digits.
Troubleshooting
On an offline till the ID cannot be checked until the till is back online. If it was used already, the sale goes to the offline review instead of being recorded twice.
Check payments against the statement
Purpose
Confirm that each payment really reached your merchant account — or flag the ones that did not.
Role / permission required
payments.verify — the Owner, managers, the Pharmacist, the route
manager and accountants. Never the cashier who took that payment.
Prerequisites
Your merchant statement (in the network’s merchant app or portal) for the same days.
Steps
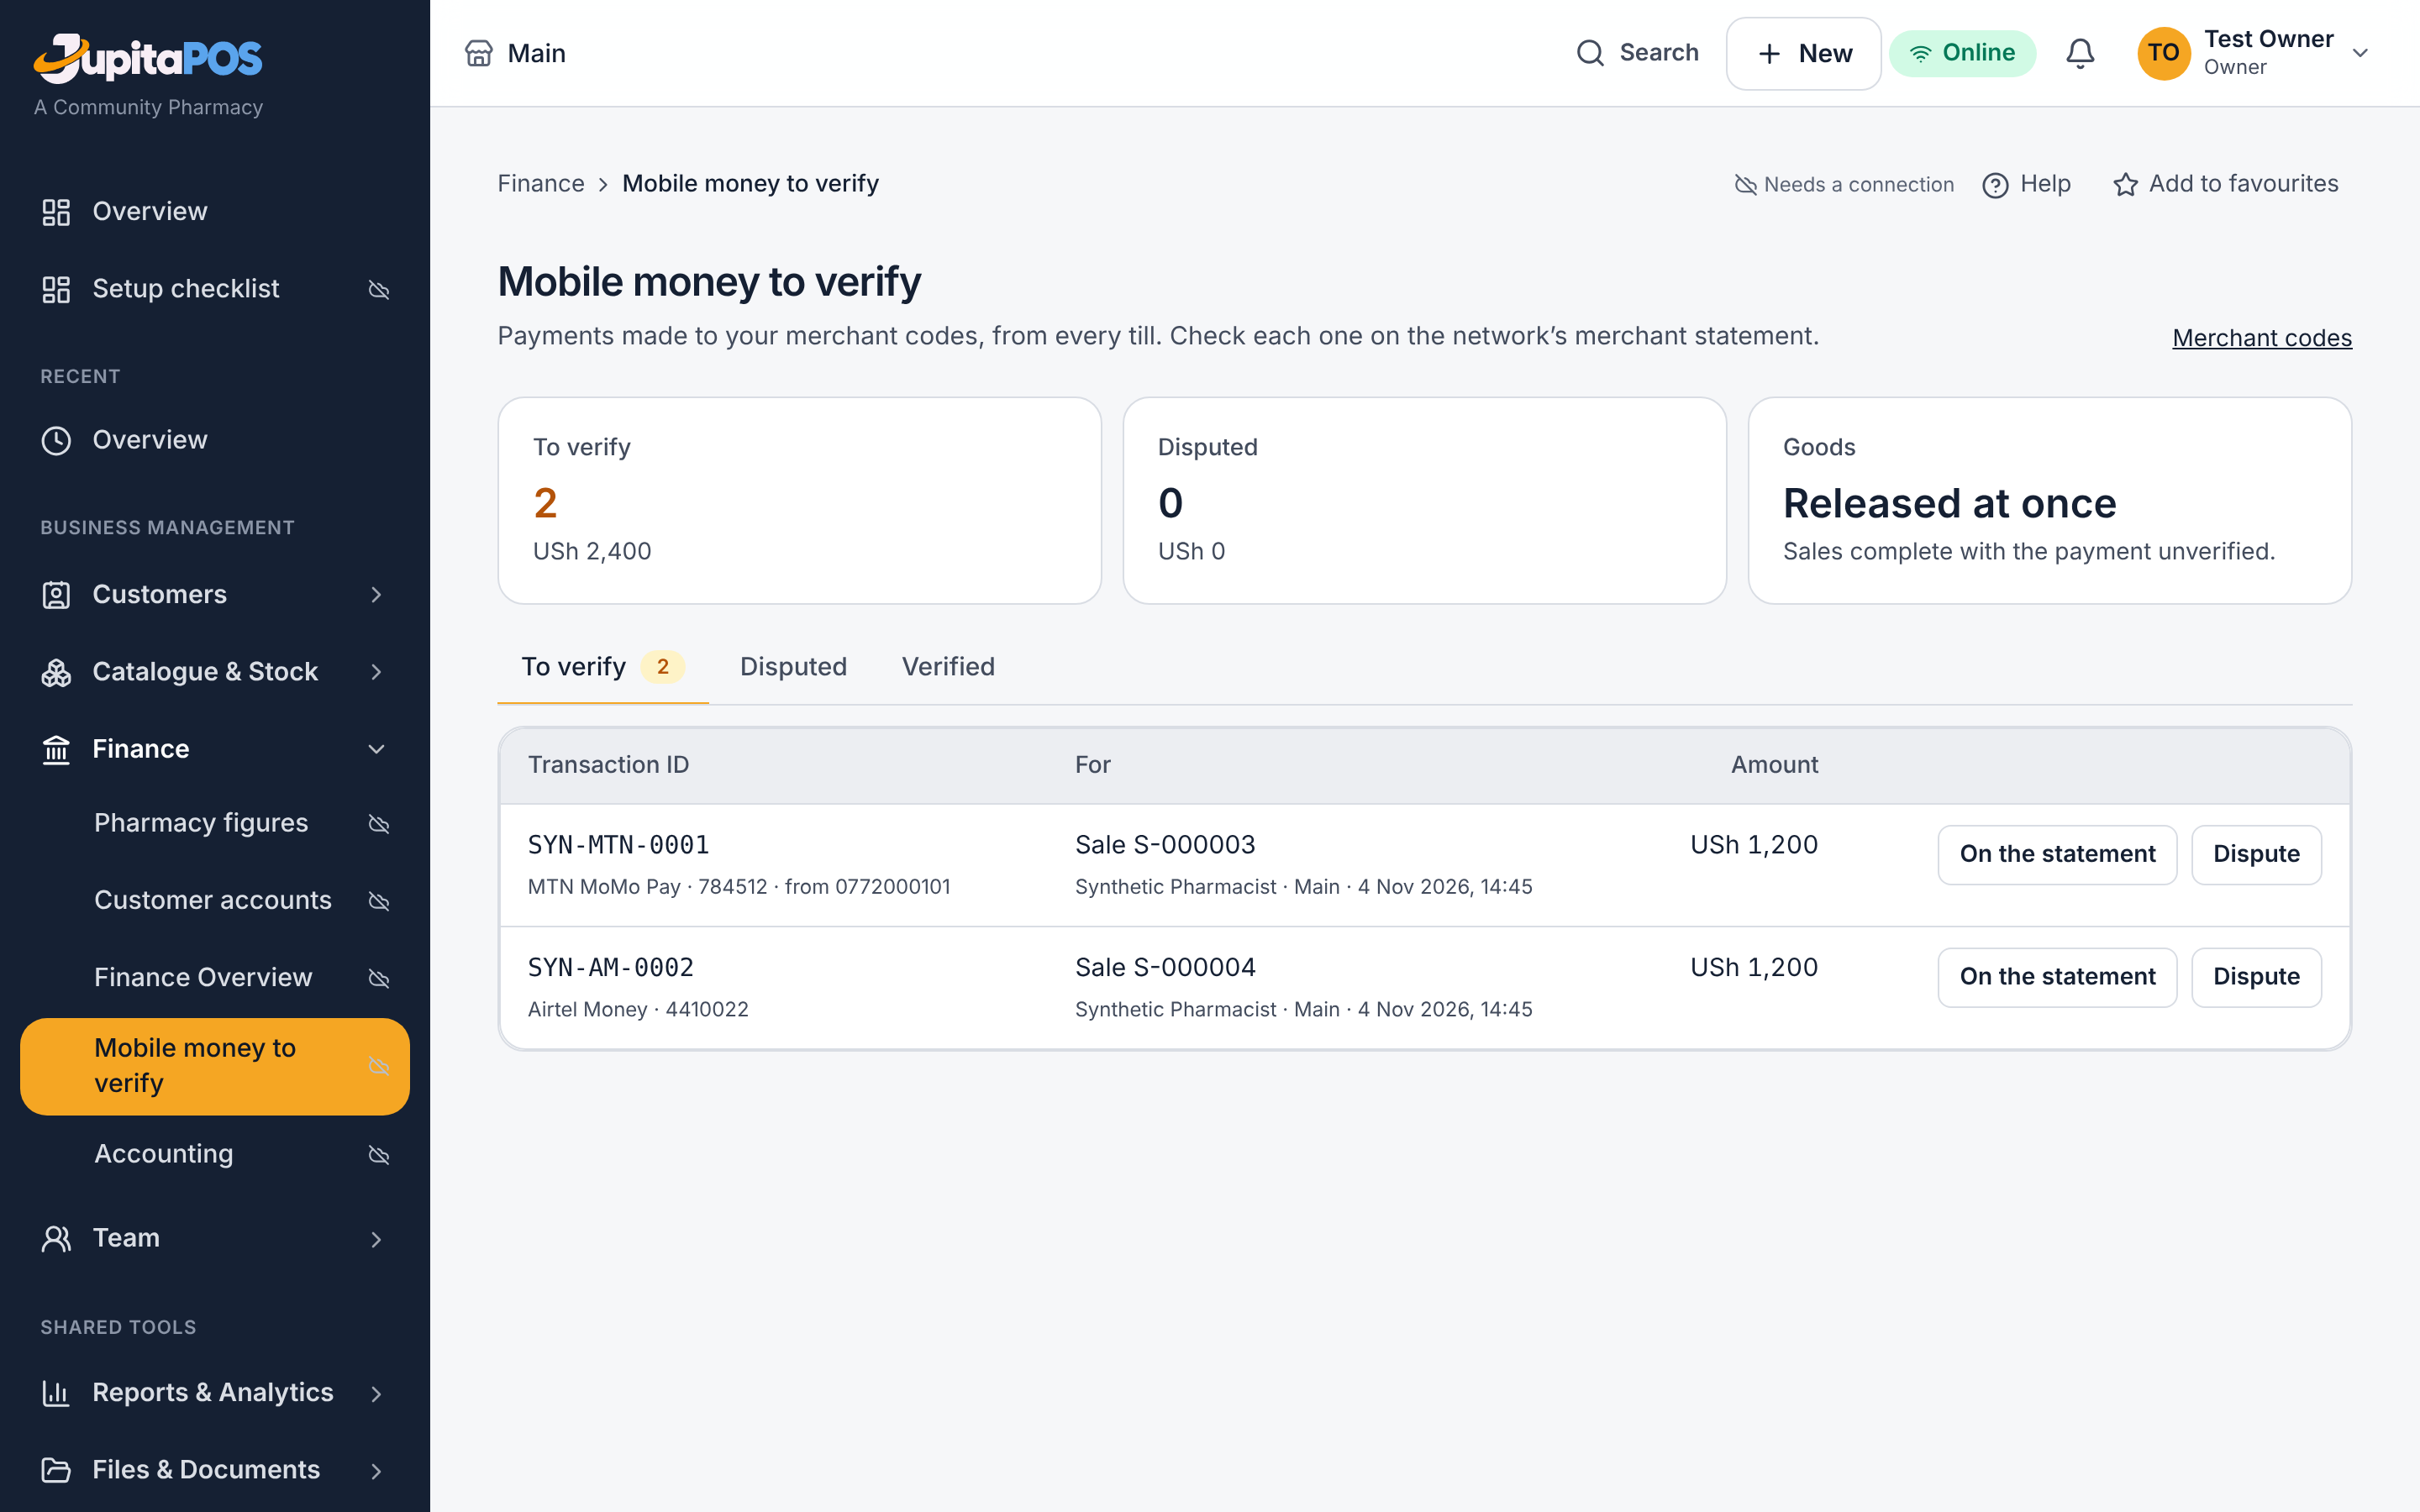
- Open Finance → Mobile money to verify. The To verify tab lists every payment, oldest first, with its network, merchant code, transaction ID, amount, who took it and when.
- Find each one on the statement. When it is there with the same amount, press On the statement.
- When it is not, press Dispute, say in What does not match what is wrong, and press Dispute.
- The Disputed and Verified tabs keep who decided and when.
Expected result
A verified payment leaves the list. When goods were held, verifying supplies them at once.
Screenshot
Common mistakes
- Checking a payment you took yourself: the page says someone else checks it — another manager does.
- Disputing without a reason: a reason is required.
Troubleshooting
A disputed payment on a completed sale: follow it up with the customer — the sale is flagged. On a held sale the goods stay held and the sale still owes the amount; take another payment or cancel the order.
Set up the prompt with your MTN or Airtel keys
Purpose
Let the tills send a payment prompt to the buyer’s phone, paid into your own collection account.
Role / permission required
payments.methods.manage — the Owner.
Prerequisites
Your API keys from the network: for MTN MoMo, a MoMo Developer (sandbox) or MTN partner (live) Collections subscription; for Airtel Money, an Airtel developer app with its client ID and secret.
Steps
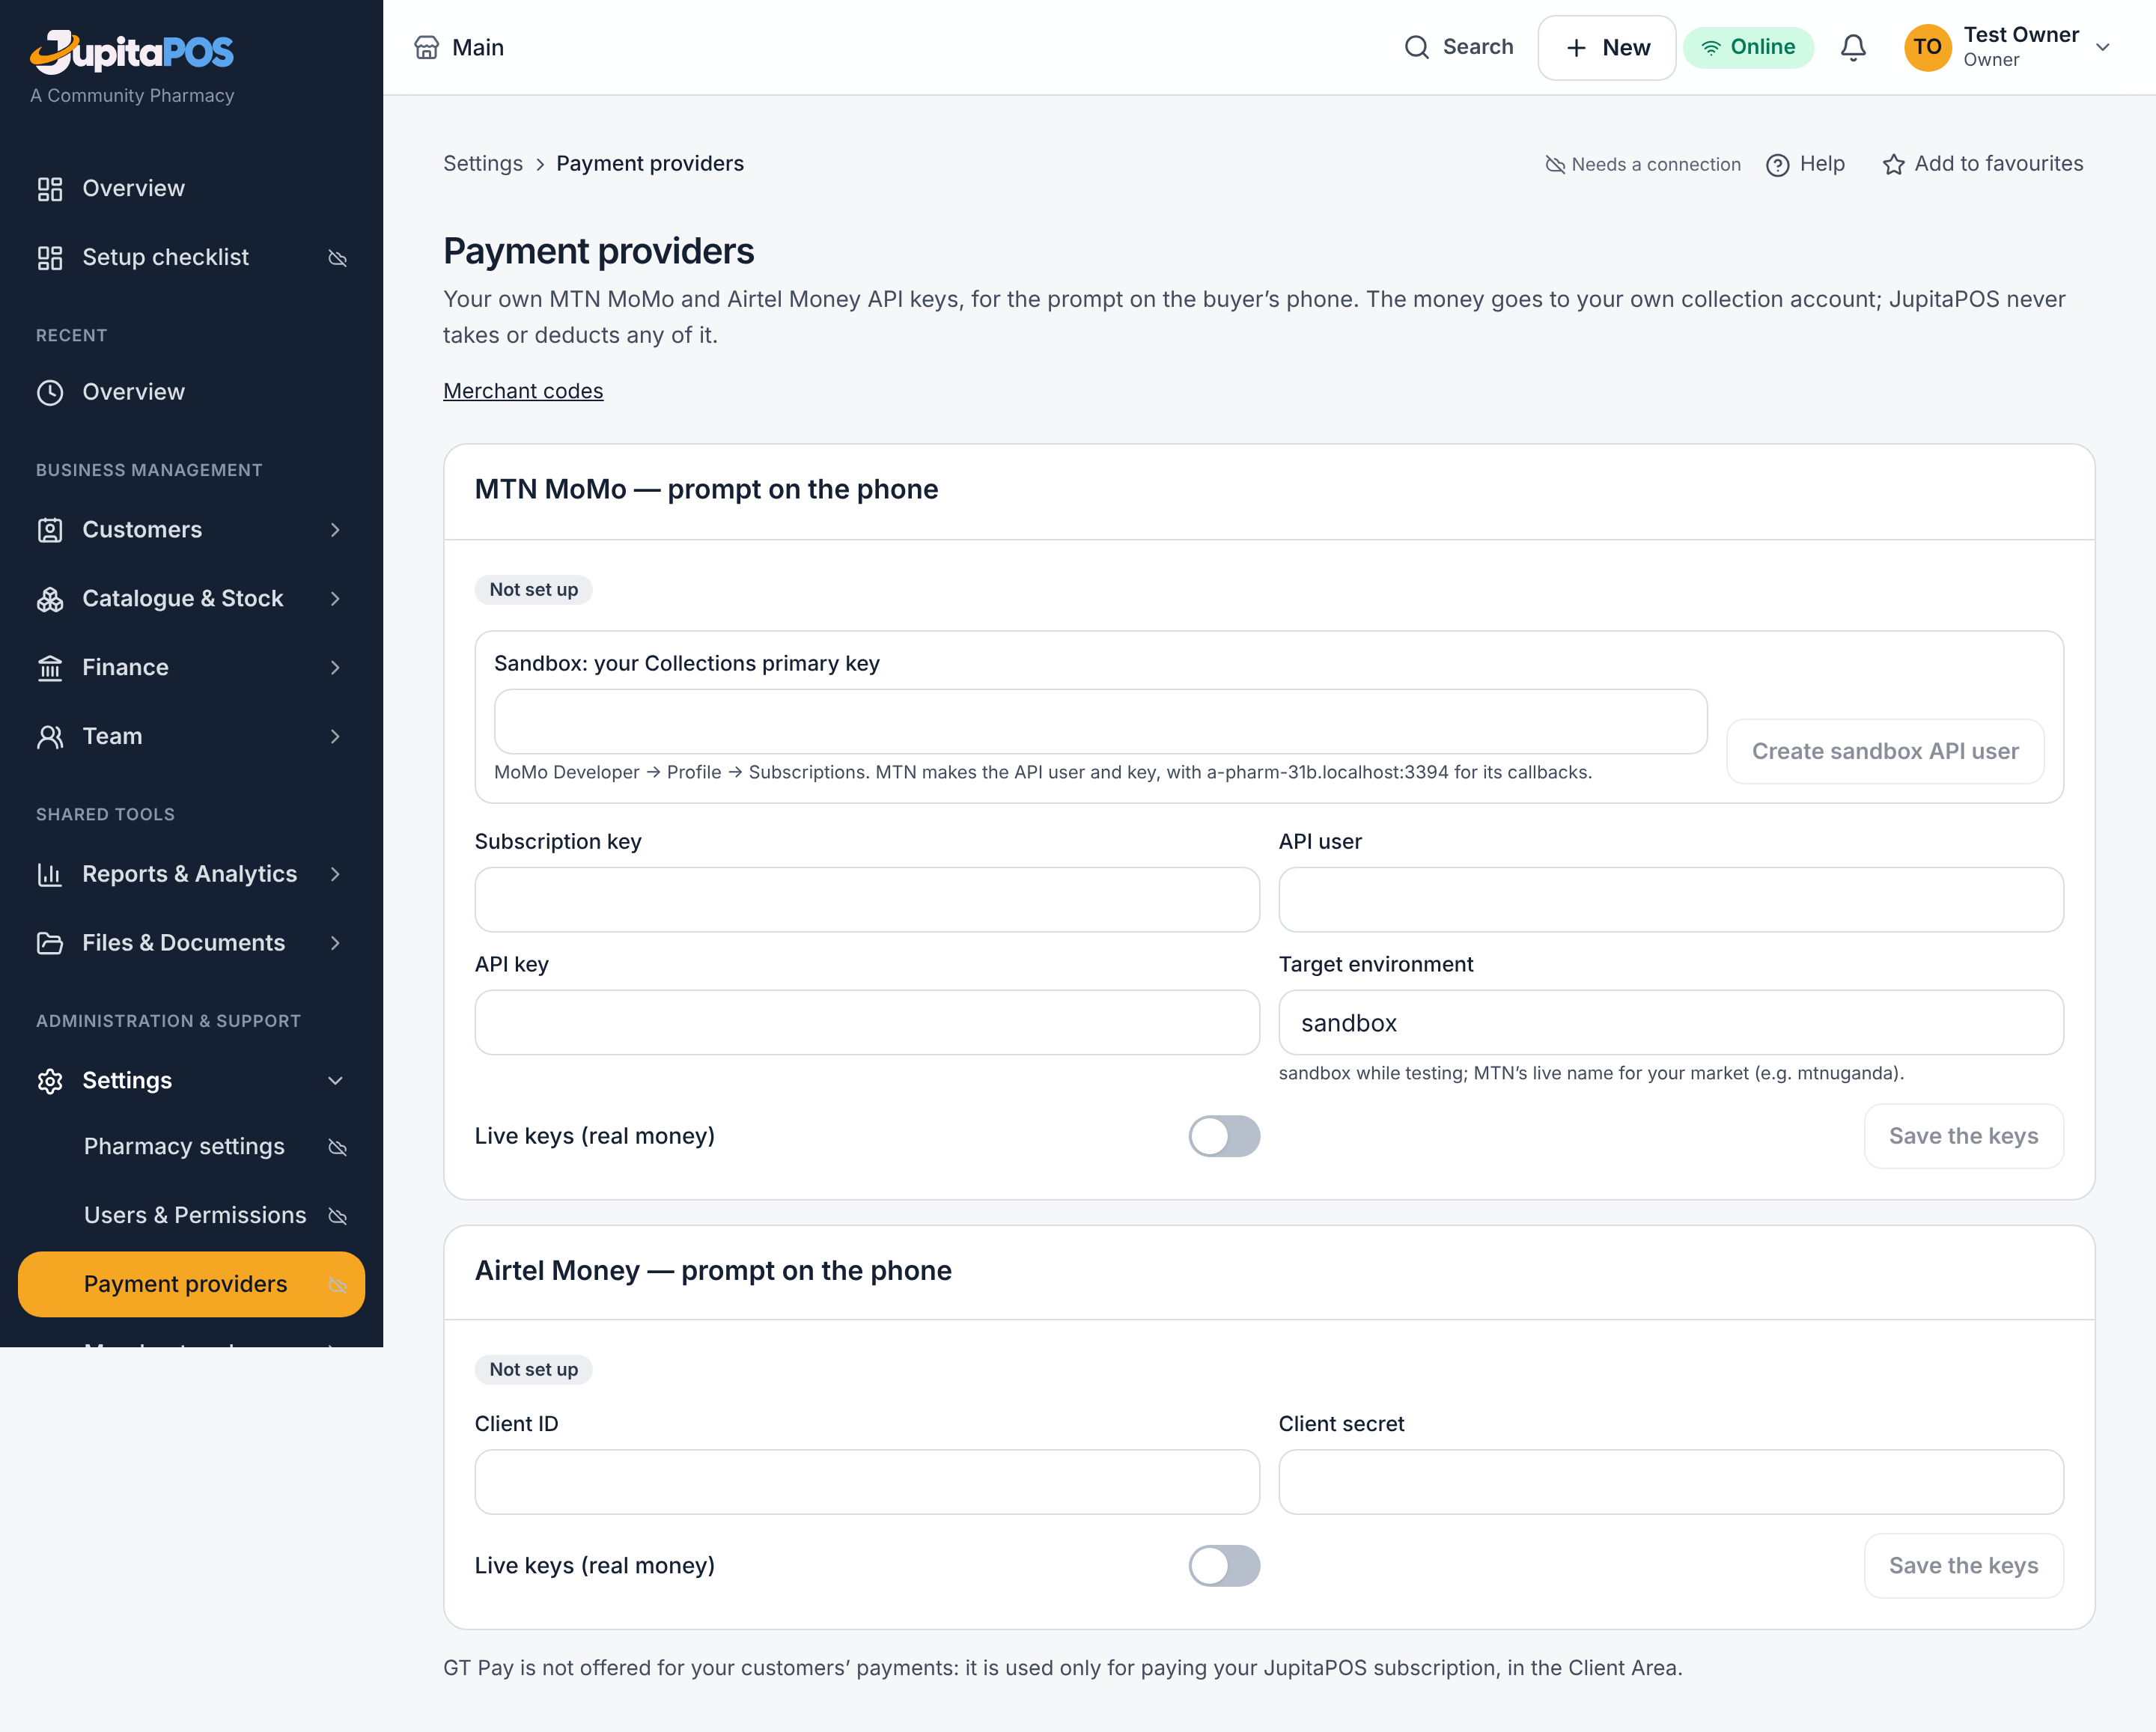
- Open Settings → Payment providers.
- MTN, while testing: paste your Collections primary key and press Create sandbox API user — MTN makes the API user and key for your address.
- MTN, live: enter the Subscription key, API user, API key and the Target environment MTN gave you, switch on Live keys (real money), and press Save the keys.
- Airtel: enter the Client ID and Client secret, choose live or test, and press Save the keys. Give Airtel the callback address the page shows.
- Press Test connection. Use Turn off at the tills to stop offering it.
Expected result
The provider shows Keys accepted. The keys are not shown again — to change them, enter new ones. The tills offer MTN MoMo (prompt on the phone) or Airtel Money (prompt on the phone).
Screenshot
Common mistakes
- Live keys with the target environment sandbox: refused — live keys name MTN’s live market.
- Pasting keys into a chat or an e-mail: enter them only on this page.
Troubleshooting
Keys refused: check that the subscription is for Collections and that the keys are for the environment chosen (sandbox or live).
Take a payment by prompt
Purpose
The buyer pays from their phone without typing a merchant code; the sale is paid when the network confirms it.
Role / permission required
payments.take — anyone who takes payments.
Prerequisites
The prompt is set up (above). The buyer has their phone with them.
Steps
- Ring up the sale and press Pay.
- Press MTN MoMo (prompt on the phone) or Airtel Money (prompt on the phone).
- Type the buyer’s number in Buyer’s number (the prompt goes here) in full with the country code, e.g. 256777111111, and press Send payment request.
- The buyer approves the prompt on their phone with their PIN.
Expected result
The sale waits for the network; when it confirms, the sale is paid and the goods are supplied. If the buyer declines, the payment fails and you take another one.
Screenshot
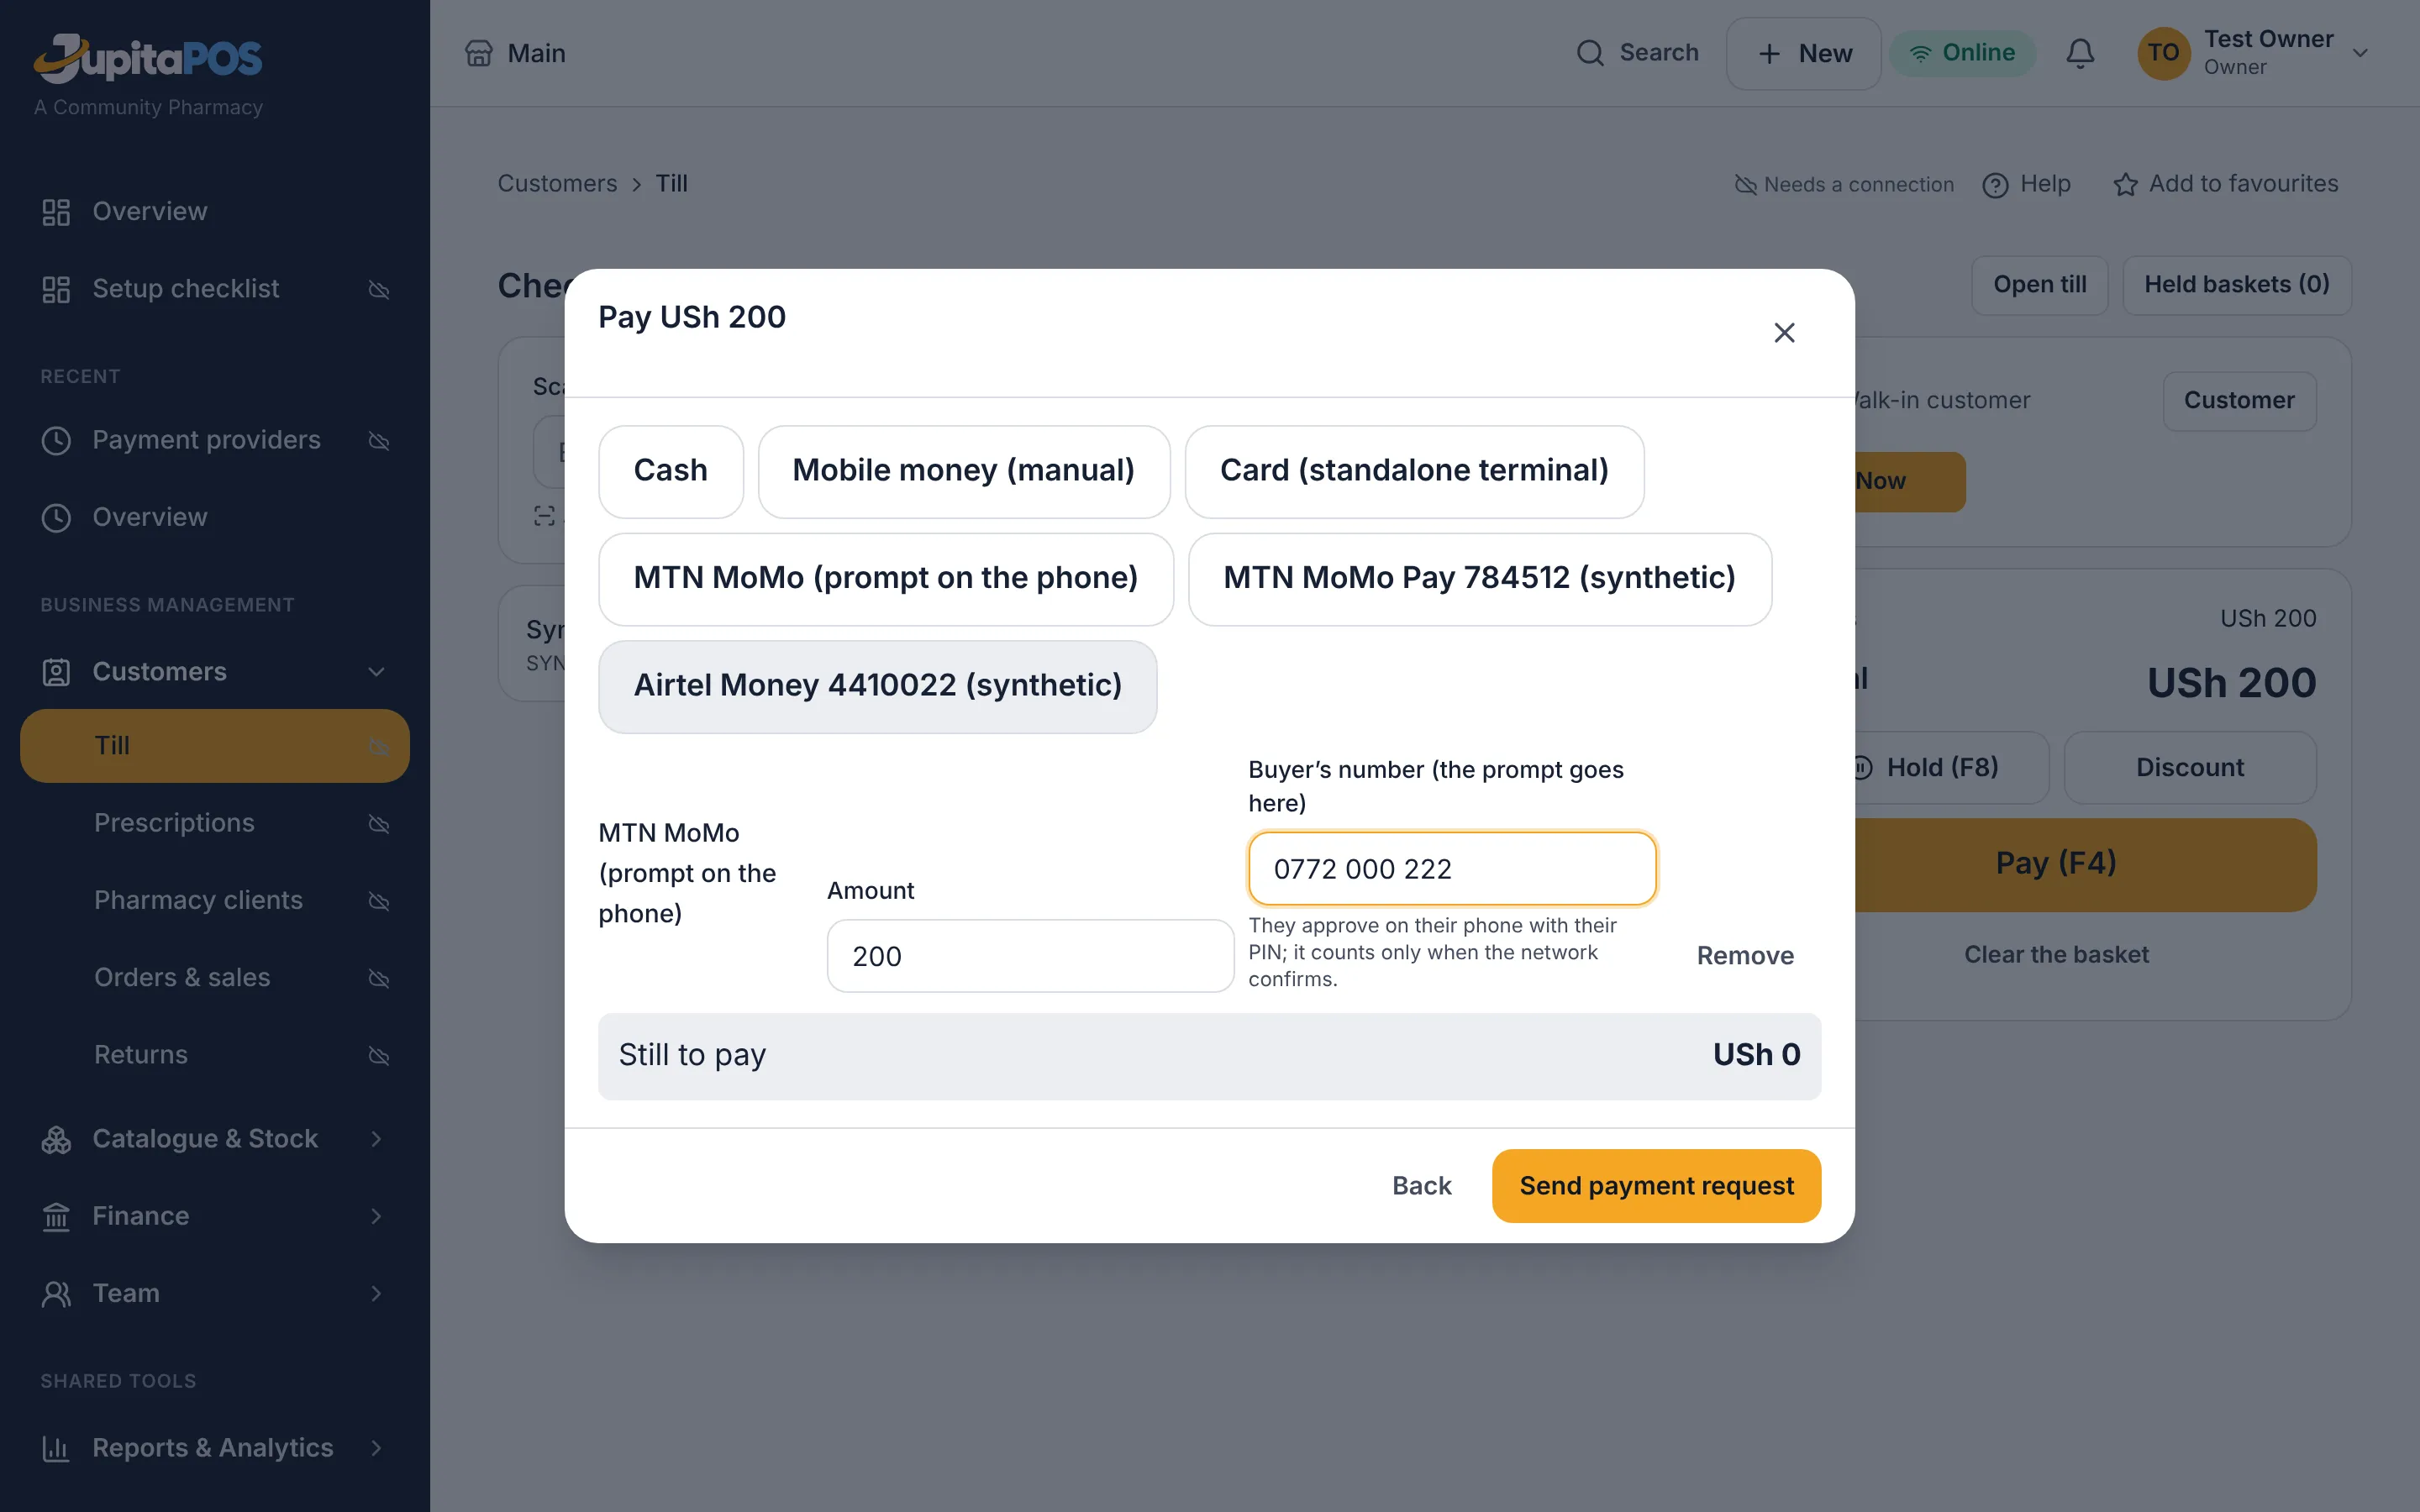
Common mistakes
- A wrong number: the prompt goes to someone else, who declines it — check the number with the buyer before completing.
- MTN’s test numbers while testing (sandbox): use an ordinary number such as 256772123456 — MTN’s published test number 46733123456 is currently refused by MTN’s sandbox (PAYEE_NOT_ALLOWED_TO_RECEIVE).
Deposits before arrival. At the front desk, Take a deposit offers the prompt too: choose MTN MoMo (prompt on the phone) or Airtel Money (prompt on the phone), type the guest’s number (e.g. 256777111111) and press Take. The deposit shows waiting for the guest to approve and is not held until MTN or Airtel confirms it; press Check its status if it does not update. Nobody can verify it by hand — the network’s answer decides; a decline shows the network’s reason.
Troubleshooting
No answer from the network: the payment stays waiting; press Check payment on the sale before charging again — it is never charged twice.
Switch deposits on or off
Purpose
Decide, product by product, where your business takes deposits — and switch them off where you do not need them.
Role / permission required
The Owner only (the page itself opens with payments.methods.manage).
A manager cannot change deposits, whatever their permissions.
Prerequisites
None.
Steps
- Open Settings → Deposits.
- Each product of this workspace has a switch — in Hospitality: rooms, catering and events, private hire and venues, spa, wellness retreats, football turf and table reservations; in Retail and Pharmacy: customer orders (goods for later pickup or delivery).
- Switch a product on to take deposits there, off to stop.
Expected result
Off: no deposit is asked or taken in that product — no deposit button at the desk, none in online booking, and a deposit sent by any other way is refused. Bookings are confirmed without one. Deposits already held stay held and are still applied, refunded or kept as usual. Every change is recorded (who and when).
Screenshot
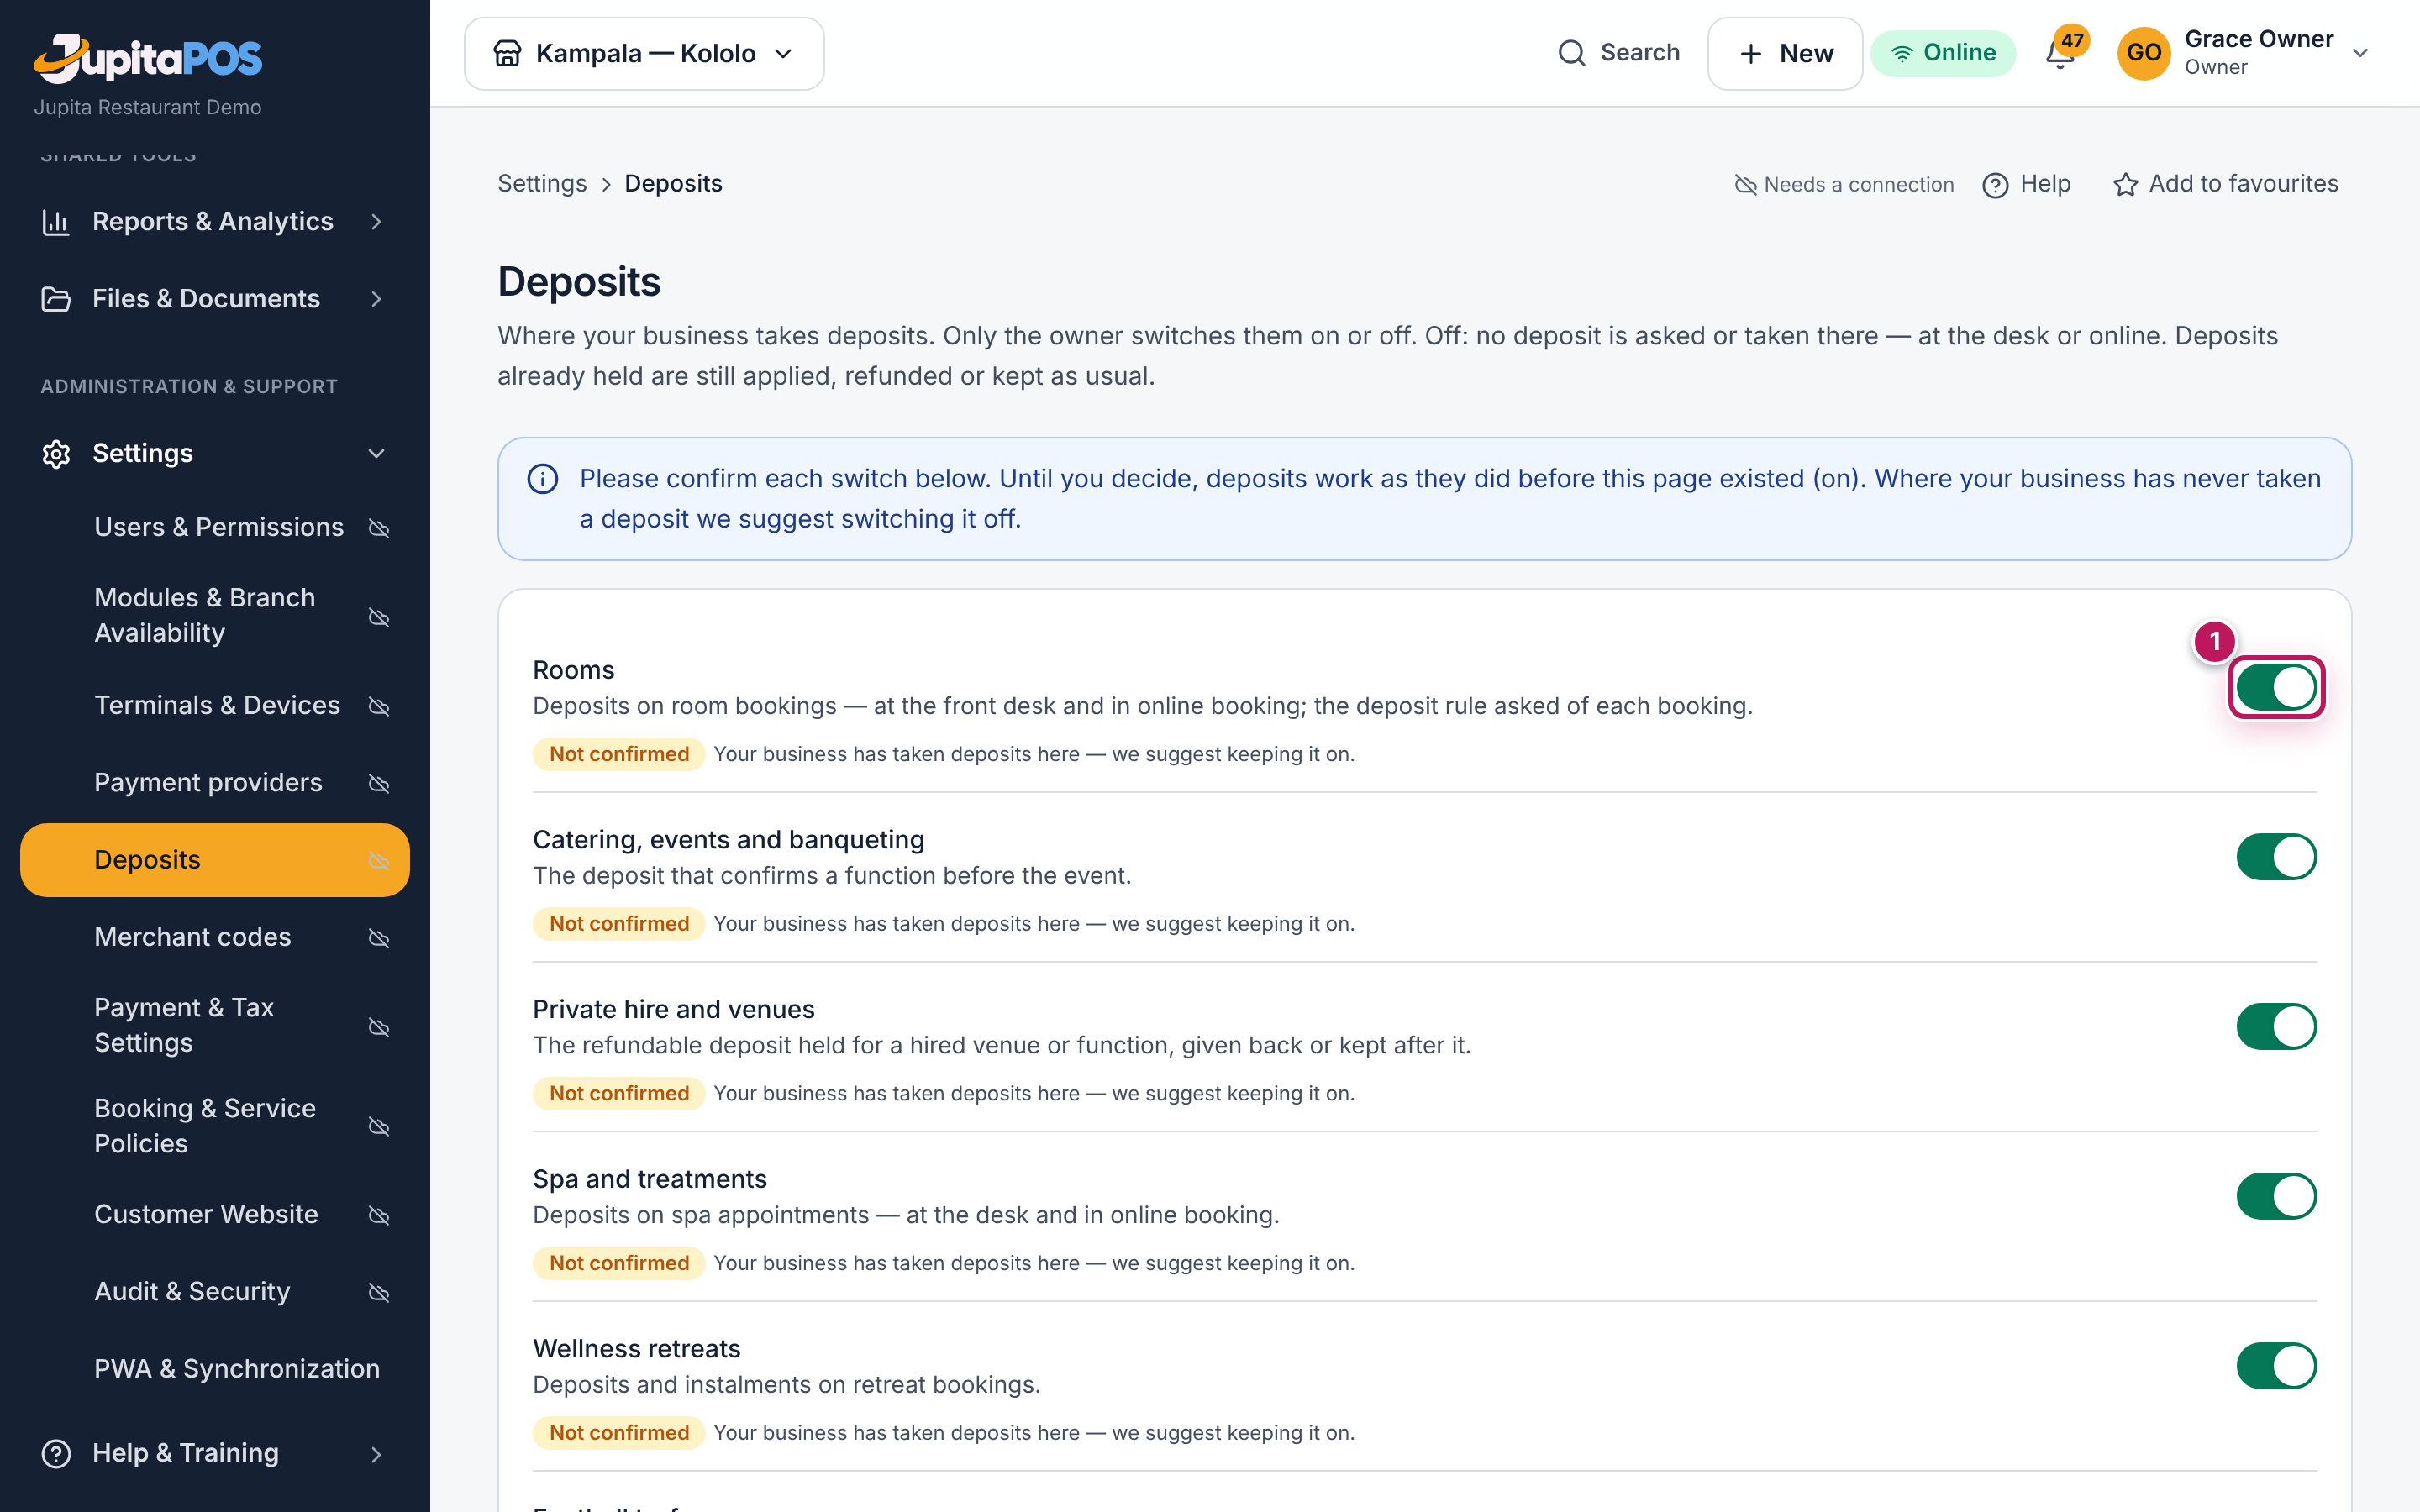
Common mistakes
- Expecting a manager to switch it: only the owner can.
- Retail and Pharmacy counter sales never take a deposit, whatever the switch.
Troubleshooting
Not confirmed next to a switch: your business existed before this page. Deposits there work as before until you choose; the page suggests off where your business has never taken one.