

On this page
Every sign-in, every change and every sensitive action — a void, a refund, a discount, a role given, a period locked, a file exported — is written to the audit trail with who did it, when, from where, and what it was before and after. Each record is signed, so a record changed behind the system’s back is detected when the trail is verified.
Owners, administrators, branch managers, accountants and auditors read it
(audit.view); verifying its integrity needs audit.verify. The
Auditor system role — for an external or internal auditor — reads this
manual and the audit trail, the accounts and the reports, and changes
nothing. The demo has no auditor login: the screens are those of Moses (the
branch manager) and Andrew (the accountant) on Friday 2 October 2026. The
trail covers the whole business: everyone who reads it sees every branch’s
records.
Search the audit trail
Purpose
Find out who did what and when — a voided order, a changed price, an expense approved — straight from the record the system keeps.
Role / permission required
Owner, administrator, branch manager, accountant or auditor: audit.view.
Prerequisites
- None.
Steps
- Open Audit trail from the sidebar (
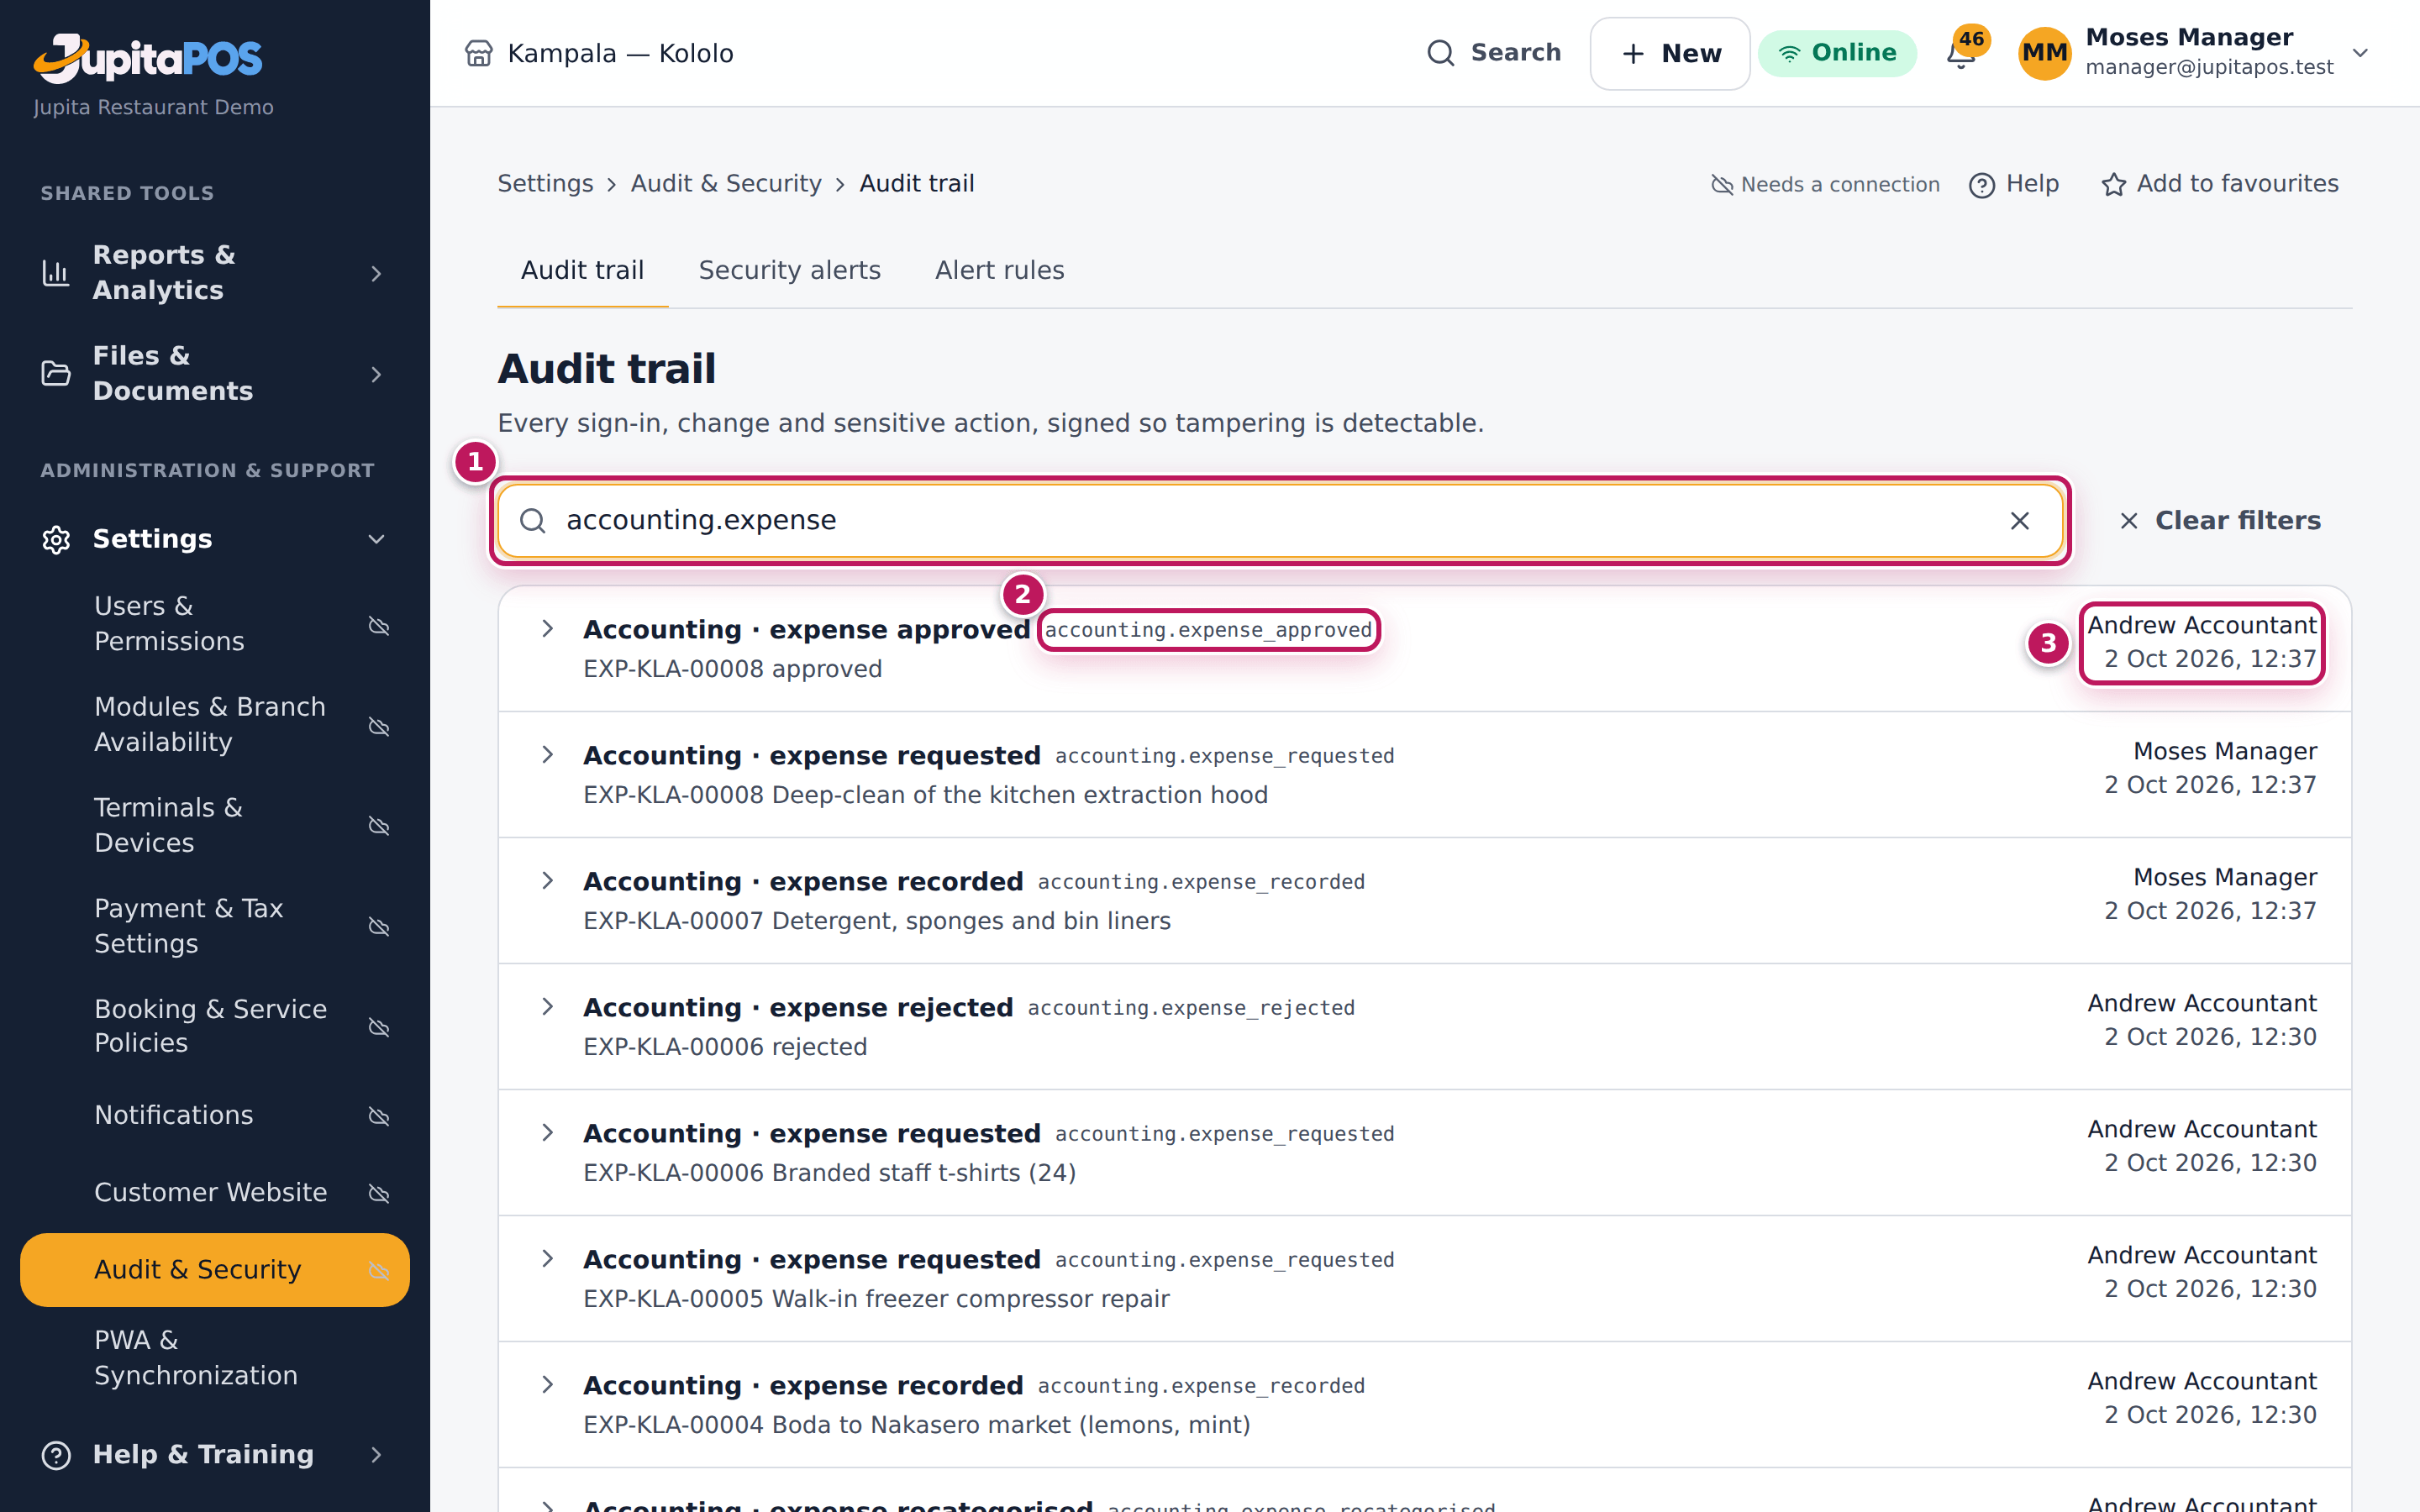
/audit). The newest records come first. - Type the start of an action in Action (1): accounting.expense for expenses, auth. for sign-ins, sales. for sales, reports. for exports.
- Read each record: what happened and its action key (2), what it was about, and on the right who did it and when (3).
- Use the pages at the foot to go further back.
Expected result
The list shows only the matching records, for example accounting.expense_approved by Andrew Accountant and accounting.expense_recorded by Moses Manager, newest first.
Screenshot
Common mistakes
- Typing a person’s name in Action. The filter is on the action key; find the person on the right of each record.
- Searching the whole trail for one order. Filter on the action first (sales.), then read the summaries.
Troubleshooting
- “No audit entries — Nothing matches this filter.” The action key is written differently; try a shorter start, such as accounting..
- You cannot find an older record. Thirty records show a page; use the pages at the foot, or a longer action filter.
Read an audit record
Purpose
See exactly what a change was — before and after — and where it came from, for example to settle a dispute about an expense or a void.
Role / permission required
audit.view.
Prerequisites
- You found the record (see Search the audit trail).
Steps
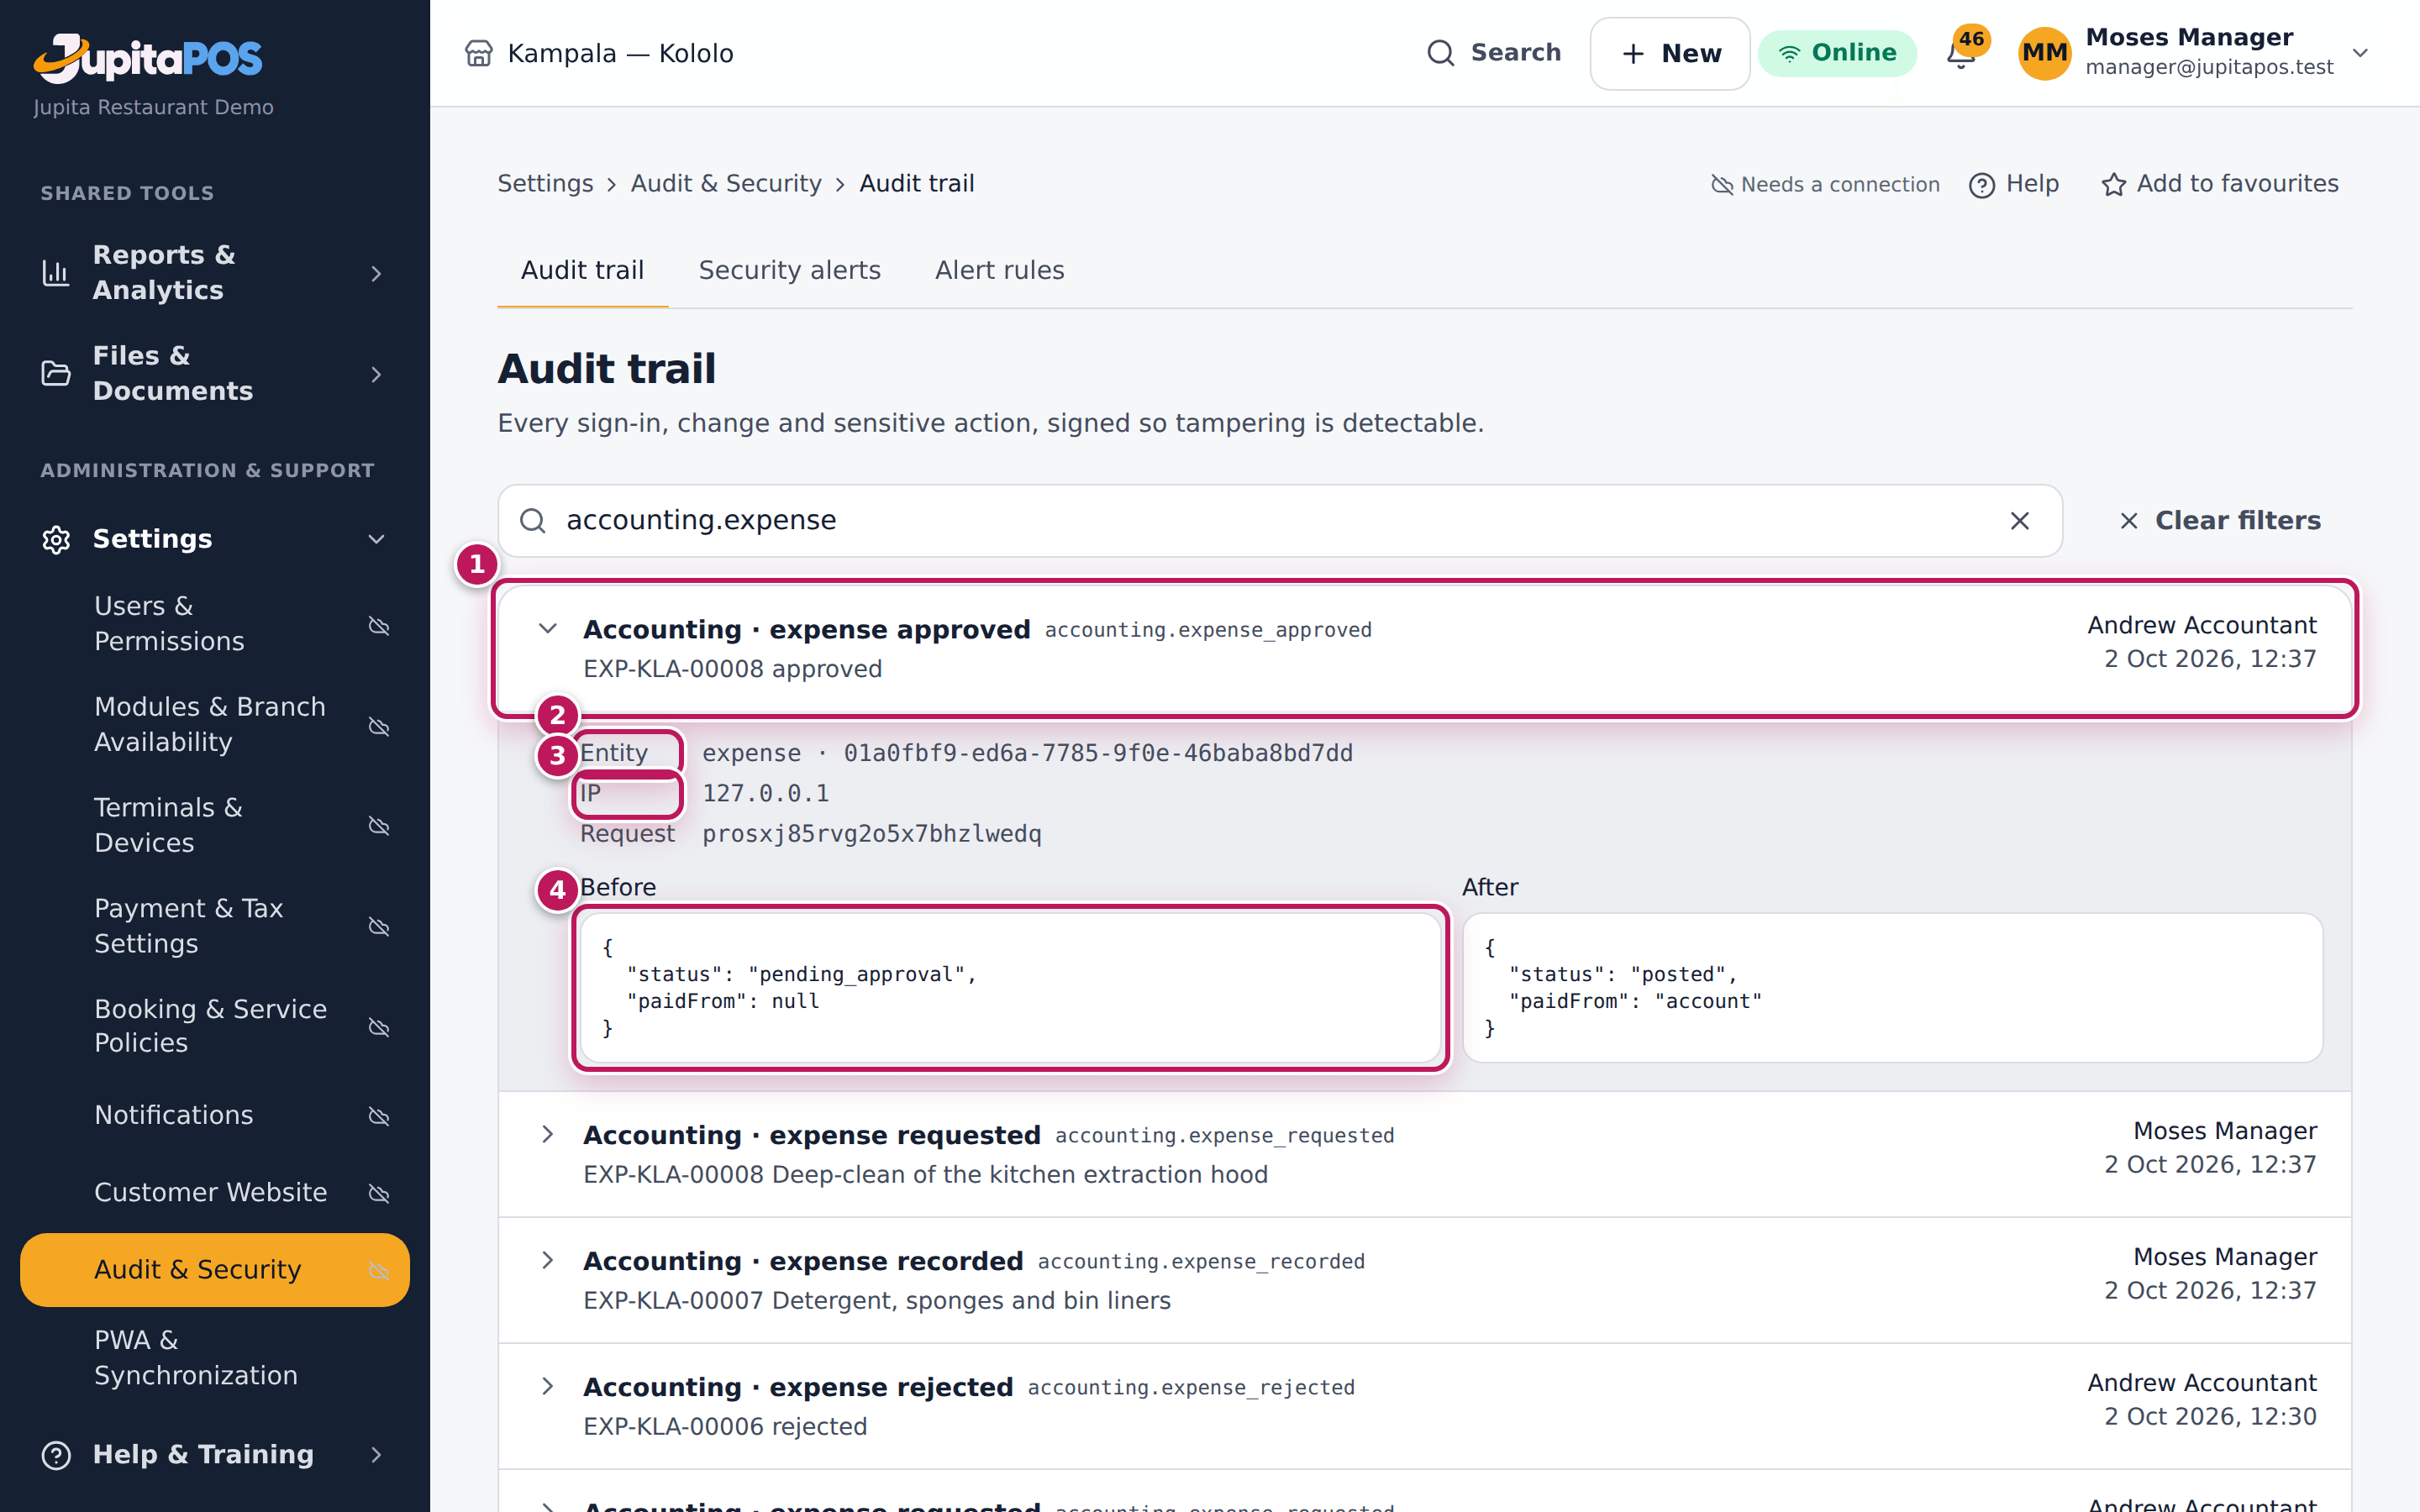
- Click the record (1) to open it.
- Read the Entity (2): what kind of record it is about and its id.
- Read the IP (3) and Request: the address and the request it came from.
- Read Before, After and Details (4): the values that changed and the reason given.
Expected result
The record opens under its line. For an expense approved you see the expense’s id, the address it was approved from, and after: its number, amount and status. Sensitive staff fields show that they changed and which one, never the values.
Screenshot
Common mistakes
- Reading “System” as a person. Records made by the system itself — a posting run, an automatic no-show — say System.
Troubleshooting
- The record has no Before or After. Some actions (a sign-in) have only details.
Verify the audit trail’s integrity
Purpose
Prove that nobody changed or removed records behind the system’s back — before an audit, after a security incident, or once a month.
Role / permission required
Owner, administrator, accountant or auditor: audit.verify.
Prerequisites
- None.
Steps
- Open Audit trail.
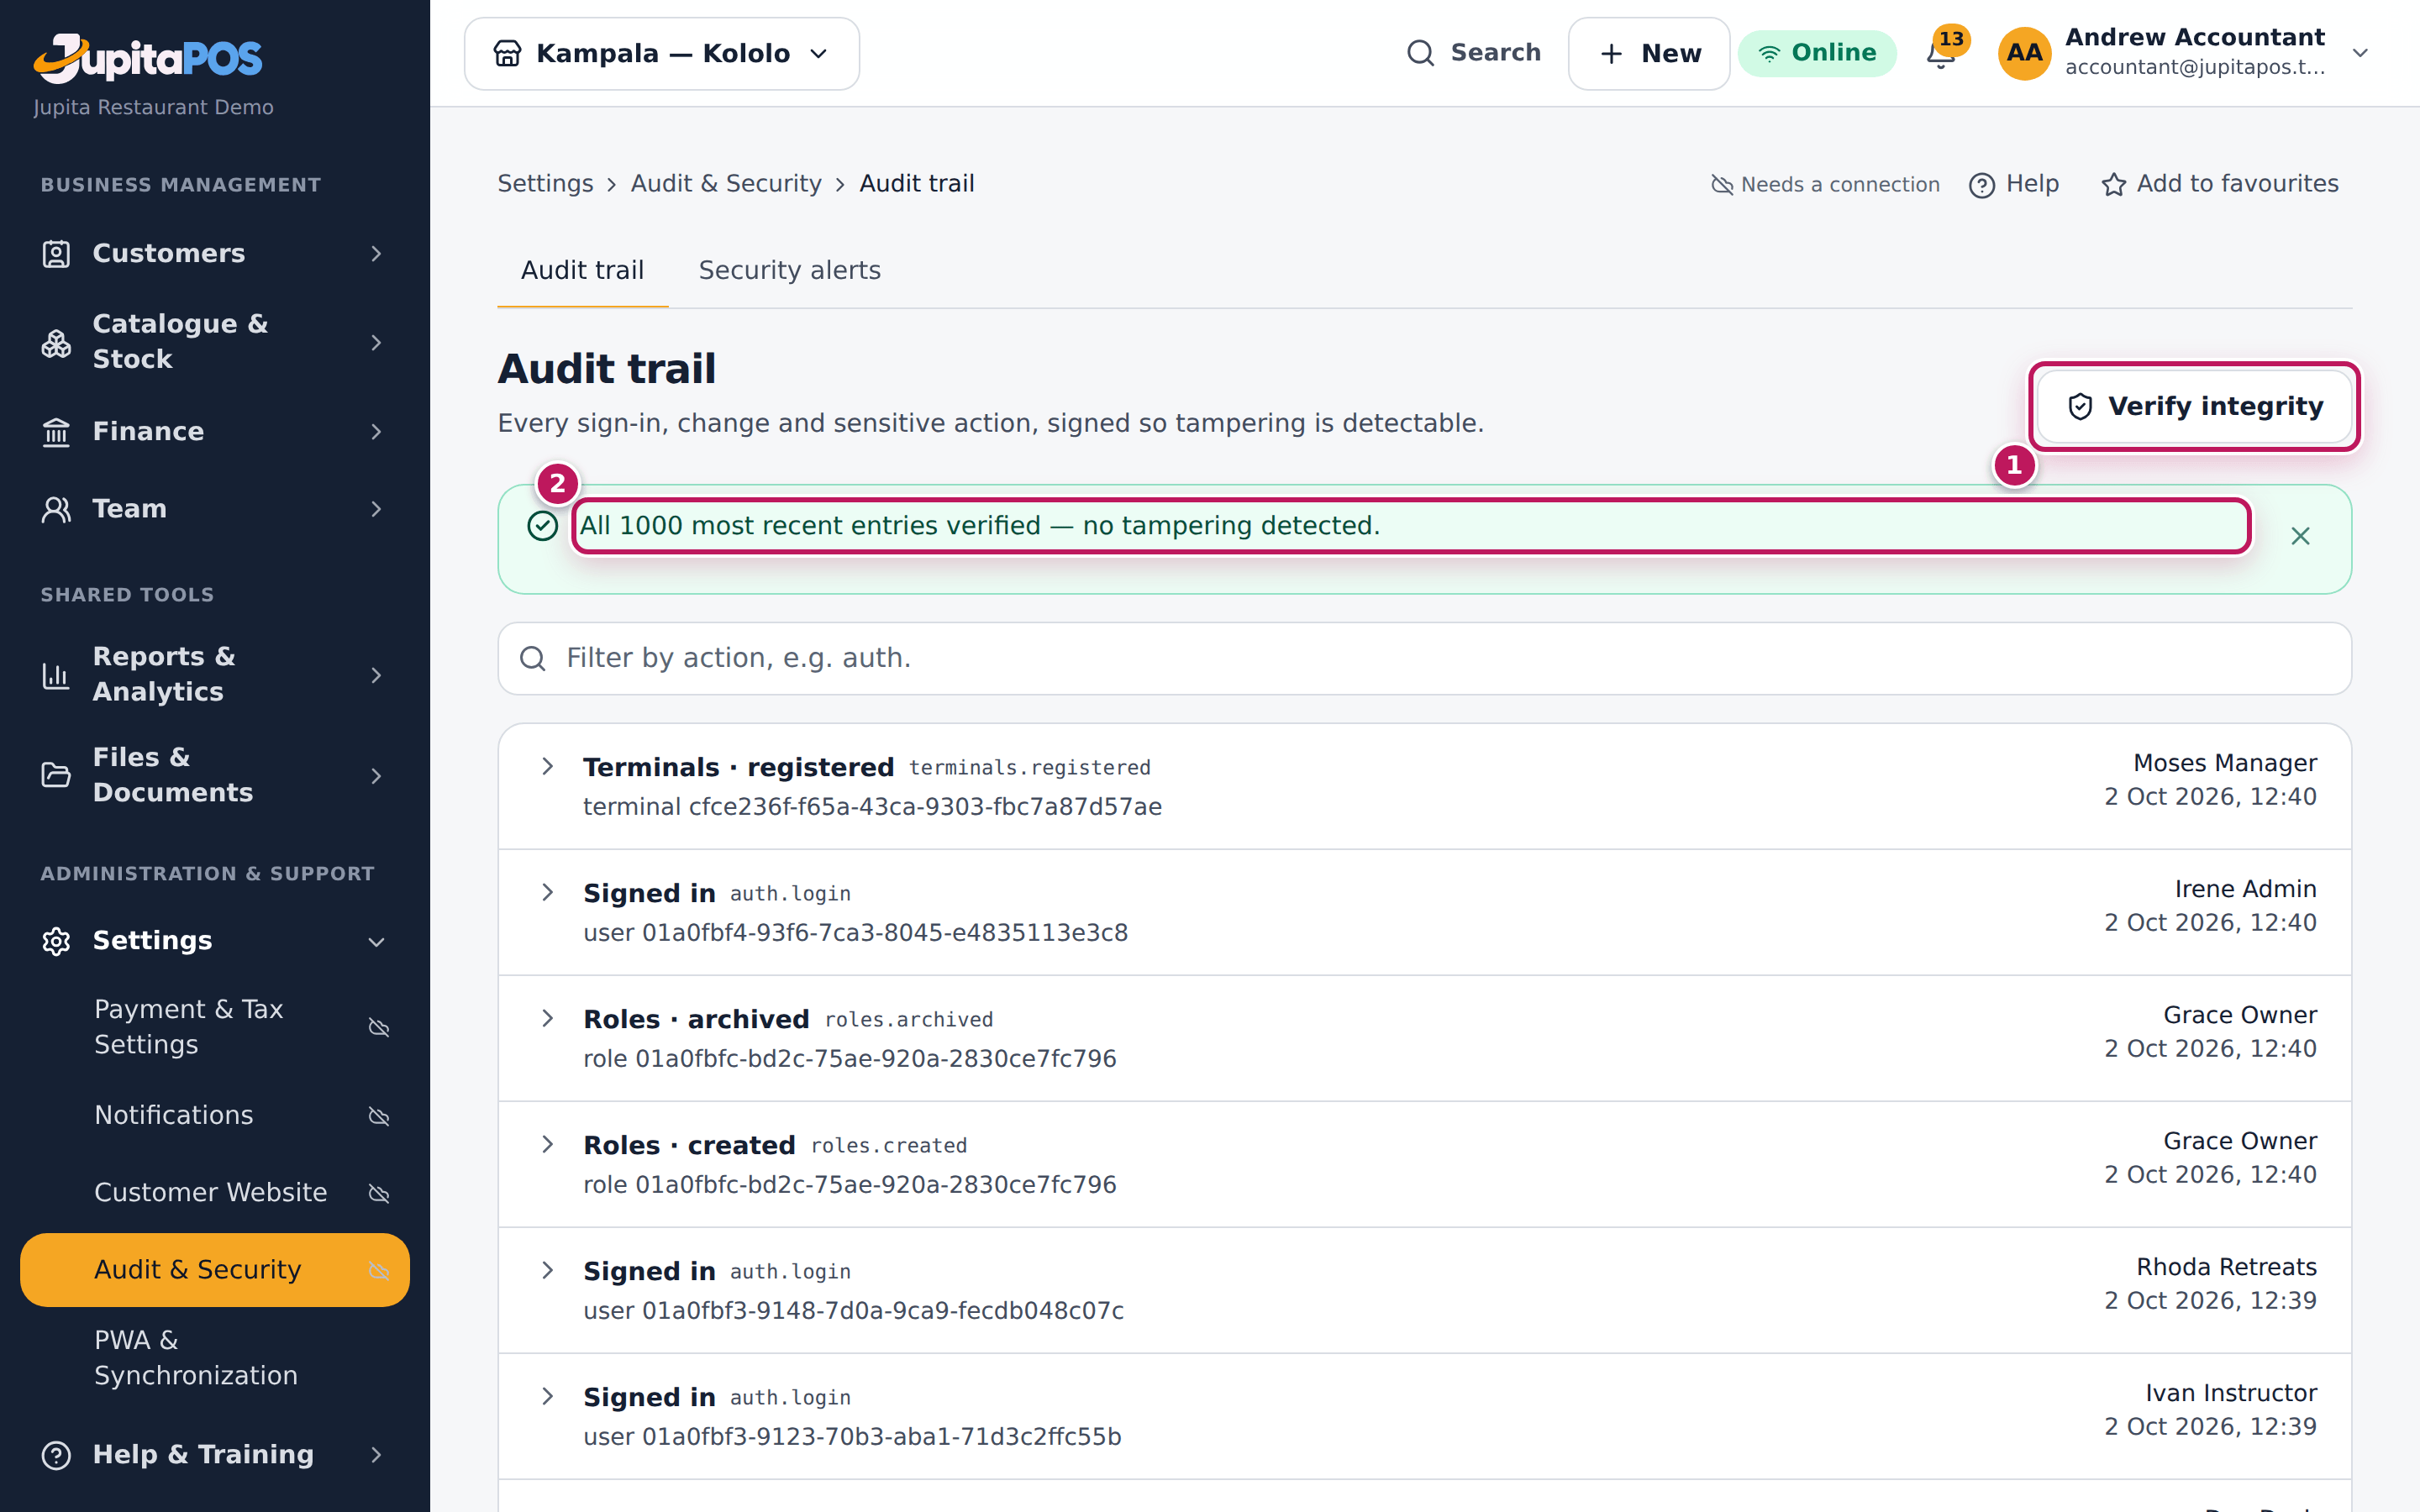
- Click Verify integrity (1).
- Wait a moment: the signatures of the 1,000 most recent entries are checked.
- Read the result (2).
Expected result
All 1000 most recent entries verified — no tampering detected. The check itself is recorded in the trail (audit.verified). If a record was changed, the message lists the entries that failed; tell the owner at once and follow the security incident steps (see Respond to a security incident, in the Help Center inside JupitaPos).
Screenshot
Common mistakes
- Verifying only after a problem. Verify regularly: a clean result on a date is part of your records.
Troubleshooting
- There is no Verify integrity button. Your role does not include
audit.verify. - “… entries failed verification”. Do not change anything; tell the owner and your JupitaPos provider.
Give an auditor access to the audit trail
Purpose
Let an auditor read the audit trail, the accounts and the reports for themselves, so they check the records where they are kept.
Role / permission required
Owner: roles.assign (the Auditor role reads the accounts, which only the
owner and those who hold them may grant).
Prerequisites
- The auditor has a login (see Add a user).
Steps
- Open User accounts and click the auditor’s account.
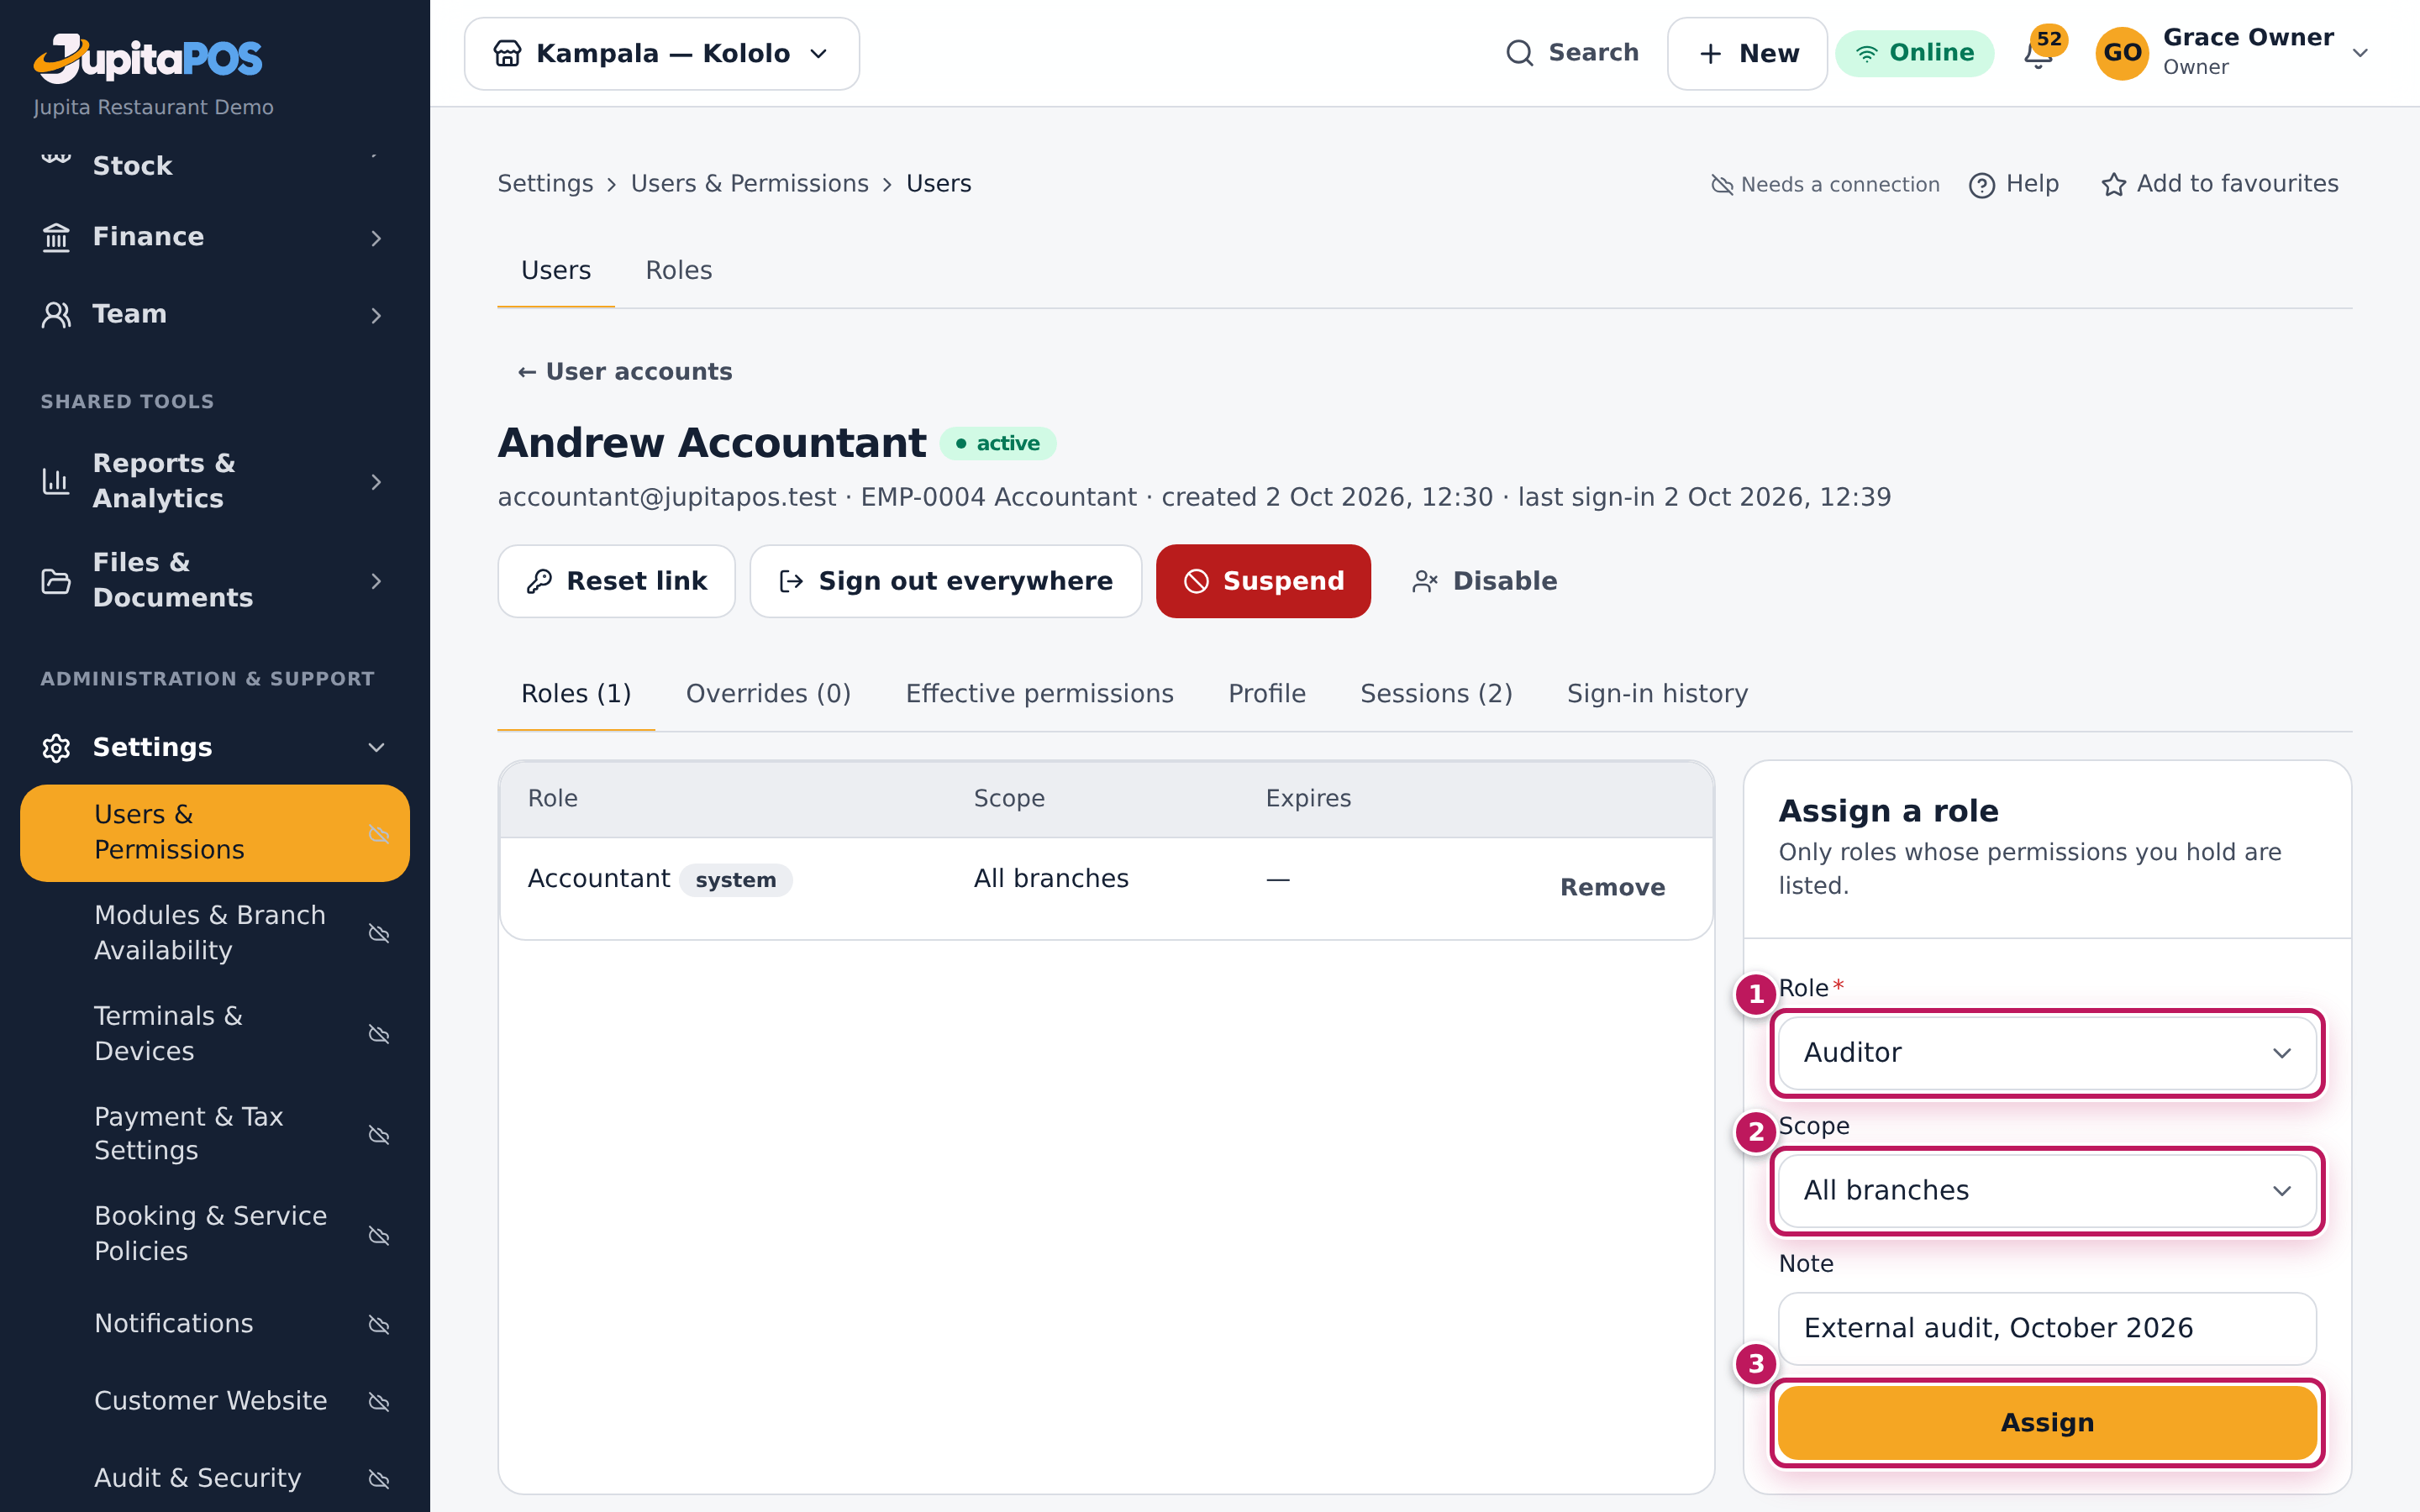
- Under Assign a role, choose Auditor in Role (1).
- Choose All branches in Scope (2), type a Note — External audit, October 2026 — and click Assign (3).
- When the audit is over, click Remove on the role.
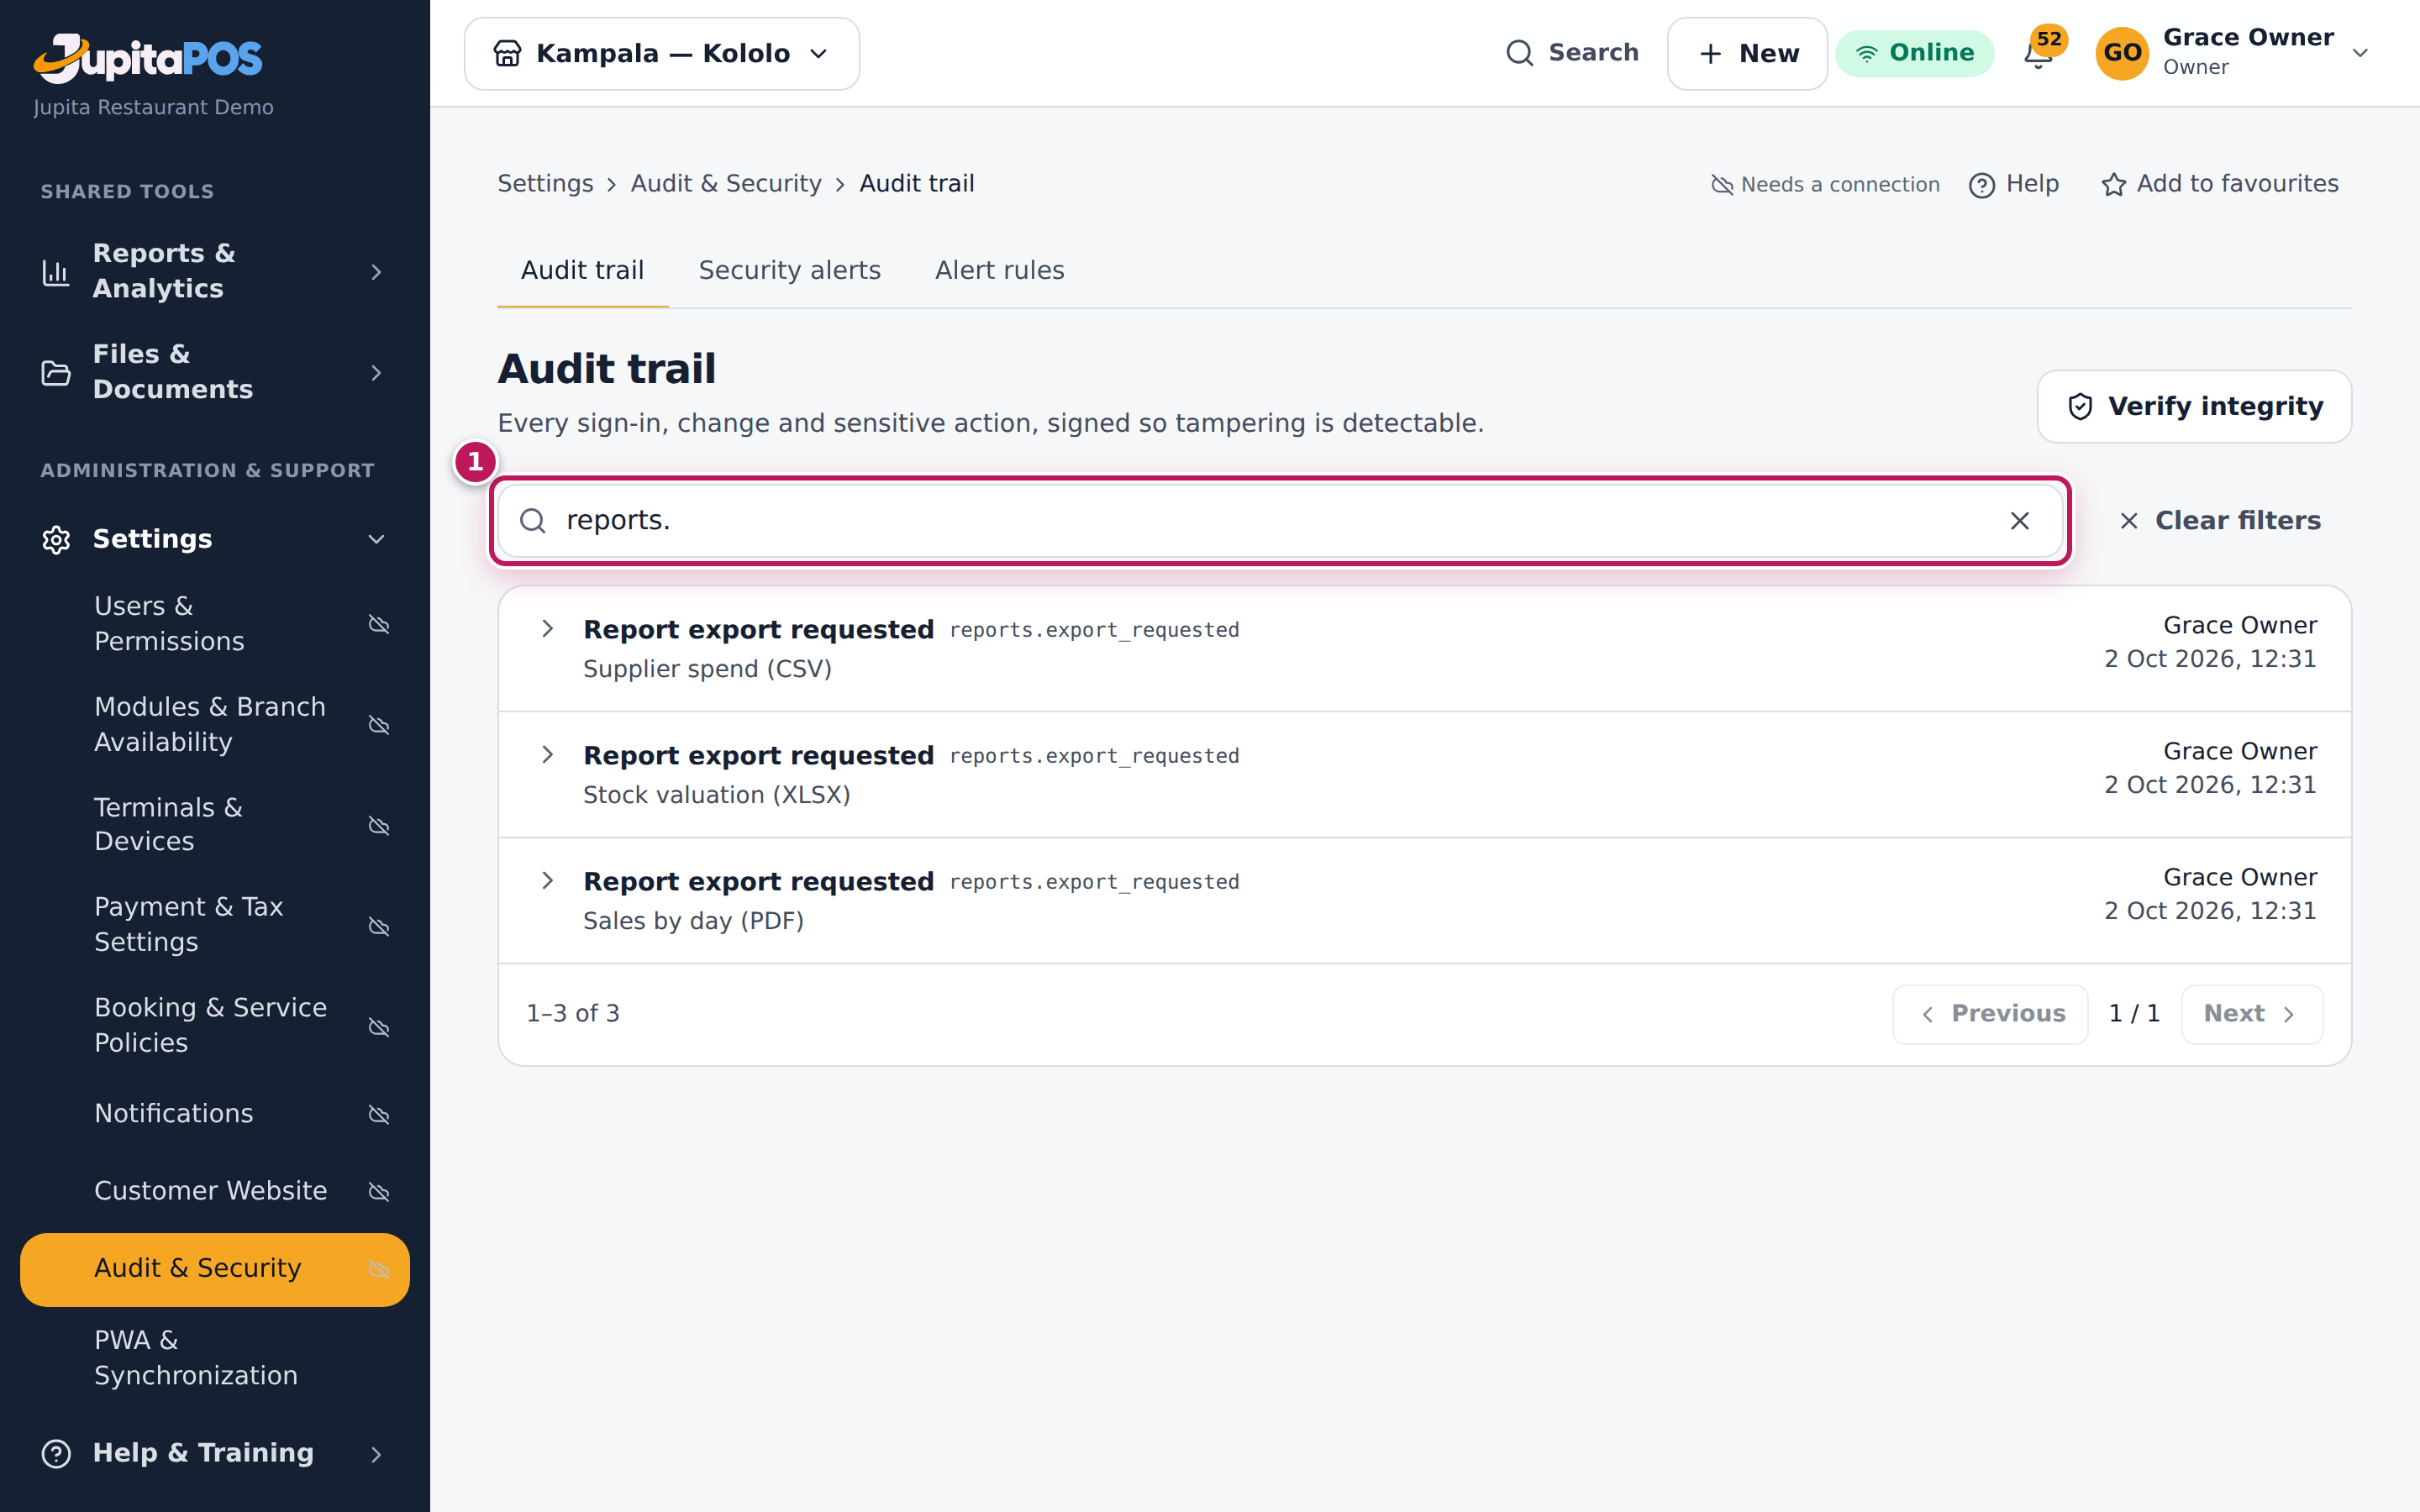
- Point the auditor to their evidence: the audit trail keeps a record of every report file exported, downloaded or shared (1 in the second picture: filter on reports.).
Expected result
The auditor signs in and reads the Audit trail, the accounts, the reports and the security alerts, and can Verify integrity; they cannot change anything. There is no button to download the audit trail as a file: it stays in the system, where it is signed, and in the business’s backups.
Screenshot
Common mistakes
- Giving the auditor the accountant’s role. The accountant can post journals; the Auditor role only reads.
Troubleshooting
- Auditor is not in the list of roles. You do not hold all its permissions; the owner assigns it.
FAQ
Can I get the audit trail as a spreadsheet? Not from the screens. The trail is kept in the database and its backups (see Back up the database, in the Help Center inside JupitaPos); report files you export are listed in the trail with who exported them.
Find out what the system did with the system logs
Purpose
See what the system itself did, line by line — a mobile money prompt and what the provider answered, a till’s offline upload, an error, an action that was refused, a sign-in — so that a problem can be traced without guessing. The audit trail says who changed what; the system logs say what happened and why something did not work.
Role / permission required
Owner, or a role with logs.view.
Prerequisites
None. Lines are kept from the day the business took this version.
Steps
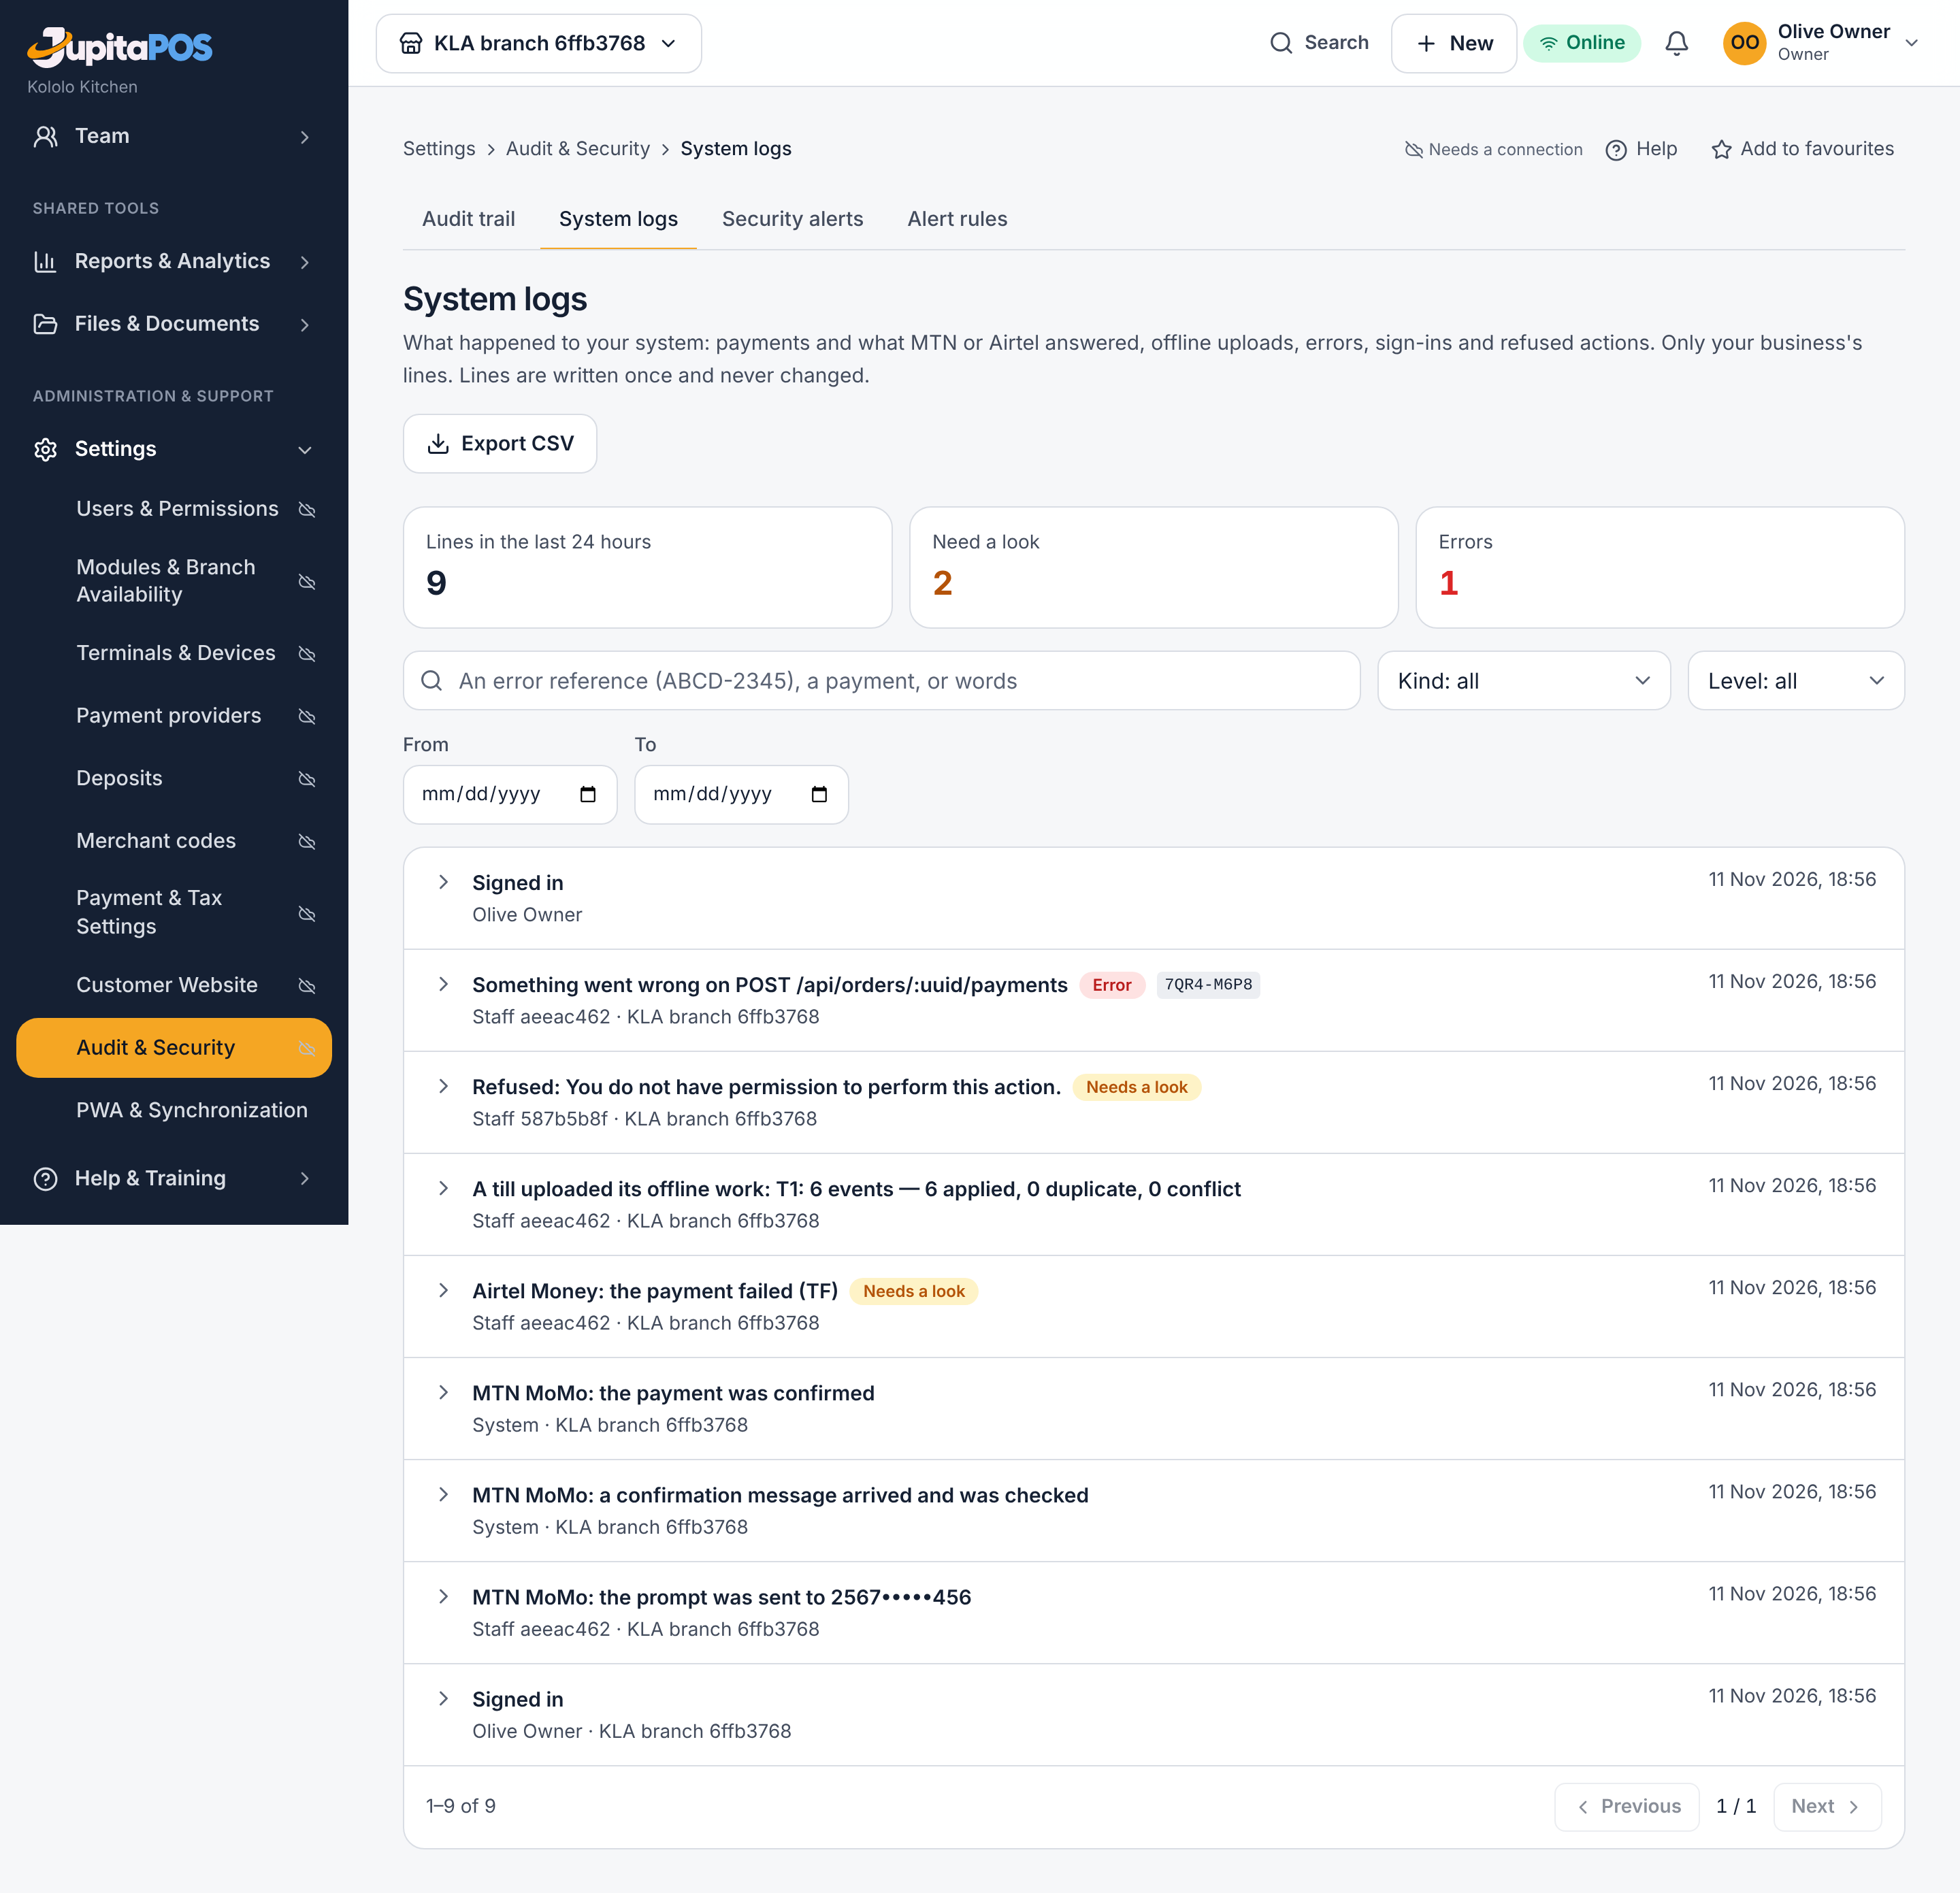
- Open Settings, then Audit & Security, tab System logs (
/system/logs). - Read the three figures at the top: the lines, warnings and errors of the last 24 hours.
- To narrow the list, type in the search box, choose an area (for example Payments or Offline uploads), choose a level, or set From and To.
- Tap a line to open it. It shows the event, what it is about, the request it belongs to and, for an upload from a till, what the till’s own clock said.
- Tap Show every line of this request to see everything the system did in that one action, in order.
- Tap Export CSV for a spreadsheet of the lines shown.
Expected result
The list shows the business’s own lines, newest first, in plain words: who, which branch and till, and when. A payment can be followed from the prompt to the provider’s answer. Phone numbers are shown with the middle hidden and card numbers are removed; passwords and payment keys are never written to a line.
Screenshot
Common mistakes
- Looking here for who changed a price. That is the audit trail (see Search the audit trail).
- Searching for a customer’s full phone number. The middle digits are hidden in the lines; search for the payment reference or the order number.
Troubleshooting
- The list is empty. Nothing has been recorded for the filter; tap Clear filters.
- The tab is not there. Your role does not have
logs.view; ask the owner.
Look up an error reference
Purpose
When a screen says Something went wrong it shows an Error reference
such as 7QR4-M6P8. The reference finds the exact line of that error, so
the owner or support can see what broke without asking the cashier to
describe it.
Role / permission required
Owner, or a role with logs.view.
Prerequisites
- The error reference from the screen, a photo of it, or the cashier’s note of it.
Steps
- Open Settings, then Audit & Security, tab System logs (
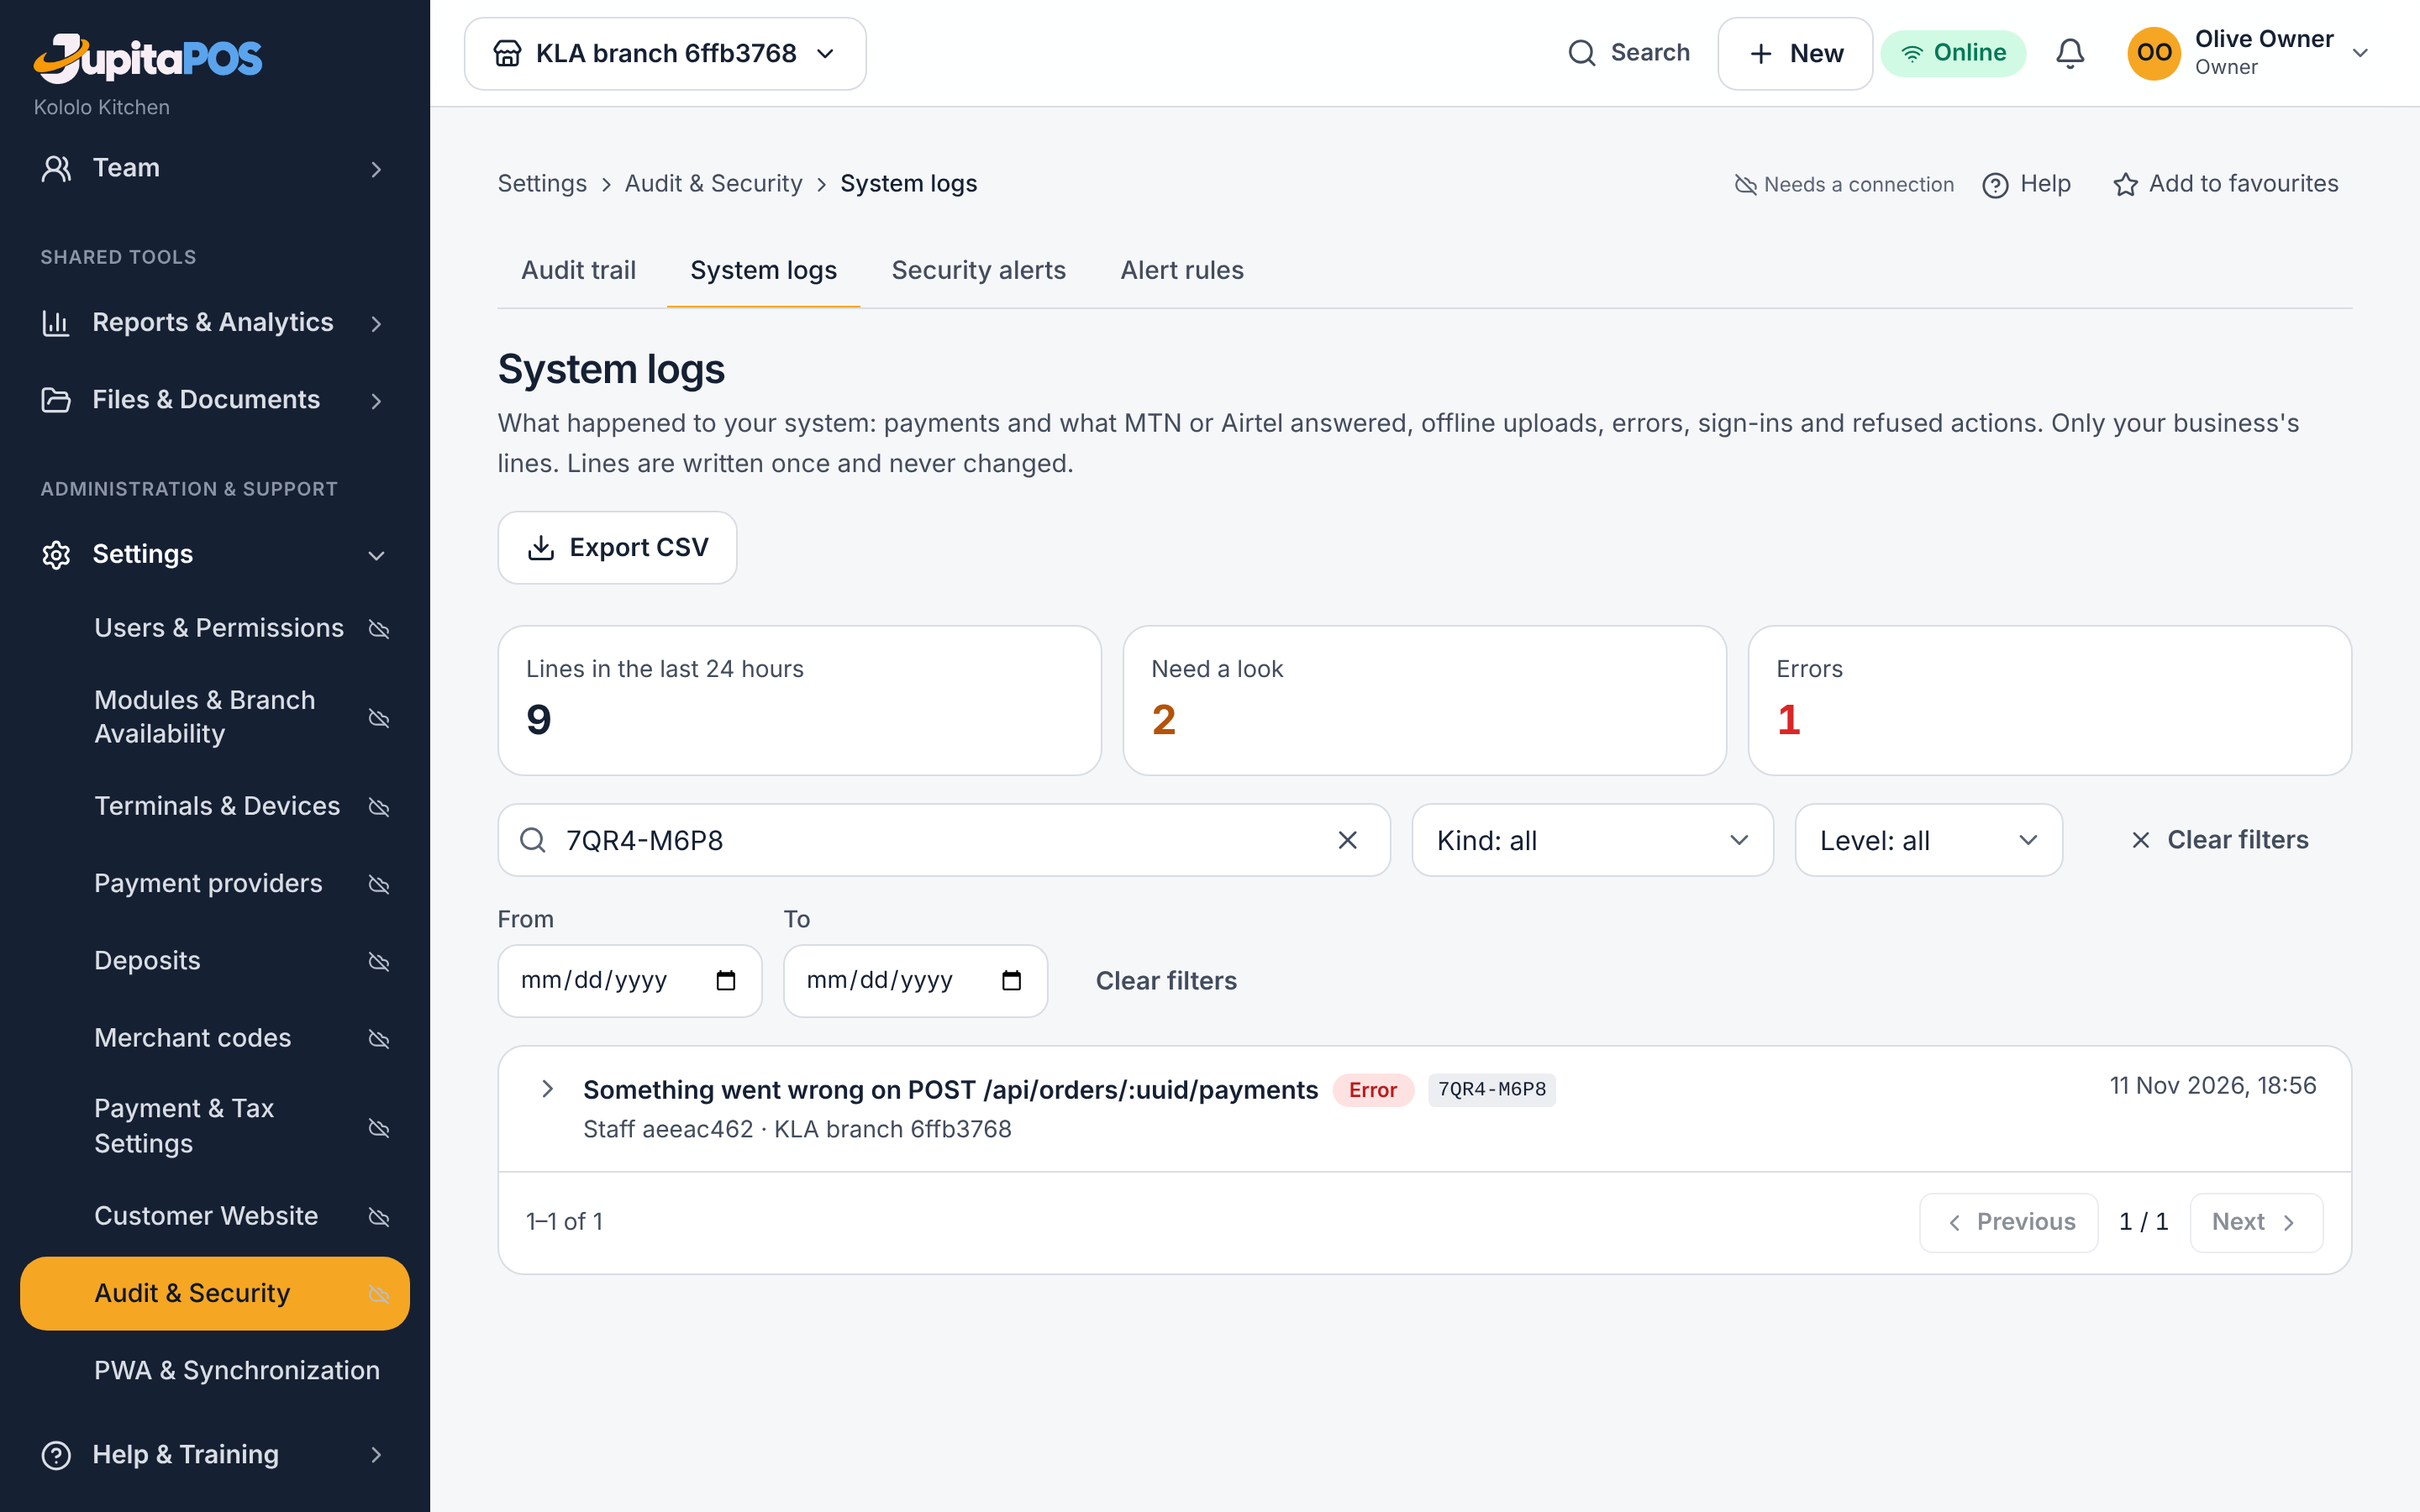
/system/logs). - Type the reference in the search box, with or without the dash, in capitals or not.
- Tap the line that is found, then Show every line of this request to see what the person was doing when it happened.
- If you contact support, give them the reference; they find the same line with it.
Expected result
One line is found: the error, when it happened, who was signed in and on which till. Technical detail holds what a developer needs.
Screenshot
Common mistakes
- Typing 0 for O or 1 for I. References never contain 0, O, 1 or I, so a character that looks like one of them was misread.
Troubleshooting
- Nothing is found. Check the reference against the screen. An error on a till that was offline has no reference: the till could not reach the server.