

On this page
- Add a menu item
- Organise the categories
- Create a modifier group
- Build a meal deal (combo)
- Schedule a menu
- Set a price rule: happy hour and promotions
- Set a different price at one branch
- Give a customer group, a period or a branch its own prices
- Give a customer group a fixed room or pitch rate
- Mark an item sold out and back
Everything the tills and the online storefront sell starts here: the items, grouped in categories, with their sizes (variants) and the questions the till asks (modifier groups), listed on menus that are live at certain times and branches, and priced by price rules — happy hours, branch prices, promotions. Every change is saved with your name in the audit trail and reaches the tills at once; a till that is offline picks it up when it reconnects.
Open Menu from the sidebar (/menu). The tabs at the top are the
sections: Items, Categories, Menus & schedules, Modifiers
and Pricing.
Who can do what
| Task | Permission | Who has it |
|---|---|---|
| See the menu screens | menu.view |
everyone who serves or manages |
| Create and change items, categories, modifiers, combos and menus | menu.manage |
owner, managers, administrator, chef |
| Mark an item sold out (86) and back | menu.availability |
also waiters, cashiers, bartenders, baristas and cooks |
| Change prices, menu prices and price rules | menu.pricing |
owner, managers — with a password sign-in, never a PIN |
| See cost and margin | menu.costs |
managers, chef, accountant |
Someone with menu.manage but not menu.pricing (an administrator, a
chef) can rename an item or change its choices, but the price fields are
locked for them.
The screens show the demo business, Jupita Restaurant Demo; prices are in Uganda shillings and include 18 % VAT.
Add a menu item
Purpose
Put a new dish or drink on sale: its name on the till’s button and the kitchen ticket, its price and tax, the station that makes it, its choices, and the menus it appears on.
Role / permission required
Managers, owners and chefs — menu.manage. Setting the price needs
menu.pricing.
Prerequisites
- Its category exists (see Organise the categories).
- Its modifier groups exist, if it has choices (see Create a modifier group).
Steps
- Open Menu (
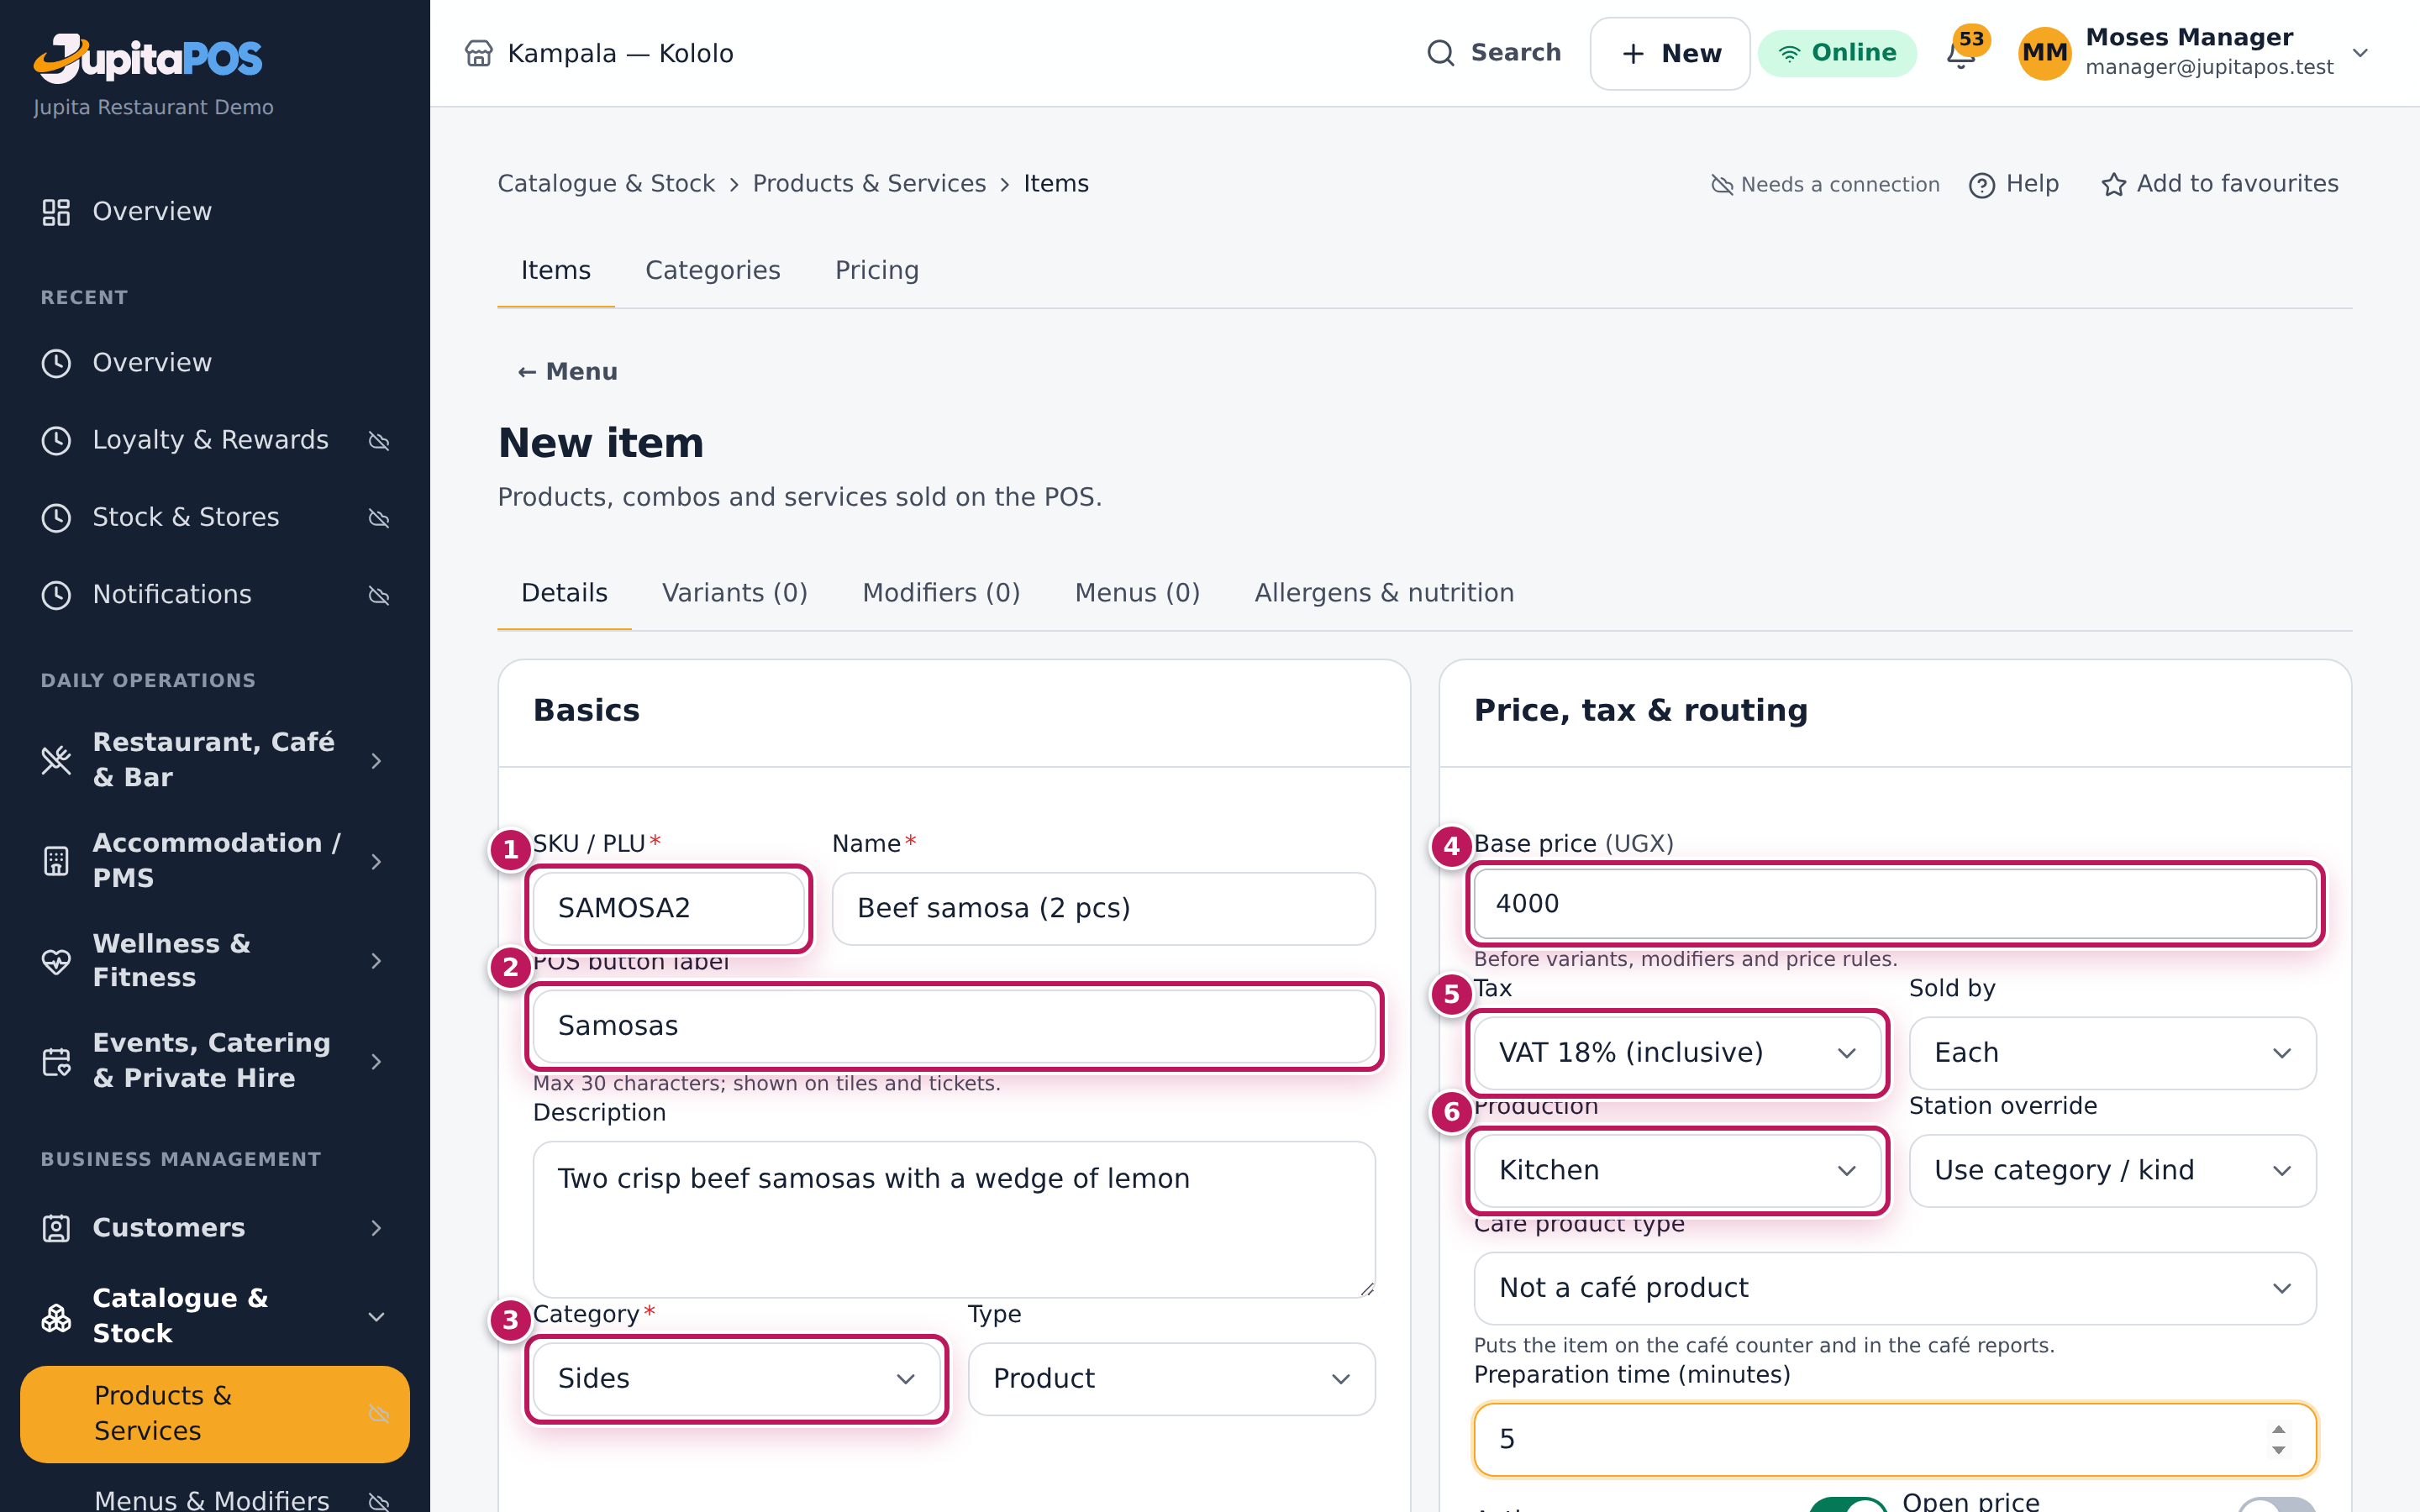
/menu) and tap New item. - On Details, enter the SKU / PLU (1), a short unique code such as SAMOSA2, and the full Name, Beef samosa (2 pcs).
- Enter the POS button label (2), Samosas — 30 characters at most; it is what the till’s tile and the kitchen ticket show.
- Choose the Category (3), Sides, and keep Type on Product.
- Enter the Base price (4), 4000, and choose the Tax (5), VAT 18% (inclusive).
- Choose Production (6): Kitchen, Bar, Barista, Bakery, or No production ticket. Leave Station override empty to let the routing decide (see Set up stations and routing).
- Enter the Preparation time (minutes), 5.
- Open Modifiers and tick the groups the till must ask, in order — here Extras.
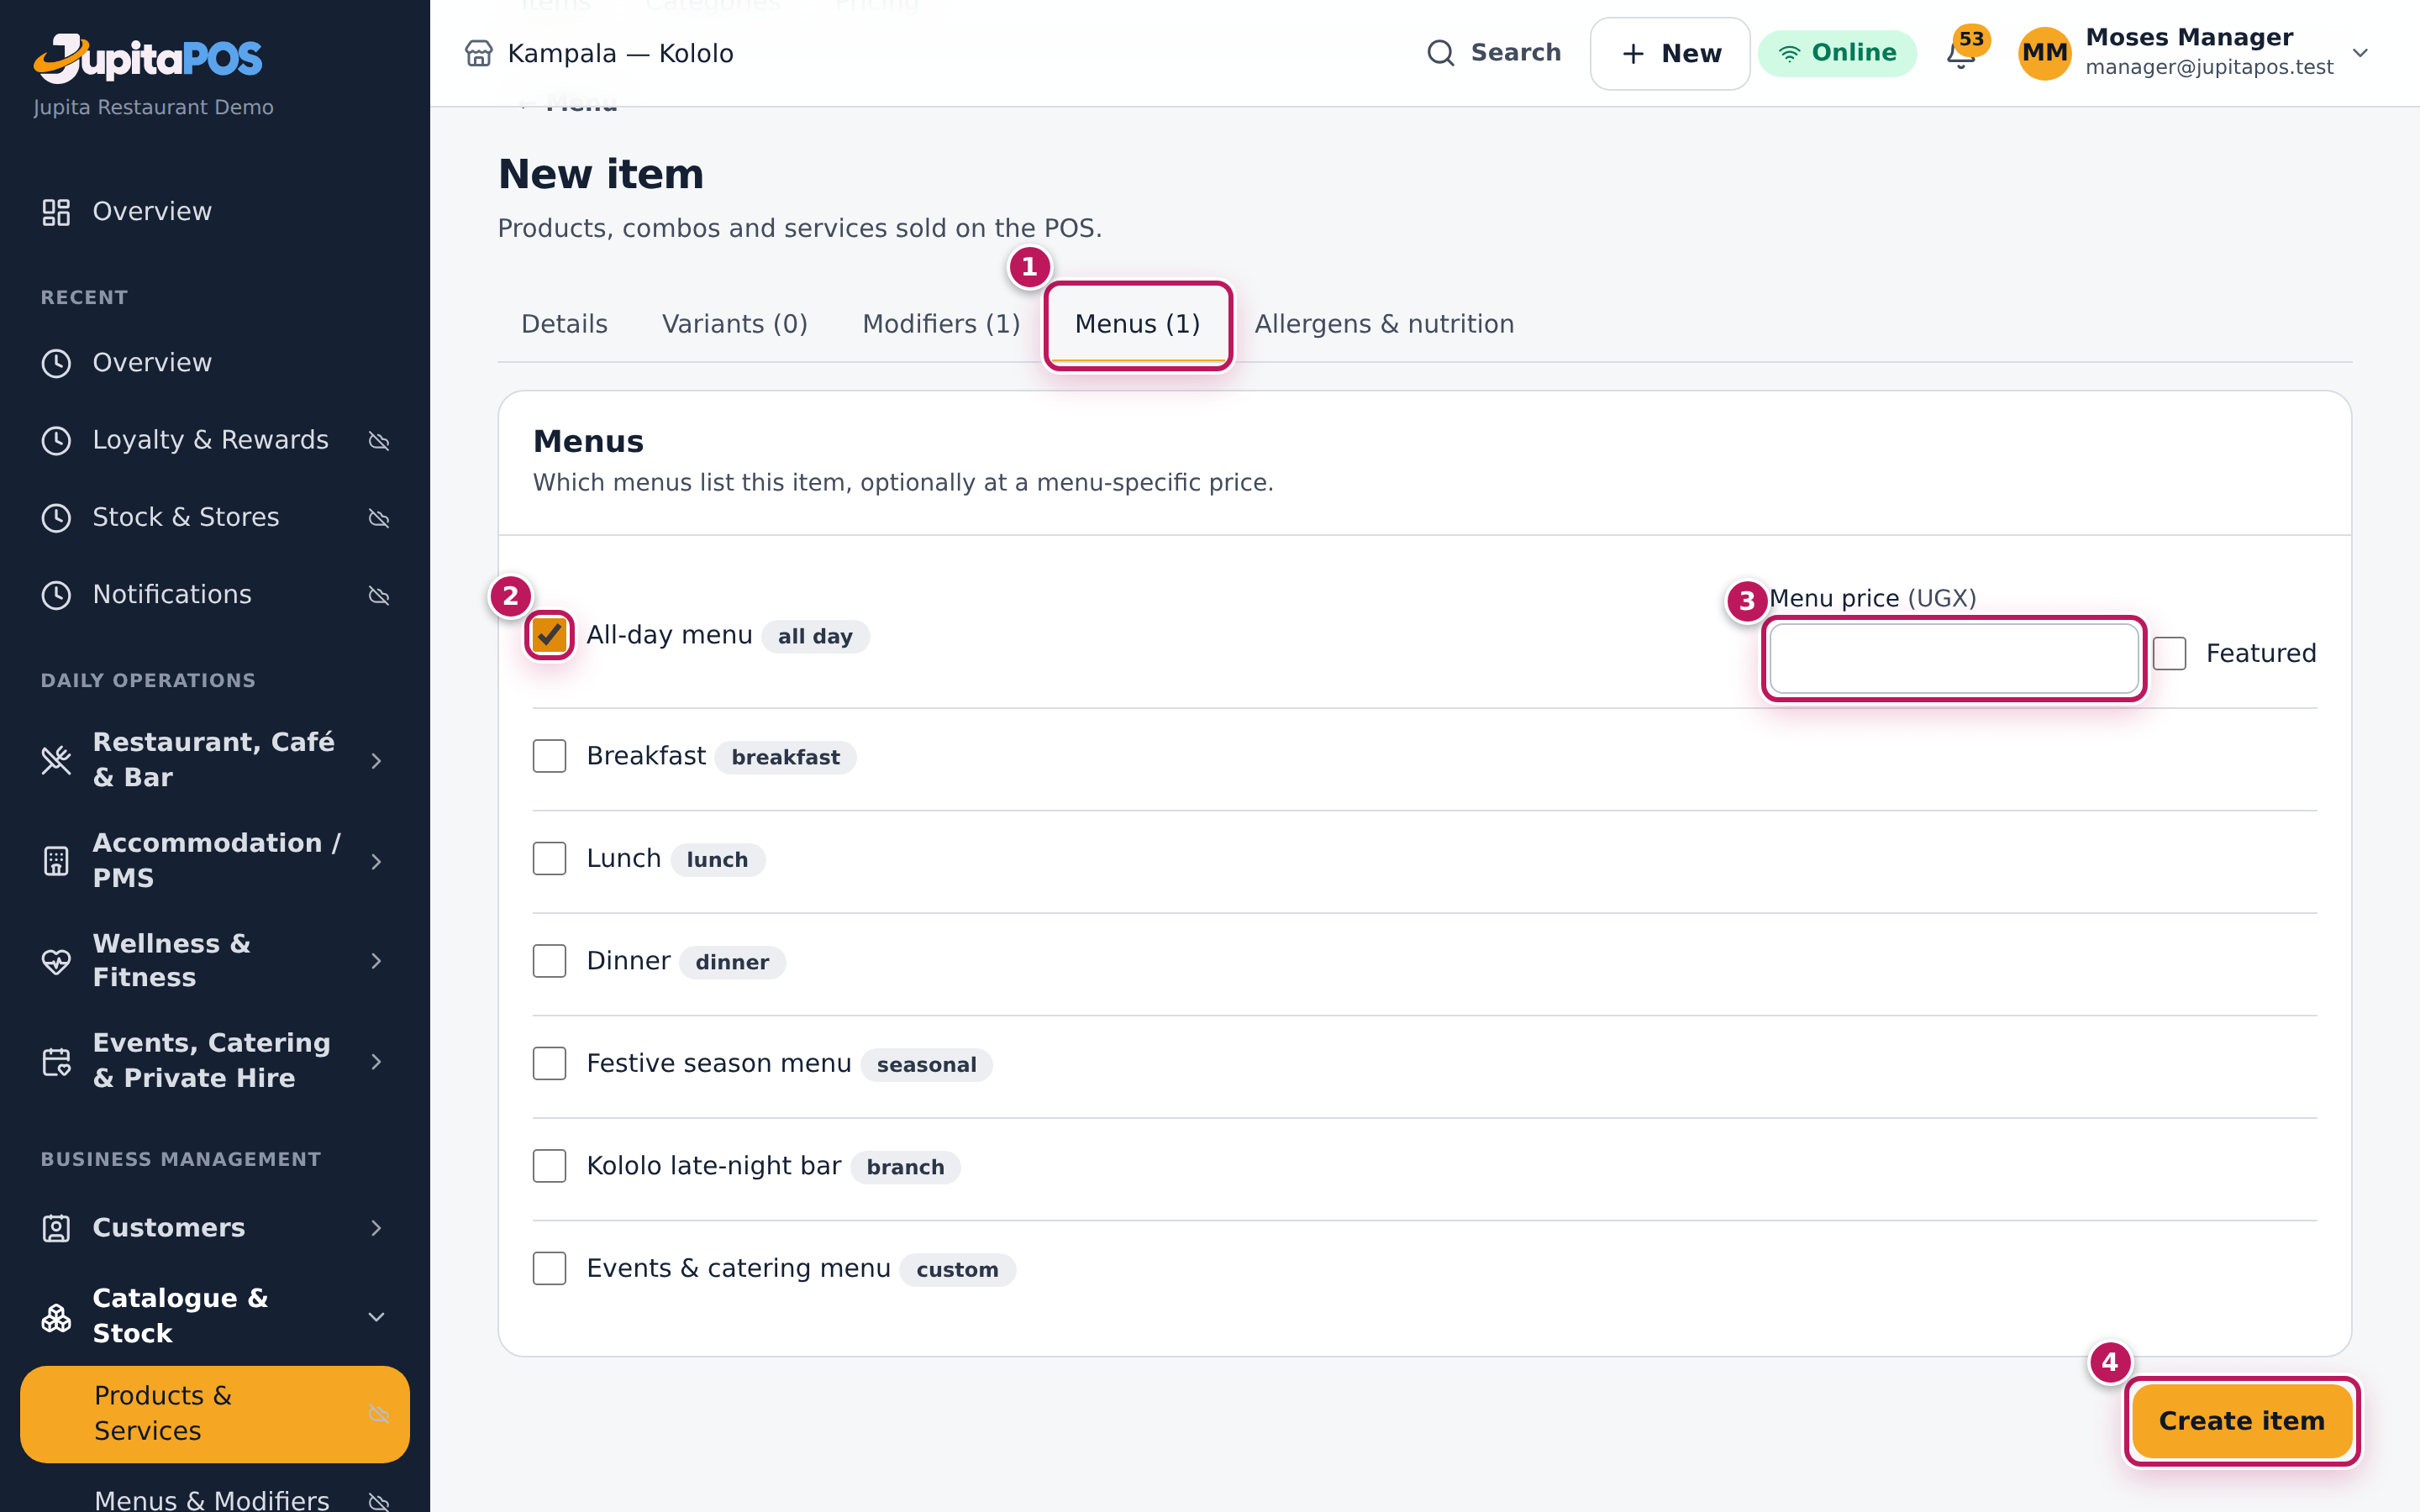
- Open Menus (1) and tick the menus it is sold on (2), here the All-day menu. Leave Menu price (3) empty to sell at the base price.
- Open Allergens & nutrition and tap its allergens, here gluten.
- Tap Create item (4).
Expected result
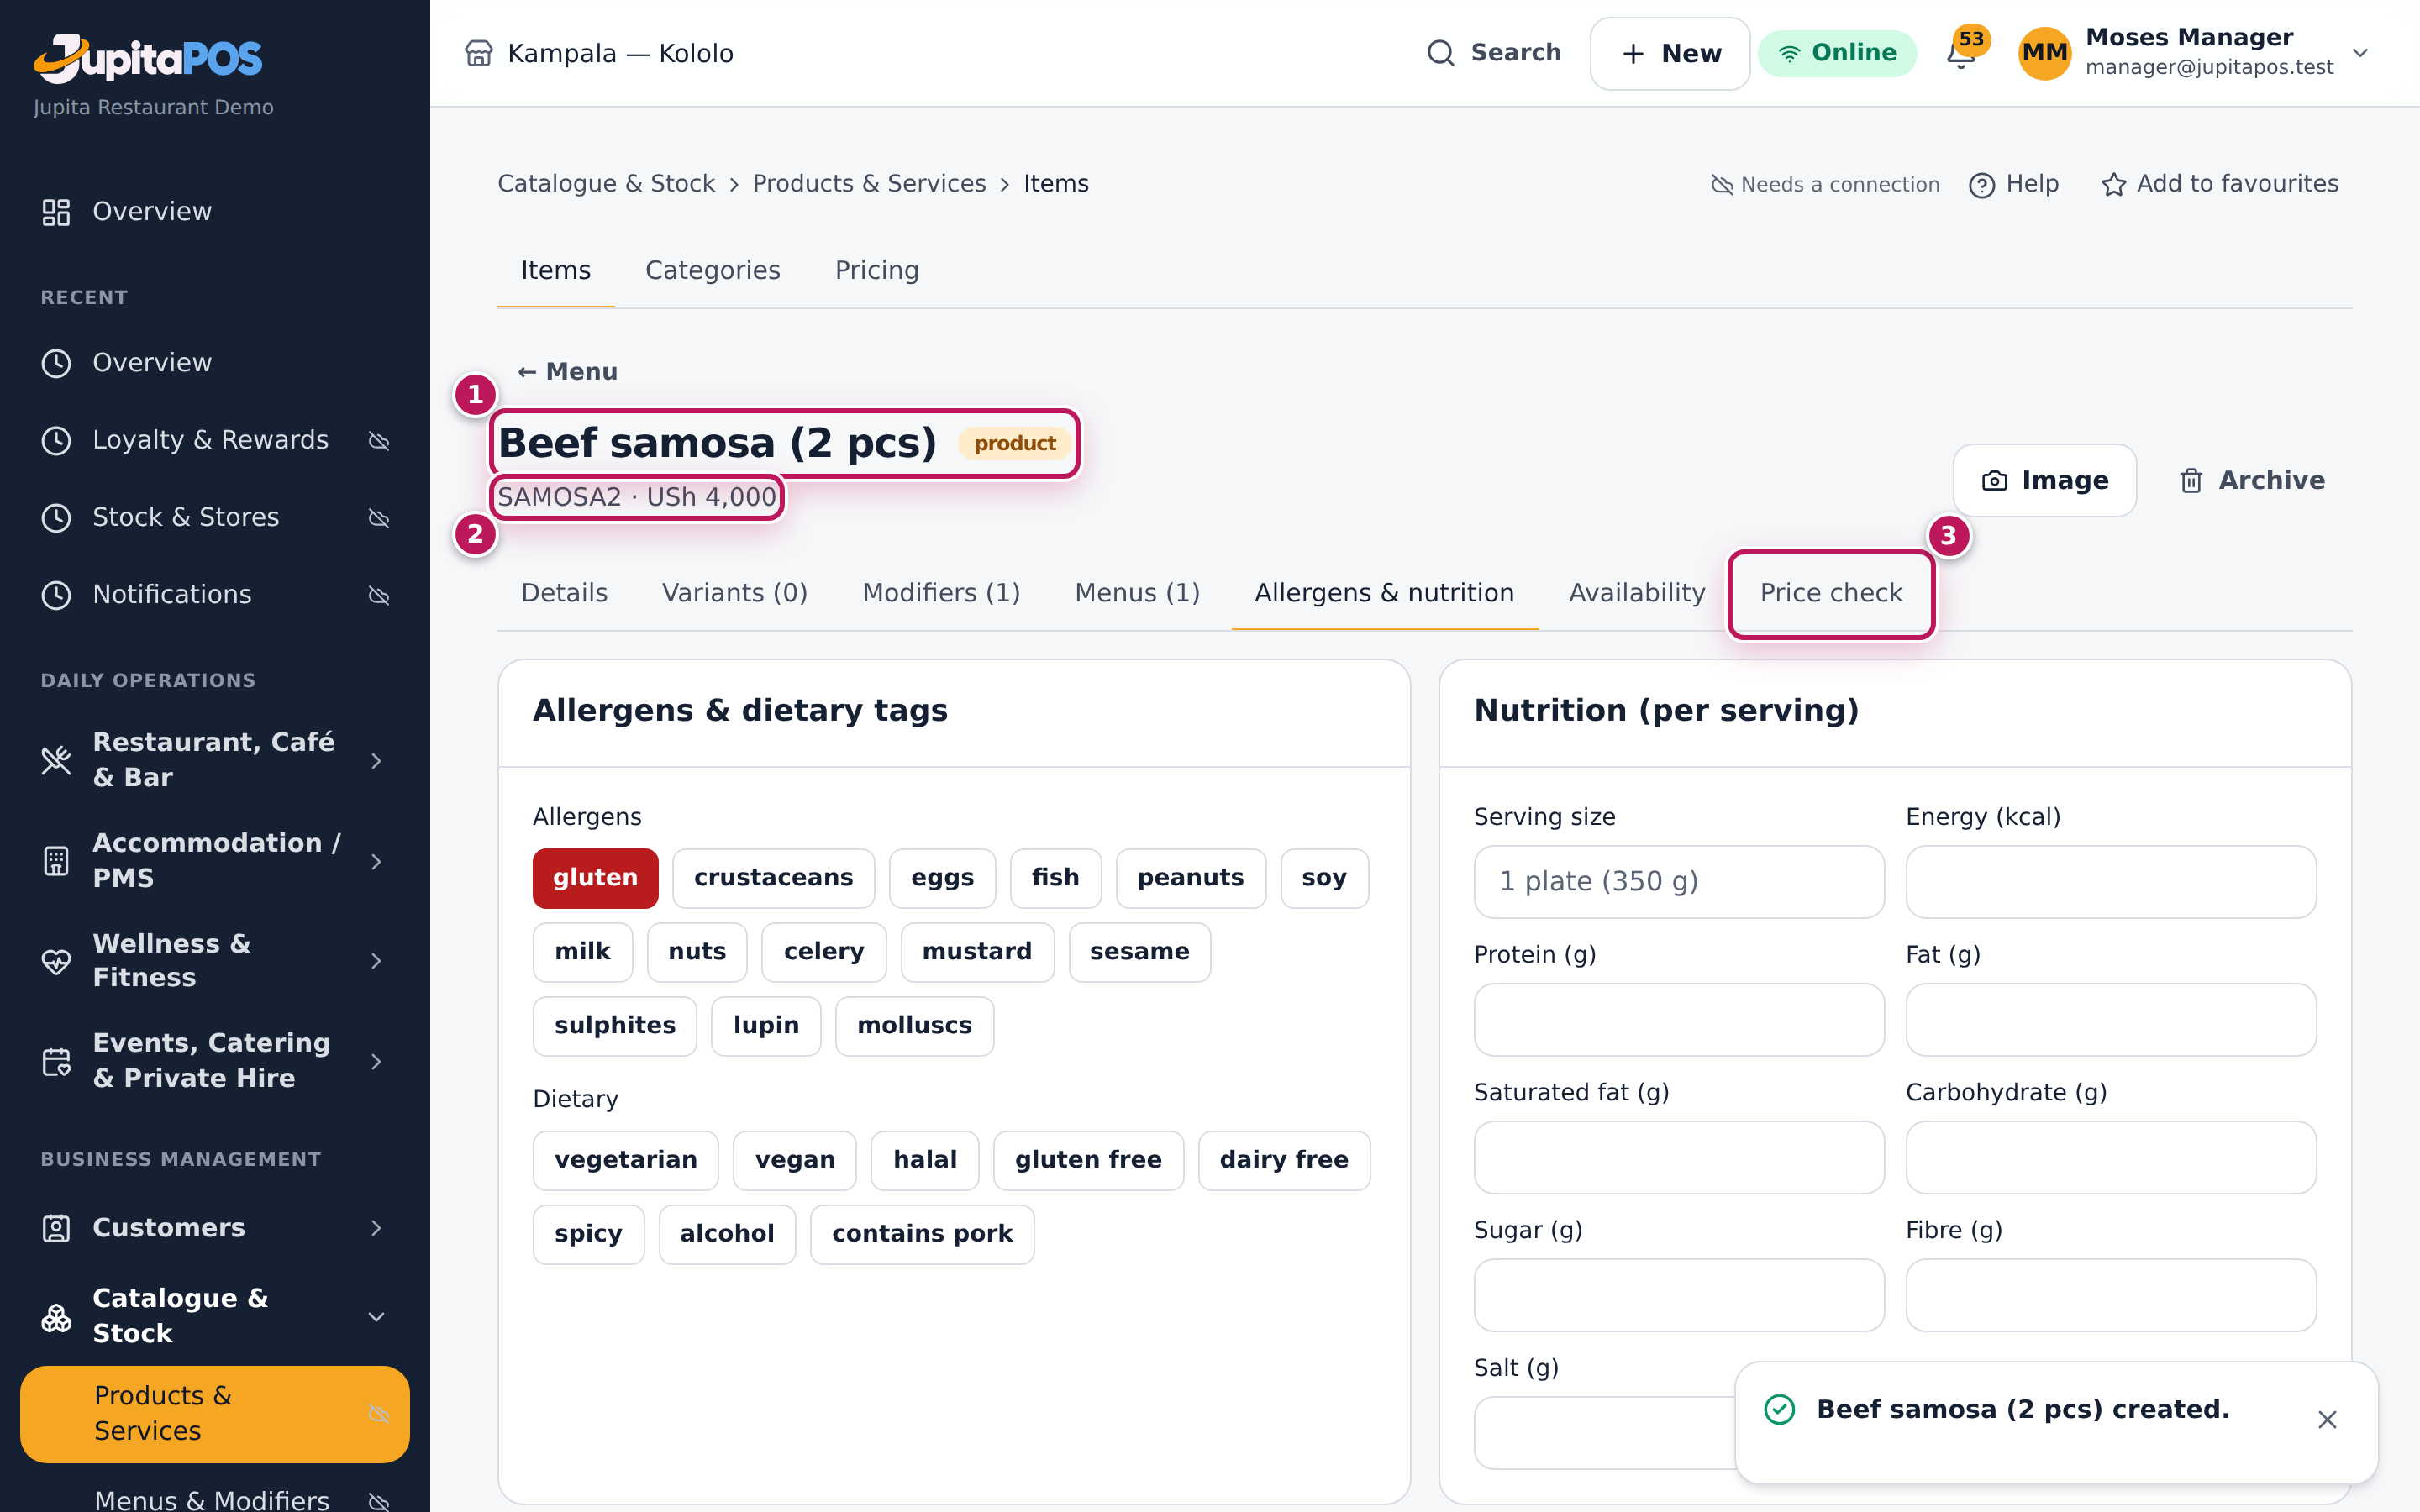
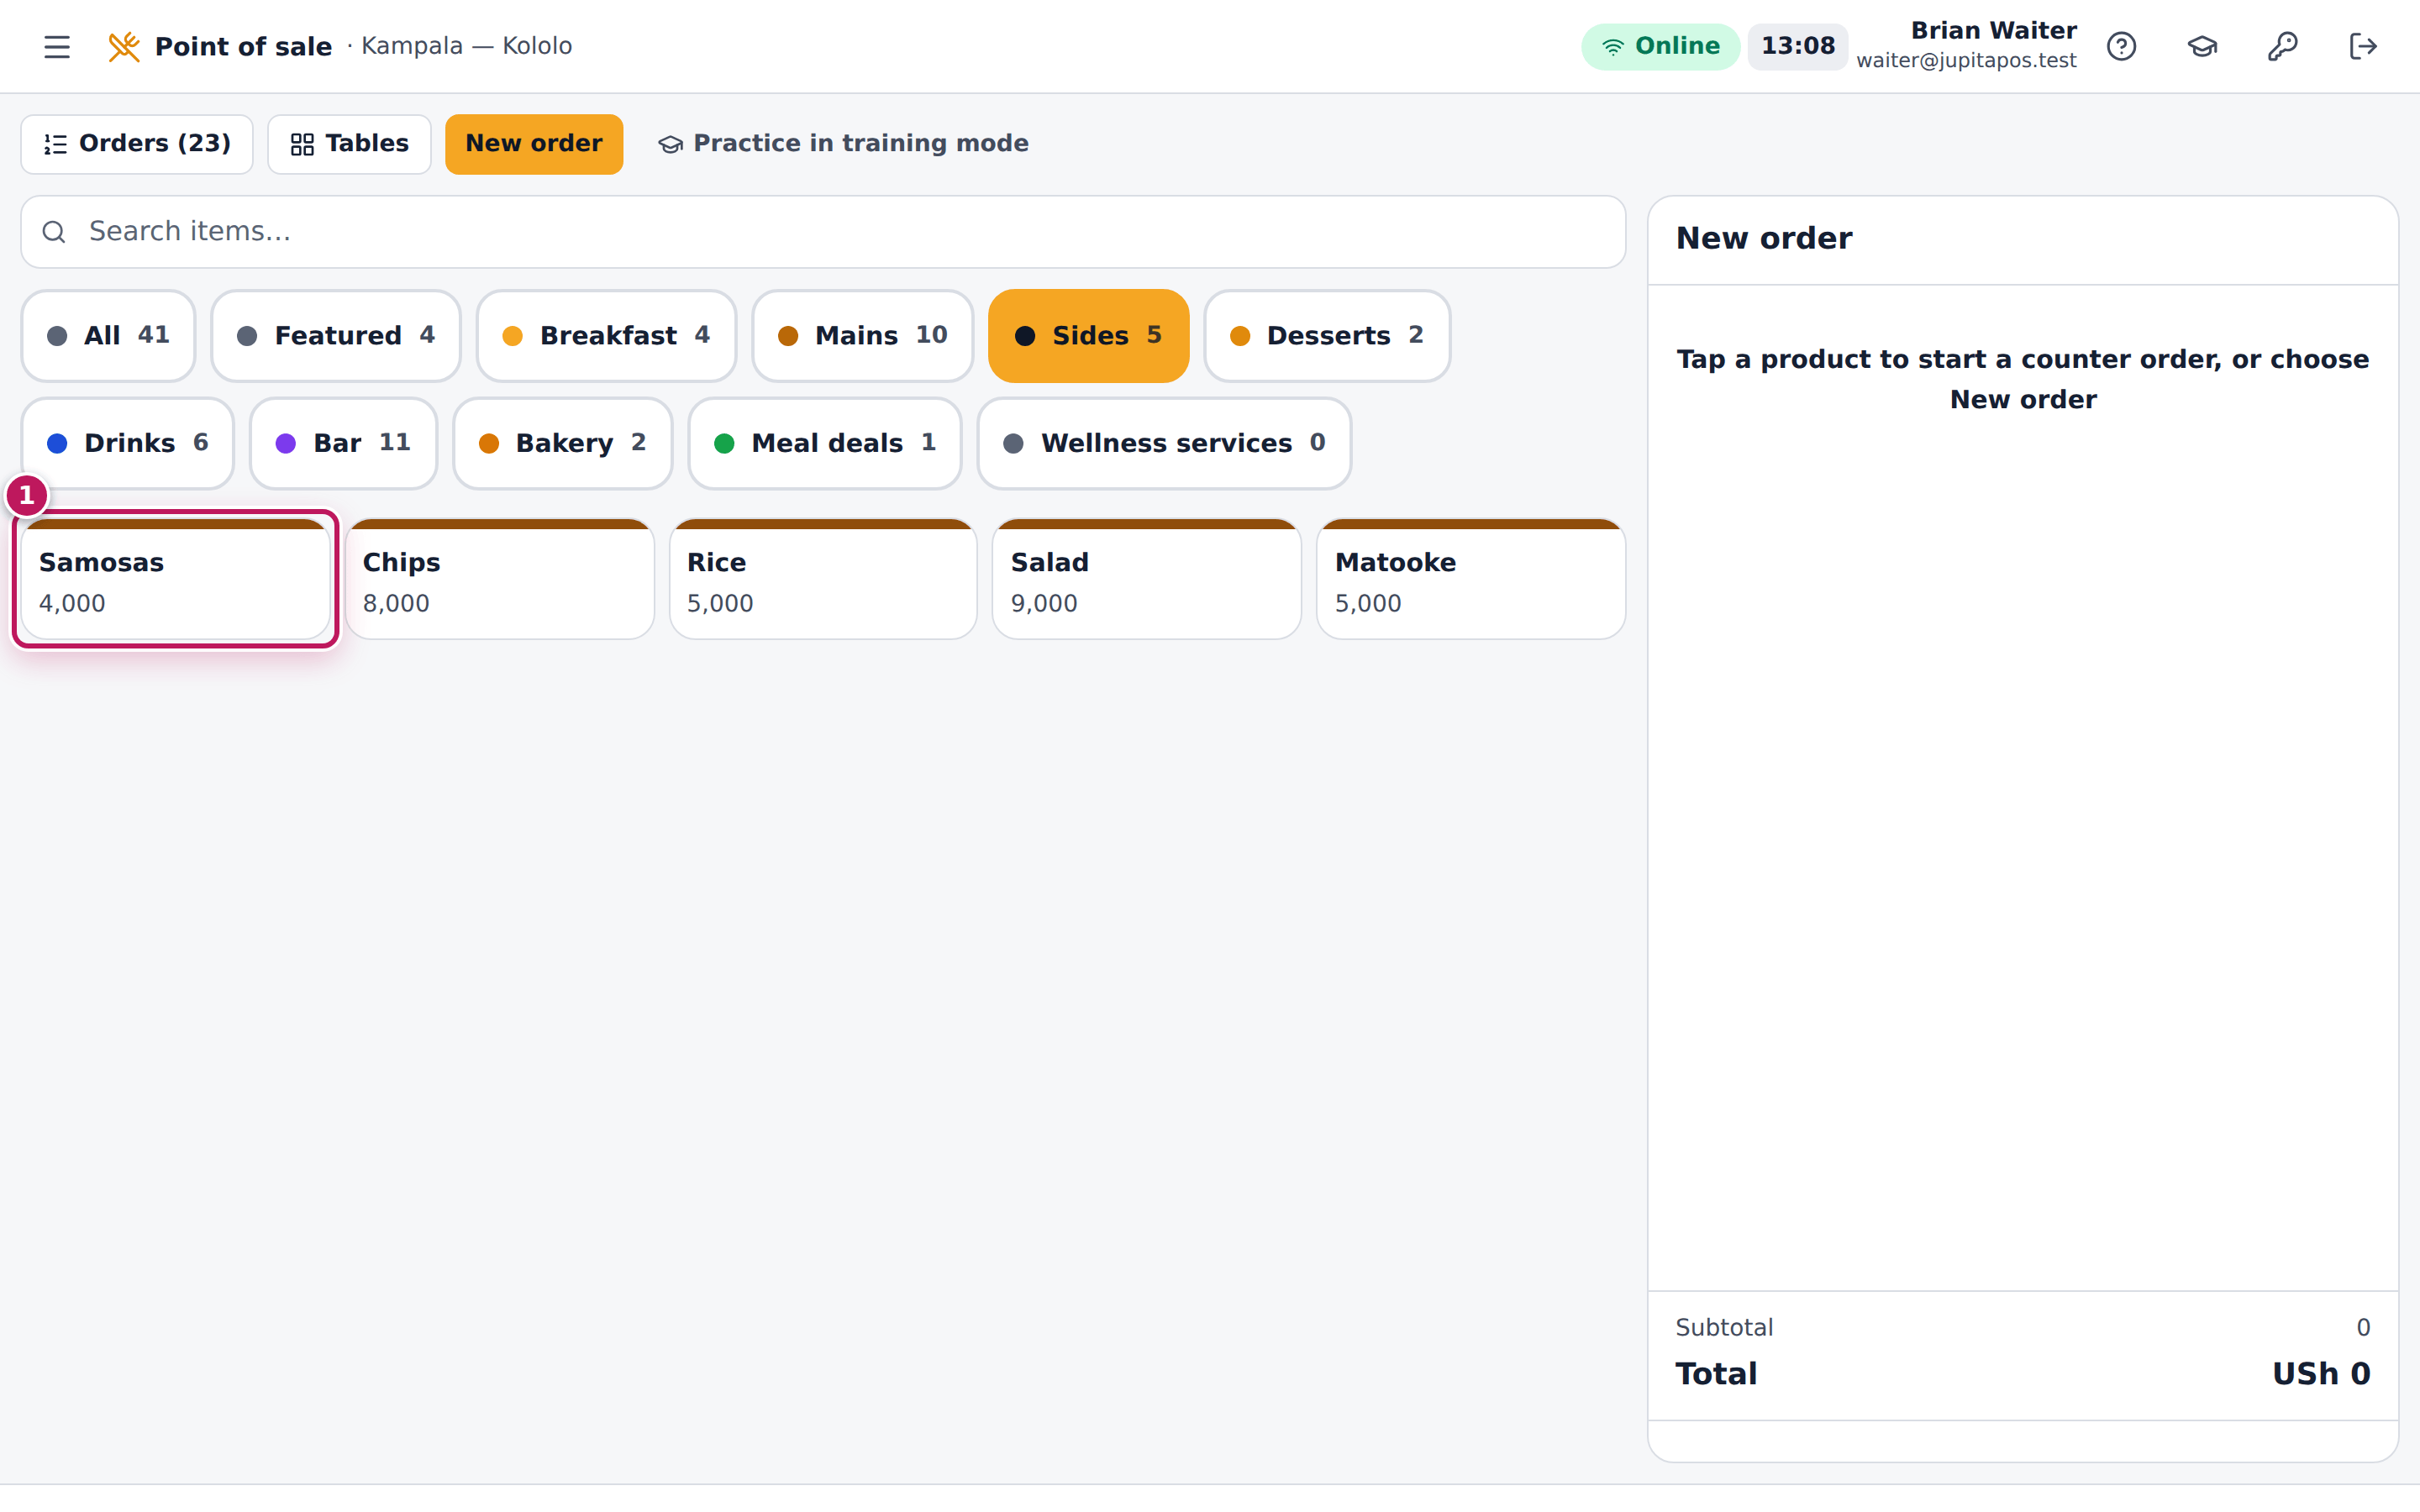
The message Beef samosa (2 pcs) created. shows, and the item’s page shows SAMOSA2 · USh 4,000 (1, 2) with two new tabs, Availability and Price check (3). On every till, under Sides, a Samosas tile at 4,000 appears (1); sent to the kitchen, it goes to the Hot Kitchen.
Screenshot
Common mistakes
- No menu ticked. An item on no live menu does not show on the till. Tick at least the all-day menu.
- A long POS button label. Beef samosa (2 pcs) with lemon does not fit on the tile; keep the label short and put the rest in the name.
- Choices typed into the name. Samosa large and Samosa small as two items make the reports harder; use Variants for sizes.
Troubleshooting
- “This SKU is already used.” SKUs are unique, archived items included. Choose another code.
- The price field is greyed out. You do not have
menu.pricing, or you signed in with a PIN. Sign in with your password, or ask a manager. - “Please check the highlighted fields”. A required field is empty or wrong; the message lists them.
FAQ
How do I add a photo? Open the saved item and tap Image (JPEG, PNG or WebP up to 5 MB). The storefront shows it too.
What are Variants? Sizes, portions or packs of one item — Small / Large, Glass / Bottle, Single / Double. Each has a code, a name and a price (Absolute, or a Delta on the base price); mark one Default.
Can it be sold online? Yes while Sell online is on and one of its menus shows on the storefront.
Organise the categories
Purpose
Group the items the way staff look for them on the till — Breakfast, Mains, Drinks — and send a whole category to its station at once.
Role / permission required
Managers, owners and chefs — menu.manage.
Prerequisites
- None. To route the category, the stations exist (see Set up stations and routing).
Steps
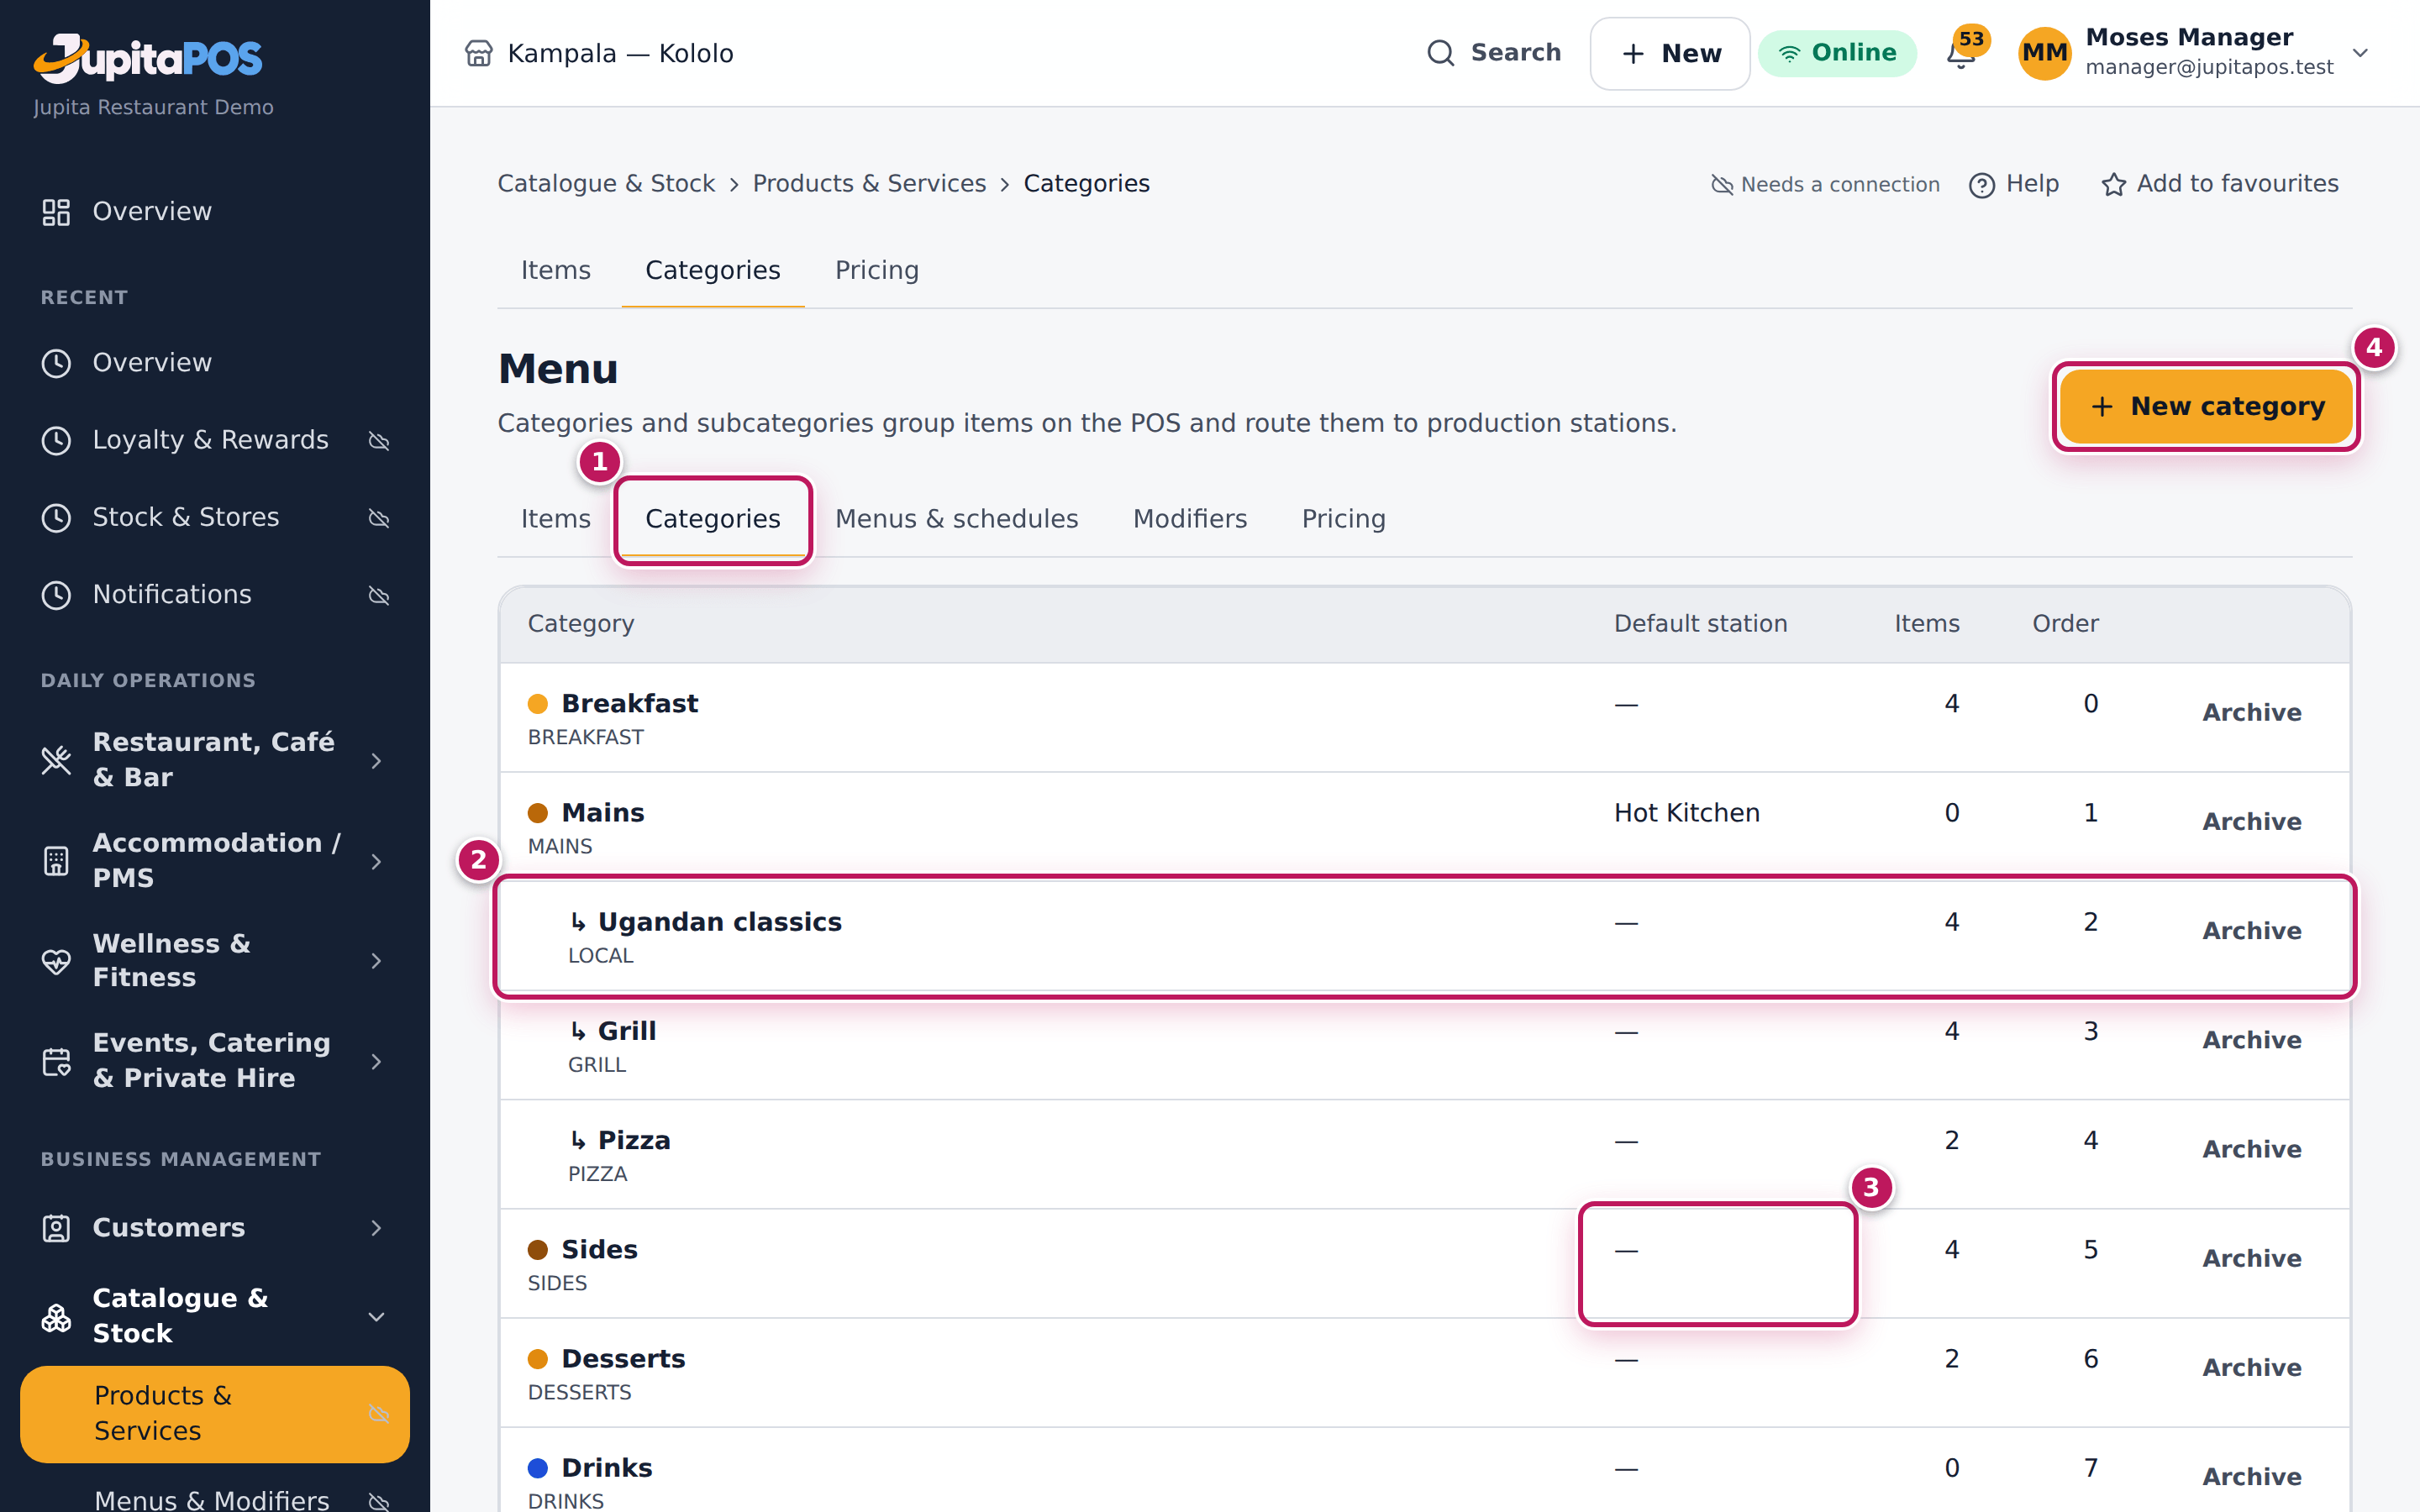
- Open Menu and the Categories tab (1) (
/menu/categories). Each row shows the category, its default station, its number of items and its order; subcategories show under their parent with ↳ (2). - Tap New category (4).
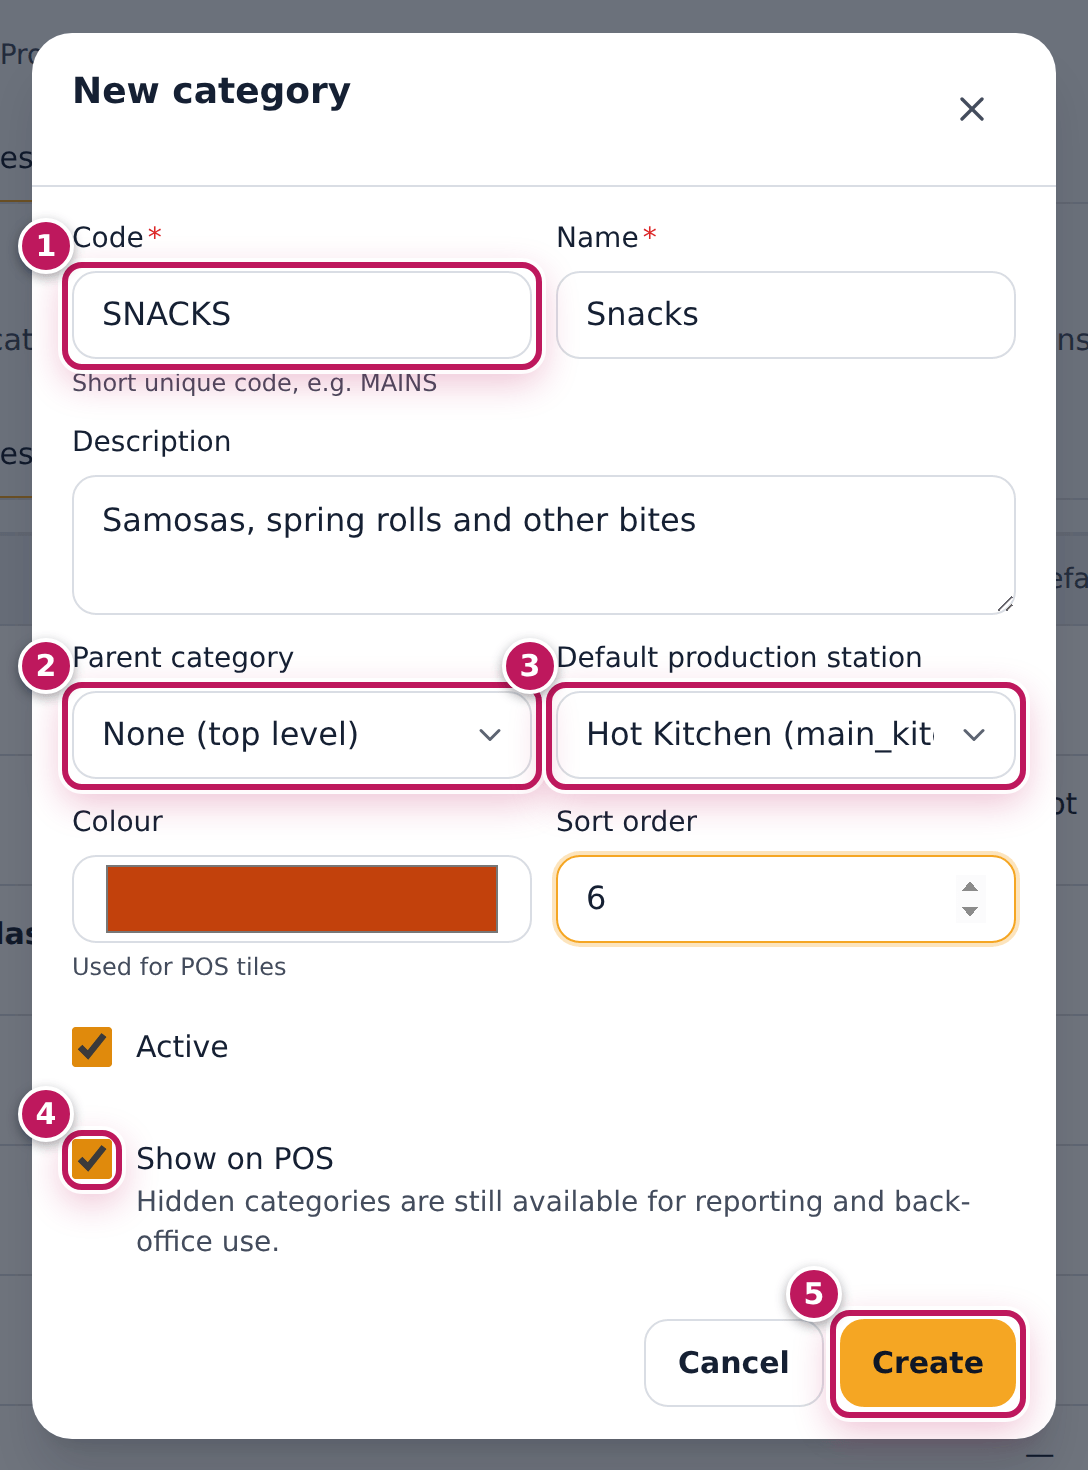
- Enter a short Code (1), SNACKS, and the Name, Snacks.
- Leave Parent category (2) on None (top level), or choose a parent to make a subcategory (two levels only).
- Choose the Default production station (3), Hot Kitchen, to send the category’s items there.
- Pick a Colour for the till’s tiles and a Sort order — the till shows the categories in this order.
- Keep Active and Show on POS (4) ticked. Untick Show on POS for back-office categories such as packaging.
- Tap Create (5).
Expected result
Snacks created. shows and Snacks (SNACKS) is in the list with Hot Kitchen as its default station and 0 items, ready for its first item.
Screenshot
Common mistakes
- Changing a code later. Codes appear in reports and exports; choose them once.
- A third level. A subcategory cannot have its own subcategories.
Troubleshooting
- “This code is already used.” Codes are unique, archived categories included.
- Archive says items are still in the category. Move or archive its items first.
Create a modifier group
Purpose
Make the till ask the question a dish needs — a size, a milk, a cooking preference, extra sauces — and charge for the answer.
Role / permission required
Managers, owners and chefs — menu.manage.
Prerequisites
- None. Attach the group to items afterwards (see Add a menu item).
Steps
- Open Menu, tab Modifiers (
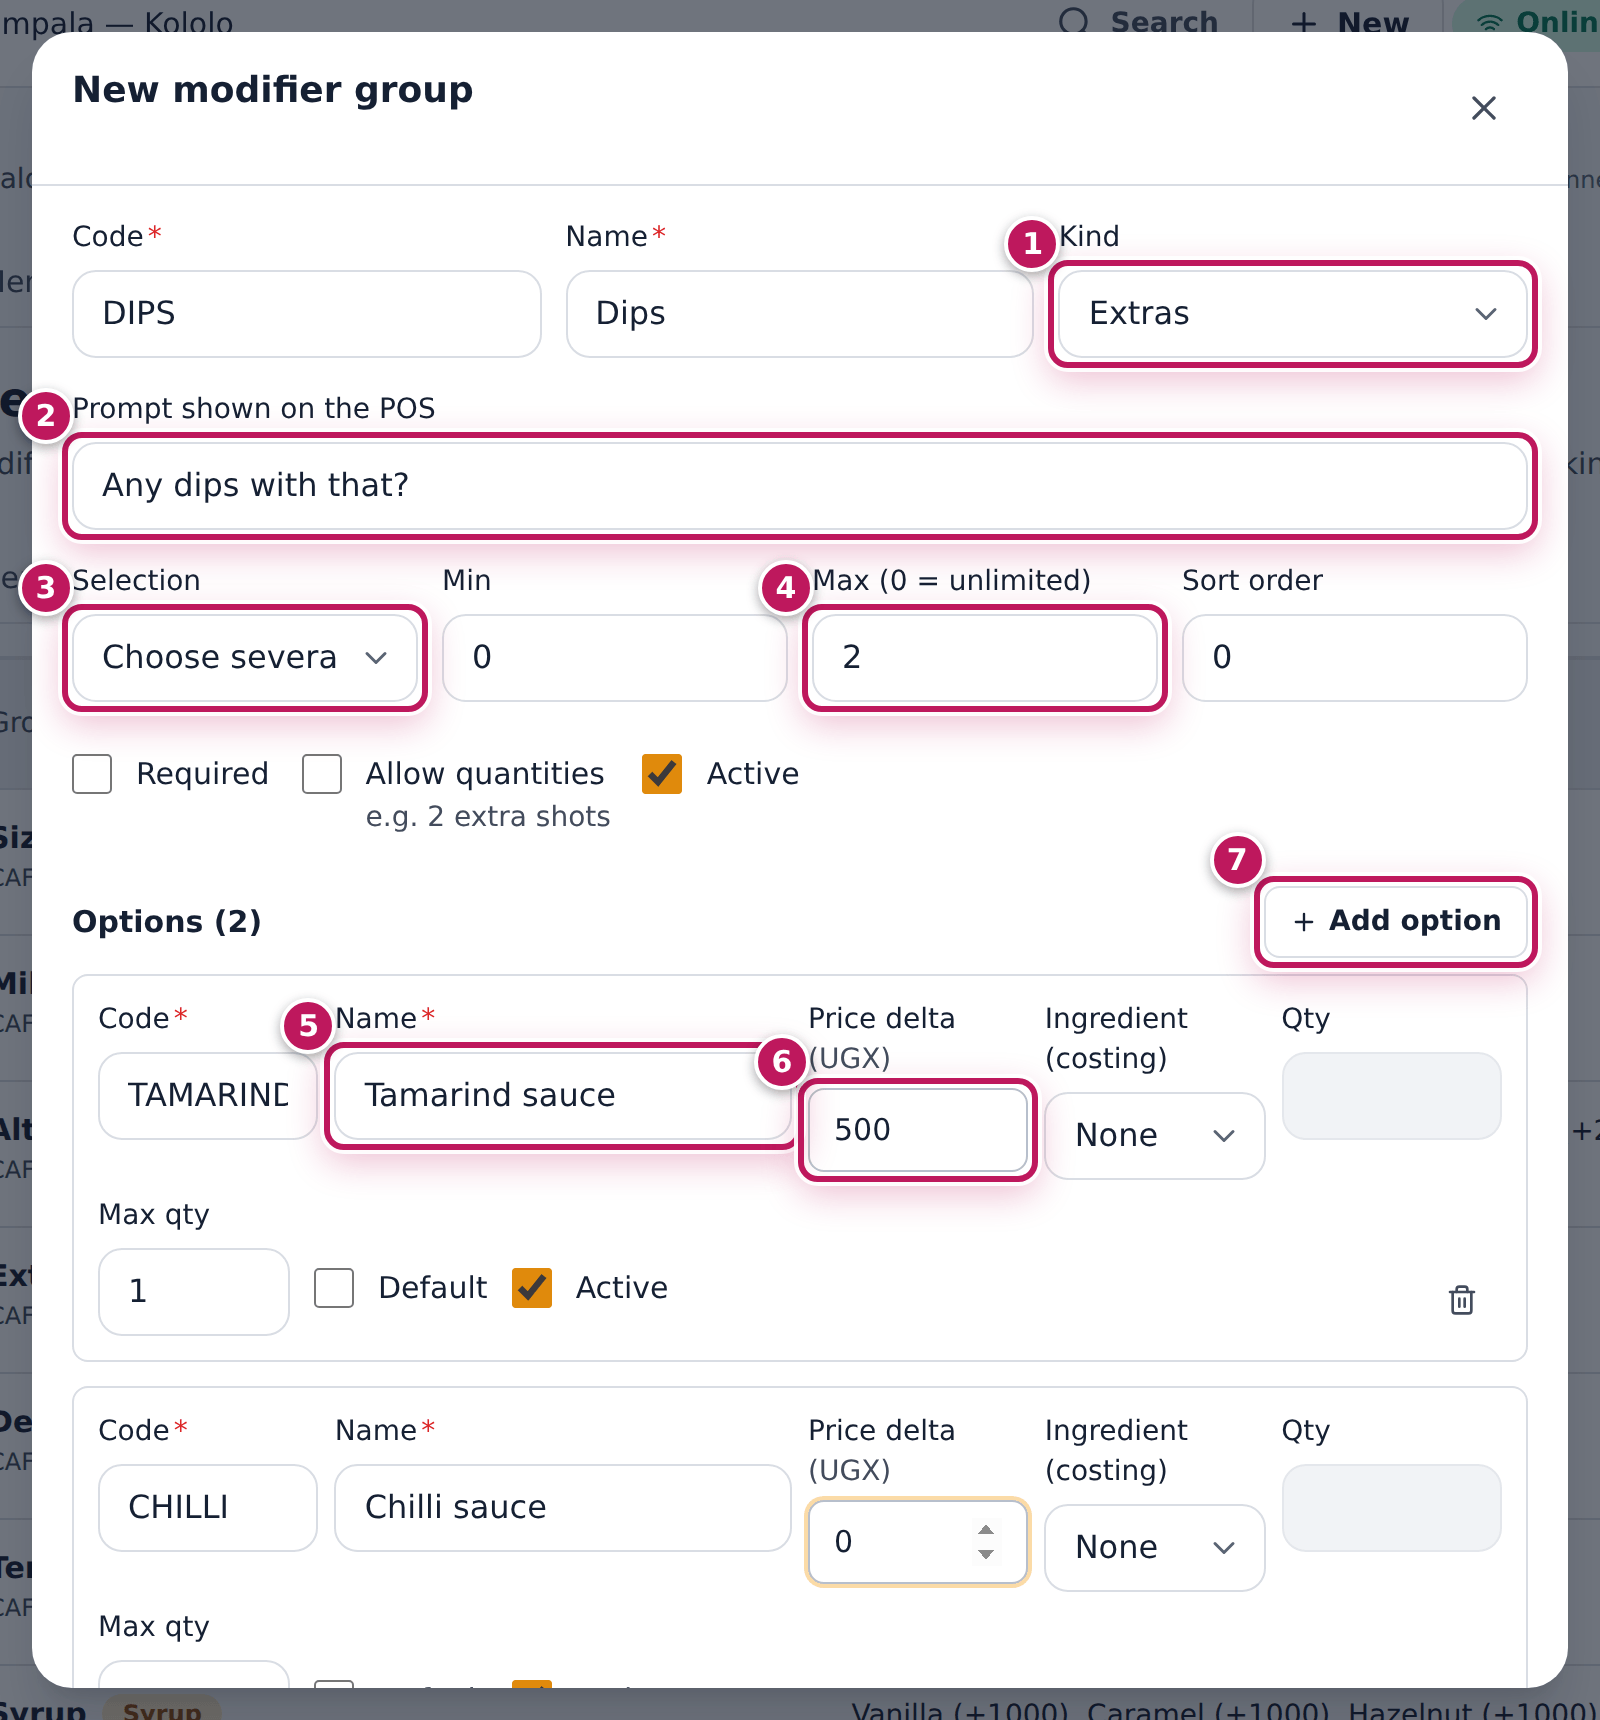
/menu/modifiers), and tap New group. - Enter the Code, DIPS, the Name, Dips, and the Kind (1), Extras.
- Type the question in Prompt shown on the POS (2), Any dips with that?
- Choose Selection (3): Choose one or Choose several. Set Min and Max (0 = unlimited) (4) — here 0 and 2. Tick Required if the till must have an answer.
- The form opens with one empty option. Enter its Code, its Name (5), Tamarind sauce, and its Price delta (6), 500 (0 for free, negative for a discount). Tap Add option (7) for each further answer — here Chilli sauce at 0.
- Tap Create group at the bottom of the form.
- Attach the group to the items that need it: on each item, tab Modifiers, tick the group and Save item.
Expected result
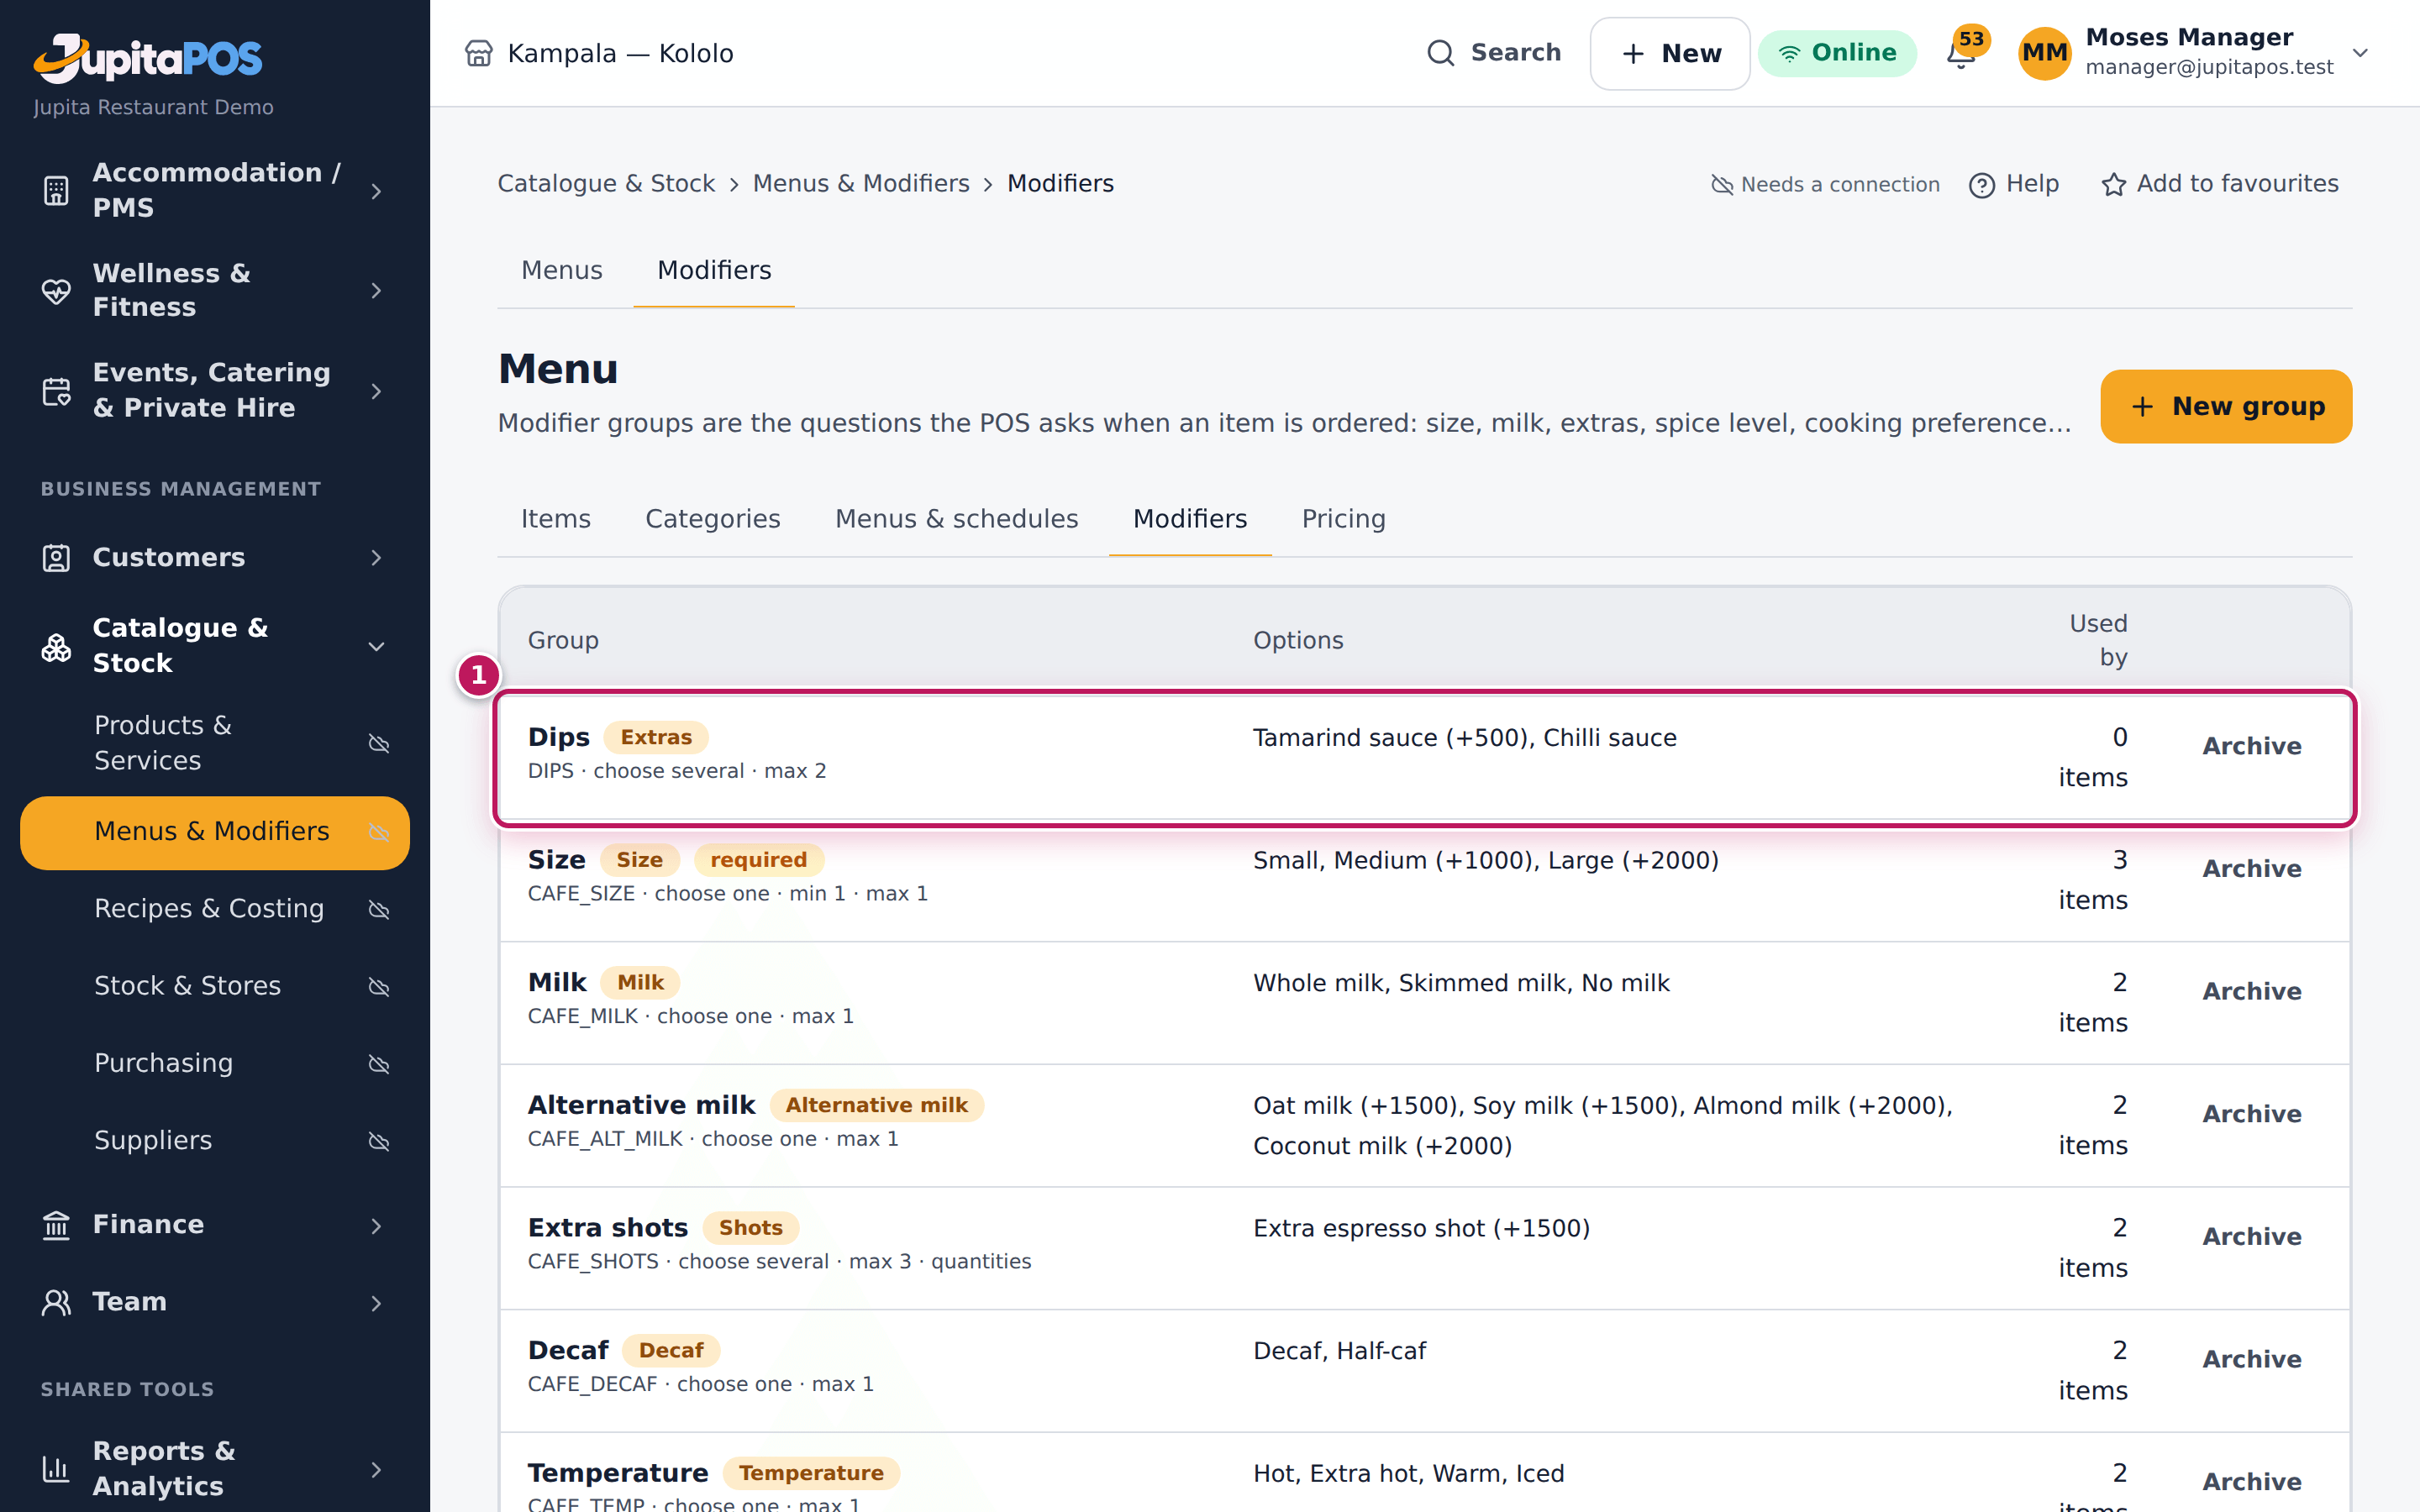
Dips created. shows. The list shows Dips — Extras, DIPS · choose several · max 2, the options Tamarind sauce (+500), Chilli sauce, used by 0 items until you attach it.
Screenshot
Common mistakes
- A minimum without Required. Min only counts once something is chosen: an optional group with Min 2 lets the waiter choose nothing, but not just one. Tick Required when the till must have an answer.
- Choose one with a Max above 1. Choosing Choose one sets Max to 1, and the group cannot be saved with a higher Max; for more than one answer choose Choose several.
- Several groups for one question. Dips 1 and Dips 2 make two questions; use one group with Max 2.
Troubleshooting
- The till does not ask the question. The group is not attached to the item, or it is not Active.
- An old option still shows on past orders. Options you remove are archived, not deleted, so past orders keep their history.
FAQ
What is Install café set? A button (shown until the set exists) that creates the eleven groups a coffee bar needs: size, milk, alternative milk, shots, decaf, temperature, syrup, cream, sugar, ice and toppings.
Build a meal deal (combo)
Purpose
Sell a set — a breakfast deal, a lunch combo, a family platter — at one price, with the guest choosing within each part and paying extra only for the upgrades.
Role / permission required
Managers, owners and chefs — menu.manage; its price needs menu.pricing.
Prerequisites
- The items that go in the deal exist (see Add a menu item).
Steps
- Open Menu and tap New item. Enter the SKU / PLU, BFDEAL2, the Name, Rolex breakfast deal, and the POS button label, Rolex deal; choose the Category, Meal deals.
- In Type, choose Combo / meal deal, and keep Combo kind on Meal deal (or Platter, Family meal, Bundle).
- Enter the deal’s Base price, 10000, and its Tax.
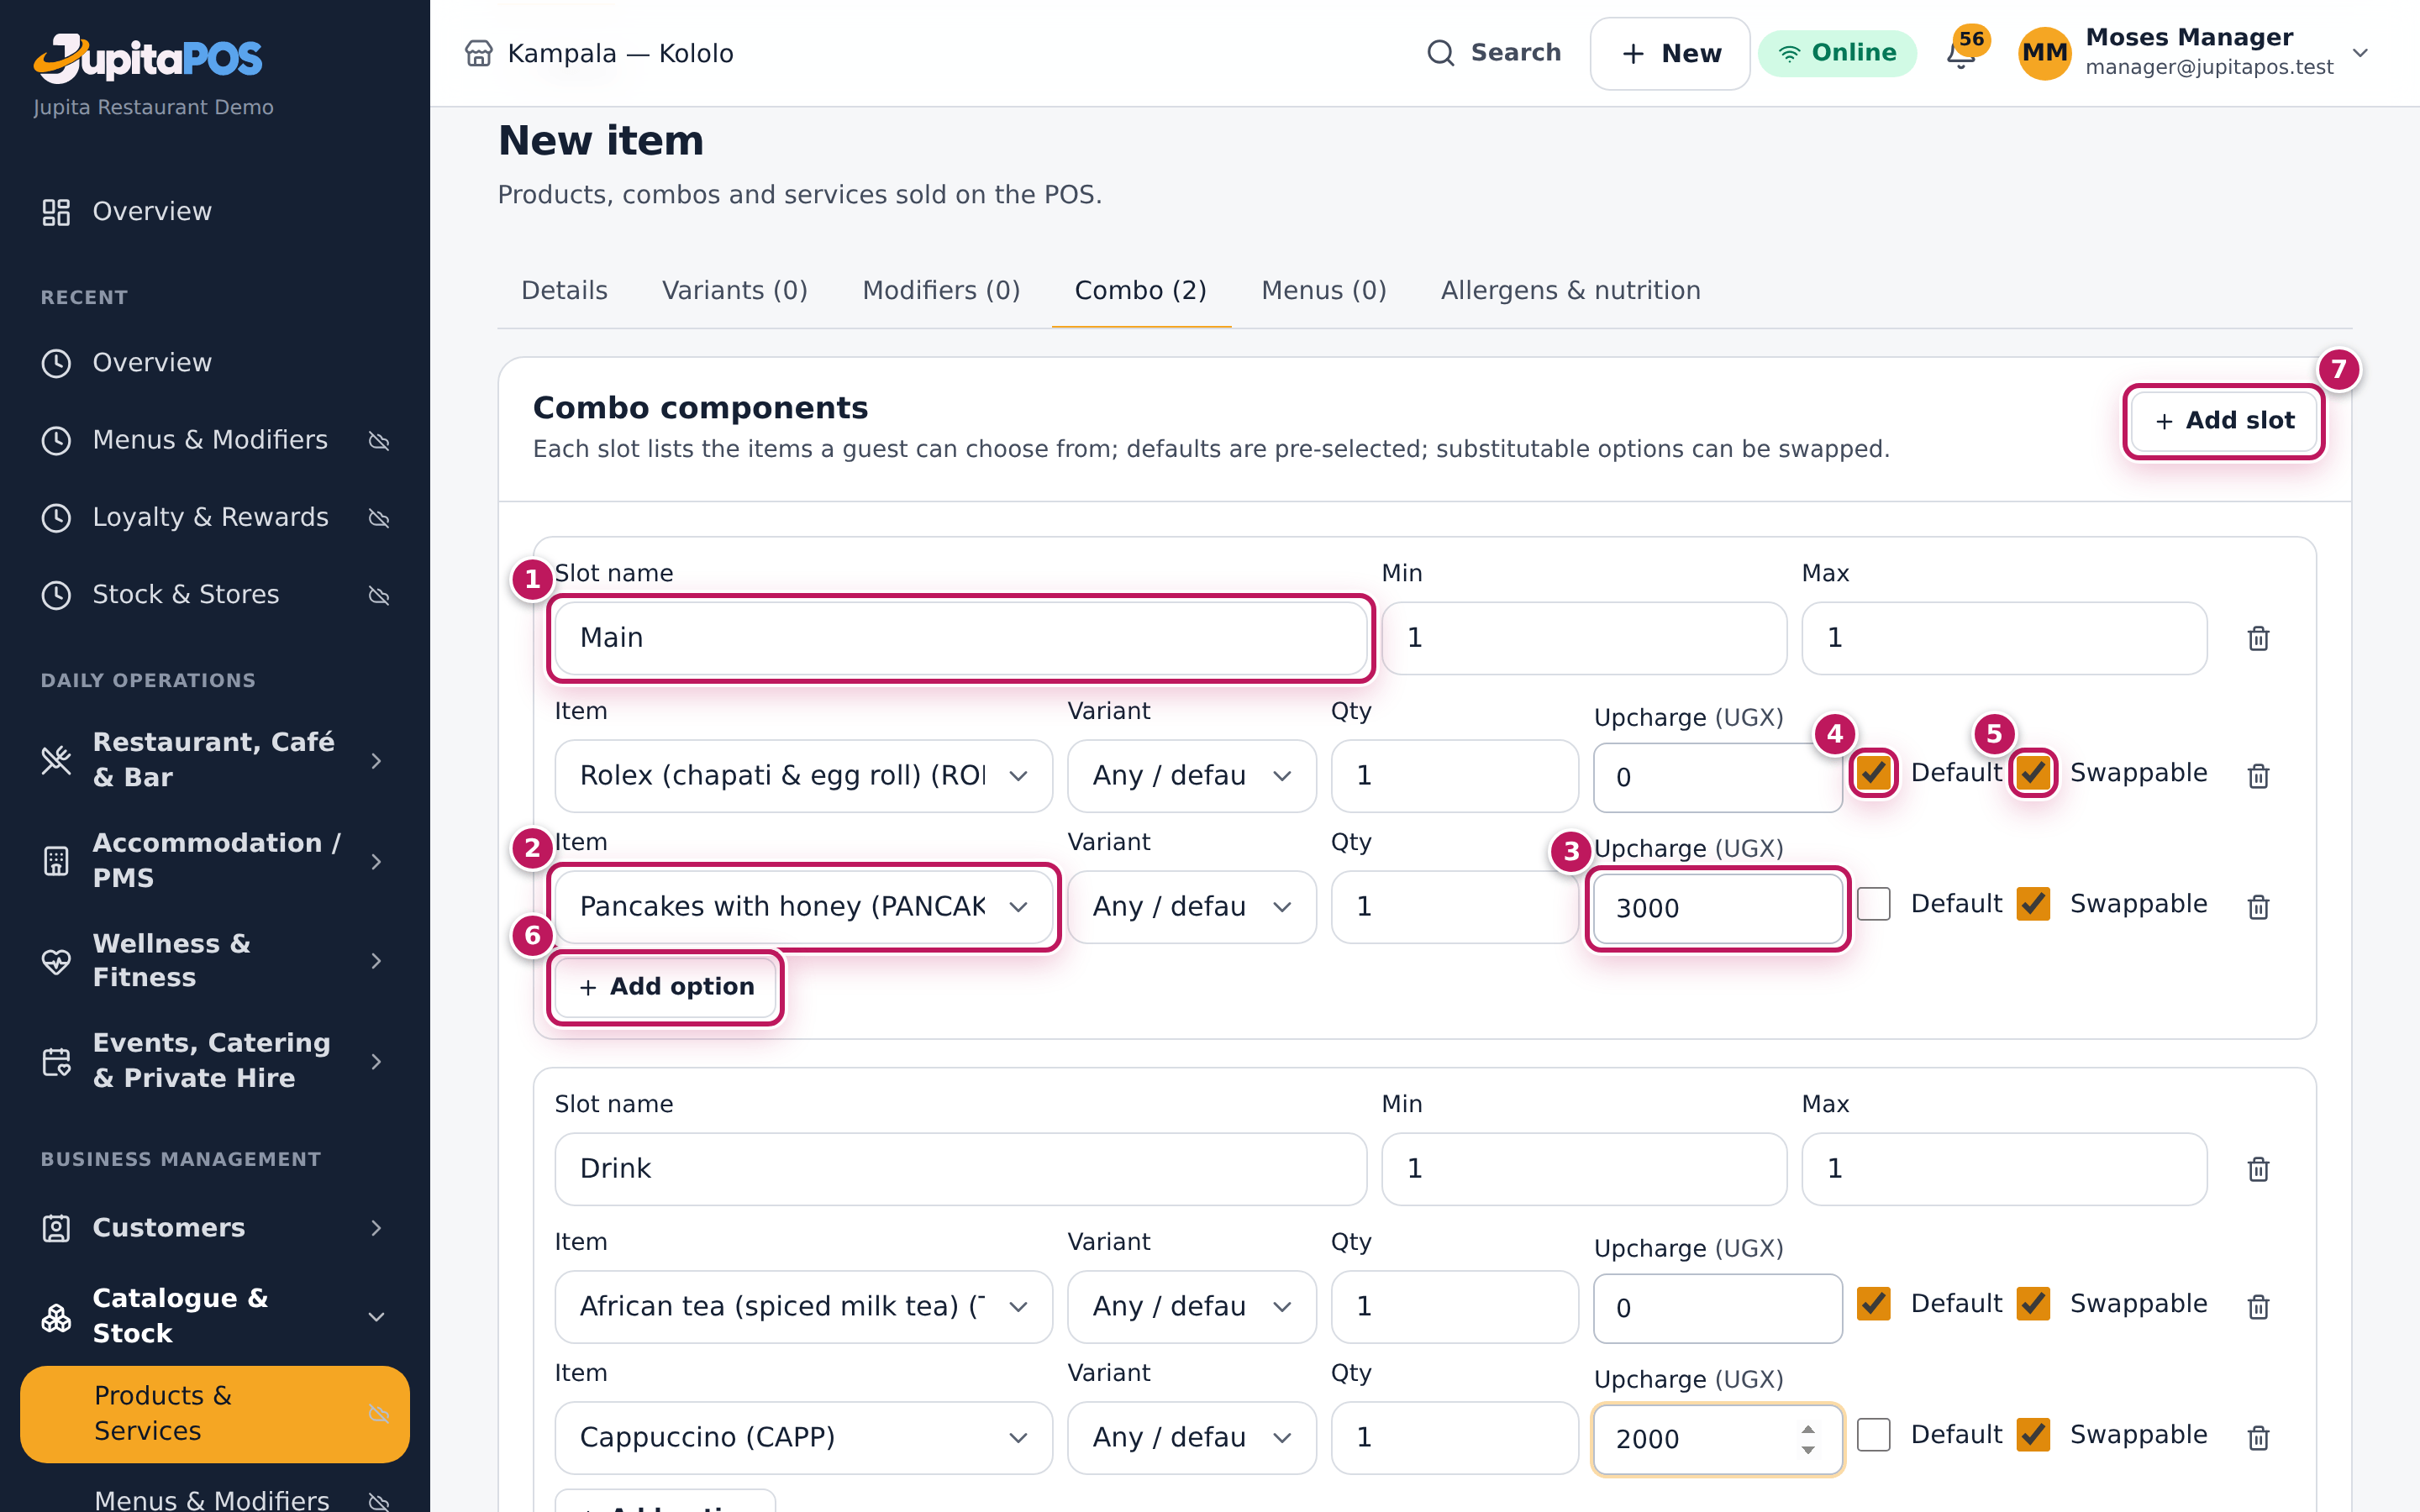
- Open the Combo tab and tap Add slot (7). Name the slot (1), Main, and set Min and Max to 1.
- Tap Add option (6) for each choice in the slot and pick the Item: the first, the Rolex, is the Default (4) — it comes pre-selected. Add the Pancakes (2) with an Upcharge (3) of 3000.
- Keep Swappable (5) ticked to let the guest change the default. A slot whose default is not swappable is fixed.
- Add a second slot, Drink: African tea as the default, a Cappuccino at 2000 more.
- On the Menus tab tick the All-day menu, and tap Create item.
Expected result
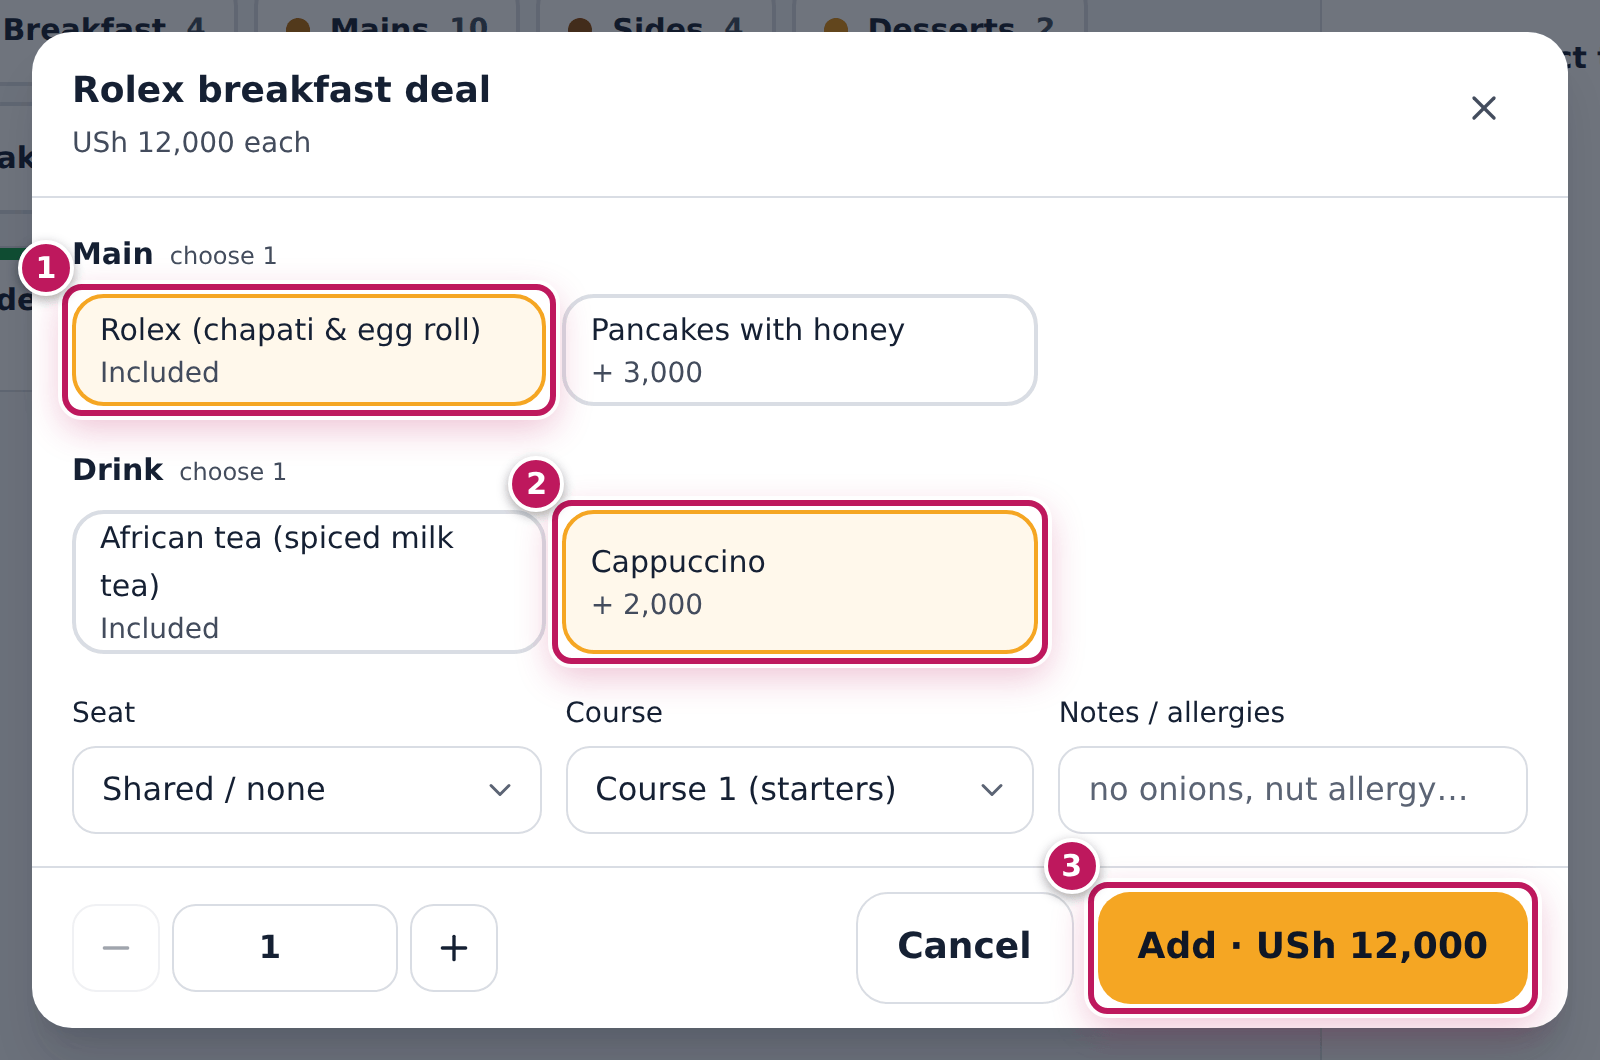
Rolex breakfast deal created. shows and the item has Combo (2). On the till, under Meal deals, the Rolex deal tile at 10,000 opens a dialog with Main (Rolex … Included, Pancakes + 3,000) and Drink. Swapping the tea for a Cappuccino (2) makes it Add · USh 12,000 (3).
Screenshot
Common mistakes
- No default in a slot. The till then asks the guest to choose every time; tick Default on the usual choice.
- Upcharges on the default. The default is included in the deal’s price; put the upcharge on the upgrades.
- Forgetting the menu. A deal on no live menu never shows on the till.
Troubleshooting
- The till’s Add button stays grey. A slot has fewer choices than its Min; pick one in each slot.
- An option cannot be tapped on the till. Its slot’s default is not swappable.
Schedule a menu
Purpose
Show the right dishes at the right time and place — breakfast until 11:00, lunch at the lunch price, a late-night bar menu at one branch — without changing the tills by hand.
Role / permission required
Managers, owners and chefs — menu.manage; menu prices need
menu.pricing.
Prerequisites
- The items exist (see Add a menu item).
Steps
- Open Menu, tab Menus & schedules (
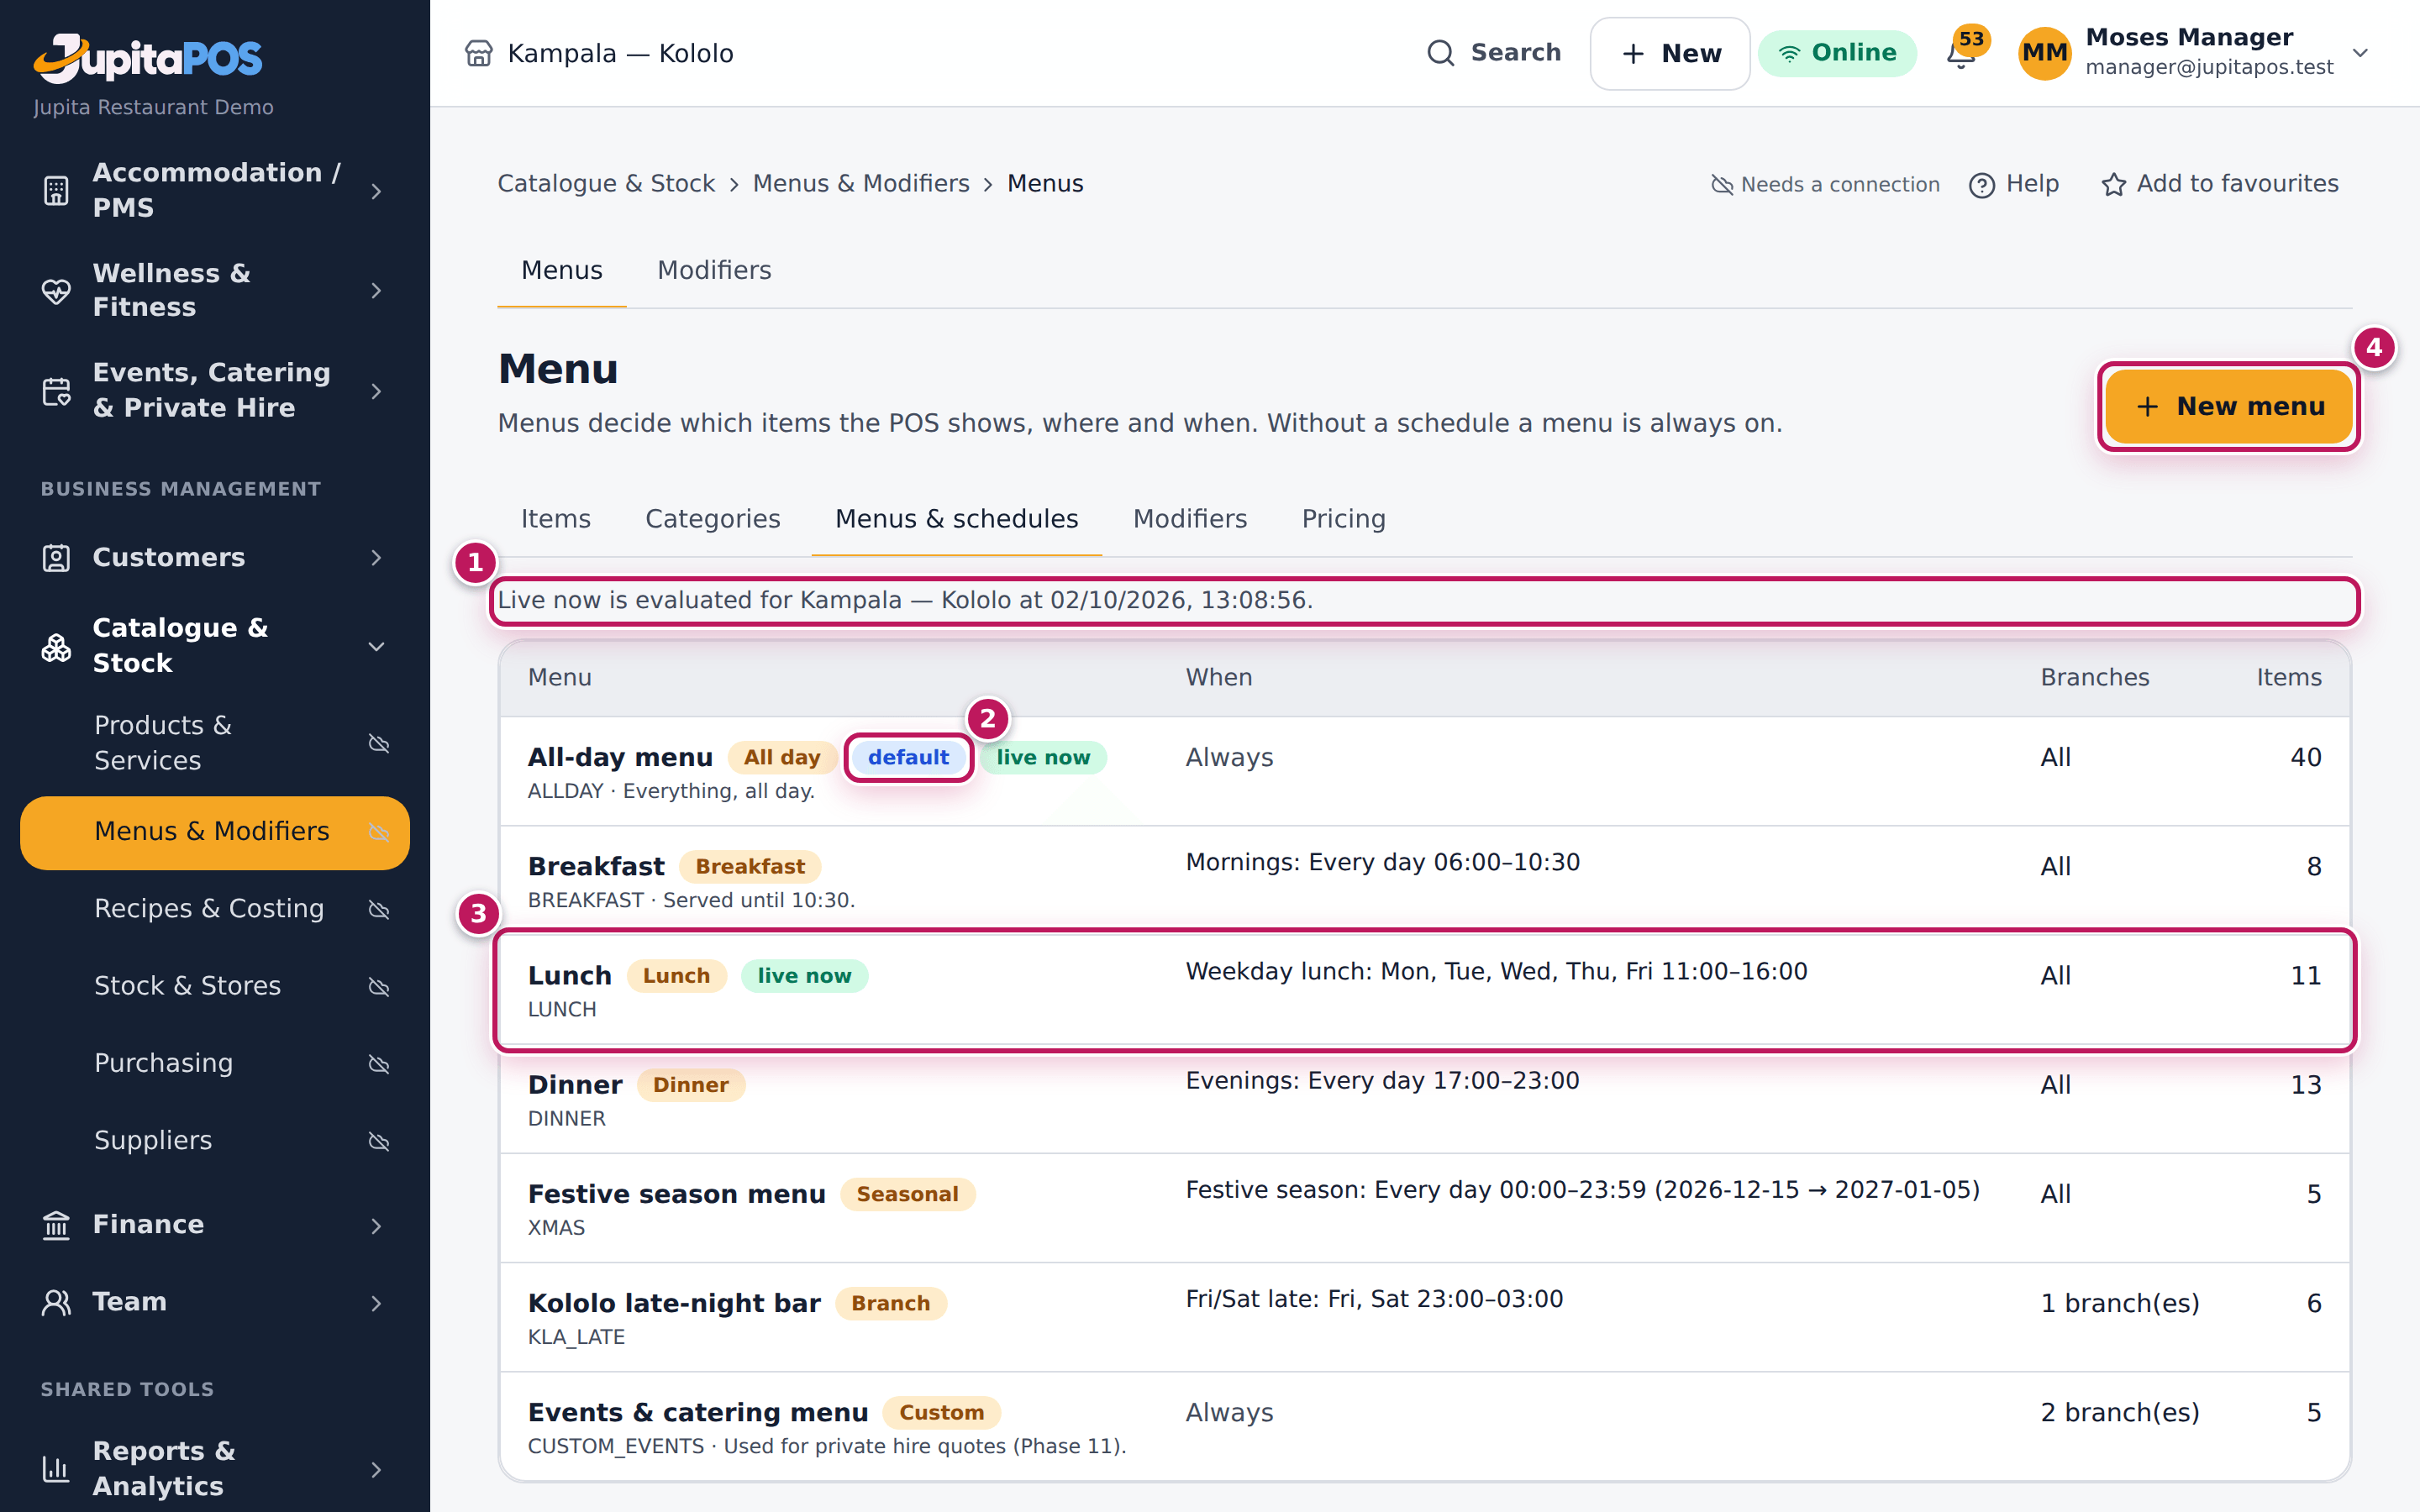
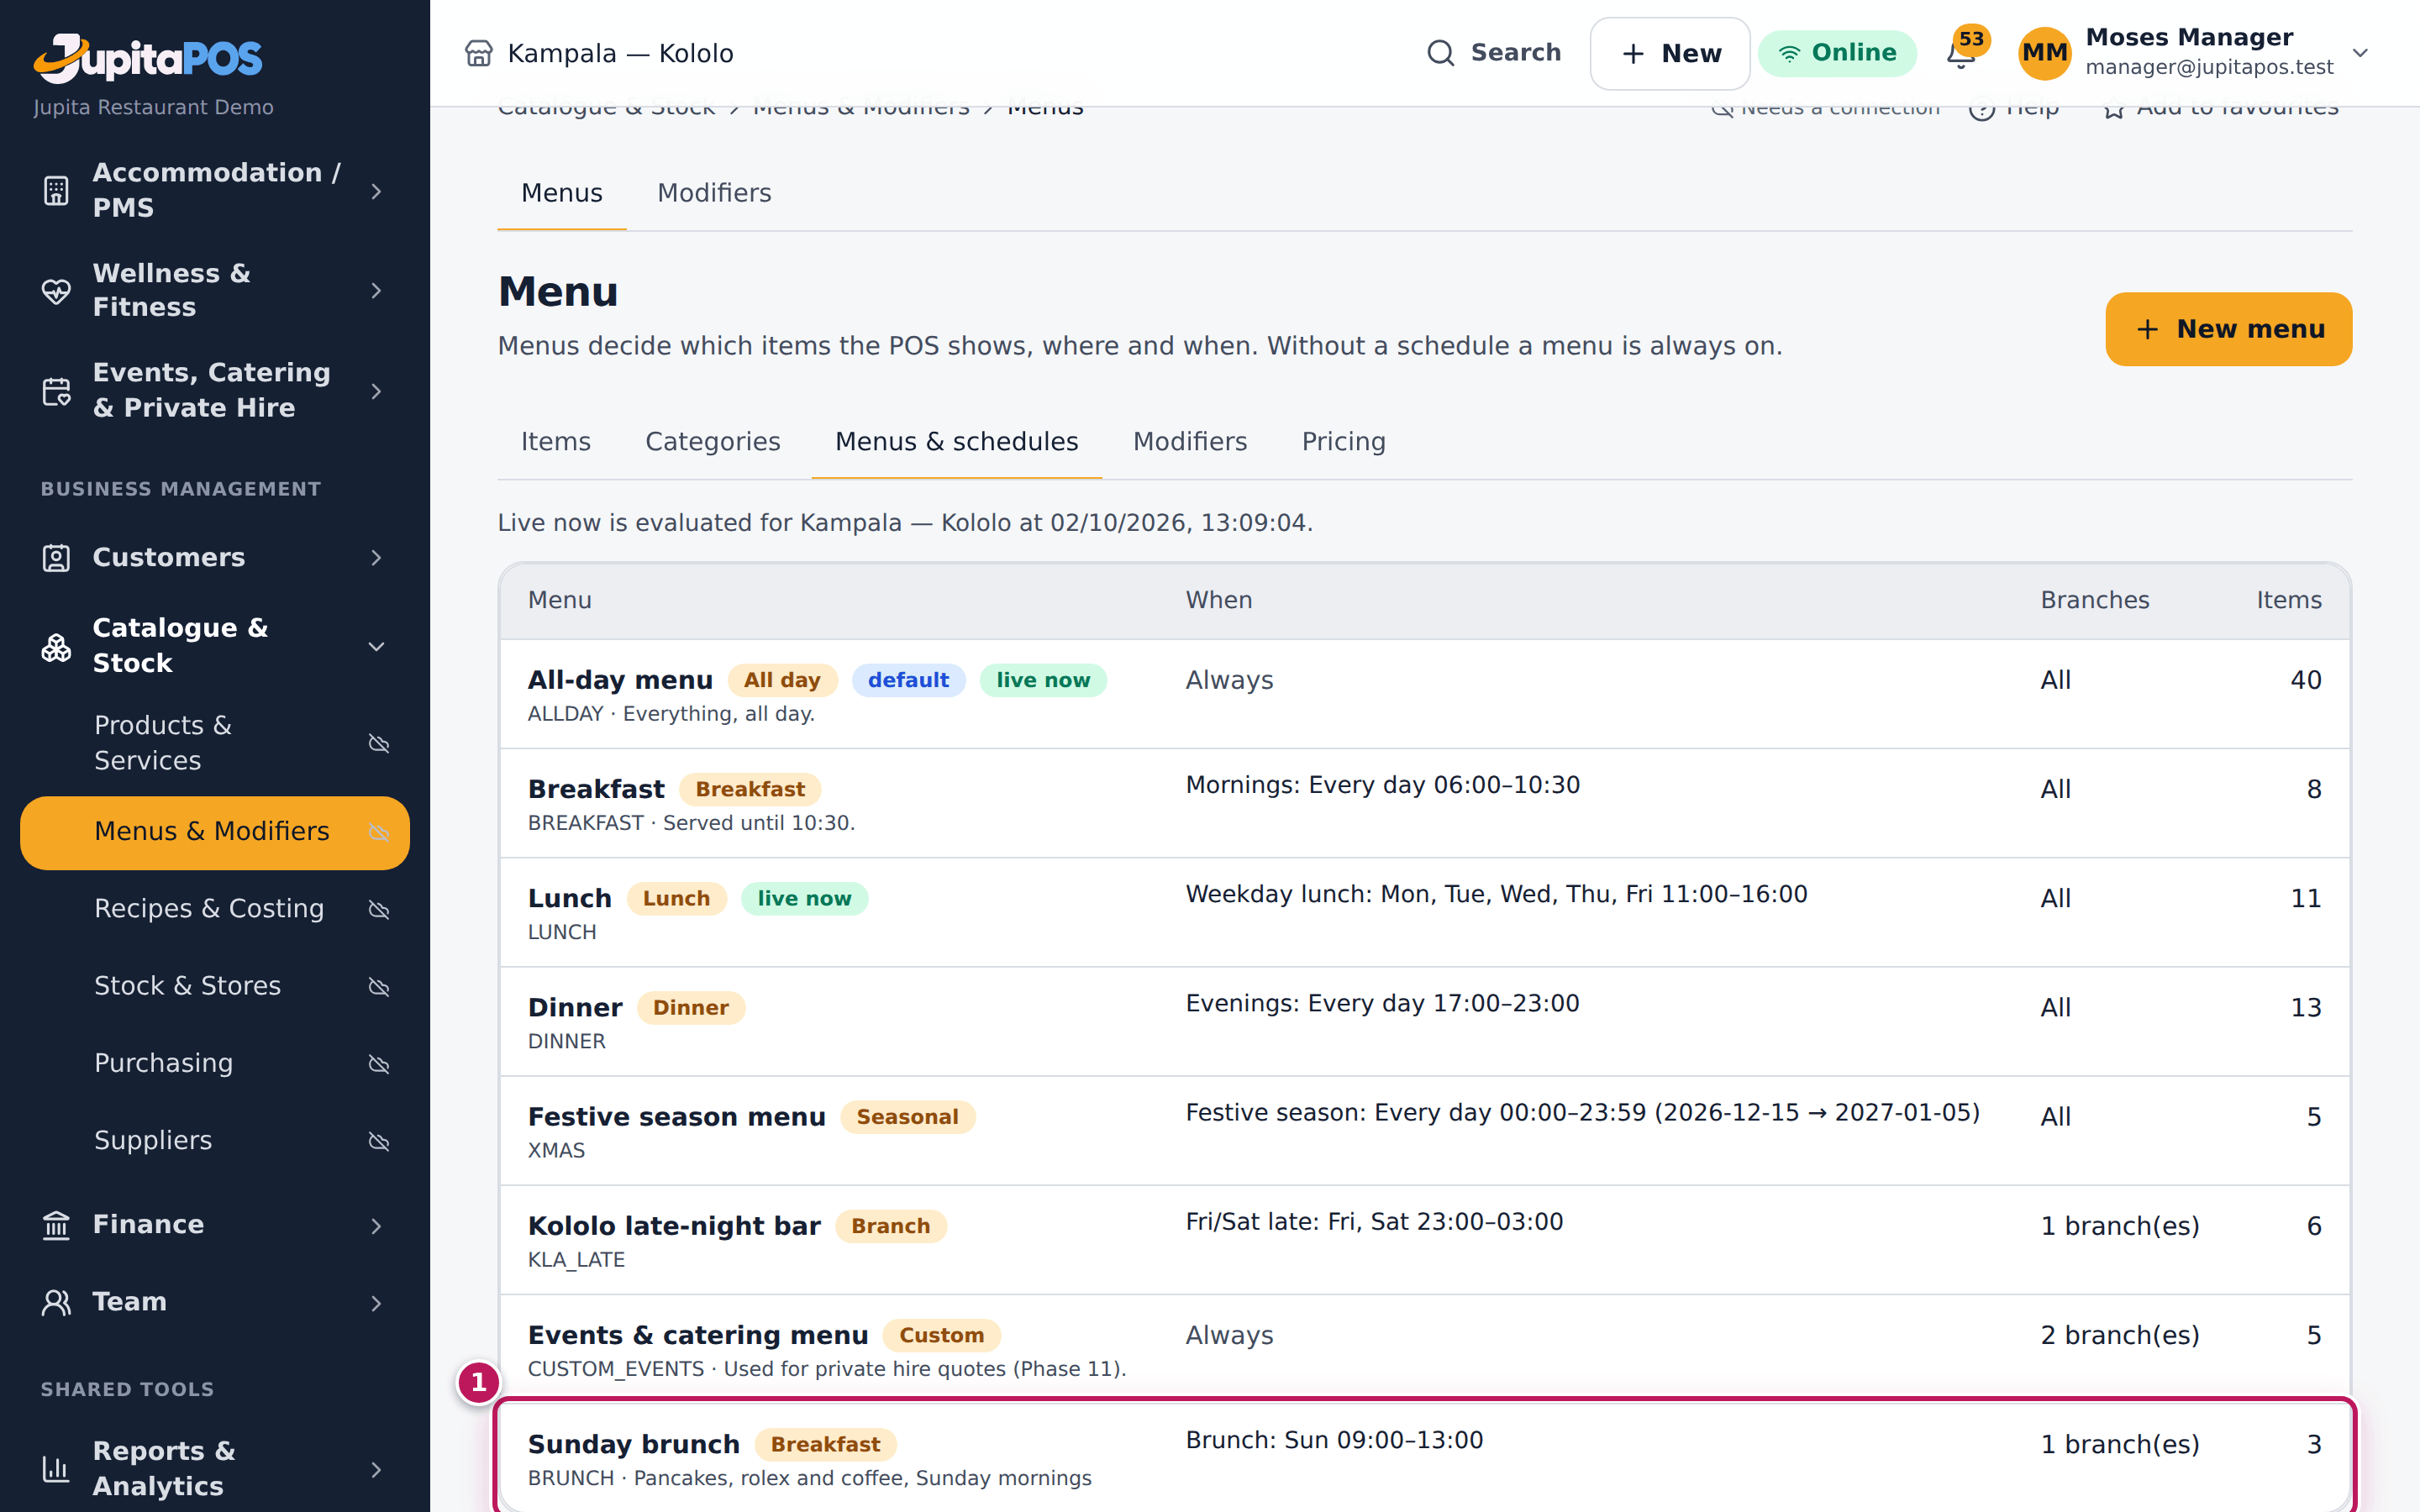
/menu/menus). The list shows when each menu is live (3), and live now at your branch (1). The default menu (2) shows when no scheduled menu is live. - Tap New menu (4).
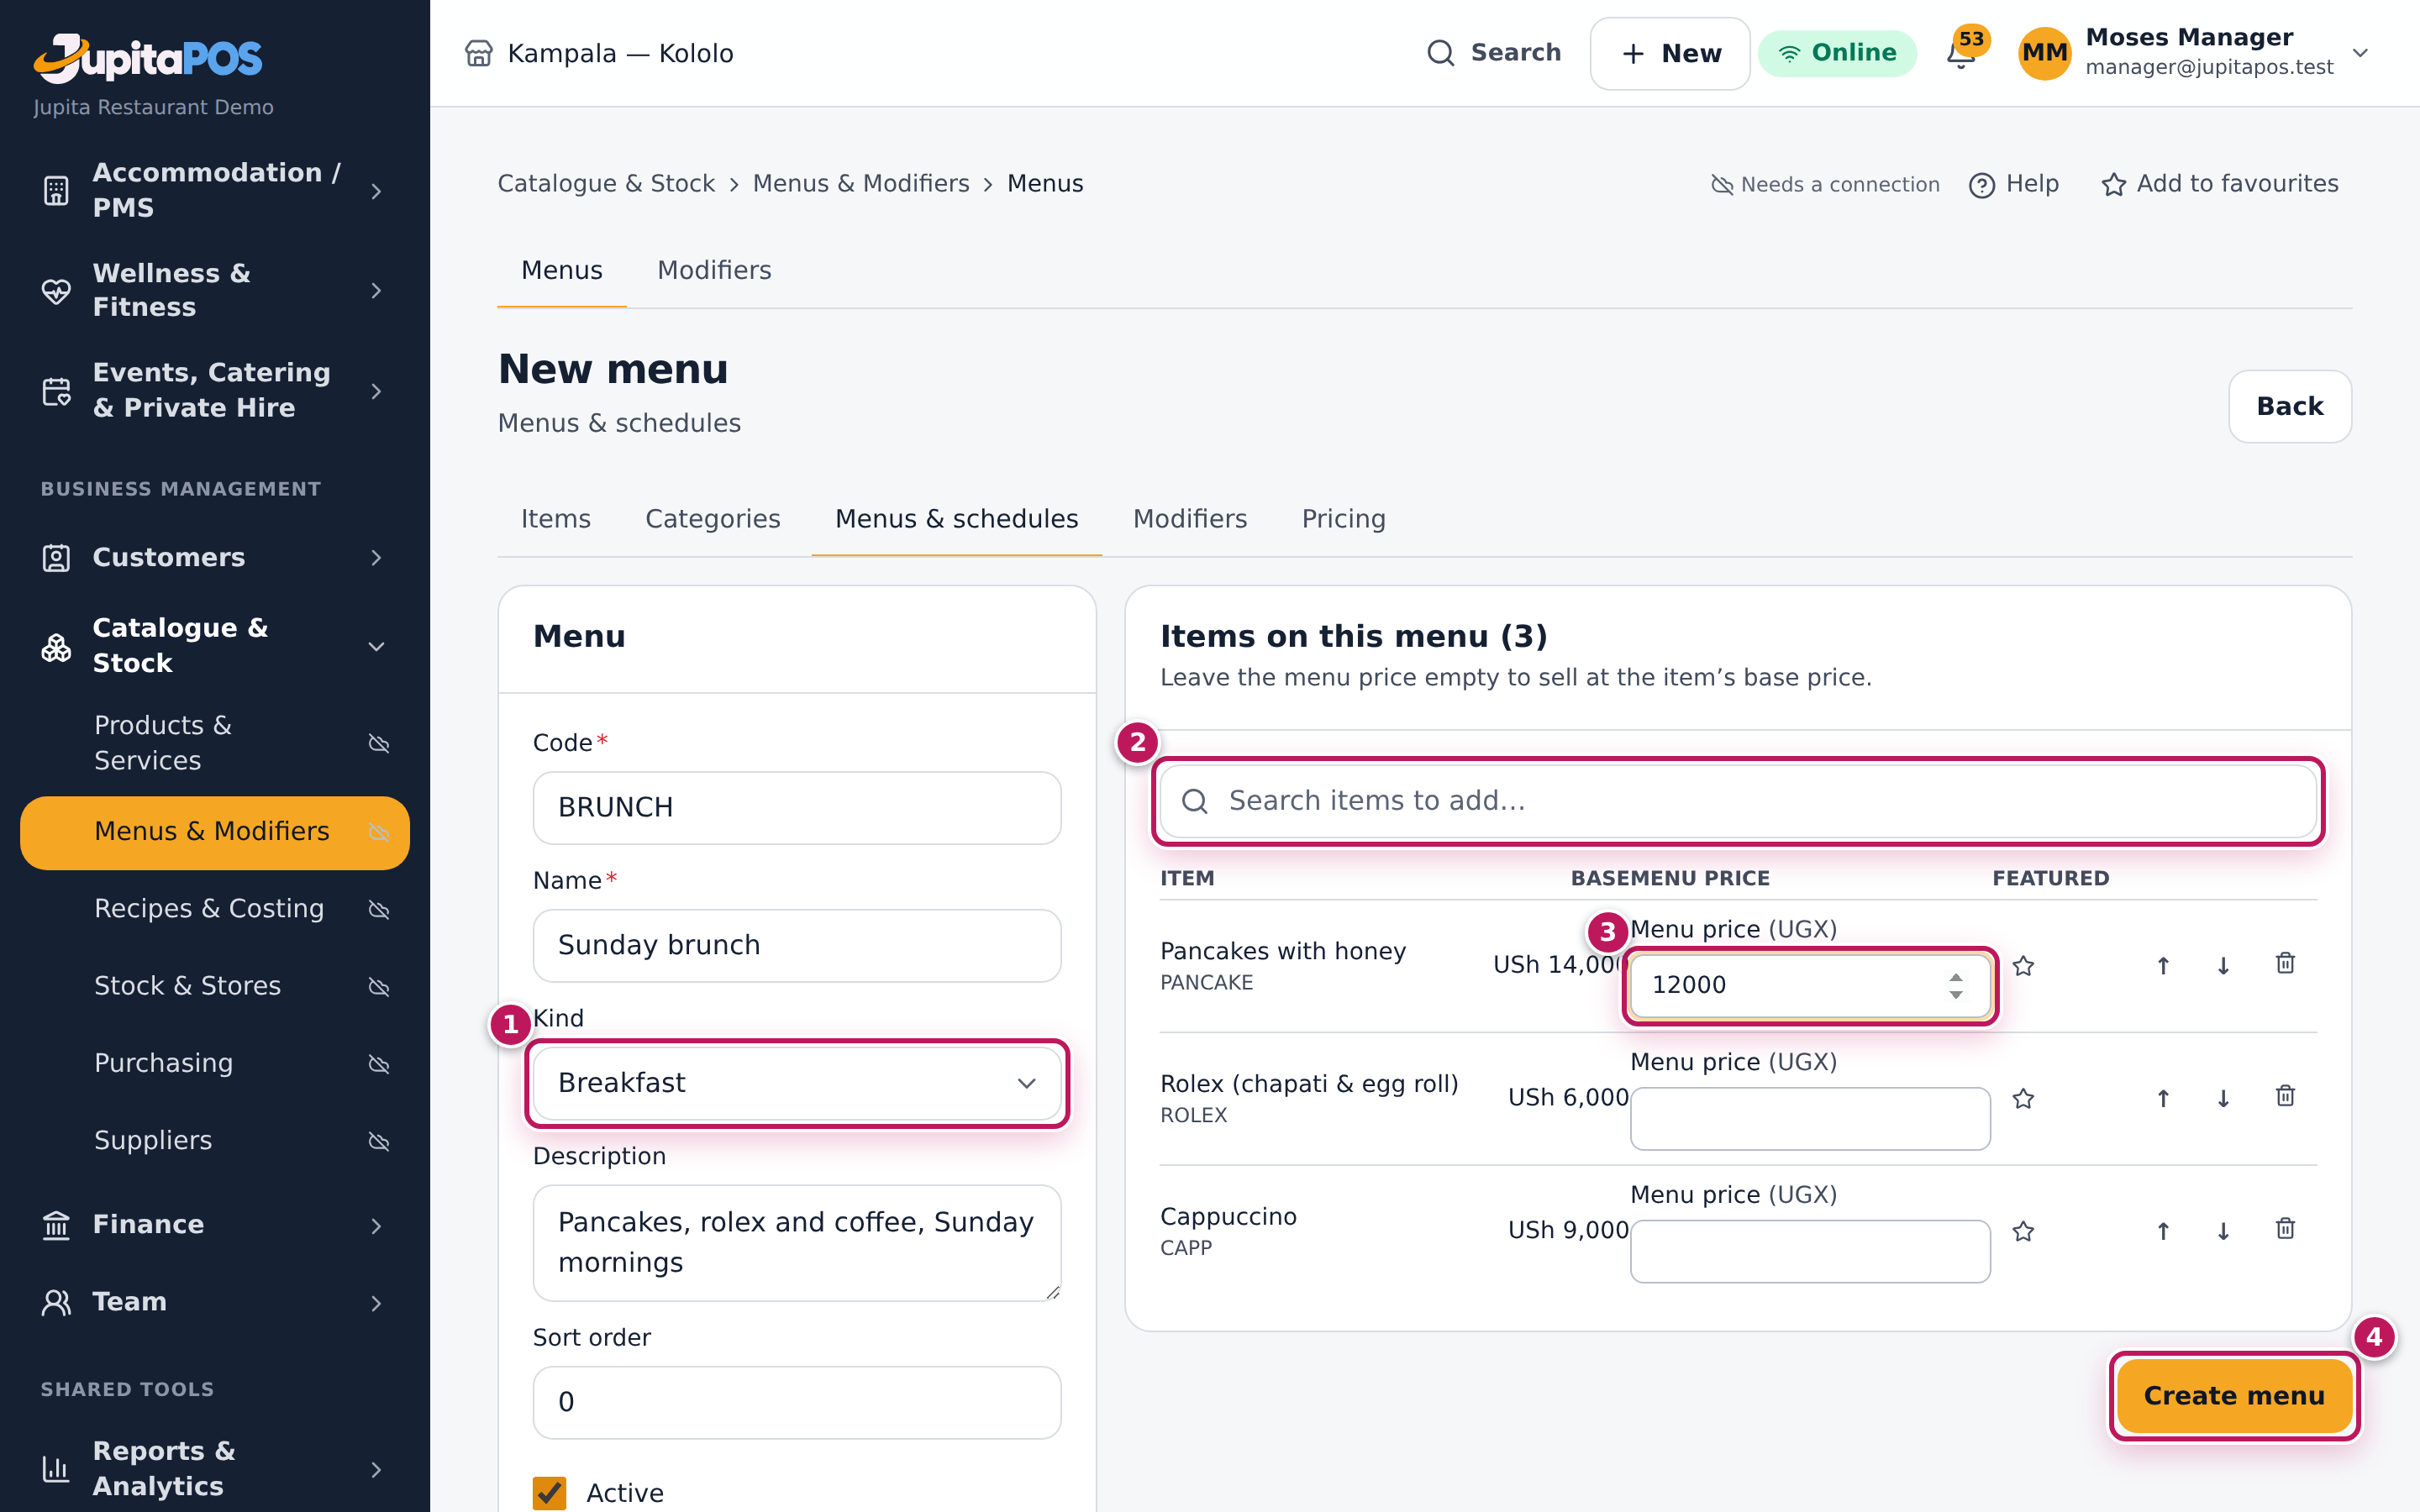
- Enter the Code, BRUNCH, the Name, Sunday brunch, and the Kind (1), Breakfast.
- Under Items on this menu, search for each item (2) and tap Add.
- To sell an item at a different price while this menu is live, enter its Menu price (3), here 12000 for the pancakes.
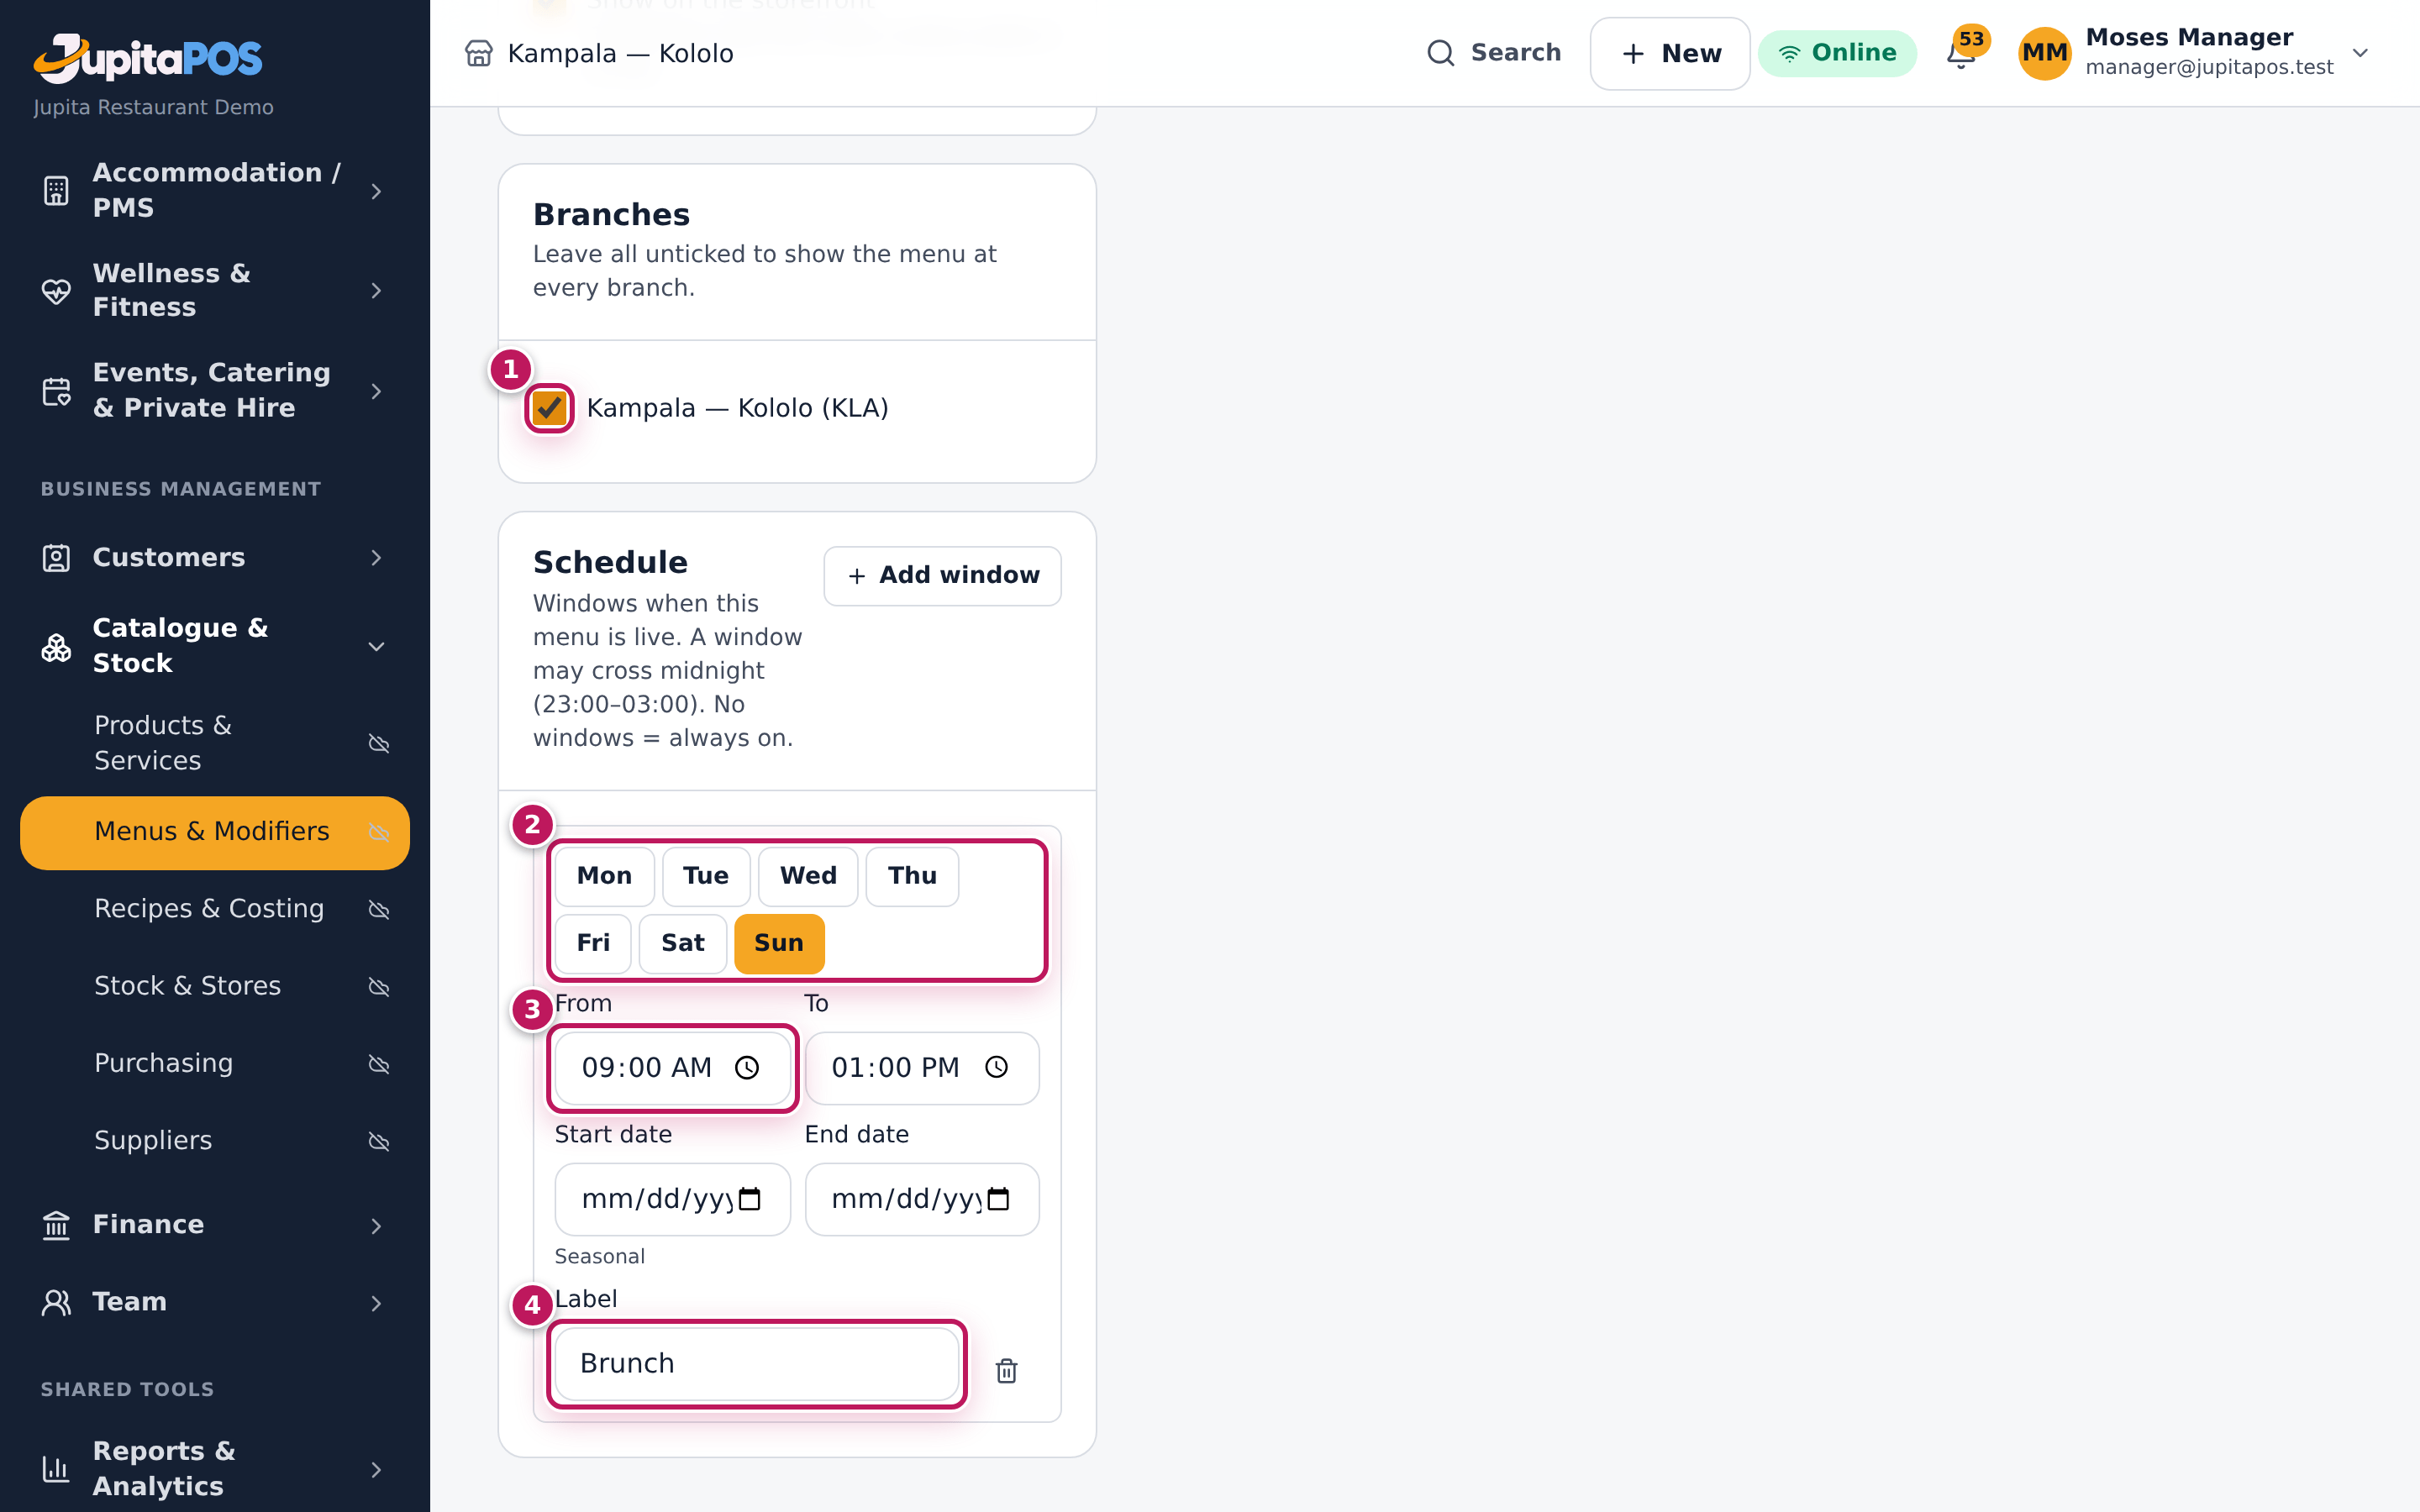
- Further down, under Branches (1 in the next picture), tick the branches it is for. Leave all unticked for every branch.
- Under Schedule, tap Add window. Press the days (2) it runs — here only Sun — and enter From (3) 09:00 and To 13:00, with a Label (4), Brunch. A window may cross midnight (23:00–03:00); add Start date and End date for a season.
- Scroll back up and tap Create menu (4 in the first form picture), under the items.
Expected result
Sunday brunch created. shows. In the list, Sunday brunch shows Brunch: Sun 09:00–13:00, 1 branch(es) and 3 items, without live now — it is Friday. On Sunday from 09:00 the tills at Kampala — Kololo show its items, and its menu price for the pancakes (12,000) applies while it is live.
Screenshot
Common mistakes
- A window with every day pressed. A new window starts with all seven days; unpress the days it does not run.
- No default menu. Between scheduled menus the till then shows nothing. Keep one menu (usually the all-day menu) as Default menu.
- A menu price for everything. Menu prices are for the few items that change; the others sell at their base price.
Troubleshooting
- “Nothing on the menu right now” on the till. No menu is live for the branch at this time and there is no default. Check the windows and the Default menu tick.
- The menu is not live at the time I expect. Times are in the business’s time zone (Kampala). Check the days pressed and the branches ticked.
- “This code is already used.” Menu codes are unique, archived menus included.
FAQ
Is there a separate online menu? No. A menu with Show on the storefront ticked shows online with the same schedule, prices and sold-out items as the till.
Set a price rule: happy hour and promotions
Purpose
Change prices automatically at certain times or for certain guests — beer 20 % off at happy hour, members 10 % off, a promotion code — without touching the items’ prices.
Role / permission required
Managers and owners — menu.pricing, signed in with a password.
Prerequisites
- The items or categories the rule is for exist.
Steps
- Open Menu, tab Pricing (
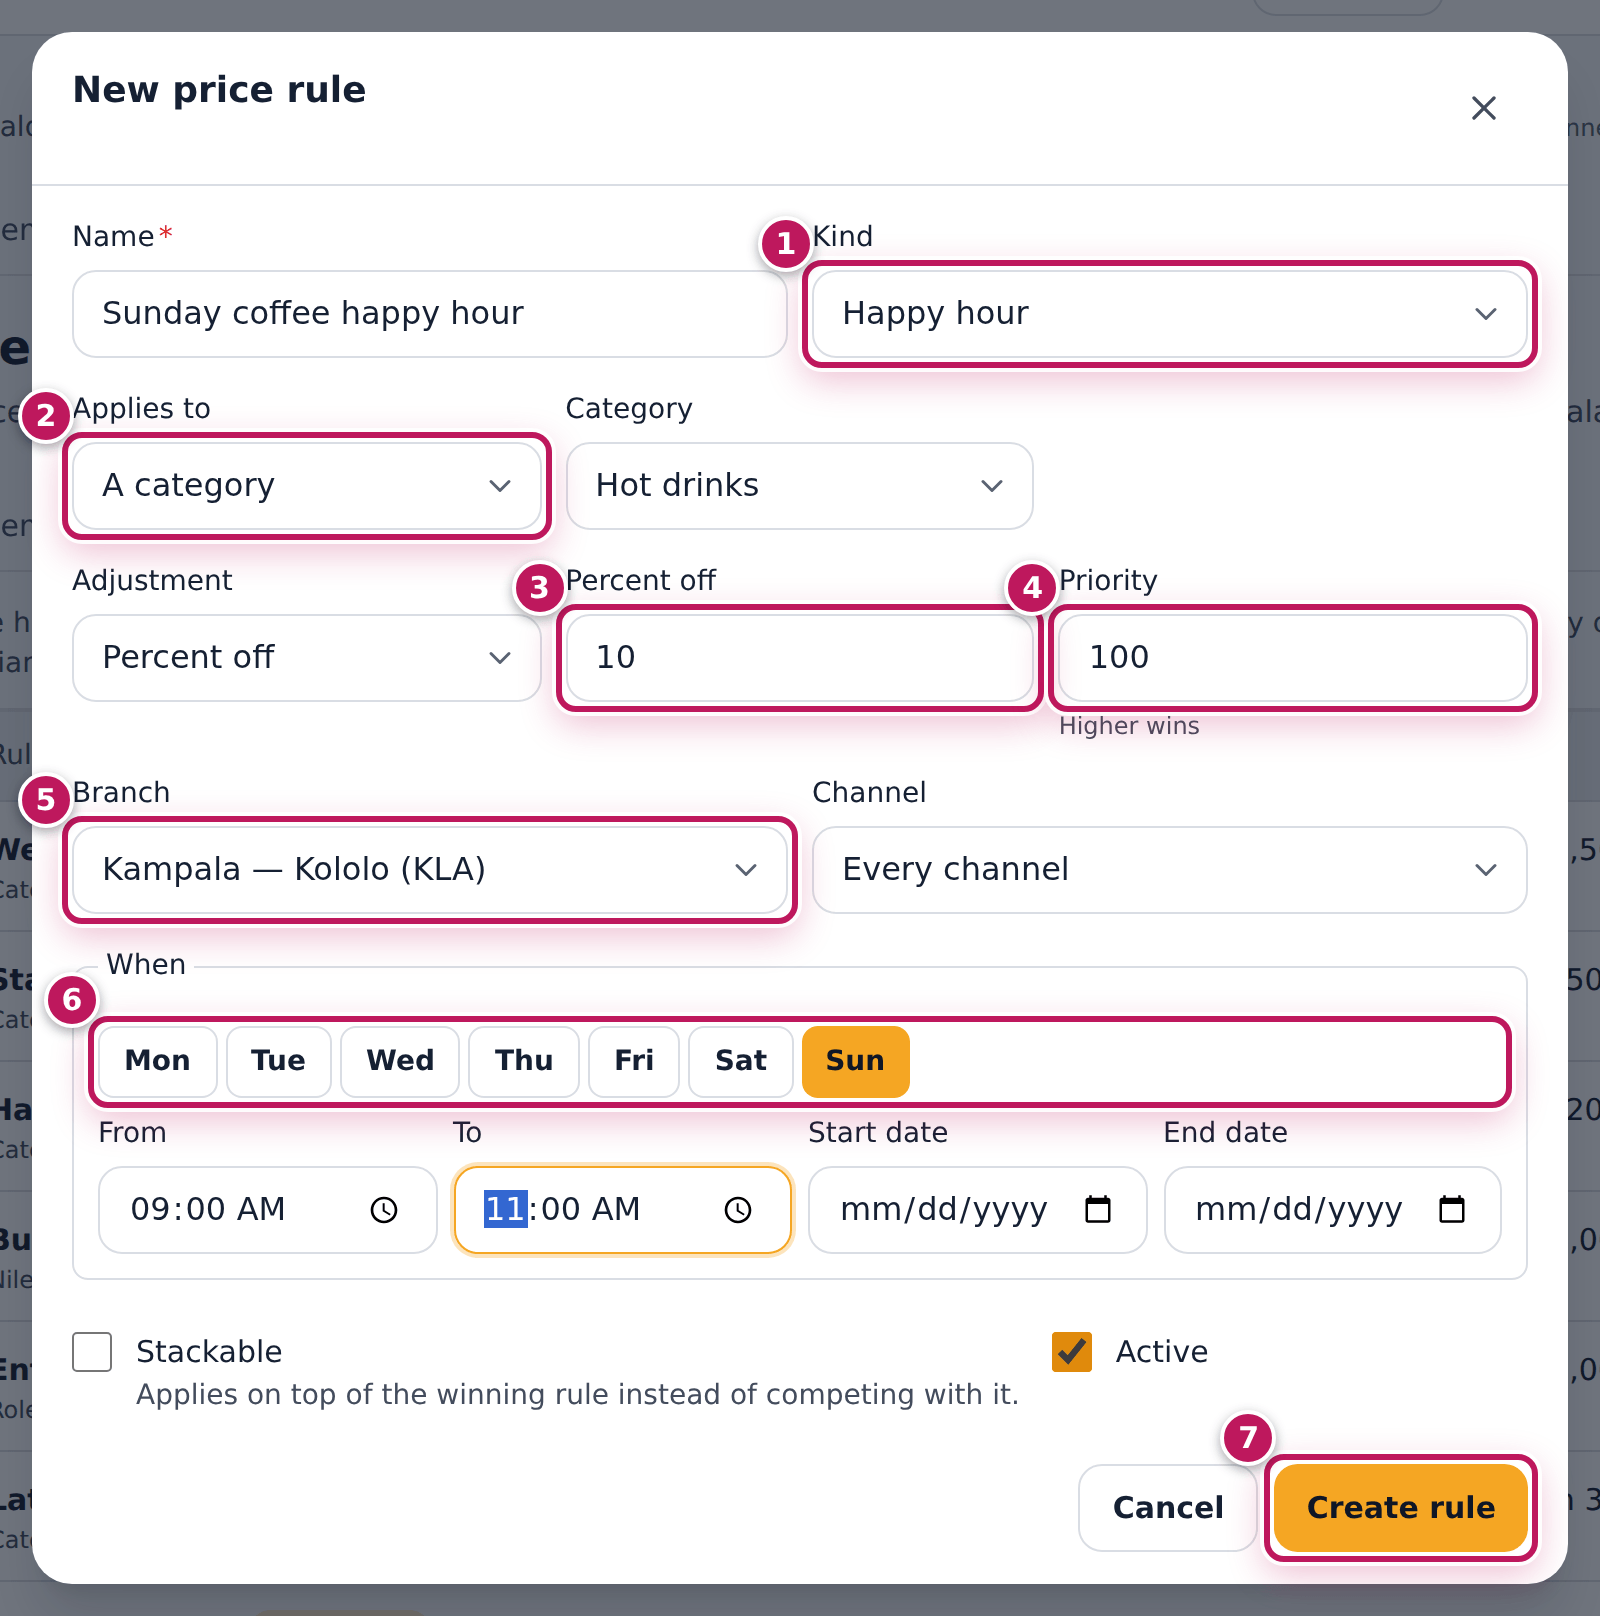
/menu/pricing), and tap New price rule. The list already shows the demo’s rules, such as Happy hour beer −20 %. - Enter a Name, Sunday coffee happy hour, and the Kind (1), Happy hour.
- In Applies to (2), choose A category and the Category, Hot drinks (or Everything, One item, One variant).
- Choose the Adjustment — Percent off, Amount off or Fixed price — and its value (3), 10 per cent.
- Keep the Priority (4) at 100 unless the rule must beat another one: the higher priority wins.
- Choose the Branch (5), Kampala — Kololo (KLA), or all branches.
- Under When (6), press the days — here only Sun — and enter From 09:00 and To 11:00. Add a Start date and End date for a promotion that ends.
- Tick Stackable only for a rule that applies on top of the winning one (a members’ discount). Tap Create rule (7).
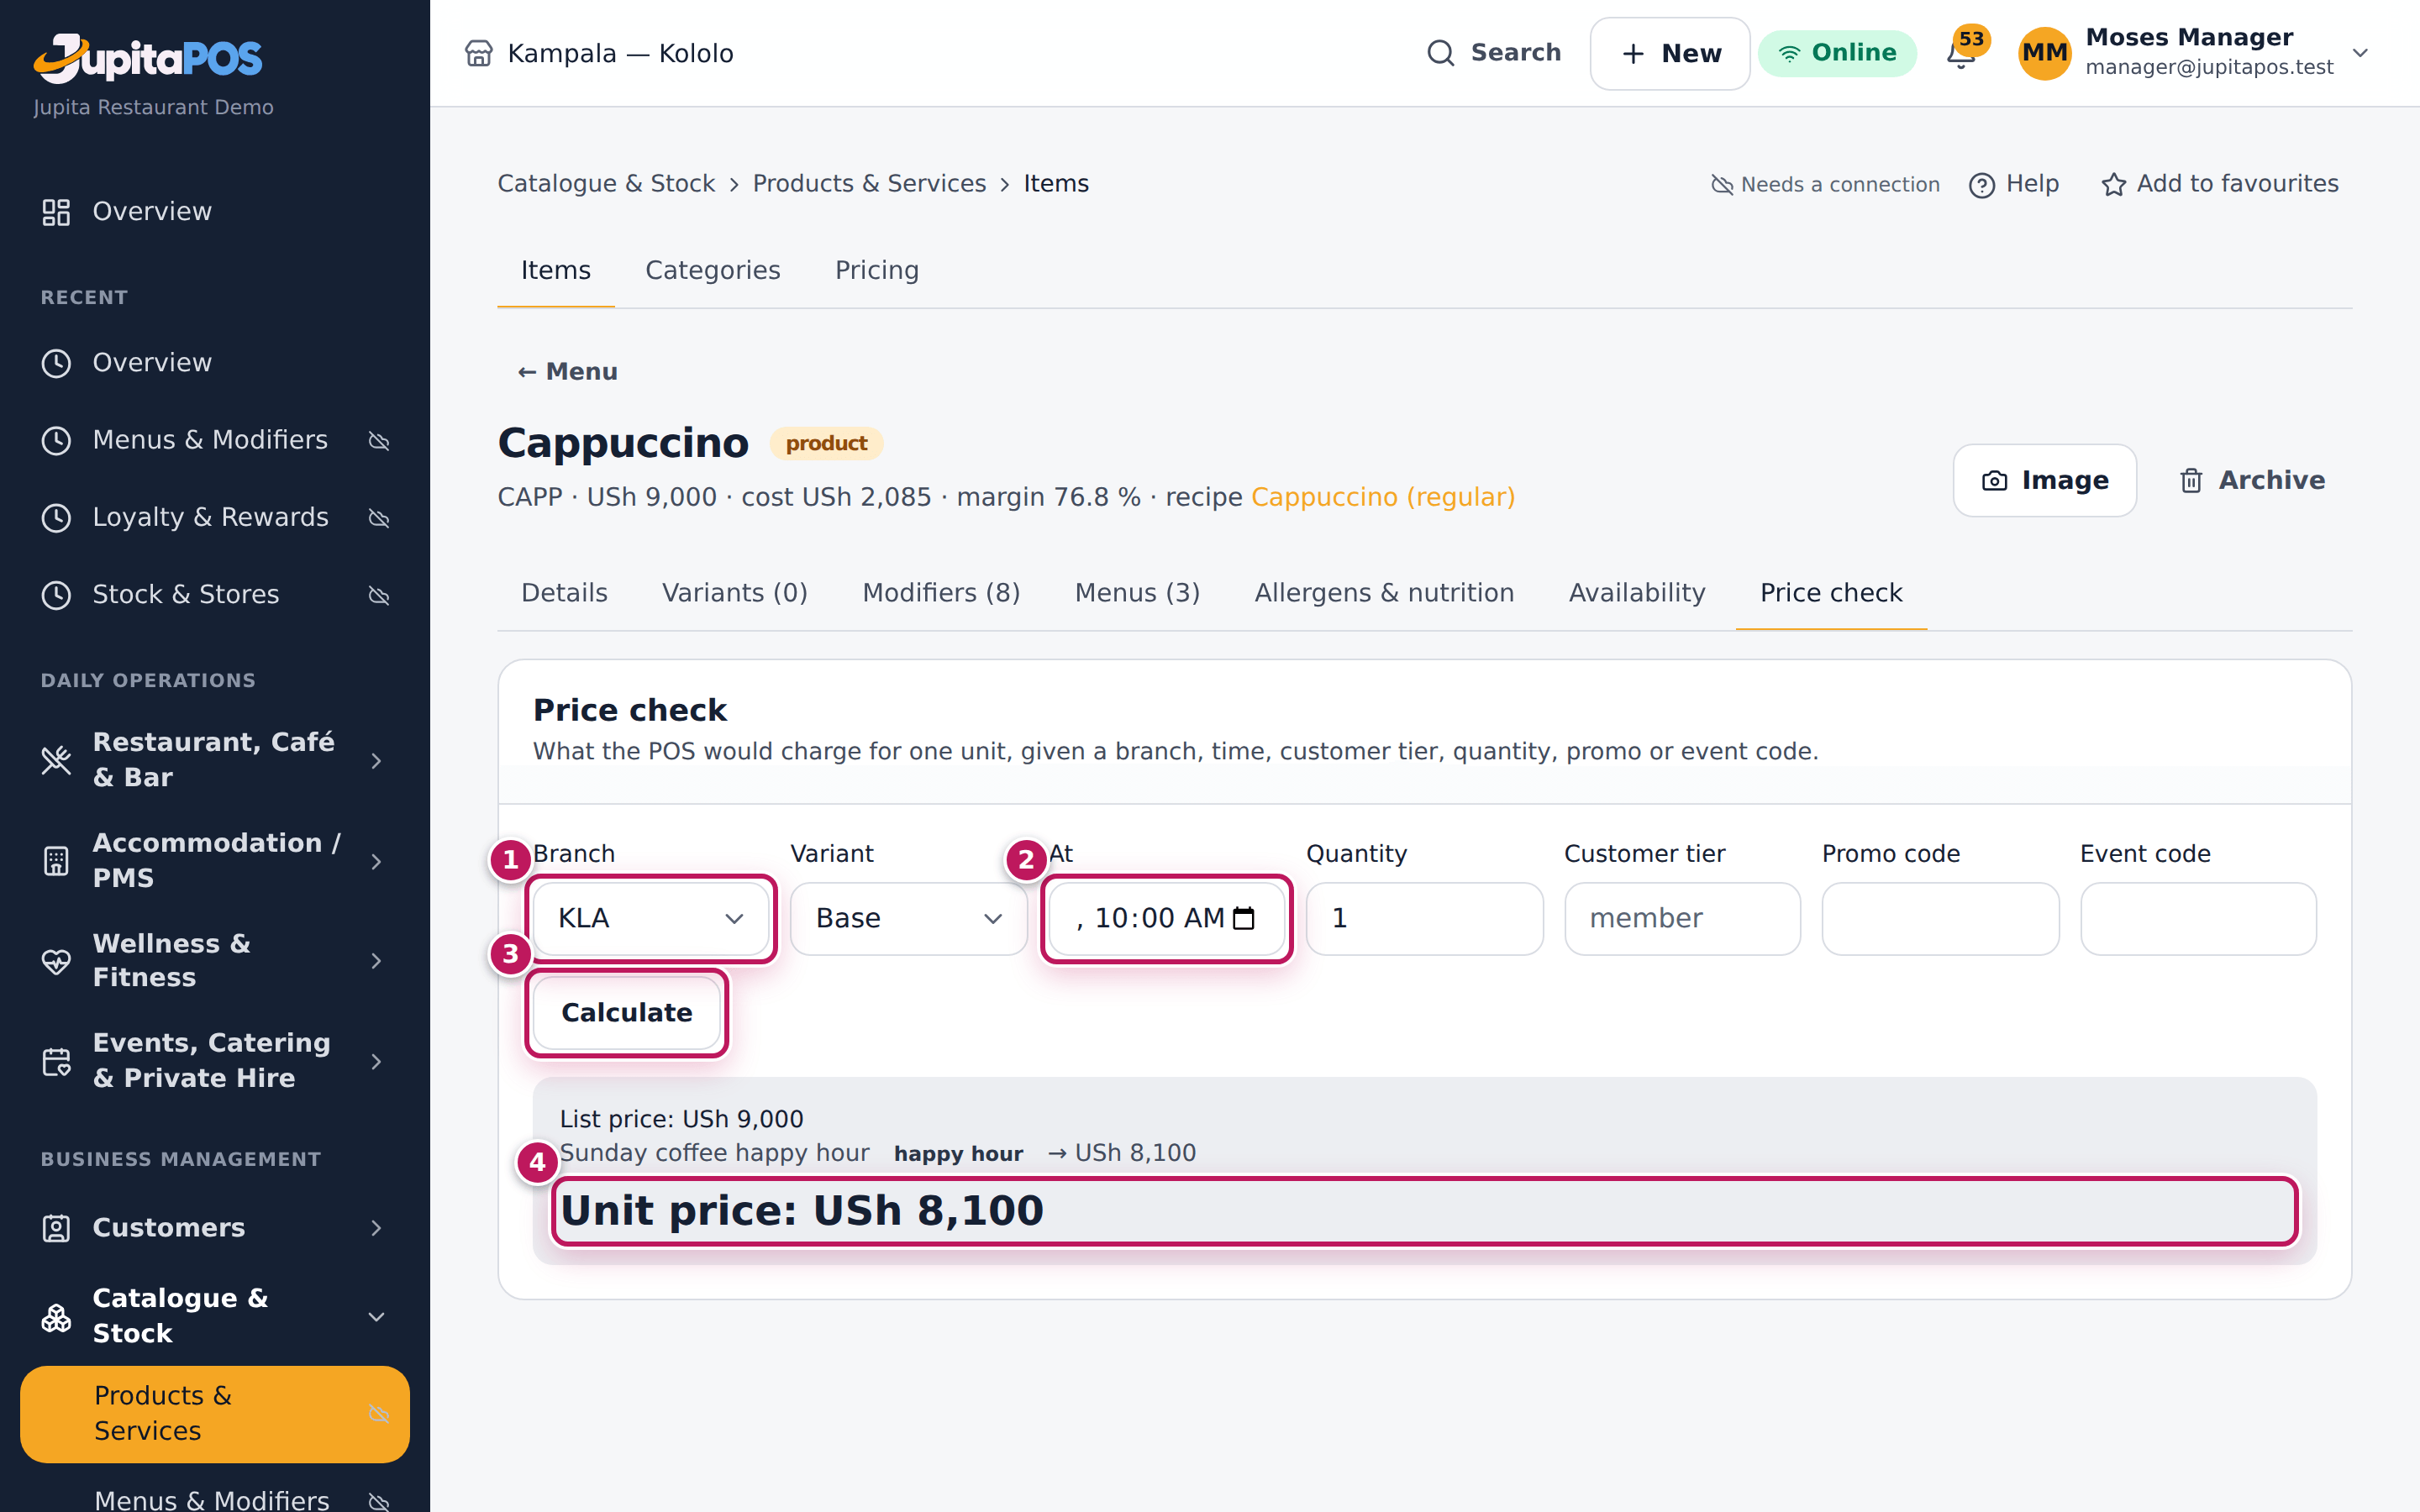
- Check it: open an item it covers, tab Price check, choose the Branch (1) and the time At (2), and tap Calculate (3).
Expected result
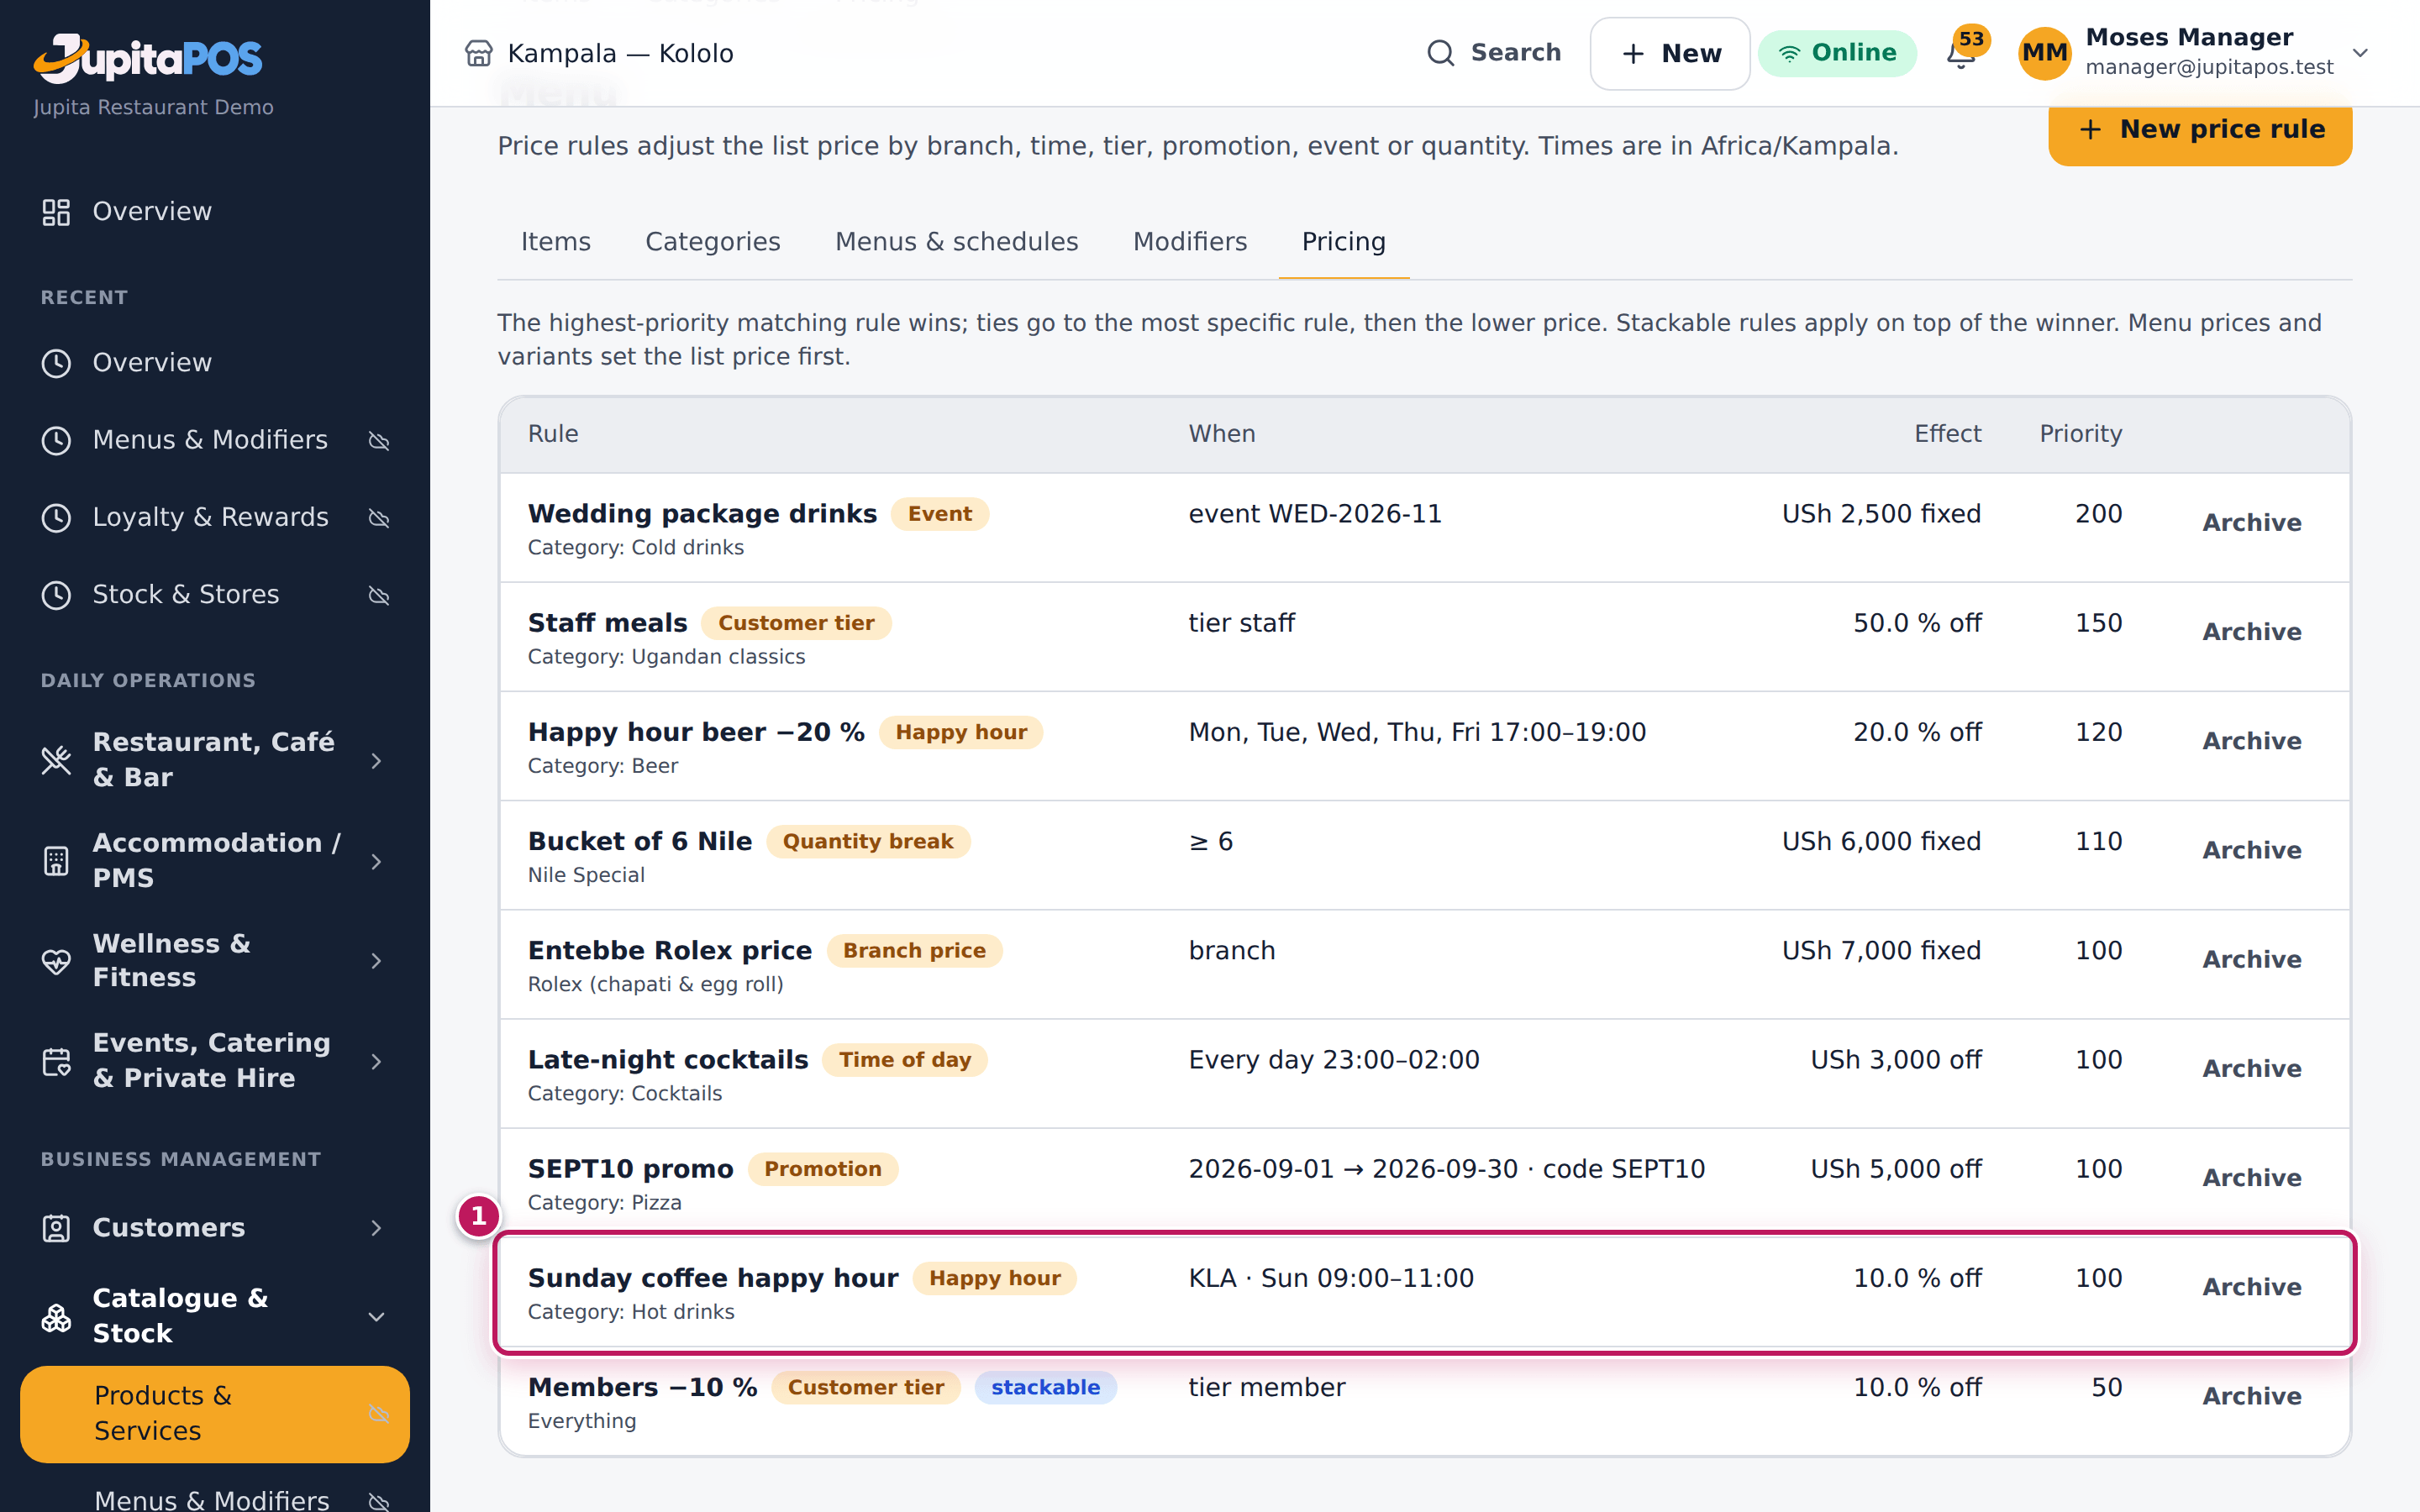
Sunday coffee happy hour created. shows and the list shows it with Category: Hot drinks, KLA · Sun 09:00–11:00 and 10.0 % off. The Price check for a Cappuccino at KLA on Sunday 4 October at 10:00 shows List price: USh 9,000, the rule, and Unit price: USh 8,100 (4) — exactly what the till will charge.
Screenshot
Common mistakes
- Two rules at the same priority. The most specific target wins (a variant beats an item, an item a category), then the lower price. Set priorities on purpose.
- Forgetting the time zone. Times are Kampala times; the till uses the branch’s clock.
- Testing at the till. Use Price check: it shows every rule that applied without ringing anything up.
Troubleshooting
- The till does not apply the rule. Check the rule is Active, the branch, the days and times, and that no higher-priority rule wins — Price check lists the rules that applied.
- The price is 0. An Amount off larger than the price makes it 0 — prices never go below zero.
FAQ
What kinds are there? Branch price, Time of day, Happy hour, Customer tier (members, staff), Promotion (with or without a promo code), Event (with an event code) and Quantity break (from a minimum quantity).
Set a different price at one branch
Purpose
Sell an item at a different price at one branch — the chips at Entebbe cost more to make — while every other branch keeps the base price.
Role / permission required
Managers and owners — menu.pricing, signed in with a password. The
Branch list shows only the branches you work at: a manager of one
branch prices that branch; the owner prices every branch.
Prerequisites
- The item exists (see Add a menu item).
Steps
- Open Menu, tab Pricing, and tap New price rule.
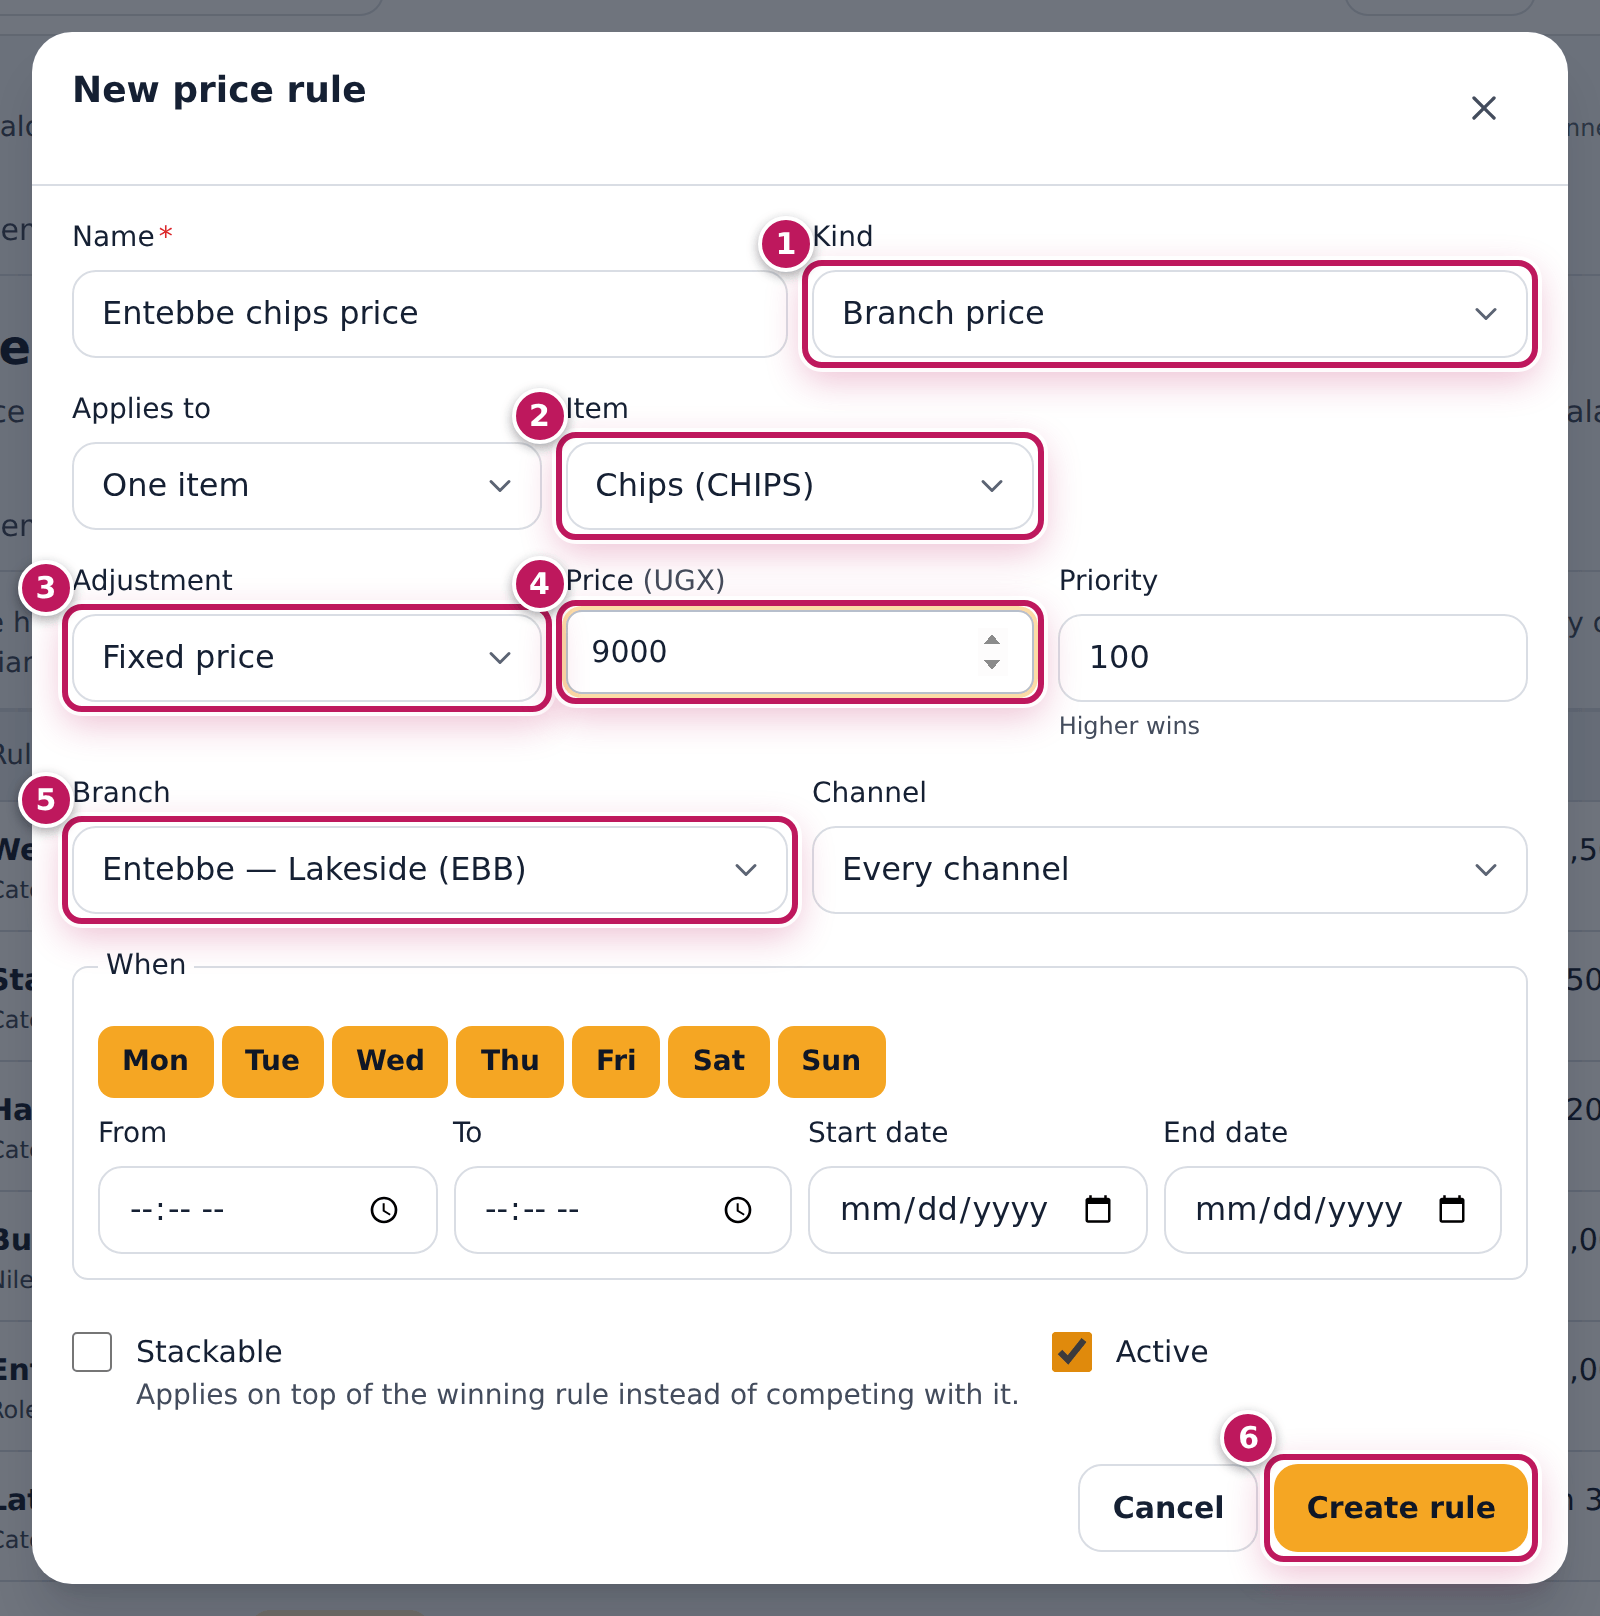
- Enter the Name, Entebbe chips price, and choose the Kind (1), Branch price.
- In Applies to, choose One item and the Item (2), Chips (CHIPS).
- Choose the Adjustment (3), Fixed price, and enter the Price (4), 9000.
- Choose the Branch (5), Entebbe — Lakeside (EBB).
- Tap Create rule (6).
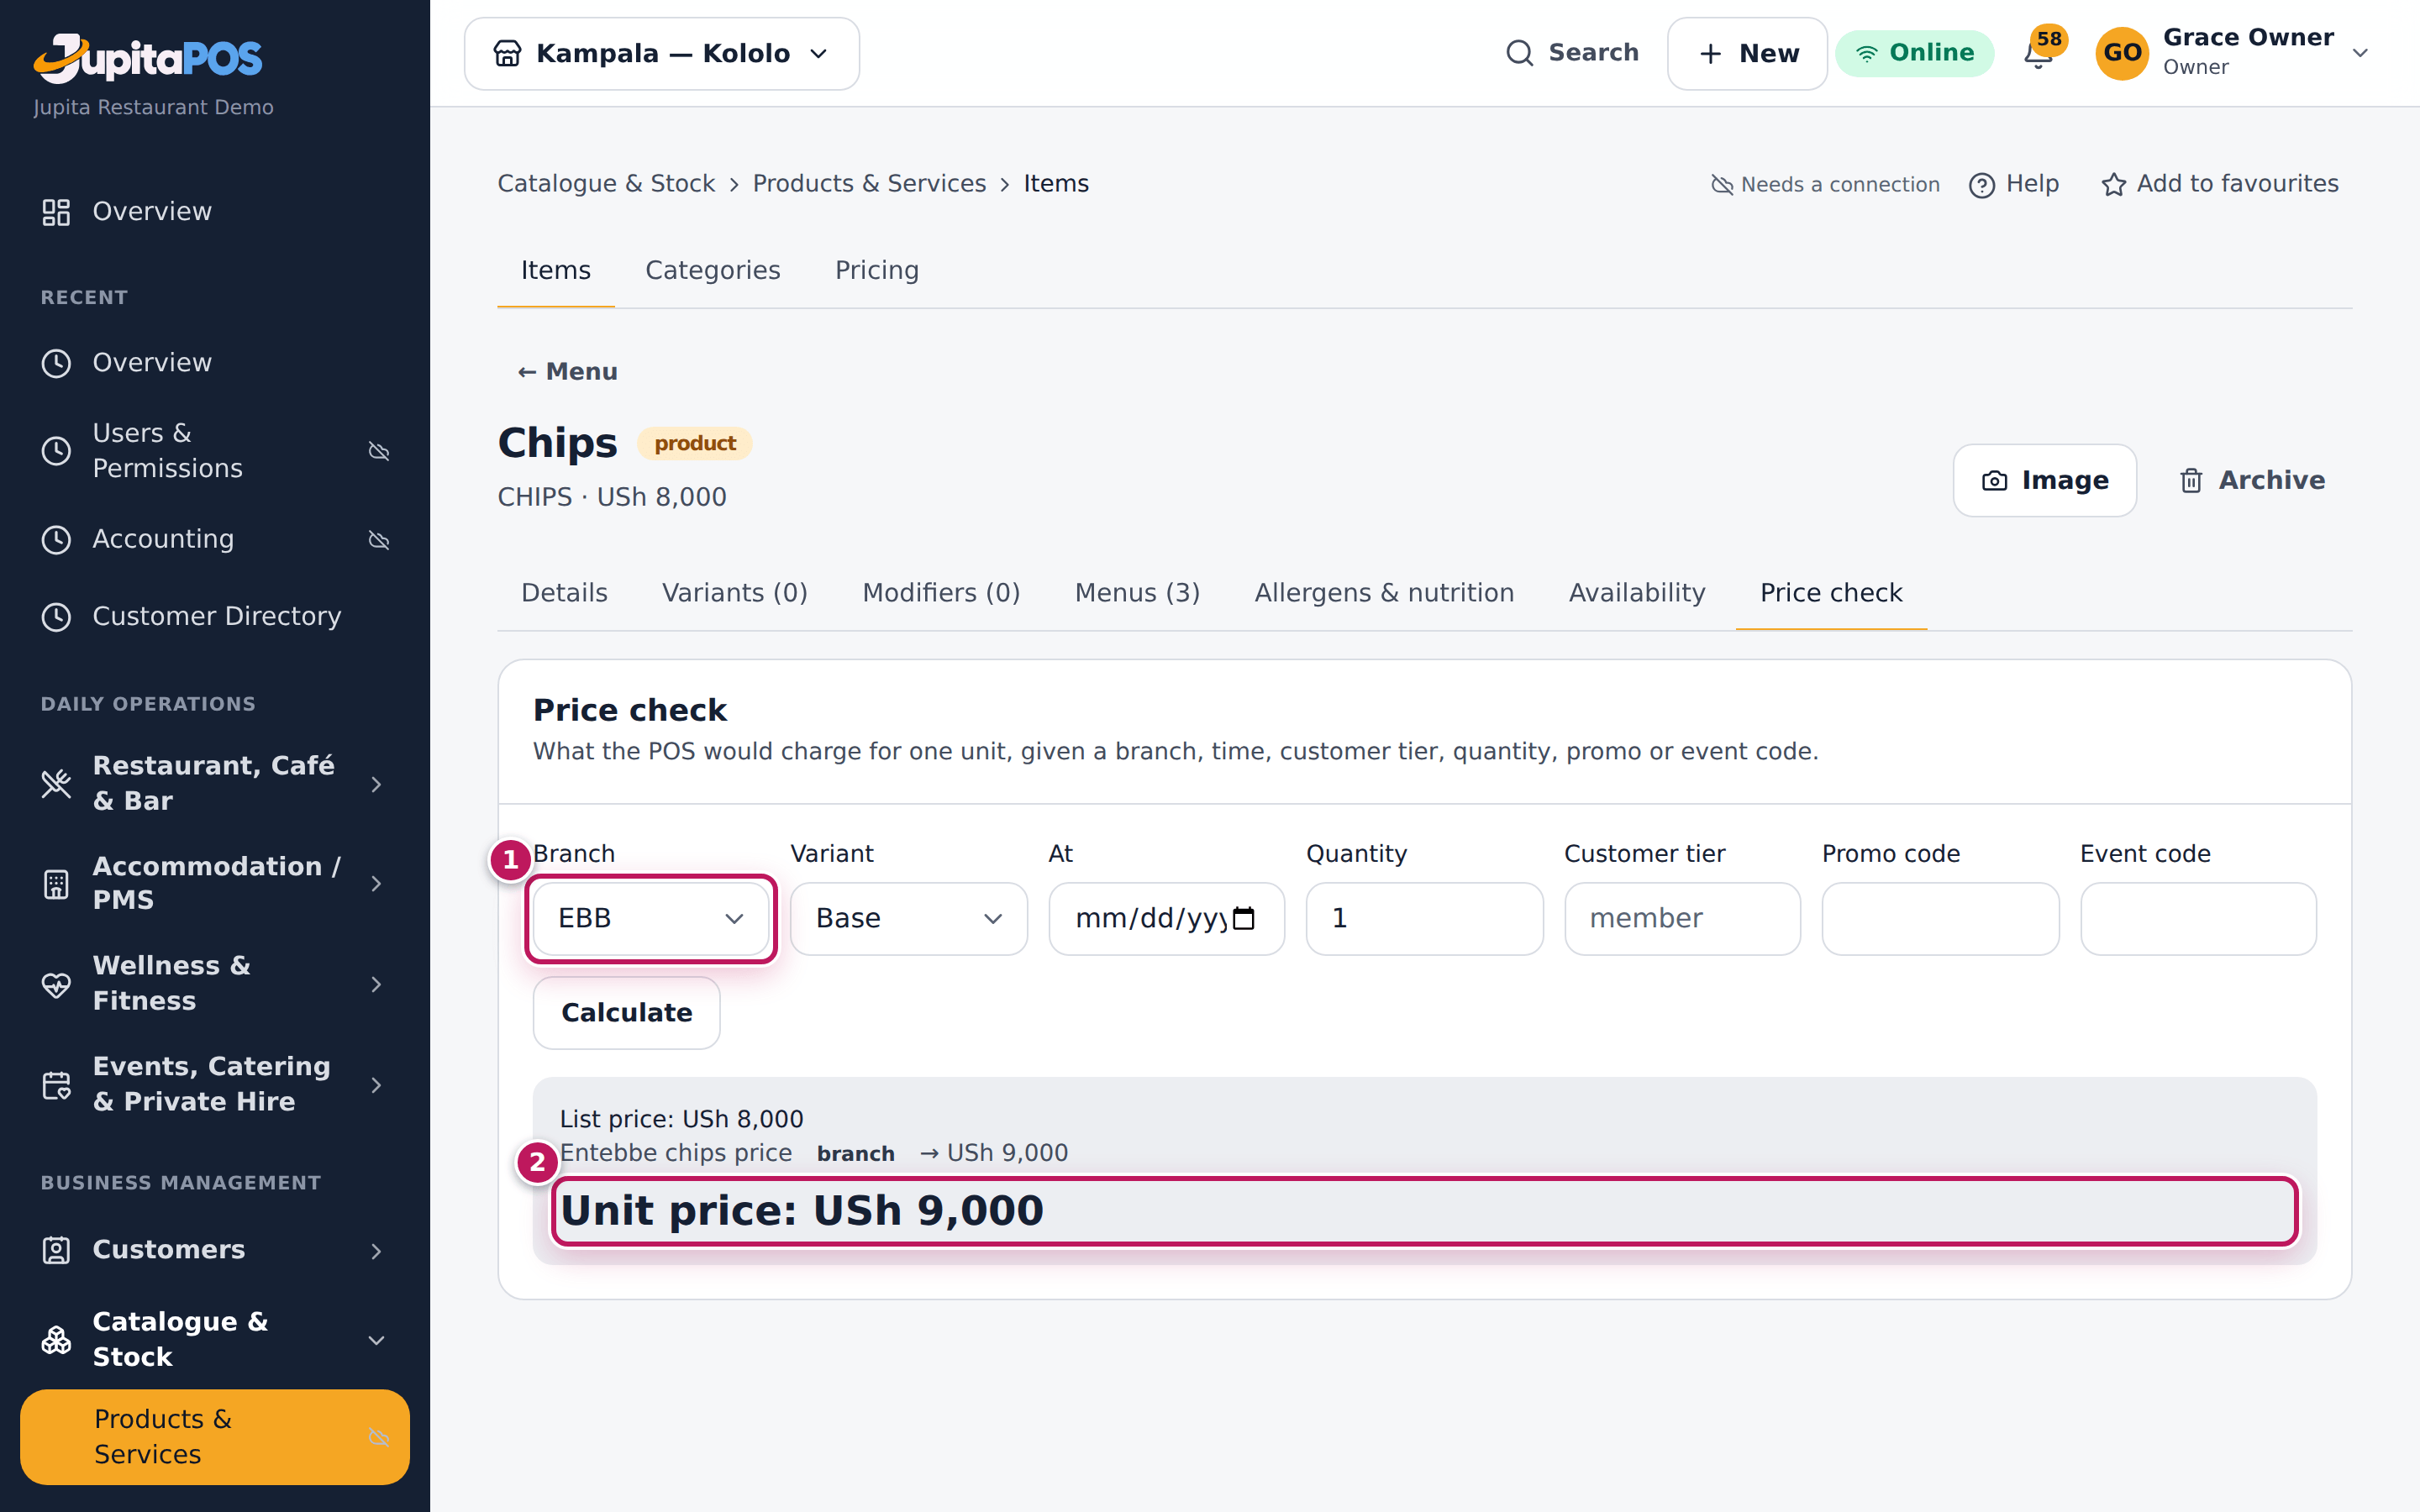
- Check it on the item’s Price check tab: choose the Branch (1) EBB and tap Calculate.
Expected result
Entebbe chips price created. shows. The Price check for Chips shows Unit price: USh 9,000 (2) at EBB and USh 8,000 at KLA. The demo already sells the Rolex at Entebbe this way (Entebbe Rolex price).
Screenshot
Common mistakes
- Changing the item’s base price for one branch. Every branch then changes. Use a branch price.
- Forgetting the branch. A Branch price needs a branch; without one the rule is not saved (Branch prices need a branch.).
Troubleshooting
- The branch still sells at the old price. A more specific or higher-priority rule wins (a variant rule, a promotion). Check the Price check.
Give a customer group, a period or a branch its own prices
Purpose
Charge different prices to a group of customers (staff, a company), at certain hours or dates (happy hour, a season), or at one branch — with a list of prices rather than one rule per item.
Role / permission required
Managers and owners — menu.pricing. Putting a customer in a group needs
customers.manage.
Prerequisites
- The items exist (see Add a menu item).
- For a customer-group list: the group exists. Add it under Customer groups on the same page.
Steps
- Open Menu, tab Price lists.
- For a customer group, type its name under New group and tap Add.
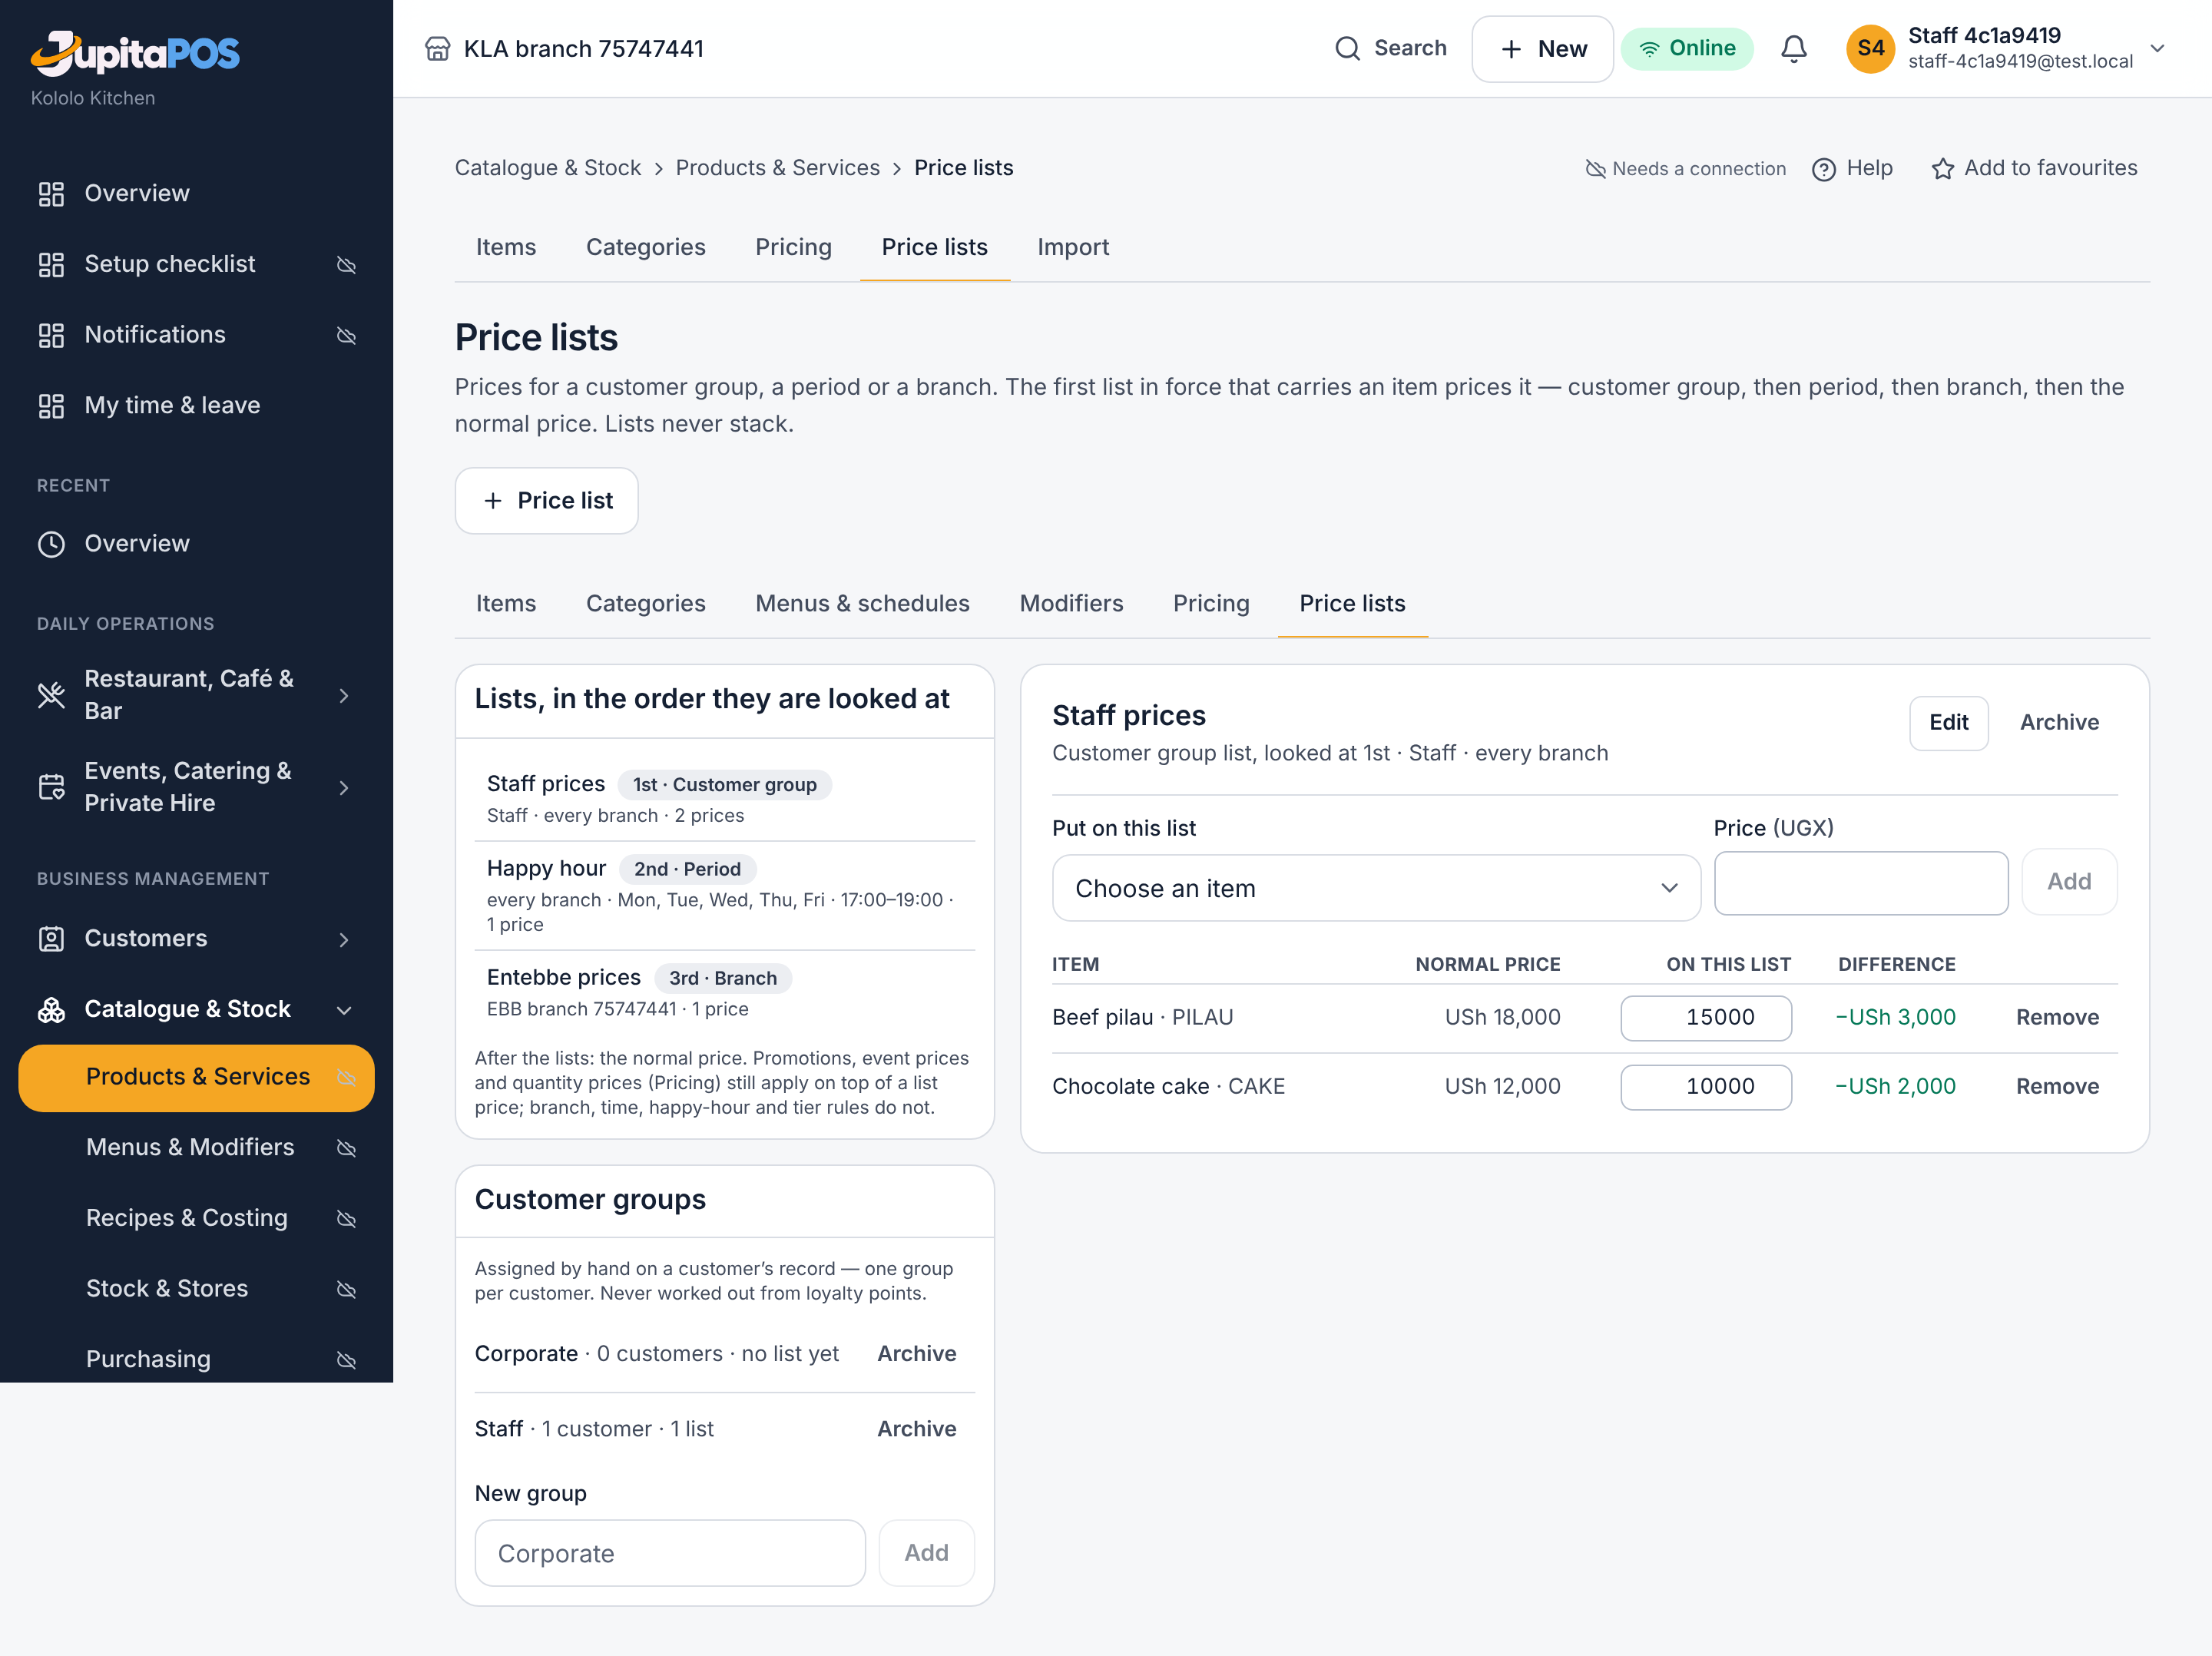
- Tap Price list. Enter the Name, choose what This list is for — Customer group, Period or Branch — and fill what it asks: the group, the days, hours or dates, or the branch.
- Tap Make the list.
- With the list open, choose an item under Put on this list, type its Price and tap Add. Repeat for each item the list should price.
- For a customer group: open the customer’s record and choose the group under Price group.
Expected result
The list appears in the order the lists are looked at: customer group first, then period, then branch. On an order, the first list in force that has the item prices the line, and the order shows the list’s name on that line. An item that is on no list in force sells at its normal price.
Screenshot
Common mistakes
- Expecting the cheapest list to win. The order is fixed. A Staff customer during happy hour pays the Staff price even if happy hour is cheaper — set the group’s prices with that in mind.
- Expecting a discount on a discount. Only one list prices a line, and a happy-hour or branch price rule does not apply on top of it. A promotion with a code still does.
- A list with nothing on it. It prices nothing: add the items.
- Using the customer’s loyalty tier. A price group is assigned by hand on the customer’s record.
Troubleshooting
- The order shows the normal price for a Staff customer. The customer was not chosen on the order before the item was added, the item is not on the Staff list, or the list is switched off. A line already added keeps its price.
- A branch list will not save with hours. A branch list is in force all the time; for certain hours make a Period list and choose the branch under Only at.
Give a customer group a fixed room or pitch rate
Purpose
Charge a group of customers — a company, an academy, a regular team — a fixed price per night for a room type or per hour for a pitch, whatever the date or the hour.
Role / permission required
Managers and owners — menu.pricing. Putting a customer in a group needs
customers.manage.
Prerequisites
- The customer group exists and the customer is in it (see Give a customer group, a period or a branch its own prices).
- The business has room types or pitches.
Steps
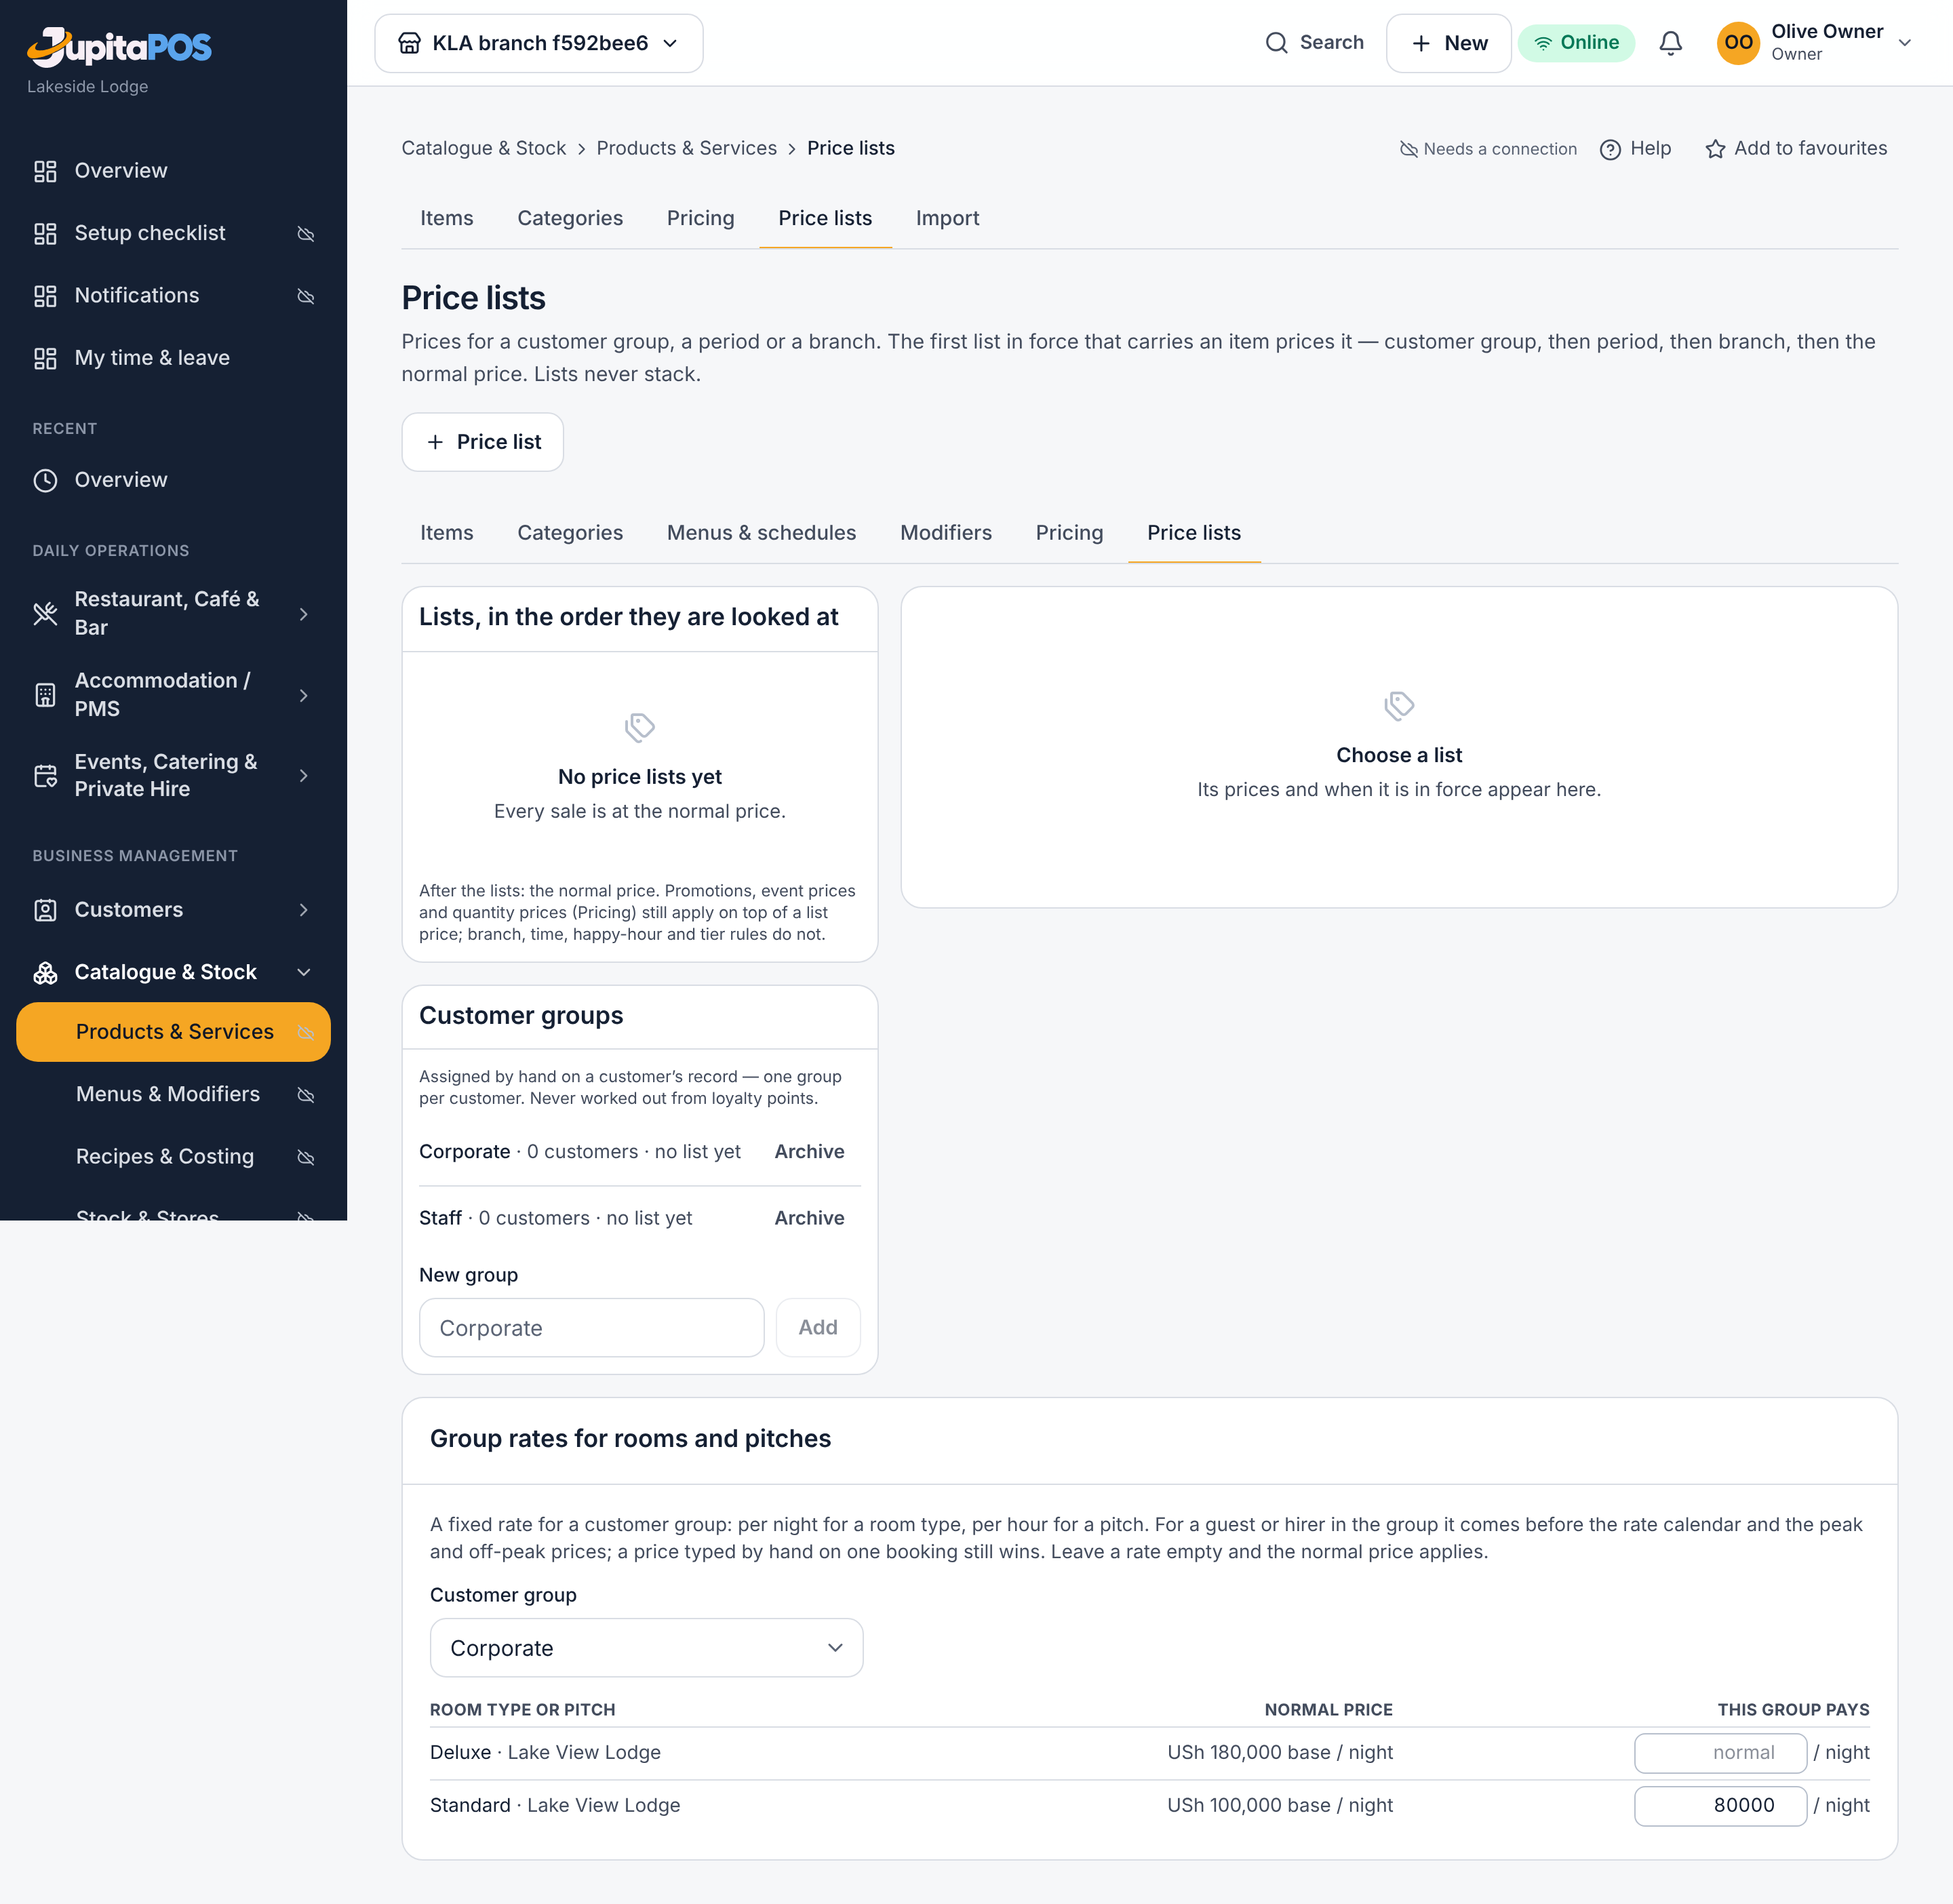
- Open Menu, tab Price lists, and go to Group rates for rooms and pitches at the bottom.
- Choose the Customer group.
- Beside each room type or pitch the group should have a rate for, type what This group pays — per night for a room, per hour for a pitch. Leave the others empty.
- Tap Save.
Expected result
A booking for a guest or hirer in the group is priced at the group’s rate: the reservation’s nights say group rate, and a pitch booking’s price is the hours at that rate. Everyone else, and anything the group has no rate for, is priced as before.
Screenshot
Common mistakes
- Expecting the group rate to follow peak hours or seasons. It is fixed: the group pays it at every hour and on every date.
- Booking before choosing the customer. The rate applies to a booking made for a customer in the group; a booking under a typed name only is at the normal price.
Troubleshooting
- A booking shows the normal price. The guest or hirer is not in the group, the group has no rate for that room type or pitch, or the booking was made before the rate was set (it keeps its price).
- A room booking shows agreed, not group rate. A price was typed by hand on that booking; it wins.
Mark an item sold out and back
Purpose
Stop every till — and the online storefront — selling an item that has run out, for one branch or all of them, and bring it back automatically at a set time.
Role / permission required
Managers and supervisors, and the floor and kitchen staff — anyone with
menu.availability.
Prerequisites
- The item is on a live menu.
Steps
- Open Menu (
/menu) and search for the item, fruit. - On its row, tap 86.
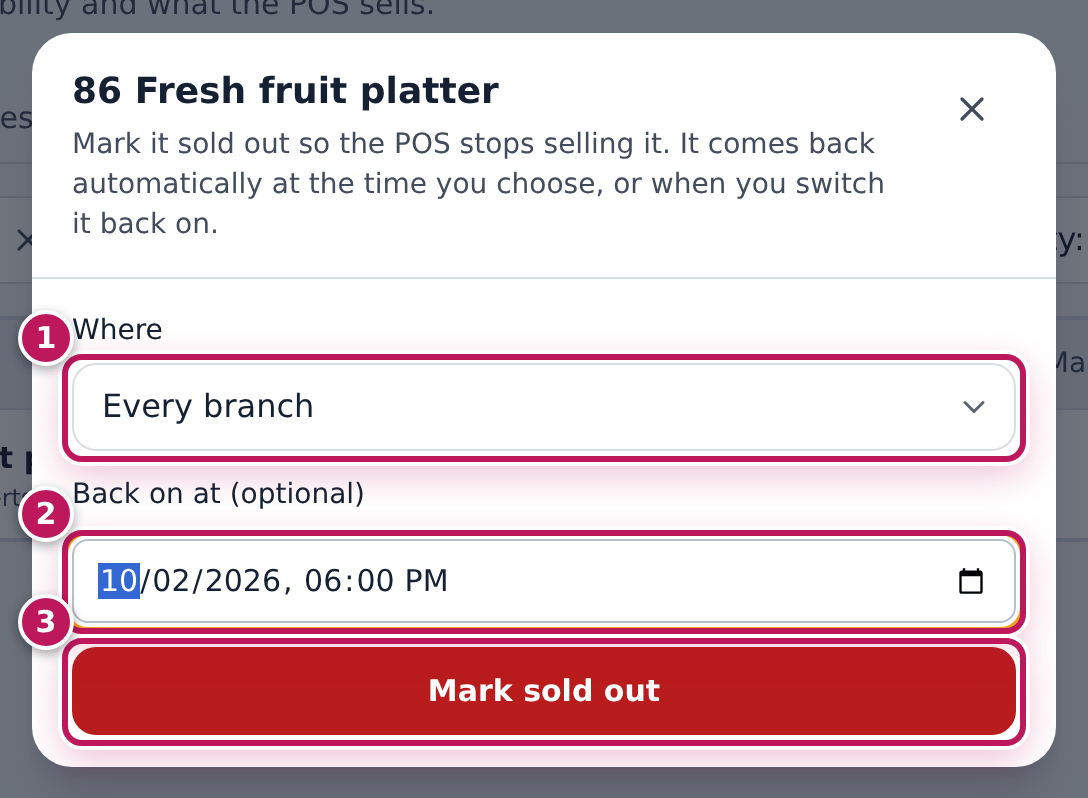
- In Where (1), choose This branch only or Every branch.
- In Back on at (optional) (2), enter when it will be back, 18:00 today. It comes back by itself then.
- Tap Mark sold out (3). The row shows 86 — sold out.
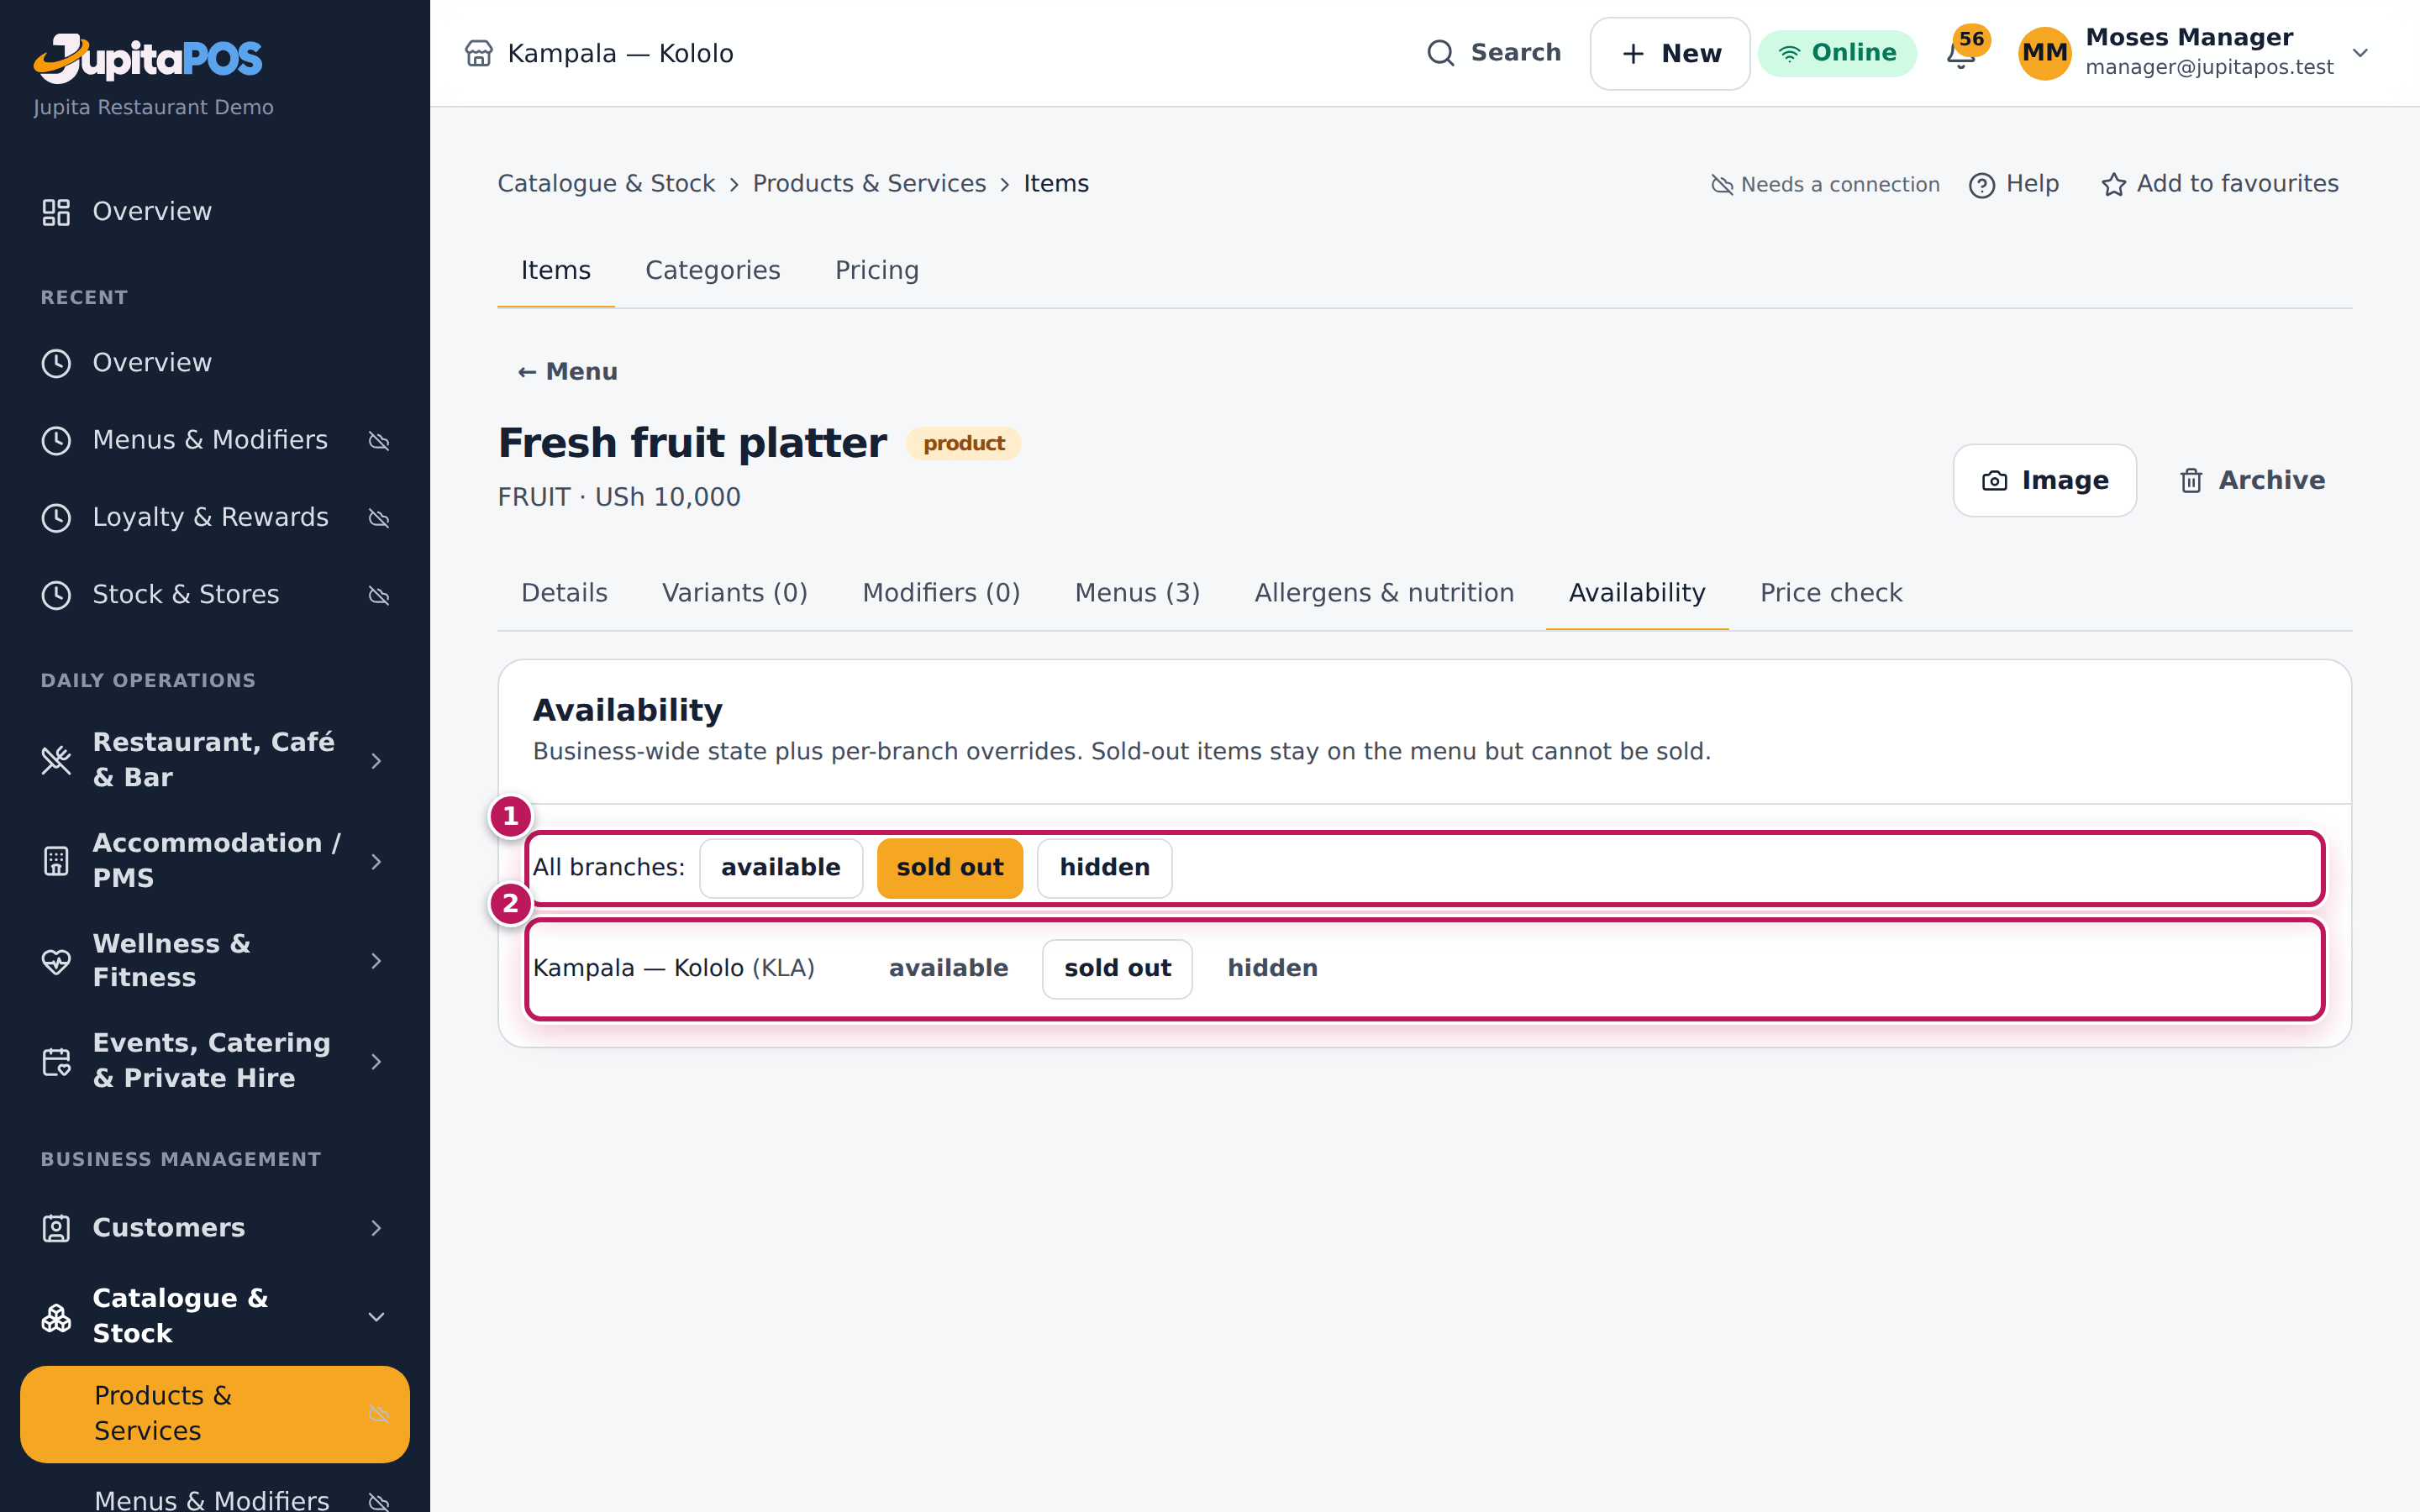
- For a finer choice, open the item and its Availability tab: All branches: (1) sets it for the whole business; each branch you work at has a line (2) that overrides it for that branch — available, sold out or hidden.
- When it is back, tap Back on on the row, or available on the Availability tab.
Expected result
Fresh fruit platter shows 86 — sold out at every branch until 18:00; its tile is greyed out on every till and it cannot be ordered online. At 18:00, or when you tap Back on, it sells again.
Screenshot
Common mistakes
- Using Hidden for a sold-out item. Hidden takes the item off the till completely; staff then think it was removed from the menu. Use sold out for a shortage.
- A branch override left behind. A branch set to available stays available even when the whole business is sold out. Check the branch lines on the Availability tab.
Troubleshooting
- The back-on time passed but a till still shows 86. An open till brings the item back by itself at the back-on time; one that was offline catches up when it reconnects. To bring it back earlier, tap Back on.
- Back on on the list does not bring it back at another branch. Back on sets it available for your branch; use the Availability tab’s All branches: line.
FAQ
Is it recorded? Yes: every sold-out and back-on, with who did it and when, is in the audit trail.