

On this page
- Open the till and make a sale
- Hand over an order, or reprint a receipt
- Take back goods: refund, exchange or credit
- Add products, set prices and print labels
- Receive, transfer and count stock
- Order from a supplier
- Sell when the connection is down
- Sell online
- Customer accounts and the day’s figures
- Who does what
- Not in RetailPOS yet
RetailPOS is the JupitaPOS edition for shops: a supermarket or a corner shop, a hardware store, a boutique, an electronics or phone shop, a cosmetics counter, a bookshop, an agro-dealer. It has its own database, separate from any other JupitaPOS product the same owner runs, and its own menu:
| Menu | Pages | What they are for |
|---|---|---|
| Shop | Checkout, Offline till, Orders & sales, Returns | the till, selling without a connection, orders to hand over, returns and exchanges |
| Catalogue & Stock | Products, Prices & Promotions, Labels, Stock, Purchasing, Online shop | what you sell, its prices and barcodes, the stores and what is in them, suppliers and purchase orders, the shop on the web |
| Finance | Shop figures, Customer accounts | the day’s money, and customers who buy on account |
| Reports & Analytics | Retail reports, The books | the shop’s reports and the accounting ledger |
| Settings | API access, Offline sync | integrations, and offline sales the server held for a manager |
The words used on these pages:
| Word | Meaning |
|---|---|
| Product | something you sell, with its variants (size, colour) — each variant has its own SKU, barcode and price |
| Pack | a carton or a case of a variant, with its own barcode: scanning a pack of 12 sells 12 |
| Store | a place that holds stock: the shop floor, a back store, a warehouse |
| Batch | goods with one lot number and expiry date; the till sells the earliest expiry first |
| Serialised | sold one by one with a serial number or IMEI (phones, appliances) |
| Quarantine | stock held aside — opened or damaged returns, damaged deliveries — that cannot be sold |
Pictures are from a practice shop with made-up data (A Corner Supermarket): no real person, product or customer appears.
Open the till and make a sale
Purpose
Take money for goods at the counter: scan, take payment, print the receipt.
Role / permission required
sales.create with cash.open — the Cashier, the Retail manager
and the Owner hold them.
Prerequisites
- The products are in the catalogue with a price, and there is stock in the store the till sells from.
- A till is set up for the branch, and your payment methods are switched on.
Steps
- Open Shop → Checkout.
- Press Open your till, choose your till, count the float and confirm.
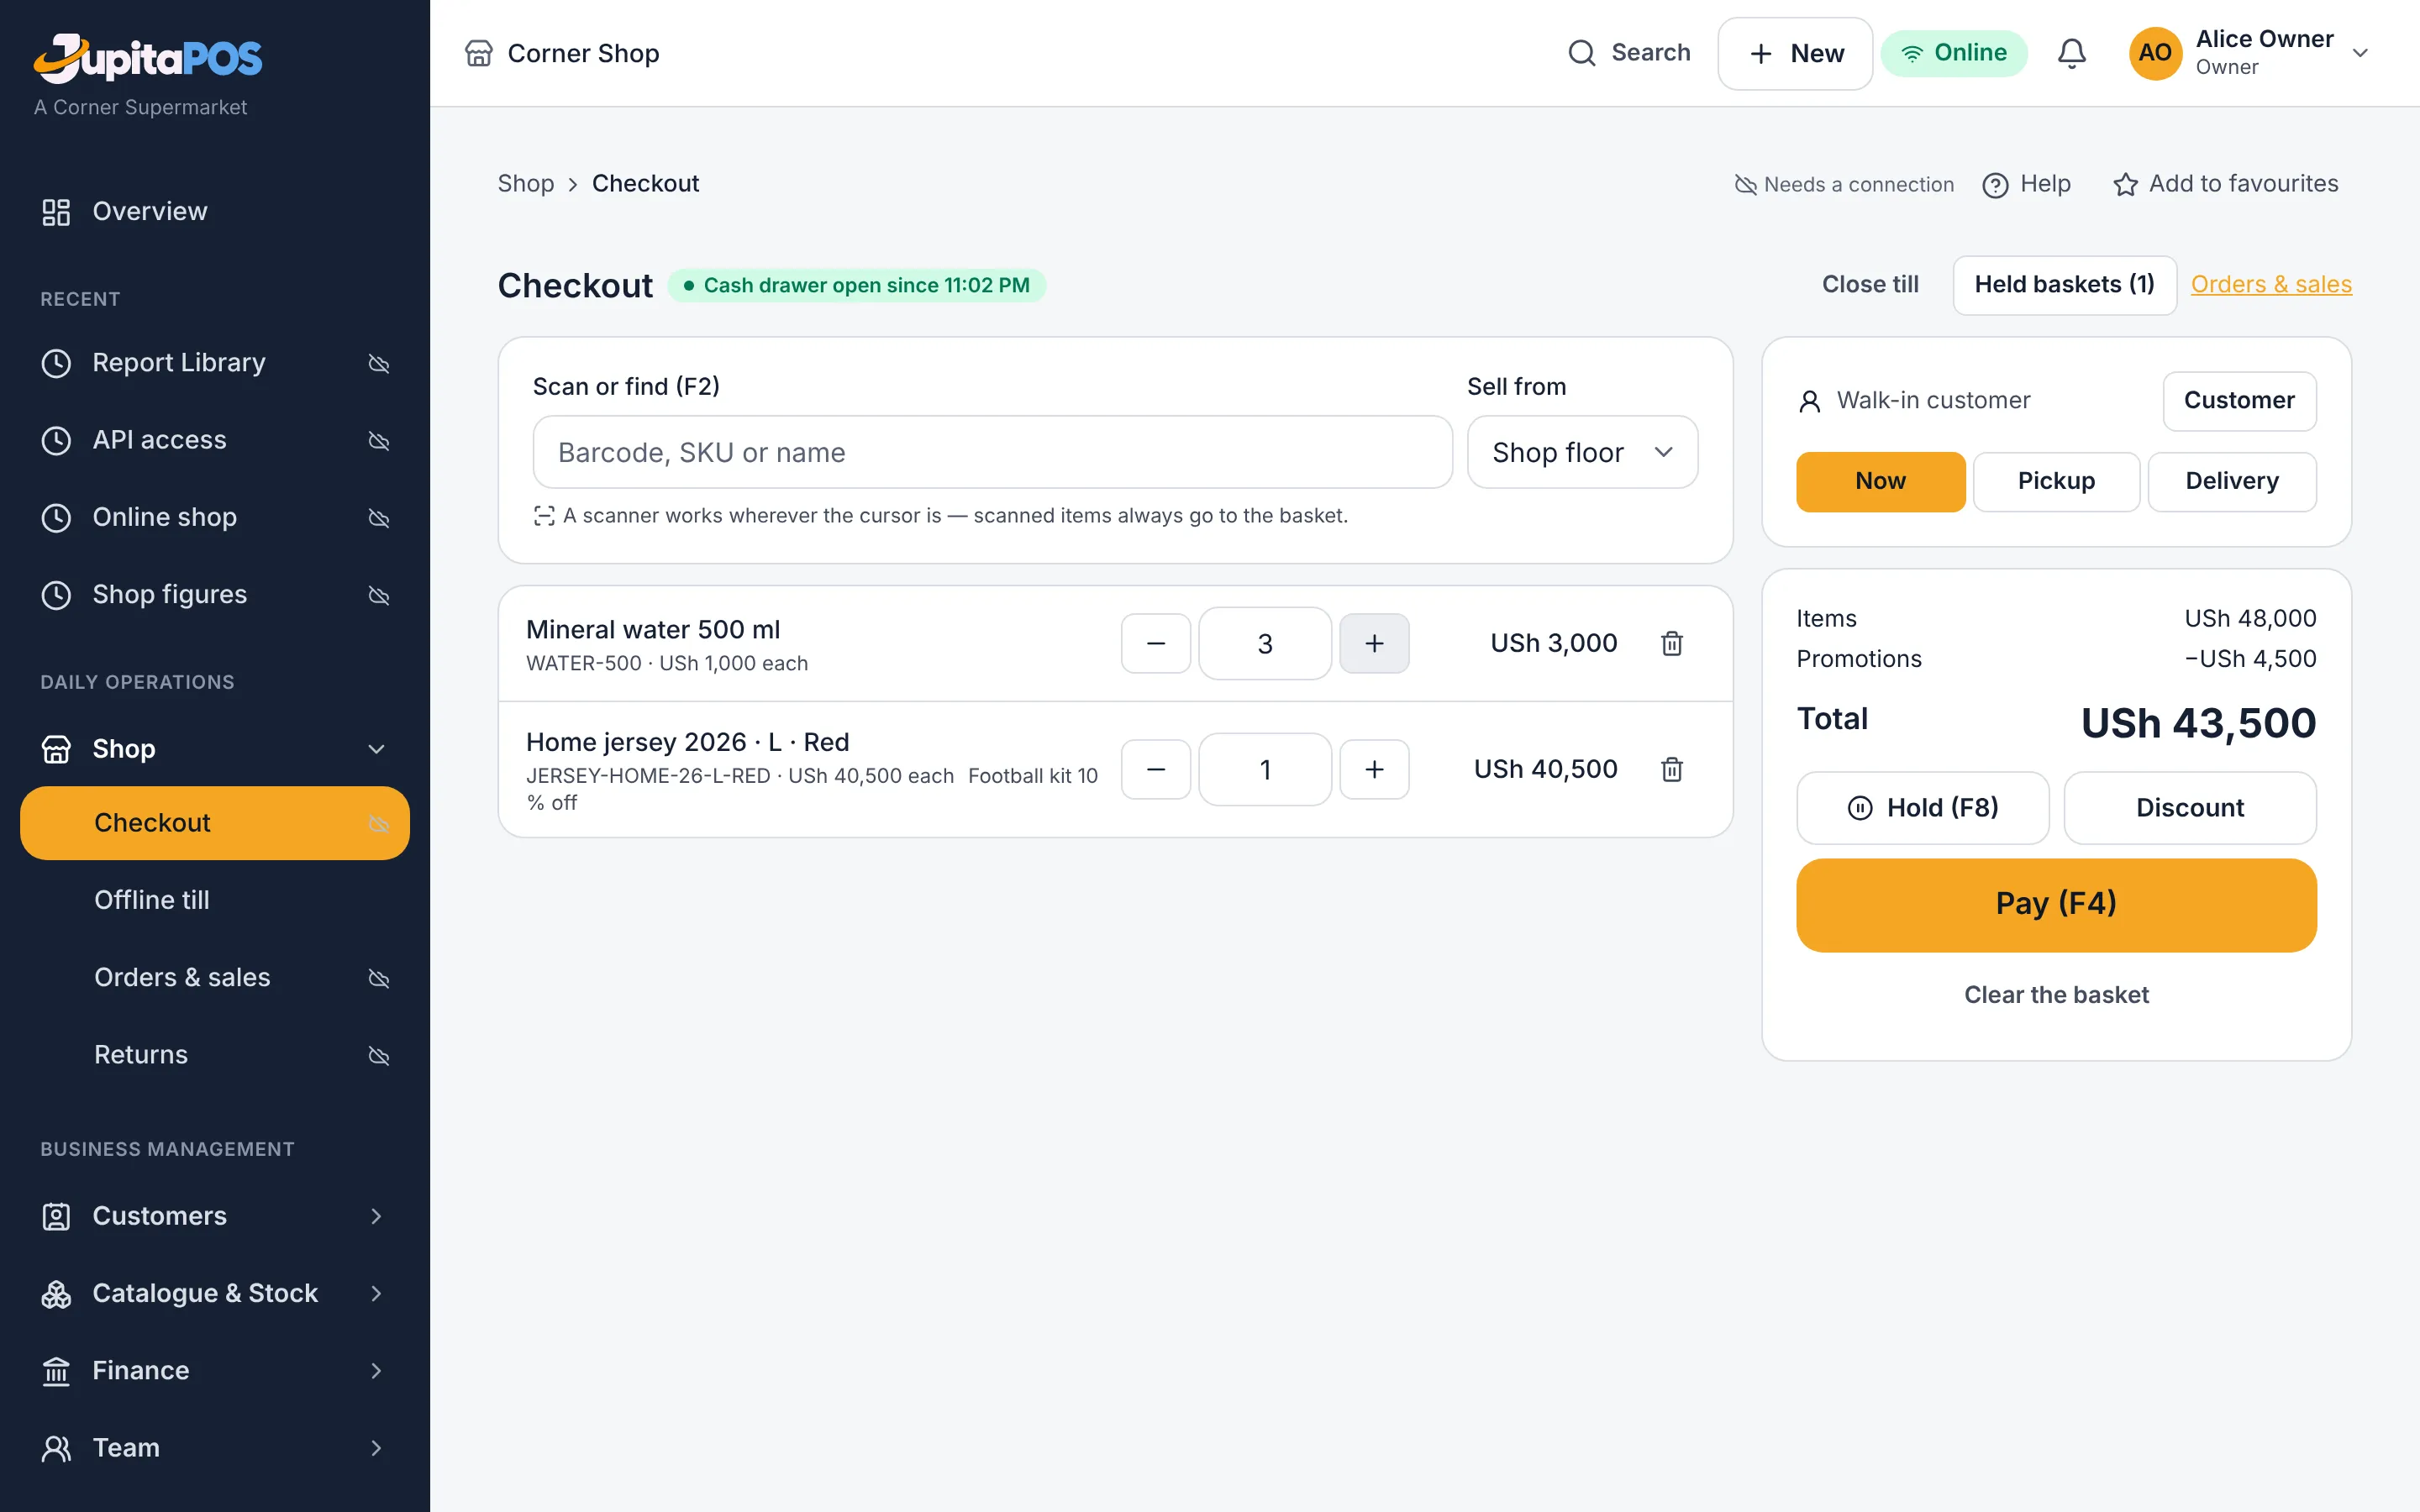
- Scan each barcode. The scanner types the code and Enter: the item goes into the basket wherever your cursor is. To find something without a barcode, type its name or SKU in Scan or find (F2) and press Enter.
- Change a quantity with + and −, or type it — weighed goods take
decimals (
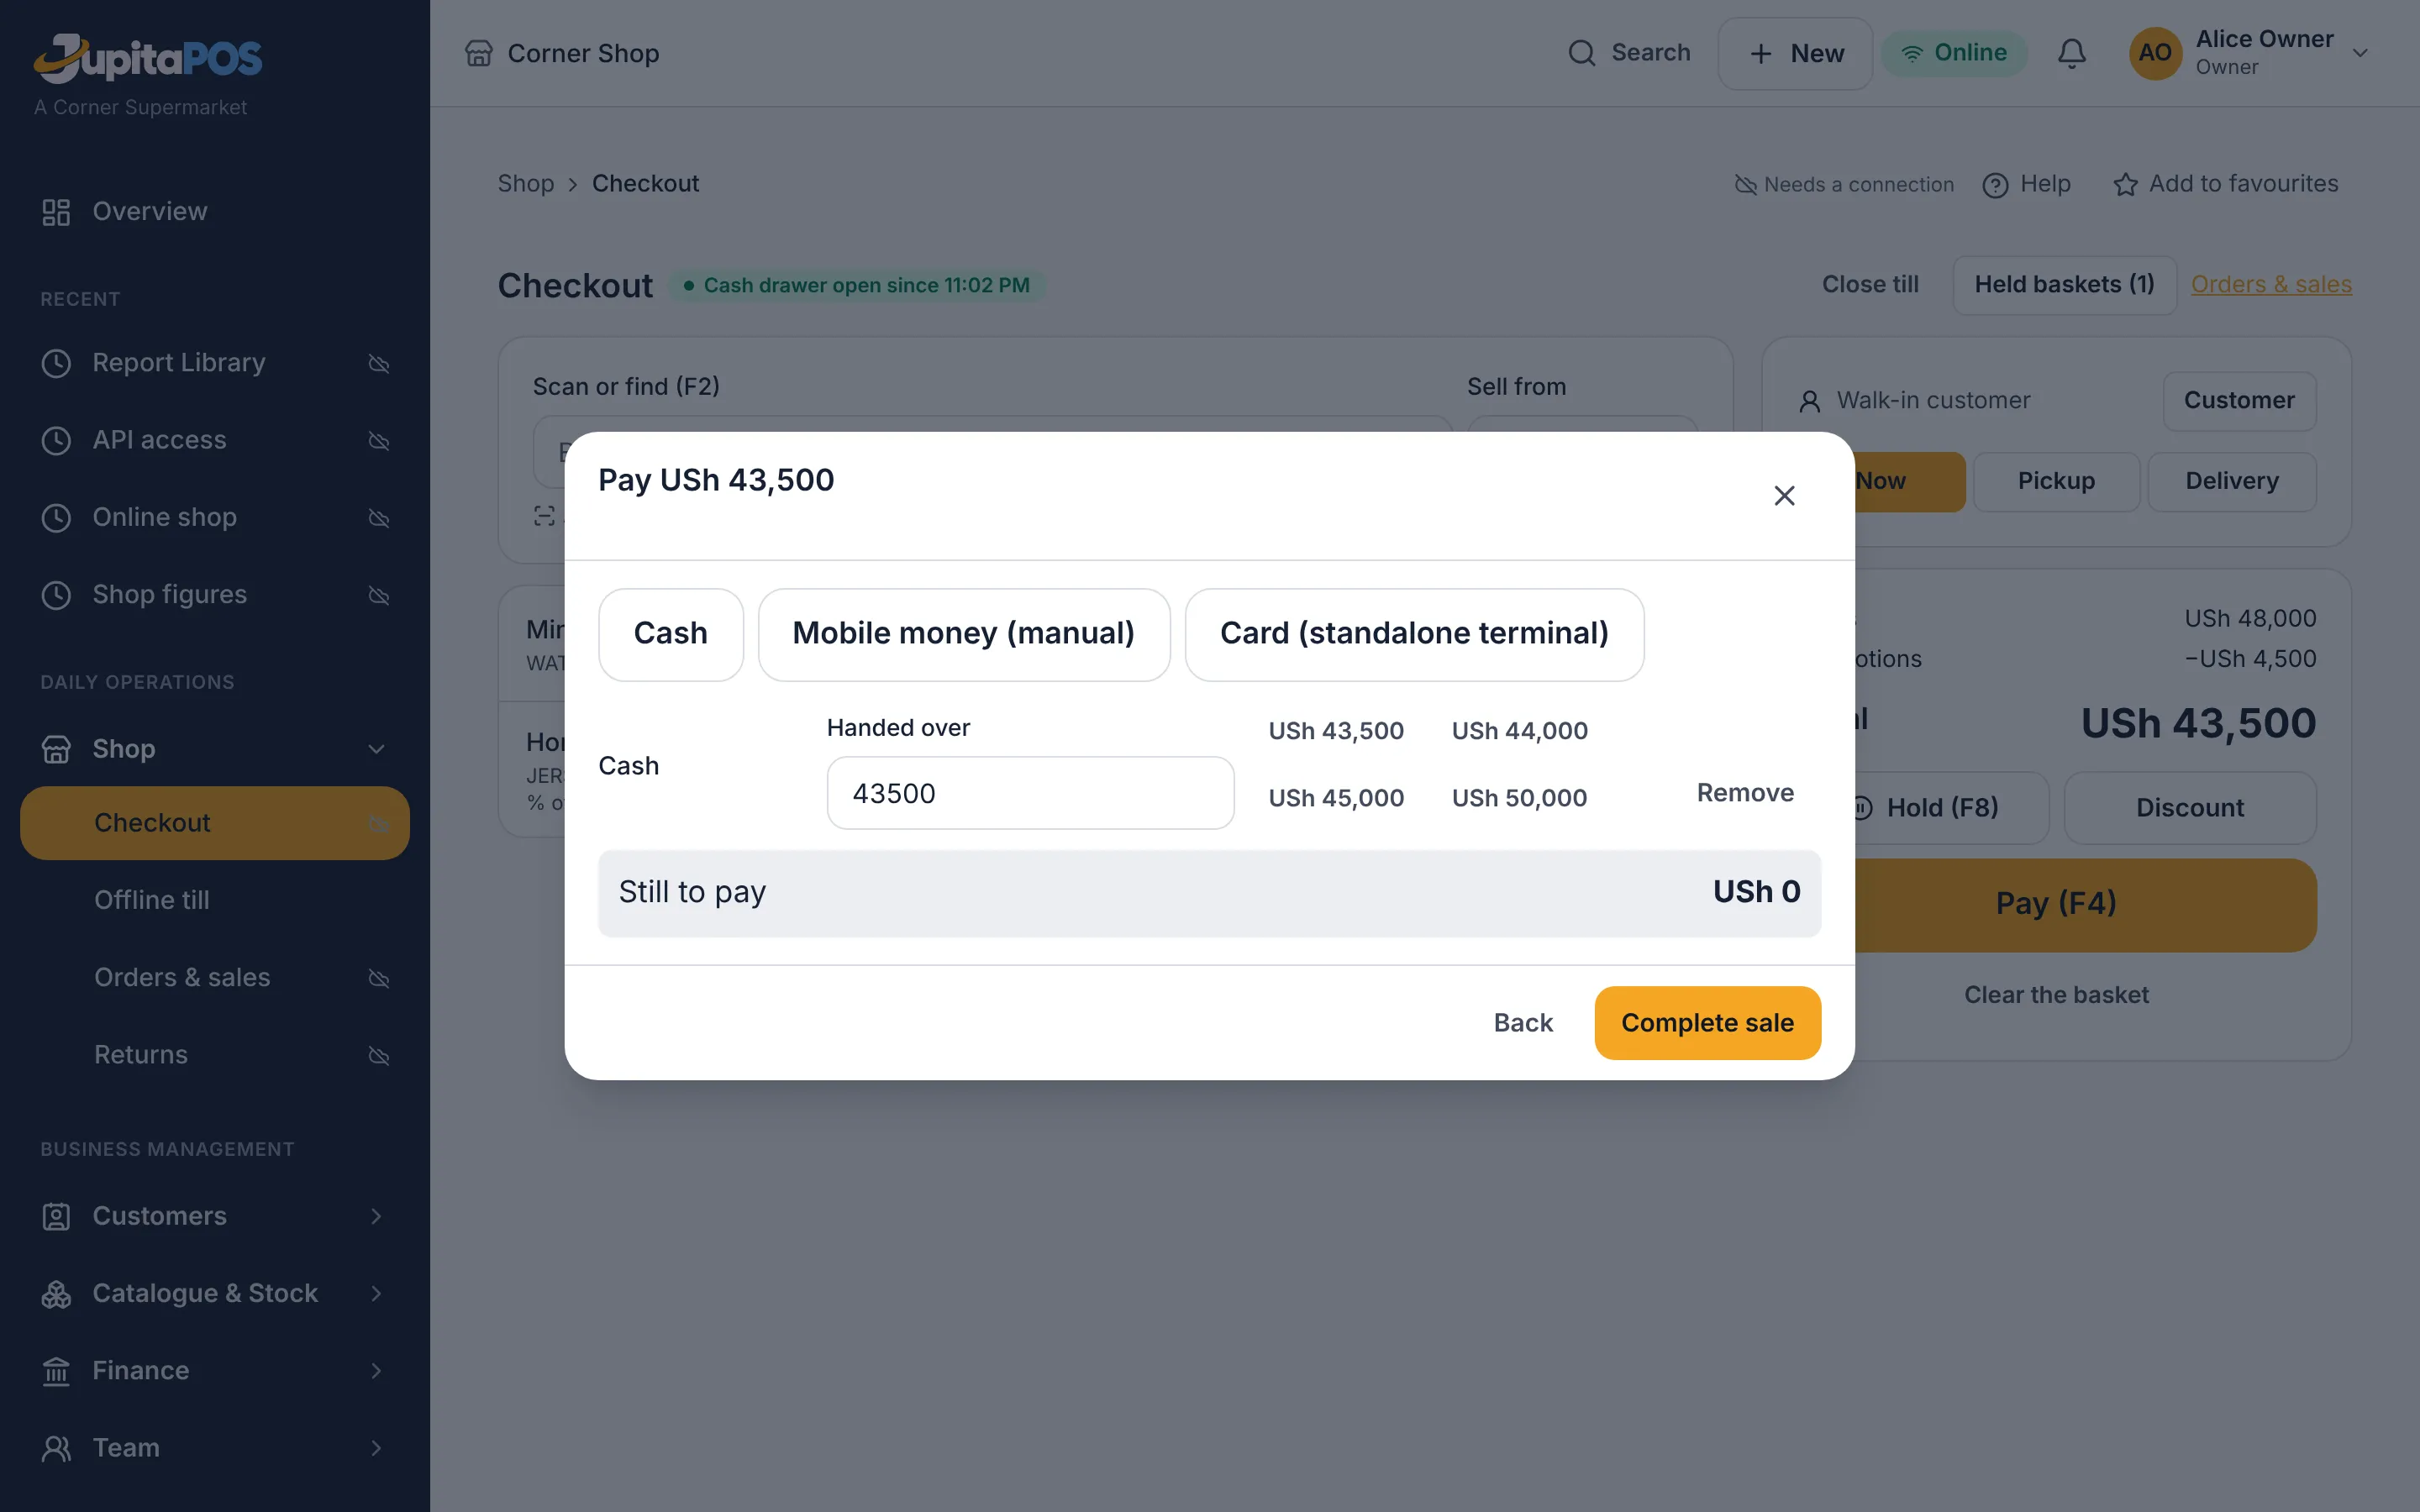
1.245kg). - Press Pay and choose how the customer pays: Cash (type what was handed over — the till shows the change), or mobile money or a card on the shop’s own machine with the transaction reference from the customer’s message or slip. Add a second payment for what is left to split it.
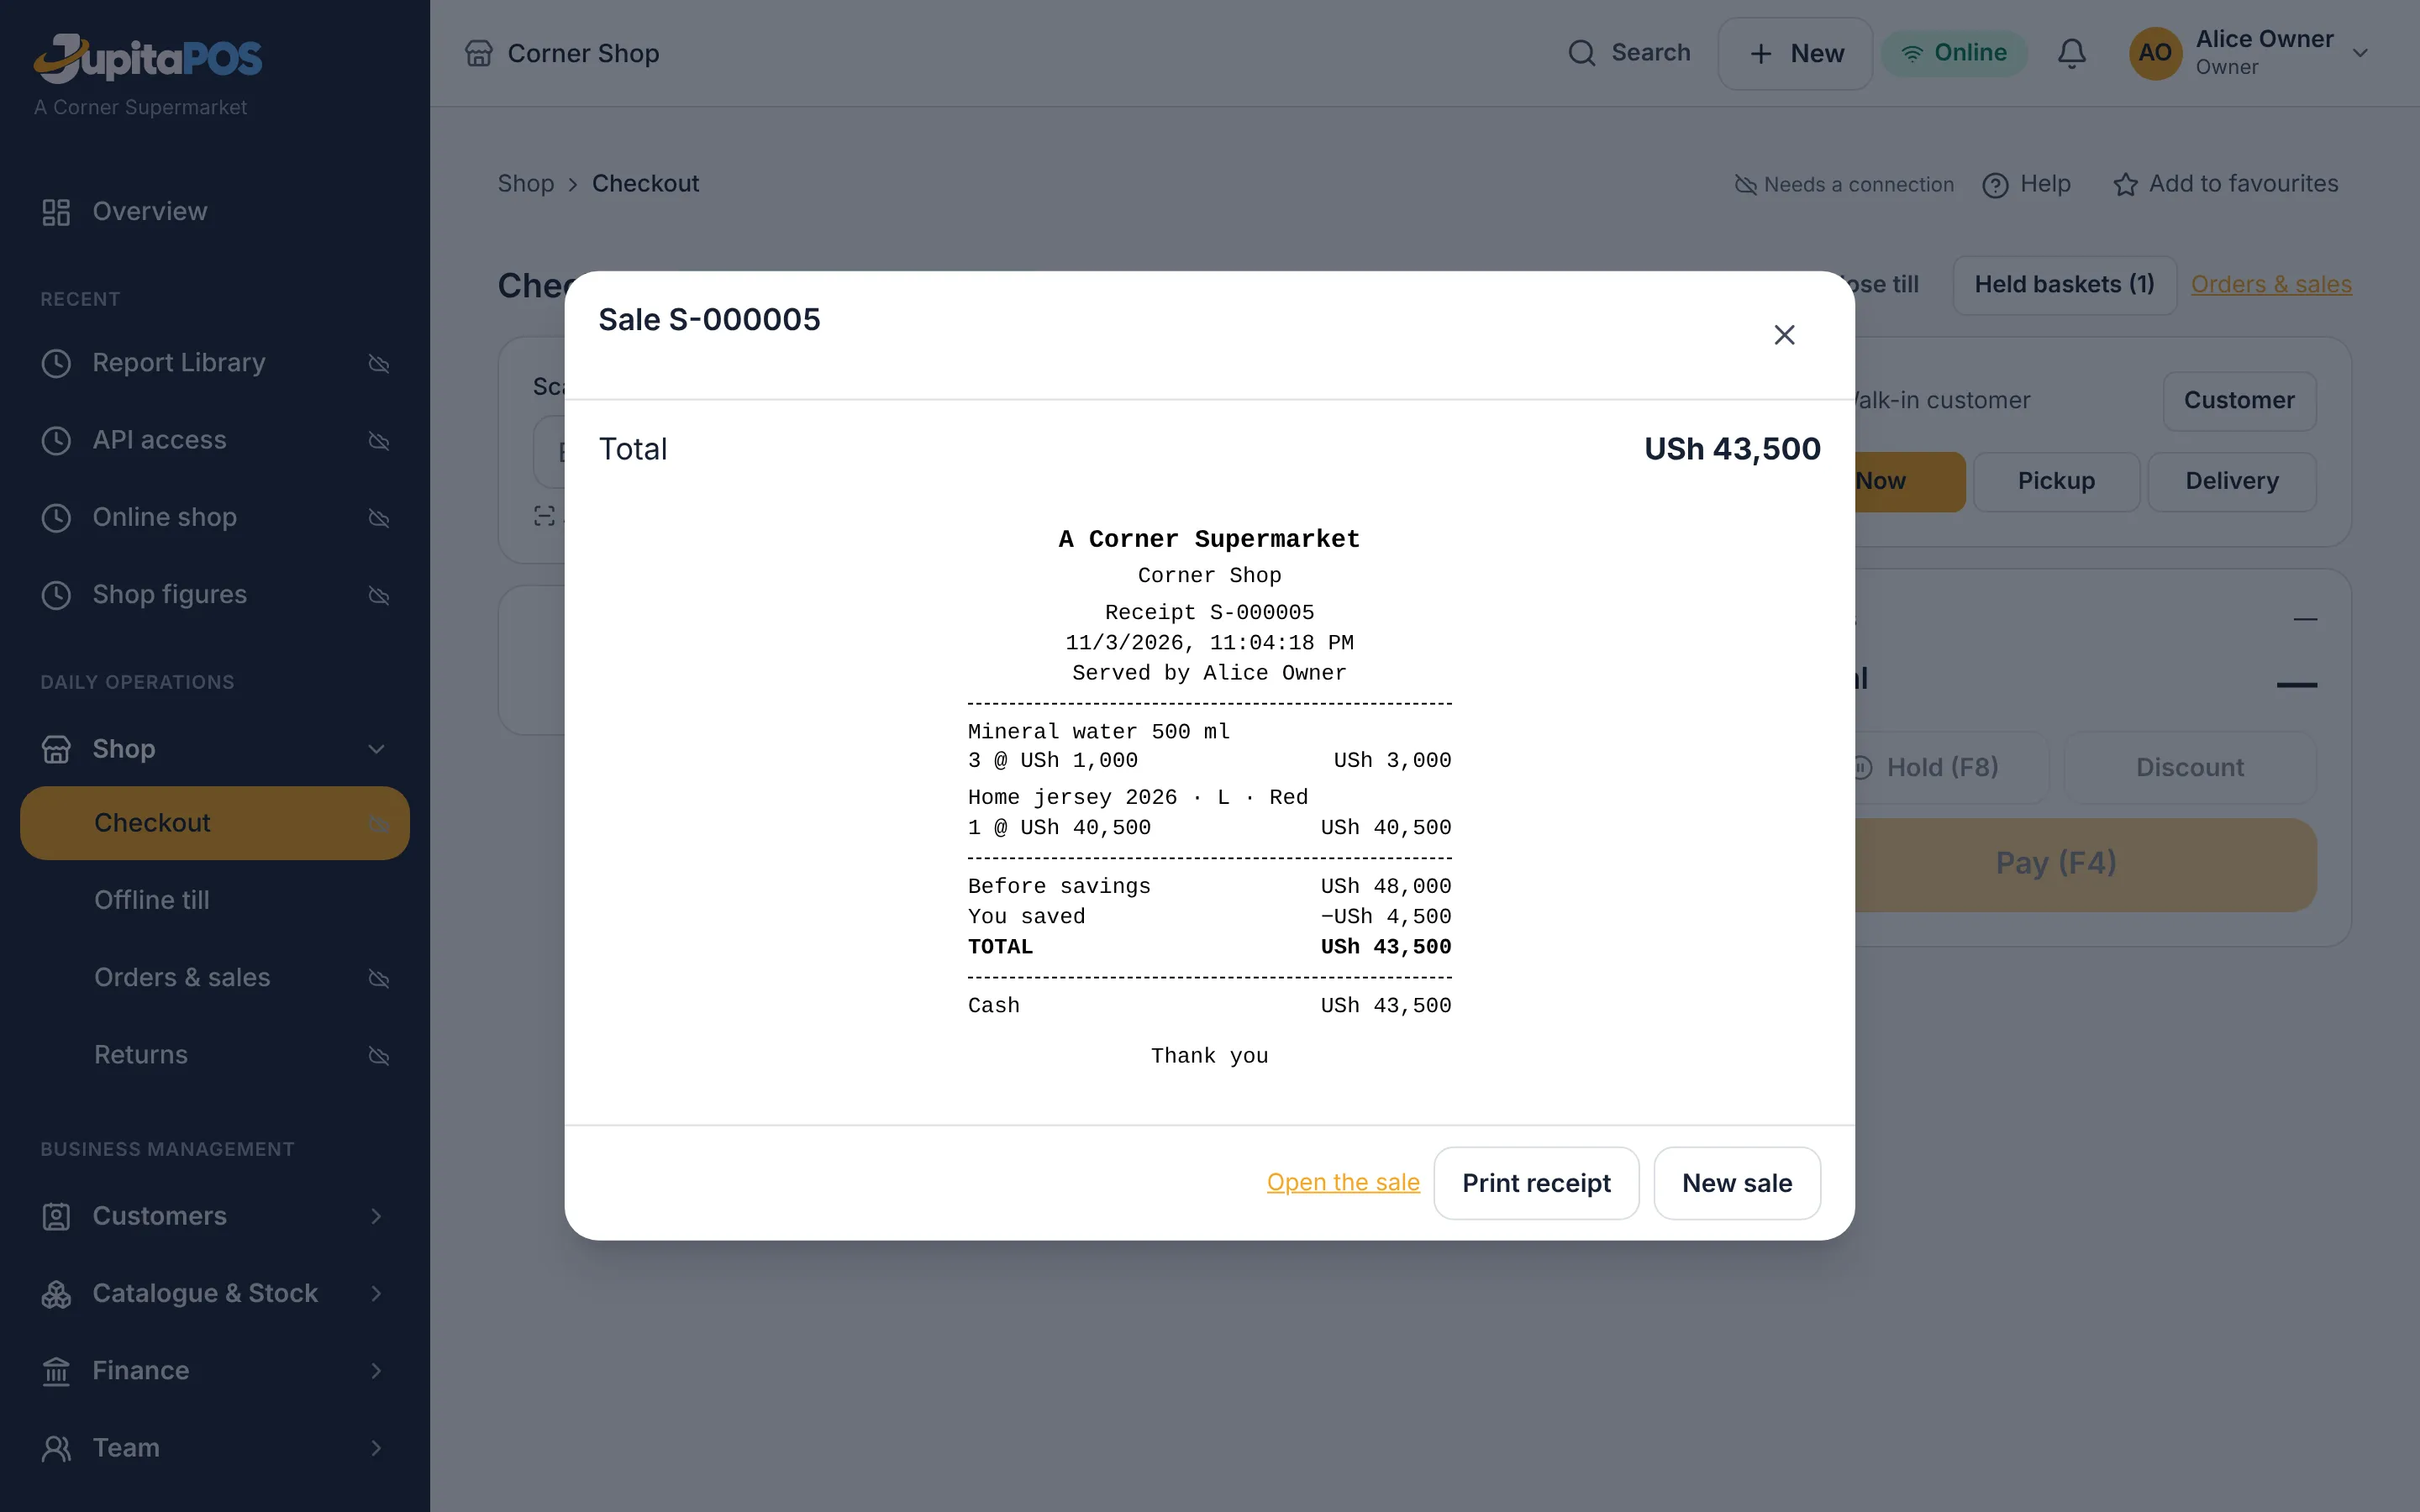
- Press Complete sale, then Print receipt.
Expected result
The sale has its number and is in Shop → Orders & sales. The stock left the store the till sells from, the money is in your till, and the receipt shows the sale number, the items, the taxes and how it was paid.
Screenshot
Common mistakes
- Typing a quantity of 12 for a carton: scan the carton’s own barcode instead — it sells the pack, and 12 units leave the shelf.
- Giving a discount you may not give: a bigger discount than your role allows needs a supervisor’s employee number and PIN on your till.
Troubleshooting
- “The price changed” while the basket was open: the till shows the new total. Check it with the customer and pay again.
- “Not enough stock”: another till sold the last one. Nothing was charged.
- No till open — cash cannot be taken: open your till first.
Hand over an order, or reprint a receipt
Purpose
Give the customer goods they ordered at the till or in the online shop, and reprint a receipt.
Role / permission required
sales.create — the Cashier and the Retail manager.
Prerequisites
The order exists (from the till or from the online shop).
Steps
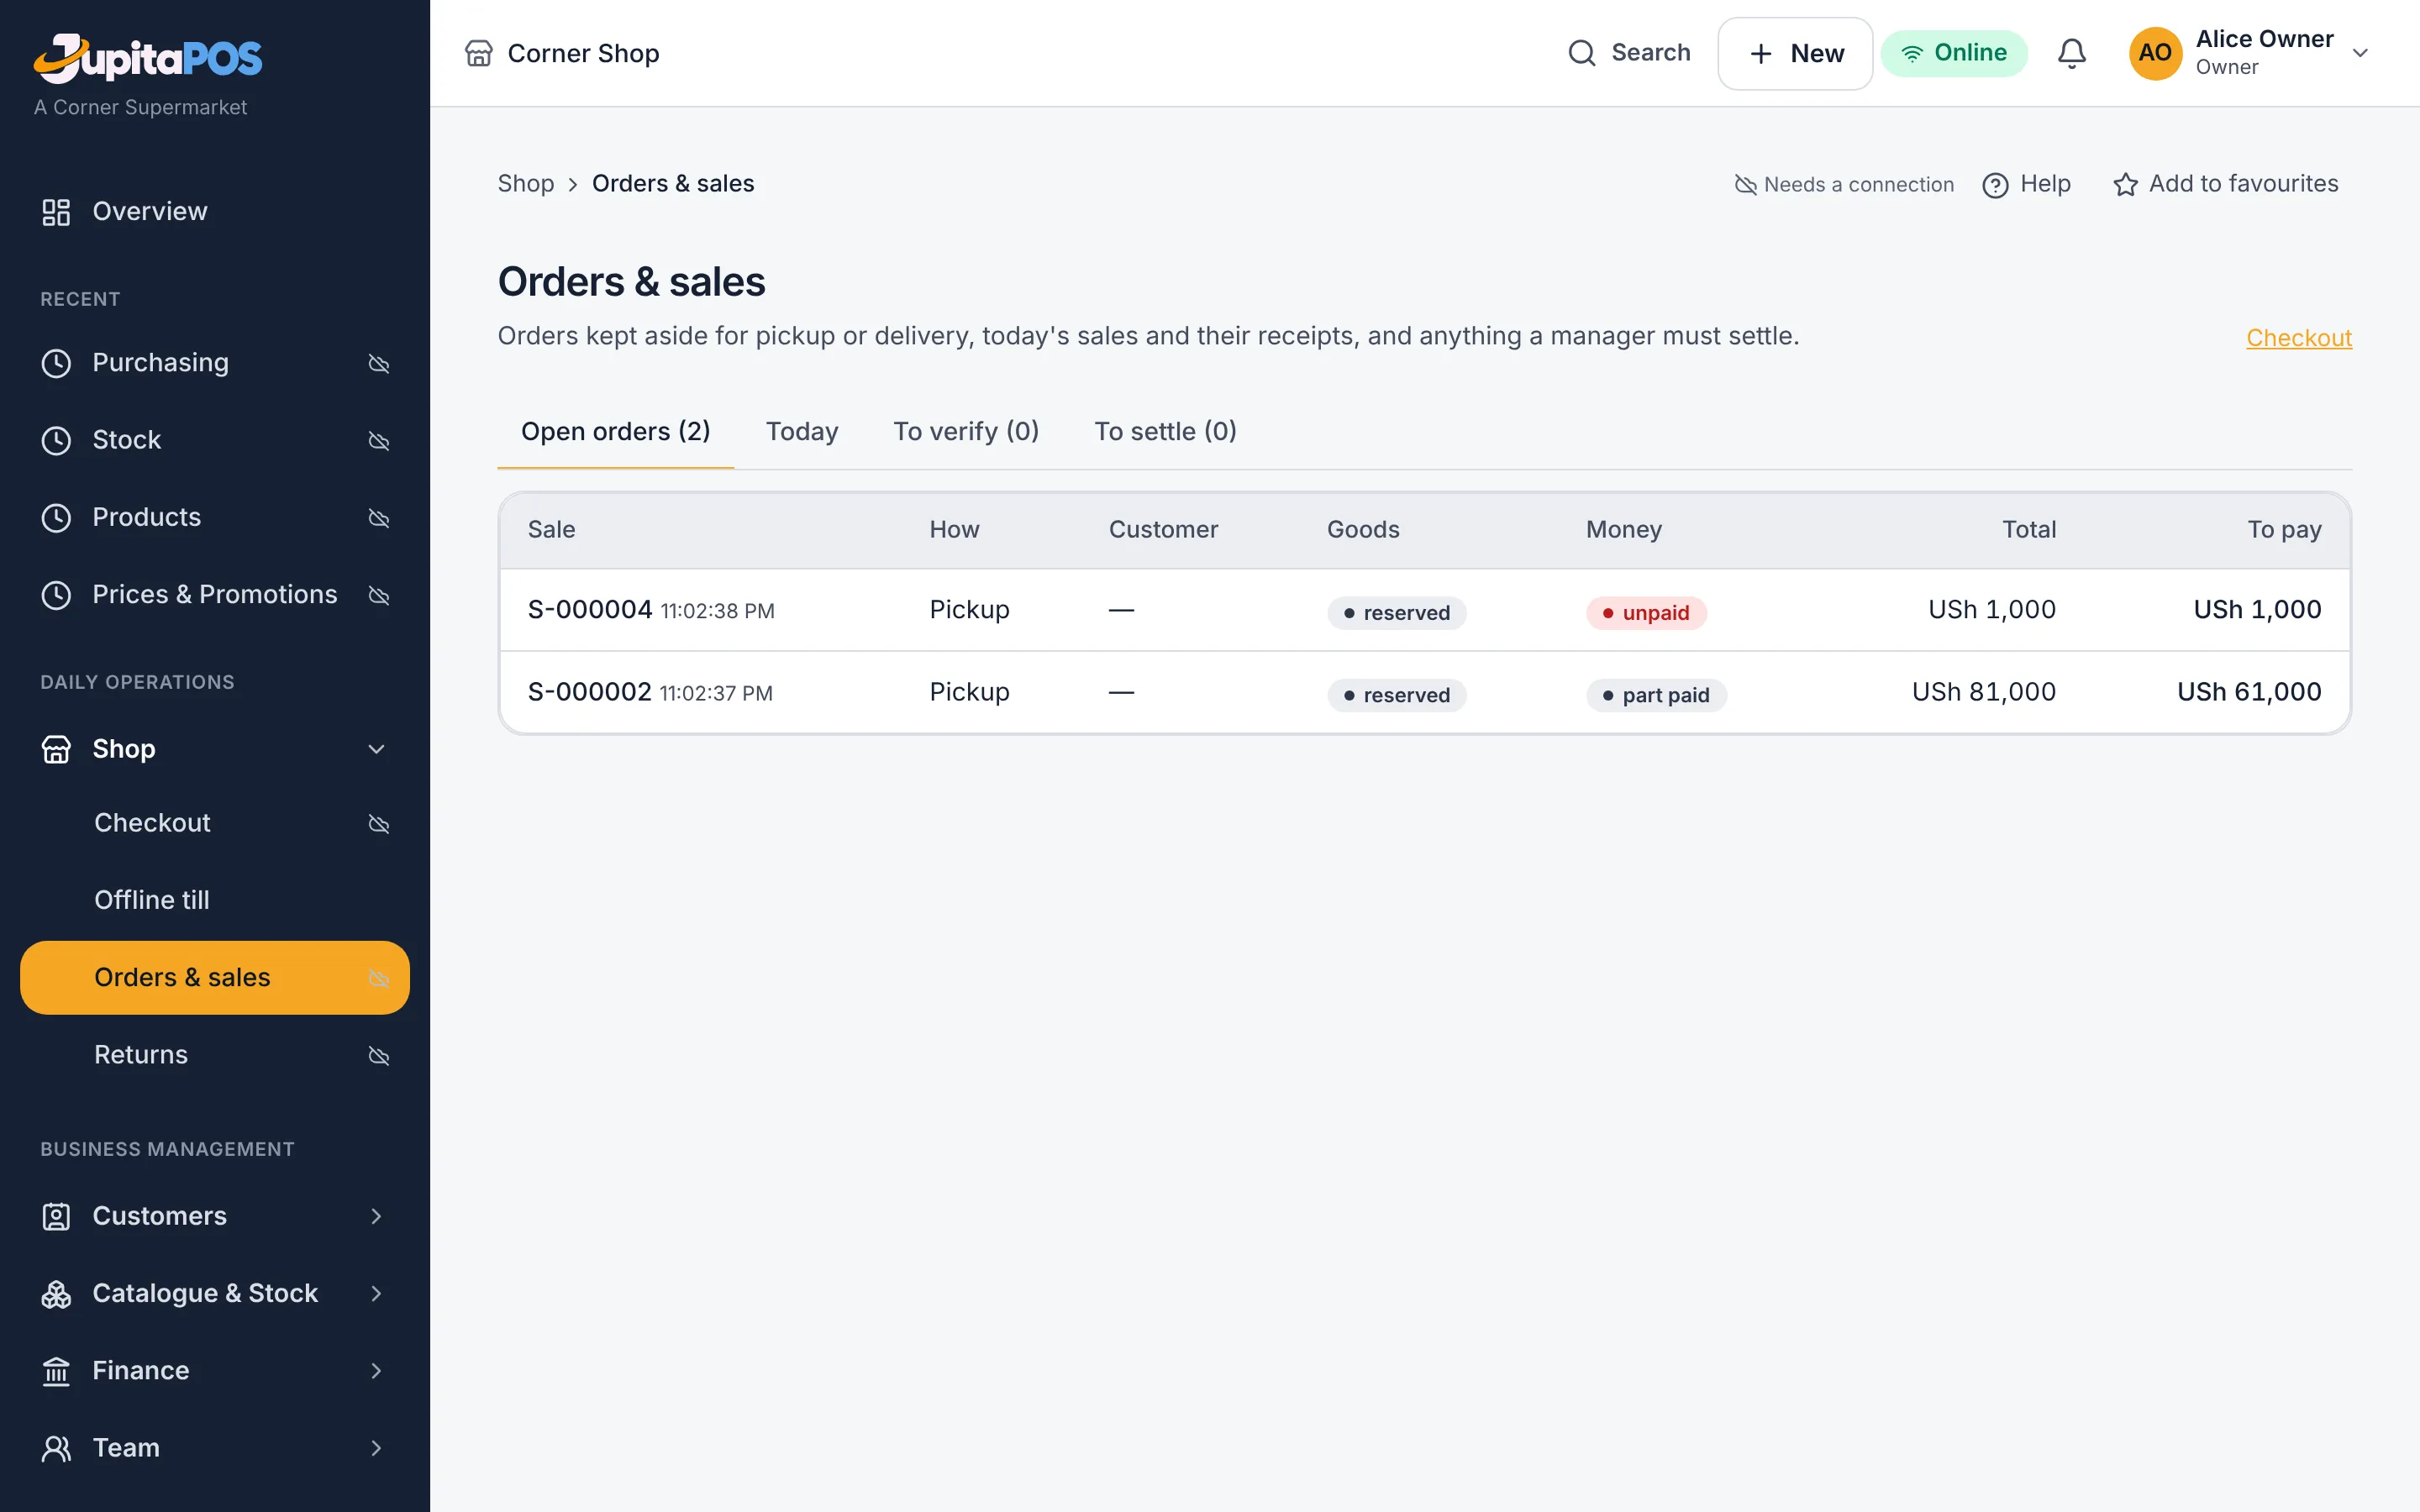
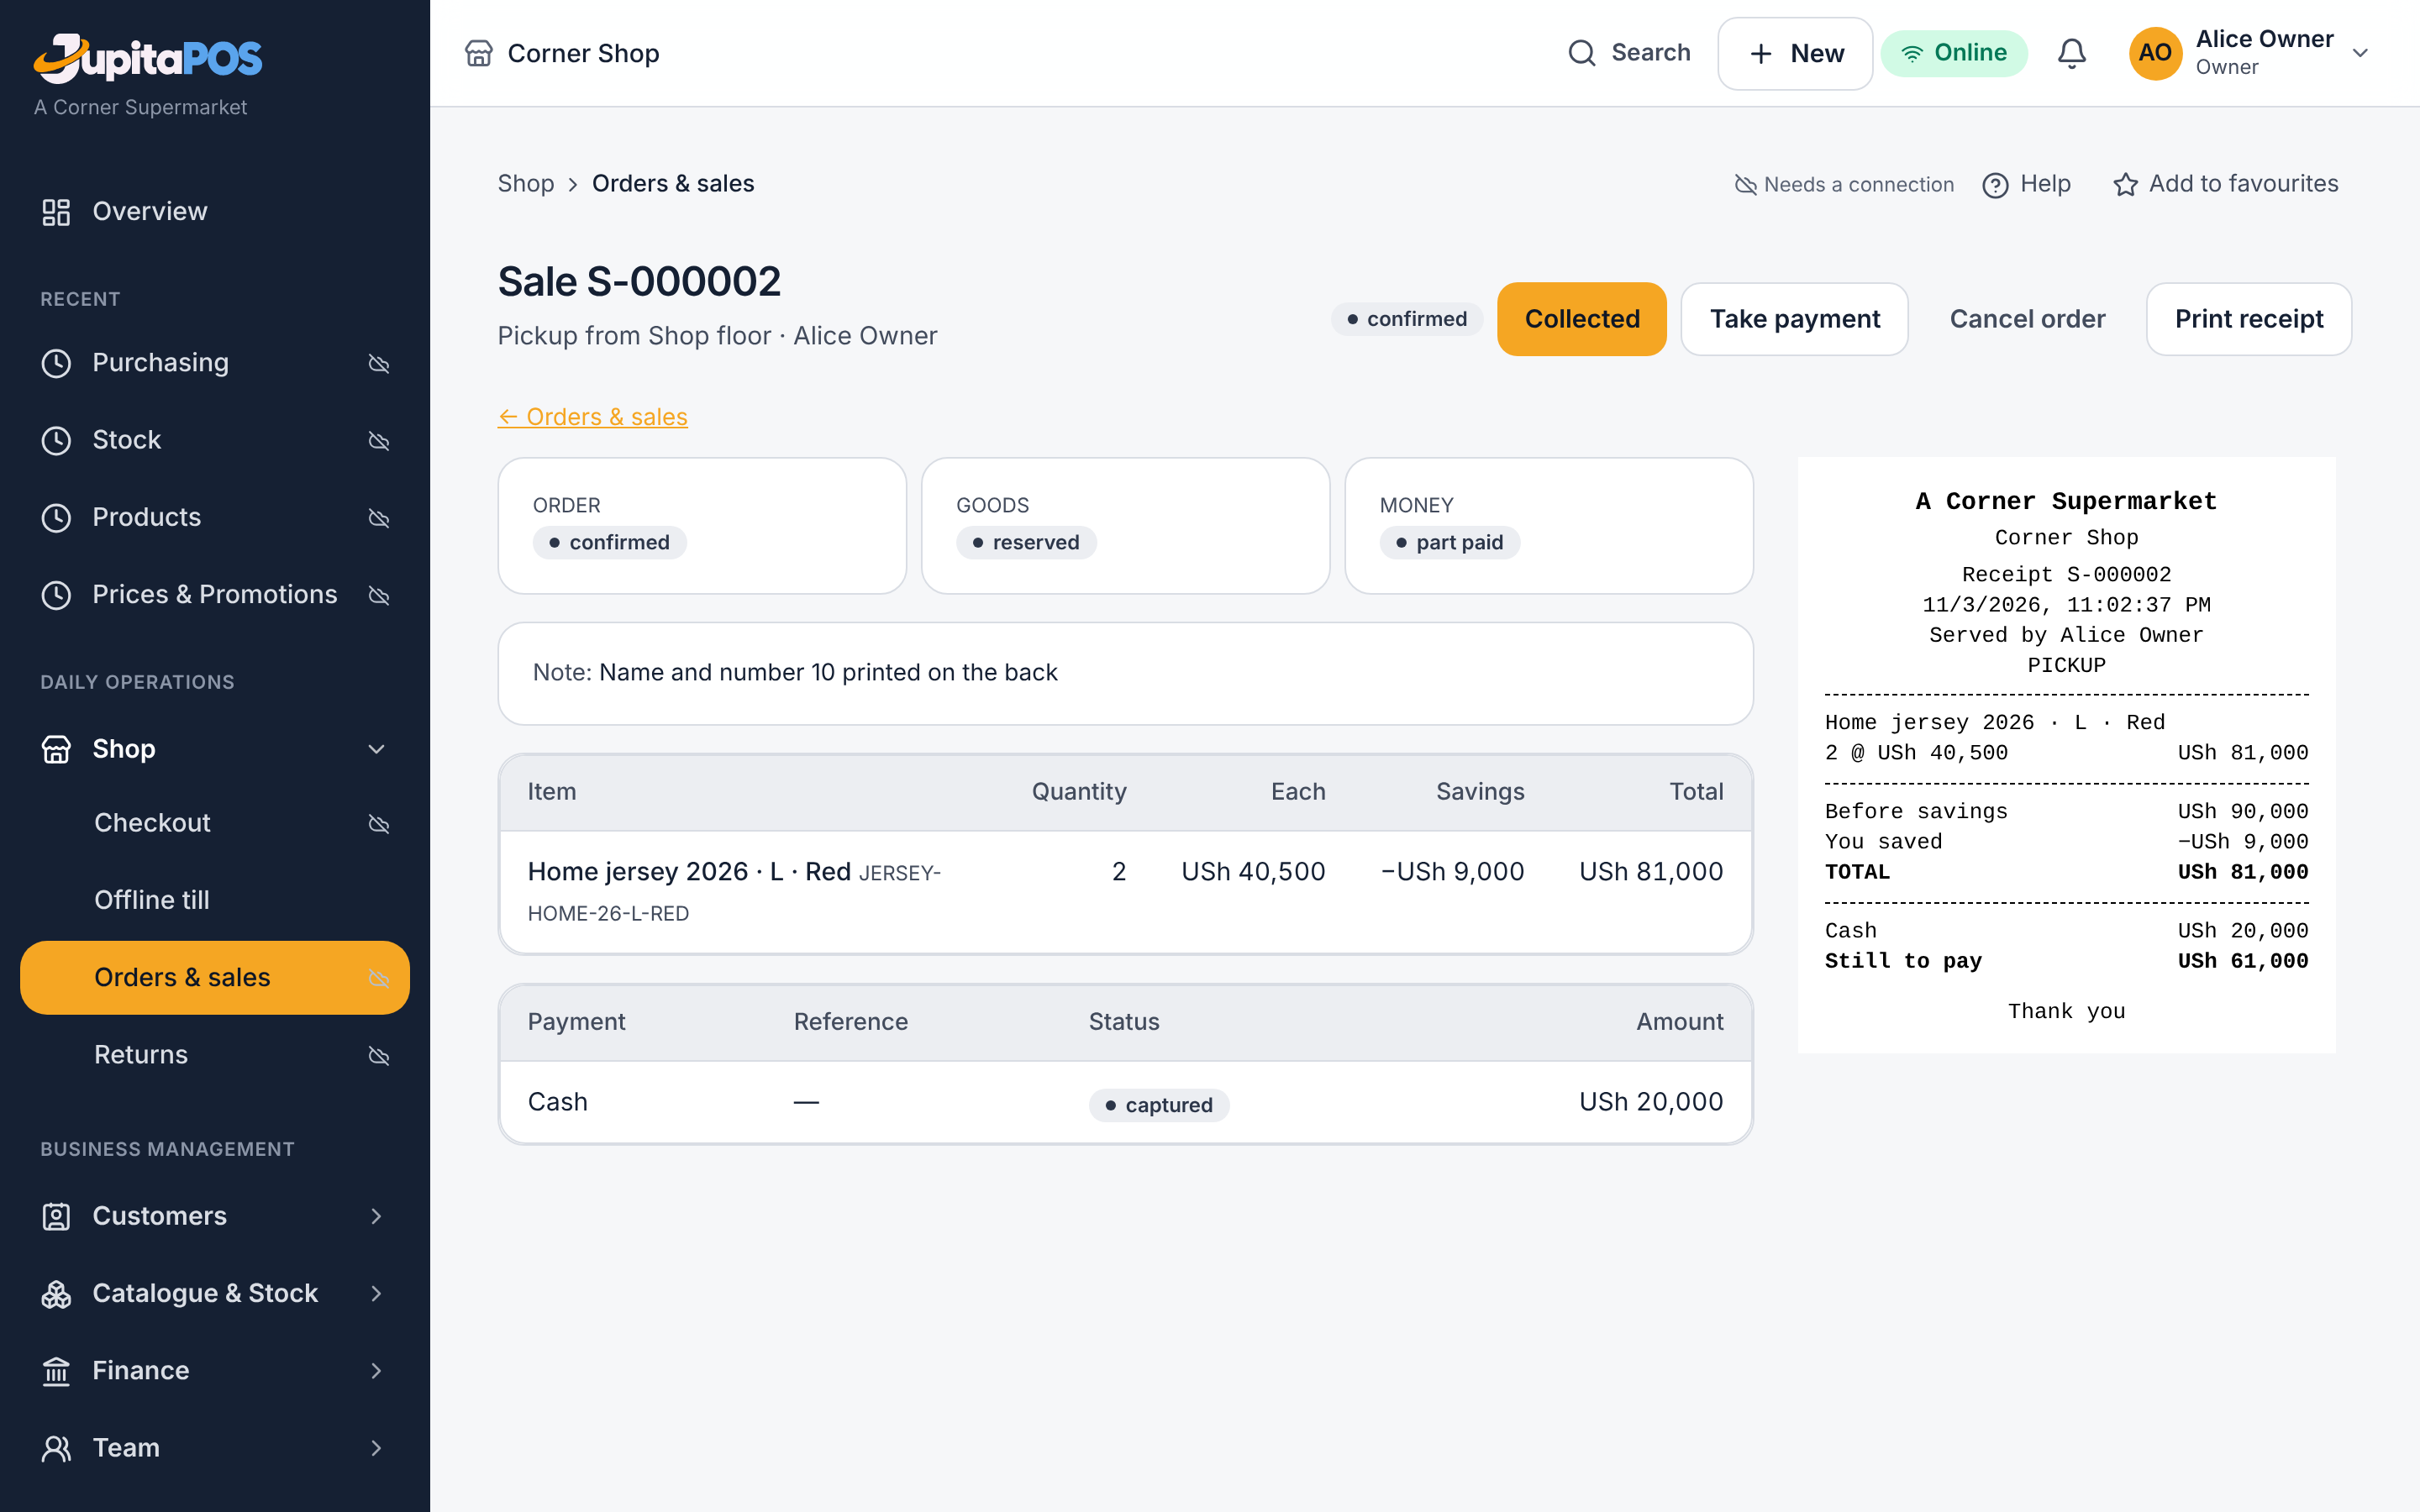
- Open Shop → Orders & sales.
- Open the order and check the customer’s name and the items.
- If it is to be paid at collection, take the payment first.
- Press Collected (pickup) or Handed over (delivery).
- To reprint a sale’s receipt, open the sale and press Print receipt.
Expected result
The order is complete and the stock leaves the store only now. A reprint says COPY 2 (3, …): the sale number never changes.
Screenshot
Common mistakes
Marking an order collected before the customer has it: the stock leaves the books at that moment.
Troubleshooting
An online order that waited too long unpaid lets go of its items by itself; the customer orders again.
Take back goods: refund, exchange or credit
Purpose
Take goods back from a customer and settle it the right way.
Role / permission required
sales.refund — the Retail manager and the Owner. On a cashier’s
till, the manager types their employee number and PIN.
Prerequisites
The receipt (its number or barcode). Without a receipt, goods are never paid out in cash.
Steps
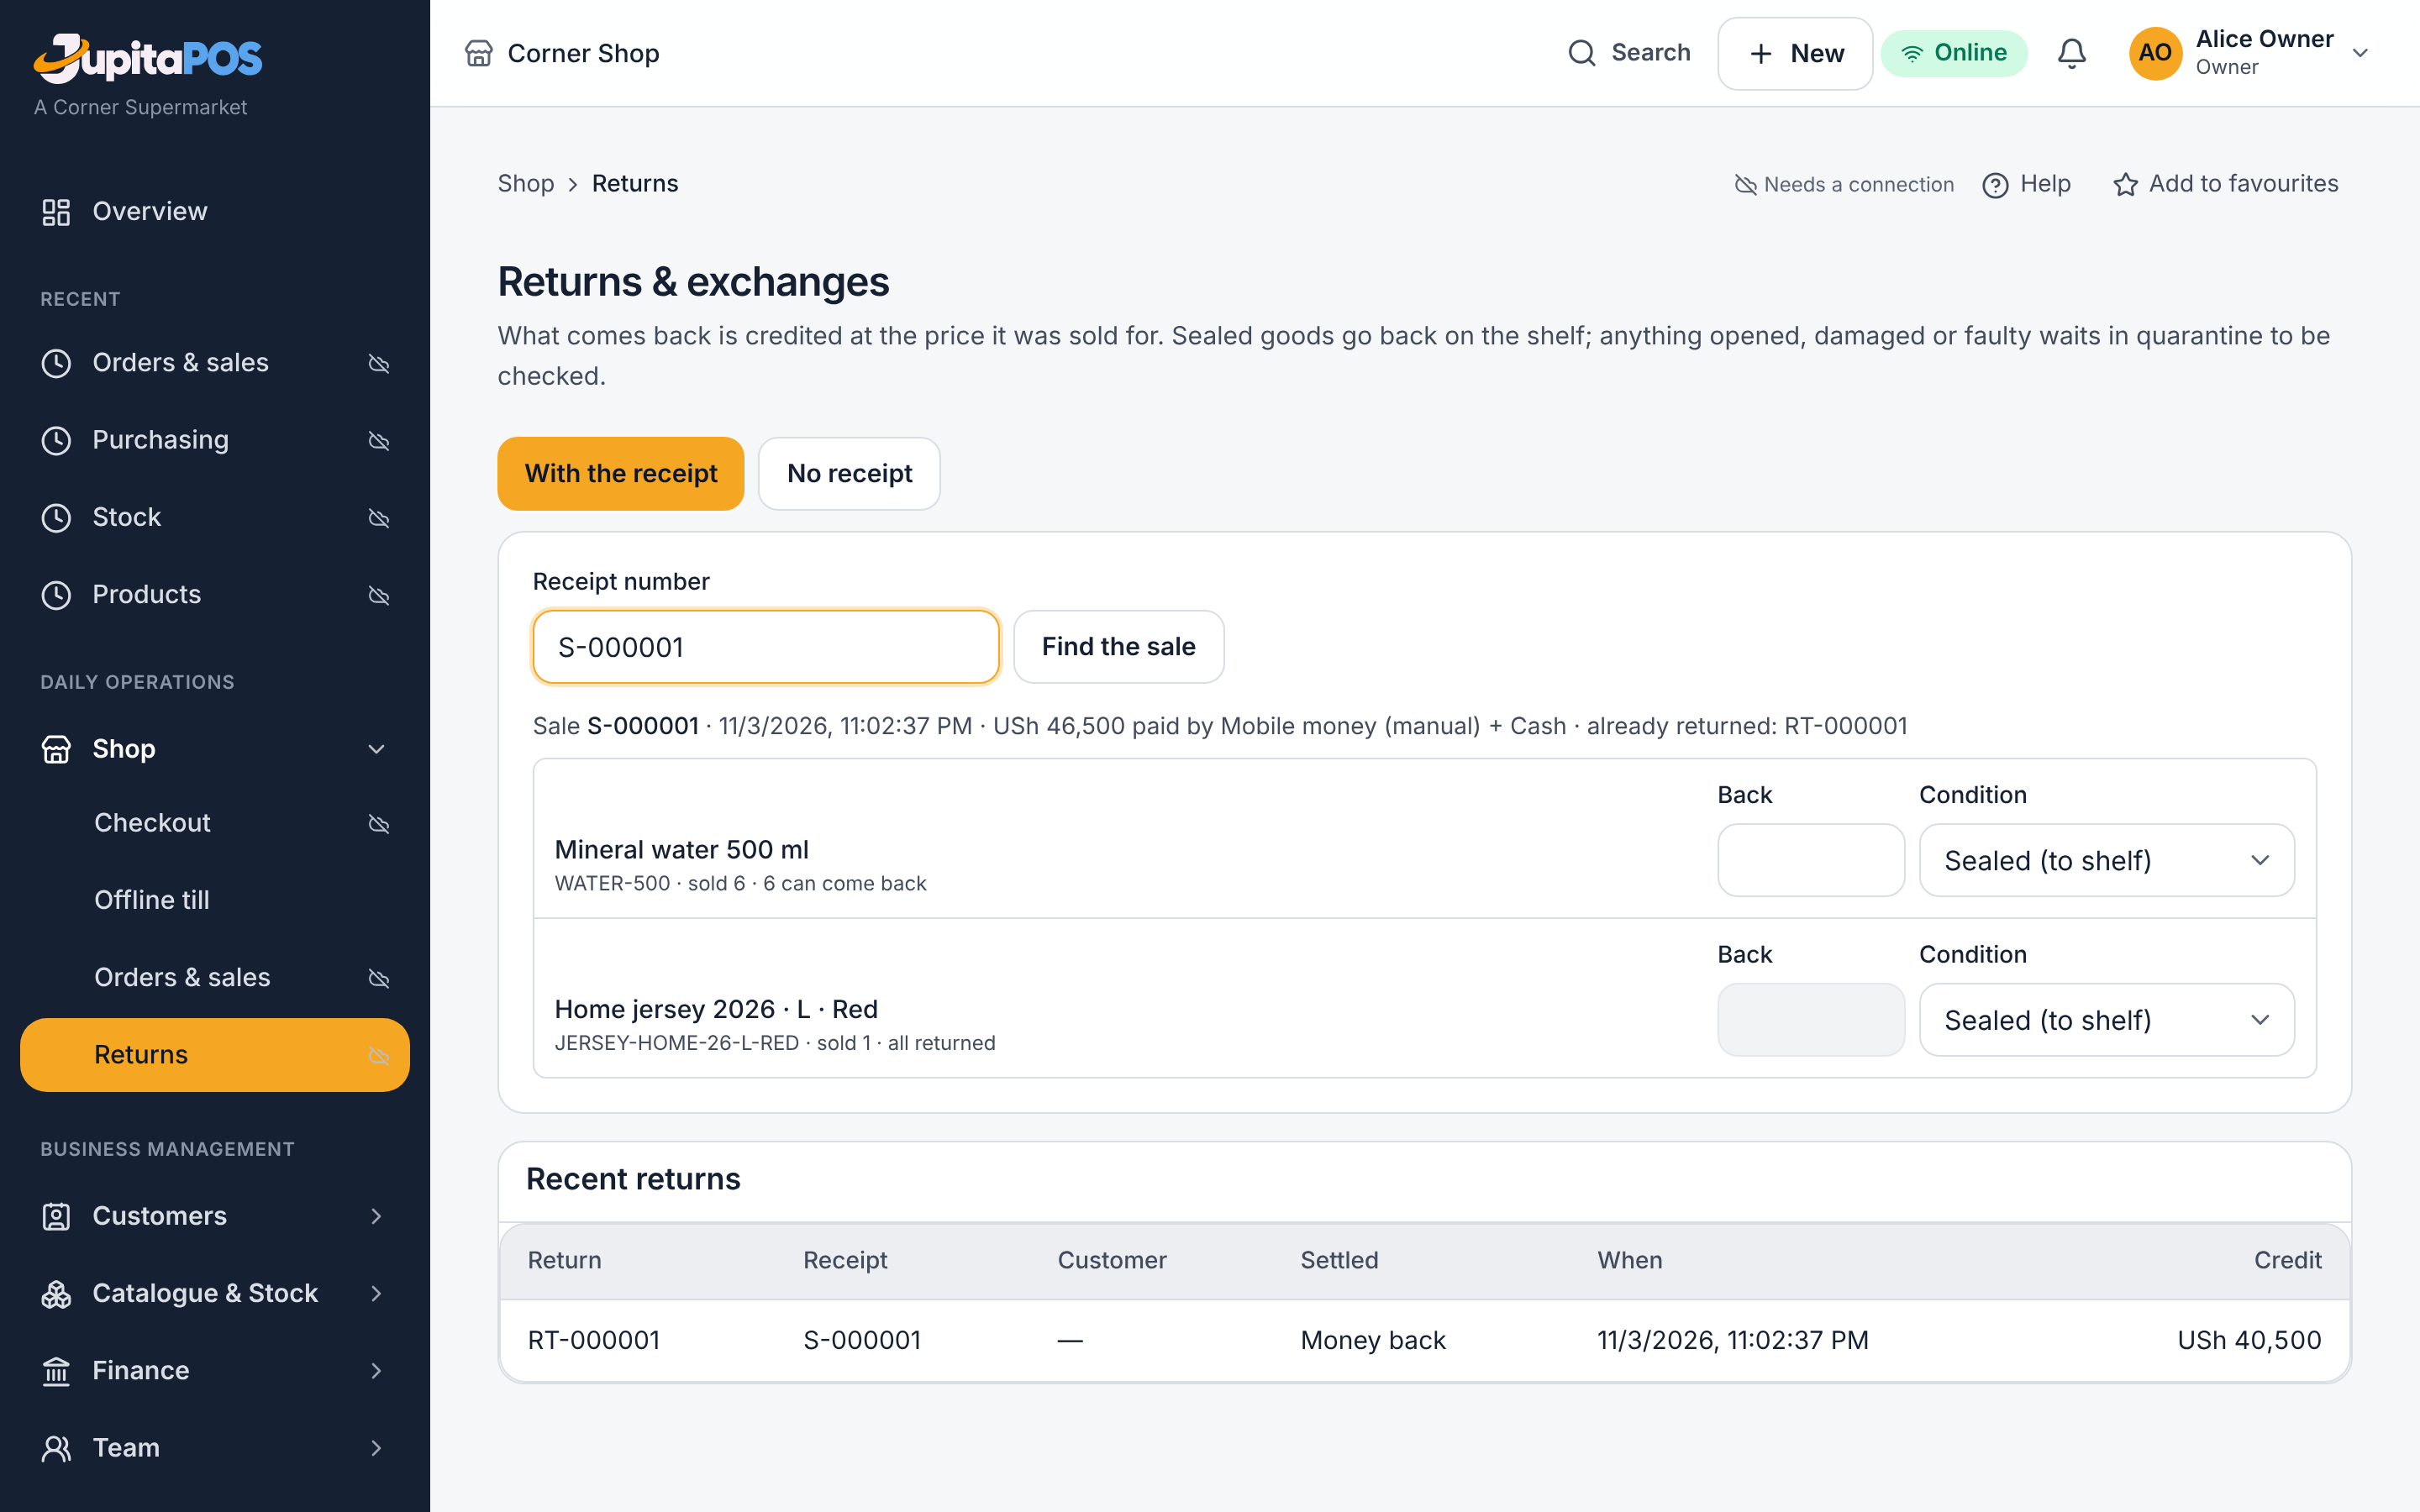
- Open Shop → Returns, scan or type the receipt number and press Find the sale.
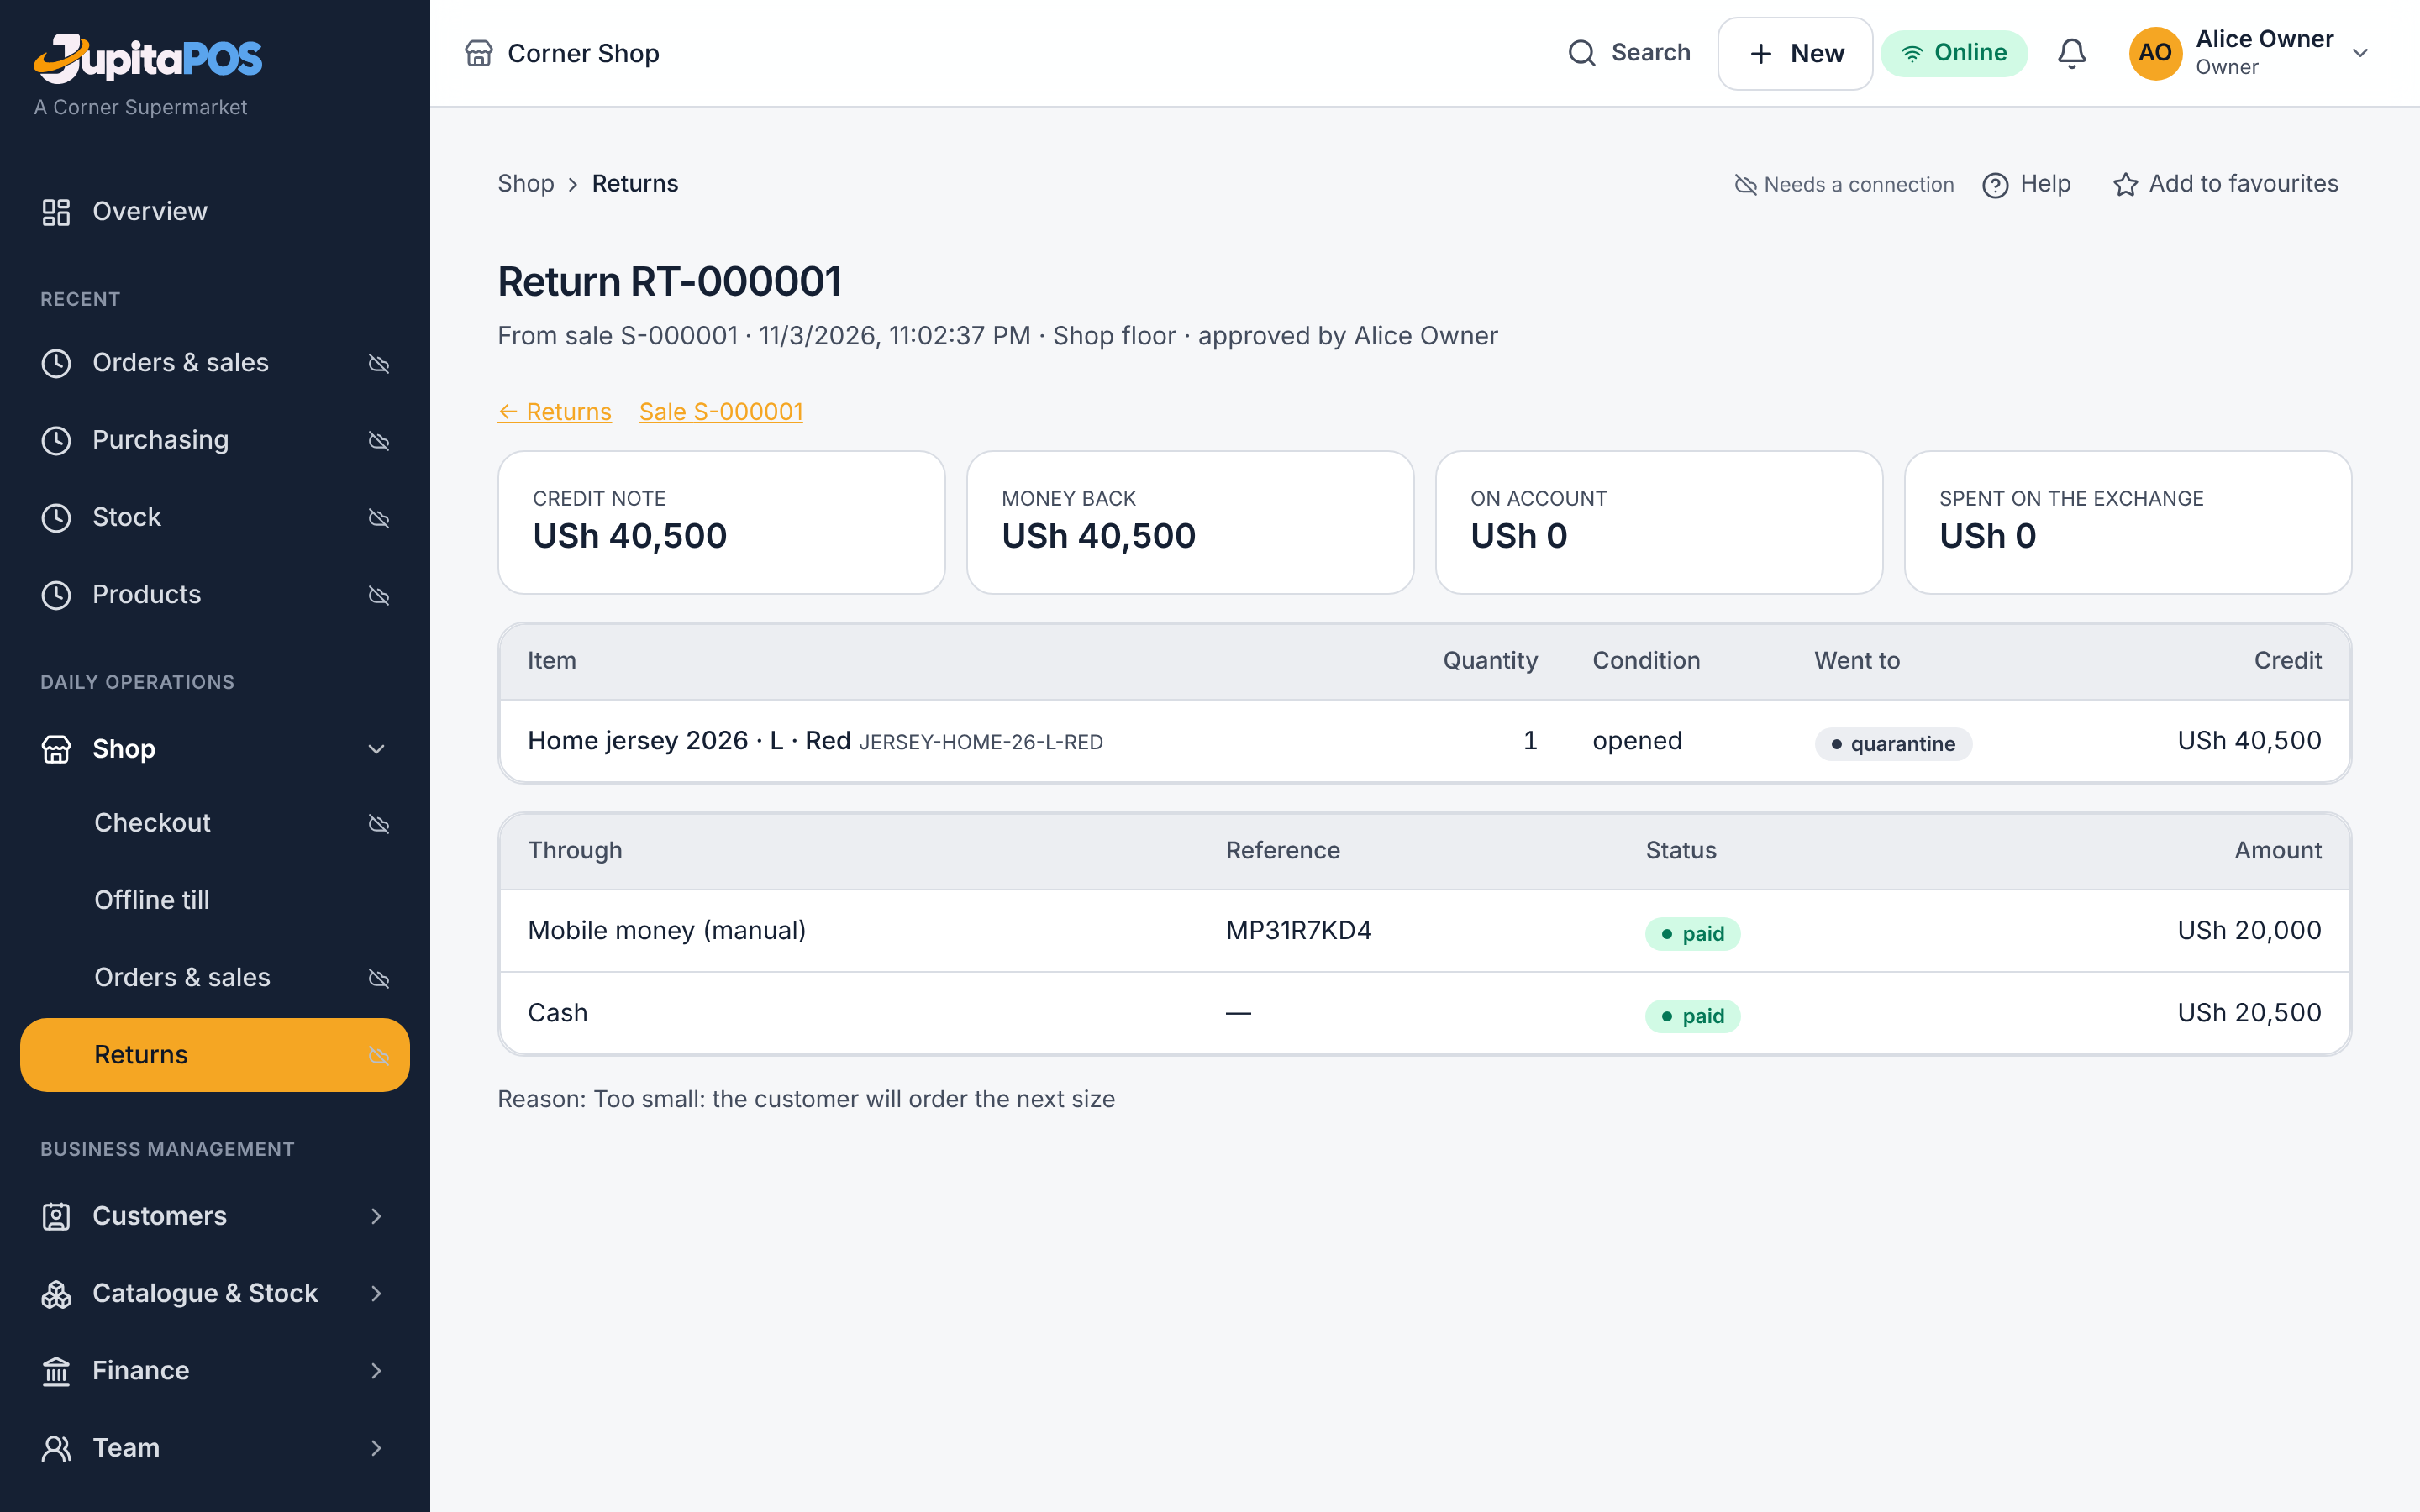
- Tick the lines coming back and how many, and say their condition: sealed goes back on the shelf; opened or damaged goes to quarantine.
- Give the reason.
- Choose how it is settled: a refund the way it was paid, a credit to the customer’s account, or an exchange for new items.
- Press Take it back (or Exchange, or Credit the account).
Expected result
The return has its own number and receipt. Stock is back on the shelf or in quarantine, and the money left the till (or the account was credited).
Screenshot
Common mistakes
Returning more than was sold, or a line already returned: the page refuses it.
Troubleshooting
Without a receipt: the goods are credited to a named customer’s account or exchanged, valued at today’s price, and go to quarantine.
Add products, set prices and print labels
Purpose
Keep what you sell, its barcodes and its prices right — and the shelf labels matching them.
Role / permission required
catalogue.manage for products, catalogue.pricing for prices,
catalogue.import to import — the Retail manager and the Owner.
Prerequisites
The categories you want to use, and your tax settings.
Steps
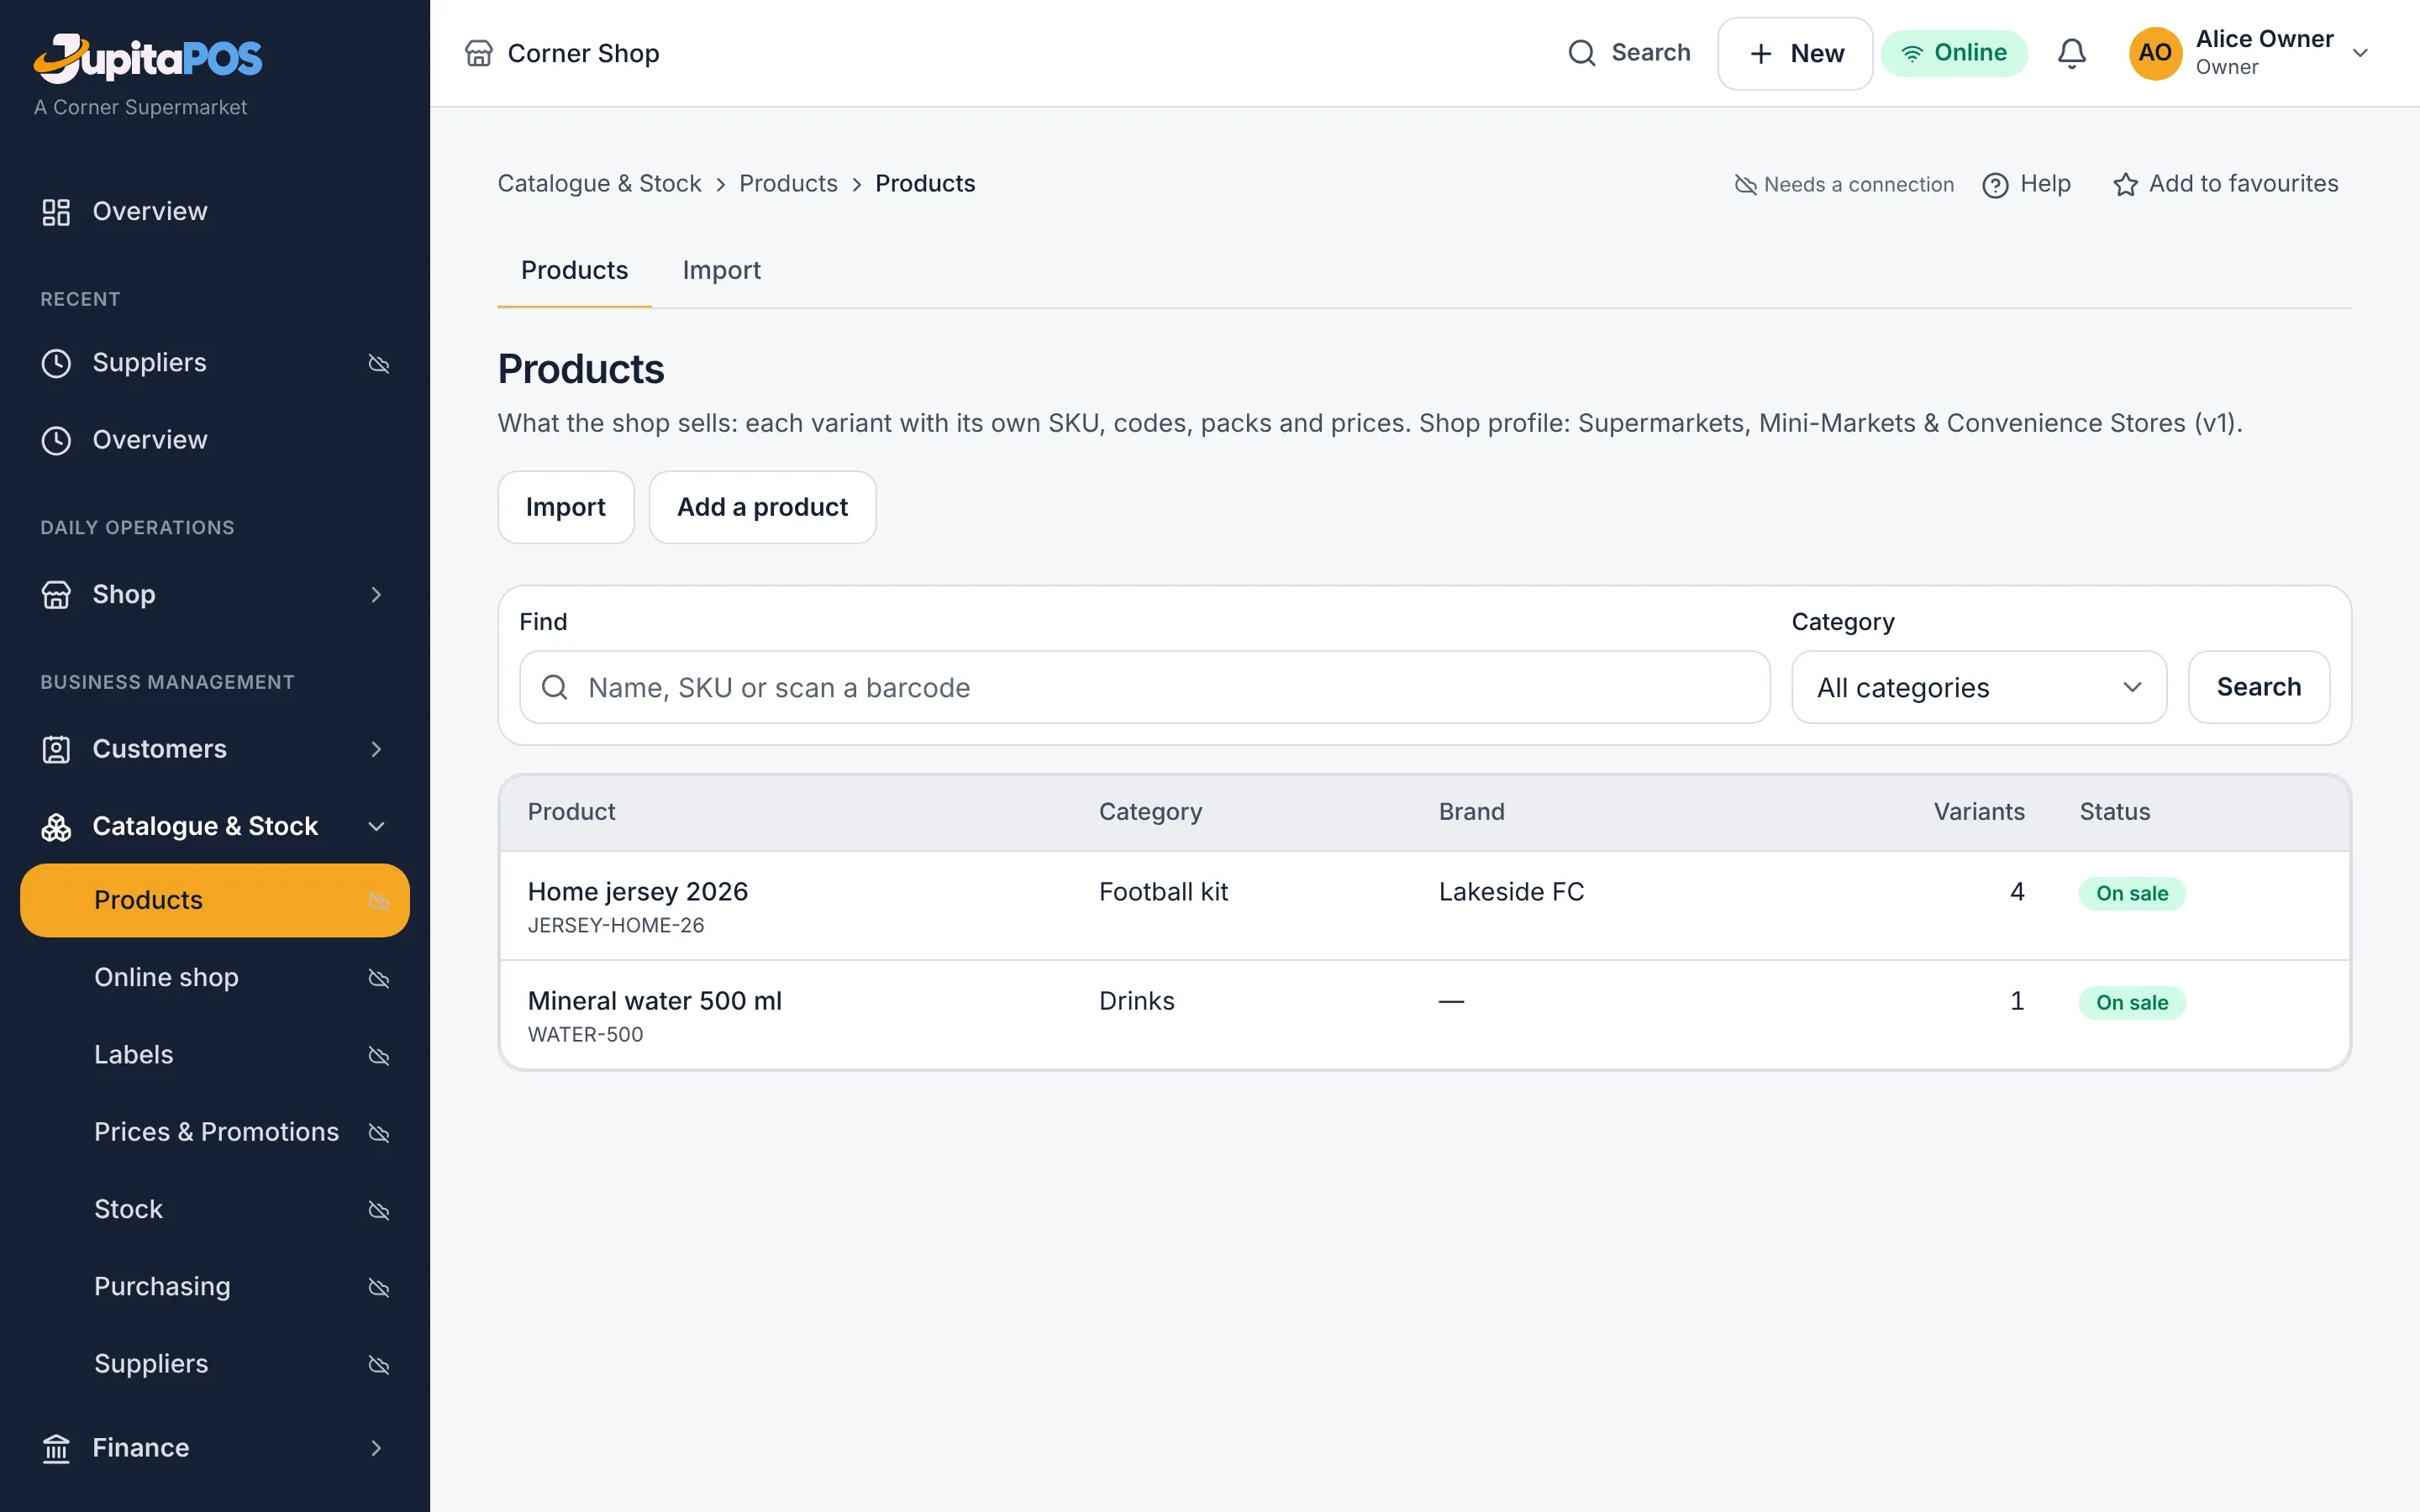
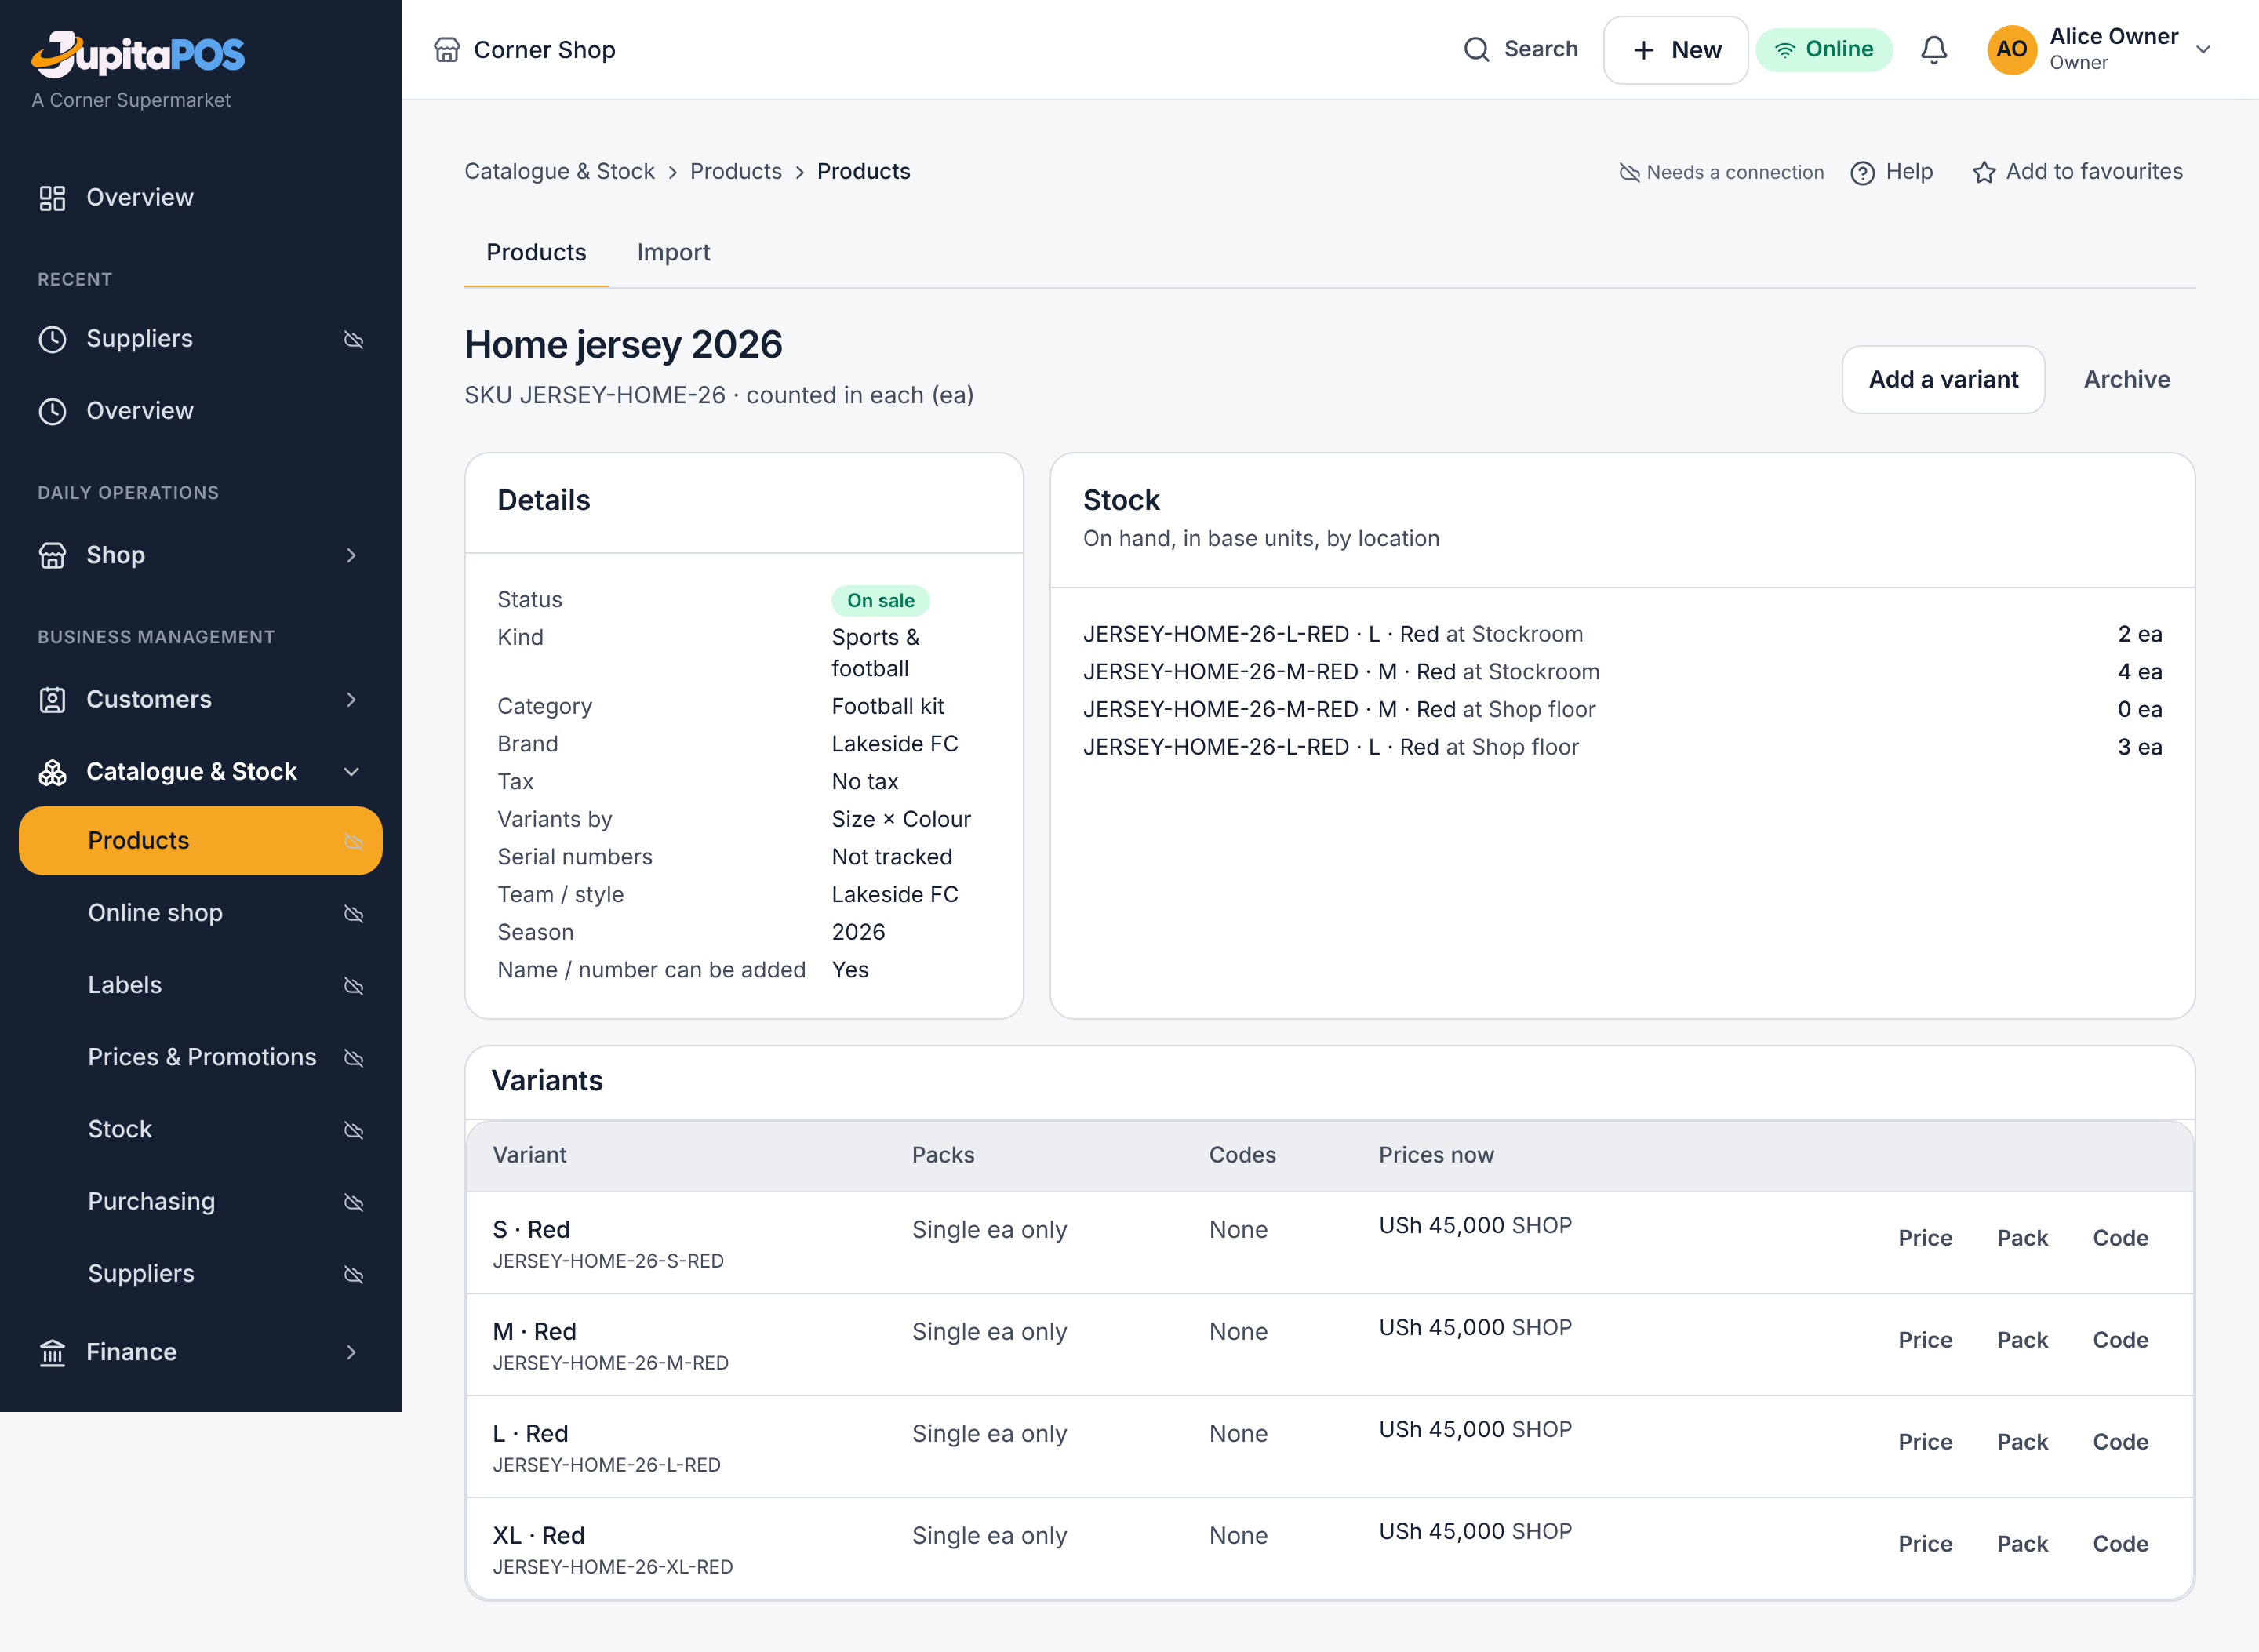
- Open Catalogue & Stock → Products. Add a category first if the one you need is not there yet (its name; the code is made from the name; optionally under another category). Then press Add a product — its name, category and unit, then each variant with its SKU, barcode and price. Many products at once: Import a spreadsheet (it creates the categories it names).
- To tidy up, open the Categories & brands tab: Edit renames a category or moves it under another; Archive removes an empty one (move its products first). Rename a brand to correct its spelling on every product; rename it to another brand’s name and the two become one.
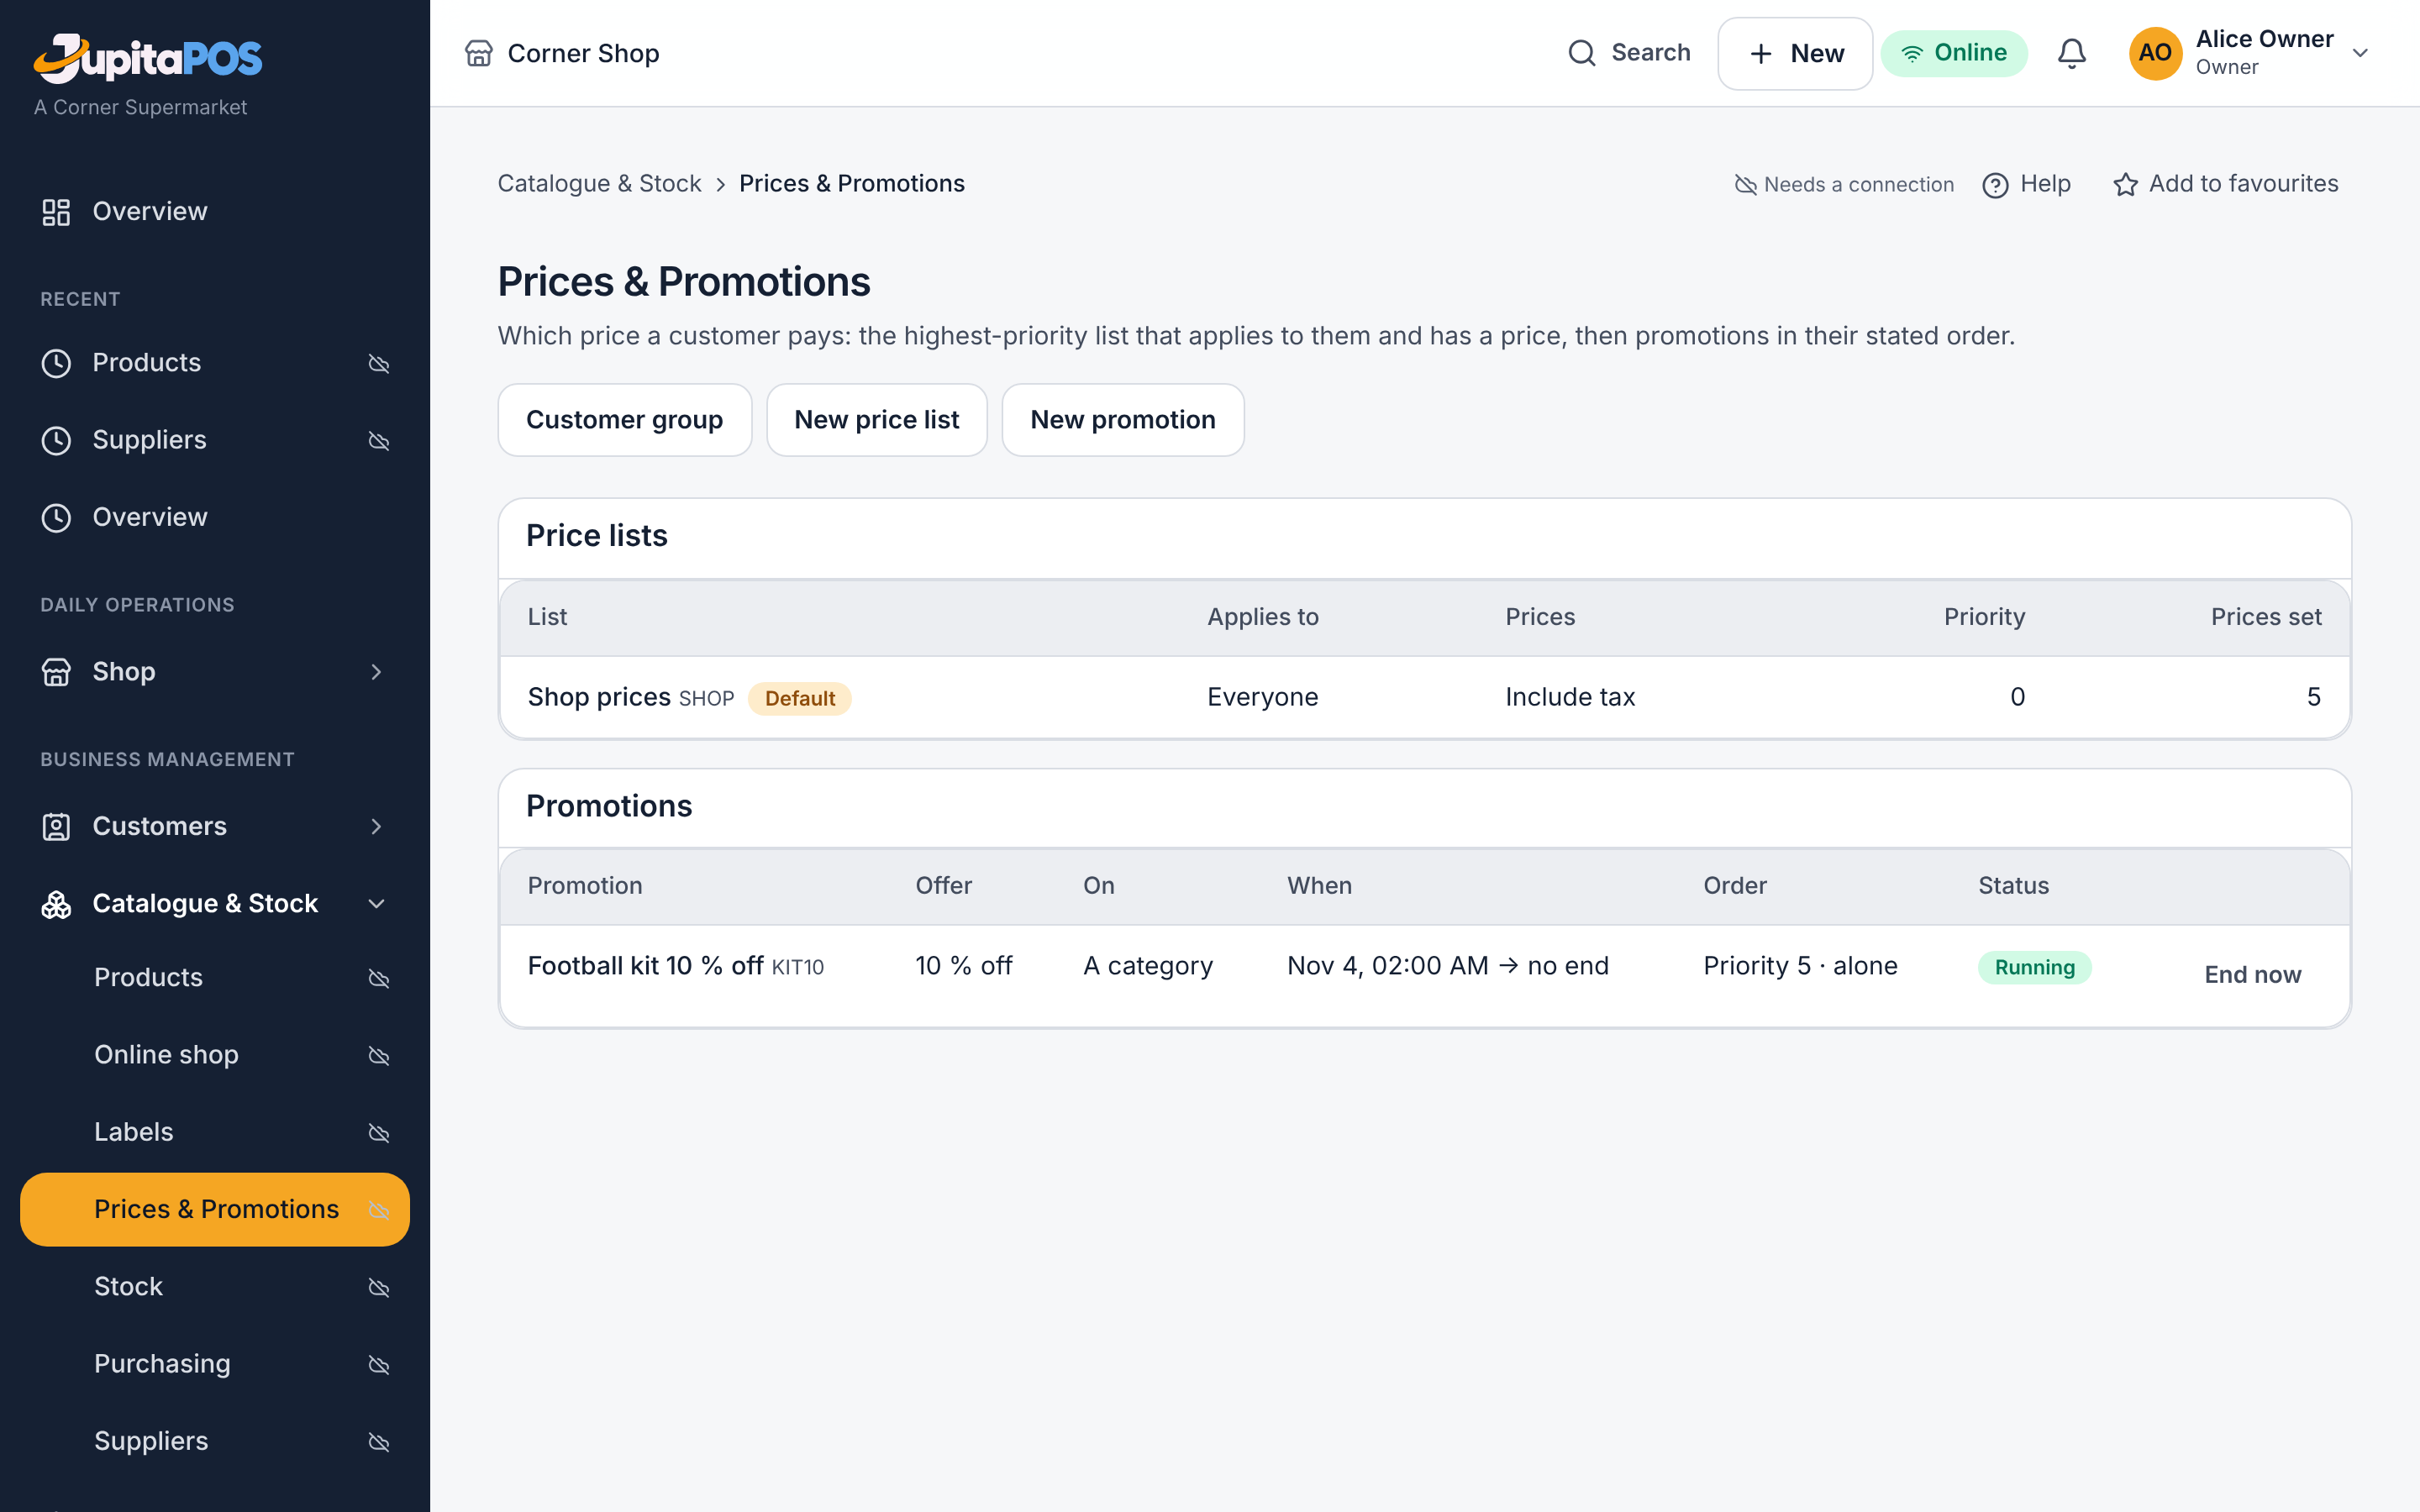
- Open Catalogue & Stock → Prices & Promotions to change a price from a time you choose, add quantity breaks, price lists for trade customers or a branch, and promotions.
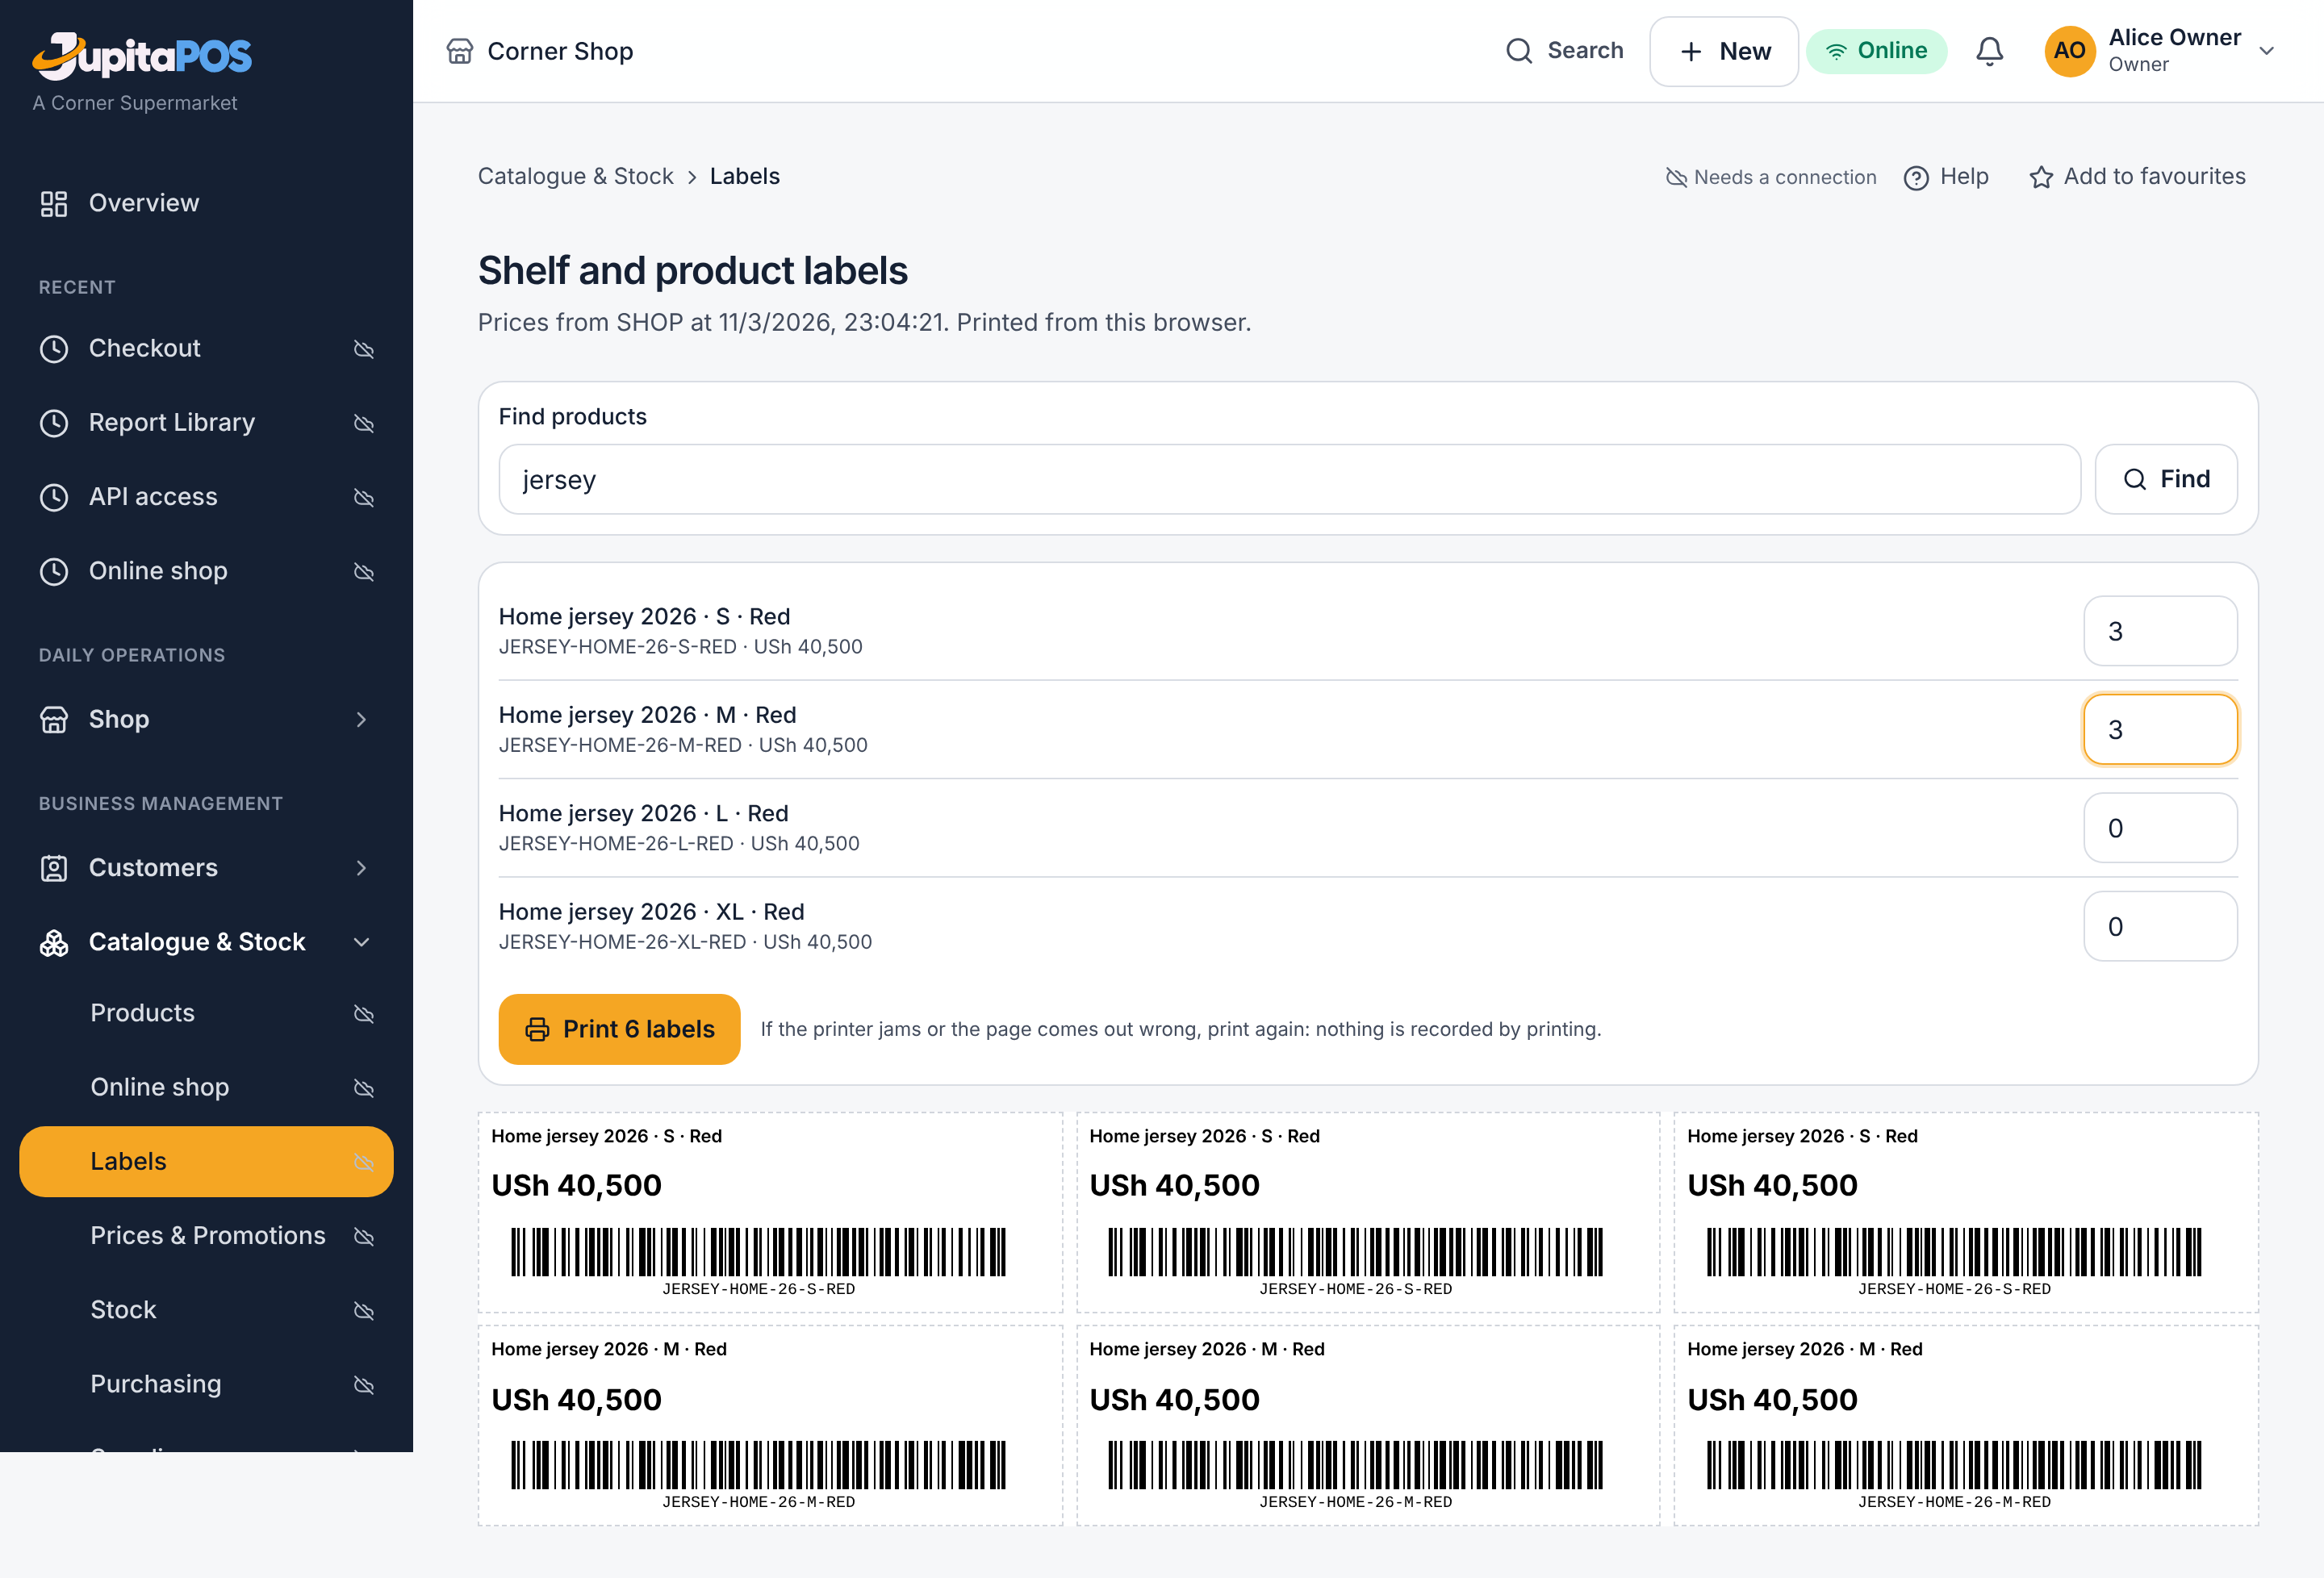
- Open Catalogue & Stock → Labels, find the products, type how many labels of each and press Print.
Expected result
The till sells at the new price from the time you set; sales already made keep their price. Each label shows the name, today’s price and a barcode your scanners read.
Screenshot
Common mistakes
- Two variants with the same barcode: refused — every barcode sells exactly one thing.
- Forgetting the labels after a price change: reprint them.
Troubleshooting
Only one promotion that does not stack applies to a line: the one with the highest priority.
Receive, transfer and count stock
Purpose
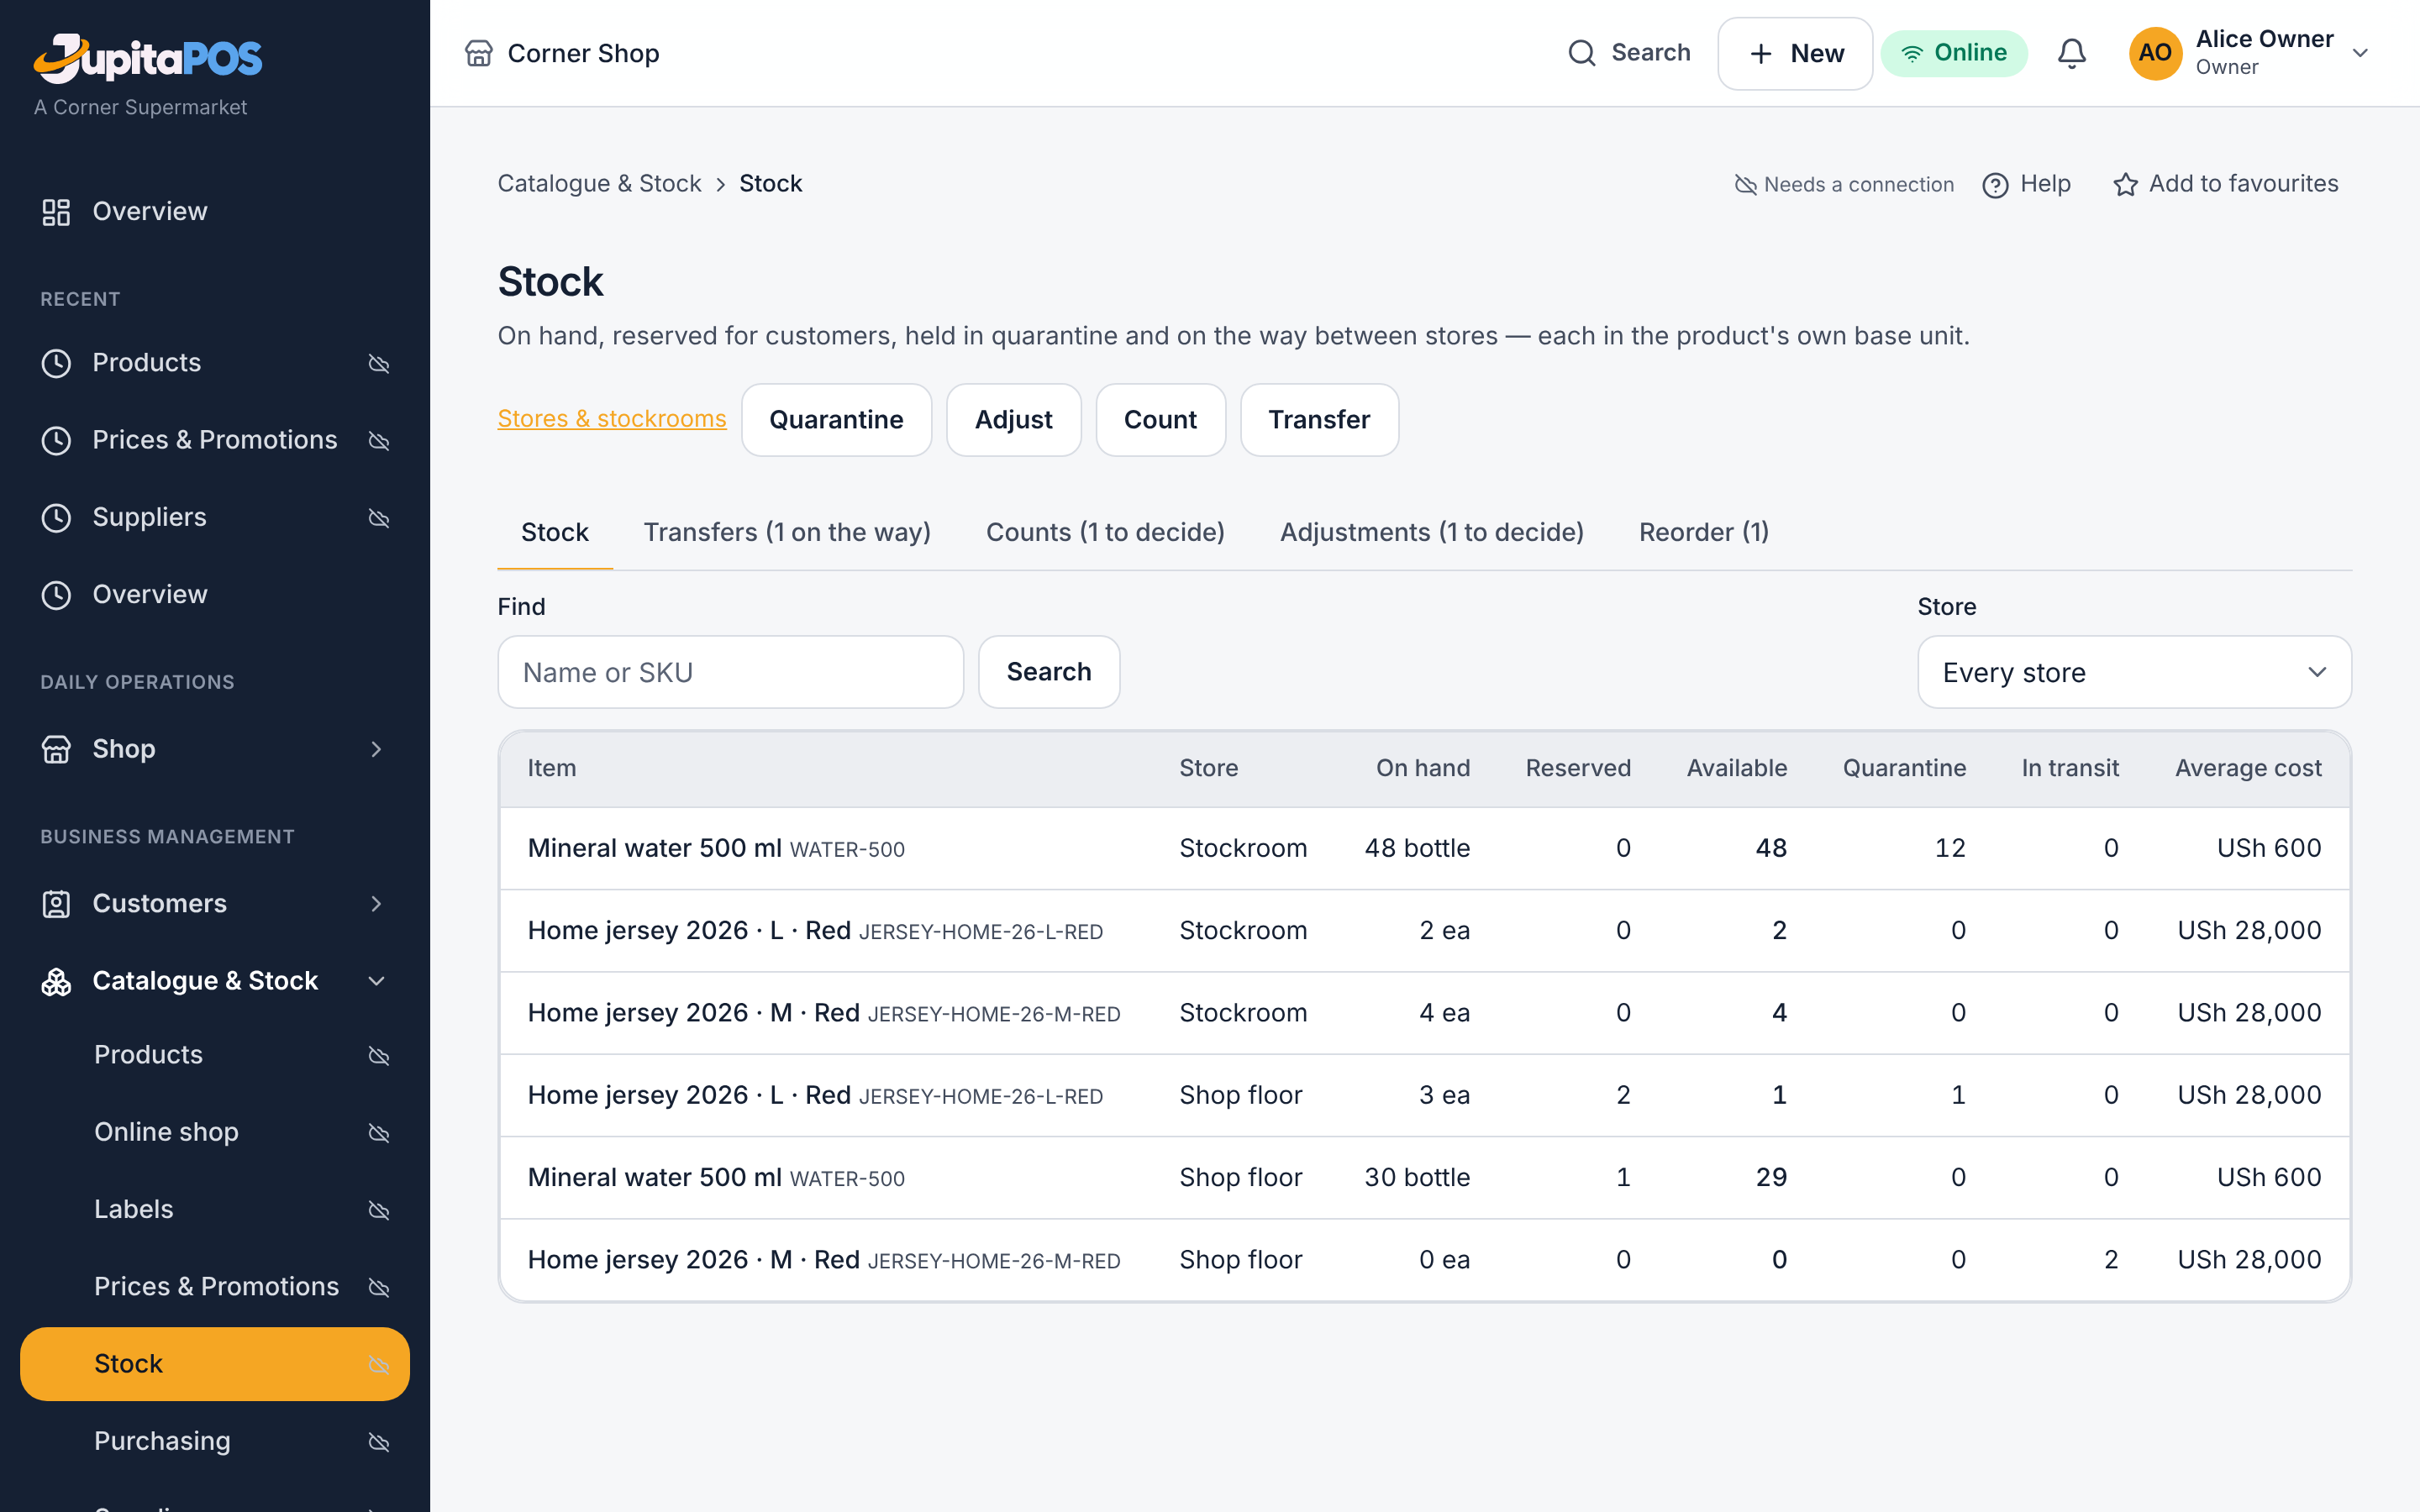
Know what is really in each store: deliveries in, transfers between stores, counts and adjustments.
Role / permission required
inventory.receive to receive, inventory.count to count,
inventory.adjust for adjustments — the Storekeeper and the Retail
manager. A count or an adjustment is approved by another person.
Prerequisites
The stores are set up, and the products exist.
Steps
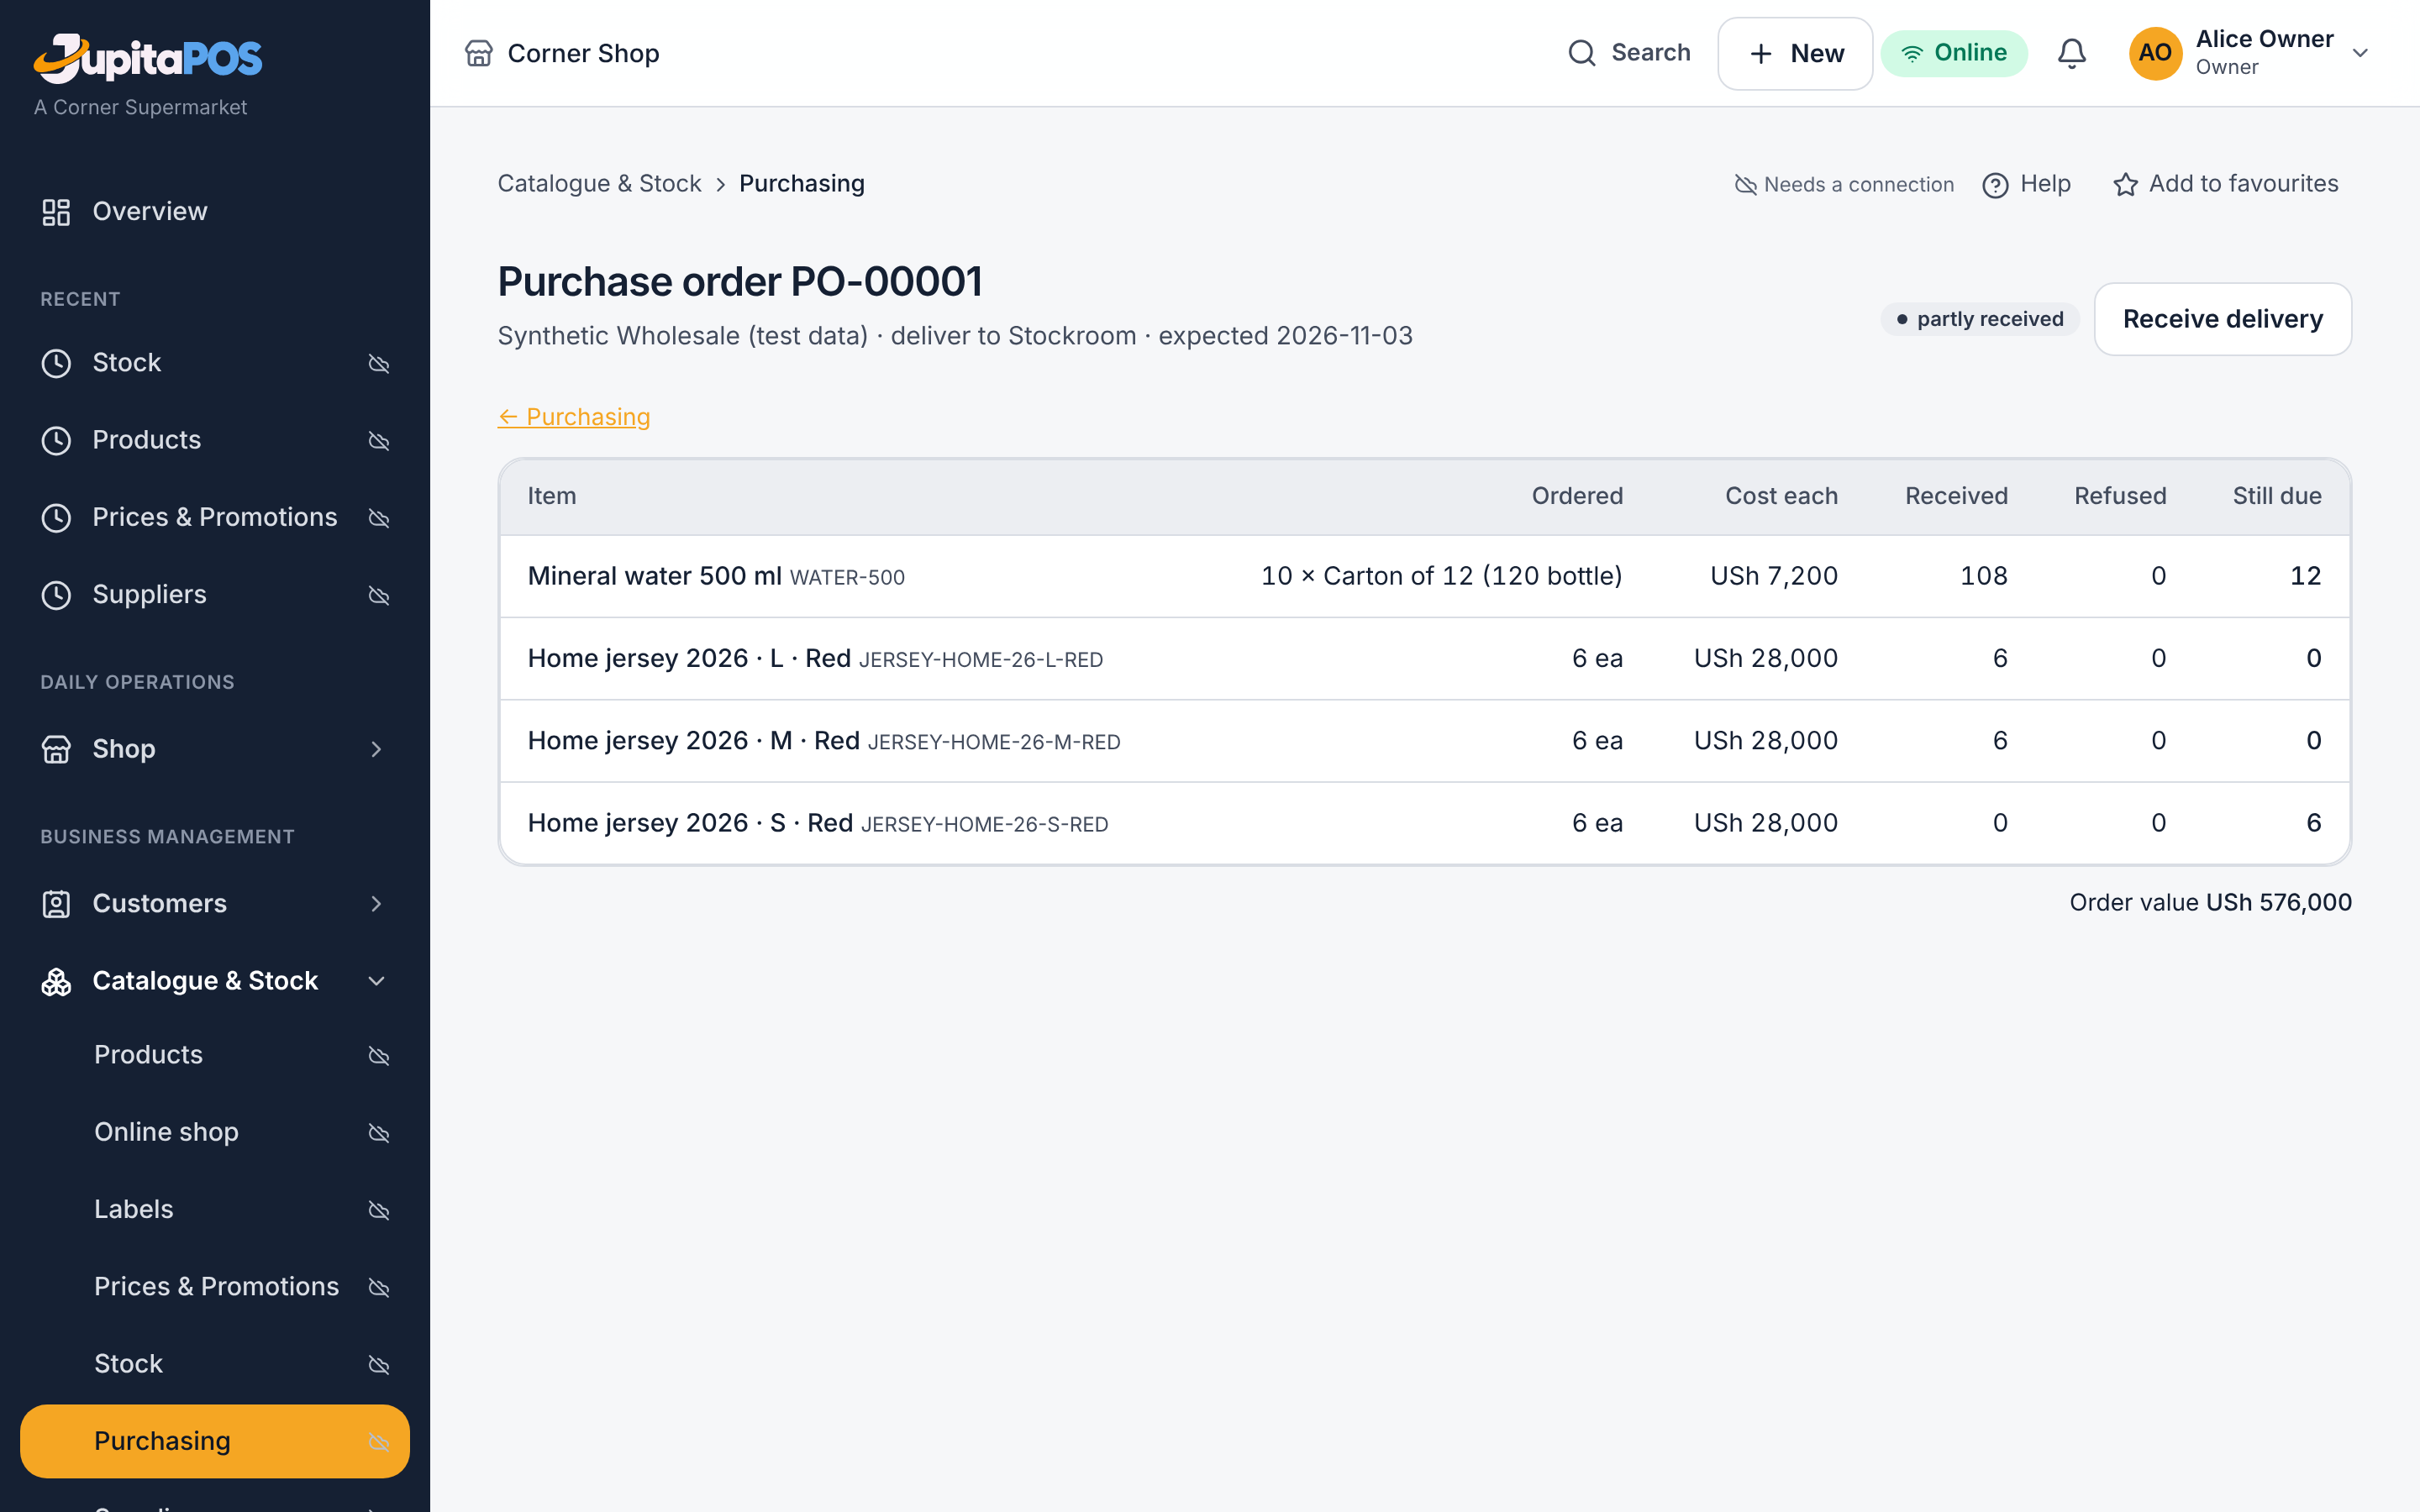
- A delivery: open the purchase order and press Receive delivery (or receive without an order). Type the delivery note number; for each line, what you accept, what is damaged and what you refuse at the door. For batch items, the lot and expiry; for serialised items, each serial number or IMEI.
- A transfer: Transfer stock from one store to another. The other store presses Receive transfer when it arrives.
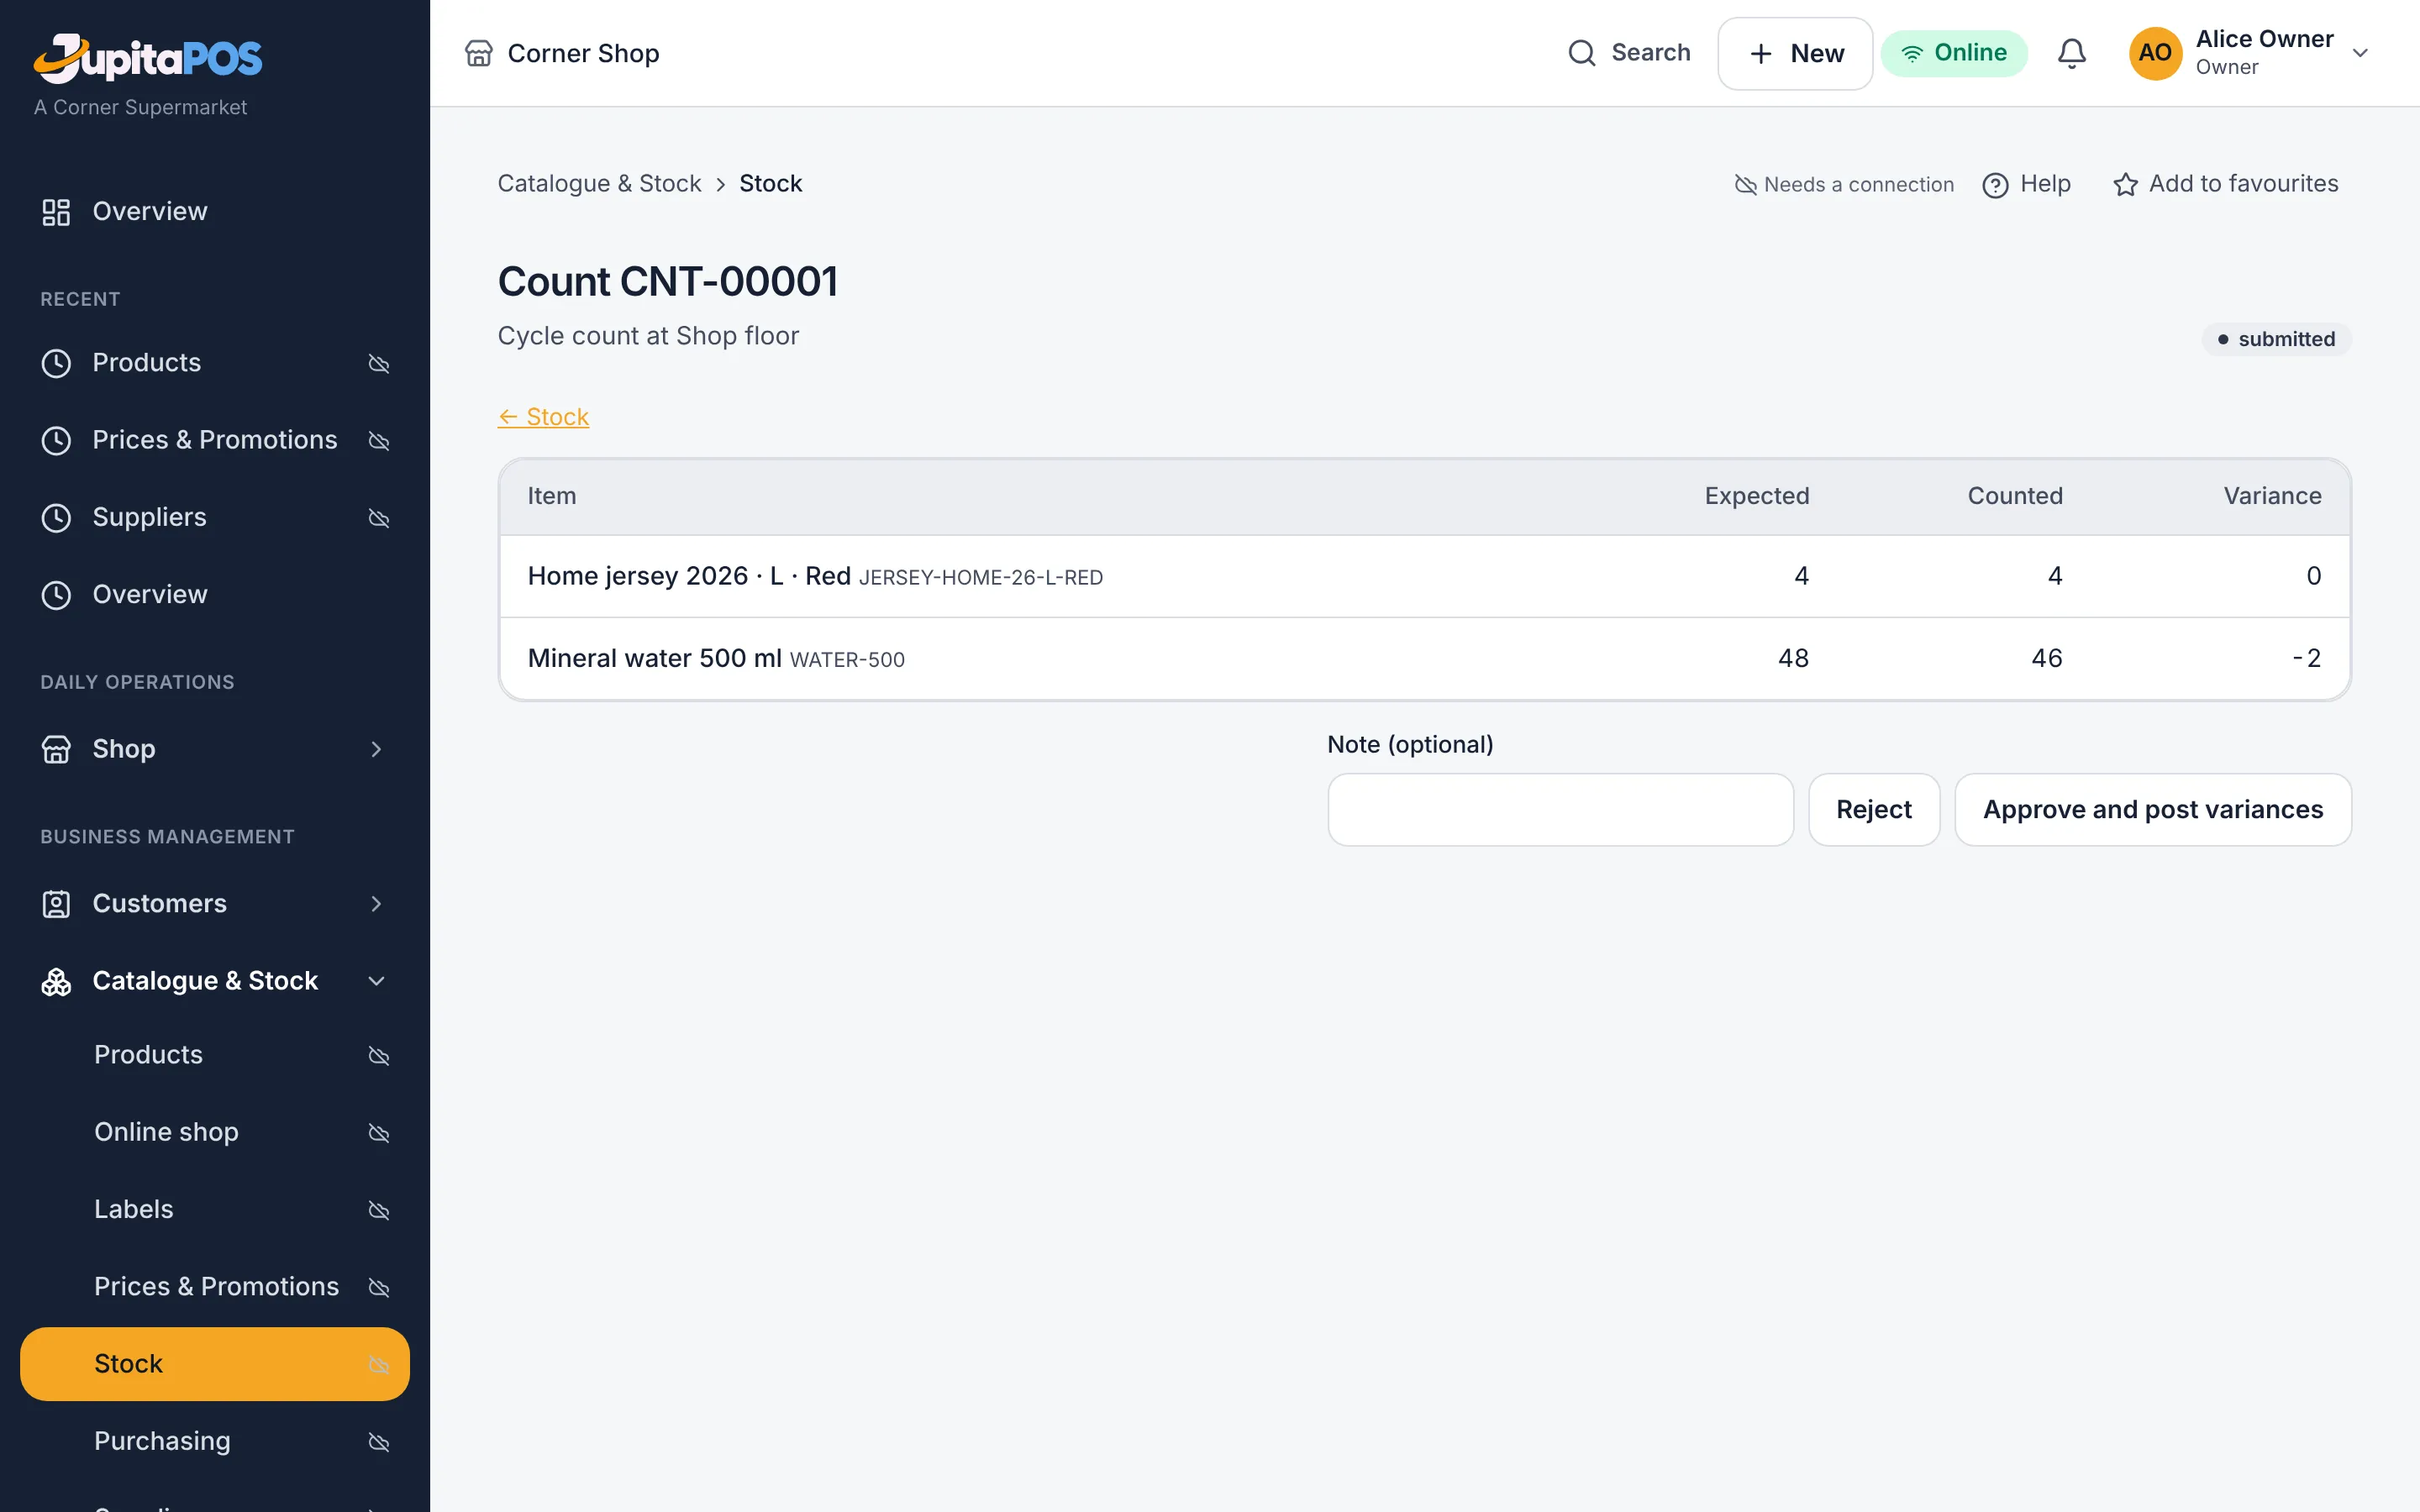
- A count: Start a count — a full count of a store or a cycle count of some items — count, type what you see, and submit it.
- Damage, expiry, theft or found goods: Ask for a stock adjustment.
Expected result
Stock and its cost go in at once on receipt. Goods are in transit until the other store receives them. A count or an adjustment changes the stock only when another person approves it.
Screenshot
Common mistakes
- Receiving the same delivery note twice: refused.
- Approving your own count: refused — another person approves.
Troubleshooting
A shortfall on a transfer is written off with a reason when the receiving store confirms what arrived.
Order from a supplier
Purpose
Order goods from your suppliers, with an approval before the order goes out.
Role / permission required
procurement.create to prepare, procurement.approve to approve — the
Purchaser prepares, the Retail manager or the Owner approves.
Prerequisites
The supplier exists, and the products you order.
Steps
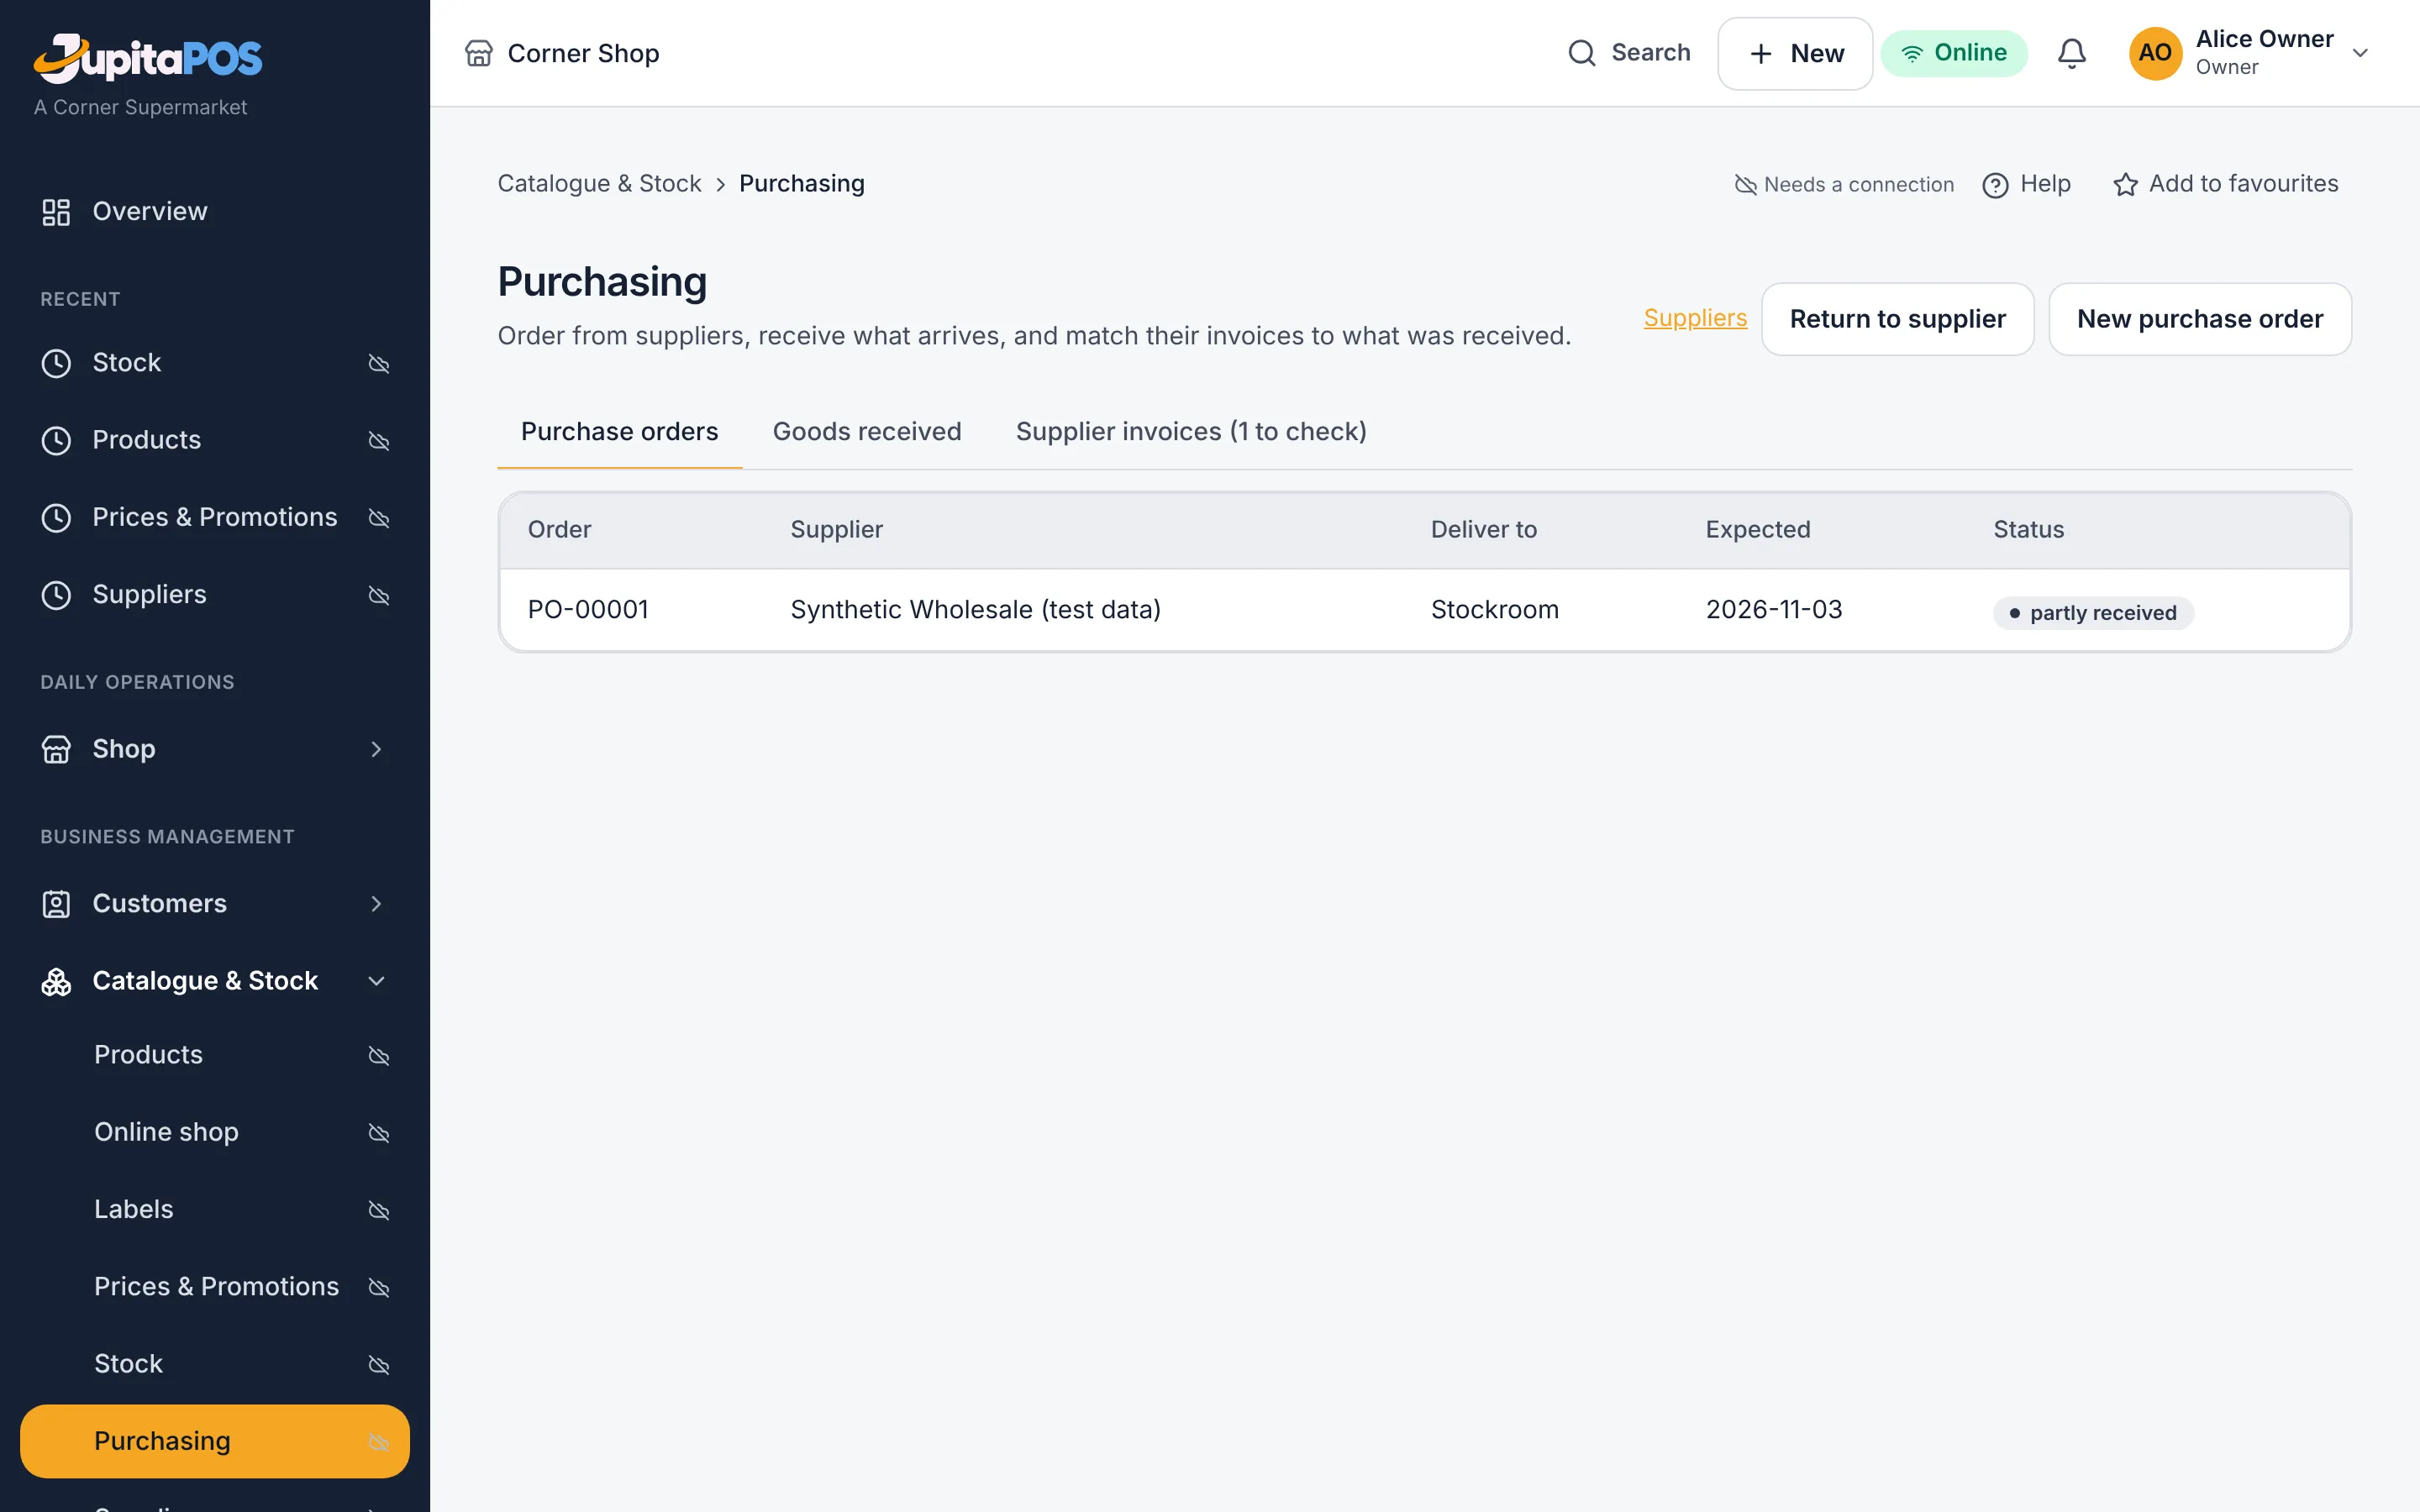
- Open Catalogue & Stock → Purchasing and press New purchase order.
- Choose the supplier and the store the goods go to.
- Add the lines: the item or its pack, how many, the unit cost.
- Send it for approval.
A storekeeper who sees a shelf running low does not need to know the supplier or the cost: on Stock or Purchasing they press Ask for stock, choose the store, the items and how many, and send it. The request waits on the Requests tab of Purchasing. The purchaser presses Make an order — chooses the supplier, types each cost, may change a quantity or leave a line out — and gets a draft purchase order to send for approval; or presses Decline and says why.
Expected result
The approved order goes to the supplier, and the storekeeper receives the delivery against it.
Screenshot
Common mistakes
Approving your own purchase order: refused.
Troubleshooting
Reports & Analytics → Report Library → Retail reports, Replenishment, lists items at or below their reorder level, with goods already on order.
Sell when the connection is down
Purpose
Keep selling for cash when the shop’s internet is gone, and settle those sales when it is back.
Role / permission required
sales.create to sell offline; sync.resolve for a manager to settle sales
the server held.
Prerequisites
The till is registered as a device with offline selling allowed, and it saved its copy of the products while it was online.
Steps
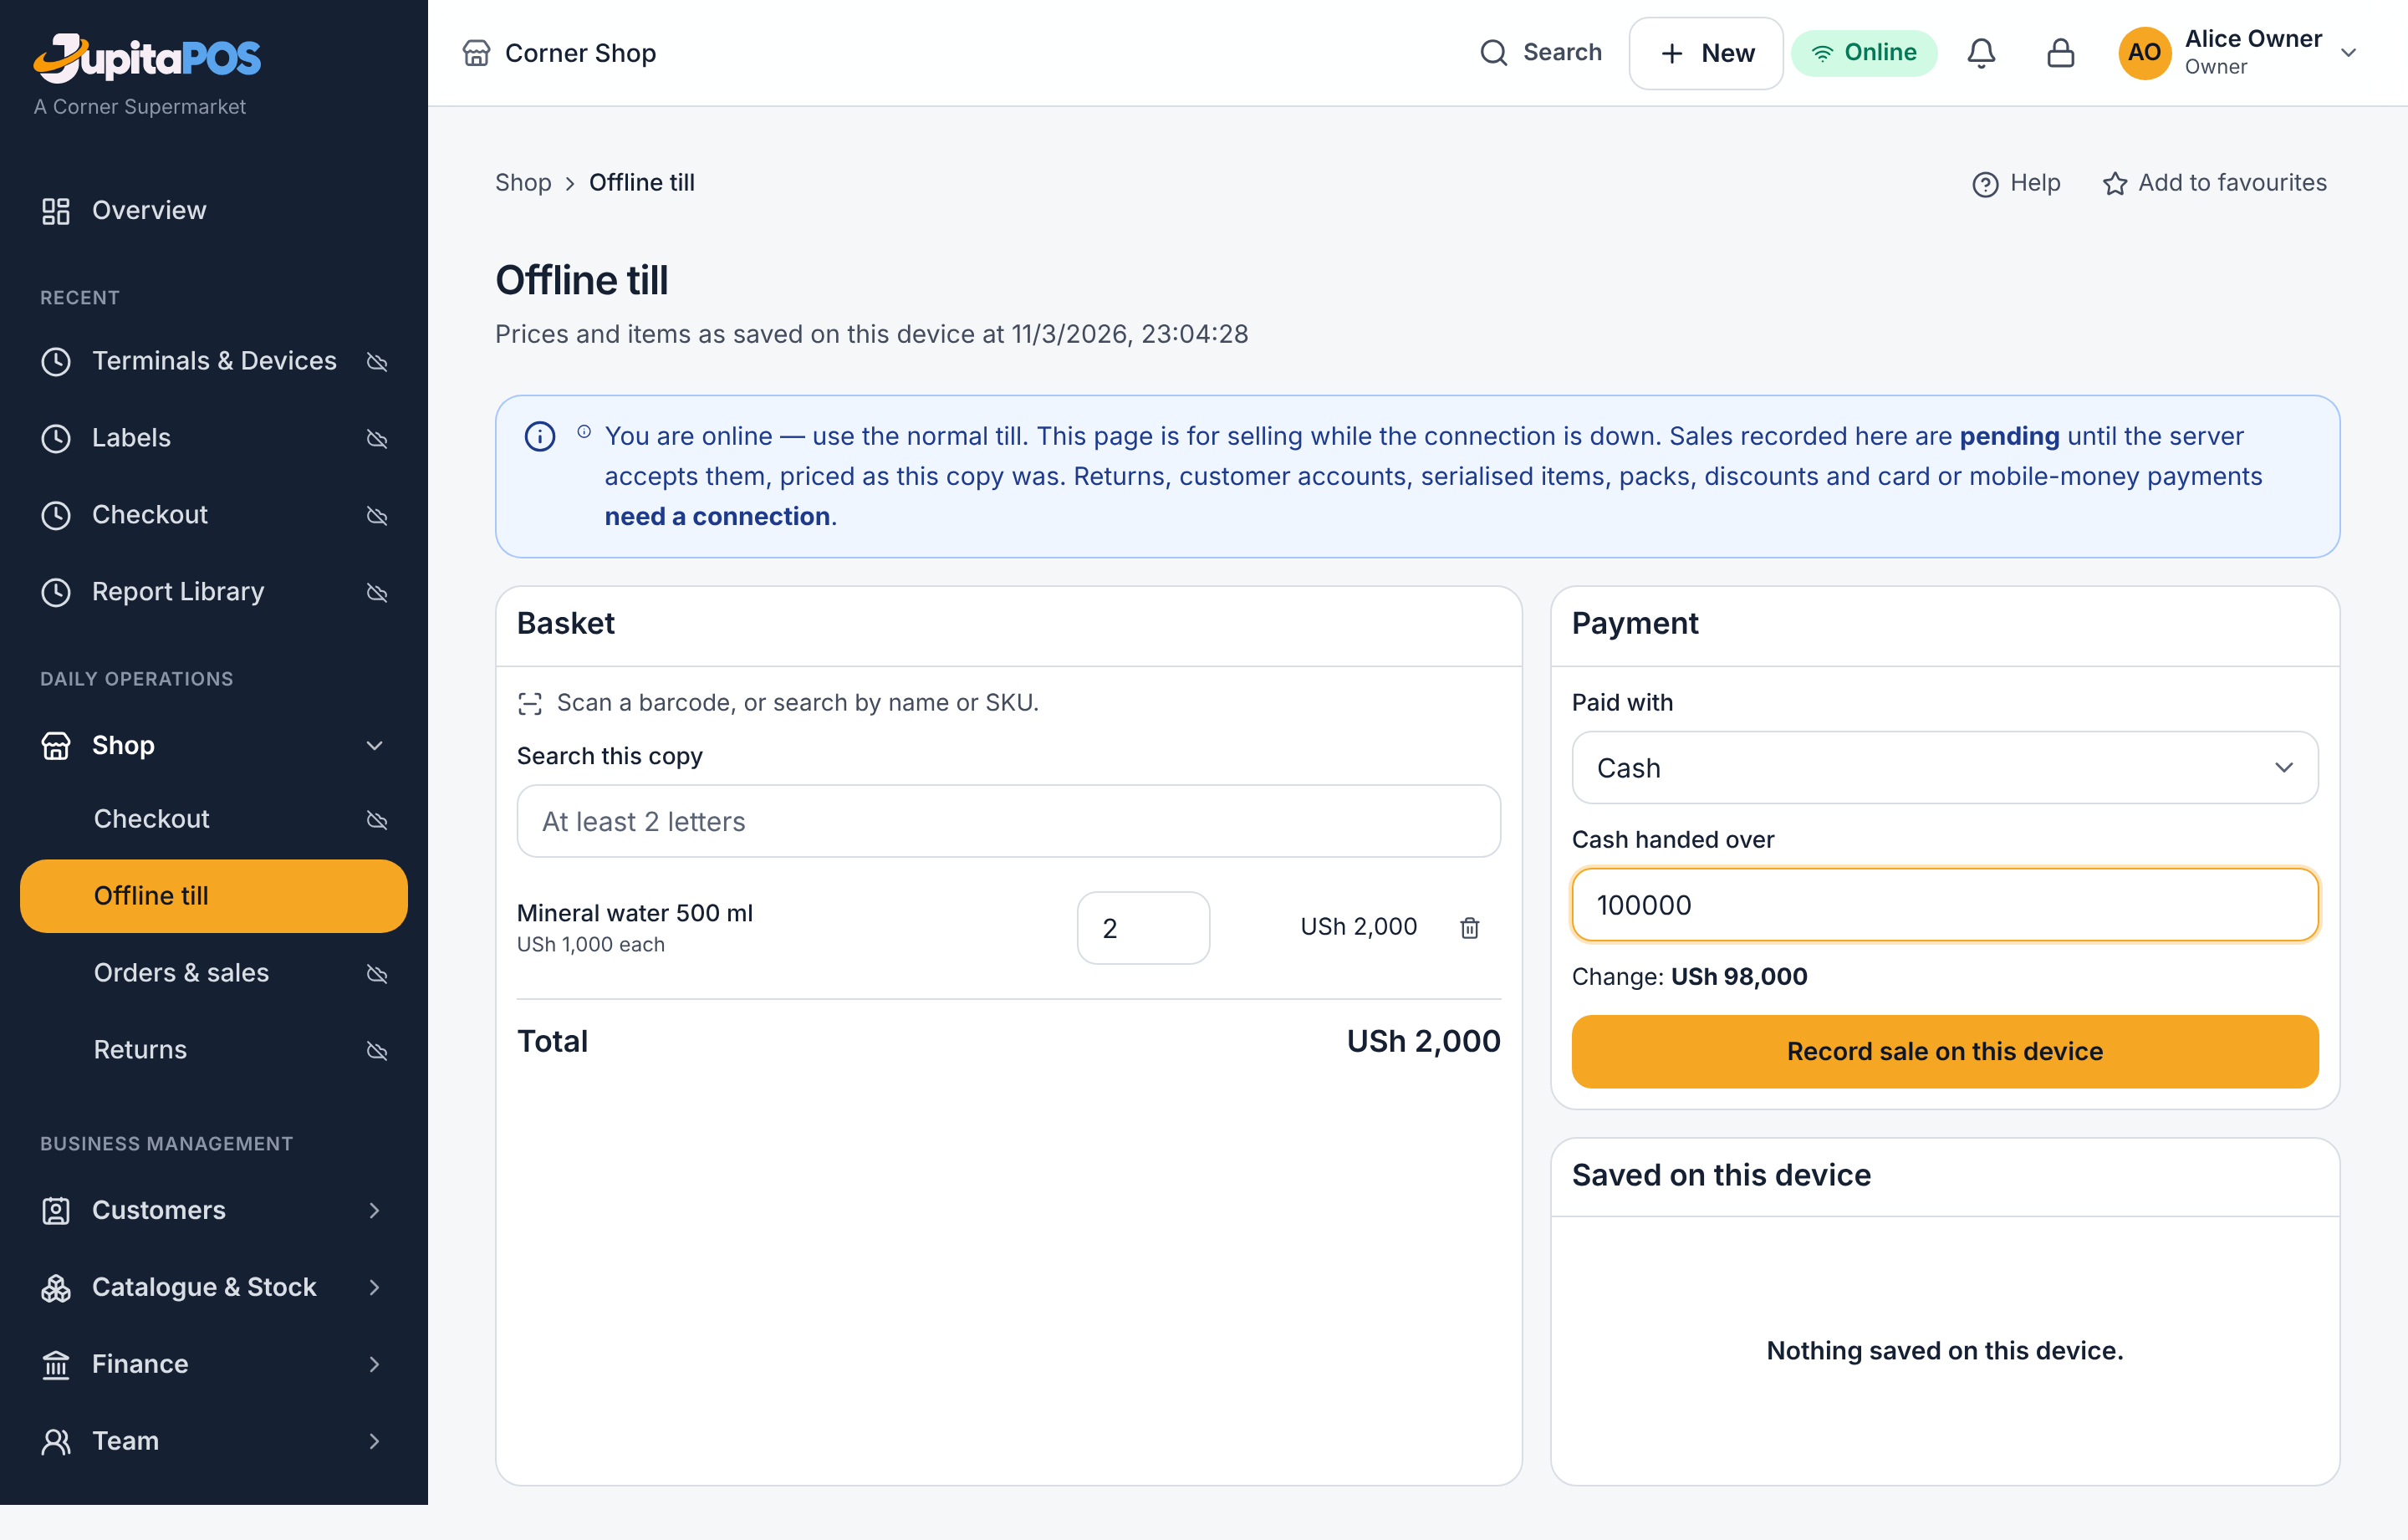
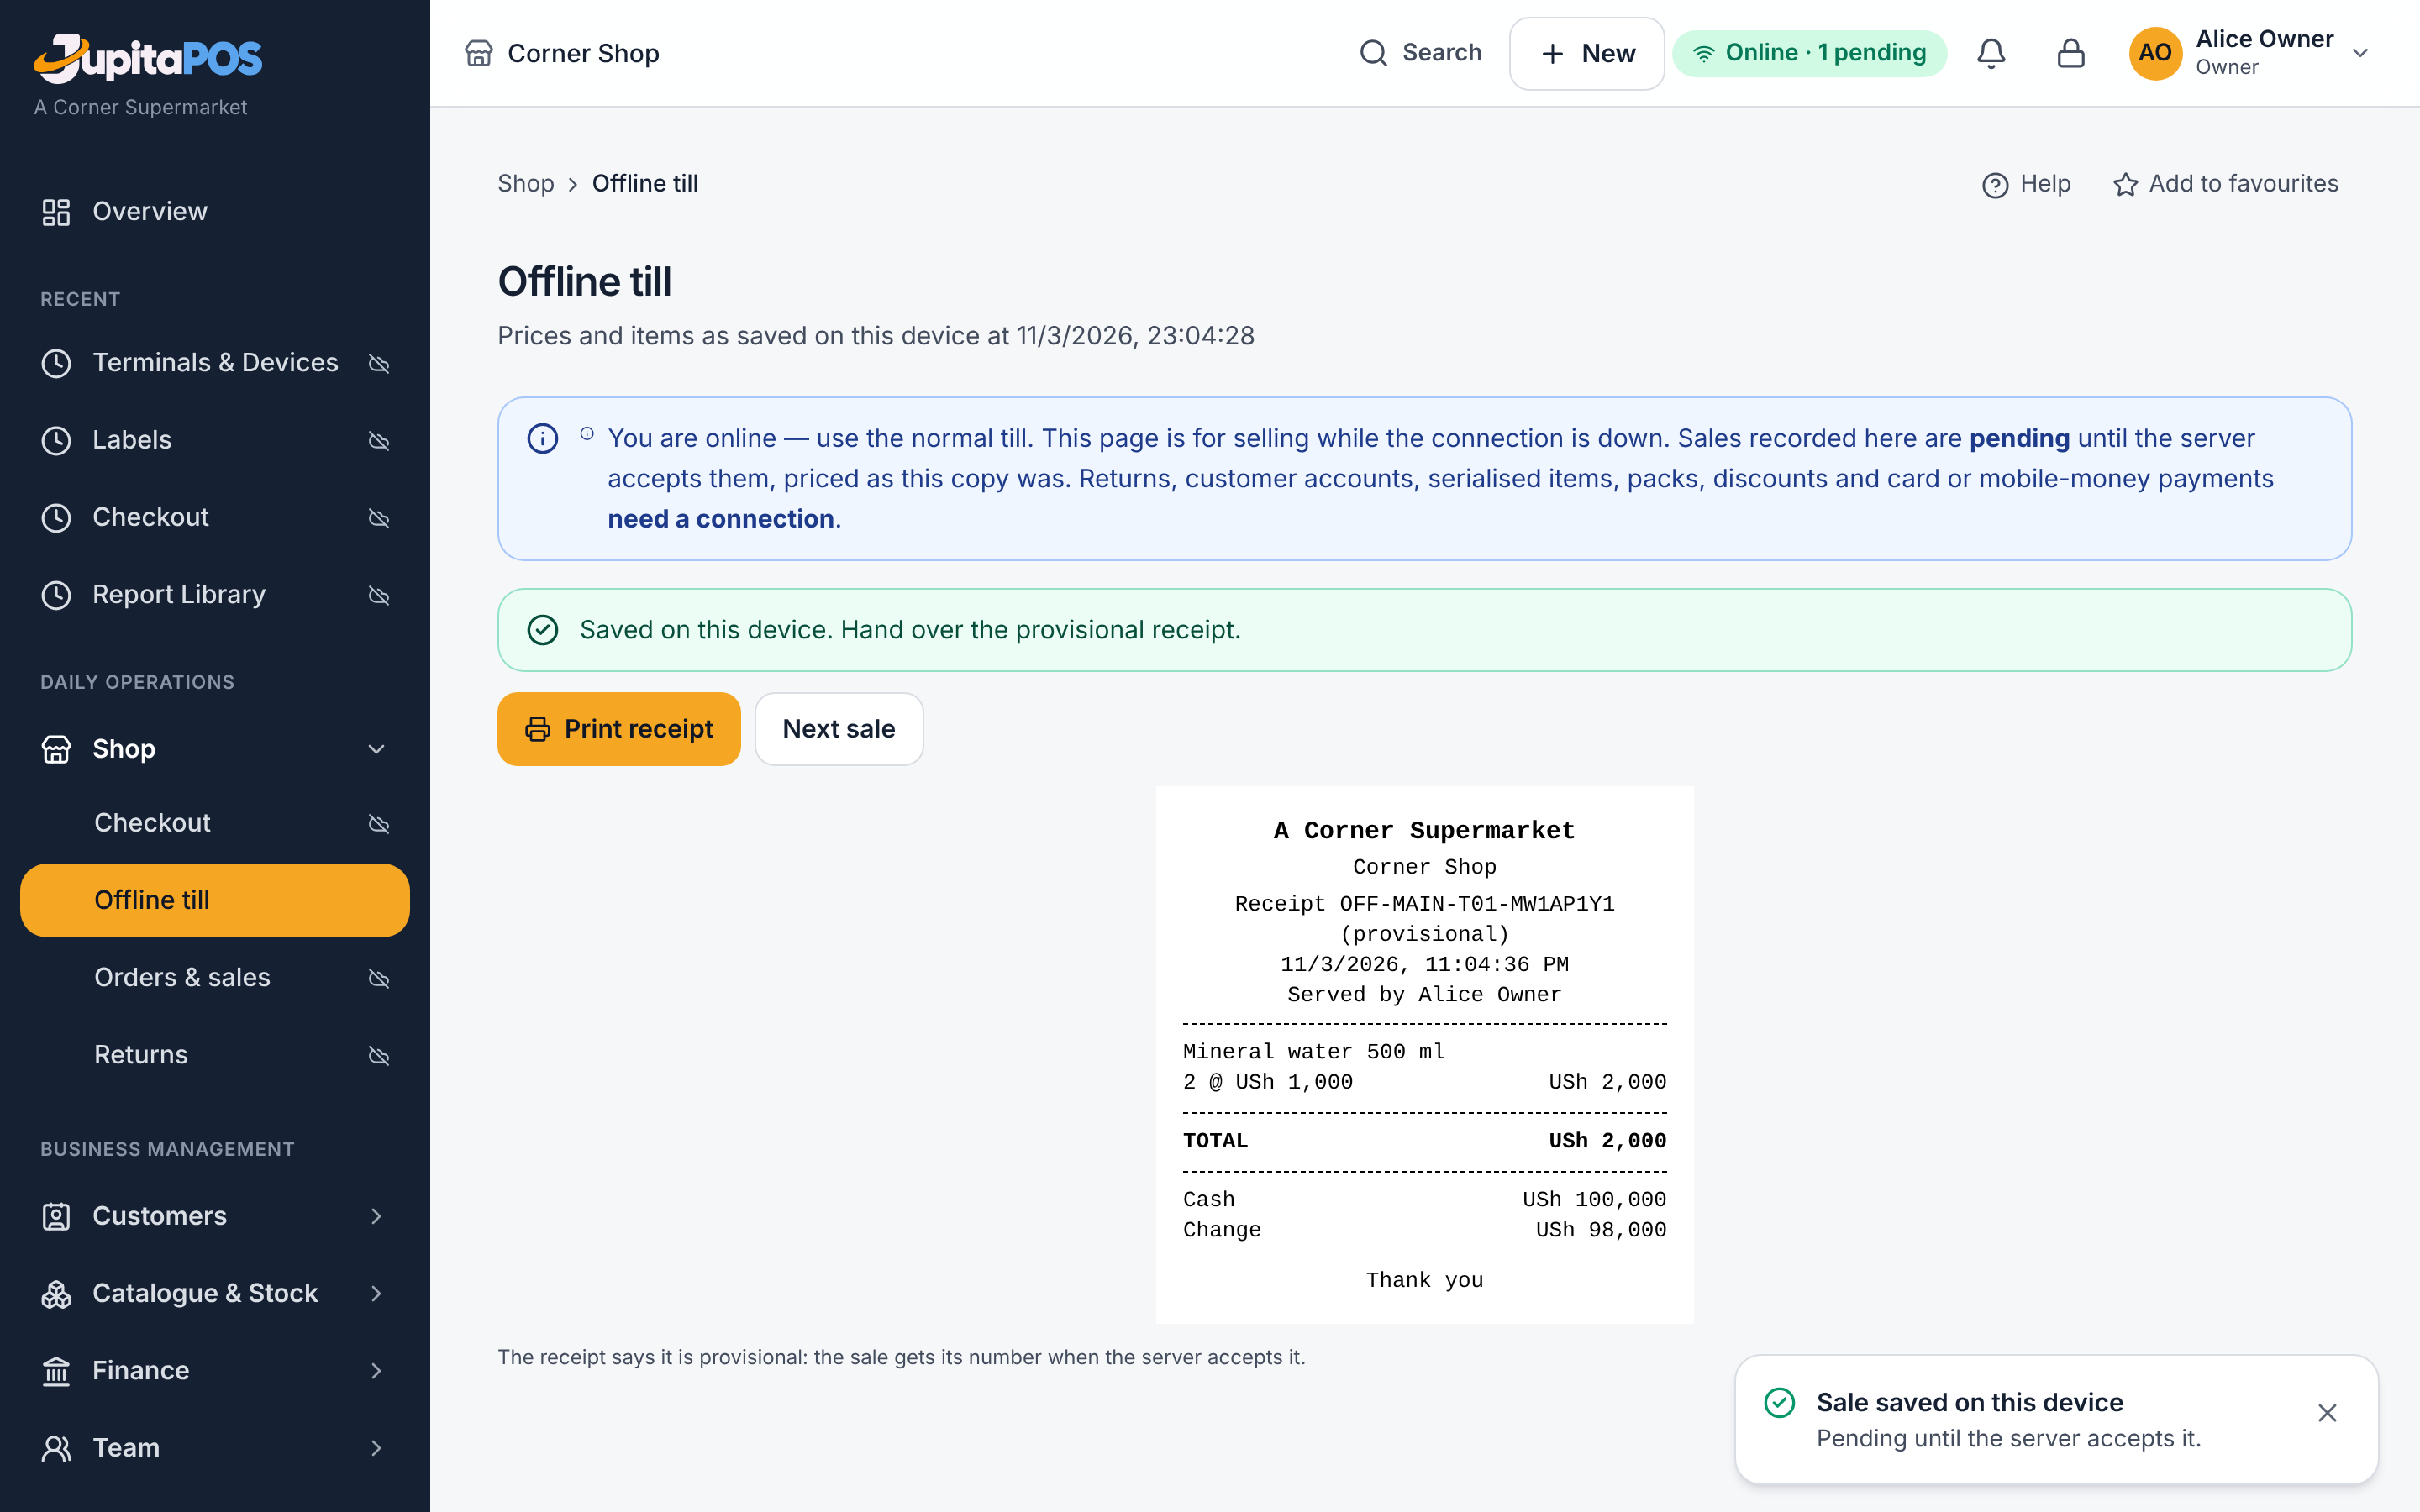
- Open Shop → Offline till (the checkout offers Sell from the offline till when the connection is down).
- Scan or search the items, choose Cash, and type what was handed over.
- Press Record sale on this device, then Print receipt.
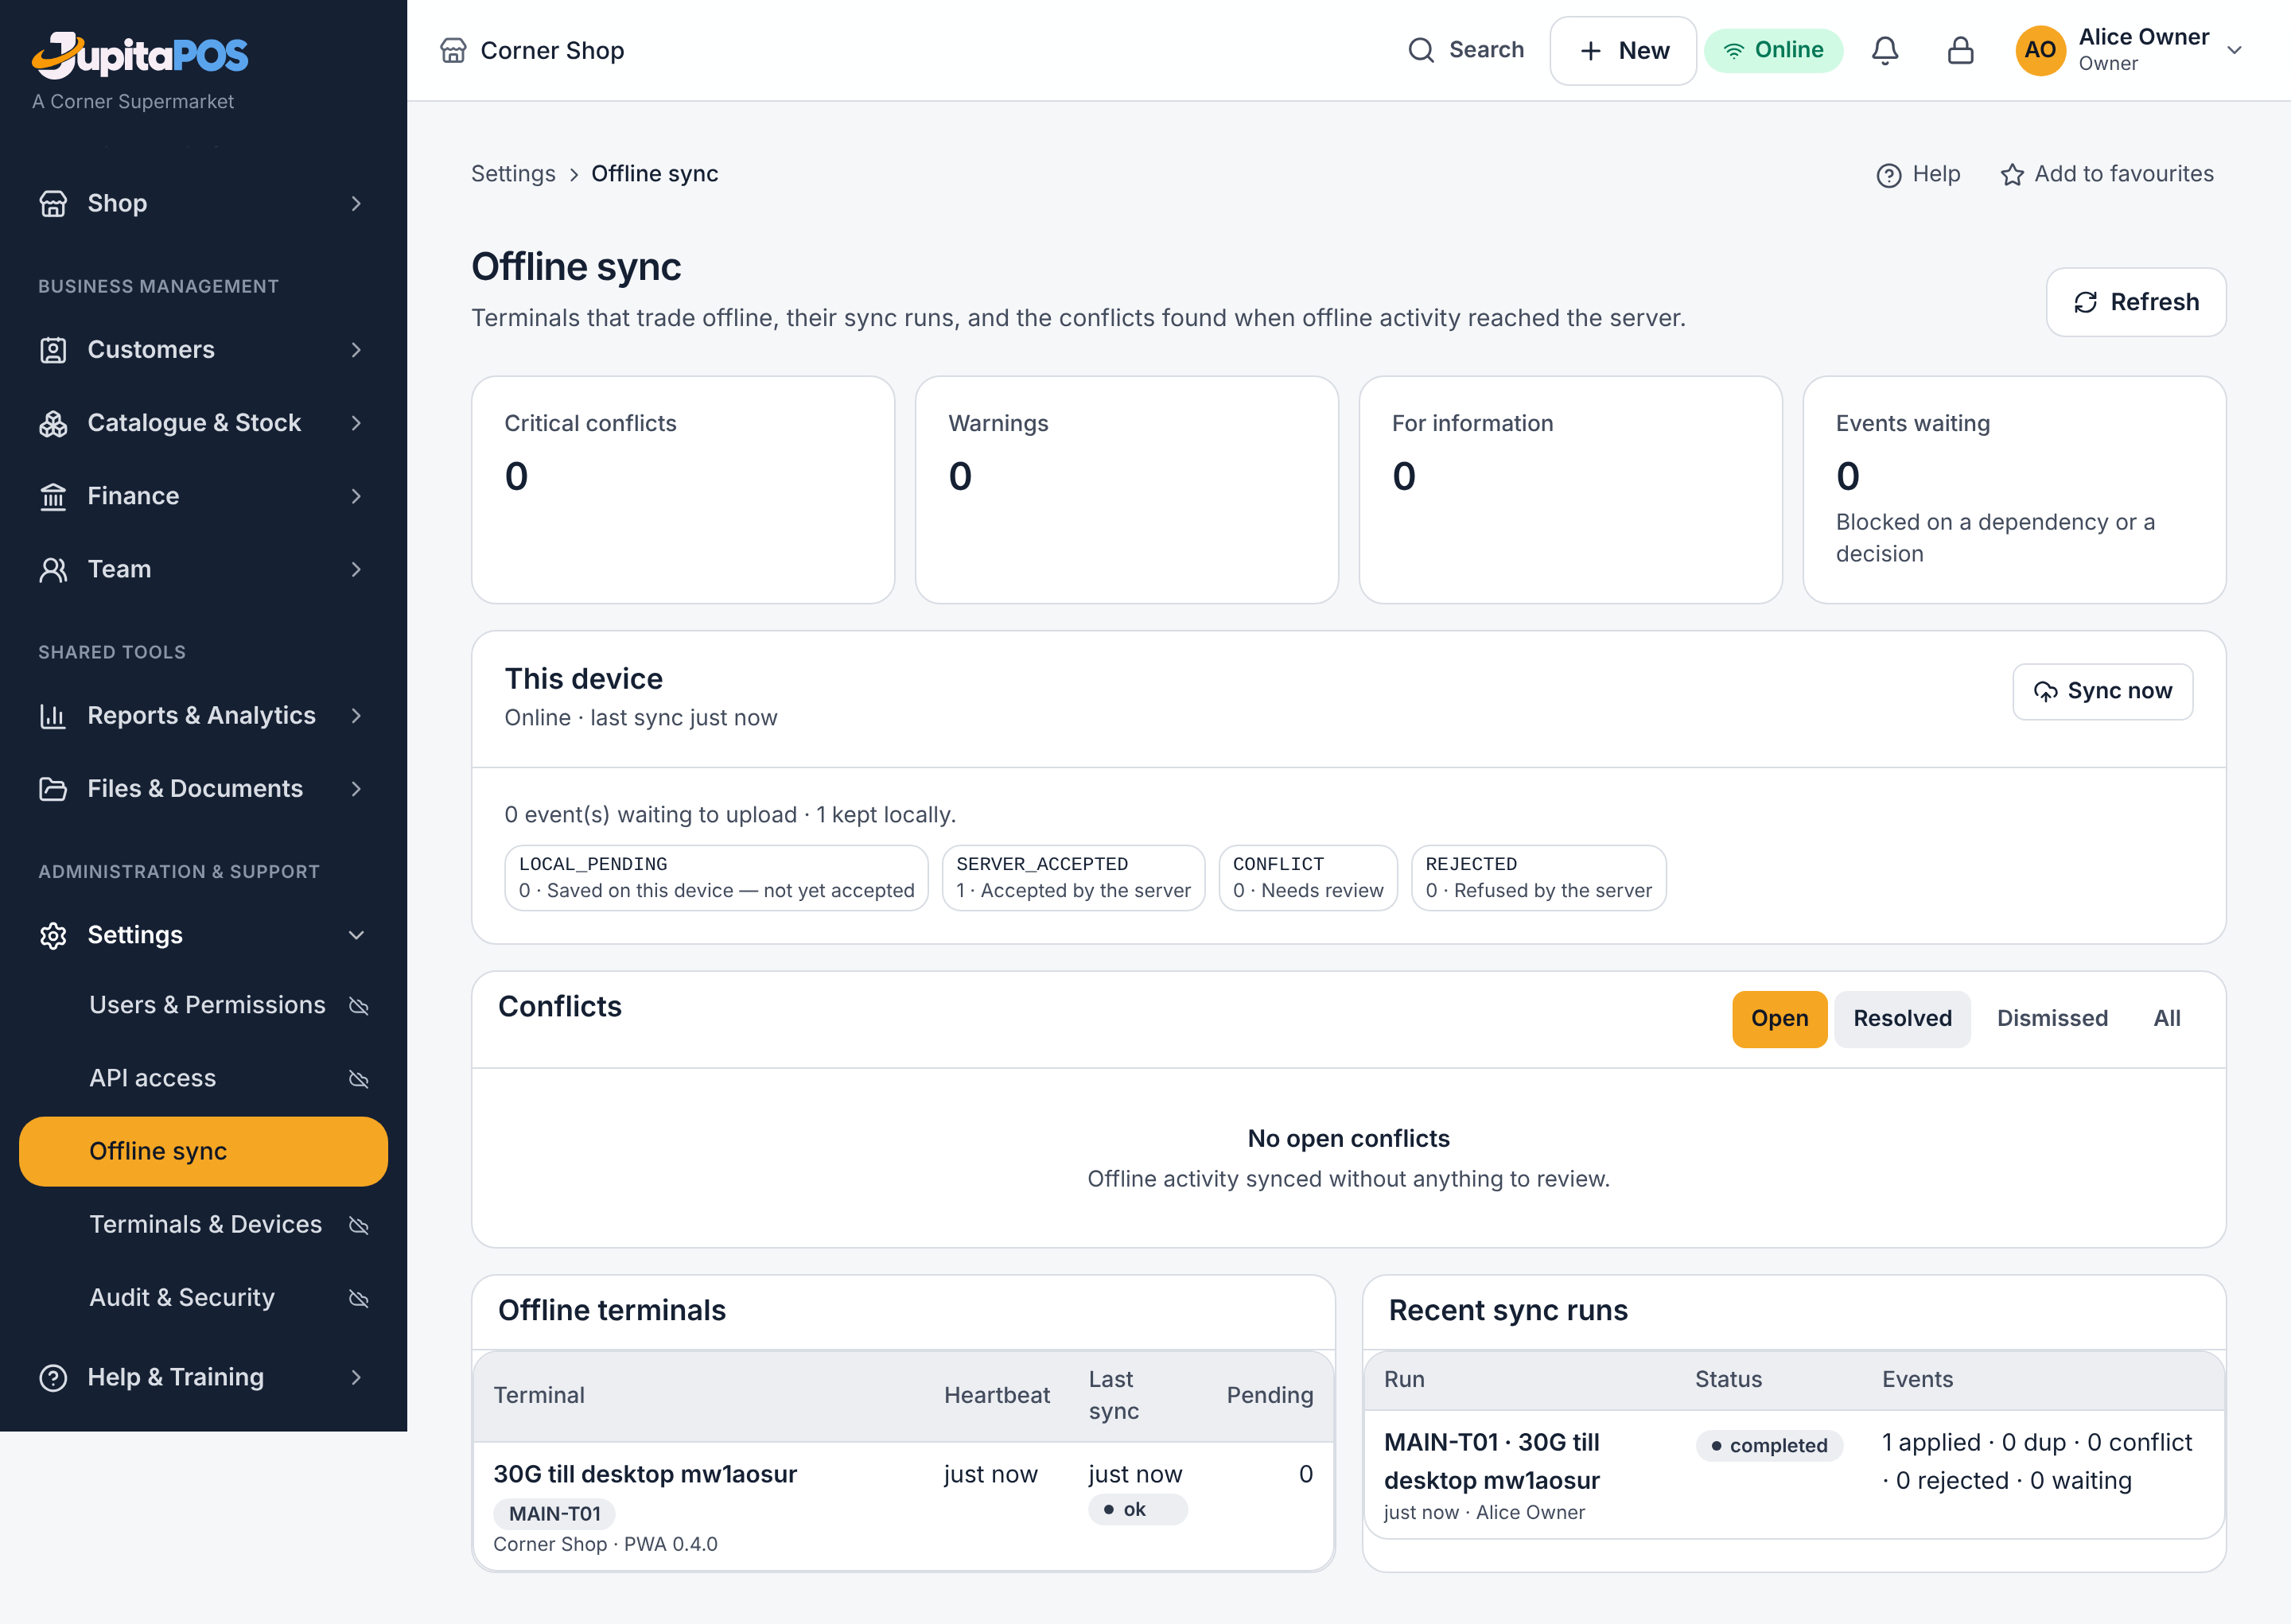
- When the connection is back, the device sends the sales by itself.
- A manager opens Settings → Offline sync for any sale the server held, and presses Retry event once the reason is dealt with.
Expected result
The receipt says it is provisional. Back online, each sale becomes an ordinary sale; none is lost — a sale the server could not accept as it was waits for a manager.
Screenshot
Common mistakes
Expecting to take a mobile-money payment through the provider, sell on account, sell a serialised item or a pack, give a discount or take a return offline: none of these work offline.
Troubleshooting
- The device says it cannot save (storage full): stop selling offline and call your manager.
- A sale charged more than the price at the time is accepted with a warning: refund the difference to the customer.
Sell online
Purpose
Let customers order from your shop on the web, for pickup or delivery.
Role / permission required
storefront.manage — the Retail manager and the Owner.
Prerequisites
Products with prices and stock, and the shop’s web address.
Steps
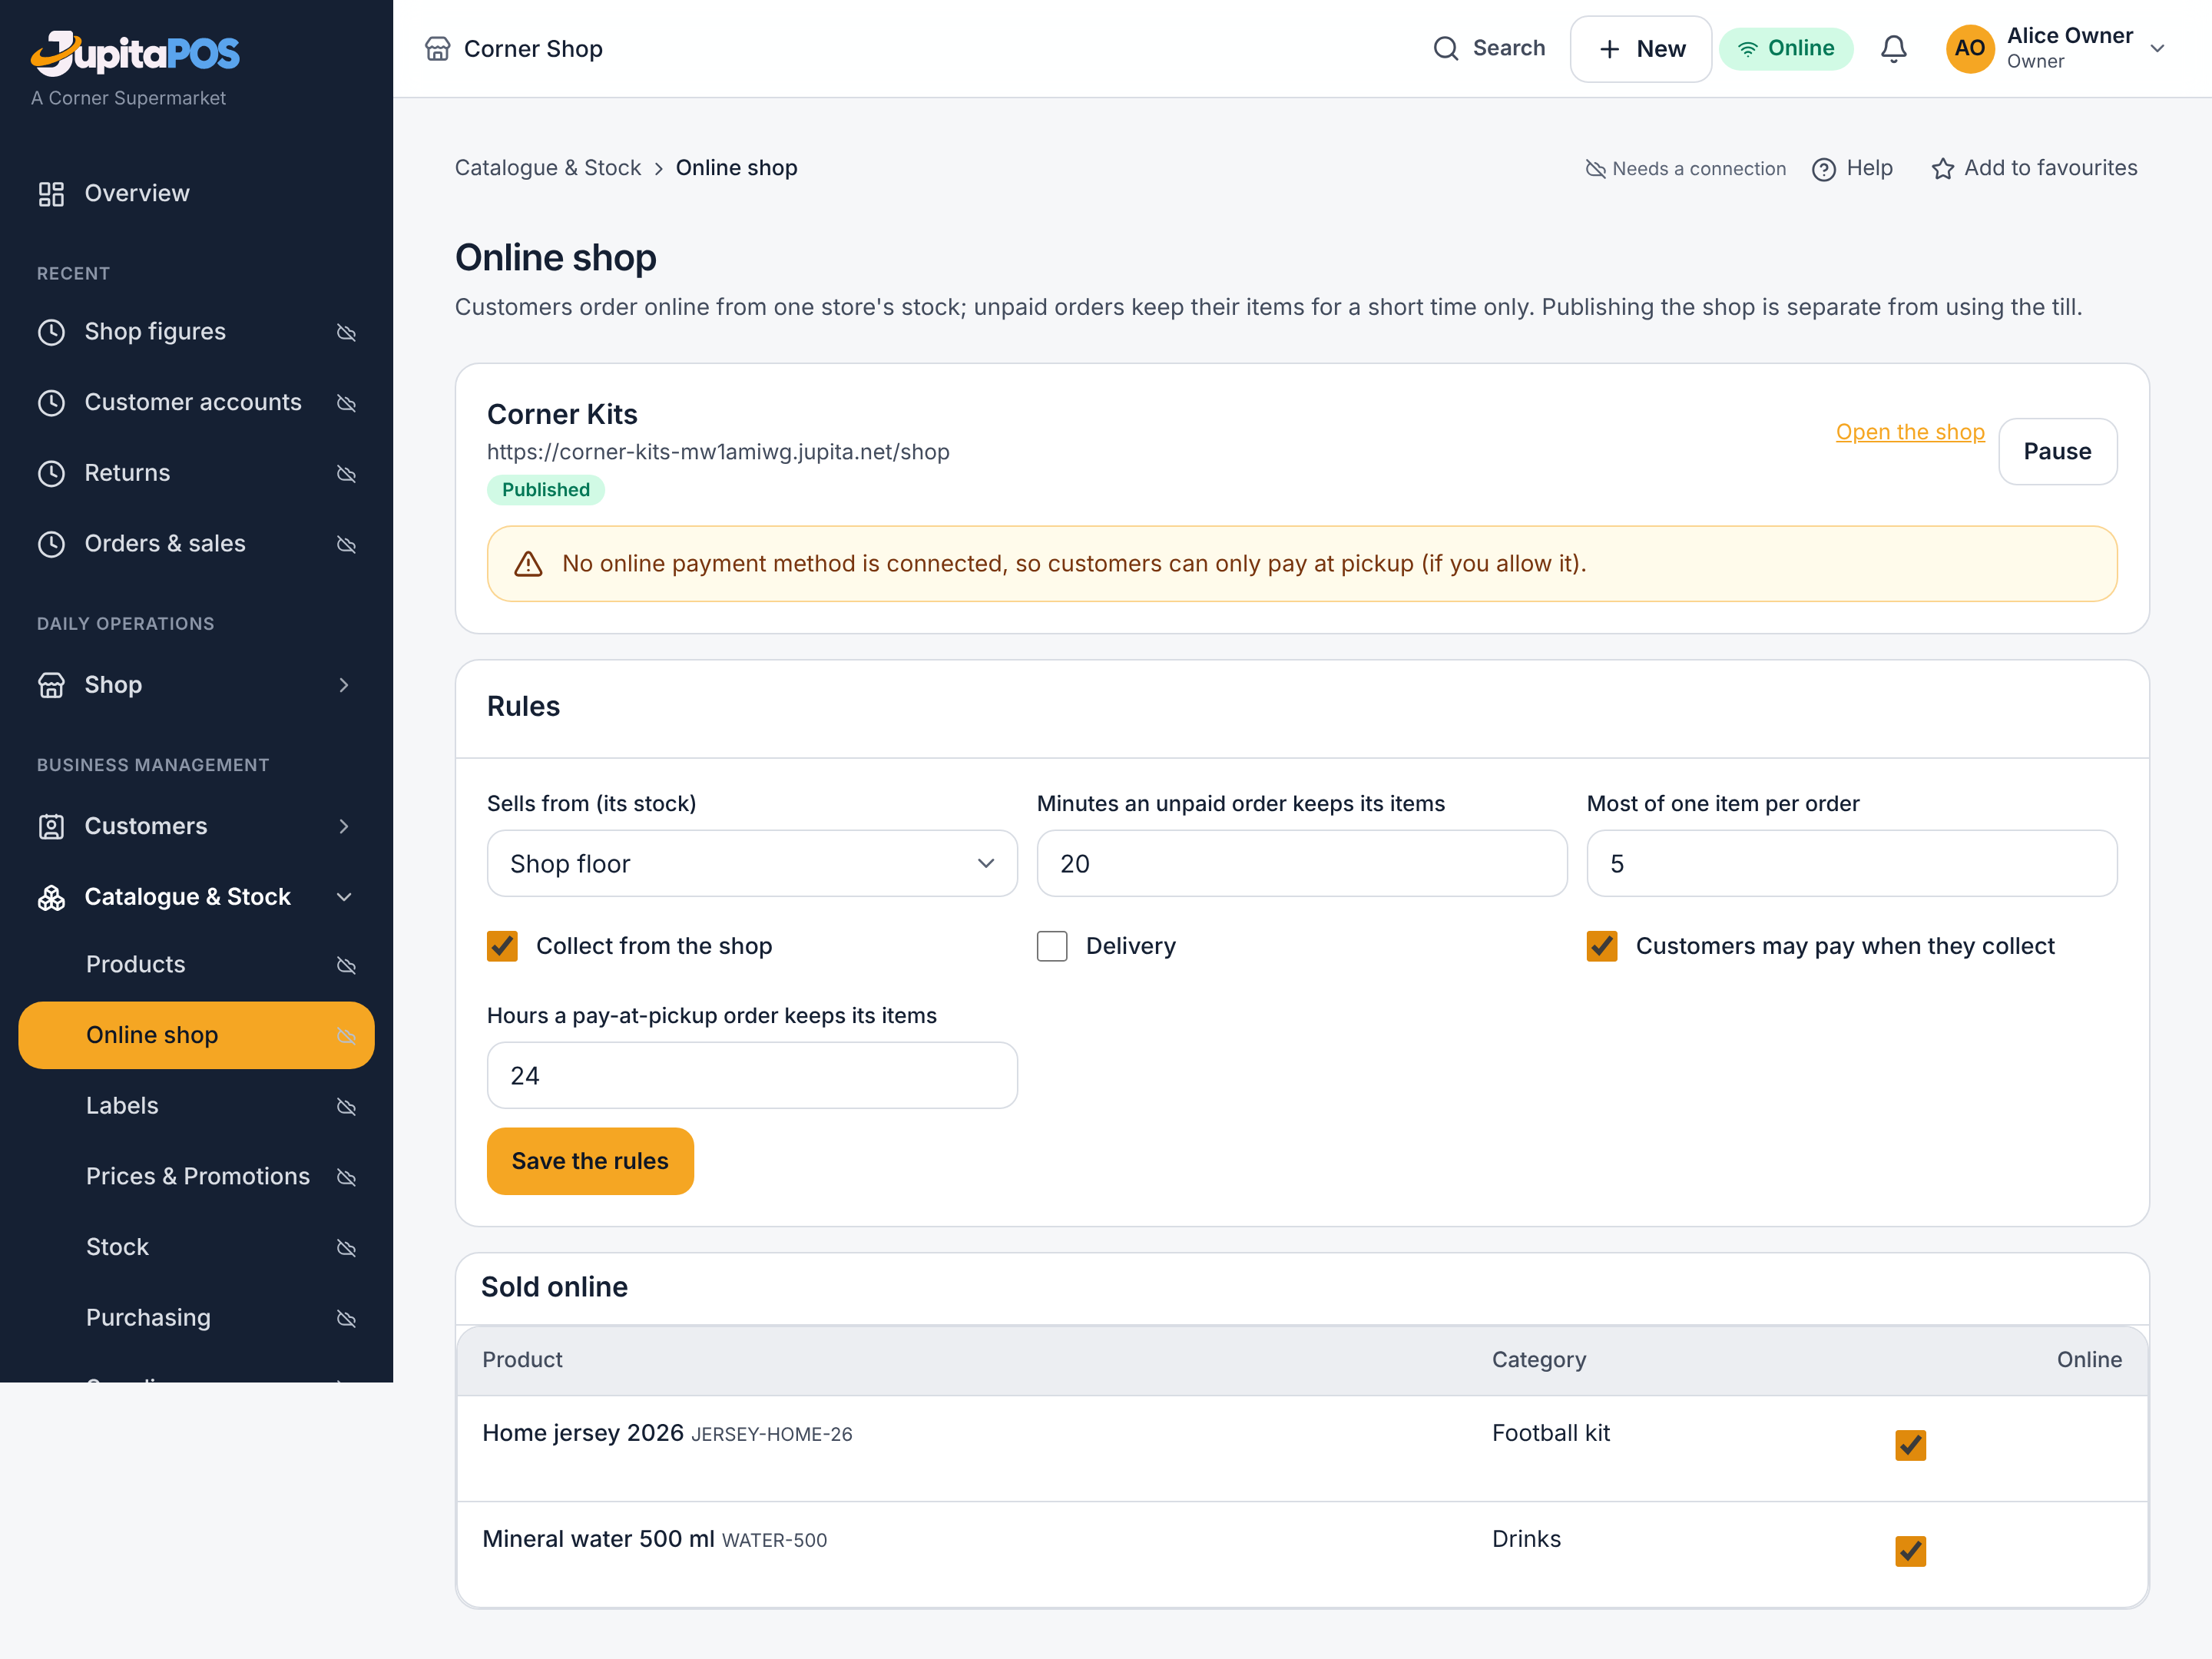
- Open Catalogue & Stock → Online shop.
- Choose the store it sells from, pickup and delivery, whether customers may pay at collection, and how long unpaid orders keep their items.
- Mark each product for sale online.
- Publish it.
Expected result
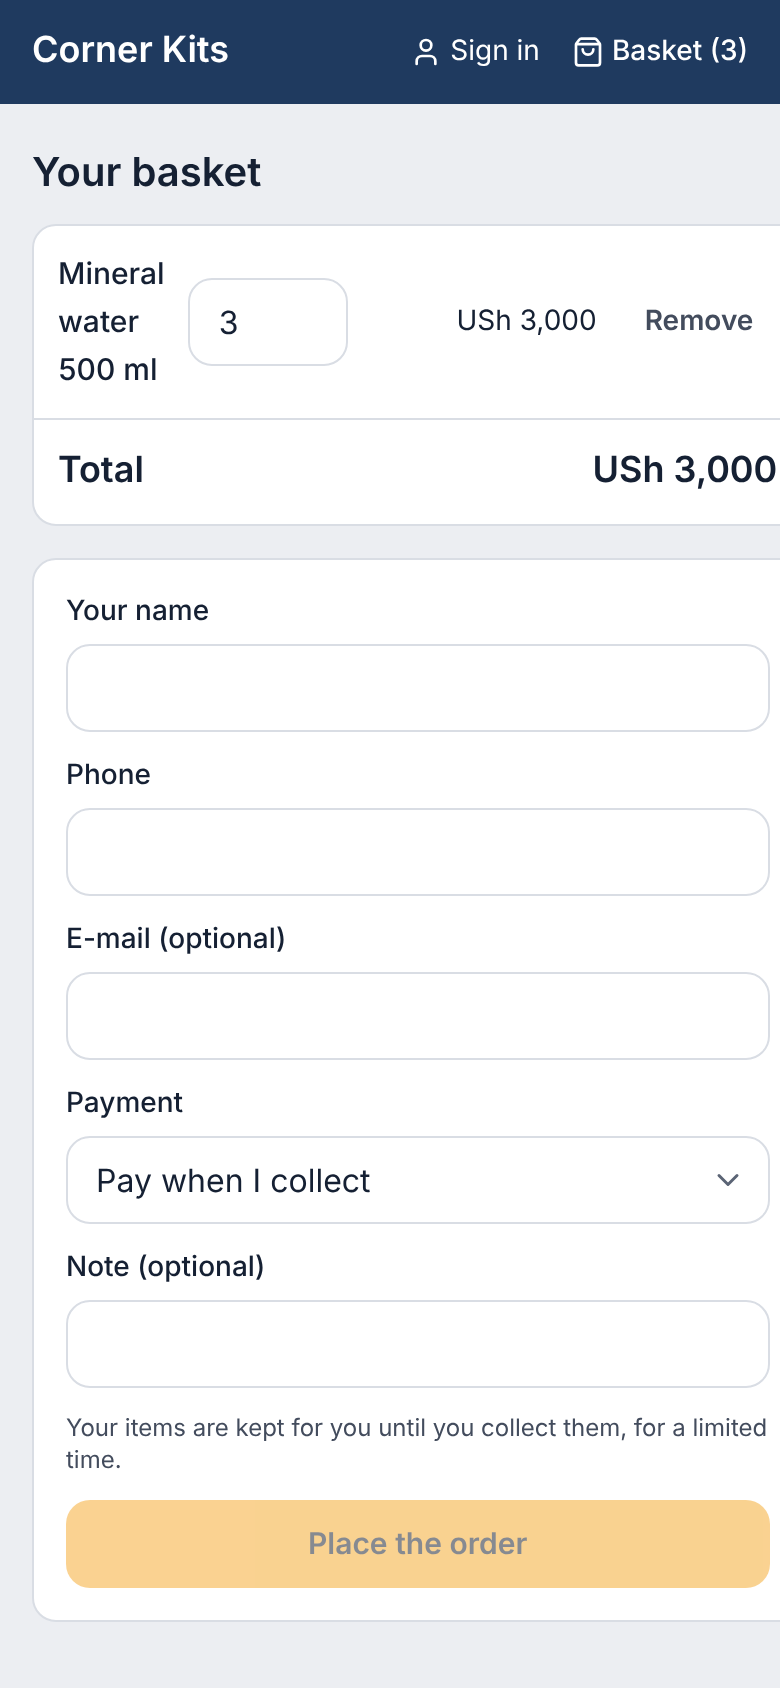
Customers see the shop, put items in a basket and order. Each order arrives in Shop → Orders & sales to be handed over.
Screenshot
Common mistakes
Publishing before the shop can really sell (no product for sale, no way to collect): publishing is refused, with the reason.
Troubleshooting
An item an online customer ordered is kept for them until the order is paid, collected or let go.
Customer accounts and the day’s figures
Purpose
Sell on account to customers you trust, collect what they owe, and see the shop’s money for the day.
Role / permission required
customers.credit to open an account and set its limit; reports.view for
the figures; reports.financial for margin and valuation — the Retail
manager, the Accountant and the Owner.
Prerequisites
The customer is in the customers list.
Steps
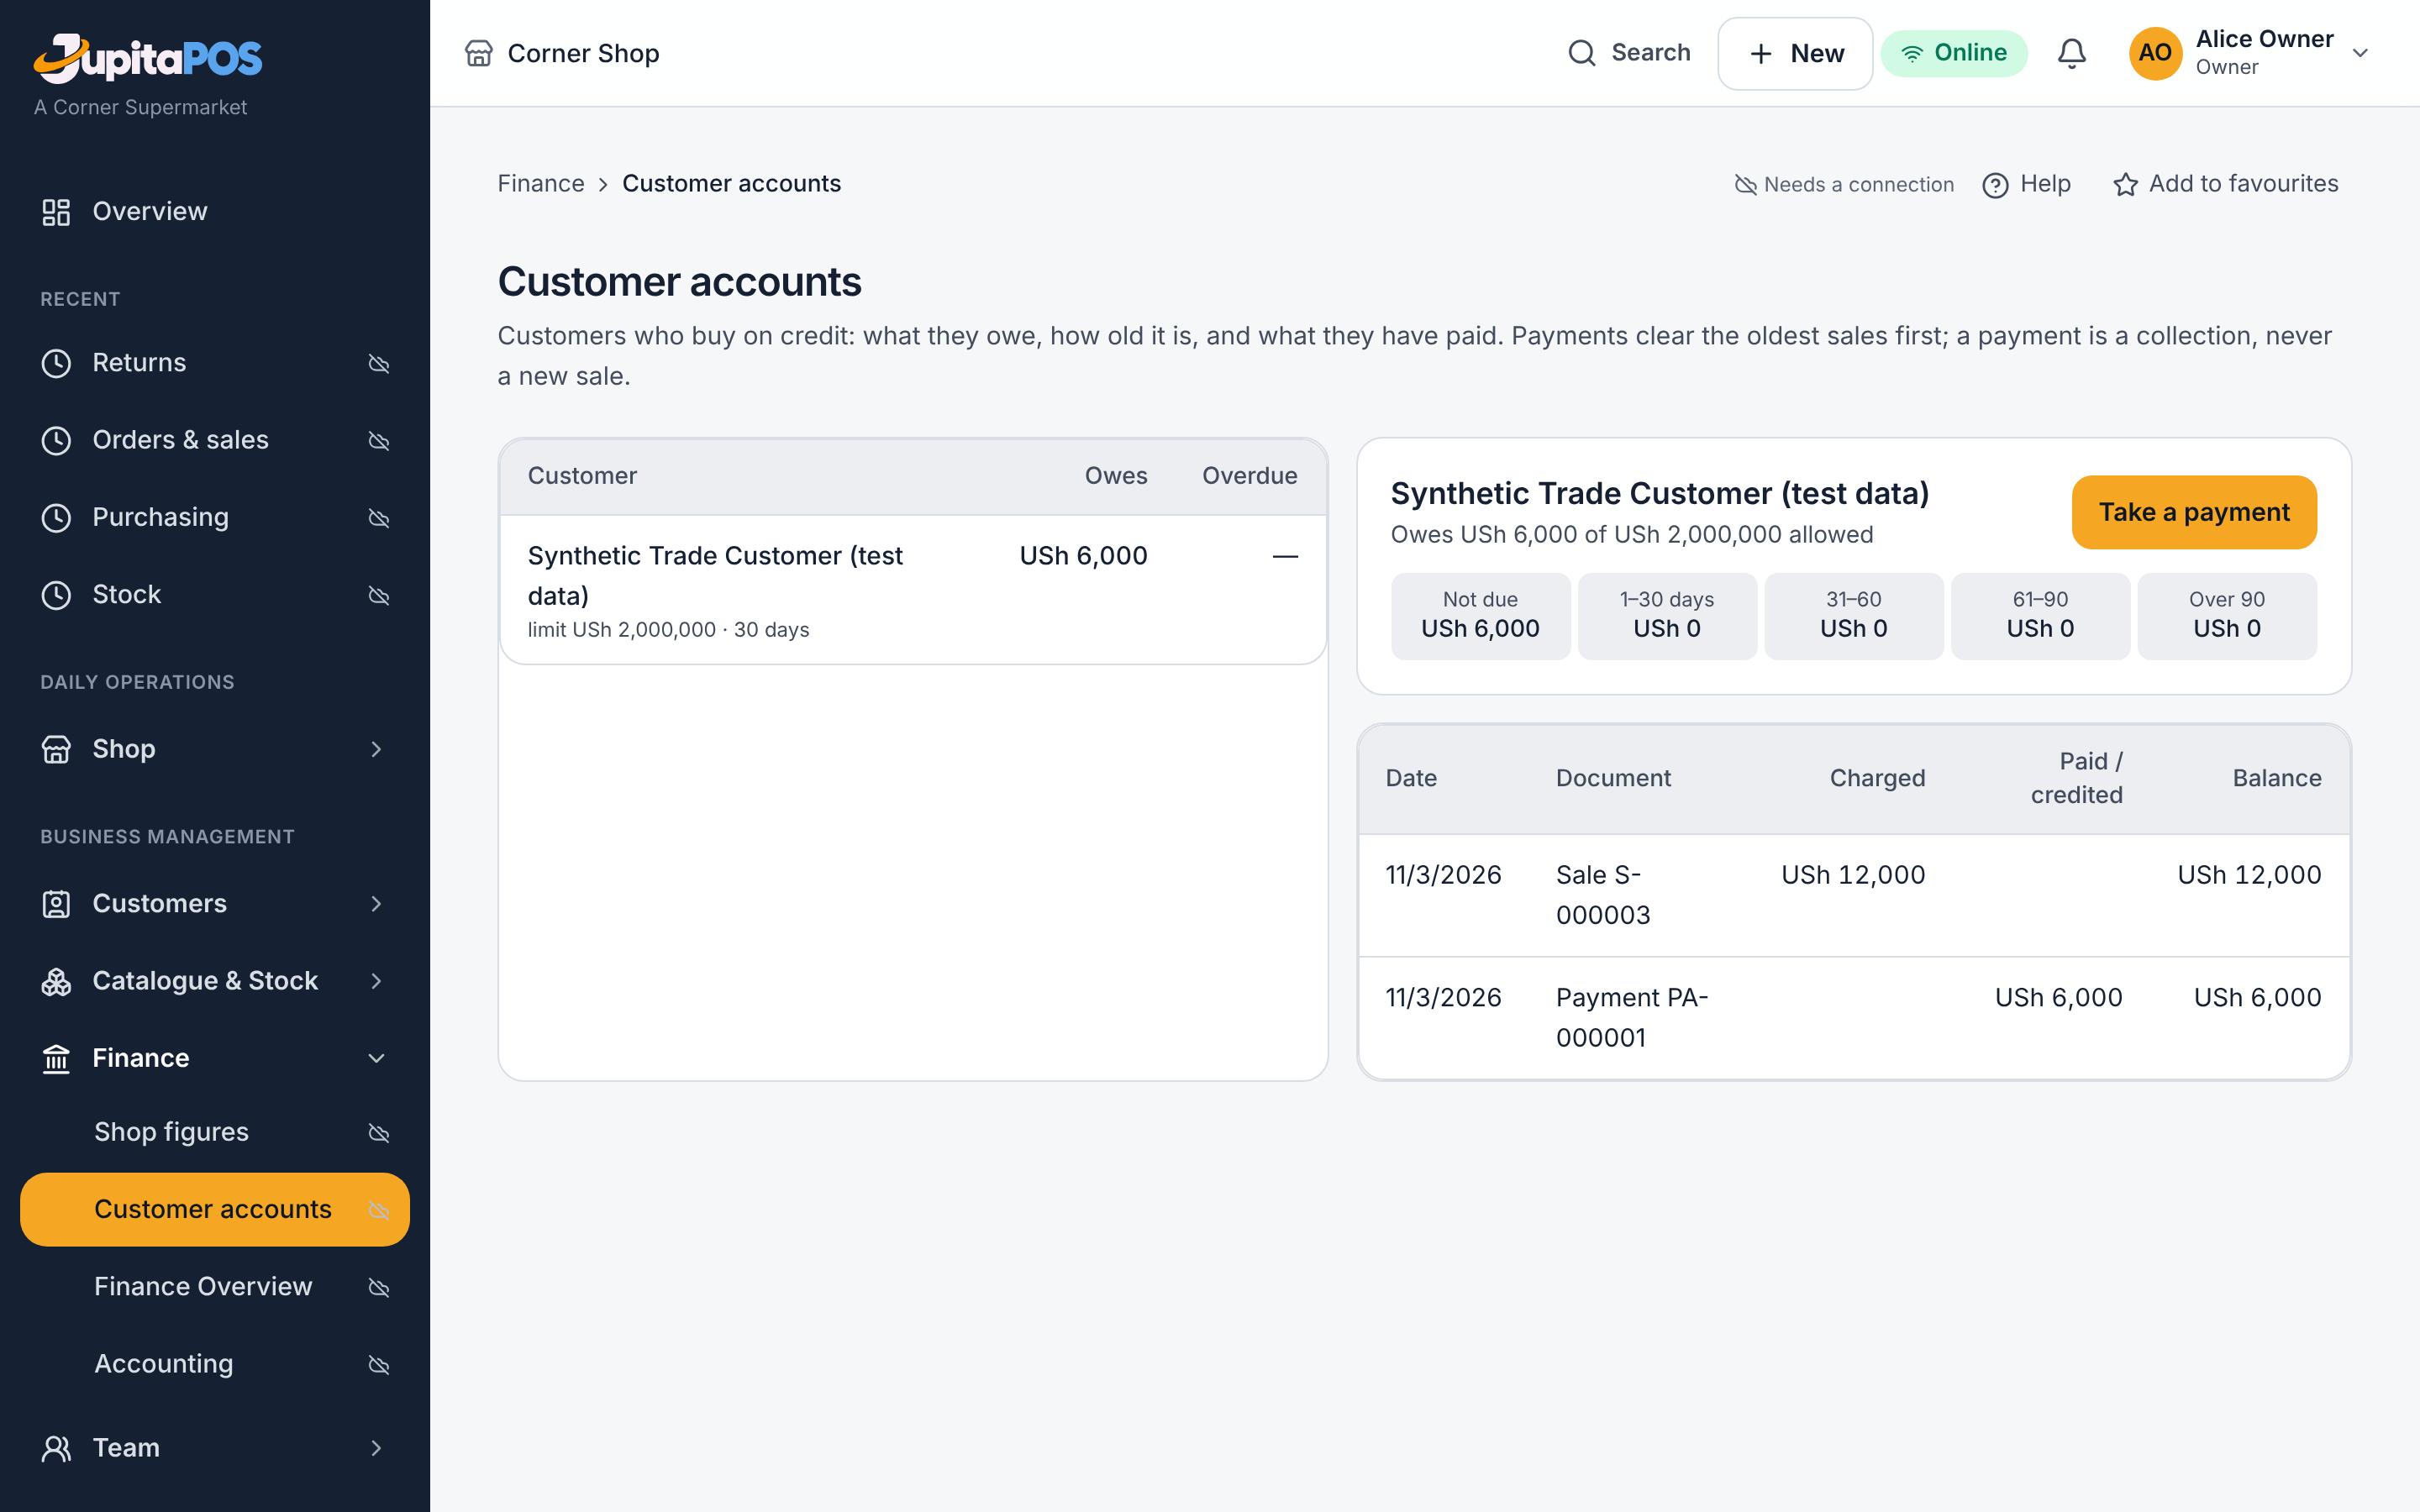
- Open Finance → Customer accounts to see each balance, what is overdue by the customer’s terms, and the statement.
- Record a payment on an account: it clears the oldest sales first.
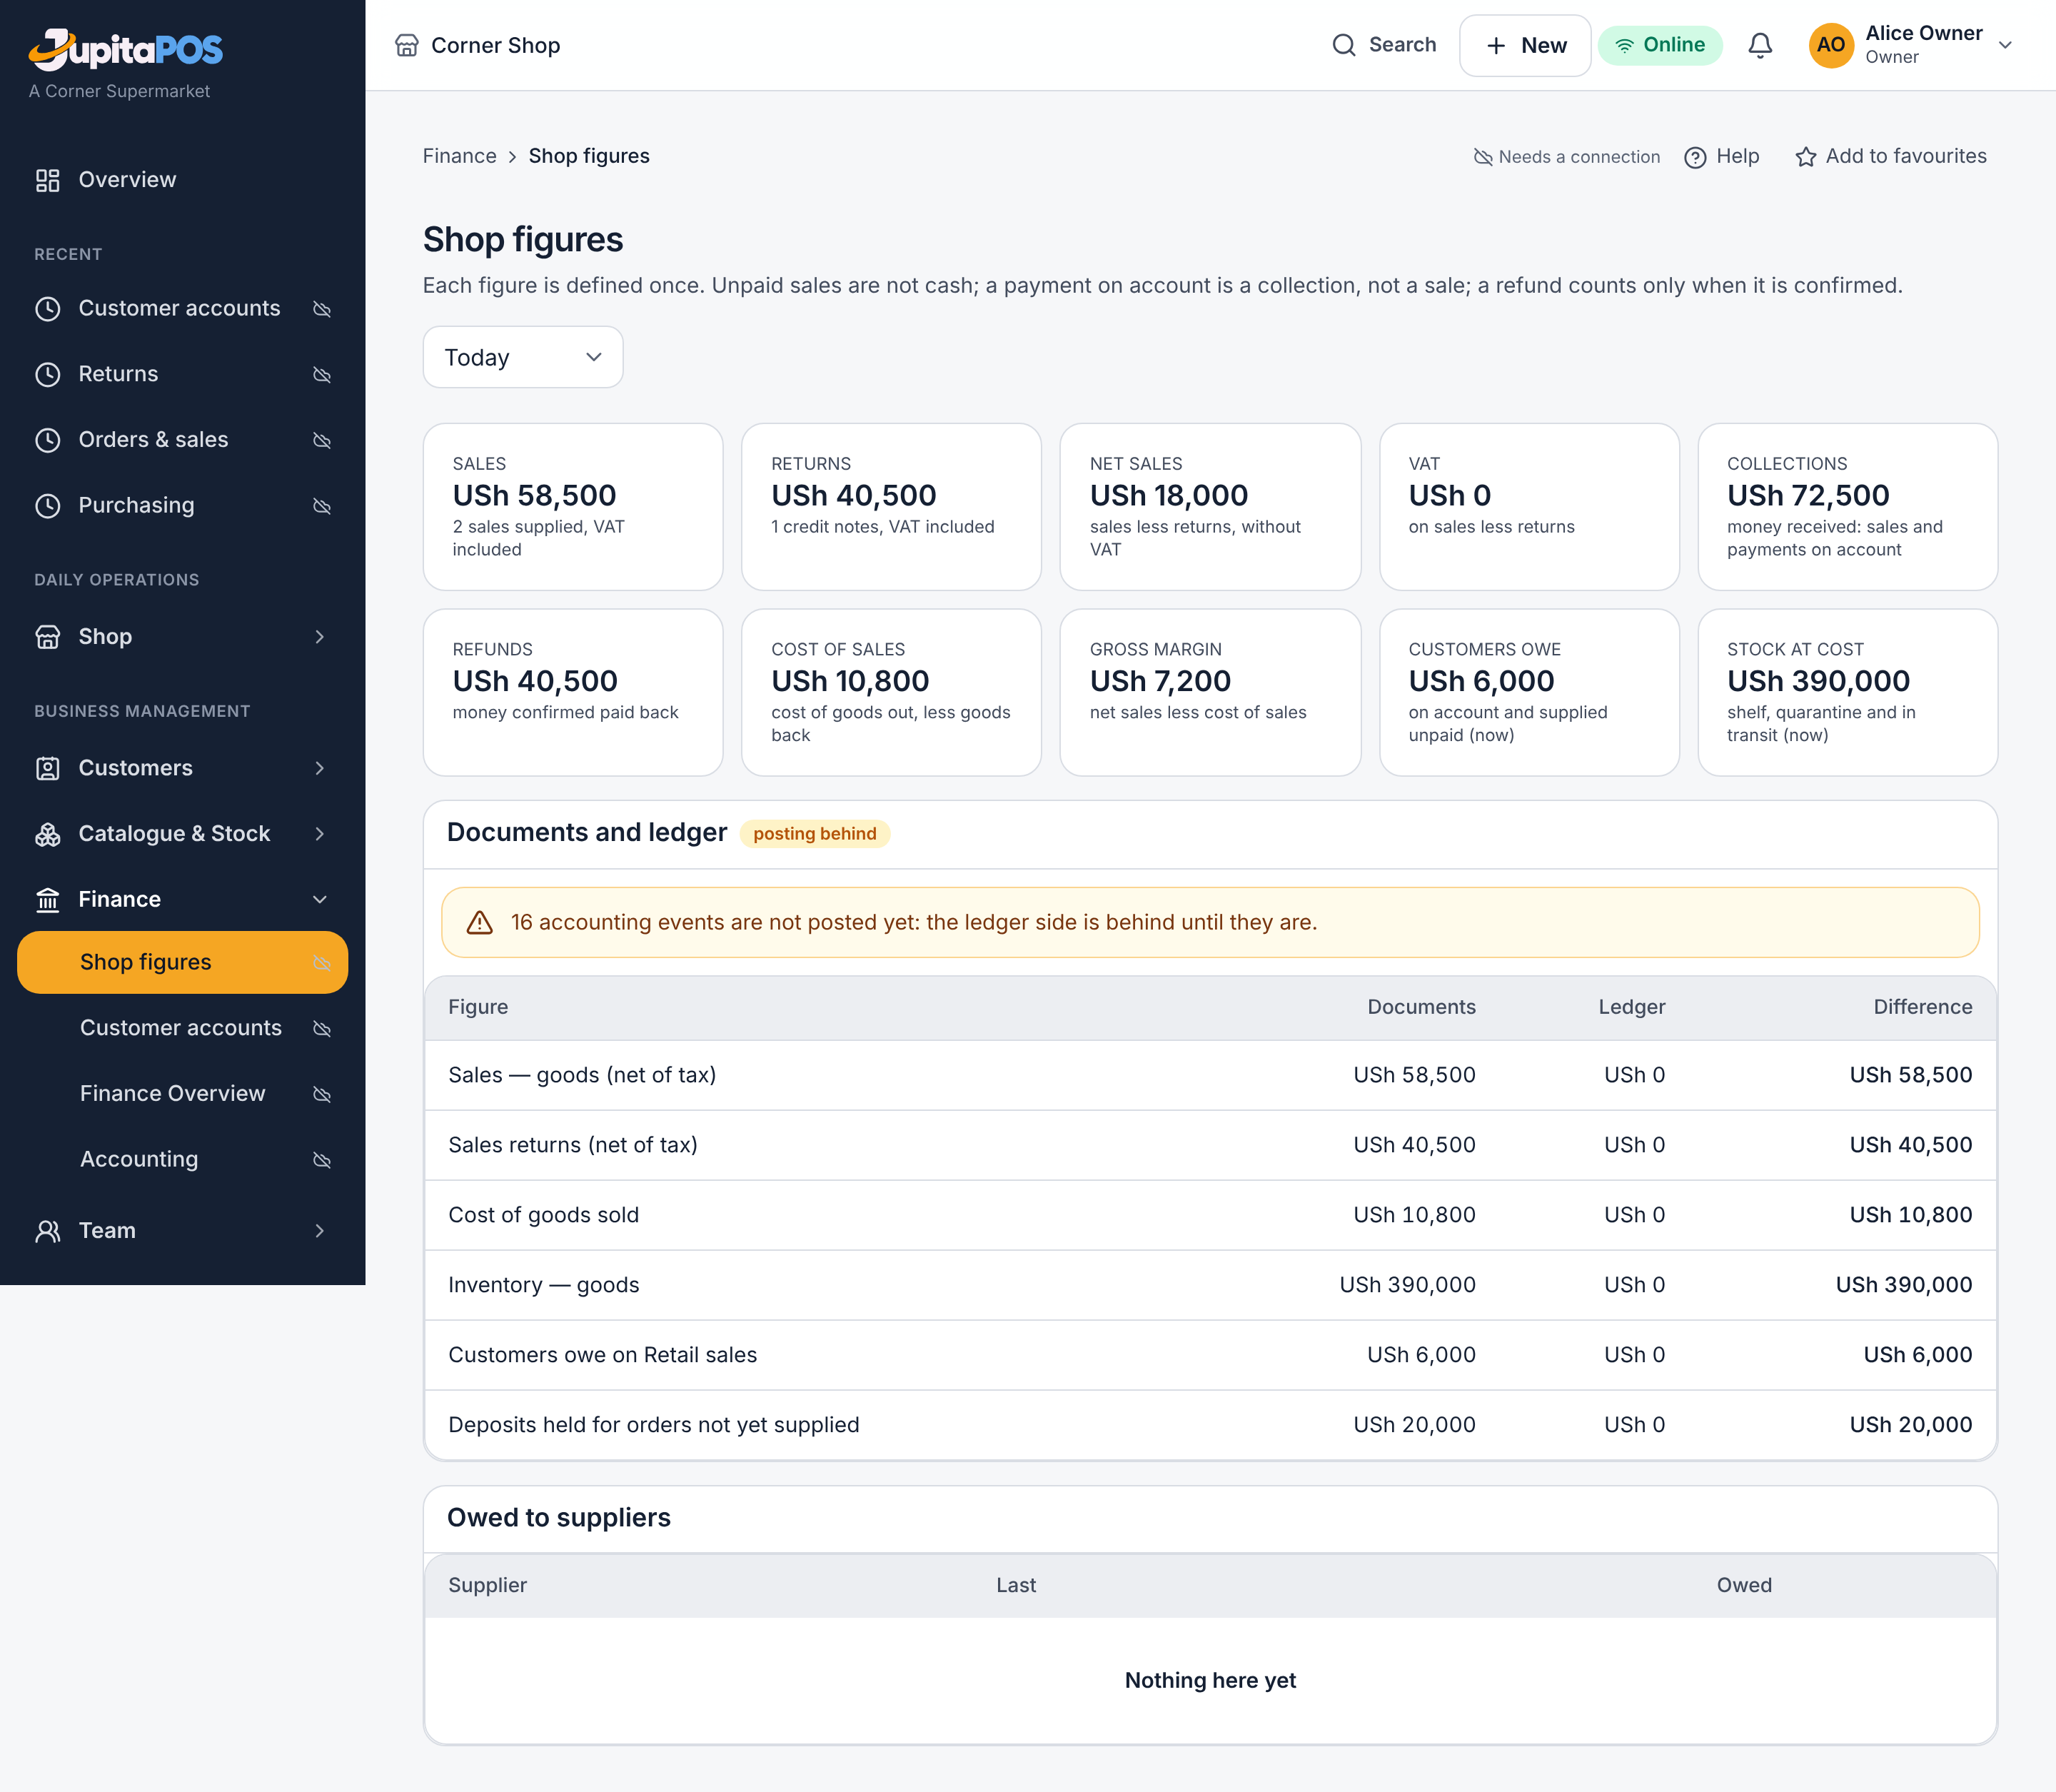
- Open Finance → Shop figures for today’s sales, payments, refunds and what is still owed.
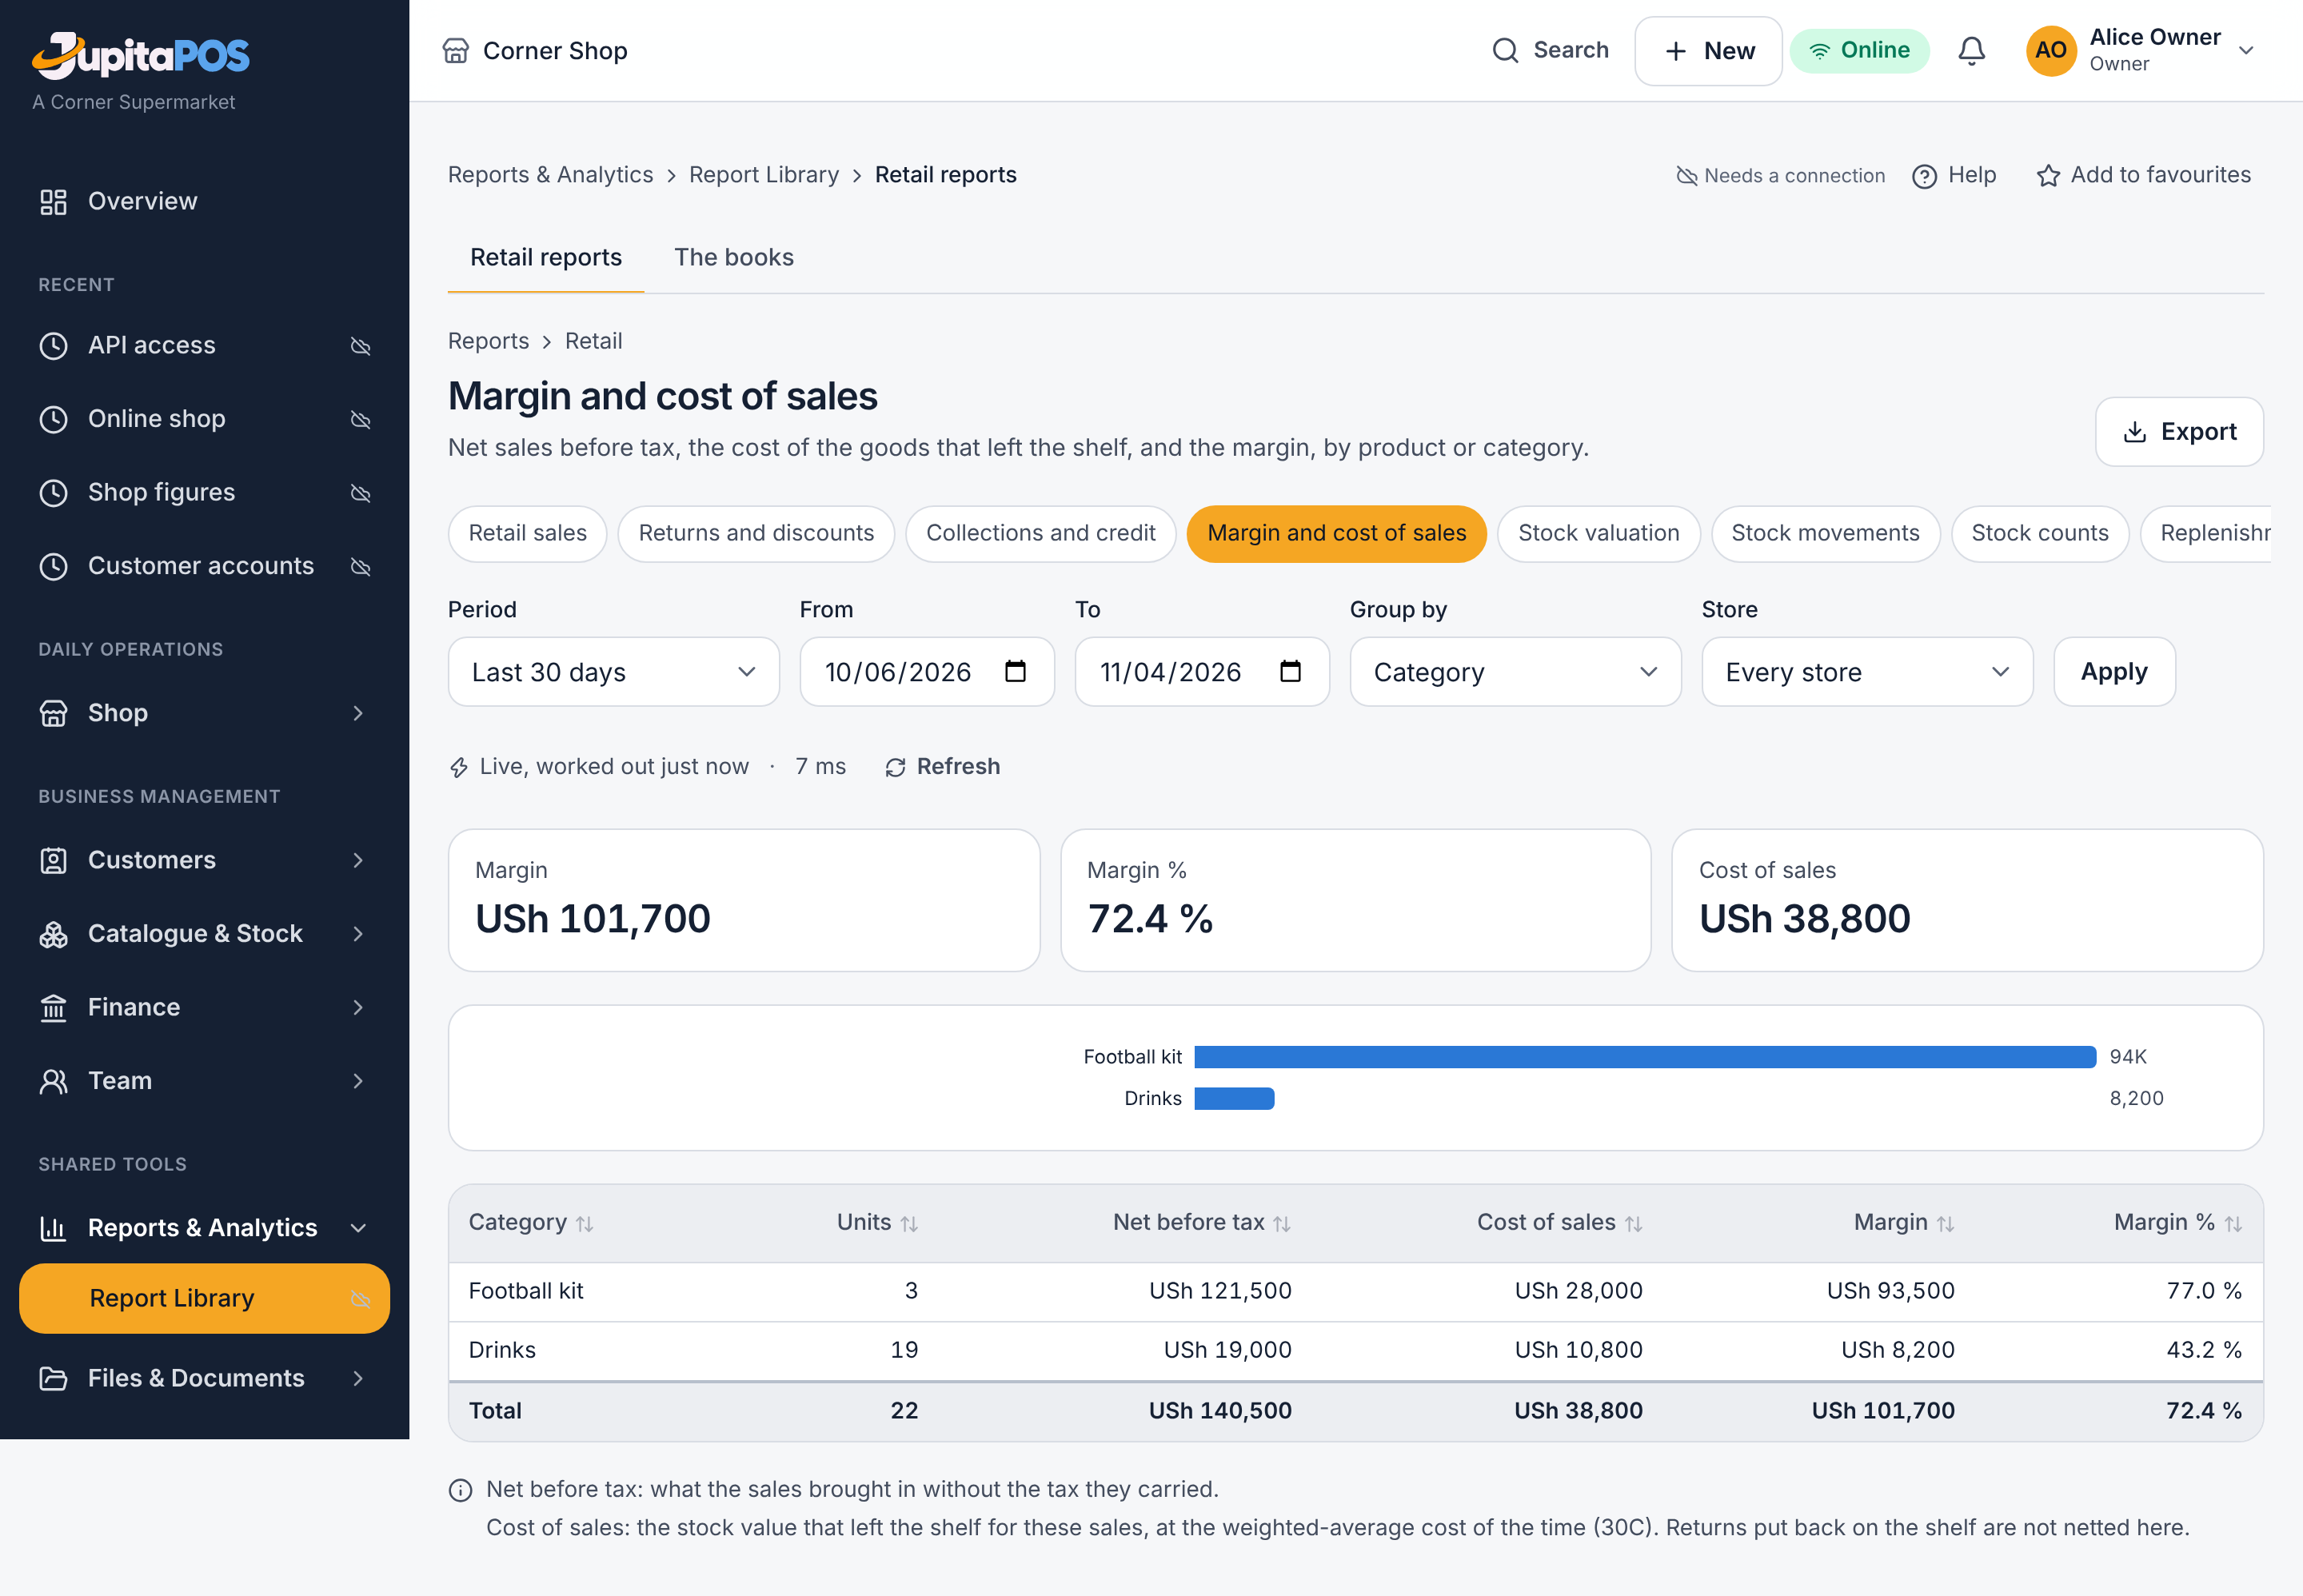
- Open Reports & Analytics → Report Library → Retail reports for the full reports: sales, returns and discounts, margin and cost of sales, valuation, movements, counts, replenishment, slow stock, expiry, serial numbers and suppliers.
Expected result
A customer buys on account only with an open account and within its limit. Each report says how its figures are defined. Retail sales, payments, refunds, stock and supplier invoices post to the shared accounting ledger.
Screenshot
Common mistakes
A closed month is never changed: a late return posts in the next open month.
Troubleshooting
Margin and valuation are hidden without reports.financial.
Who does what
| Role | What they do |
|---|---|
| Cashier | opens and closes their till, sells, hands over orders, reprints receipts, sells offline |
| Retail manager | everything a cashier does, plus returns, prices and promotions, labels, the online shop, offline sales held for review, the day’s figures |
| Storekeeper | receives deliveries, transfers between stores, counts and asks for adjustments |
| Purchaser | prepares purchase orders for approval |
| Accountant | customer accounts, the reports and the books |
| Auditor | reads everything, changes nothing |
| Owner | everything, including setting up and integrations (Settings → API access) |
Not in RetailPOS yet
Weighing scales, cash drawers and card terminals connected to the till; delivery fees; gift cards and loyalty; repairs and warranty claims.