

On this page
- The setup checklist
- RetailPOS, PharmacyPOS and Route SalesPOS
- Sign in with your e-mail and password
- Sign in or switch user with your PIN on a shared till
- Practise in training mode first
- Lock the screen, unlock it or switch user
- Find your way: the dashboard, the menu, your branch
- Read and act on notifications
- Find help: the Help Center
- Change your password and turn on two-step sign-in
- Reset a forgotten password
This manual is for everyone who works with JupitaPos: the first day on the job, or the first time on a new till. It shows how to sign in, how to share a till safely with your colleagues, how to find the screens you need, and how to keep your account safe.
JupitaPos runs in a web browser (Chrome, Edge or Safari) or as an app installed on the till, tablet or phone (see Installing JupitaPos). The screens are the same either way.
The pictures show the demo business, Jupita Restaurant Demo, at its Kampala — Kololo branch on a Friday lunchtime. In the demo, the sign-in names and the staff records differ: the accounts carry names that say the job — Moses Manager, Sam Supervisor, Brian Waiter — while their staff records carry surnames — Moses Kigozi, Samuel Mukasa, Brian Mugisha. The top bar, the tills, the boards and the timelines show the sign-in name; Team › Employees, the roster and the timecards show the staff record. The manuals name each person as the screen in front of you does.
New on the job? Practise on the real screens first, in training mode (see Practise in training mode first).
The setup checklist
Overview → Setup checklist (/setup) lists what your business needs
before its first real day: the business settings, the products or the menu,
stock, tills, staff and what your products need besides. Each task is
ticked by what really exists in your business, never by a checkbox. Open
takes you to the page that does it. The same checklist shows in your Client
Area, task by task, with Check again to read it afresh.
Owners and managers who may see the settings see the checklist.
RetailPOS, PharmacyPOS and Route SalesPOS
JupitaPOS has four products: the Hospitality Suite, RetailPOS for shops, PharmacyPOS for pharmacies and drug shops, and Route SalesPOS for distributors and field sales teams. Each business has its own address and its own database for each product it uses, so a shop’s stock never mixes with a restaurant’s, and a pharmacy’s client records never leave the pharmacy.
Everything in this manual works the same way in every product: signing in with your e-mail and password or with your PIN at a shared till, locking the screen and switching user, notifications, the Help Center, two-step sign-in and a forgotten password. What differs is the menu — each product shows only its own pages:
| Product | Where the work is | Its manual |
|---|---|---|
| RetailPOS | Shop (the till, orders, returns), Catalogue & Stock, Finance | RetailPOS |
| PharmacyPOS | Customers (the till, prescriptions, clients), Catalogue & Stock (medicines, stock by batch), Settings → Pharmacy settings | PharmacyPOS |
| Route SalesPOS | Field sales (the journey, vehicle stock, customers, sales, the close), Team → Field team | Route SalesPOS |
The Help Center of a RetailPOS, PharmacyPOS or Route SalesPOS business lists that product’s manual and the manuals every product shares, such as this one.
Sign in with your e-mail and password
Purpose
Start your shift: open JupitaPos with your own account, so that every sale, payment and change you make is recorded in your name.
Role / permission required
Everyone who has a user account. Signing in needs no permission; what you
see afterwards depends on your roles (the dashboard needs dashboard.view).
Prerequisites
- A manager or administrator has created your user account and told you your e-mail address and first password.
- The device is connected to the internet. The sign-in page says so when it is not.
Steps
- Open JupitaPos: the installed app, or the address your manager gave you in the browser. The Sign in page opens.
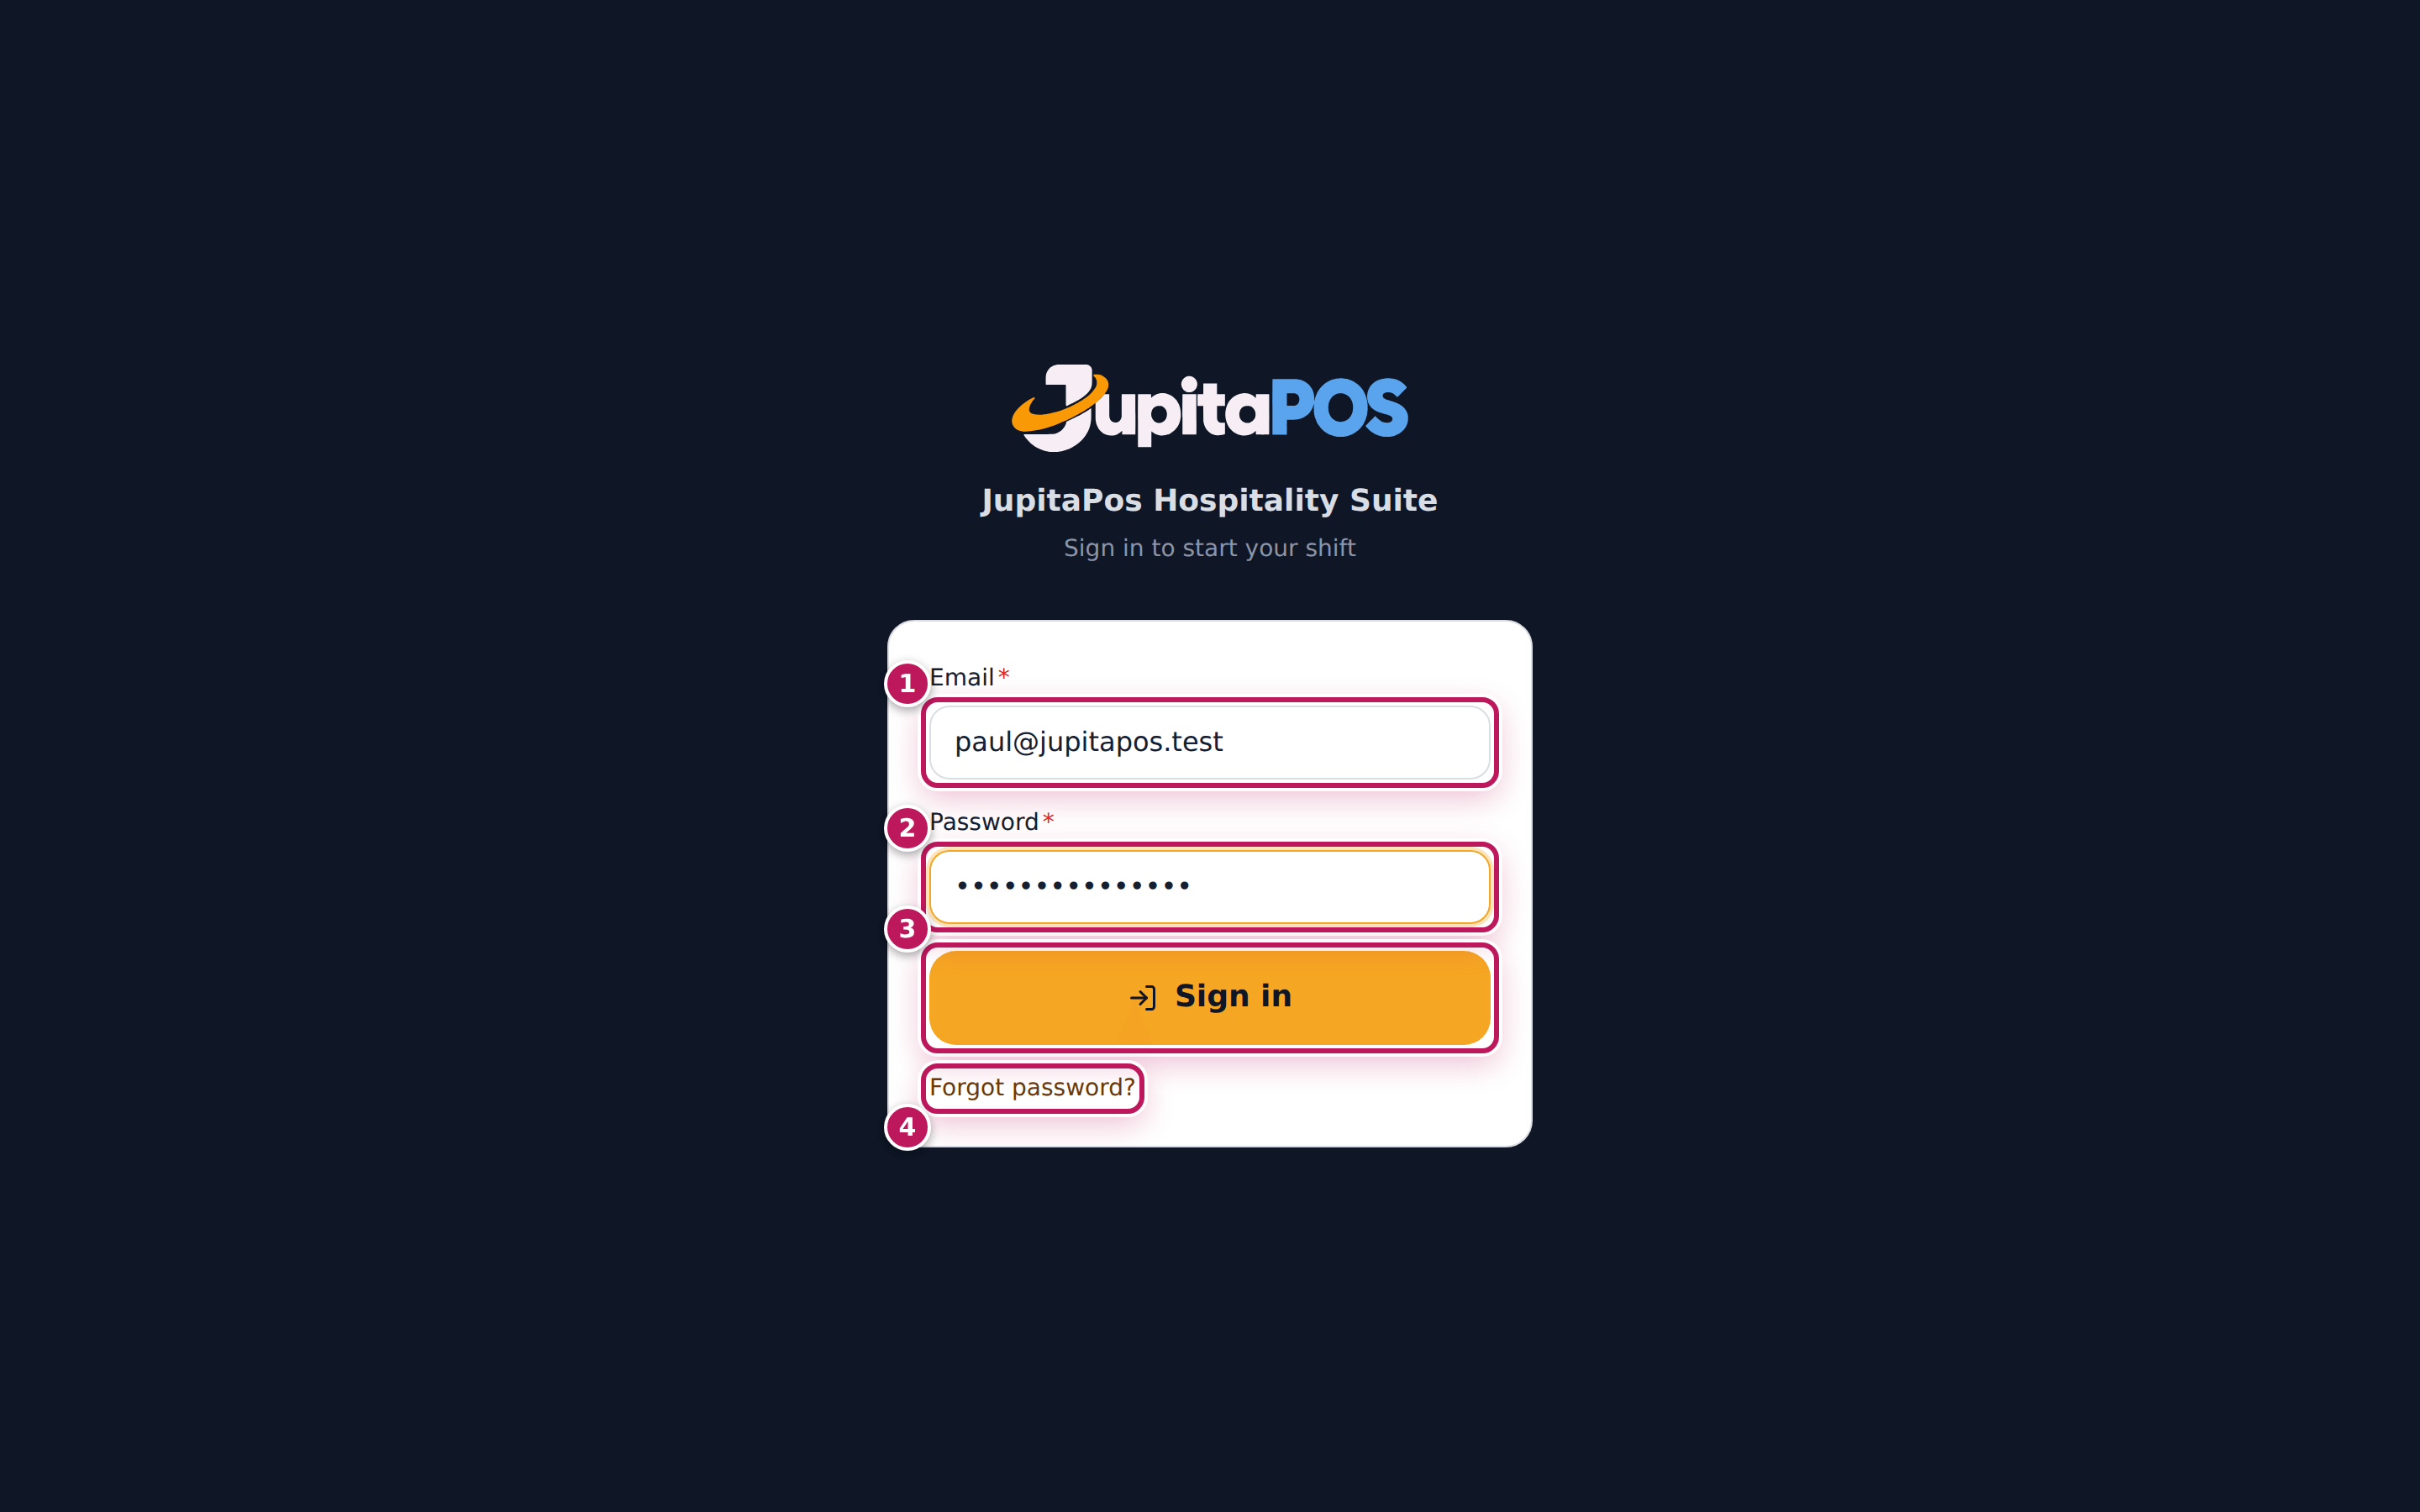
- Type your e-mail address in Email (1).
- Type your password in Password (2). The dots hide what you type.
- Tap Sign in (3).
- If your account uses two-step sign-in, the Two-factor check page asks for a code: open your authenticator app and type the 6-digit code it shows, then tap Continue (see Change your password and turn on two-step sign-in).
- If this is your first sign-in, JupitaPos may ask you to choose a new password (You must choose a new password before continuing.). Type the password you were given, then a new one twice, and tap Change password.
Expected result
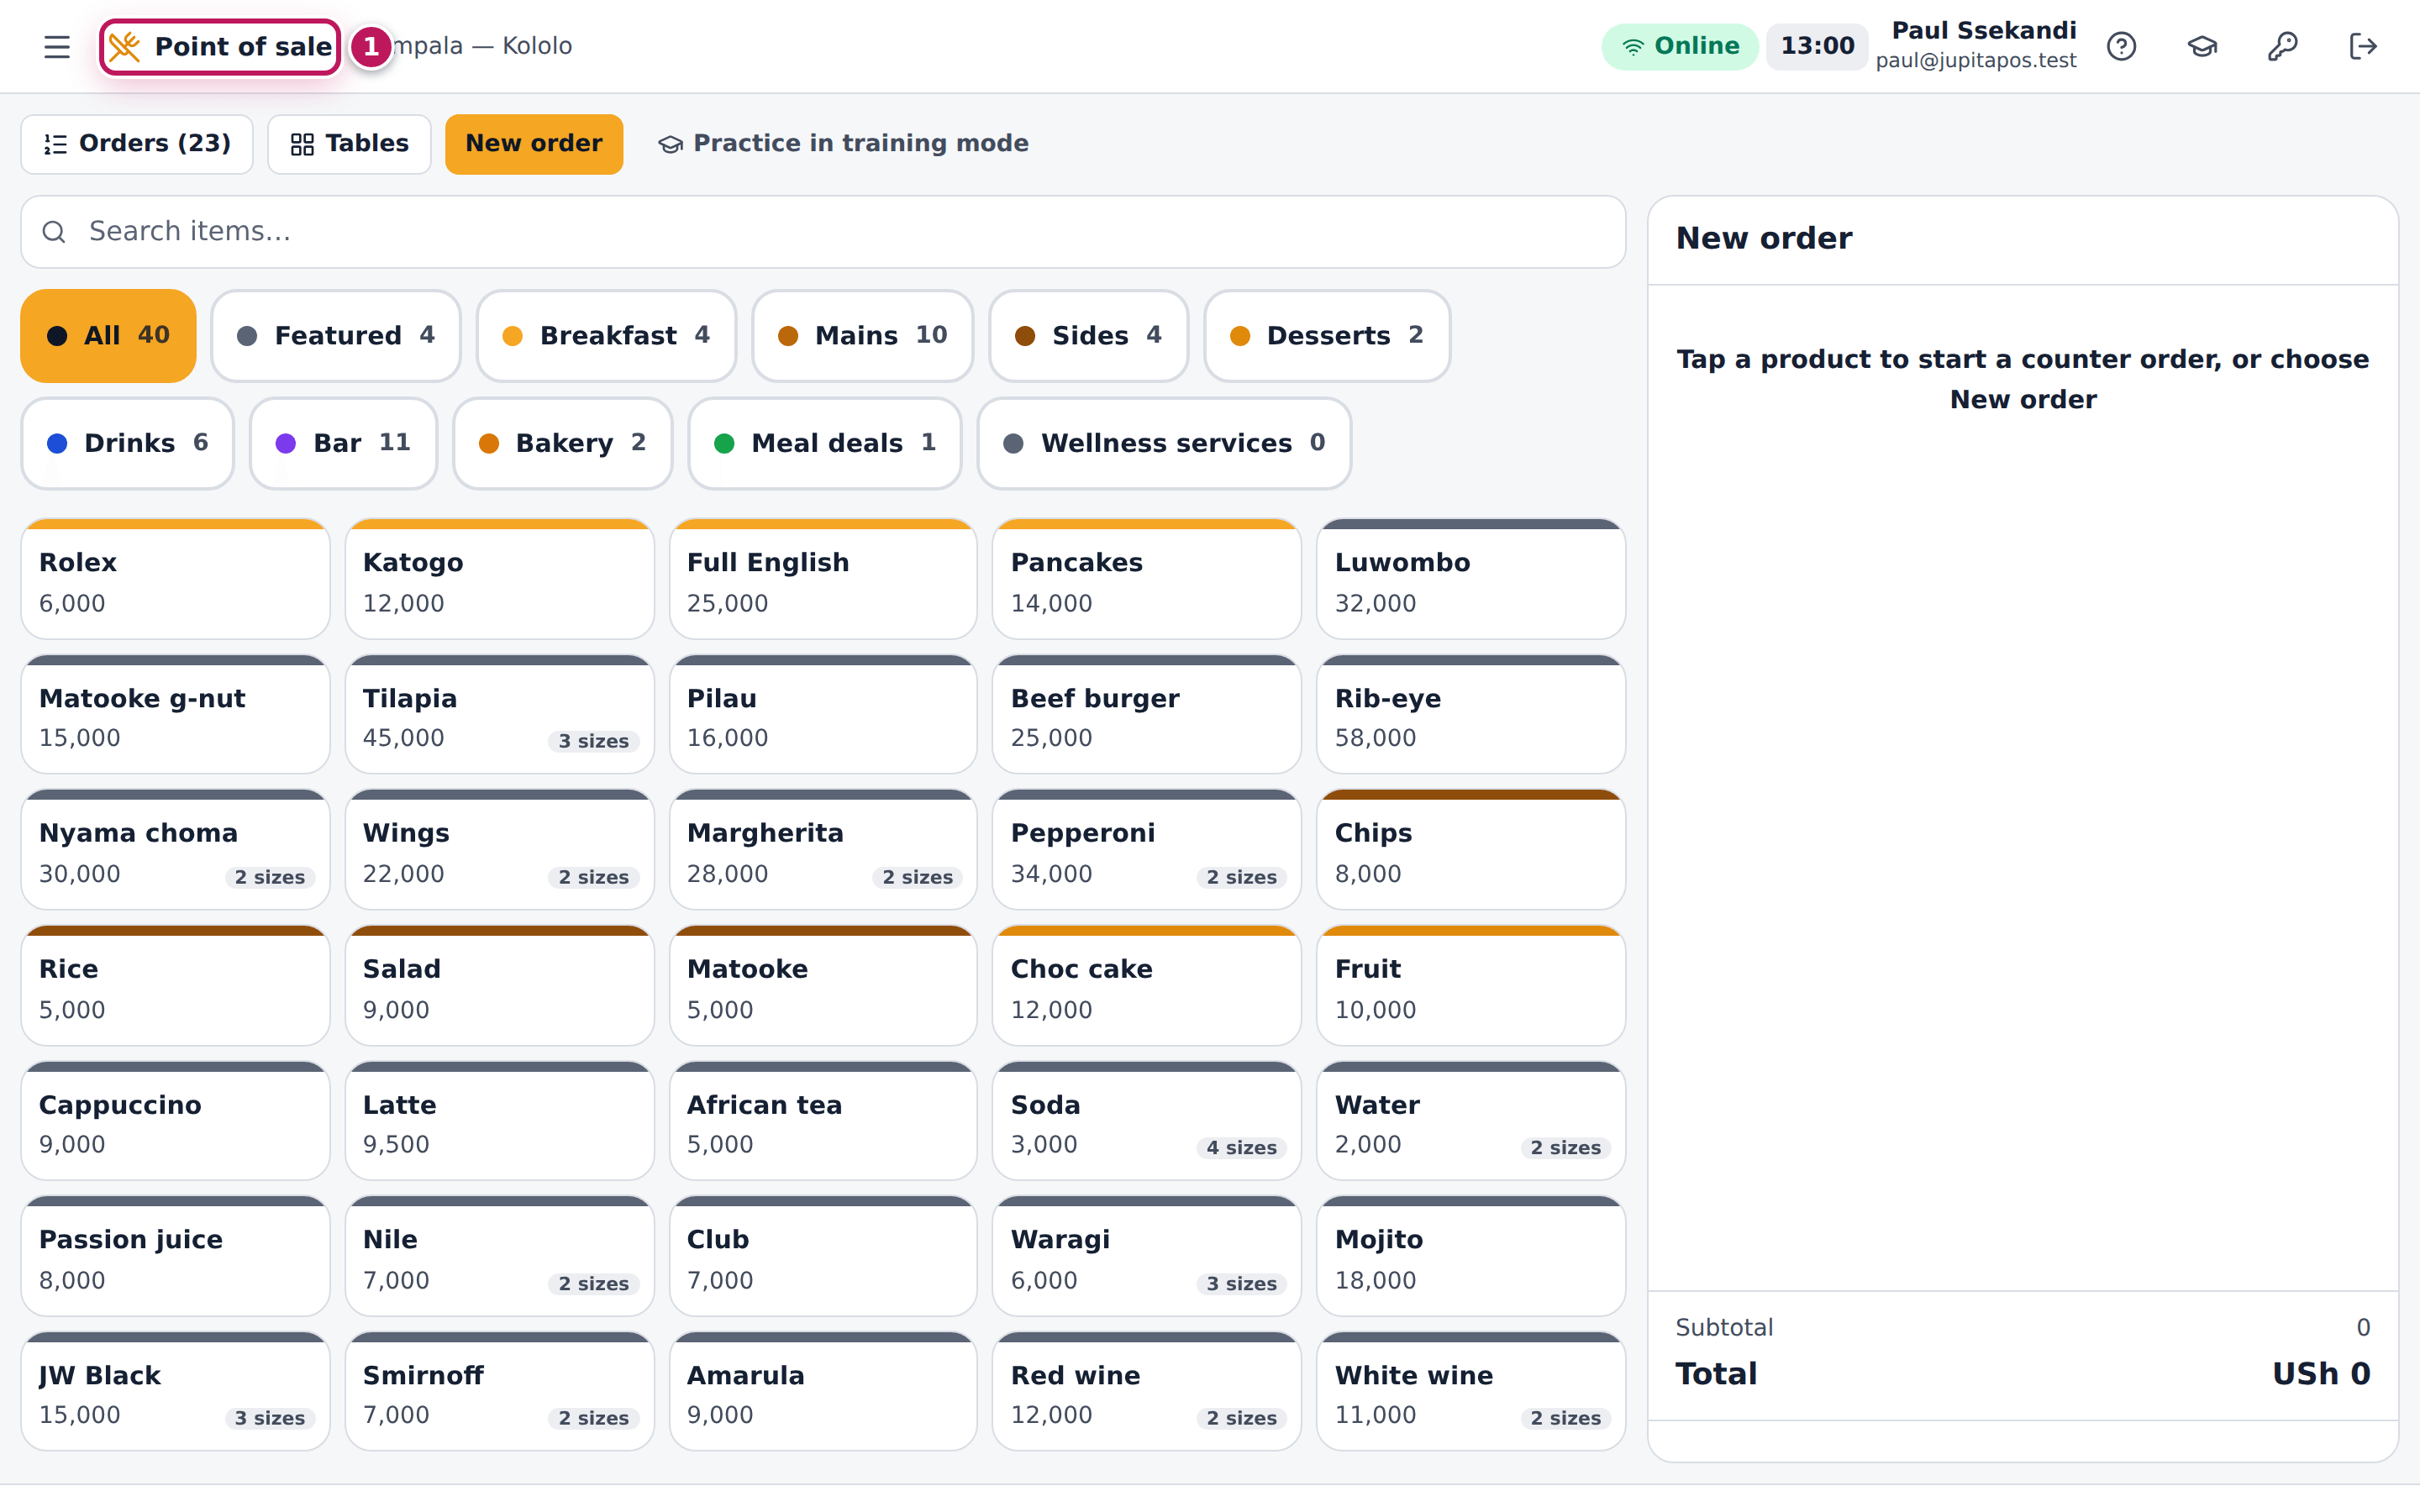
You land on the screen of your work. Paul, a cashier, lands on the Point of sale (1): the till of his branch, ready for the first order. An owner or a manager lands on the Overview, a receptionist on the front desk, an accountant on Finance. Everything else is in the menu, which lists only what your roles allow (see Find your way); on a full-screen screen such as the point of sale or a kitchen board, Open menu at the top left opens it.
Screenshot
Common mistakes
- Signing in on a colleague’s account. Everything you do is recorded under the name that is signed in — sales, voids, cash. If you find a till signed in as someone else, sign them out first (your name at the top right, then Sign Out) and sign in as yourself.
- Typing the e-mail with a capital letter or a space at the end. Type it exactly as your manager gave it to you.
- Trying again and again with the wrong password. After five wrong passwords the account locks for 15 minutes. Use Reset a forgotten password instead.
Troubleshooting
- “Invalid email or password — or the account is locked for a few minutes after too many attempts.” The e-mail or the password is wrong, or the account is locked after five wrong tries. Check both, wait 15 minutes if you tried several times, or reset your password.
- “You’re offline. Signing in needs a connection.” The device has no internet. Sign in stays greyed out until the connection is back. A till that is already signed in keeps working offline (see Offline mode).
- “This account has been suspended. Contact your administrator.” Your manager or HR has suspended the account. Only they can reinstate it.
- “Too many failed sign-in attempts from this network. Try again in … minutes.” Many wrong passwords came from your restaurant’s network in a short time. Wait the minutes shown.
- After signing in you land on the preparation screens (or the till, the floor plan, the front desk …), not the Overview. You land on the screen of your role — chefs, cooks, bartenders and baristas on the preparation screens. That is normal; the Overview is in the menu if your role has it.
- “You don’t have access to this”. You opened a screen your roles do not allow (from an old link or bookmark). Tap the button under the message — Back to dashboard, or Go to Production boards for someone without a dashboard — or ask your manager for the permission it names.
FAQ
Do I have to sign out at the end of my shift? Yes, on a shared device. Tap your name at the top right, then Sign Out. On a till, the next person can also take over from the lock screen with Switch user (see Lock the screen, unlock it or switch user).
How long does a sign-in last? A password sign-in ends after 12 hours, or after 4 hours without any activity. JupitaPos then asks you to sign in again.
Sign in or switch user with your PIN on a shared till
Purpose
Take over a shared till quickly — at the start of a shift, or when a colleague hands the till to you — with your employee number and a 4-digit PIN instead of an e-mail and a password.
Role / permission required
Staff who may use a PIN: waiters, cashiers, bartenders, baristas, cooks,
supervisors and managers (auth.pin). The till must be approved for your
branch and, if a manager restricted it, for your role.
Prerequisites
- The device is a till approved by a manager (see Register this device as a till and Approve a new till). Sign in with PIN appears only on an approved till.
- Your manager has set your PIN (see Set an employee’s PIN) and told you your employee number, for example EMP-0006.
- The till is online. A PIN sign-in is checked by the server.
Steps
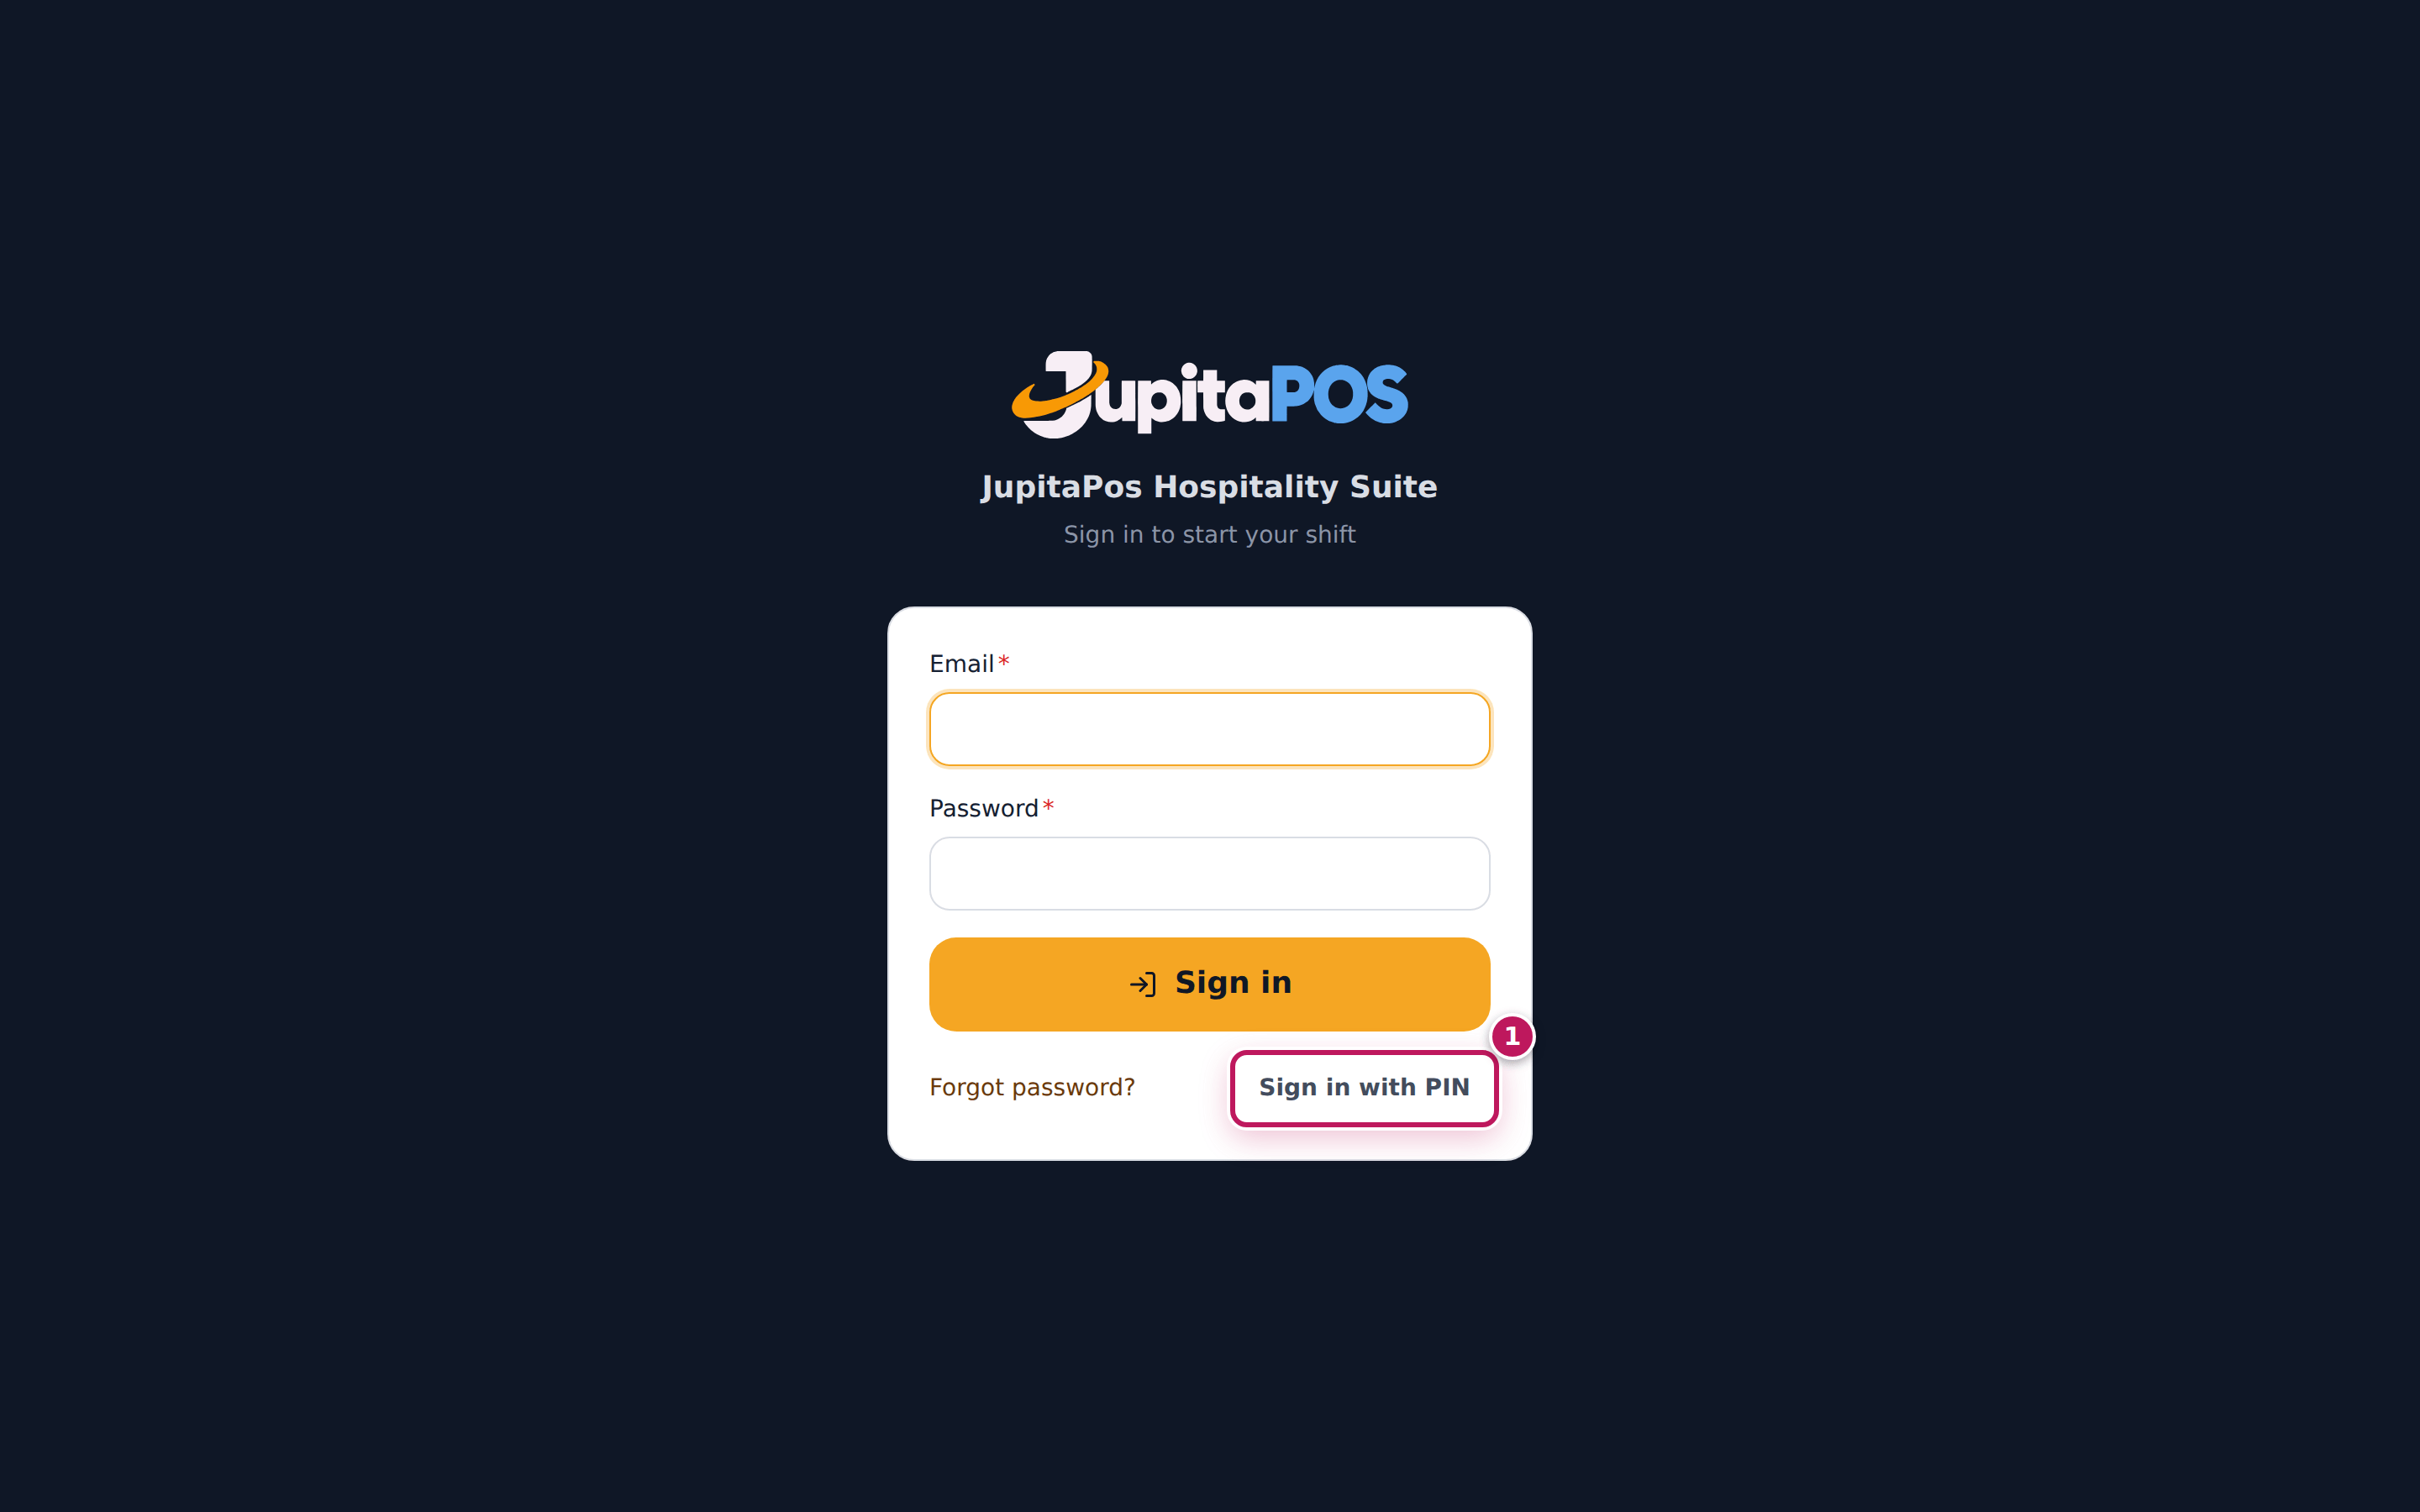
- On the till’s Sign in page, tap Sign in with PIN (1).
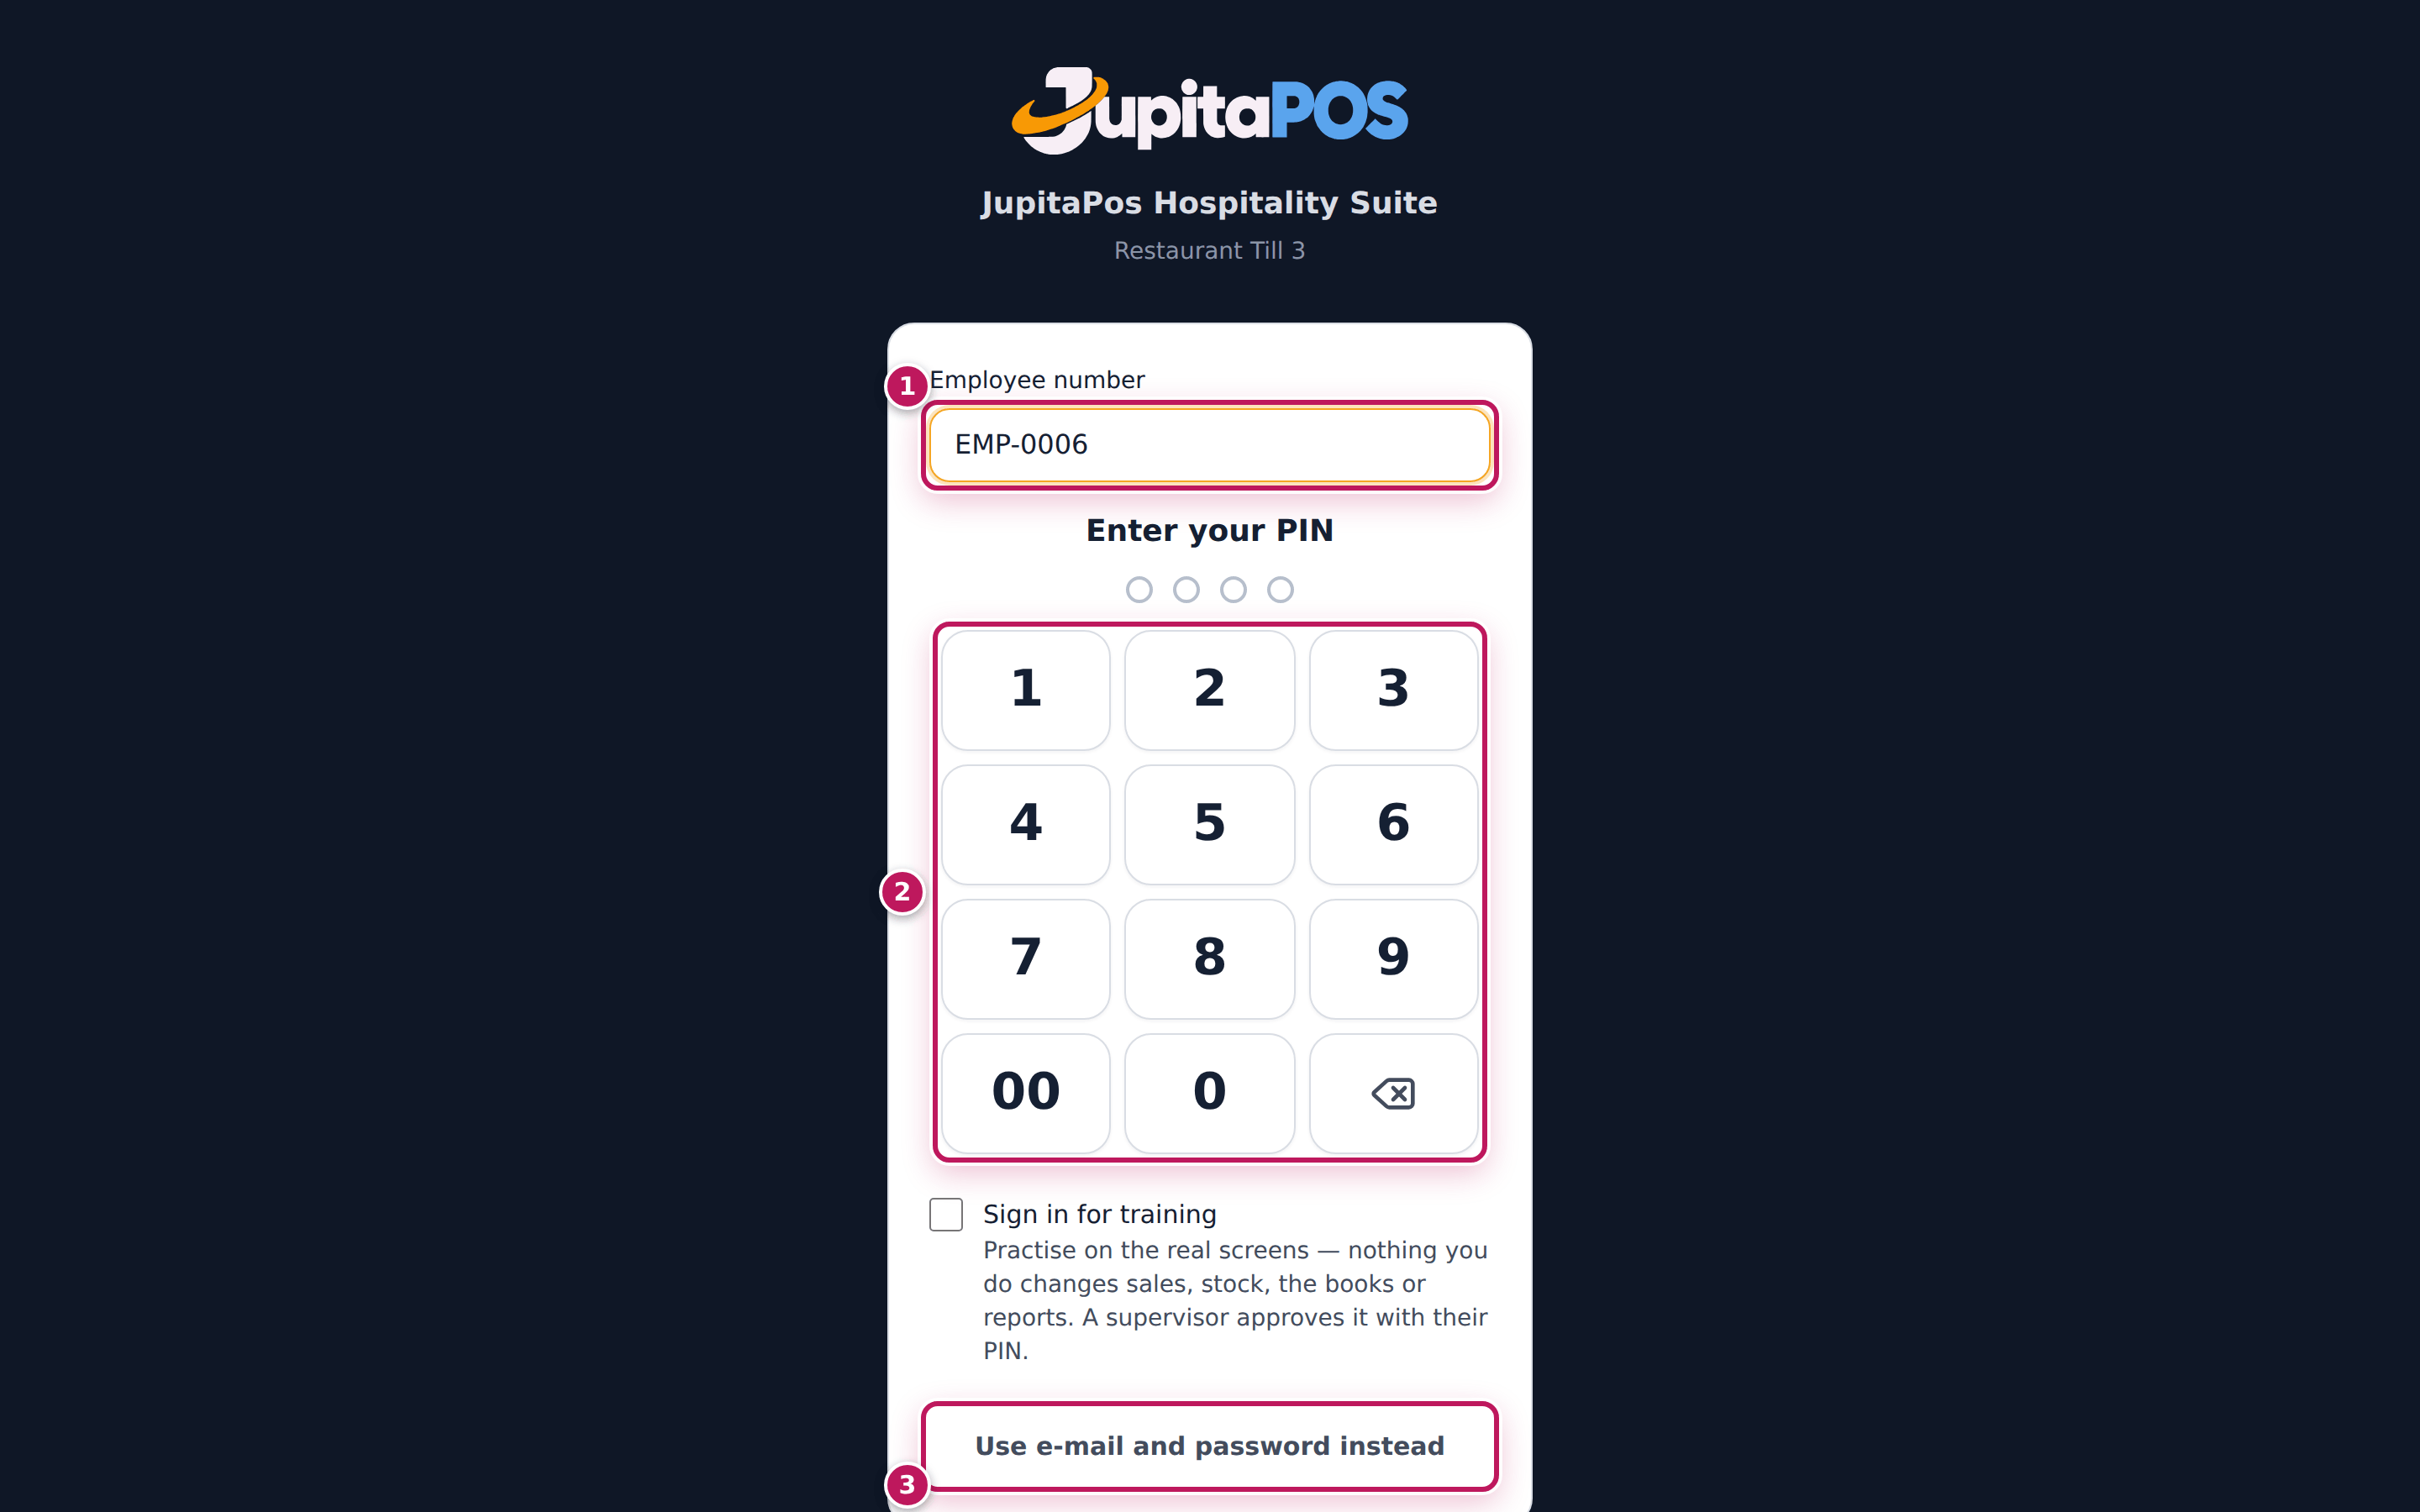
- The page now shows the till’s name under JupitaPos — here
Restaurant Till 3. Type your employee number in Employee number
(1), for example
EMP-0006. The keyboard that opens has letters and digits. - Tap your 4 digits on the keypad (2). JupitaPos signs you in as soon as the fourth digit is in; there is no button to press.
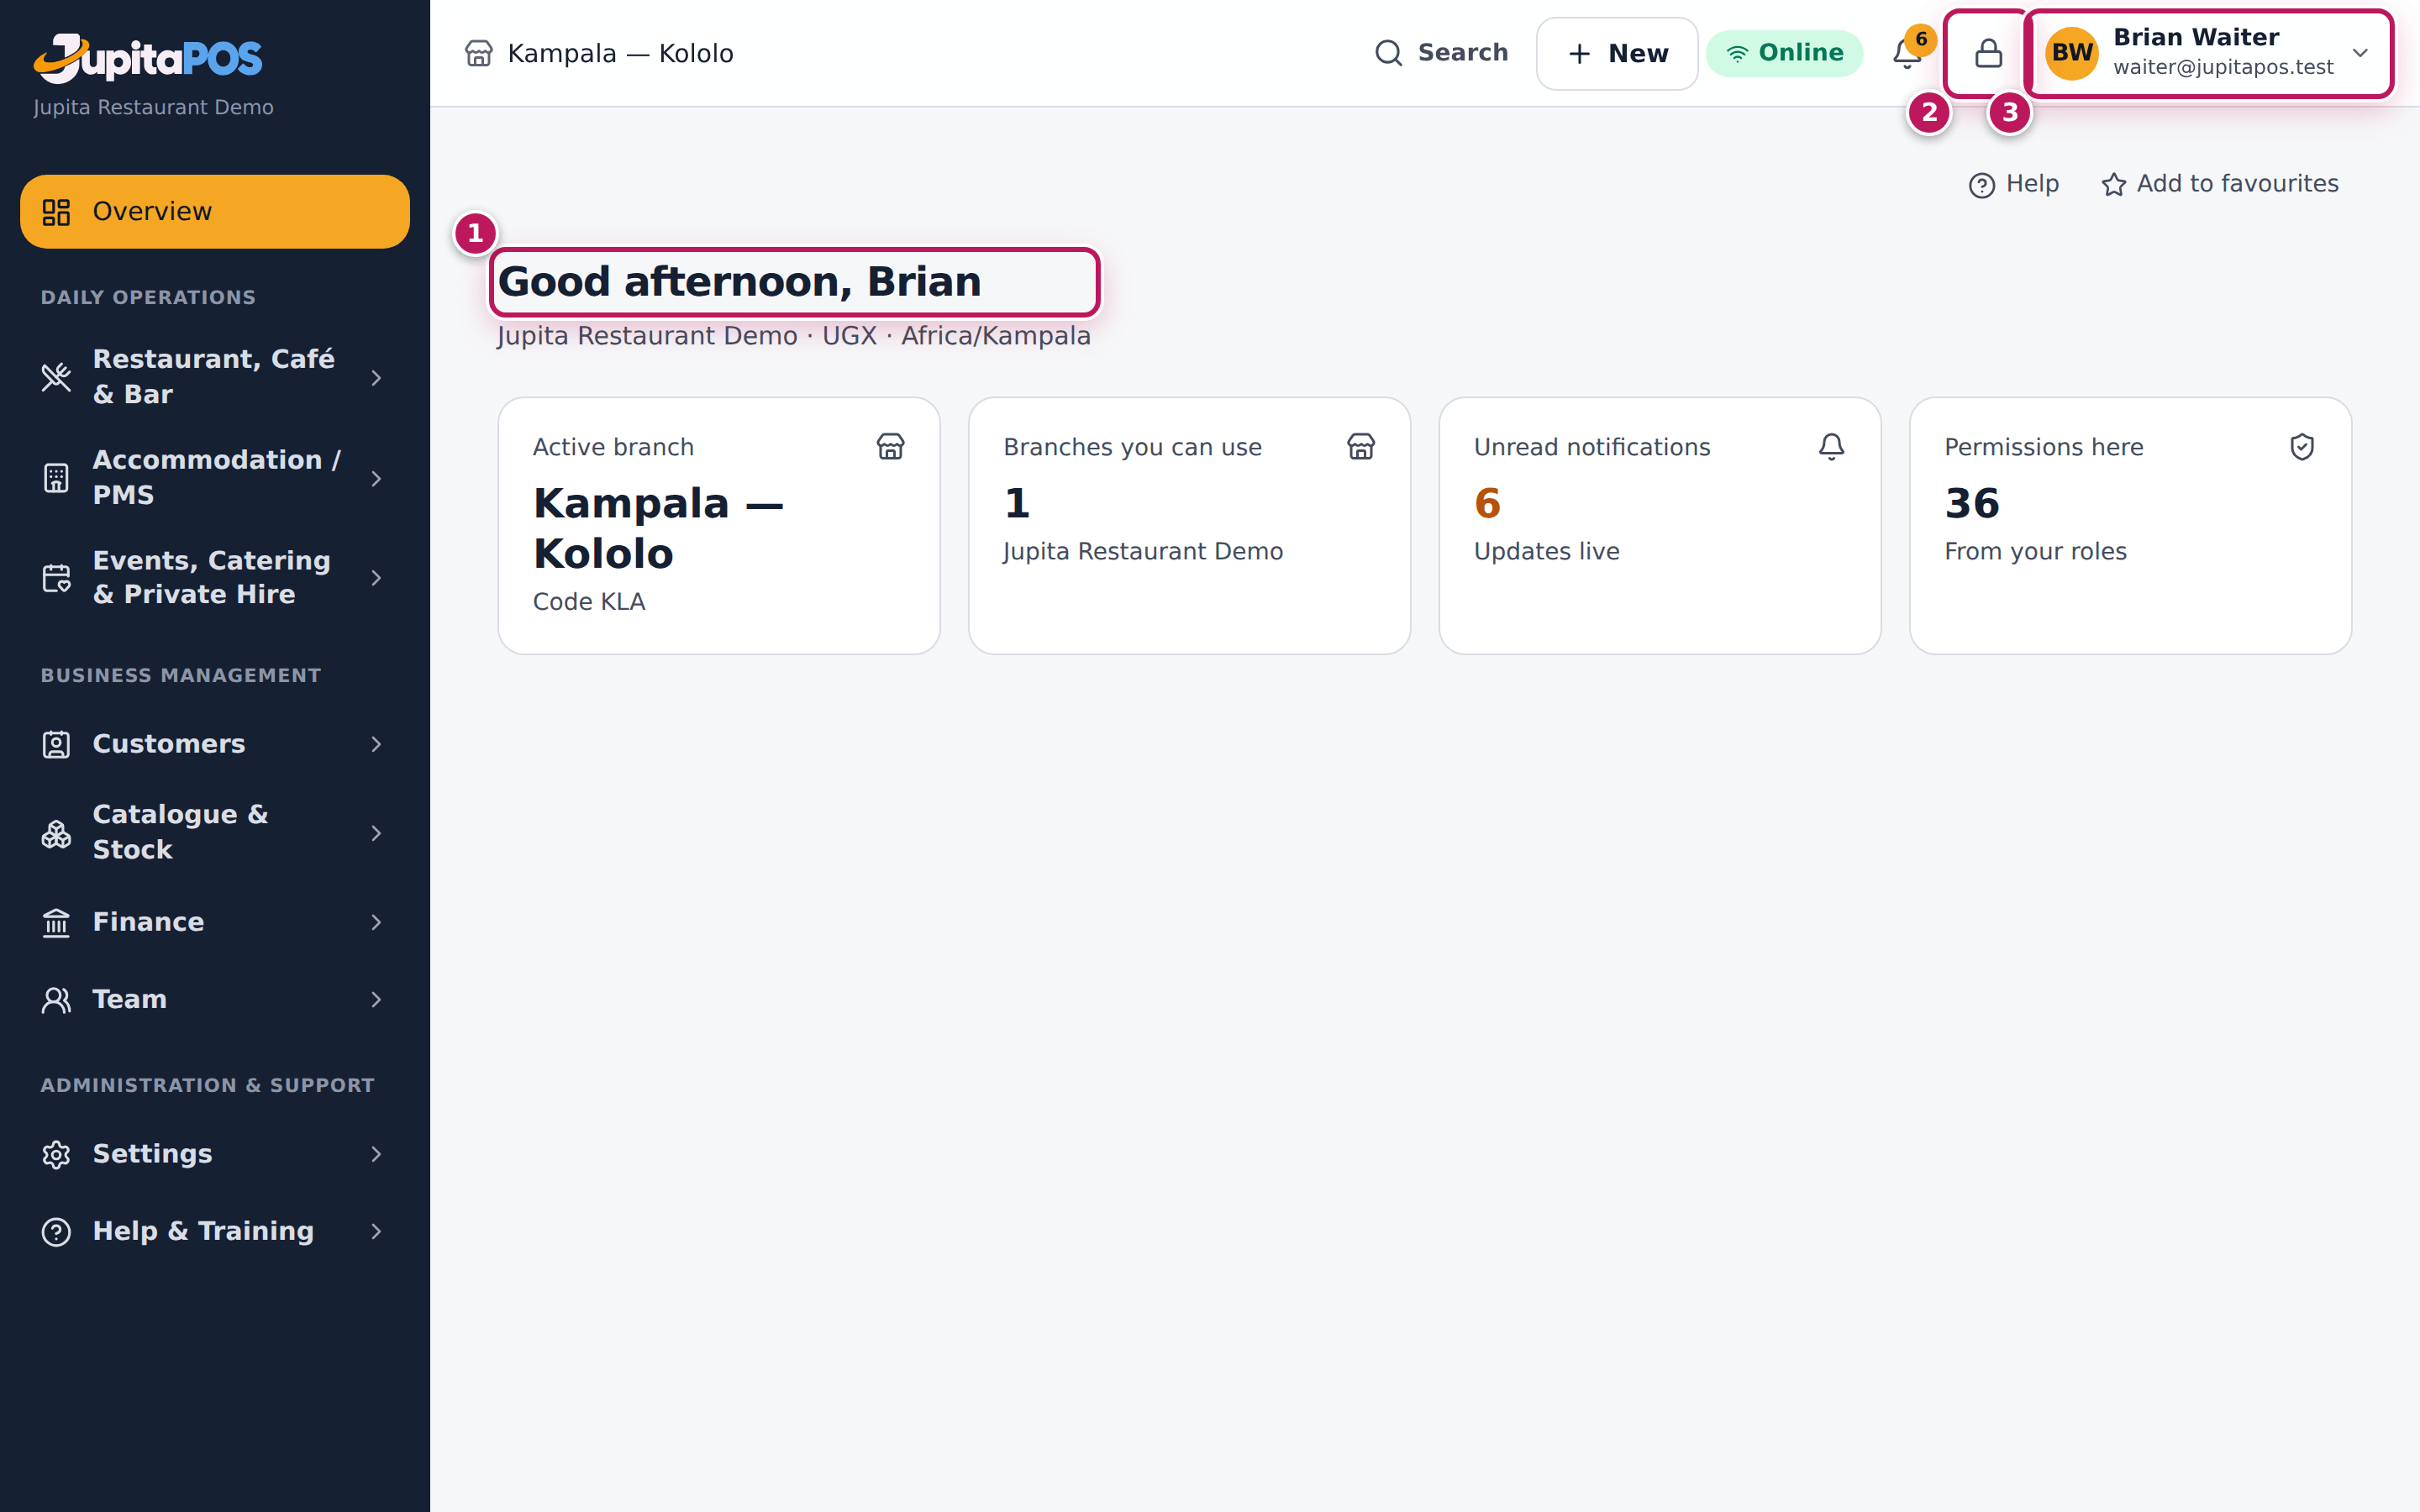
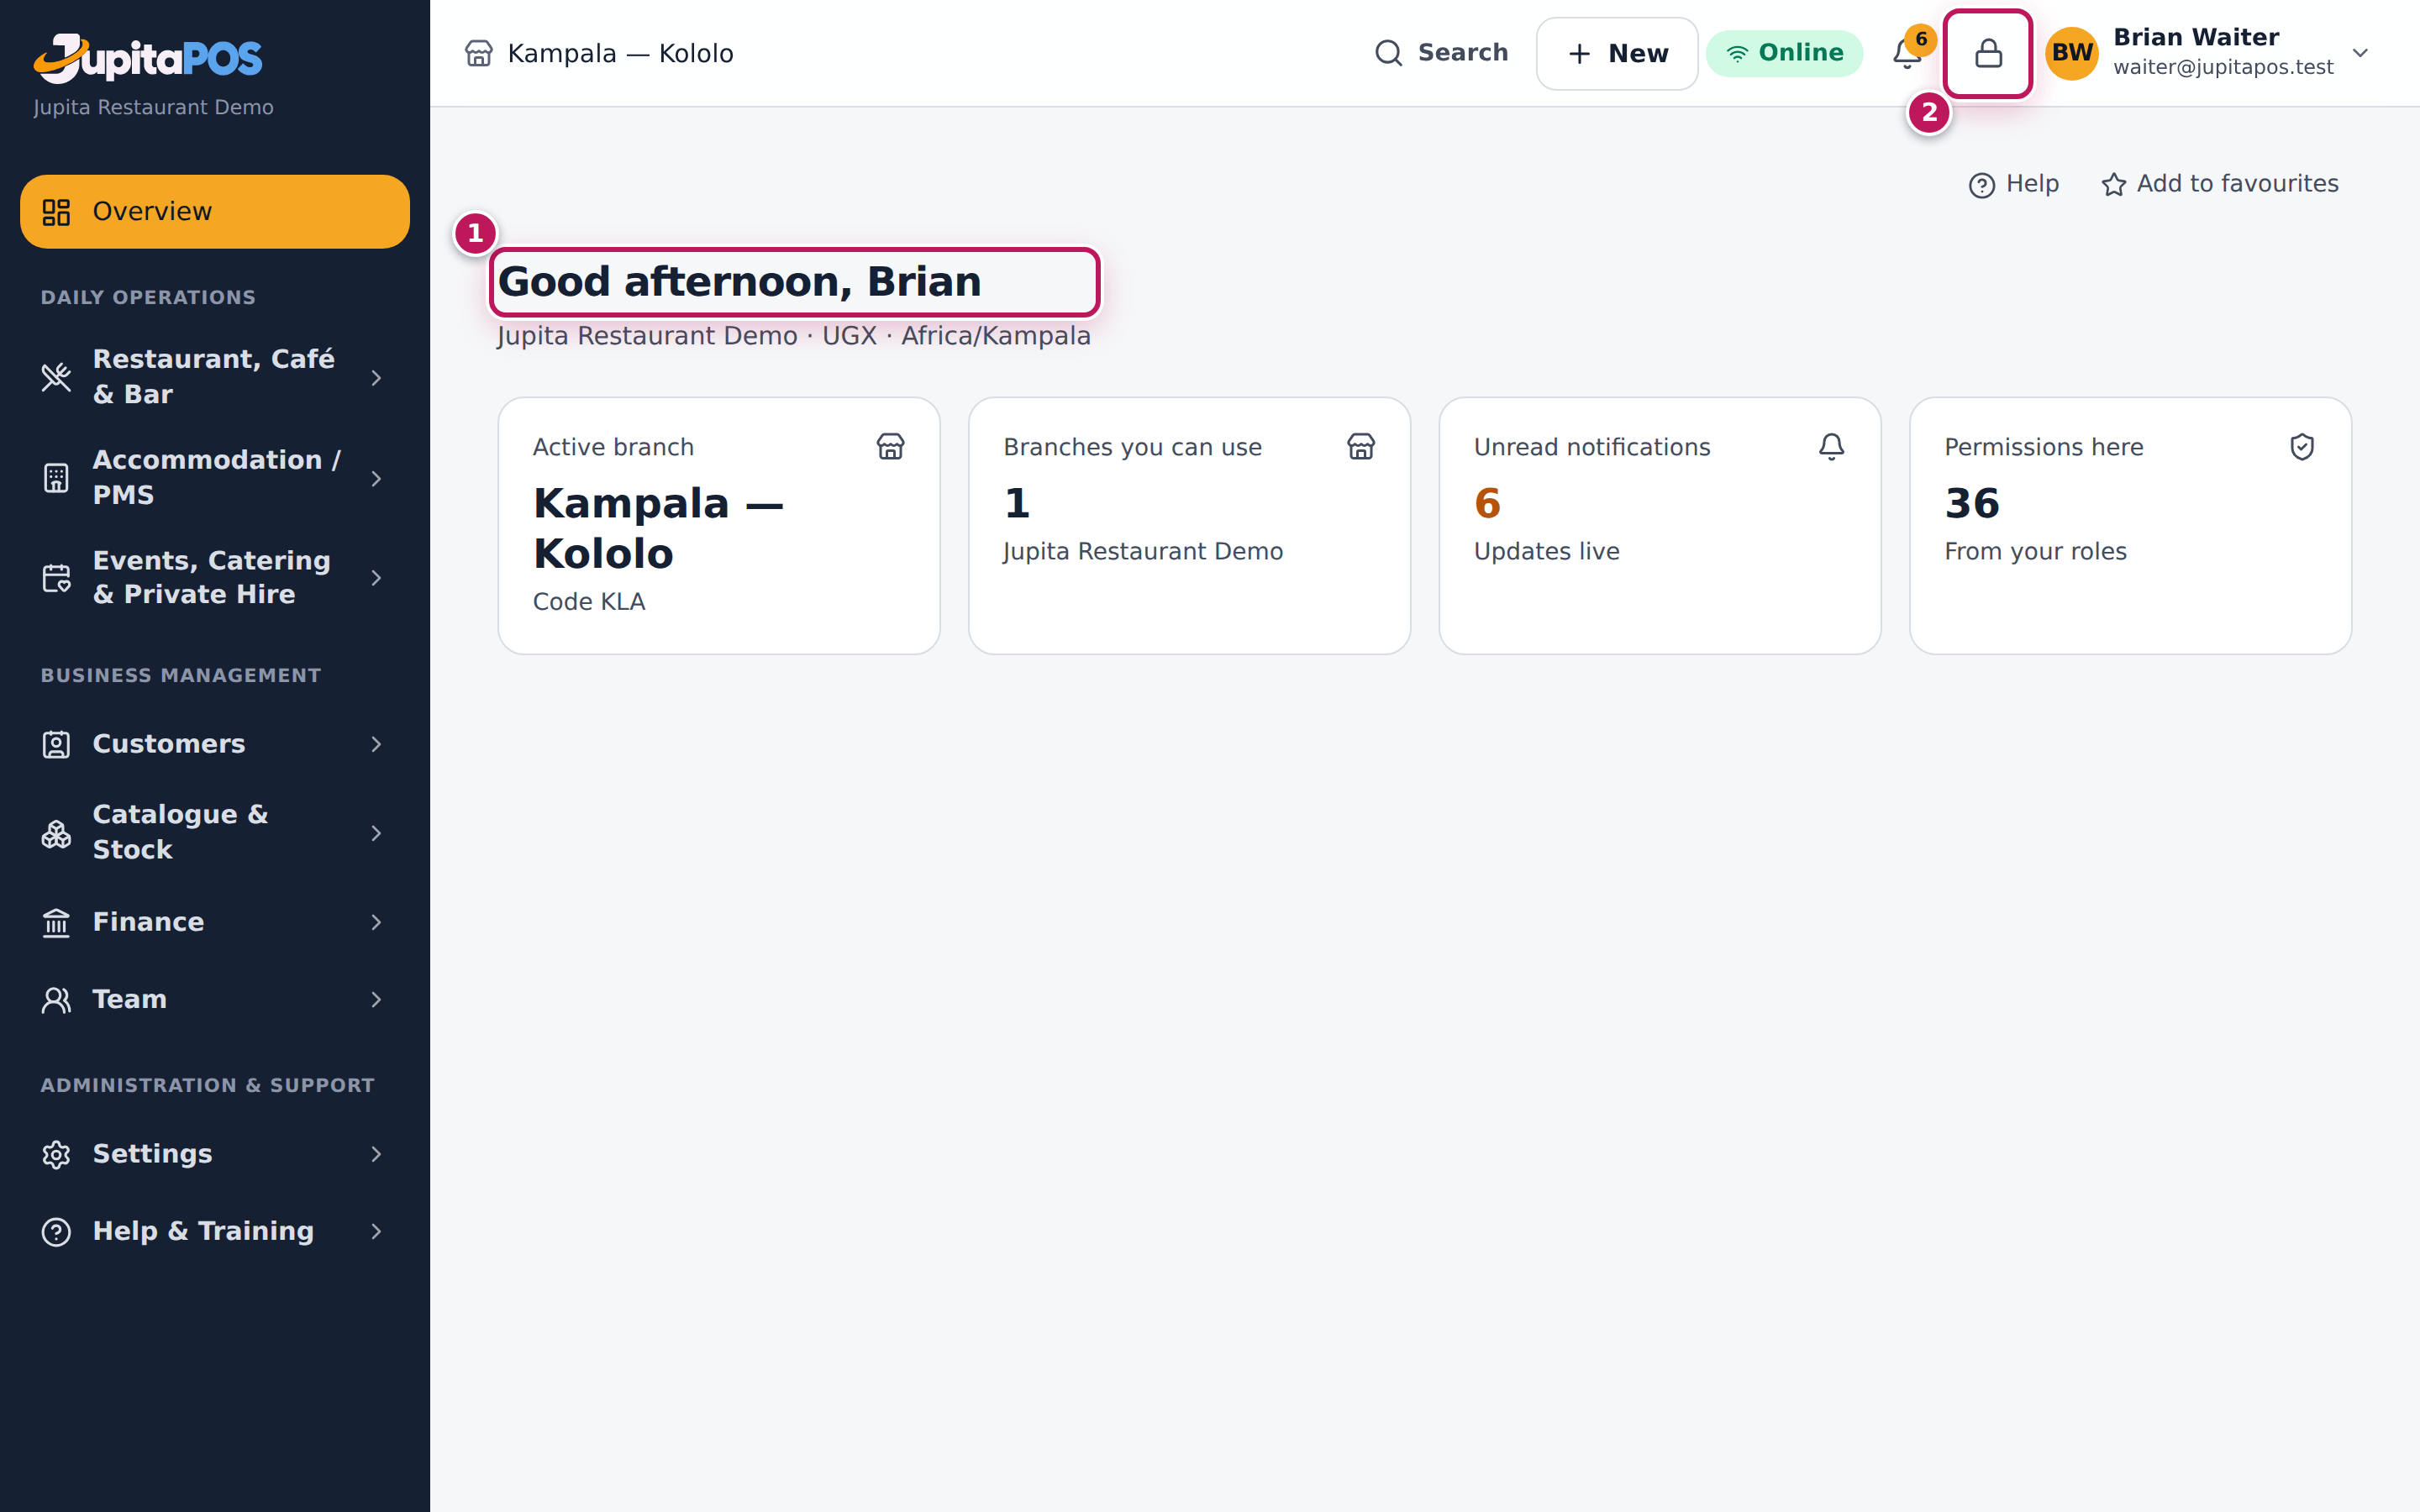
- To hand the till to a colleague, tap Lock screen (2), the padlock at the top right, and let them tap Switch user on the lock screen (see Lock the screen, unlock it or switch user). At the end of your shift, tap your name (3) and Sign Out instead.
Expected result
The screen you work on opens and greets you by name — for Brian, a waiter, the dashboard says Good afternoon, Brian (1) — and the top bar shows your name. Chefs, sous chefs, cooks and kitchen assistants, who have no dashboard, land on Production boards. Everything you do on this till is now in your name until you sign out or someone switches user.
Screenshot
Common mistakes
- Leaving the till signed in when you walk away. The next person would sell in your name. Lock the screen, or sign out. The till also locks by itself after 5 minutes without a touch.
- Telling colleagues your PIN. A PIN is like a signature. If you think someone knows it, ask your manager to change it.
- Typing only the digits of the employee number. Type it exactly as it
is written, with the letters and the dash:
EMP-0006, not6.
Troubleshooting
- There is no Sign in with PIN button. This browser is not an approved till. Sign in with your e-mail and password, or ask a manager to register and approve the device.
- “Wrong number or PIN.” The employee number or the PIN is wrong, or your role may not use PINs on this till. Check the number; ask your manager if it keeps happening.
- “Too many wrong PINs — try again in … min.” Five wrong PINs lock your PIN for 15 minutes. Wait, or sign in with your e-mail and password.
- “Too many wrong PINs on this terminal. Wait a few minutes.” Many wrong PINs were typed on this till. Wait a few minutes.
- “PIN sign-in is only available on an approved terminal.” The till has not been approved yet, or it was revoked. Ask a manager to check Terminals.
- “This action needs a password sign-in.” Sensitive manager actions — approving a till, resolving a sync conflict — need a password sign-in, not a PIN. Sign out and sign in with your e-mail and password.
FAQ
What is the difference between Switch user and Sign out? Switch user on the lock screen ends your session and opens your colleague’s in one step, without going back to the sign-in page. Sign out ends your session and leaves the till on the sign-in page.
Practise in training mode first
Before your first real customer, practise. Training mode puts your own session into practice: you use the real till, floor plan and kitchen or bar board, during real service, and nothing you do changes sales, stock, the books, reports, loyalty or the cash in the drawer. A striped banner across the top — Training mode — practice only. Nothing you do changes sales, stock, the books or reports. Your time clock and account are real. — tells you that you are practising; Leave training on it takes you back to real work, and signing out ends it too.
- Signed in already? Tap the graduation-cap button Practice in training mode in the top bar (see Start training mode).
- At a shared till, tick Sign in for training before you type your PIN (see Sign in for training at a shared till).
- Either way, a supervisor approves the switch: in Approve training mode they type their own employee number and PIN (see Approve a colleague’s training). Managers who look after training start without approval.
- Then practise a sale, table service or the kitchen board, and leave training when you are done — the Training mode manual has a guide for each.
Your manager is told when you start, and sees what you practised on the Training page; the till and the shift report list practice beside the real figures. Cashiers, waiters, hosts, bartenders, baristas, cooks, chefs, supervisors and managers can practise; other roles do not use training mode.
Training mode is part of the Hospitality Suite. In RetailPOS, PharmacyPOS and Route SalesPOS, practise in a practice copy of the product instead: a separate business, filled with made-up products, customers and stock, that your provider can set up next to your real one (see Training mode).
Lock the screen, unlock it or switch user
Purpose
Keep your till safe for a moment — while you carry plates, fetch change or take a break — without signing out, and hand the till to the next person in one step when your colleague takes over.
Role / permission required
Anyone signed in on an approved till, with a password or a PIN. Unlocking
and switching user need auth.pin and a PIN on the staff record.
Prerequisites
- You are signed in on an approved till (the Lock screen button appears only there).
- Your manager has set your PIN (see Set an employee’s PIN), and your colleague’s PIN too if they take over.
Steps
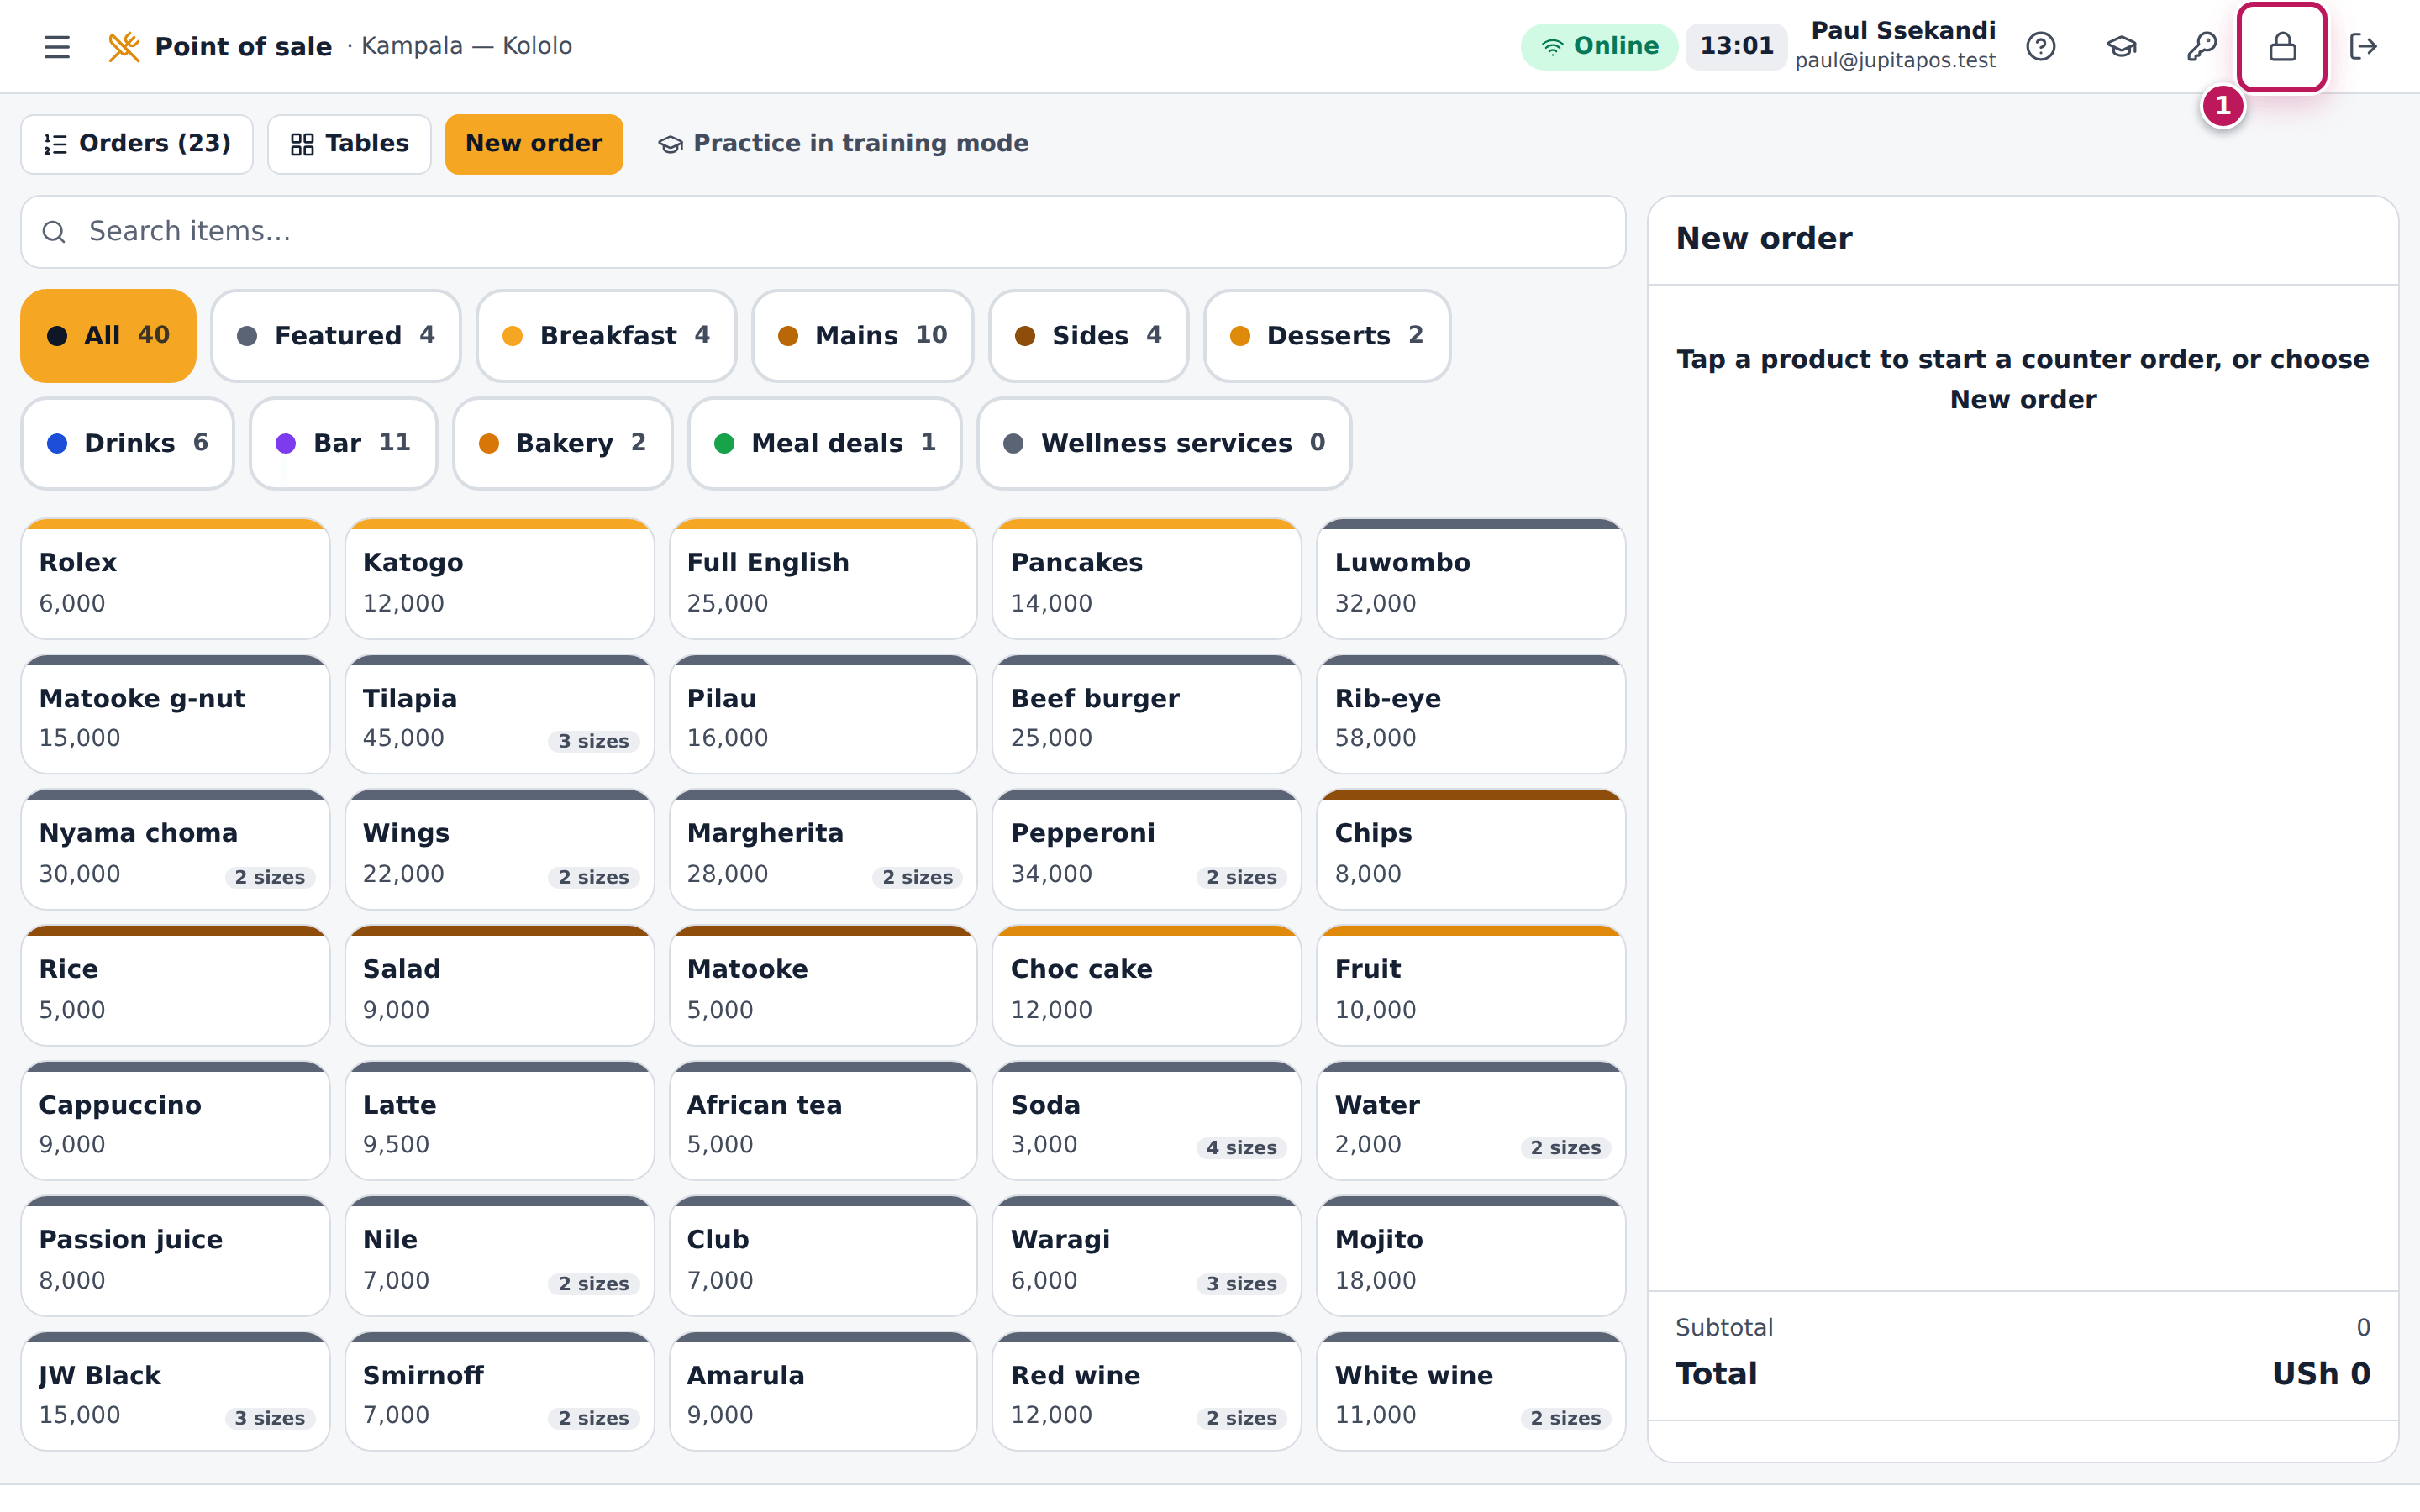
- Tap Lock screen (1), the padlock at the top right of the till.
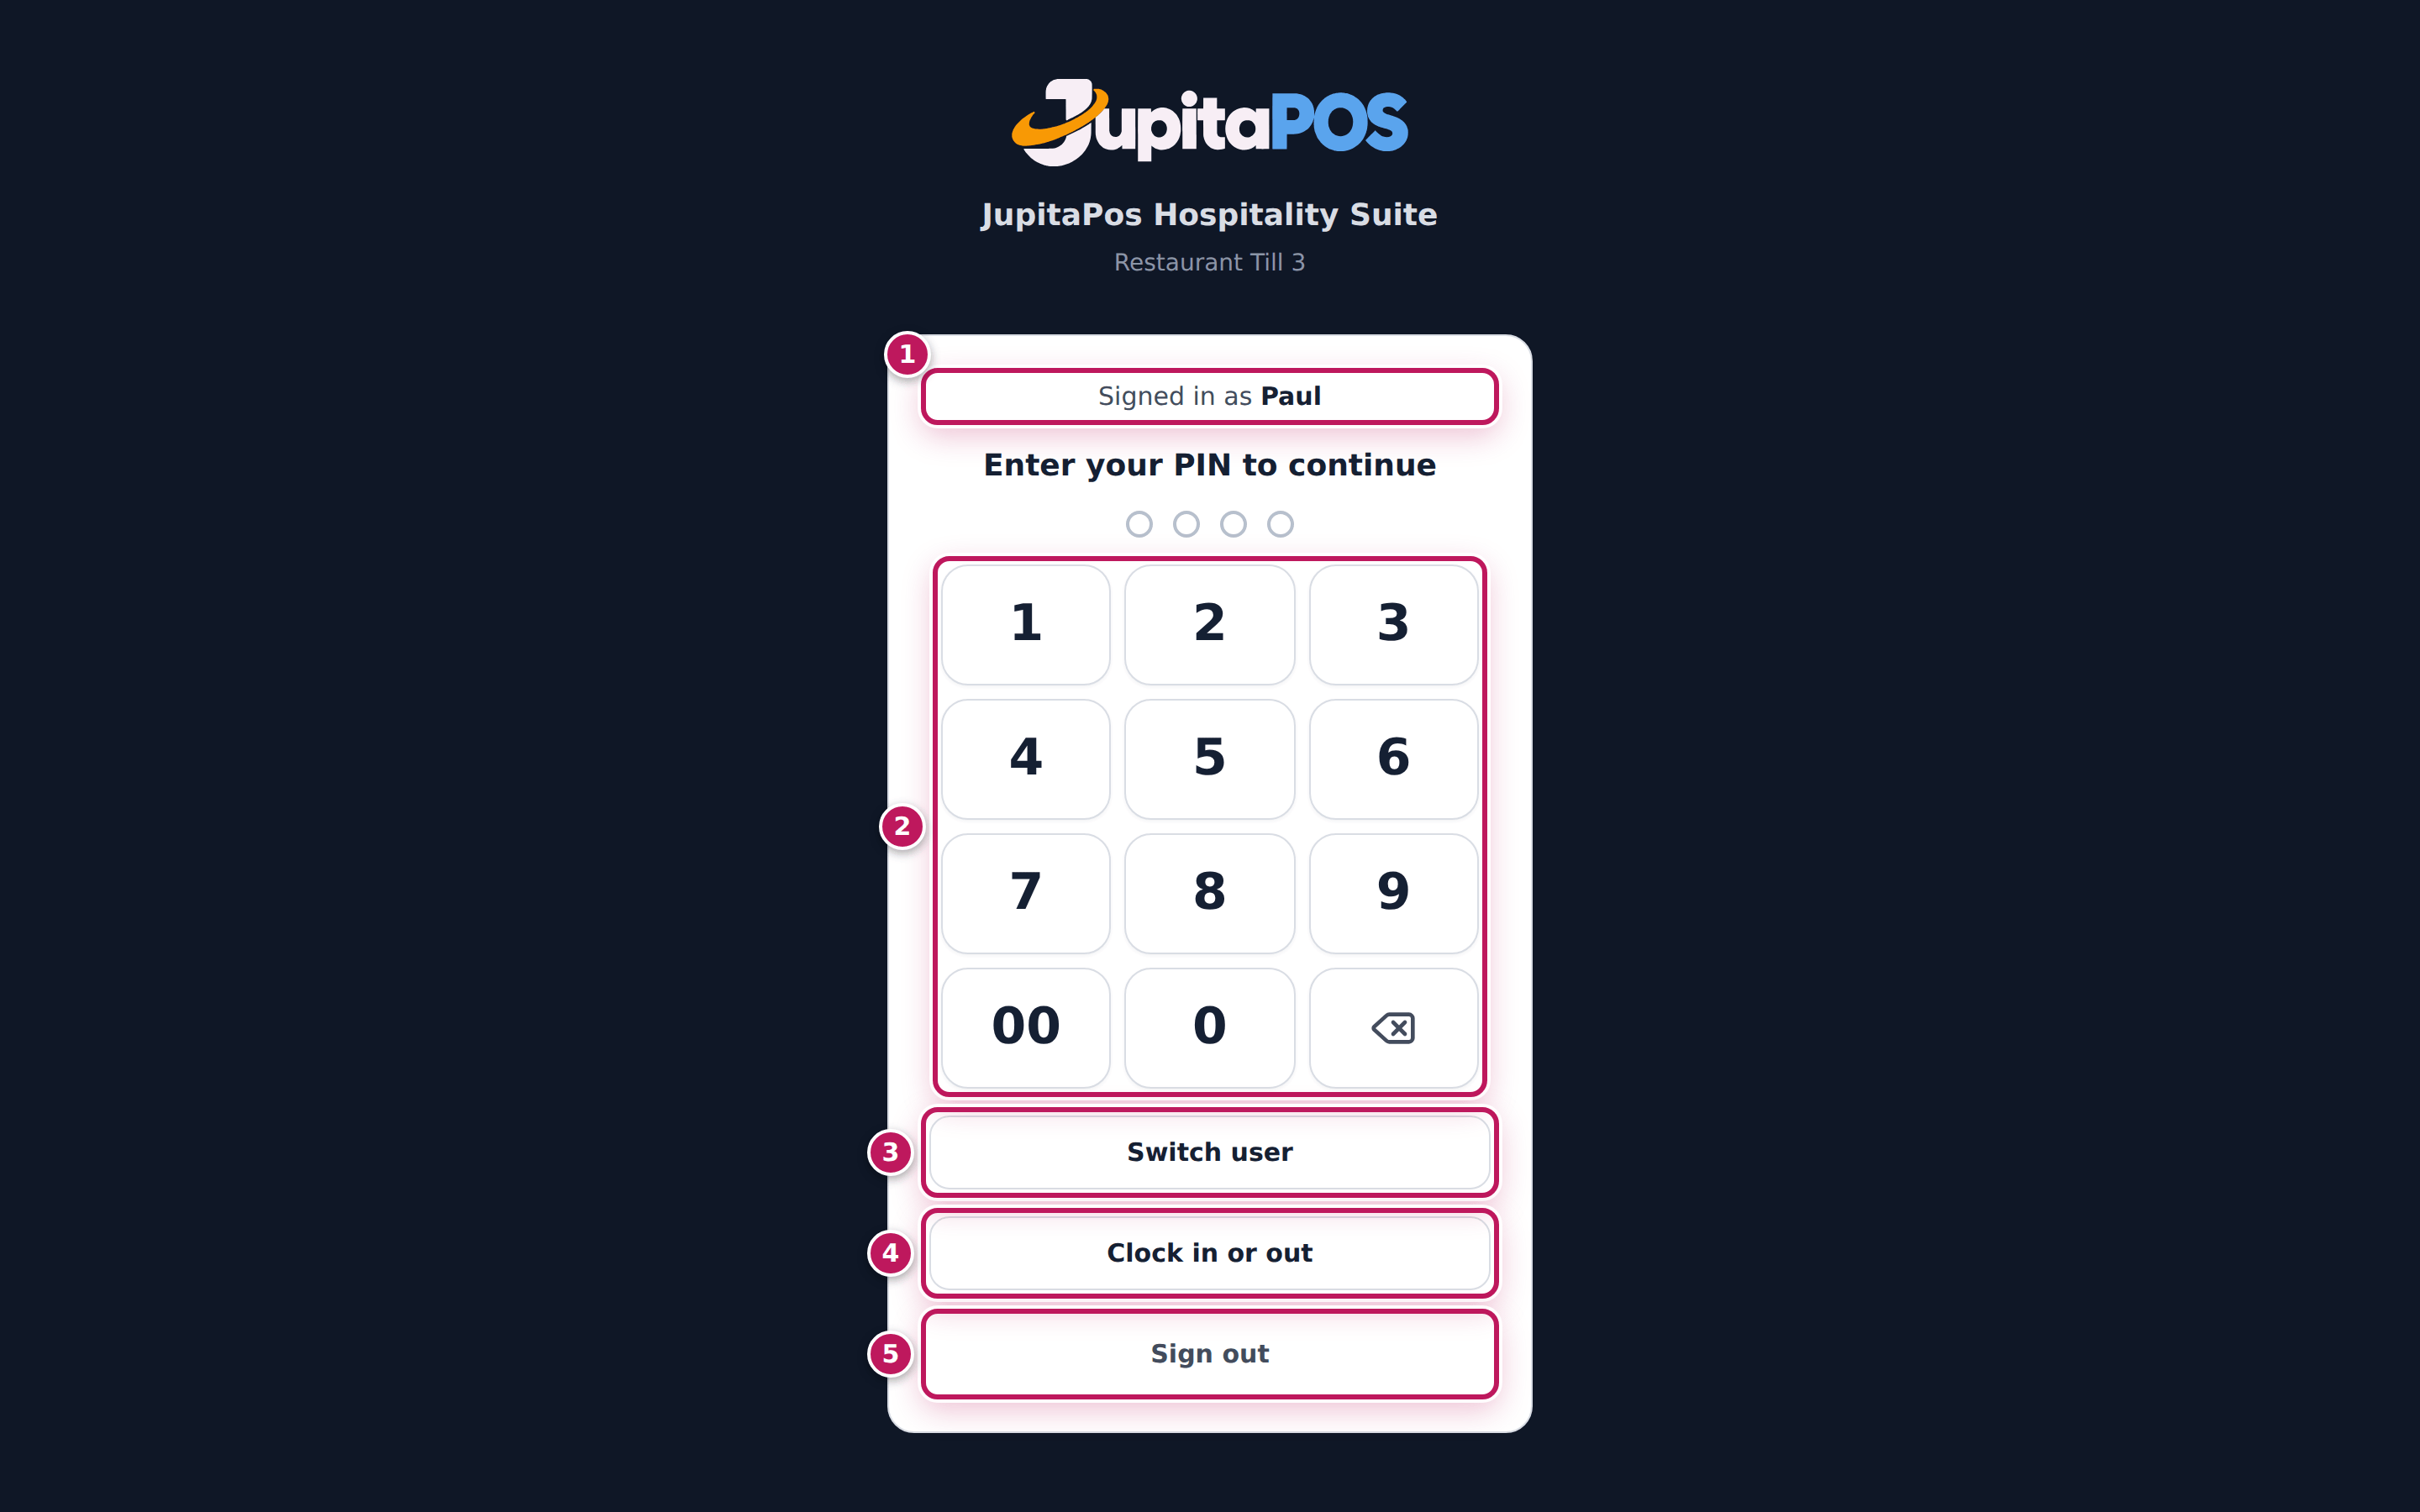
- The lock screen opens. It shows the till’s name and Signed in as with your name (1).
- When you are back, type your 4-digit PIN on the keypad (2). The till opens again as soon as the fourth digit is in.
- If a colleague takes over, they tap Switch user (3) instead.
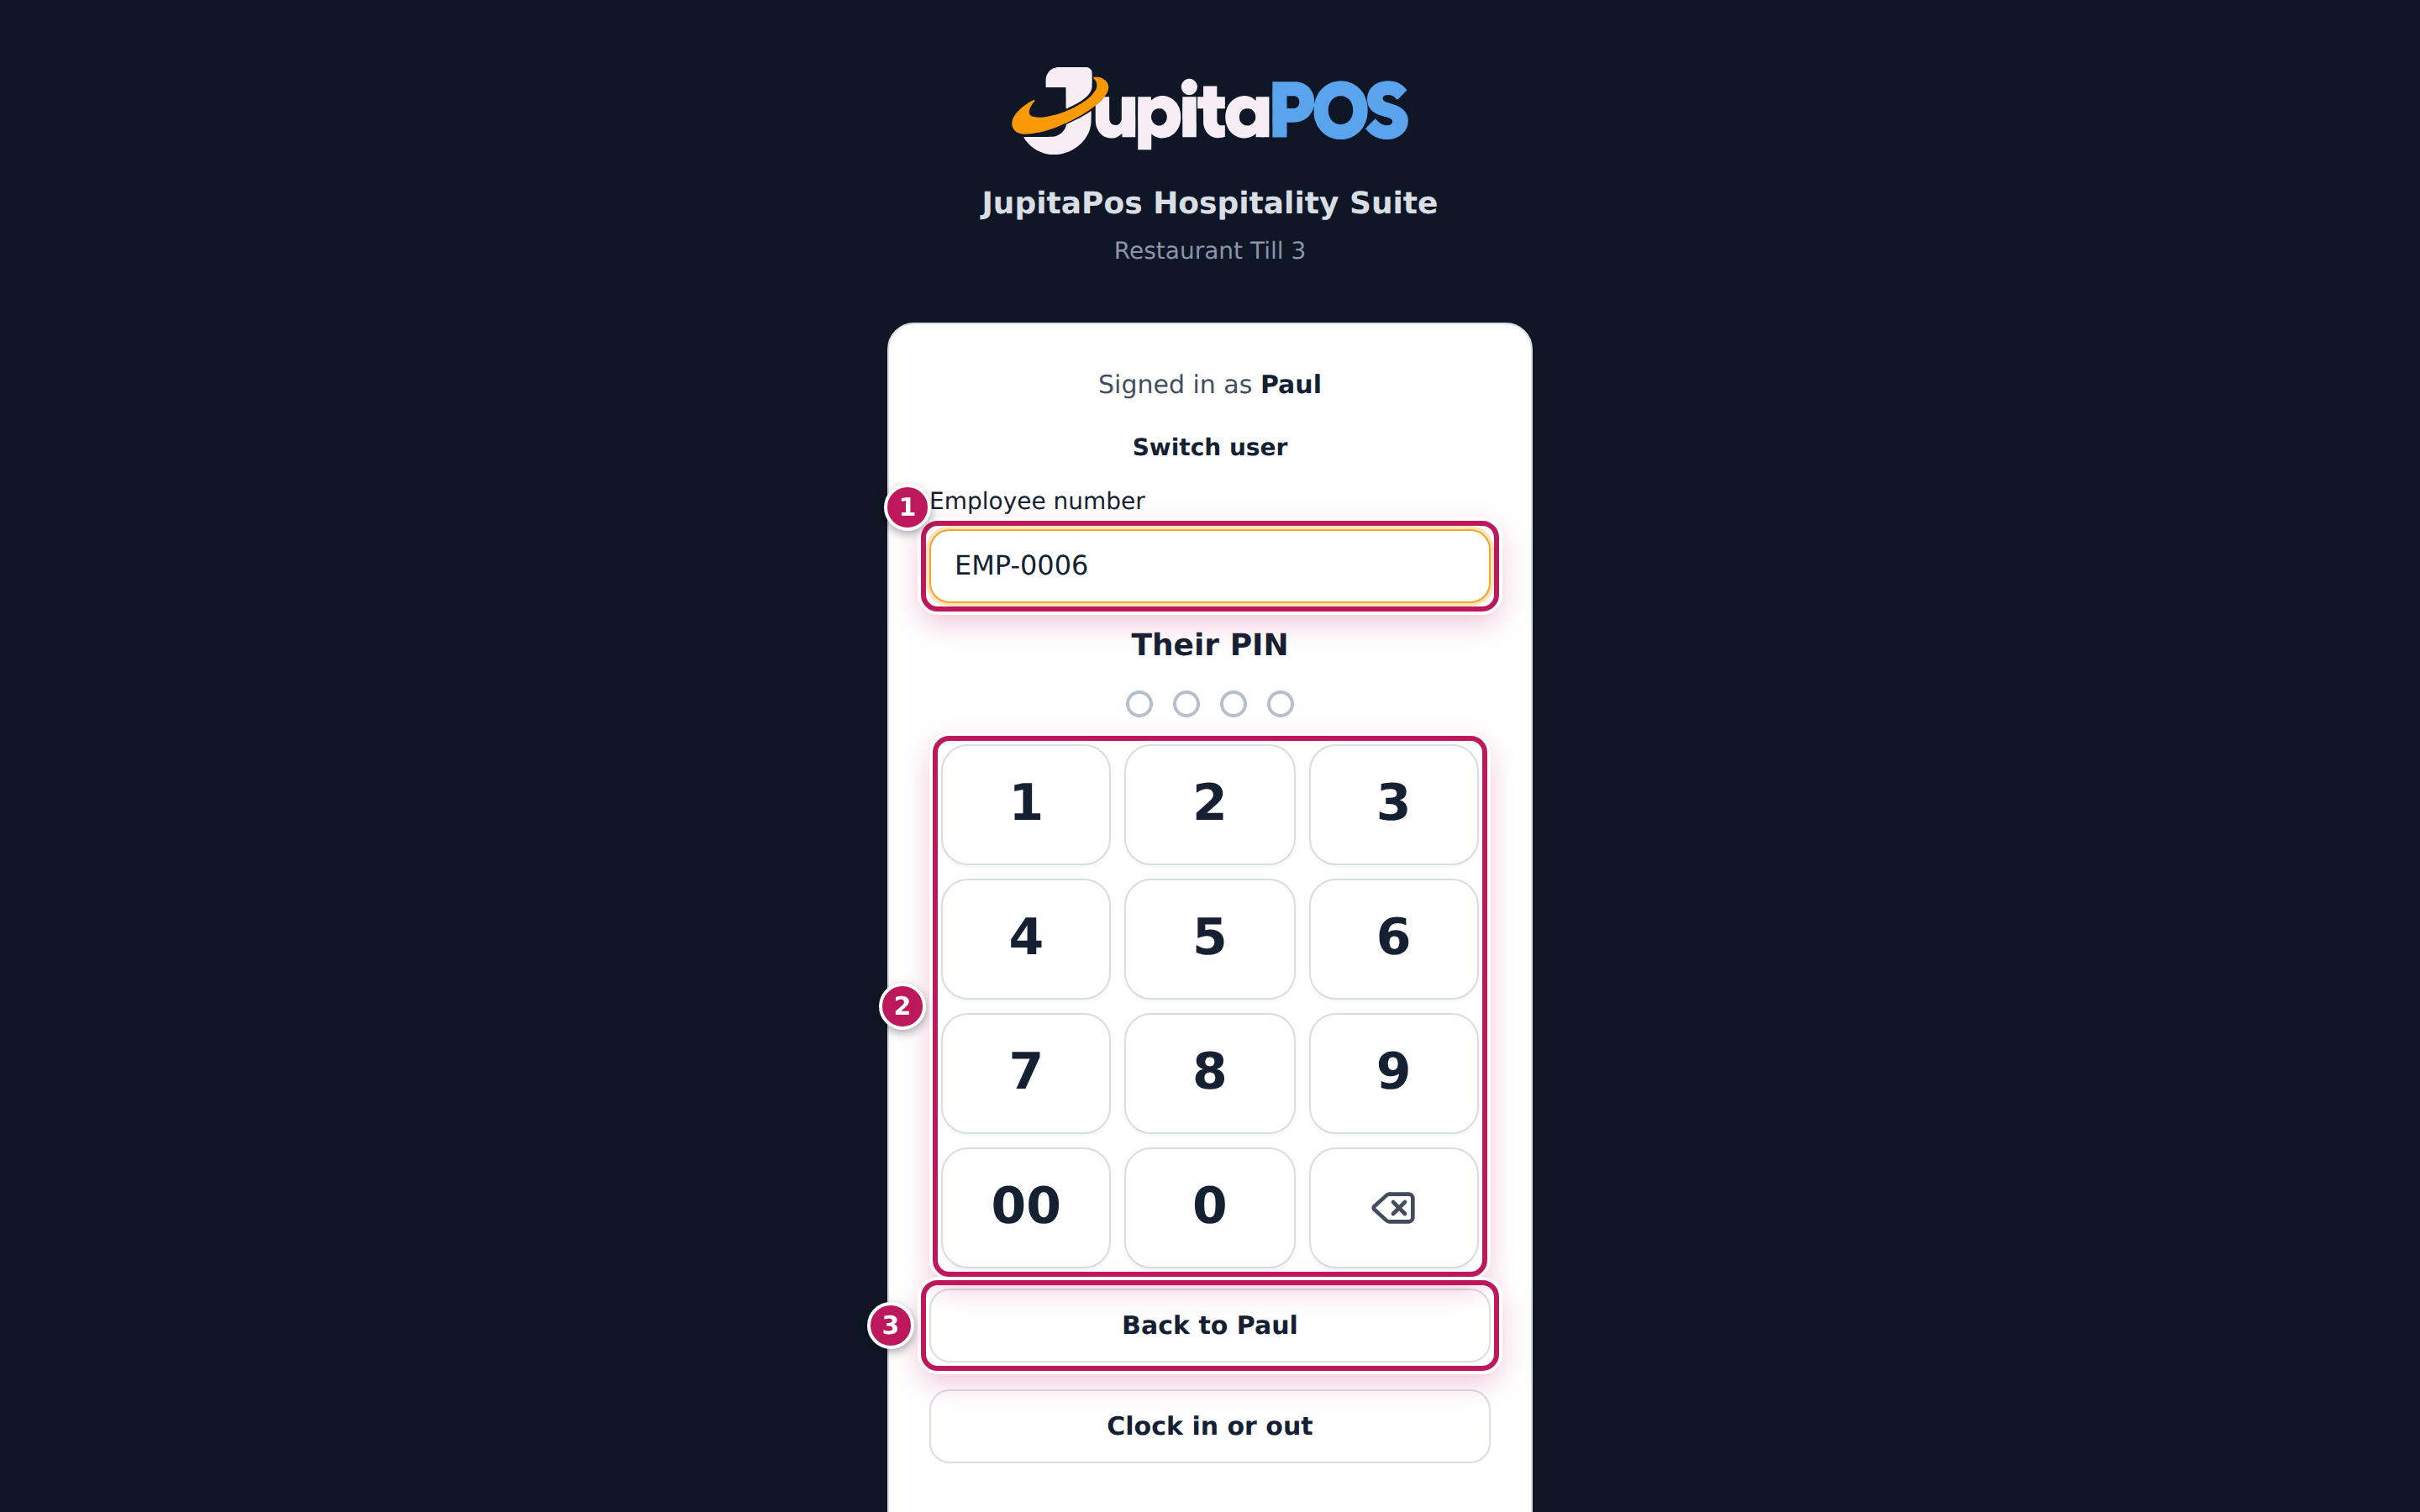
- They type their employee number in Employee number (1), for example
EMP-0006, then their 4-digit PIN on the keypad (2). Tap Back to Paul (3) — with your own name — if you want to unlock it yourself after all. - To clock in or out without unlocking, tap Clock in or out (4) on the lock screen. To leave the till on the sign-in page, tap Sign out (5).
Expected result
After your PIN, the dashboard opens and greets you — Good afternoon, Paul — and the padlock is still in the top bar. After Switch user, your session ends and your colleague’s opens in its place: here Good afternoon, Brian (1), with the padlock (2) for when Brian steps away. The till also locks by itself after 5 minutes without a touch, with the same lock screen.
Screenshot
Common mistakes
- Locking the till at the end of the shift. A locked till is still signed in as you. At the end of your shift, sign out.
- Taking over a colleague’s locked till with their session. Do not ask for their PIN: tap Switch user and use your own. Their session ends and everything you do is in your name.
- Expecting the order you were on to be open after unlocking. The till opens on the dashboard. Your order is saved: open Point of sale and find it under Orders.
Troubleshooting
- There is no padlock button. The device is not an approved till. Sign out instead when you leave.
- “No PIN is set for your staff profile. Sign out and sign in with your password.” Your staff record has no PIN. Ask your manager to set one. Colleagues can still take over with Switch user.
- “PIN unlock is available on registered terminals only. Sign out and sign in again.” The device is not a registered till. Tap Sign out and sign in again.
- “Wrong number or PIN.” in Switch user: the employee number or the PIN is wrong, or that person’s role may not use this till.
- “Too many wrong PINs — try again in … min.” Wait, or tap Sign out and sign in with a password.
FAQ
Is a PIN session different from a password session? A till unlocked or taken over with a PIN continues as a PIN sign-in: it locks and switches the same way, but sensitive manager actions, such as approving a till, ask for a password sign-in.
Find your way: the dashboard, the menu, your branch
Purpose
Know where everything is: the menu of workspaces and pages, the page tabs, search, New, the branch you are working in, the connection status, notifications, help and your profile.
Role / permission required
Everyone. The Overview needs dashboard.view; the menu, search and New
show only what your roles allow in the active branch.
Prerequisites
- You are signed in (see Sign in).
Steps
- After you sign in you land on the screen of your work: the Overview for owners and managers, the till for a cashier, the floor plan for a waiter, the preparation screens for the kitchen and bar, the front desk for reception, Finance for an accountant.
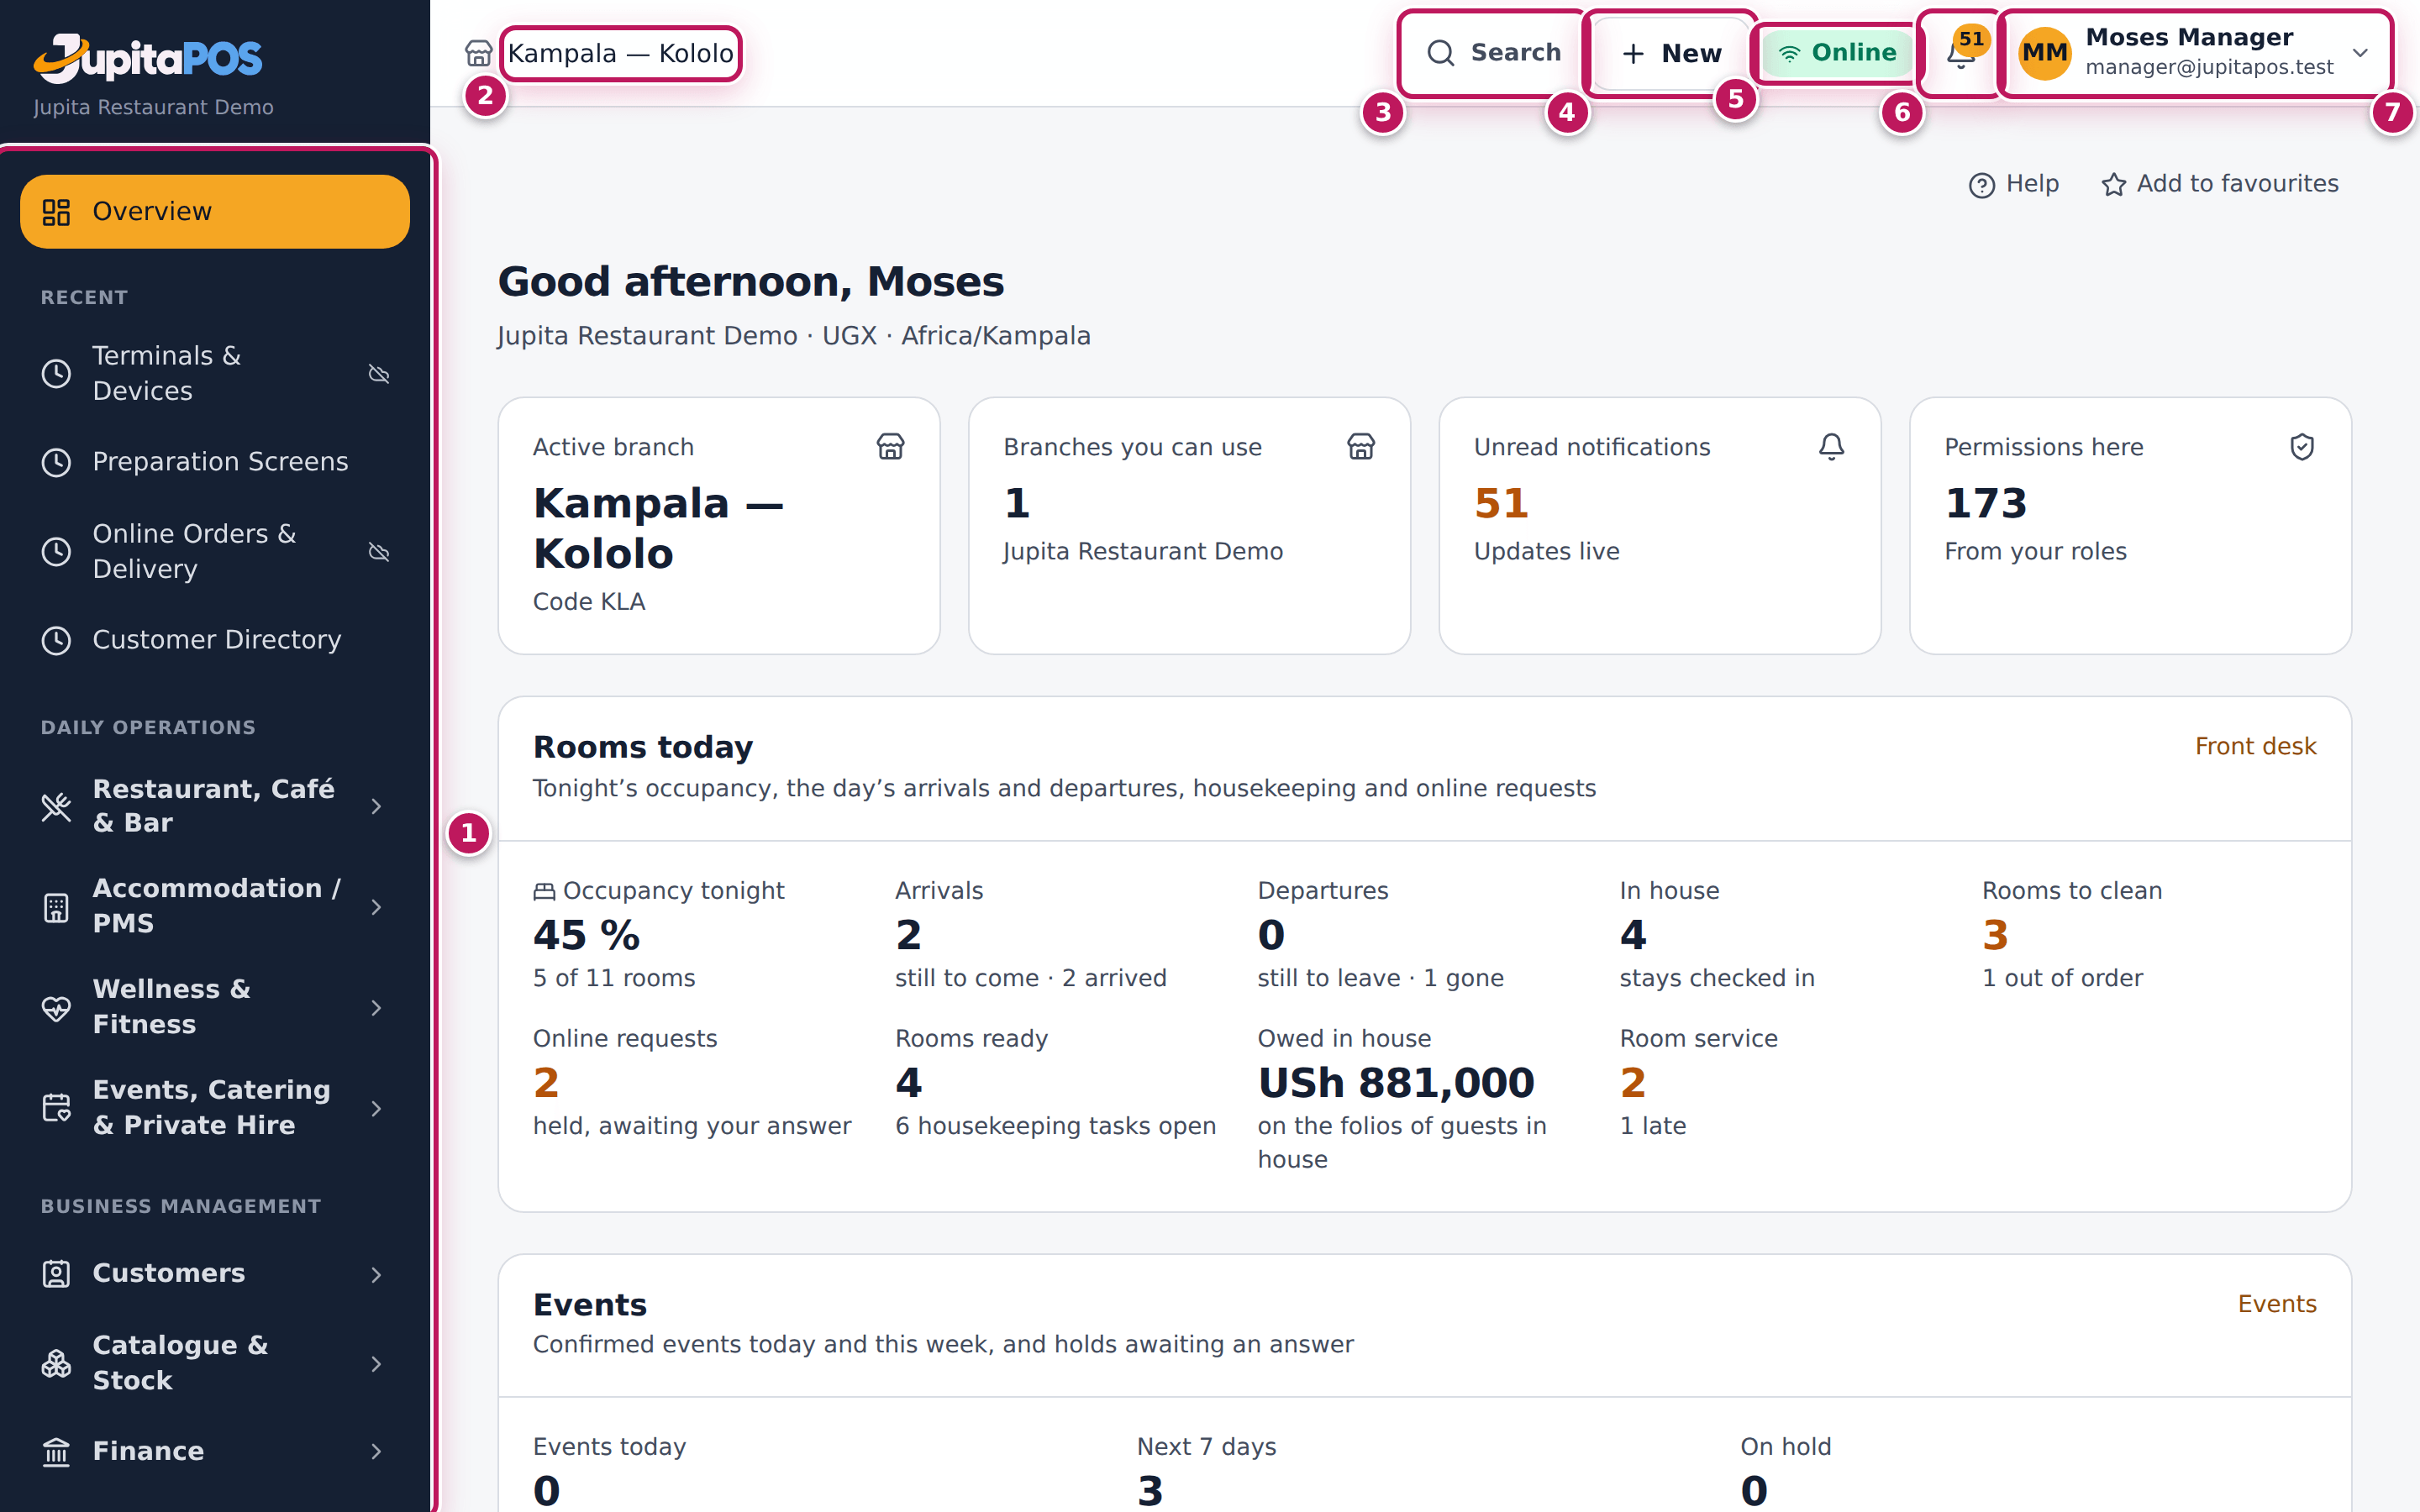
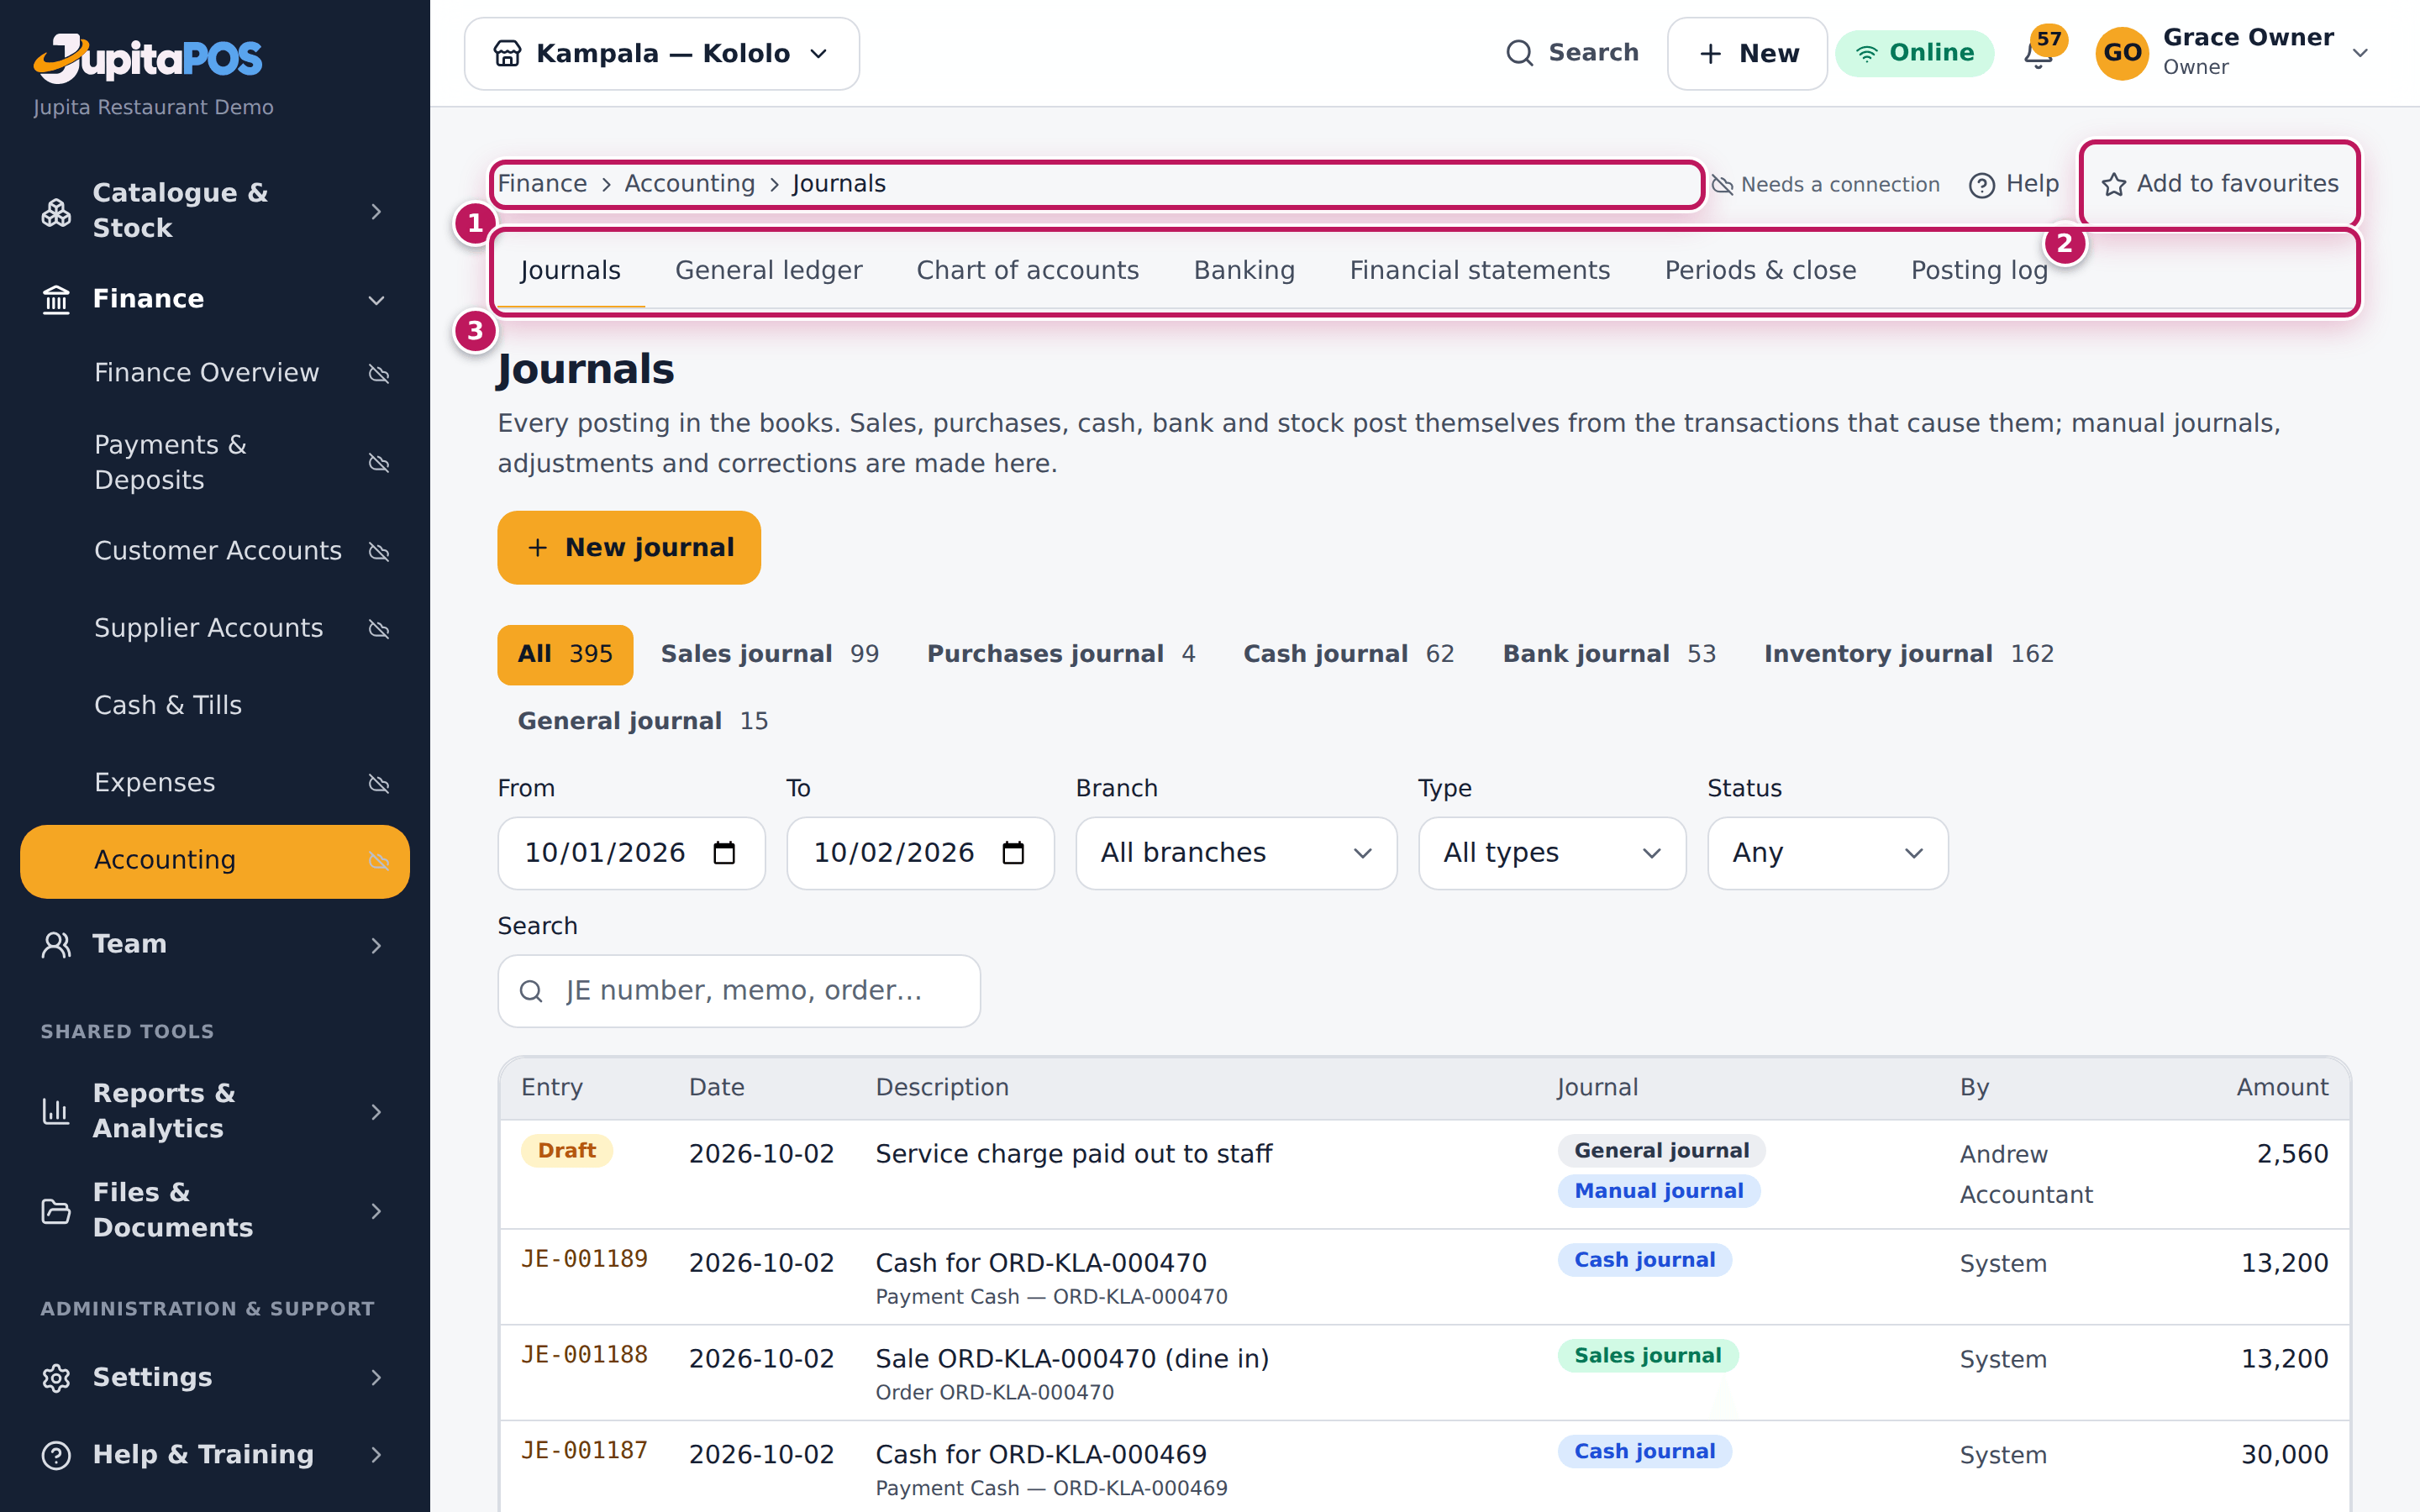
- Use the menu on the left (1). It starts with Overview, then four sections — Daily operations, Business management, Shared tools and Administration & support. Each section holds workspaces such as Restaurant, Café & Bar or Finance: tap a workspace to open it and tap a page in it. The workspace you are in stays open. On a phone, tap Open menu first.
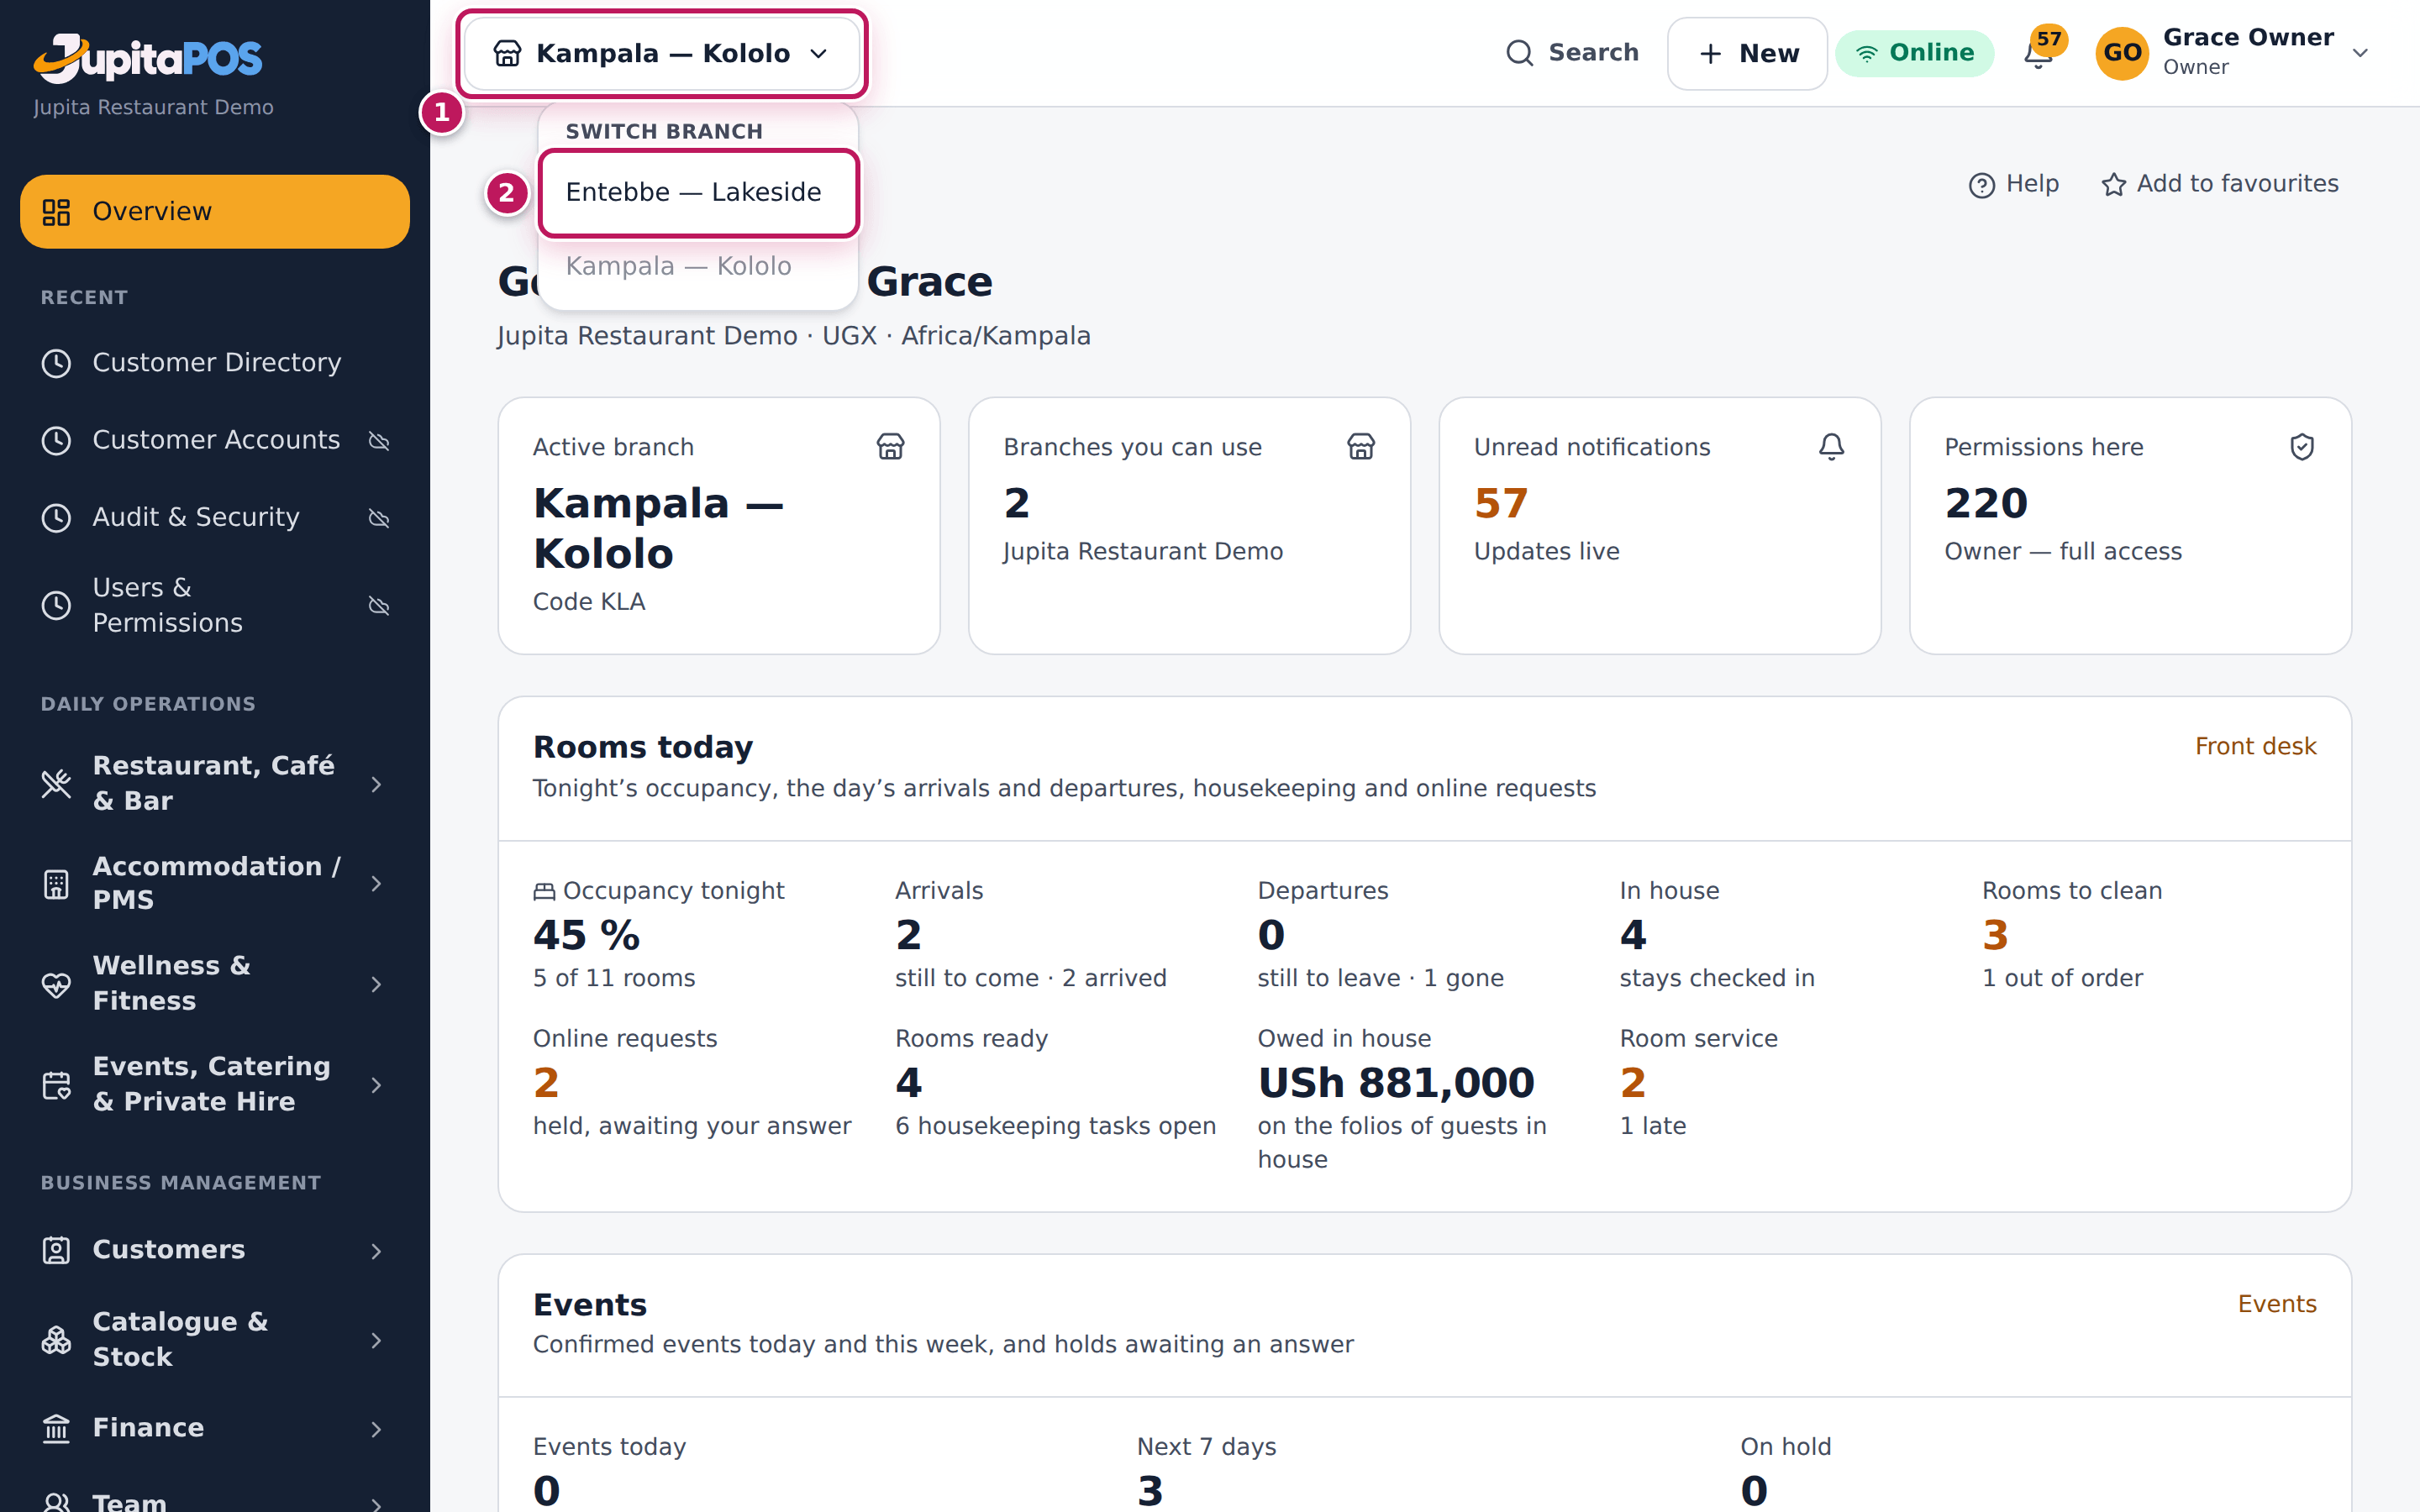
- Check the branch at the top (2). Everything you see and do is for this branch. If you work in more than one branch, tap the branch button and choose another branch from the list. The menu changes with the branch: a branch without rooms has no Accommodation / PMS.
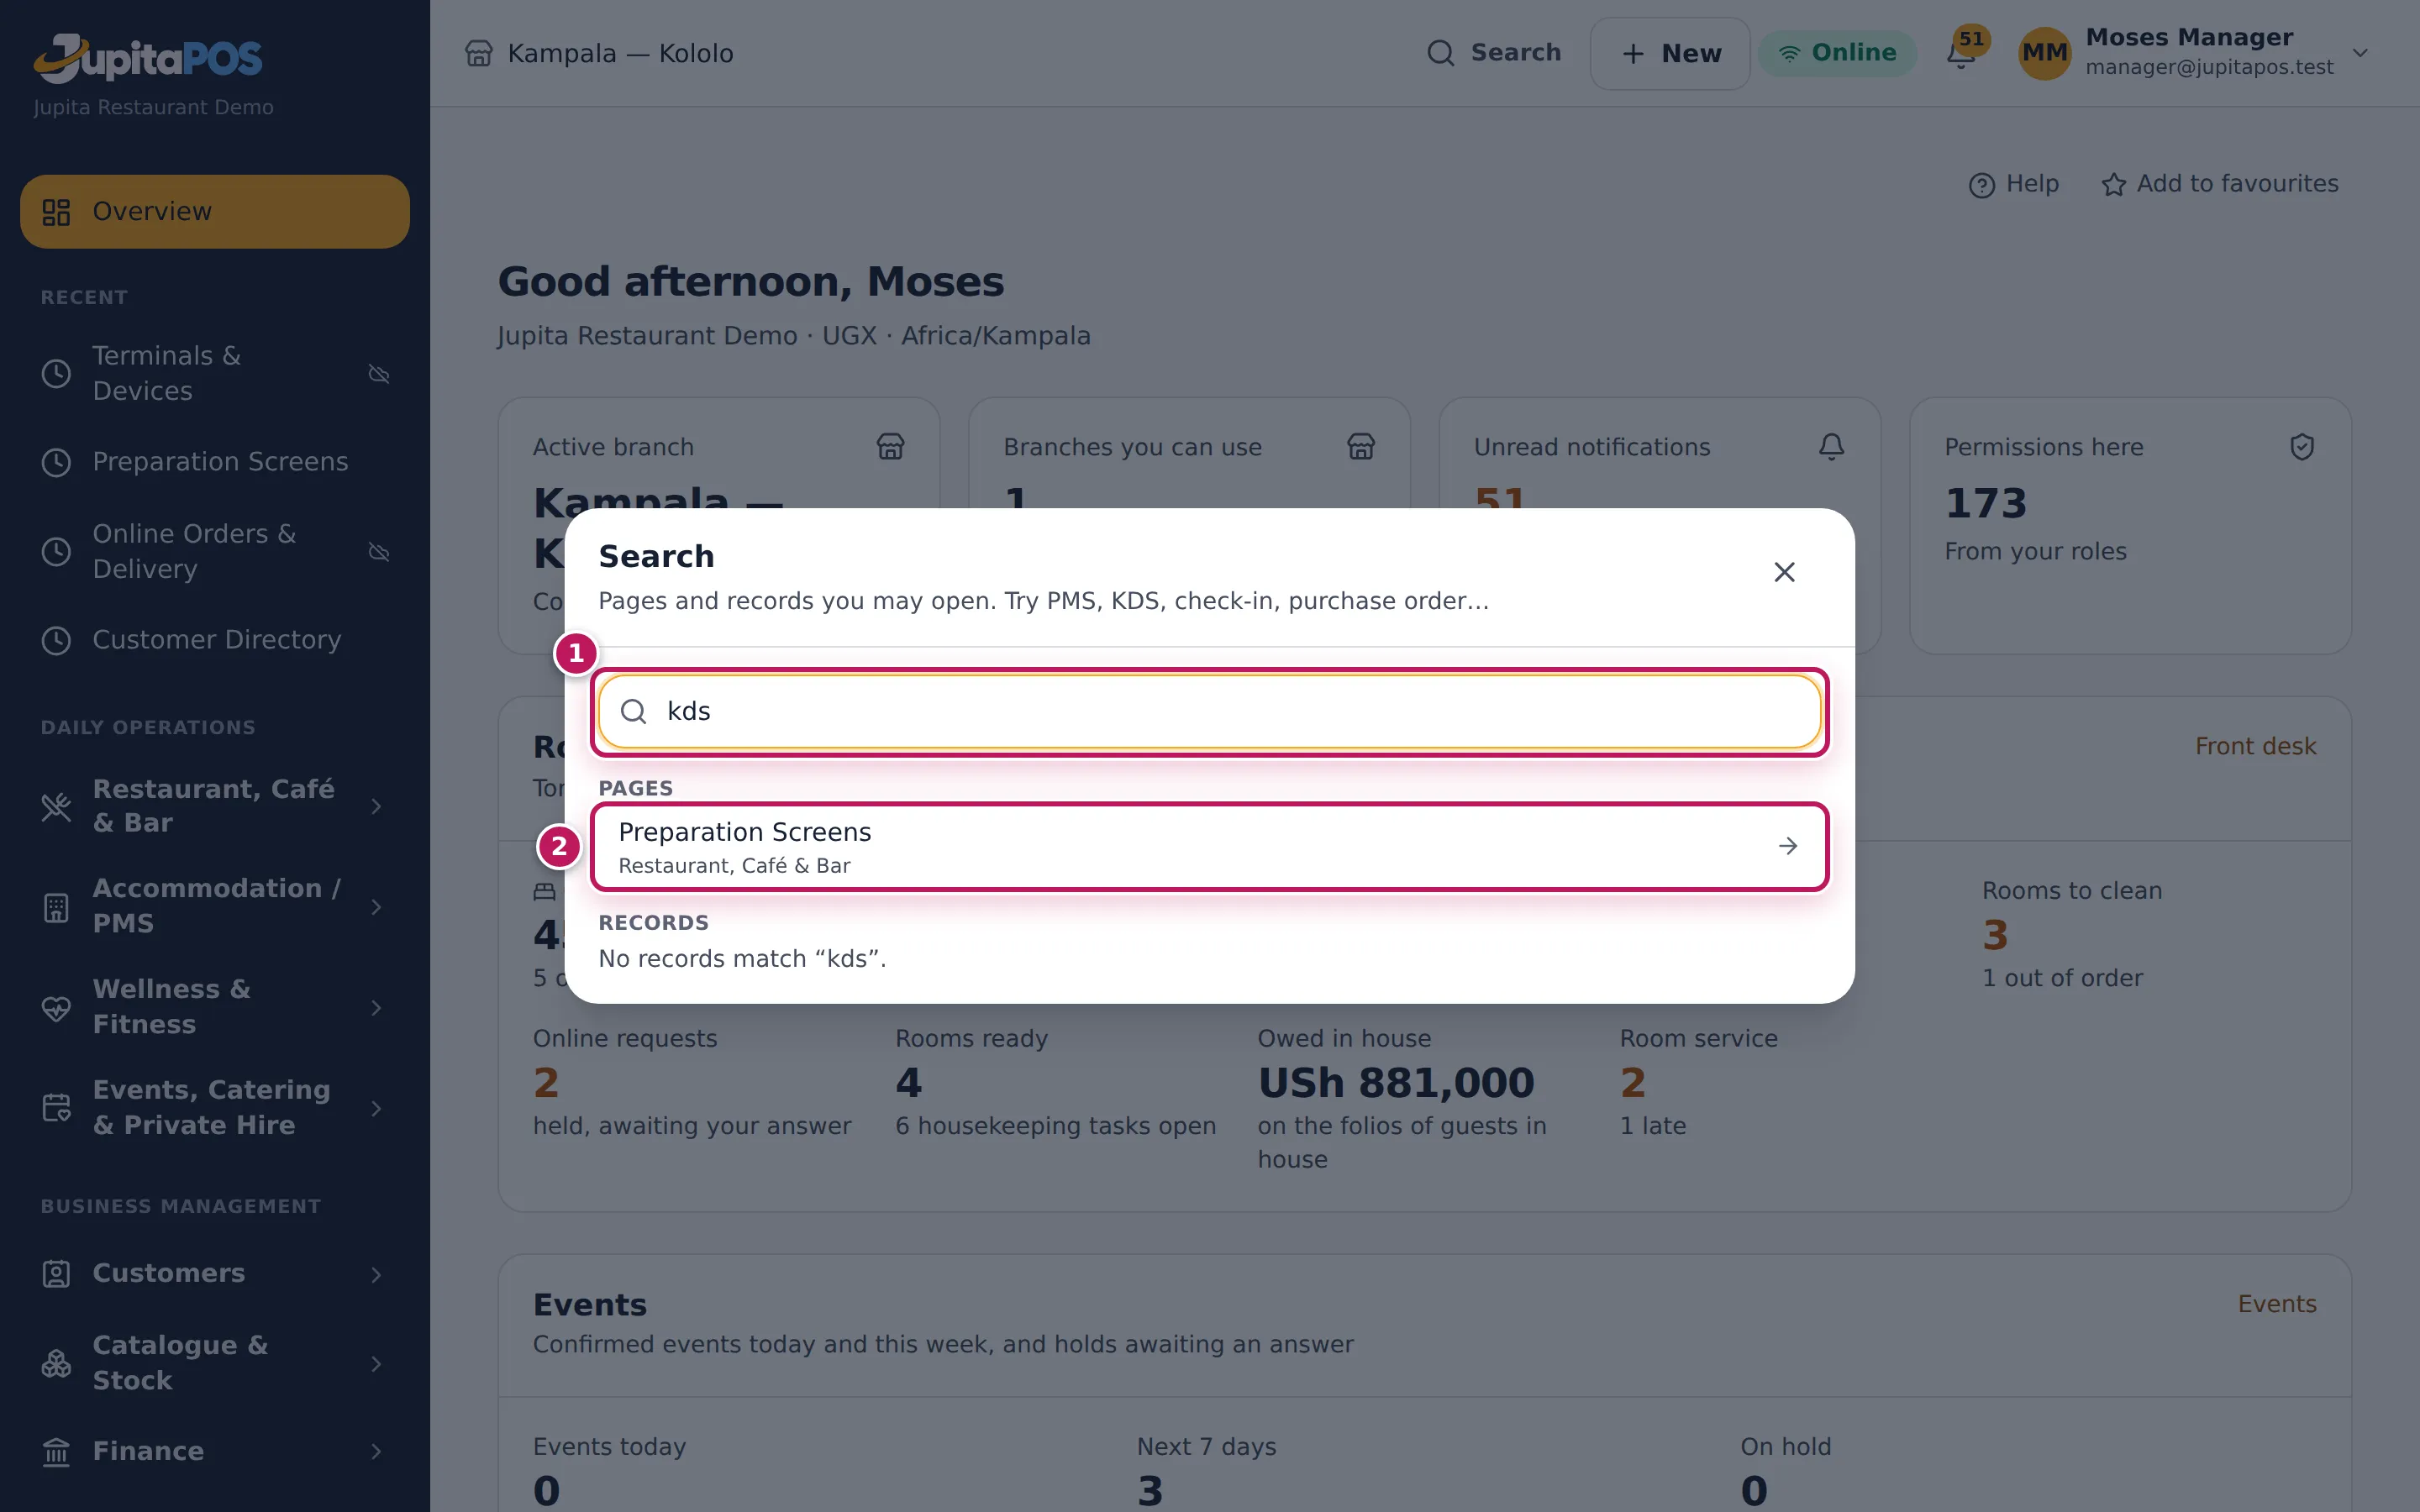
- Tap Search (3) — or press Ctrl+K — and type what you are looking for: a page (the words people use work too: PMS, KDS, check-in, purchase order, gym renewal) or a record you may see (a customer, an order, a room reservation, a member, a function, a supplier or a purchase order). Pages are found offline too; records need a connection.
- Tap New (4) to start something you may create — a sale, a reservation, a customer, a journal entry …
- Check the connection status (5): Online in green is what you want. Degraded, Offline or Sync failed mean the connection has a problem (see See whether the till is online). On a phone the status shows only its icon and colour: green for online, amber for degraded, red for offline or a failed sync.
- Tap the bell (6) to see your notifications (see Read and act on notifications).
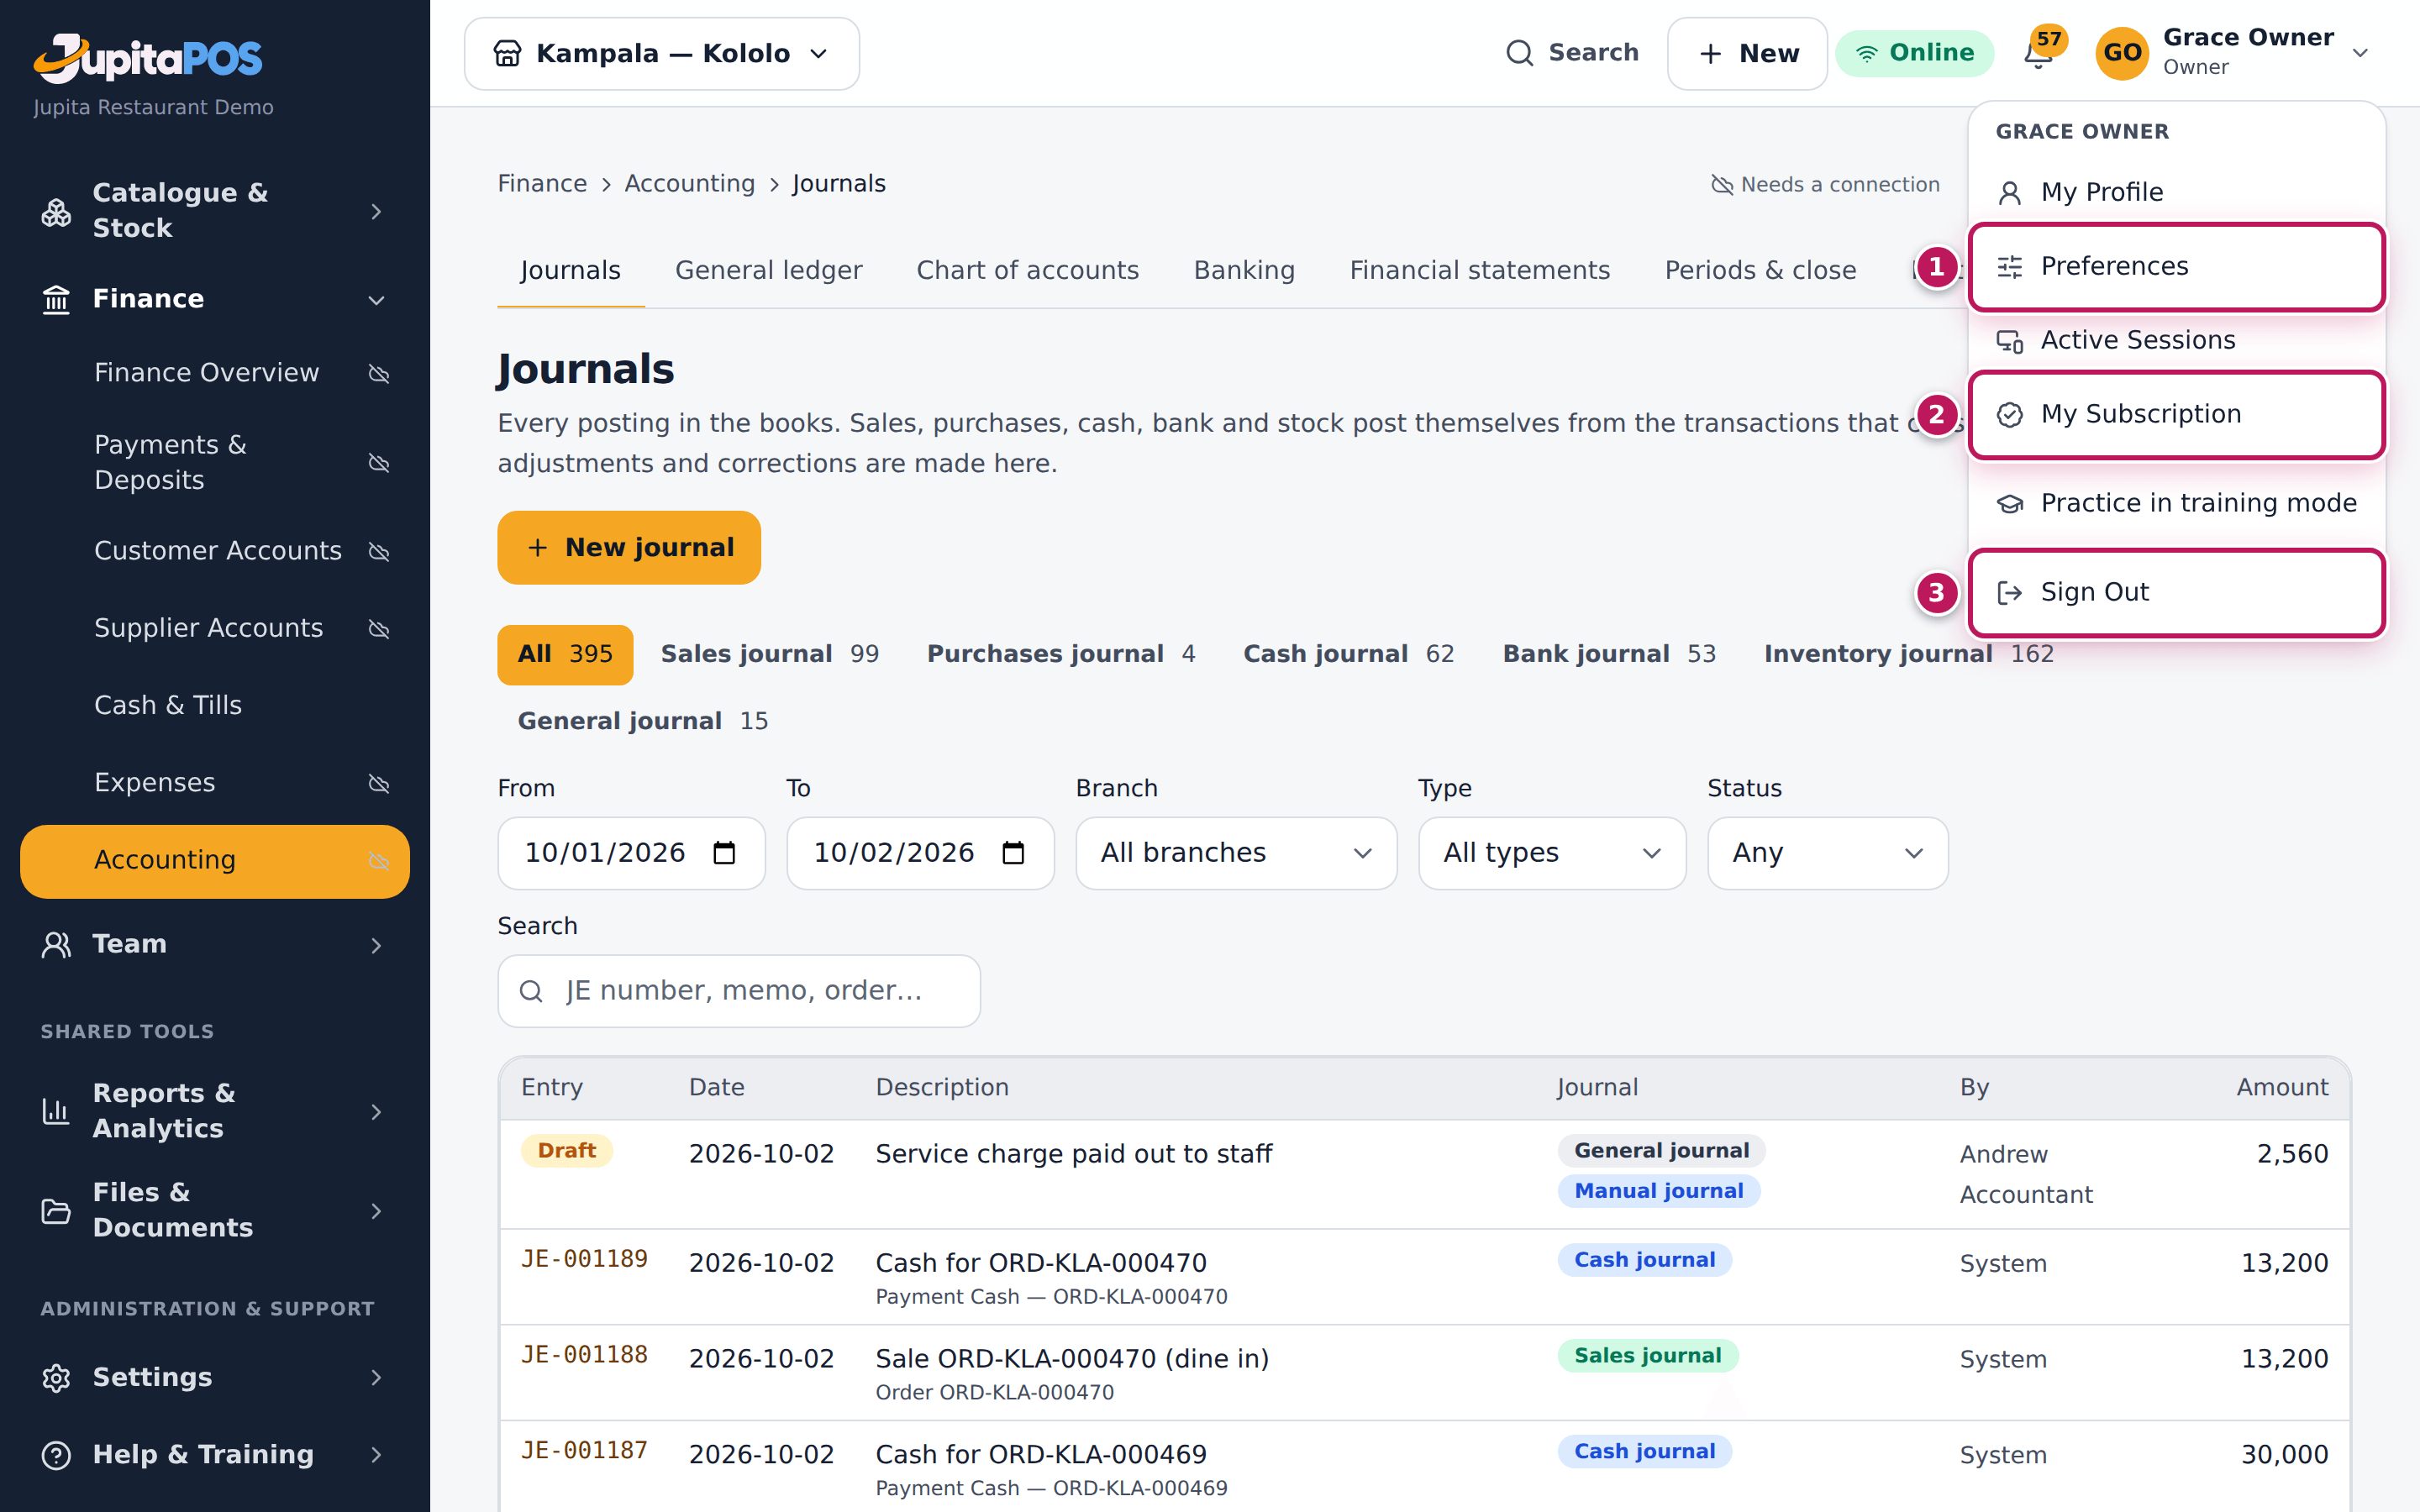
- Tap your name (7) for your profile: My Profile, Preferences, Active Sessions, My Subscription (administrators), Lock screen (on a till) and Sign Out.
- Above every page are where you are (Finance › Accounting › Journals), Help for the guides of the screen, the star to Add to favourites, and the page’s tabs. Favourites and the pages you opened recently sit at the top of the menu.
Expected result
Moses, the branch manager of Kampala — Kololo, lands on the Overview with the branch Kampala — Kololo; his menu shows the workspaces his roles allow. Grace, the owner, sees Kampala — Kololo and Entebbe — Lakeside in the branch list.
Screenshot
Common mistakes
- Working in the wrong branch. Sales, stock and reports follow the branch at the top. Check it before you start, especially if you move between branches.
- Looking for a page your role does not have. The menu, search and New show only what you may use. If you need a page for your work, ask your manager to add the permission to your role.
Troubleshooting
- The branch button has no arrow and does not open. You have access to one branch only. An administrator can give you access to more.
- The Overview shows “None” as the active branch. No branch is assigned to your account. Ask an administrator.
- A workspace is missing that a colleague has. Your roles differ, or the module is switched off, or your branch has no rooms. Your manager can check Roles & permissions and Modules.
- A favourite disappeared. You no longer have the permission for that page in this branch; it comes back if the permission does.
FAQ
Are there keyboard shortcuts? Yes: Ctrl+K opens search, Alt+D the Overview, Alt+N the notifications, and Shift+? shows the list of shortcuts.
Can I keep a workspace open? Yes: it stays as you left it. Preferences in your profile lists your favourites, recent pages and open workspaces.
Why are some numbers on the Overview different from the reports? Today’s sales comes from the sales summaries, which are updated every few minutes; open Open reports for the full, filtered figures.
Read and act on notifications
Purpose
See what needs your attention — a purchase order waiting for approval, a leave request, a shift waiting for sign-off, a delivery with a problem — and deal with it in time.
Role / permission required
Everyone who receives notifications (notifications.view); each person
sees only their own.
Prerequisites
- You are signed in (see Sign in).
Steps
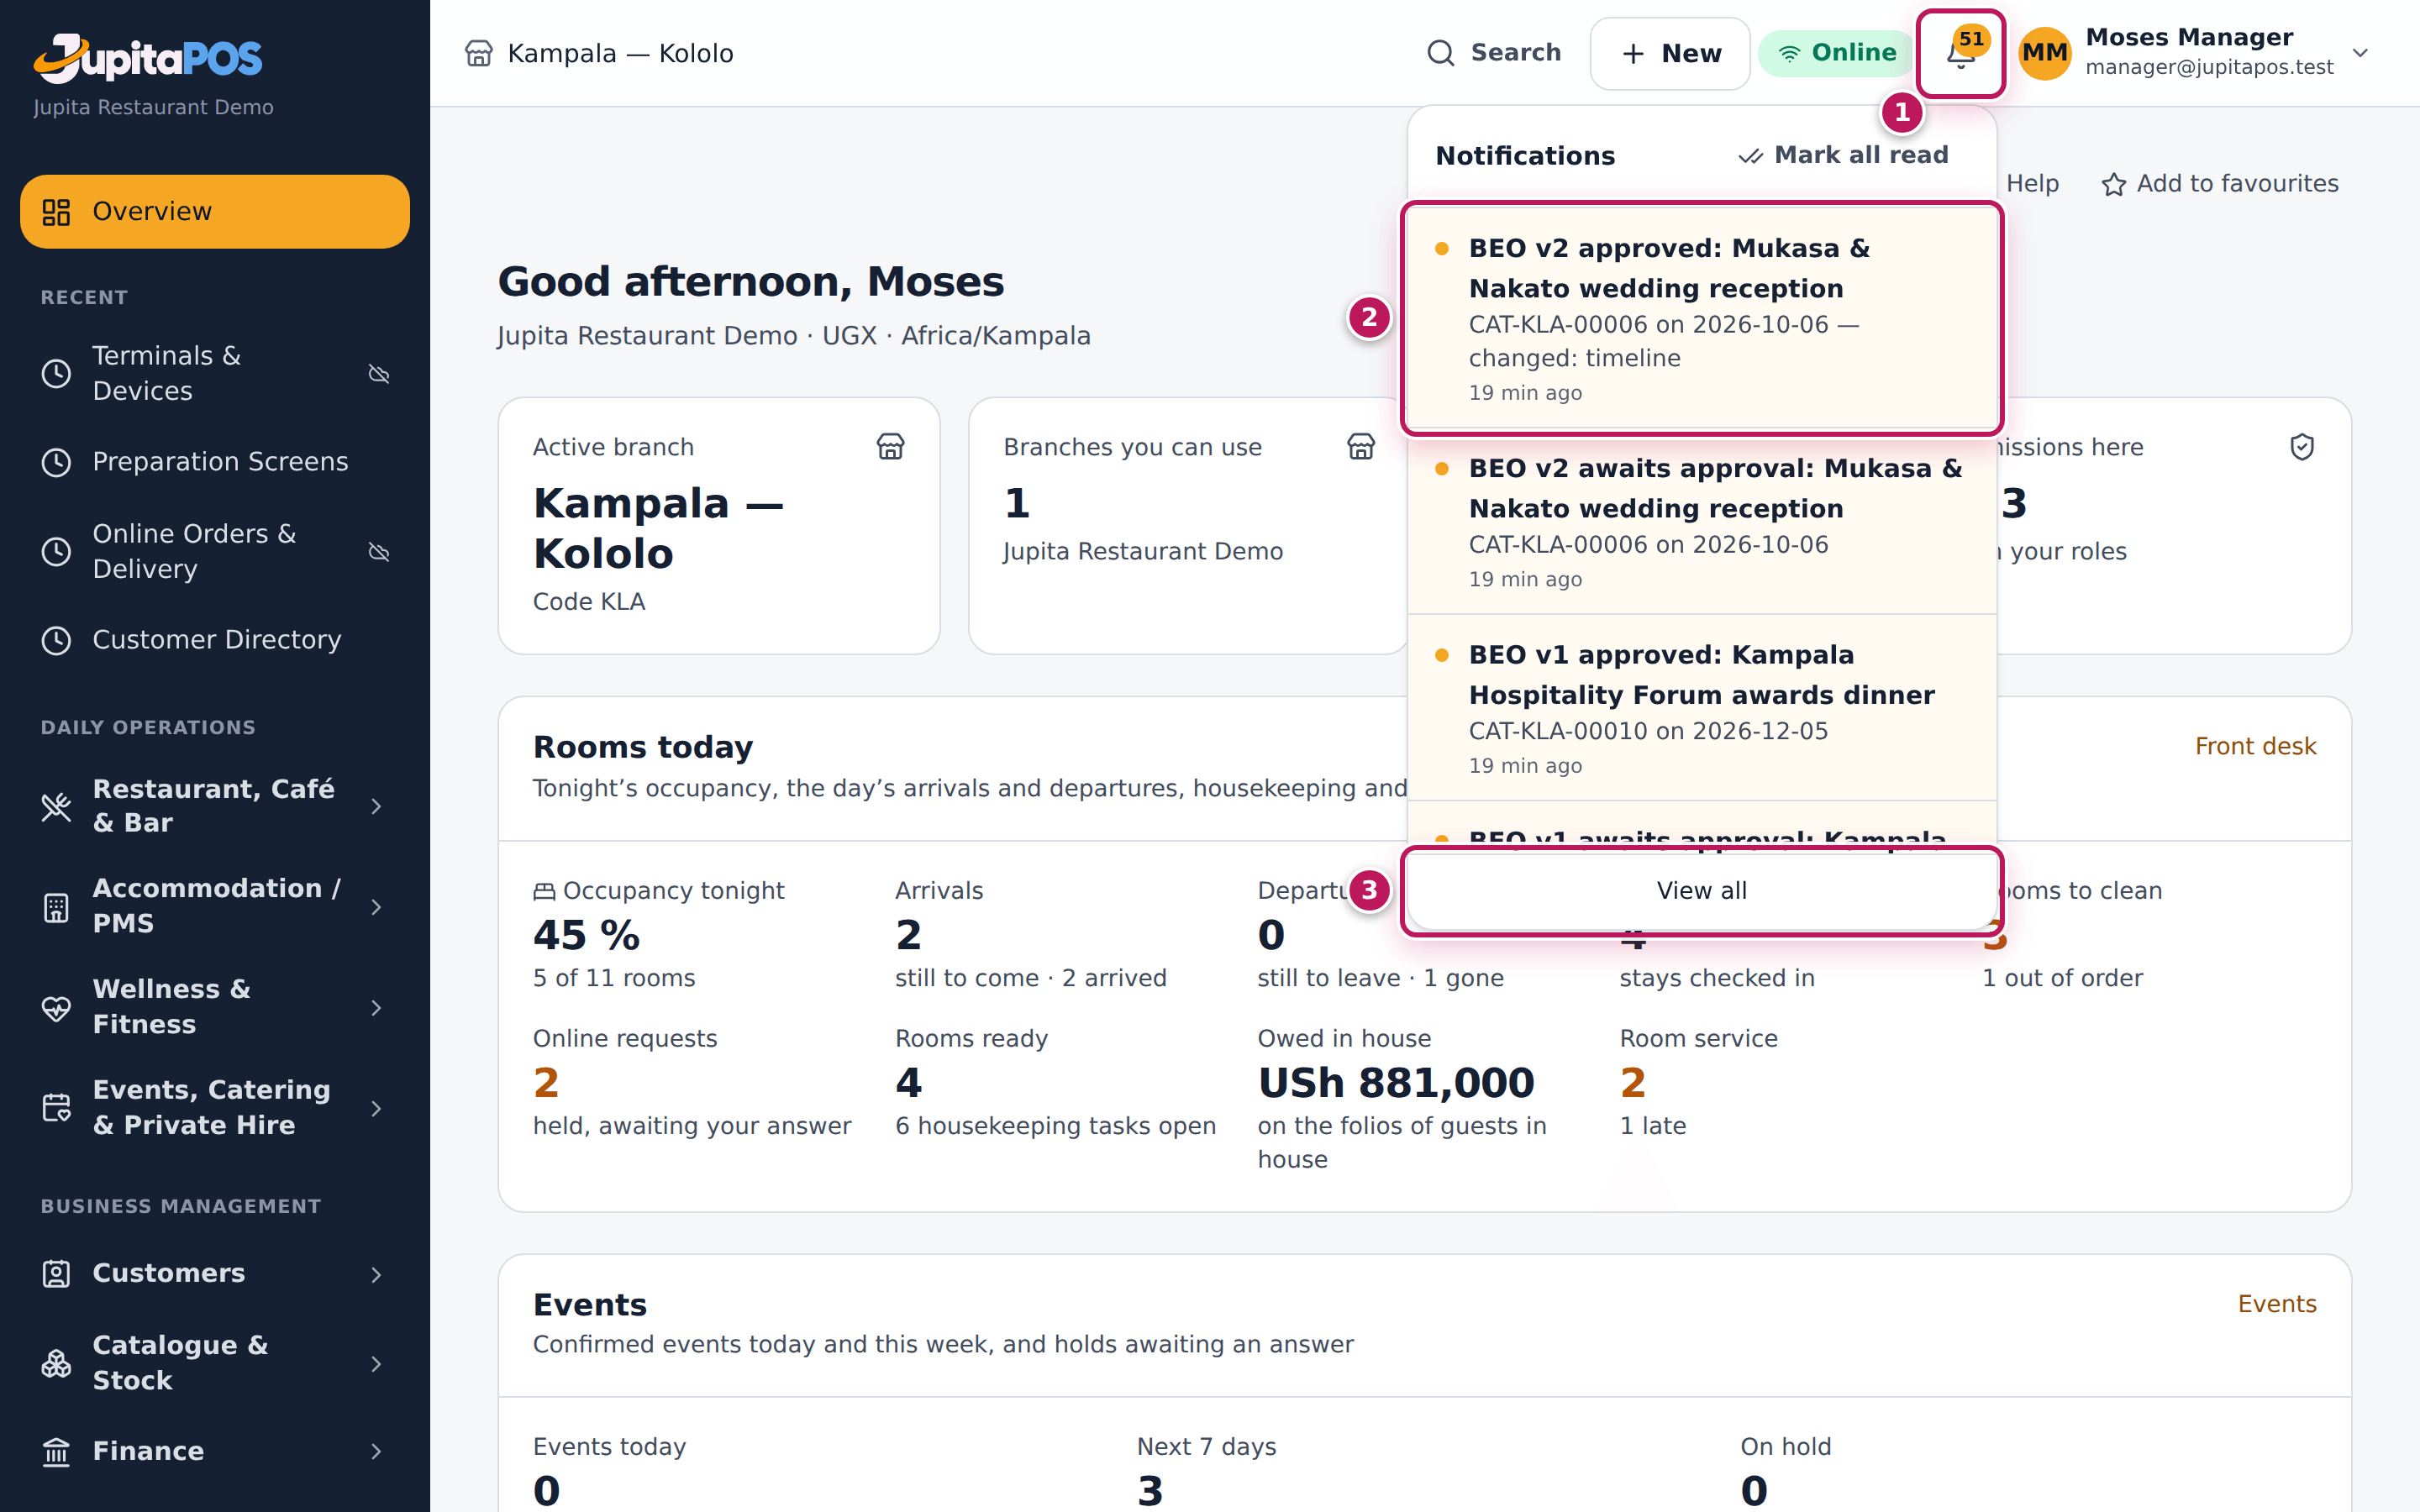
- Look at the bell (1) at the top right. The number on it is how many notifications you have not read yet. New ones also pop up for a few seconds at the corner of the screen.
- Tap the bell. The Notifications panel shows your ten most recent notifications, unread ones first with a coloured dot (2).
- Read the title and the text: they name the thing to deal with, for example EXP-KLA-00005 needs approval or Joy asks for 1 day(s) of sick leave.
- Open the screen the notification is about from the menu (for example Procurement for a purchase order) and deal with it.
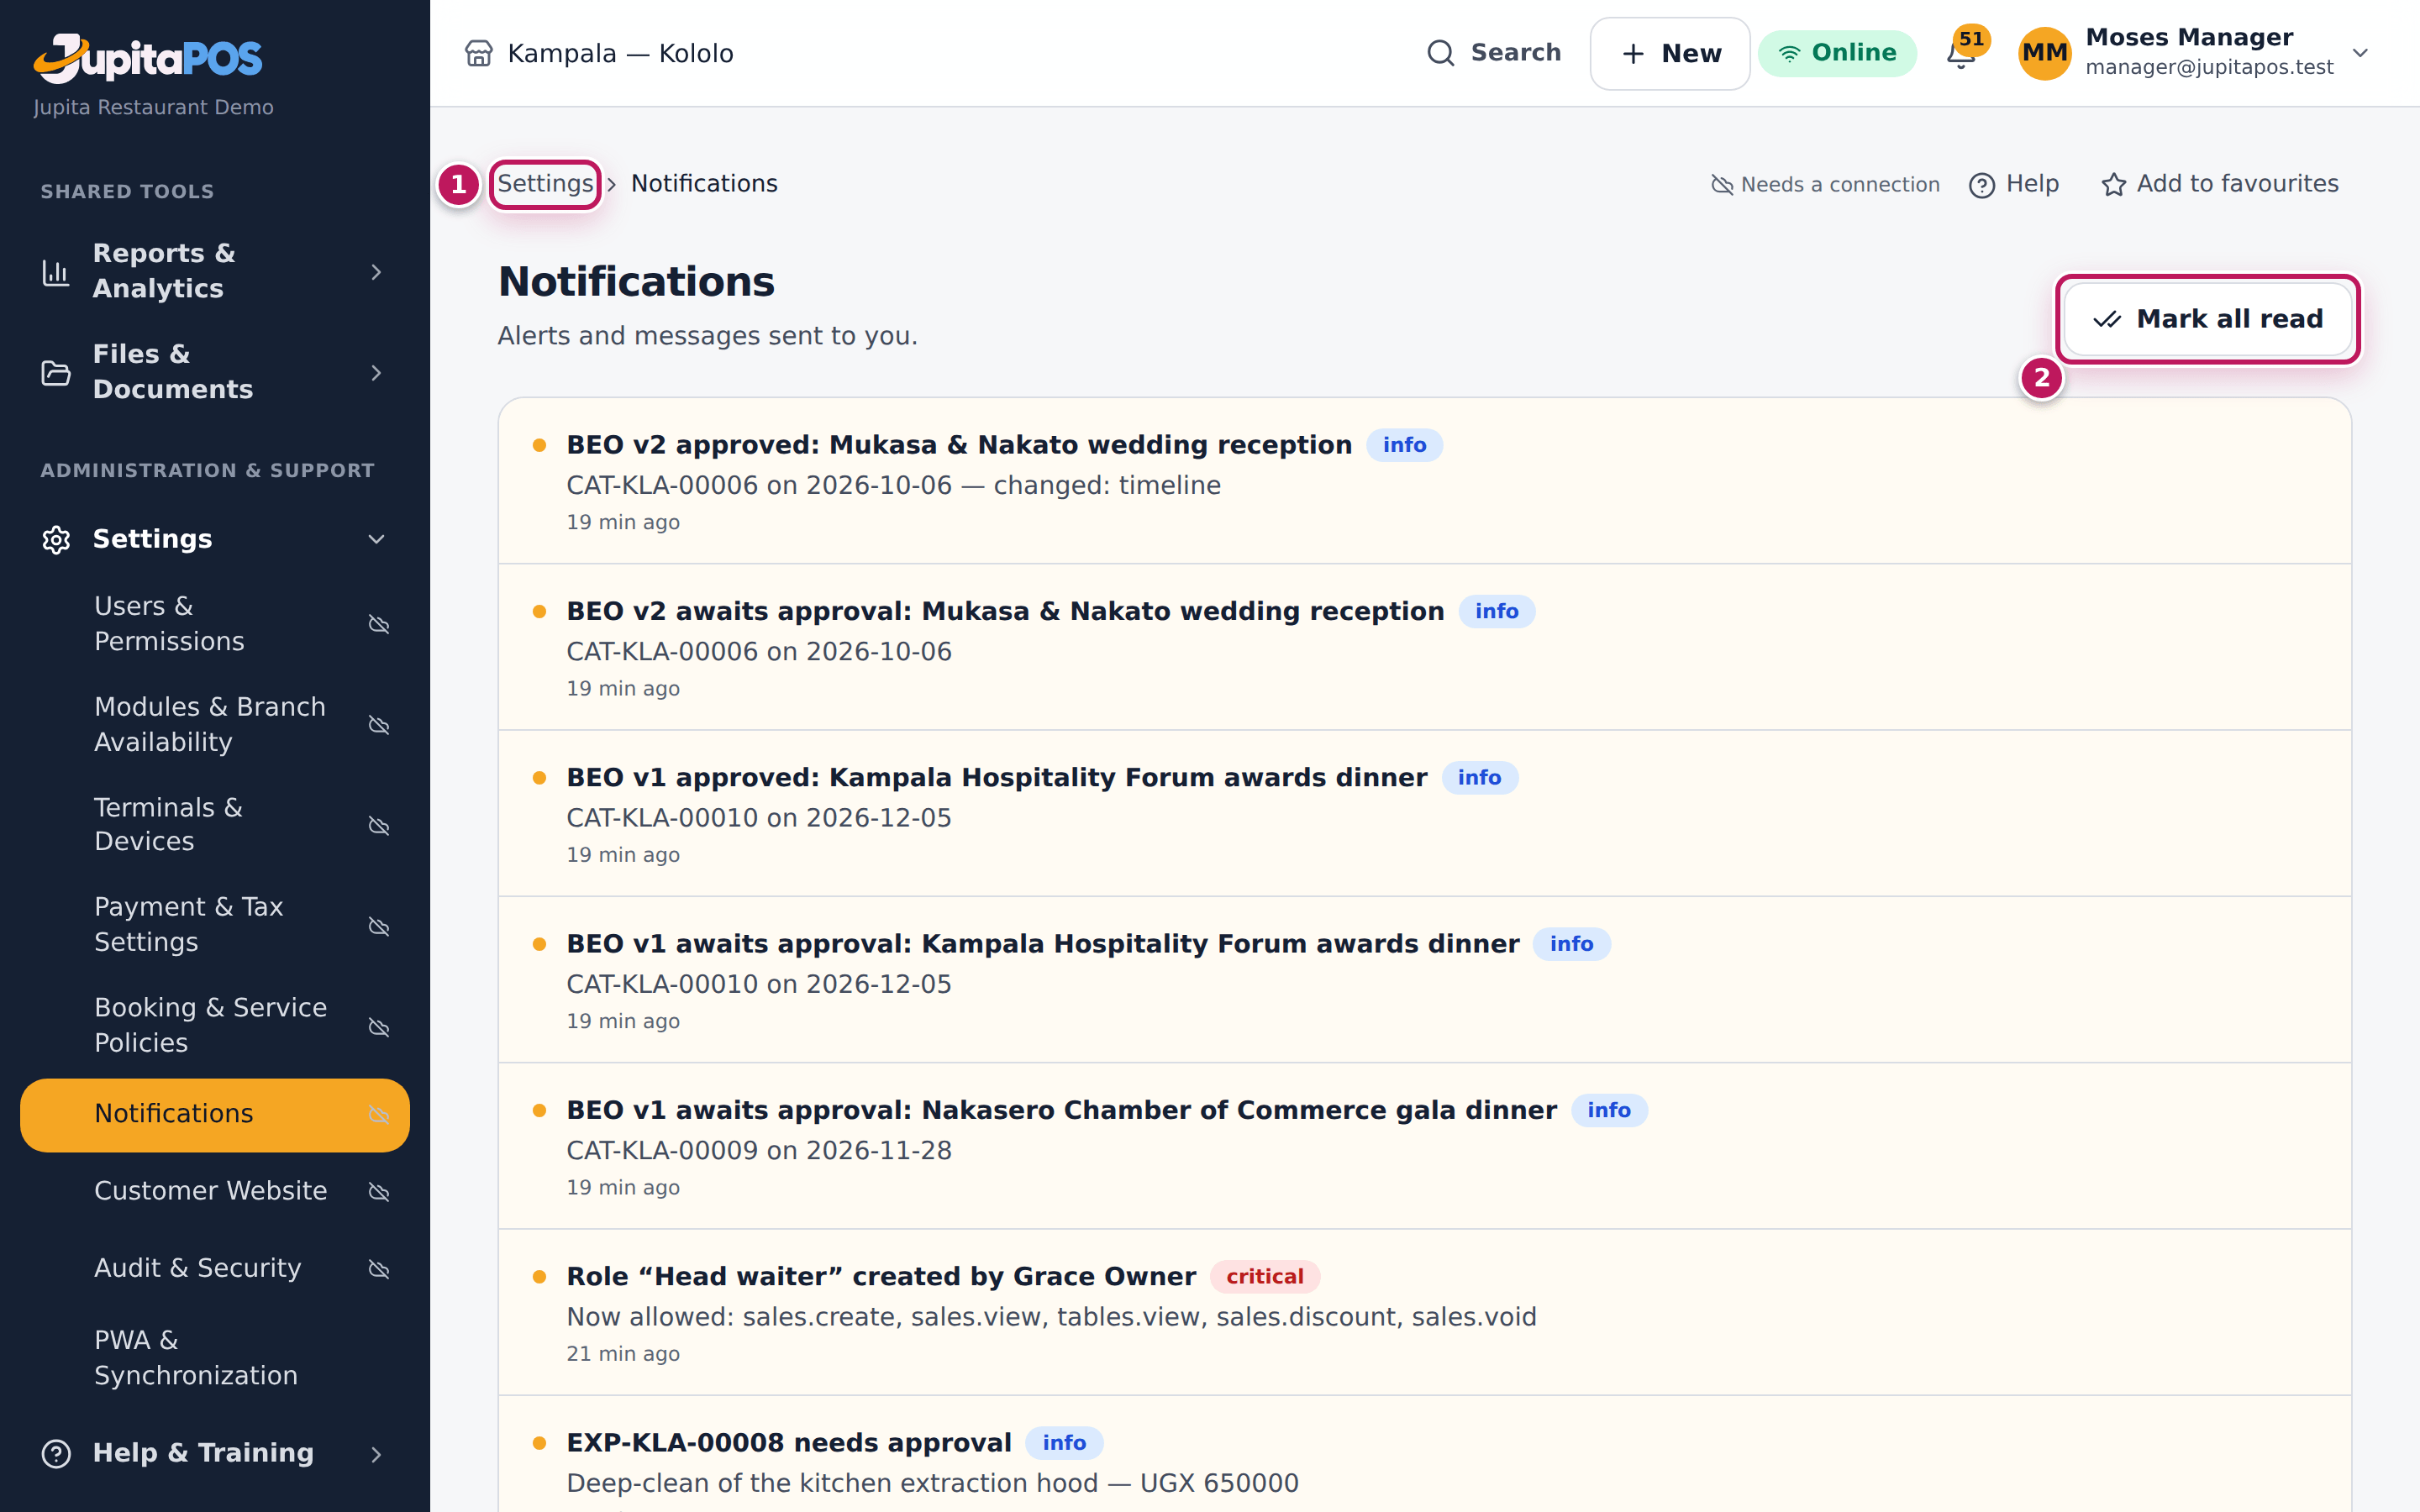
- To see them all, tap View all (3). The Notifications page lists every notification with its level — info, success, warning or critical (1).
- When you have read them, tap Mark all read (2).
Expected result
The bell’s number and the Unread notifications card on the dashboard drop to zero; the notifications stay on the Notifications page for later.
Screenshot
Common mistakes
- Marking everything read without acting. Mark all read only hides the number; the purchase order or leave request still waits. Deal with the item first.
- Expecting the notification to open the item. Notifications tell you what and where; open the screen from the menu.
Troubleshooting
- The bell never shows anything. Your role receives few notifications, or they go to your manager. The panel then says You’re all caught up.
- A pop-up disappeared before I could read it. Tap the bell: every notification is kept there and on the Notifications page.
Find help: the Help Center
Purpose
Find out how to do something without waiting for a colleague: search every guide you may read, open the manual of the screen you are on, and see each step with its screenshot for a computer, a tablet or a phone.
Role / permission required
Everyone signed in. The Help Center shows only the manuals for the screens your roles allow.
Prerequisites
- You are signed in (see Sign in).
Steps
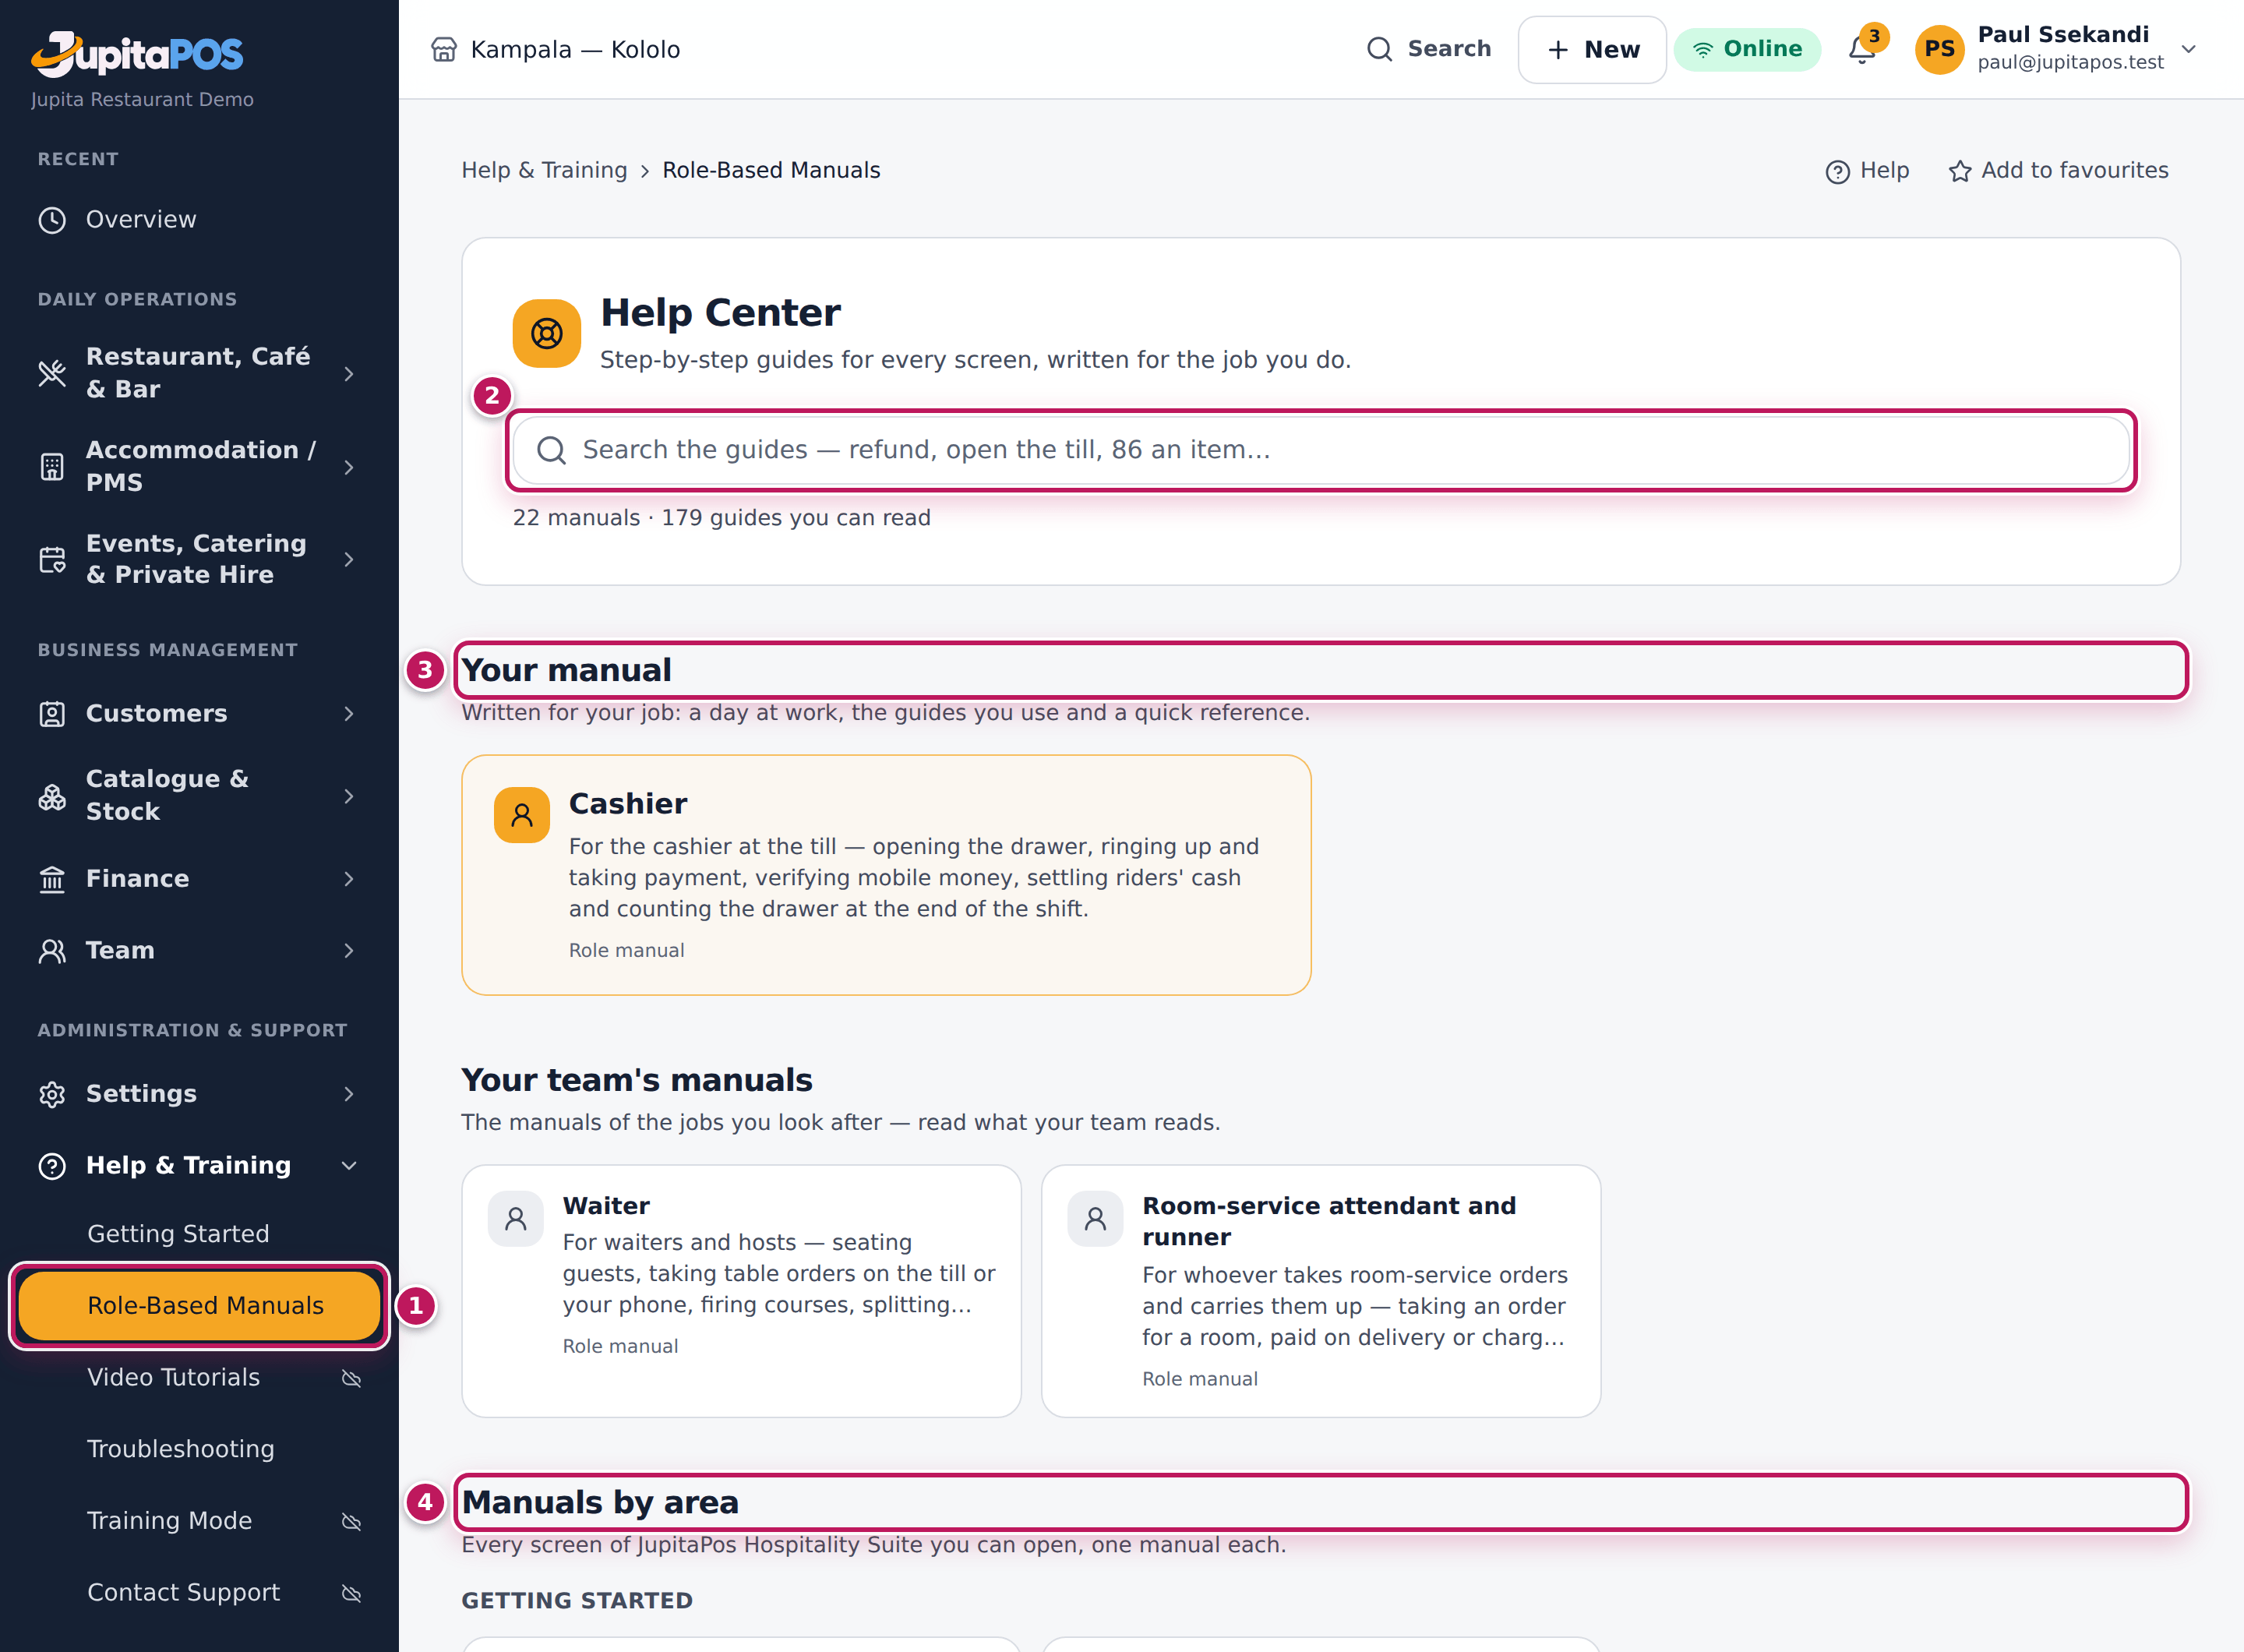
- In the menu on the left, open Help & Training and tap Role-Based Manuals (1) — on a phone, tap Open menu first. The Help Center opens.
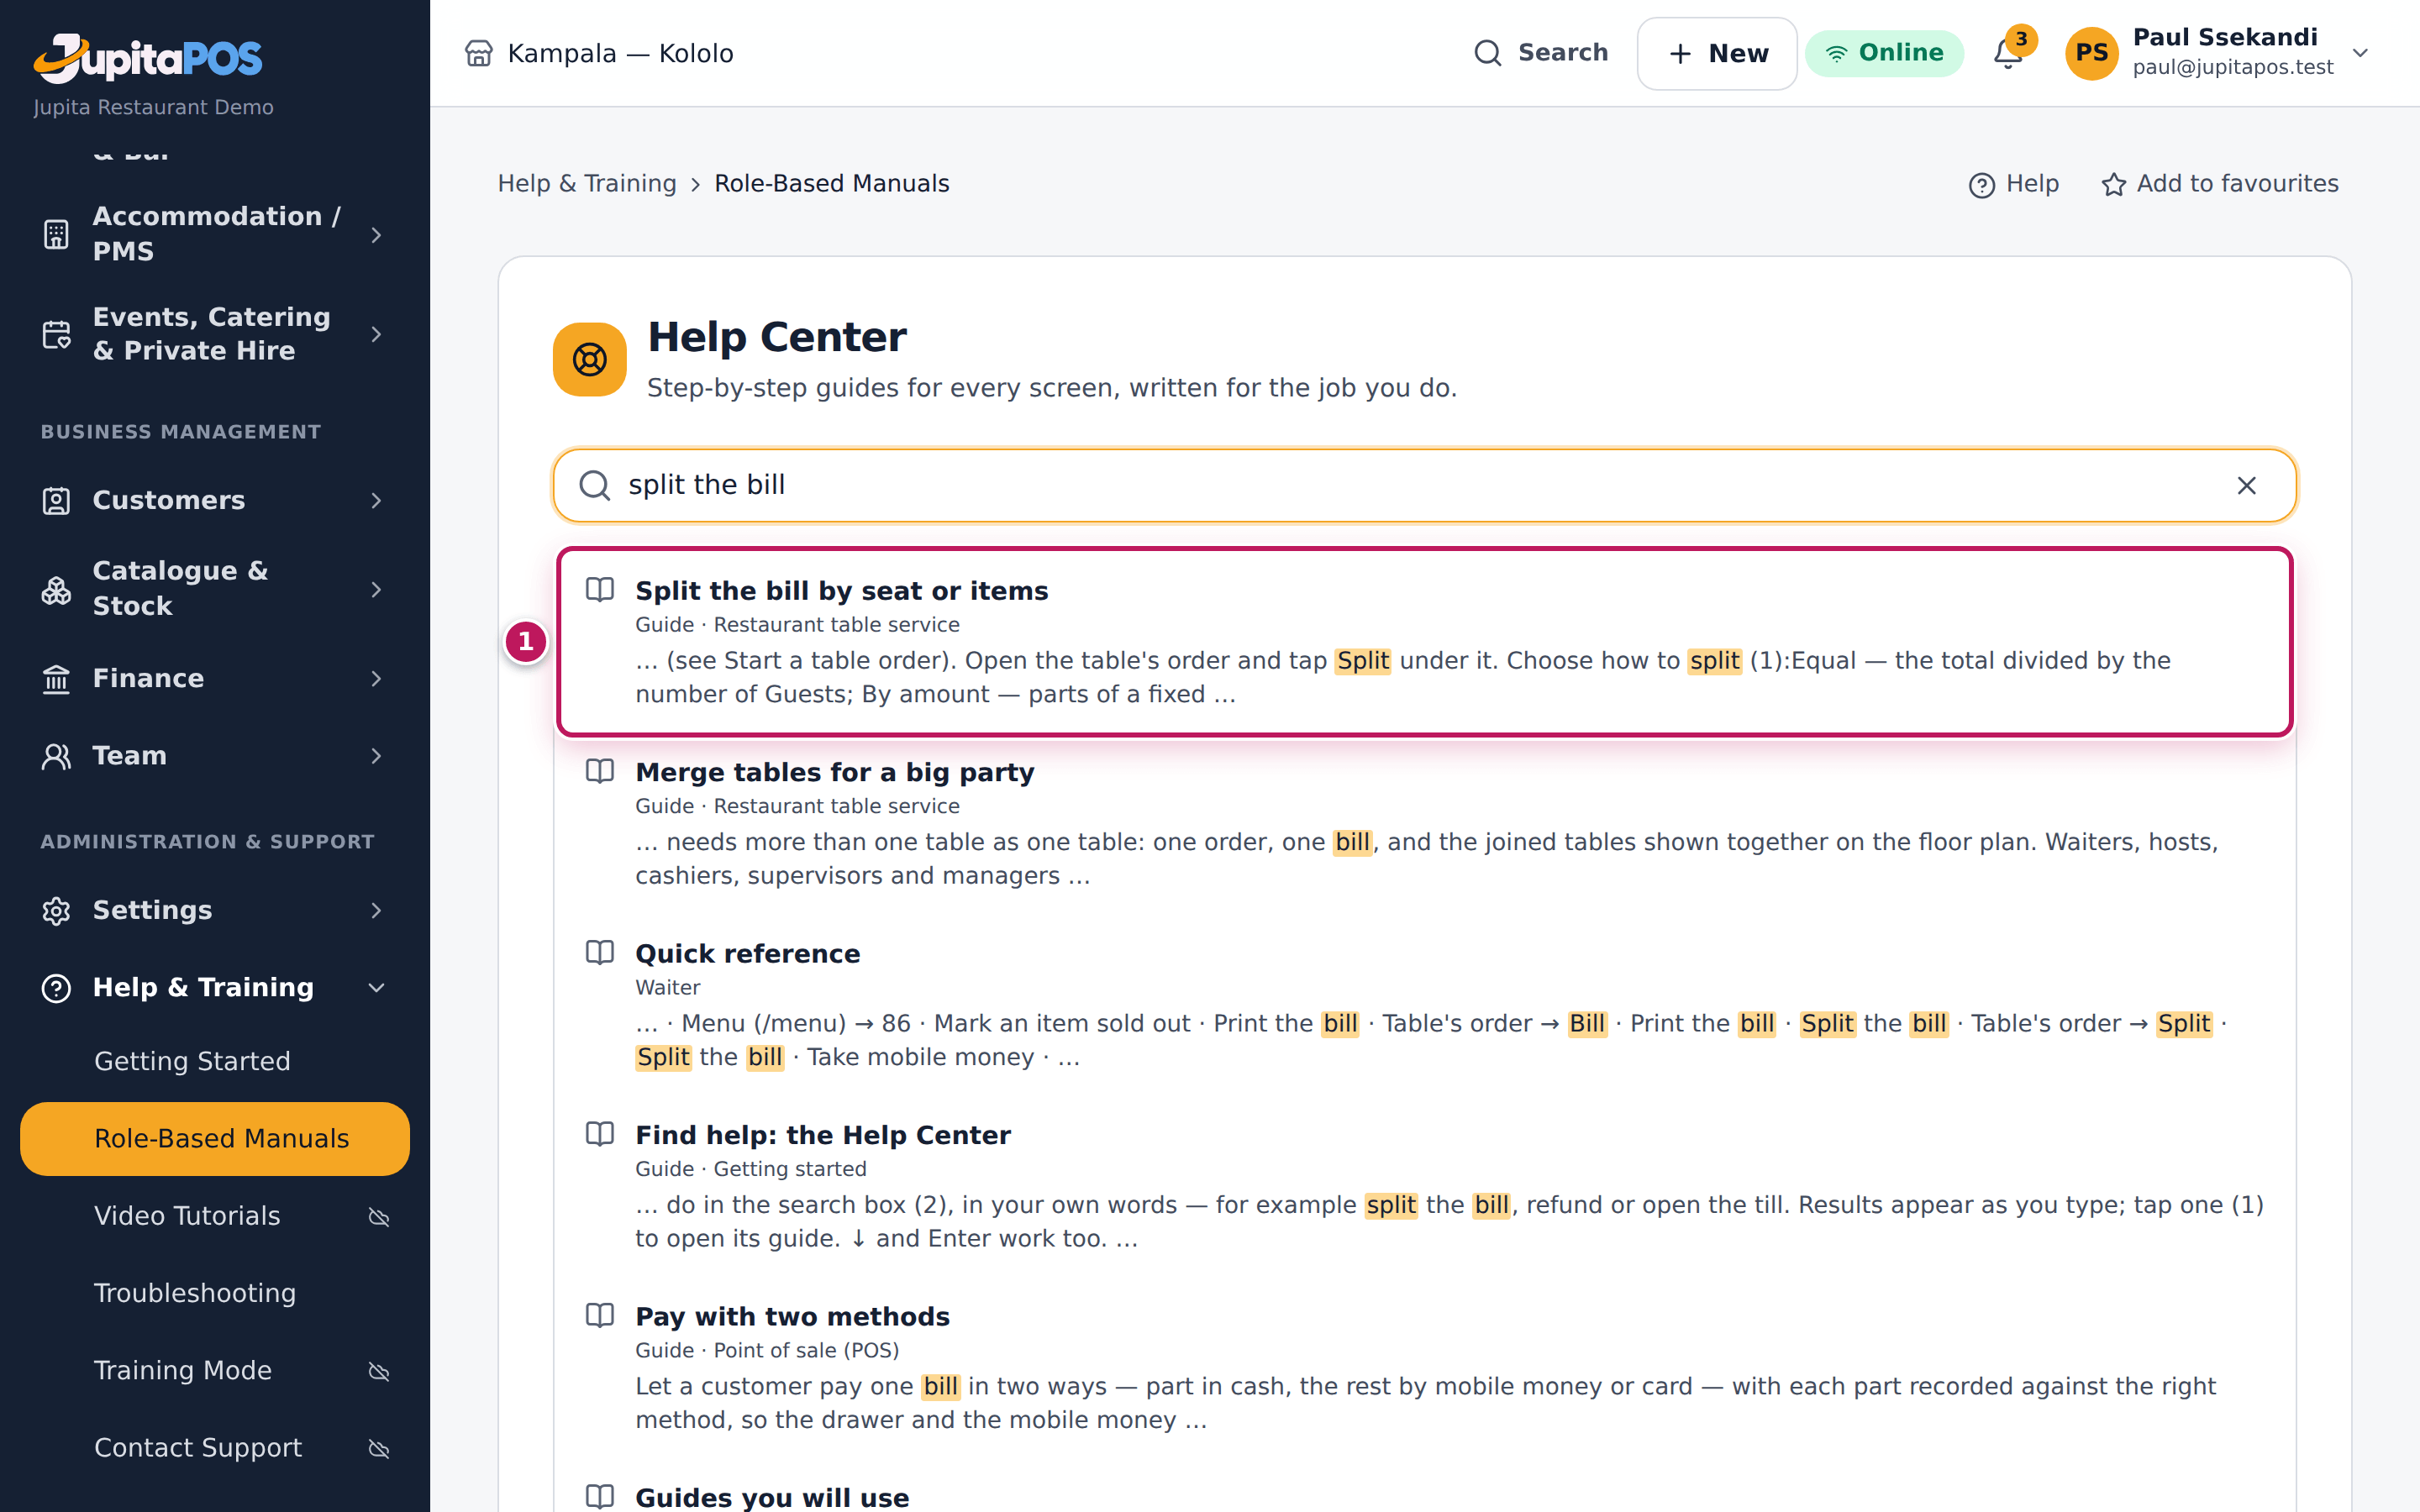
- Type what you want to do in the search box (2), in your own words — for example split the bill, refund or open the till. Results appear as you type; tap one (1) to open its guide. ↓ and Enter work too.
- Under the search, Your manual (3) is the manual written for your job; until there is one, a note says so. Managers also see Your team’s manuals. Manuals by area (4) lists every manual you may read, and Training videos the short videos.
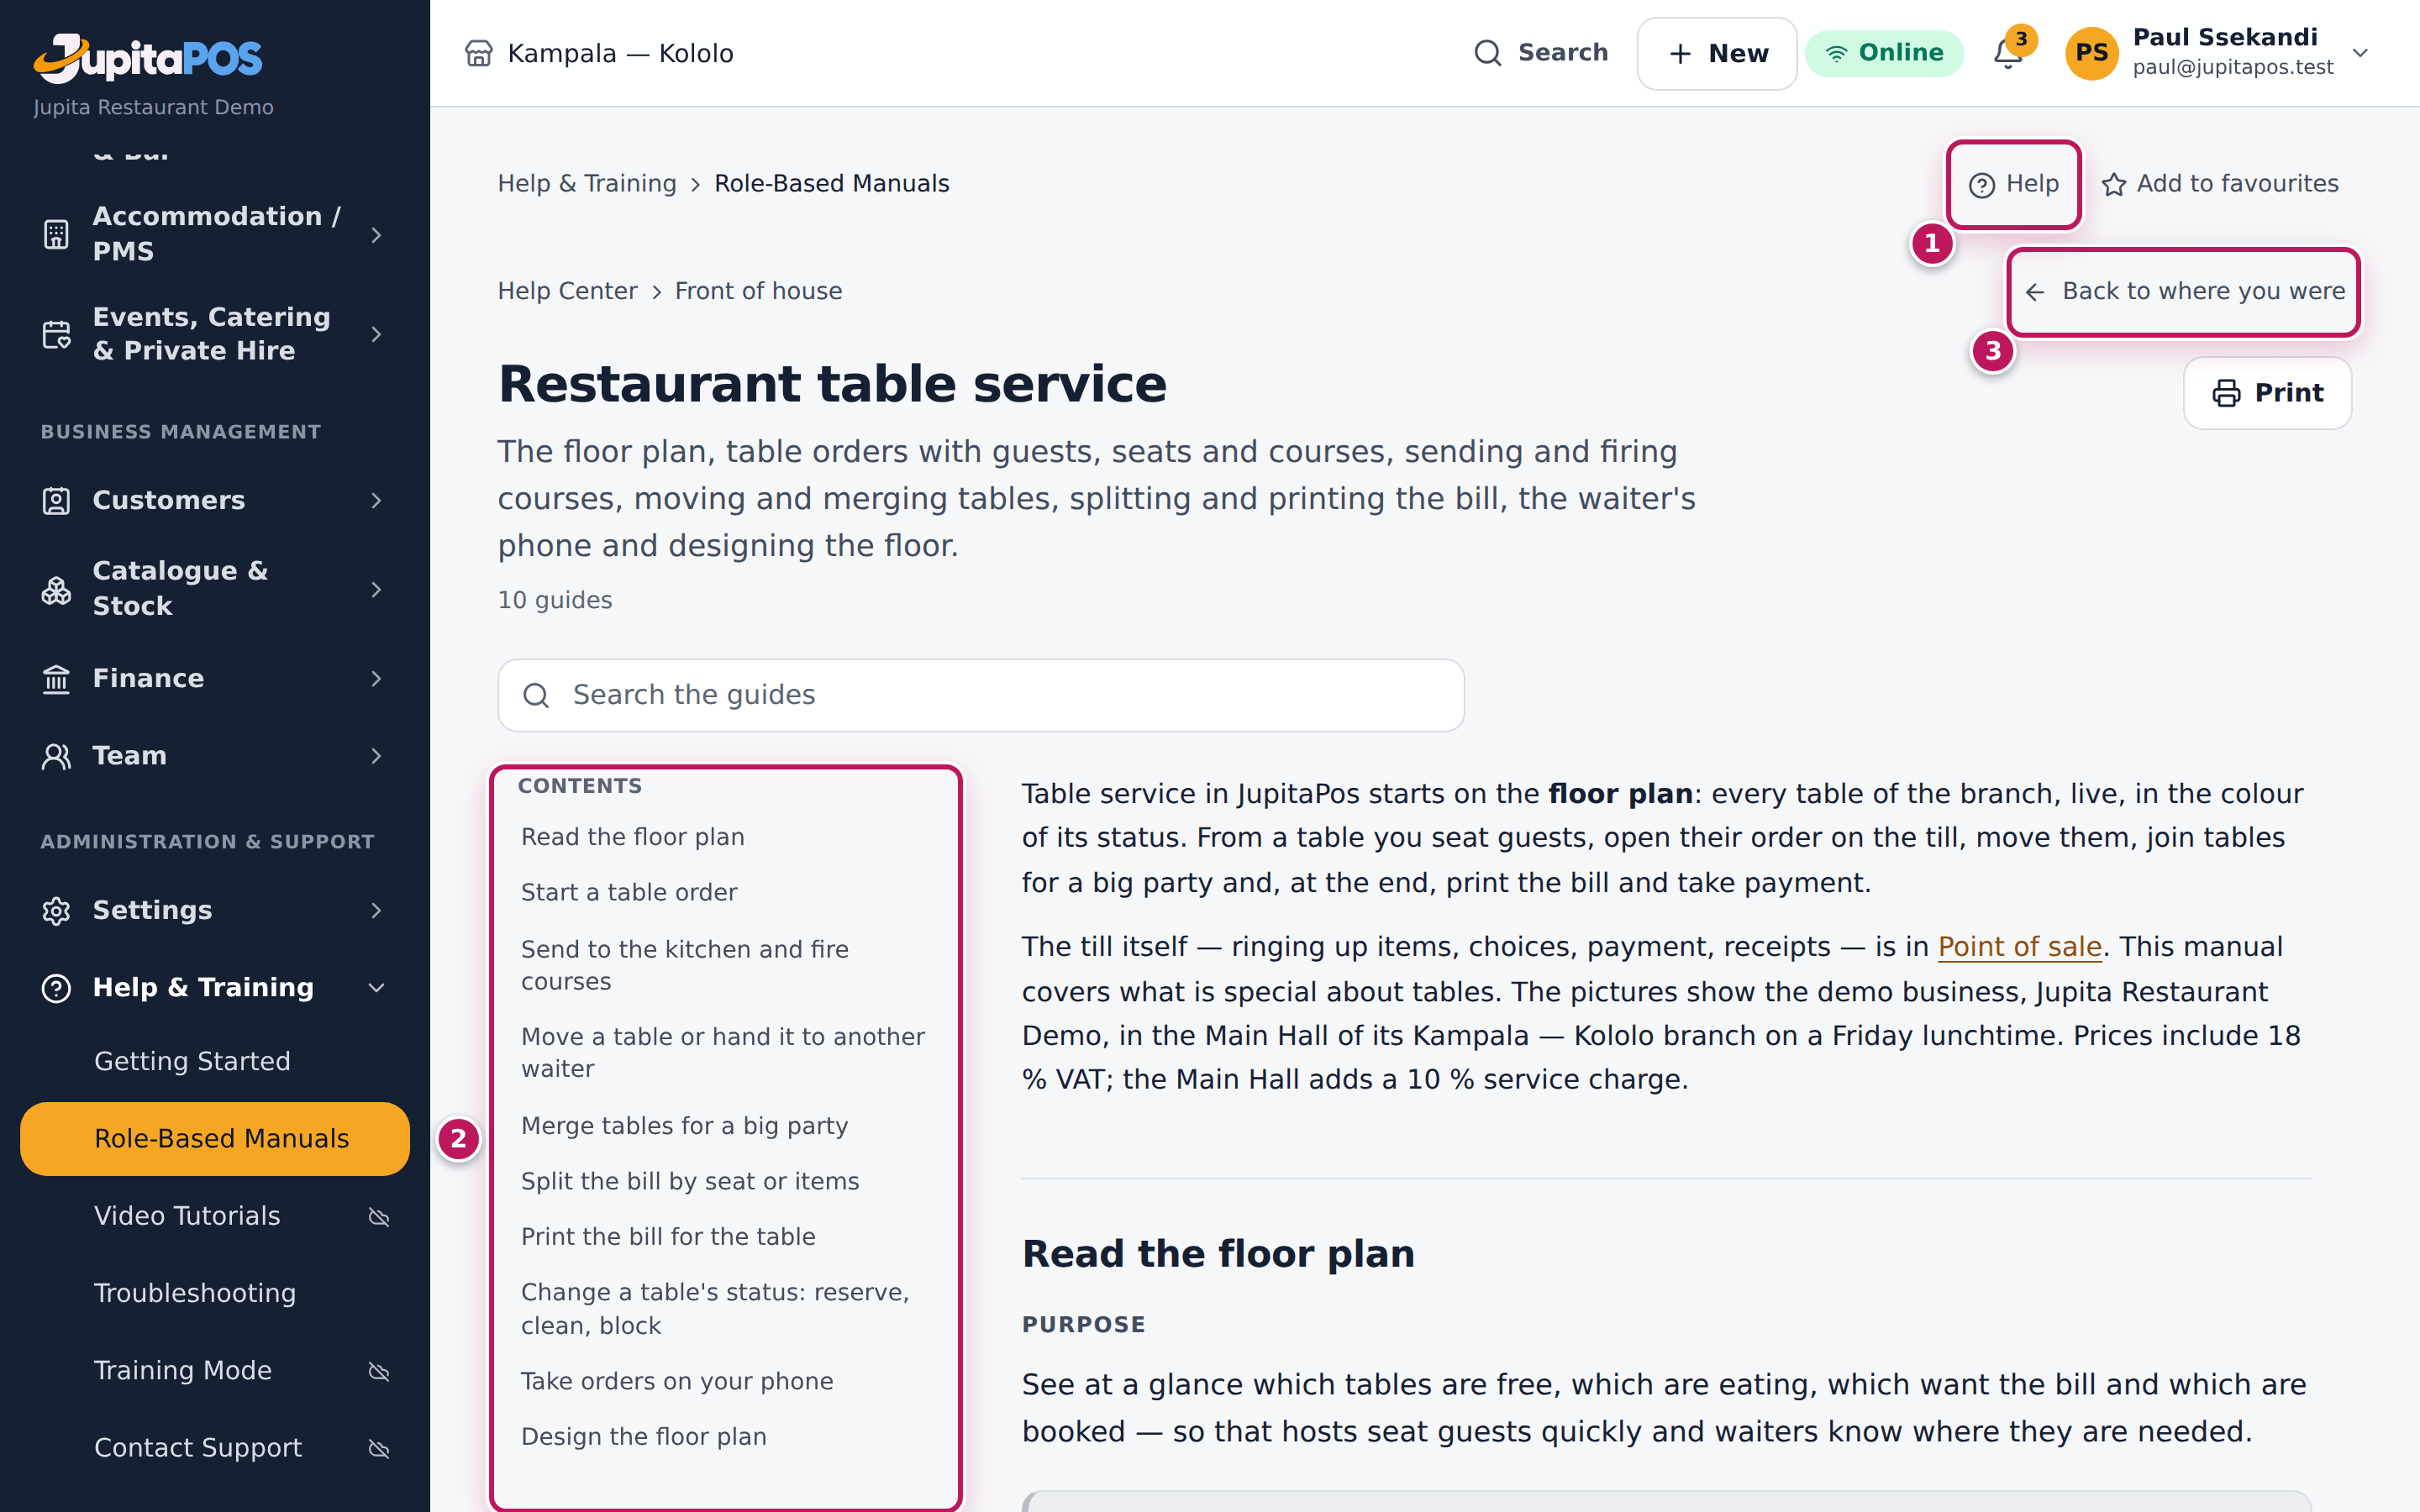
- From any screen, tap Help for this screen (1), the question mark above the page (on a full-screen till, at the top right). The manual of that screen opens — on the floor plan, the restaurant manual.
- Use Contents (2) to jump to a guide. On a phone it is folded: tap Contents to open it.
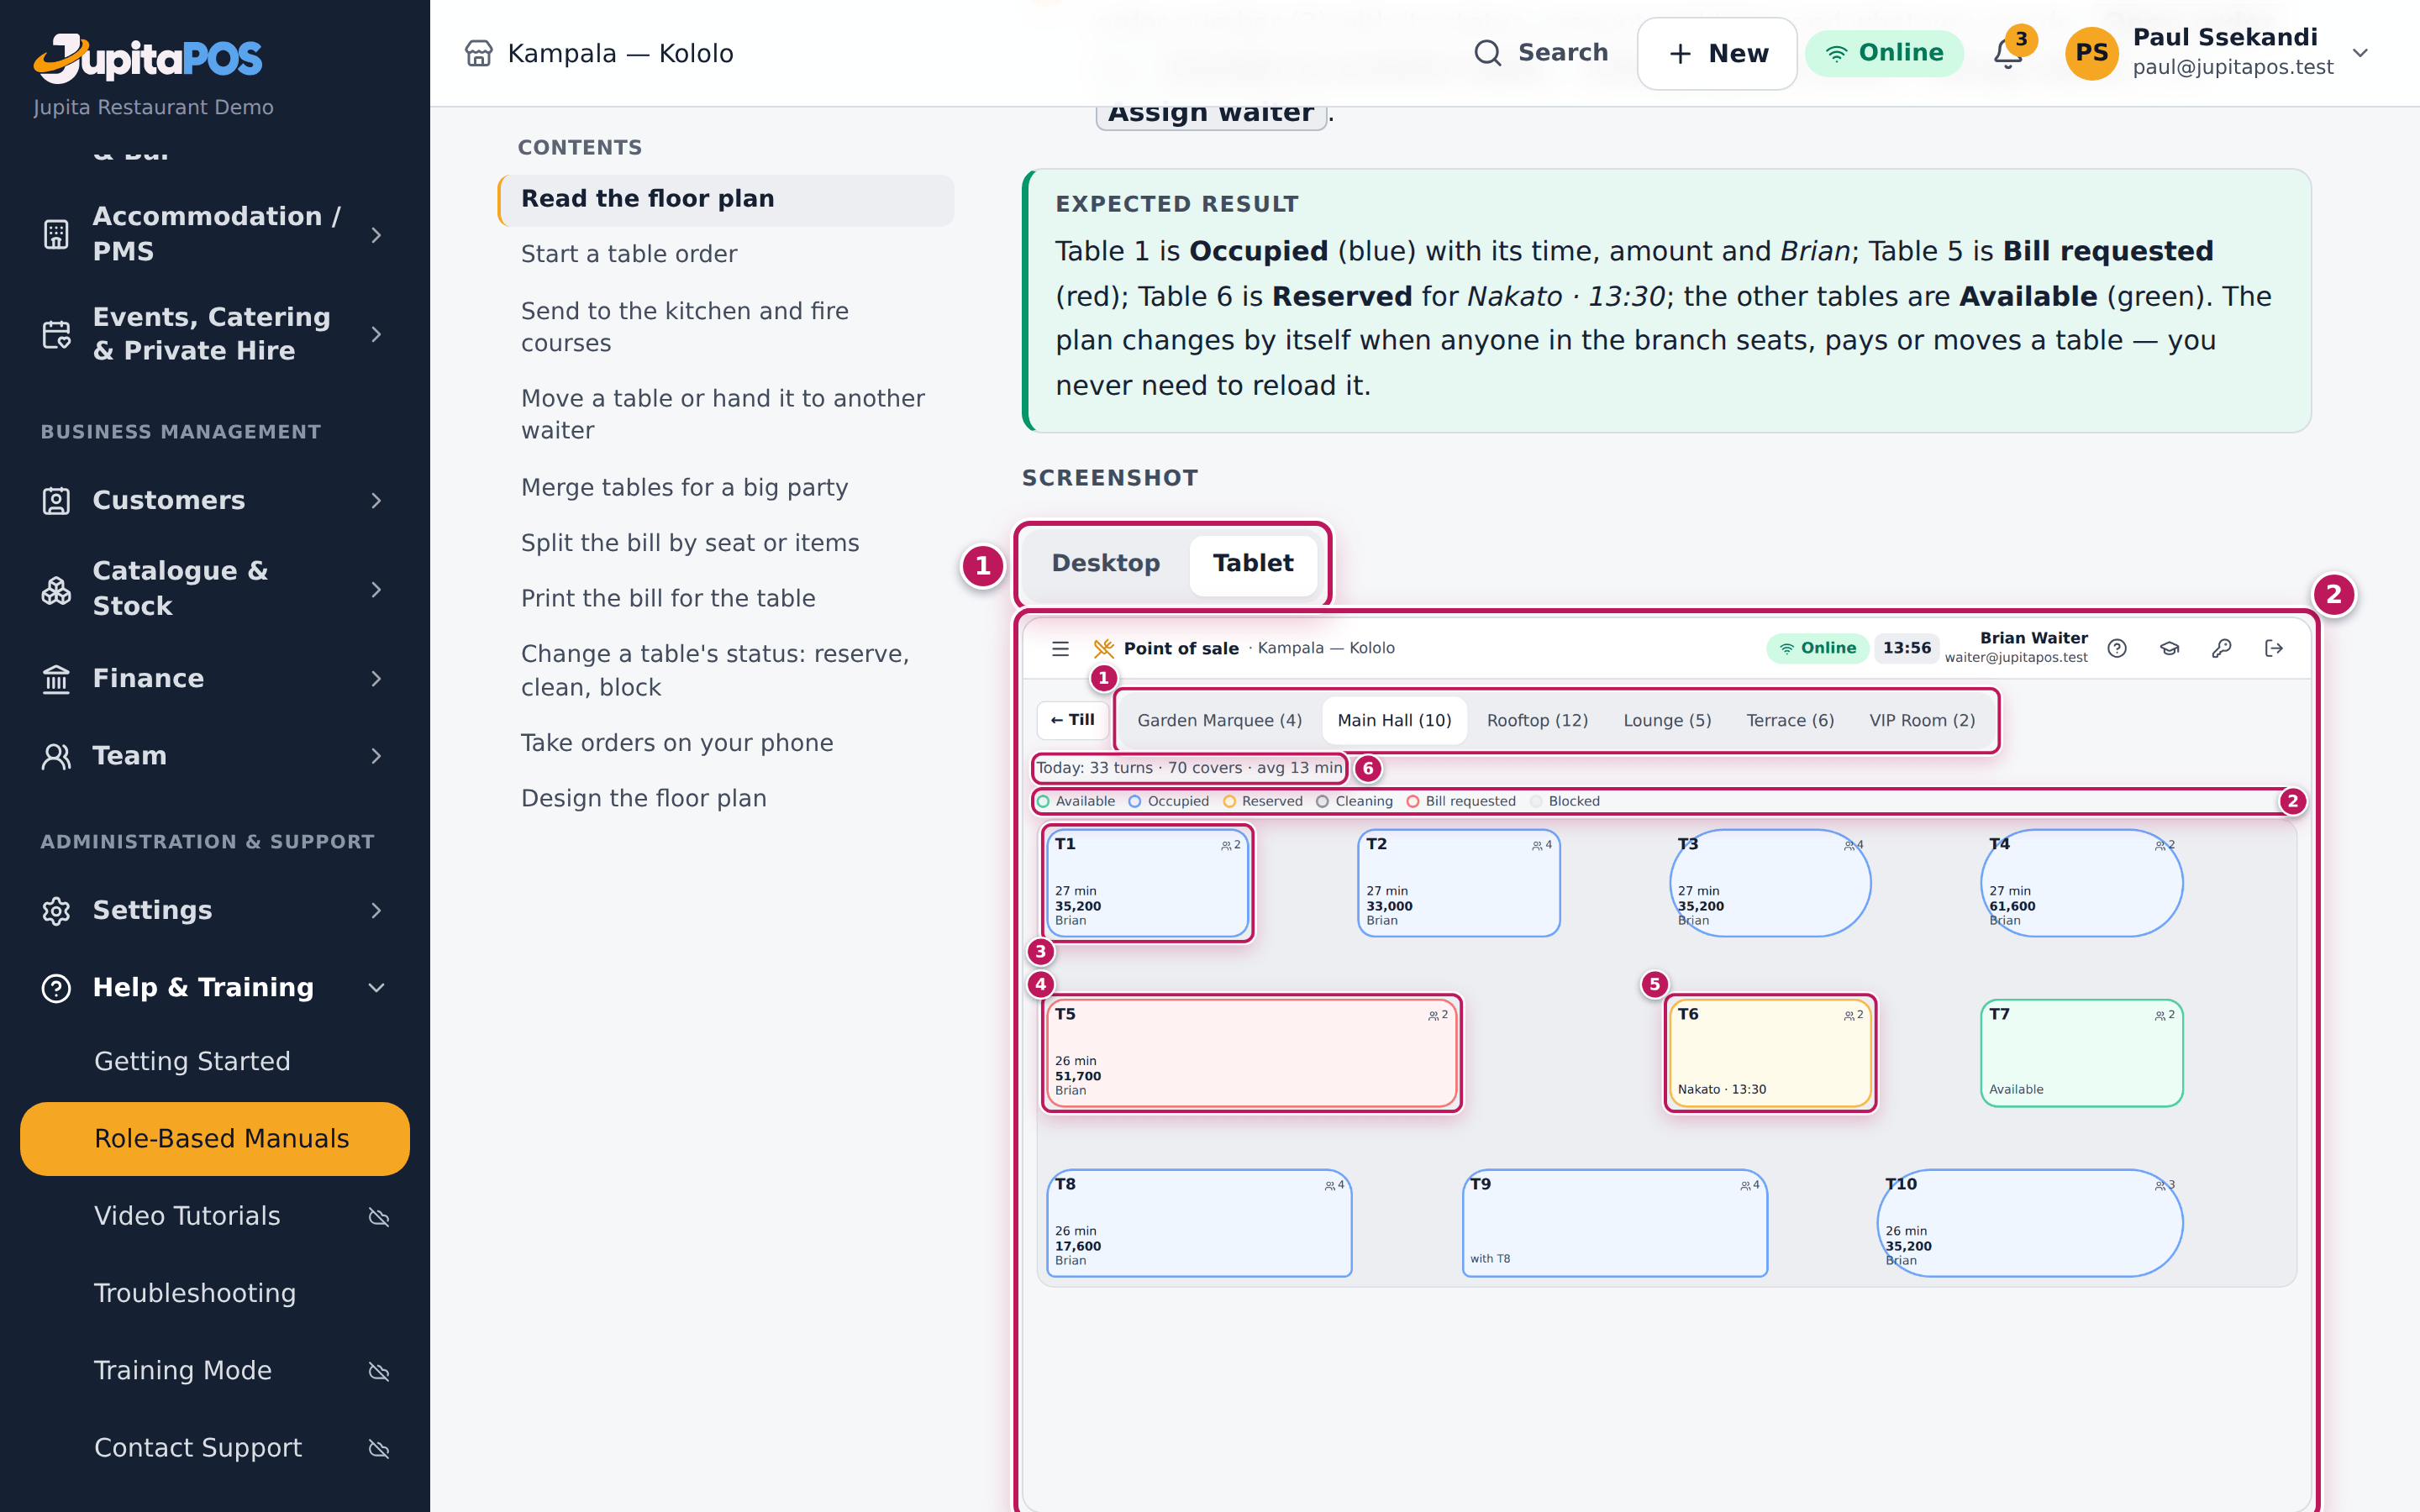
- Under a screenshot, choose Desktop, Tablet or Phone (1) to see the screen at that size; tap the screenshot (2) to enlarge it.
- Tap Back to where you were (3) to return to the screen you came from.
Expected result
Paul, a cashier, searches split the bill: the first result is Split the bill by seat or items in Restaurant table service. From the floor plan, Help for this screen opens Restaurant table service, and Back to where you were takes him back to the floor plan.
Screenshot
Common mistakes
- Searching with one long sentence. A few words work best — the name of a button or of what you want to do.
- Looking for a screen you cannot open. The Help Center shows only what your roles allow; ask your manager if you need more.
Troubleshooting
- “Nothing found for …”. Try fewer or other words, such as the button’s name.
- “The search did not answer — check the connection and try again.” The device is offline or the server is slow. The manuals need a connection.
- Help for this screen opens the Help Center, not a manual. That screen has no manual of its own, or you may not read it. Search instead.
- “The manuals are not installed”. This installation has no documentation. Ask the person who runs JupitaPos.
FAQ
Can I print a manual? Yes: tap Print at the top of a manual. Every screenshot is printed with it.
Change your password and turn on two-step sign-in
Purpose
Keep your account safe: change your password when you want or must, and add two-step sign-in so that a stolen password alone cannot open your account.
Role / permission required
Everyone, for their own account. These changes need a password sign-in — not a PIN.
Prerequisites
- You are signed in with your e-mail and password.
- For two-step sign-in: an authenticator app on your phone (Google Authenticator, Authy or 1Password).
Steps
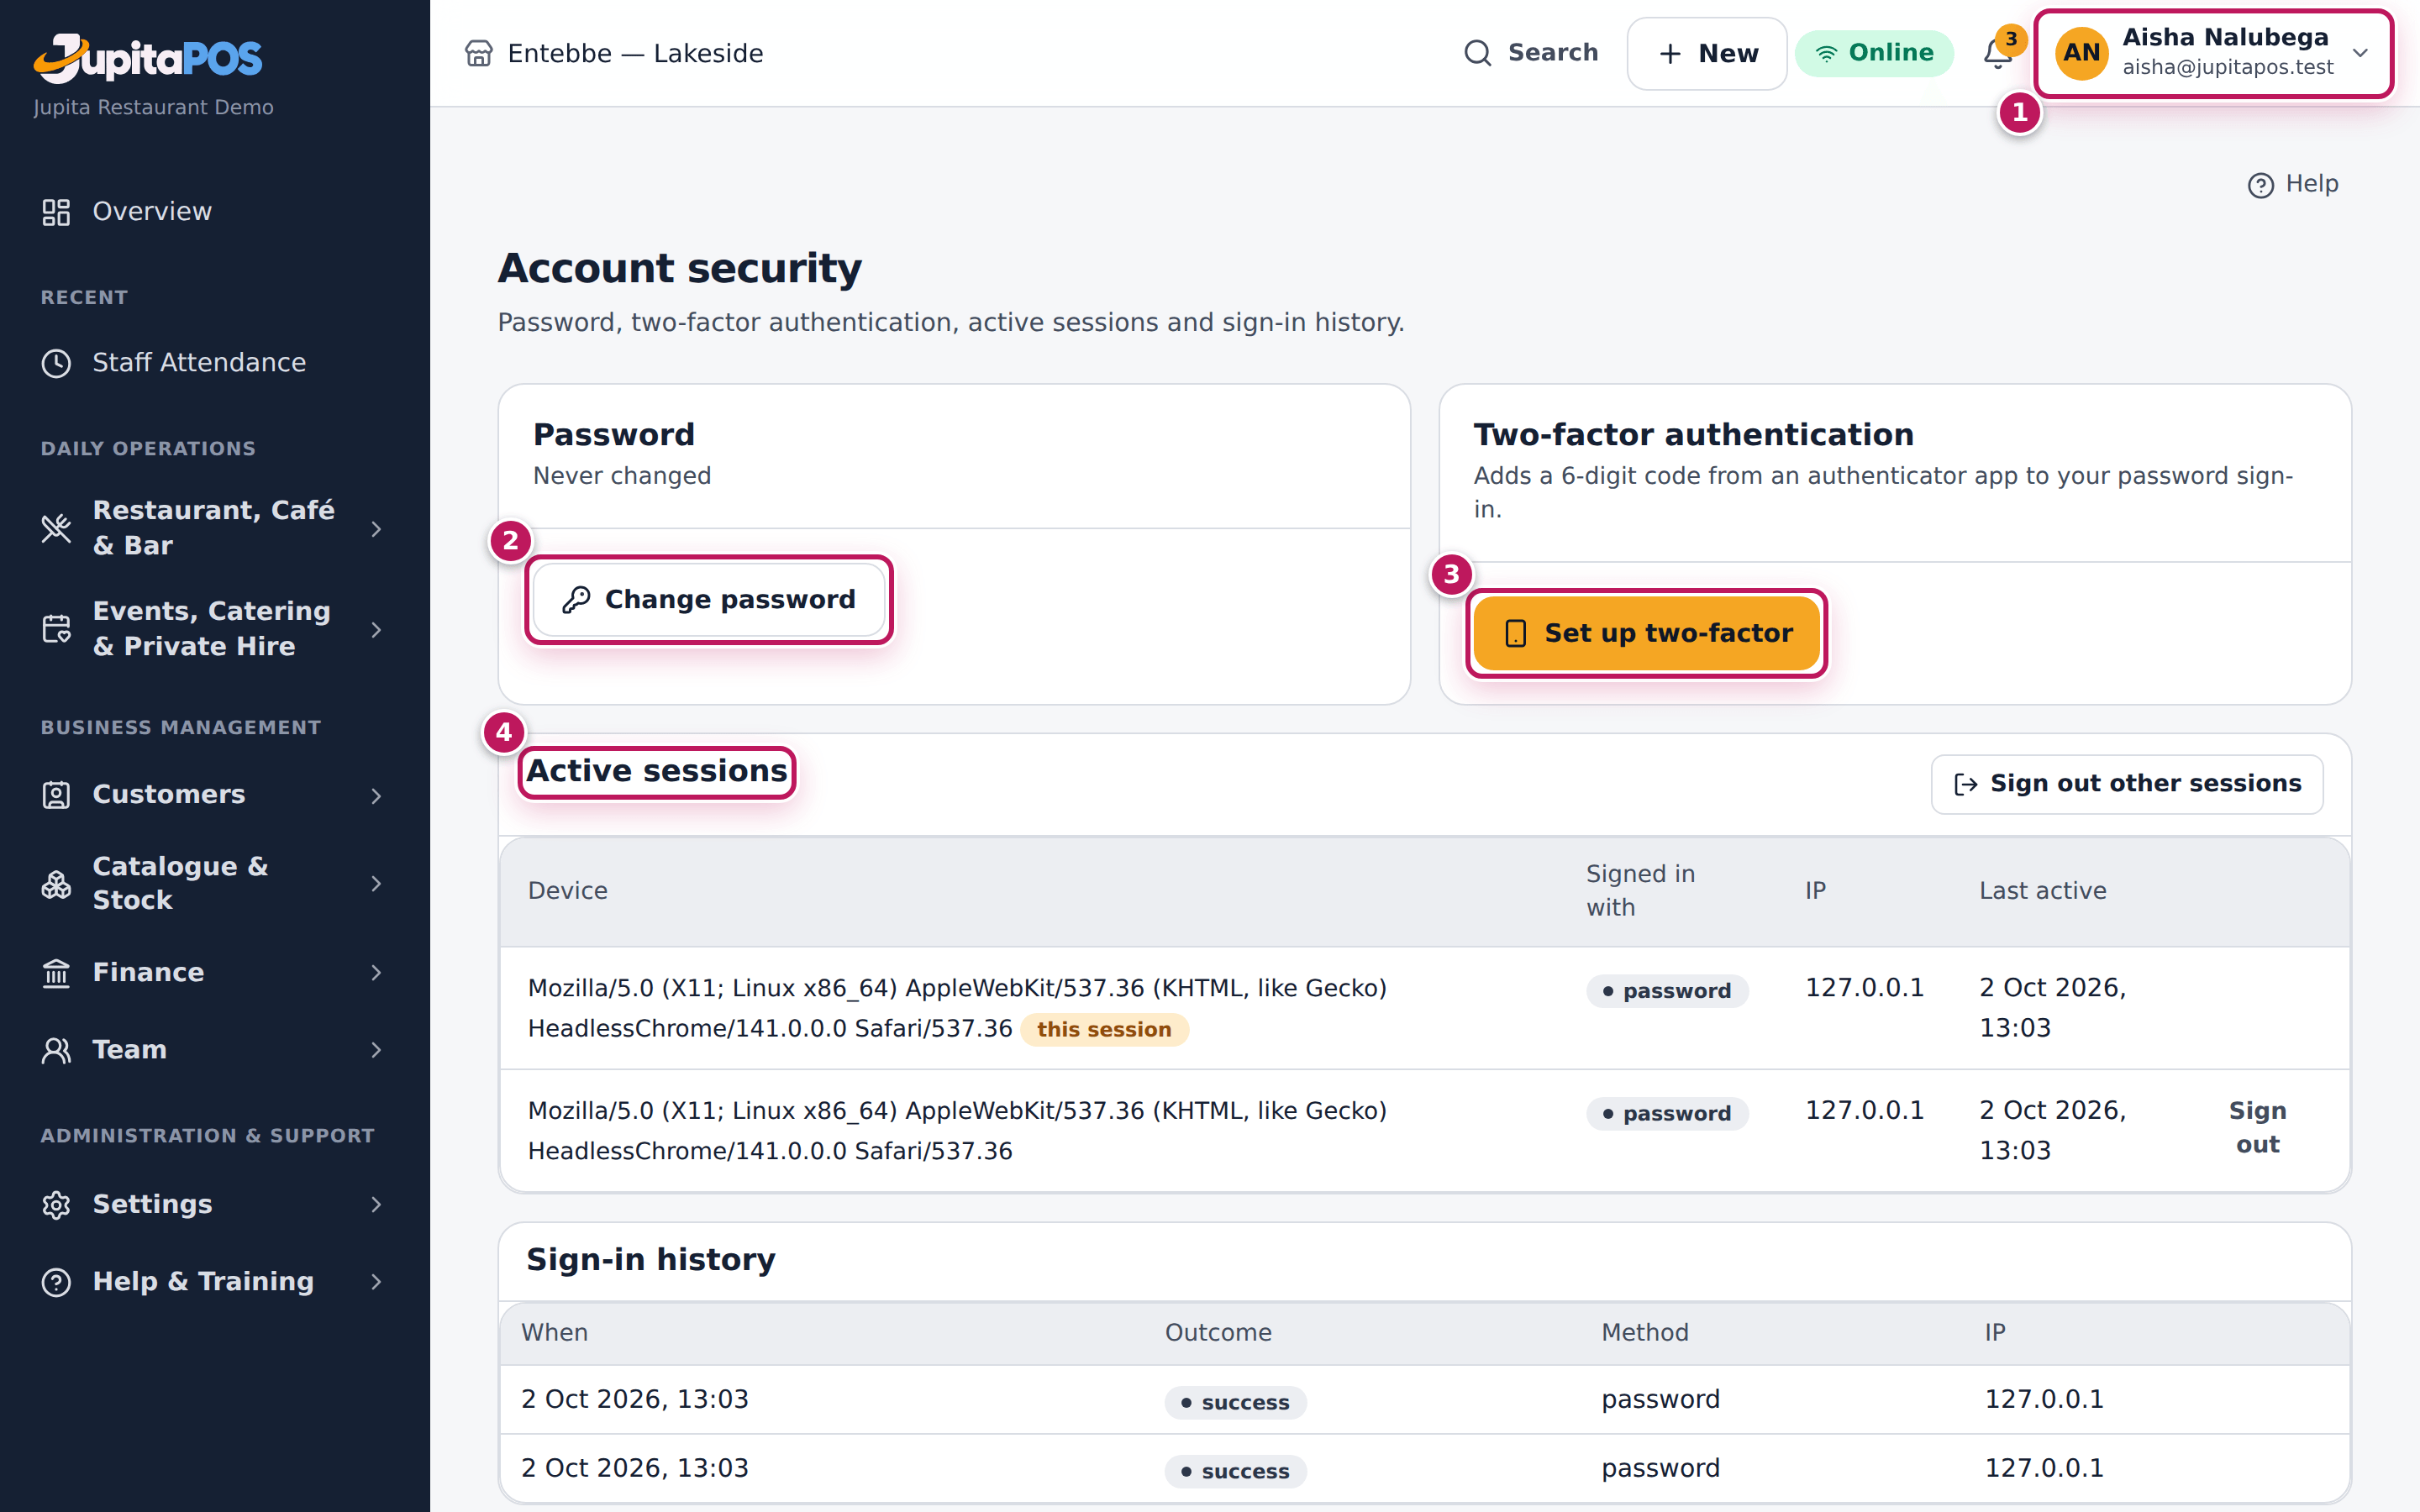
- Tap your name at the top right (1), then Active Sessions. The Account security page shows your password, two-factor authentication, your Active sessions (4) and your sign-in history.
- To change your password, tap Change password (2).
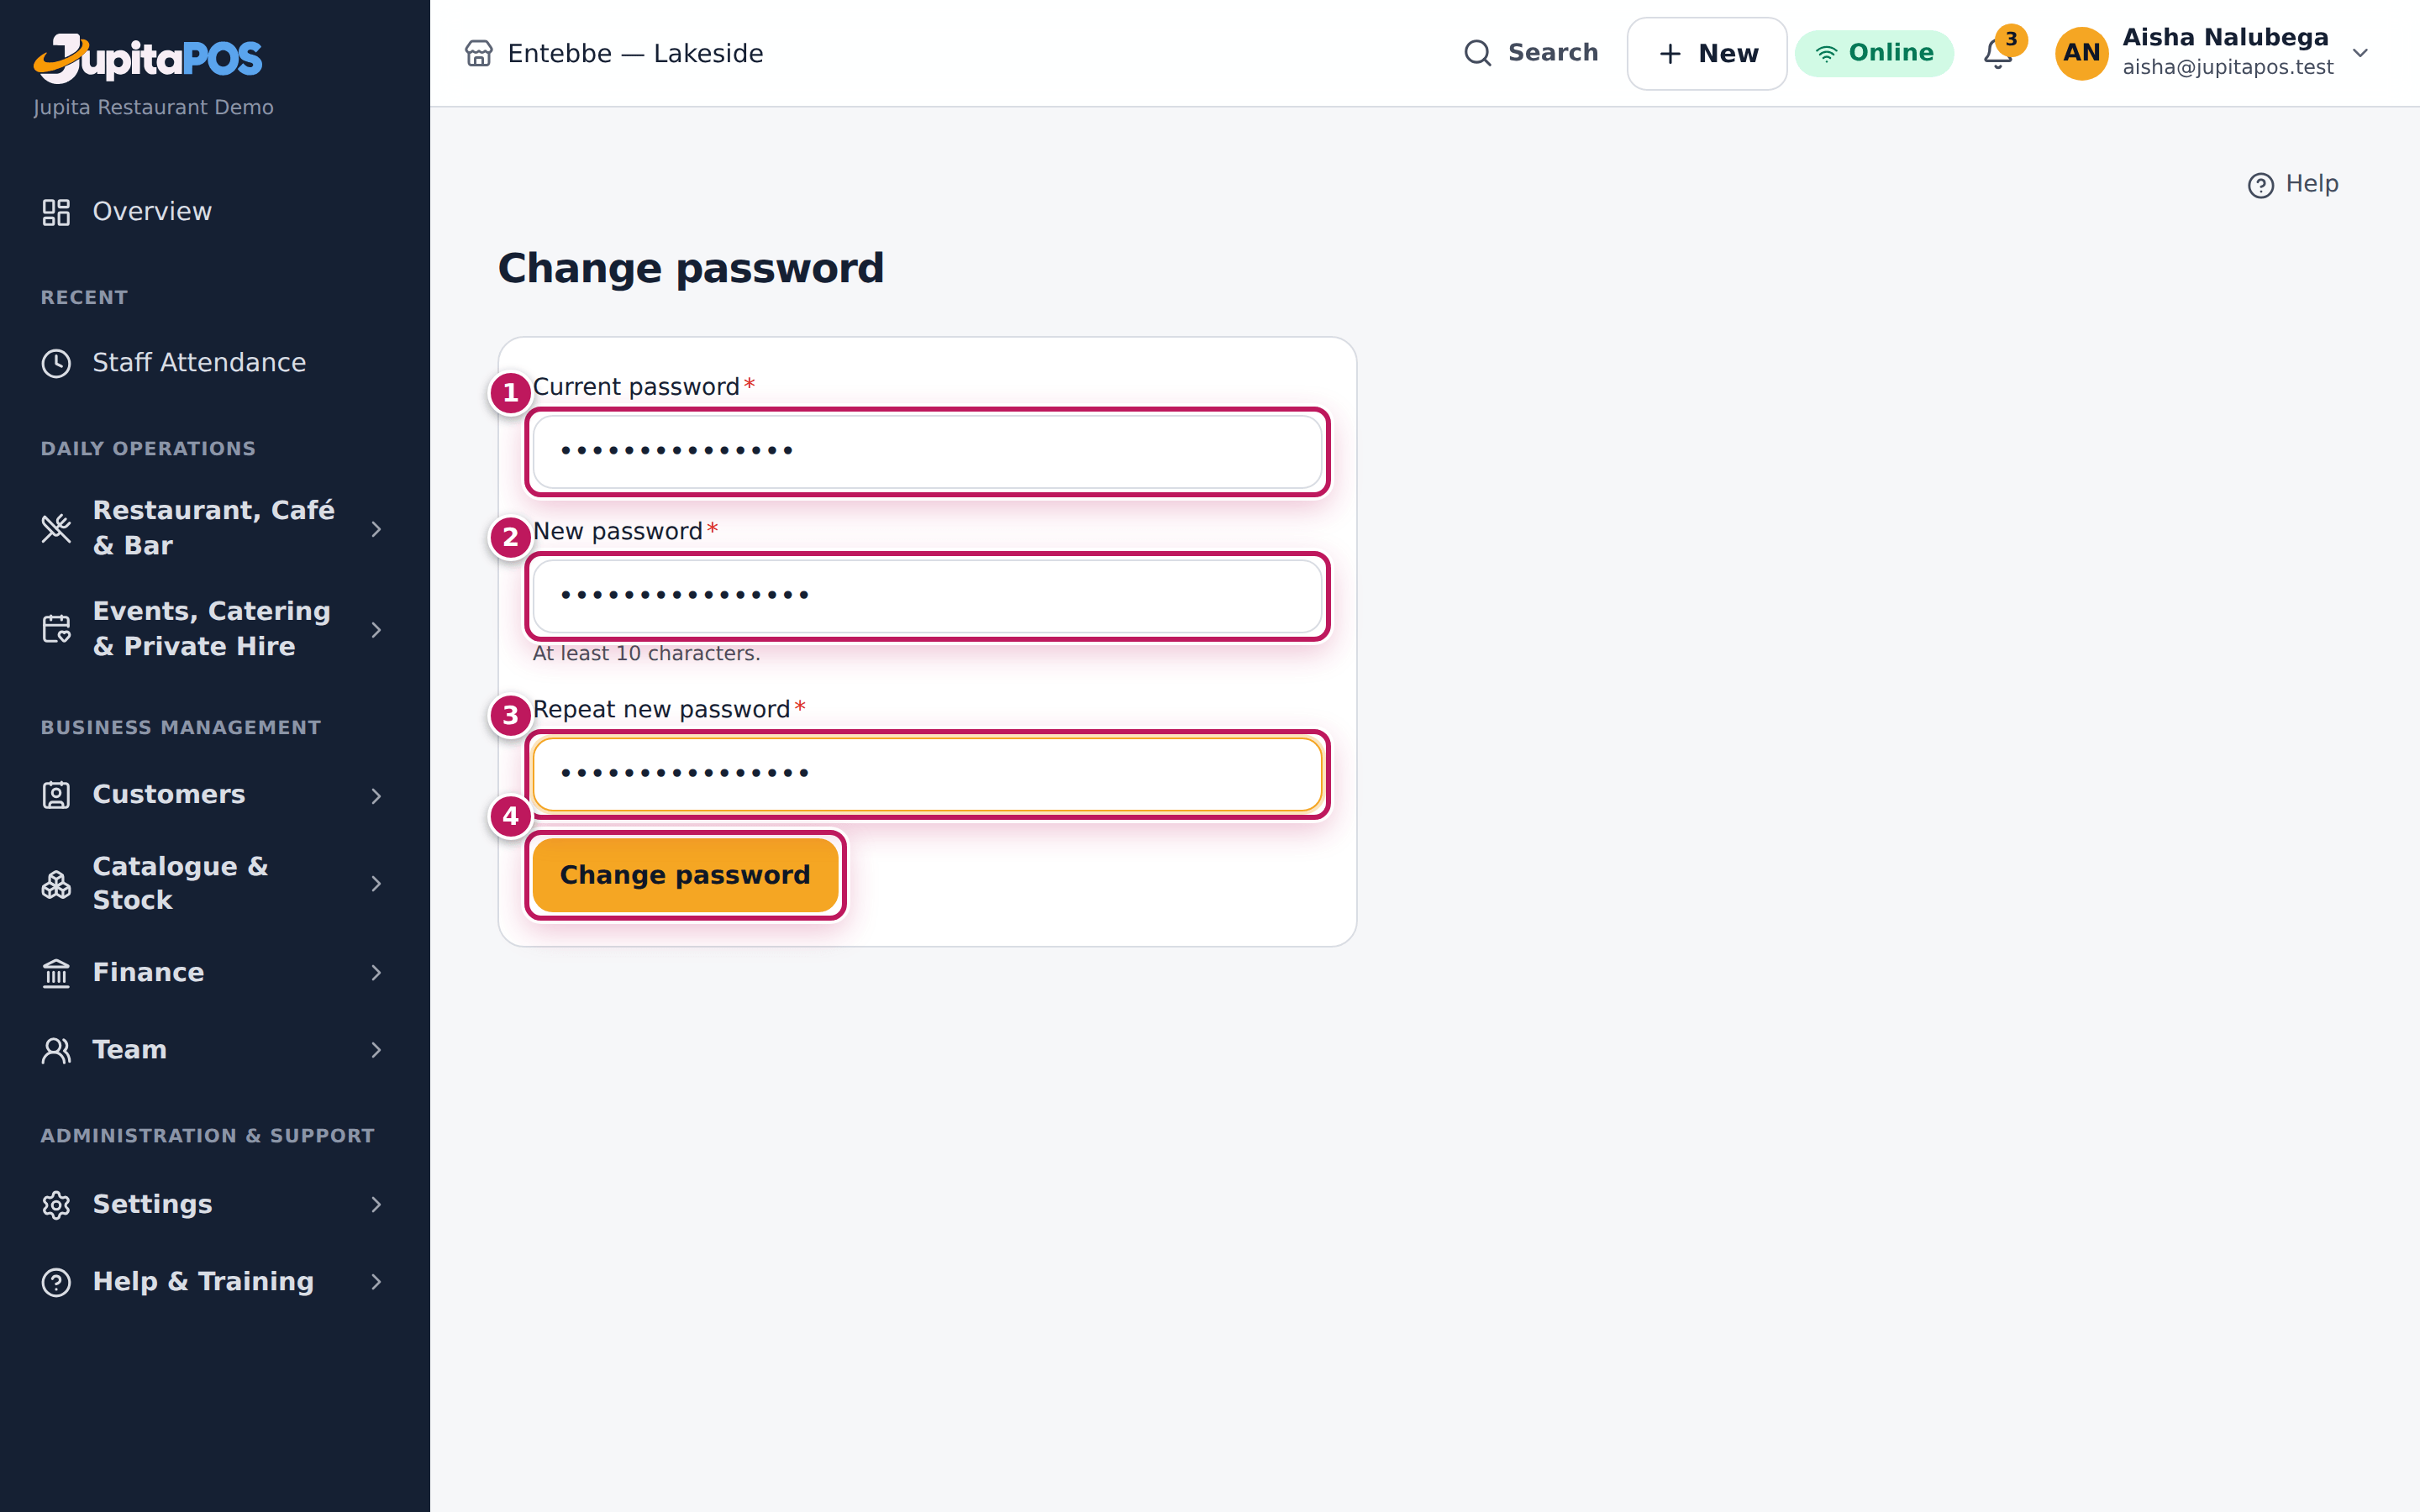
- Type your Current password (1), then a new one in New password (2) — at least 10 characters — and again in Repeat new password (3).
- Tap Change password (4).
- To add two-step sign-in, tap Set up two-factor (3).
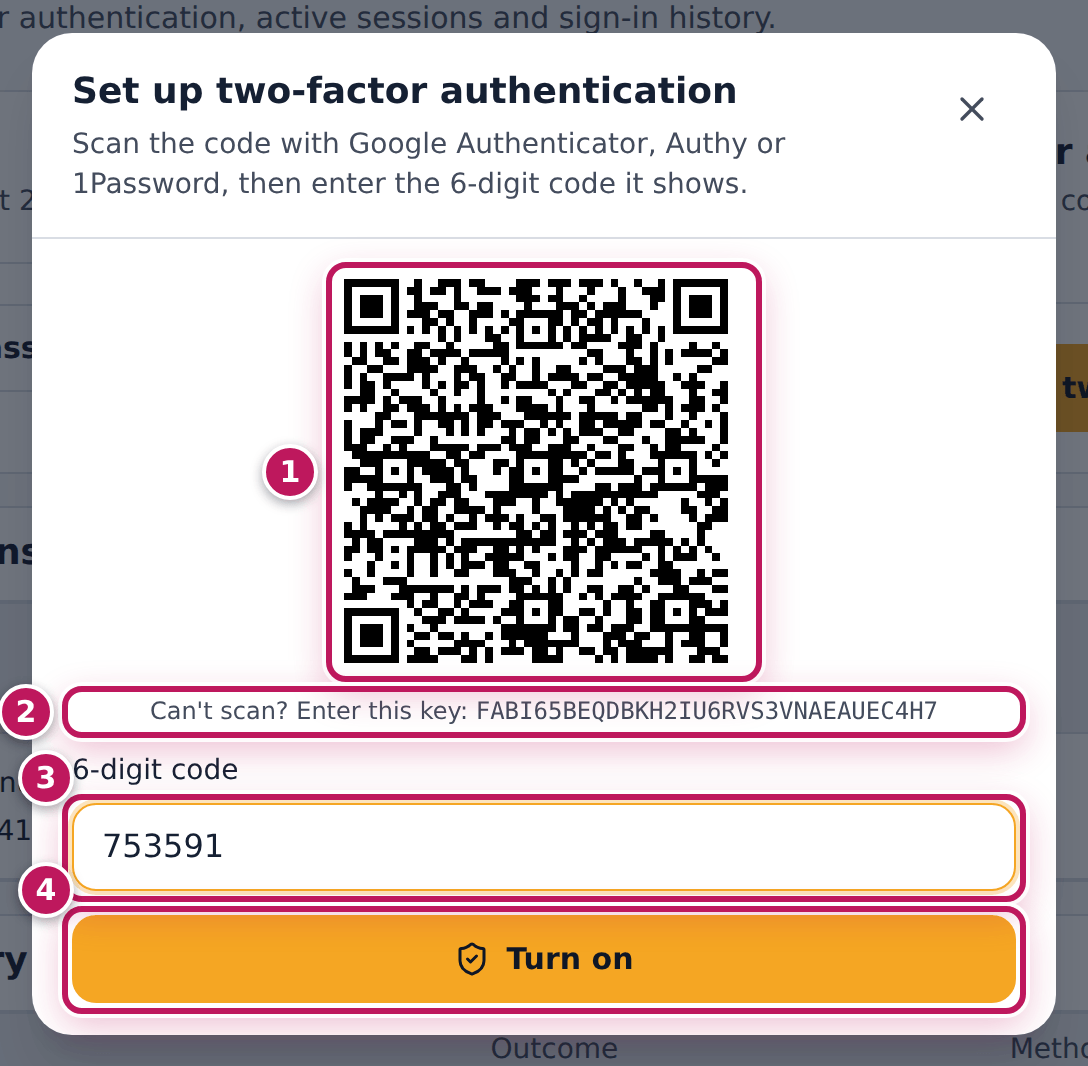
- Scan the QR code (1) with your authenticator app. If you cannot scan, type the key under it (2) into the app instead.
- Type the 6-digit code the app shows in 6-digit code (3) and tap Turn on (4).
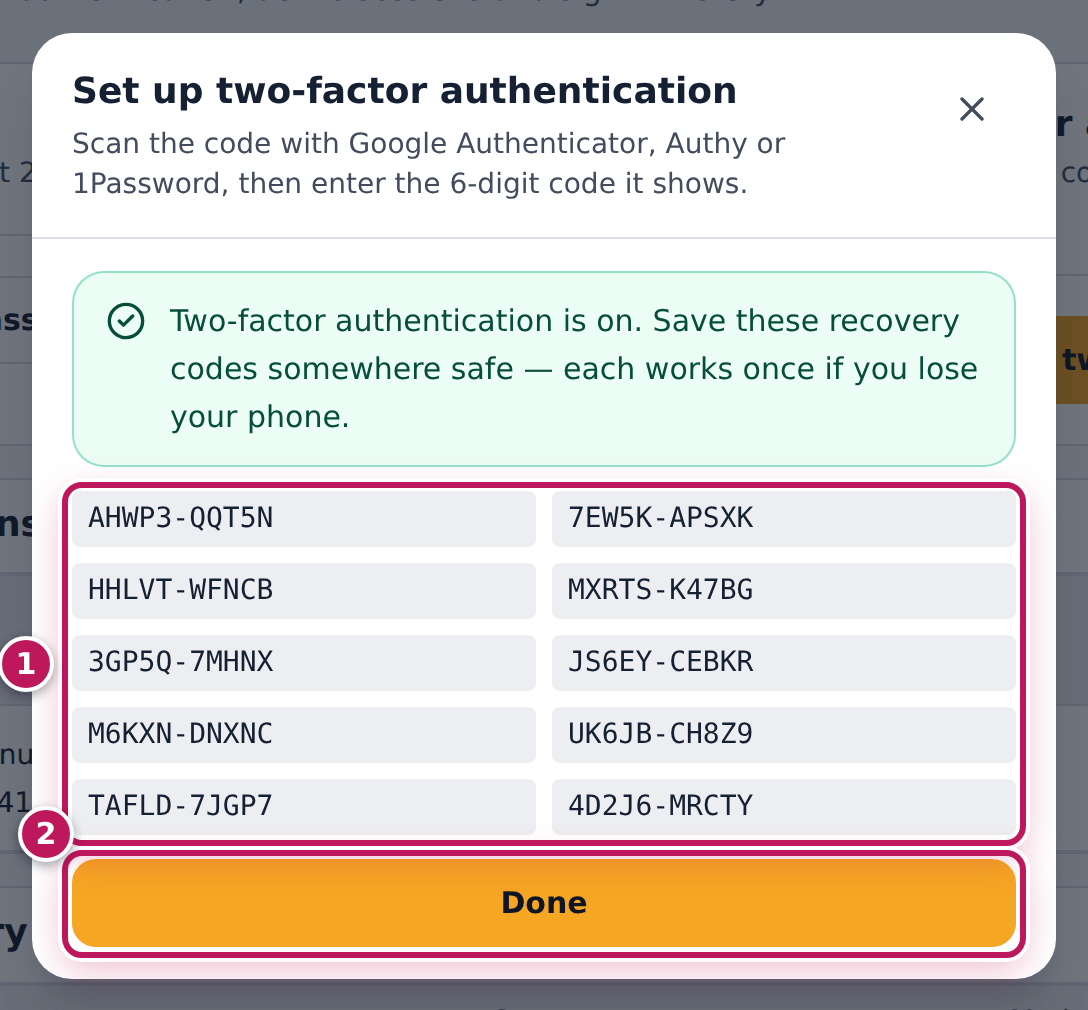
- Write down or print the ten recovery codes (1) and keep them somewhere safe, away from your phone. Tap Done (2).
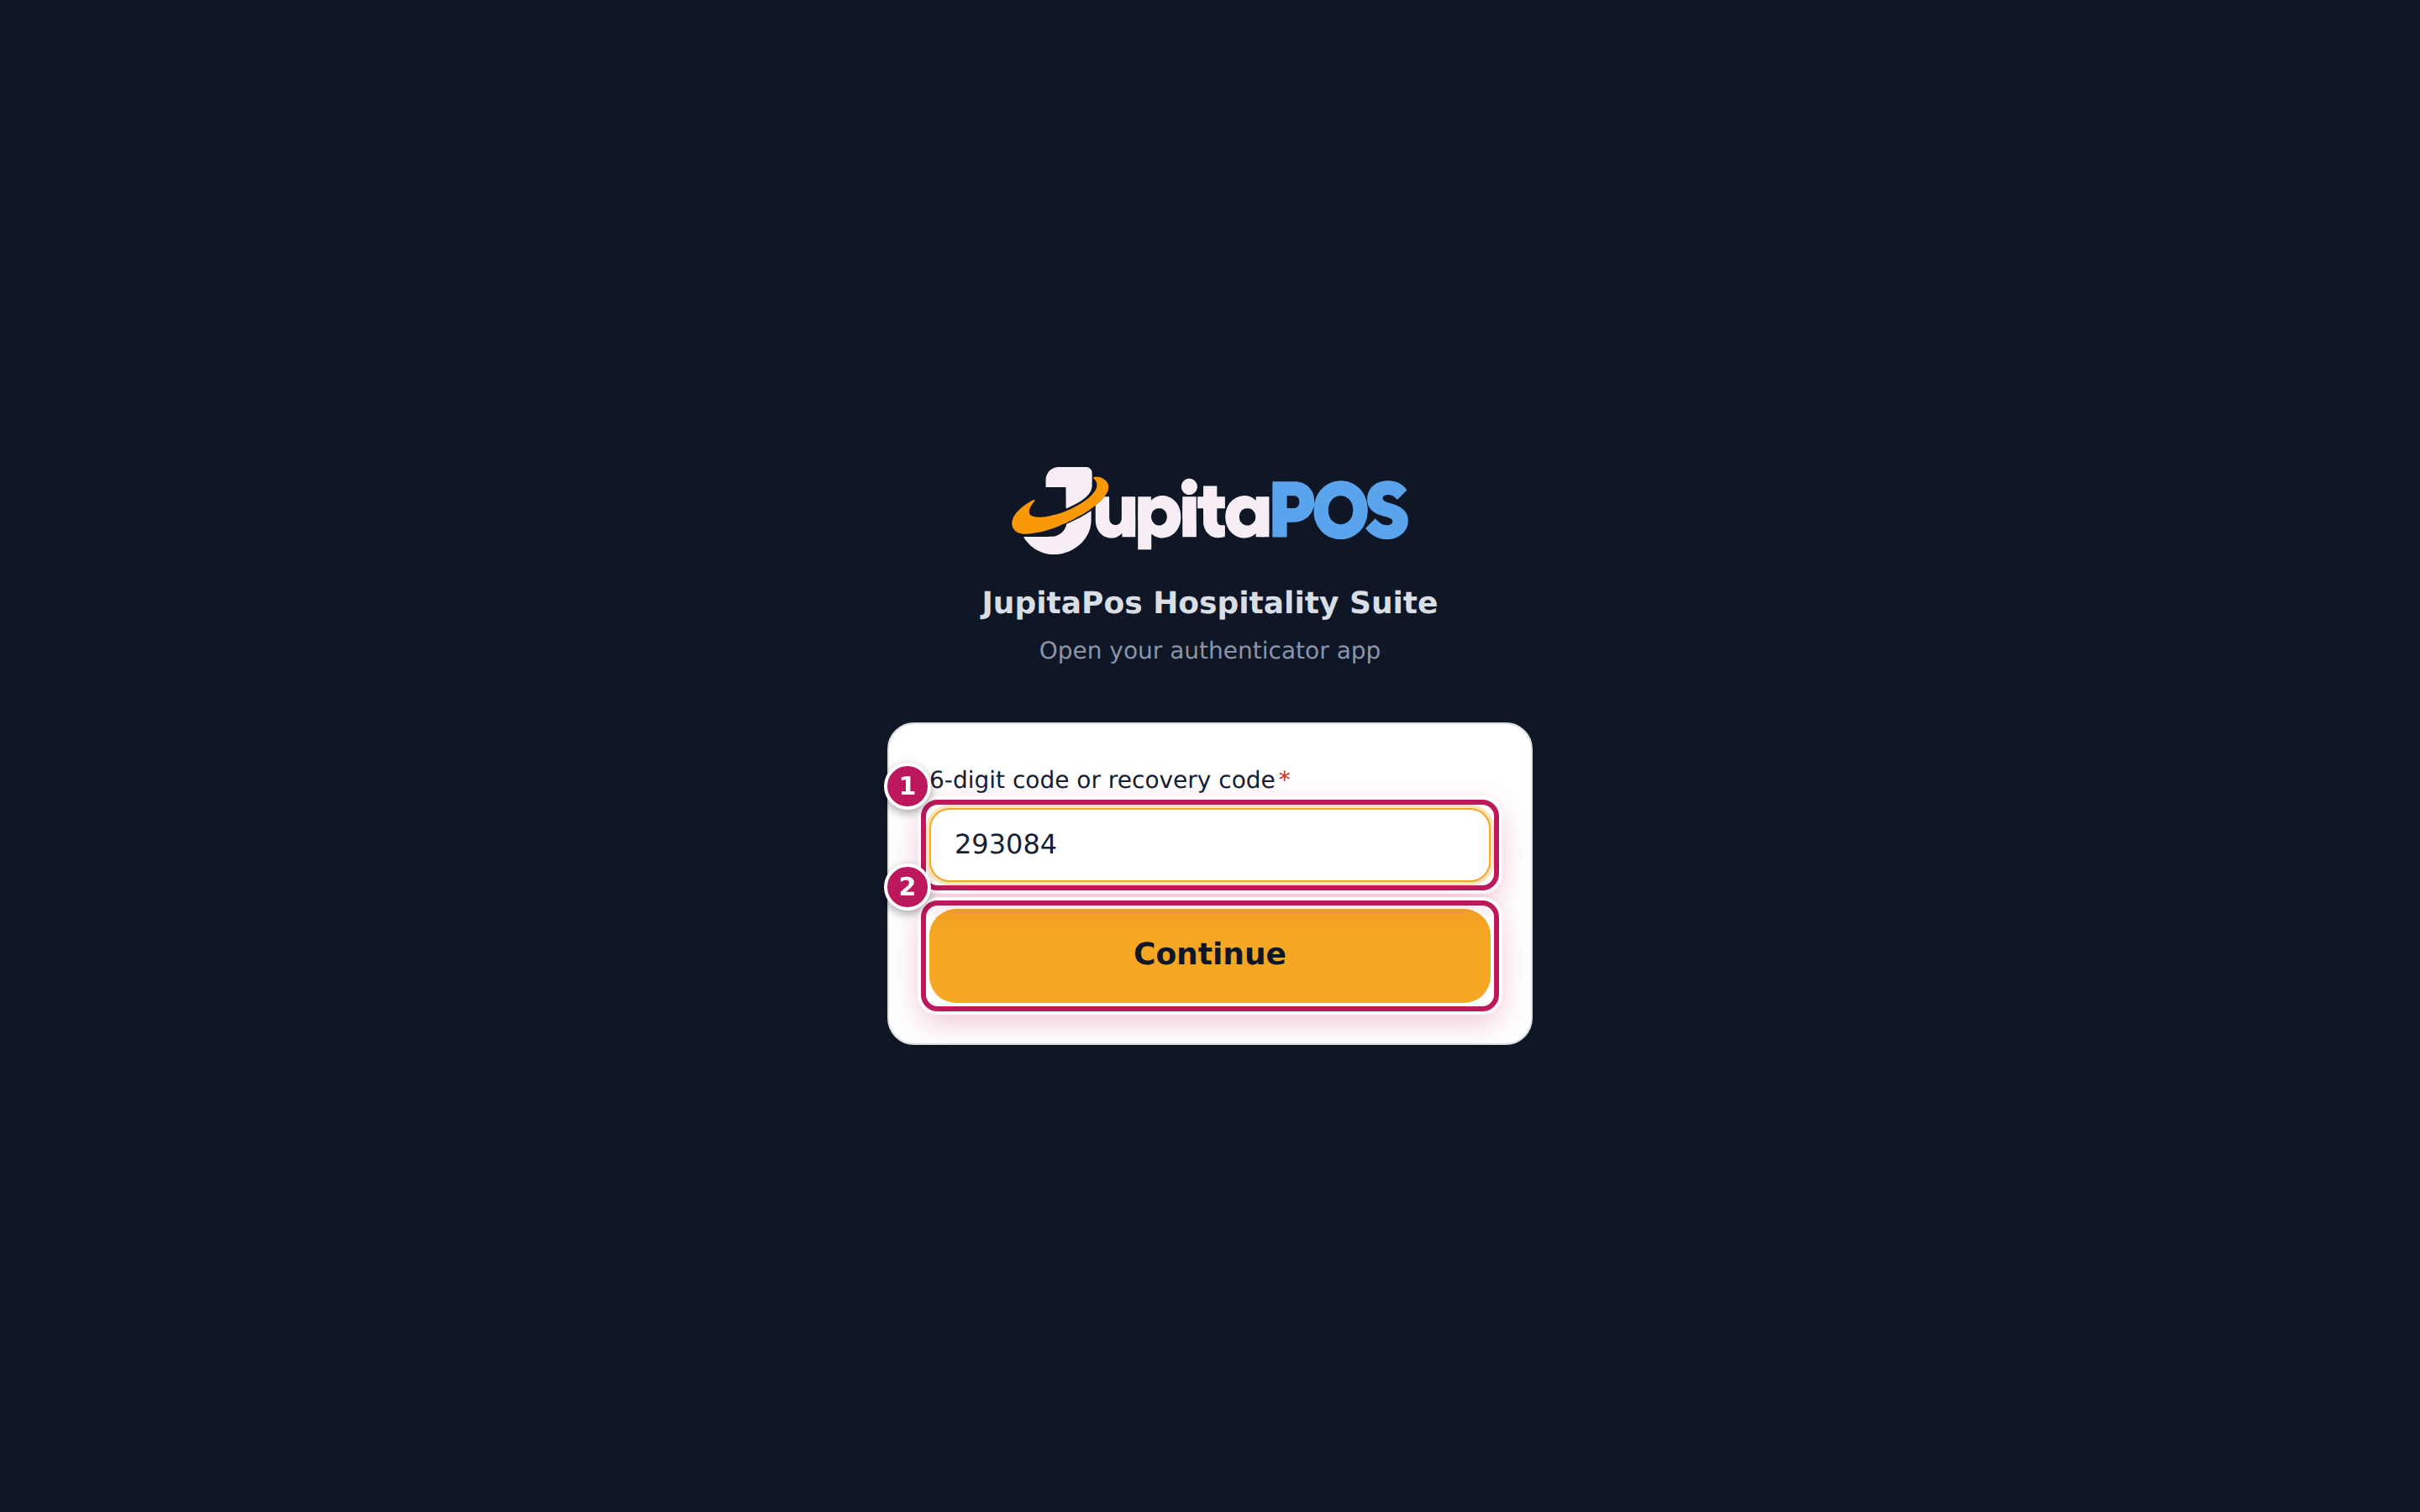
- The next time you sign in, the Two-factor check page asks for the code: type the 6-digit code from the app (1) and tap Continue (2).
Expected result
After step 4 JupitaPos says Password changed. Other sessions have been signed out. — any other device where you were signed in must sign in again. After step 7 the page says Two-factor authentication is on. and the card shows Enabled with 10 recovery codes left. From then on, a sign-in needs your password and a code.
Screenshot
Common mistakes
- Not keeping the recovery codes. If you lose or change your phone, a recovery code is the only way in without an administrator. Each code works once.
- Using the same password as for your e-mail or social media. Choose a password you use only for JupitaPos.
- Setting up two-step sign-in on a shared phone. The codes must come from your own phone.
Troubleshooting
- “That code is not valid. Check the time on your phone and try again.” The phone’s clock is wrong, or the code changed while you typed it. Set the phone’s time to automatic and type the new code.
- “Your current password is not correct.” Type your current password again. Five wrong tries lock the account for 15 minutes.
- “Choose a password you have not used before.” The new password is the same as the current one. Choose another.
- “Security changes need a password sign-in. Sign out and sign in with your password.” You signed in with a PIN. Sign out and sign in with your e-mail and password.
- “Two-factor authentication is required for your role and cannot be disabled.” Your business requires two-step sign-in for your role. If it is required and not yet on, JupitaPos opens this page after you sign in with Two-factor authentication is required for your role. Set it up now to keep full access.
- “Too many wrong codes. Please sign in again in a few minutes.” Five wrong codes at the two-factor check end the sign-in. Wait, then sign in again.
FAQ
I lost my phone. How do I sign in? At the two-factor check, type one of your recovery codes instead of the 6-digit code. Then set up two-step sign-in again on your new phone. If you have no recovery code, an administrator can reset your two-step sign-in (see Require two-step sign-in and reset it).
How do I turn two-step sign-in off? On Account security, tap Disable, type your password and a current code, and tap Disable again — unless your role requires it.
What are the active sessions? Every device where you are signed in now. Tap Sign out on a line to end that session, or Sign out other sessions to end all but this one.
Reset a forgotten password
Purpose
Get back into your account when you have forgotten your password, without waiting for a manager.
Role / permission required
Everyone who has a user account and can read the e-mail address it uses.
Prerequisites
- Your account has a real e-mail address that you can open.
- The device is online.
Steps
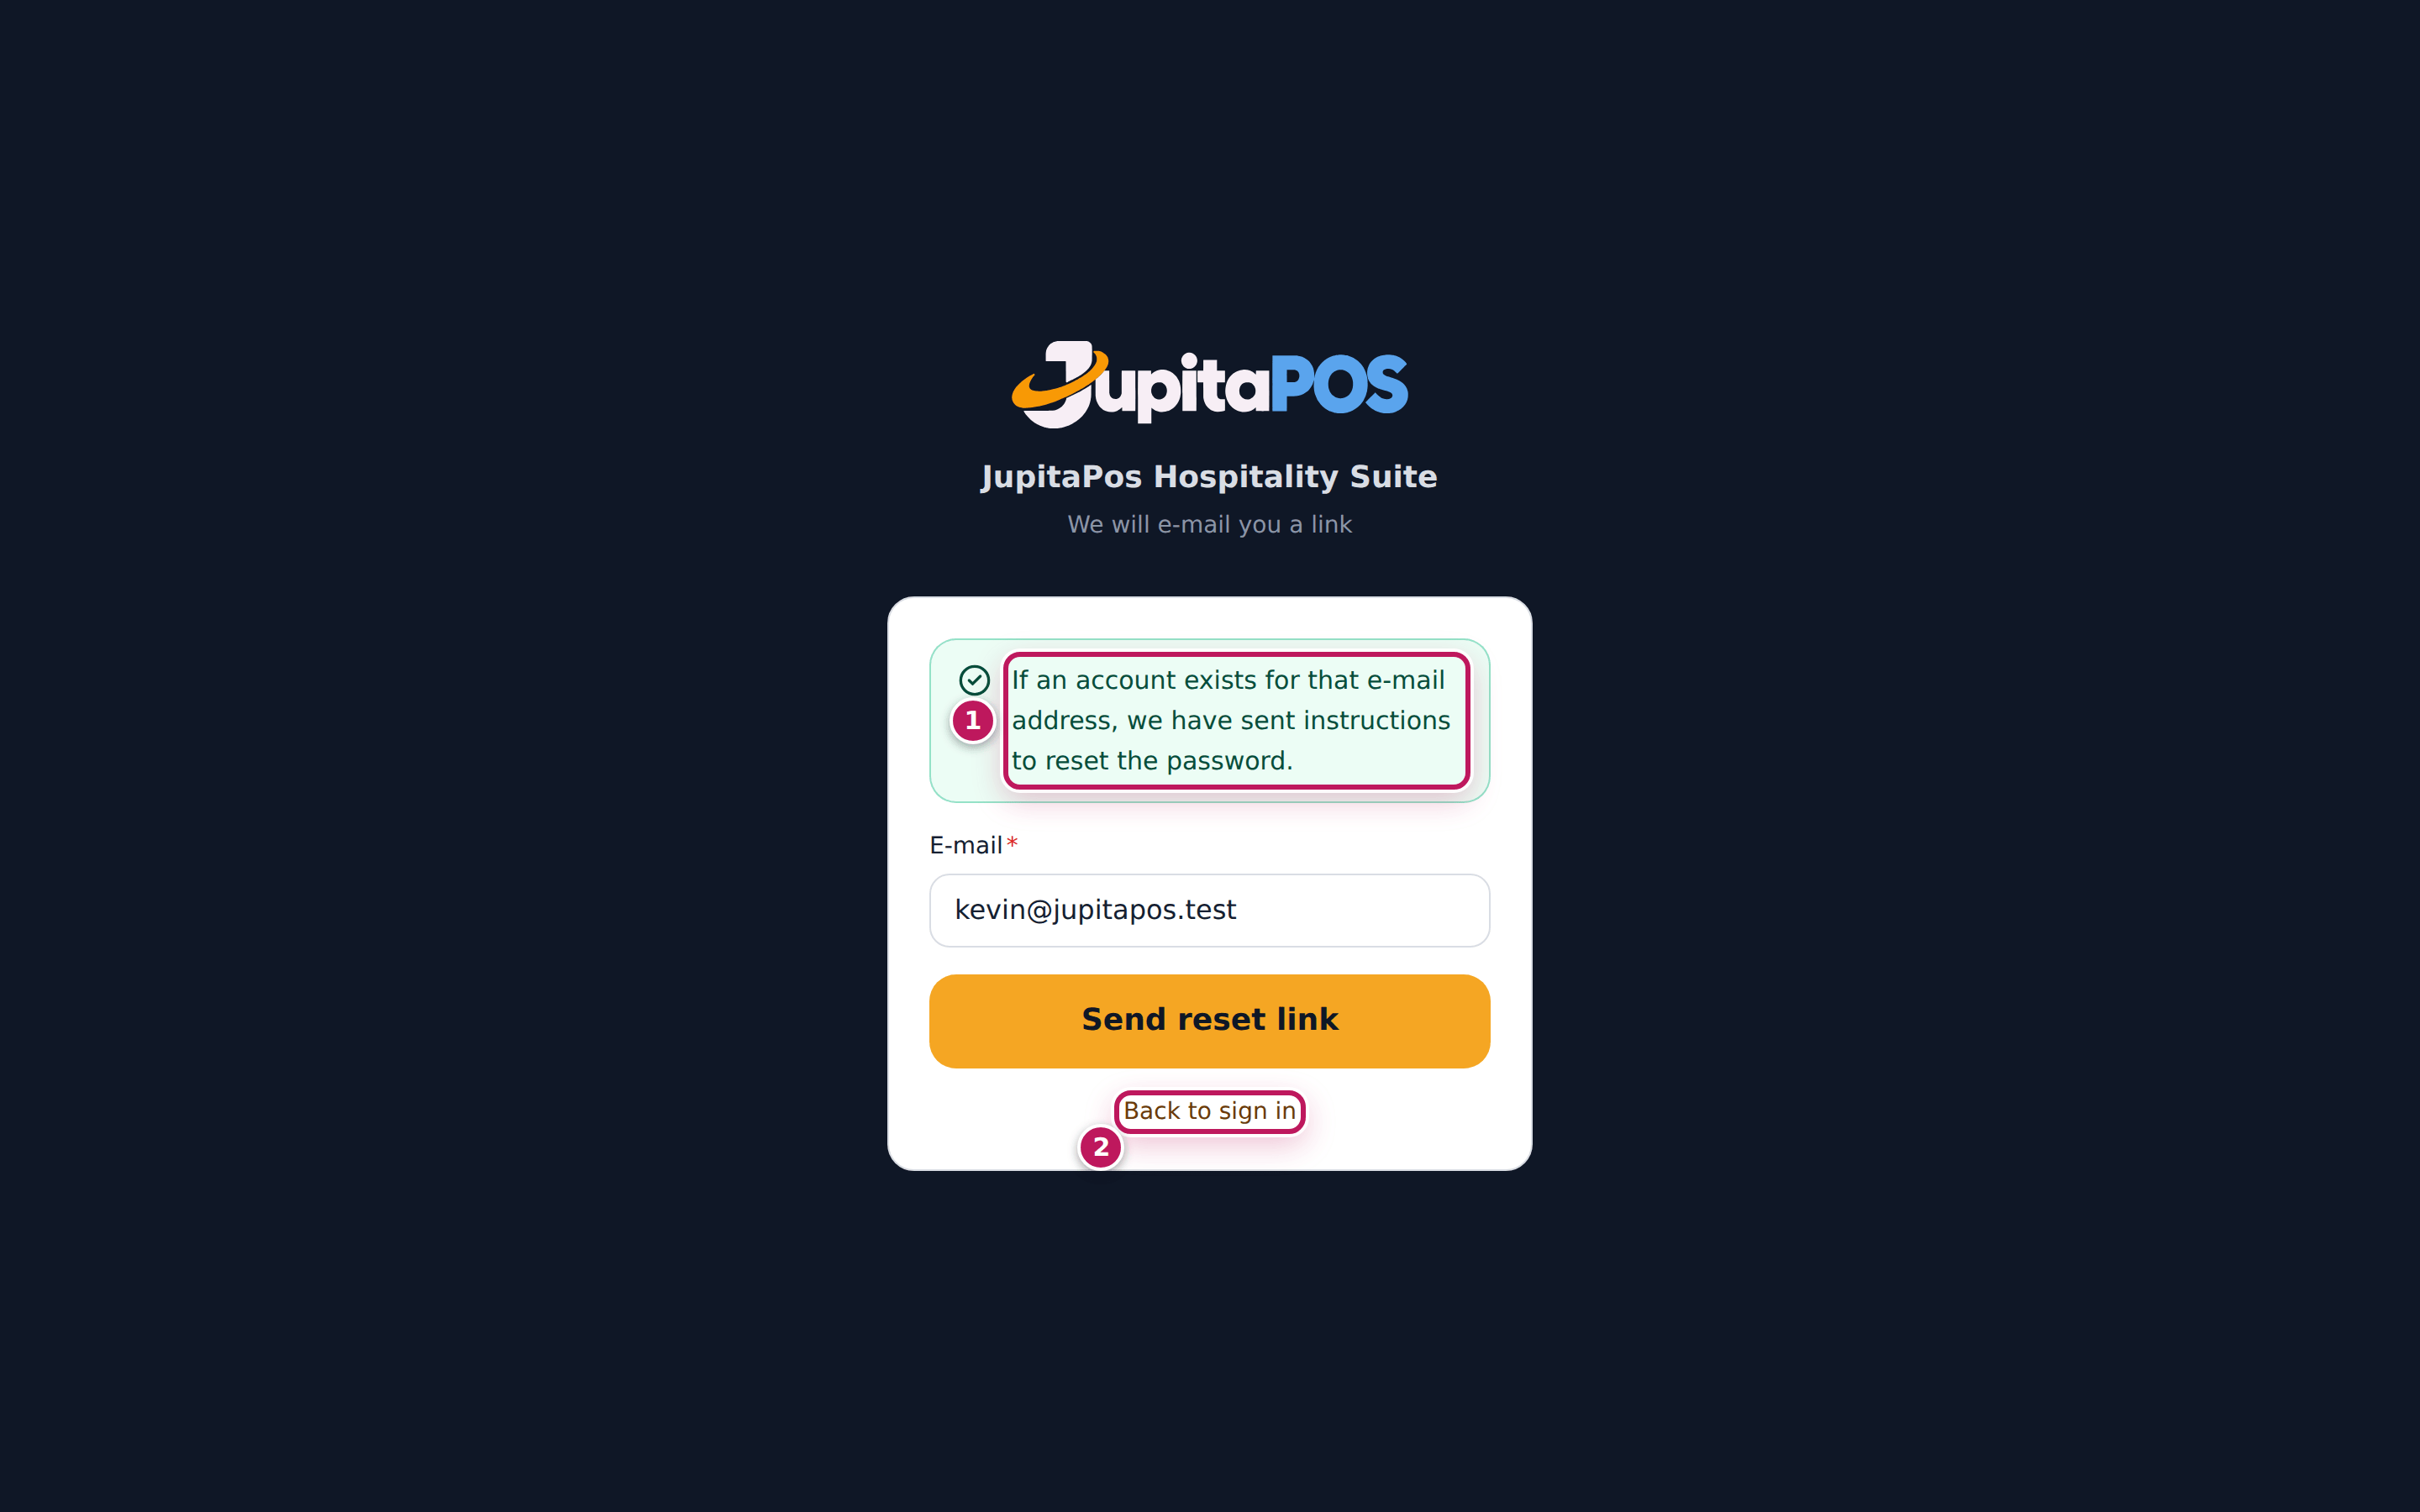
- On the Sign in page, tap Forgot password?.
- The Reset password page opens: We will e-mail you a link. Type your e-mail address in E-mail.
- Tap Send reset link. The page says If an account exists for that e-mail address, we have sent instructions to reset the password. (1).
- Open the e-mail from JupitaPos and tap the link in it within 60 minutes.
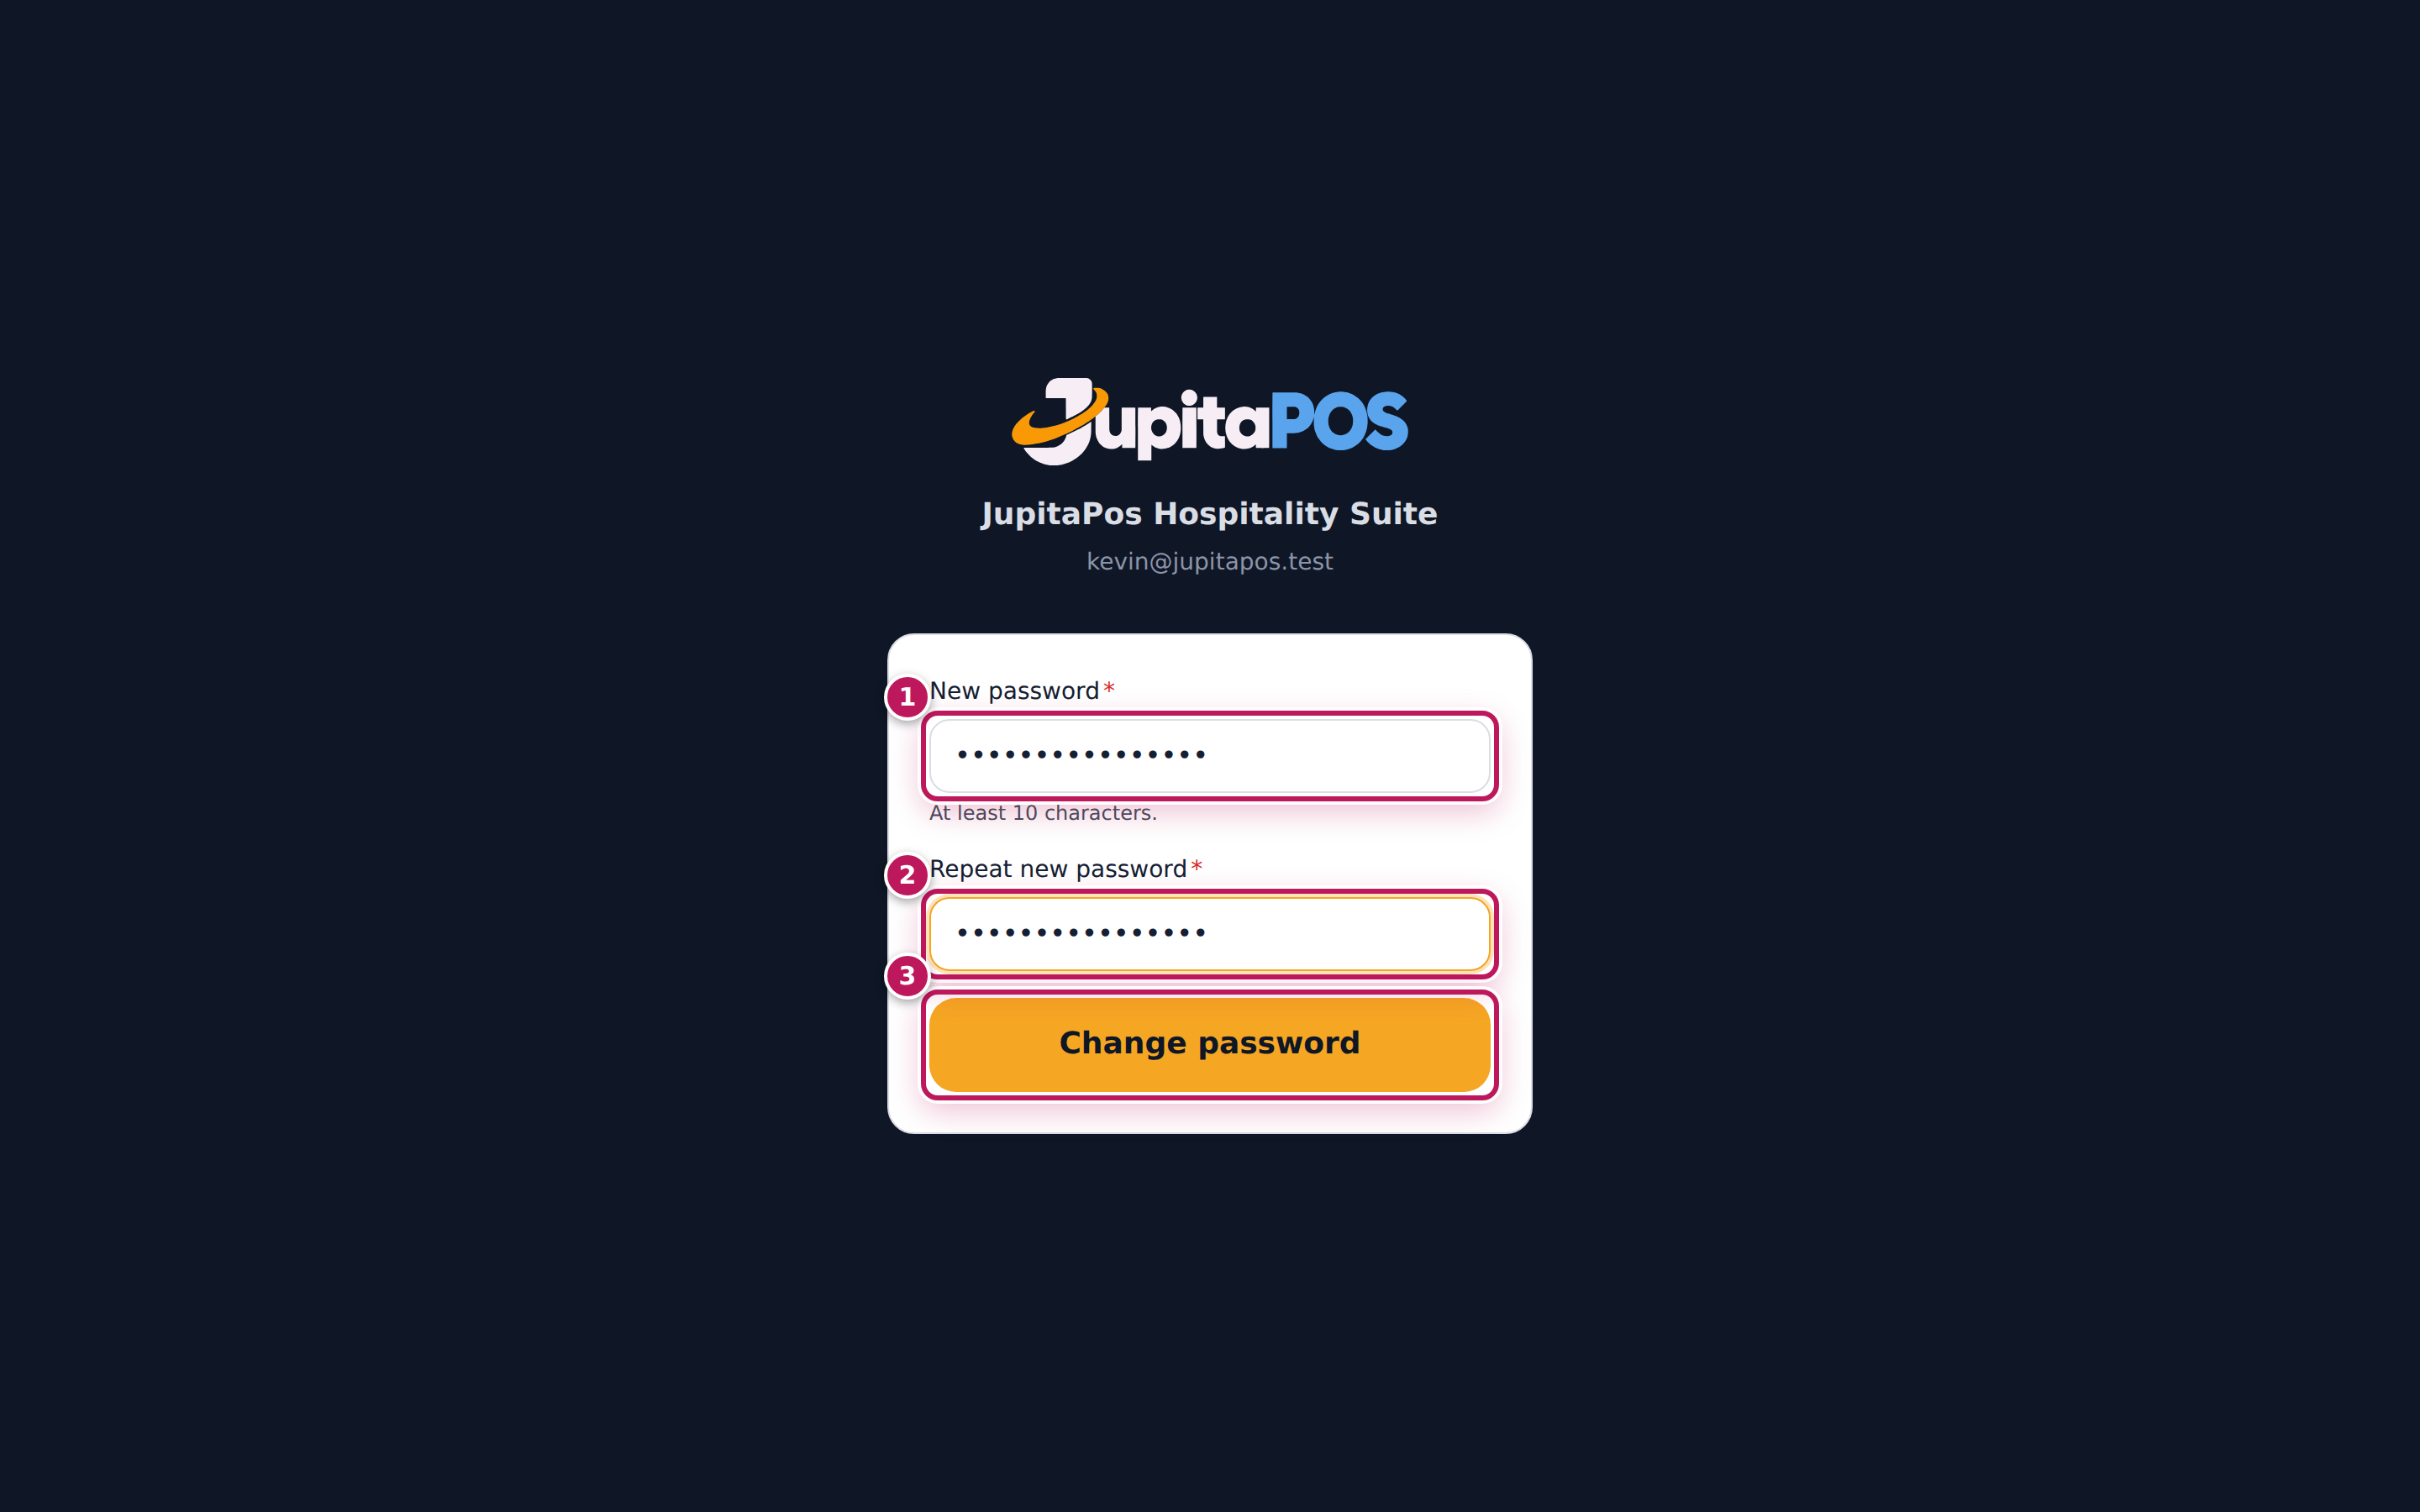
- The Choose a new password page shows your e-mail address. Type a new password in New password (1) — at least 10 characters — and again in Repeat new password (2).
- Tap Change password (3).
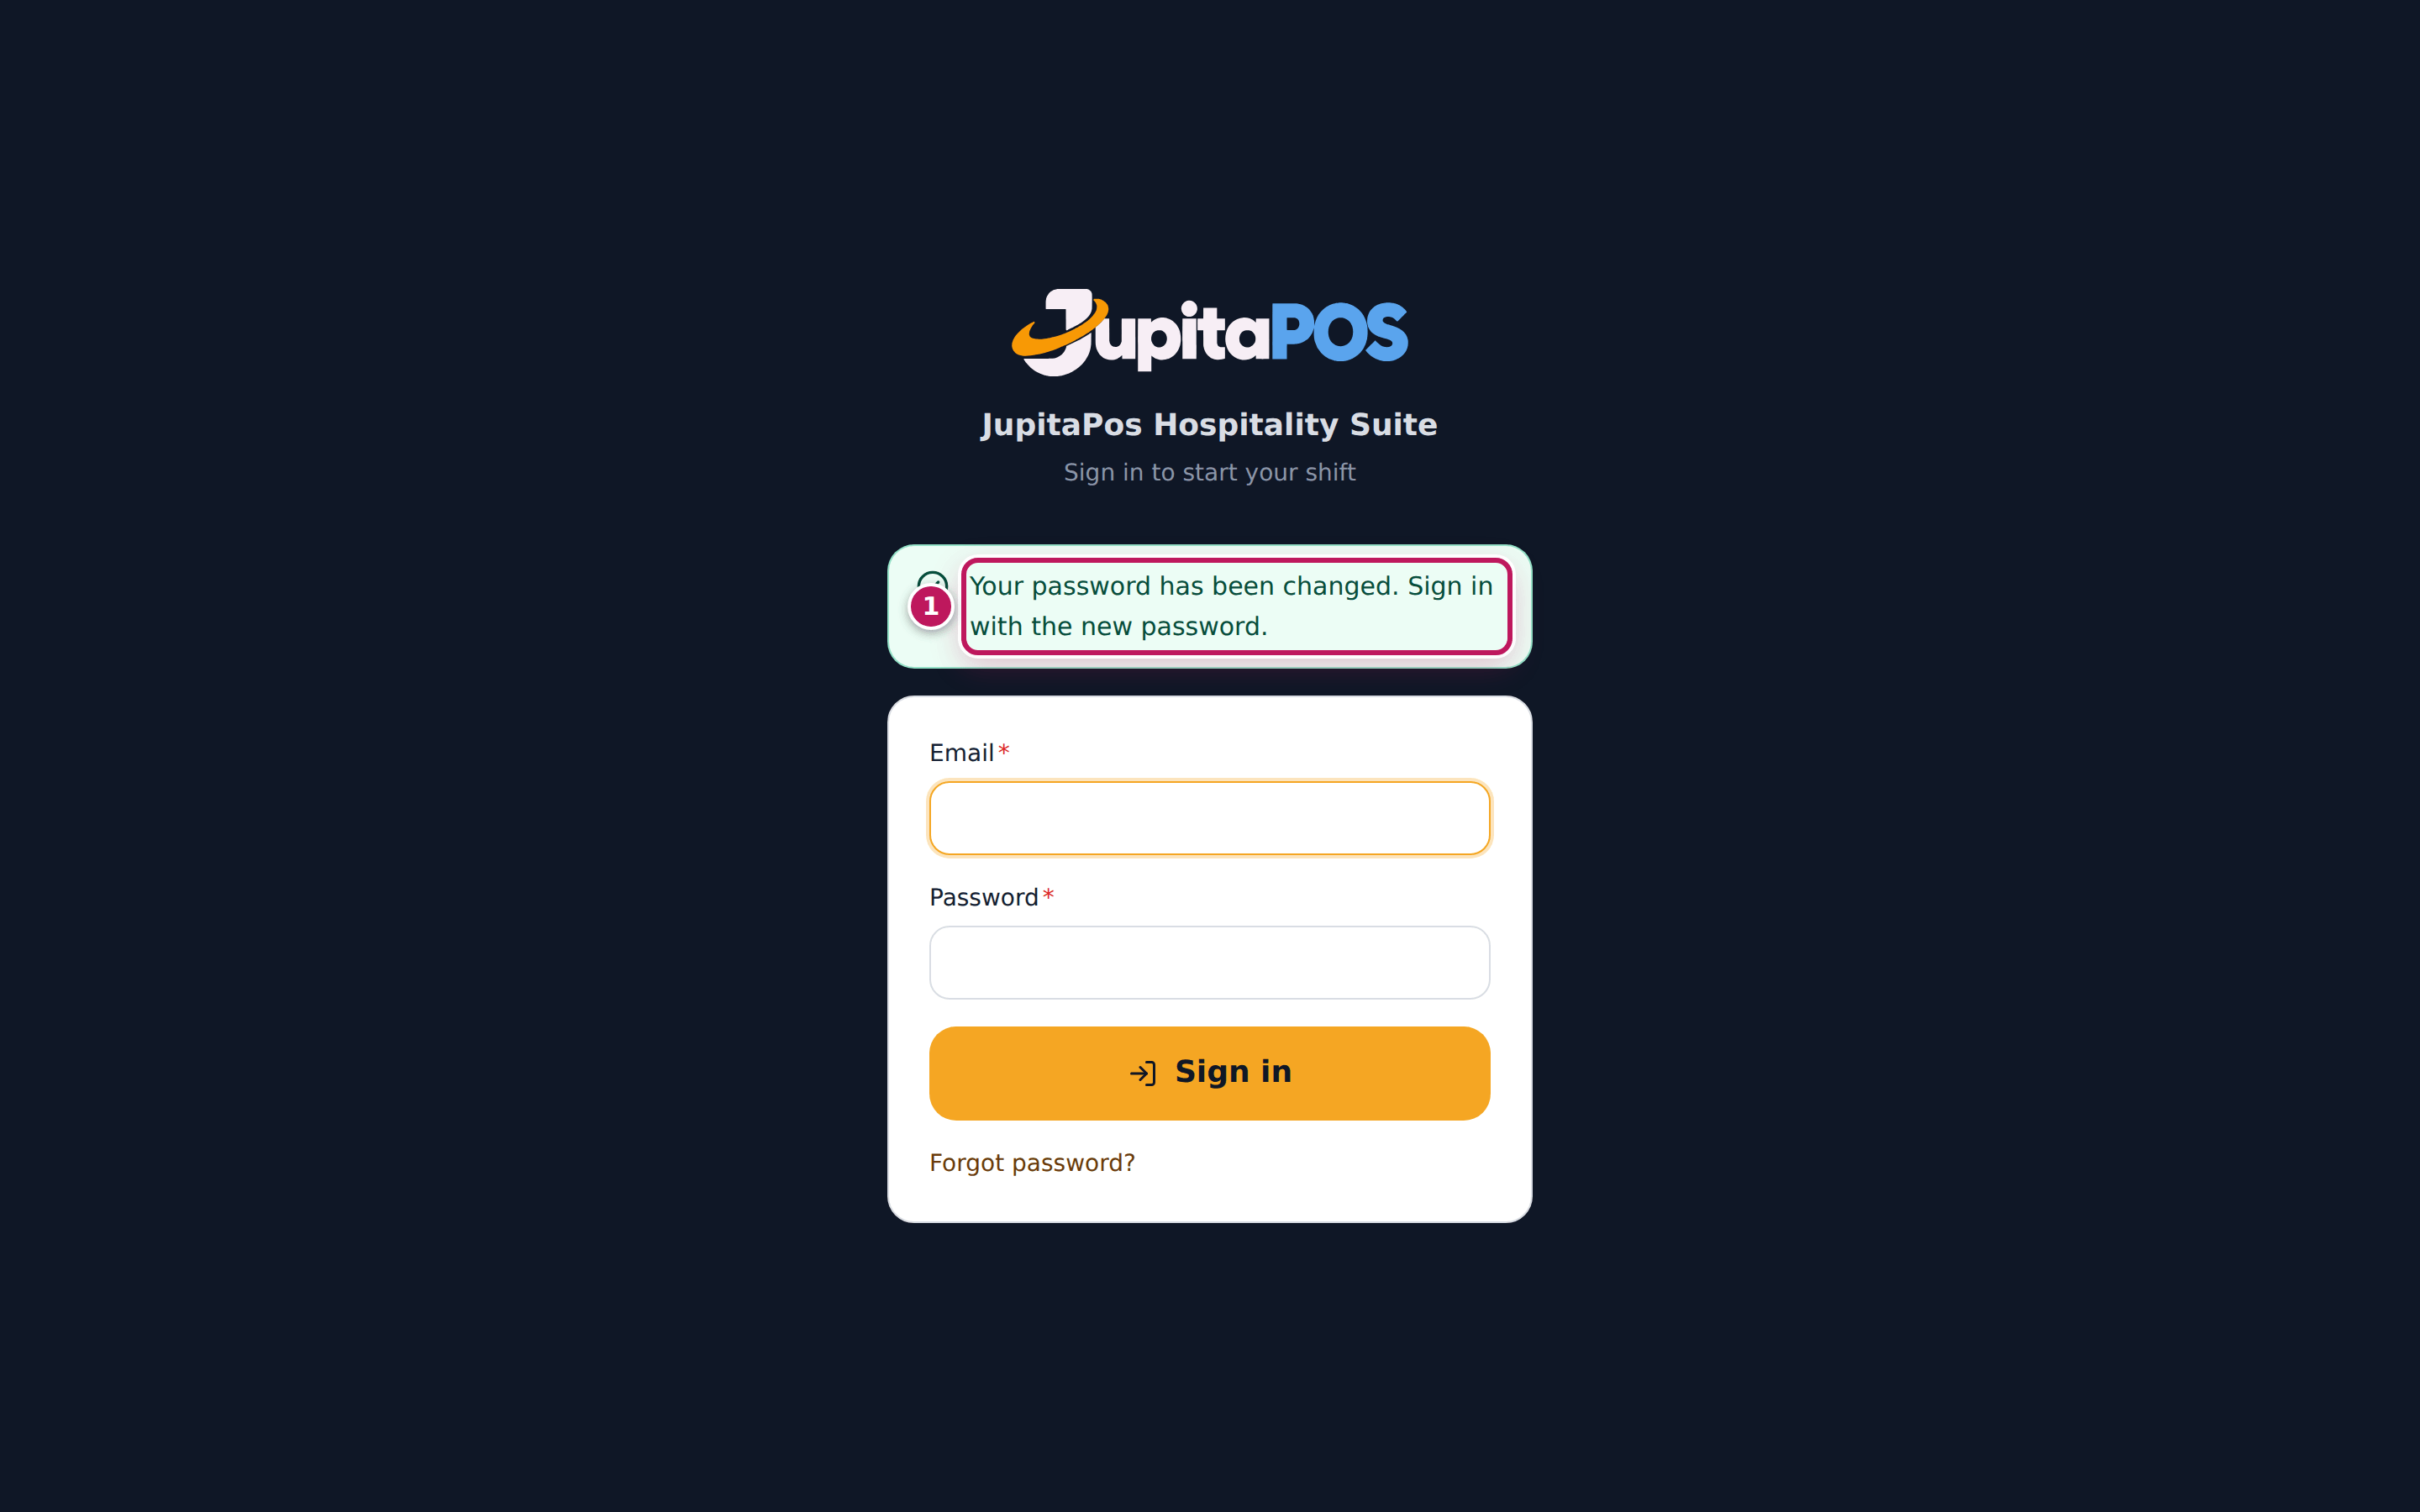
- The Sign in page says Your password has been changed. Sign in with the new password. (1). Sign in with your e-mail and the new password.
Expected result
Kevin signs in with his new password and sees his dashboard. Every other device where he was still signed in is signed out.
Screenshot
Common mistakes
- Waiting for the e-mail when the account uses another address. The message is the same whether or not the address has an account, so that nobody can find out who works here. If no e-mail arrives, ask your manager which address your account uses.
- Asking for several links. Only the newest link works; each new request cancels the older ones.
Troubleshooting
- “This reset link is invalid or has expired. Request a new one.” The link is older than 60 minutes, was already used, or a newer one was sent. Tap Forgot password? again.
- No e-mail arrives. Check the spam folder. Five requests in 15 minutes are the most JupitaPos accepts; wait before trying again. Your manager or administrator can also give you a reset link directly.
FAQ
Can my manager tell me my password? No. Nobody can see a password. An administrator or the owner can give you a reset link from your user account; it opens the same Choose a new password page.