

On this page
JupitaPos watches its own signed audit trail and sign-in history and raises an alert when something happens a manager would want to know about — not every discount, but the large one; not every refund, but the third one by the same person today. This manual also covers who is signed in where, two-step sign-in and suspending an account.
Who does what:
| You can | You need |
|---|---|
| See security alerts | security.alerts.view (owners, administrators, branch managers, accountants, auditors) |
| Acknowledge and resolve alerts, change the rules | security.alerts.manage, signed in with a password (not a PIN) |
| See someone’s sessions and sign-in history | auth.sessions.view |
| Sign someone out everywhere | auth.sessions.revoke |
| Give someone a reset link, reset their two-step sign-in | users.reset_credentials |
| Suspend and reinstate an account | users.suspend |
To manage someone’s account you must hold every permission they hold — so a waiter’s account is managed by the owner or their branch manager, not by an administrator who does not sell. Nobody acts on an alert about their own action (the owner excepted).
The screens are the demo business on Friday 2 October 2026: Moses is the branch manager at Kampala — Kololo, Grace the owner, and Juliet Namara a waiter’s login.
Work a security alert
Purpose
Look into what the system flagged — a large discount, a string of refunds, a cash shortage, repeated wrong passwords — and record what you found.
Role / permission required
Owner, administrator or branch manager: security.alerts.manage (seeing the
alerts needs security.alerts.view).
Prerequisites
- You are signed in with your password, not a PIN.
Steps
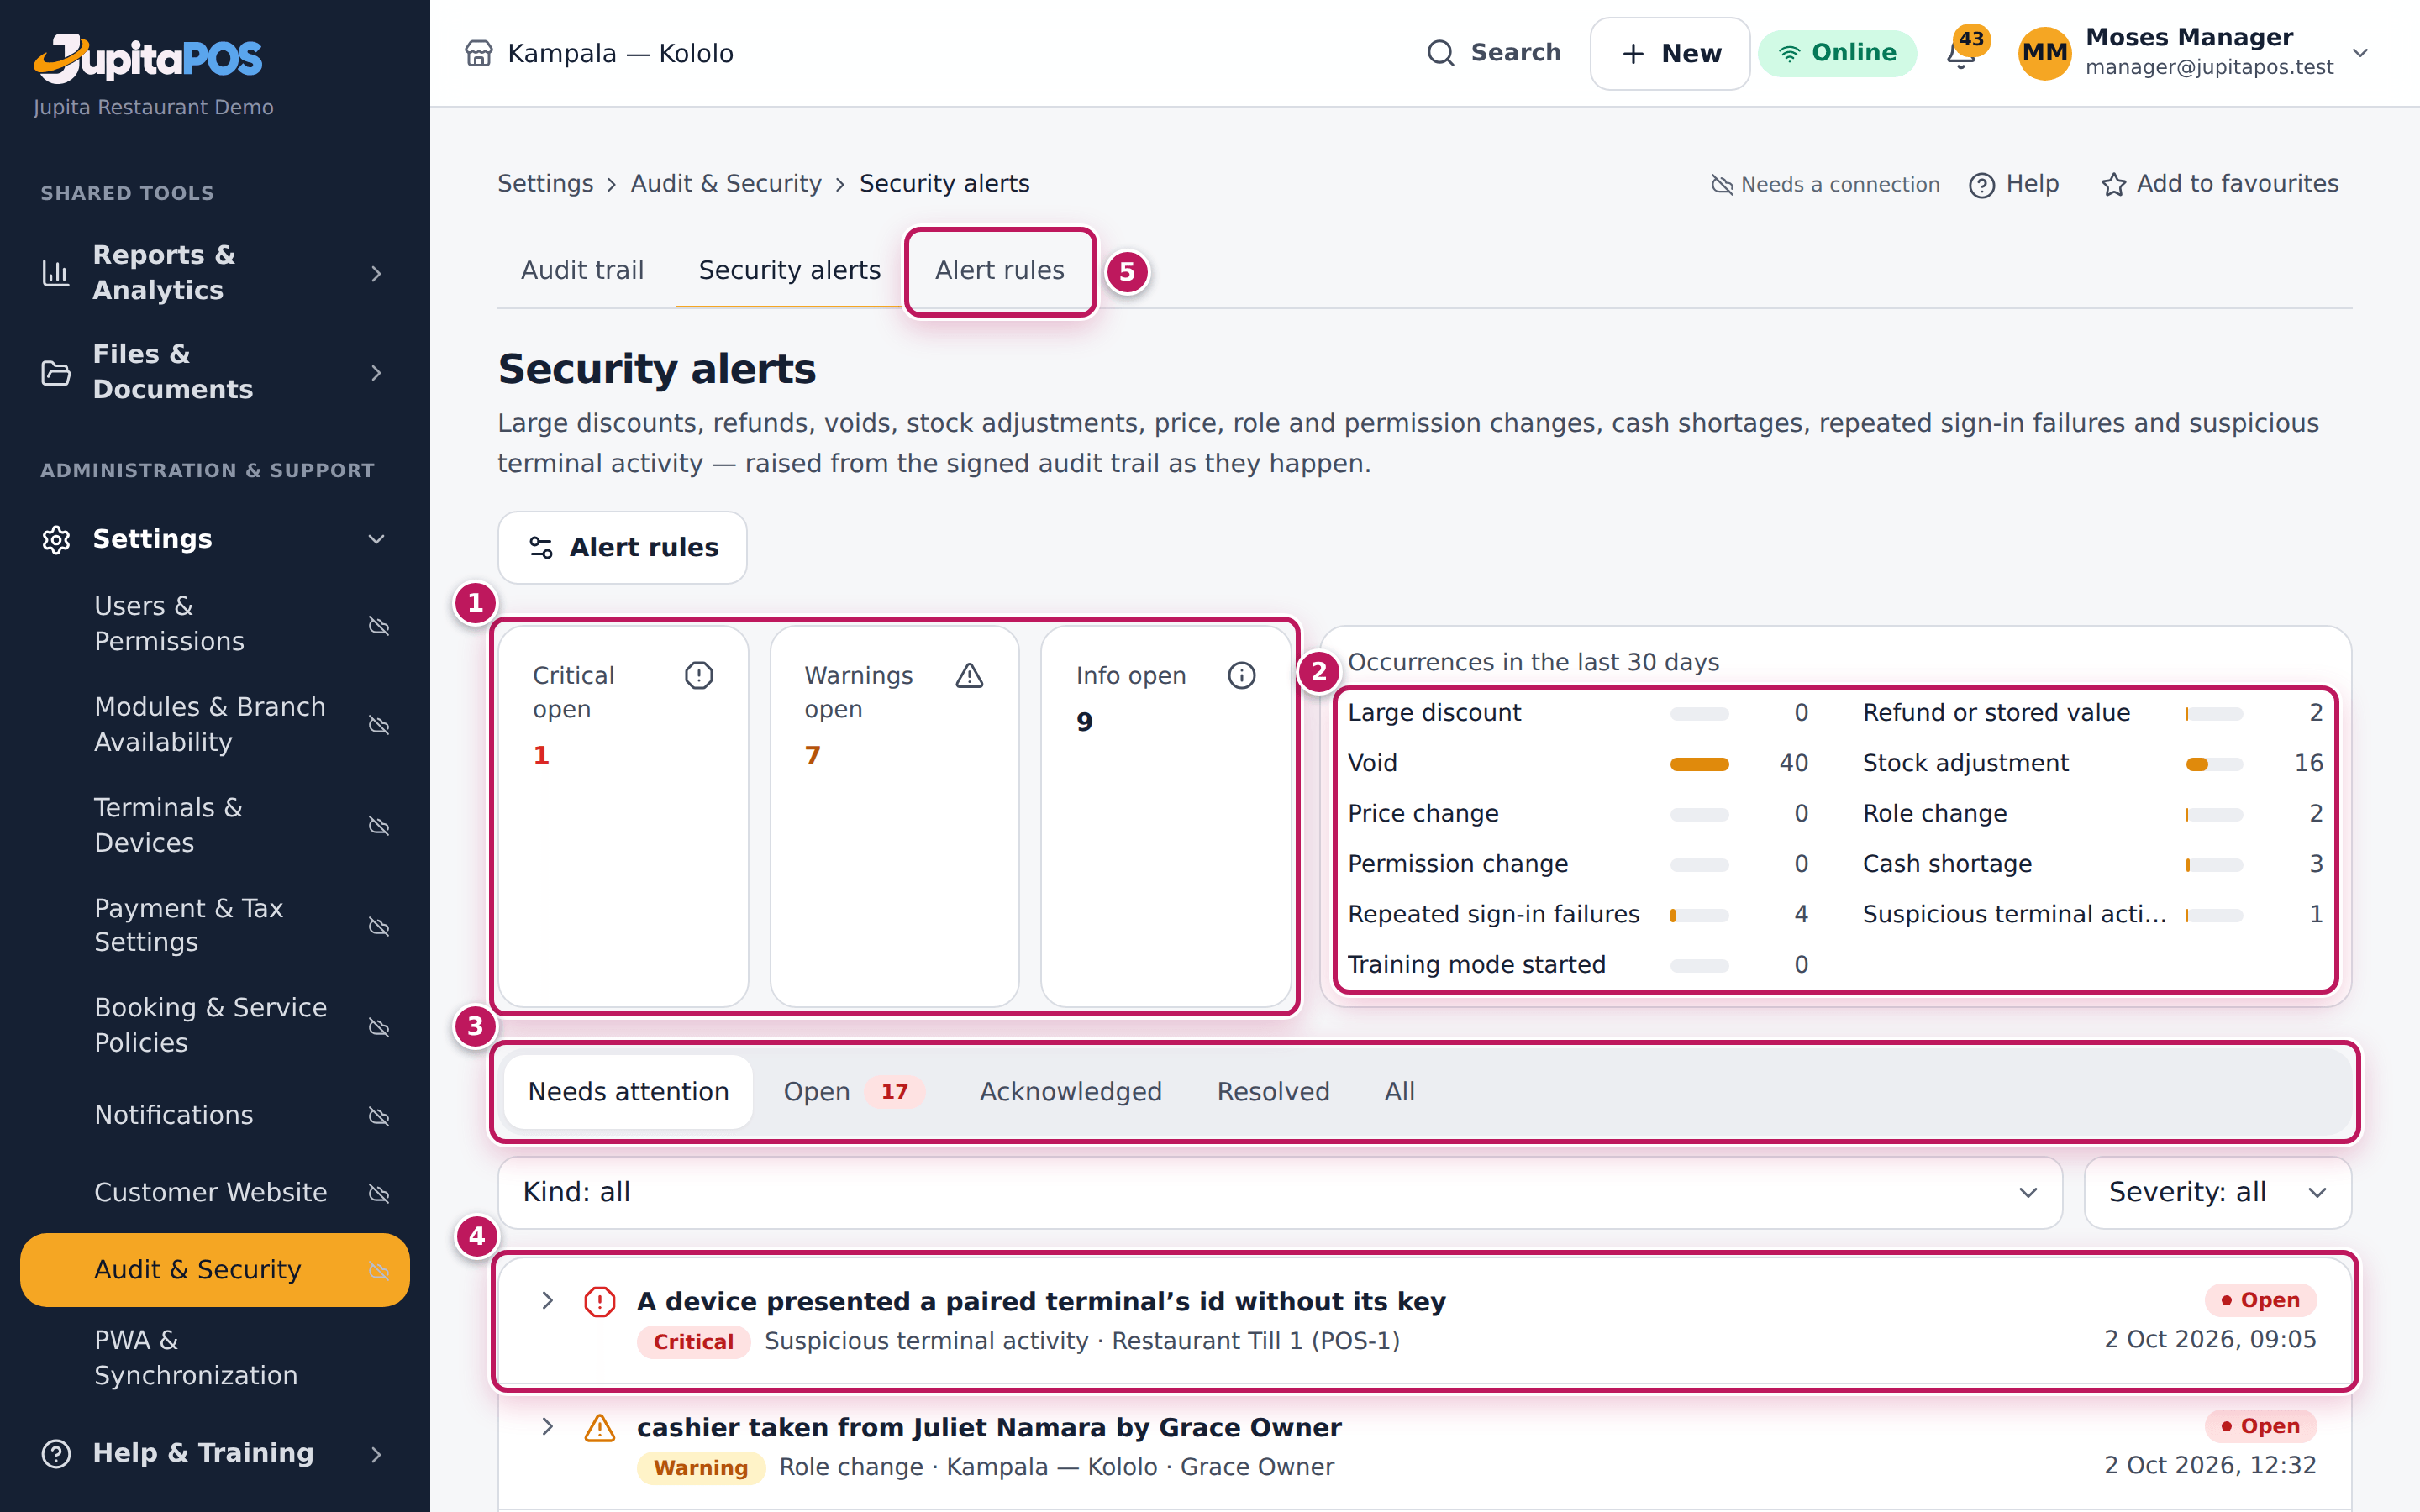
- Open Security alerts. The page opens on Needs attention: open and acknowledged alerts, worst first.
- Read the counts (1): Critical open, Warnings open, Info open, and what happened in the last 30 days by kind (2) — click a kind to see only those. The tabs (3) show Open, Acknowledged, Resolved and All.
- Click an alert (4) to open it.
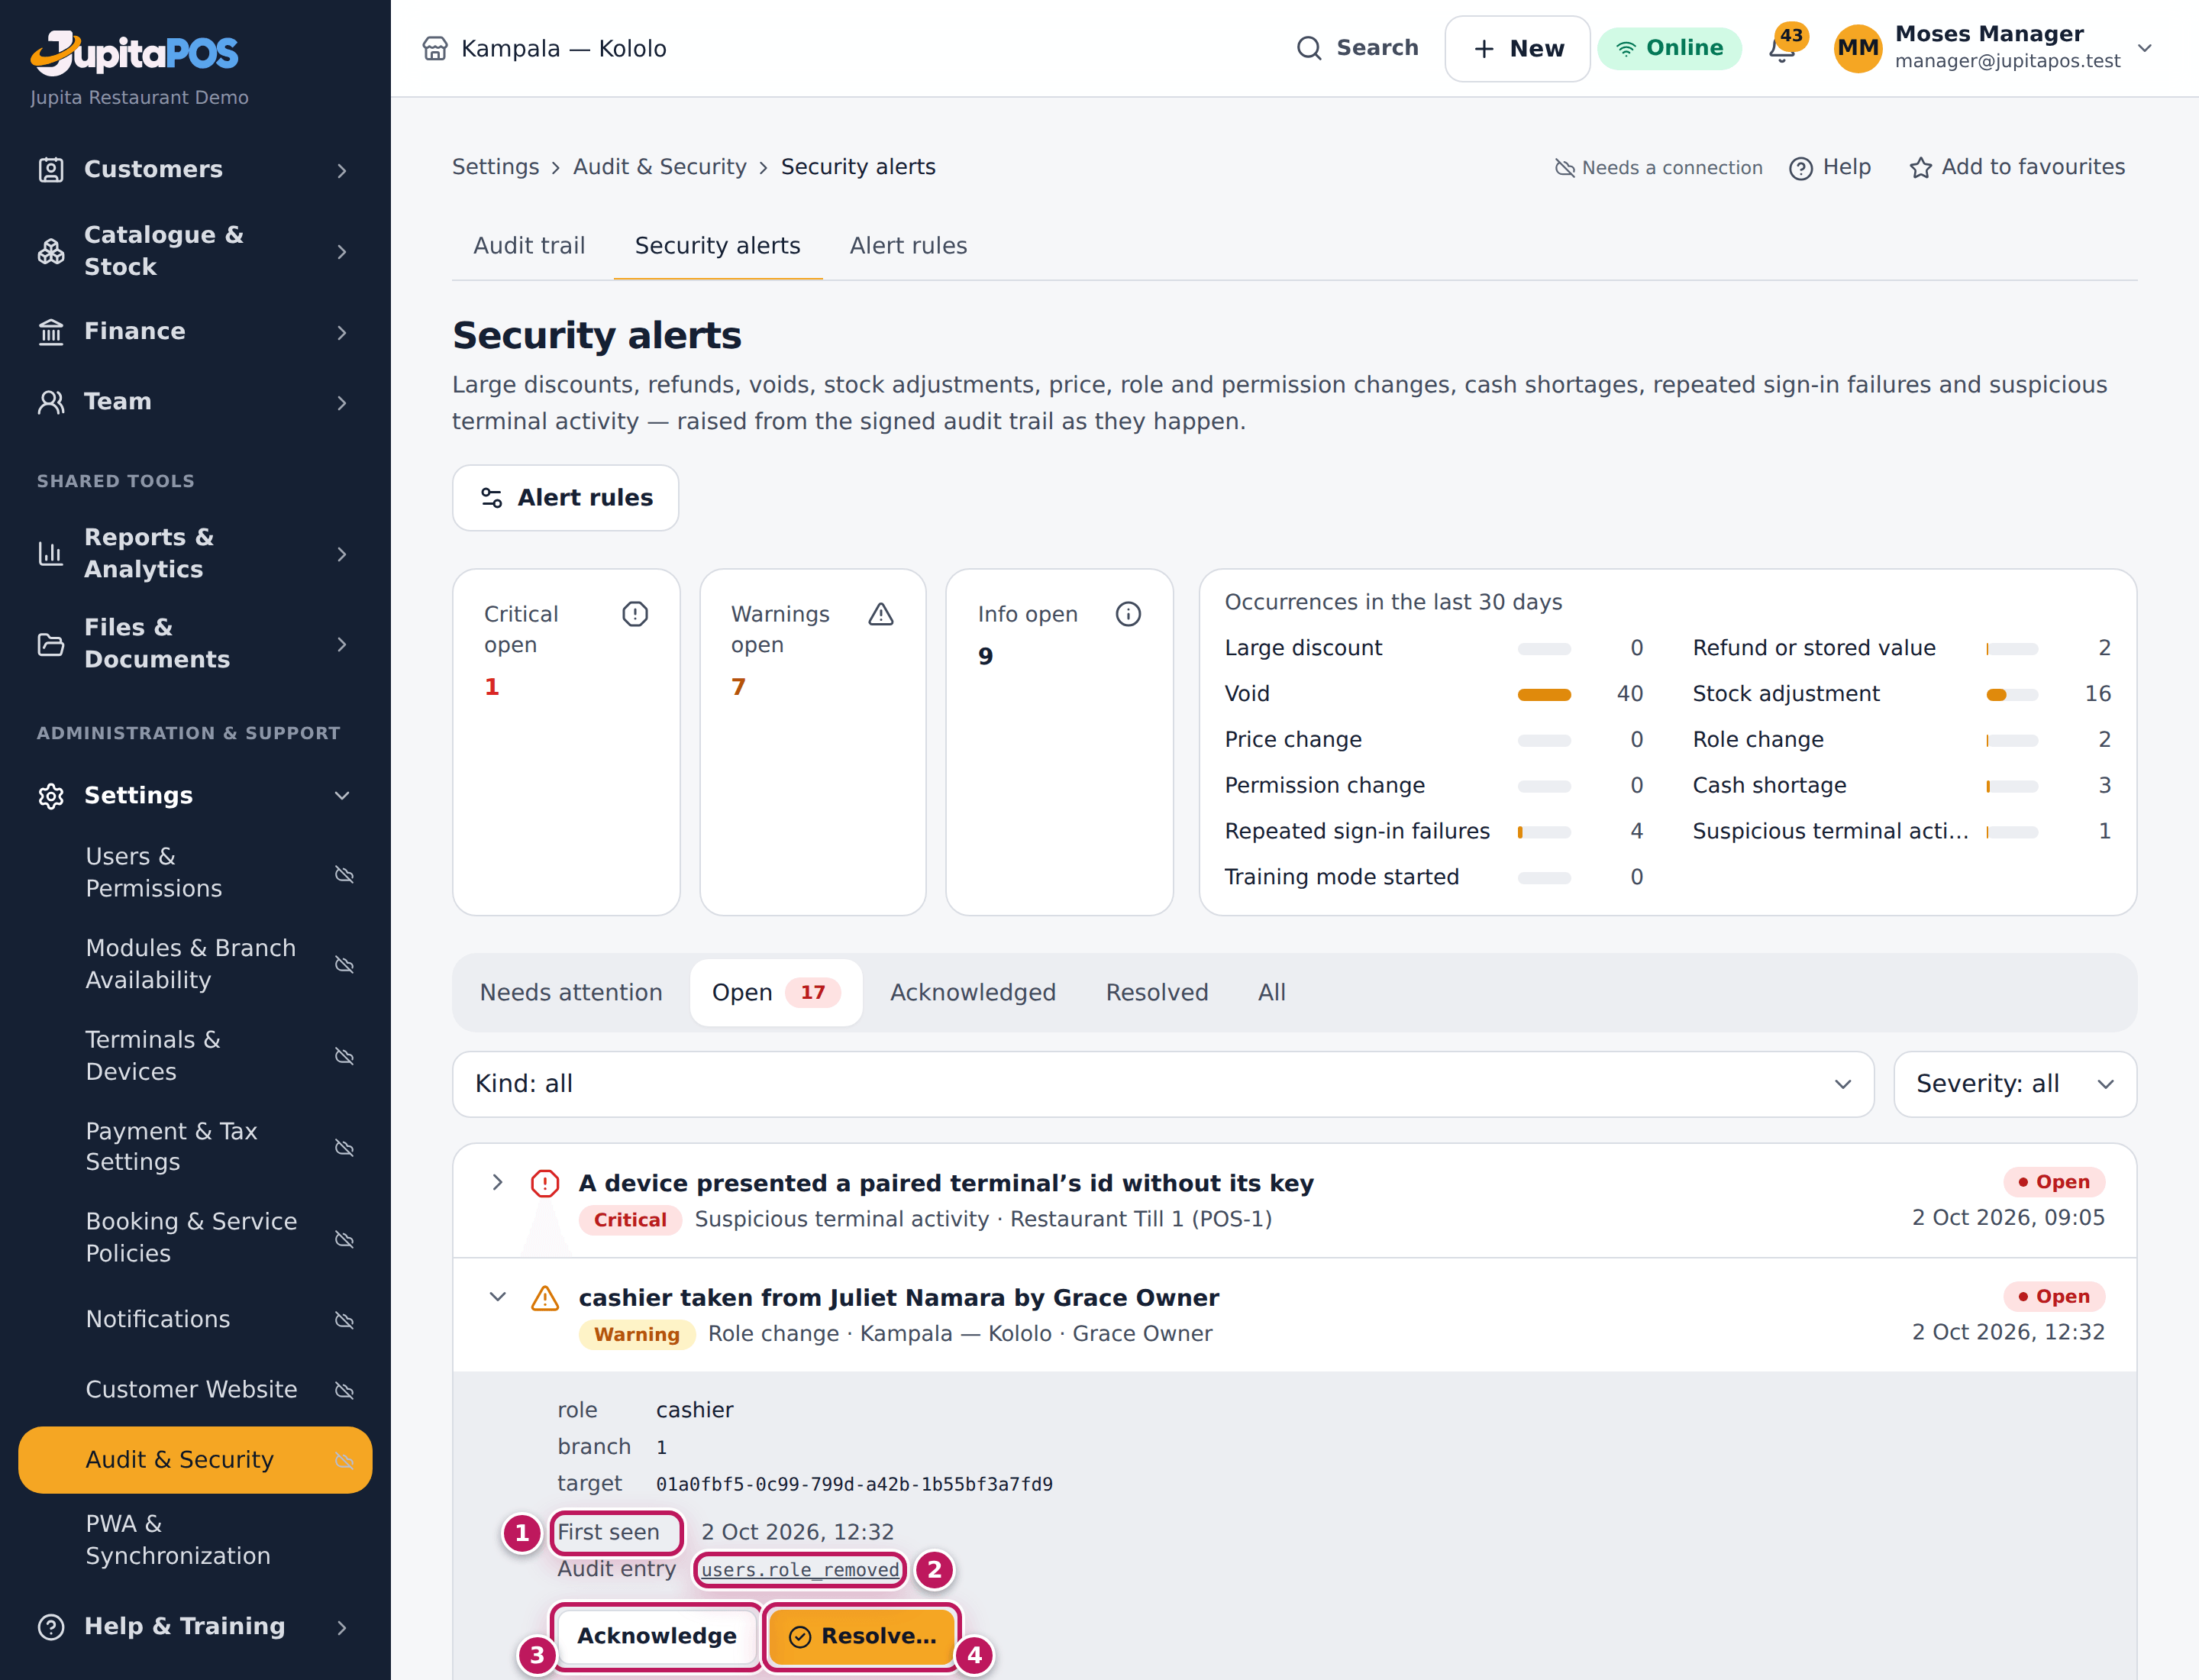
- Read what happened: the amounts, the order, the terminal, the address, First seen (1) — and Last seen when it happened more than once — and the Audit entry (2) it came from. ×3 means it happened three times.
- Click Acknowledge (3) — “seen, looking into it” — and type a note.
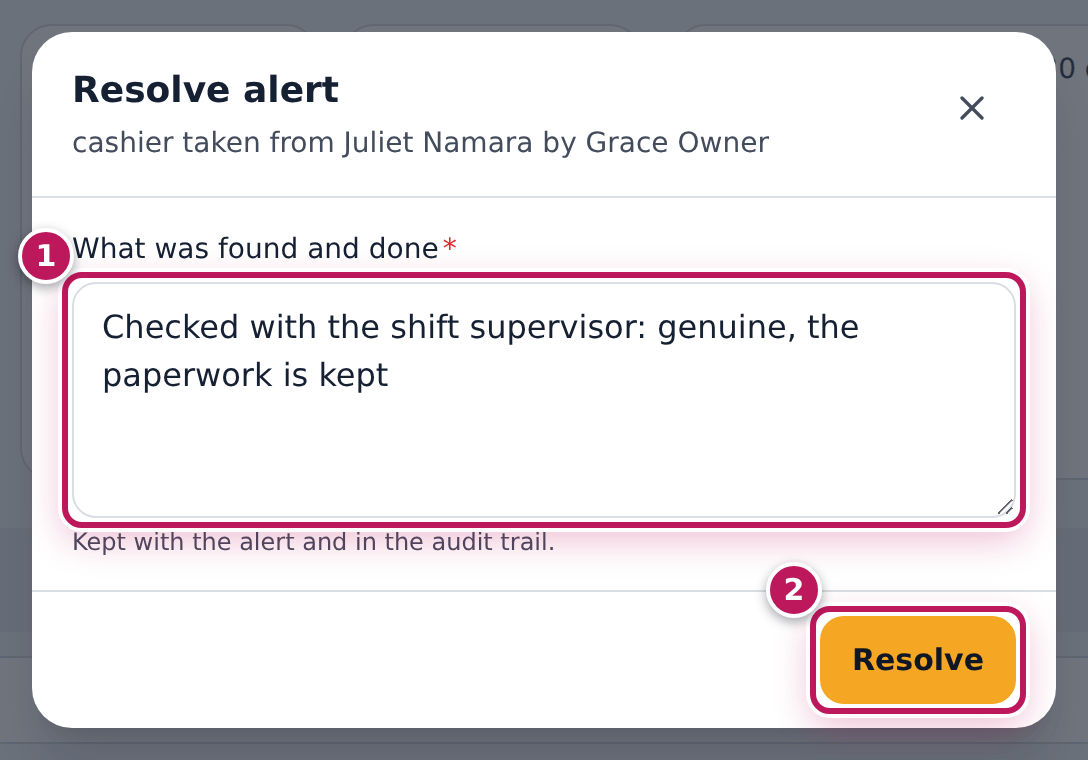
- When you know what happened, click Resolve (4), type What was found and done (1 in the third picture) and click Resolve (2).
Expected result
Alert acknowledged: the alert stays under Needs attention marked acknowledged. Alert resolved: it moves to Resolved with your note, which is also in the audit trail. If the same thing happens again after an acknowledgement, the alert opens again and people are told once more.
Screenshot
Common mistakes
- Resolving without looking. The note stays with the alert for ever; say what you checked and what you did.
- Ignoring warnings because they are not critical. Three voids by one person in a day is a warning; a pattern over a week is the story.
Troubleshooting
- There are no Acknowledge and Resolve buttons. The alert is about your own action — someone else deals with it — or you are signed in with a PIN.
- Alerts arrive by e-mail at night. Critical alerts are e-mailed to everyone who may see them for that branch, except the person they are about.
FAQ
What raises an alert? A discount of 20 % or more (critical from 50 %), a refund above the amount set (critical at three by one person in a day), a void after the kitchen had the line, a stock adjustment, a price cut or rise, a role or permission change, a till closed short, 5 wrong passwords or PINs in 15 minutes, and a suspicious terminal. The rules are in Alert rules.
Who is told? Critical: an in-app notification and an e-mail. Warning: a notification. Info: listed only. Business-wide alerts (sign-ins, roles, rules) go to business-wide roles; branch alerts also to that branch’s managers.
Set the alert rules
Purpose
Tune when alerts are raised — the discount percentage, the refund amount, the shortage — so managers are told about what matters, not about everything.
Role / permission required
Owner, administrator or branch manager: security.alerts.manage.
Prerequisites
- None. The defaults suit most restaurants.
Steps
- Open Security alerts and click Alert rules.
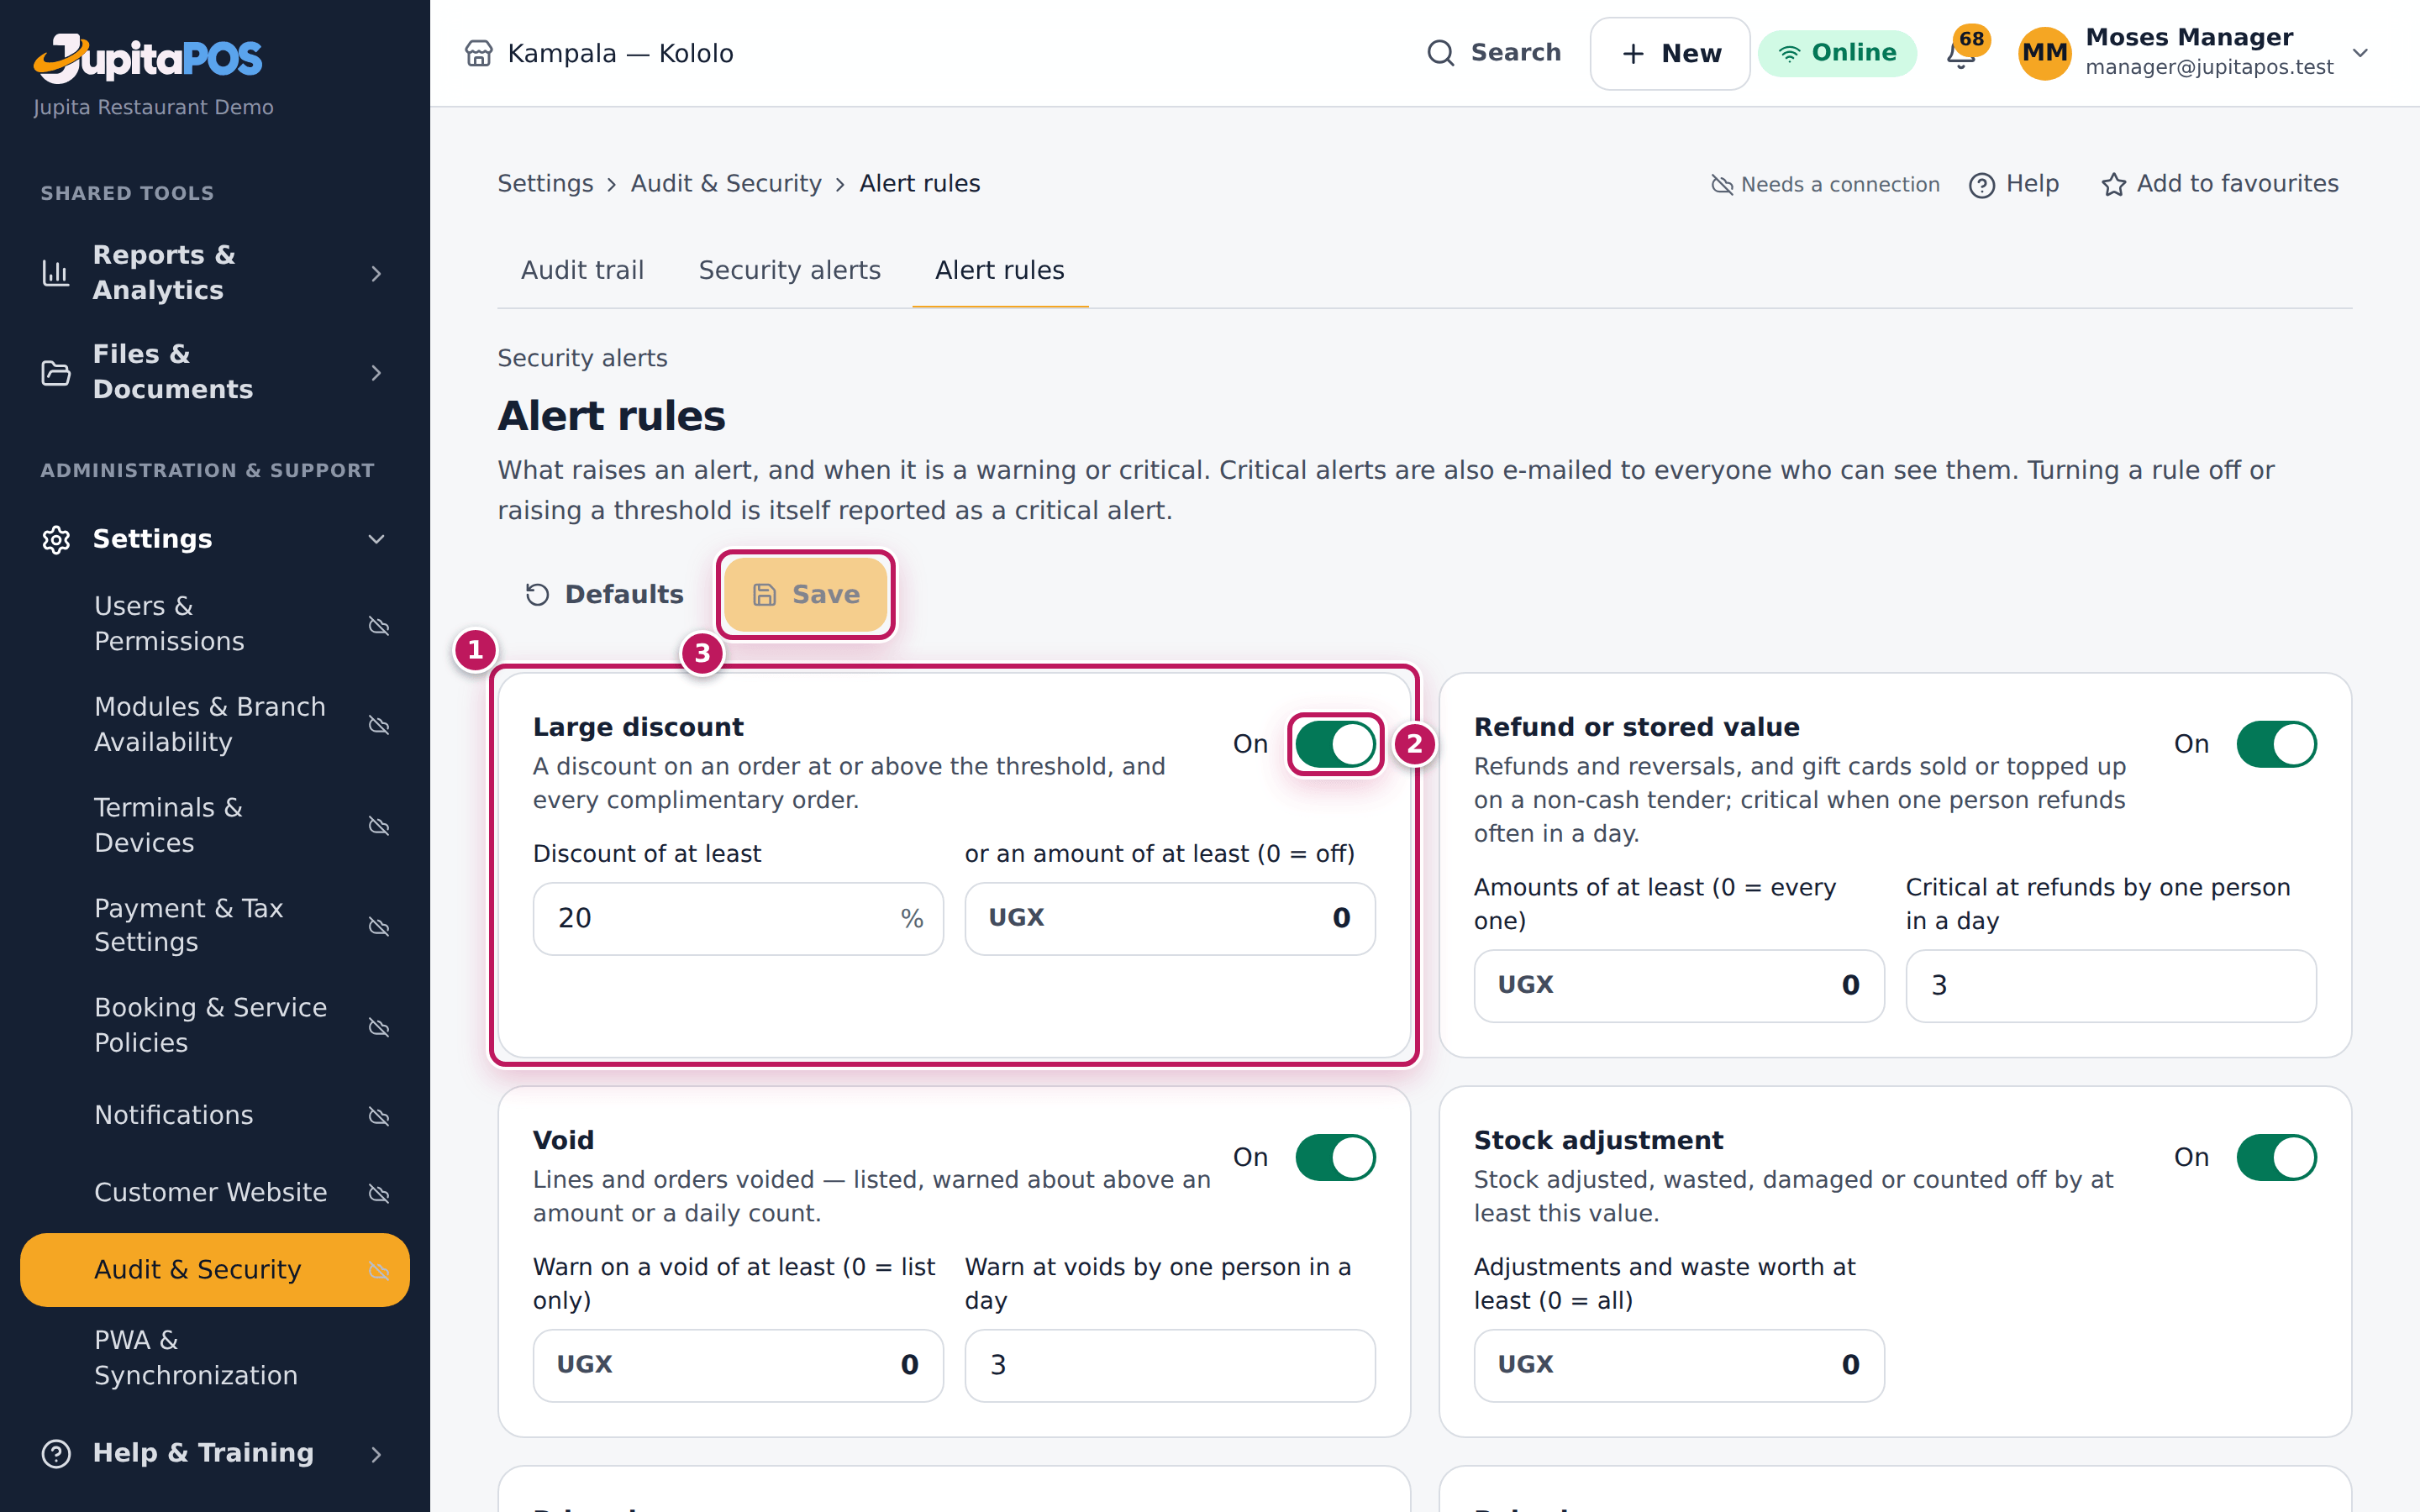
- Each kind of alert (1) has a switch (2) — On or Off — and its thresholds: the discount percentage, the refund amount and daily count, the stock value, the price cut, the shortage multiple, the failed sign-ins and their window, the terminal clock.
- Change a threshold, then click Save (3). Defaults puts every rule back.
Expected result
The rules apply from the next event. Turning a rule off, or making it harder to trigger, is itself raised as a critical alert — under the rules as they were, so a rule cannot switch off its own warning.
Screenshot
Common mistakes
- Raising a threshold to silence one busy day. Acknowledge the alerts instead; the rule protects every other day.
Troubleshooting
- A critical alert appeared after you saved. You weakened a rule; that is expected. Resolve it with the reason.
See and end someone’s sign-in sessions
Purpose
Check where someone is signed in and end every session at once — a lost phone, a login seen at the wrong place, someone who left.
Role / permission required
Owner, or a manager who holds all of the person’s permissions:
auth.sessions.view to see, auth.sessions.revoke to sign them out.
Prerequisites
- None. Your own sessions are under your name at the top right › Active Sessions (the Account security page; see Change your password and turn on two-step sign-in).
Steps
- Open User accounts and click the person.
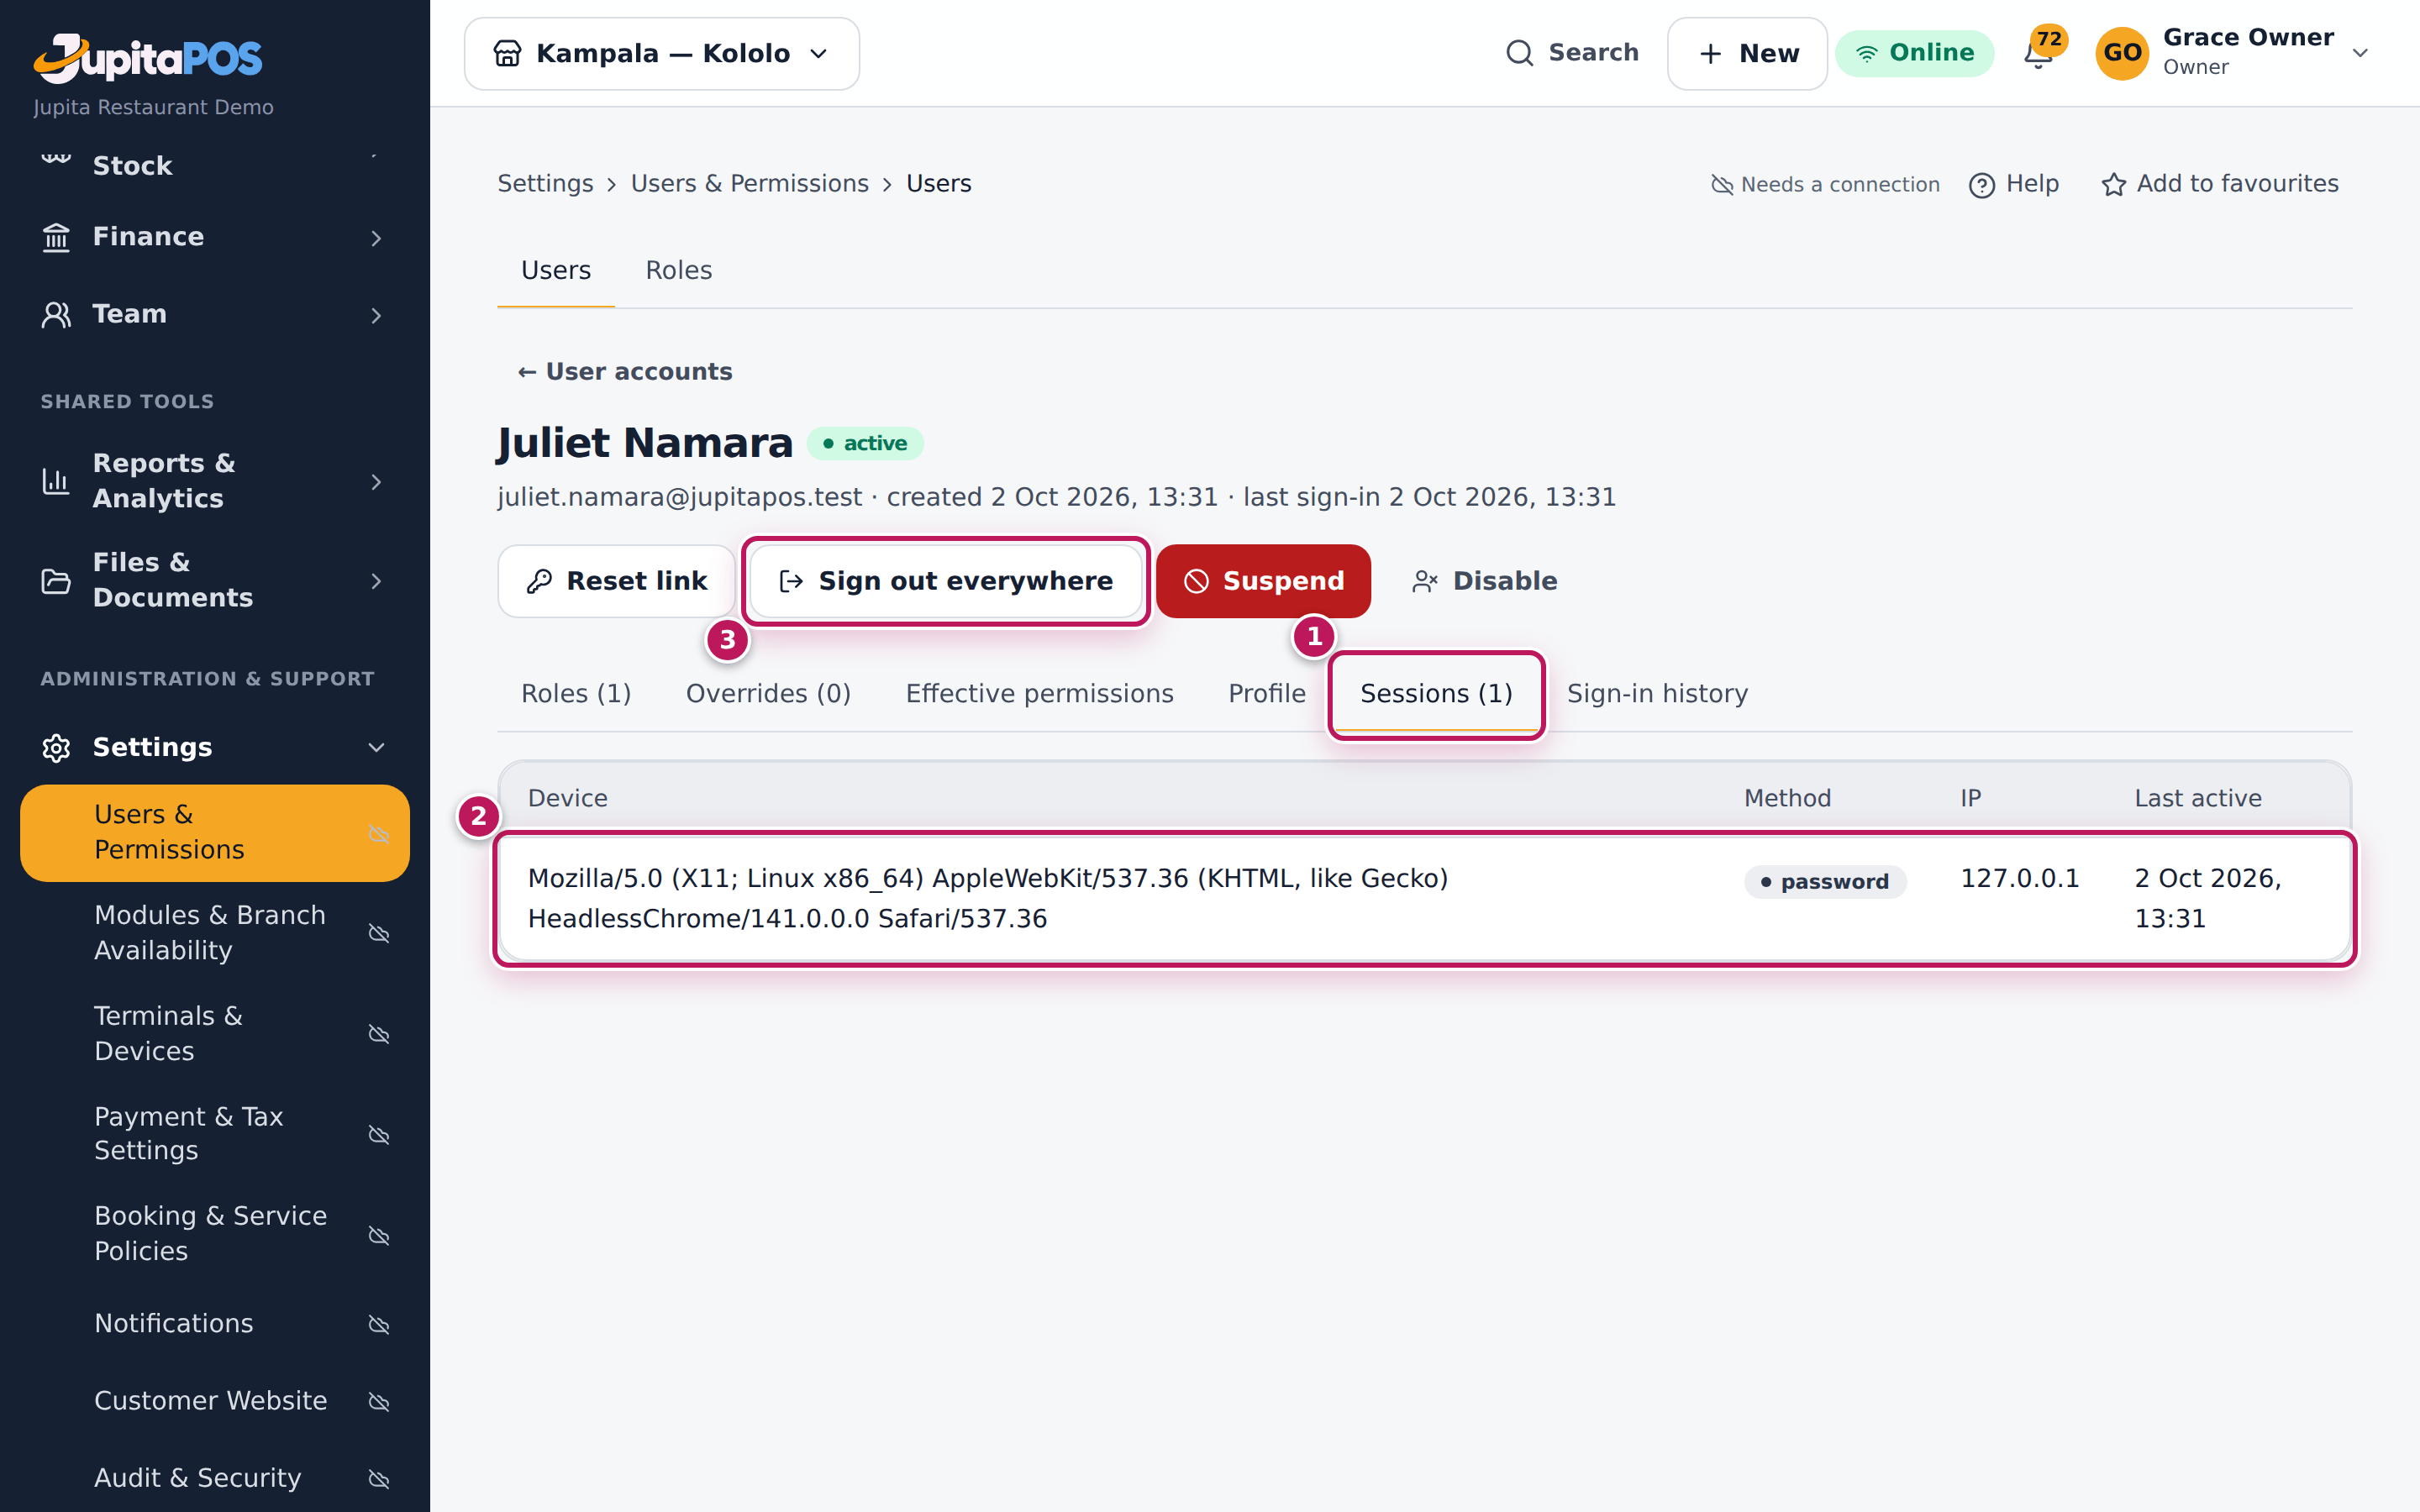
- Click the Sessions tab (1): each device they are signed in on (2), how (password, PIN, two-step), from which address and when it was last active.
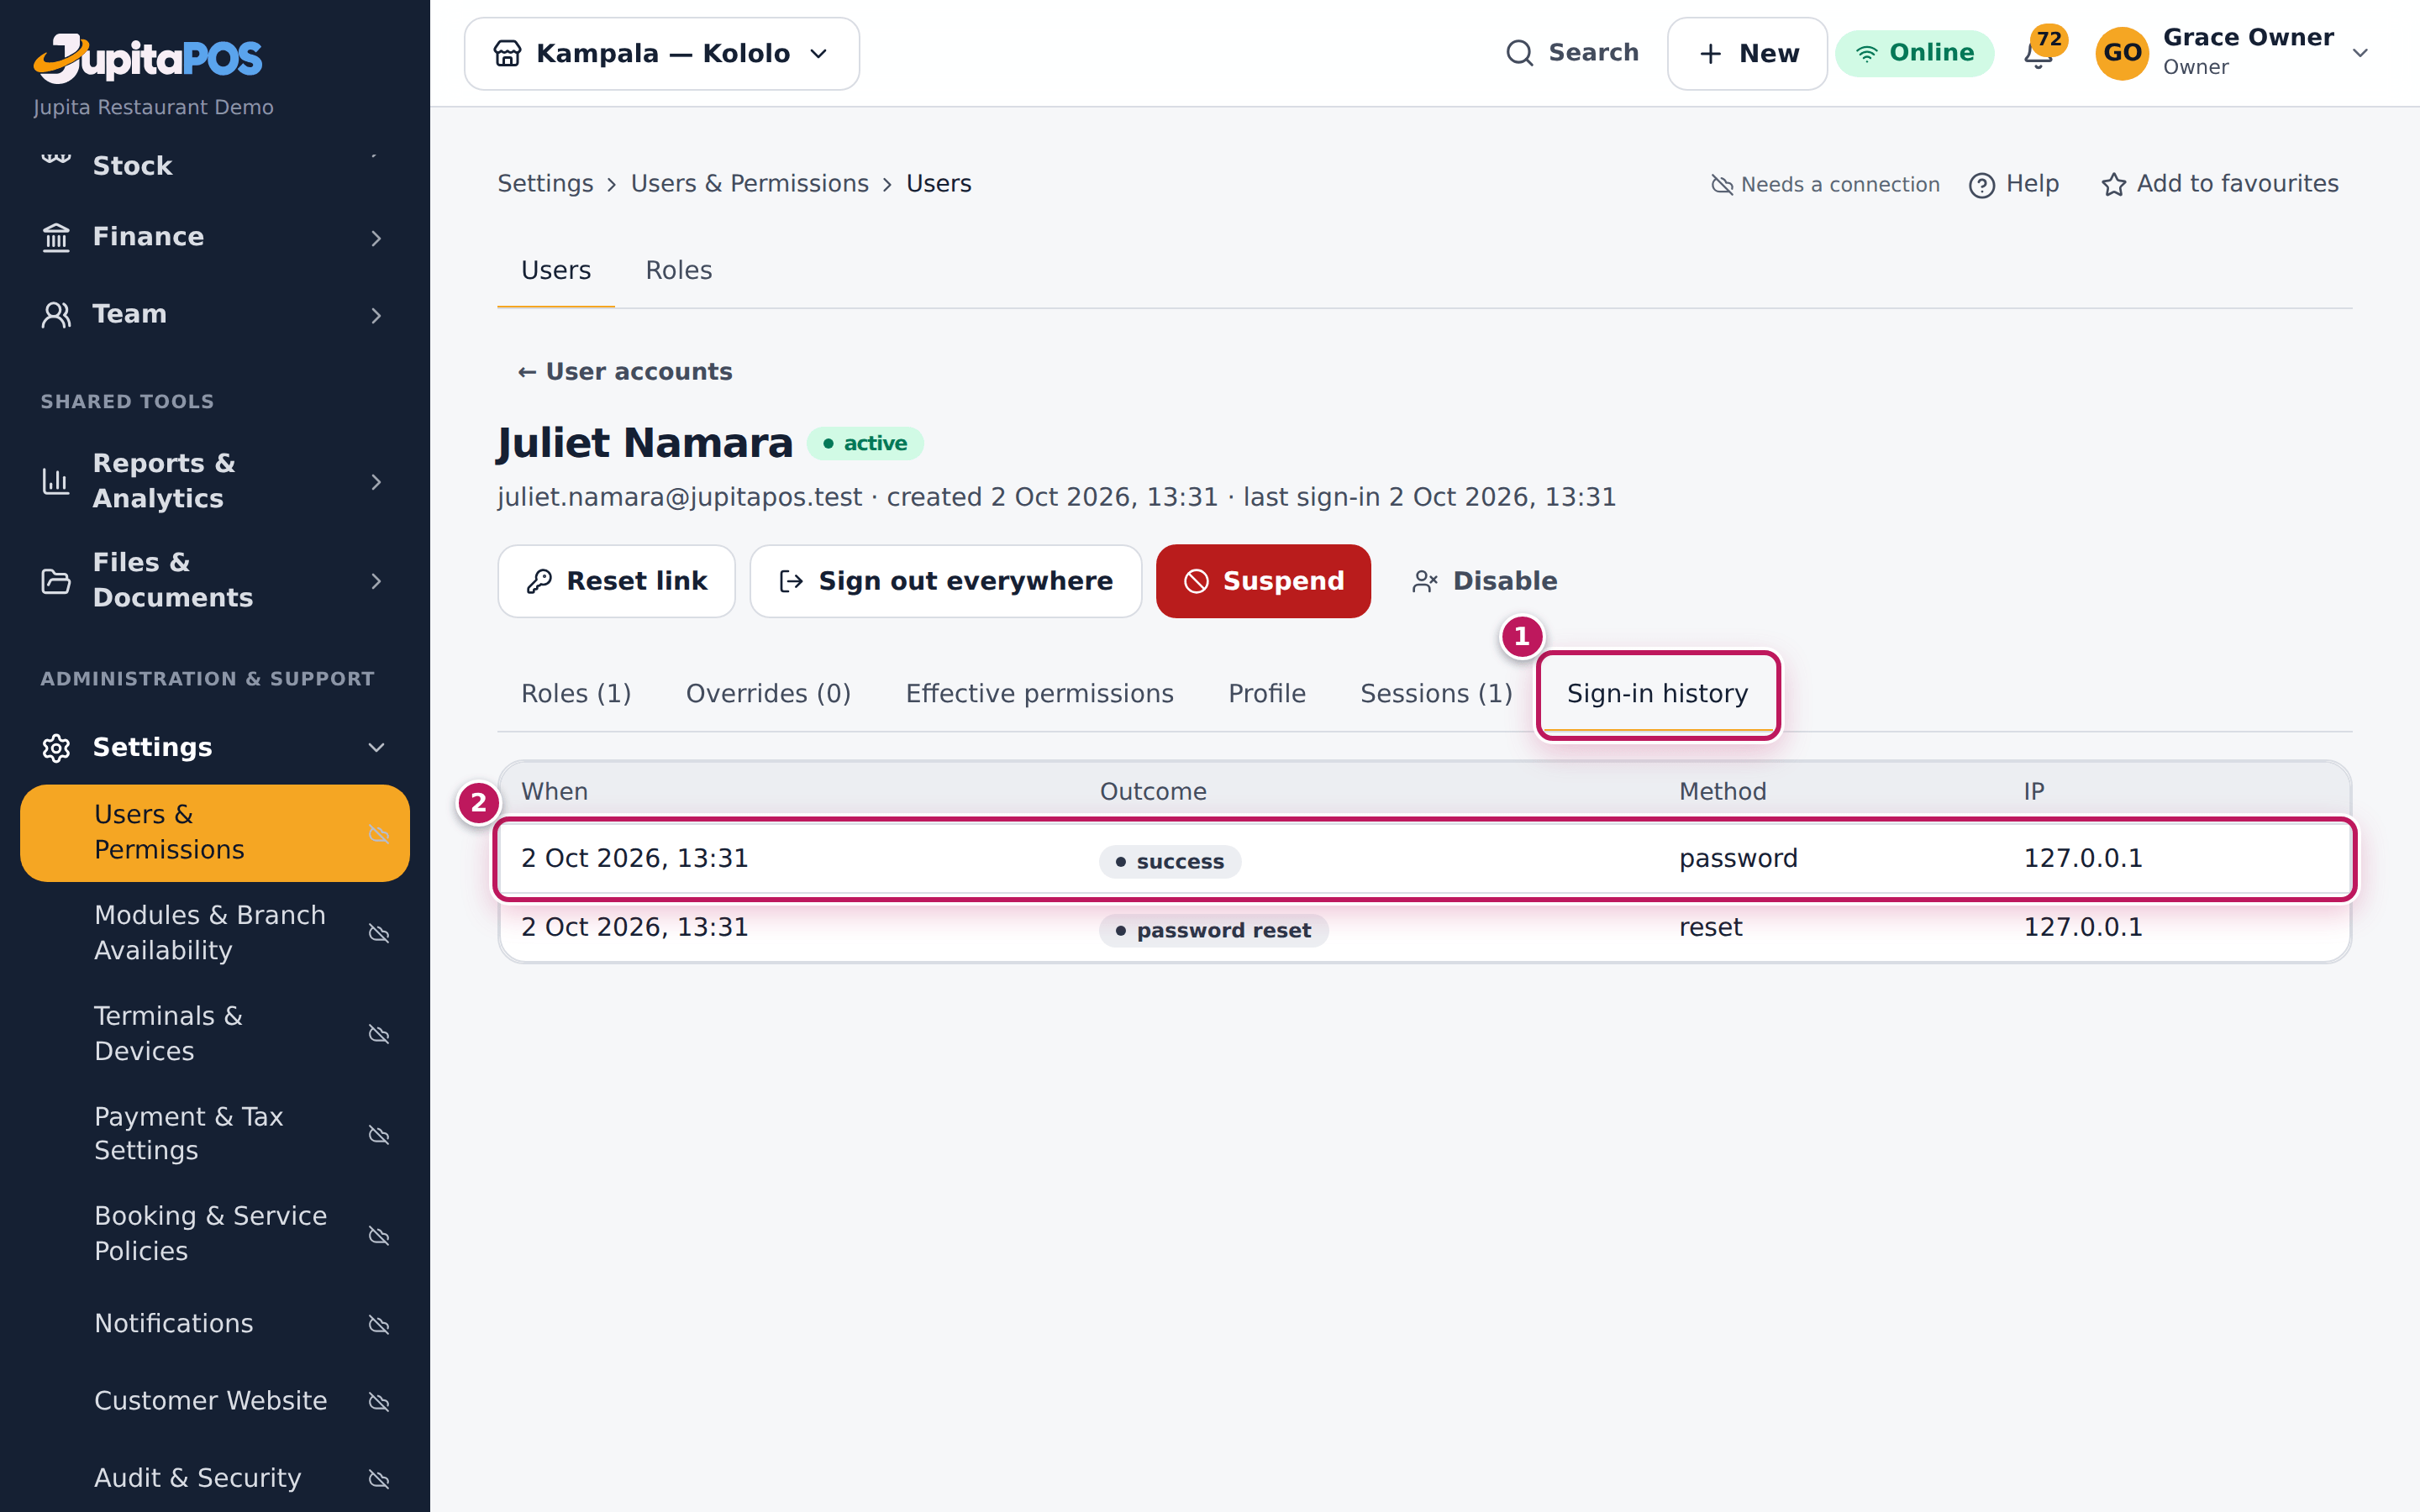
- Click Sign-in history (1 in the second picture): every sign-in and failed attempt with its outcome (2).
- Click Sign out everywhere (3).
Expected result
Every session of the person ends: on their next step they are on the sign-in page. Their password still works: to stop them signing in again, suspend the account (see Suspend a user).
Screenshot
Common mistakes
- Signing someone out instead of suspending them. They can sign in again at once.
Troubleshooting
- There is no Sessions tab. Your role does not include
auth.sessions.view. - “This user holds permissions you do not …” Ask the owner.
Require two-step sign-in and reset it
Purpose
Protect the logins that can do most — with a 6-digit code from an authenticator app as well as the password — and let someone back in when they lose their phone.
Role / permission required
Everyone turns it on for themselves. Resetting it for someone needs
users.reset_credentials and holding all their permissions (the owner for
a waiter).
Prerequisites
- The person has an authenticator app (Google Authenticator, Authy, 1Password).
Steps
- Each person turns it on under their name › Active Sessions (the Account security page) → Set up two-factor: scan the code, type the 6-digit code and click Turn on; keep the recovery codes (see Change your password and turn on two-step sign-in).
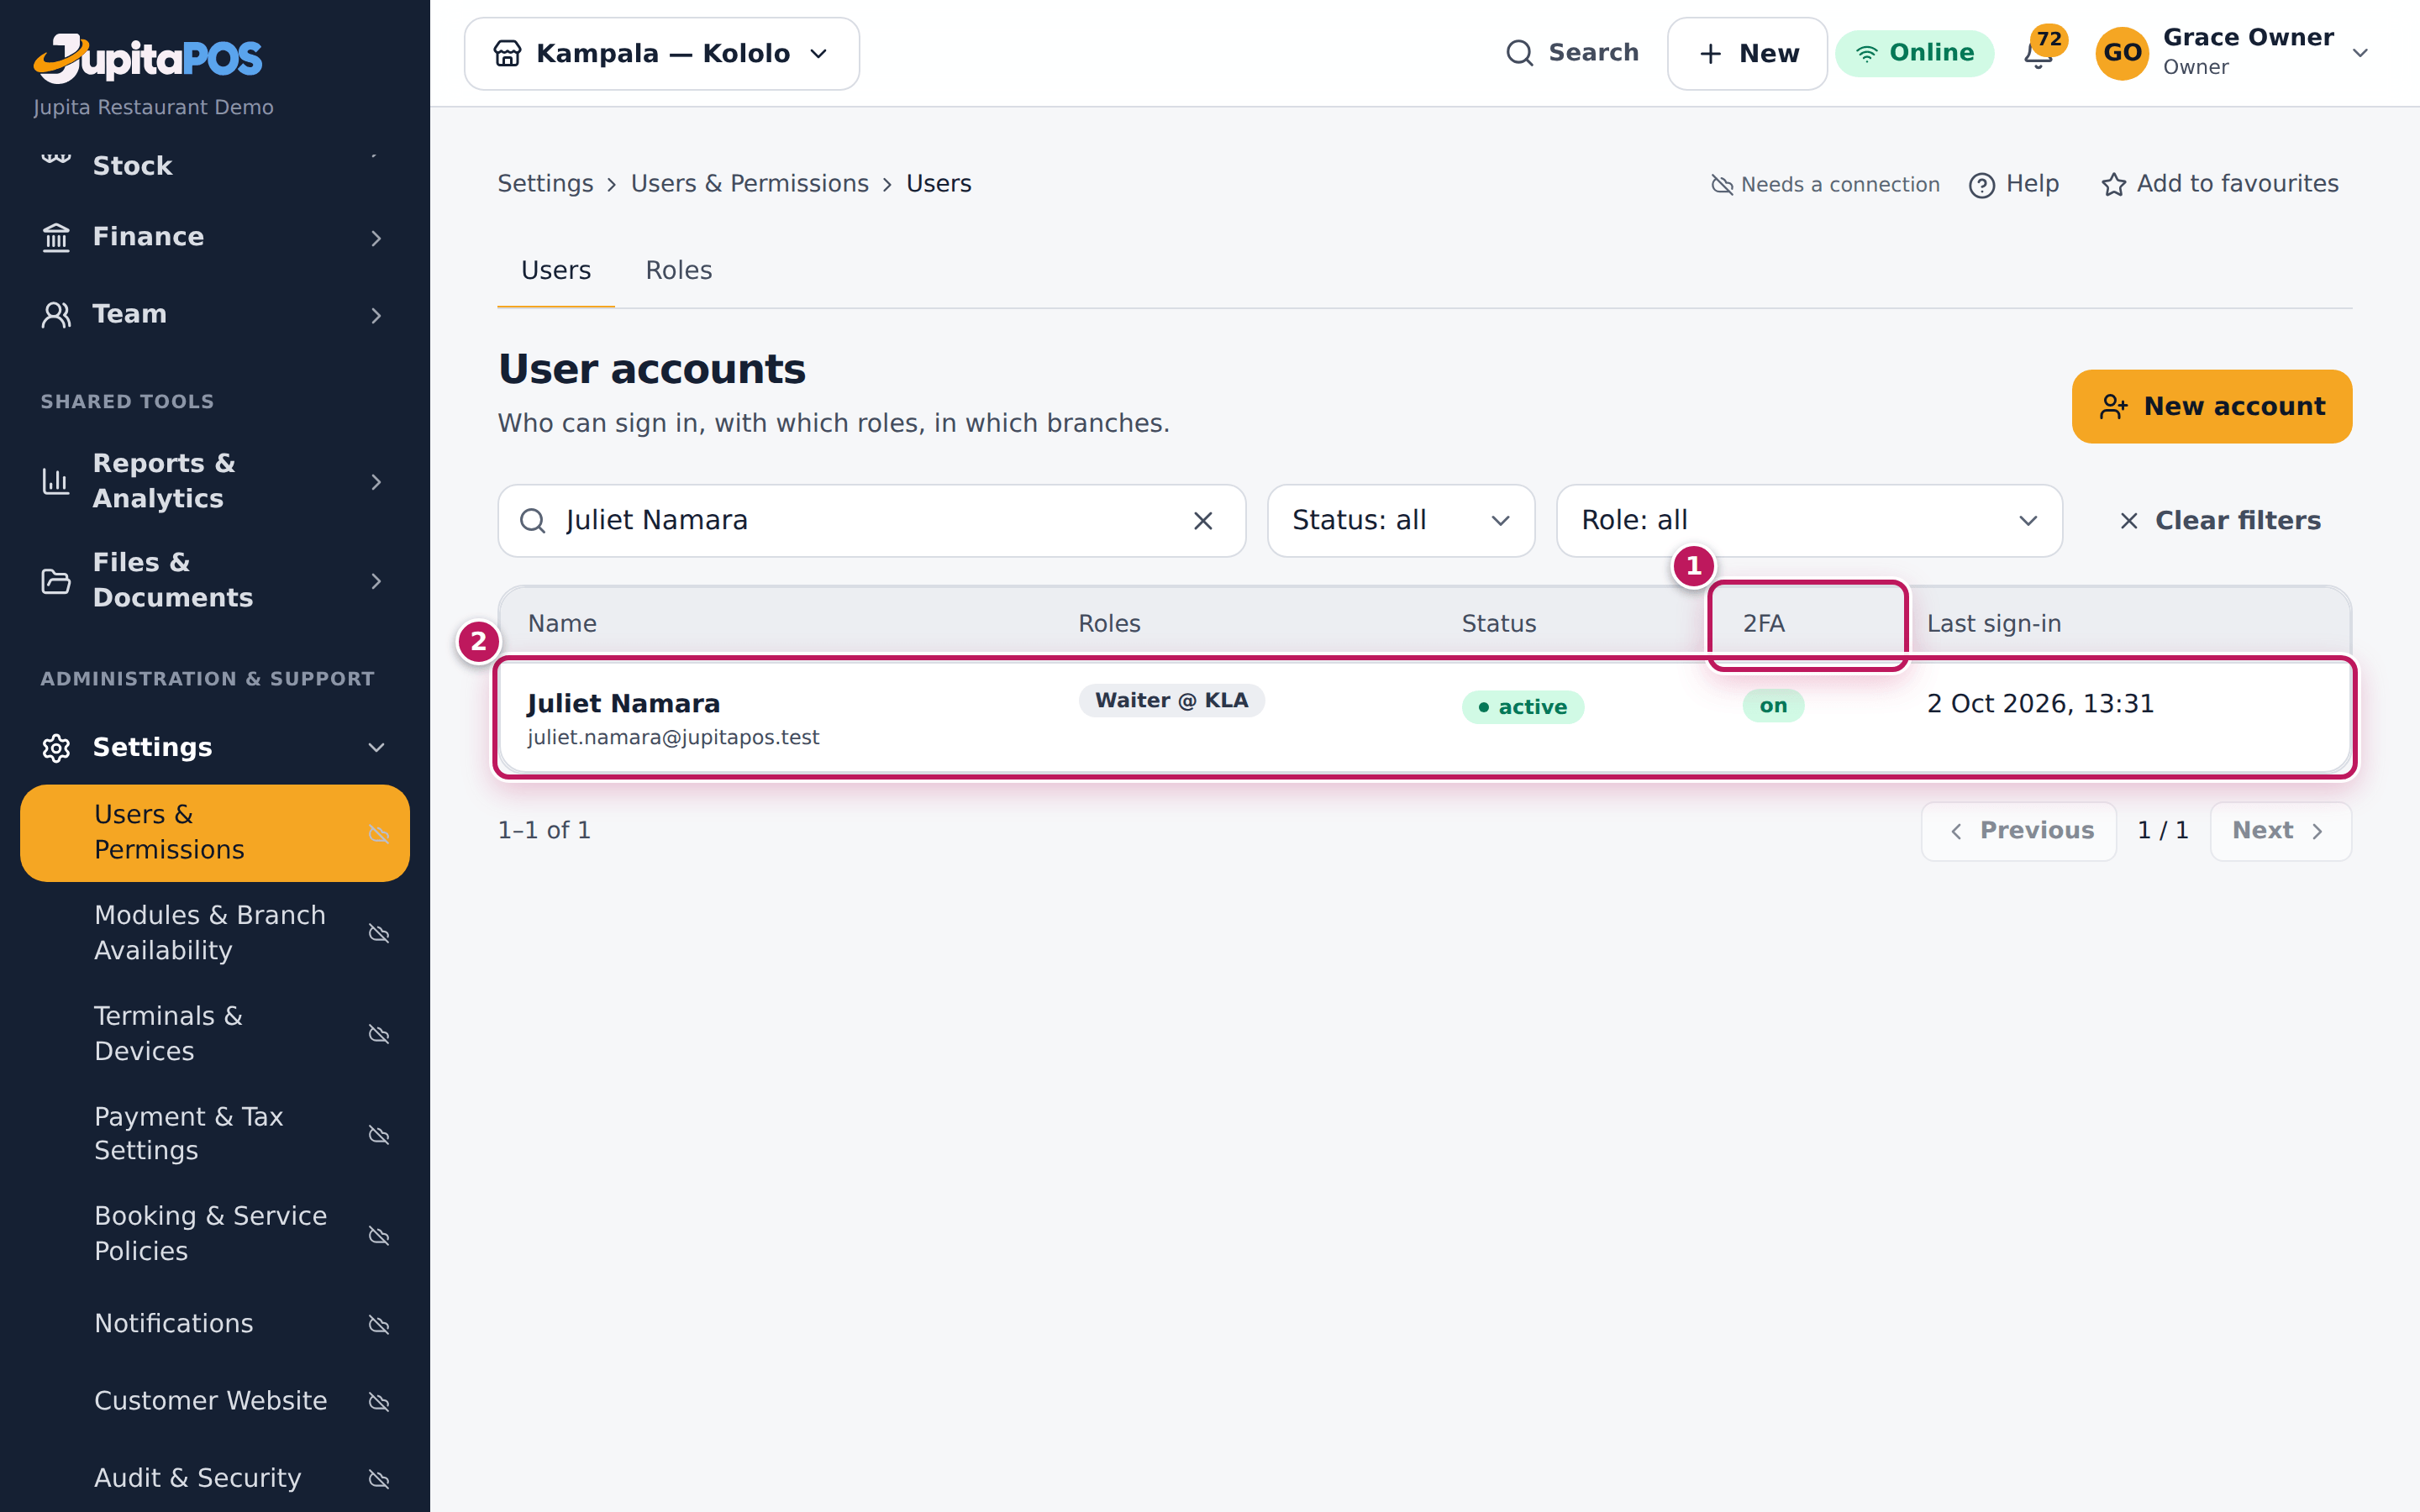
- In User accounts the 2FA column (1) shows who uses it (2).
- The business can require it for some roles — owner, directors, administrators. That is set up for you by your JupitaPos provider; those people are then asked to set it up at their next sign-in.
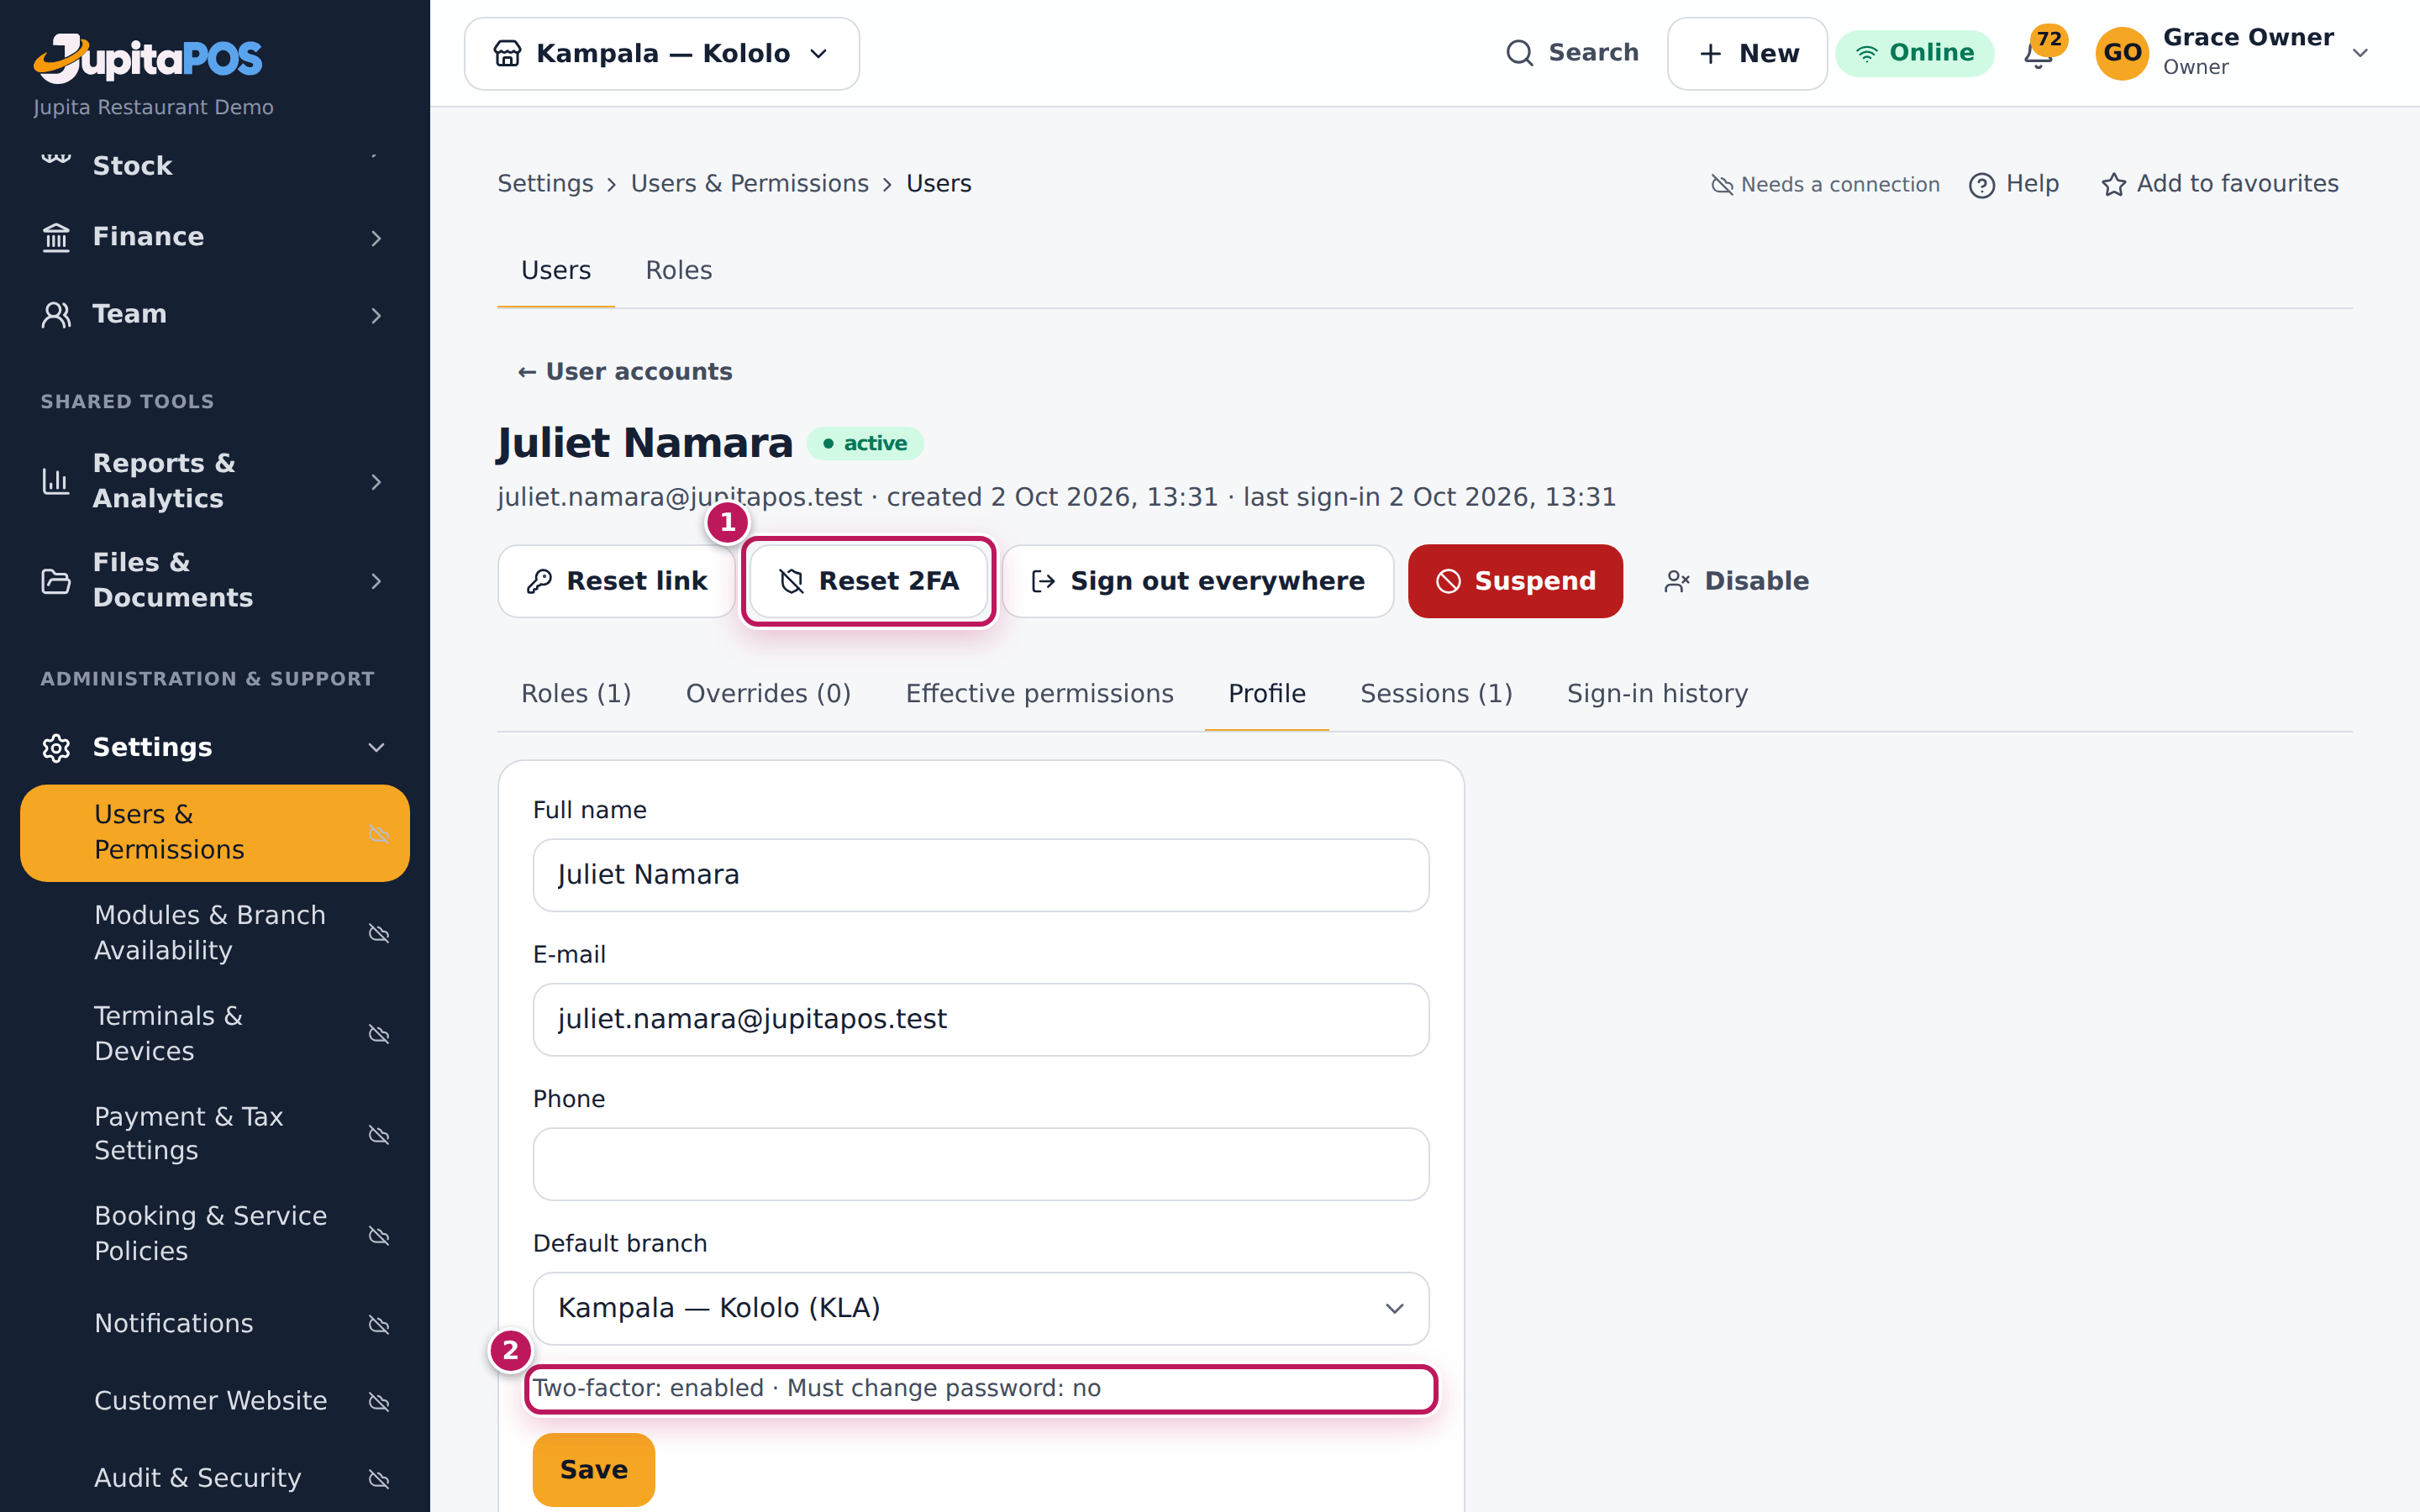
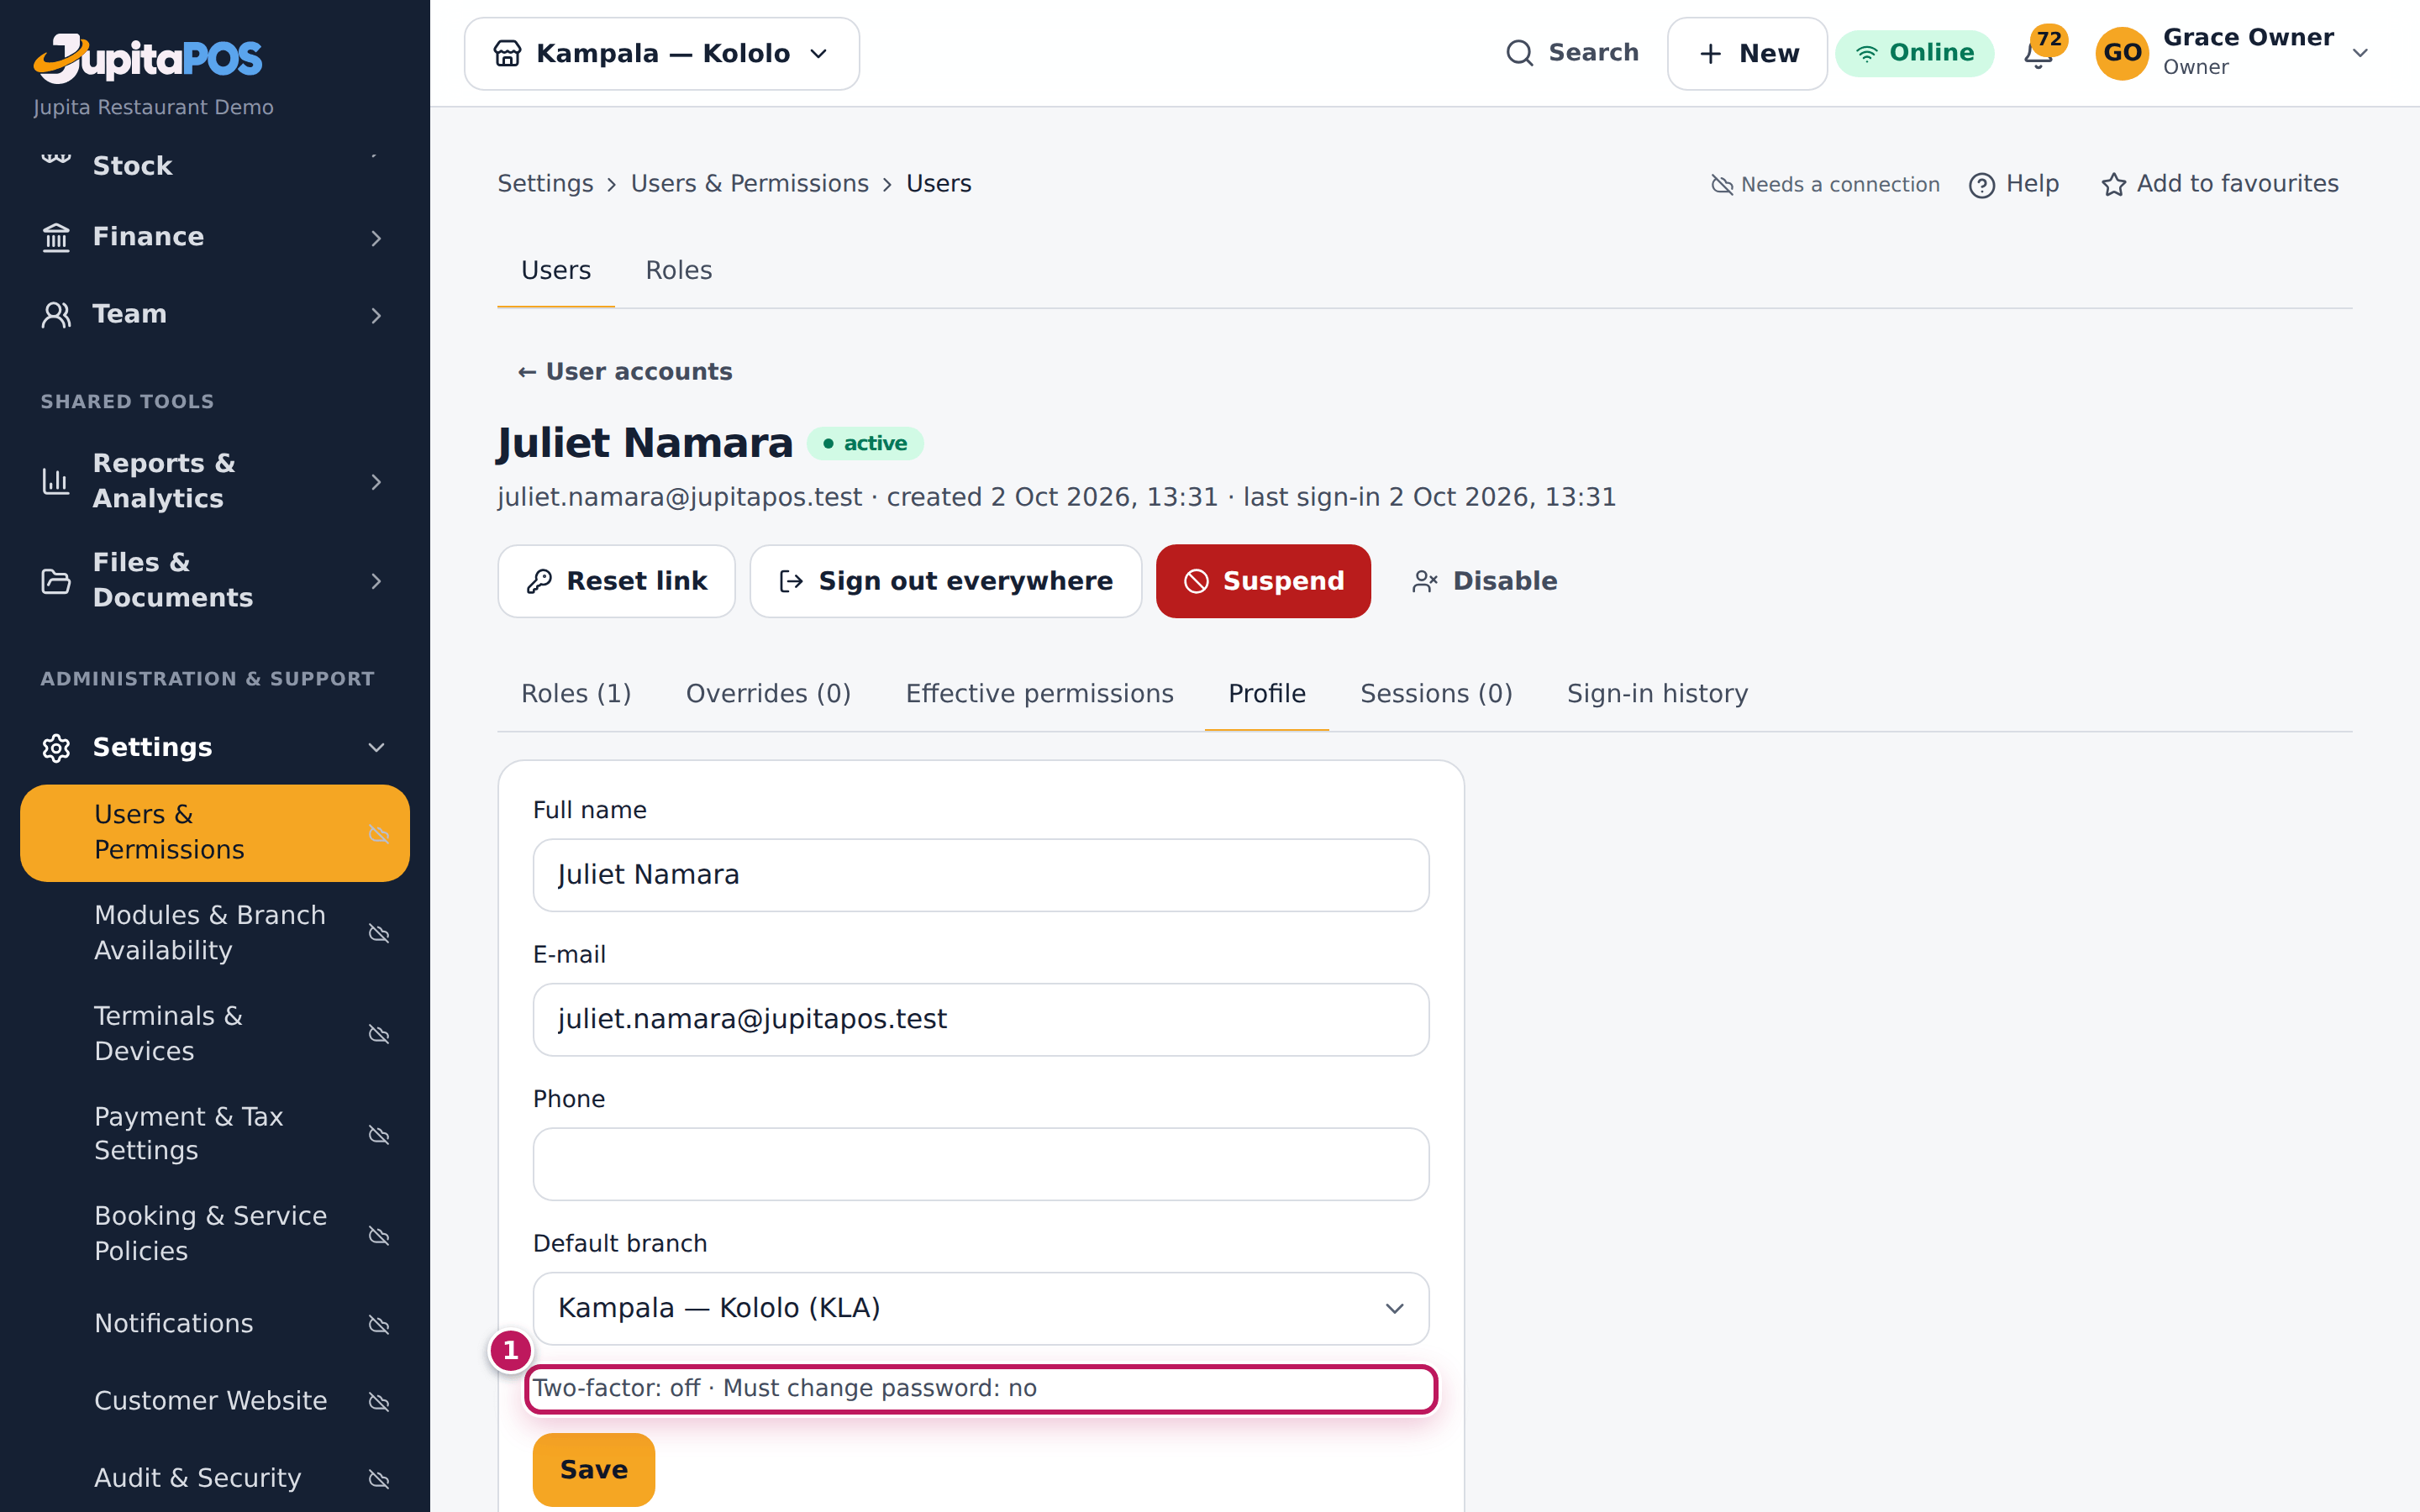
- When someone loses their phone and their recovery codes, open their account and click Reset 2FA (1).
Expected result
After Reset 2FA their profile says Two-factor: off (1) and every session they had ends. They sign in with their password alone and set it up again under their name › Active Sessions; if their role requires it, they are asked to straight away. The reset is in the audit trail.
Screenshot
Common mistakes
- Resetting two-step sign-in over the phone for a caller. Check who it is first: the reset opens their account to their password alone.
Troubleshooting
- There is no Reset 2FA button. The person does not use two-step sign-in, or you cannot manage their account.
- The 6-digit code is refused. The phone’s clock is wrong; set it to the network time, or use a recovery code.
Suspend a user
Purpose
Stop someone signing in at once — while something is looked into, or when they leave — without losing their history.
Role / permission required
Owner, or someone who holds all the person’s permissions: users.suspend.
Prerequisites
- None.
Steps
- Open User accounts and click the person.
- Click Suspend.
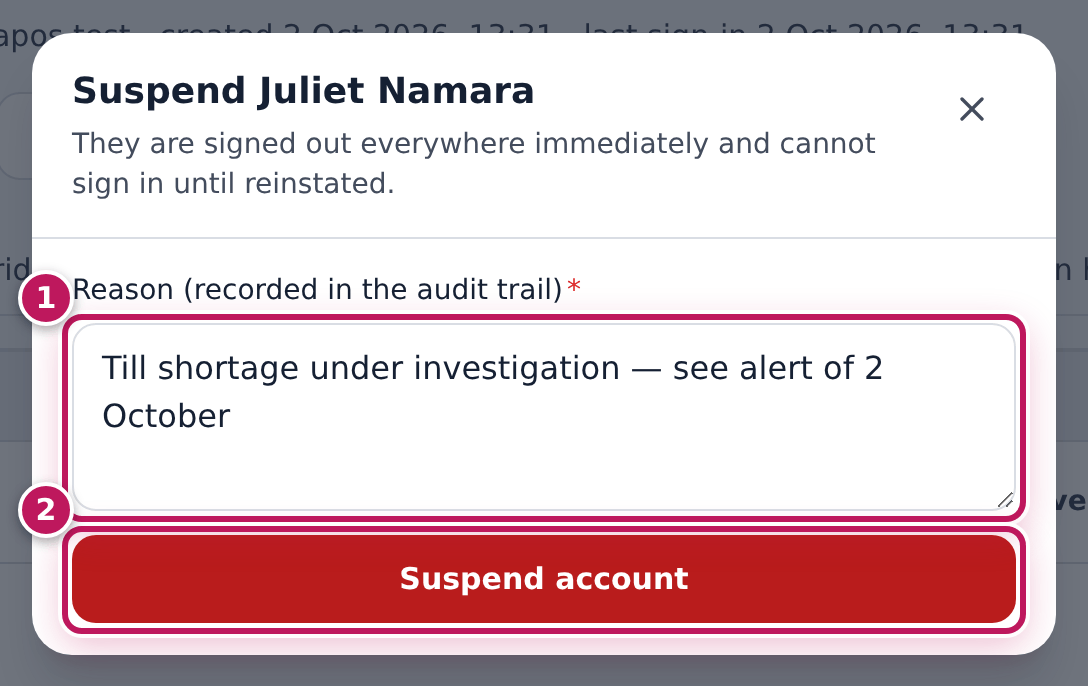
- Type the Reason (recorded in the audit trail) (1).
- Click Suspend account (2).
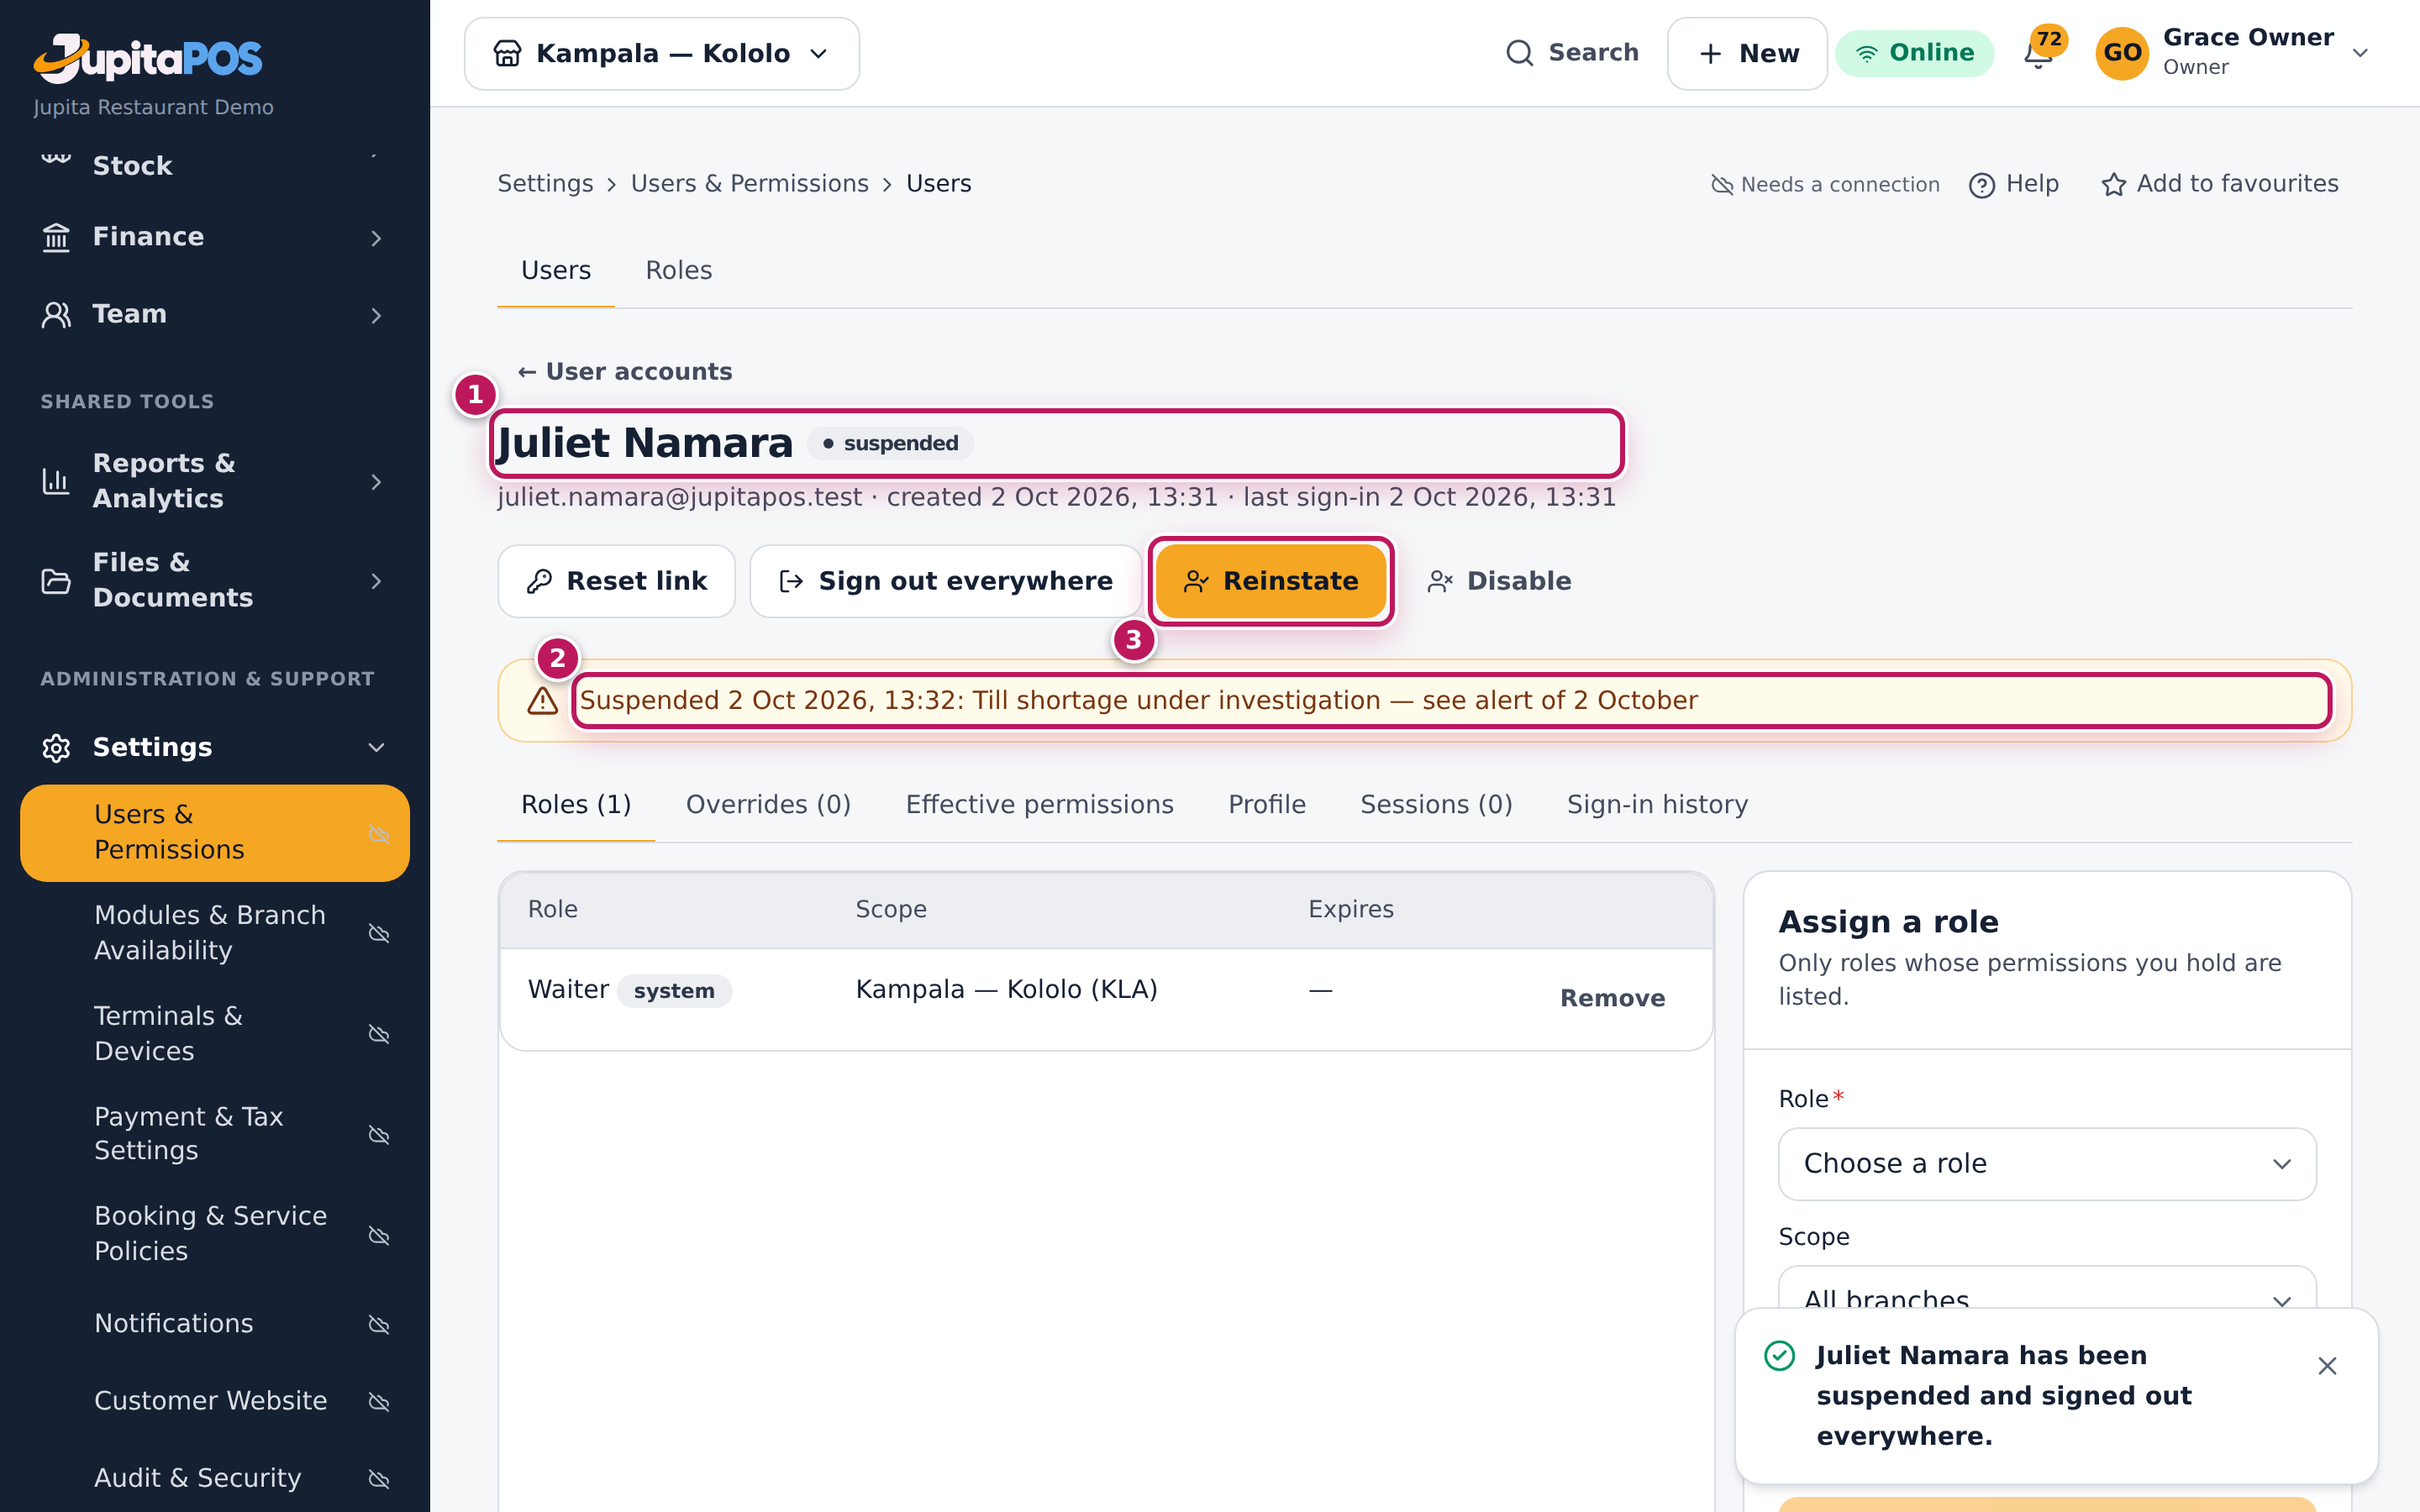
- When they may work again, click Reinstate (3 in the second picture).
- For someone who has left for good, click Disable: the account is archived, never deleted.
Expected result
The message Juliet Namara has been suspended and signed out everywhere. appears. The account shows suspended (1), and the line under the buttons (2) says Suspended, the date and time, and your reason. They are signed out everywhere at once and cannot sign in until reinstated. Their sales and history stay.
Screenshot
Common mistakes
- Suspending the login but not the employee. A suspended login can no longer sign in, with its password or its PIN, nor approve anything; but the time clock follows the employee record, so they could still clock in. Change the employee’s status too (see Change an employee’s status).
Troubleshooting
- There is no Suspend button. You cannot manage this account (they hold permissions you do not), or it is your own.