

On this page
Setting up and looking after JupitaPos: who may sign in and what they may do, which devices are tills, how people pay and where the money and the tickets go. The owner can do everything; an administrator looks after accounts, terminals and security; a branch manager adds the staff of their branch.
One rule runs through this manual: you can only grant what you hold yourself. A role, a permission or a user account whose permissions you do not all hold is out of your reach — so an administrator, who does not sell, cannot give someone the Waiter role, and the owner or the branch manager does.
The screens are the demo business on Friday 2 October 2026: Grace is the owner, Irene Admin the administrator, Moses the branch manager at Kampala — Kololo. Juliet Namara is a waiter’s login added for these guides.
Find the business settings
Purpose
Know where each setting of the business lives, so you change it in the right place — and know which ones are fixed when JupitaPos is installed.
Role / permission required
Owner or administrator: settings.view to look; each screen needs its own
permission to change it.
Prerequisites
- None.
Steps
- The business name, currency, time zone and the branches are set when JupitaPos is installed for you. They are not changed from the screens: ask your JupitaPos provider.
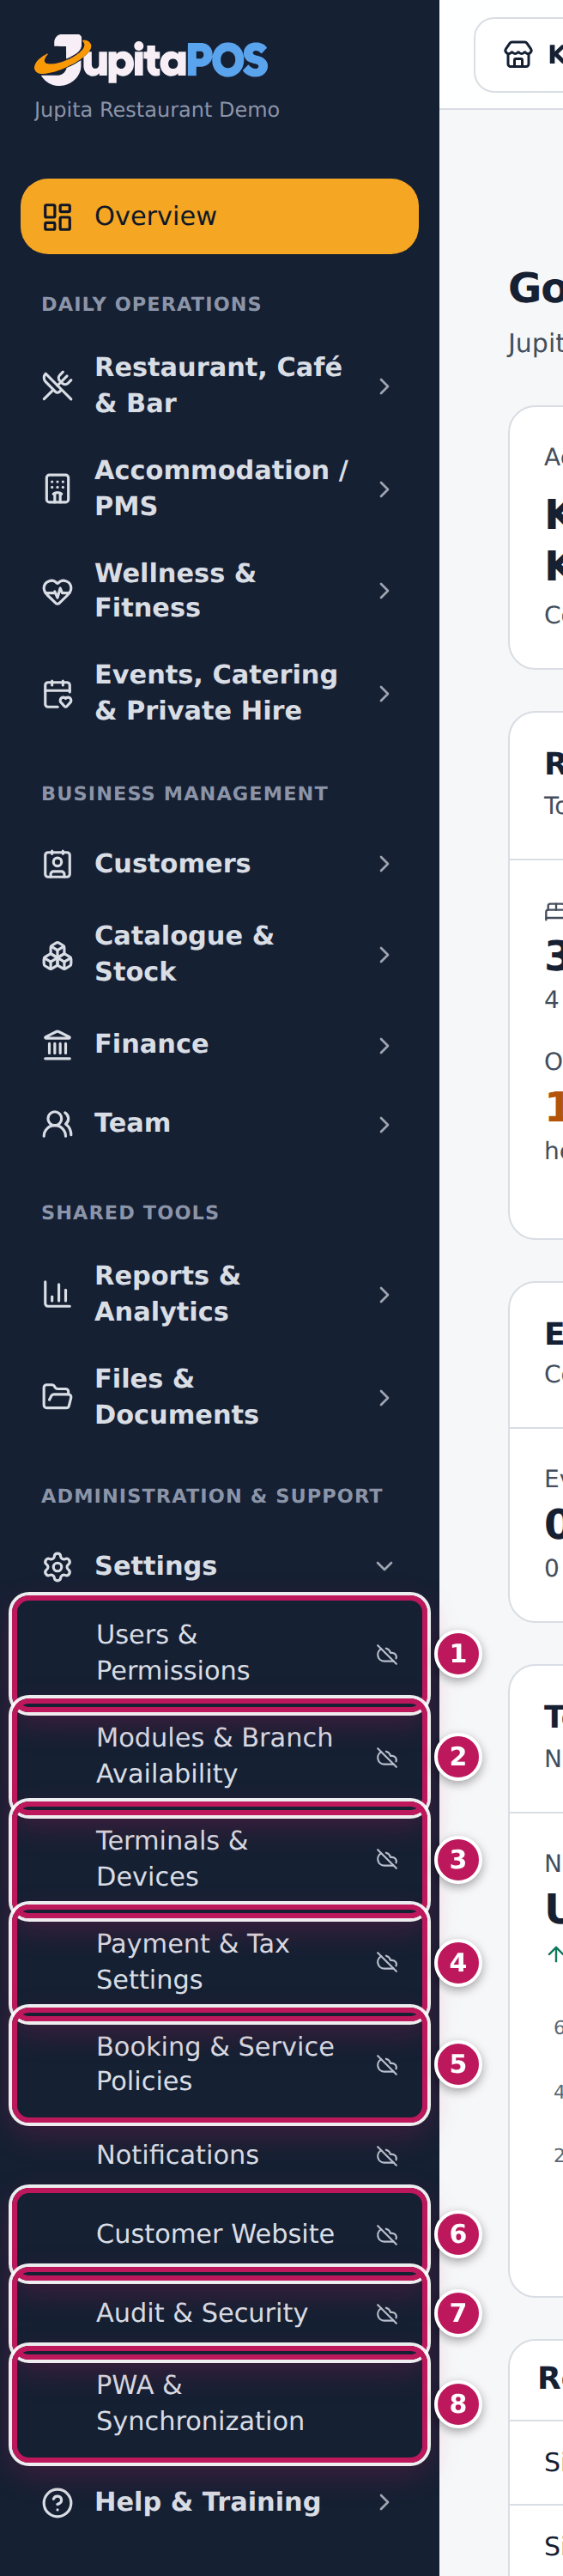
- The business-wide settings are in the Settings workspace of the menu
(Administration & support):
- Users & Permissions (1) — Users (who signs in) and Roles (what they may do).
- Modules & Branch Availability (2) — which modules are on.
- Terminals & Devices (3) — the tills and devices, and their approval.
- Payment & Tax Settings (4) — Payment methods: how people may pay (see Payment methods); taxes are part of the installation.
- Booking & Service Policies (5) — the rooms’ and the wellness policies (table-reservation and event policies are on their own set-up pages).
- Customer Website (6) — the Storefront: online ordering and table QR.
- Audit & Security (7) — the audit trail, security alerts and alert rules.
- PWA & Synchronization (8) — offline sync, the system status and the background jobs.
- The rest lives with what it controls:
- Restaurant, Café & Bar › Preparation Screens › Stations & routing — kitchen, bar and café stations and where each item is made (see Outlets and stations); Point of Sale › Café set-up — the café’s own settings.
- Events, Catering & Private Hire › Venues & Resources — the events’ own settings and venues.
- Catalogue & Stock › Products & Services — items, prices, the tax each item is sold with, menus and their hours (see Taxes and service charges); Stock & Stores › Set-up — stock locations, units and unit conversions.
- Team › Employees › Staff set-up — positions, departments, leave types and attendance rules.
- Finance › Accounting › Chart of accounts › Posting map — where each payment method, till, tax and category posts (see the chart of accounts).
Expected result
You open the right screen for the change you want. A change is saved at once and recorded in the audit trail with who made it.
Screenshot
Common mistakes
- Looking for every setting under Settings. The business-wide ones are there; a station, a menu, a venue or a staff position is set up with what it controls — follow the list above.
- Changing a setting at the wrong branch. Some settings are per branch: check the branch at the top first (see Branches).
Troubleshooting
- A menu entry is missing. Your role does not include that screen’s permission. Ask the owner.
- The business name or currency is wrong. It is part of the installation; ask your JupitaPos provider.
Work in a branch and give people access to it
Purpose
Switch between branches, and decide who works at which branch — because everything a person may do is given branch by branch.
Role / permission required
Everyone with more than one branch switches; giving access needs
roles.assign (owner, director, general manager, administrator, and a
branch manager for their branch).
Prerequisites
- The branches exist (set at installation).
Steps
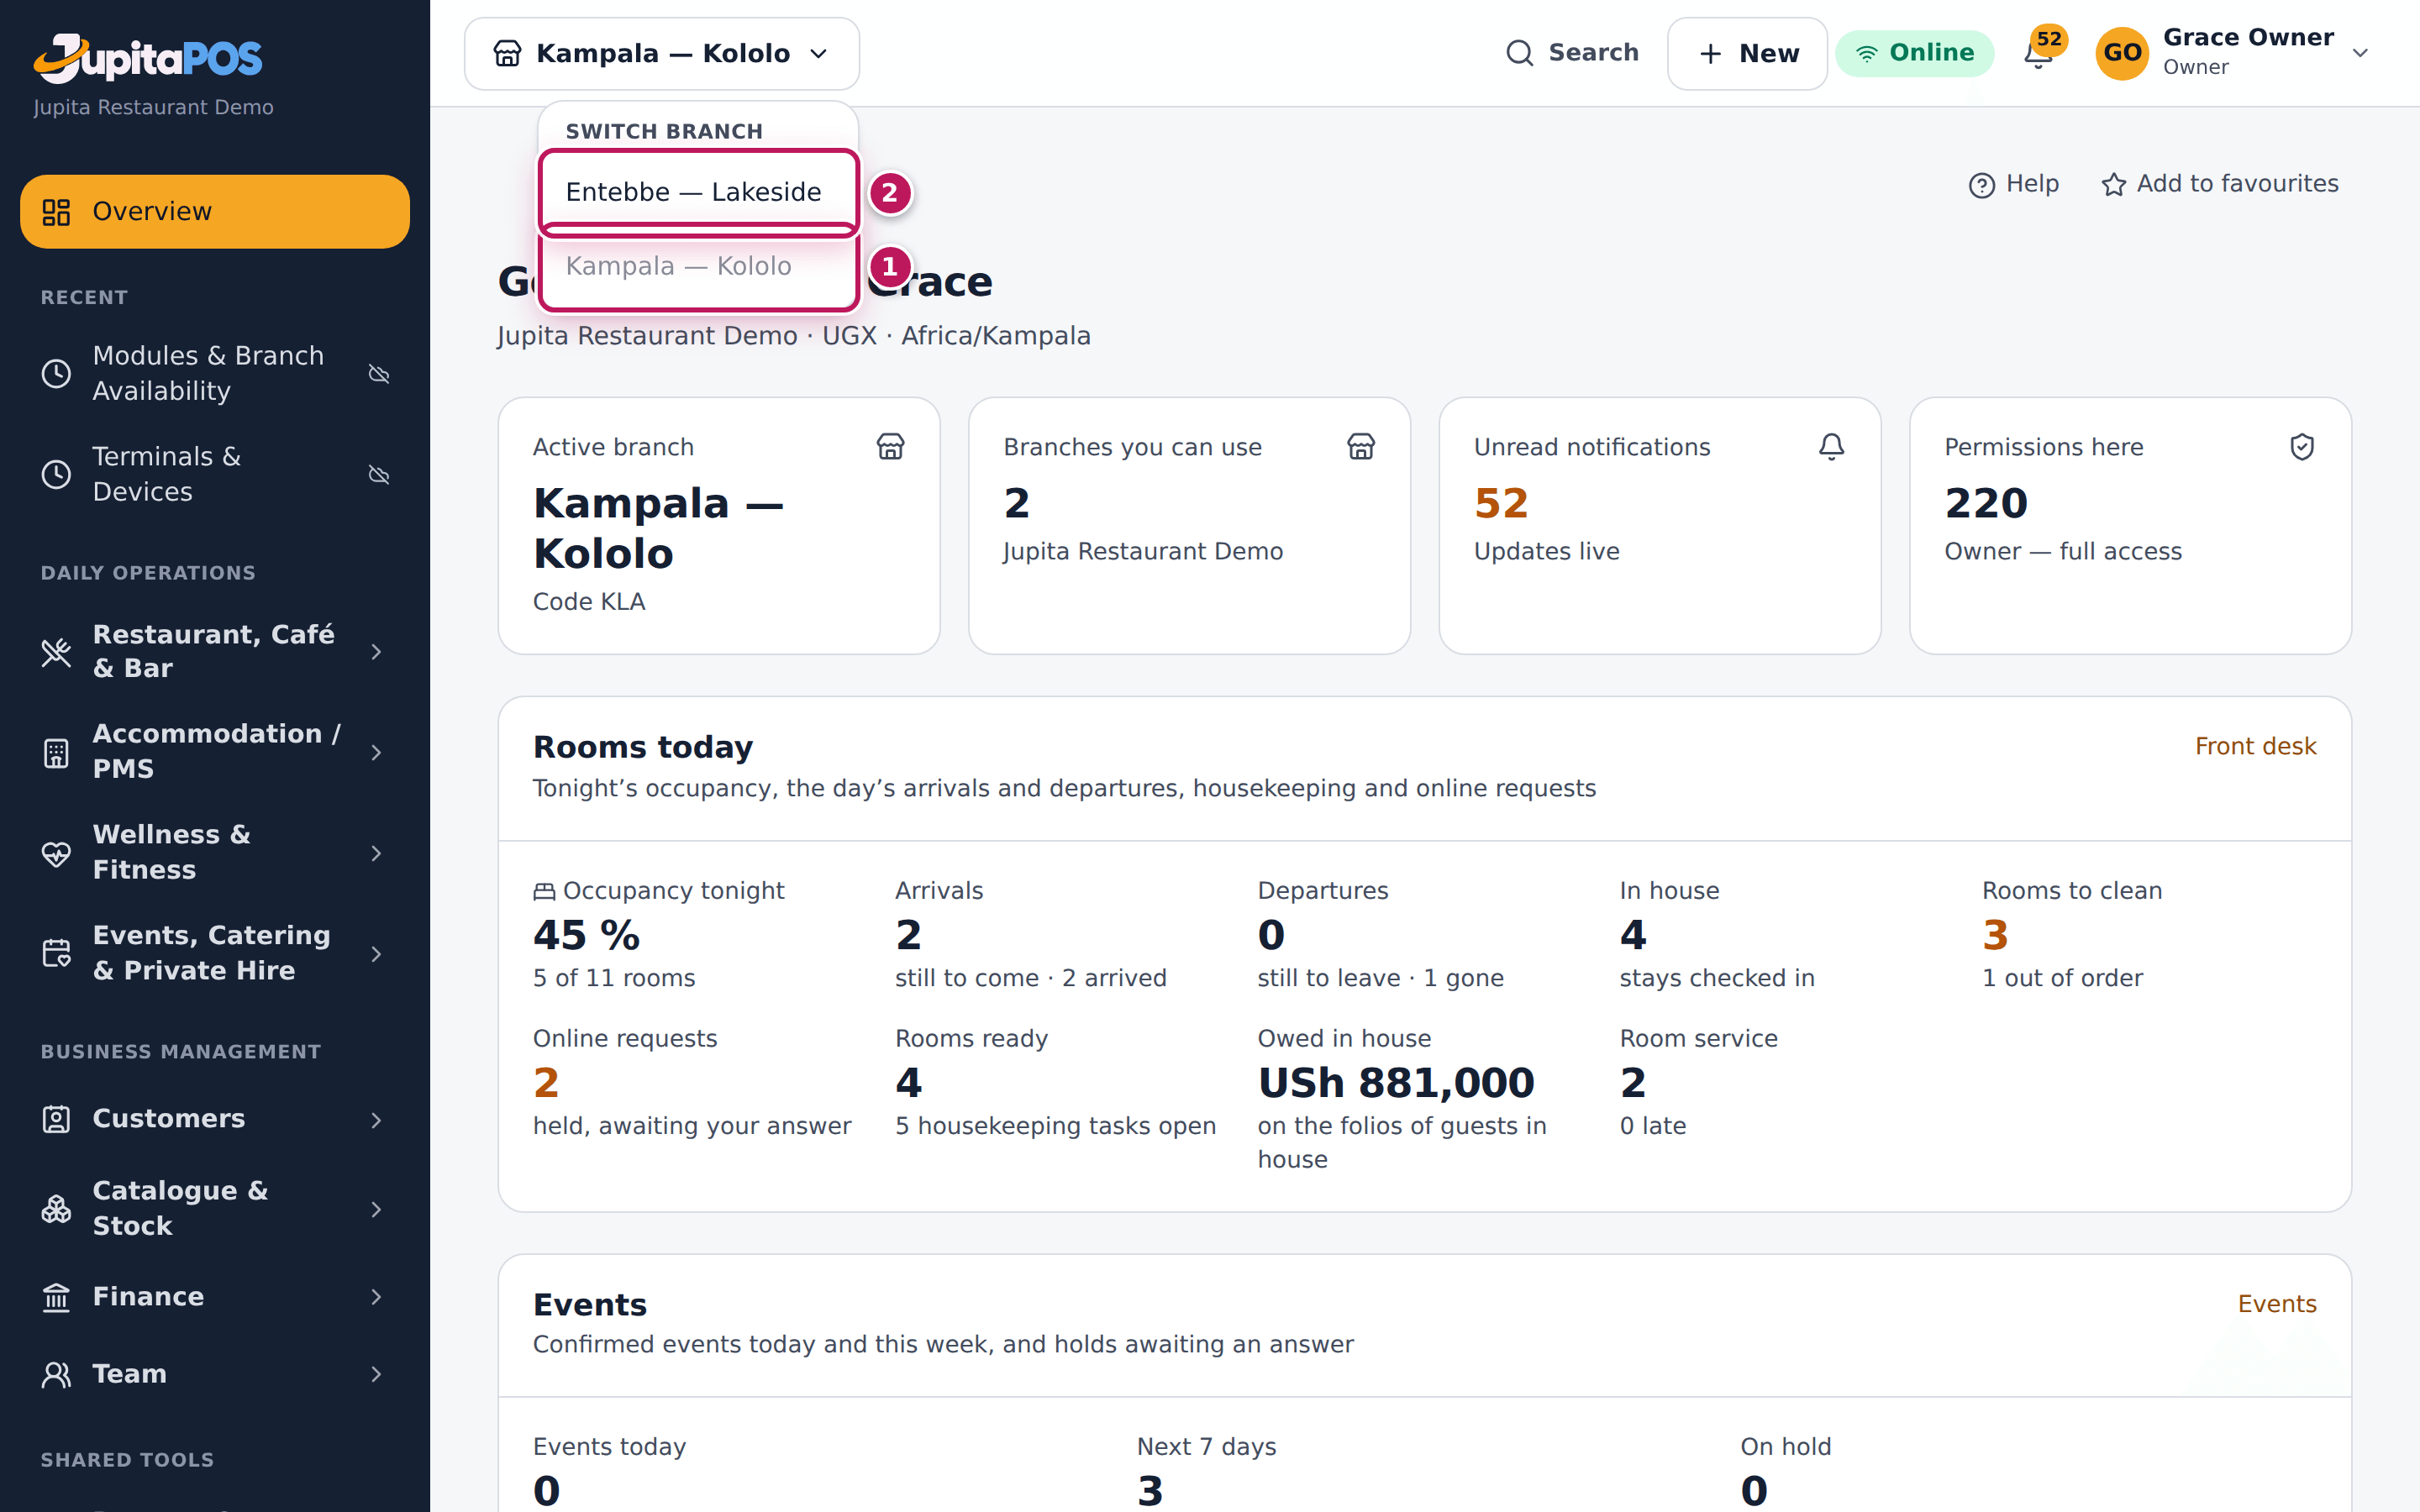
- At the top of the screen, click the branch: Kampala — Kololo. The list shows the branch you work in, greyed (1), and the others.
- Choose another branch (2): Entebbe — Lakeside. The screens now show that branch; a till always works for the branch it belongs to.
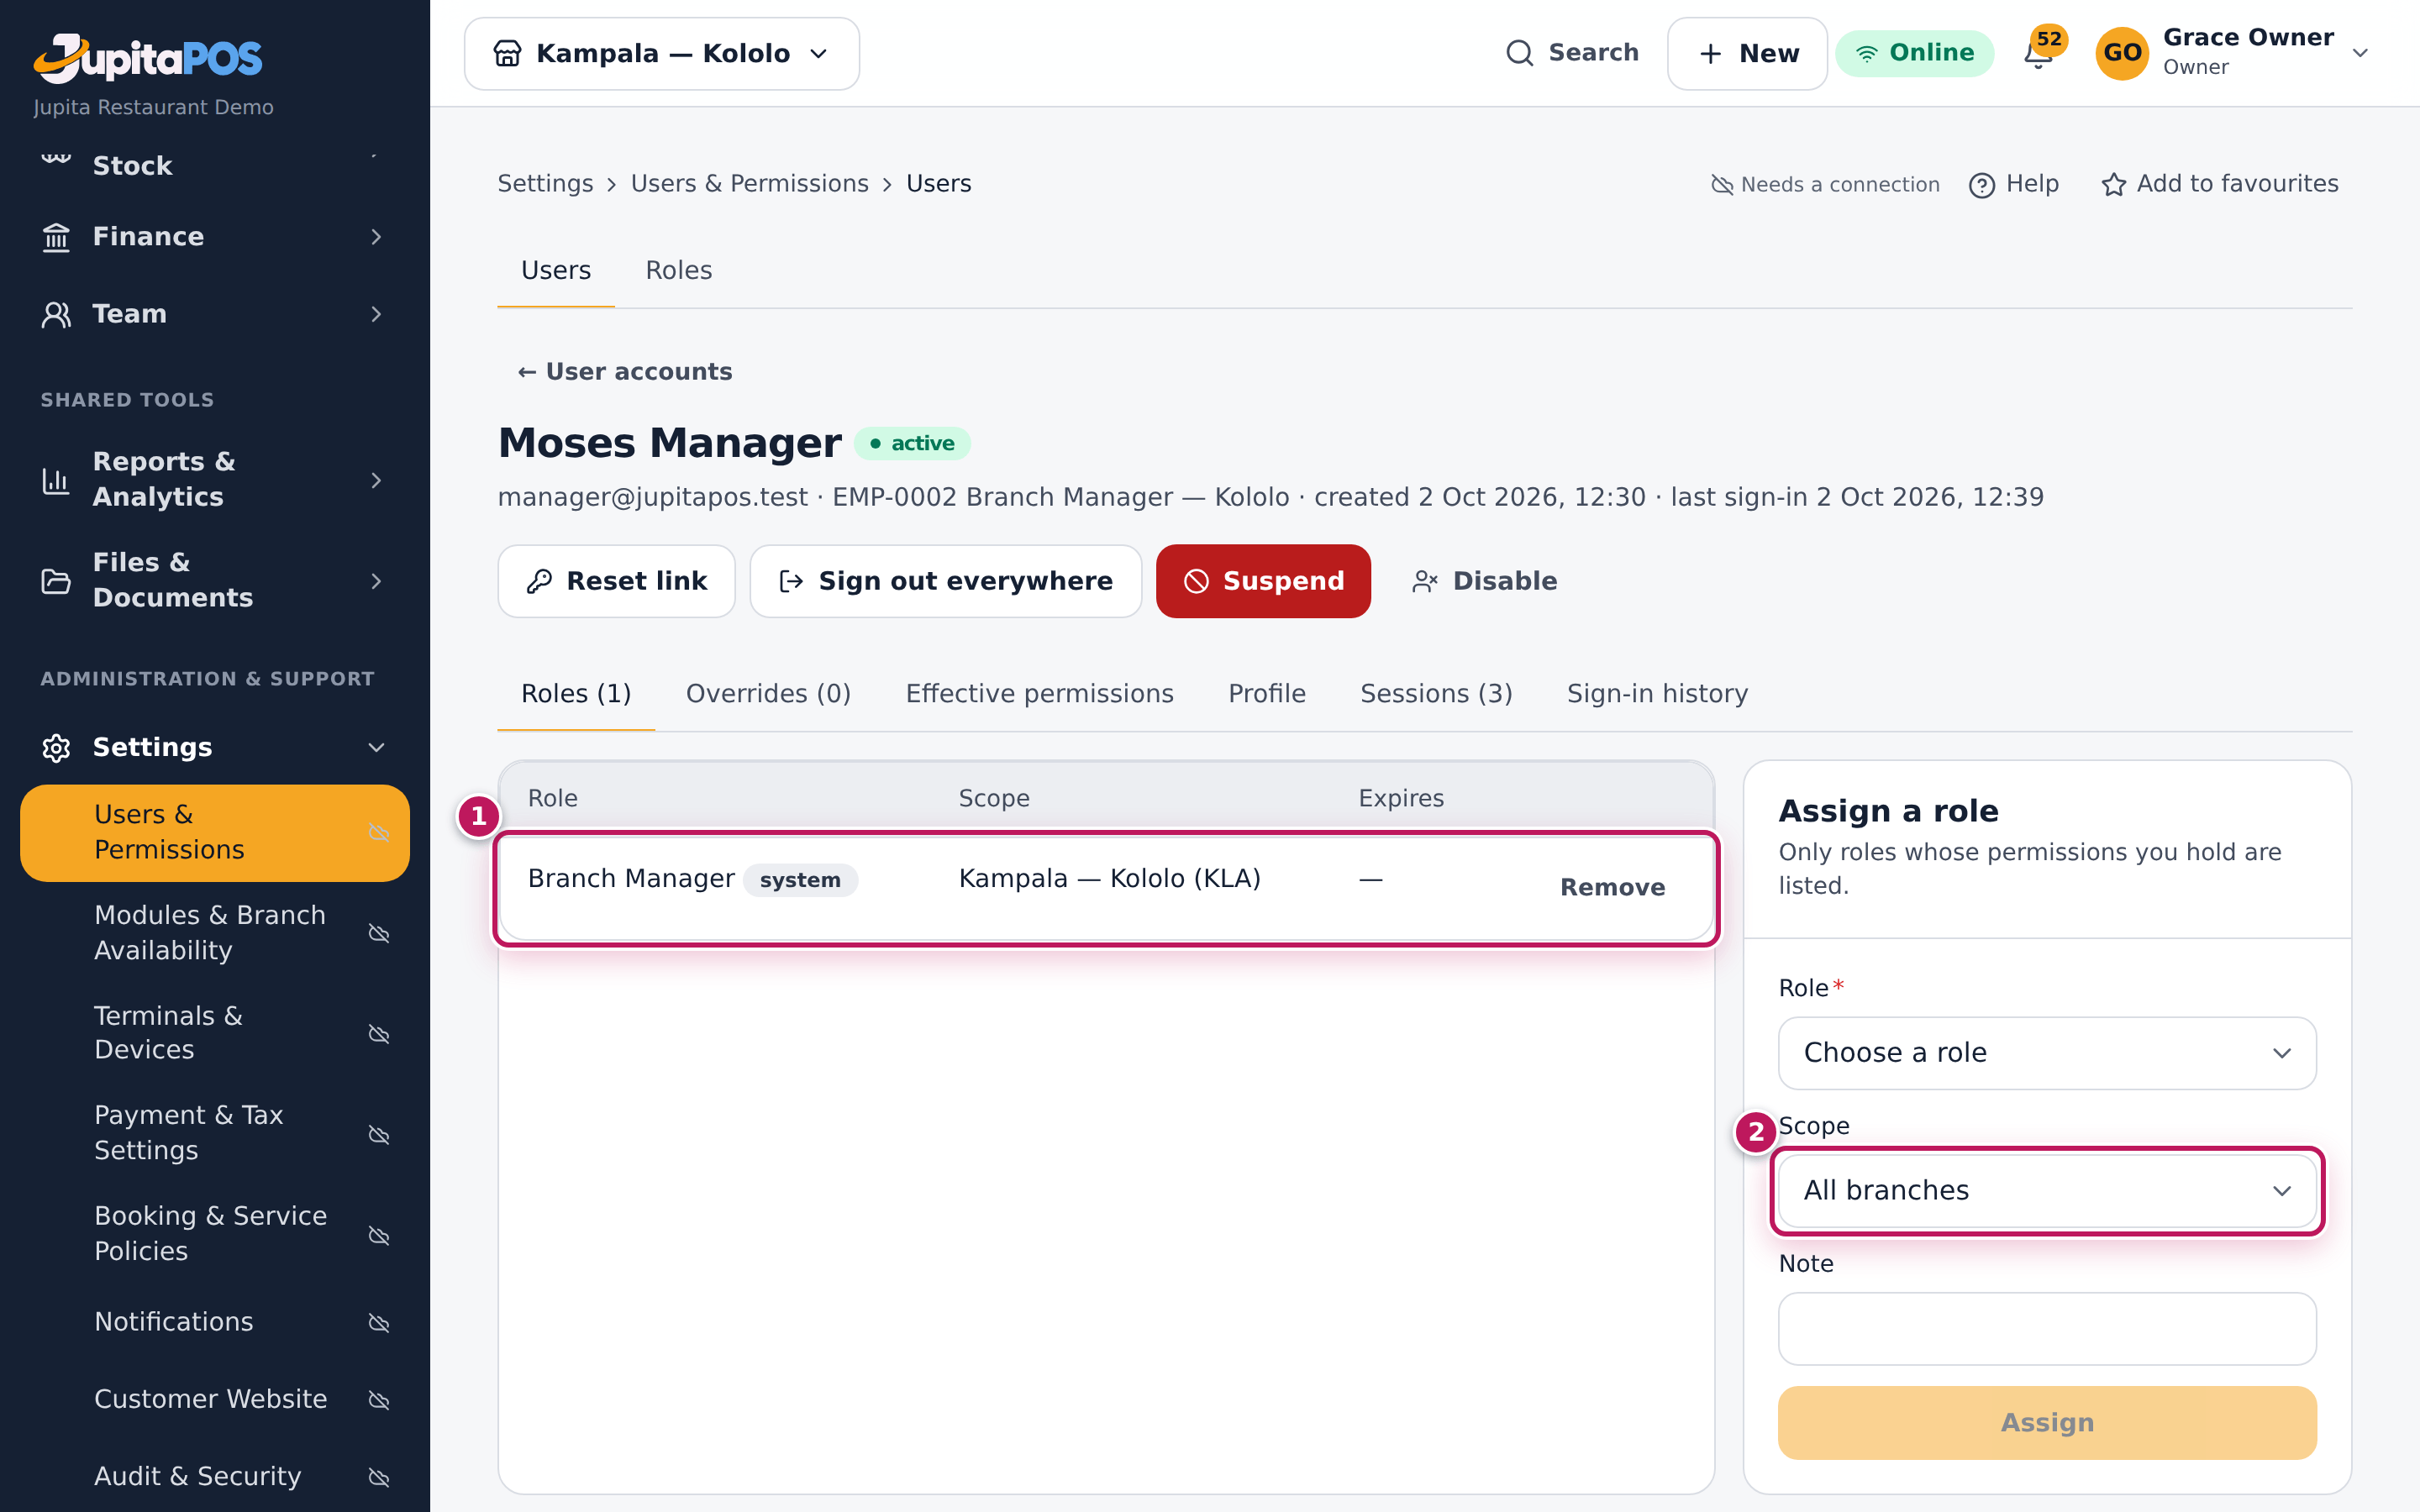
- To let someone work at a branch, open User accounts, open the person and look at their roles (1): each role has a Scope — one branch or All branches.
- Under Assign a role, choose the Role and, in Scope (2), the branch. Click Assign.
Expected result
The screens follow the branch you chose. Moses Manager holds Branch Manager for Kampala — Kololo (KLA) only: he sees Kololo’s staff, reports and alerts, and Entebbe’s are not sent to his screen.
Screenshot
Common mistakes
- Giving a role for All branches when one is meant. A waiter at Entebbe does not need Kololo’s tables.
- Switching branch on a till. A till belongs to its branch; switch on the back-office screens only.
Troubleshooting
- There is no branch switcher. You work at one branch only.
- “The books cover every branch: accounting needs access to all of them.” Accounting needs a role for all branches.
Add a user and give them a role
Purpose
Give someone a login to JupitaPos with exactly the access their job needs.
Role / permission required
Owner, or a branch manager for their branch: users.manage and
roles.assign. You can only grant roles whose permissions you hold.
Prerequisites
- For staff, the person has a staff profile (see Add an employee); link it so their hours and figures follow the login.
Steps
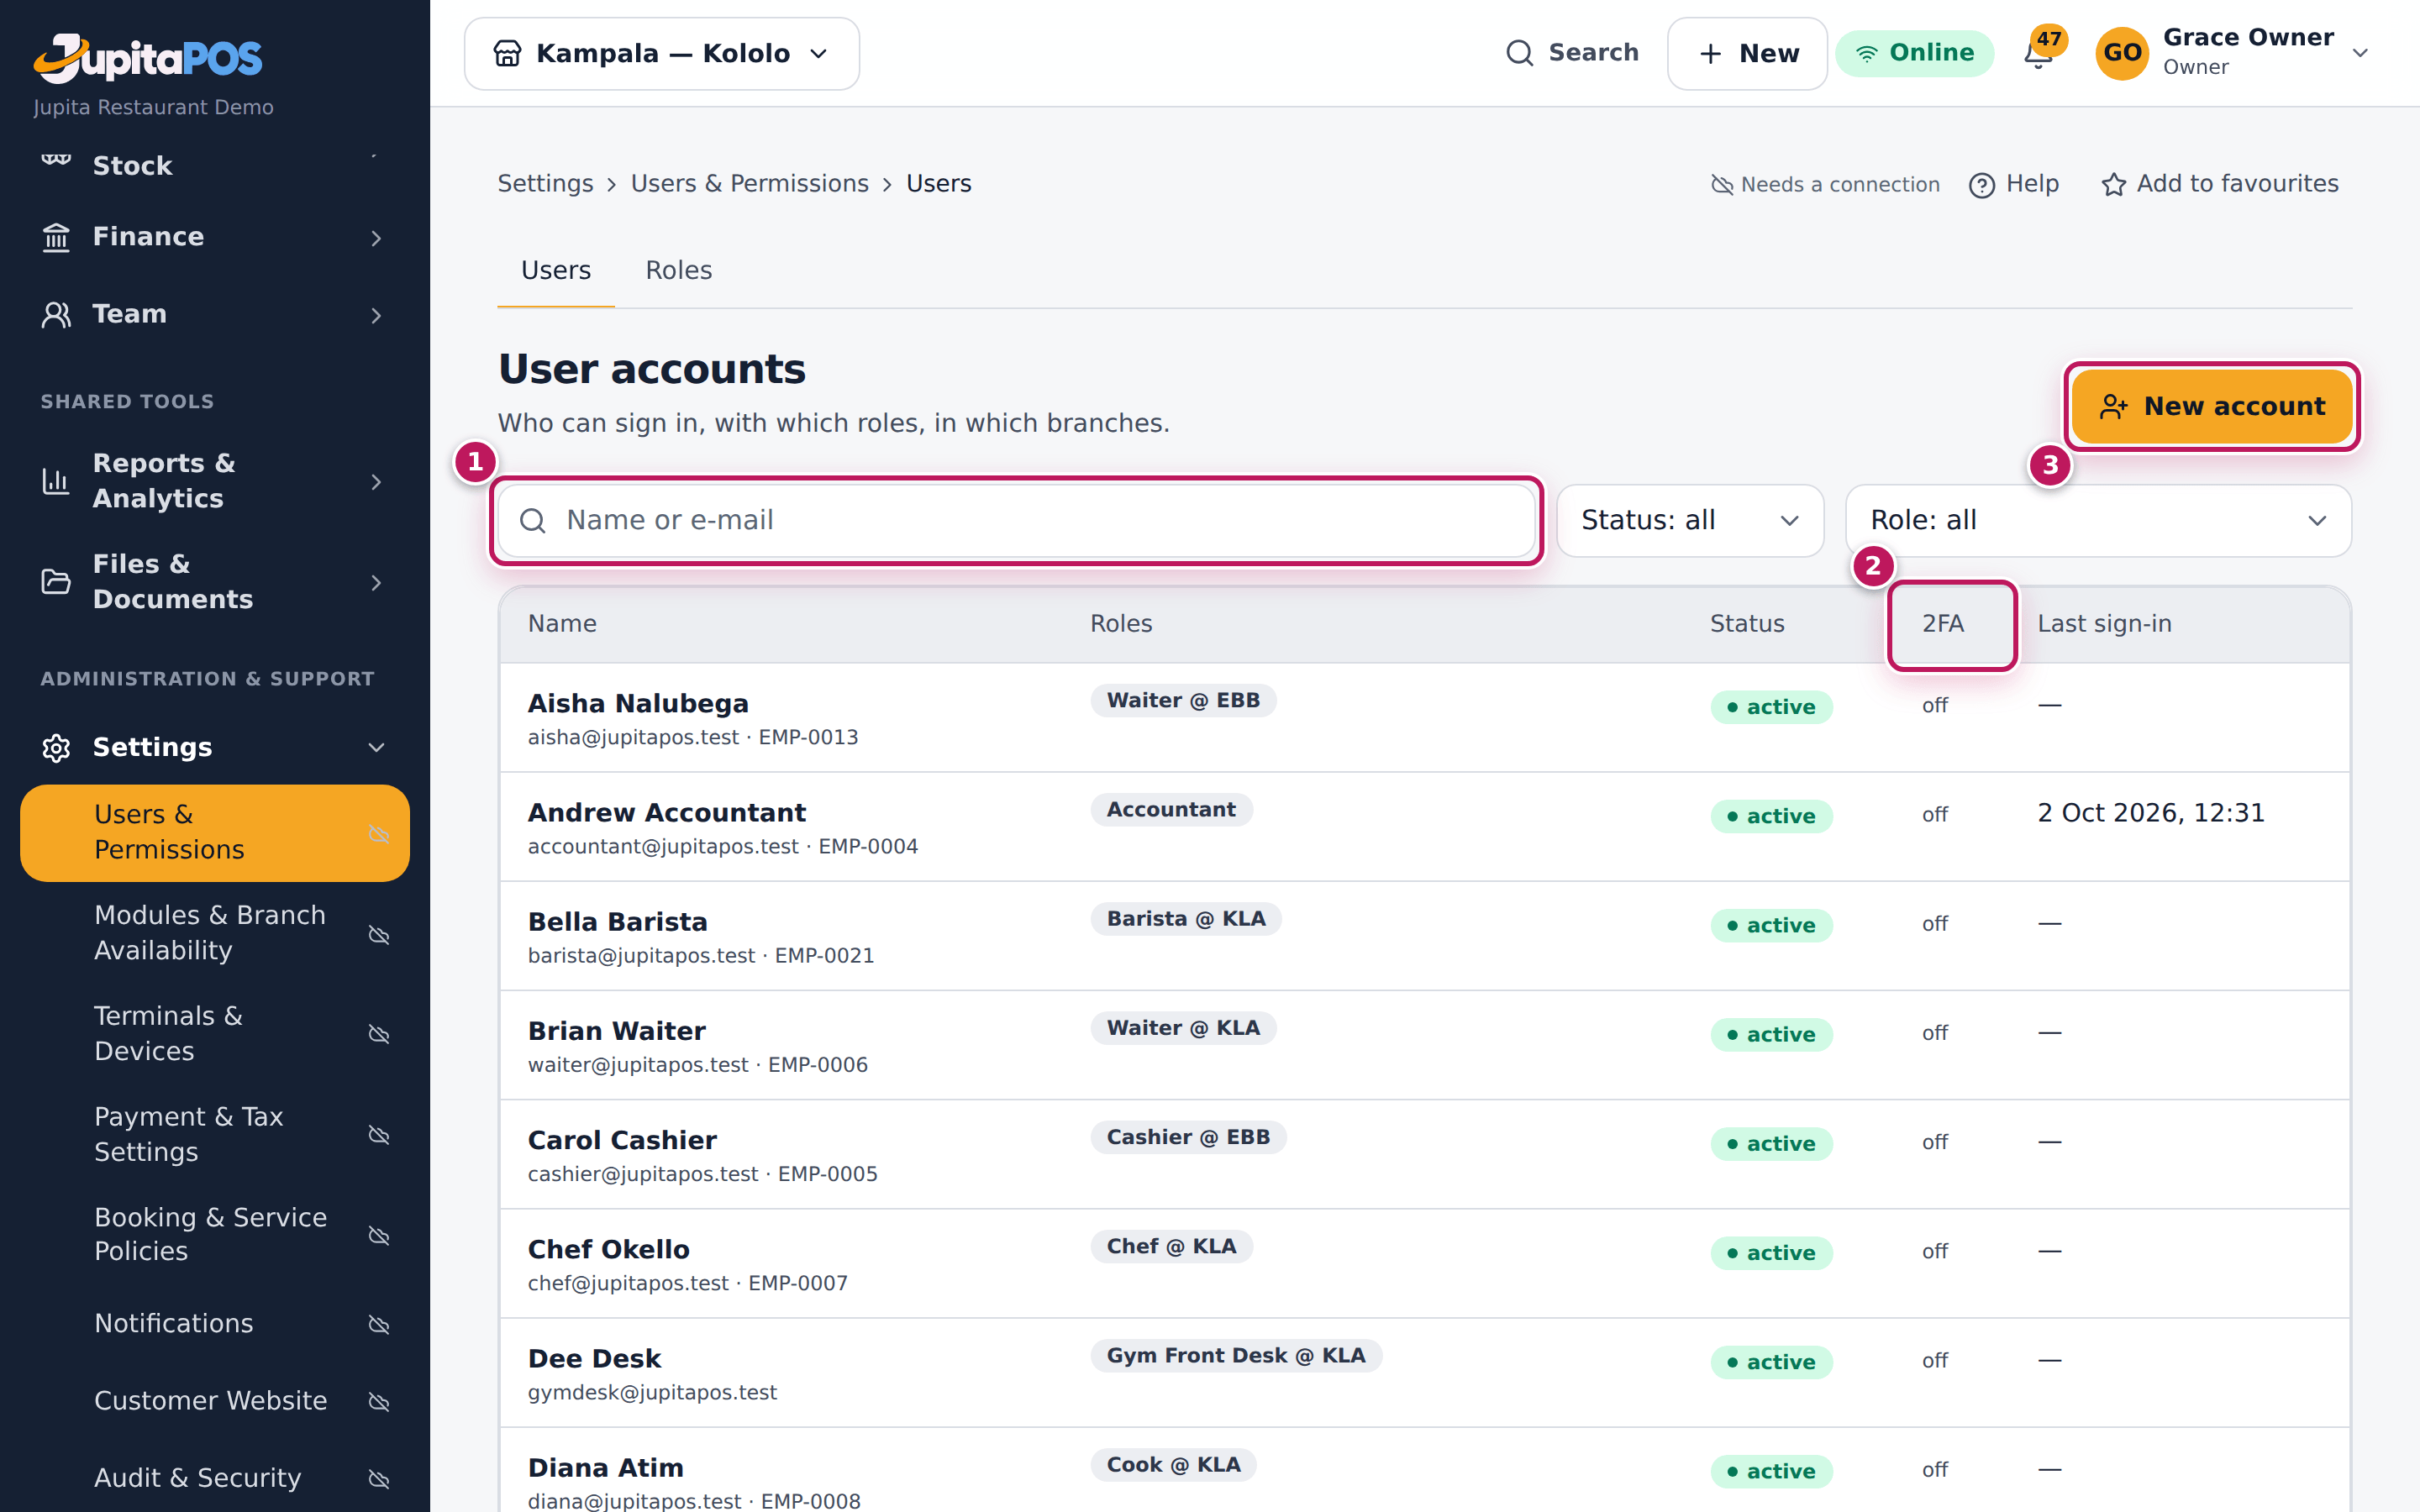
- Open User accounts. Search (1) by name or e-mail; the 2FA column (2) shows who uses two-step sign-in.
- Click New account (3).
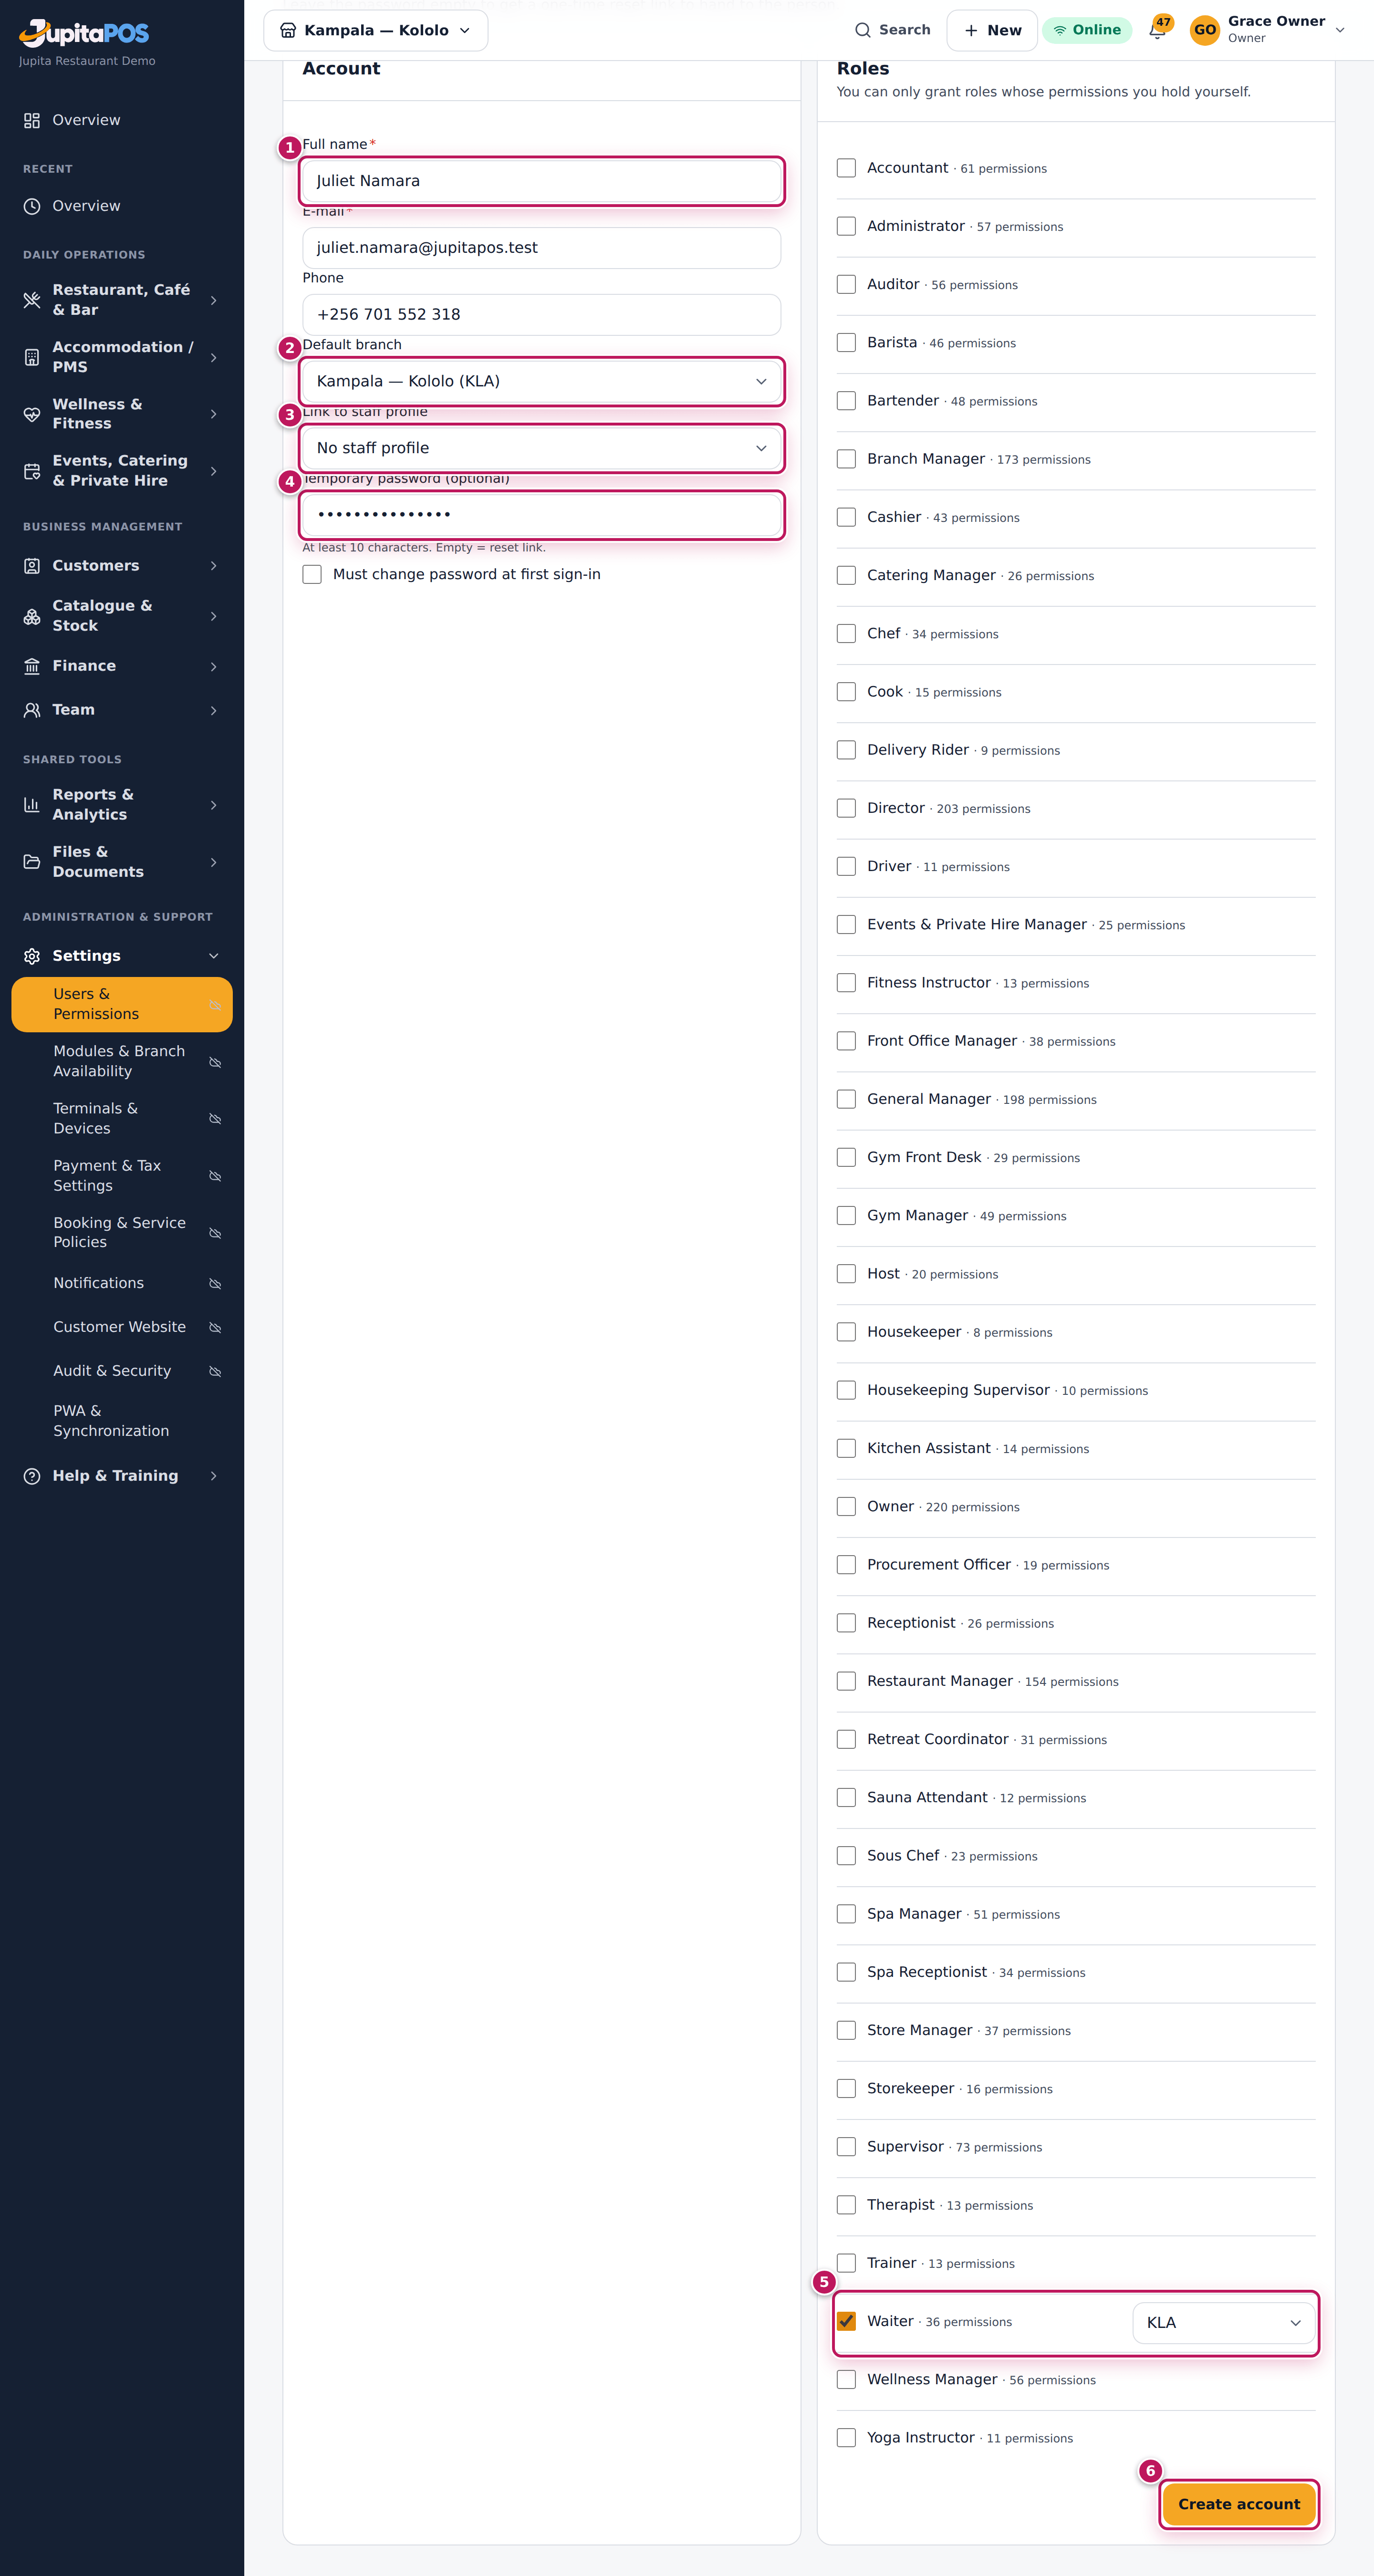
- Type the Full name (1), E-mail and Phone, and choose the Default branch (2).
- Choose Link to staff profile (3), or leave No staff profile.
- Type a Temporary password (optional) (4) — at least 10 characters — and give it to the person. Tick Must change password at first sign-in if they should choose their own. Or leave it empty: JupitaPos then shows a one-time reset link (valid 60 minutes, shown once) with which they choose their password.
- Under Roles, tick the role (5) — Waiter — and choose its scope: the branch, or All branches.
- Click Create account (6).
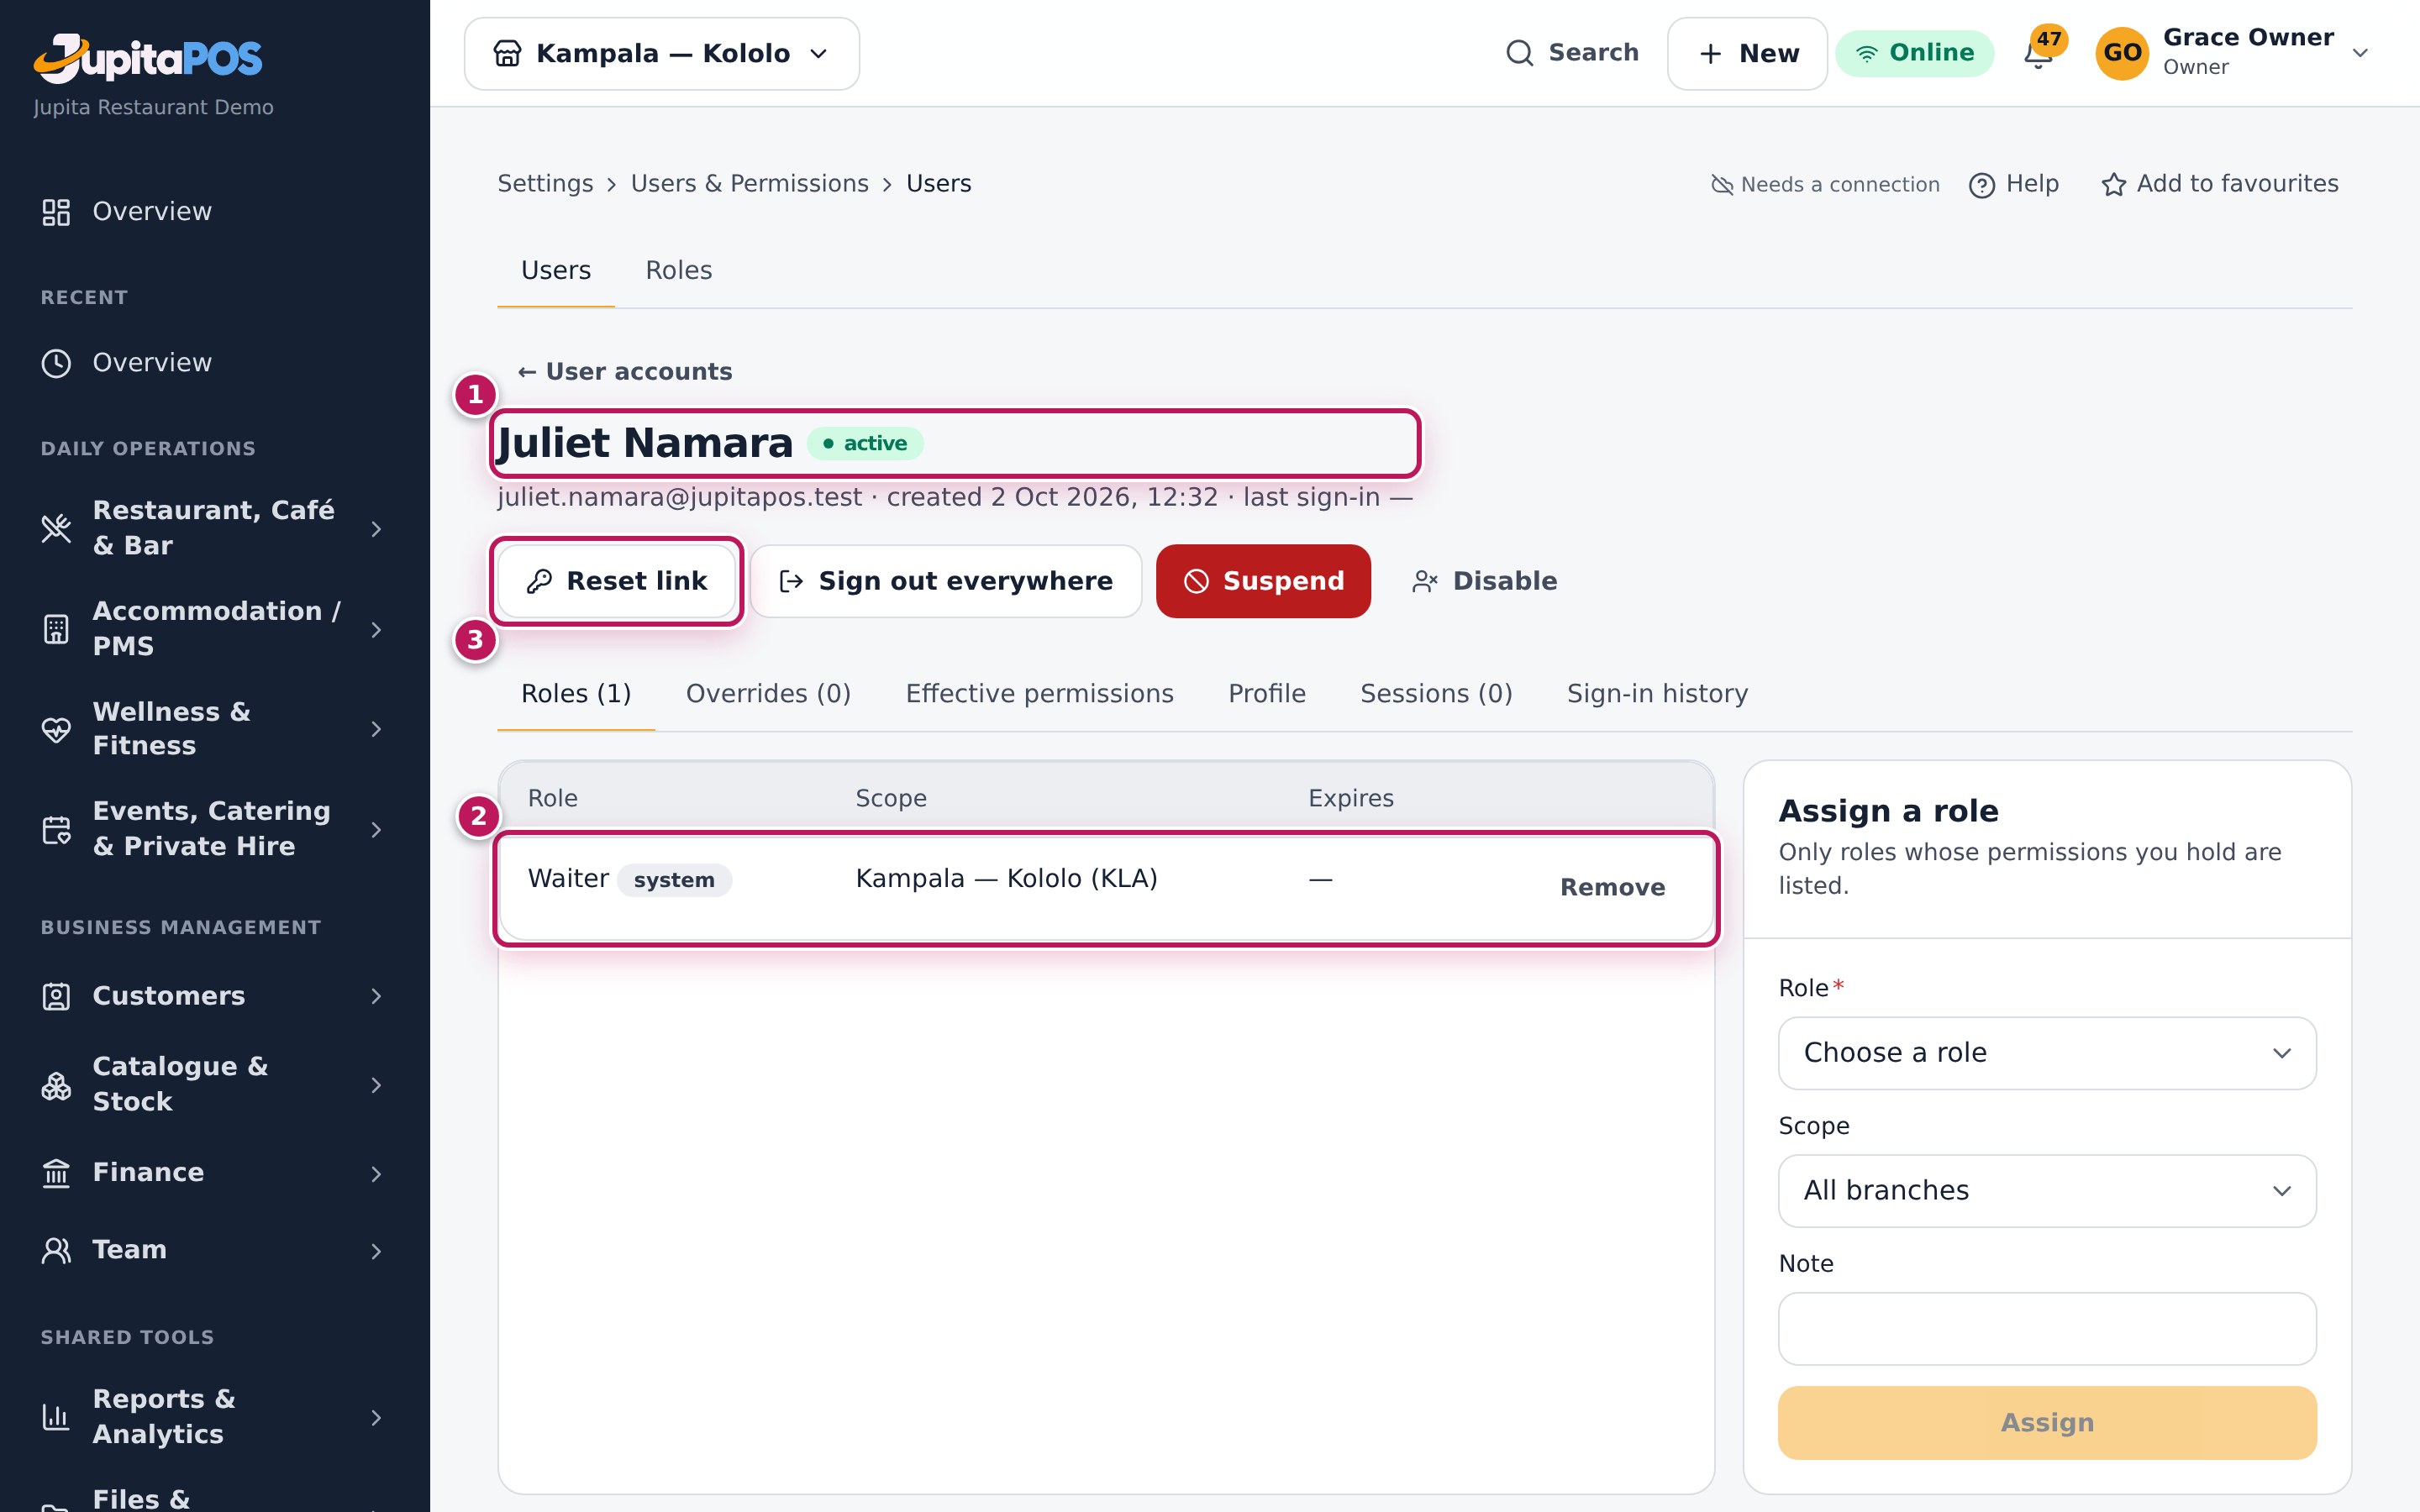
- The account opens (1 in the third picture) with their roles (2) and their scope. Reset link (3) gives a new one-time link if they forget their password.
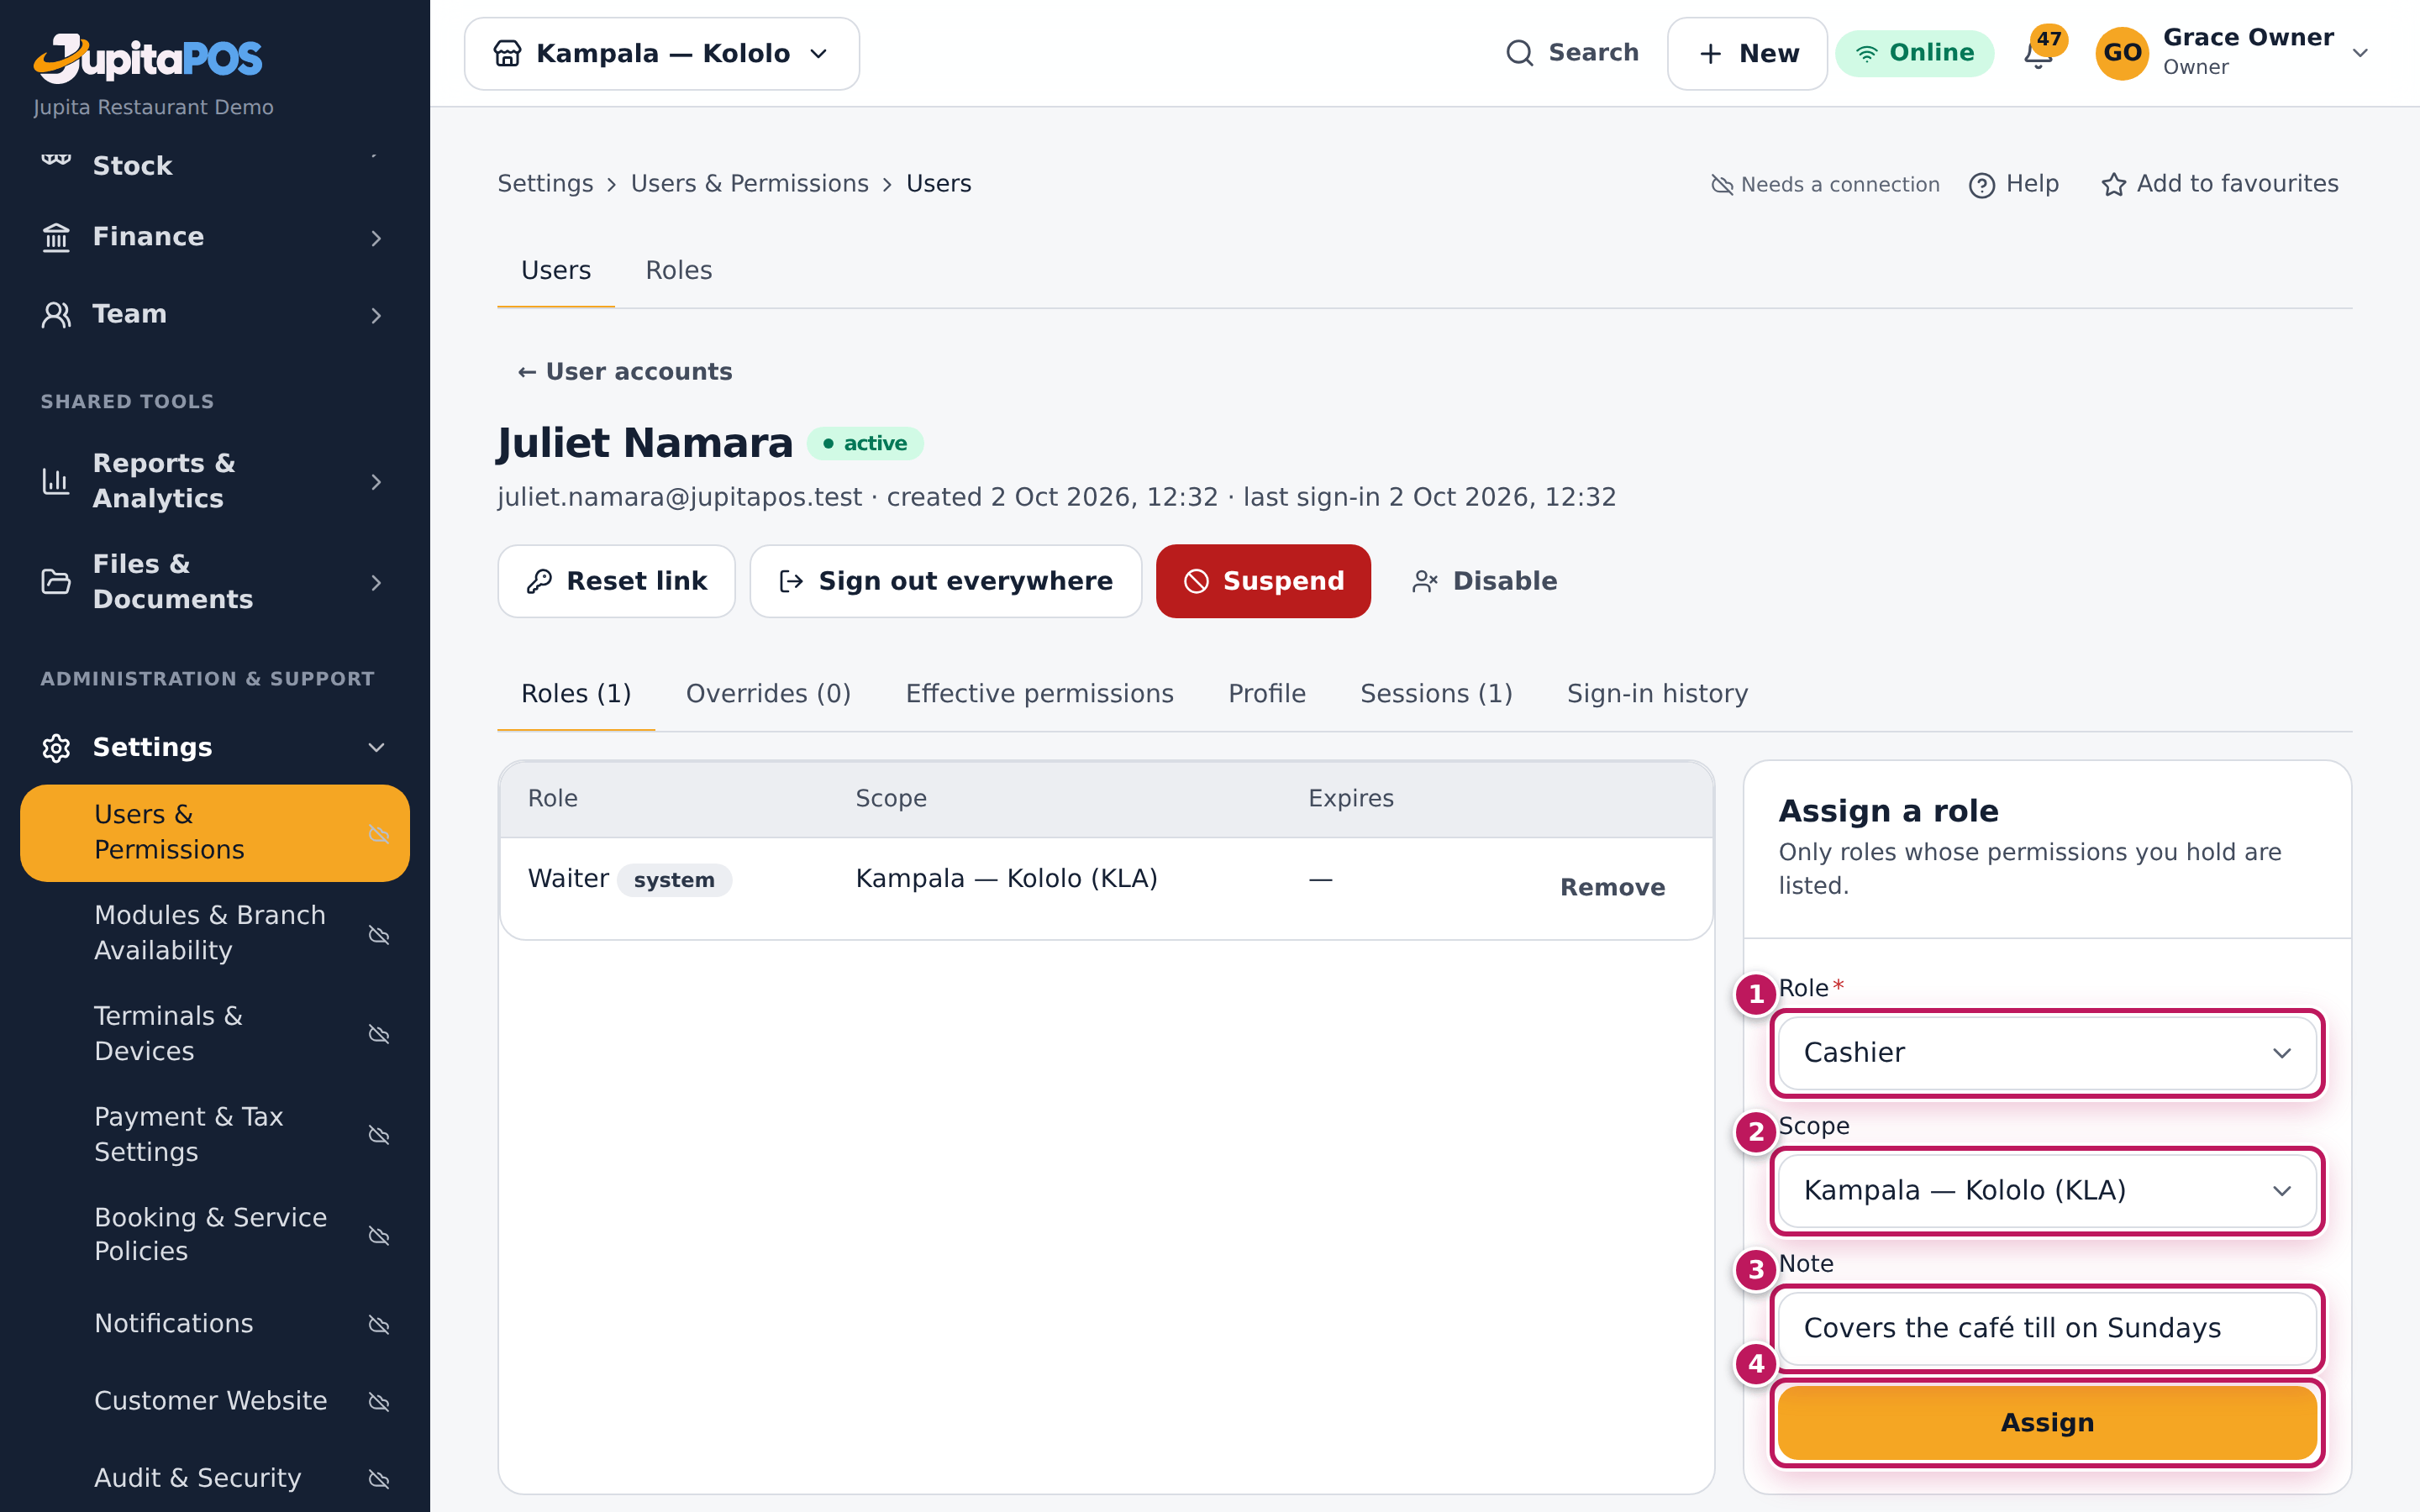
- To add a role, choose it in Role (1 in the fourth picture), the Scope (2), type a Note (3) and click Assign (4). Remove takes a role away.
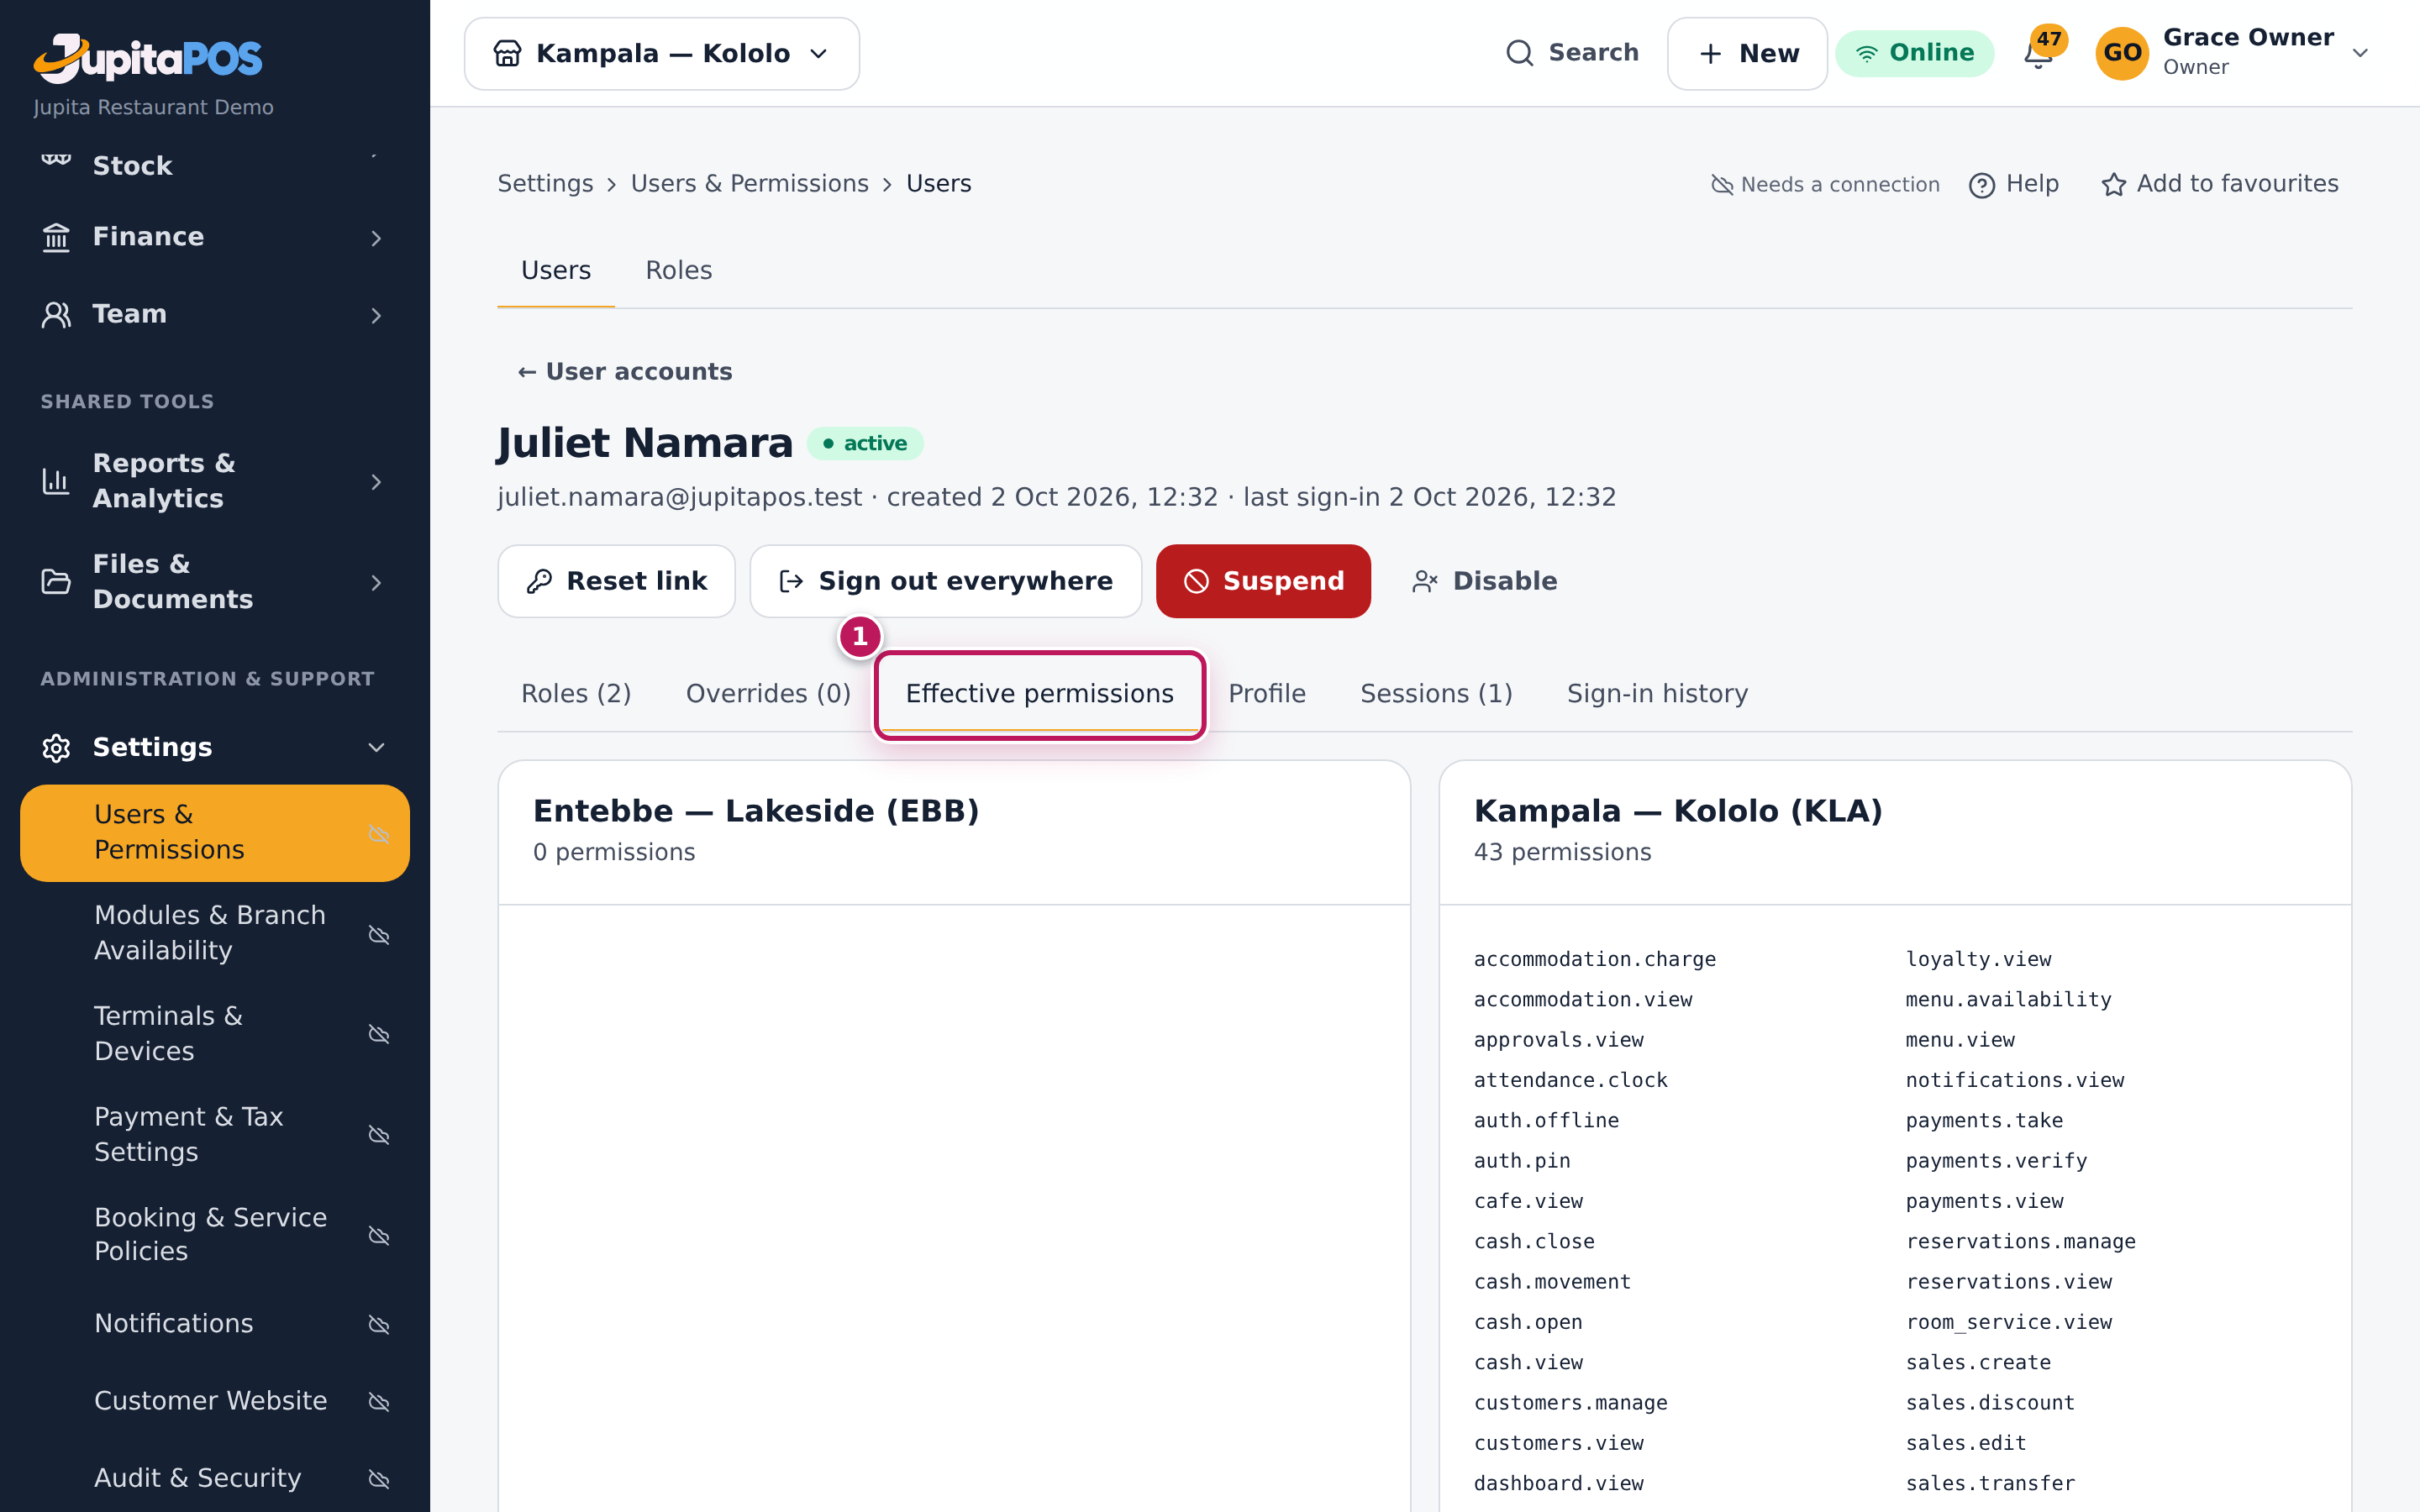
- Check Effective permissions (1 in the fifth picture): everything the person may do now.
Expected result
Juliet Namara was created. The account is active, with Waiter for Kampala — Kololo (KLA). She signs in at once with the temporary password. Every change of role is in the audit trail and raises a security alert.
Screenshot
Common mistakes
- Sharing one login between two people. Every sale, void and approval says who did it; give each person their own.
- Giving a manager’s role “to make it work”. Give the role the job needs; add a single permission as an override on Overrides if needed.
- Passing a password or reset link around. Give it to the person only; whoever has it can sign in as them.
Troubleshooting
- “An account with this e-mail already exists.” Search for it: the person may already have a login.
- “This reset link is invalid or has expired.” Click Reset link on the account for a new one.
- The role you want is not in the list. You do not hold all its permissions. Ask the owner.
- “This user holds permissions you do not …, so you cannot manage their account.” Only someone who holds everything they hold can manage them.
Create a custom role
Purpose
Make a role that fits a job the system roles do not — a head waiter who may also void and discount — without giving a whole manager’s role.
Role / permission required
Owner or administrator: roles.manage. You can only put in a role the
permissions you hold yourself.
Prerequisites
- None.
Steps
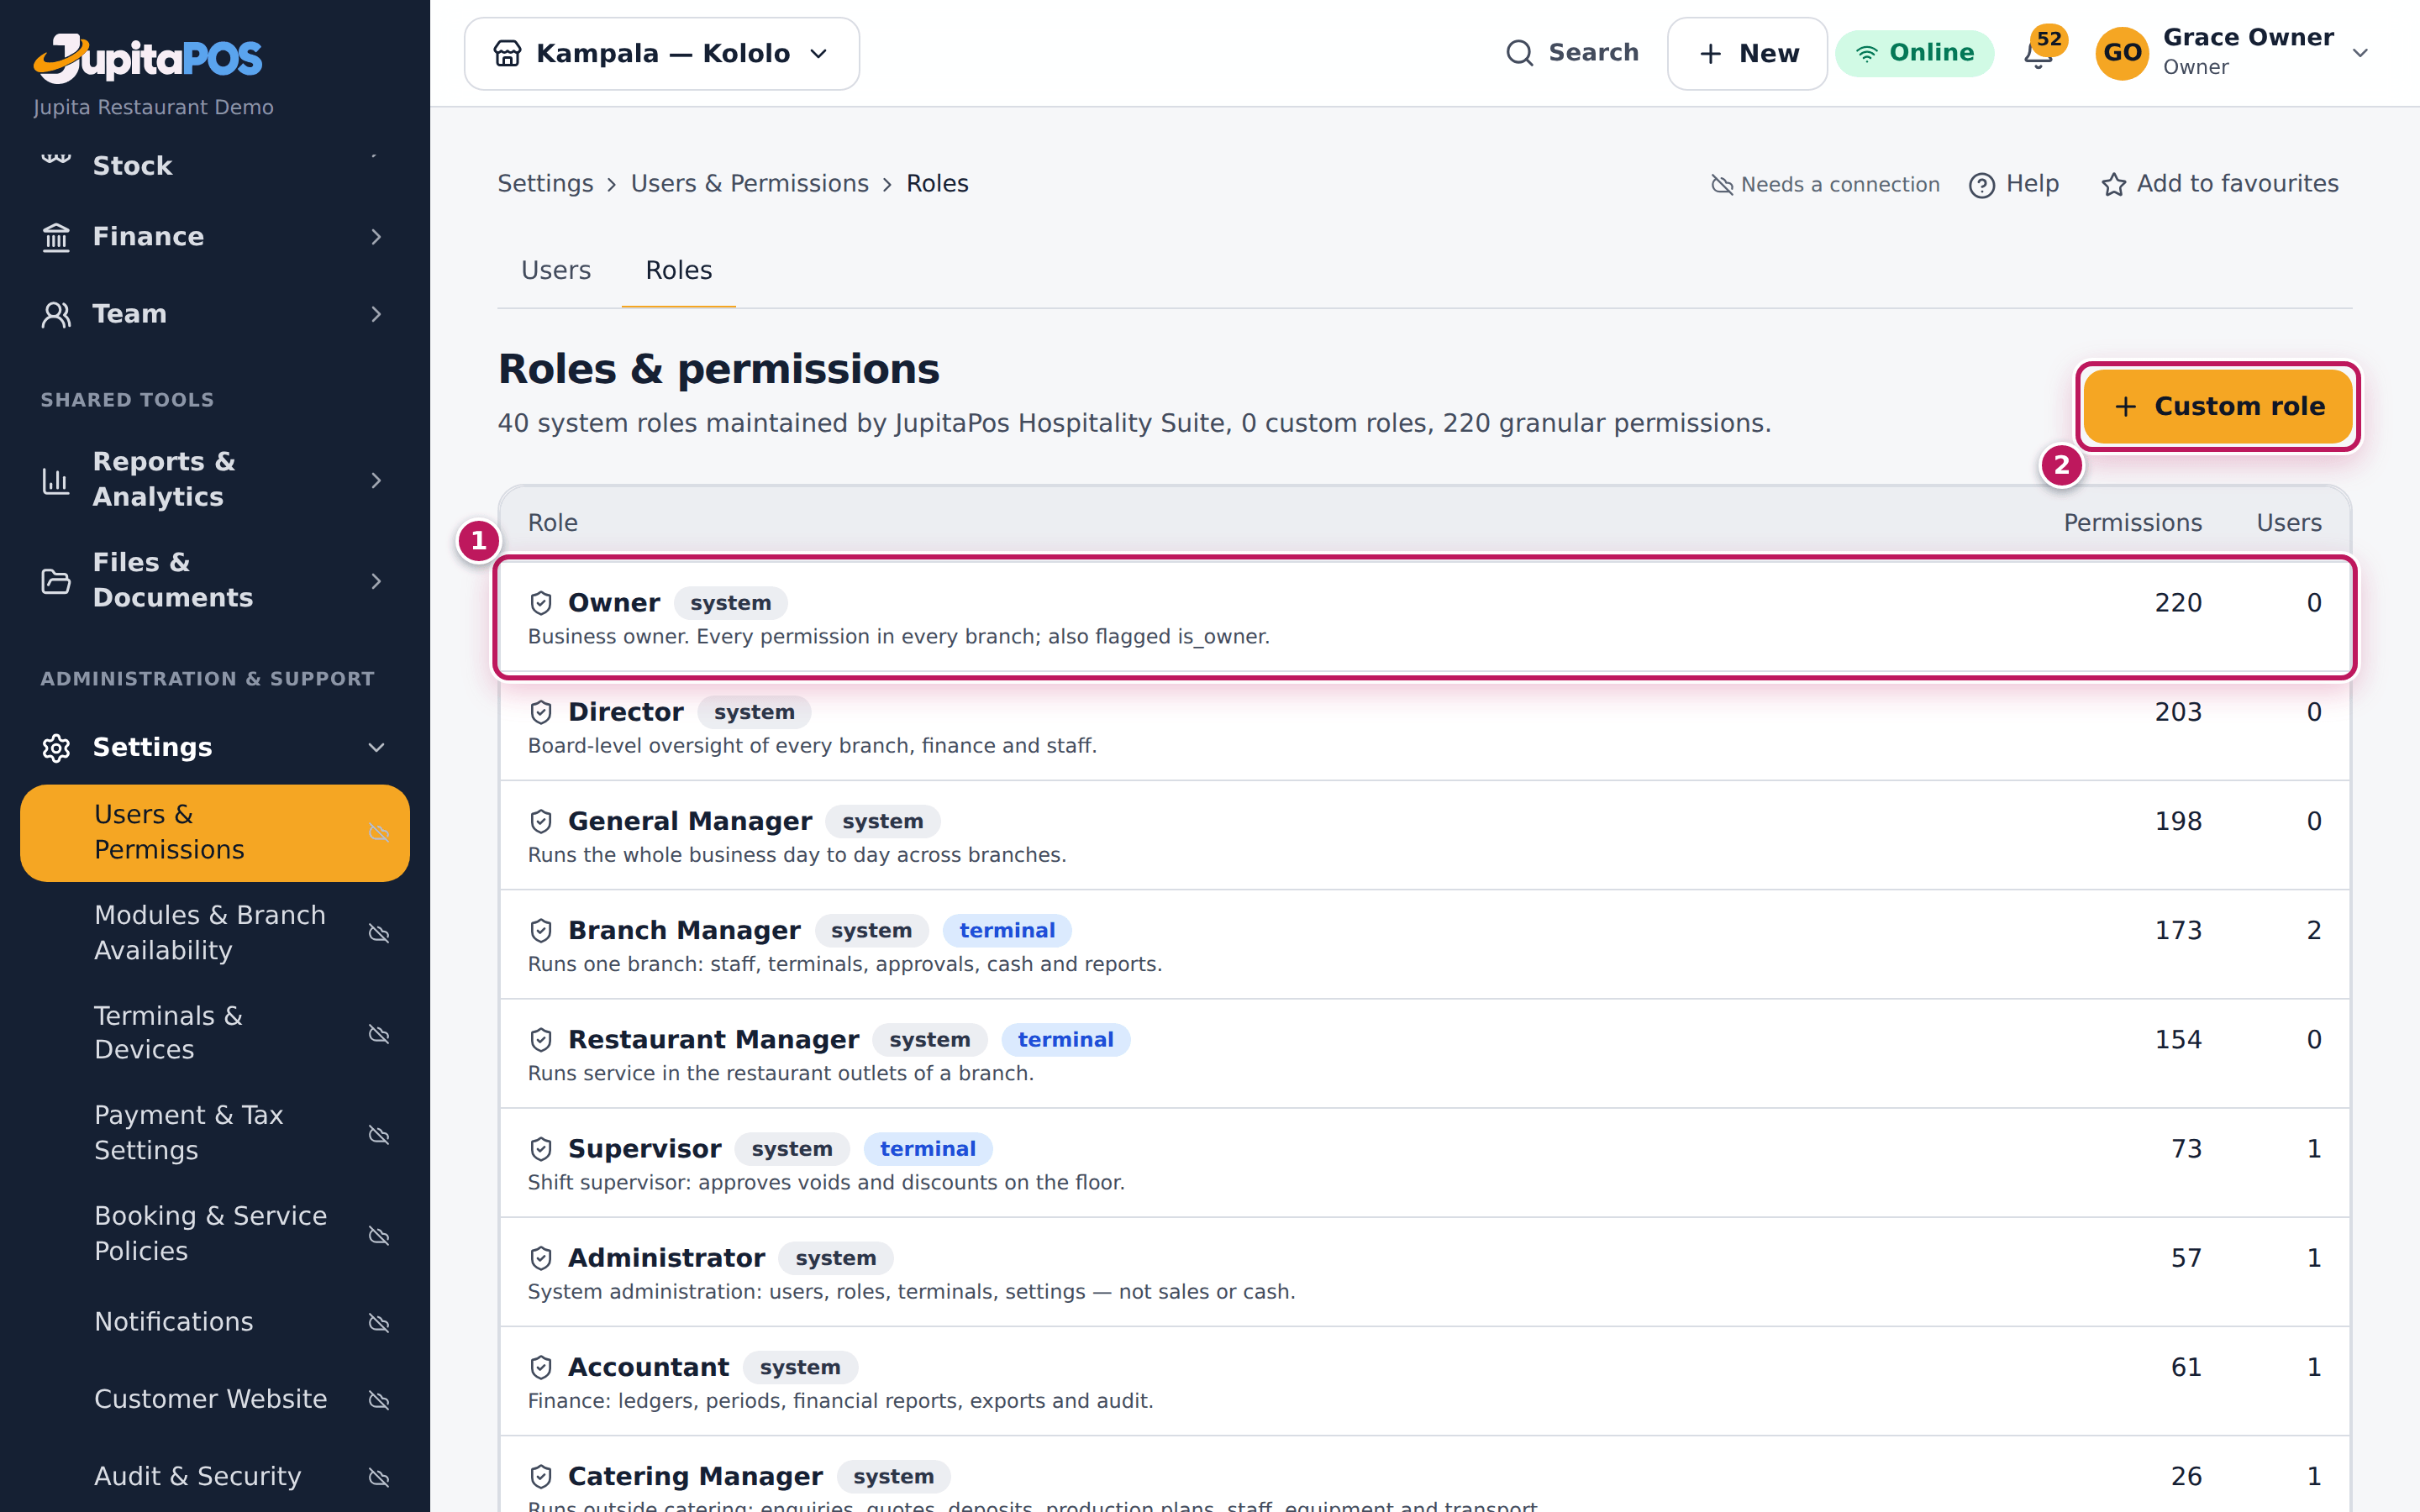
- Open Roles & permissions. The system roles (1) are maintained by JupitaPos; your custom roles are marked custom.
- Click Custom role (2).
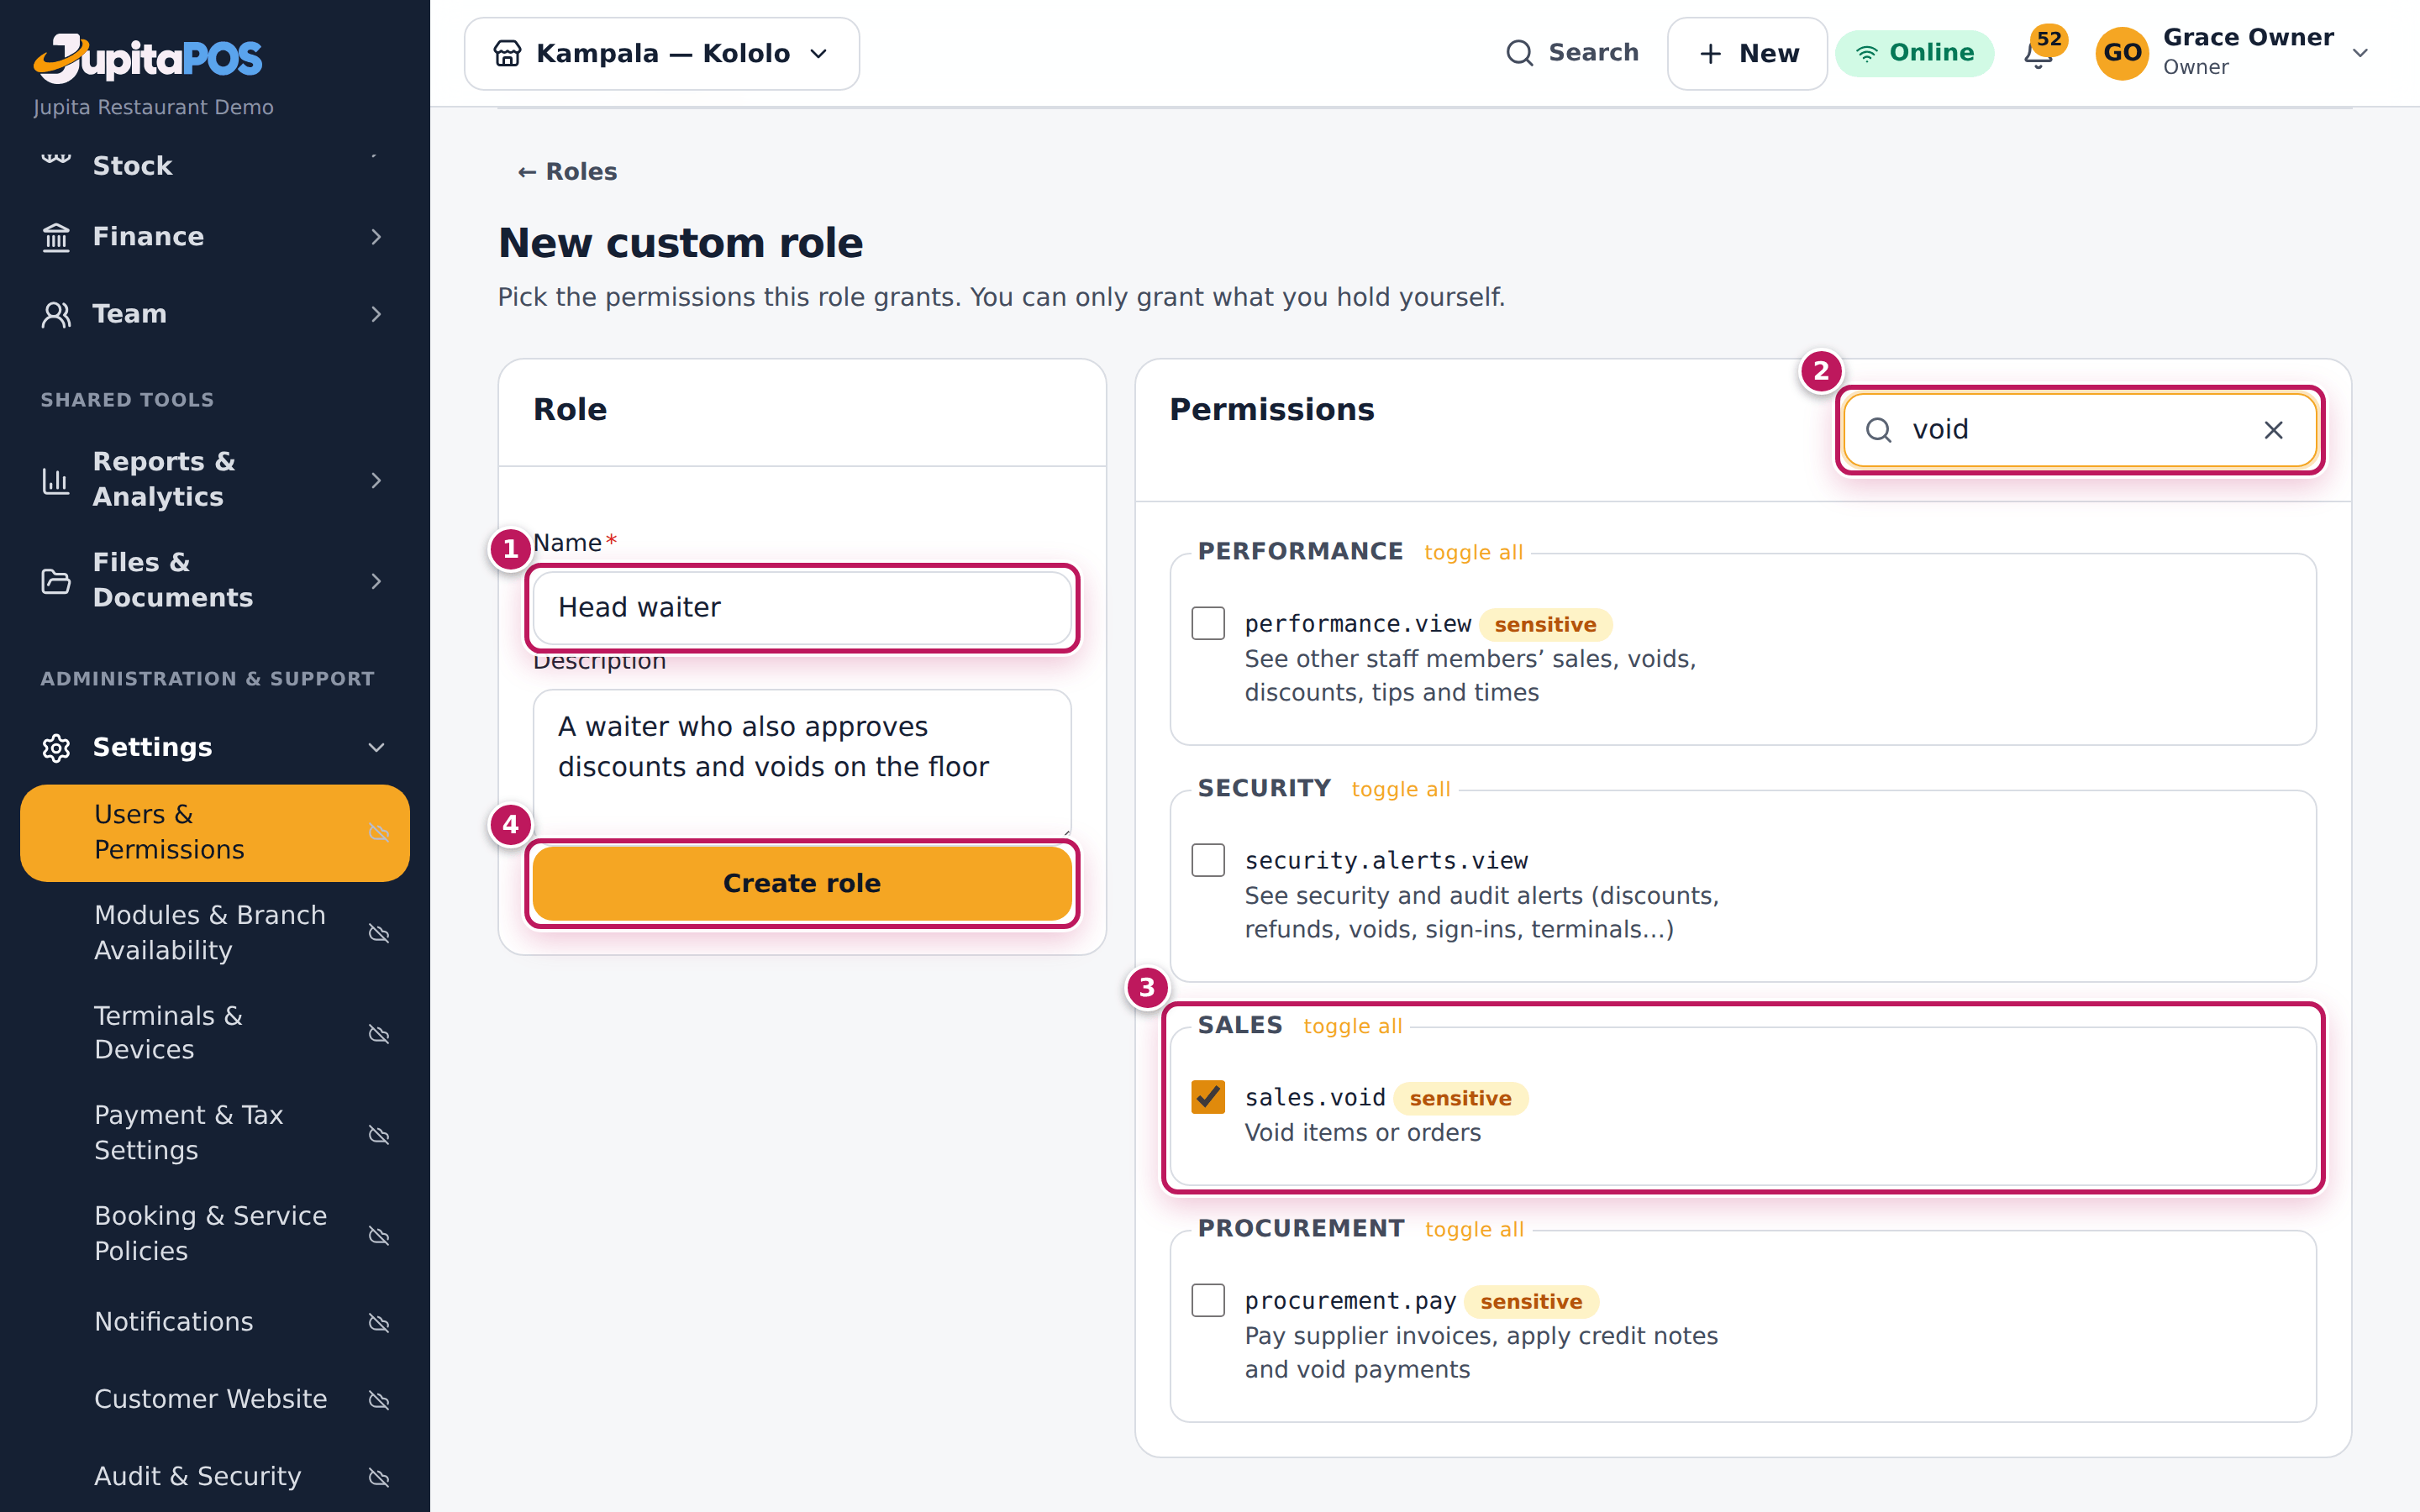
- Type the Name (1): Head waiter, and a Description.
- Type in Filter permissions (2) to find what you need — void.
- Tick each permission (3). Each shows what it allows; sensitive ones are marked. toggle all ticks a whole group.
- Click Create role (4).
- Give the role to people on their accounts (see Add a user).
Expected result
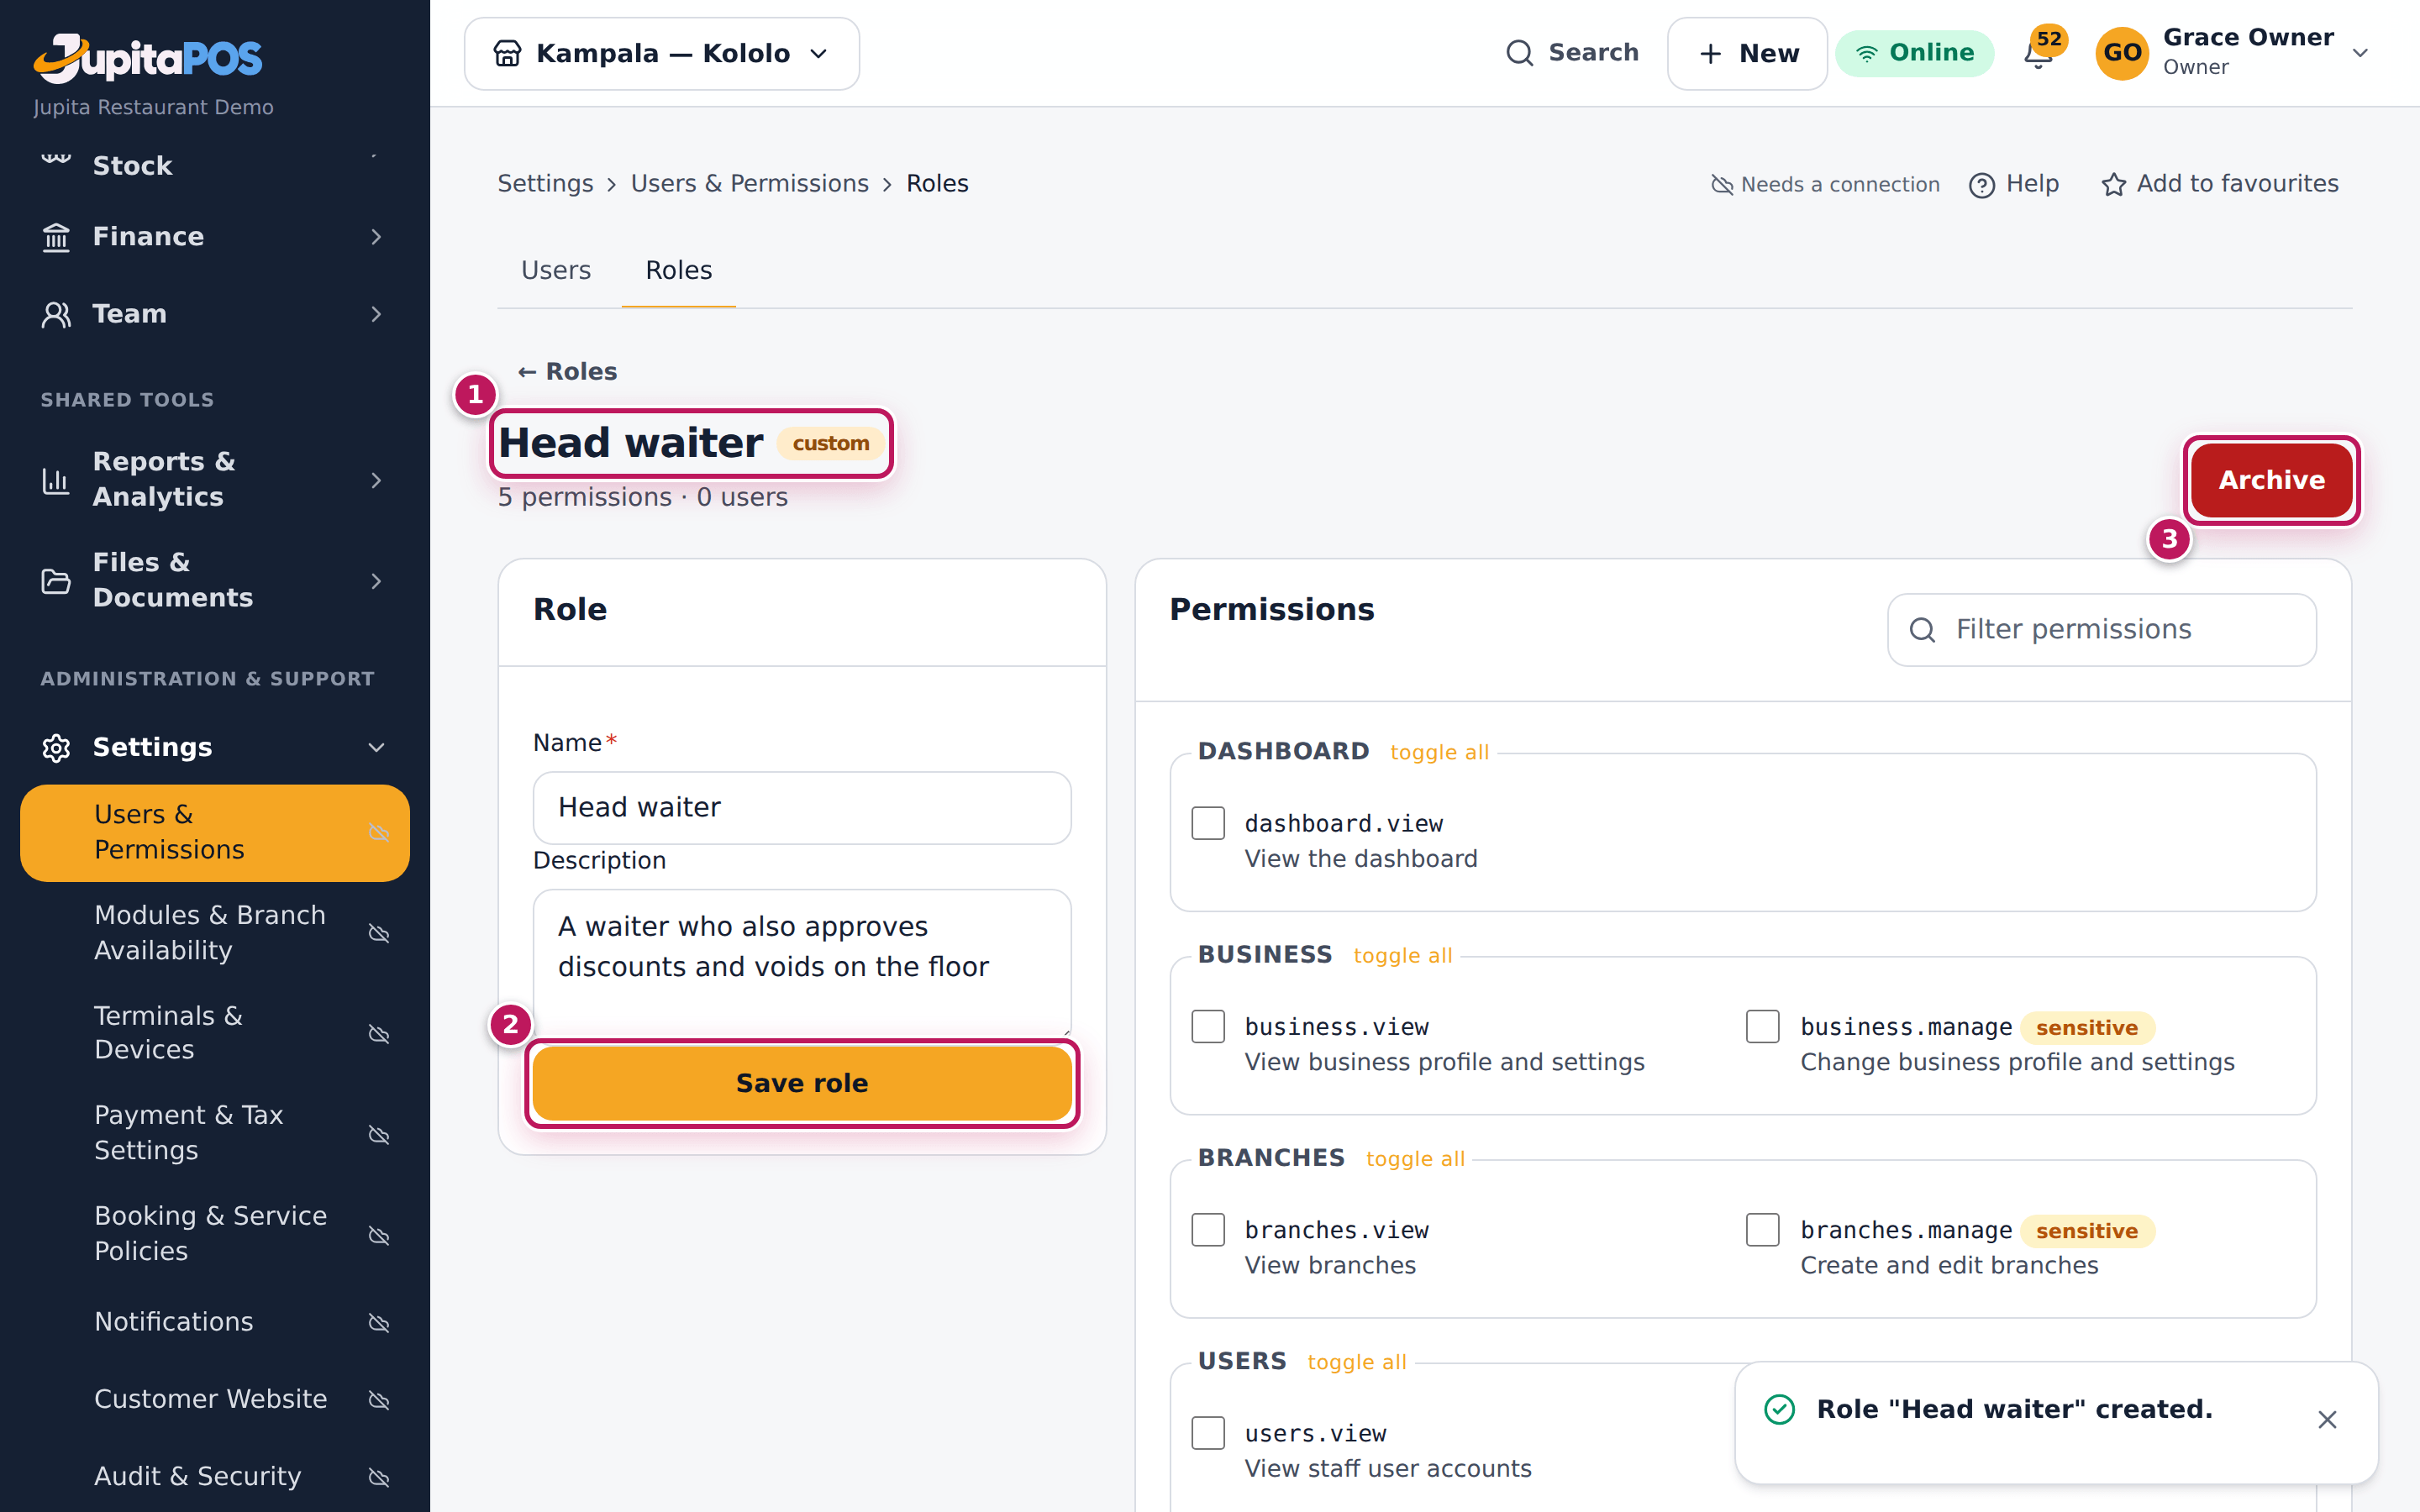
Role “Head waiter” created. The role opens (1), marked custom, with its permissions and the number of users. Save role (2) saves changes; Archive (3) removes a role nobody holds.
Screenshot
Common mistakes
- Copying a manager’s role and removing a few permissions. Start from the job: add only what it needs.
- Adding sensitive permissions without thinking. Voids, refunds and price overrides raise security alerts; give them to few people.
Troubleshooting
- A permission cannot be ticked (you do not hold this permission). Ask the owner to create the role.
- Archive is missing. The role is a system role or people still hold it.
Approve, restrict and revoke a till
Purpose
Decide which devices may be tills, for which branch and roles, and stop a lost or replaced device at once.
Role / permission required
Administrator, owner or branch manager: terminals.approve,
terminals.manage and terminals.revoke.
Prerequisites
- The device has registered itself on This device (see Register this device as a till).
Steps
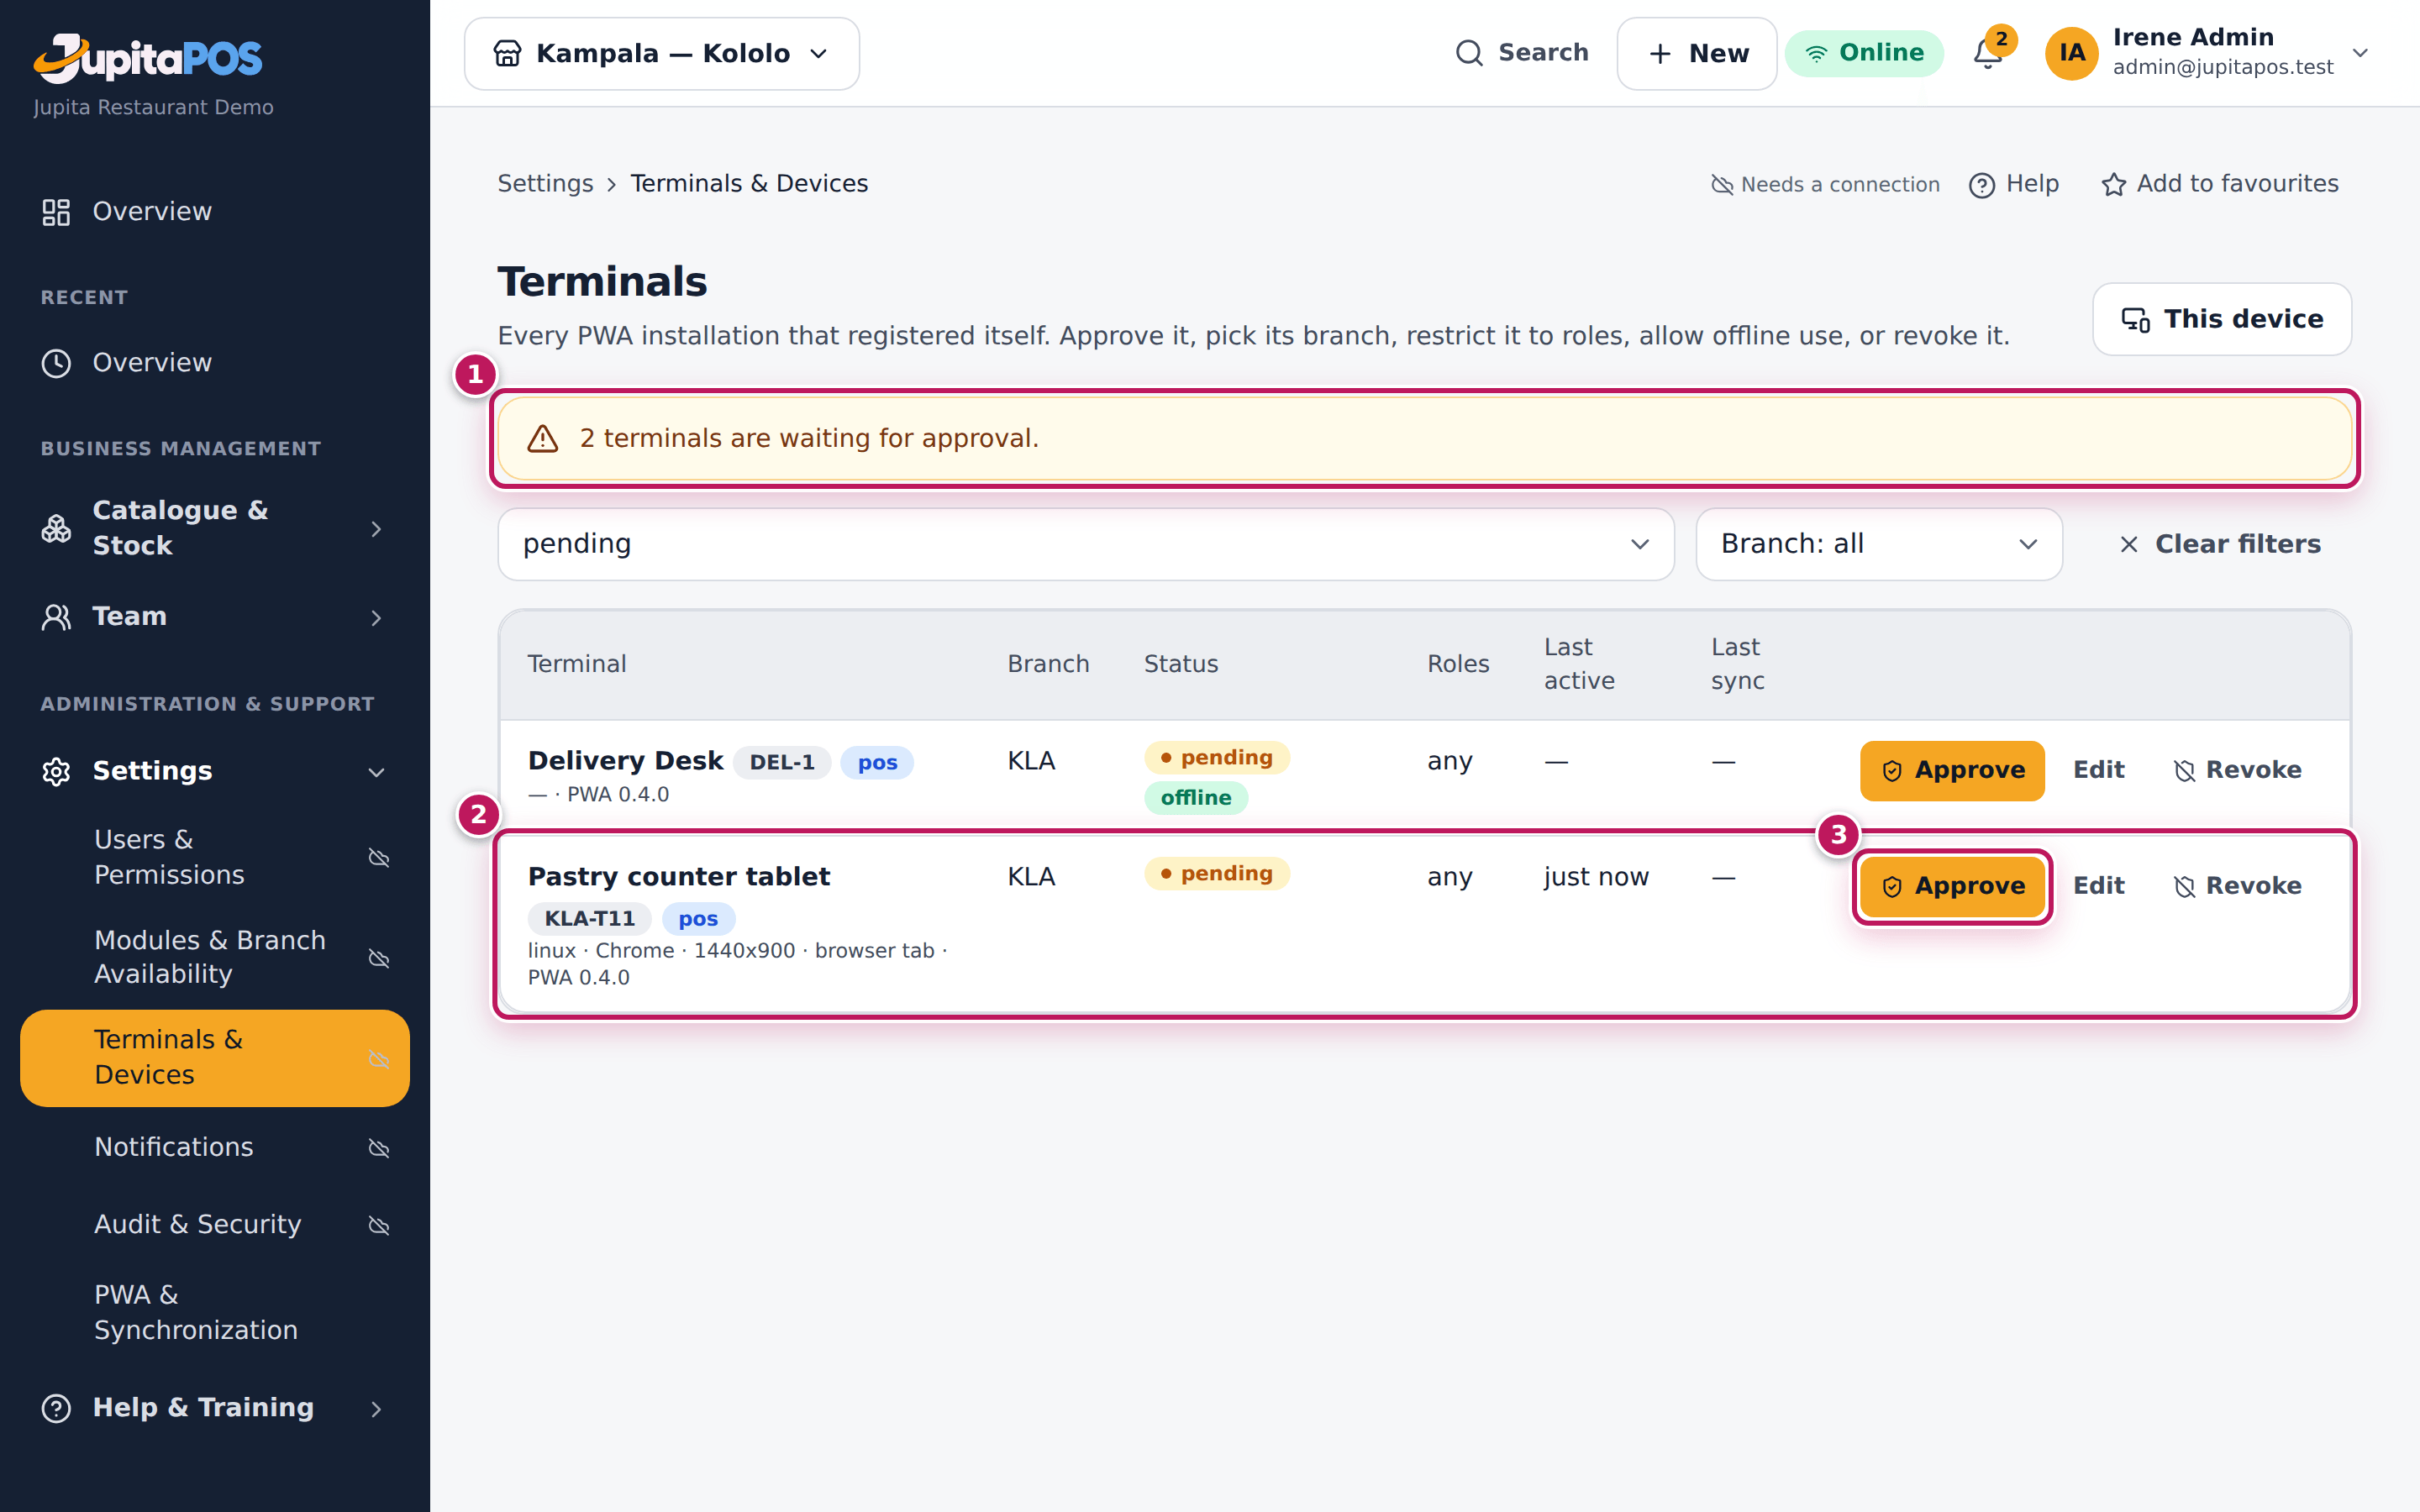
- Open Terminals. A new device waits as pending (2); the line at the top (1) says how many.
- Click Approve (3).
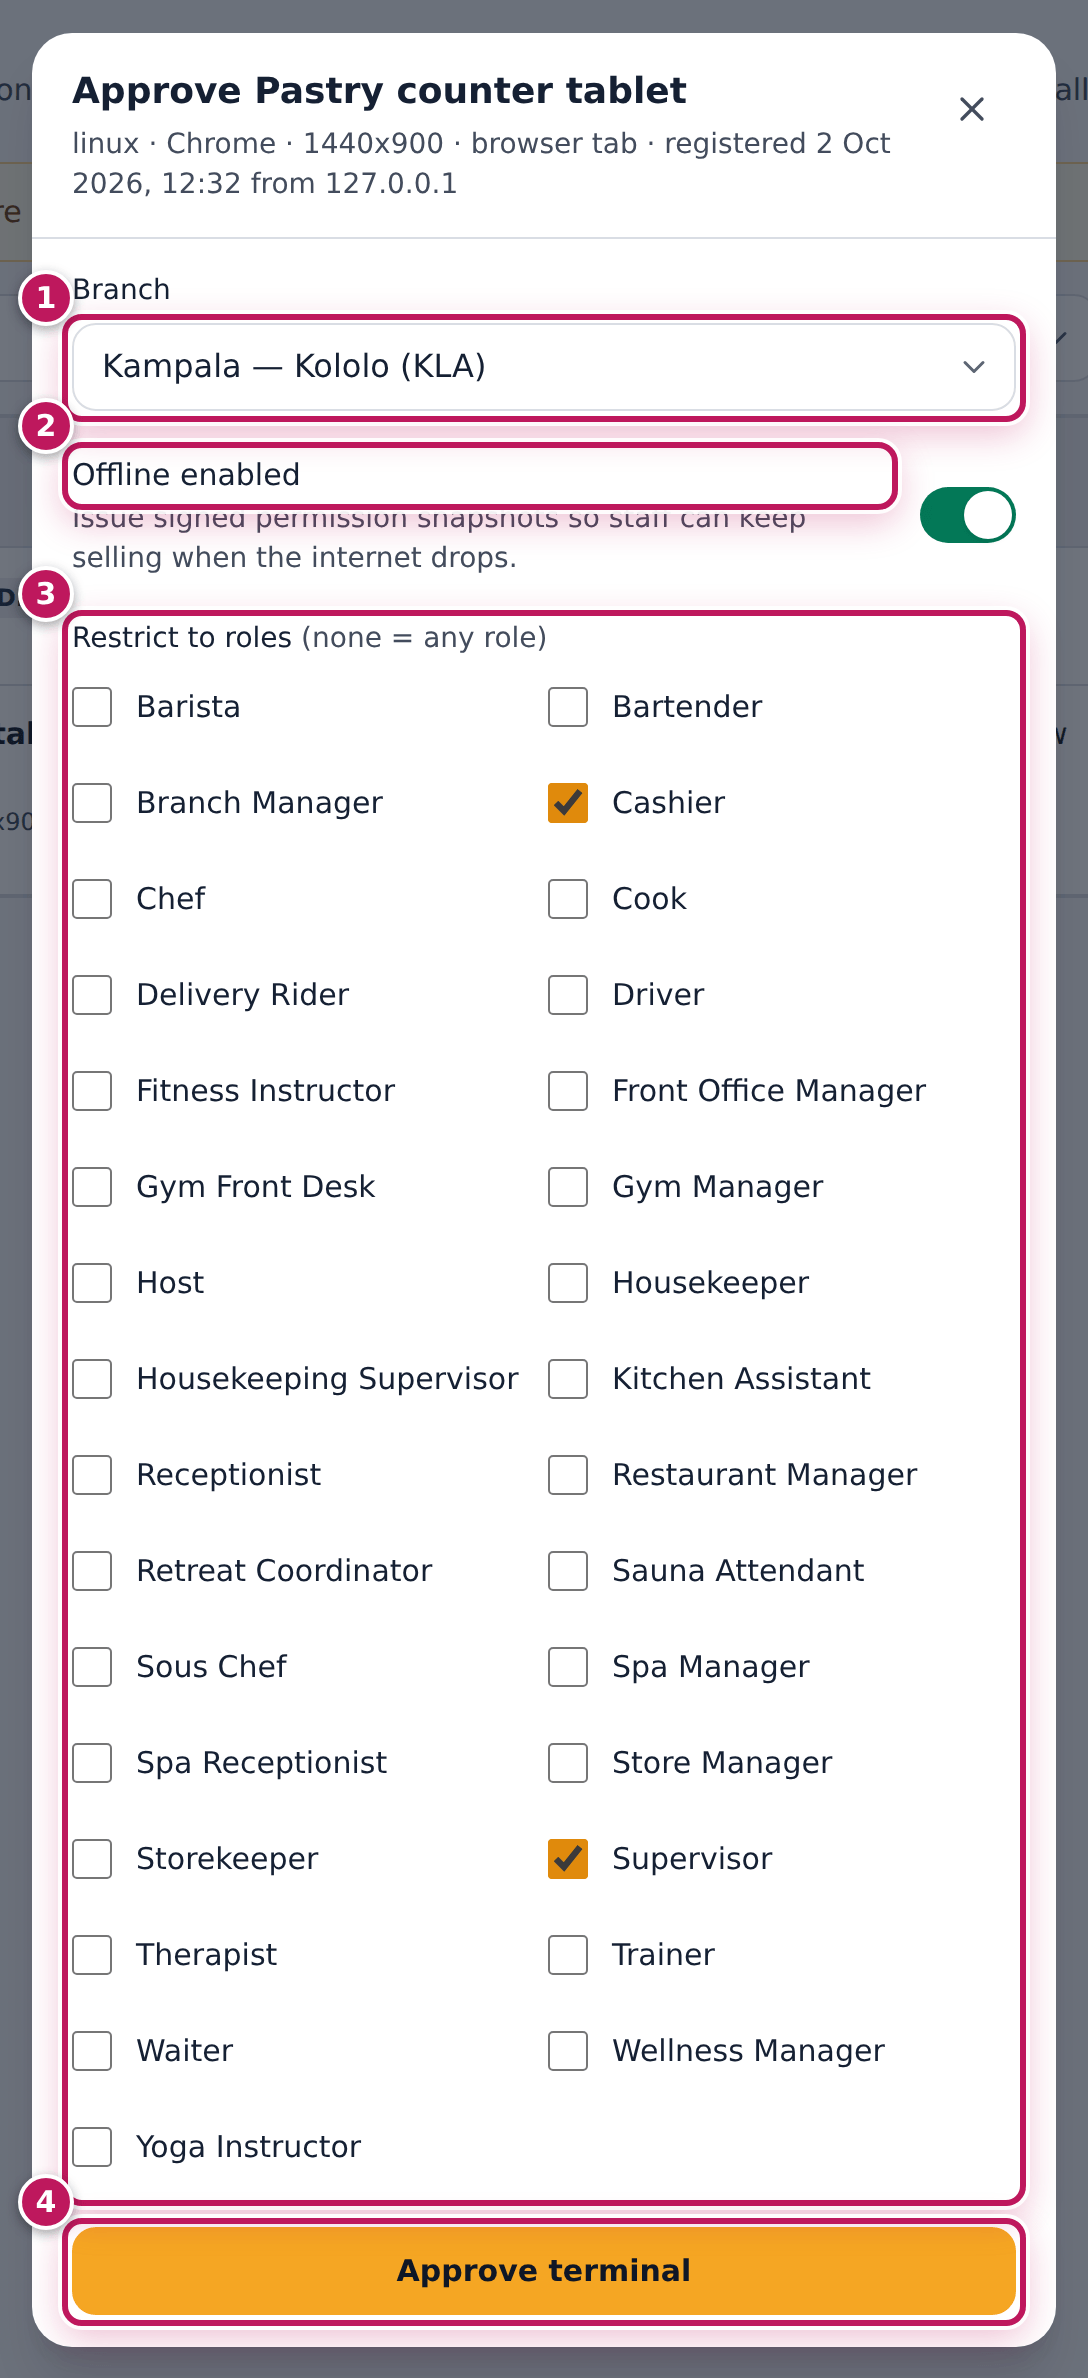
- Choose the Branch (1).
- Turn Offline enabled (2) on for a till that must keep selling when the internet drops.
- Under Restrict to roles (3), tick the roles that may use it — none means any role.
- Click Approve terminal (4).
- To change it later, click Edit: name, type, branch, offline, roles.
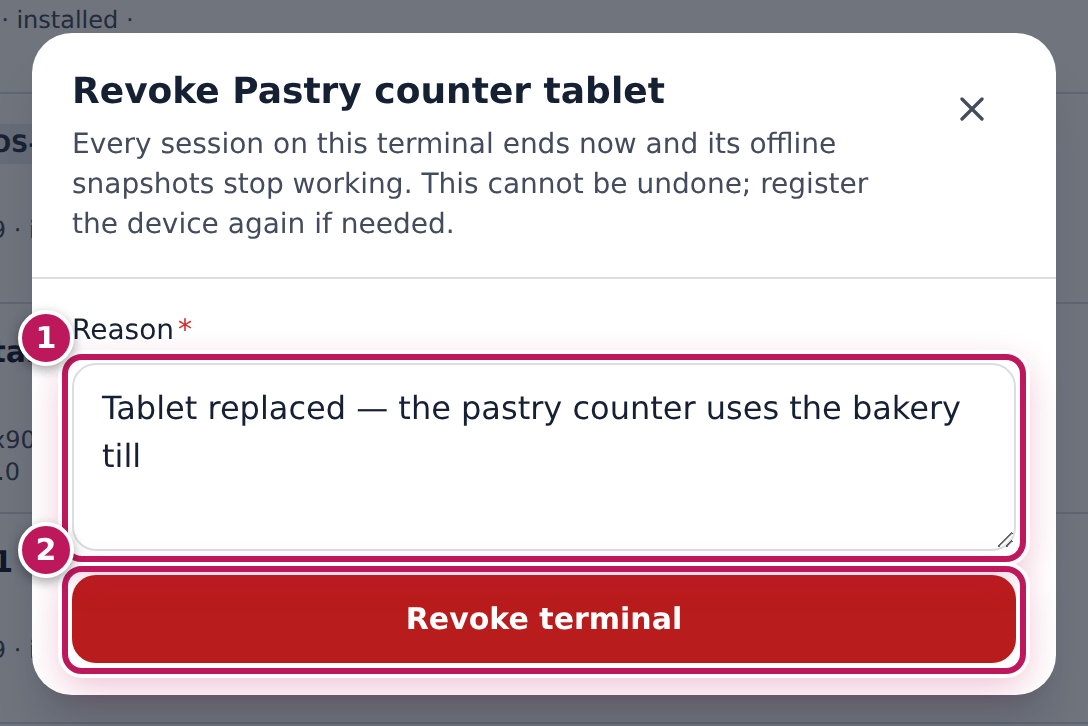
- To stop a lost, stolen or replaced device, click Revoke, type the Reason (1) and click Revoke terminal (2).
Expected result
Pastry counter tablet approved: it is active at its branch and only the chosen roles can use it. After Revoke it is revoked: every session on it ends at once and its offline snapshots stop working. This cannot be undone; the device registers again if it comes back.
Screenshot
Common mistakes
- Approving a device you do not know. Check the device and the time it registered with the person standing at it.
- Moving a till to another branch during service. Moving ends its sessions and offline snapshots.
Troubleshooting
- “Your role is not allowed to use this terminal.” The till is restricted to other roles. Edit it, or use another till.
- A device says its terminal was revoked. Register it again and approve it.
See the outlets and production stations
Purpose
Know the kitchen, bar and café stations of each branch and where each ordered line is made, so tickets reach the right screen.
Role / permission required
Owner, administrator or branch manager: outlets.view; changing stations
and routing needs production.manage.
Prerequisites
- The branches and their outlets (restaurant, rooftop bar, café, bakery) are set at installation.
Steps
- Open Stations & routing.
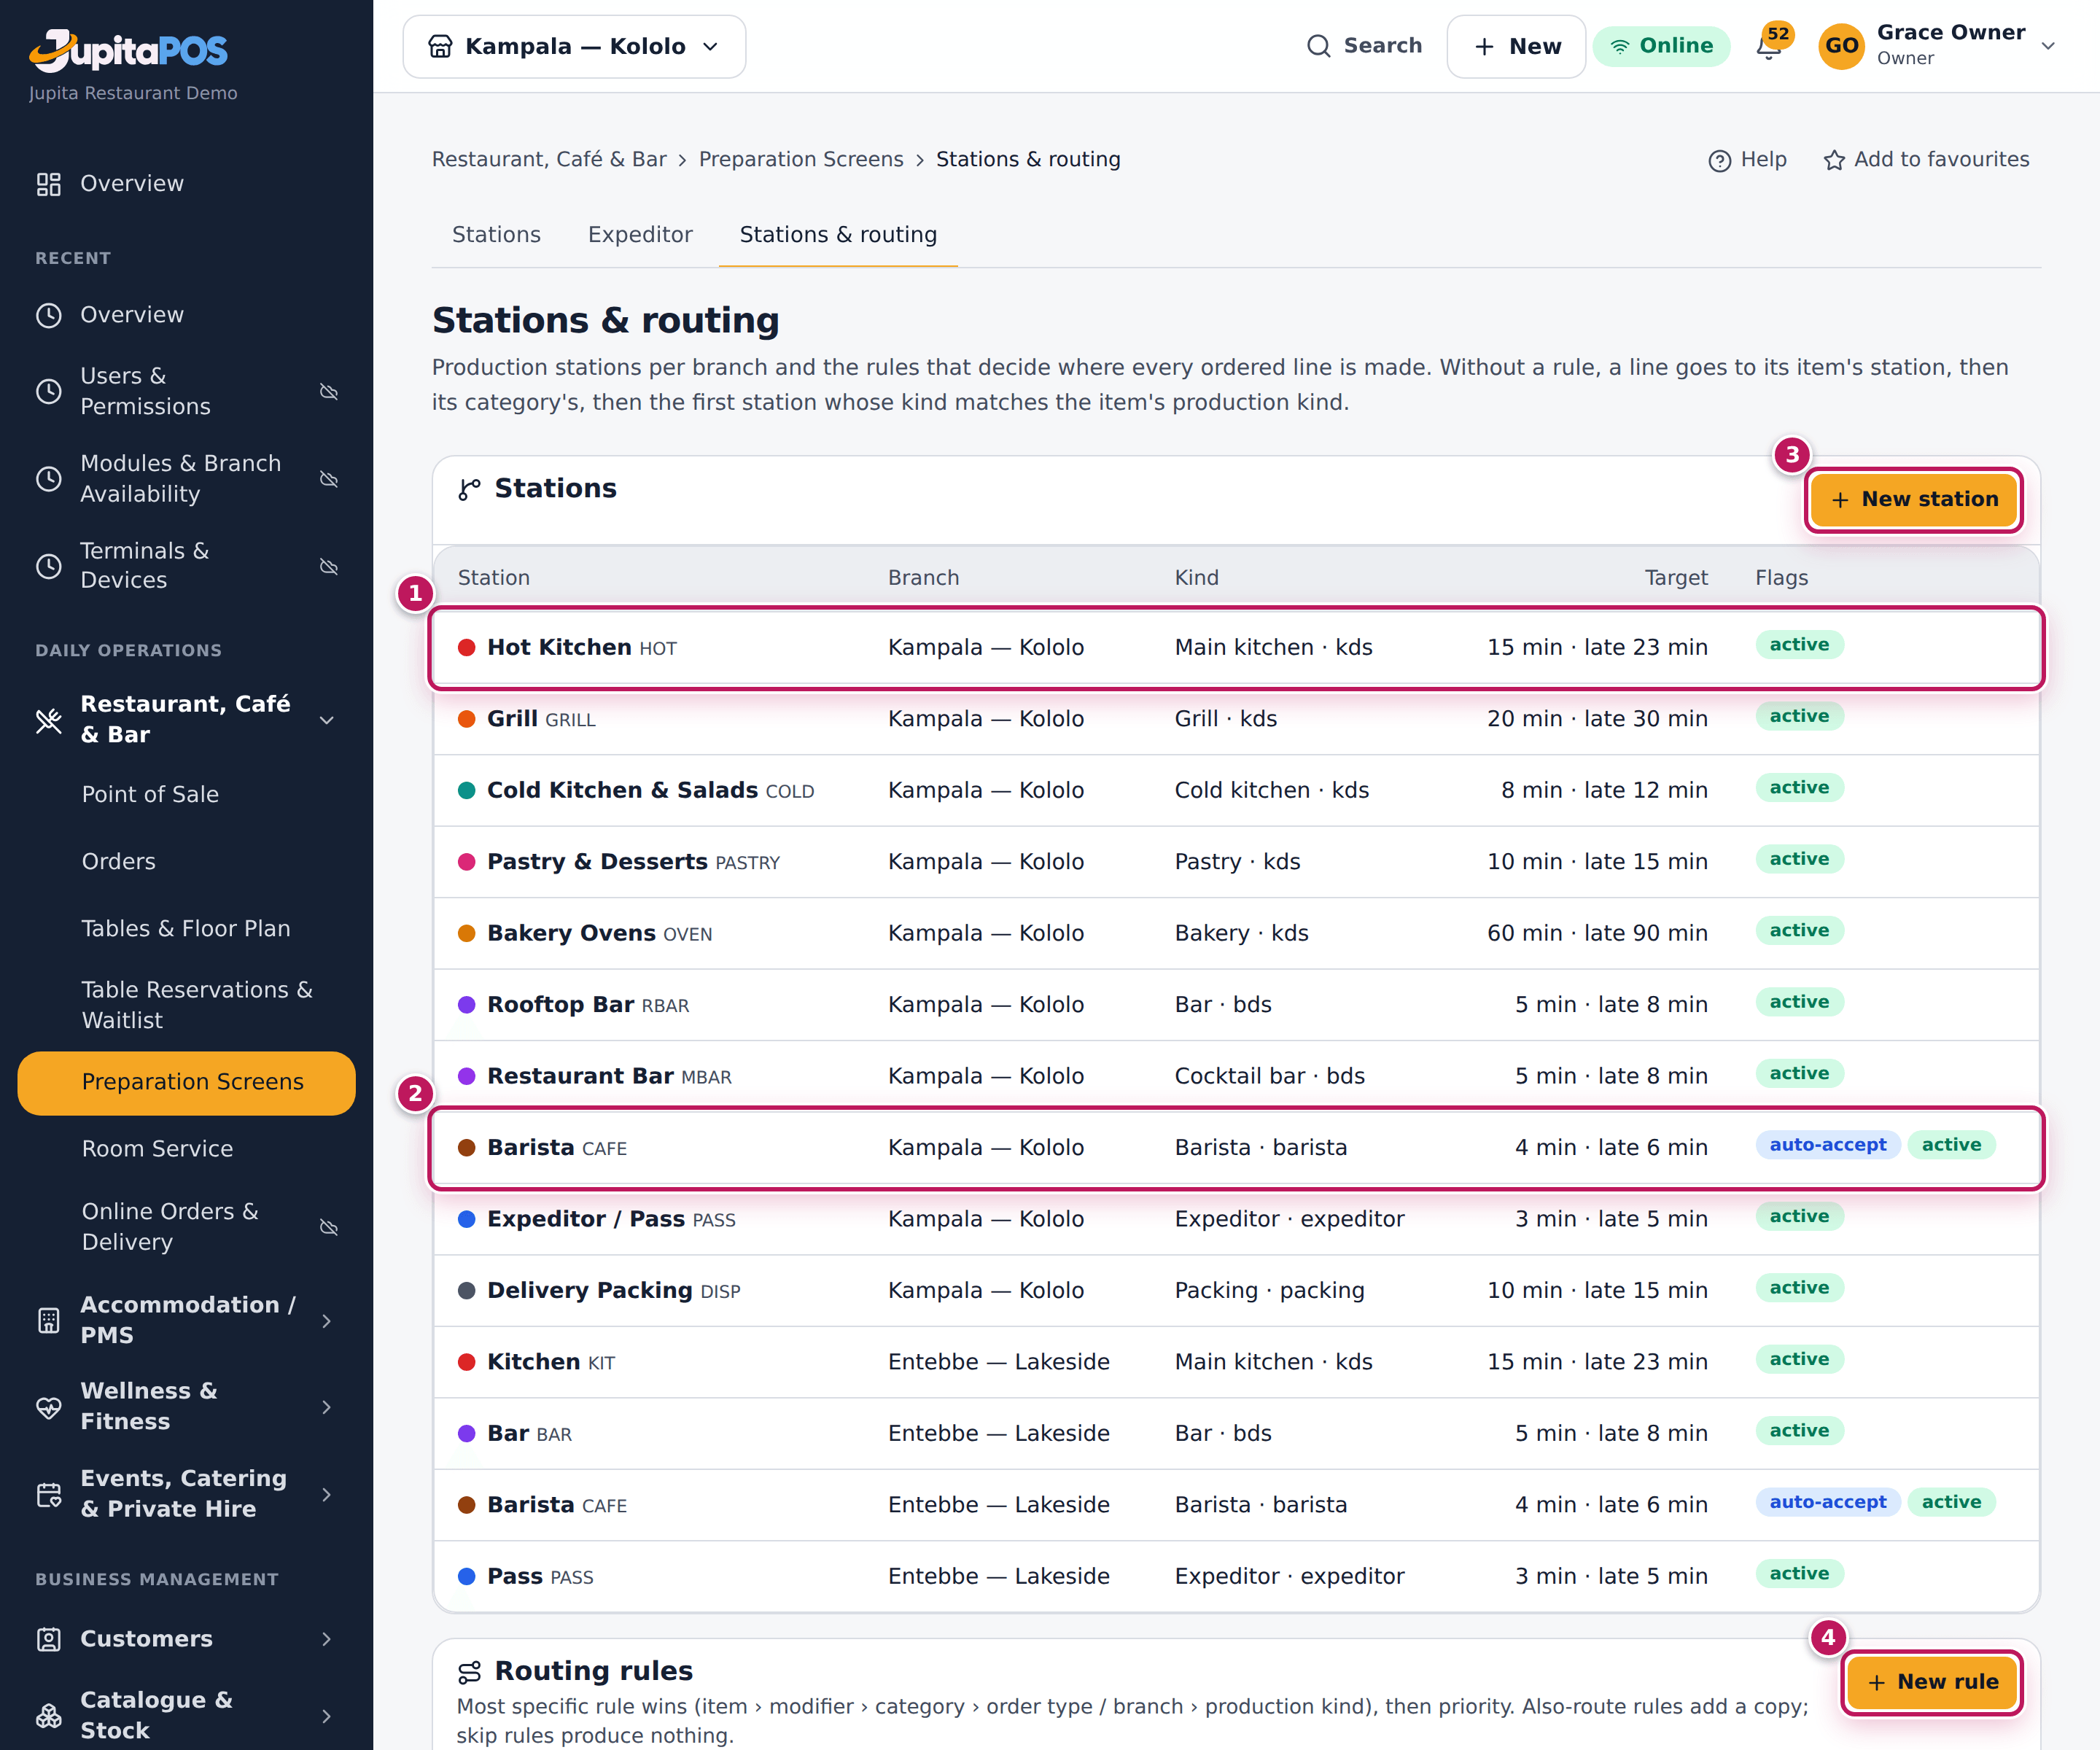
- Read Stations: each branch’s stations (1, 2) with their kind, the screen they use, the target time and when a ticket is late.
- Read Routing rules below: which station makes an item, a category or an order type.
- New station (3) and New rule (4) add them; how to set them up is in Set up stations and routing.
- The dining areas and tables of each outlet are drawn on the floor plan (see Design the floor plan).
Expected result
You see, for example, Hot Kitchen at Kampala — Kololo, a kitchen screen with a 15-minute target and late after 23 minutes, and the rules that send bakery items to the ovens and cocktails to the restaurant bar.
Screenshot
Common mistakes
- Adding a station without a rule. Without a rule a line goes to its item’s station, then its category’s, then the first station of its kind.
Troubleshooting
- An item’s ticket goes to the wrong screen. Check the routing rules: the most specific rule wins (item, modifier, category, order type, production kind), then the priority.
Taxes and service charges
Purpose
Know how VAT and service charges are applied and where they post, so bills and the VAT return are right.
Role / permission required
Owner or accountant: finance_setup.view; the posting map needs
accounting.view, and changing it accounting.post.
Prerequisites
- The tax rates and service charges of the business are set at installation (the demo has VAT 18 %, included in the prices).
Steps
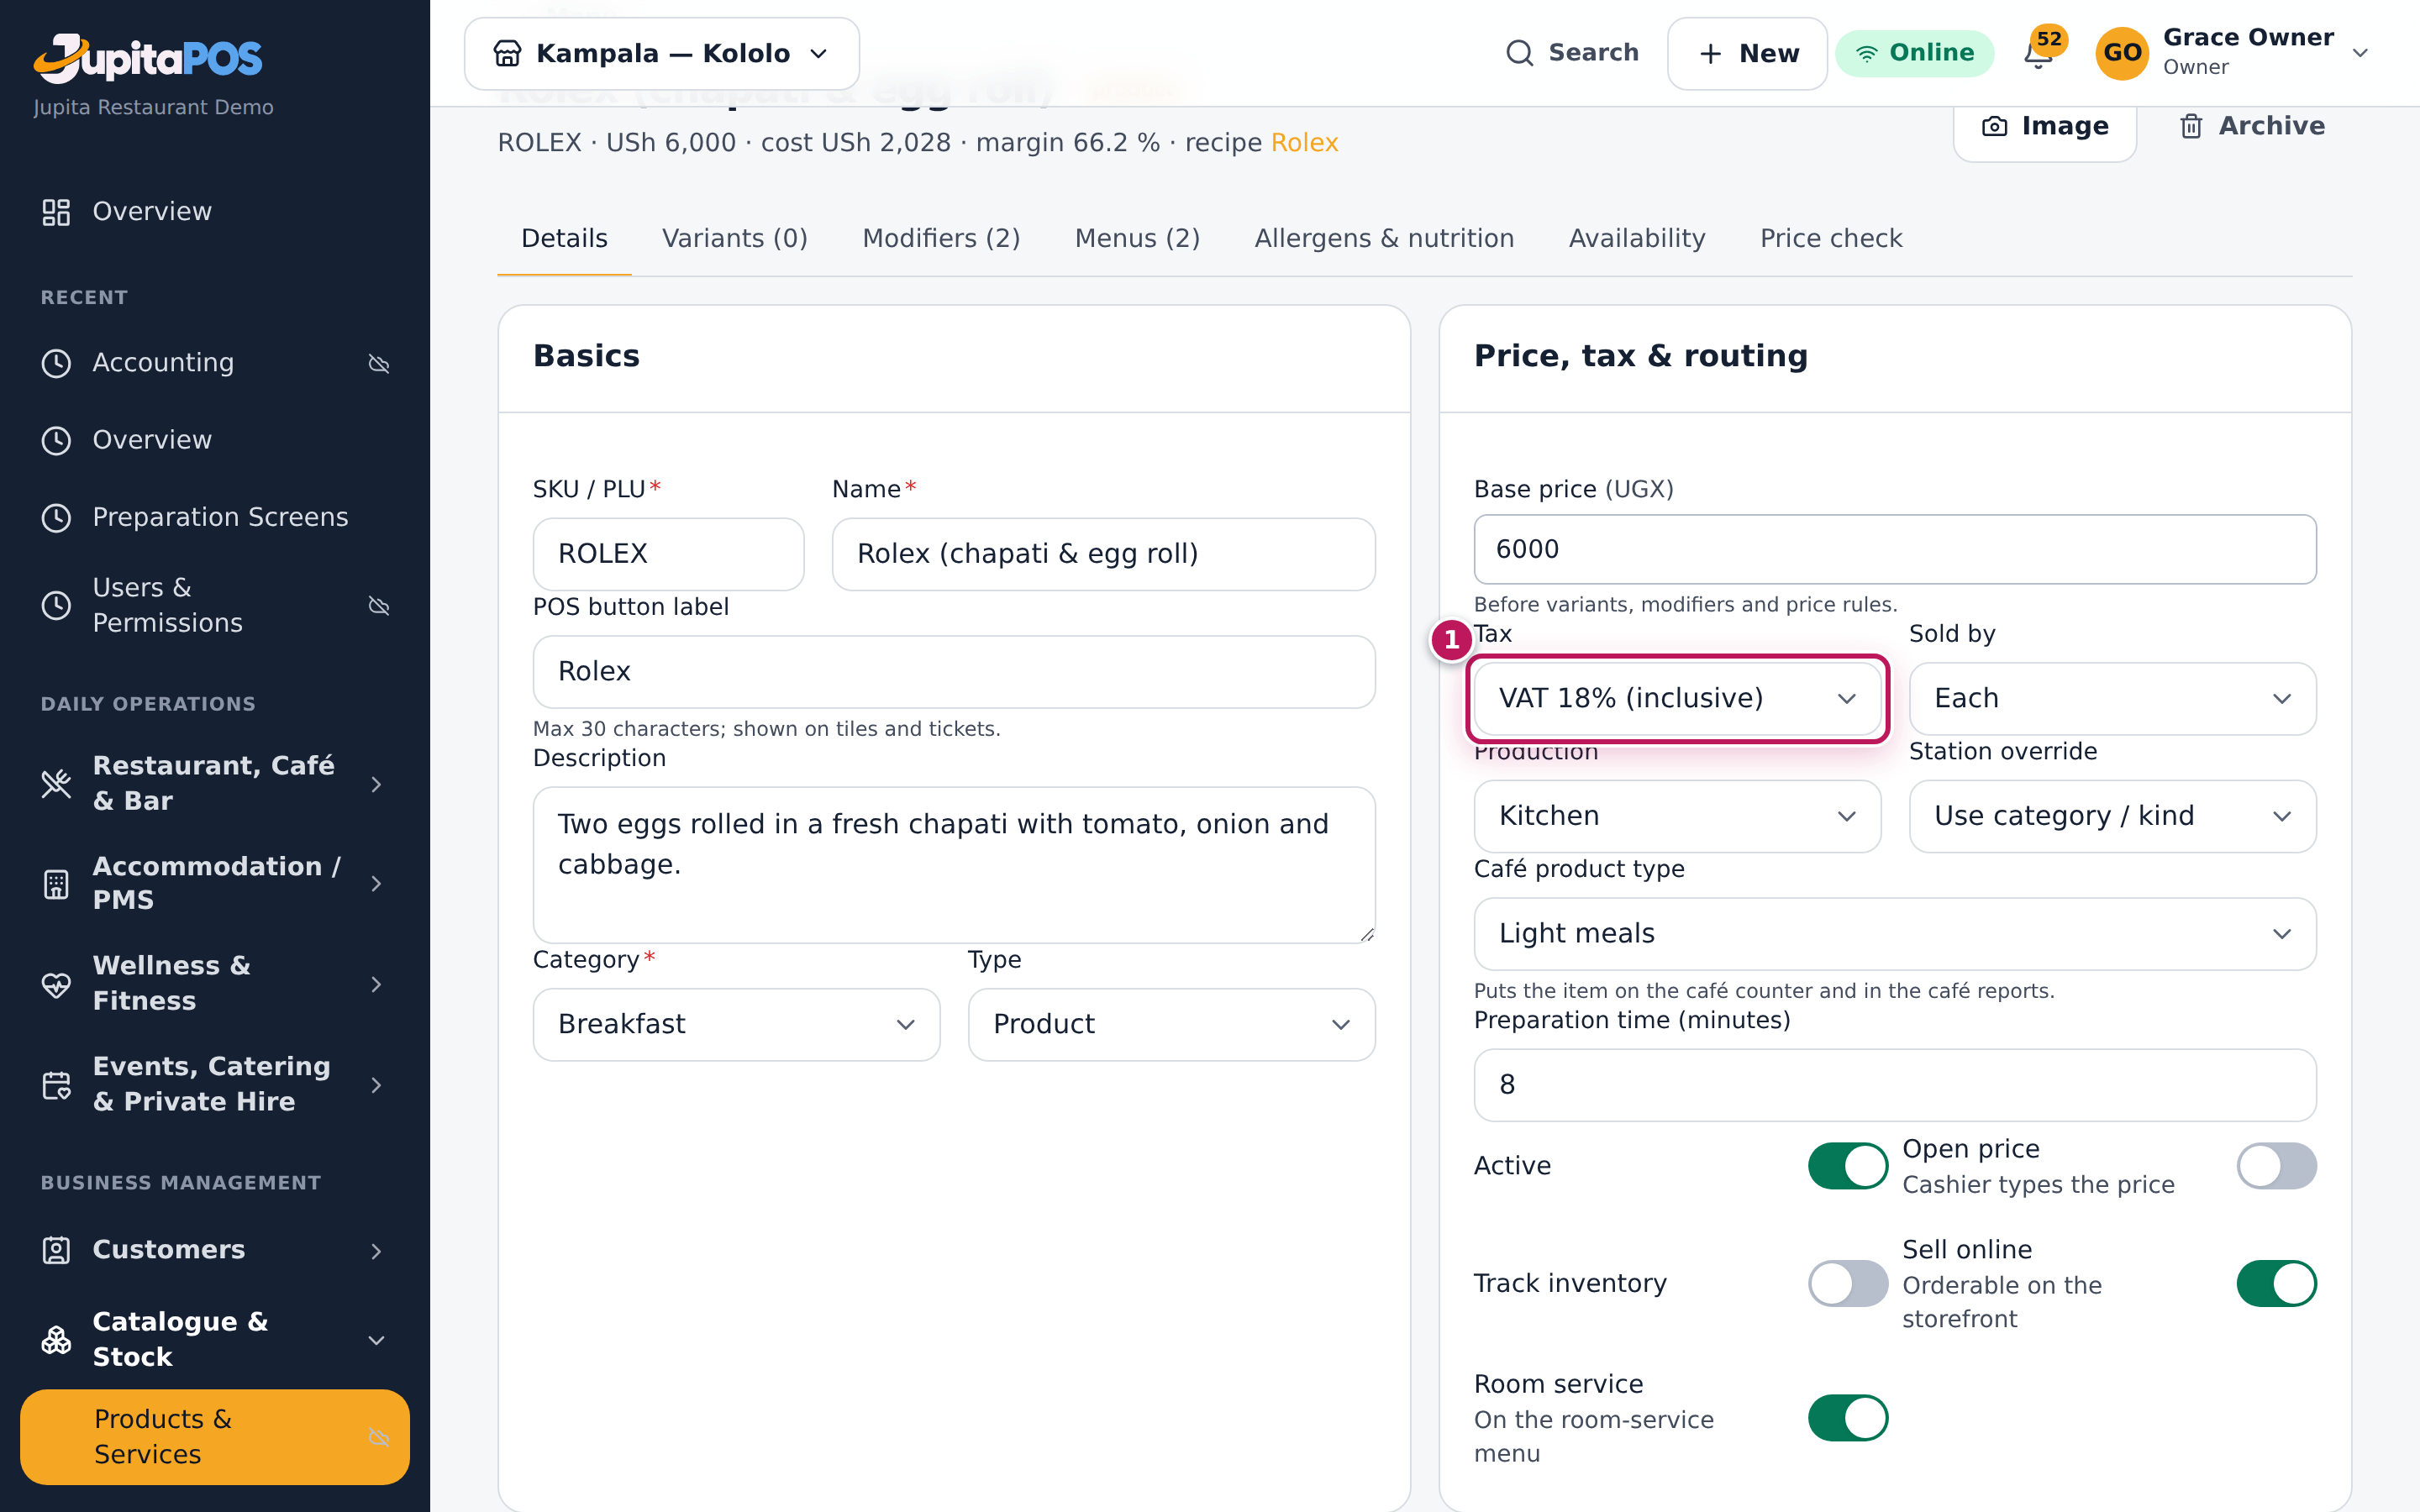
- Each menu item carries its tax: open the item under Menu and read Tax (1 in the second picture) under Price, tax & routing — VAT 18% (inclusive). Prices include VAT; the till shows how much of each bill is VAT.
- A service charge is added by dining area: set the area’s Service charge on the floor plan (see Design the floor plan).
- Open Accounting, then Chart of accounts, then Posting map.
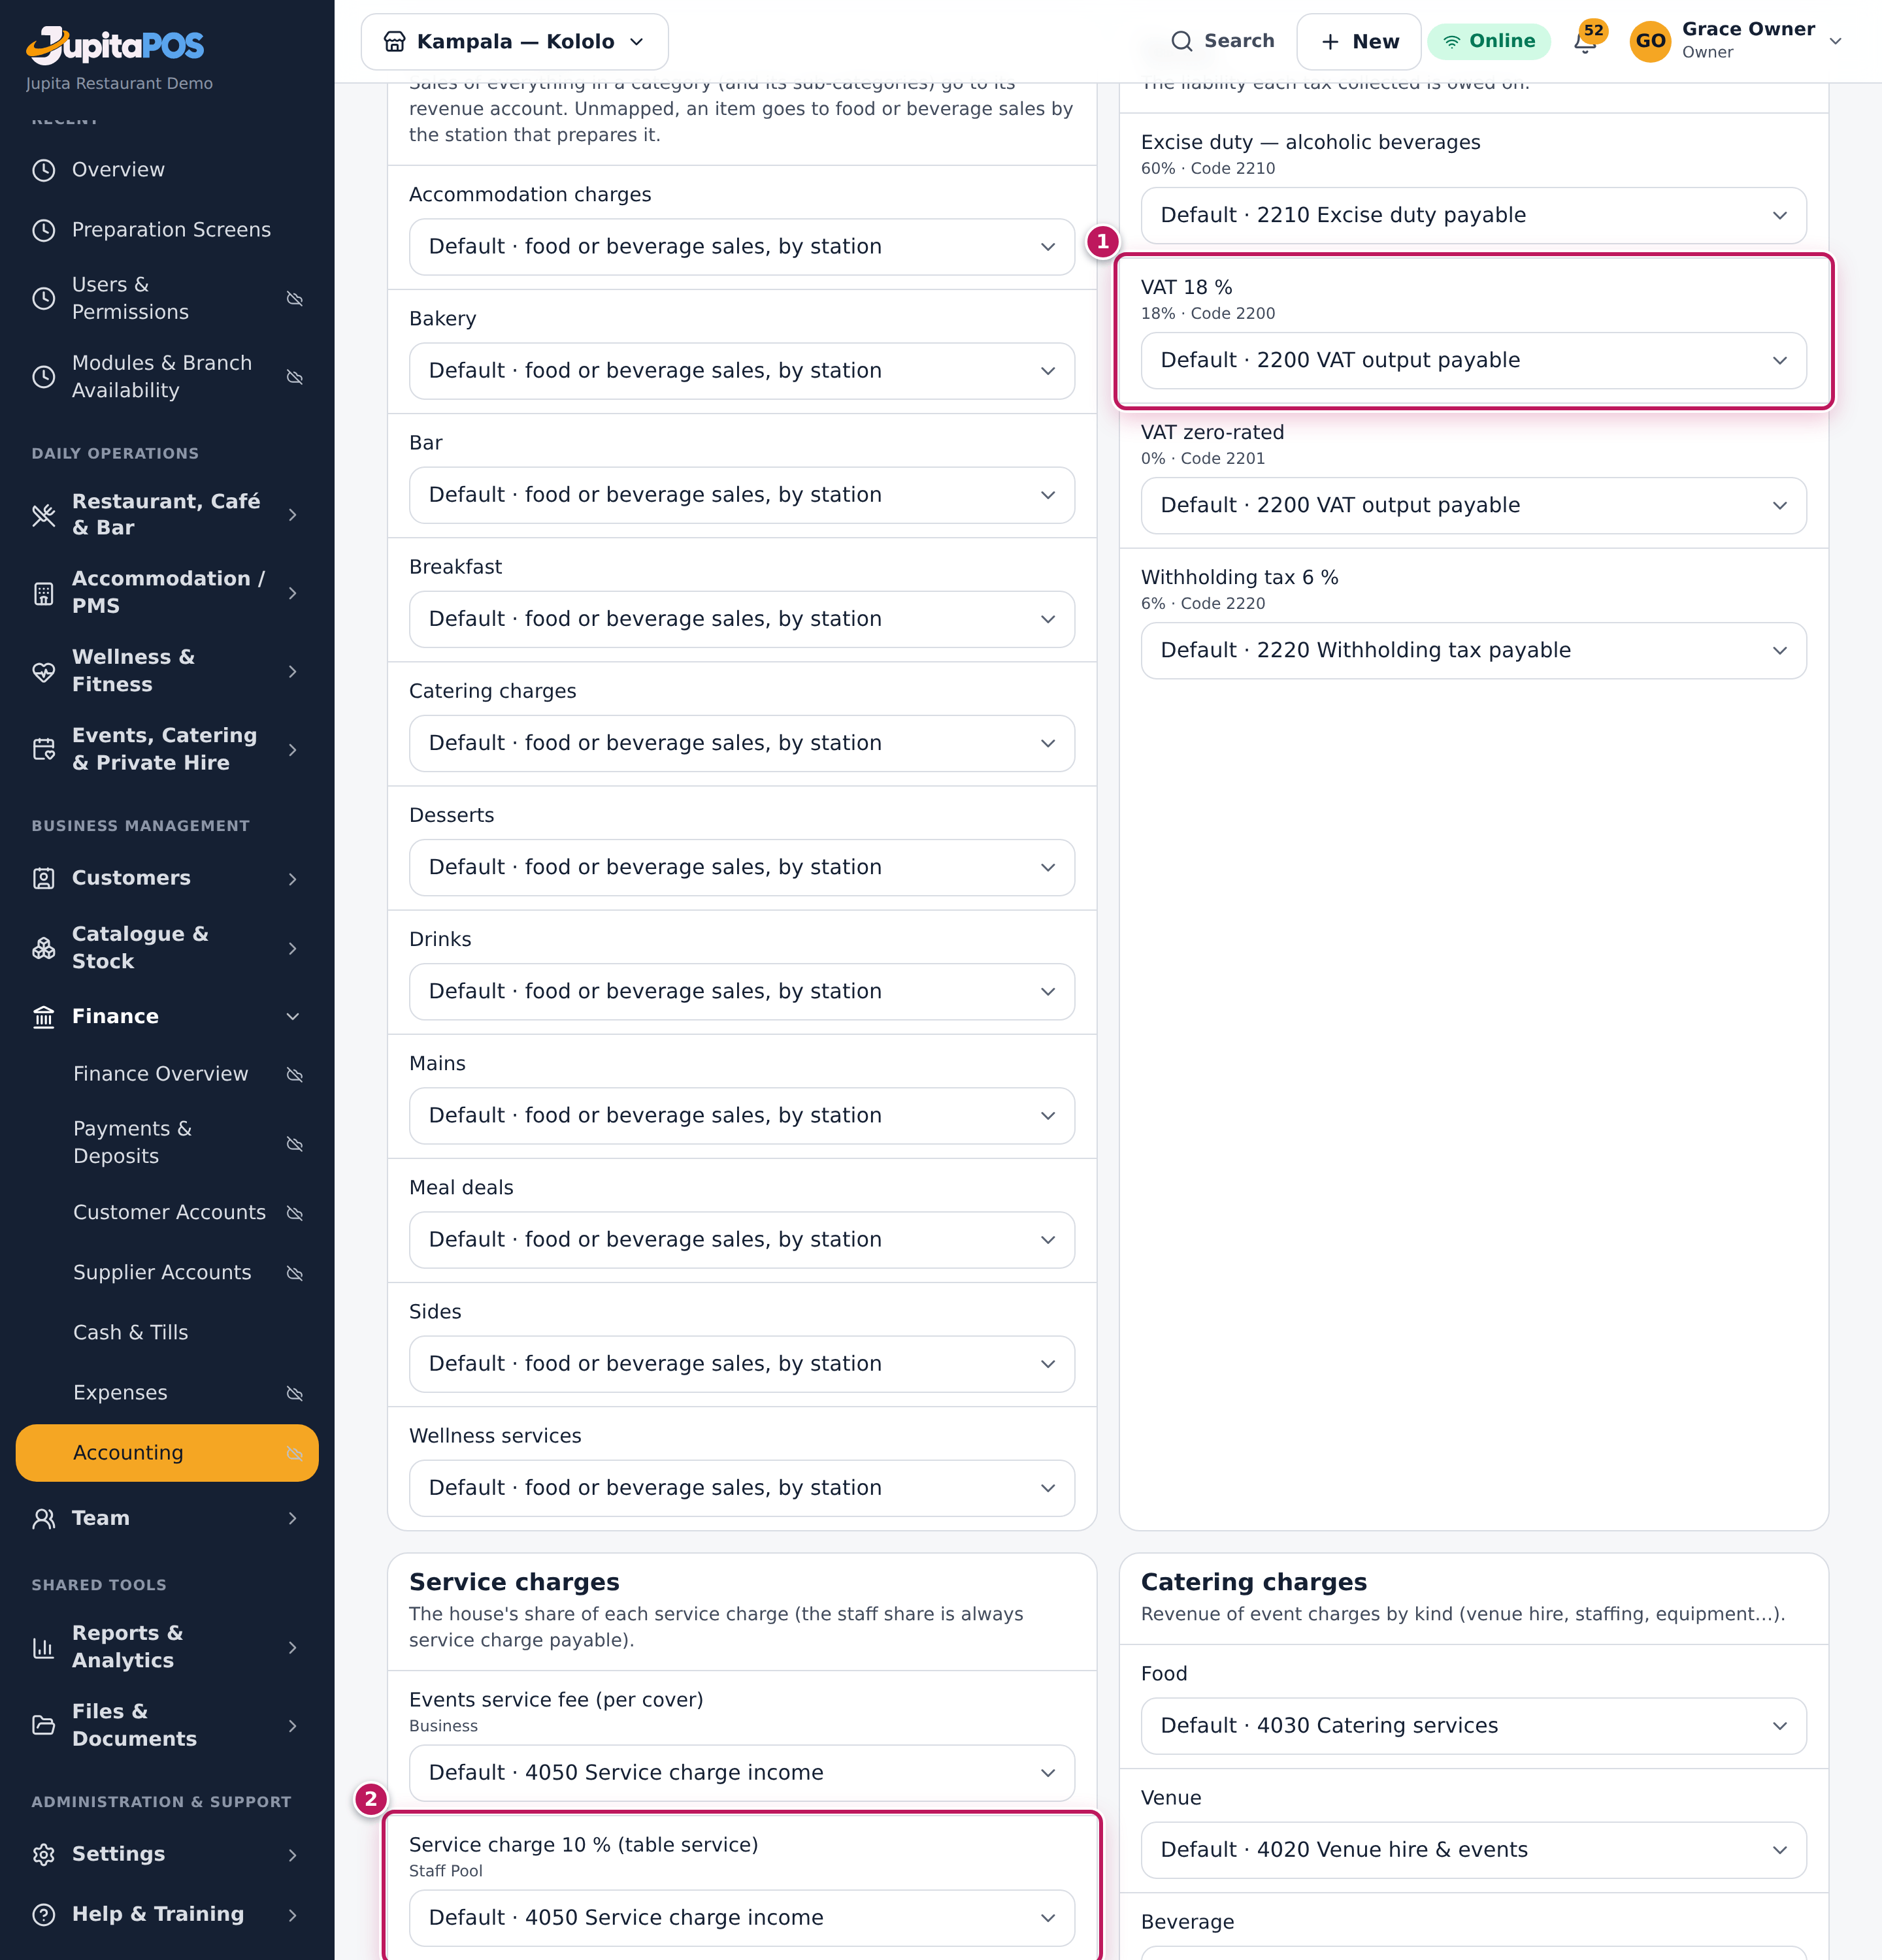
- Read Taxes (1): each tax and the liability account it posts to — 2200 VAT output payable.
- Read Service charges (2): the income account for the house’s share; the staff share is owed to staff.
Expected result
Every sale posts its VAT to VAT output payable and the VAT report shows what is due (see Profit and loss, balance sheet, VAT).
Screenshot
Common mistakes
- Adding VAT on top of the menu price. Prices include VAT; the tax on the item says how much of the price is VAT.
- Leaving an item on “No tax” by mistake. Its sales then carry no VAT on the return.
Troubleshooting
- A new tax rate is needed. Tax rates are part of the installation; ask your JupitaPos provider.
Set up payment methods
Purpose
Decide how customers may pay at the tills — cash, mobile money, card, bank transfer, house account — and the rules for each.
Role / permission required
Owner or branch manager: payments.methods.manage.
Prerequisites
- For an integrated method (mobile money, card, QR), the provider account and its webhook secret.
Steps
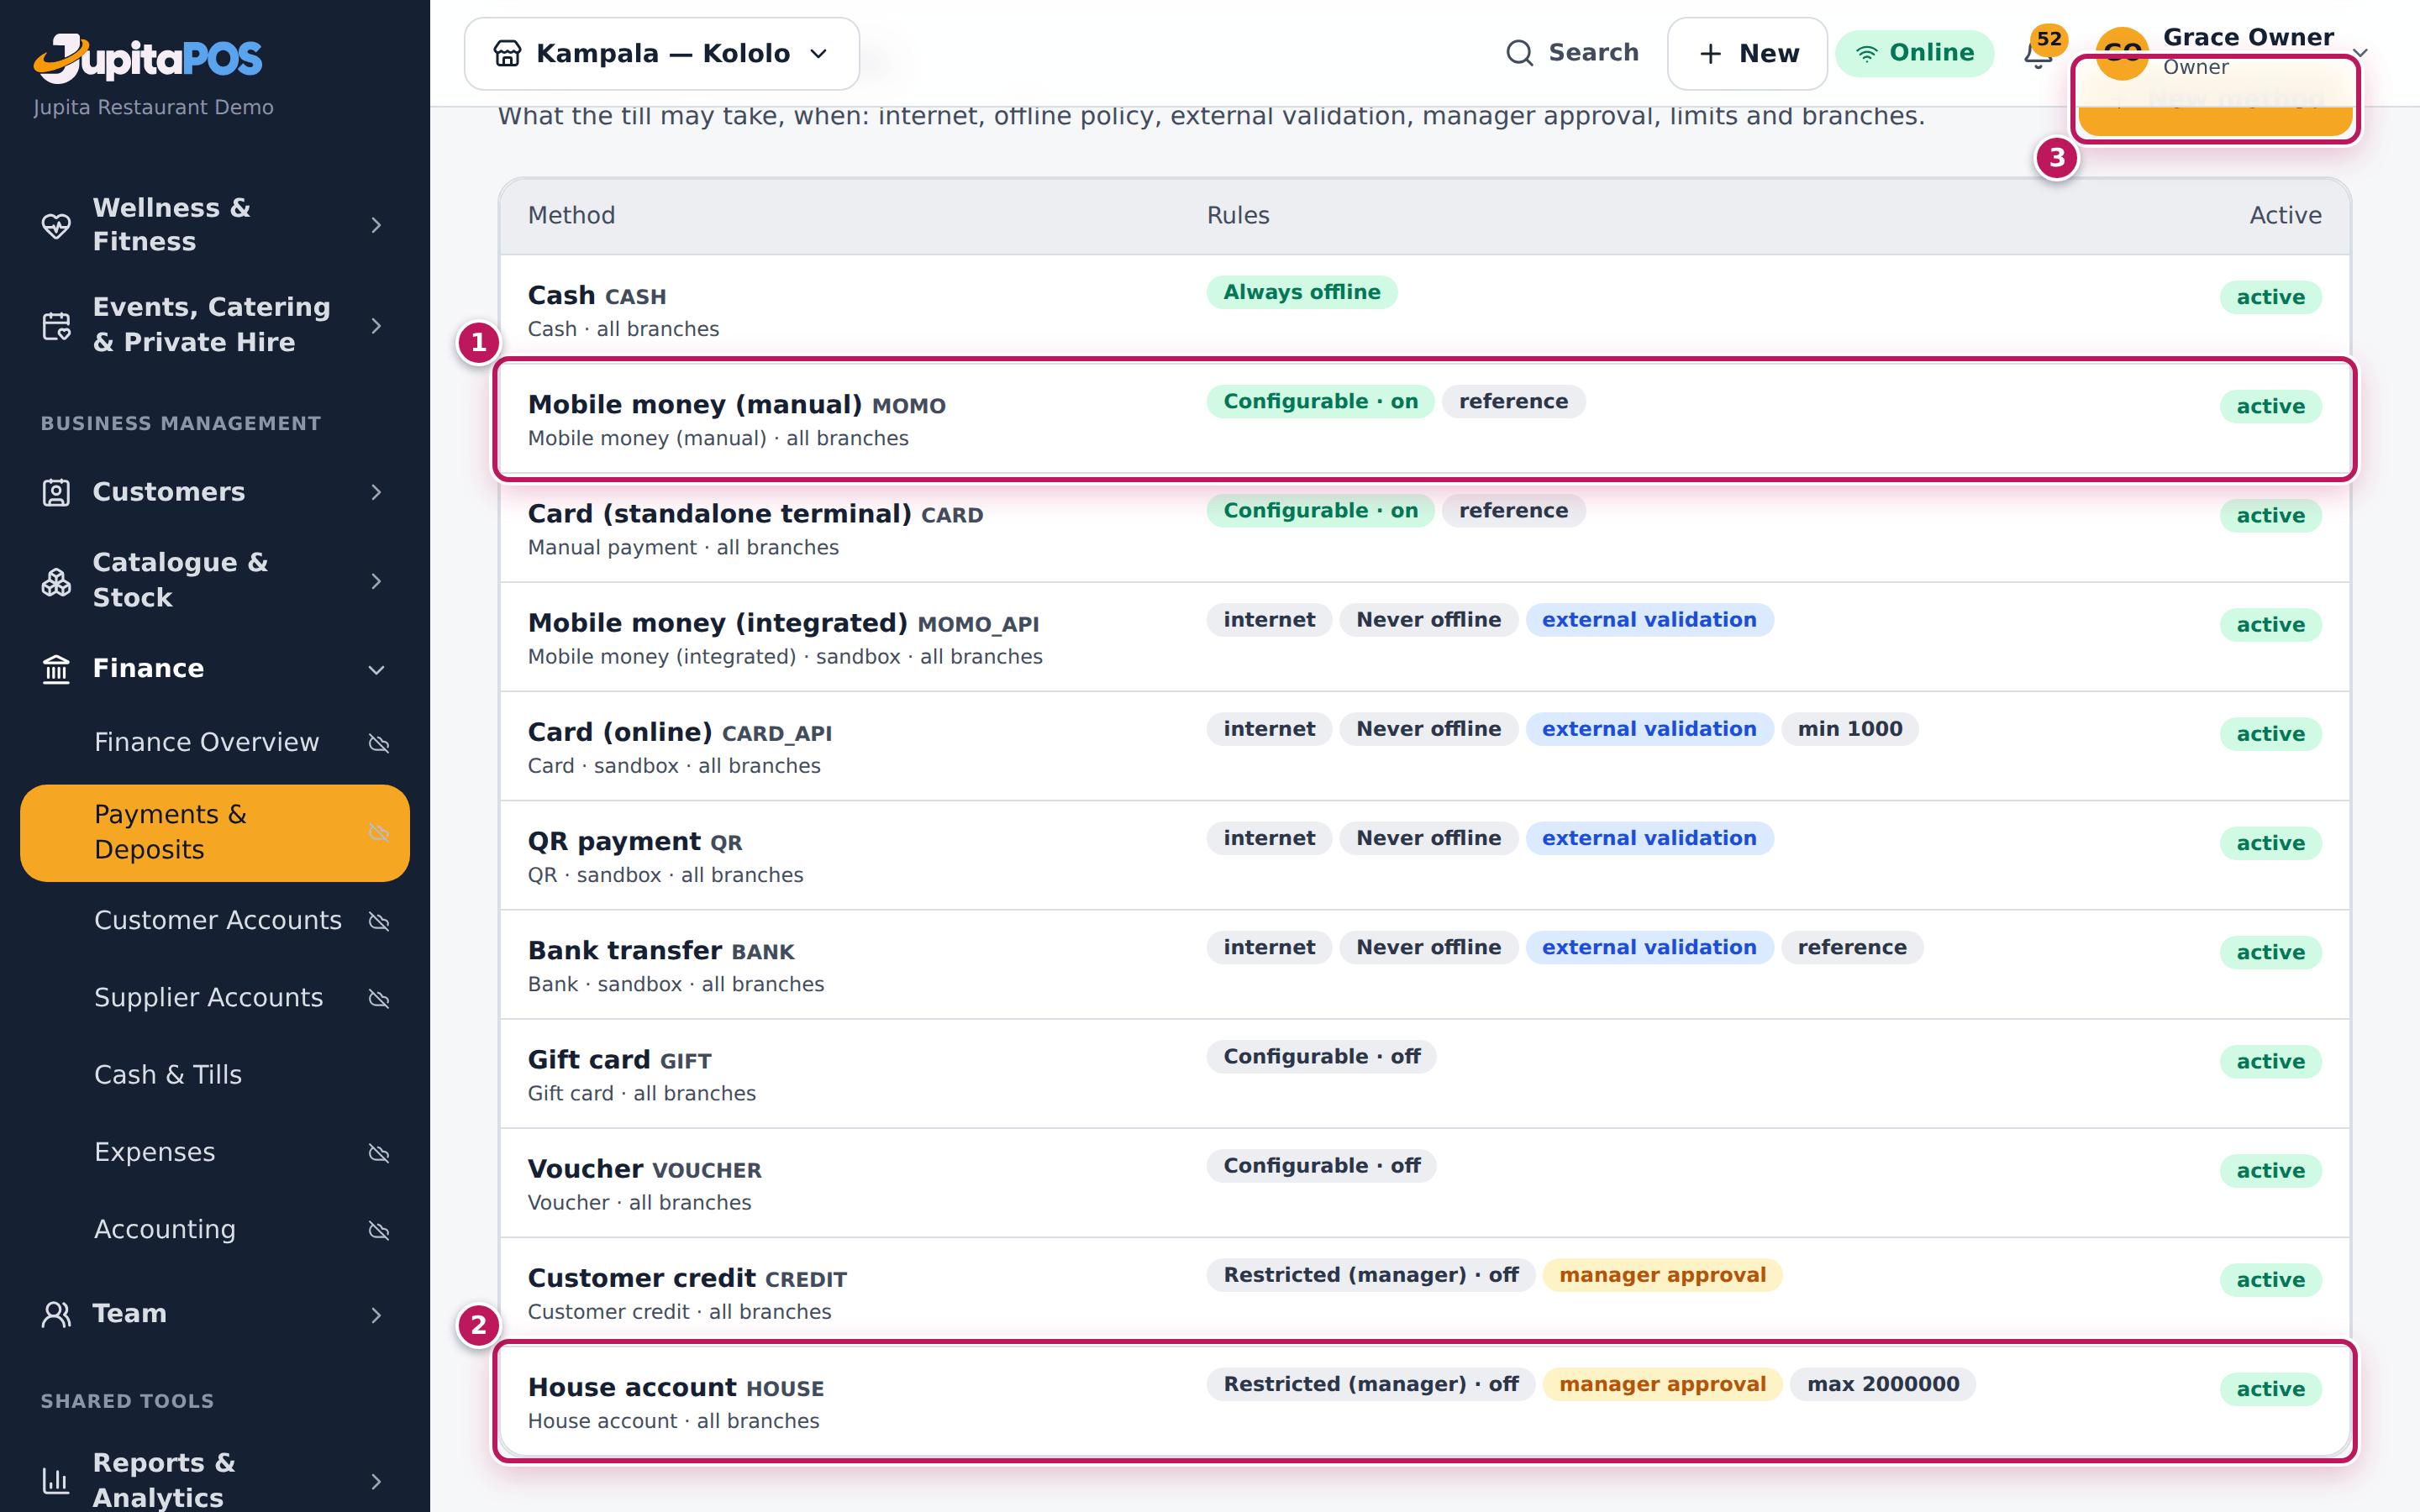
- Open Payments, then Payment methods. Each method (1, 2) shows its rules: offline, reference, external validation, manager approval, limits.
- Click New method (3), or click a method to change it.
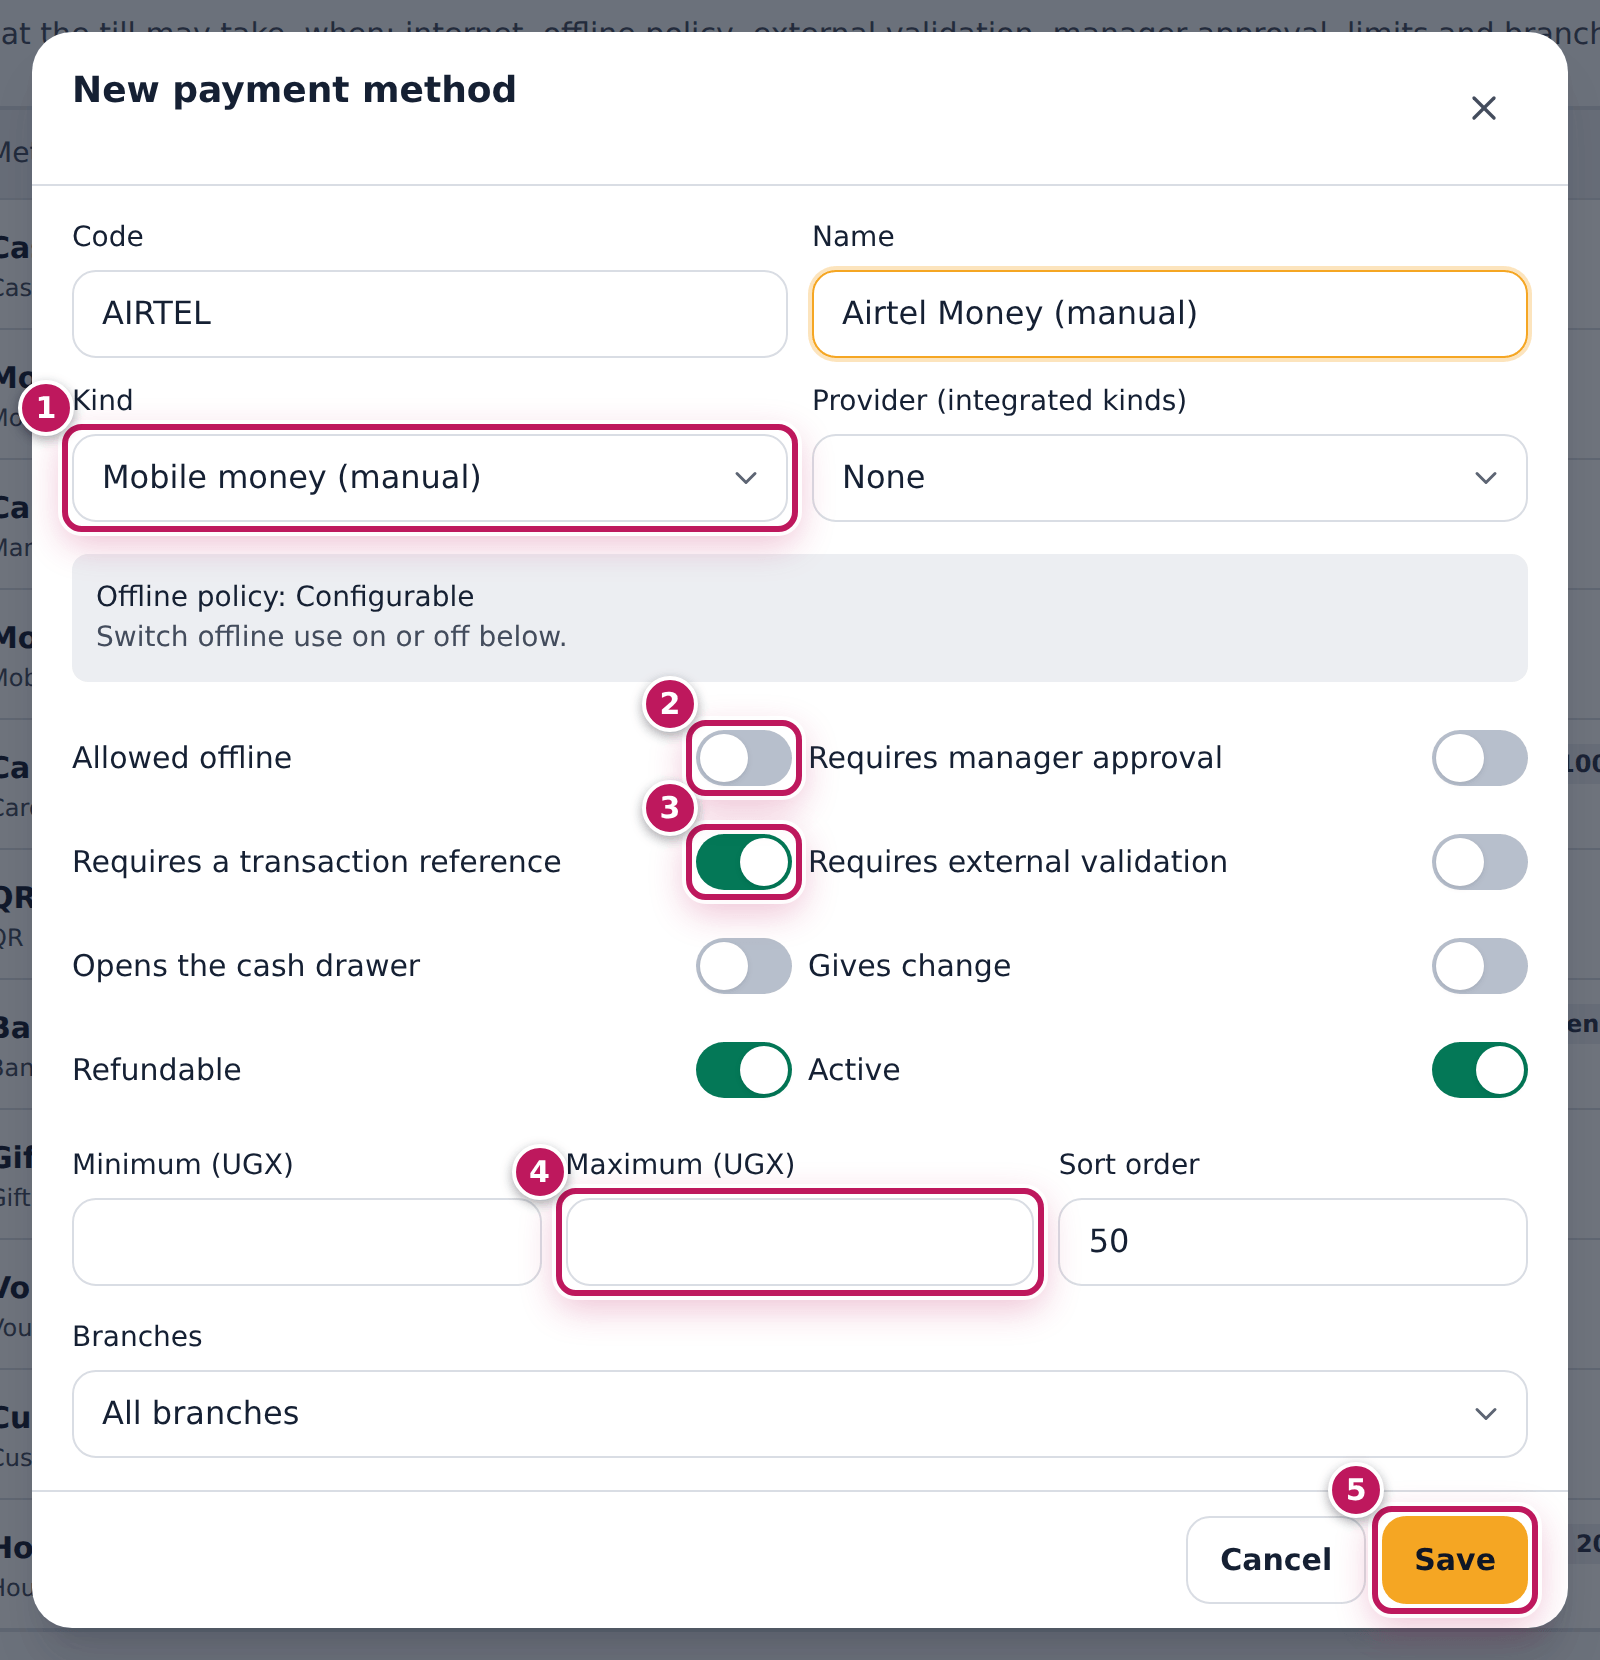
- Type the Code and Name, and choose the Kind (1). The kind sets sensible rules.
- Set the rules: Allowed offline (2), Requires manager approval, Requires a transaction reference (3), Requires external validation, Opens the cash drawer, Gives change, Refundable.
- Set a Minimum and Maximum (4) if needed, the Sort order on the till, and the Branches.
- Click Save (5).
Expected result
Payment method saved. The method appears on the tills’ Pay dialog of its branches, in its sort order, with its rules: a manual mobile money payment asks for the transaction reference; a house account needs a manager.
Screenshot
Common mistakes
- Allowing a method offline that needs checking. Only cash and manual methods can be taken offline; an integrated method must reach the provider.
- Reusing a code. A method’s code stays with it for ever, even when archived.
Troubleshooting
- “Code … is already used.” Choose another code.
- A method does not show on a till. It is not active, not for that branch, or not allowed offline while the till is offline.
Receipt and kitchen printers
Purpose
Print receipts and bills on the till’s printer, and know how kitchen tickets reach the cooks.
Role / permission required
Anyone who prints a receipt: sales.view. Setting up the device’s printer
is done on the device itself.
Prerequisites
- The printer (an 80 mm receipt printer) is installed on the till — the Windows PC, Android tablet or iPad — and set as its default printer.
Steps
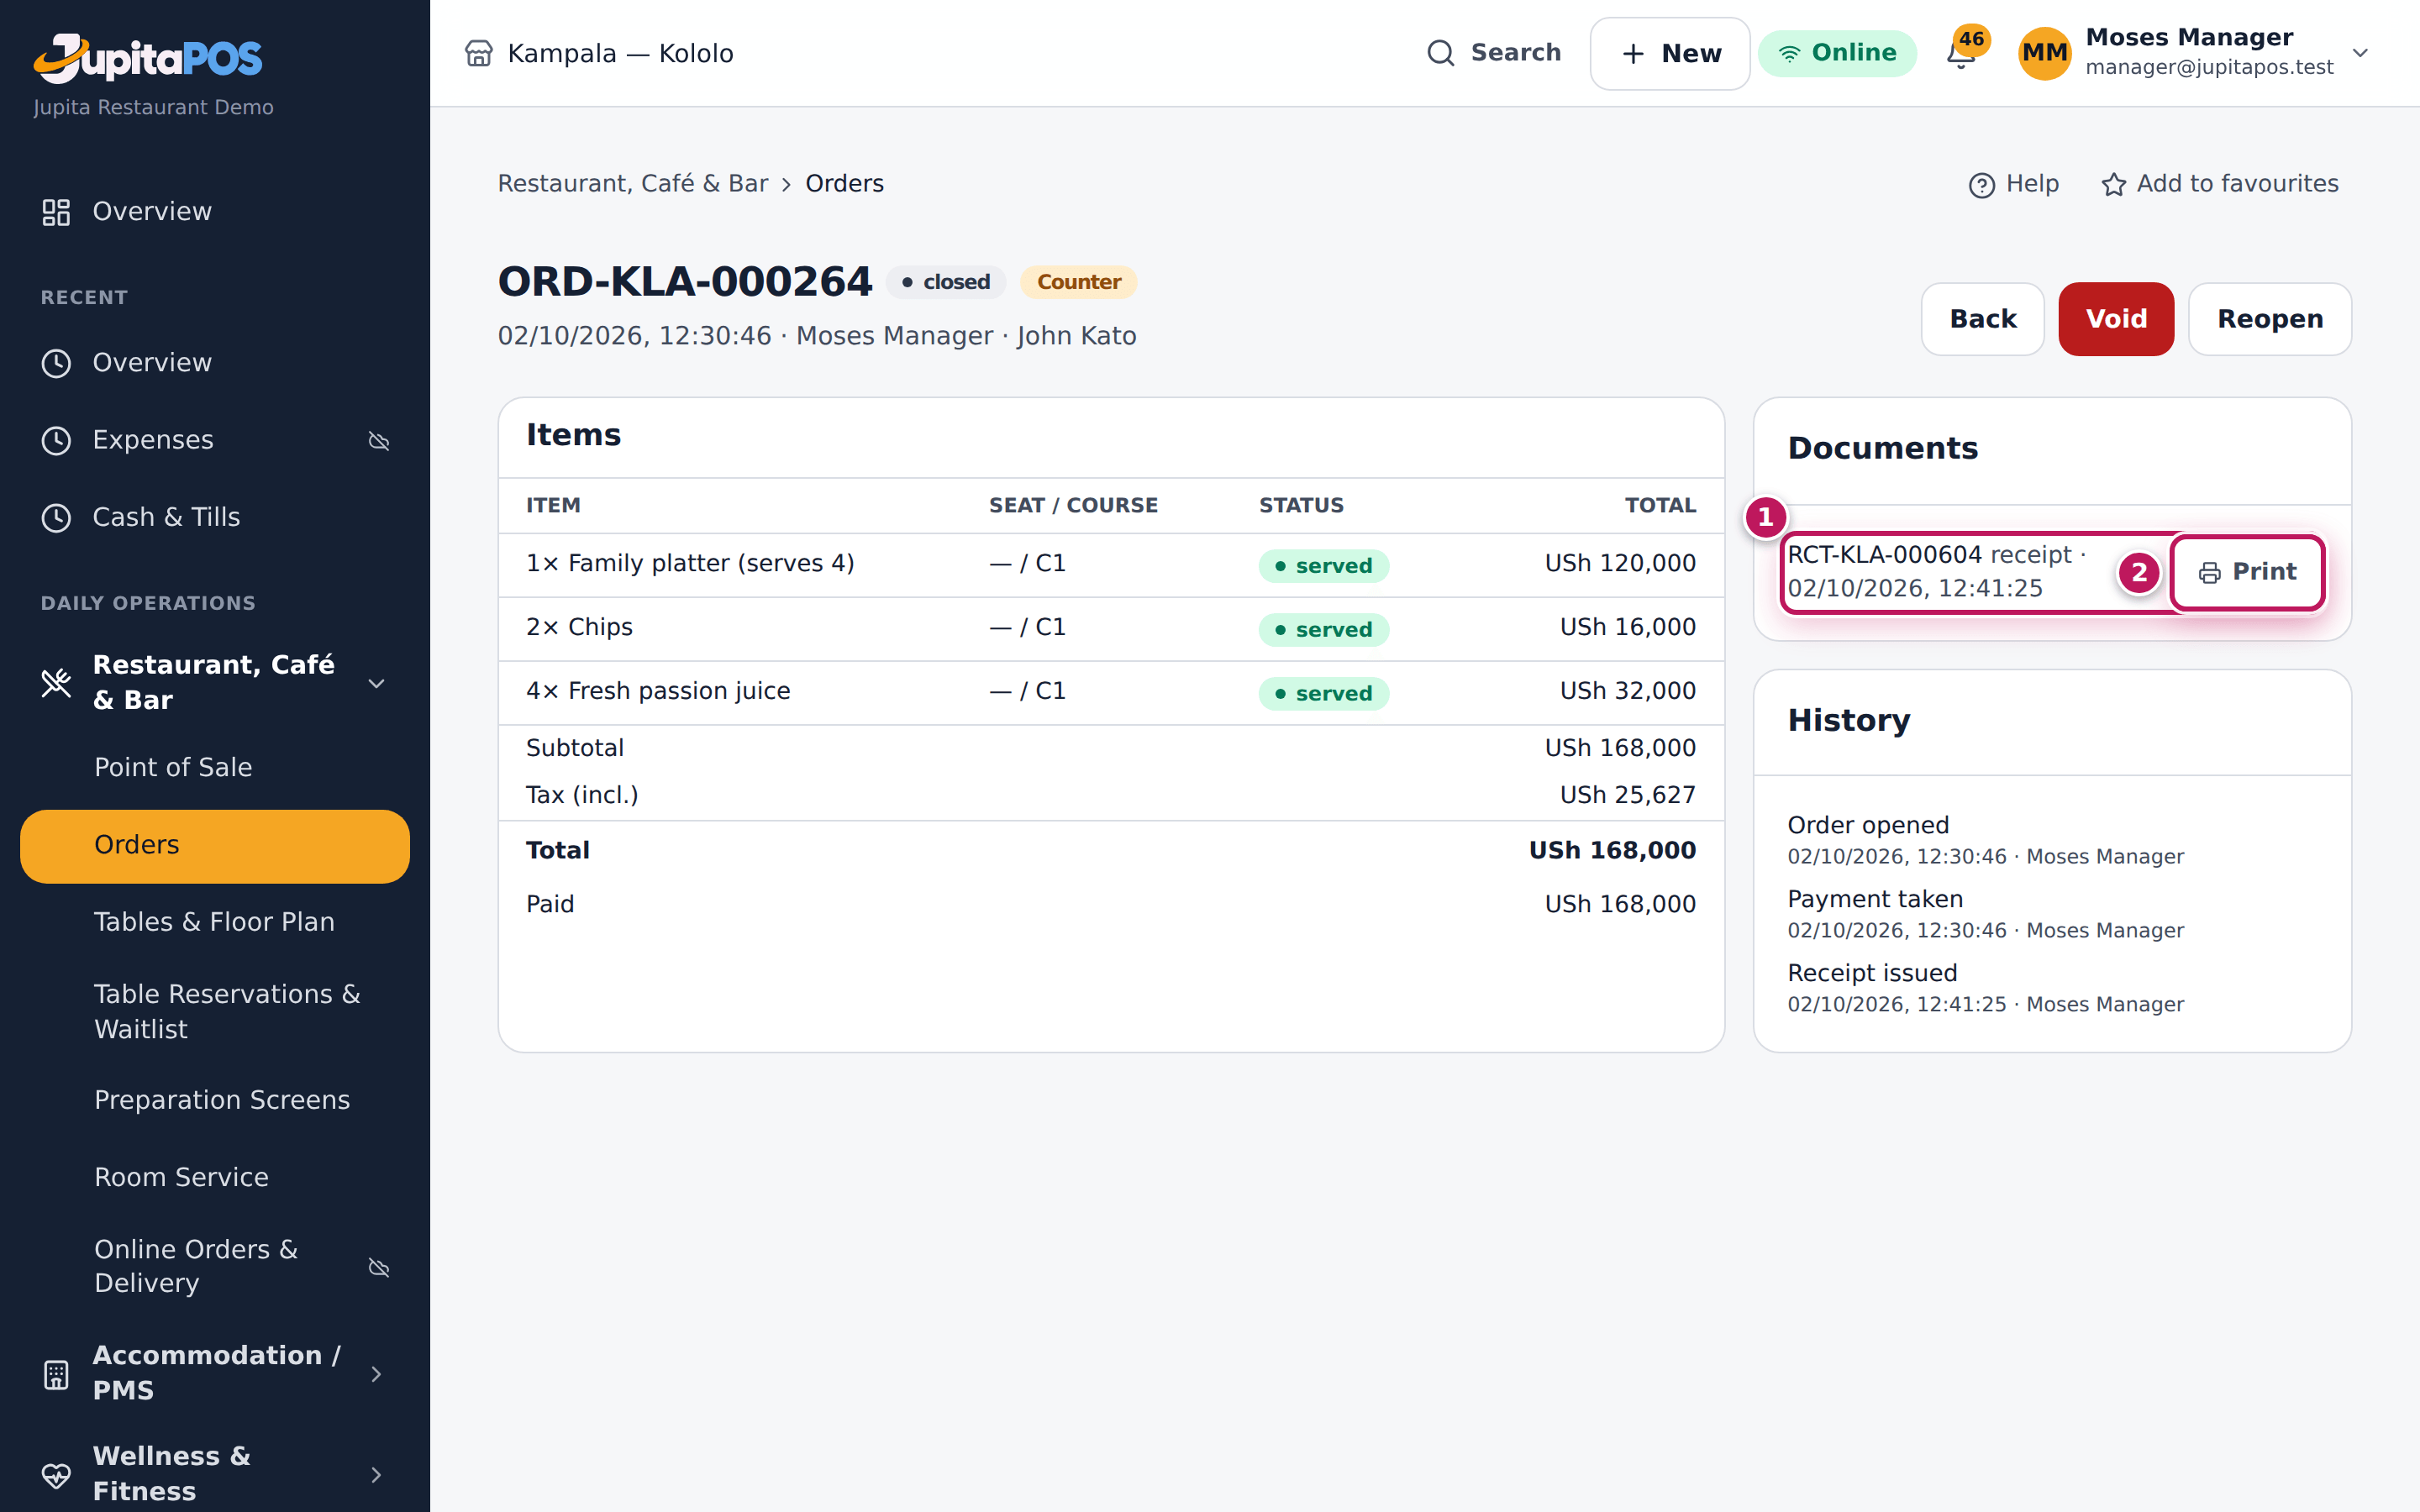
- After a payment, tap Print in the receipt on the till. For an older sale, open the order under Orders: its receipt is under Documents (1); click Print (2) next to it.
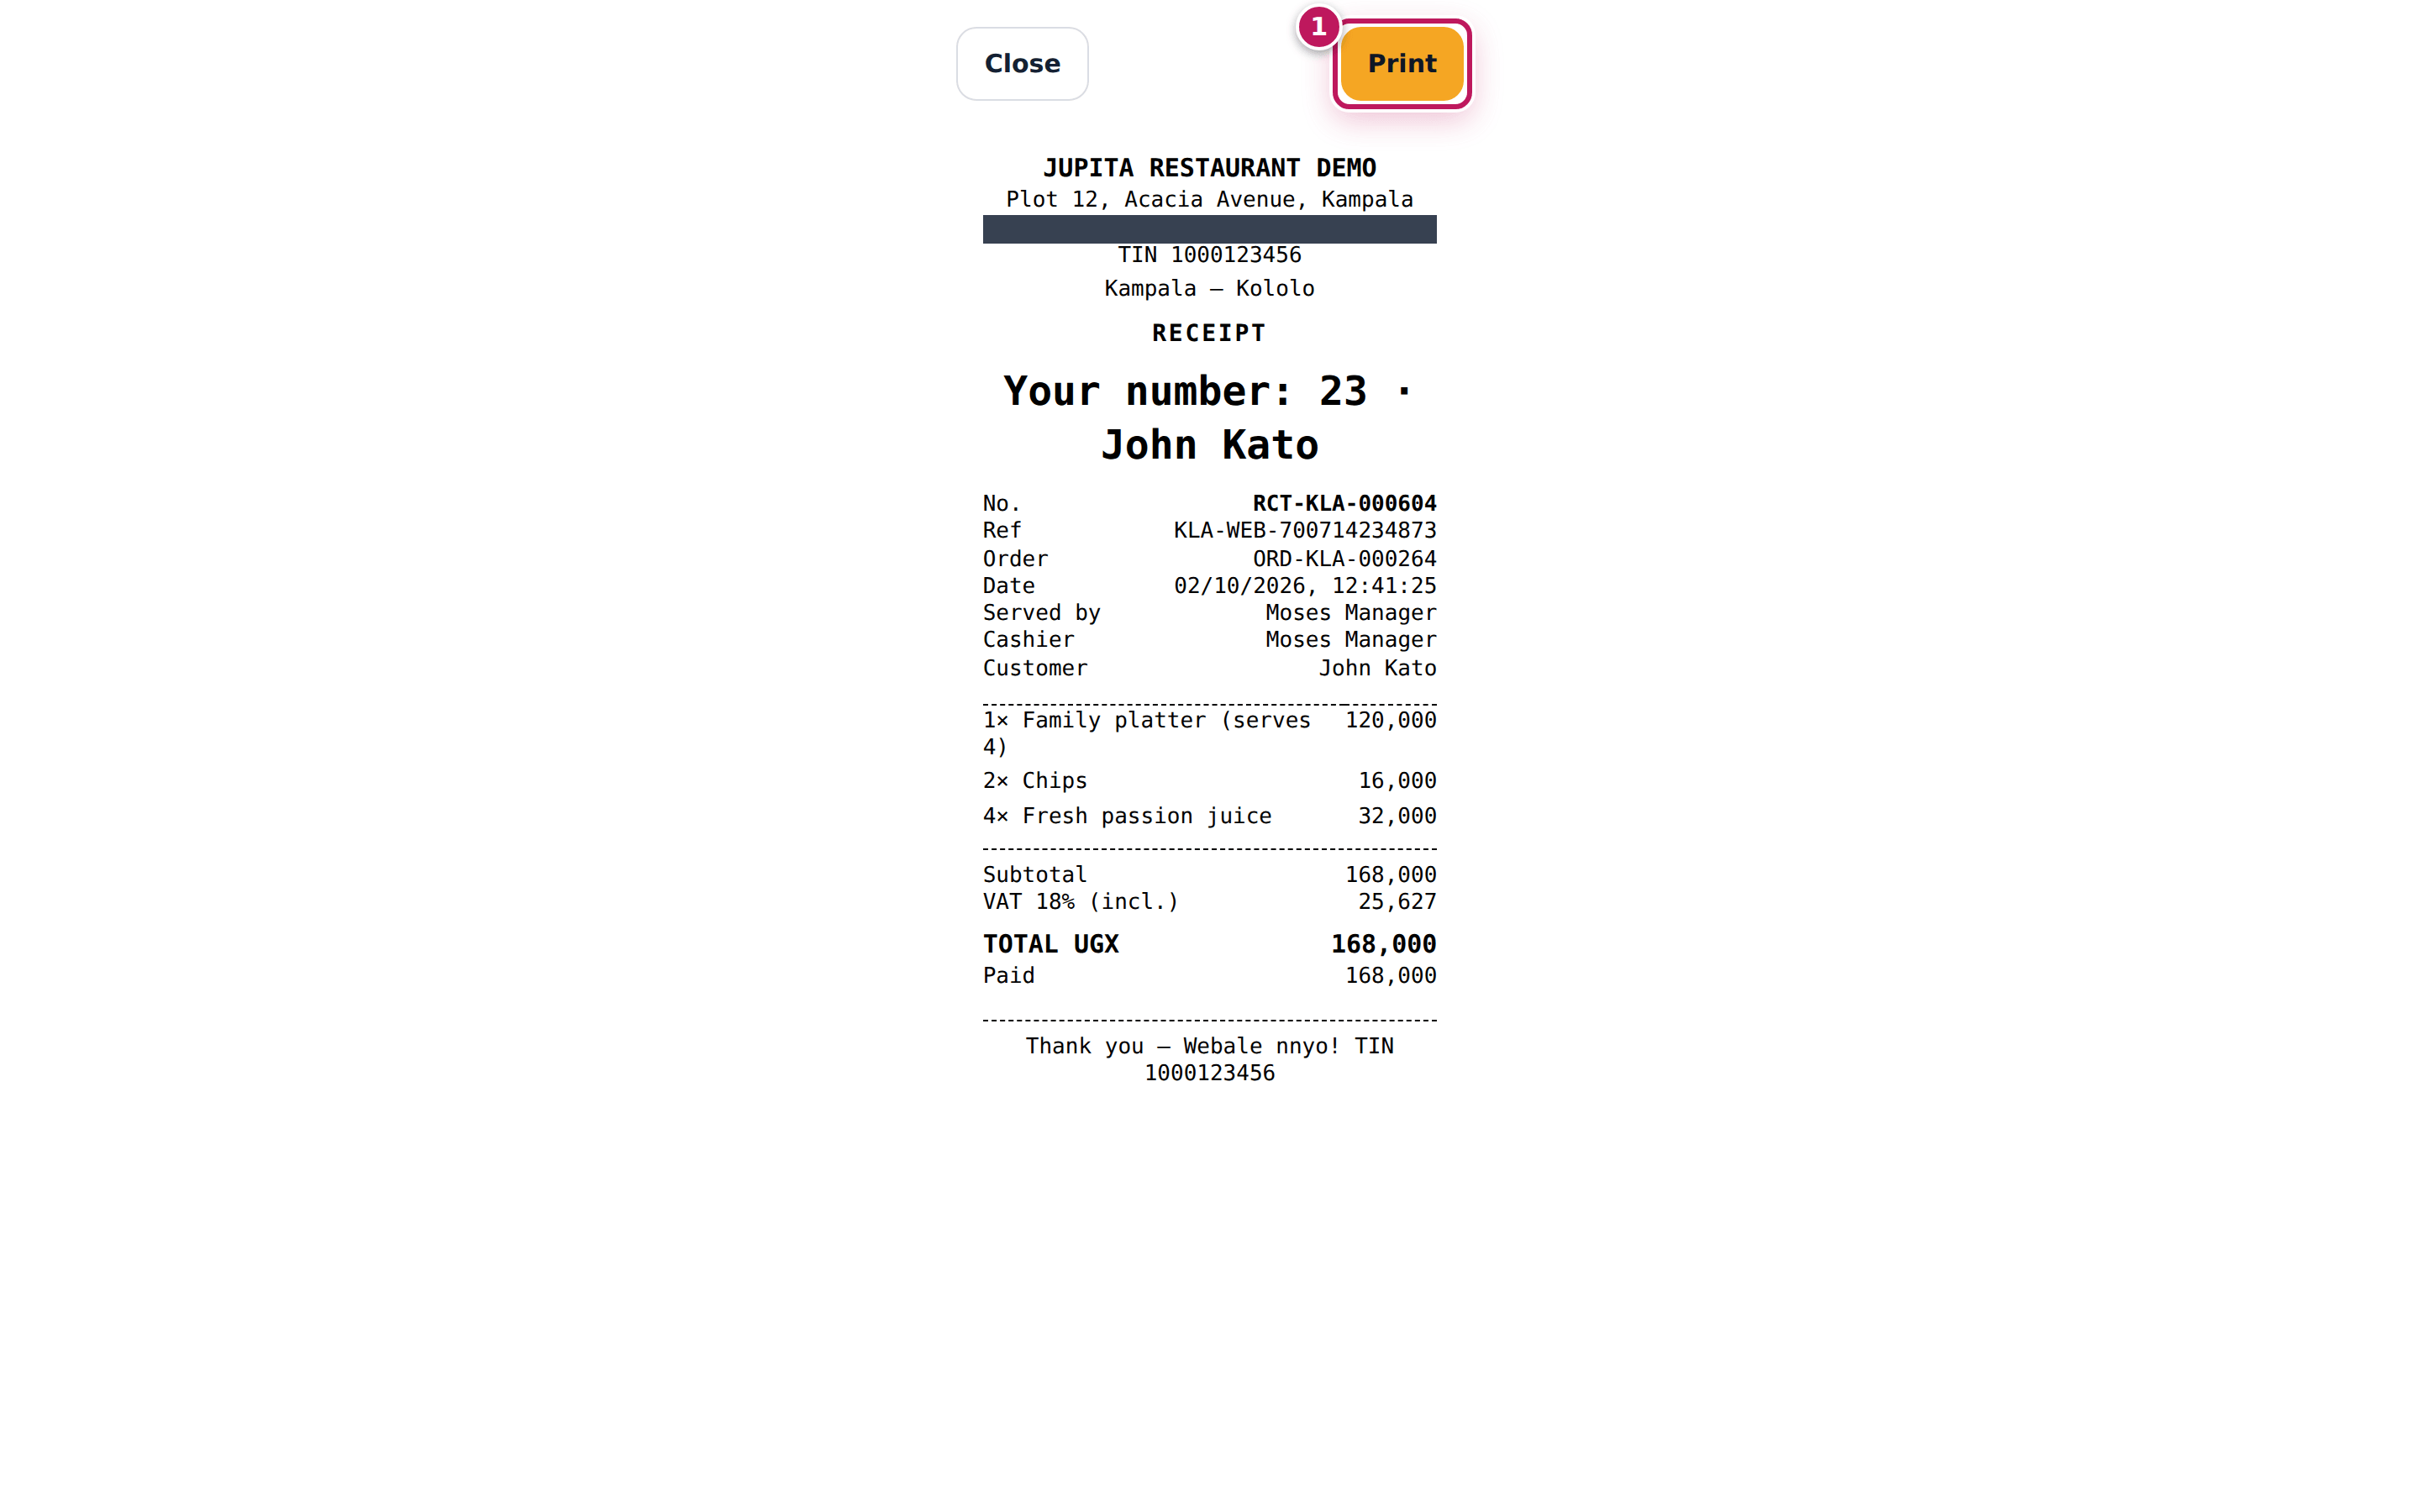
- The receipt opens as a page 80 mm wide, and the device’s print dialog opens by itself.
- In the print dialog, choose the receipt printer the first time; the device remembers it. Tap Print (1 in the second picture) to print again.
- Tickets for the kitchen, bar and café go to their screens: the production boards (see Open the kitchen board).
Expected result
The receipt prints on the till’s printer with the business, the items, the VAT and the total. Reprint on the till records a reprint (Reprint 1 recorded) and opens the copy marked as a reprint in a new tab to print.
Screenshot
Common mistakes
- Choosing a normal office printer in the dialog. The receipt is laid out for an 80 mm roll; set the receipt printer as the device’s default.
- Expecting kitchen tickets on paper. The kitchen, bar and café work from screens; there is no ticket printer setting.
Troubleshooting
- Nothing prints. Check the printer’s power, paper and cable, and that it is the device’s default printer. The sale is saved either way; print the receipt again from the order.
- The print dialog does not open. Allow pop-ups for JupitaPos in the browser.