

On this page
- Ring up a counter order
- Add an item with choices, extras and a note
- Start a takeaway or another type of order
- Attach a customer to an order
- Put an order on hold and pick it up again
- Give a discount
- Remove a line that was sent to the kitchen
- Cancel an order nothing was sent for
- Void an order that was sent
- Take a cash payment and give change
- Pay with two methods
- Take a mobile money or card payment with its reference
- Add a tip to the payment
- Charge a company’s house account
- Reprint a receipt or print a tax invoice
- Find an order and read its history
- Verify mobile money and card payments
- Reverse a payment taken by mistake
- Refund a paid order, in full or in part
- Open the till with a float
- Record cash in, cash out and safe drops
- Pay tips out to the waiters
- Hand the drawer over to the next cashier
- Count and close the till
- Approve or send back a till close
The till is where most of the day’s money goes through. Open Point of
sale from the sidebar (/pos). It is built for touch: the menu on the
left, the order on the right, one tap per item. Everything that is not the
sale itself — printing, e-mail, the kitchen’s copy, reports, stock — happens
in the background after the order is saved, so a slow printer never holds
up a queue.
The screens in this manual are the demo business, Jupita Restaurant Demo, at its Kampala — Kololo branch on a Friday lunchtime. Amounts are in Uganda shillings and include 18 % VAT. The cashier is Paul Ssekandi, whose till is open for the day; the shift supervisor is Sam — Sam Supervisor on the till, employee number EMP-0018 — and the branch manager is Moses (Moses Manager on the till). Their staff records (in Team › Employees) carry their surnames, Samuel Mukasa and Moses Kigozi.
The guides follow the day at the till:
- Taking the order — ring up a counter order, add choices and notes, start a takeaway or another type of order, attach a customer, hold an order, give a discount, void a line, cancel or void an order.
- Taking the money — cash, two methods, mobile money or card, a tip, a house account, receipts and invoices.
- After the sale — find an order, verify, reverse or refund a payment.
- The cash drawer — open the till, cash in and out, pay out tips, hand the drawer over, count and close, approve a variance.
Table service — the floor plan, seats and courses, sending courses to the kitchen, splitting a table’s bill — is in the restaurant manual (see Start a table order).
Ring up a counter order
Purpose
Sell to a customer standing at the counter — a takeaway coffee, a juice, a plate of chips — without choosing a table or a customer first.
Role / permission required
Cashier, waiter, bartender, barista, supervisor or manager — anyone with
sales.create.
Prerequisites
- You are signed in at a till in your branch (see Sign in).
- The items are on a menu that is active now; items that are sold out are greyed out.
Steps
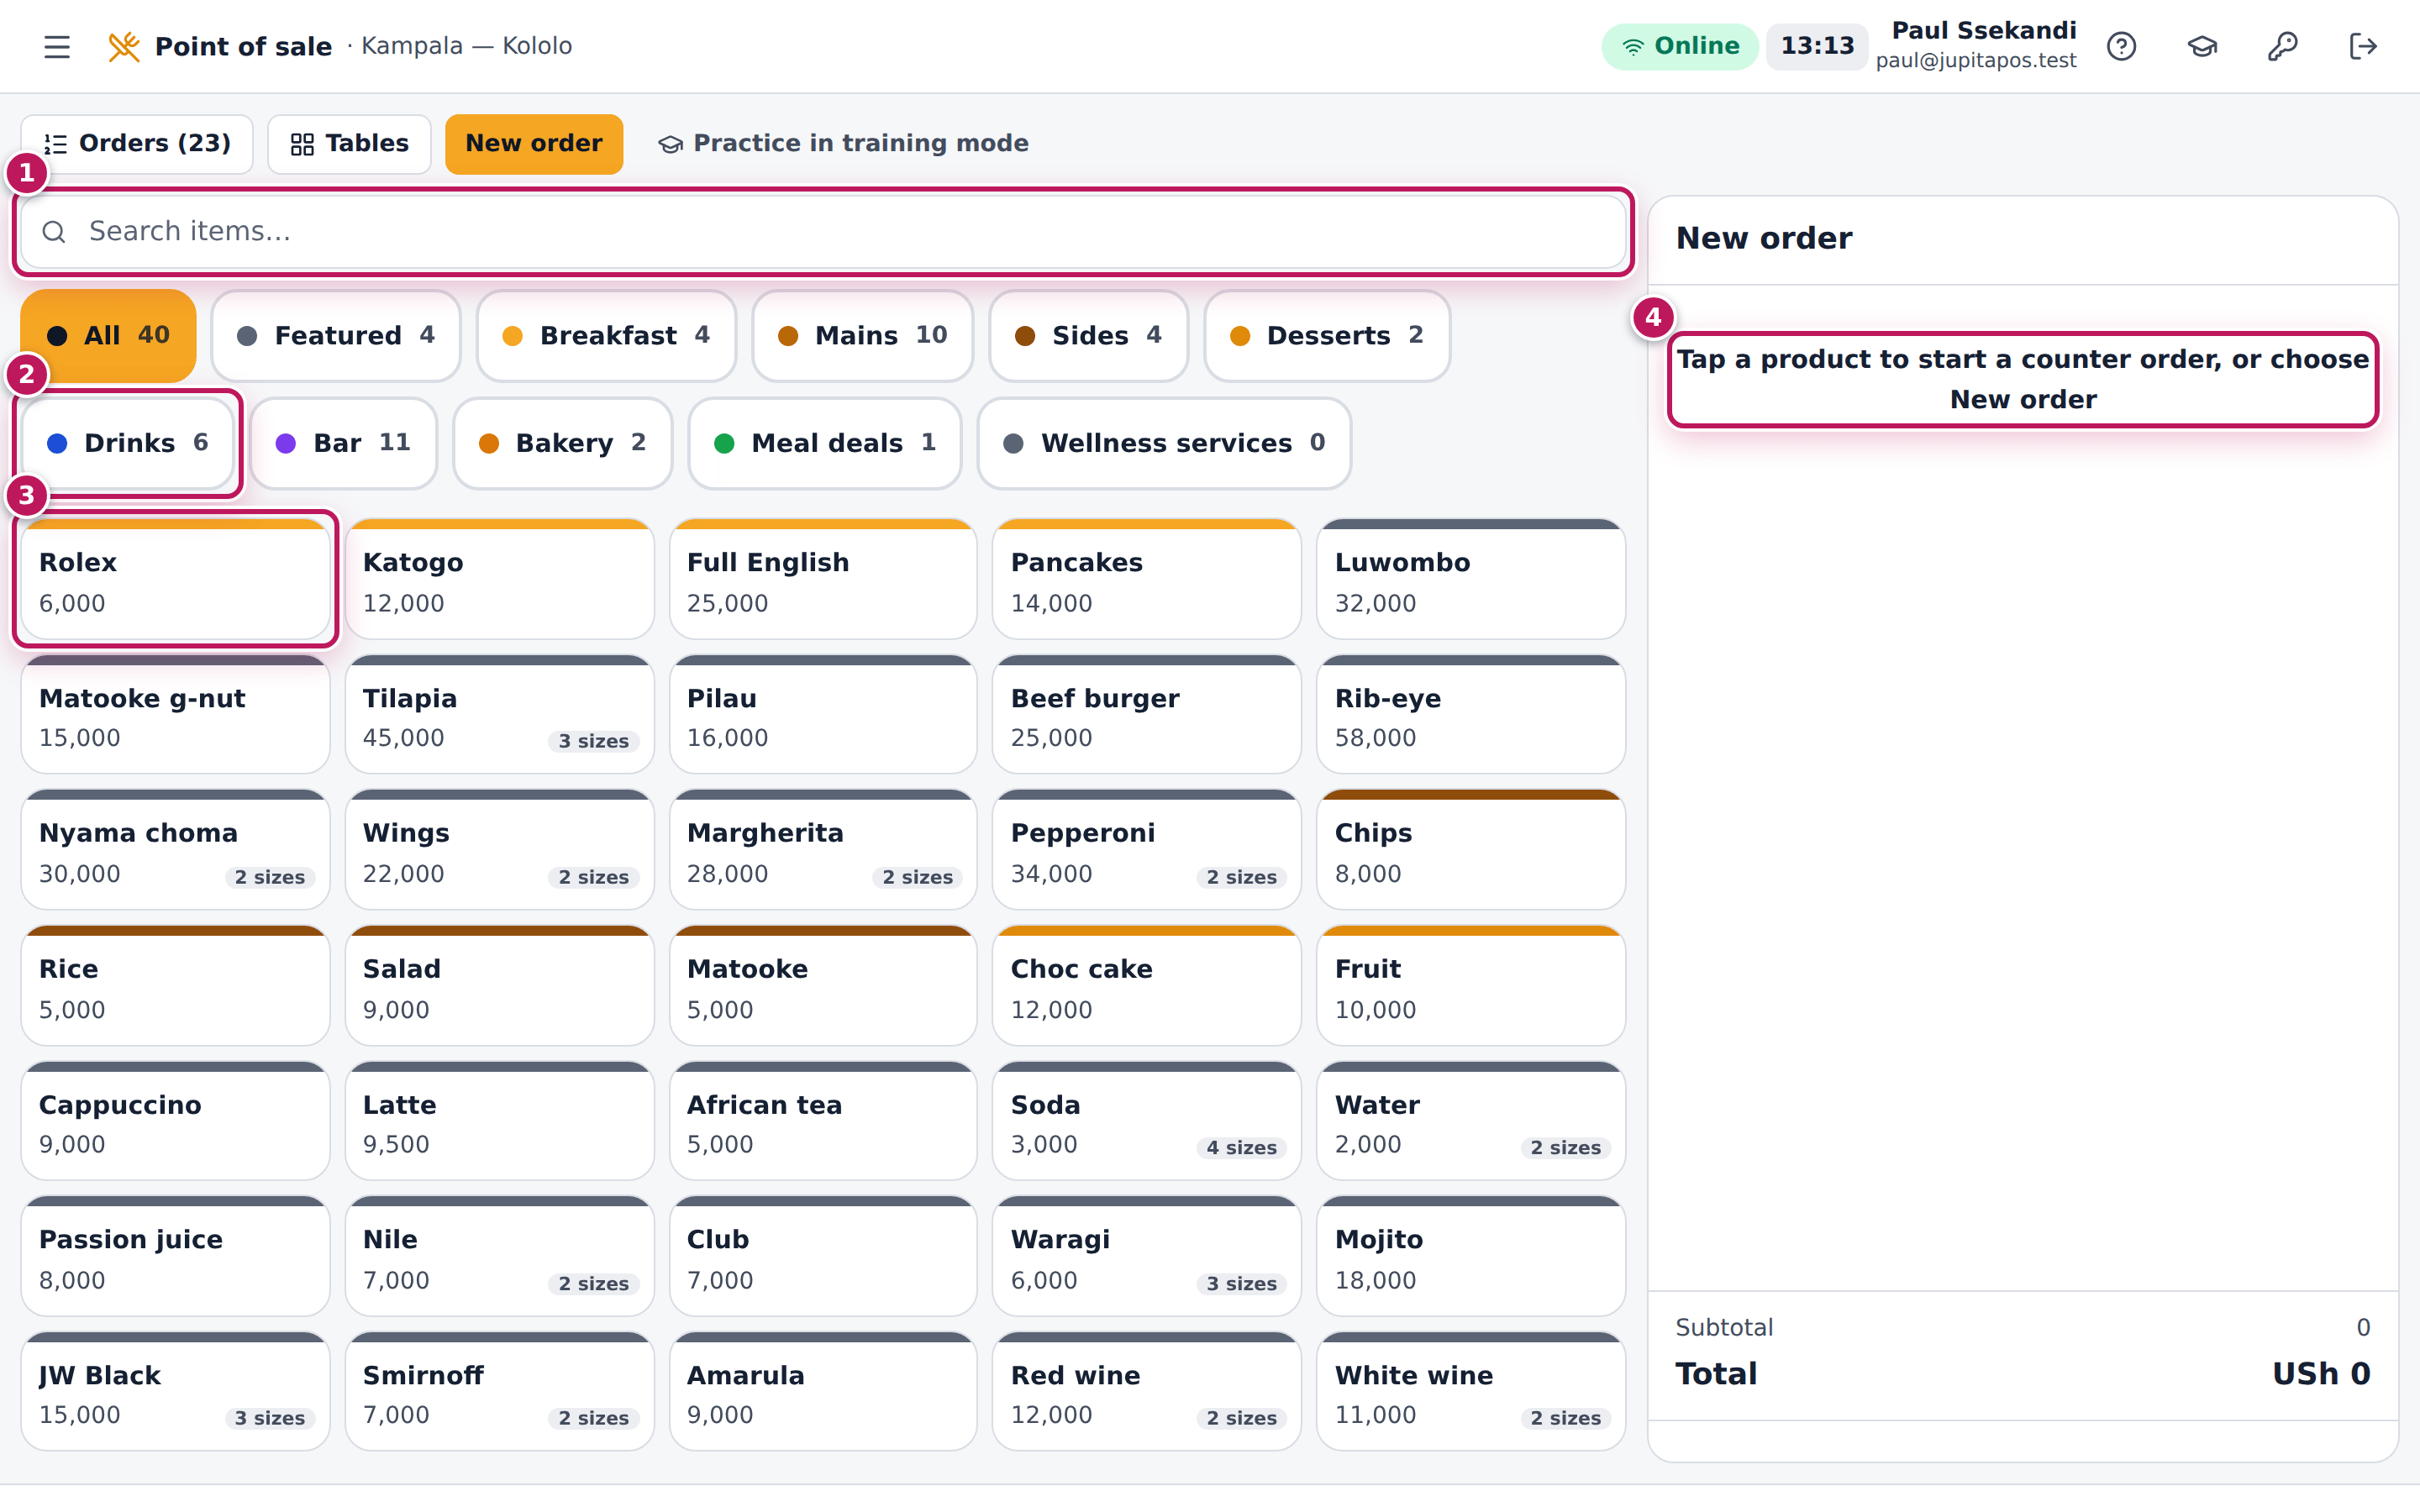
- Open Point of sale from the sidebar. The order panel on the right says Tap a product to start a counter order (4).
- Find the item: tap a category such as Drinks (2), or type in Search items… (1).
- Tap the item’s tile, such as Rolex (3). Tapping an item with no order open starts a Counter order and adds the item at quantity 1.
- Tap more tiles to add more items. Tapping the same tile again adds one more; the number on the tile shows how many are in the order.
- If the kitchen, the bar or the barista makes any of the items, tap Send: their tickets go to the stations’ boards and the lines are locked. Paying does not send: an item that is not sent never reaches a board.
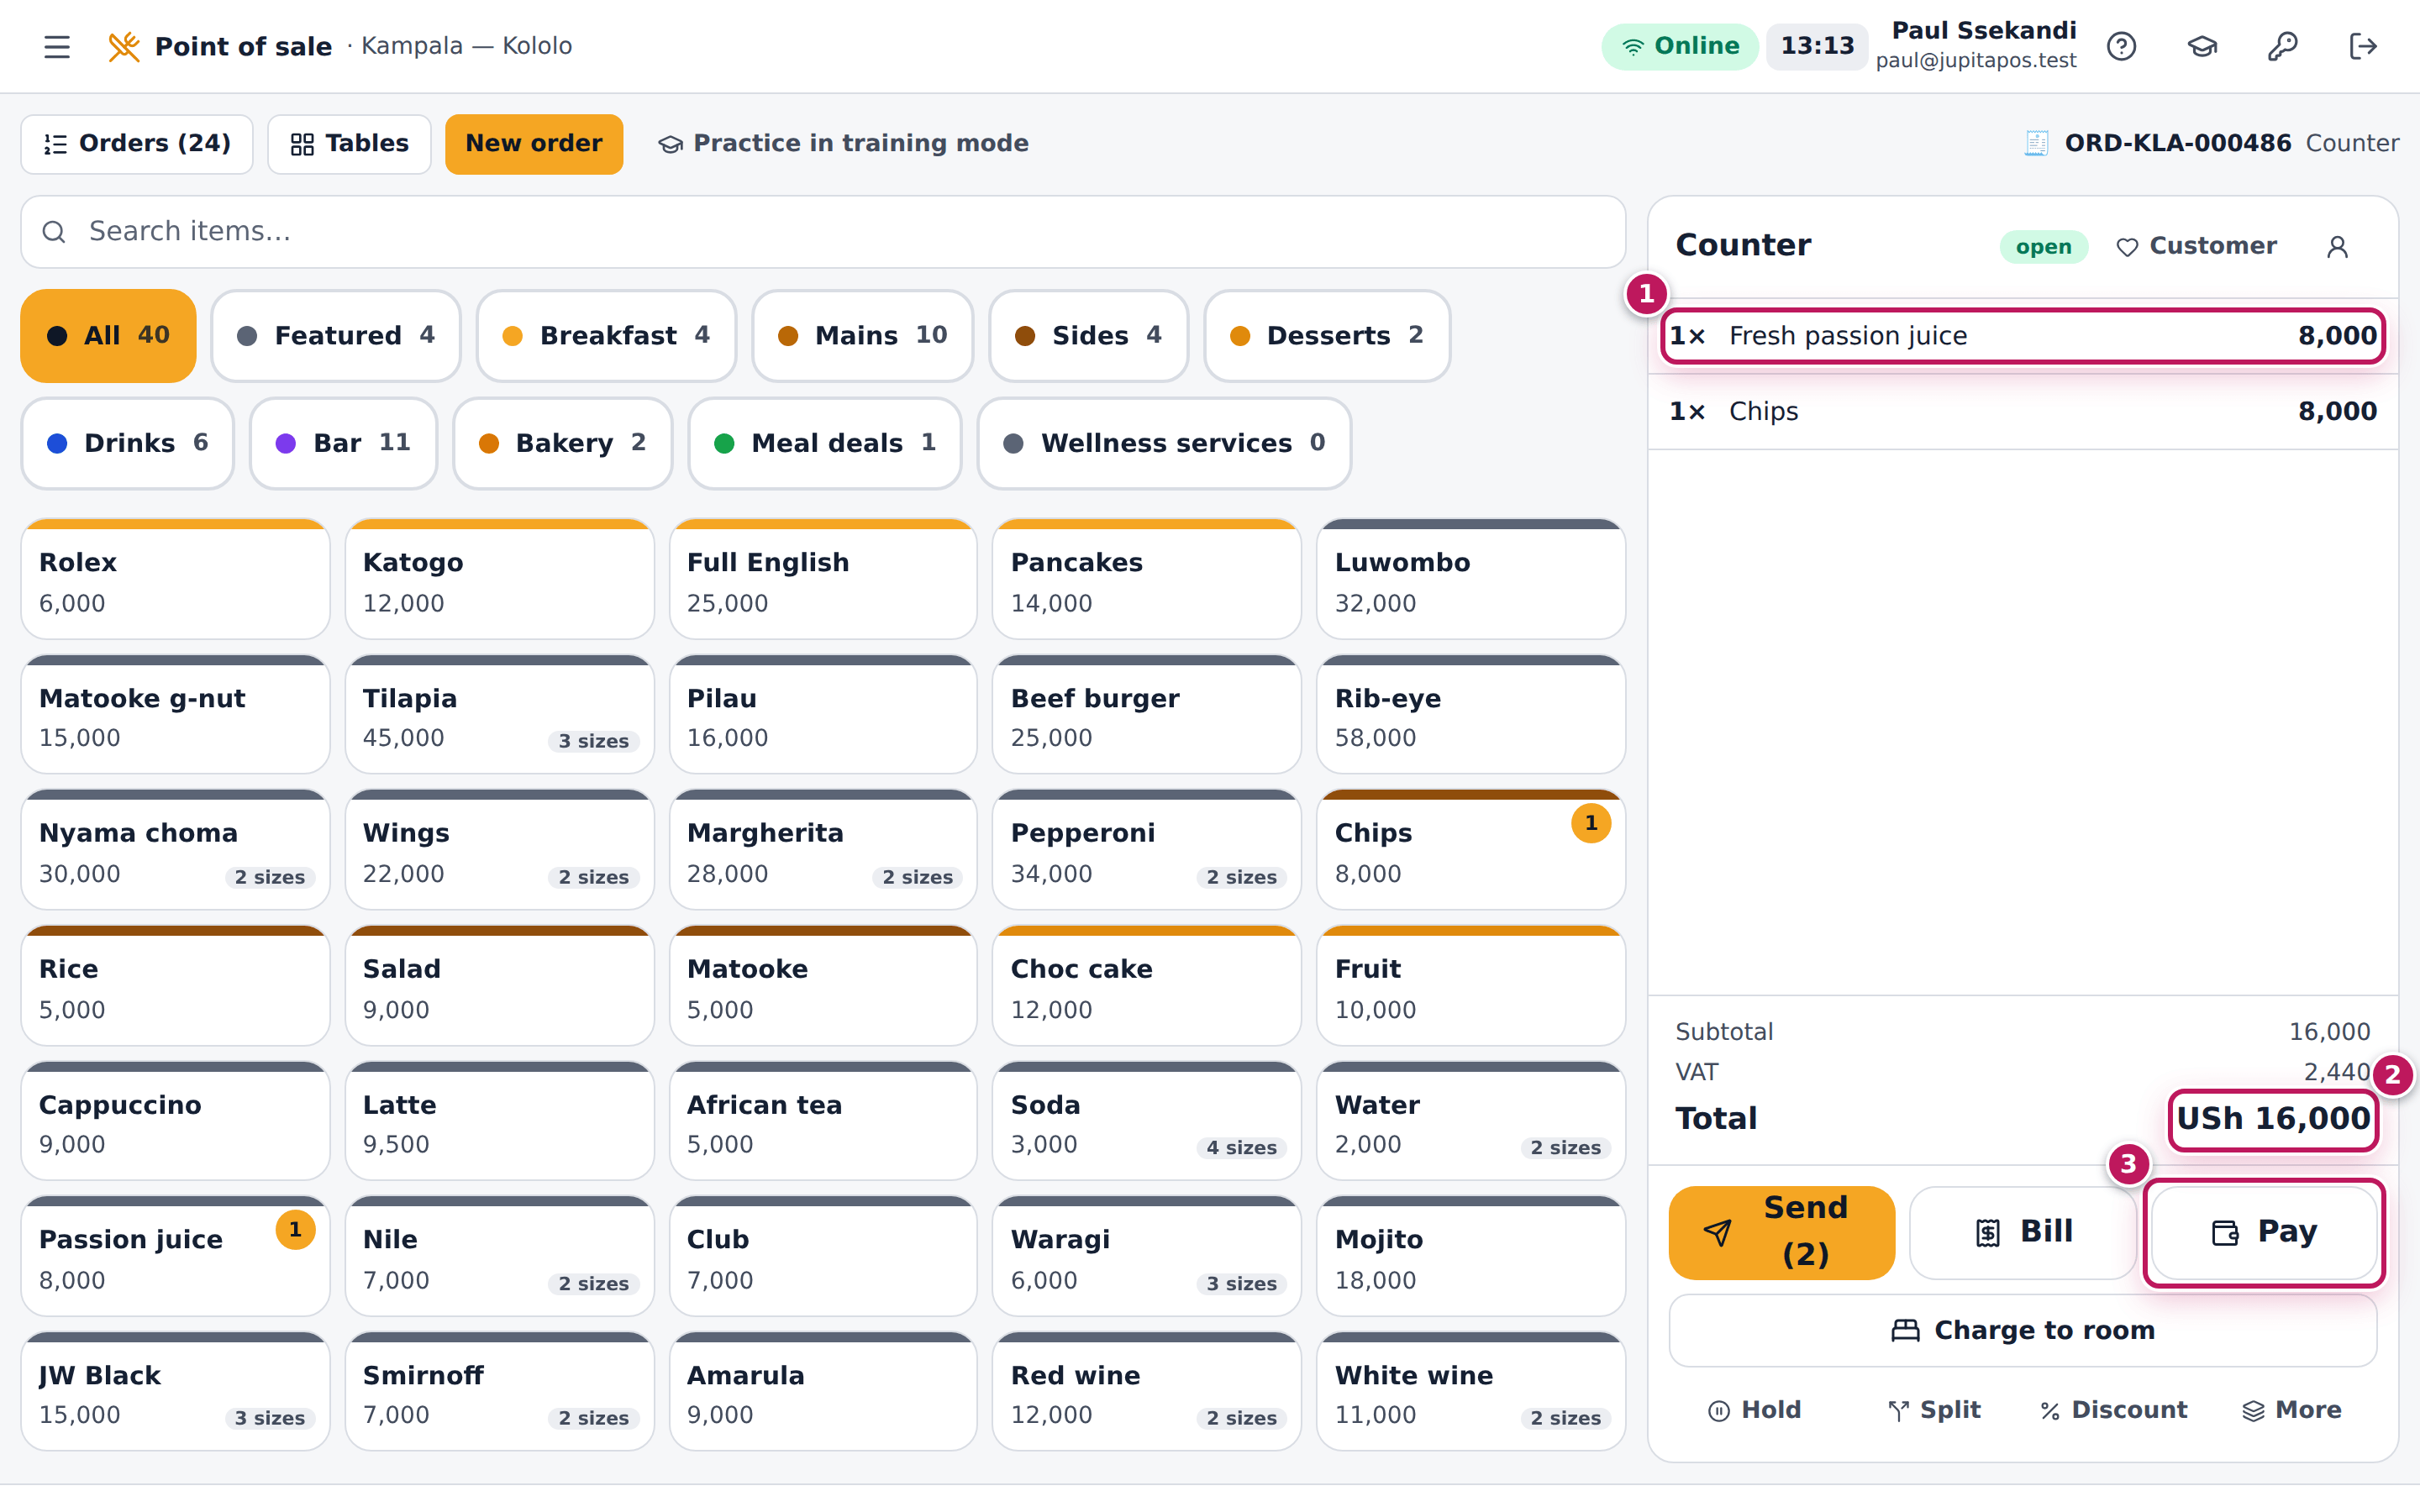
- Check the lines (1) and the Total (2) in the order panel, then tap Pay (3) (see Take a cash payment).
Expected result
The order panel shows a Counter order with its number (for example
ORD-KLA-000409), one line per item and the total. For a fresh passion
juice (8,000) and chips (8,000) the total is USh 16,000, of which VAT is
2,440. The order is saved on the server from the first tap: if the power
goes, it is still in Orders when the till comes back.
Screenshot
Common mistakes
- Starting a counter order for a table. A counter order has no table, so the bill cannot be found from the floor plan. For table service choose New order first and pick the table (see Start a table order).
- Tapping an item twice to “select” it. Every tap adds one. Remove an extra line by tapping it and choosing Remove (only before it is sent).
- Looking for an item under the wrong category. Search matches the item’s name and its code (SKU); it is faster than the categories.
Troubleshooting
- The tile is greyed out and does nothing. The item is sold out (86’d) for this branch. A supervisor or the kitchen can put it back on (see Mark an item sold out).
- An item I expect is missing. It is not on a menu that is active at this branch at this hour, or it is not published. Ask a manager to check the menu’s schedule (see Schedule a menu).
- “Nothing on the menu right now”. No menu is active for this outlet at this time. A manager checks Menu → Menus and the outlet’s schedule.
FAQ
Can I change the order type after I started? No. The order details change the customer, phone, guests, promo code, allergies and notes, not the type. If nothing was sent yet, cancel the order and start again with New order (see Start a takeaway or another type of order).
Why is VAT shown when the prices already include it? Prices on the menu include VAT; the order panel shows how much of the total is VAT, as the receipt must.
Add an item with choices, extras and a note
Purpose
Sell an item the customer wants their way — a size, a milk, extras, a spice level, “no onions” — so the kitchen or bar makes it right and the price includes the extras.
Role / permission required
Anyone who can sell (sales.create).
Prerequisites
- An order is open, or you are happy to start a counter order with this item.
Steps
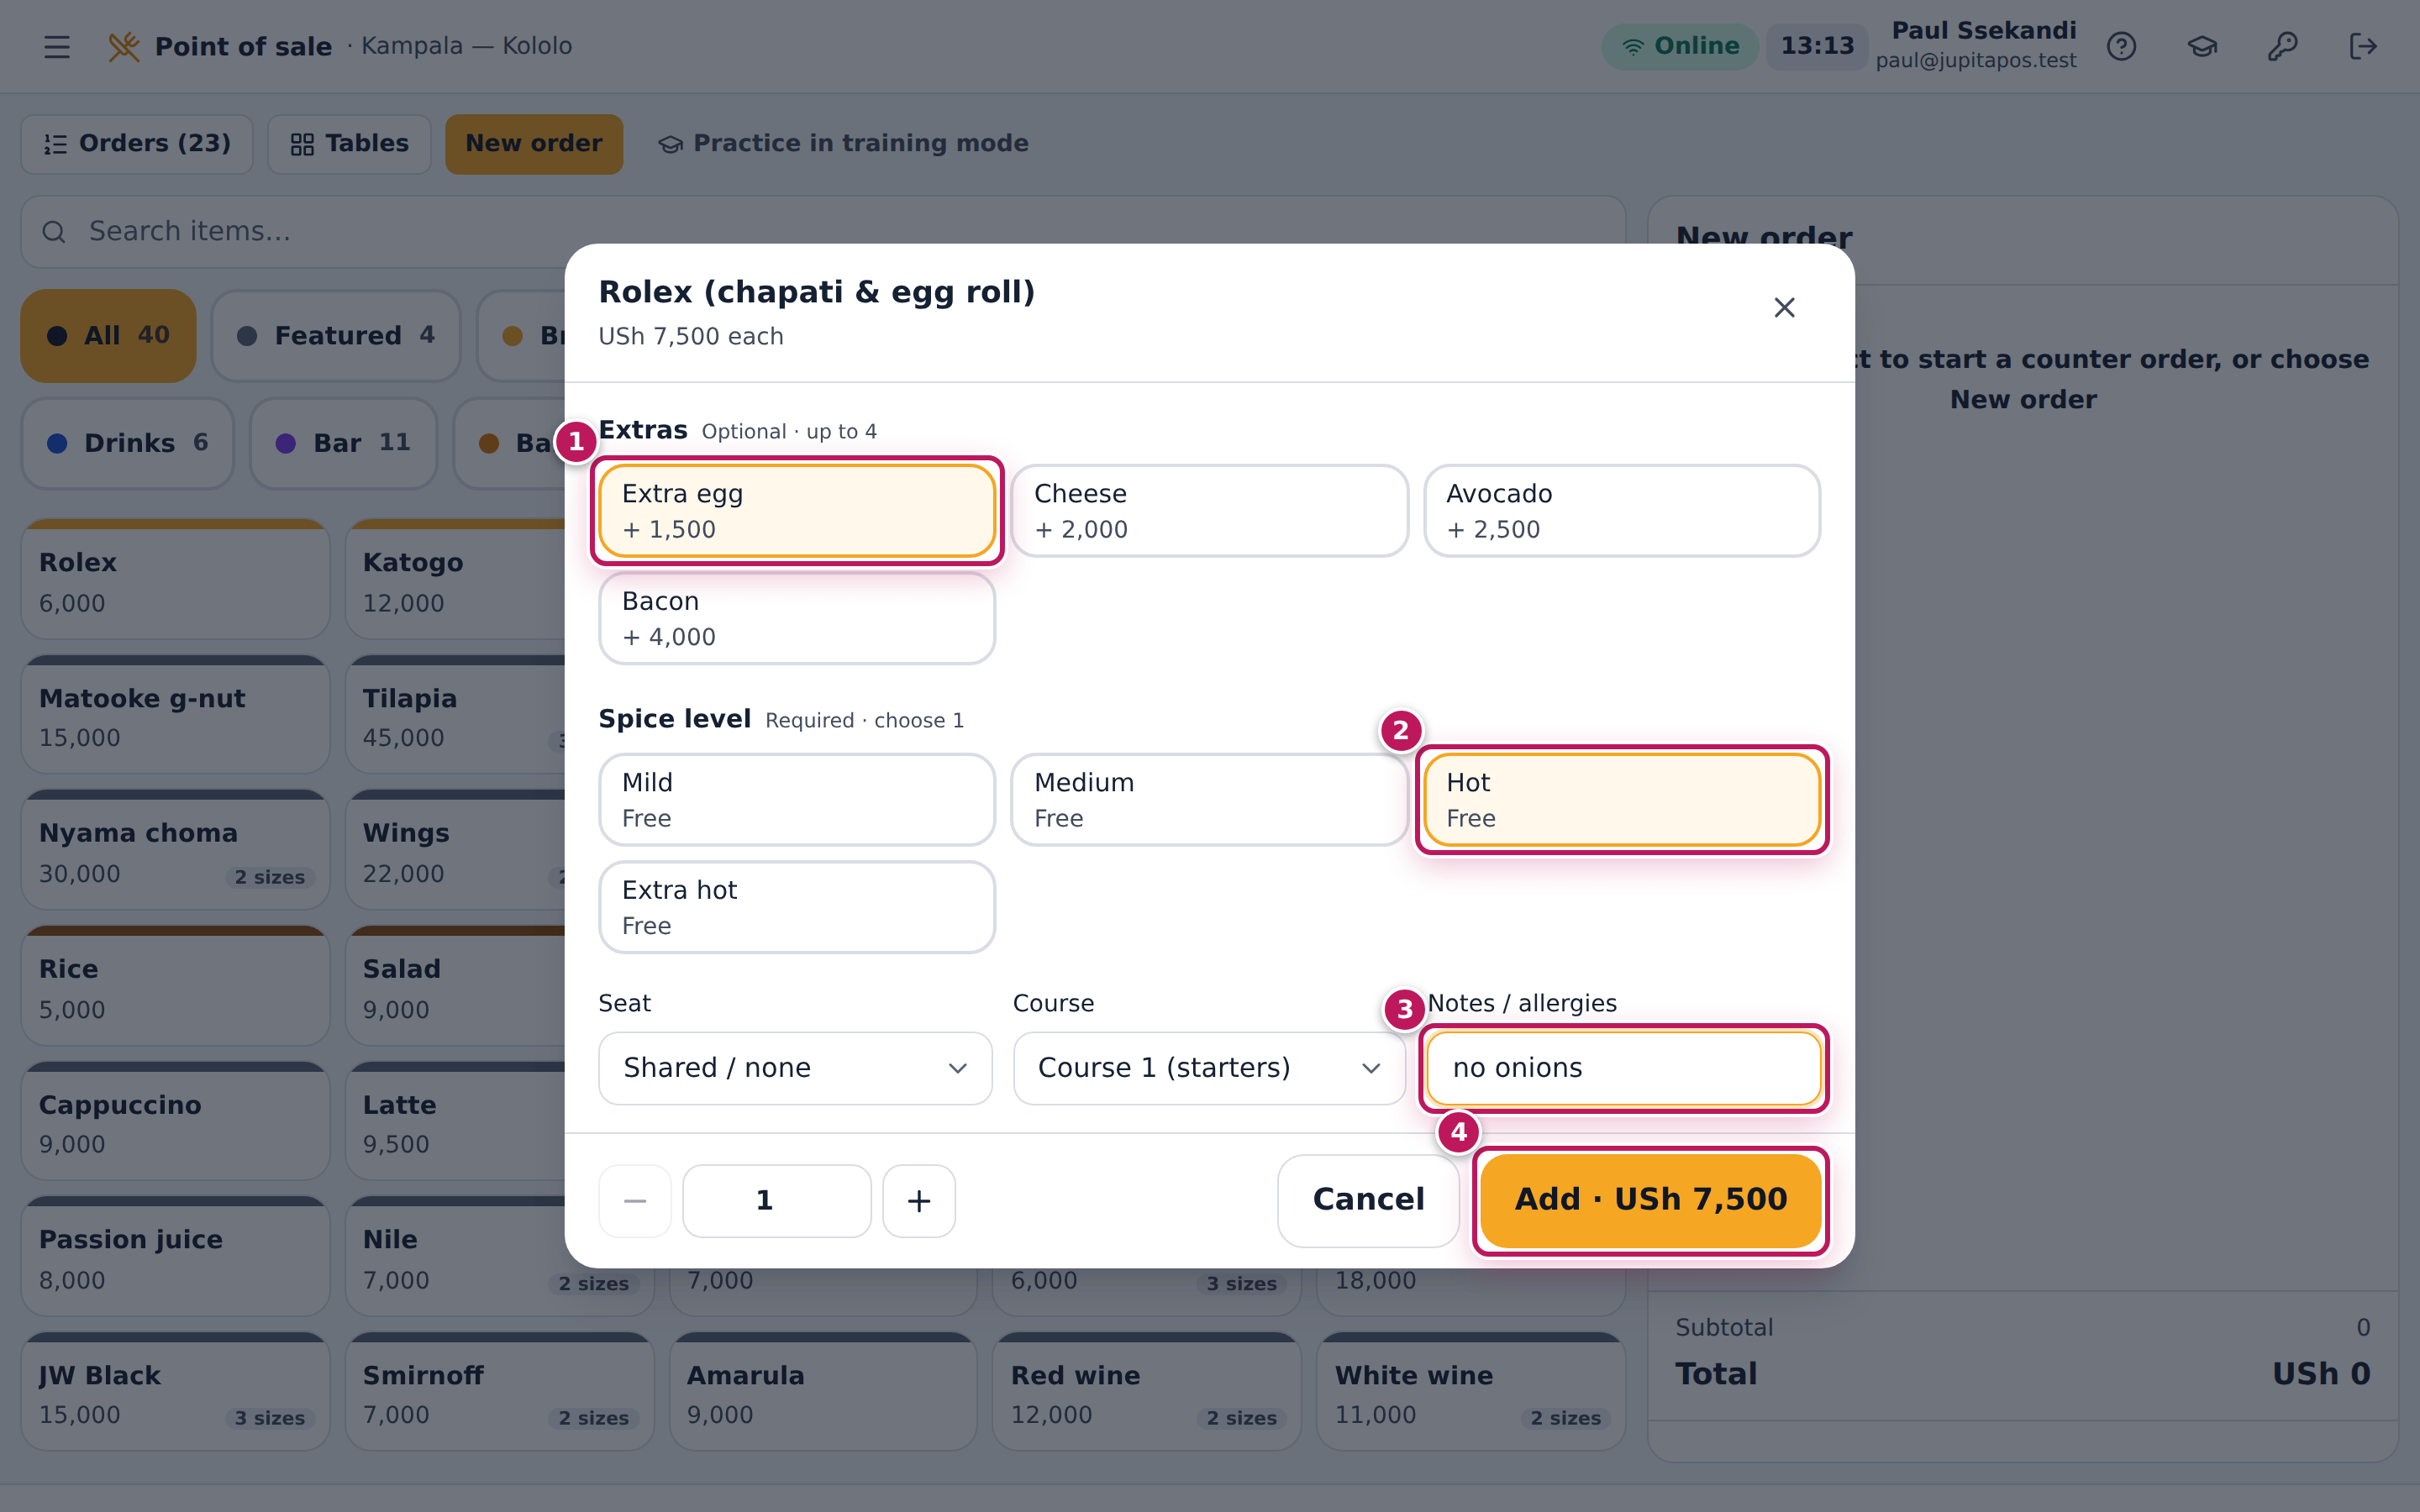
- Tap the item’s tile. An item with choices opens its dialog instead of going straight into the order.
- Choose the options the customer asked for (1). Groups marked Required need an answer before you can add; Optional groups say how many you may choose.
- For a required choice (2), tap the one the customer wants — the first is preselected where the menu sets a default.
- Type anything the kitchen must know in Notes / allergies (3), for example no onions.
- Set the quantity with + and − if they want more than one.
- Tap Add (4). The button shows the price with the extras, for example Add · USh 7,500.
Expected result
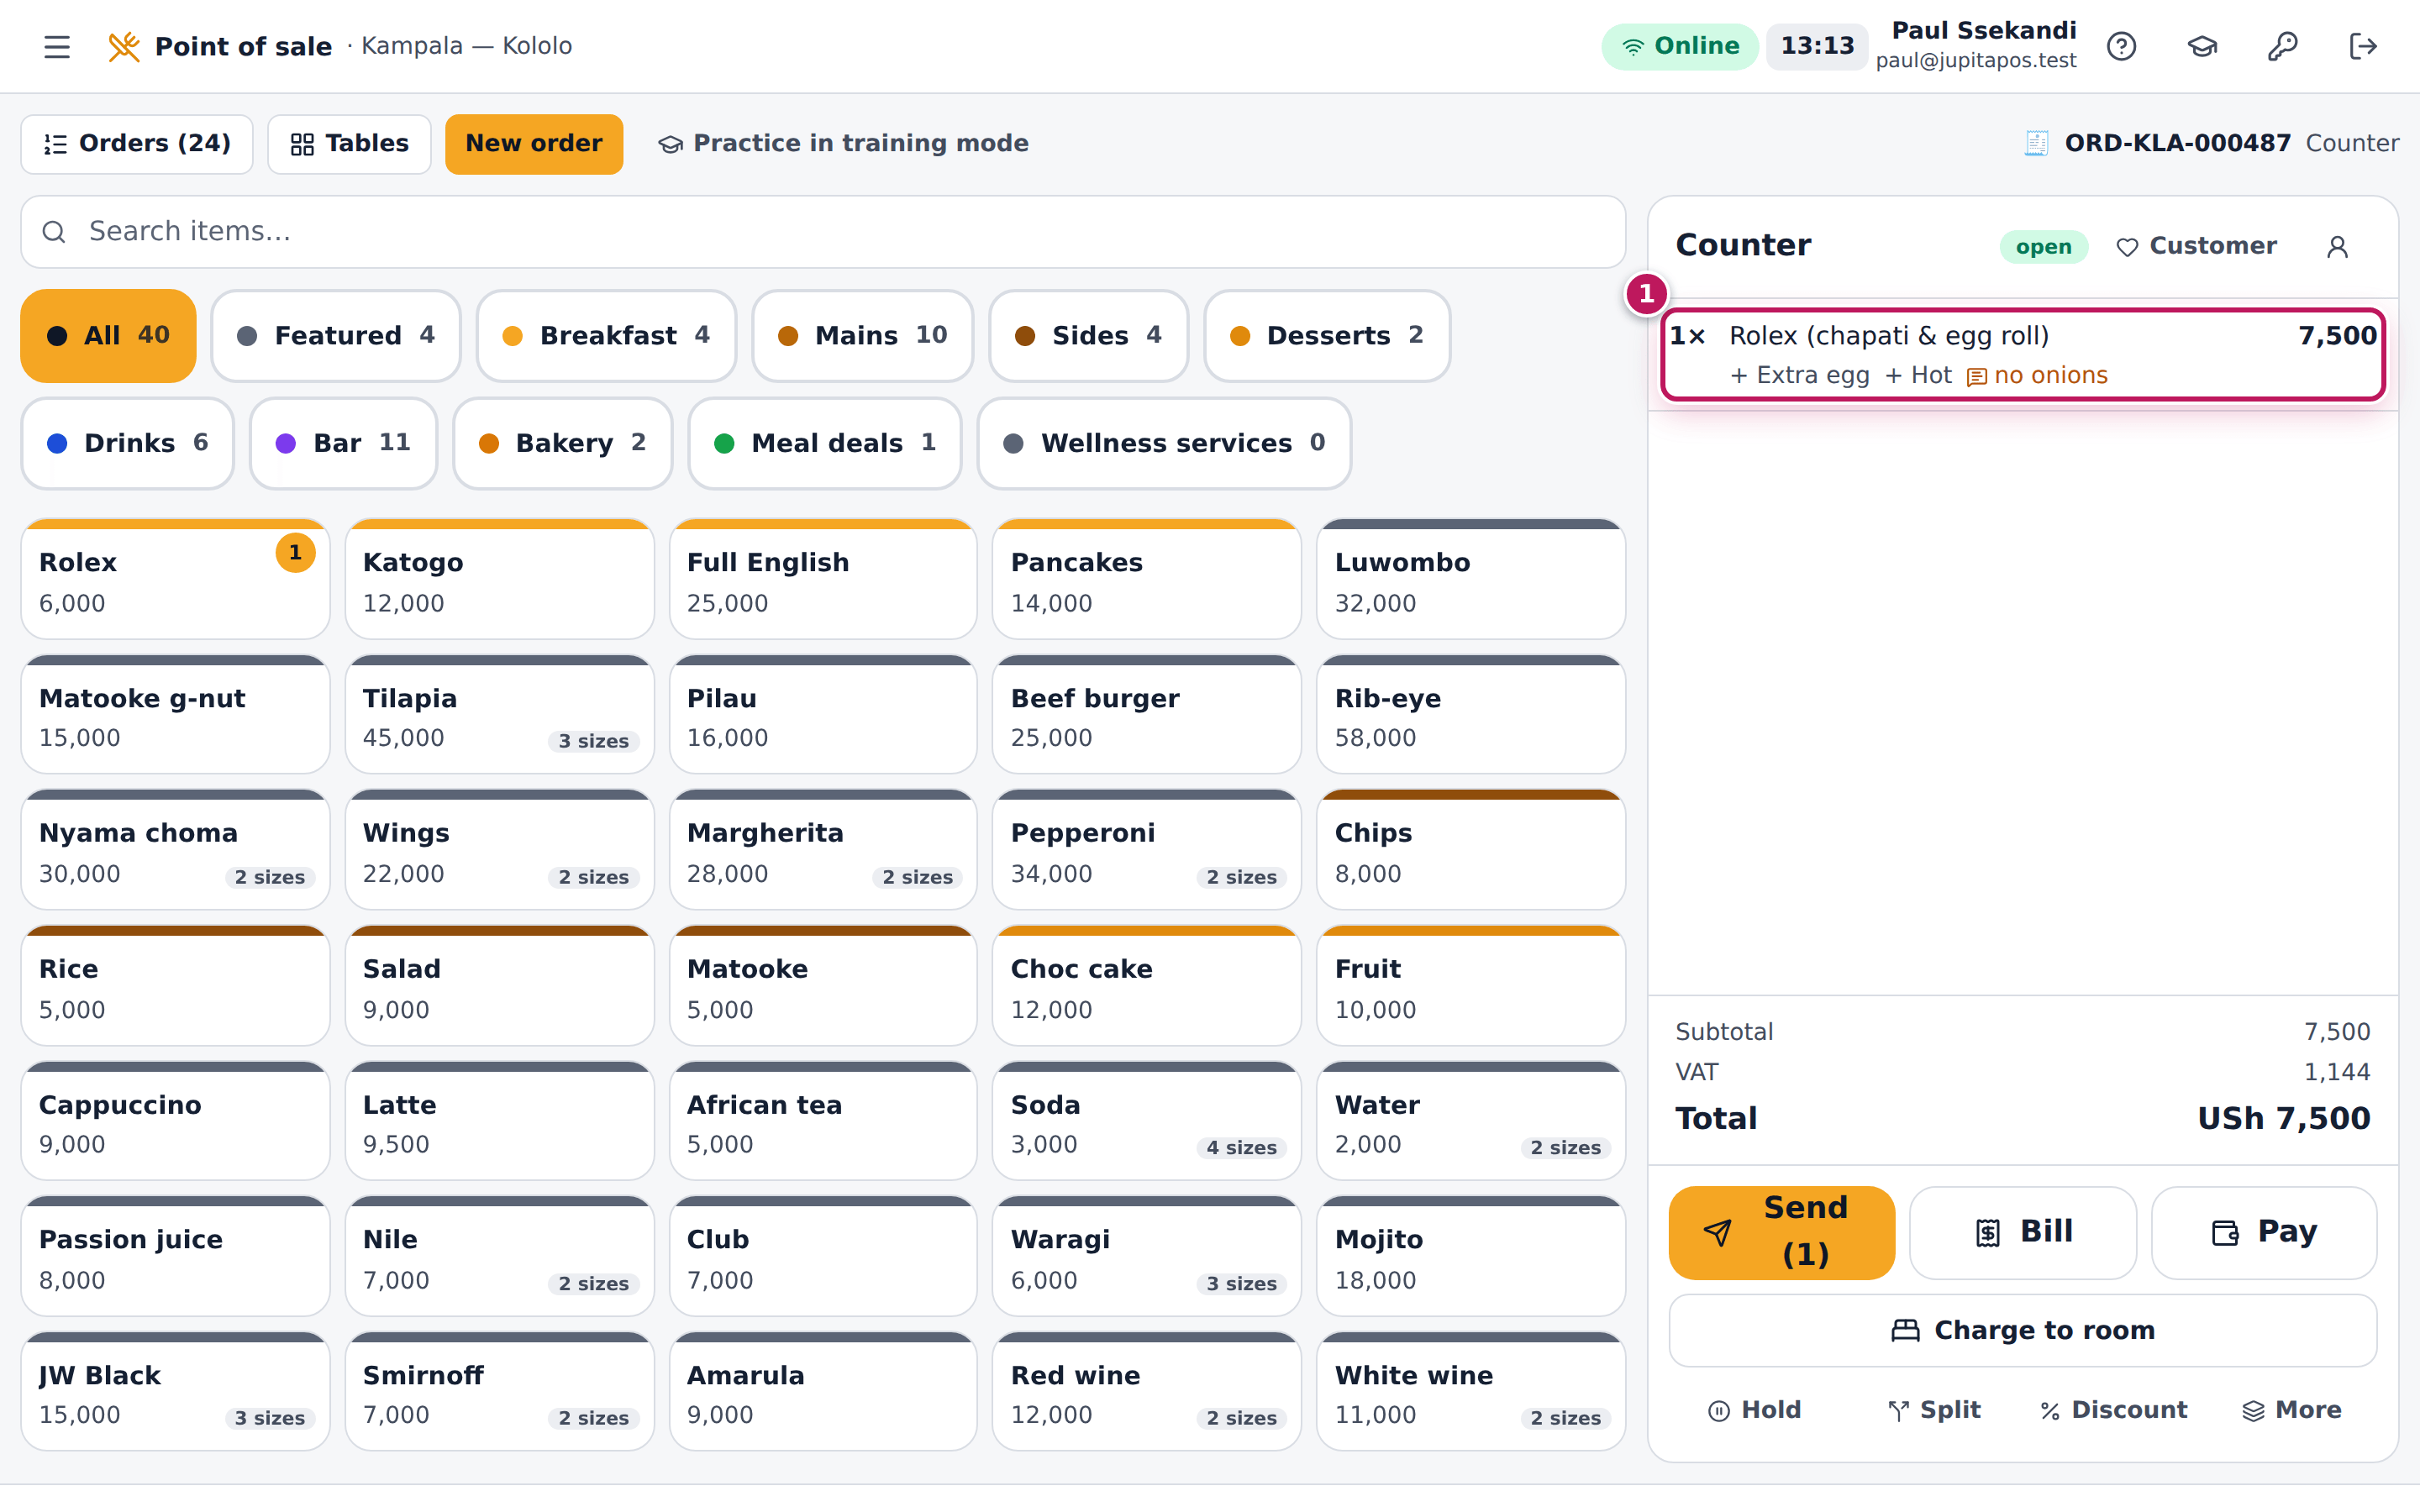
The line appears in the order (1) with its choices and note under the item’s name, and the price includes the extras: a Rolex (6,000) with an extra egg (+1,500), hot, with no onions is 7,500. The kitchen ticket shows the same choices and note when the order is sent.
Screenshot
Common mistakes
- Writing a choice in the note. “Large”, “oat milk” or “extra cheese” typed as a note is not charged and is not counted in stock. Tap the choice in its group; use the note only for what has no button.
- Forgetting the required group. Add stays disabled until every required group has an answer; look for the group marked Required.
- Changing the choices after sending. A line that has gone to the kitchen is locked; changing it means voiding it and ringing it again (see Remove a line that was sent).
Troubleshooting
- Add does nothing. A required group has no answer yet. The group’s header says what it needs (Required · choose 1).
- The extra’s price is not what the menu board says. Prices can differ by branch, time or order type (a happy hour, a branch price). The dialog always shows the price that will be charged.
- The kitchen did not see the note. Notes print and show on the kitchen screen only once the order is sent. Check the line in the order: the note is under the item’s name.
Start a takeaway or another type of order
Purpose
Most orders that are not a quick counter sale have a type: a takeaway called by name, a pickup or delivery, a room, a staff meal, food on the house. The type goes with the order to the kitchen tickets, the Orders list and the reports, and decides what the till asks for — a dine-in order, for example, has a table, guests and a waiter and adds the service charge.
Role / permission required
Anyone who can sell (sales.create): cashiers, waiters, bartenders,
baristas, supervisors, managers.
Prerequisites
- You are signed in at the till (see Sign in).
- For table service, the table is free (see Read the floor plan).
Steps
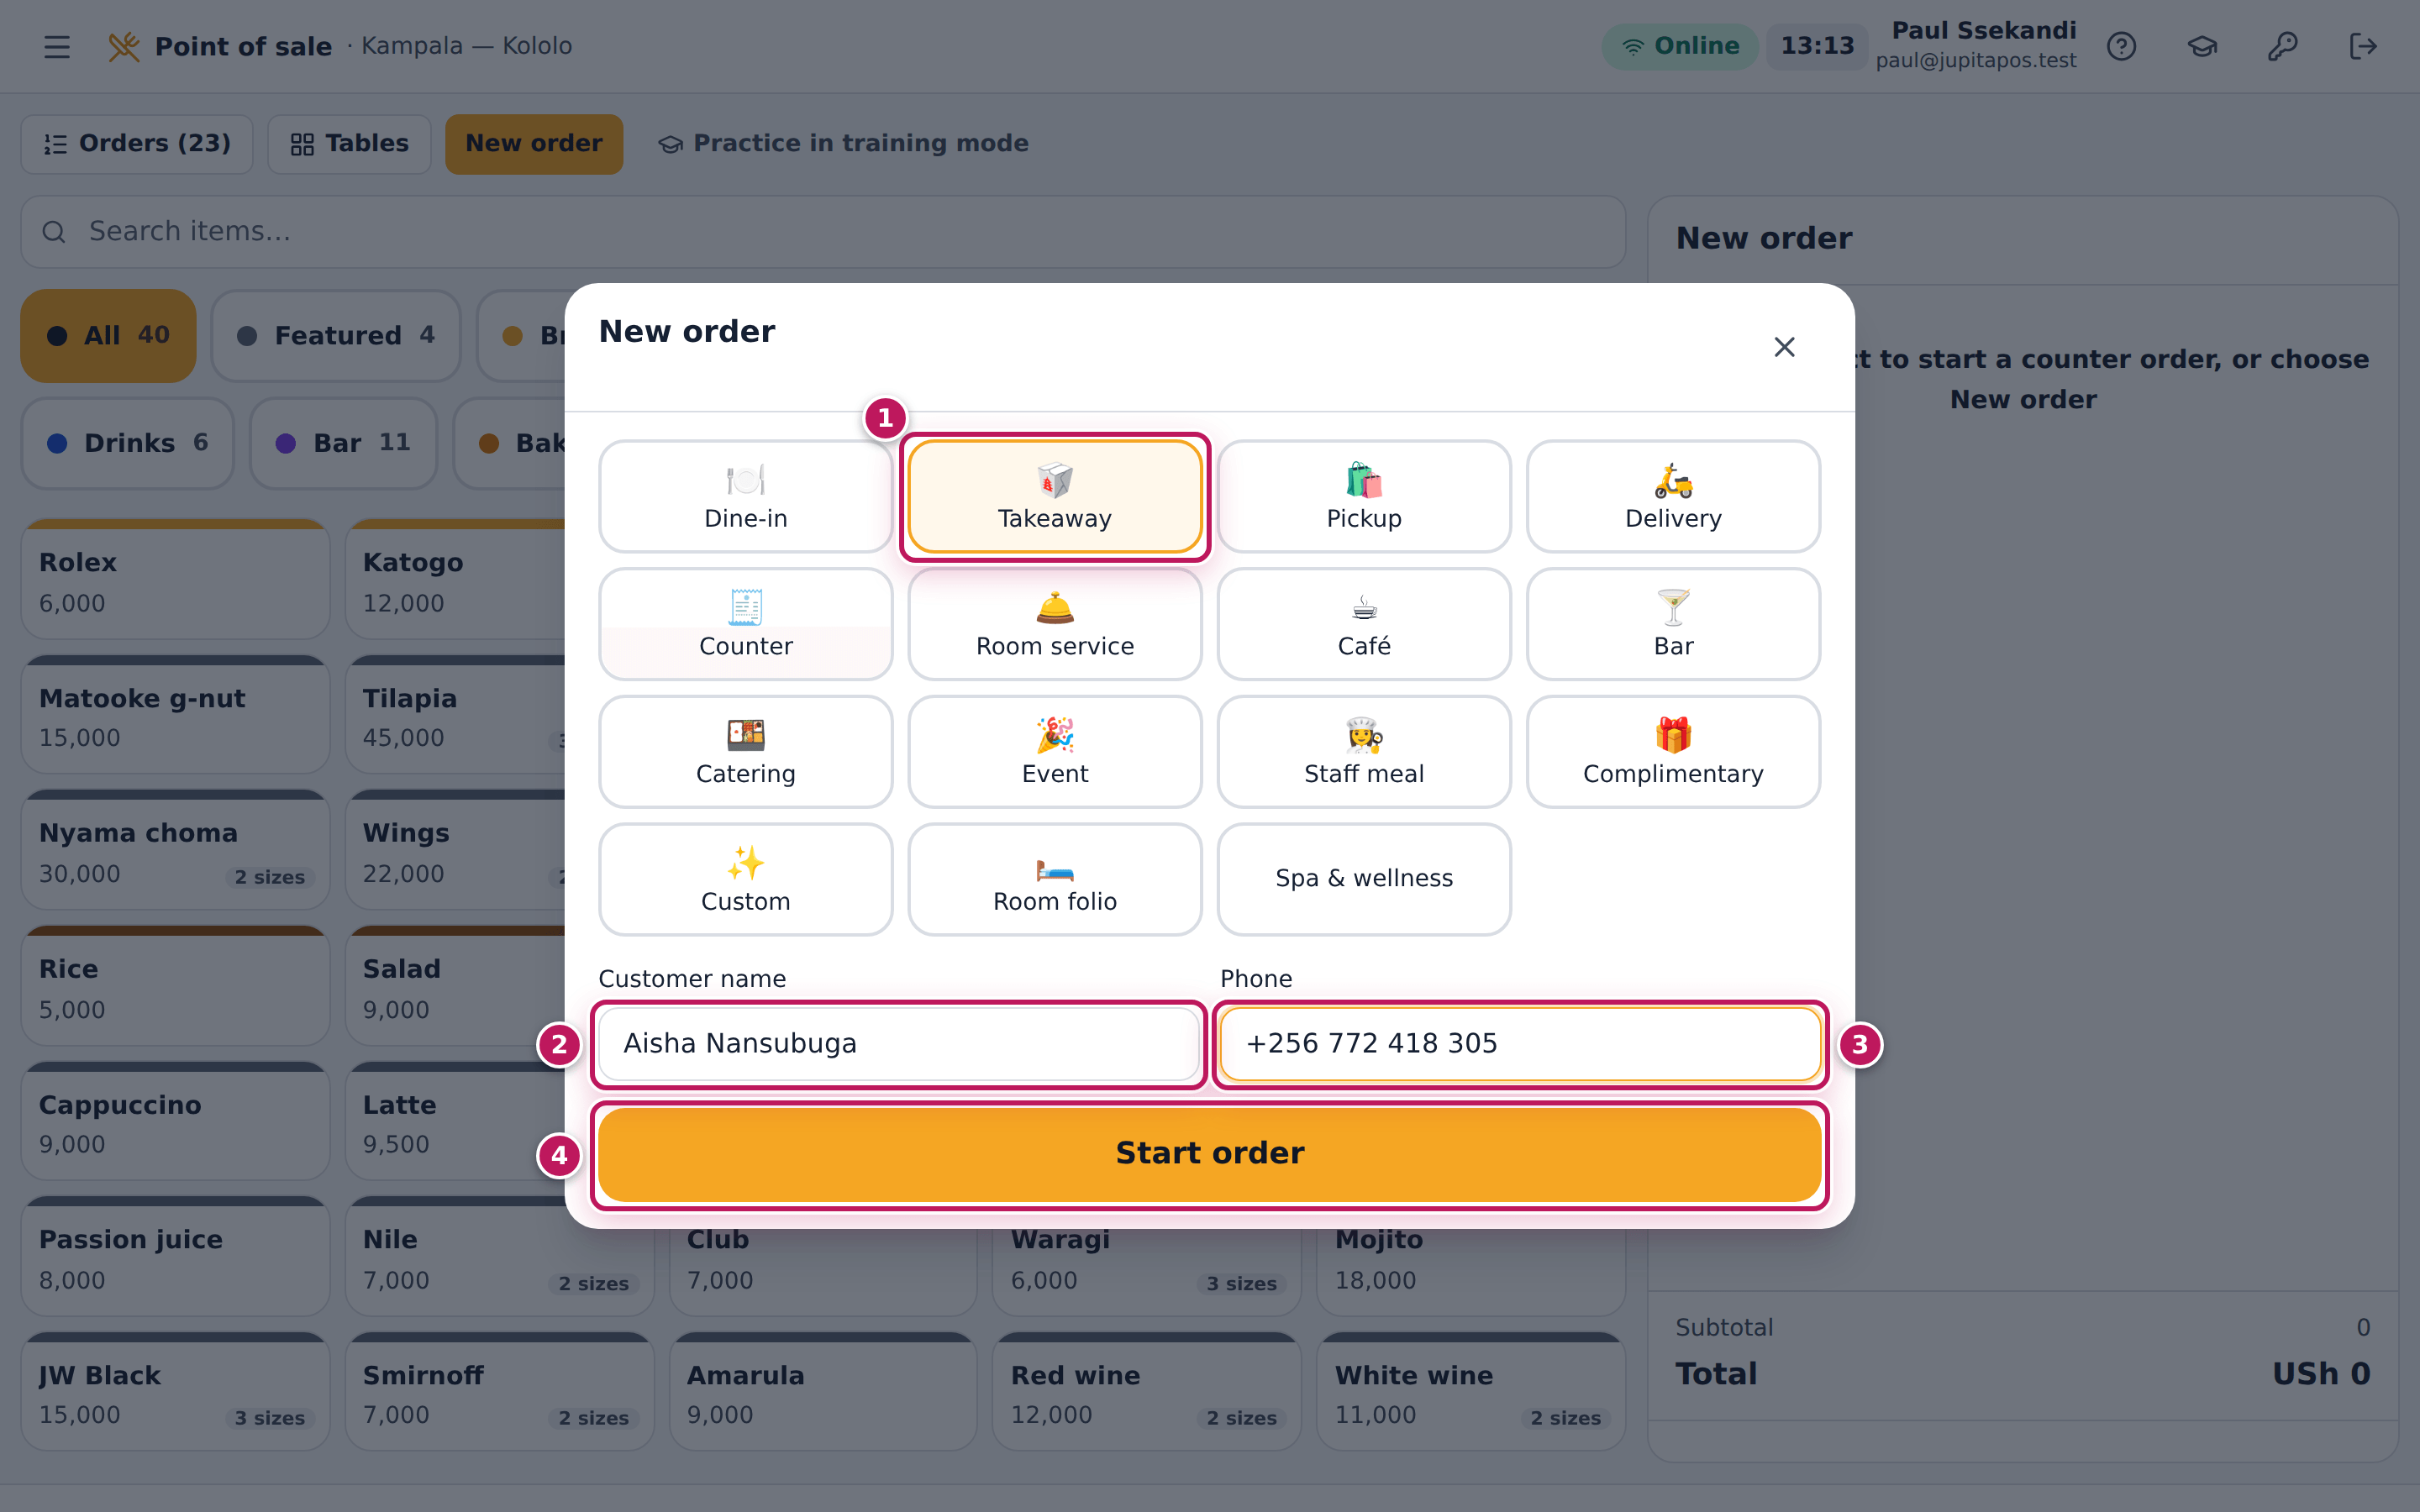
- Tap New order at the top of the till.
- Tap the type (1). The types are Dine-in, Takeaway, Pickup, Delivery, Counter, Room service, Café, Bar, Catering, Event, Staff meal, Complimentary and Custom.
- Fill in what the type asks for: Table, Guests and Waiter for dine-in, café, bar and event orders; the Room number for room service; the Delivery address for a delivery; a Custom type label for a custom order.
- Type the Customer name (2) and Phone (3), so the order can be called and found later.
- Tap Start order (4). The order panel is titled with the type (or the table) and the customer’s name shows beside the order number.
- Tap the items as usual (see Ring up a counter order).
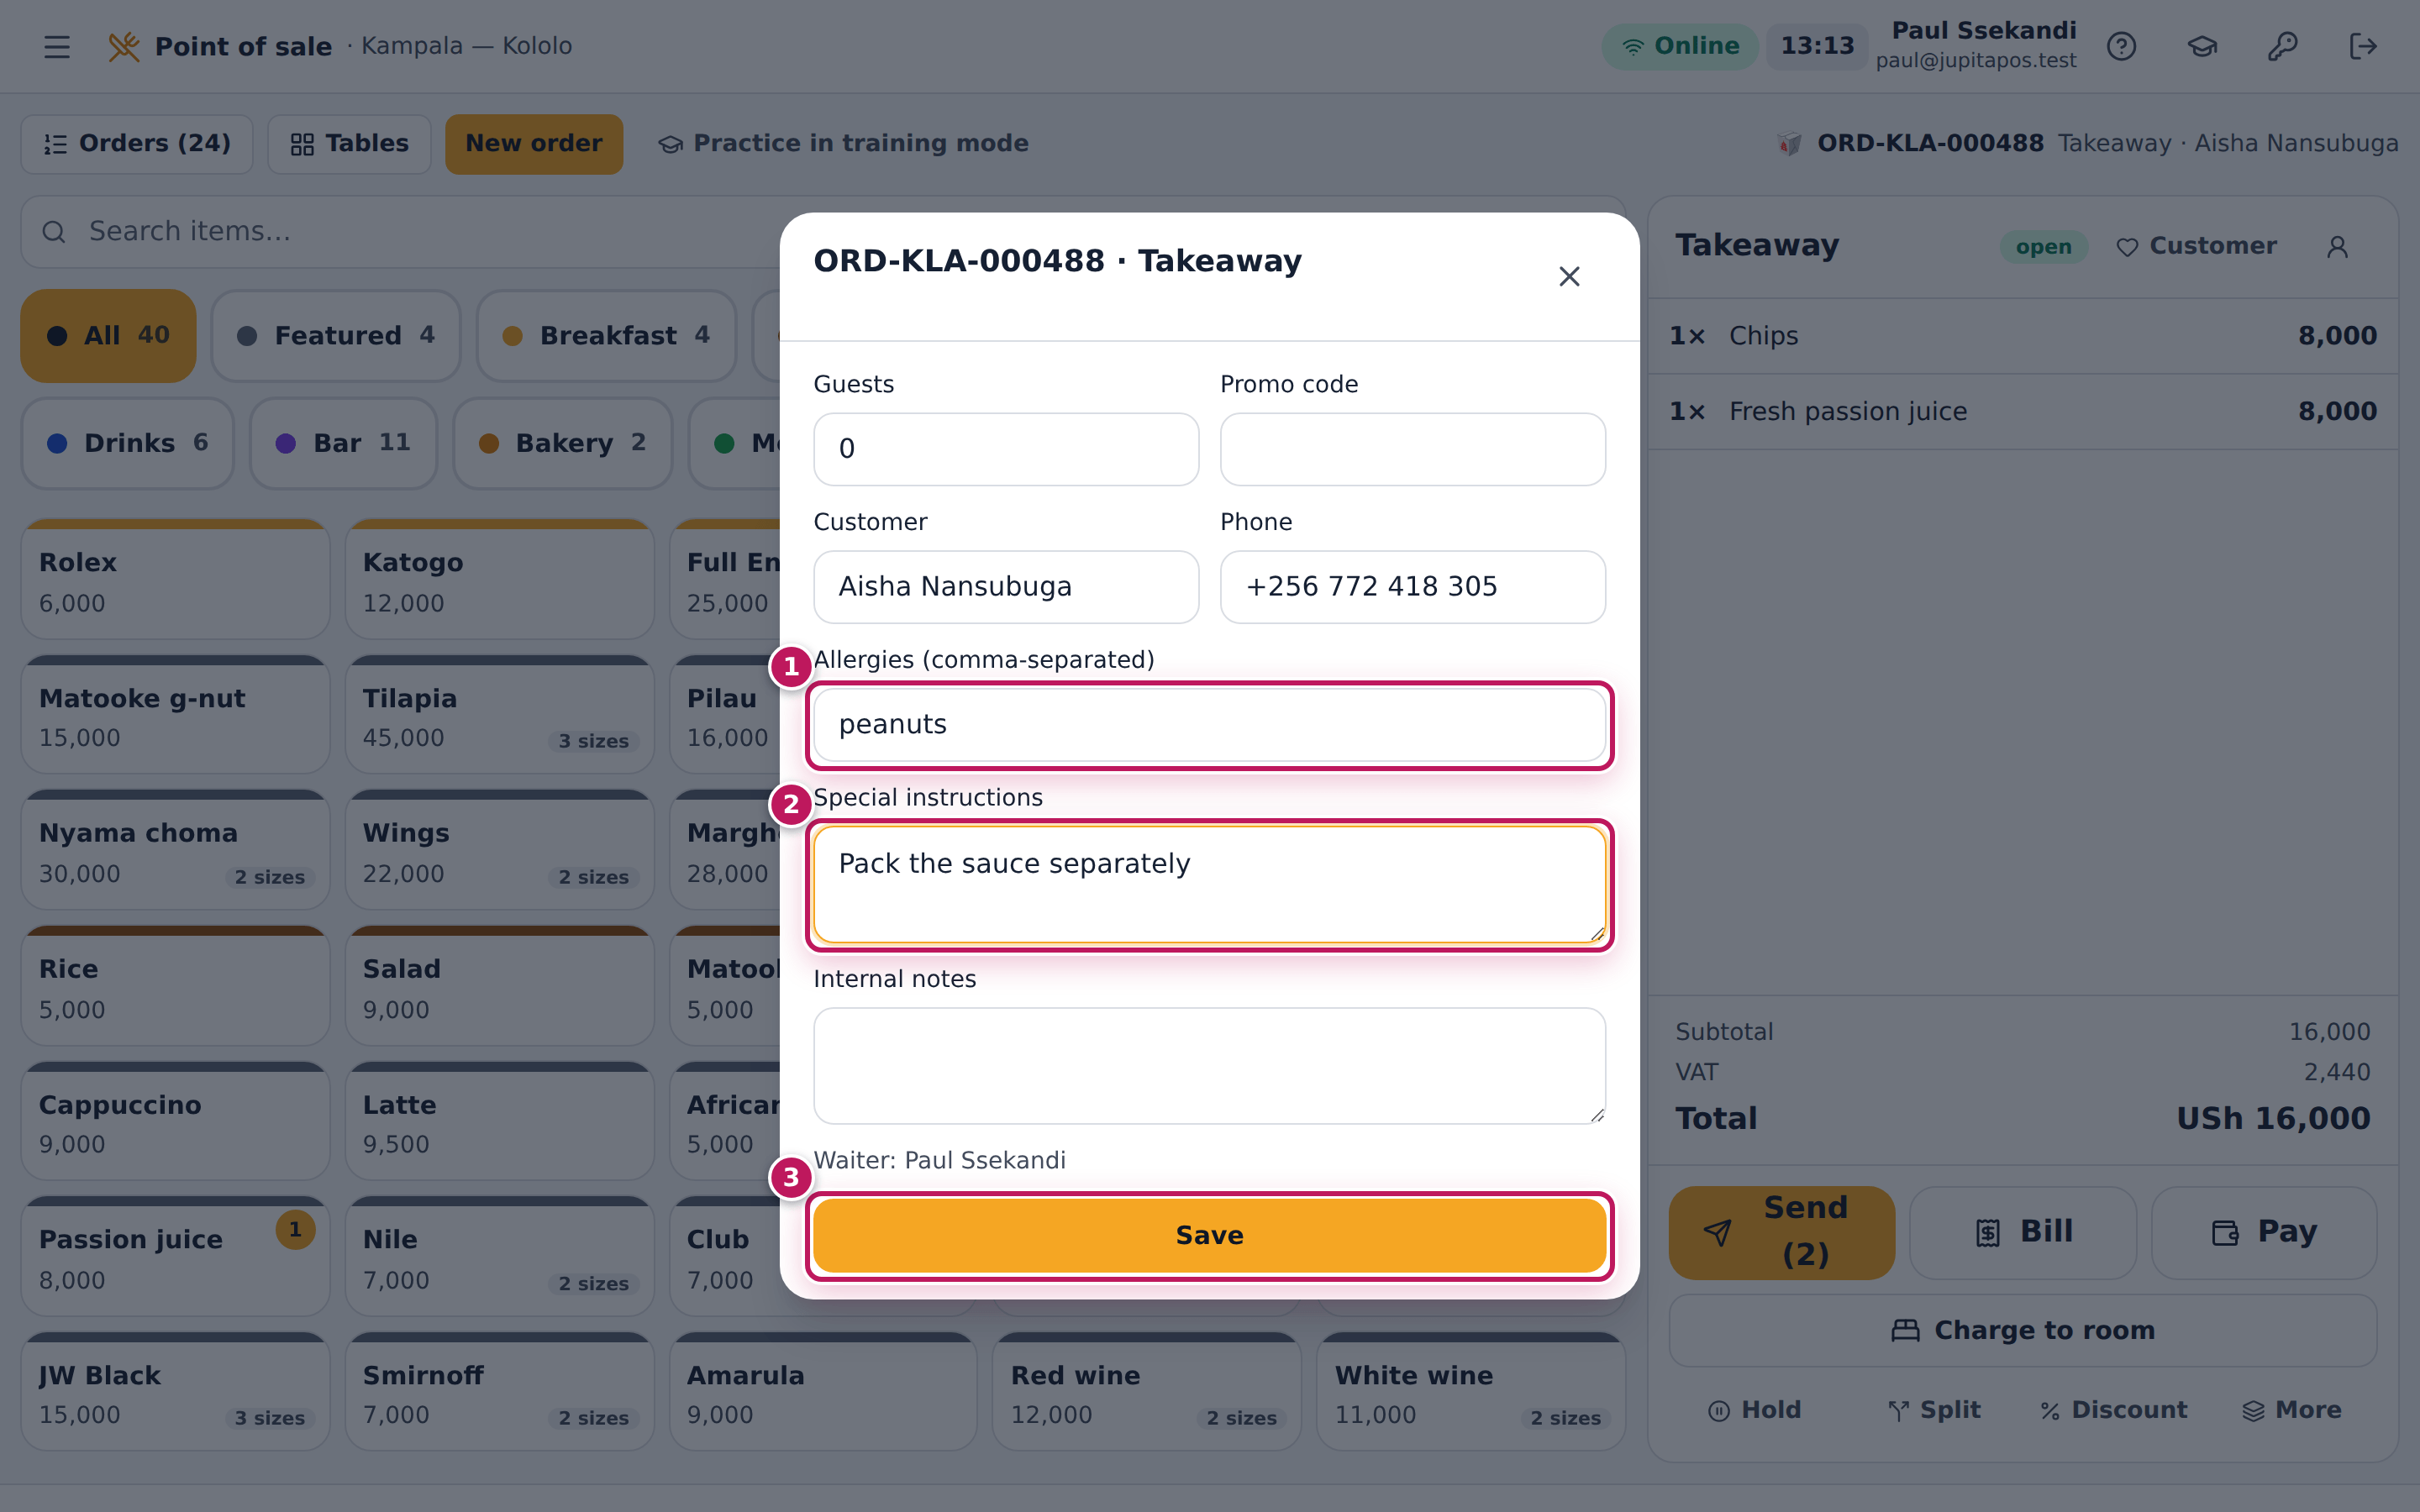
- For allergies or instructions that concern the whole order, tap the person button at the top of the order panel (Order details, also More → Customer, guests & notes).
- Type the Allergies (comma-separated) (1) and the Special instructions (2), then tap Save (3).
Expected result
A Takeaway order for Aisha Nansubuga: the order number, Takeaway · Aisha Nansubuga at the top of the till, the items, and — saved with the order — the allergy peanuts and the instruction Pack the sauce separately. Chips and a passion juice come to USh 16,000. A dine-in order adds the dining area’s service charge (10 % in the demo); on a complimentary order every line is priced at zero.
Screenshot
Common mistakes
- Taking a phone order as a counter order. Without a name the order is hard to find when the customer arrives. Use Takeaway or Pickup and type the name and phone.
- Choosing Dine-in for a takeaway. The dine-in service charge is added to the bill. The type cannot be changed later: cancel the order (nothing sent yet) and start it again with the right type.
- Putting an allergy only in an item’s note. An allergy that concerns the whole party belongs in the order details, where every ticket of the order carries it.
Troubleshooting
- The table I want is not in the list. Only free and reserved tables are offered. A table with an open order is occupied; open that order from Orders or the floor plan instead.
- Save is missing in the order details. The order is already billed, closed or cancelled; its details can no longer change.
FAQ
What does Staff meal do? It marks the order as a staff meal and applies the staff prices the business has set up (see Set a price rule).
Where do I type the promo code? In the order details, Promo code. Changing it prices the items that are not sent yet again.
Attach a customer to an order
Purpose
Put the customer’s name on the order so their allergies follow it to the kitchen, they collect loyalty points when they pay, and their visits and favourites build up in their profile.
Role / permission required
Anyone who can sell and see customers (sales.create and
customers.view). Creating a new customer needs customers.manage
(cashiers, waiters, supervisors, managers).
Prerequisites
- An order is open on the till (see Ring up a counter order).
Steps
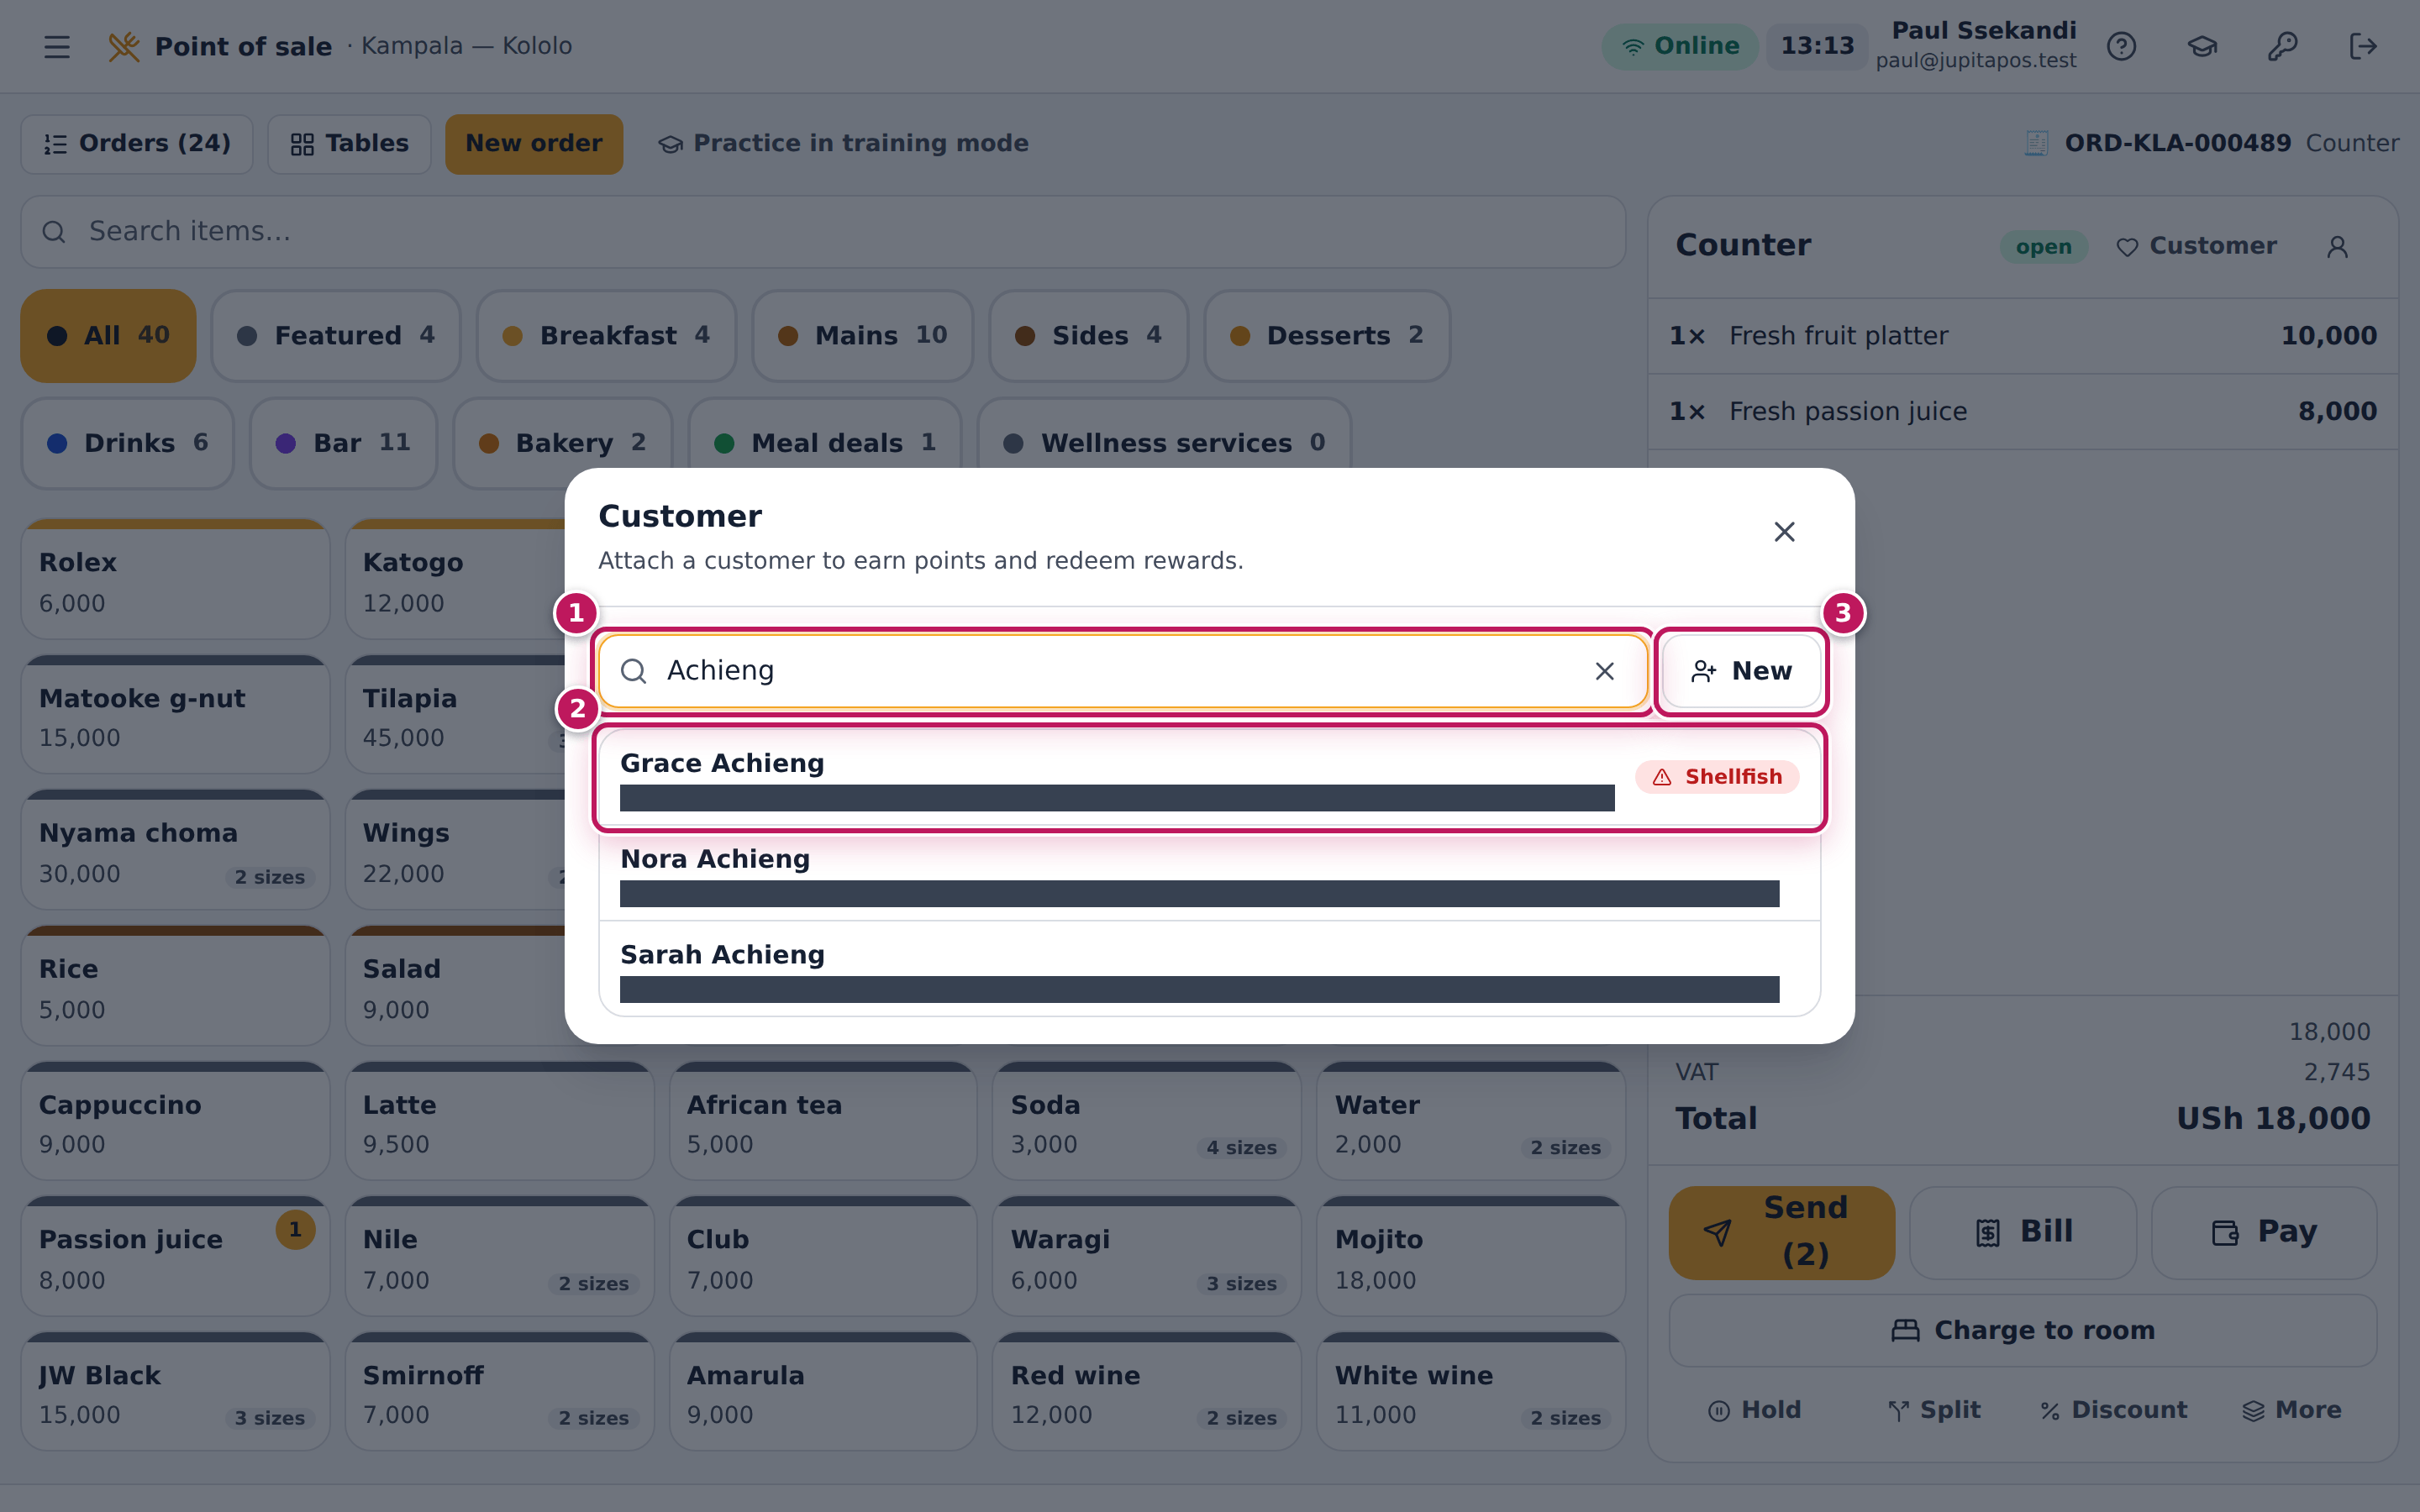
- Tap Customer at the top of the order panel.
- Type part of the customer’s name, phone number, e-mail or code in the search box (1) — for example Achieng.
- Tap the customer (2). A red tag in the list warns you of an allergy before you choose.
- If the customer is not there yet, tap New (3), fill in their details and save; they are attached at once (see Add a customer).
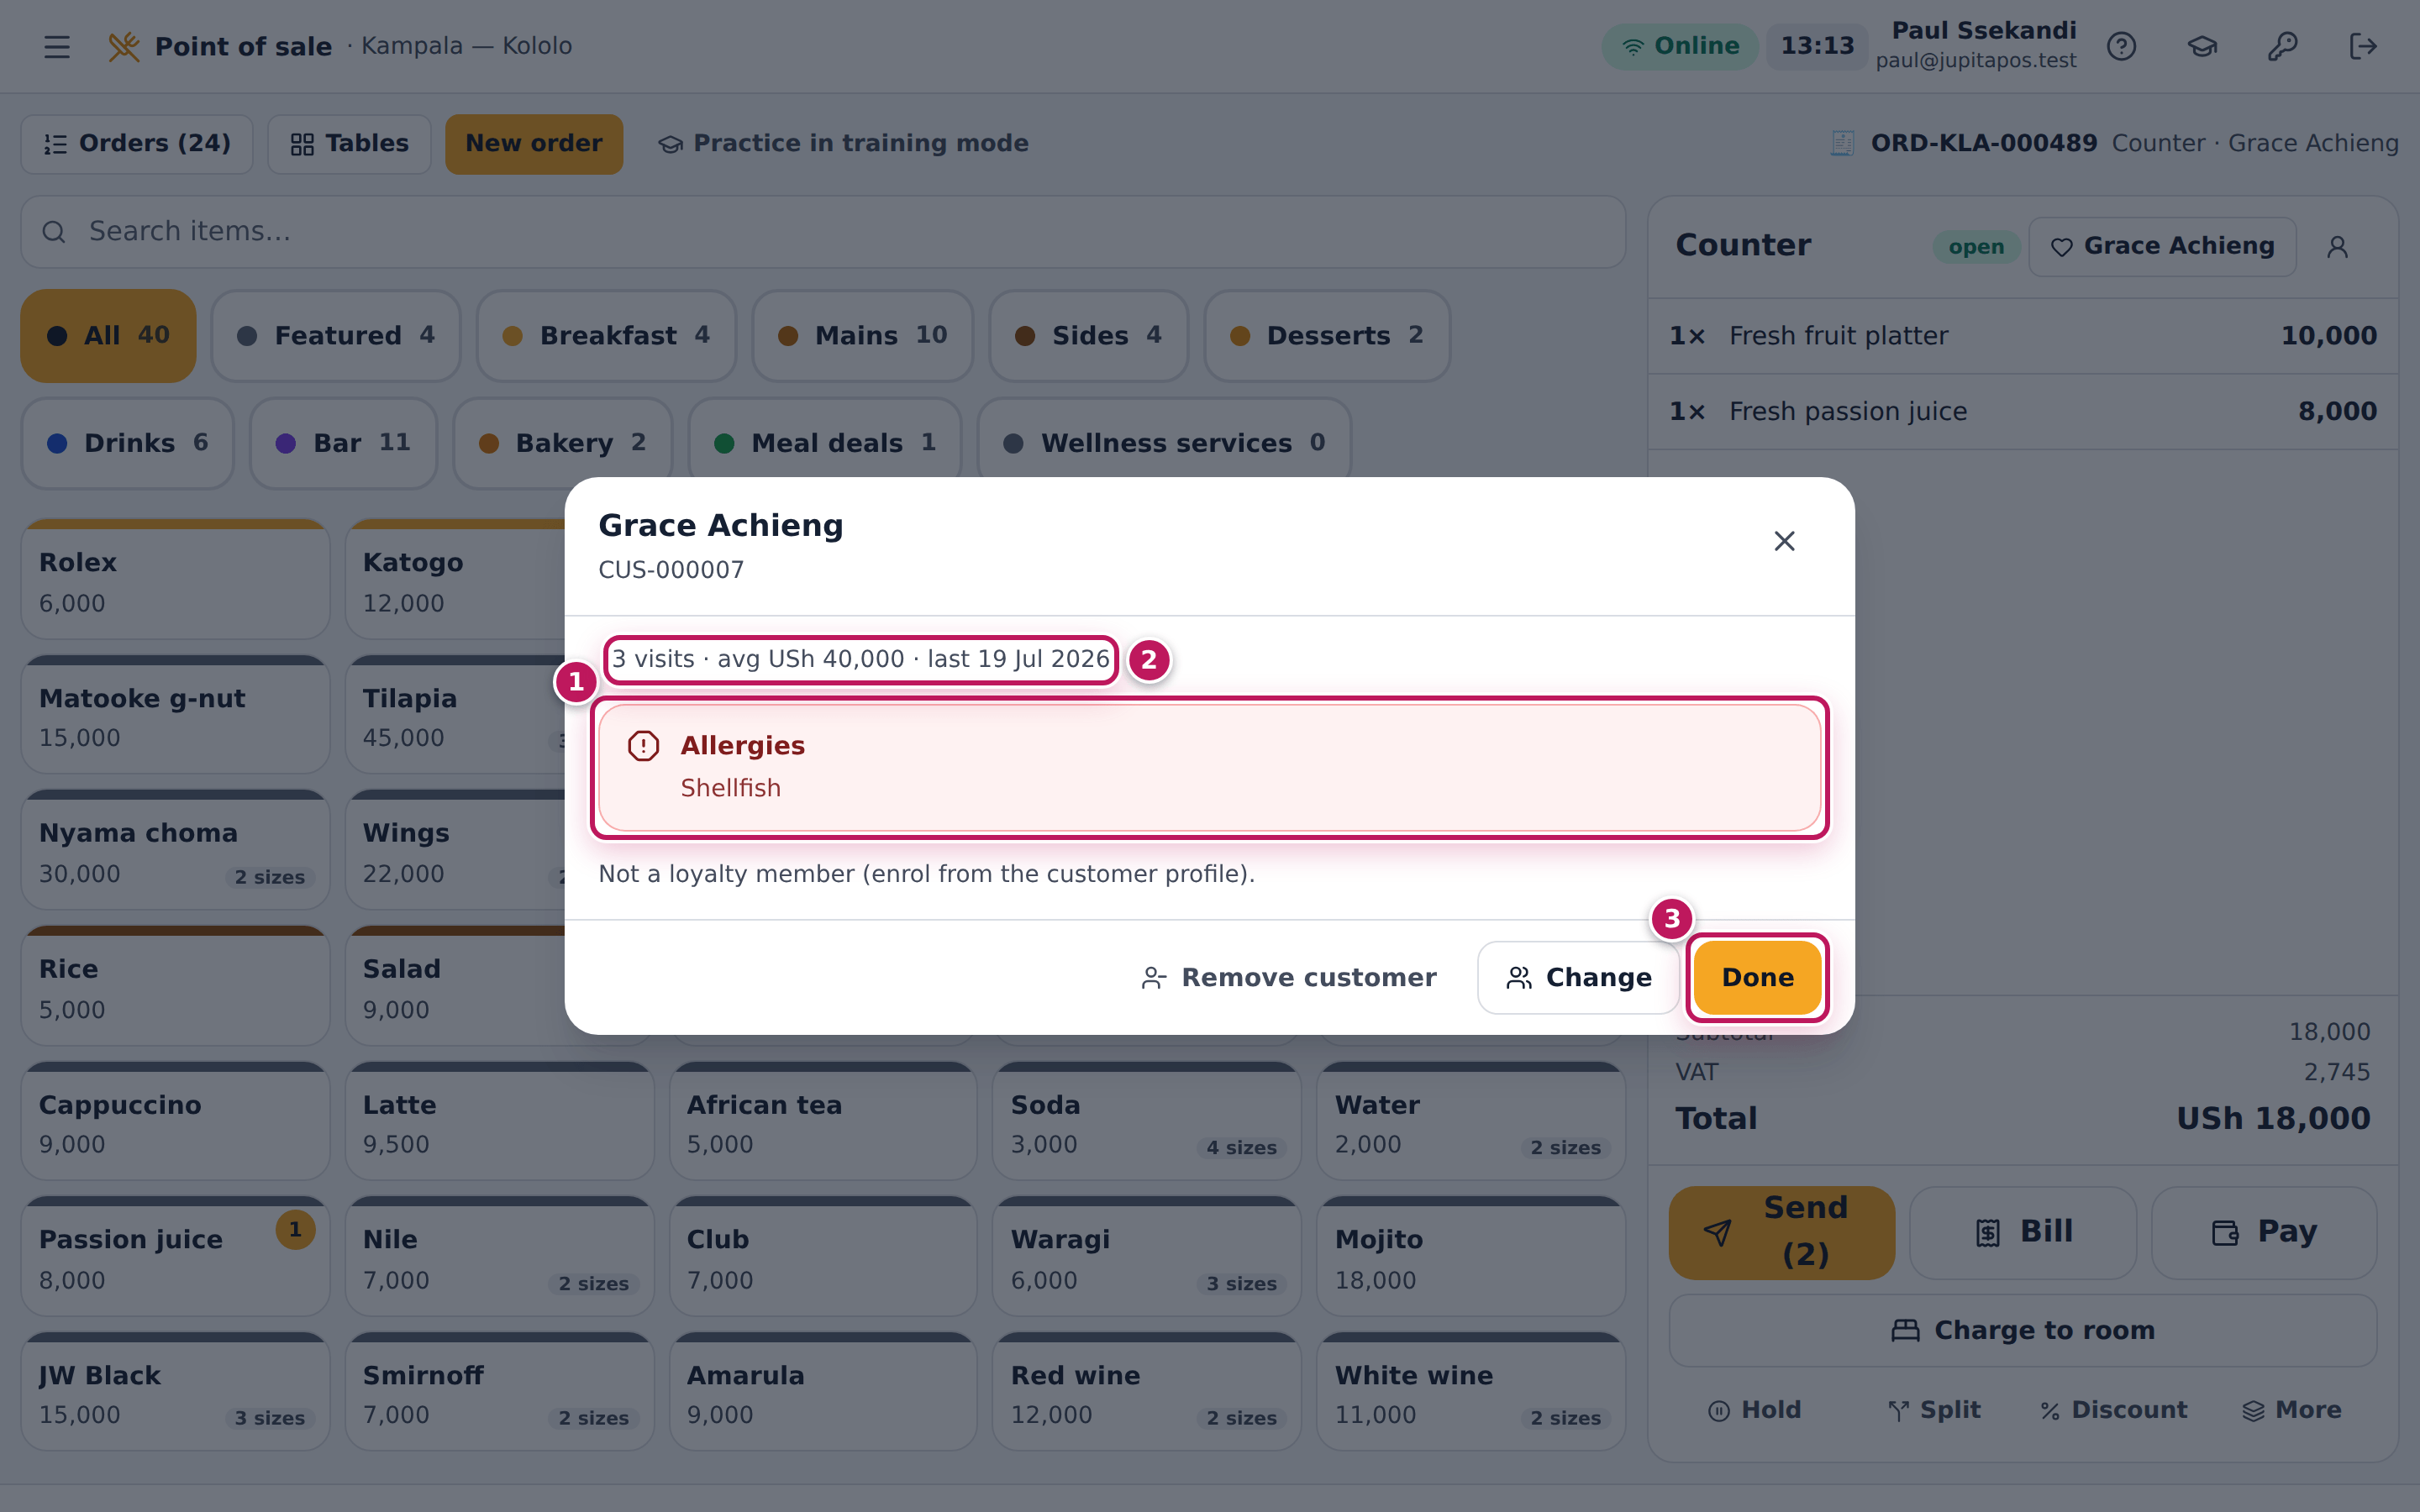
- Read the panel that opens: their Allergies (1), their visits and average spend (2), their preferences and what they usually have, and — for a loyalty member — their points, rewards and stamp cards.
- Tap Done (3).
Expected result
The Customer button now shows Grace Achieng and the top of the till reads Counter · Grace Achieng. Her allergy, Shellfish, is added to the order’s allergies, so it is on every ticket of this order. When the order is paid, the visit counts in her profile, and a loyalty member earns points (see Earn points on a sale).
Screenshot
Common mistakes
- Creating the customer again. Search by phone number first: a second record splits the customer’s points and history. A manager can merge duplicates later, but it is easier not to make them.
- Typing the name in the order details instead. The name then prints on the ticket, but the order is not linked to the customer: no points, no allergies from the profile, no history.
Troubleshooting
- “Samuel Wasswa is blocked.” The customer’s record is blocked (for example after disputed bills). Serve them without attaching the record and tell the manager.
- “Remove the reward of the current customer before changing the customer.” A reward of the first customer is on the order. Open the customer panel, tap Take off next to the reward, then Change.
- Remove customer is greyed out. The order is closed; its customer can no longer change.
FAQ
How do I redeem a reward or a stamp card? In the same panel, under Rewards or Stamp cards (see Redeem a reward).
The customer wants to pay with their voucher or prepaid balance. The panel lists them under Vouchers & credit; take them at Pay.
Put an order on hold and pick it up again
Purpose
Park an order that is not finished — the customer went to get their friend, the delivery rider will pay later — so you can serve the next person, then carry on with it from any till of the branch.
Role / permission required
Anyone who can sell (sales.create).
Prerequisites
- An order is open on the till and is not paid.
Steps
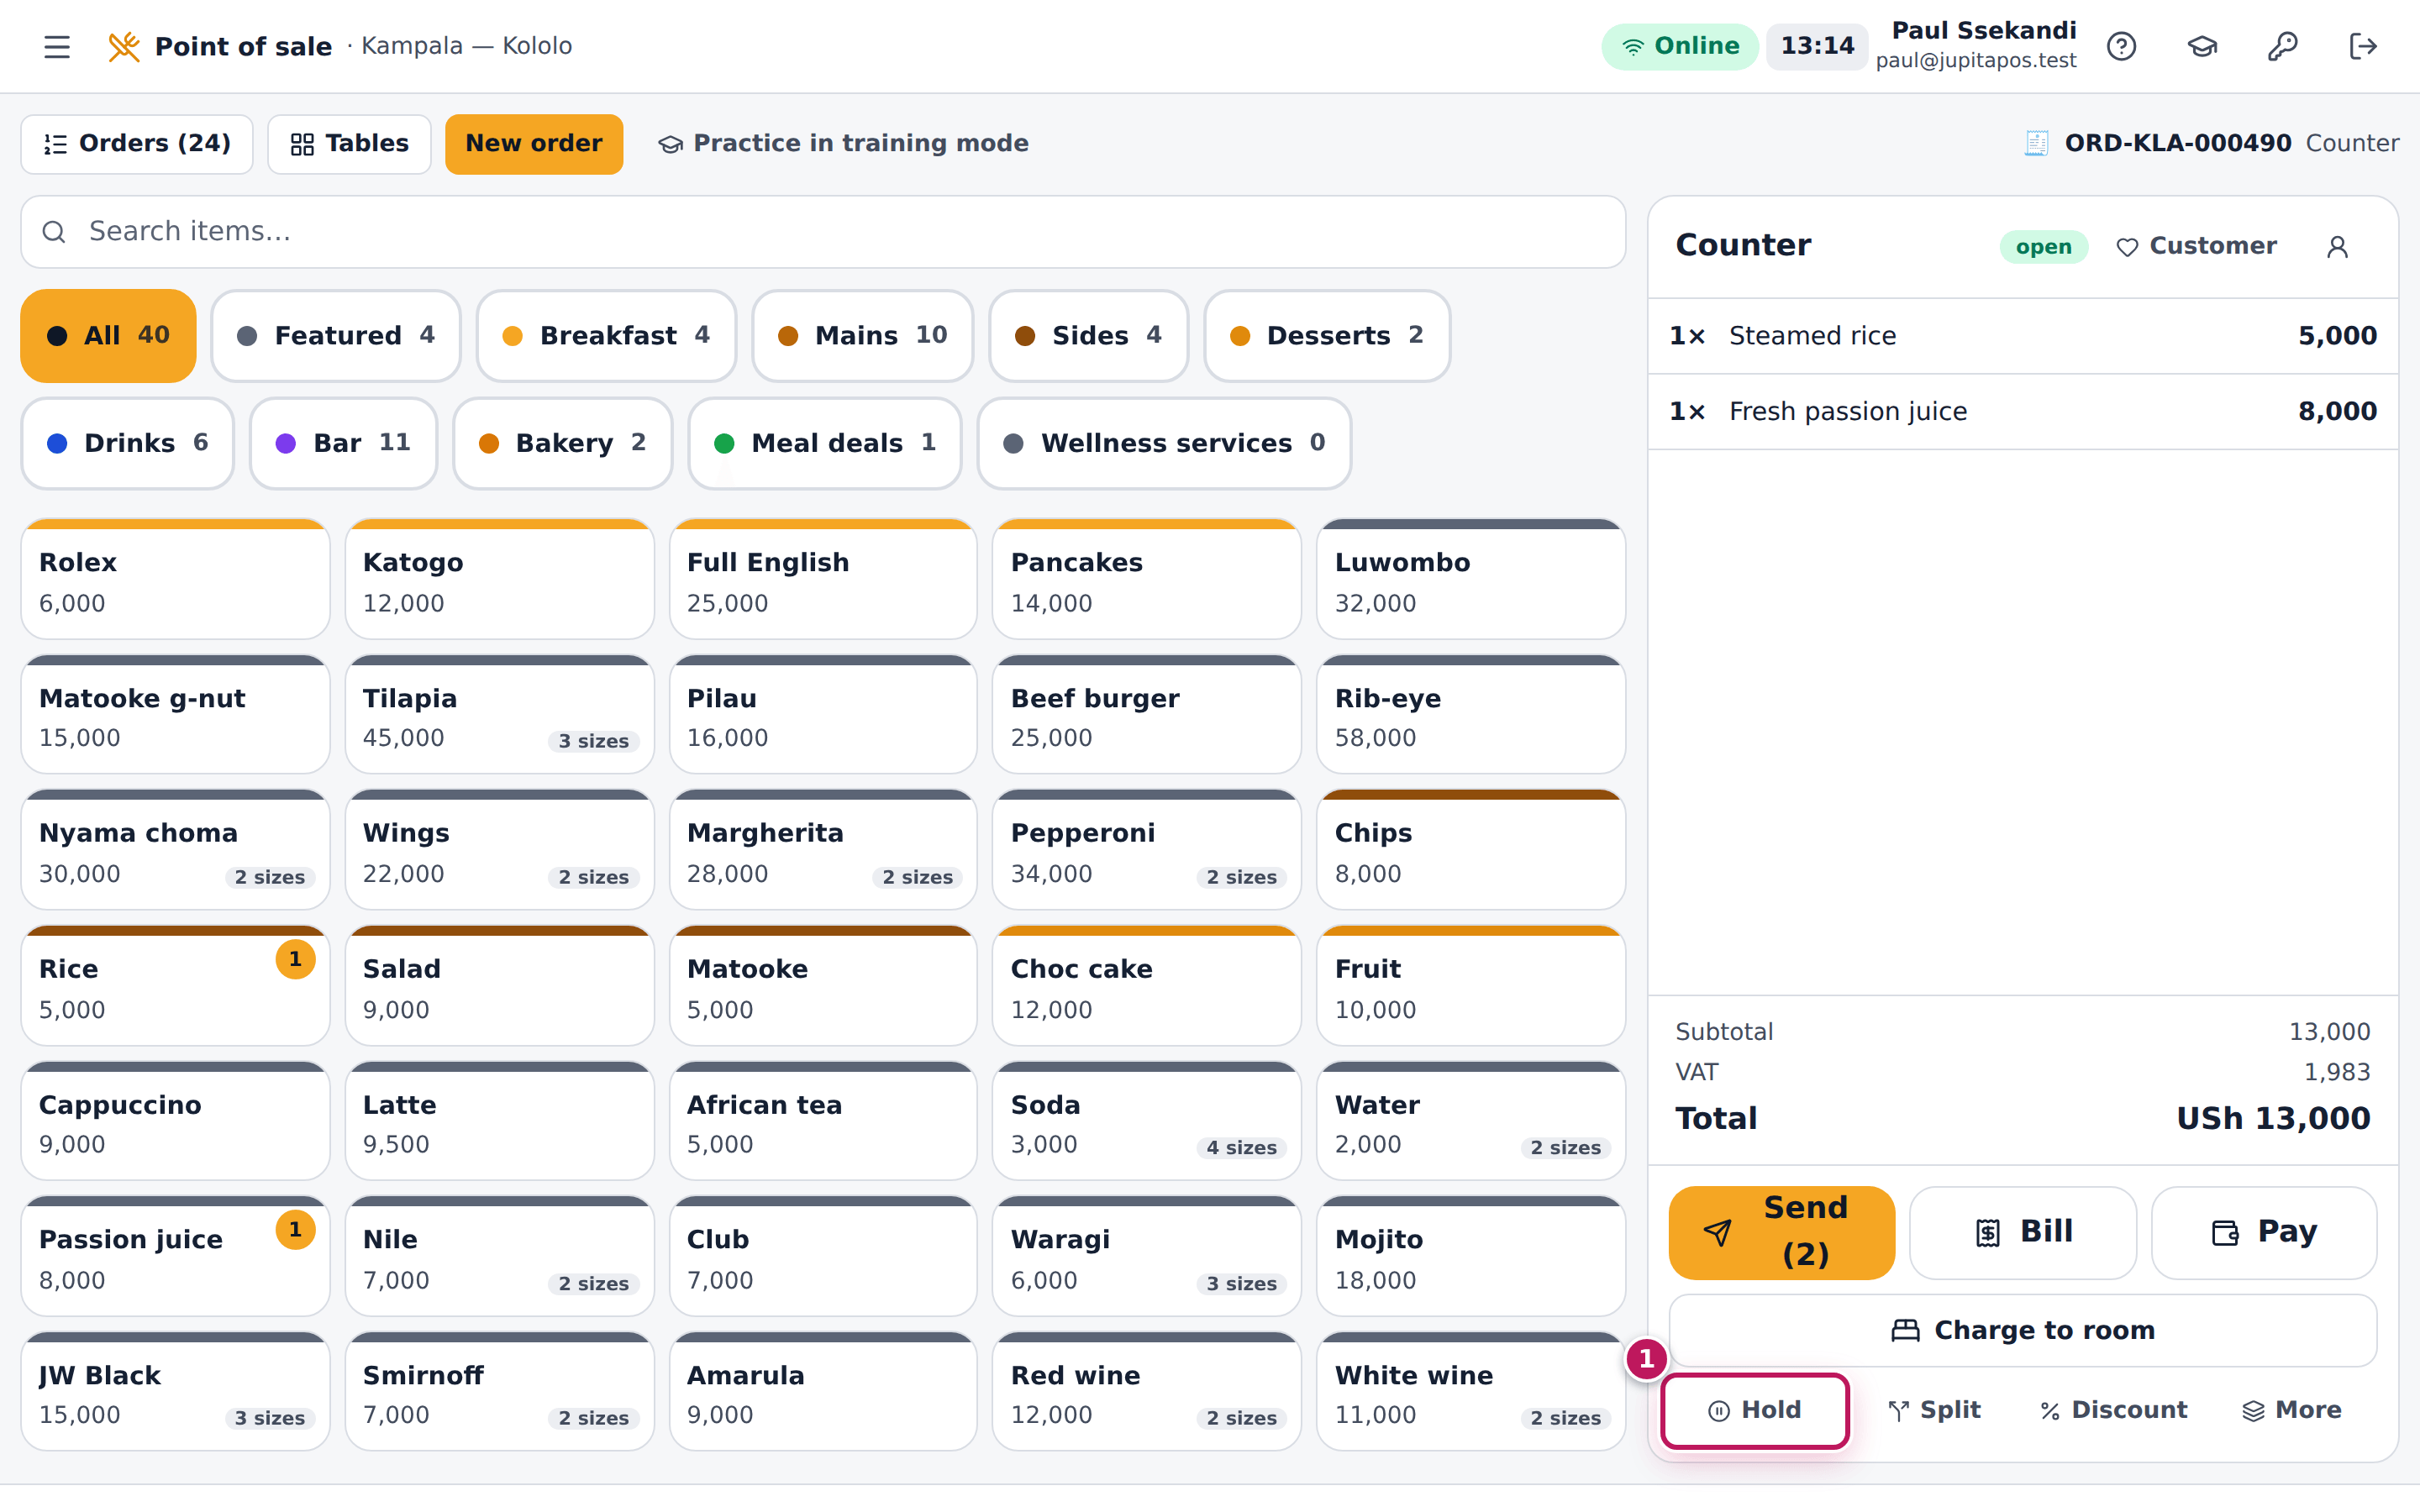
- Tap Hold (1) under the order. The order is saved with the status held and the till is ready for the next customer.
- Serve the next customers as usual.
- To pick up the held order, tap Orders at the top of the till.
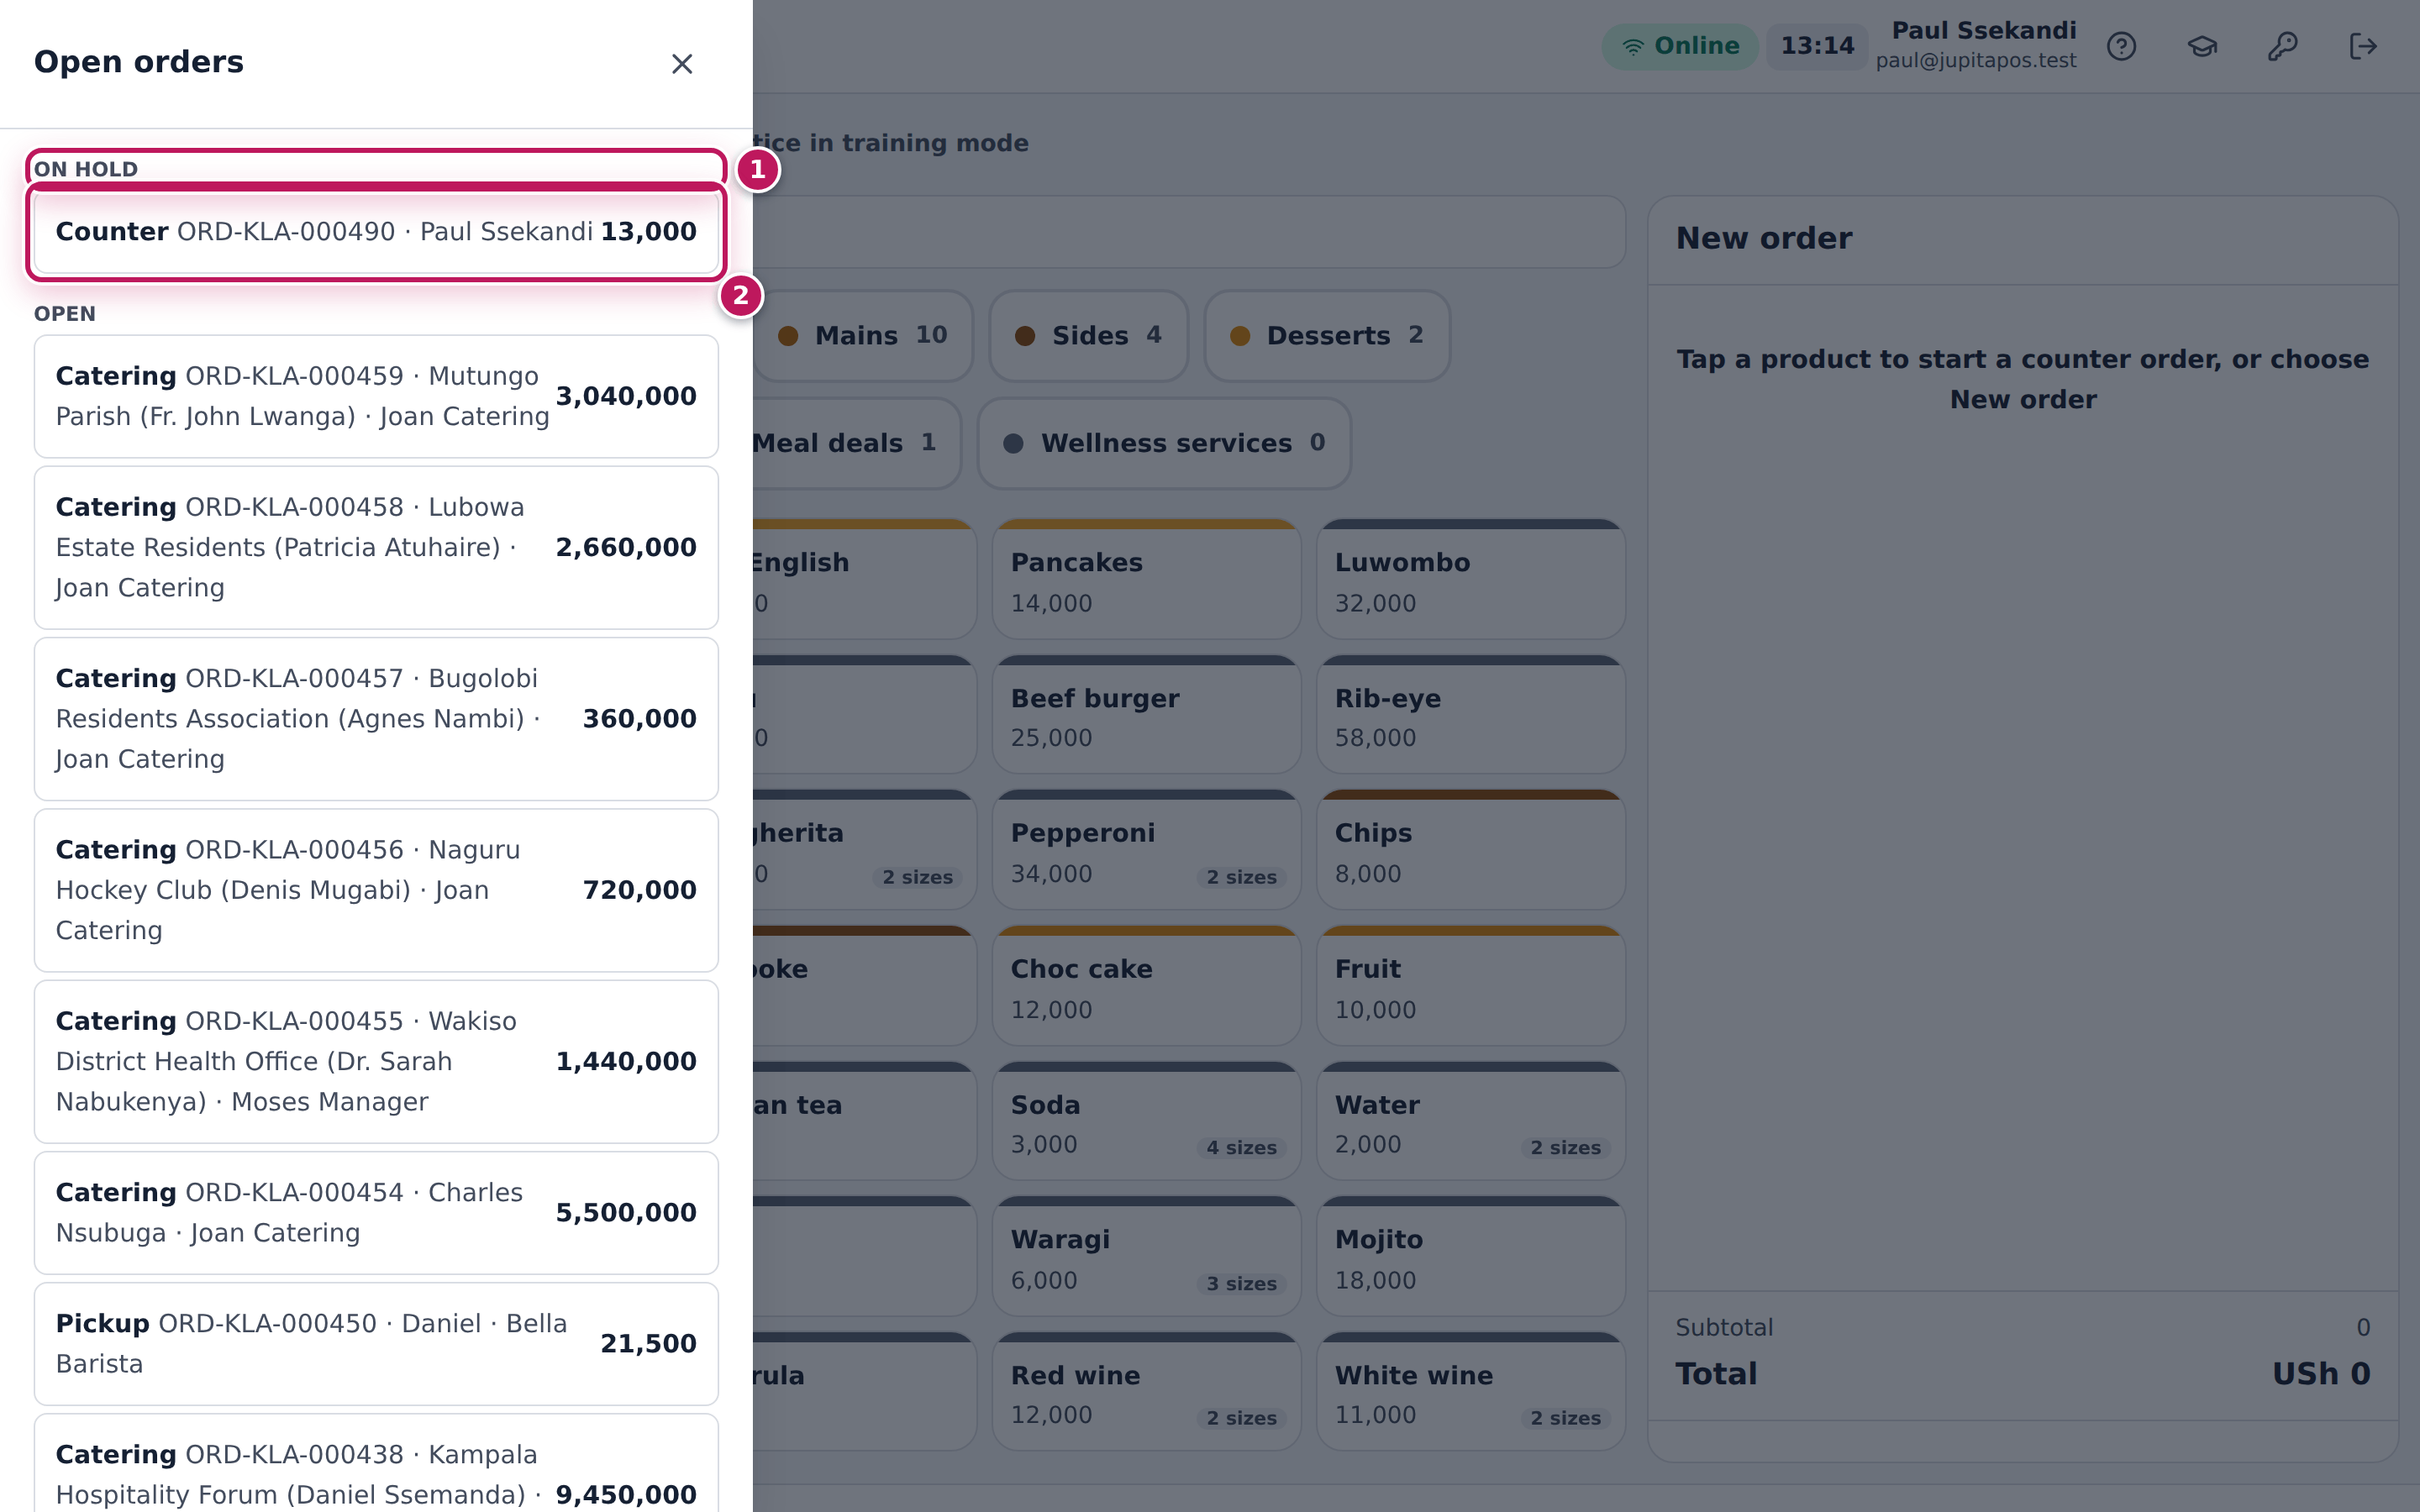
- In Open orders, look under On hold (1) and tap the order (2).
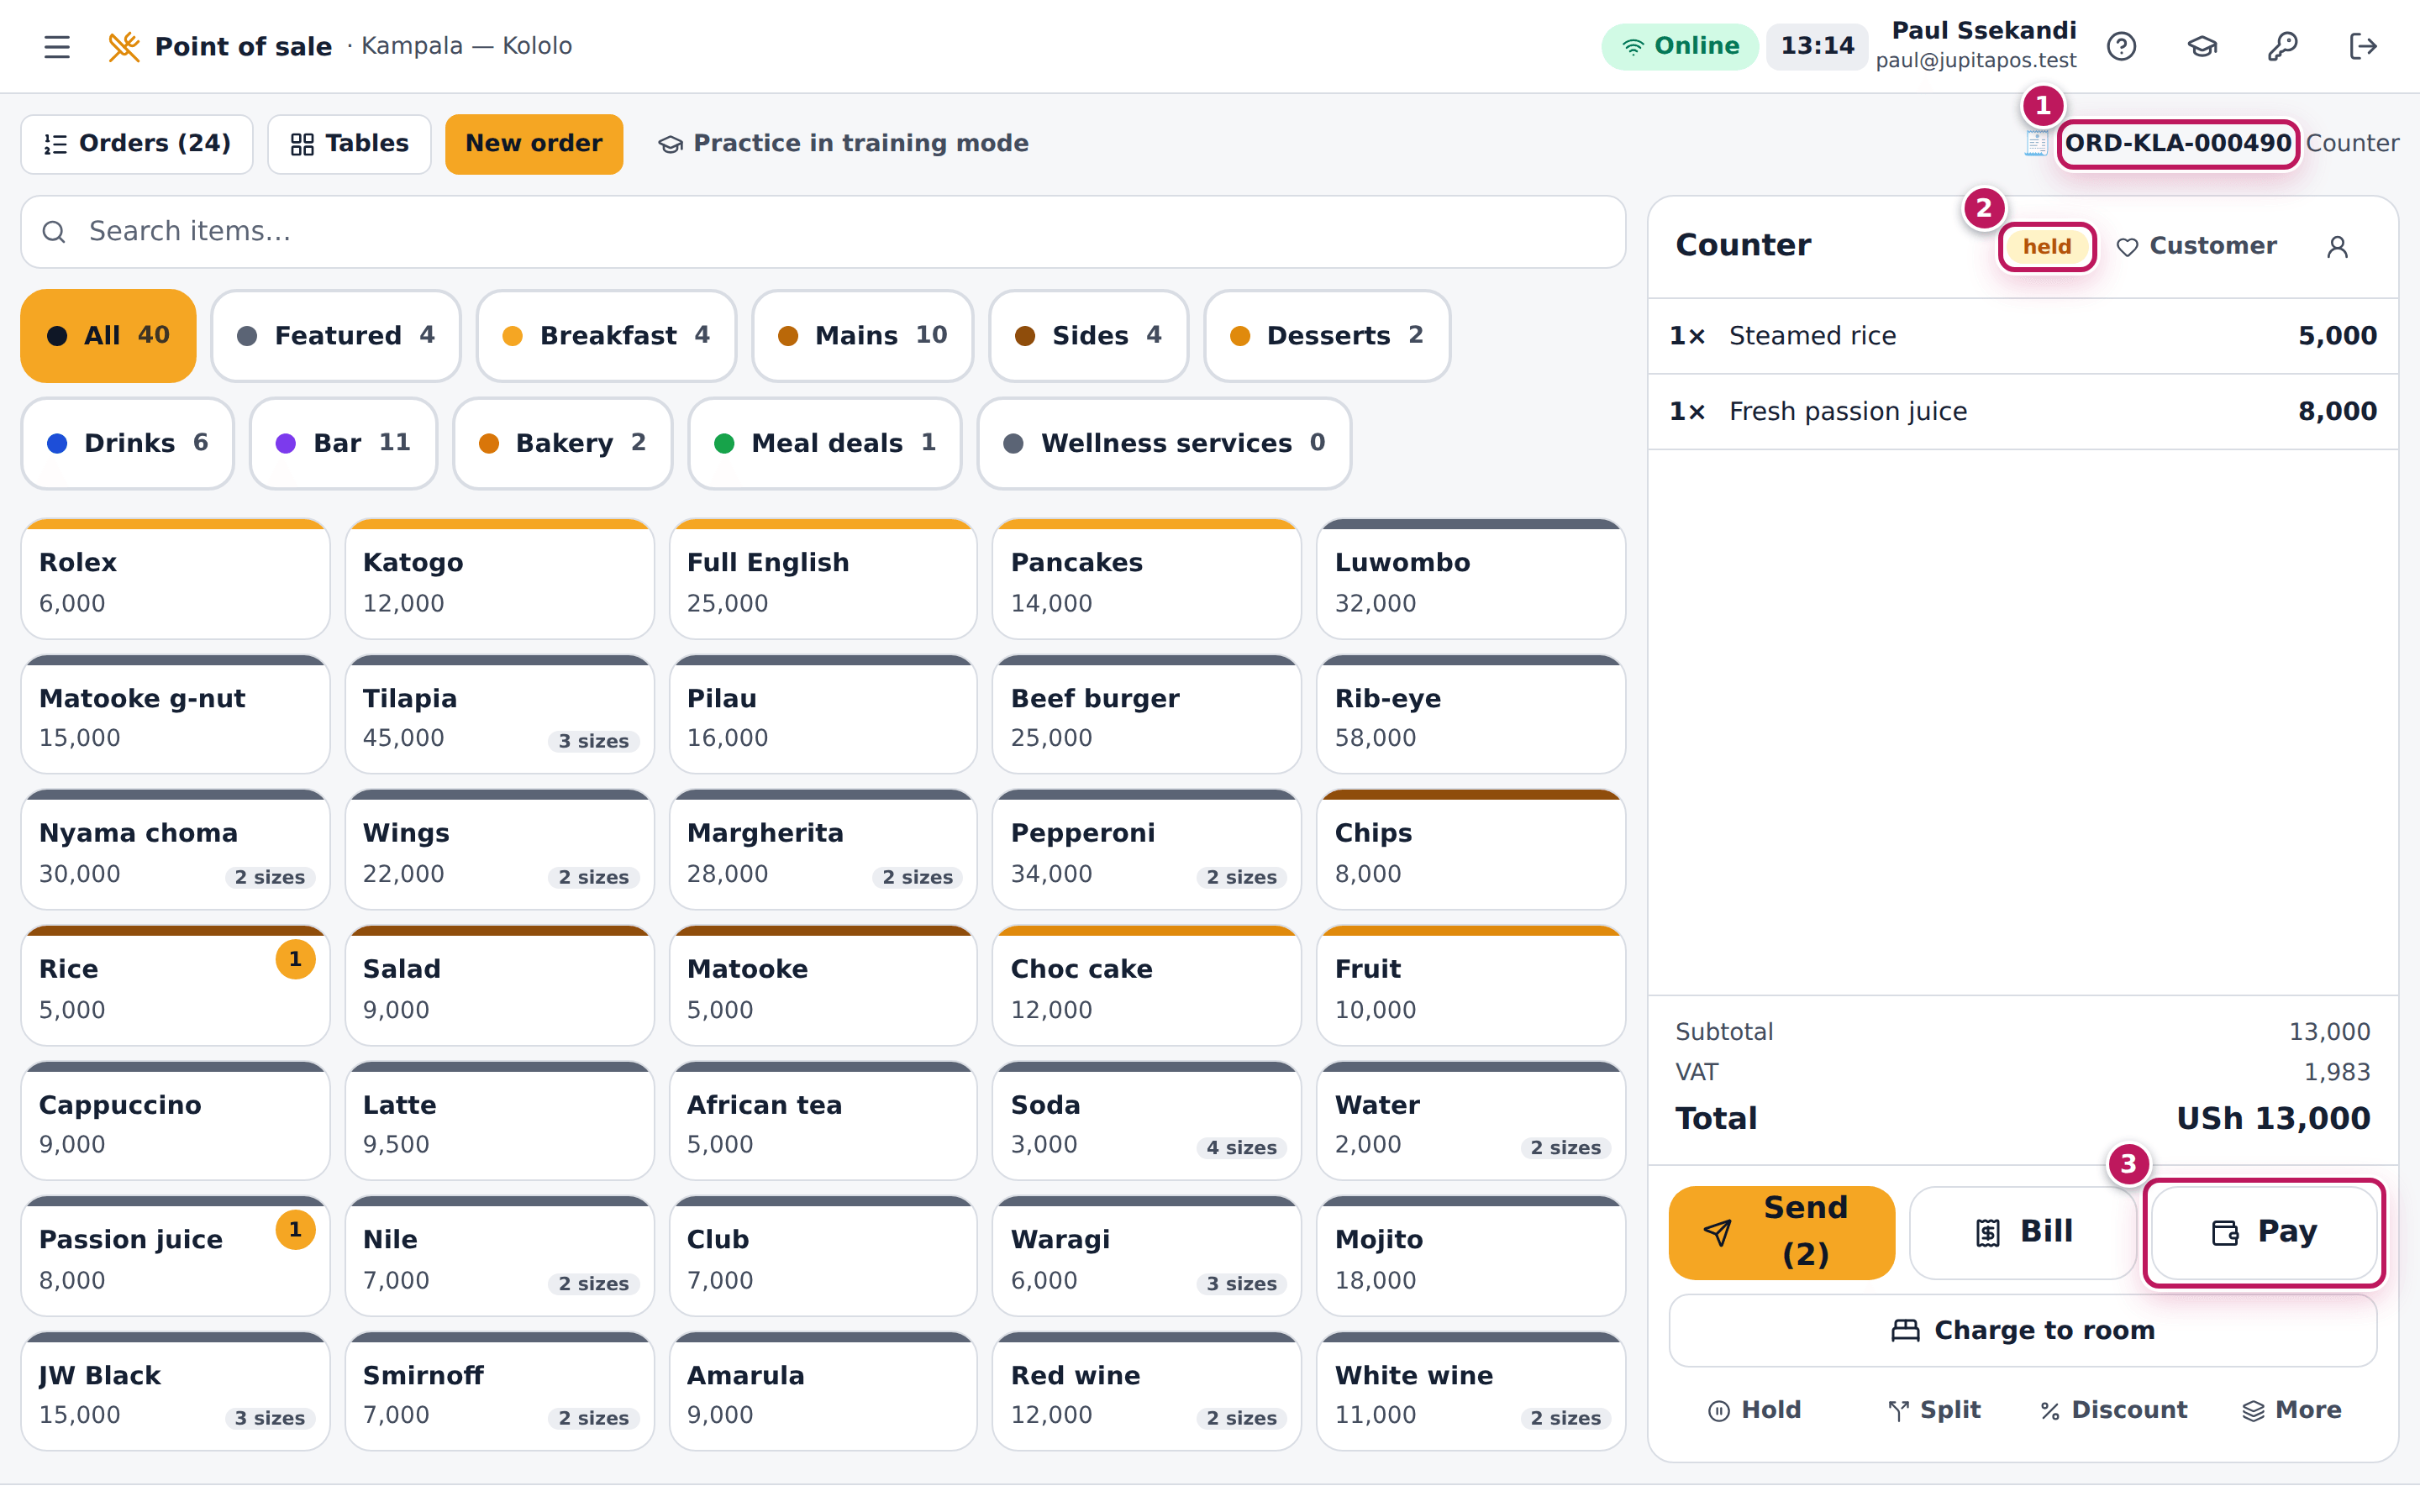
- The order opens on the till with its number (1), still marked held (2). Add items, send it, or tap Pay (3) as usual.
Expected result
The order waits under On hold in the Orders list of every till of the branch, with its number, the person who started it and its total (13,000 for a rice and a passion juice). Picked up again, it continues where it stopped; it becomes open again when you send it and closed when it is paid.
Screenshot
Common mistakes
- Starting a new order instead of picking up the held one. The customer is then rung up twice. Look under On hold first.
- Holding a table’s order to “free” the table. A held order keeps its table occupied; that is on purpose, the guests are still there.
Troubleshooting
- The held order is not in Orders. Someone paid, cancelled or merged it. Search for it in the Orders list (see Find an order); its history says who did what.
- “This record was changed by someone else. Reload and try again.” A colleague changed the order at the same moment; the till loads the latest version. Check the lines and do it again.
FAQ
Can a colleague pick up my held order? Yes. The Orders list shows every open, held and billed order of the branch, on every till, live.
What does the number on Orders mean? How many orders of the branch are open, held or waiting for payment right now.
Give a discount
Purpose
Take money off an order — for a regular, a staff friend, a complaint — with the reason recorded, so the discount shows on the receipt and in the reports and nobody can give one without it being seen.
Role / permission required
Discounts up to 20 %: anyone with sales.discount (cashiers, waiters,
bartenders, baristas, supervisors, managers). Above 20 %:
sales.discount.large (supervisors and managers), or a supervisor’s
approval with their employee number and PIN on your till. The 20 % is the
limit as delivered; a different one is set for you by your JupitaPos
provider (there is no screen for it).
Prerequisites
- The order has its items and is not paid.
- For a discount above the limit, a supervisor is at hand.
Steps
- Tap Discount under the order.
- Keep Percent, or tap Amount (UGX) for a fixed amount.
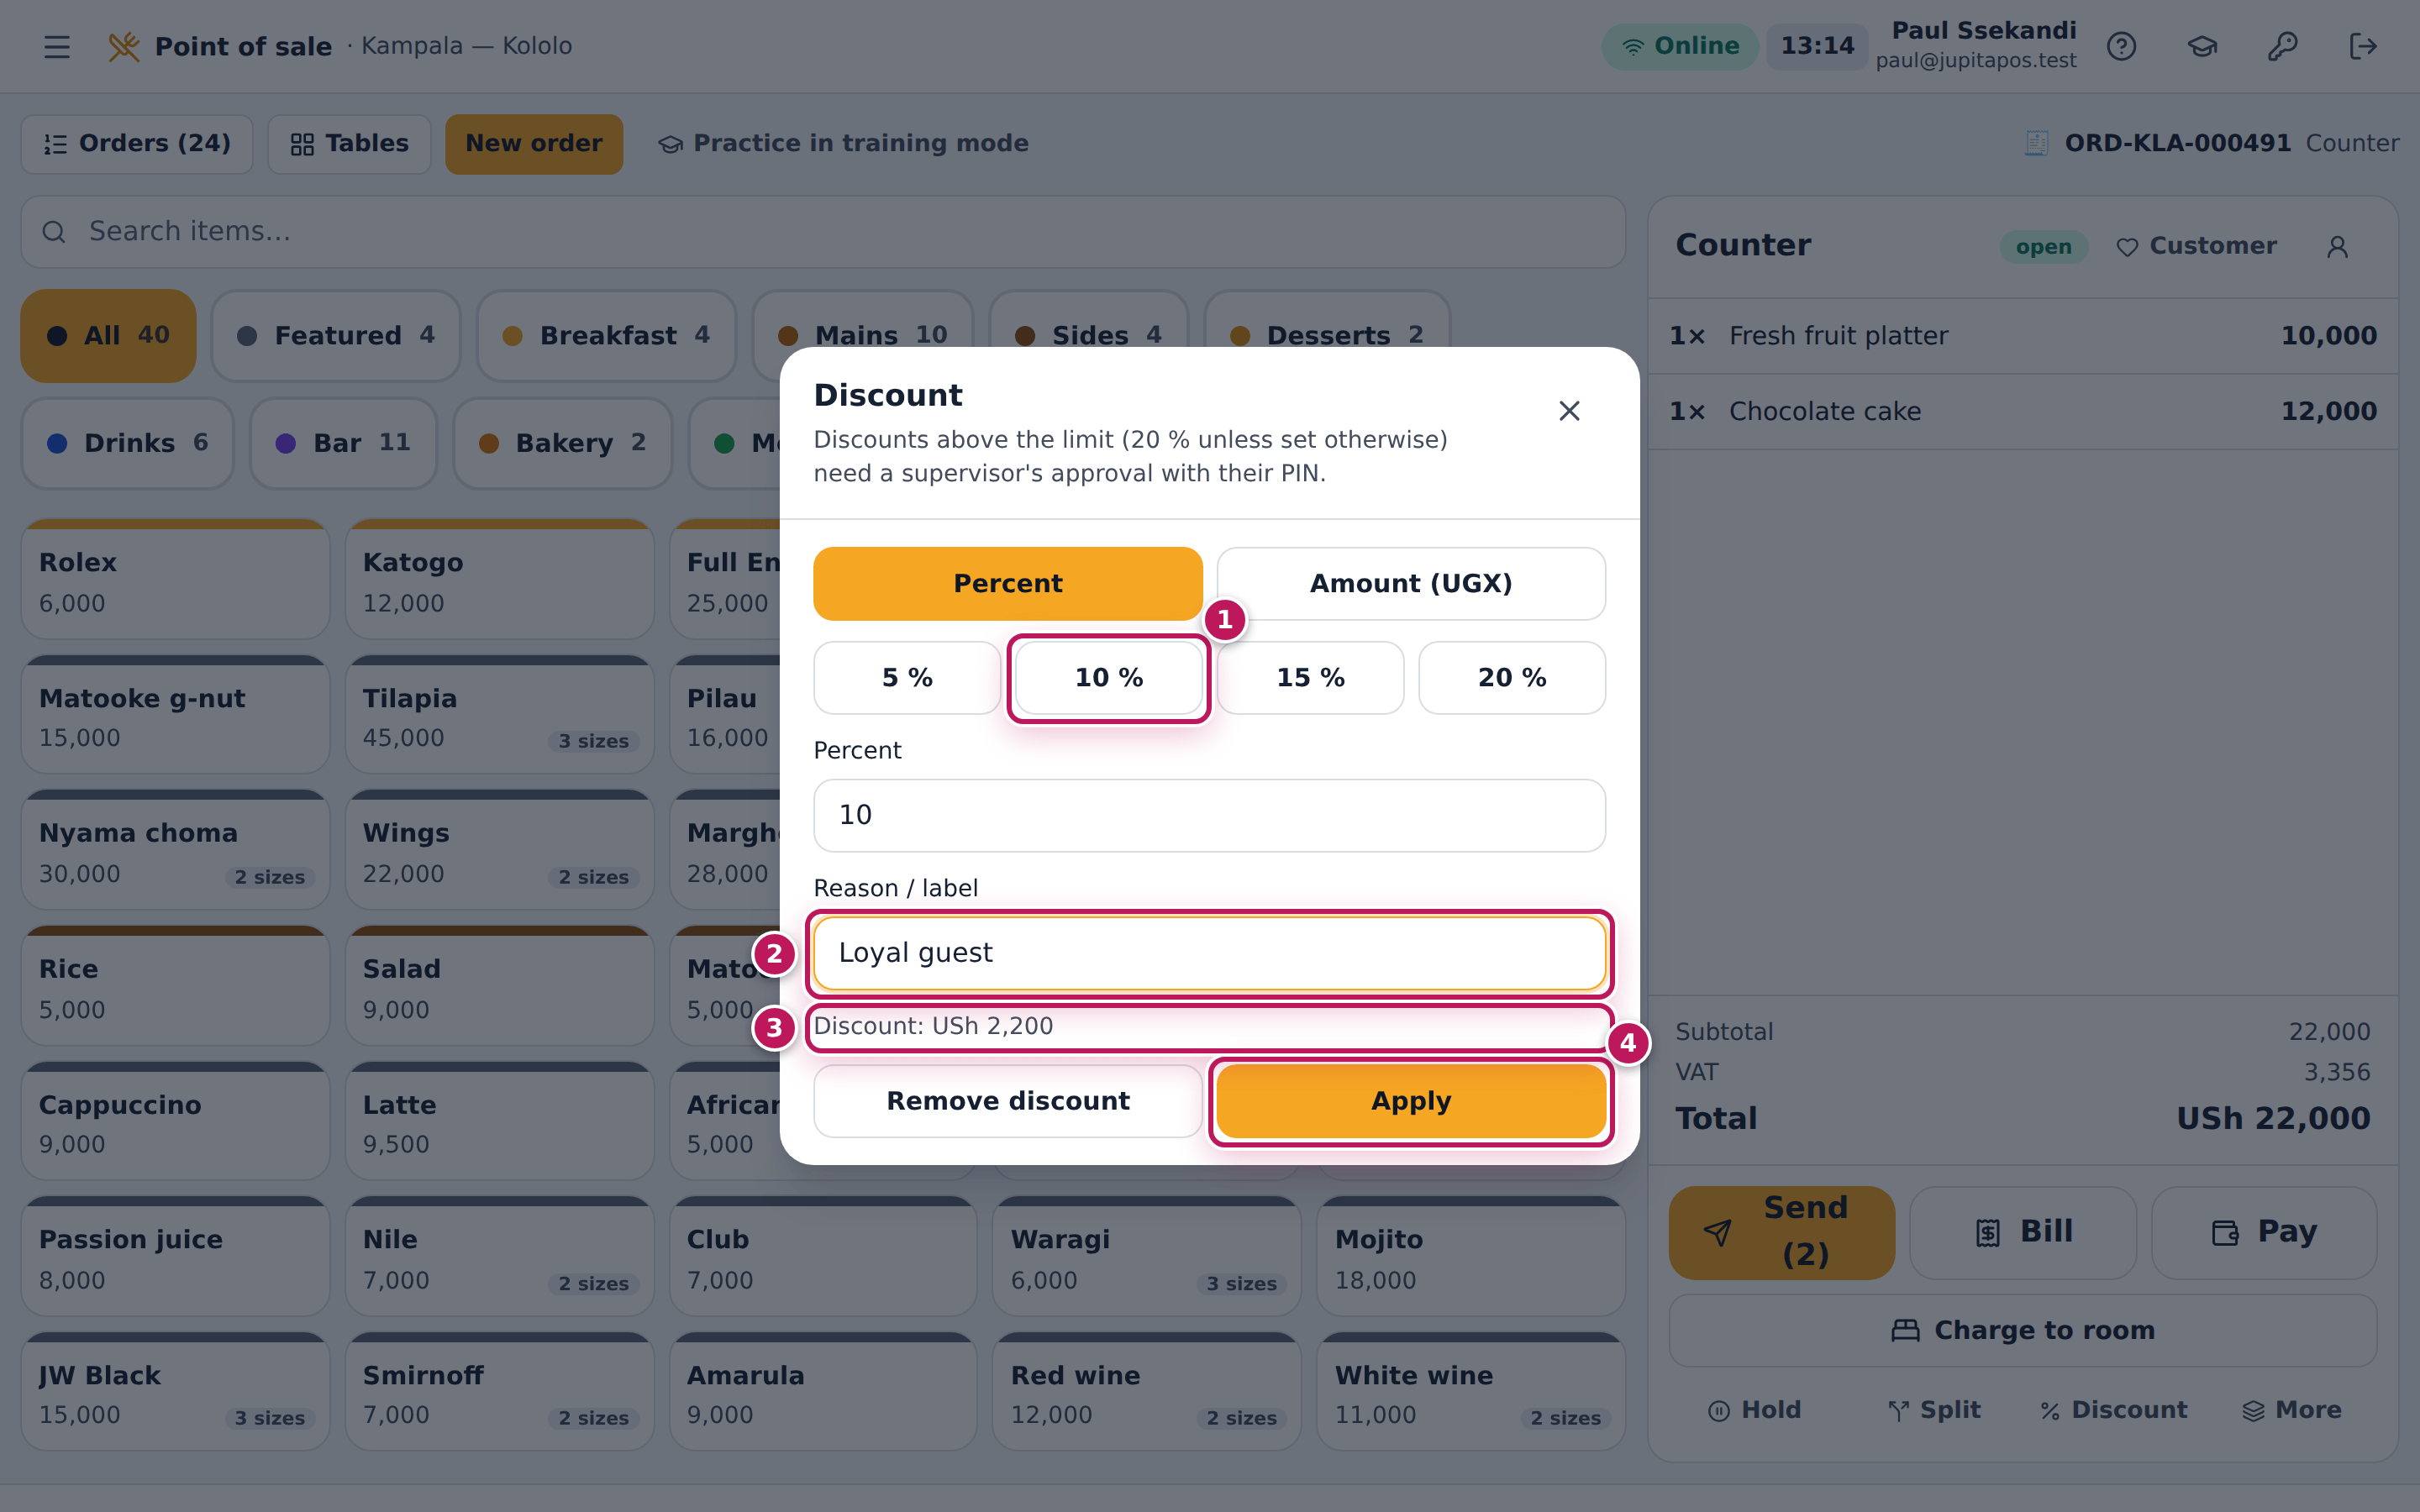
- Tap a quick percentage such as 10 % (1), or type it in Percent.
- Type why in Reason / label (2), for example Loyal guest.
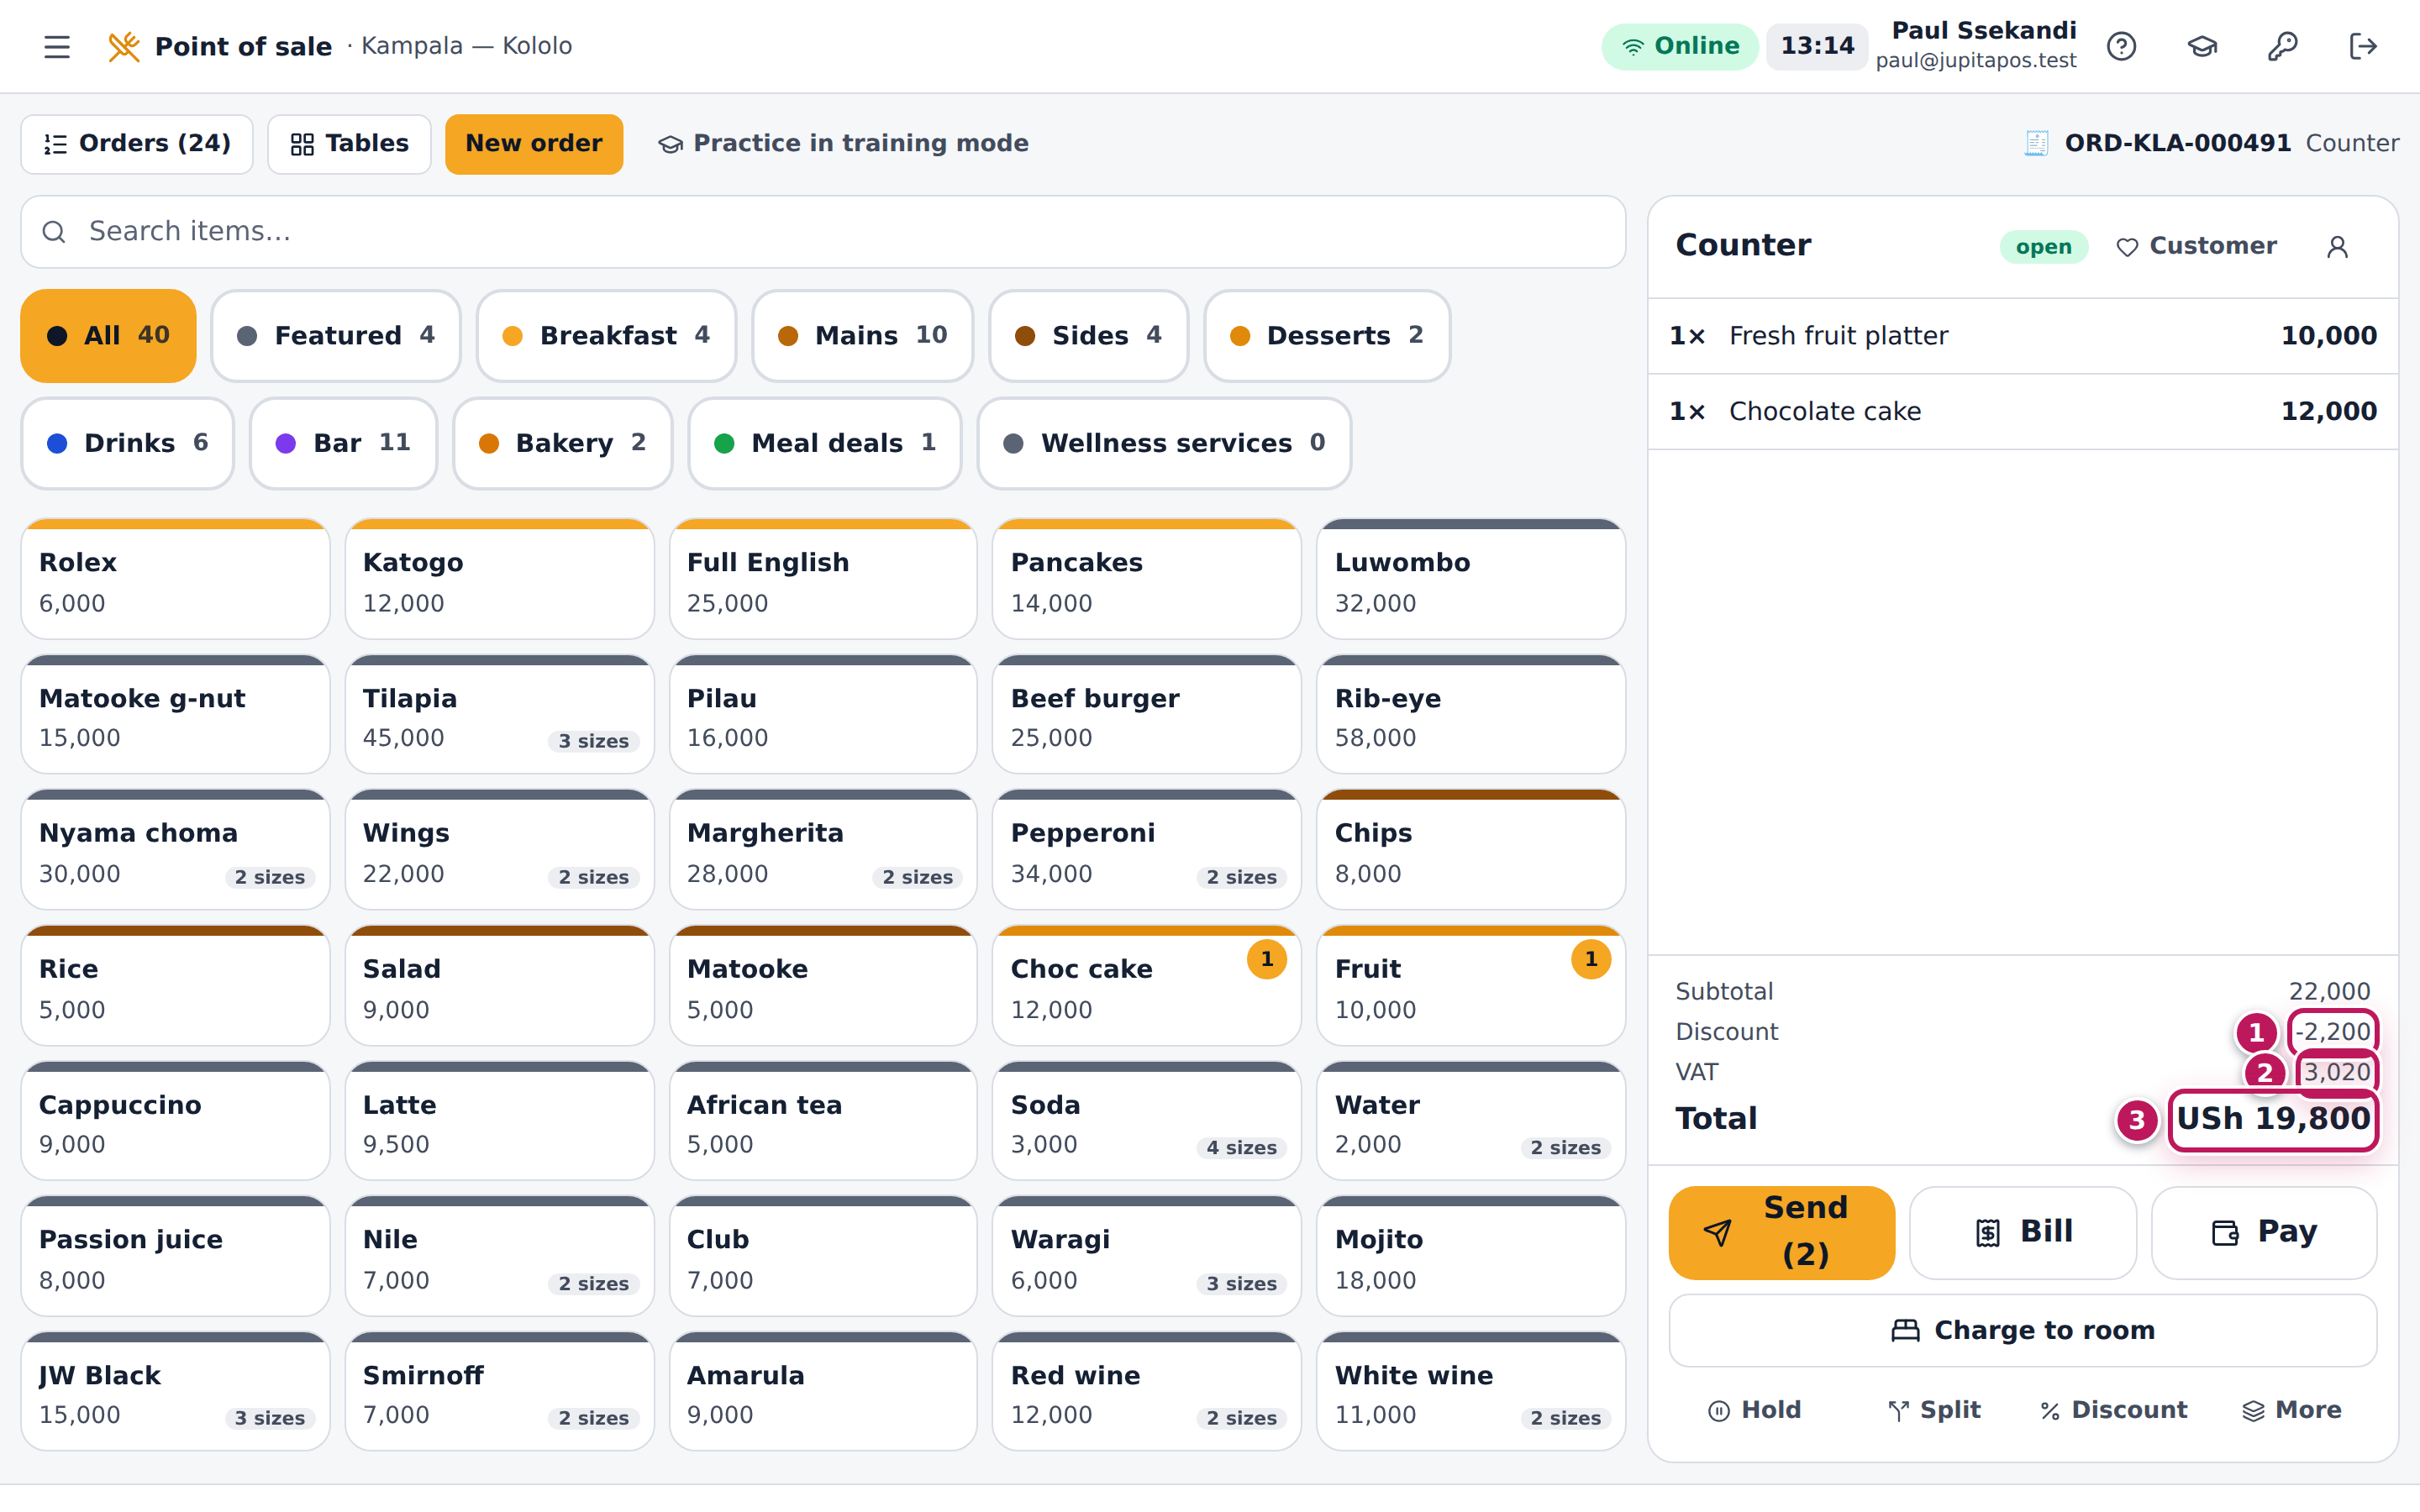
- Check the amount under the fields (3): Discount: USh 2,200.
- Tap Apply (4).
- To take a discount off again, open Discount and tap Remove discount.
Above the limit — here 25 % for a complaint — the till asks for a supervisor:
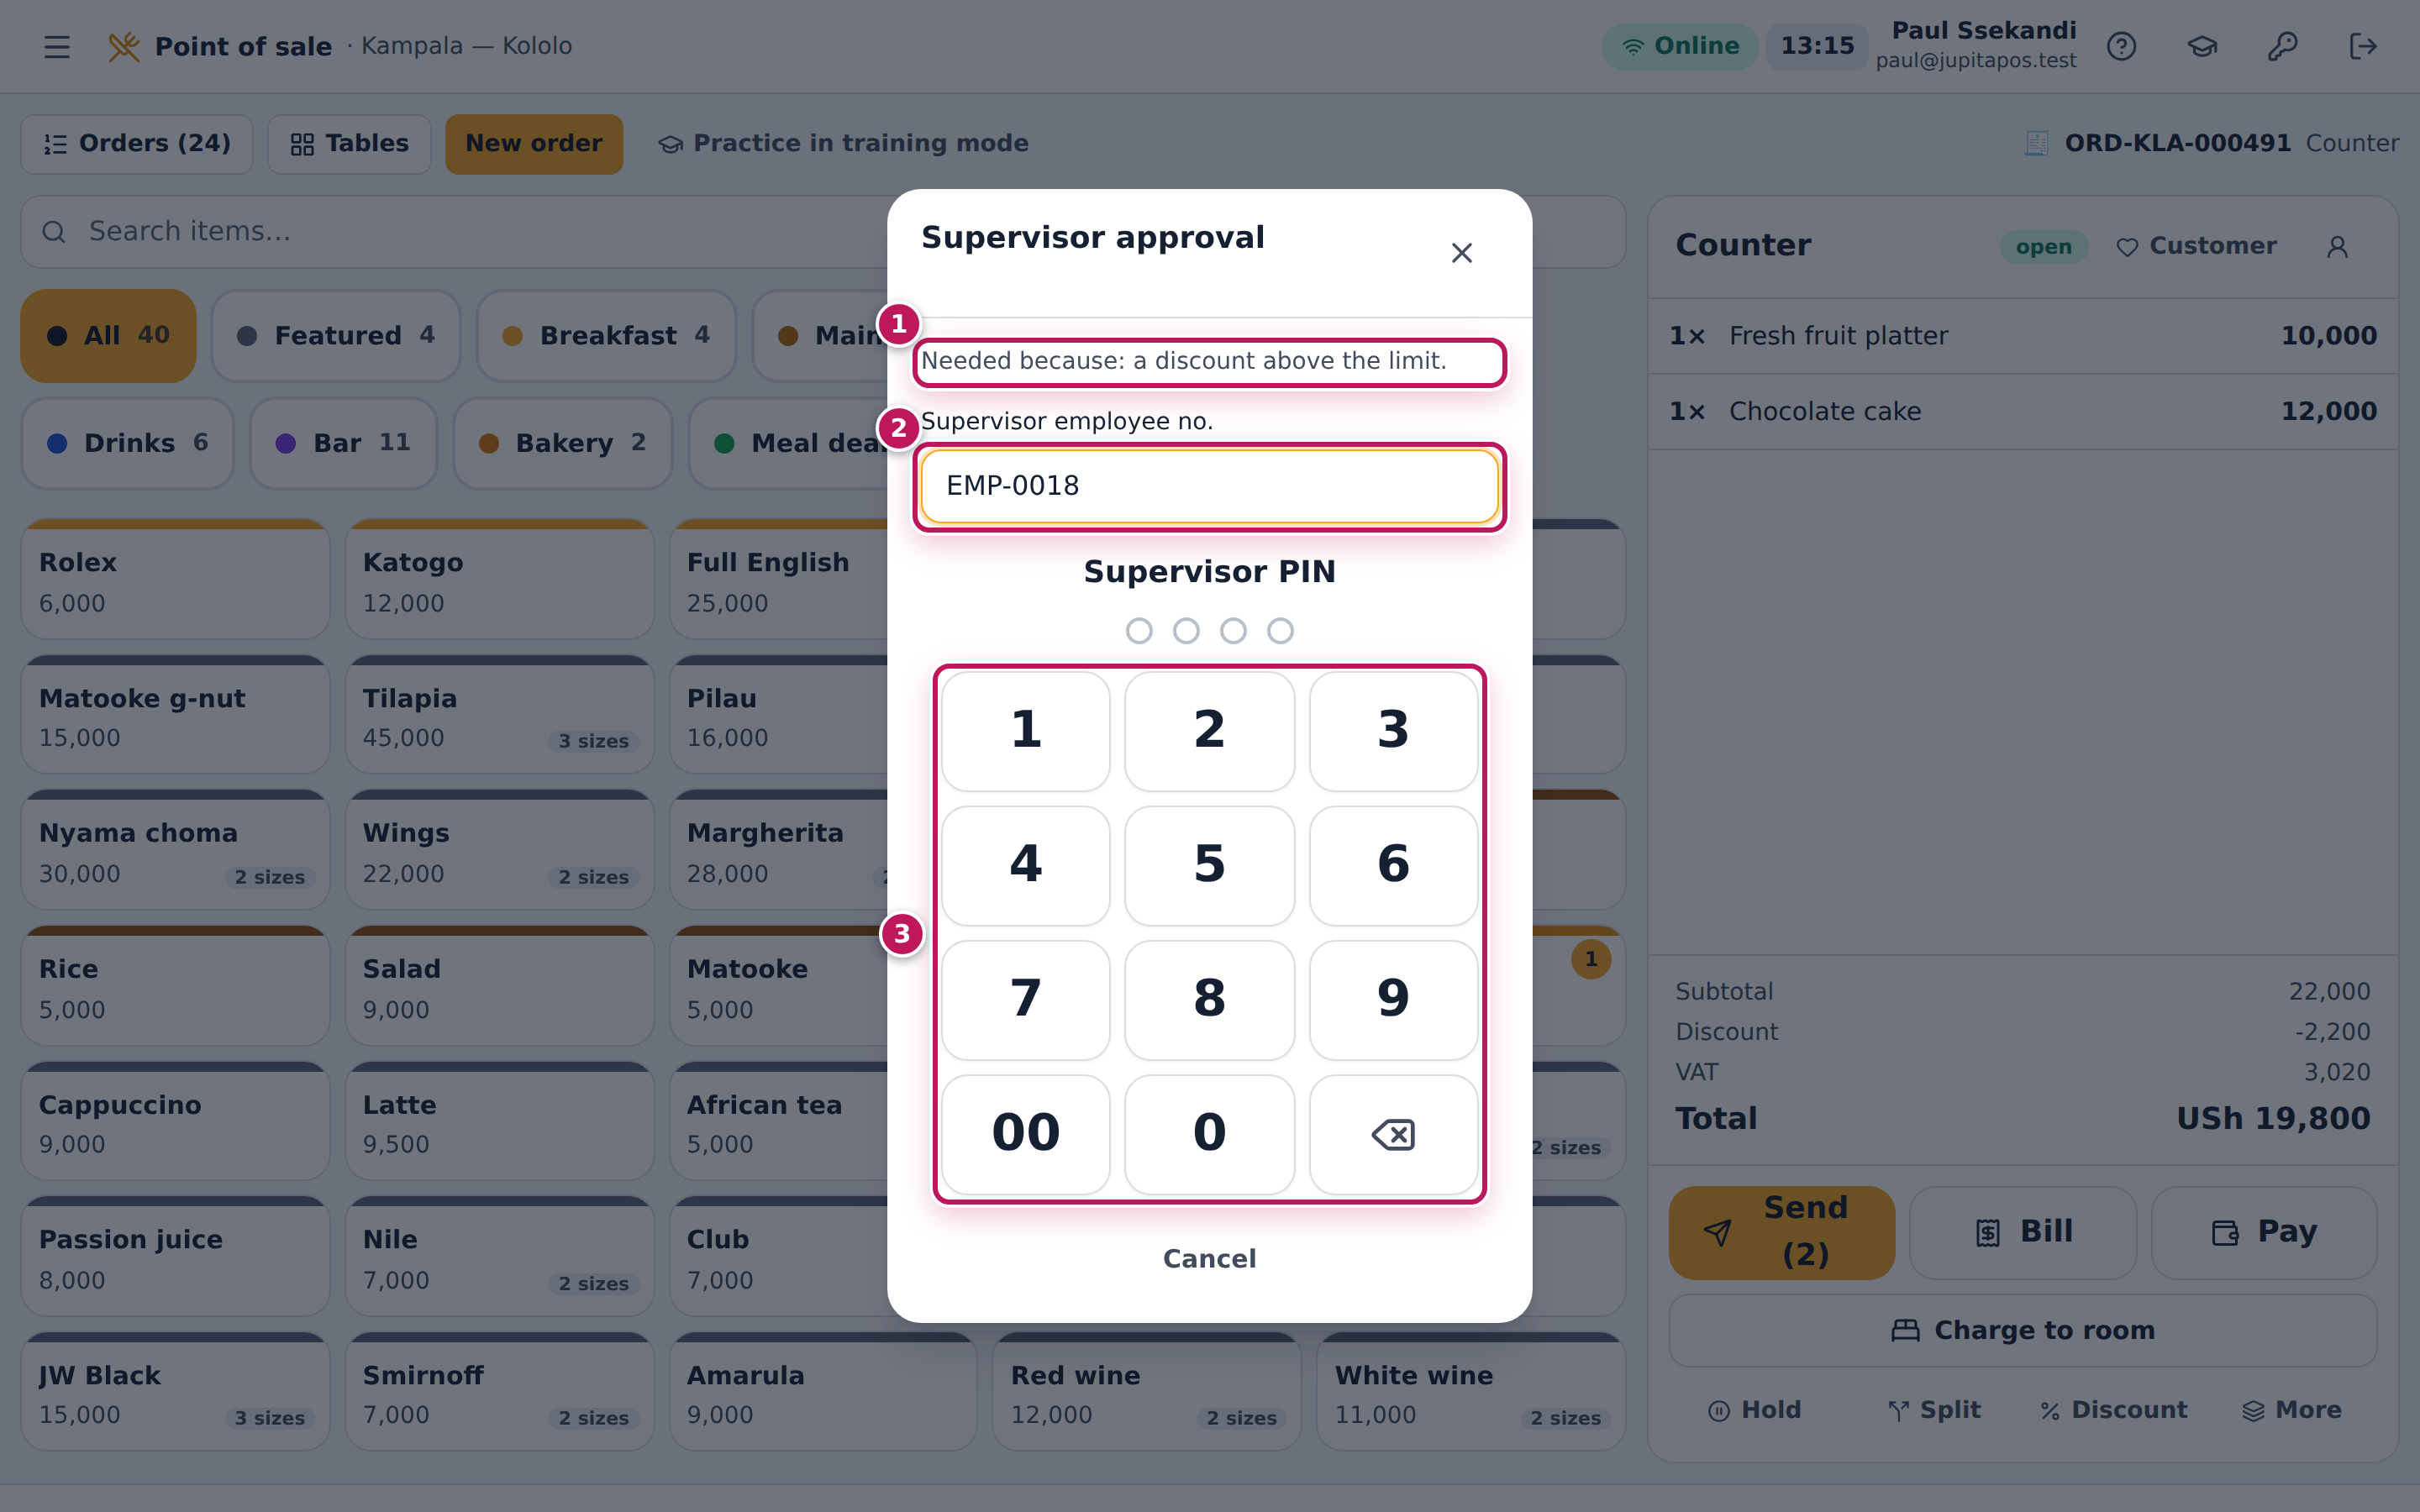
- After Apply, the Supervisor approval prompt opens and says why (1): a discount above the limit. Hand the till to the supervisor.
- The supervisor types their Supervisor employee no. (2) — for Sam, EMP-0018 — and their PIN on the keypad (3). The discount is applied and you carry on; you stay signed in.
Expected result
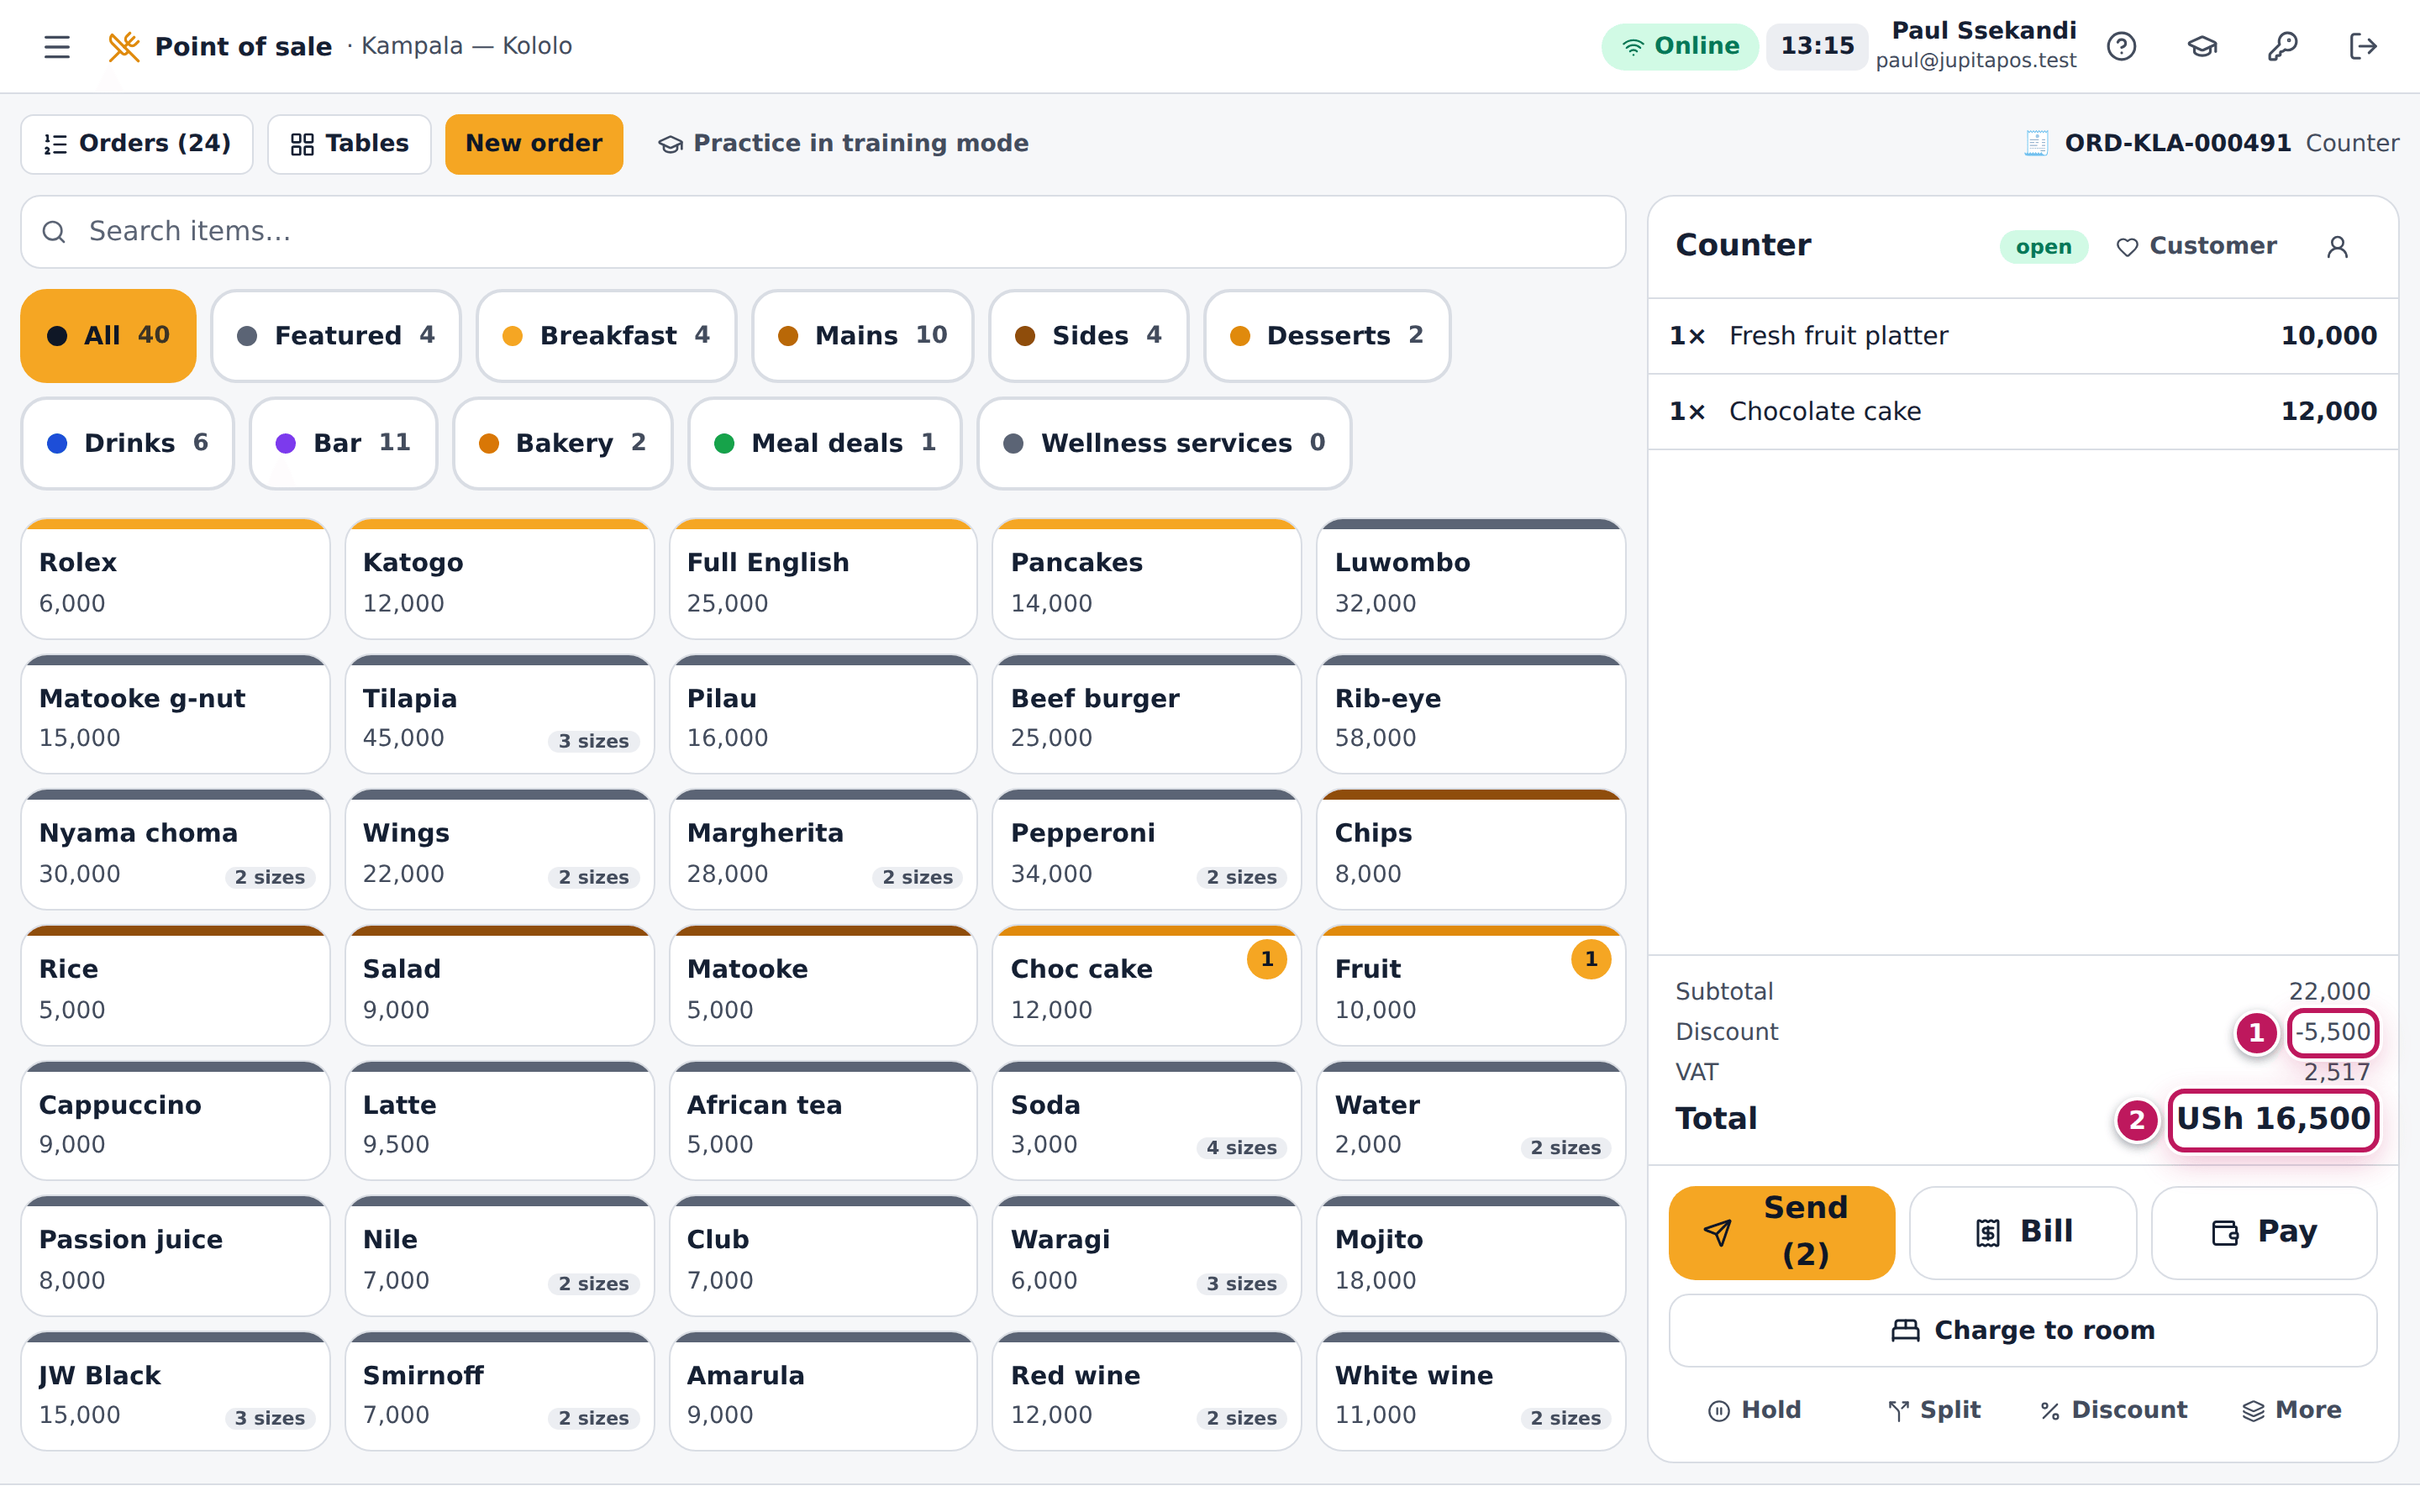
The order panel shows a Discount line of −2,200 (1) and the new total, USh 19,800 (3), for a fruit platter and a chocolate cake of 22,000 with 10 % off. The VAT falls with the price: 3,020 (2) instead of 3,356. The receipt prints the discount with its reason, and the discount is written to the audit trail with who gave it. The 25 % approved by the supervisor shows −5,500 (1 in the last picture) and USh 16,500 (2), with VAT of 2,517; the supervisor is recorded as its approver.
Screenshot
Common mistakes
- Discounting one item. The discount is on the whole order. For “the cake is free”, give the amount of the cake with Amount (UGX).
- No reason. Type a real reason: managers and the audit trail read it, and alerts can be set up for unusual discounts.
- Typing the supervisor’s PIN for them. The supervisor is recorded as the approver; they type their own number and PIN.
- Stacking with a loyalty reward. A reward is a discount too; the till refuses a second one while the reward is on.
Troubleshooting
- “Wrong PIN.” The supervisor types it again. After several wrong PINs it is locked for a while.
- “Unknown supervisor.” The employee number is wrong; check it.
- “… cannot approve this (sales.discount.large).” That person is not a supervisor or manager. Call one who is.
- “The order has a loyalty reward; remove the reward first.” Take the reward off in the customer panel, or keep the reward and skip the discount.
- Discount is greyed out. The order has no items, or your role cannot give discounts.
FAQ
Is the service charge worked out before or after the discount? After: the service charge is on the discounted amount.
Why did the VAT change? Prices include VAT, so a discount lowers the VAT in them too: the discount is shared across the items and each item’s VAT is worked out on what it is sold for.
Remove a line that was sent to the kitchen
Purpose
Take an item off an order after it went to the kitchen or bar — the customer changed their mind, it was rung up by mistake — so it is not charged, the kitchen knows, and the loss is recorded with a reason and the supervisor who approved it.
Role / permission required
Removing a line that was not sent: anyone who can edit orders
(sales.edit). Voiding a line that was sent: sales.void (supervisors and
managers), or a supervisor’s approval with their employee number and PIN
on your till.
Prerequisites
- The order is open (not paid). A paid order is refunded instead (see Refund a paid order).
- For a sent line, a supervisor is at hand.
Steps
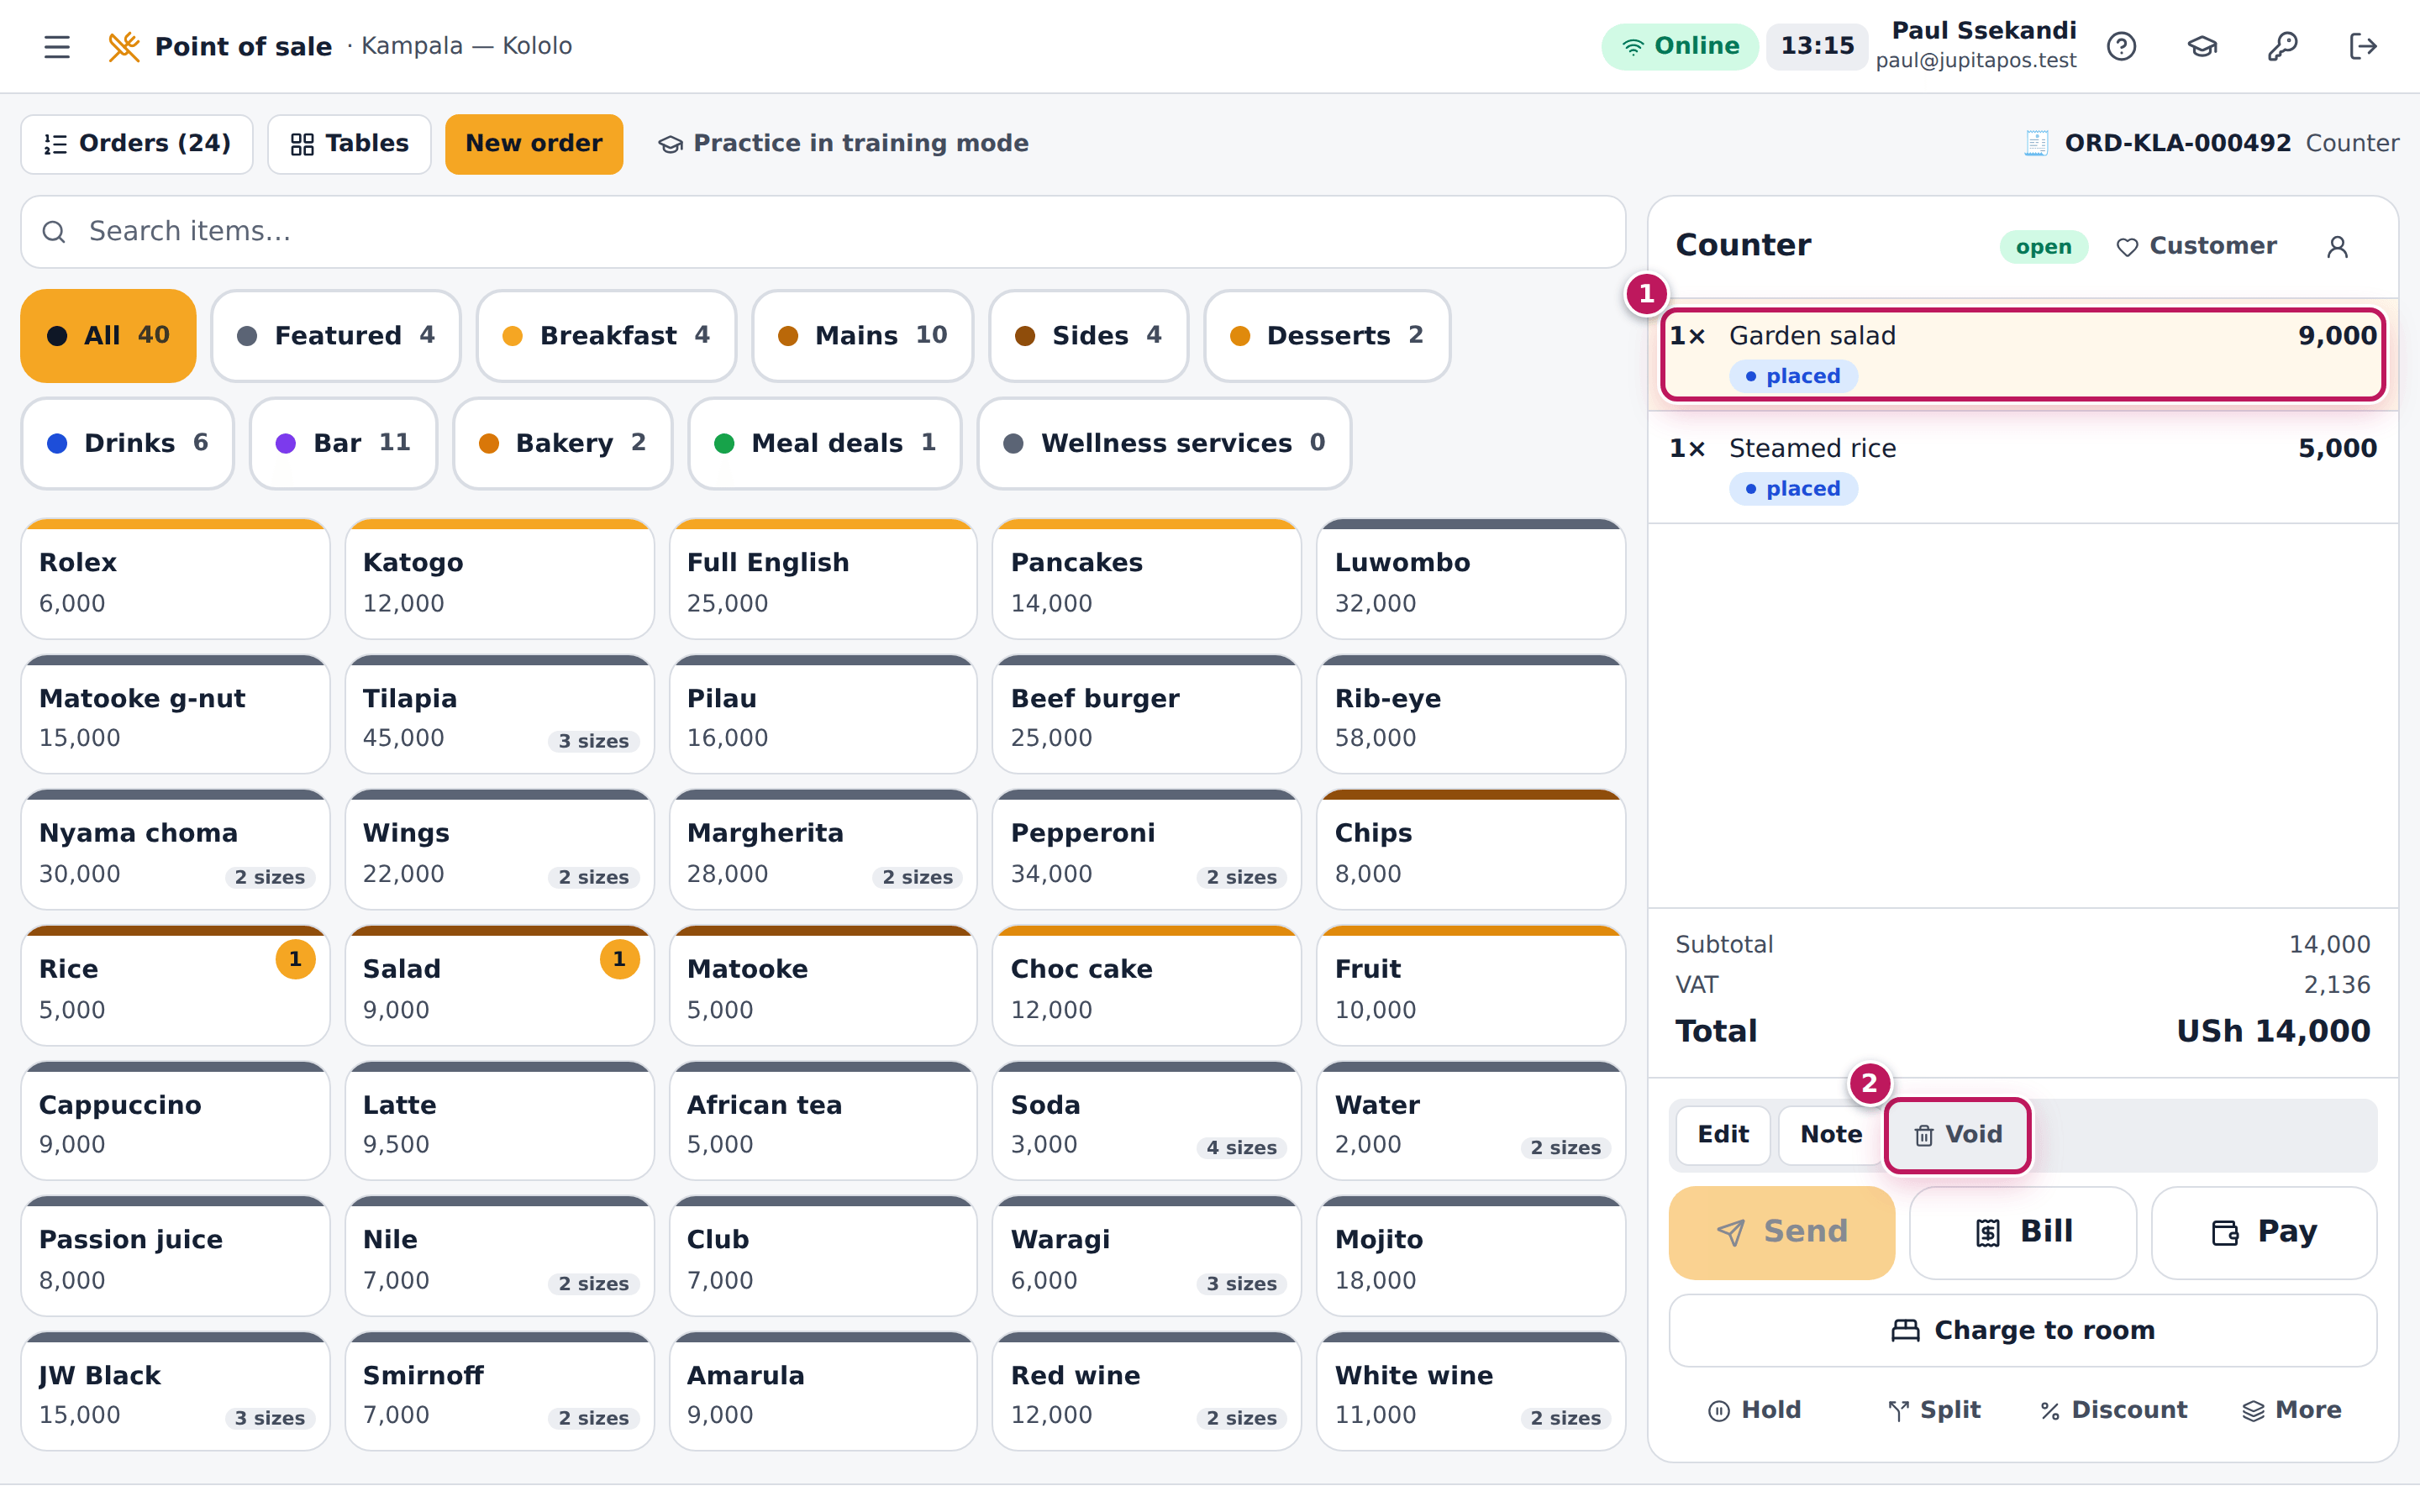
- Tap the line in the order (1). Buttons appear under the lines.
- If the line was not sent yet, tap Remove: it is taken off at once.
- If it was sent — it shows placed, in progress, ready or served — the button says Void (2). Tap it.
- Type the reason in the box that opens — for example Customer changed mind — and confirm with OK.
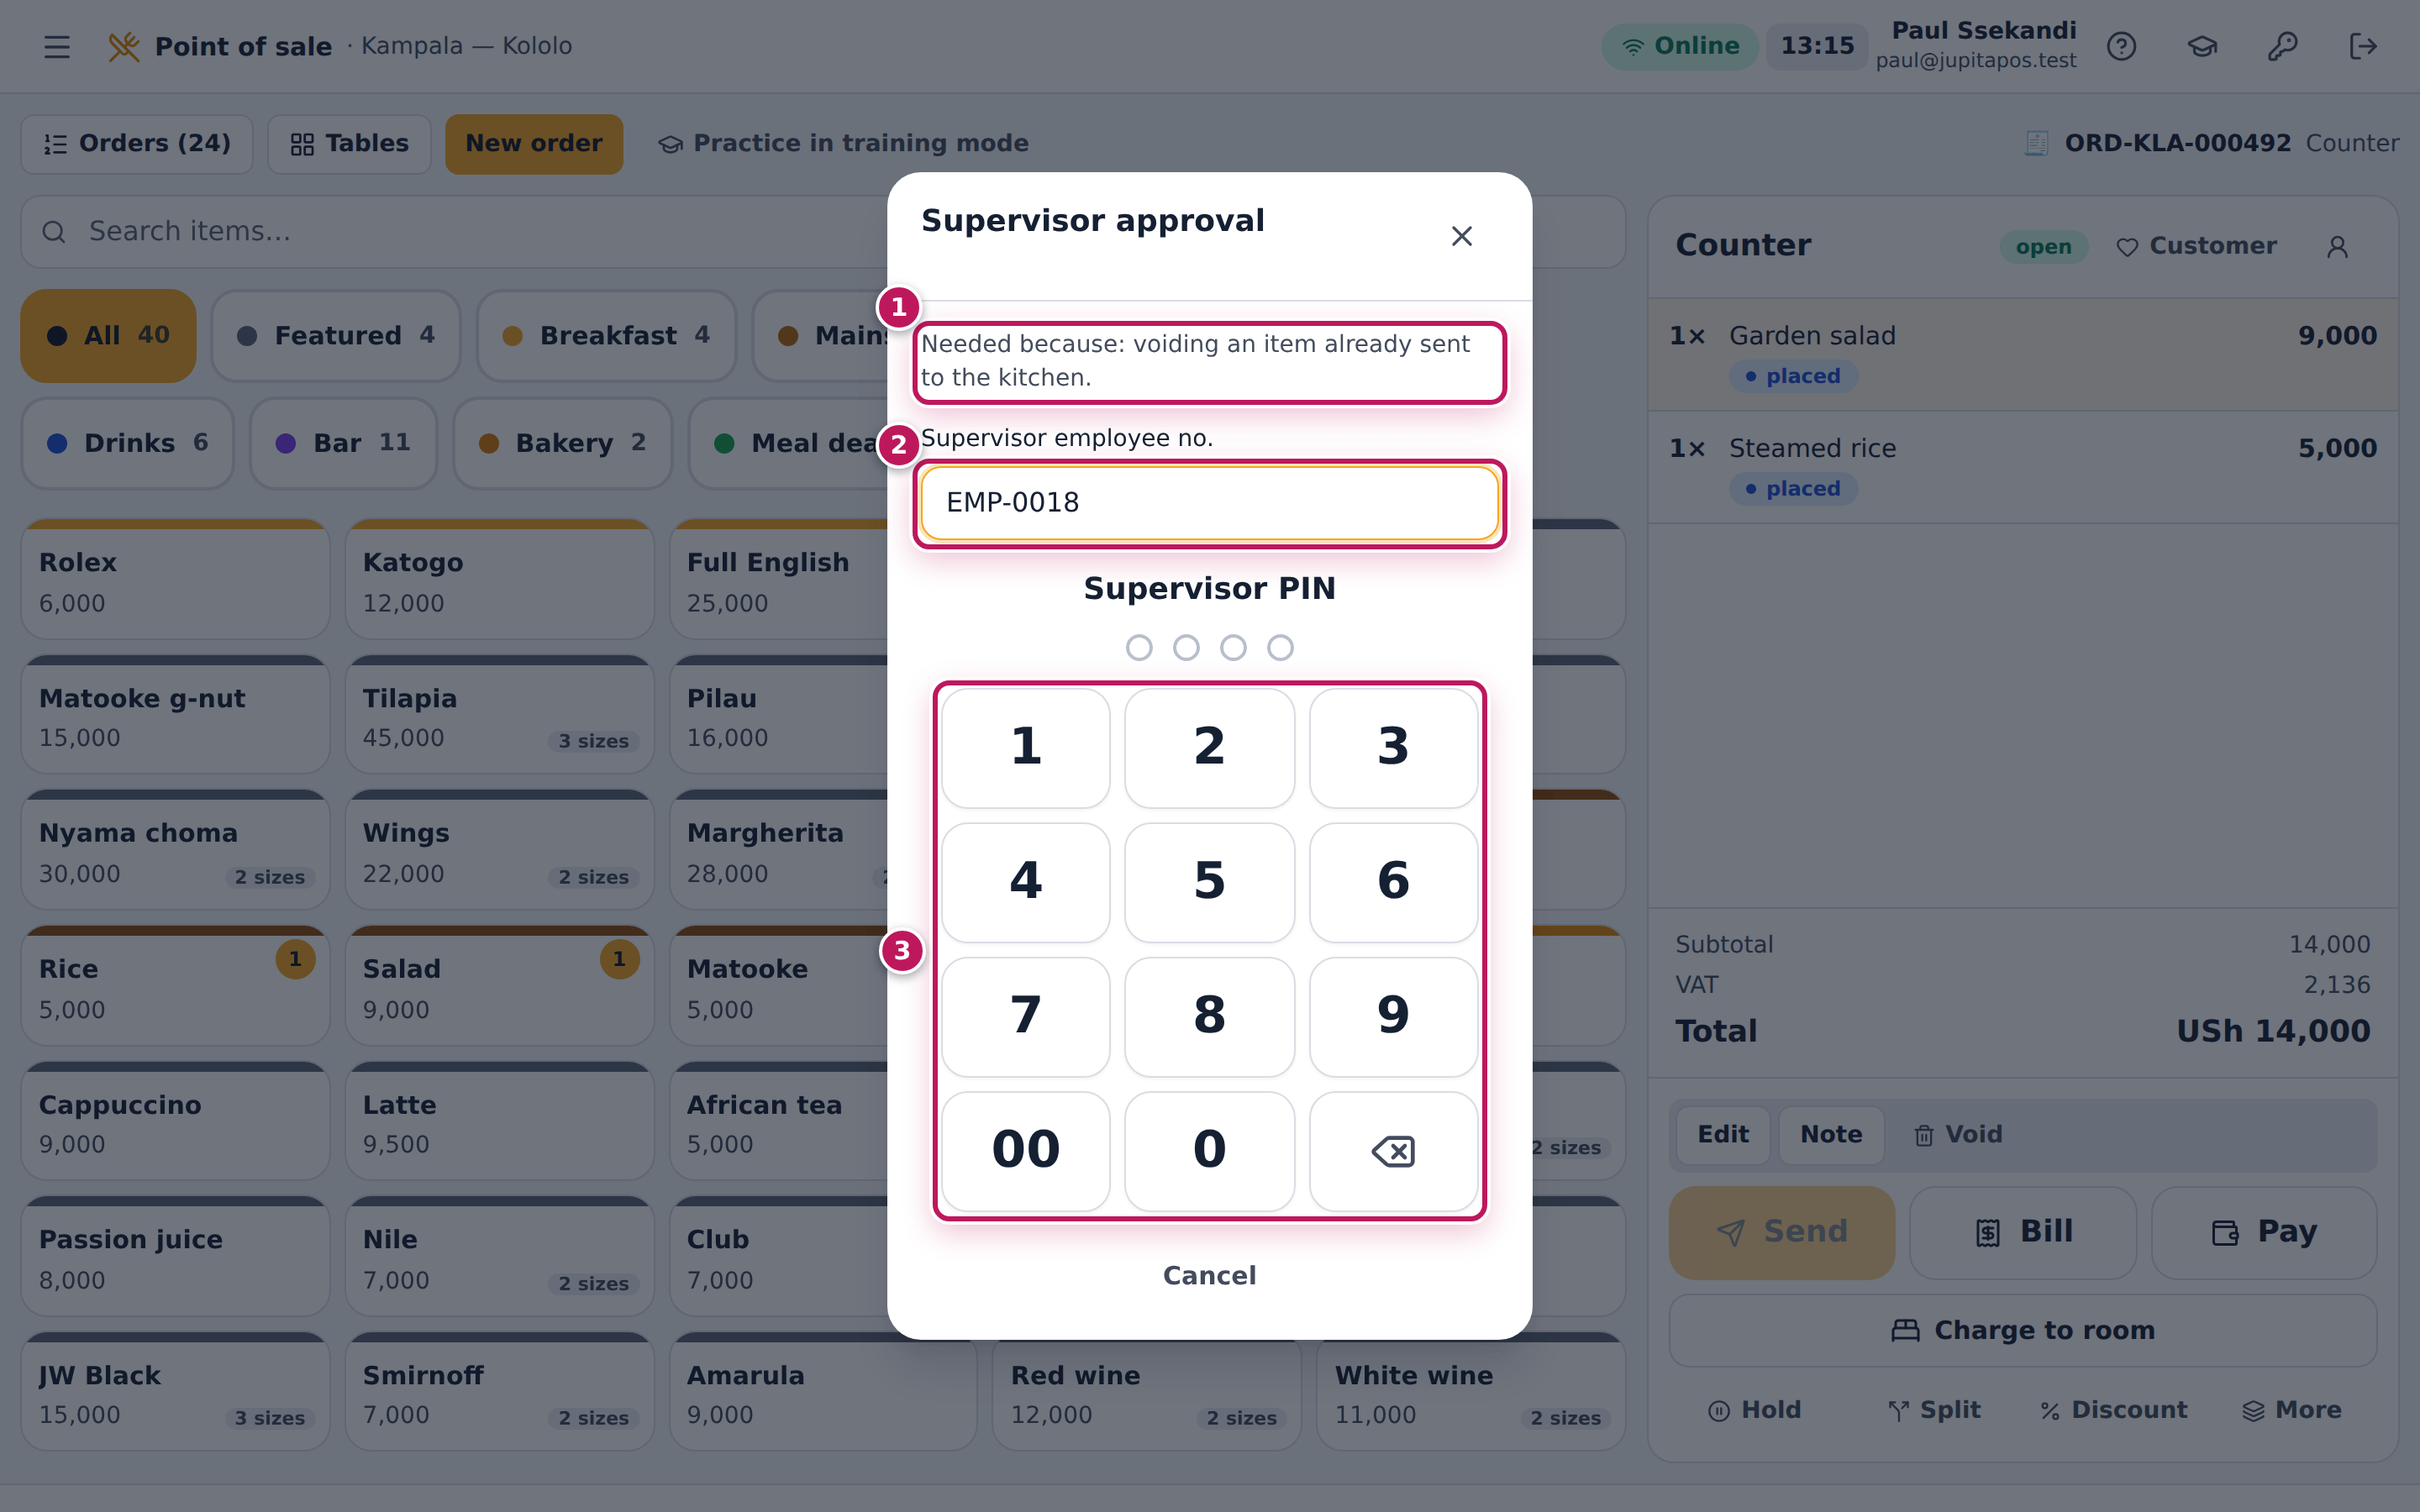
- The Supervisor approval prompt opens and says why (1): voiding an item already sent to the kitchen. Hand the till to the supervisor.
- The supervisor types their Supervisor employee no. (2) — for Sam, EMP-0018 — and their PIN on the keypad (3). The line is voided and you carry on with the order.
A supervisor or manager signed in with their own e-mail and password voids the line straight away, without the prompt.
Expected result
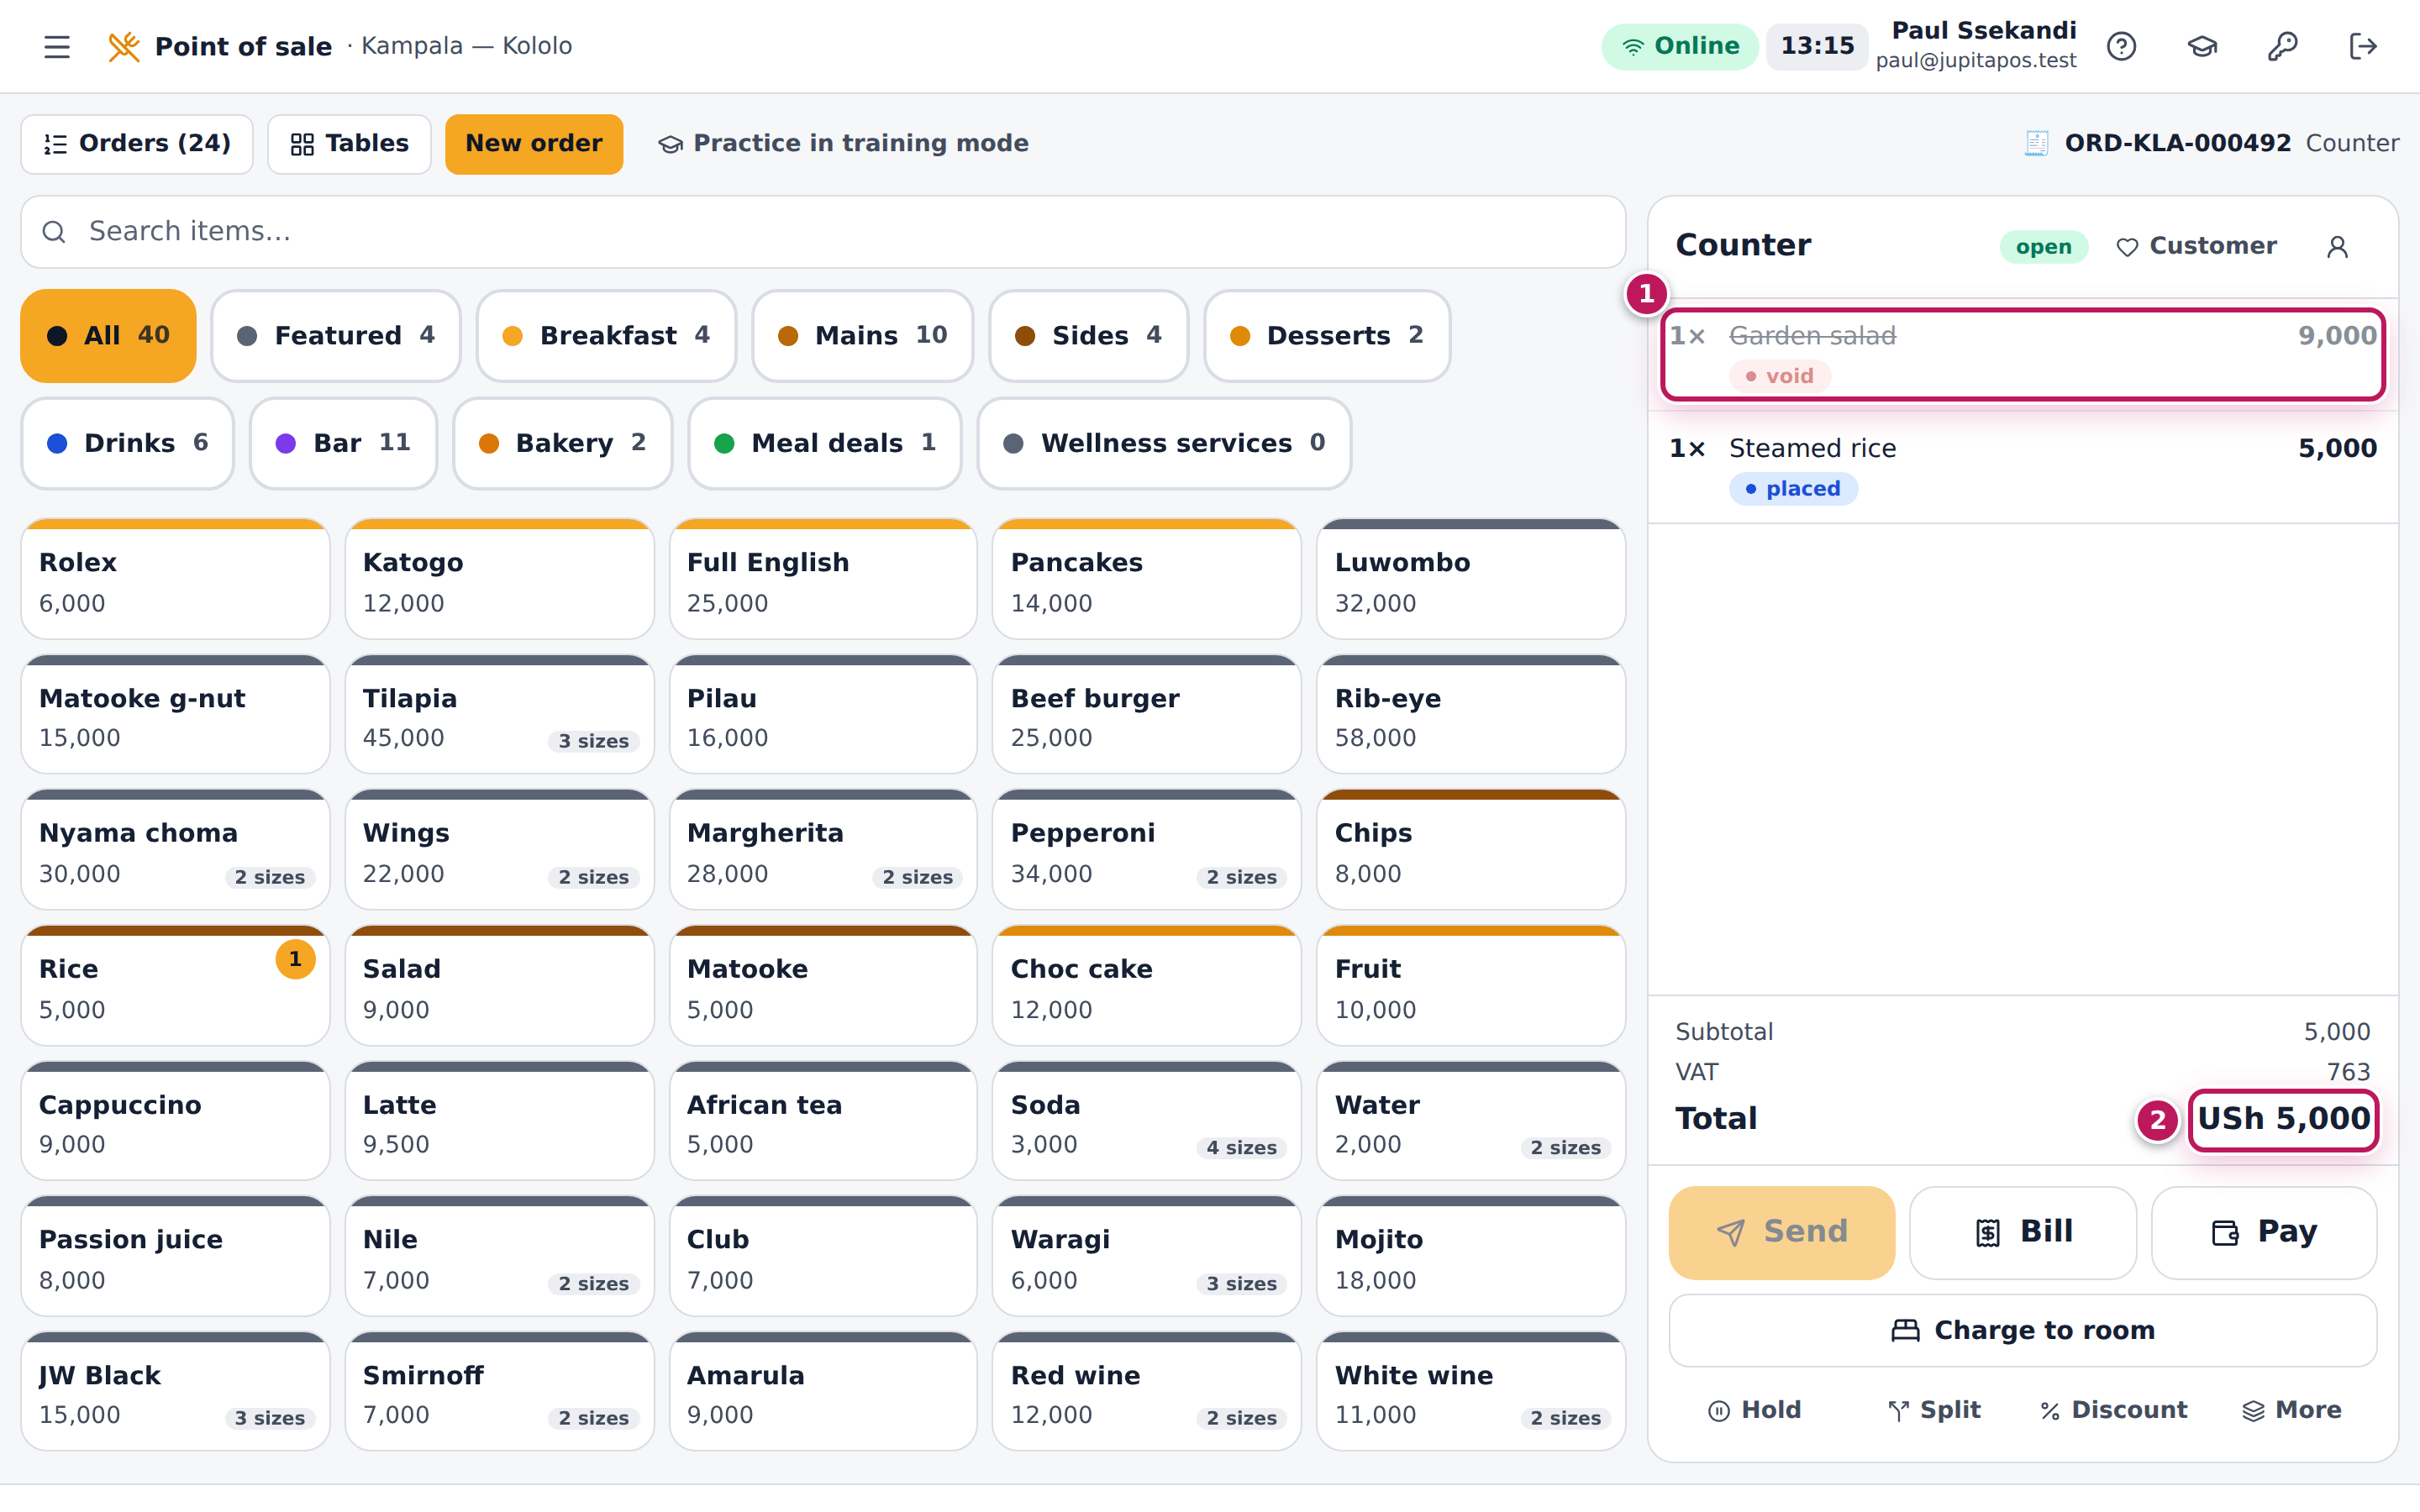
The line stays on the order, struck through and marked void (1), and is no longer charged: without the salad (9,000) the order is USh 5,000 (2). The item is taken off the kitchen or bar ticket, and the void is written to the audit trail with the reason, the cashier and the supervisor who approved it.
Screenshot
Common mistakes
- Sending before checking. Every line sent by mistake costs a supervisor’s approval. Read the order back to the customer, then tap Send.
- Voiding to “correct” a price or a choice. Void the wrong line and ring the right item again; the kitchen sees both.
- Typing the supervisor’s PIN for them. The approver is recorded in the audit trail; each person types their own PIN.
Troubleshooting
- “Wrong PIN.” The supervisor types it again. After several wrong PINs it is locked for a while.
- Void does nothing. The box asking for the reason was left empty or closed. A void always needs a reason; tap Void again and type one.
- “Unknown supervisor.” The employee number is wrong. Sam’s is EMP-0018 in the demo; it is on the supervisor’s staff record.
- “… cannot approve this (sales.void).” The person who typed their number is not a supervisor or manager. Call one who is.
FAQ
Can we void the whole order? Yes (see Void an order that was sent).
Cancel an order nothing was sent for
Purpose
Throw away an order that should not exist — the customer left, it was started by mistake — before anything was sent to the kitchen or bar. The order is kept with its reason, so the order numbers stay complete.
Role / permission required
Anyone who can edit orders (sales.edit): cashiers, waiters, bartenders,
baristas, supervisors, managers.
Prerequisites
- Nothing of the order was sent to the kitchen or bar, and it is not paid.
Steps
- Open the order on the till.
- Tap More under the order.
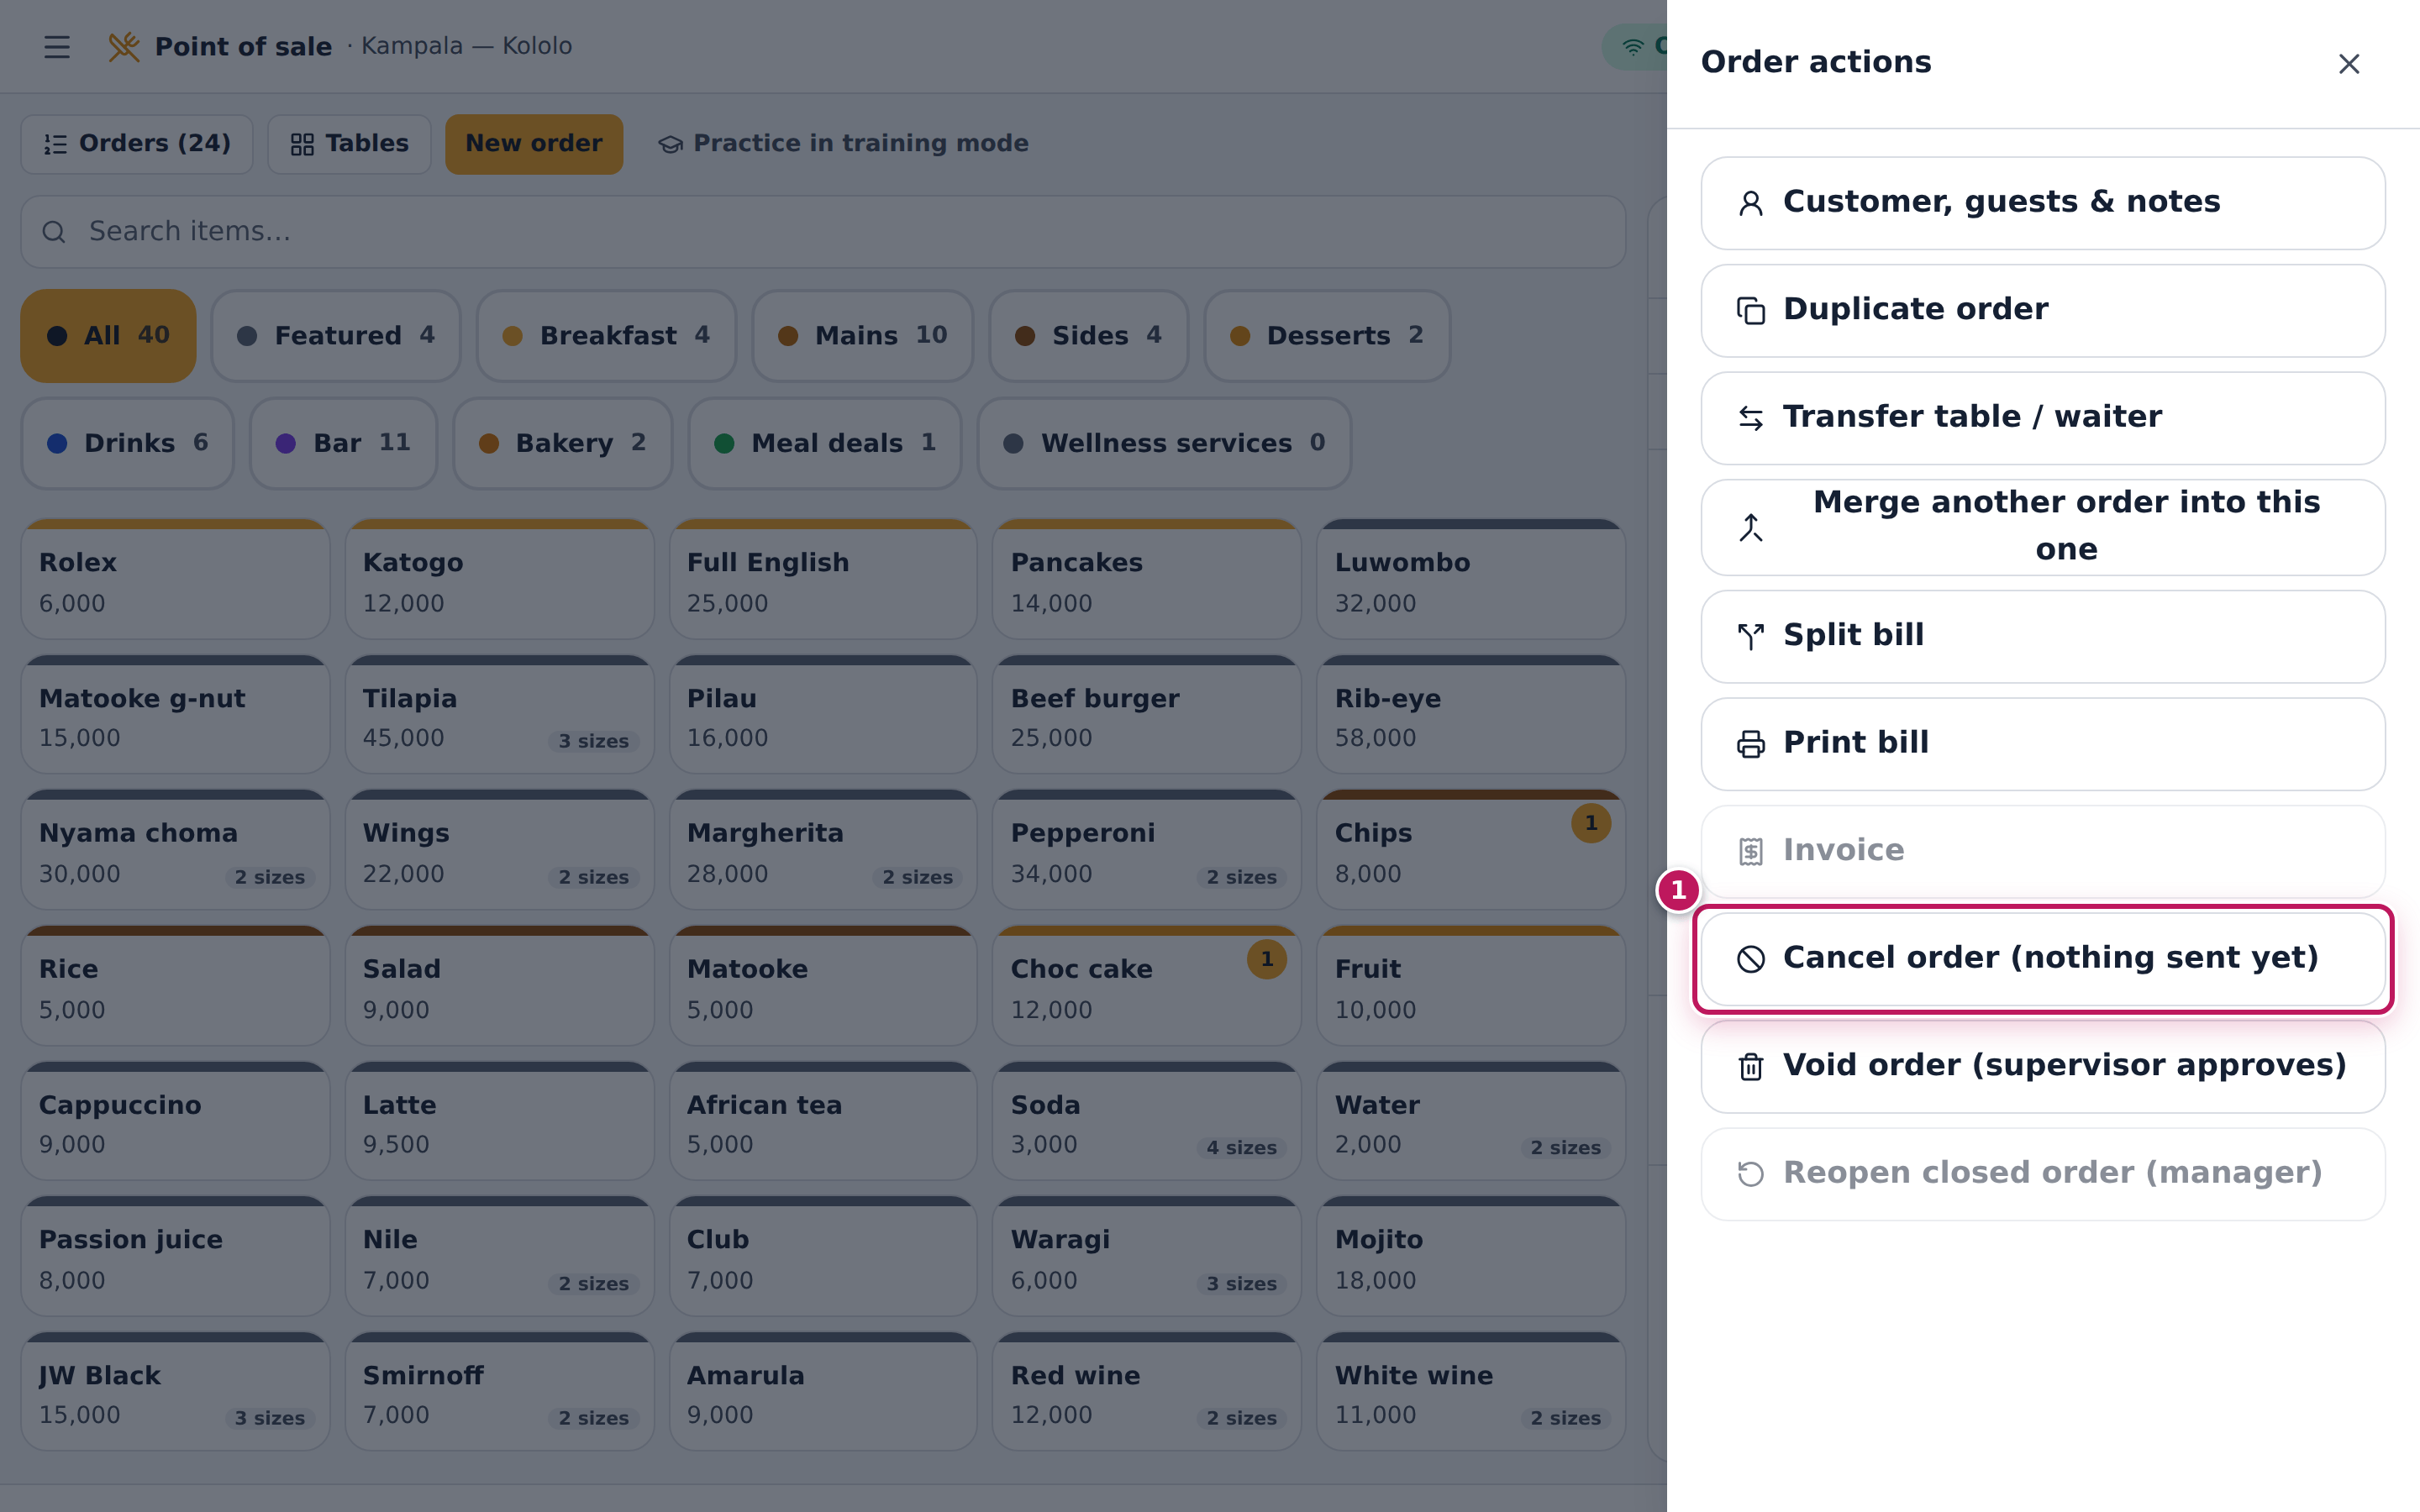
- Tap Cancel order (nothing sent yet) (1).
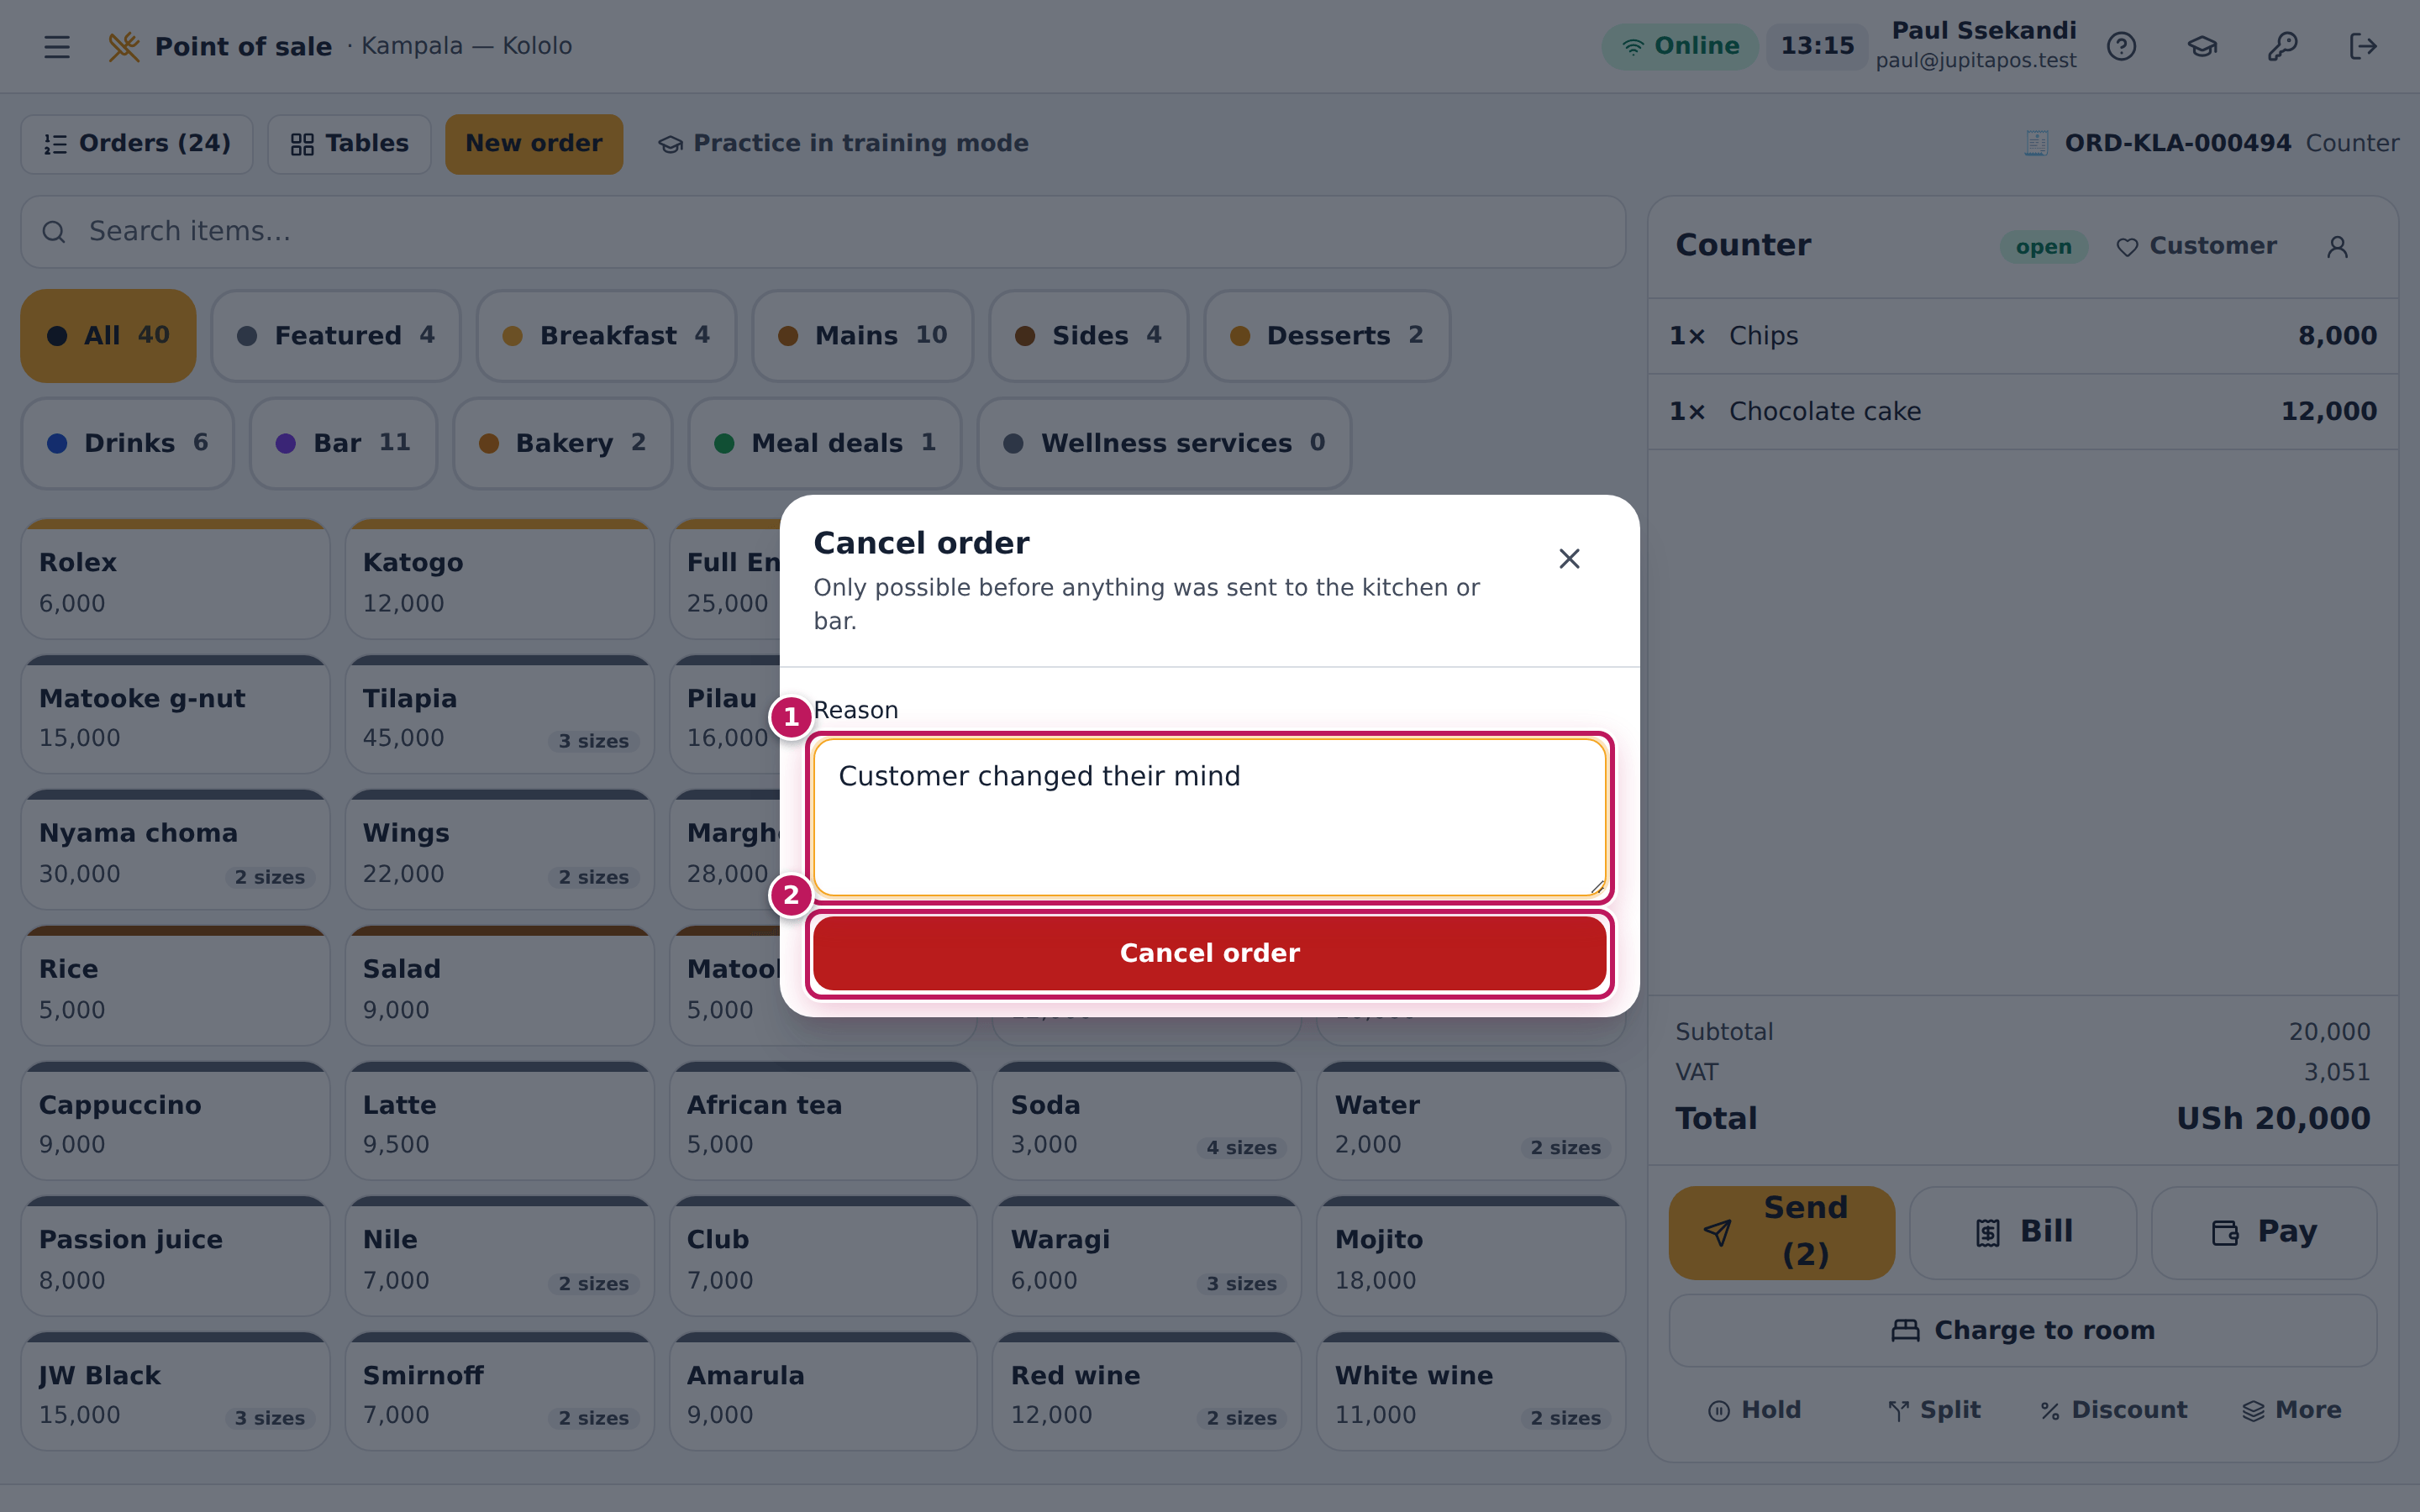
- Type the Reason (1), for example Customer changed their mind.
- Tap Cancel order (2). The till is empty again, ready for the next customer.
Expected result
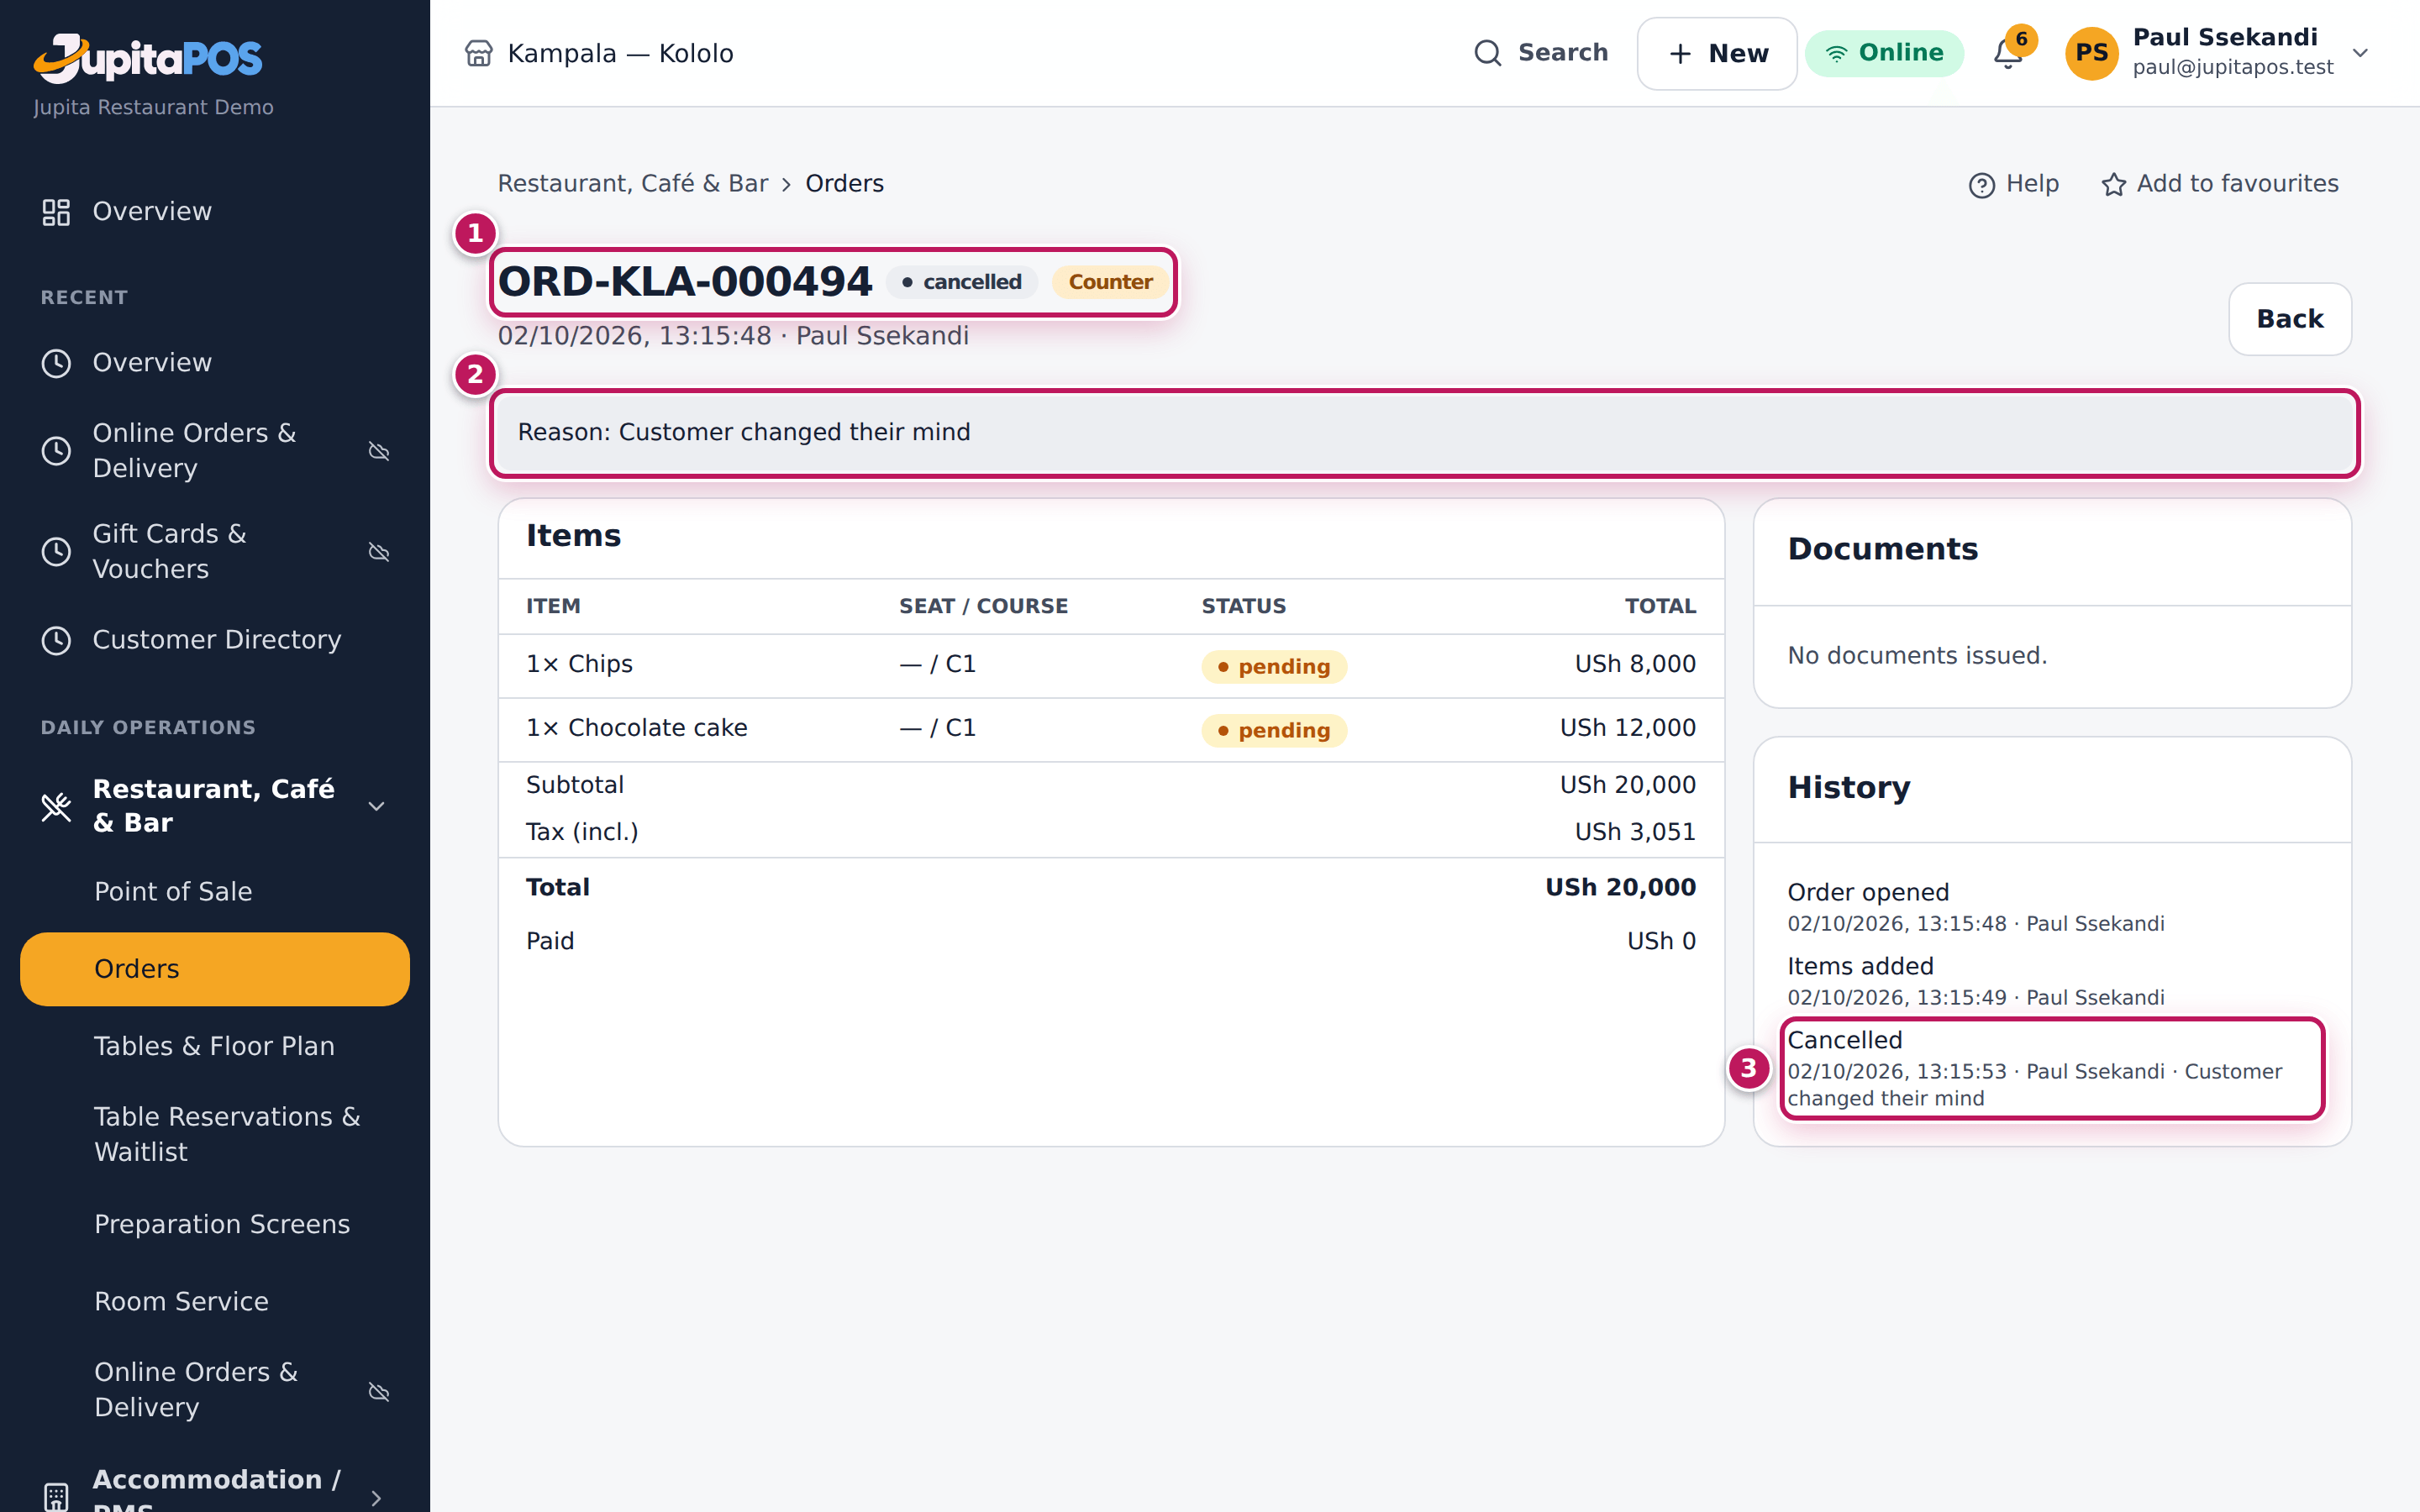
The order is cancelled (1): it leaves the till and the Orders drawer, its table is free again, and its page in the Orders list shows the reason (2) and Cancelled in its history (3) with your name and the time.
Screenshot
Common mistakes
- Cancelling a paid order. A paid order cannot be cancelled; refund it (see Refund a paid order).
- Cancelling to remove one item. Tap the line and Remove instead.
Troubleshooting
- “Items were already sent to the kitchen — void the order instead.” Something was sent. Void the order (see Void an order that was sent).
Void an order that was sent
Purpose
Stop a whole order after the kitchen or bar has it — the guests walked out, the order was a mistake — so nothing of it is charged and the kitchen stops. The order is kept, with the reason and the approver, for the audit trail and the reports.
Role / permission required
Supervisors and managers (sales.void), or anyone who can edit orders with
a supervisor’s approval (employee number and PIN) on their till.
Prerequisites
- The order is open, held or billed. A paid order can be voided too, but voiding does not give money back: refund the payment first (see Refund a paid order).
- A supervisor is at hand, unless you are one.
Steps
- Open the order on the till (from Orders if it is not on the screen).
- Tap More under the order.
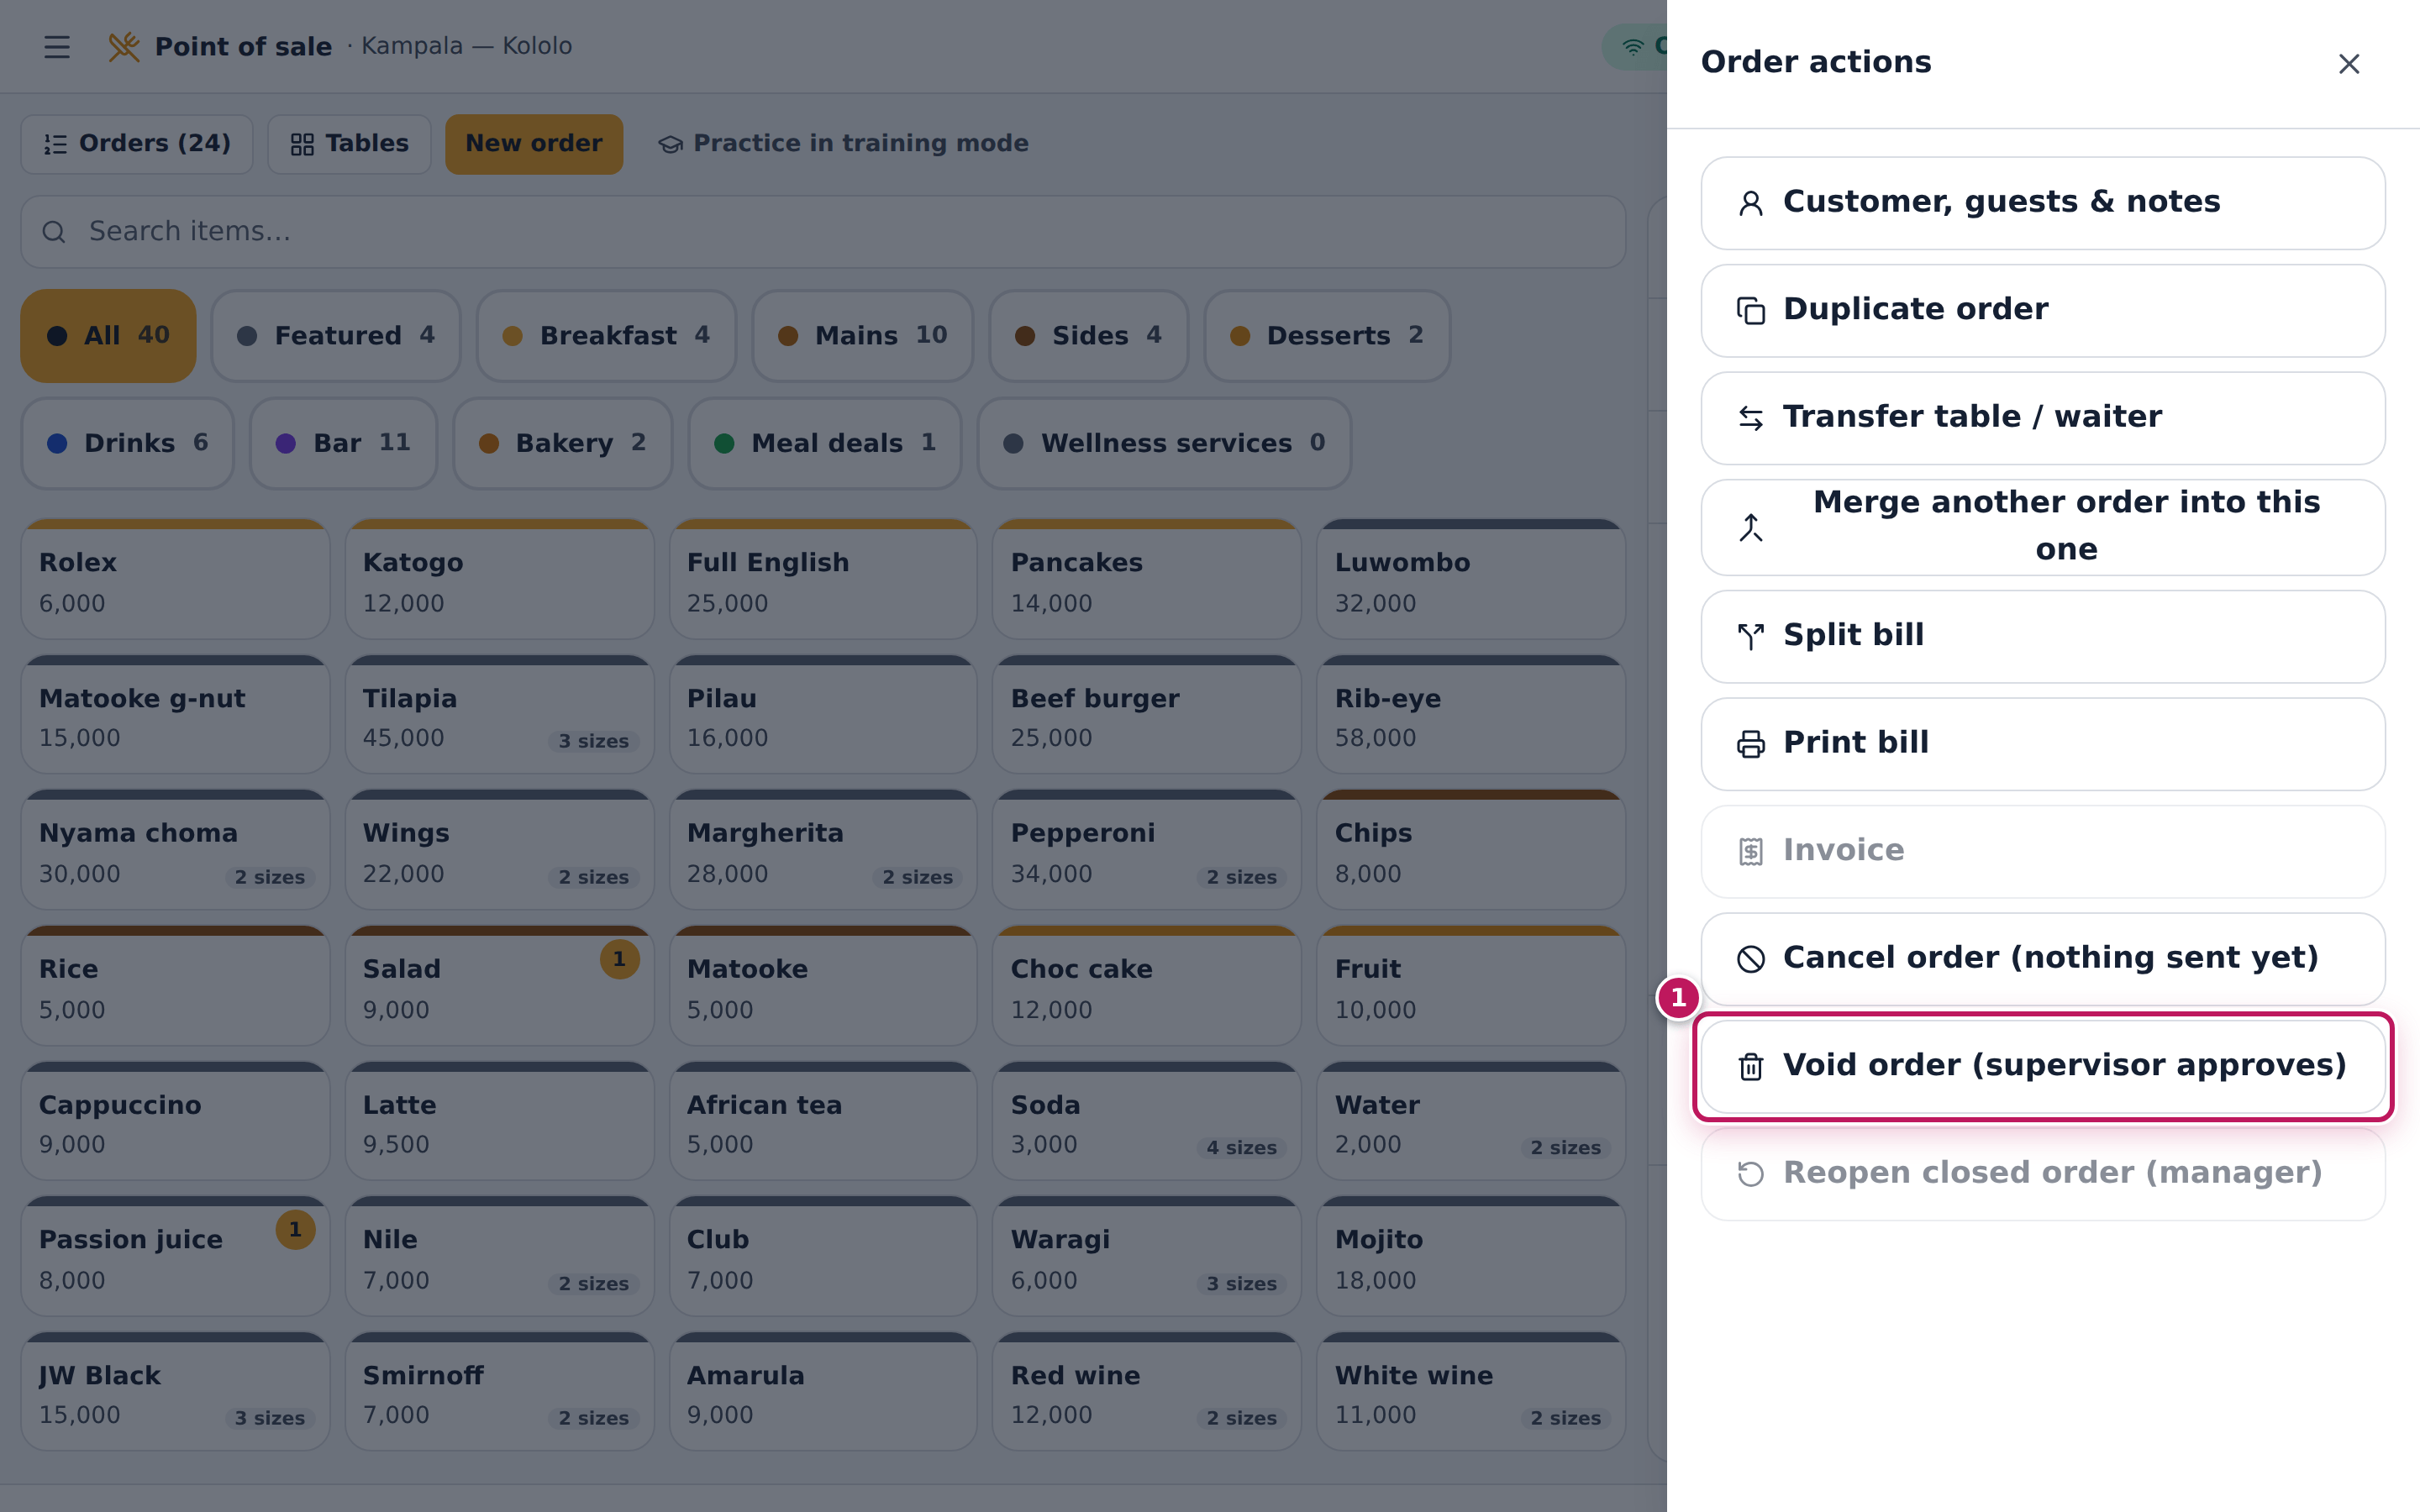
- Tap Void order (supervisor approves) (1). A supervisor or manager sees Void order.
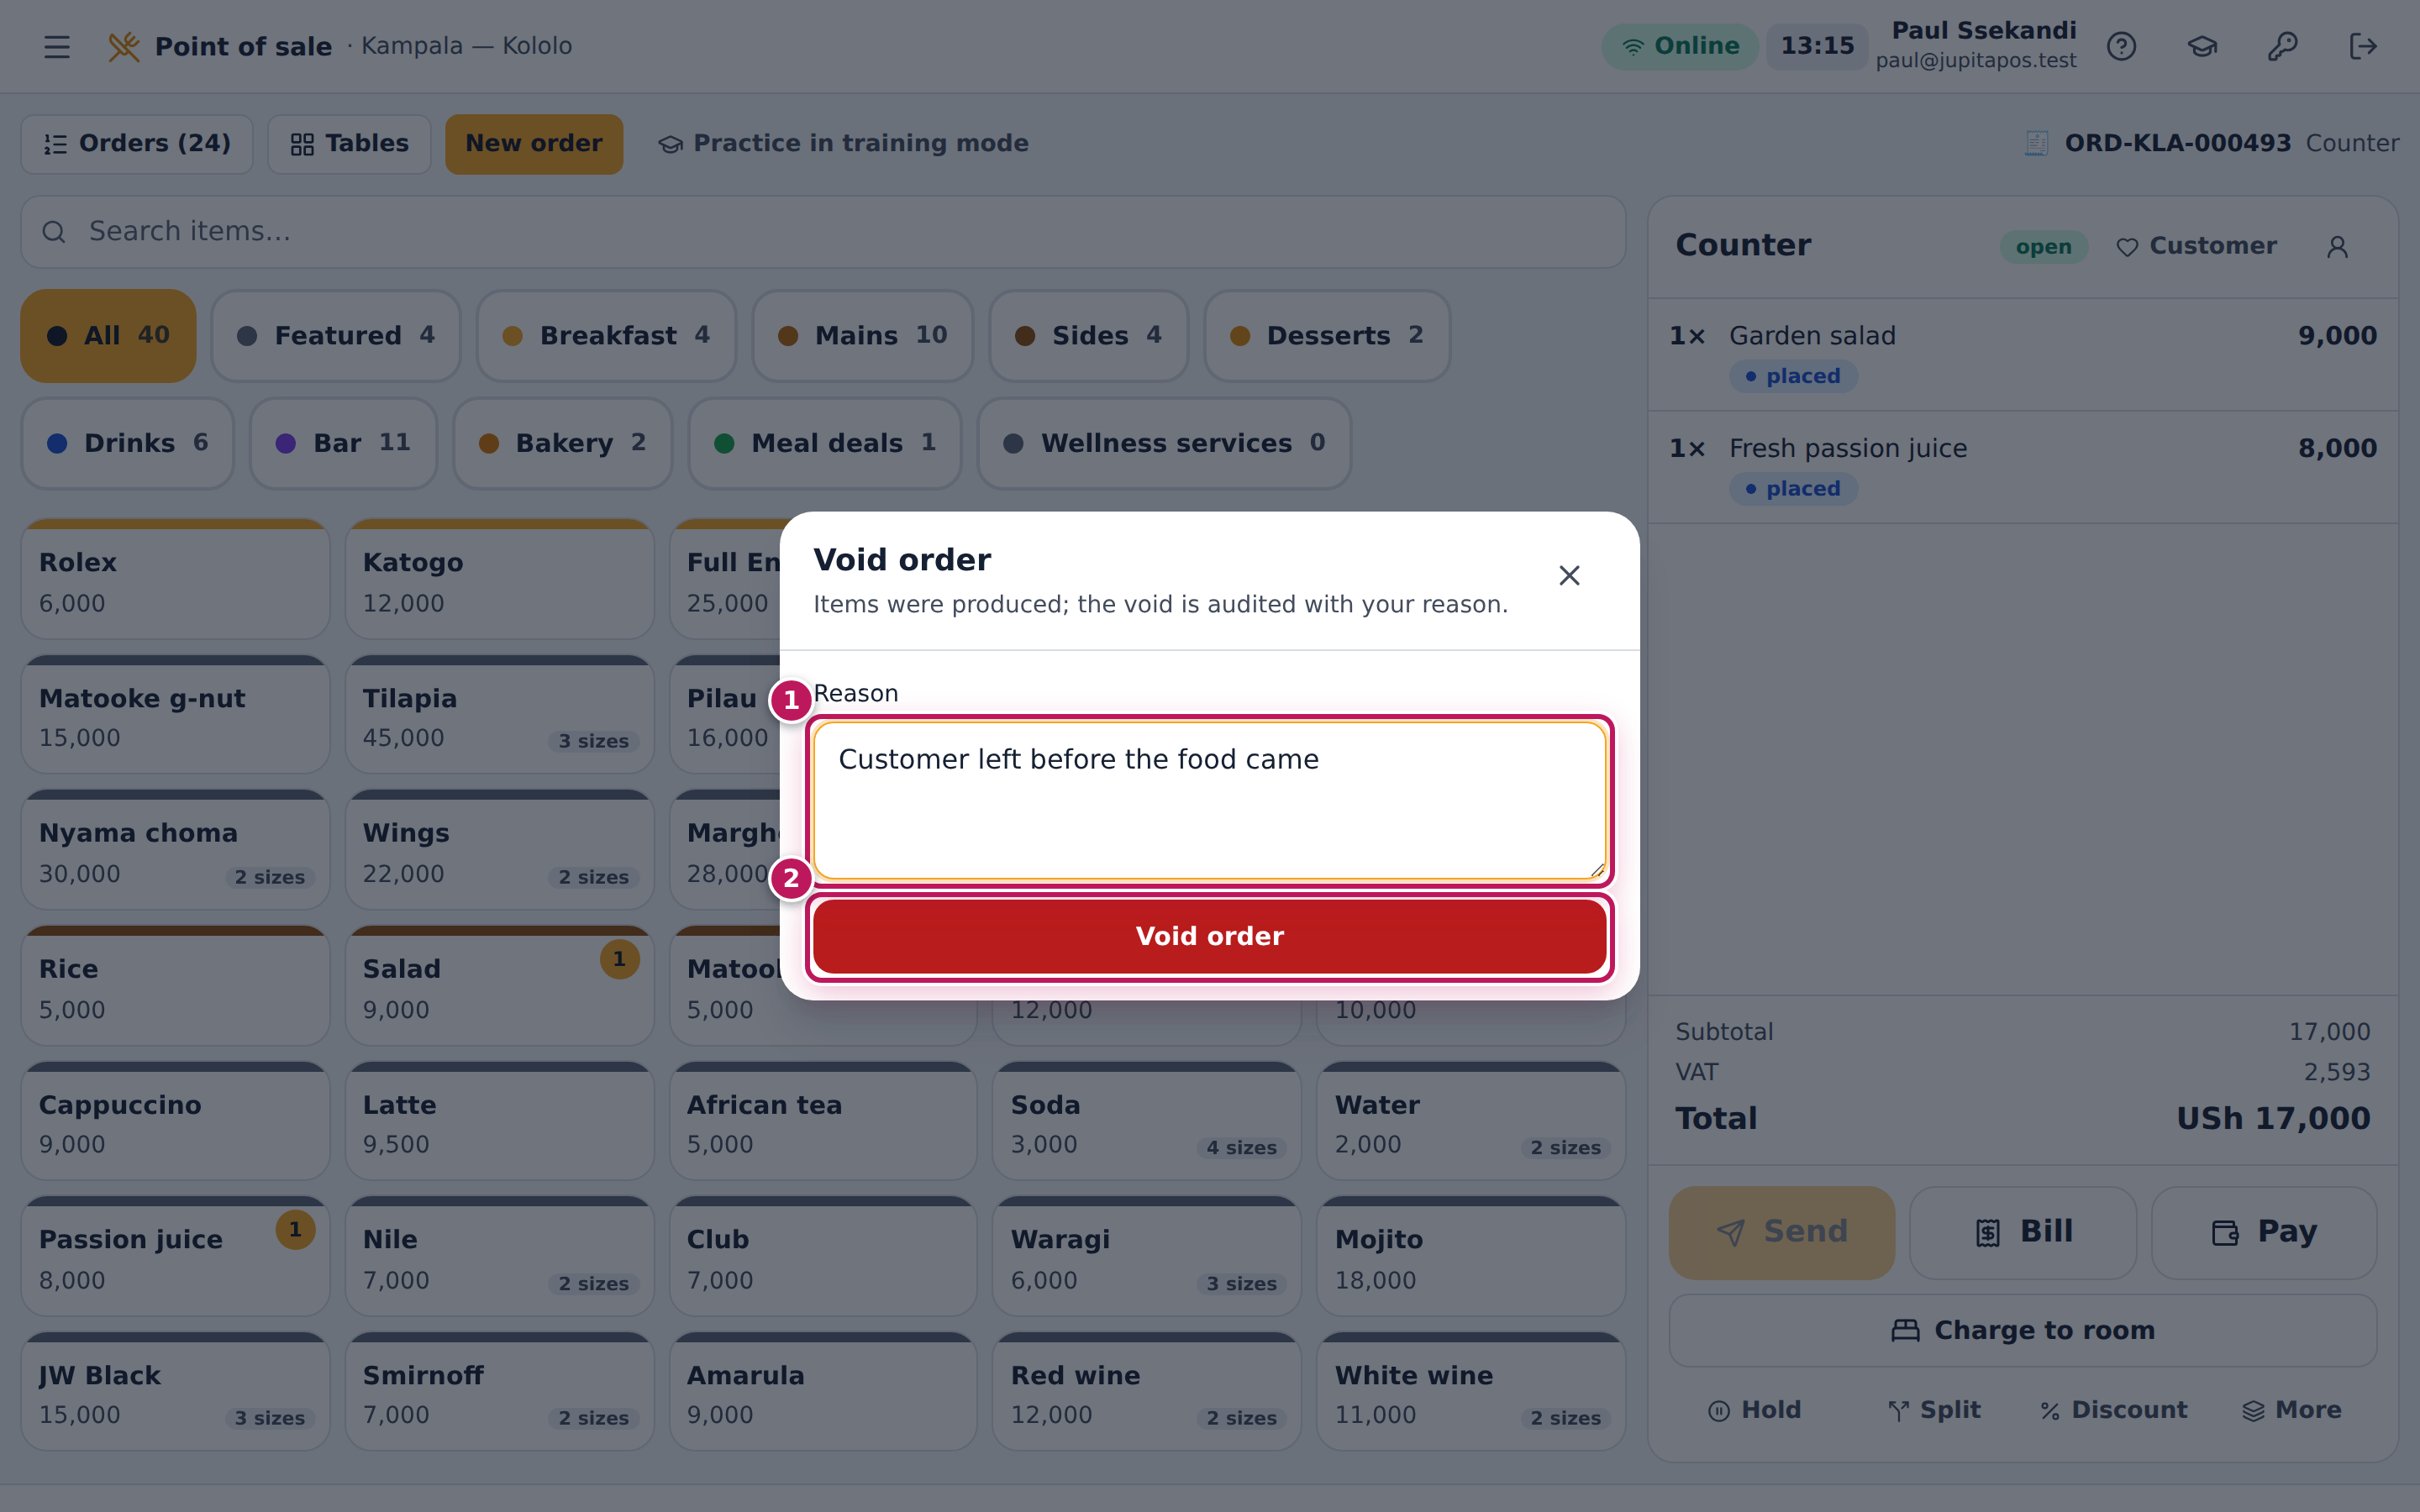
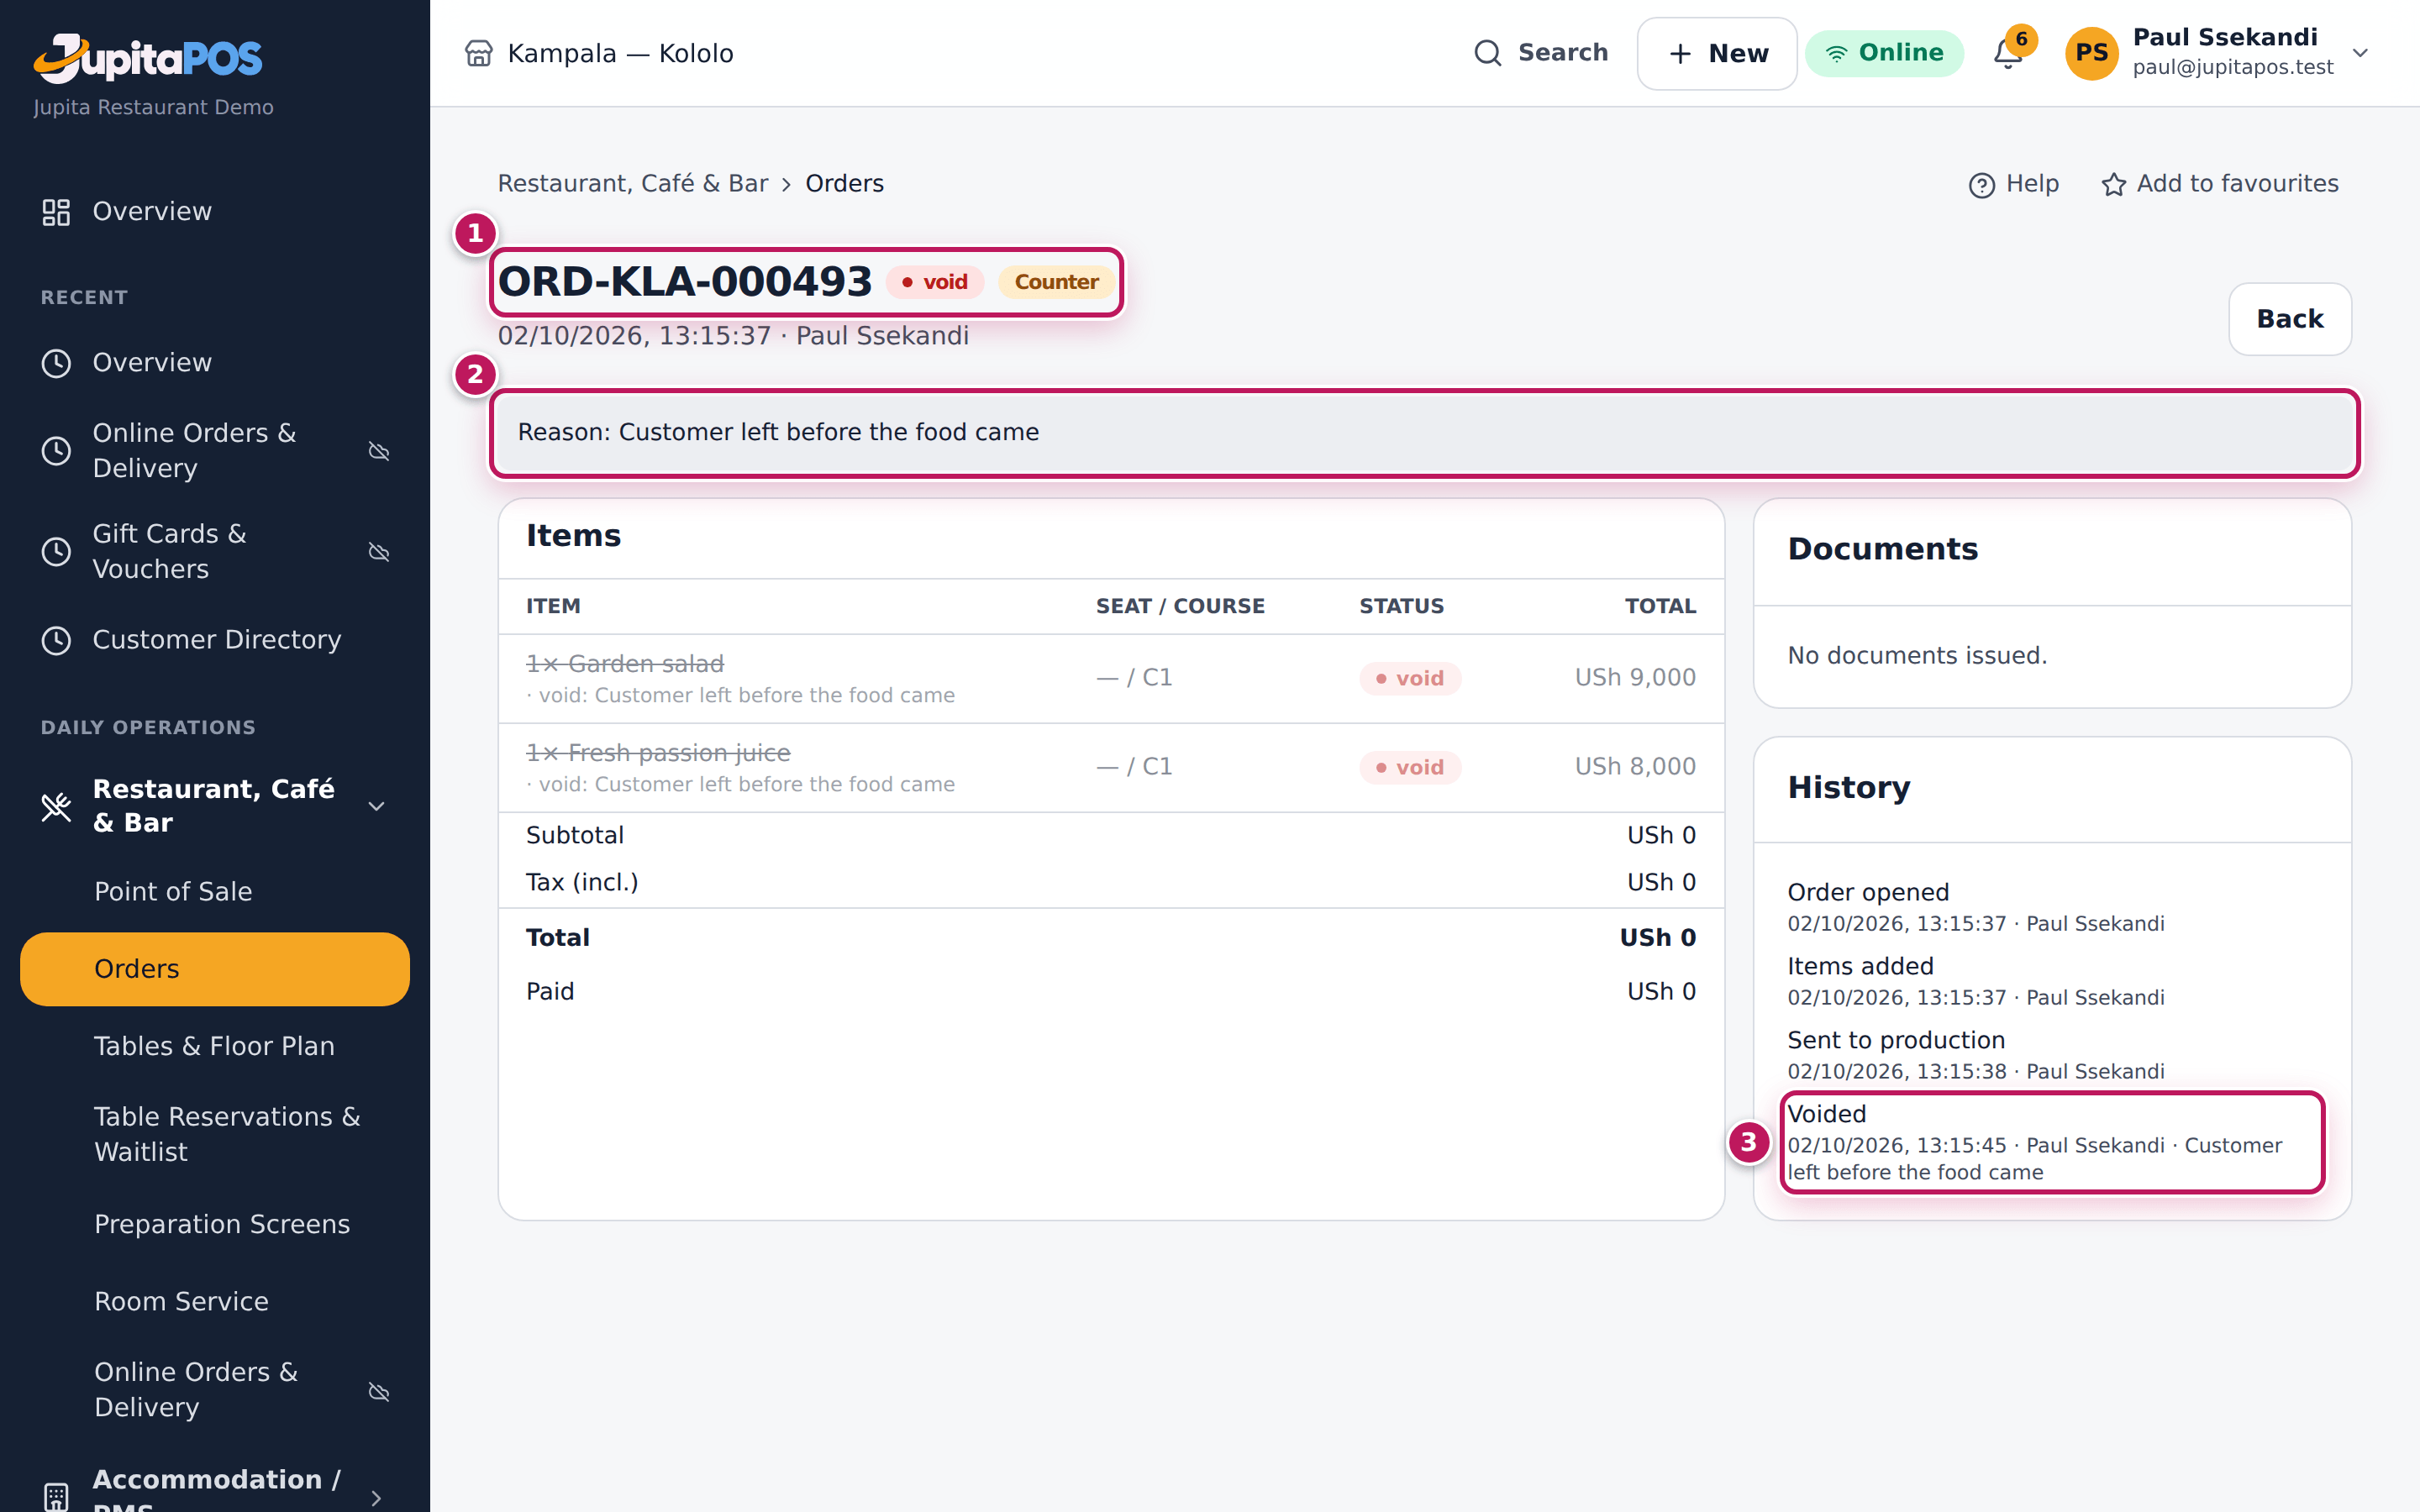
- Type the Reason (1), for example Customer left before the food came.
- Tap Void order (2).
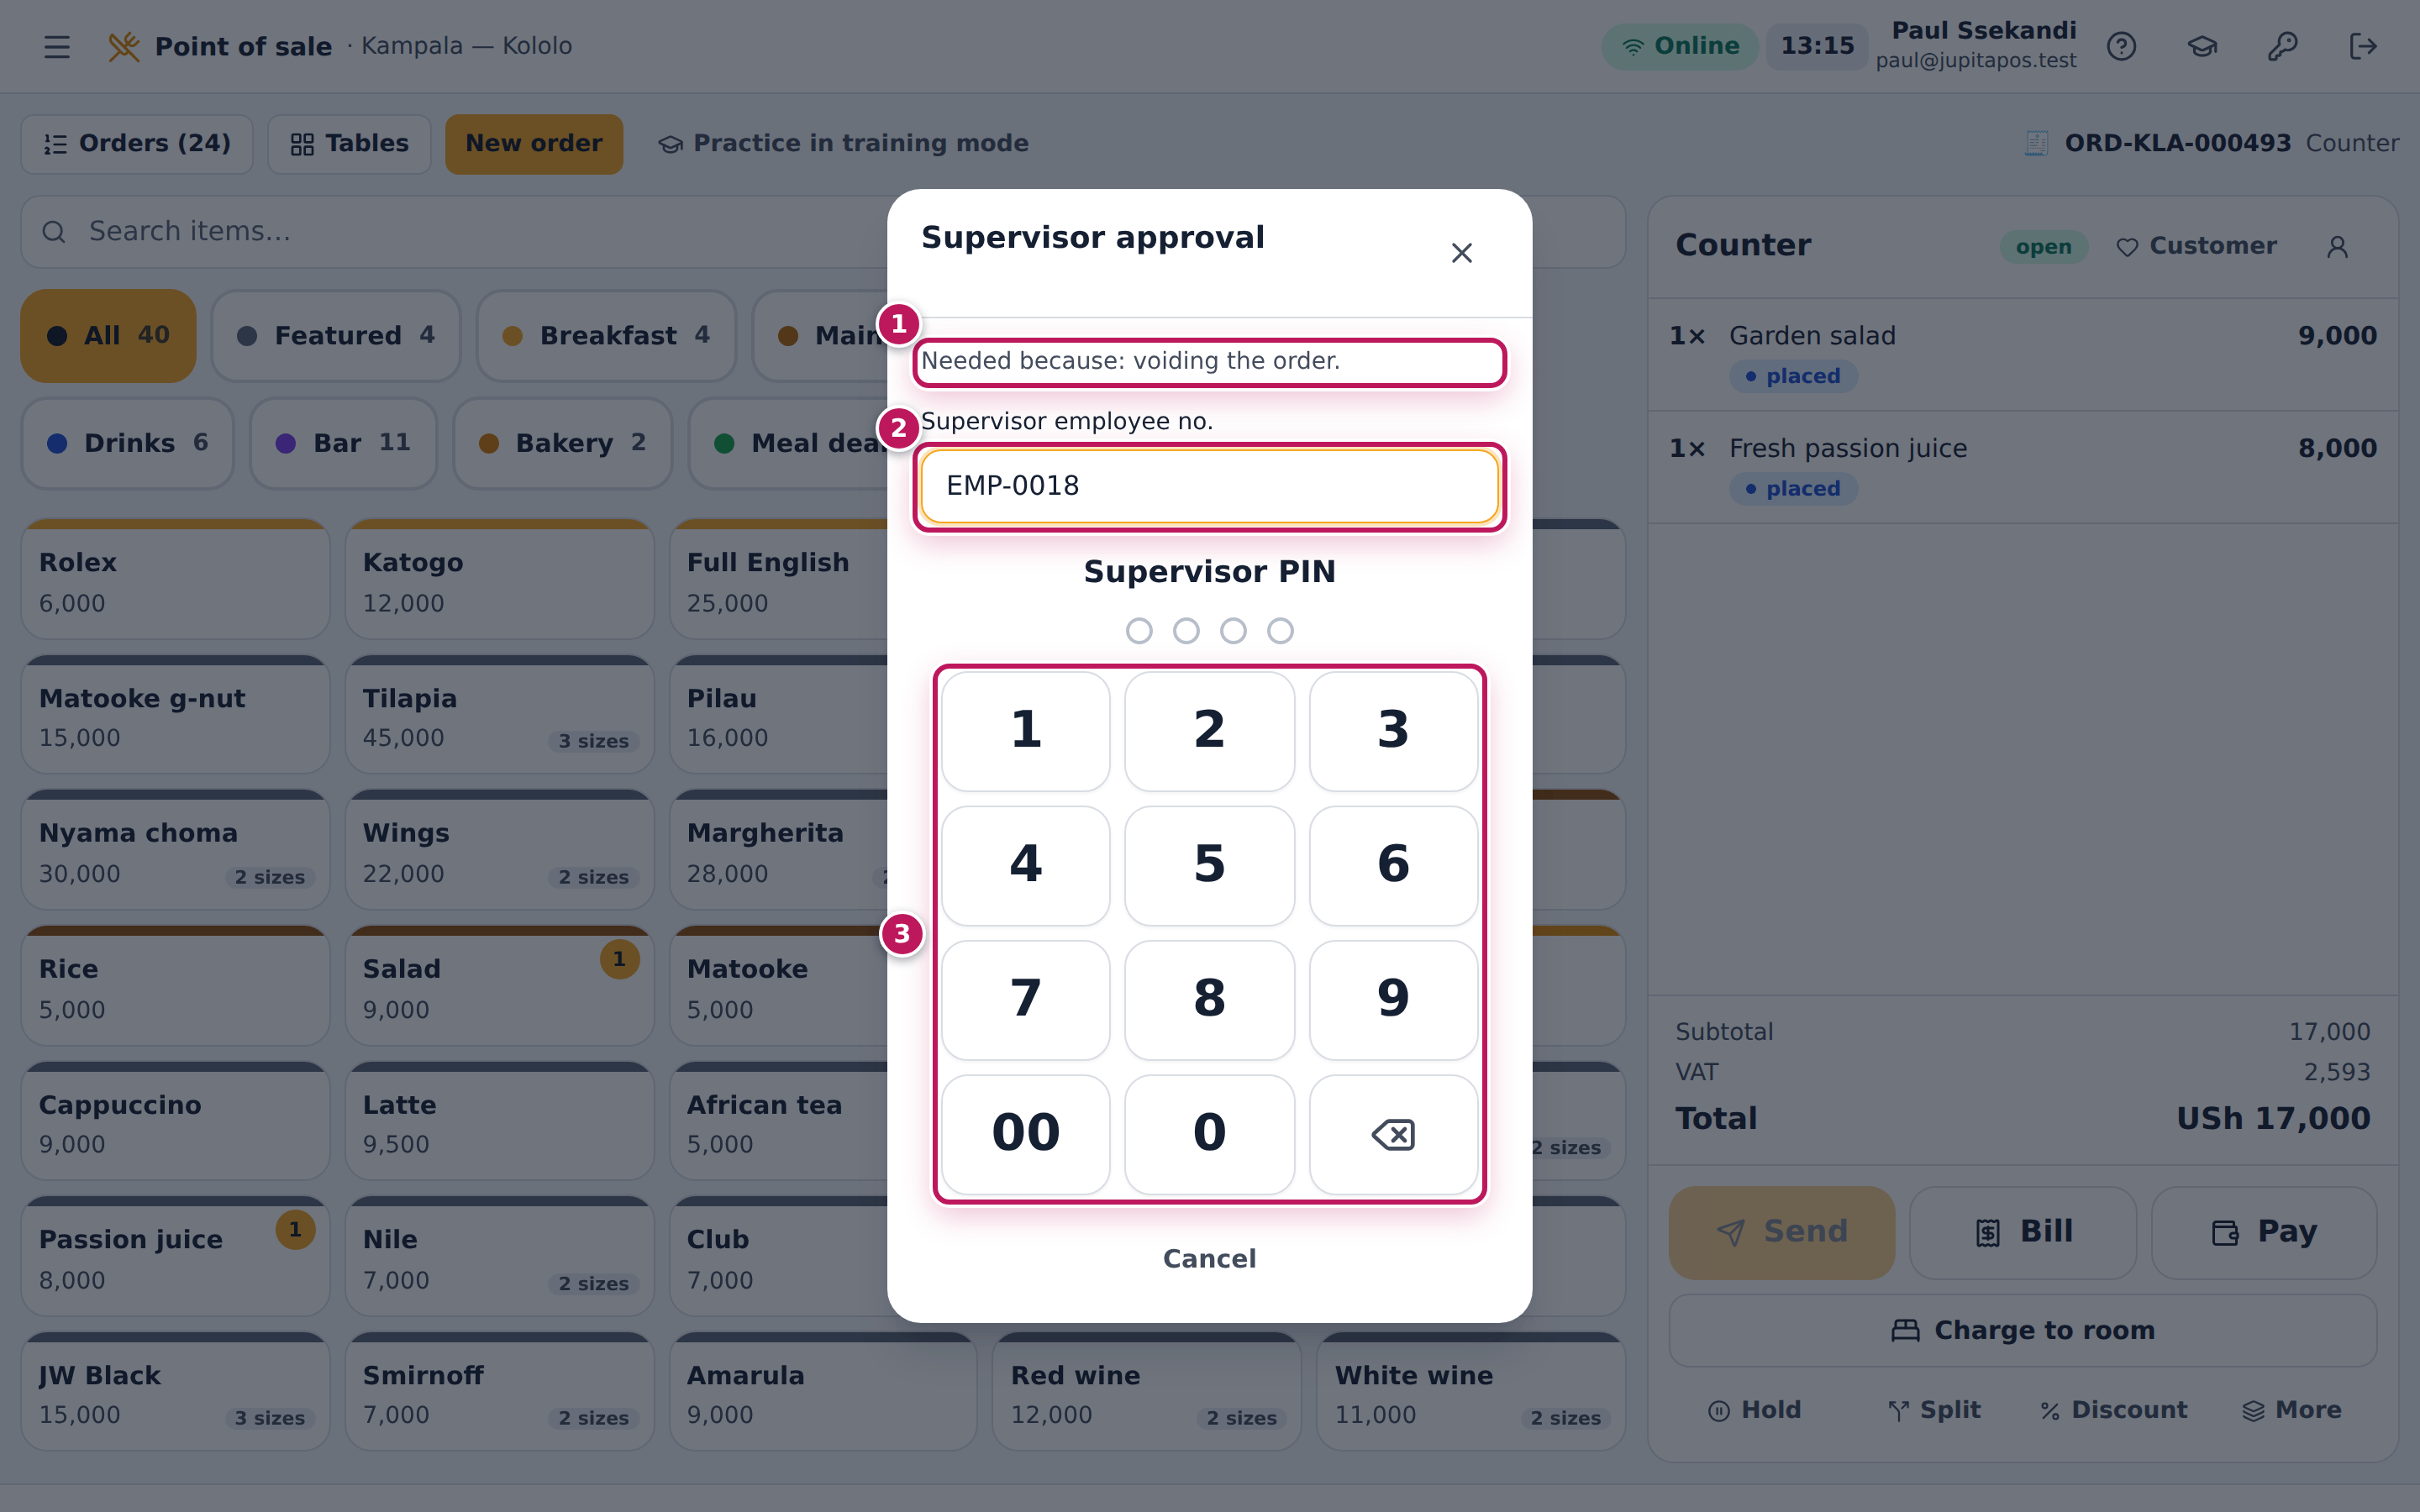
- The Supervisor approval prompt opens and says why (1): voiding the order. The supervisor types their Supervisor employee no. (2) and their PIN on the keypad (3).
Expected result
The till is empty again, ready for the next customer. The order is void (1): every line is struck through and not charged, the tickets come off the kitchen and bar screens, the table is freed, and the order’s page shows the reason (2) and Voided in its history (3) with your name. The Orders page offers Void too, for supervisors and managers working away from the till.
Screenshot
Common mistakes
- Voiding when one line is wrong. Void only that line (see Remove a line that was sent).
- A reason like “error”. Write what happened; the owner reads voids in the audit trail.
Troubleshooting
- “Wrong PIN.” The supervisor types it again. After several wrong PINs it is locked for a while: PIN locked — try again later.
- “Unknown supervisor.” The employee number is wrong; check it.
- “… cannot approve this (sales.void).” That person is not a supervisor or manager. Call one who is.
- The prompt was closed by mistake. Nothing was voided. Tap More → Void order (supervisor approves) again.
Take a cash payment and give change
Purpose
Take the customer’s cash, see the change to give, close the order and hand over a receipt.
Role / permission required
Anyone who takes payments (payments.take) with a till open in their name:
cashiers, bartenders, baristas, supervisors, managers. Waiters take card
and mobile money; cash
goes through the person who has the drawer.
Prerequisites
- Your till is open (see Open the till). Cash always goes into a drawer, so the payment is refused without one.
- The order has its items (see Ring up a counter order).
Steps
- Tap Pay under the order. The Pay dialog shows what is due.
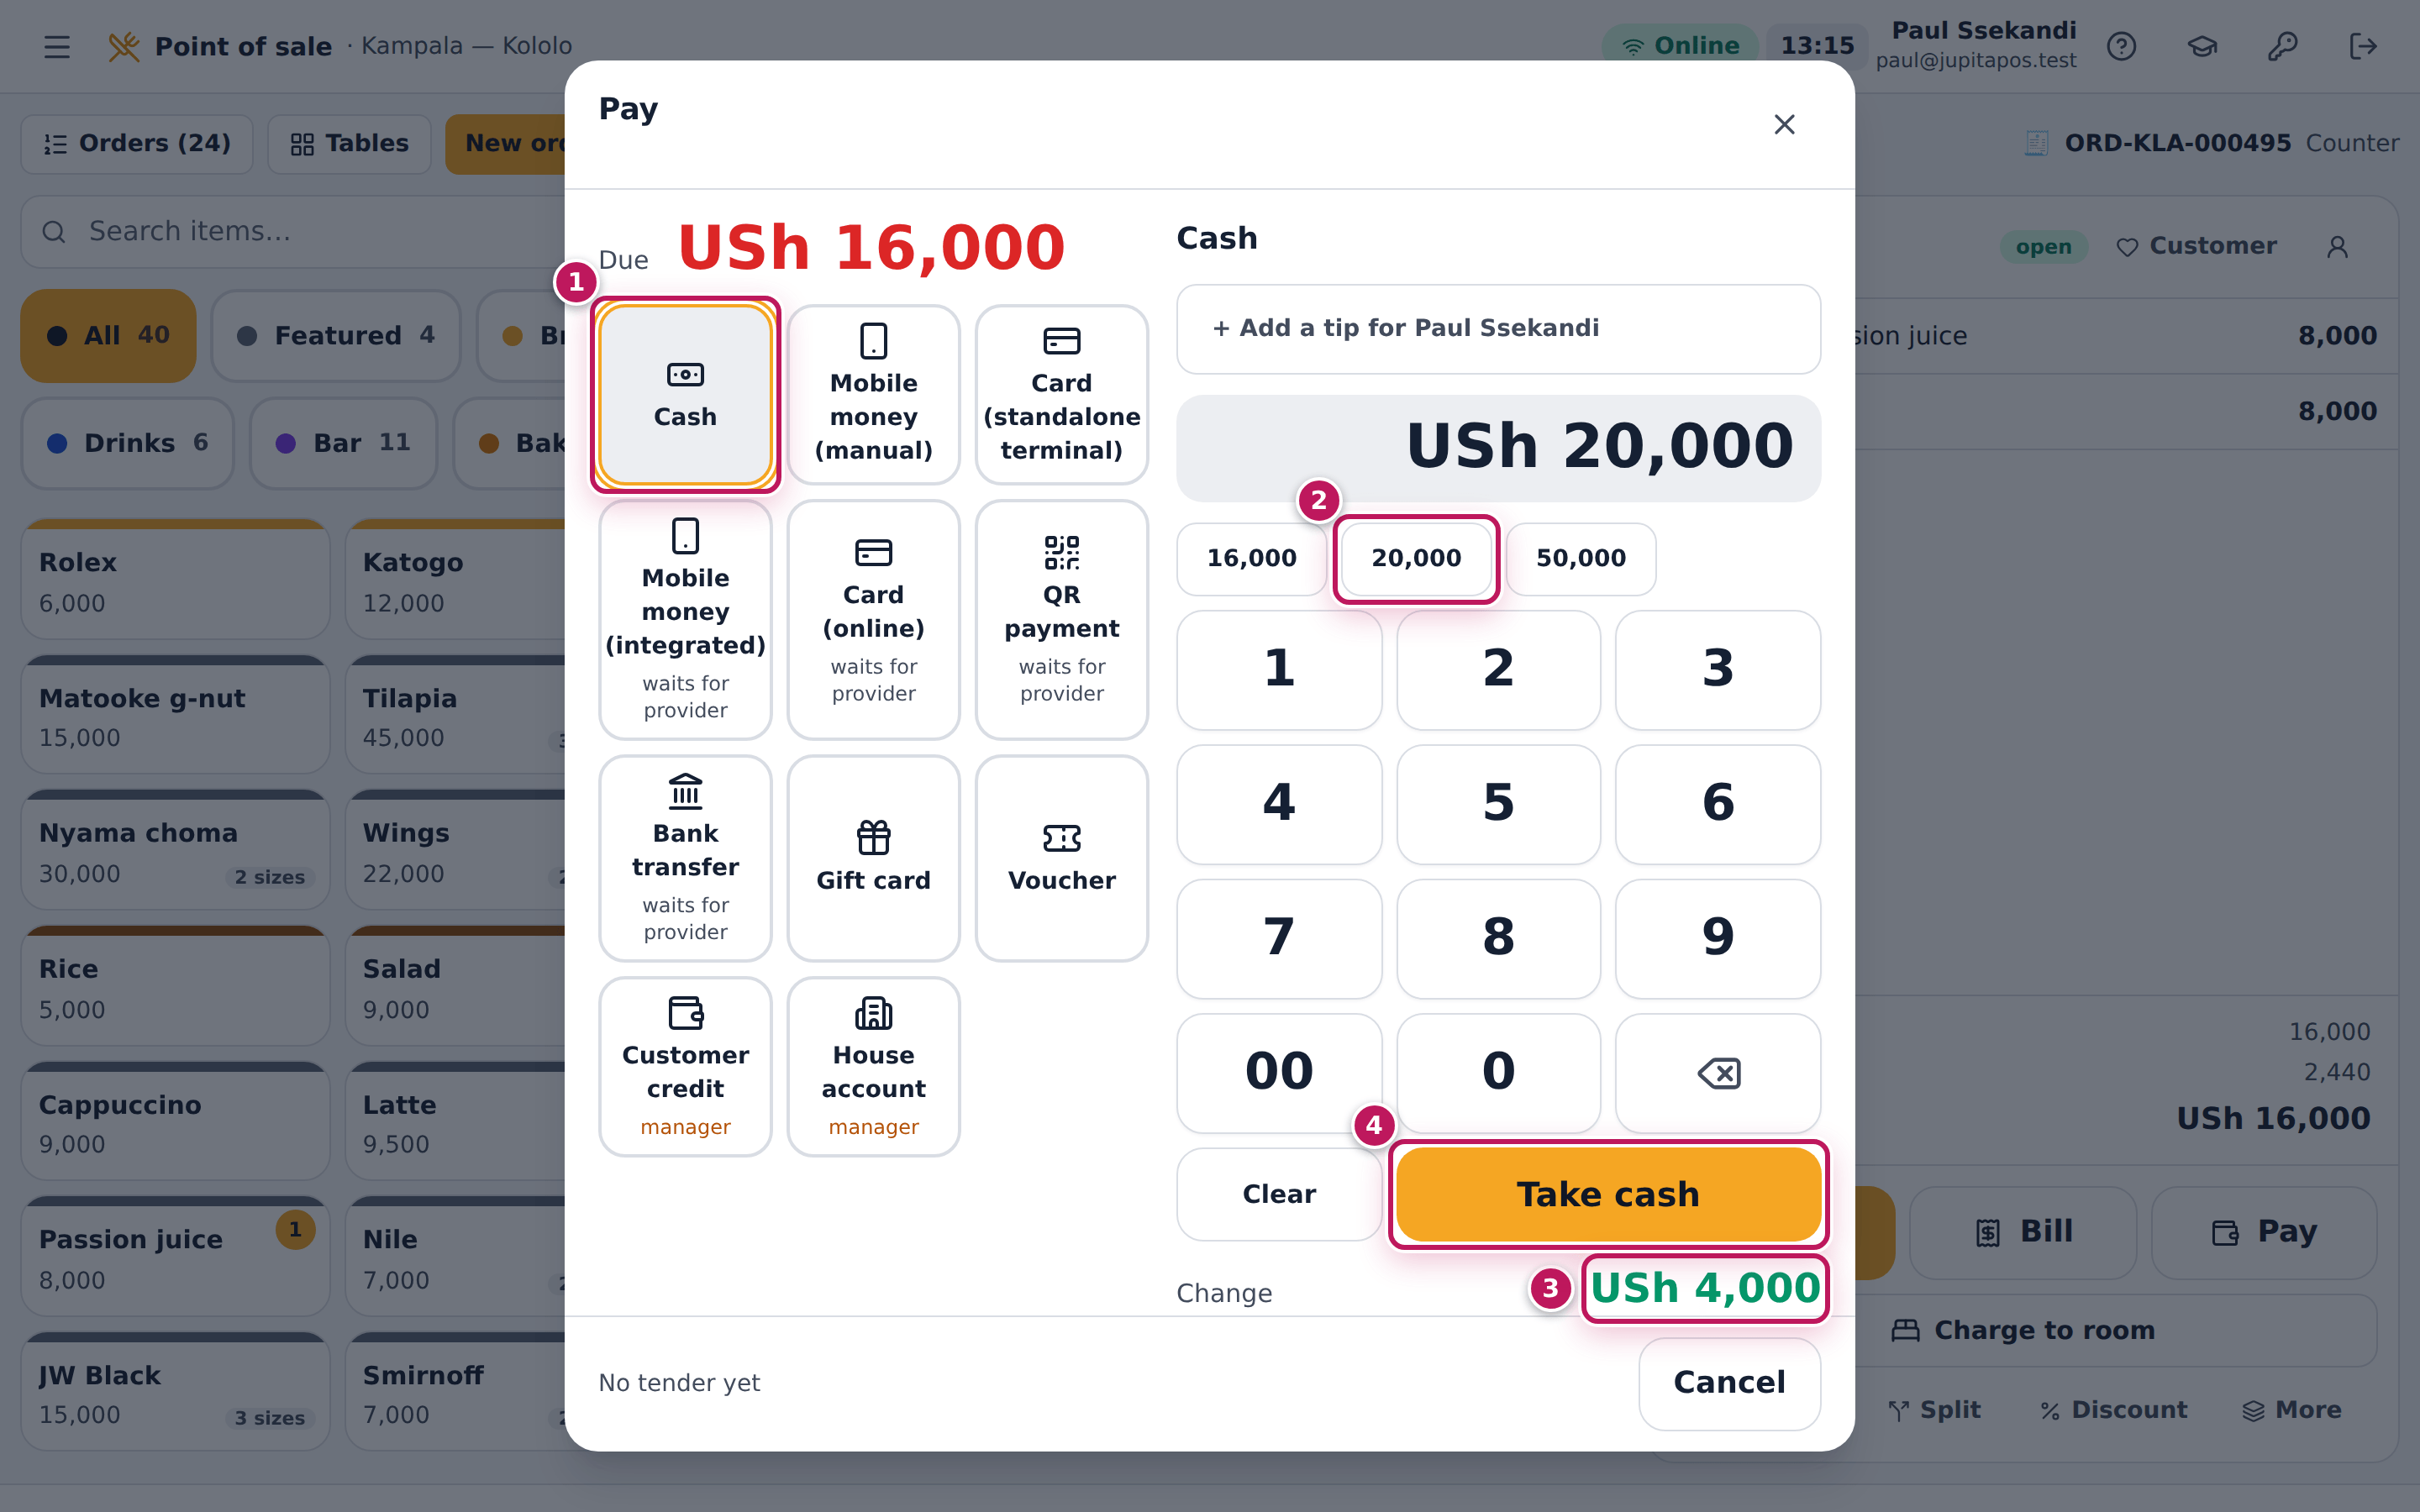
- Tap Cash (1).
- Enter what the customer gives you: tap a quick amount such as 20,000 (2), or type it on the keypad.
- Read the Change (3) — here USh 4,000 — and count it out.
- Tap Take cash (4). When the cash covers what is due, the payment is taken and the order closes.
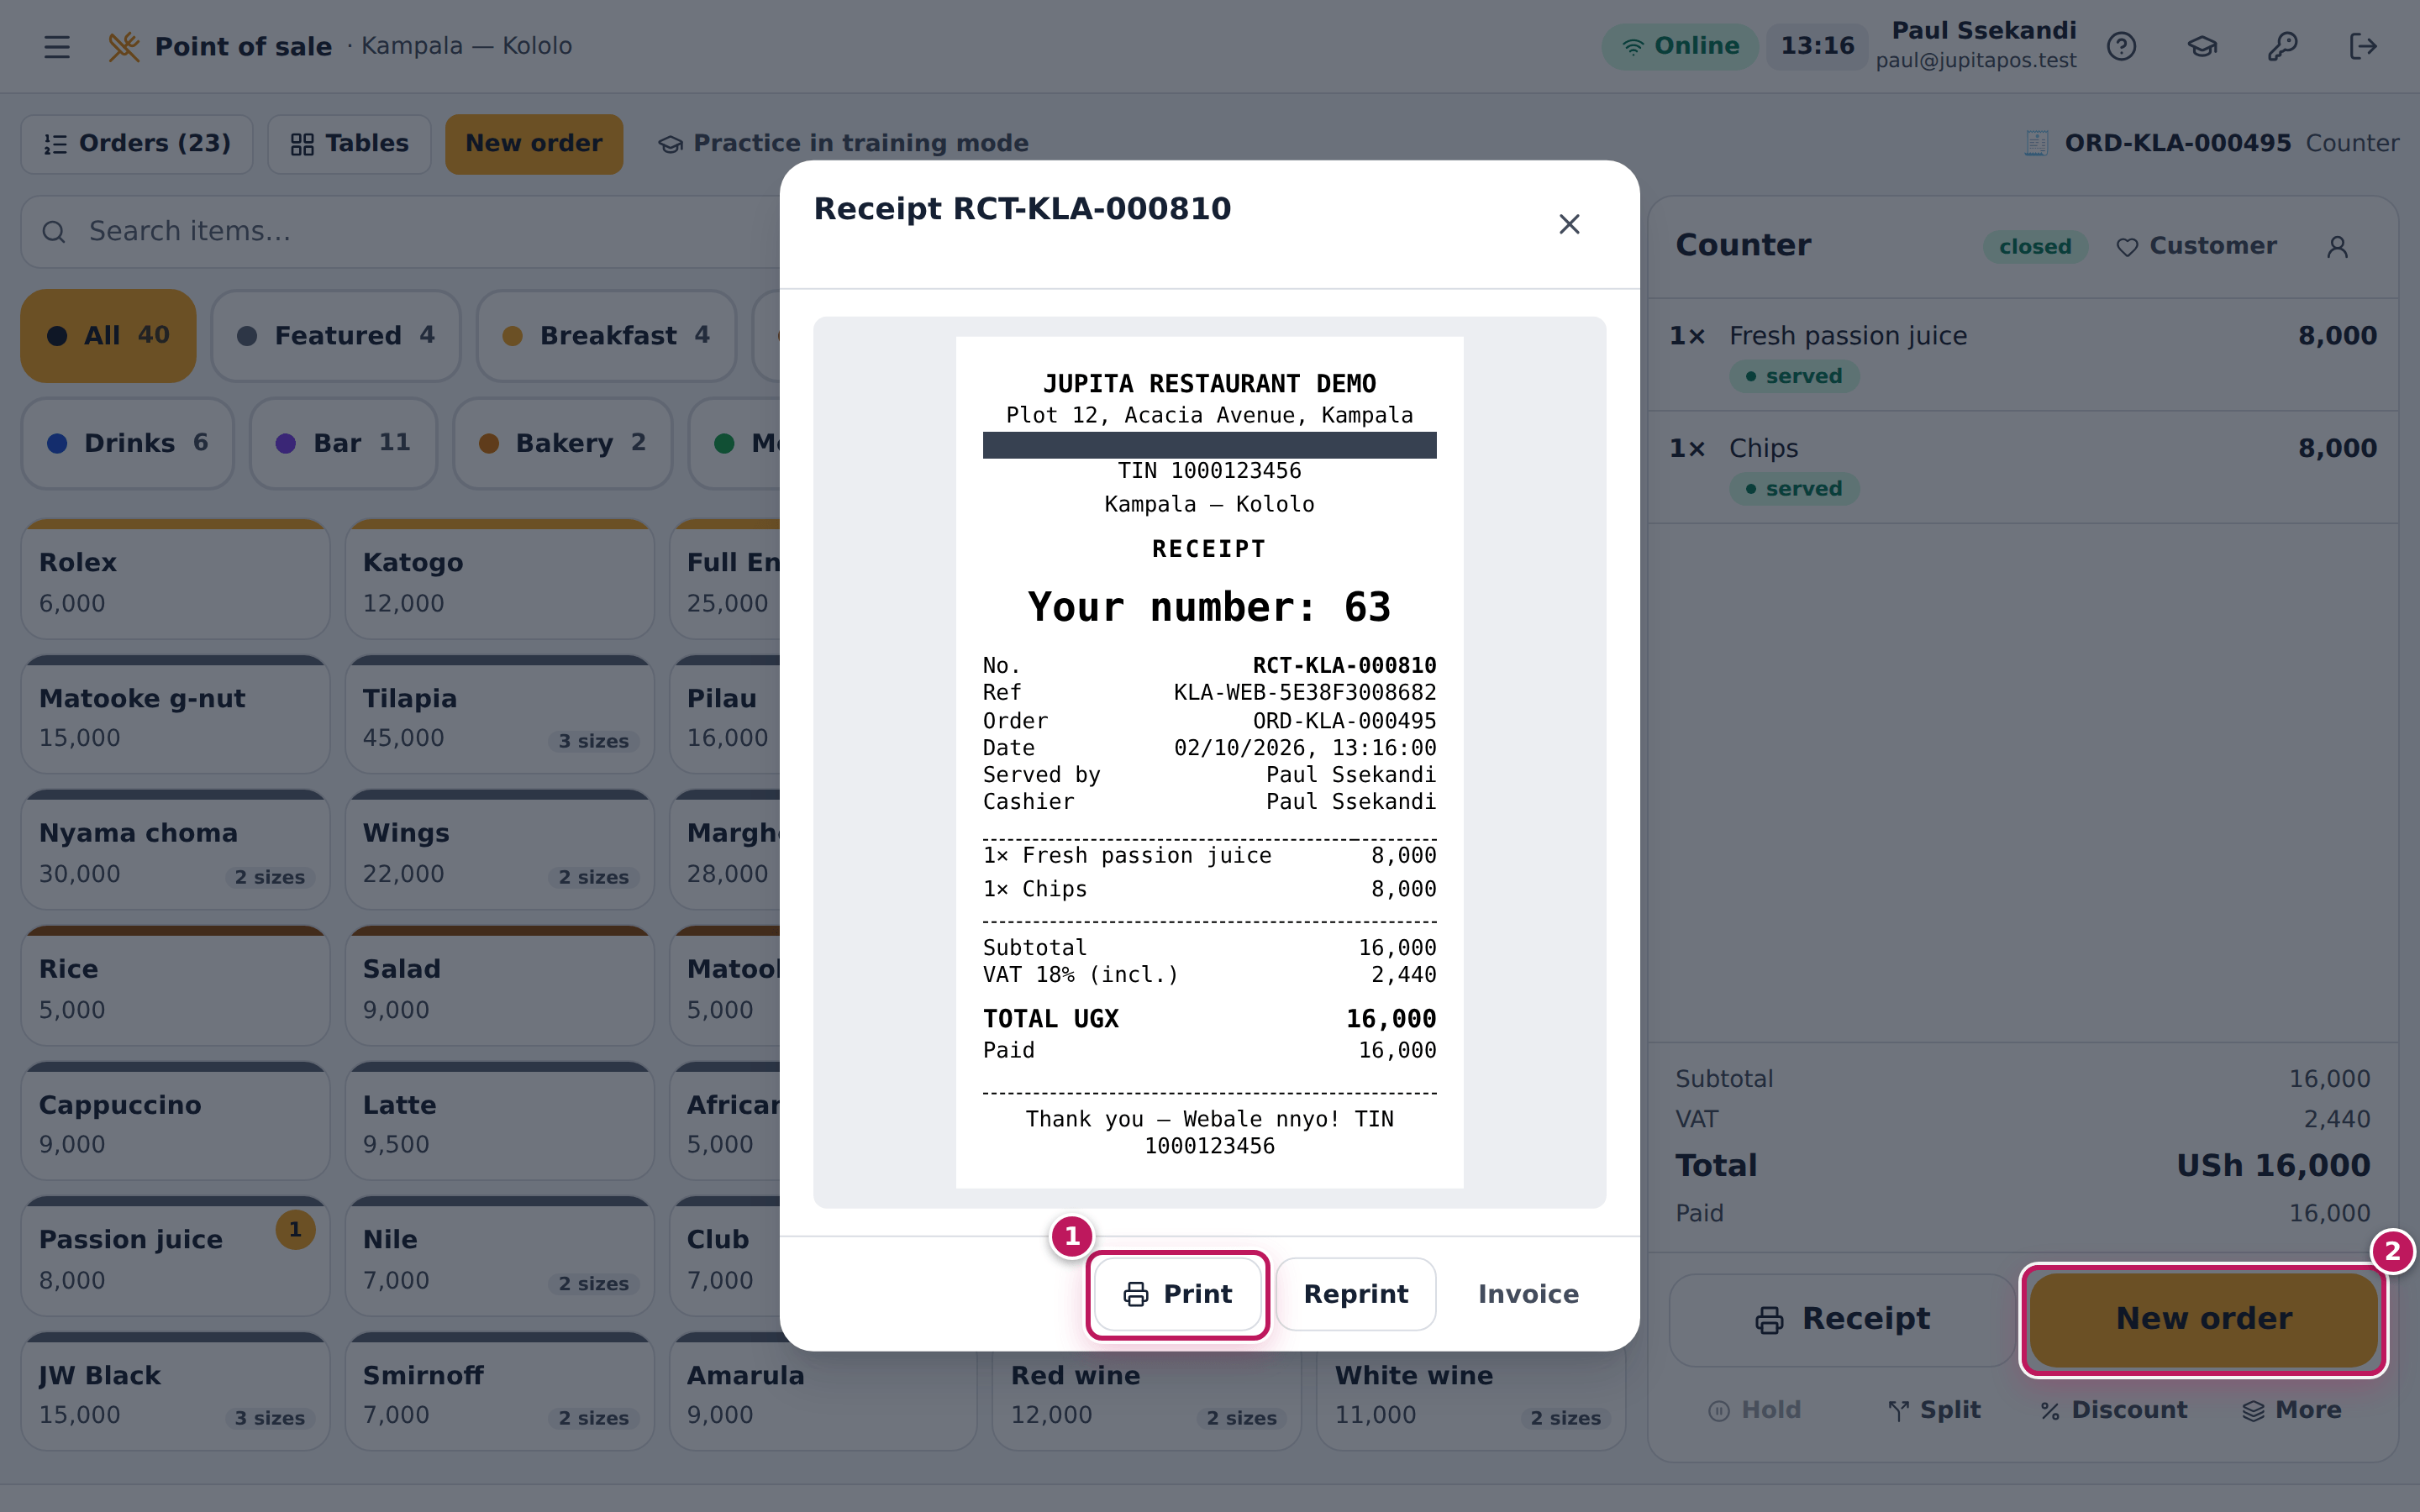
- The receipt opens. Tap Print (1) to print it, or close it and tap New order (2) for the next customer.
Expected result
The order shows closed and Paid 16,000; the receipt has its own
number (for example RCT-KLA-000201), the items, the VAT included
(VAT 18% (incl.)) and the total, and
a call number for counter orders (Your number: 32). The cash is in your
drawer’s expected cash for the cash-up.
Screenshot
Common mistakes
- Typing the total instead of what was handed over. The till then shows no change and you give none. Enter the note the customer gave you.
- Choosing Mobile money for cash, or the other way round. The cash-up compares the drawer with the cash tenders; a wrong tender makes the drawer short and the mobile money over. A supervisor reverses the wrong tender and you take it again (see Reverse a payment taken by mistake).
- Closing the Pay dialog to “come back later”. Nothing is taken until you tap Take cash or Take payment; the order stays open.
Troubleshooting
- “Open a till before taking cash.” No till is open in your name at this branch. Open one (see Open the till) or ask your supervisor. Card and mobile money do not need a till.
- The change is wrong. The keypad adds to what is there: tap Clear and enter the amount again.
- The receipt does not print. The payment is taken either way; tap Reprint, and check the printer’s paper and power.
FAQ
Can the customer pay part in cash and part by mobile money? Yes — enter the cash part and tap Part payment; the dialog keeps the rest due for the next tender (see Pay with two methods).
Does the receipt show the change? The till shows the change on screen; the receipt shows the amount paid against the total.
Pay with two methods
Purpose
Let a customer pay one bill in two ways — part in cash, the rest by mobile money or card — with each part recorded against the right method, so the drawer and the mobile money statement both add up at the cash-up.
Role / permission required
Anyone who takes payments (payments.take); the cash part needs a till
open in your name.
Prerequisites
- The order has its items and is not paid.
- For the cash part, your till is open (see Open the till).
Steps
- Tap Pay under the order. The dialog shows what is due — for a pancakes and a passion juice, USh 22,000.
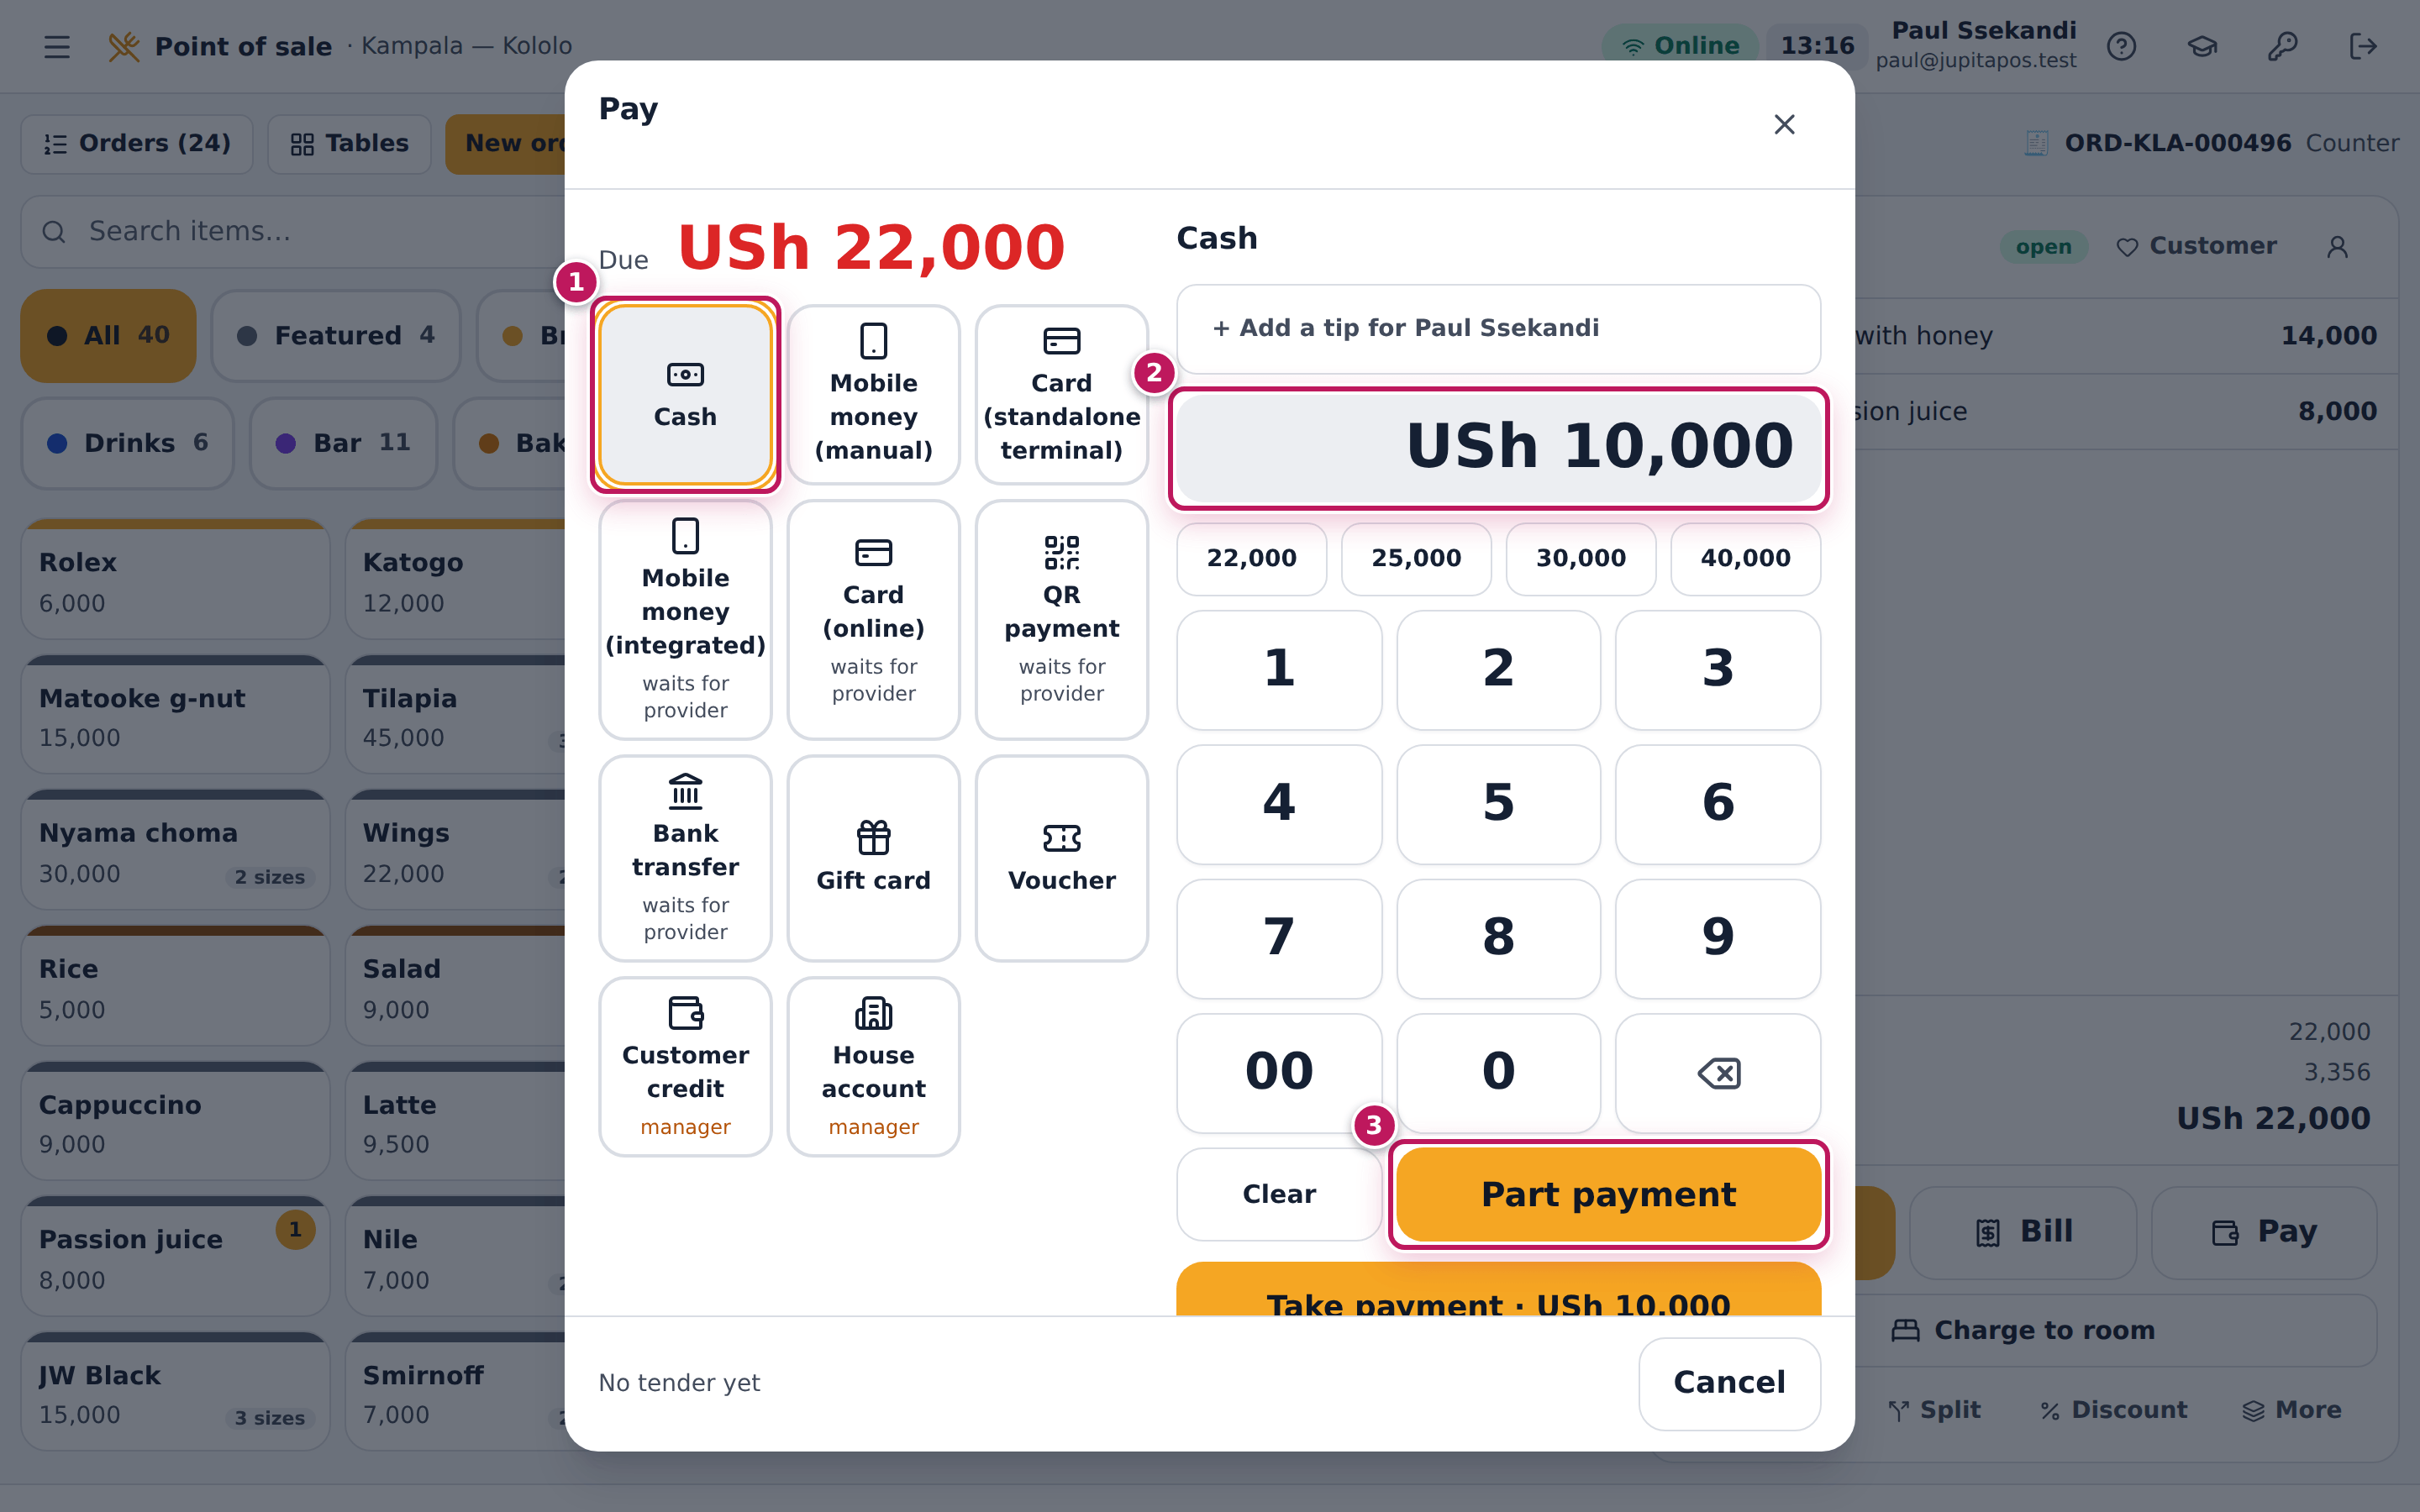
- Tap the first method, for example Cash (1).
- Tap Clear, then type the part the customer pays this way on the keypad (2) — here 10,000.
- Tap Part payment (3). The dialog now shows what is still due, USh 12,000.
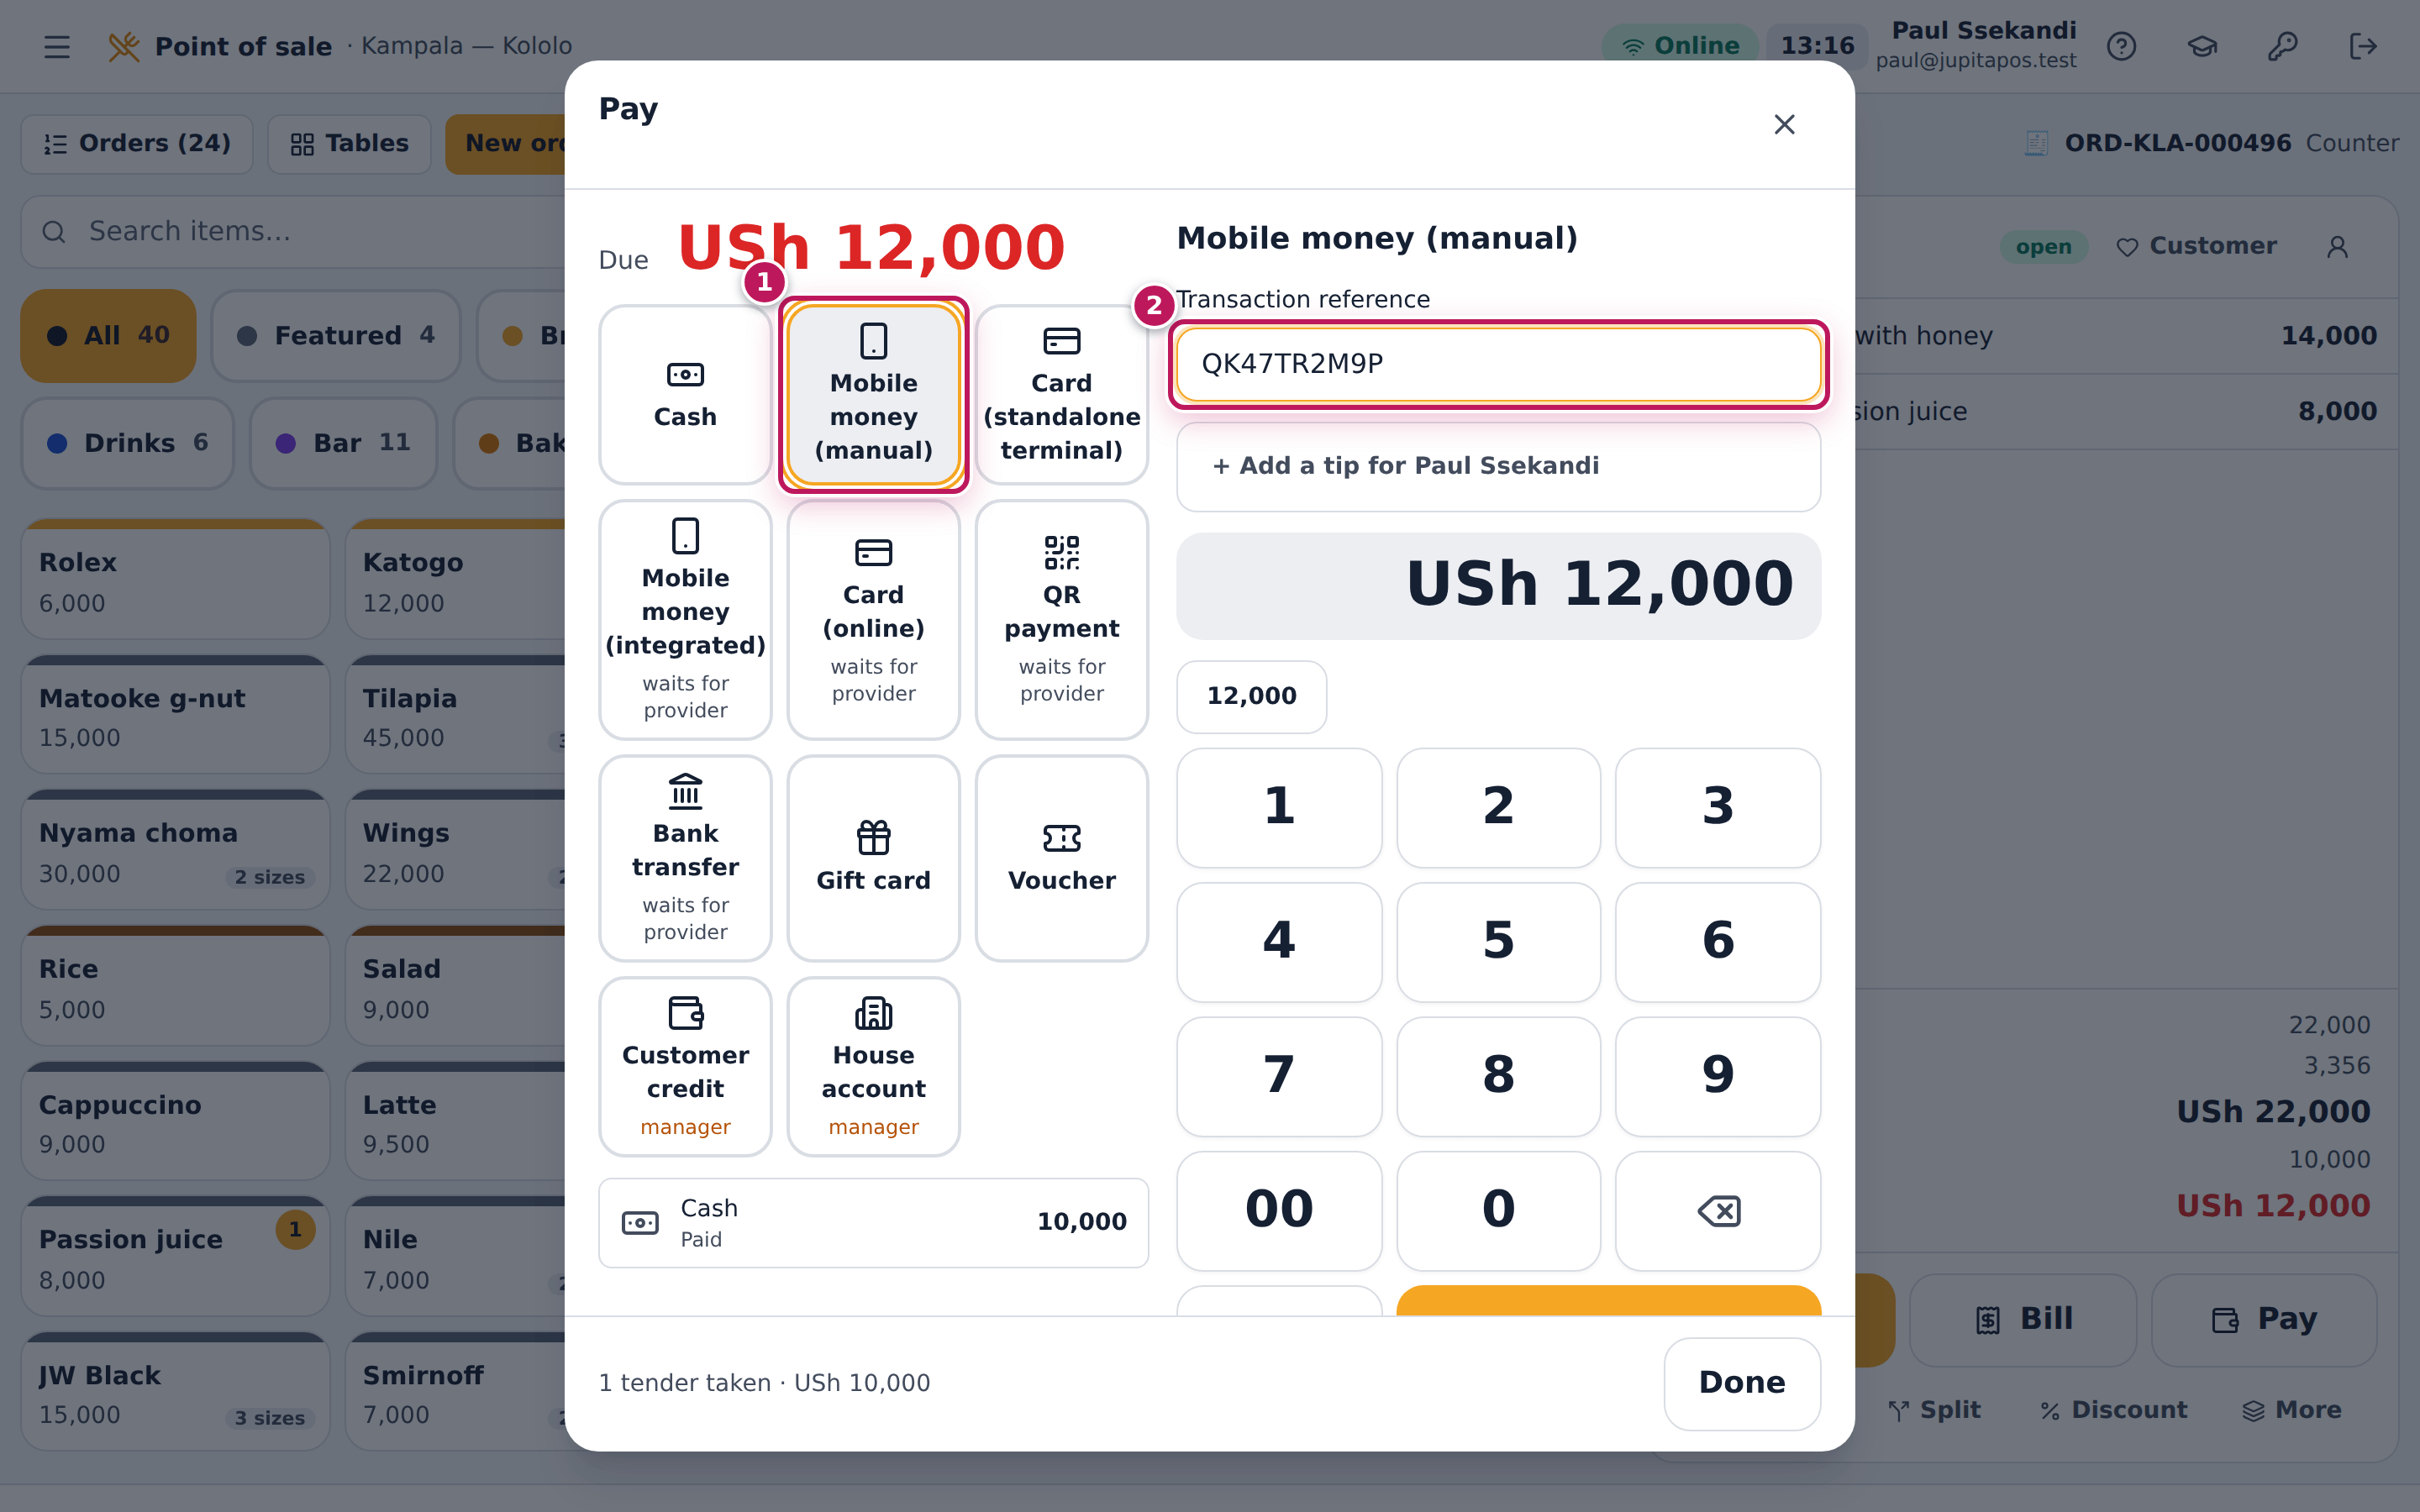
- Tap the second method, for example Mobile money (manual) (1 in the second picture).
- Type the Transaction reference (2) from the customer’s SMS.
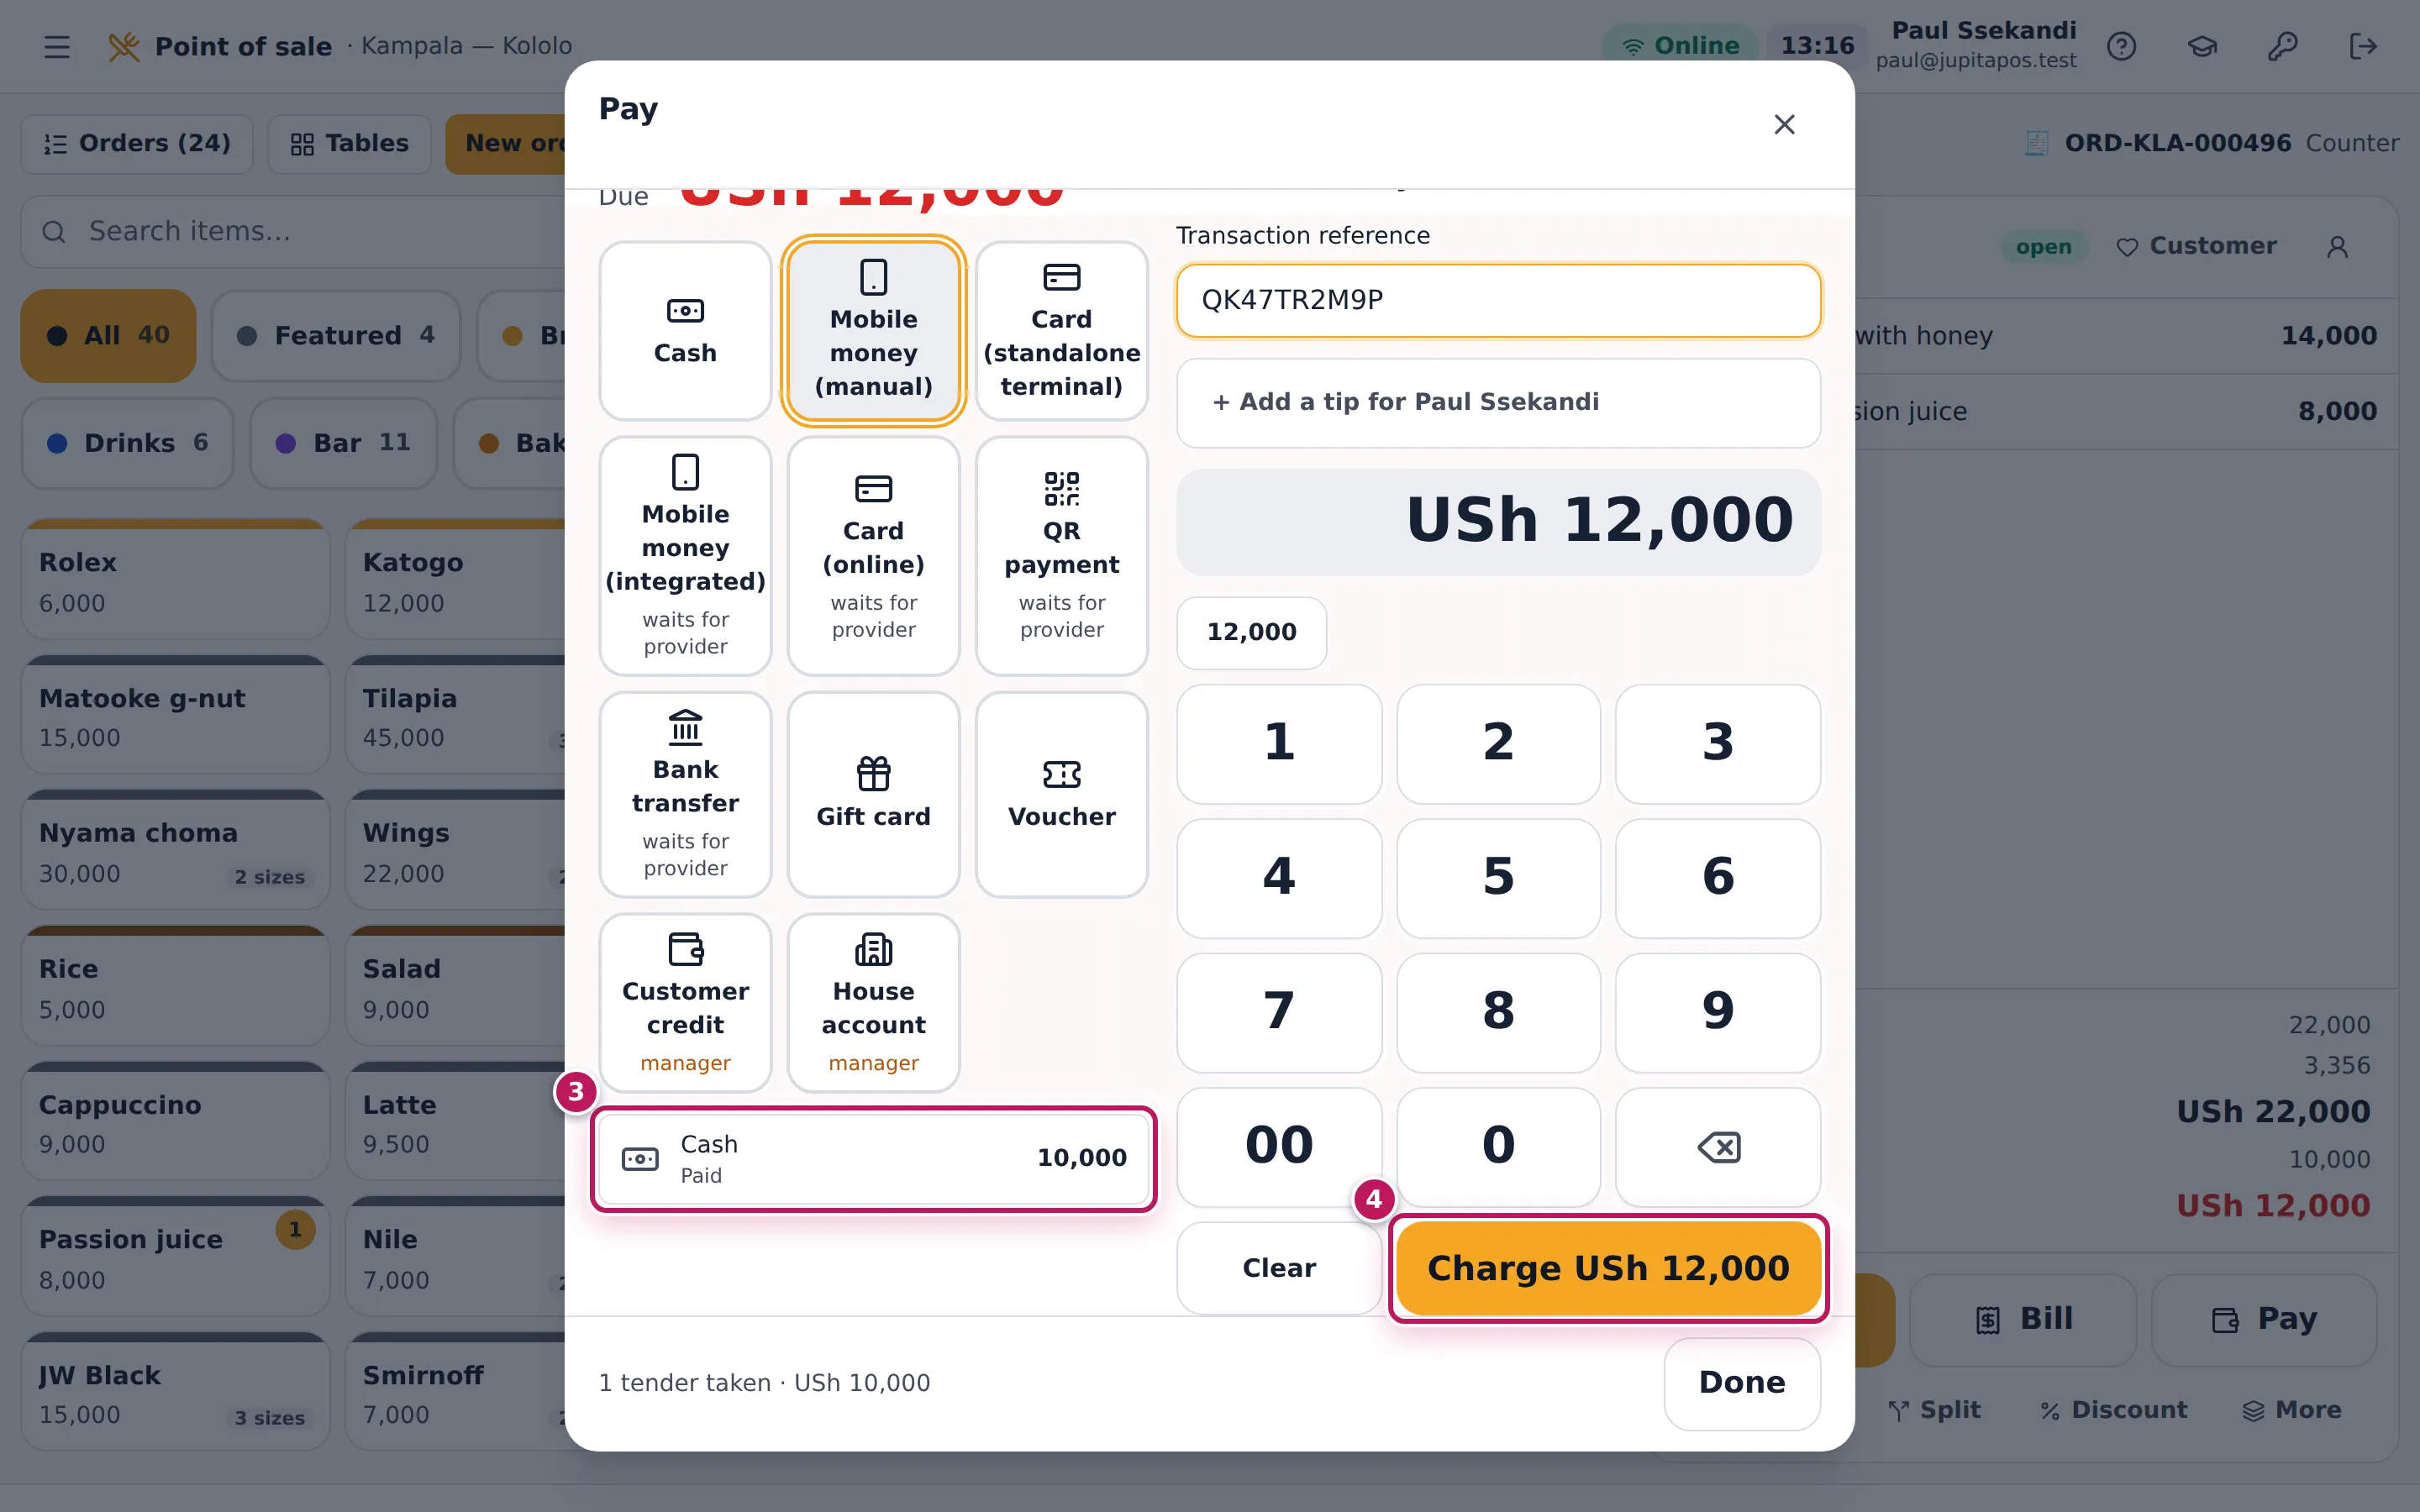
- Check the first tender in the list under the methods (3 in the third picture): Cash · Paid · 10,000.
- Tap Charge USh 12,000 (4). When the tenders cover the total, the order closes and the receipt opens.
Expected result
The receipt shows Paid 22,000 and the order is closed. On the Payments page the order has two tenders: Cash · Paid · 10,000 and Mobile money (manual) · Pending verification · 12,000 with its reference. The 10,000 is in your drawer’s expected cash.
Screenshot
Common mistakes
- Taking the second part as cash too. Choose the method the money really came by; the cash-up compares each method with its own count.
- Tapping Done after the first part. Done closes the dialog and keeps what was paid; the order stays open with the rest Due in red. Tap Pay again to take the rest.
Troubleshooting
- “That is more than is due.” A card or mobile money part can be at most what is still due; only cash gives change.
- The second method is greyed out with a reason under it. The method is not allowed now (for example needs internet or below minimum). Choose another one.
FAQ
Can three people each pay their share? Yes, add as many tenders as you need. To give each guest their own bill, split the bill instead (see Split the bill).
Take a mobile money or card payment with its reference
Purpose
Take a payment that goes straight to the business’s mobile money number or card machine, with the transaction reference recorded, so it can be checked against the statement later. Waiters can take it at the table on their phone.
Role / permission required
Anyone who takes payments (payments.take): cashiers, waiters, bartenders,
baristas, supervisors, managers. No till is needed.
Prerequisites
- The order has its items and is not paid.
- The customer has sent the money to the business’s number, or their card has gone through on the card machine, and you have the SMS or the slip.
Steps
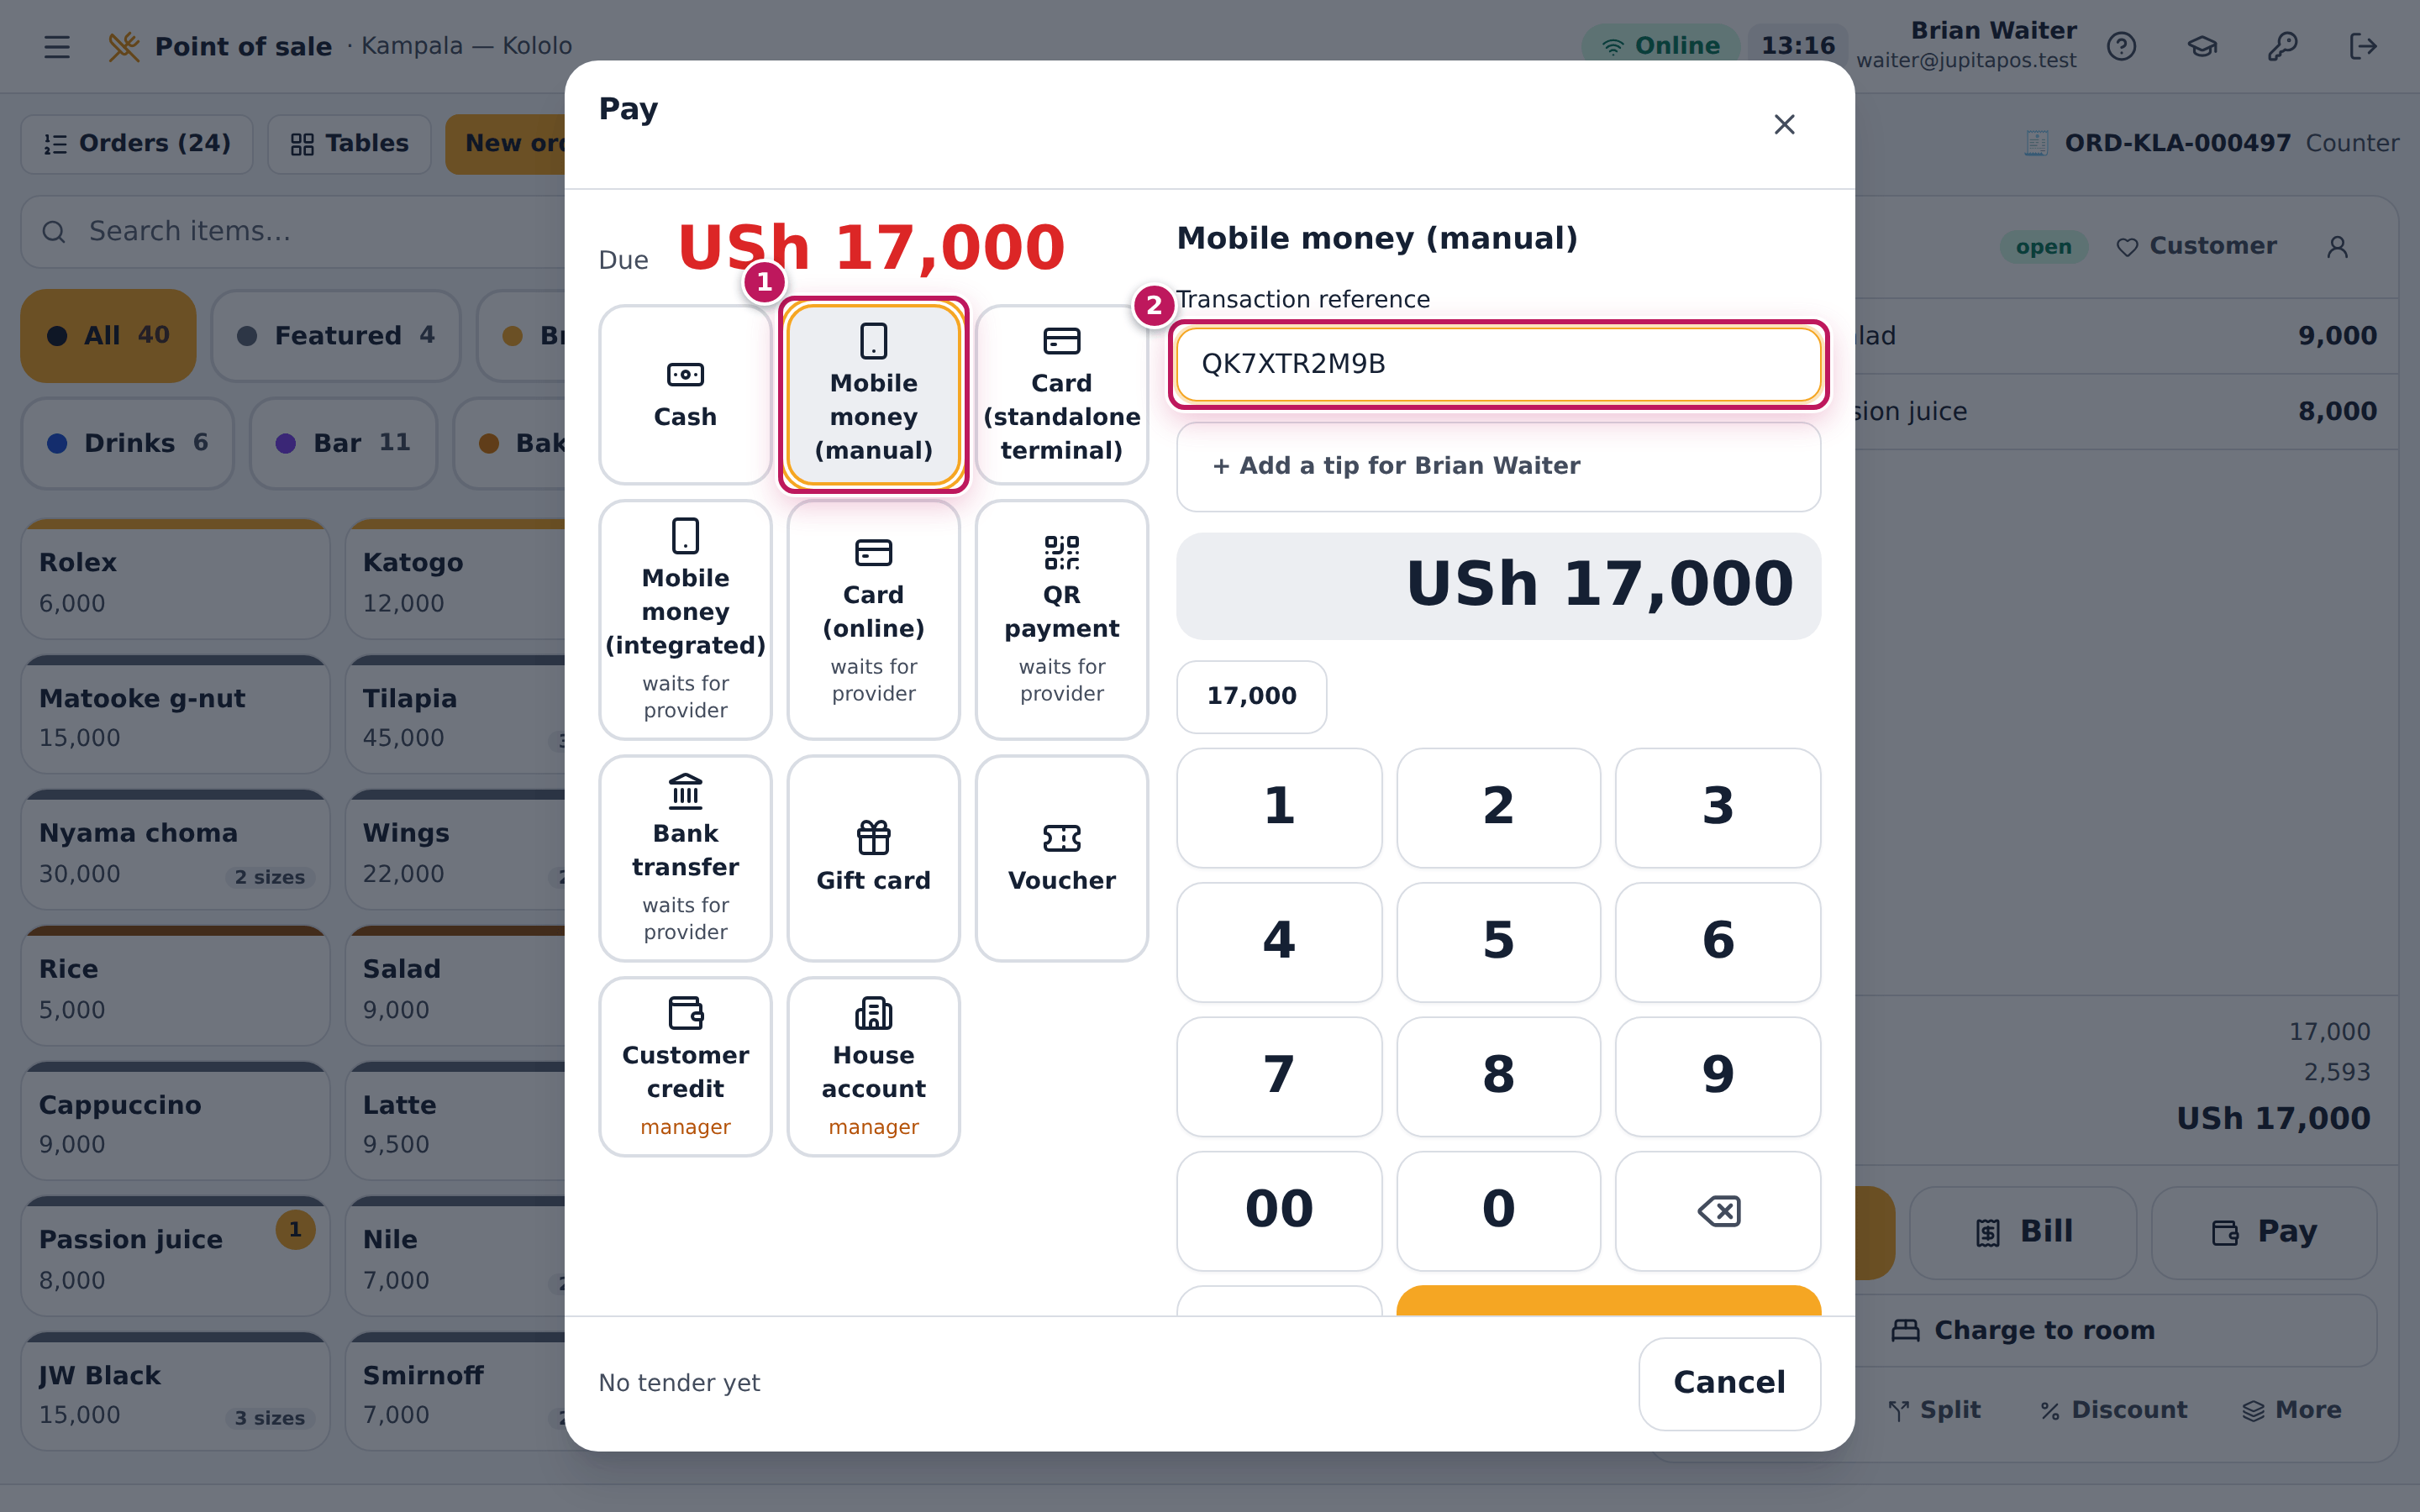
- Tap Pay under the order. On a phone, tap the Order · USh 17,000 button at the bottom first, then Pay.
- Tap Mobile money (manual) (1). For a card paid on the separate card machine, tap Card (standalone terminal) instead.
- Type the Transaction reference (2) exactly as it is on the SMS or the card slip.
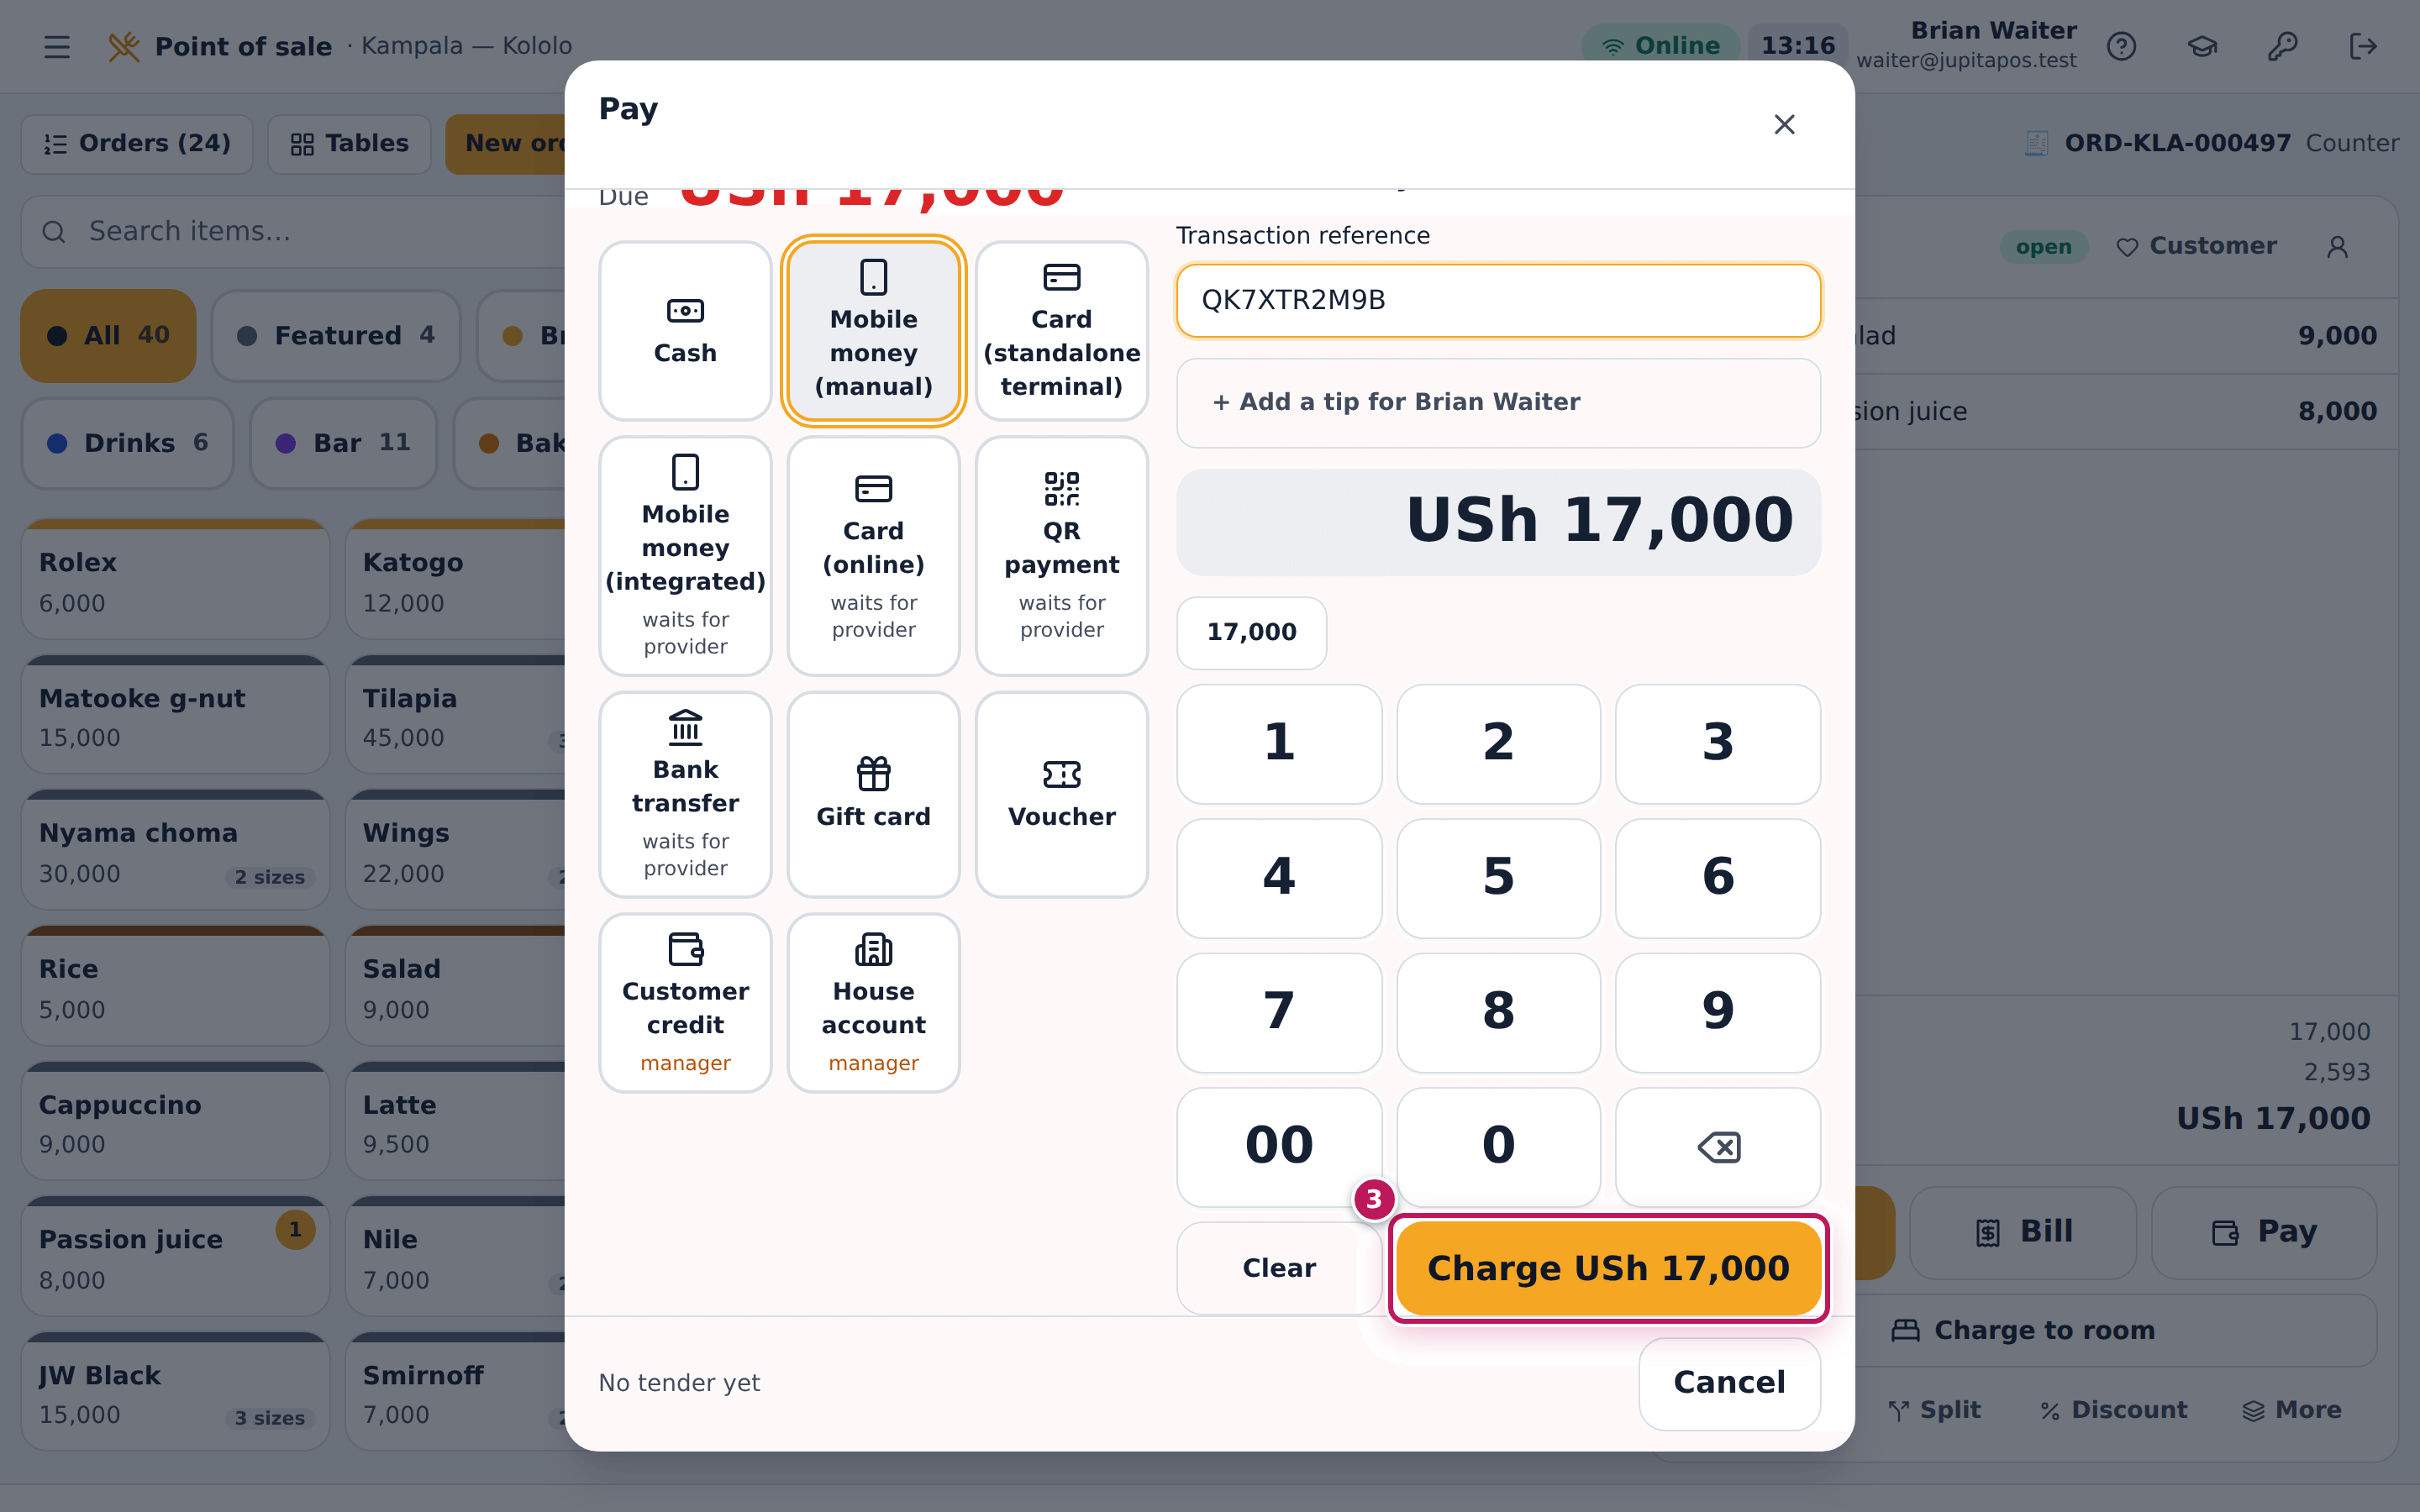
- Tap Charge USh 17,000 (3).
Expected result
The order closes and the receipt opens. The payment is recorded as Pending verification with its reference: it counts as paid at once, and a cashier or supervisor ticks it off against the statement later (see Verify mobile money and card payments).
Screenshot
Common mistakes
- Charging before the money arrived. Check the SMS or the slip first; a reference that does not exist is found at verification and the order becomes unpaid again.
- Typing the customer’s phone number as the reference. Use the transaction ID from the SMS (letters and numbers), not the number it came from.
Troubleshooting
- Charge stays greyed out. The Transaction reference is empty, or the amount is zero.
- The method is greyed out, with needs internet or not allowed offline under it. The till is offline and the business has not allowed this method offline. Take cash, or wait for the connection (see Sell while the internet is down).
FAQ
What are the methods marked waits for provider? Mobile money (integrated), Card (online), QR payment and Bank transfer ask the provider directly. The dialog says it is waiting for the provider to confirm, and the order closes only when the provider confirms; Check now asks again.
Can the customer add a tip? Yes, with the payment that settles the bill (see Add a tip to the payment).
Add a tip to the payment
Purpose
Take a tip together with the bill — in cash, by card or mobile money — so it is recorded for the waiter who served, kept apart from the takings and paid out to them at the end of the shift.
Role / permission required
Anyone who takes payments (payments.take); a cash tip needs a till open
in your name.
Prerequisites
- The order has its waiter (for a counter order, the person who rang it up).
- The tip is paid with the tender that settles the bill.
Steps
- Tap Pay and choose how the customer pays, for example Cash.
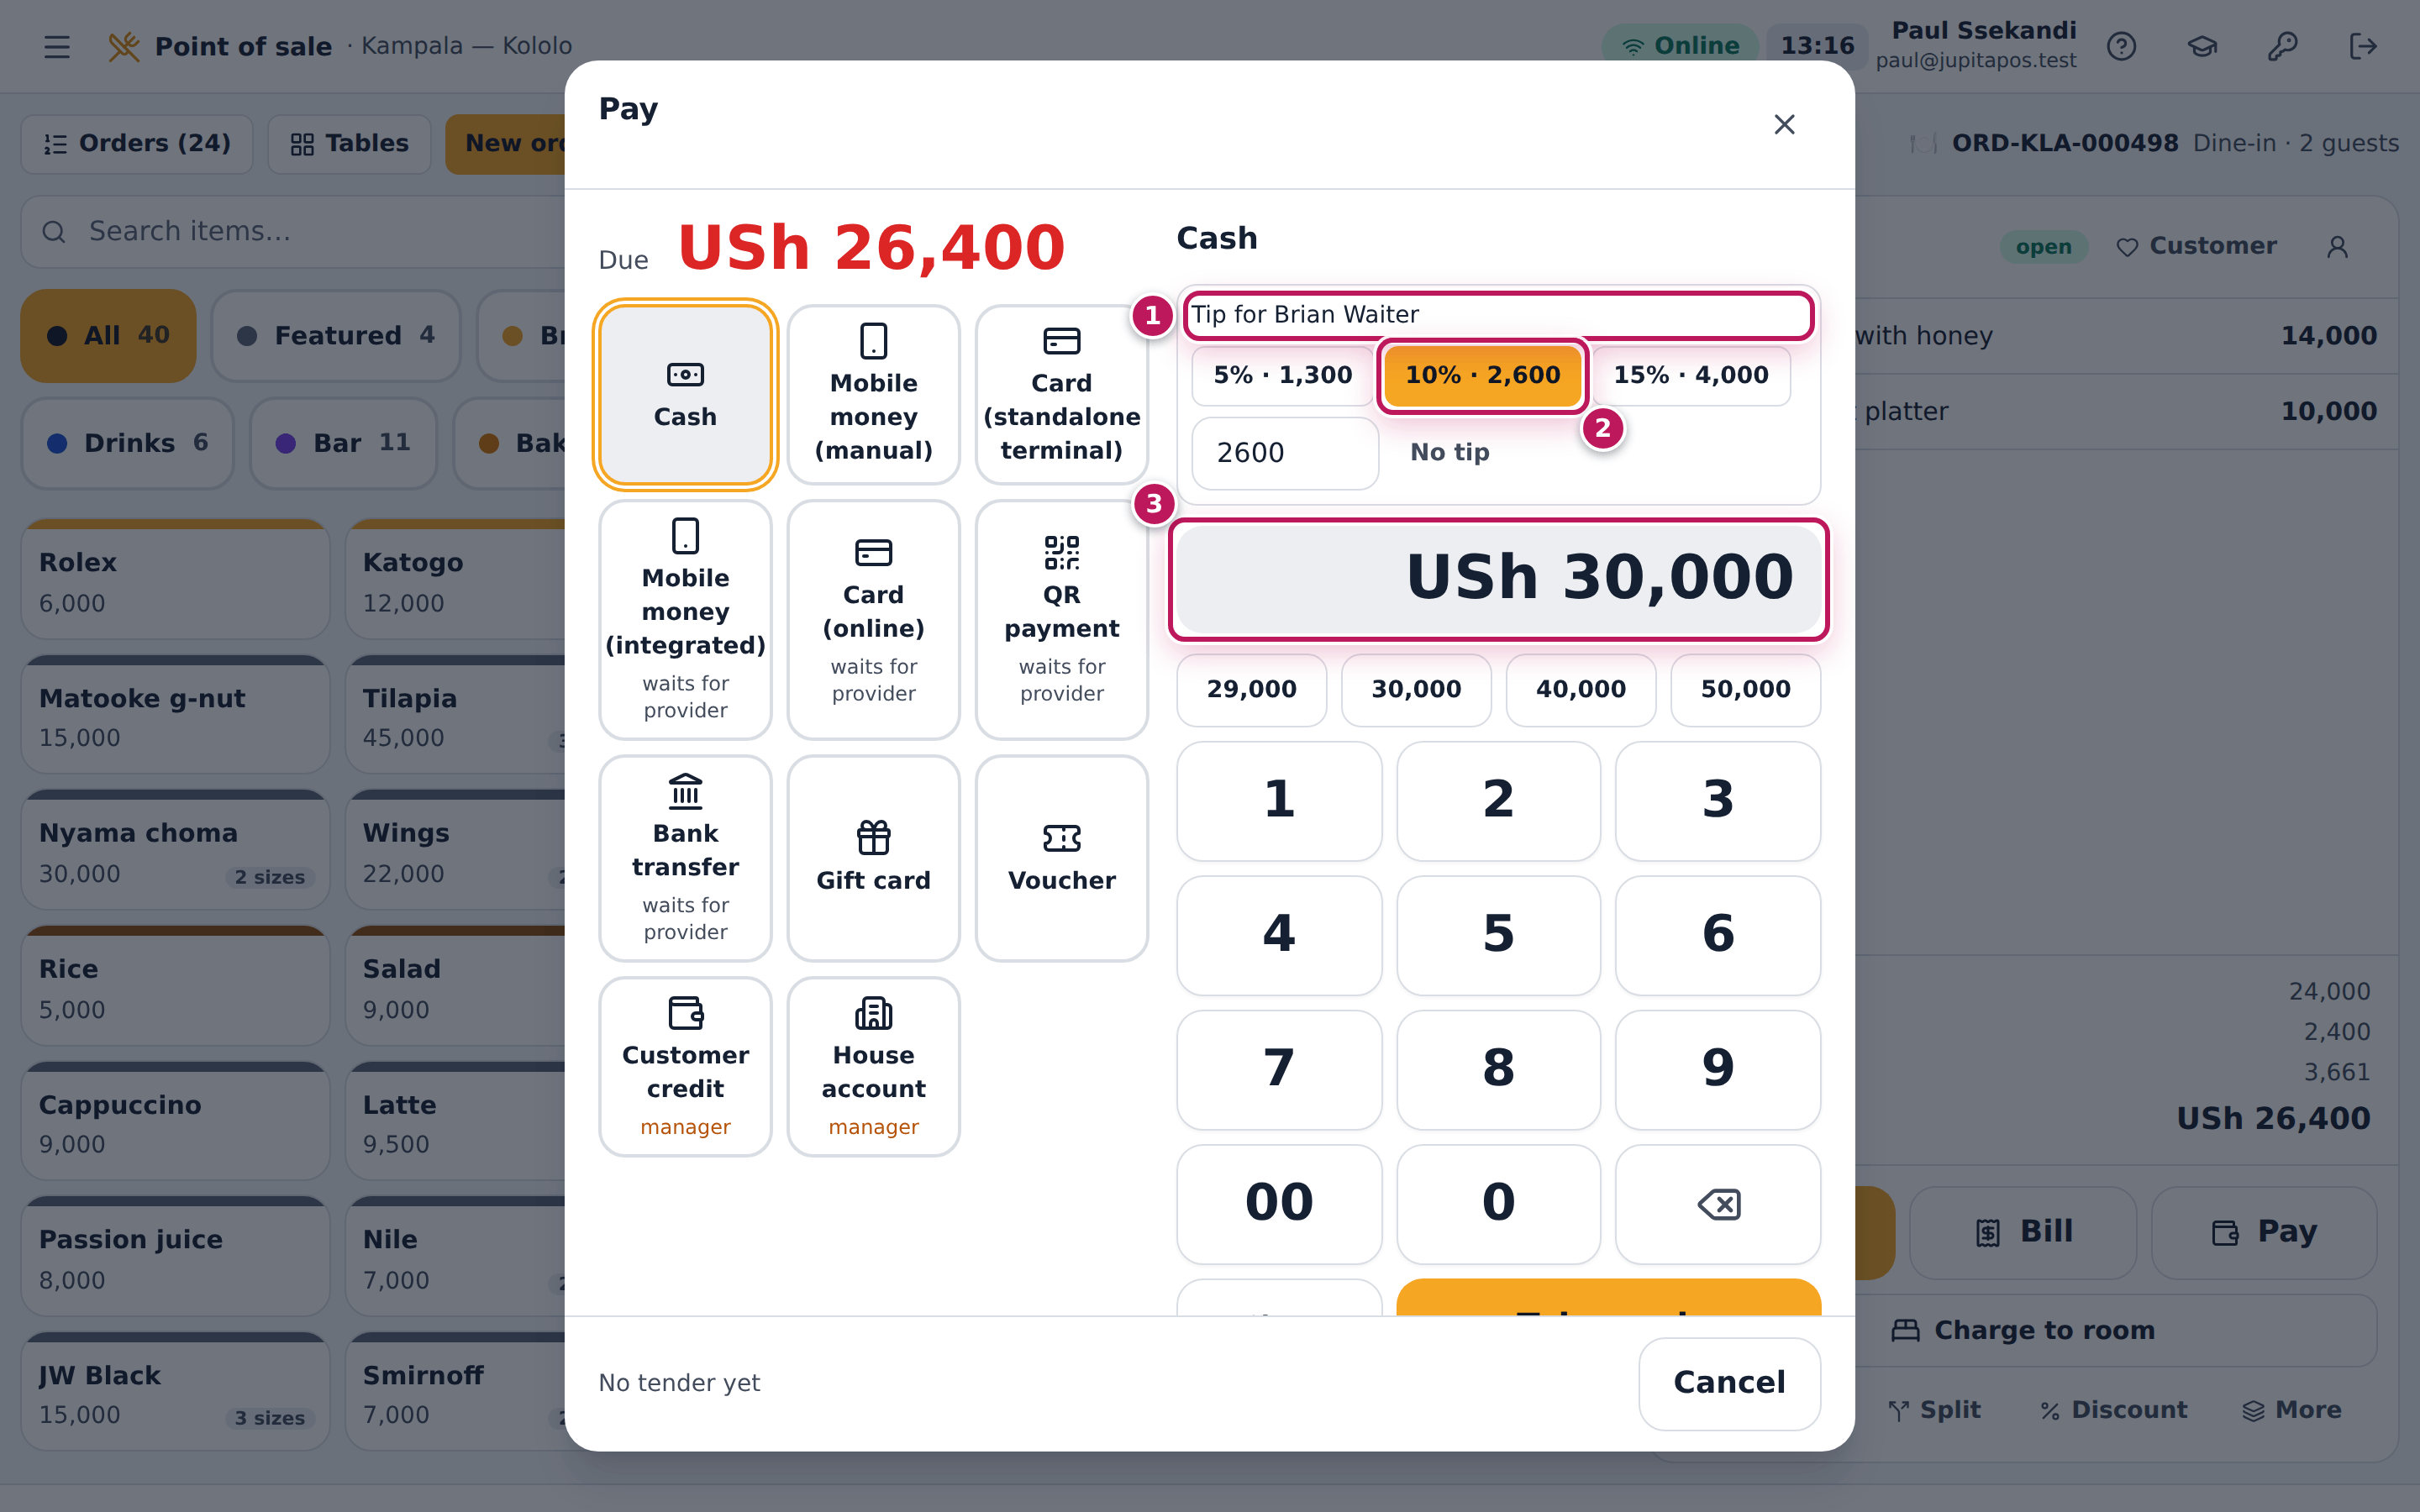
- Tap + Add a tip for Brian Waiter — the button names the order’s waiter. The tip panel opens (1).
- Tap a suggested tip, for example 10% · 2,600 (2), or type another amount in the box beside them.
- Enter what the customer hands over (3): the quick amounts now include the tip — here 30,000 for a bill of 26,400 and a tip of 2,600.
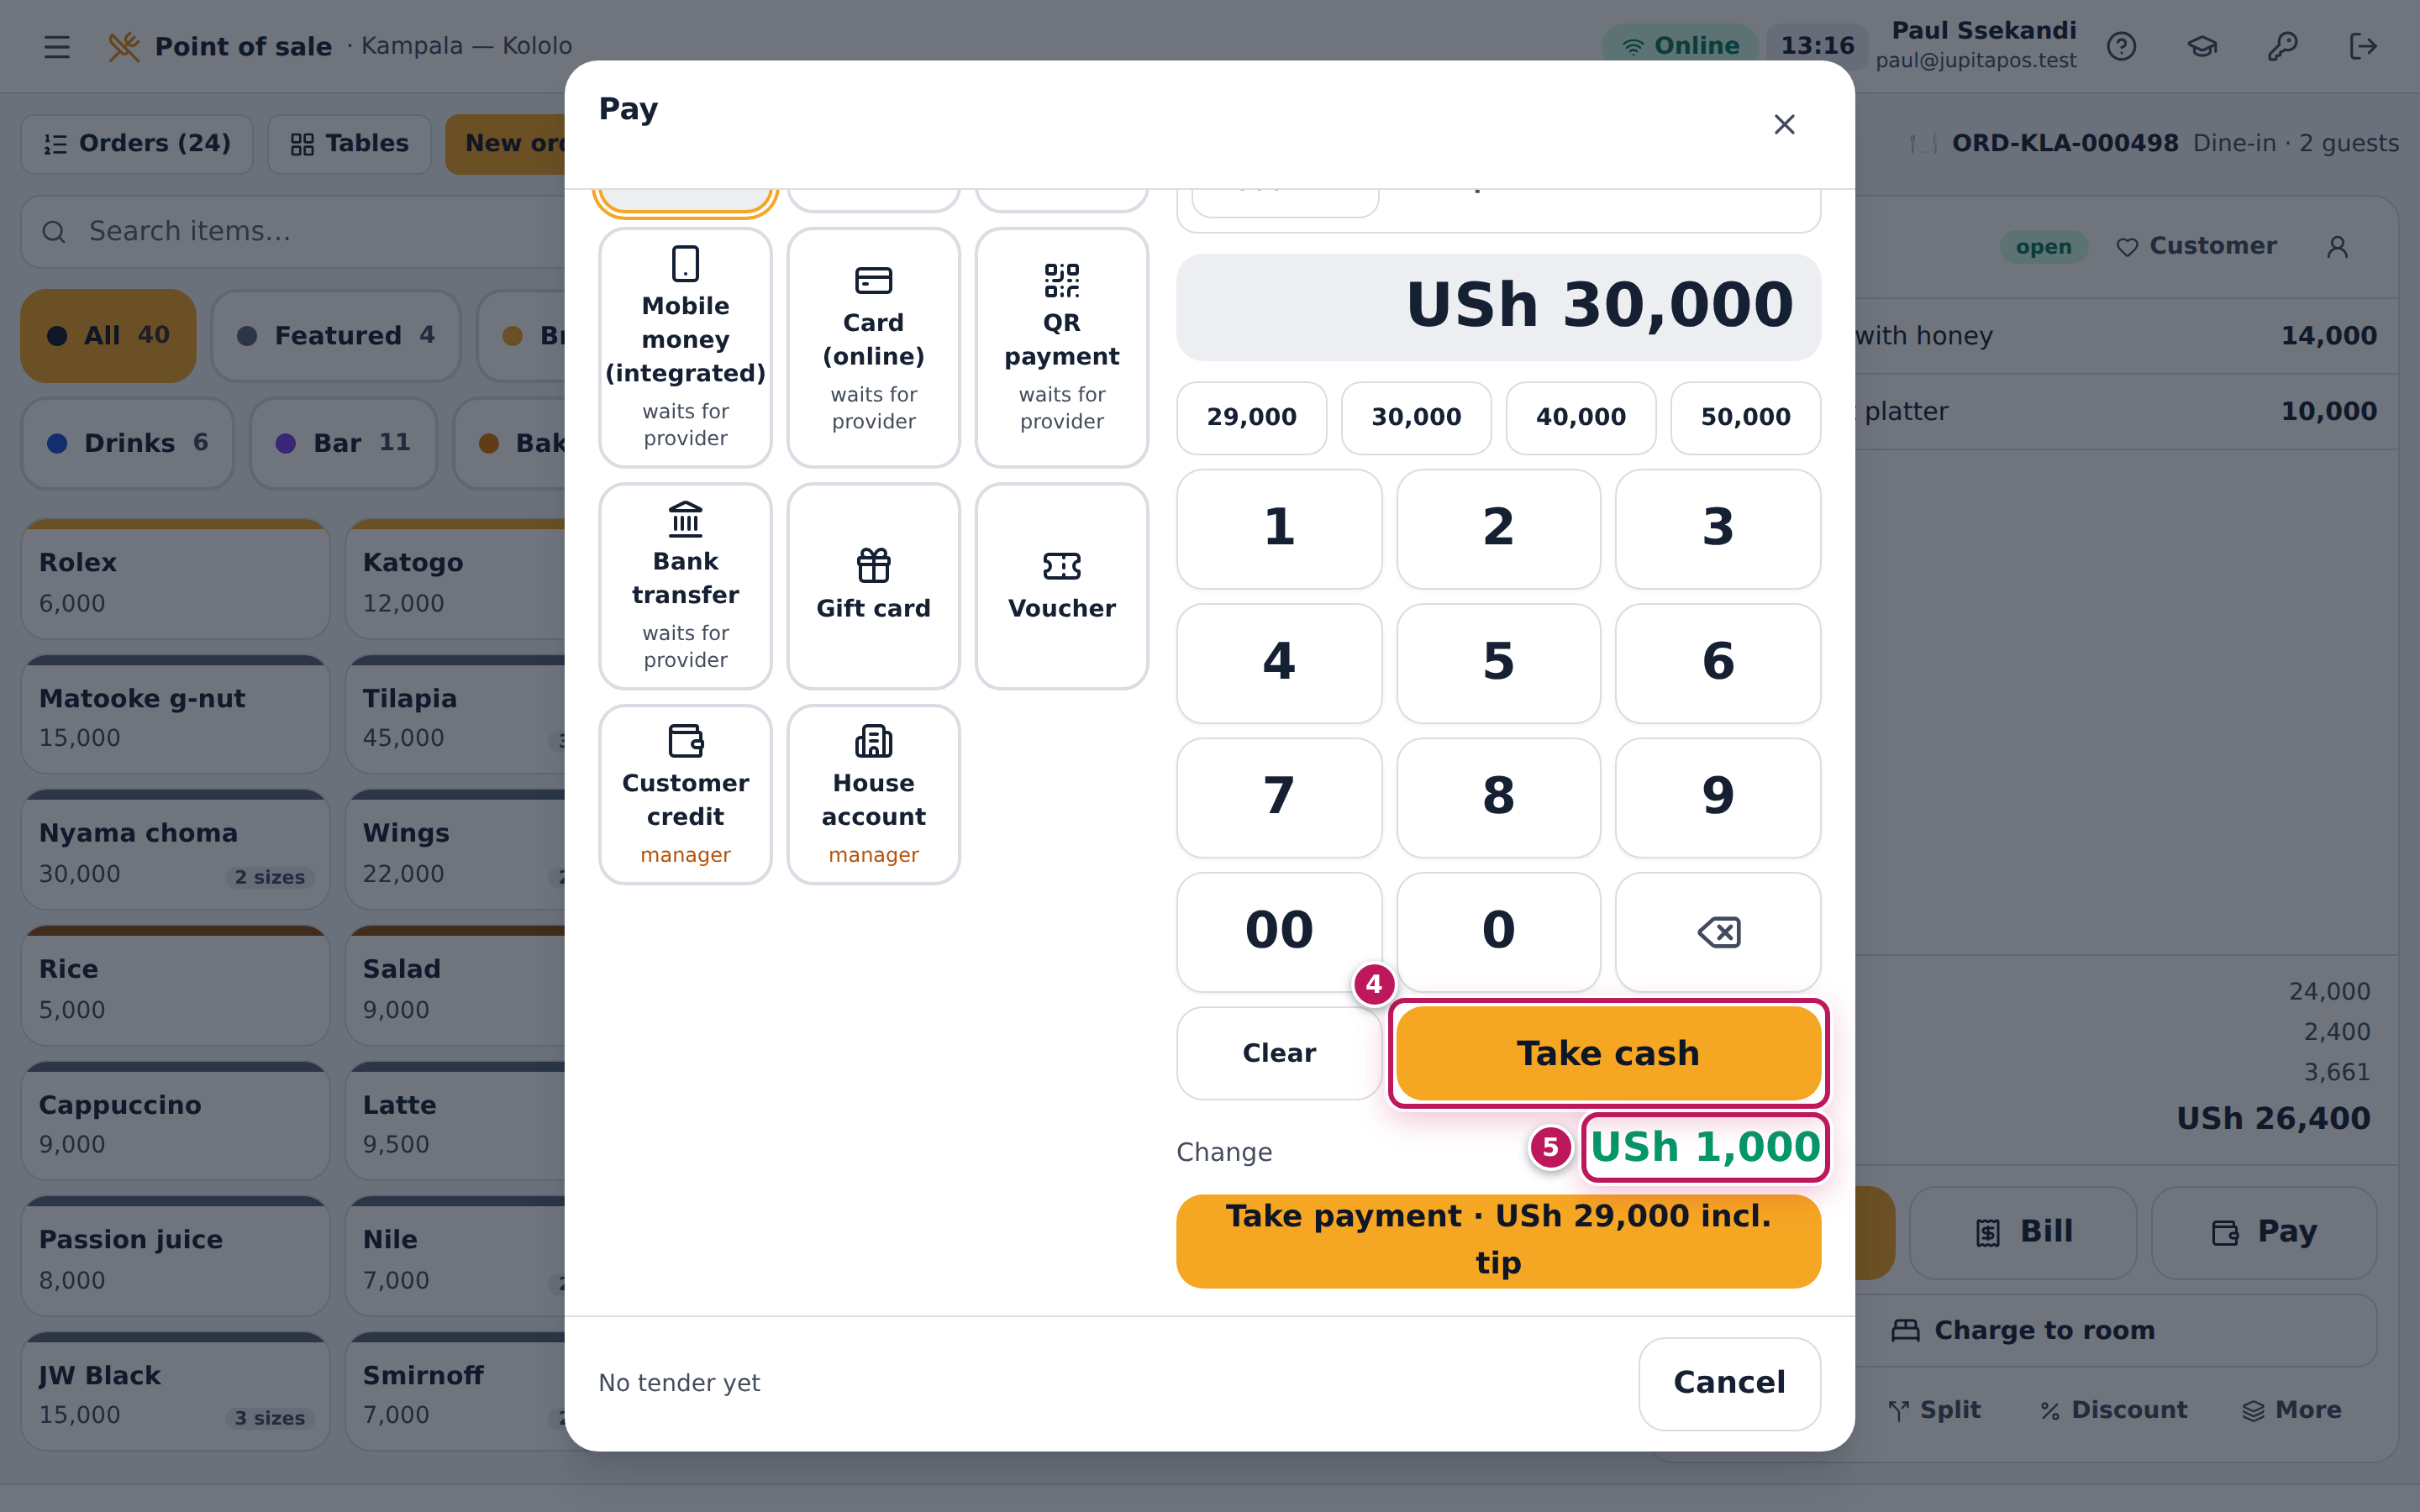
- Read the Change (5): USh 1,000.
- Tap Take cash (4). For card or mobile money, charge the bill and the tip together; the dialog says how much.
Expected result
The bill of USh 26,400 is paid and the order closes. The tip of 2,600 is recorded for Brian with the payment; the cash tip goes into the drawer as Cash tips in the expected cash — it is owed to Brian, not takings — until it is paid out (see Pay tips out to the waiters).
Screenshot
Common mistakes
- Adding the tip to the bill as an item. It is then counted as sales and taxed. Use the tip panel.
- Giving the tip as change. The customer’s note covers the bill and the tip; give back only the Change the till shows.
Troubleshooting
- “The cash handed over must cover the bill and the tip.” Enter the whole note the customer gave, or lower the tip.
- The tip panel says only with the payment that settles the bill. A part payment cannot carry a tip. Take the tip with the last tender.
- There is no + Add a tip button. Tips are not taken on gift cards, vouchers, customer credit, house accounts, providers that confirm the payment themselves, or one part of a split bill.
FAQ
Who gets the tip on a counter order? The person who rang the order up. On a table order, the table’s waiter.
Where do I see the tips? In the waiters’ performance figures (see Staff performance and tips).
Charge a company’s house account
Purpose
Let a company or a regular with an account — Lakeview Tours Ltd in the demo — eat now and pay at the end of the month. A supervisor approves every charge with their PIN, and the account’s balance and credit limit are kept up to date.
Role / permission required
Anyone who takes payments (payments.take), with a supervisor or manager
who approves (payments.approve) with their employee number and PIN.
Prerequisites
- The customer has a house account and you have its number (for example HA-DEMO-0001). Accounts are set up by a manager (see Credit and house accounts).
- A supervisor is at hand.
Steps
- Tap Pay under the order.
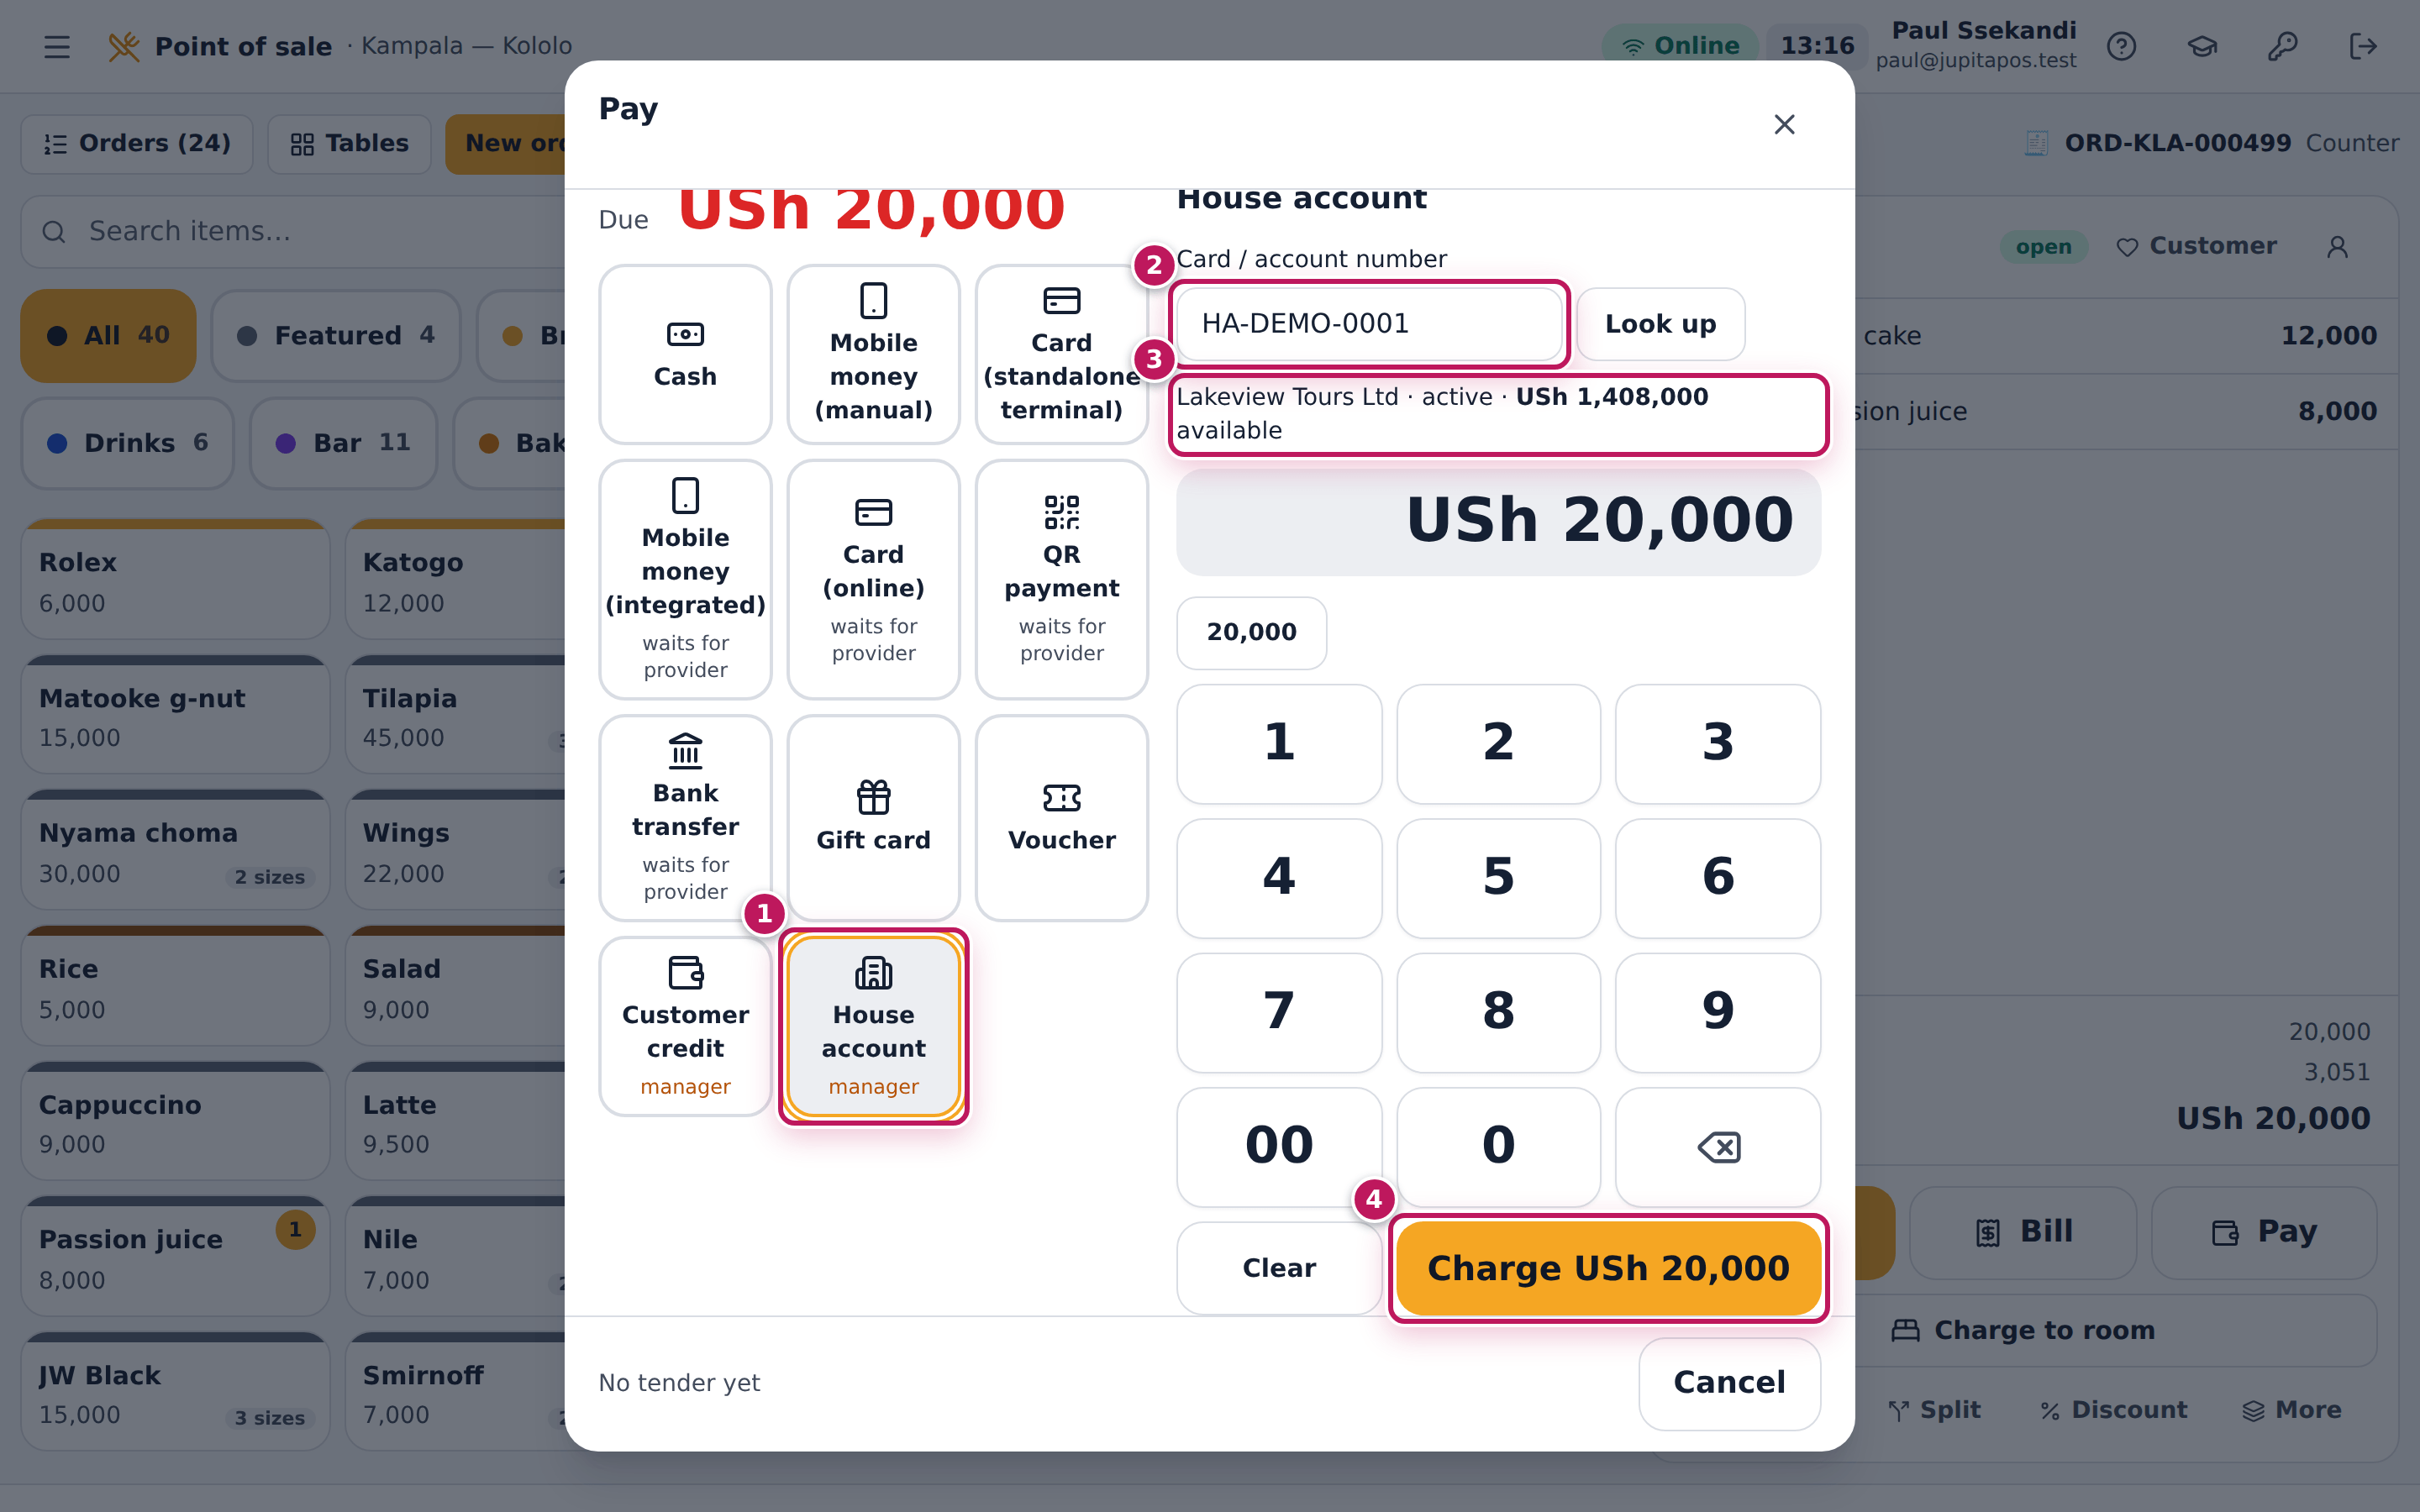
- Tap House account (1). The manager under it means a supervisor must approve.
- Type the account number in Card / account number (2) and tap Look up.
- Check the name, the status and what is available (3): Lakeview Tours Ltd · active · USh … available.
- Tap Charge USh 20,000 (4).
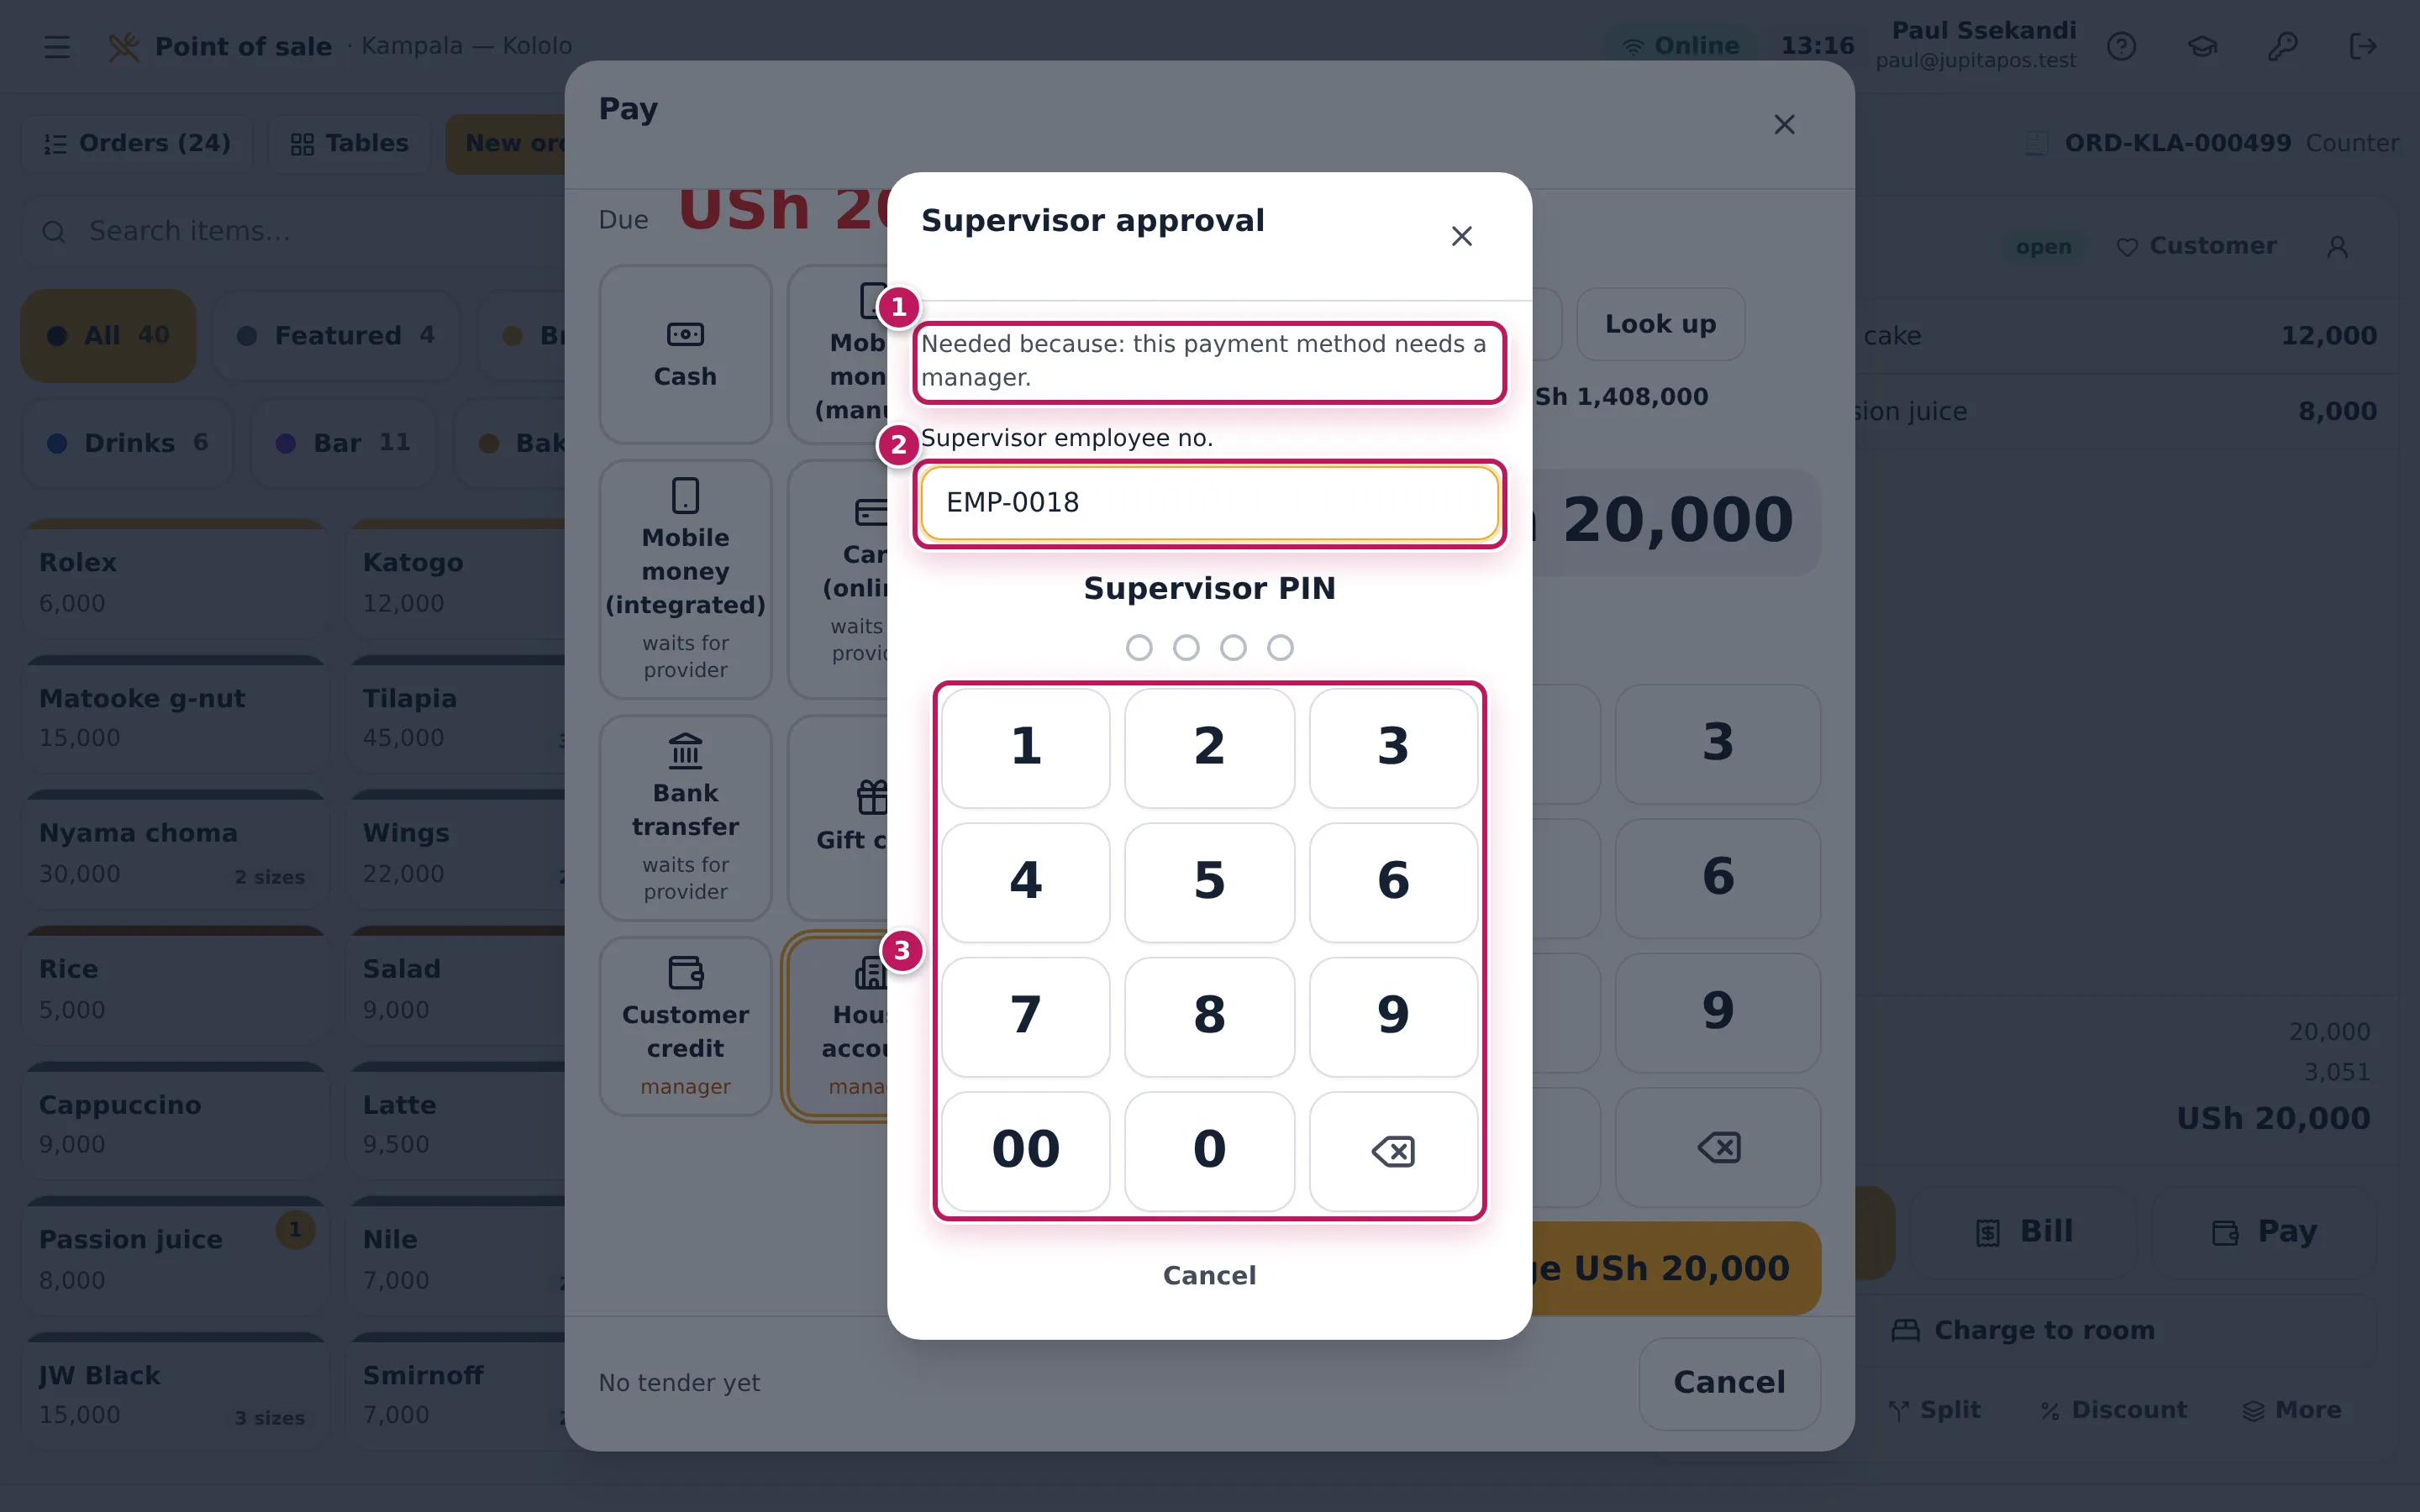
- The Supervisor approval dialog says why it is needed (1). Hand the till to the supervisor.
- The supervisor types their Supervisor employee no. (2) — for Sam, EMP-0018 — and their PIN on the keypad (3).
Expected result
The order closes and the receipt opens. The payment is Paid by House account, with the supervisor recorded as its approver; the account owes 20,000 more and has 20,000 less available. The company pays the balance later (see Credit and house accounts).
Screenshot
Common mistakes
- Charging someone who is not on the account. Check the name on the account with the customer before you charge.
- Telling the supervisor your PIN, or typing theirs for them. The approver is recorded in the audit trail; each person types their own PIN.
Troubleshooting
- “Unknown card / account.” The number is wrong or the account was closed. Check the number on the customer’s card.
- “HA-DEMO-0001 has … available.” The charge is more than the credit left. Take the rest another way (see Pay with two methods) or ask a manager.
- “Wrong PIN.” The supervisor types it again. After several wrong PINs it is locked for a while: PIN locked — try again later.
- “You cannot approve your own action.” You cannot approve your own payment with your own number; another supervisor approves.
FAQ
Customer credit works the same way? Yes: Customer credit is also marked manager and asks for a supervisor’s approval.
Reprint a receipt or print a tax invoice
Purpose
Give the customer another copy of their receipt, or a tax invoice with their company’s name and TIN for their accounts, without issuing a second sale.
Role / permission required
Anyone who can see orders (sales.view) reprints; issuing an invoice needs
sales.create.
Prerequisites
- The order is paid (closed). An invoice can also be issued once the bill is requested.
Steps
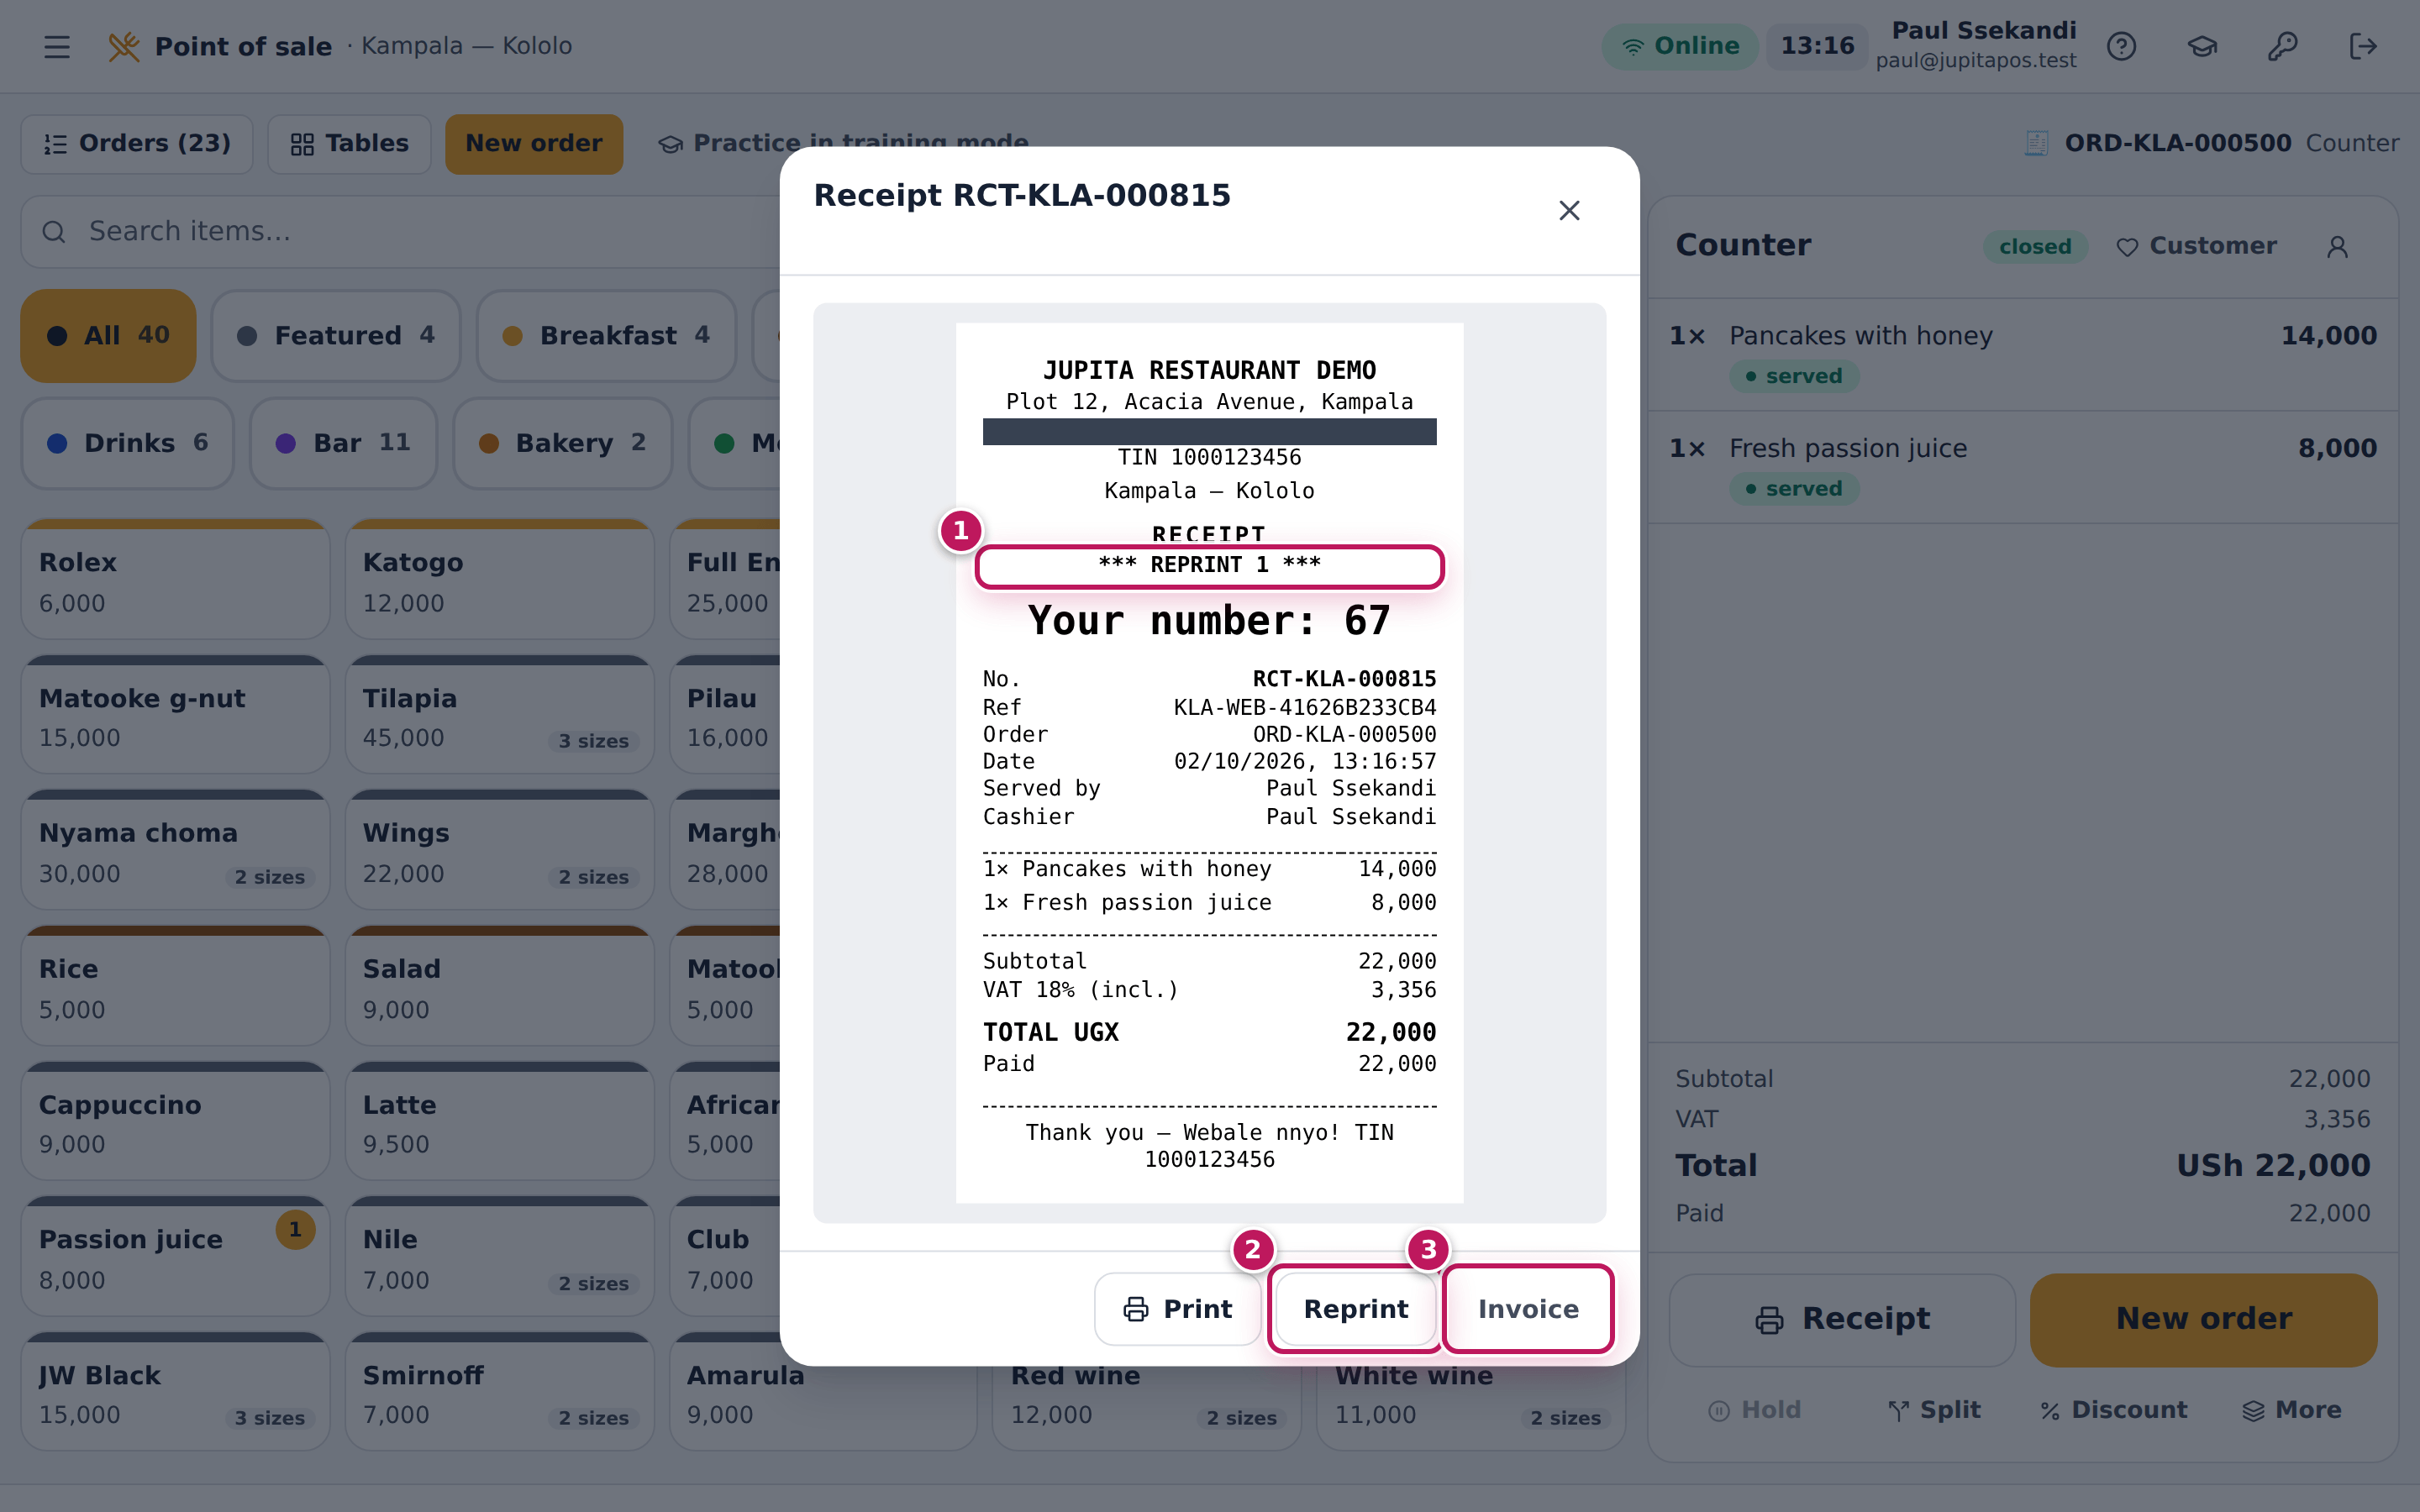
- Open the paid order on the till (it stays on the screen after payment; an older one from Orders, see Find an order) and tap Receipt under it.
- Tap Reprint (2). The reprint is recorded and the copy, marked *** REPRINT 1 *** (1), opens in a new tab to print; the till says Reprint 1 recorded. It also goes to the receipt printer if the till has one.
- Print opens the receipt in a new tab to print, without counting a reprint.
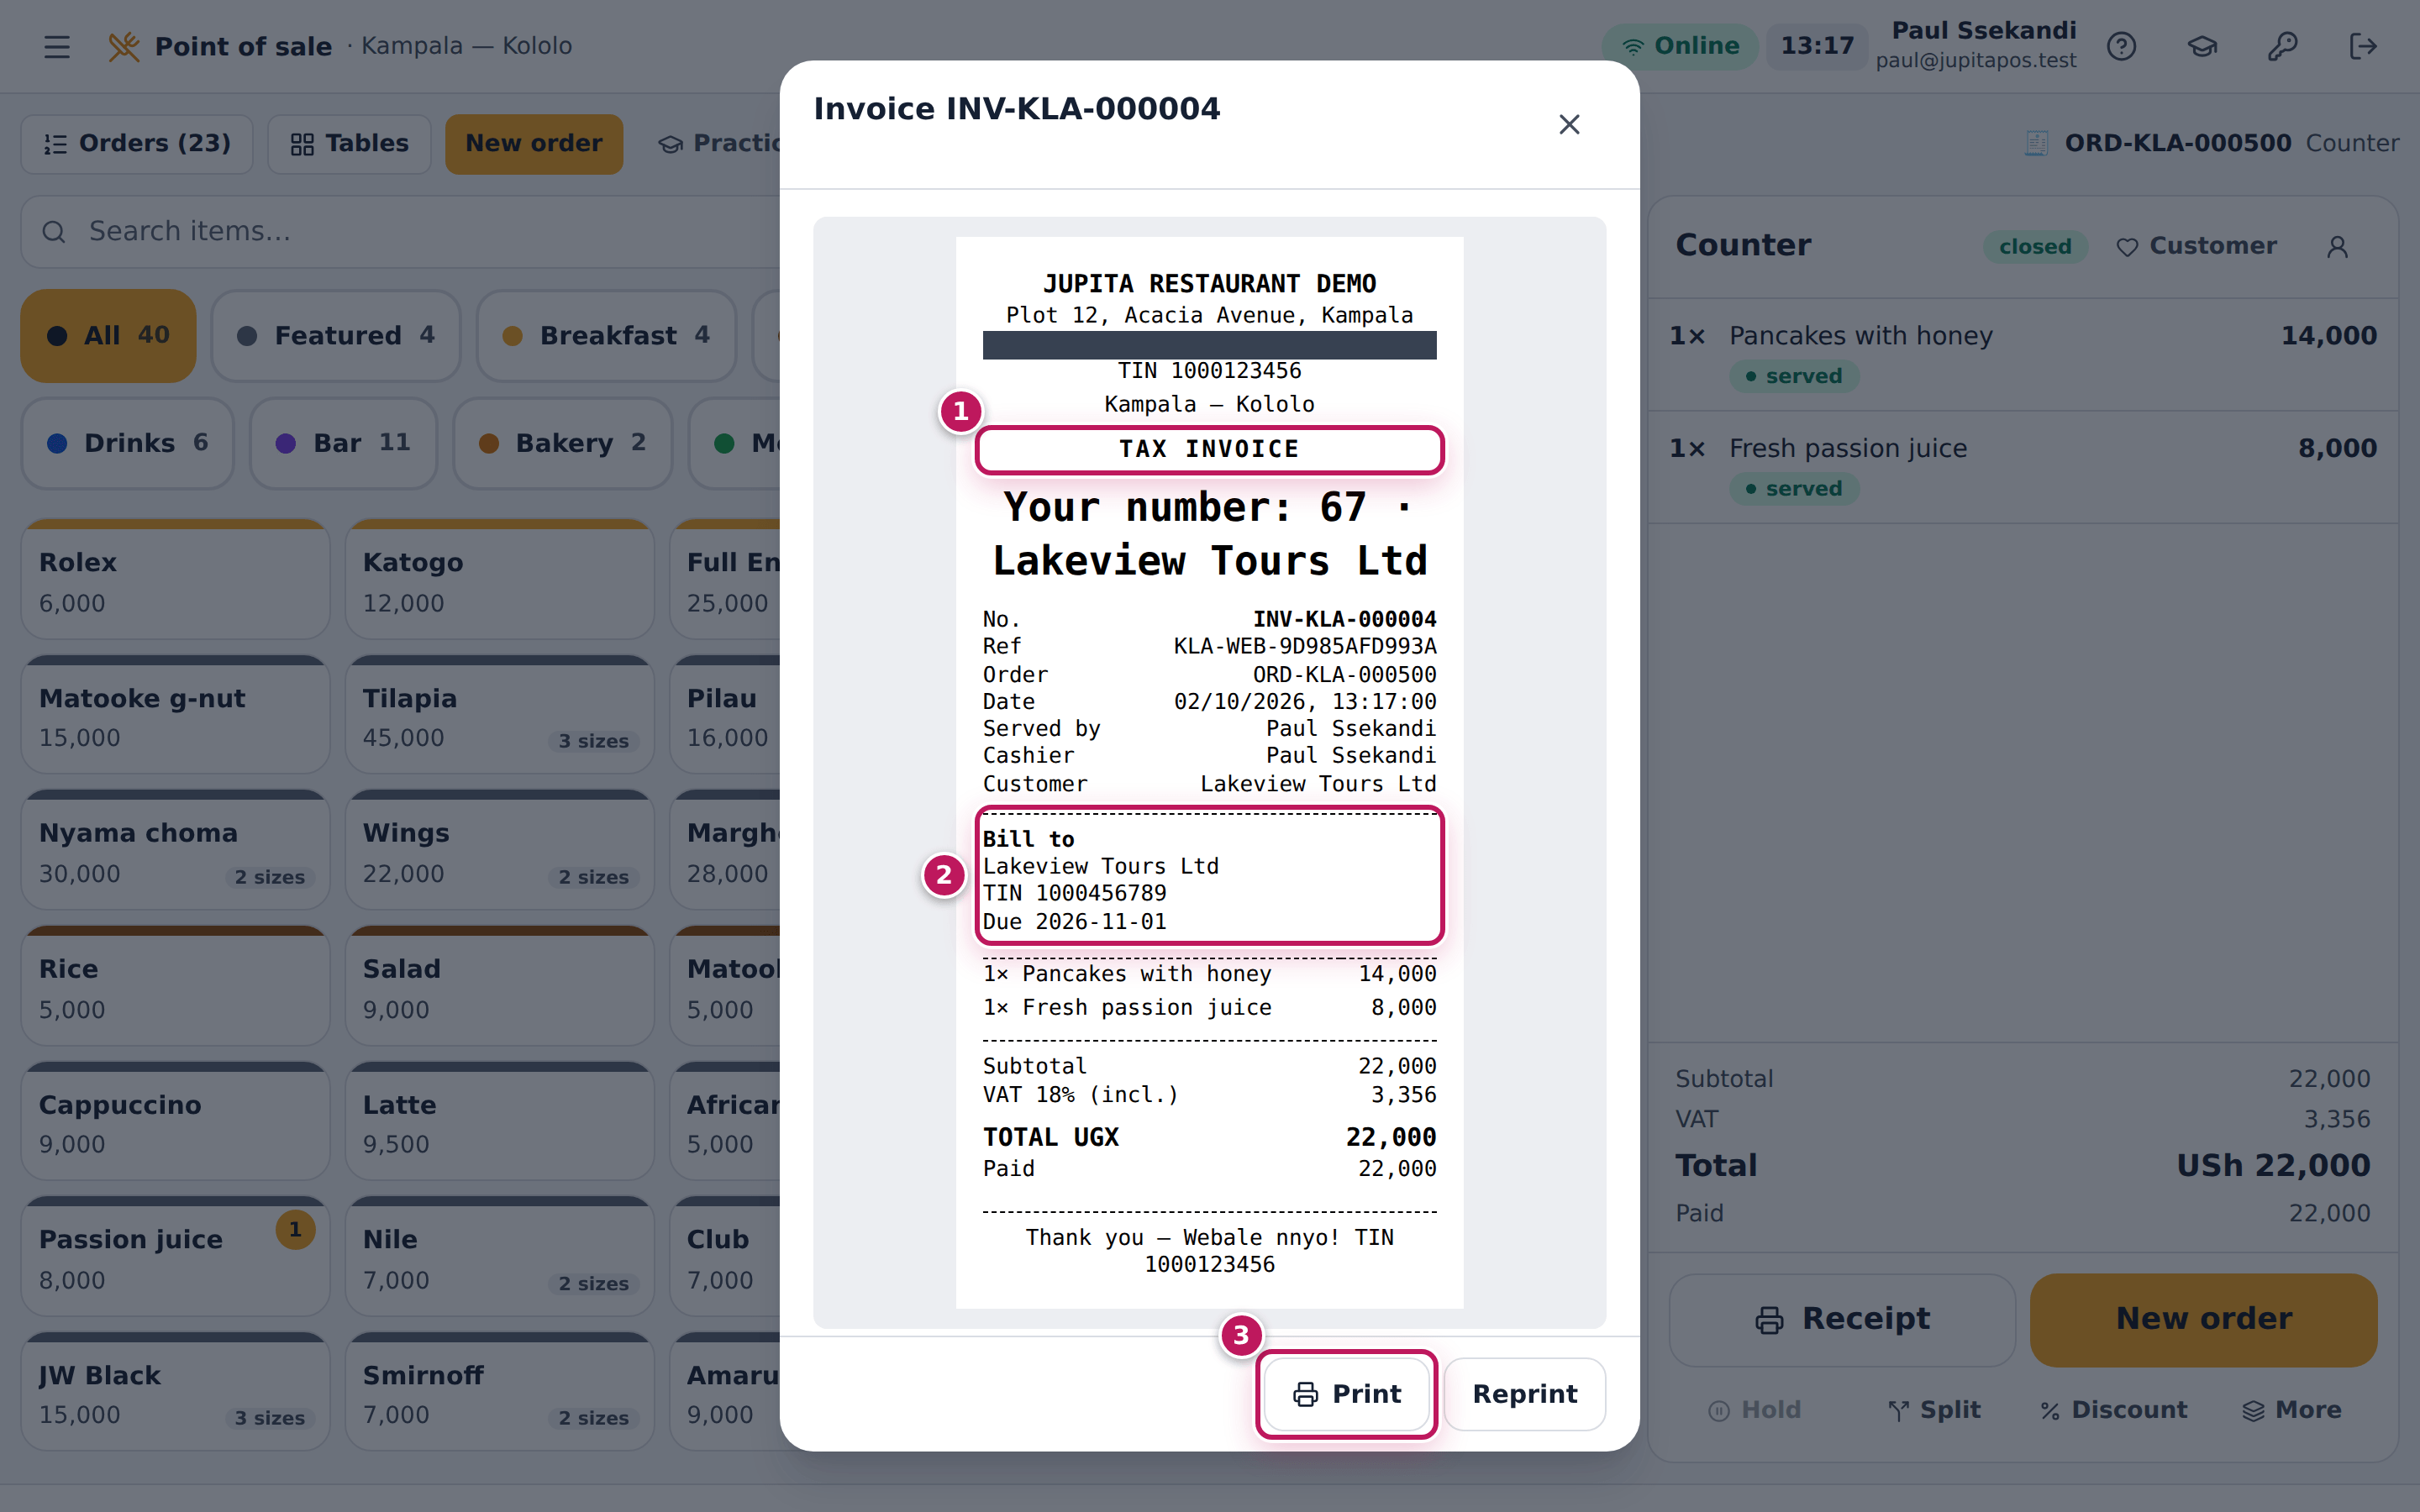
- For a tax invoice, tap Invoice (3). Type the customer’s or company’s name in the box that opens and confirm, then their TIN (optional) and confirm.
- The invoice opens: TAX INVOICE (1) with its own number, and Bill to (2) with the name, the TIN and the due date. Tap Print (3).
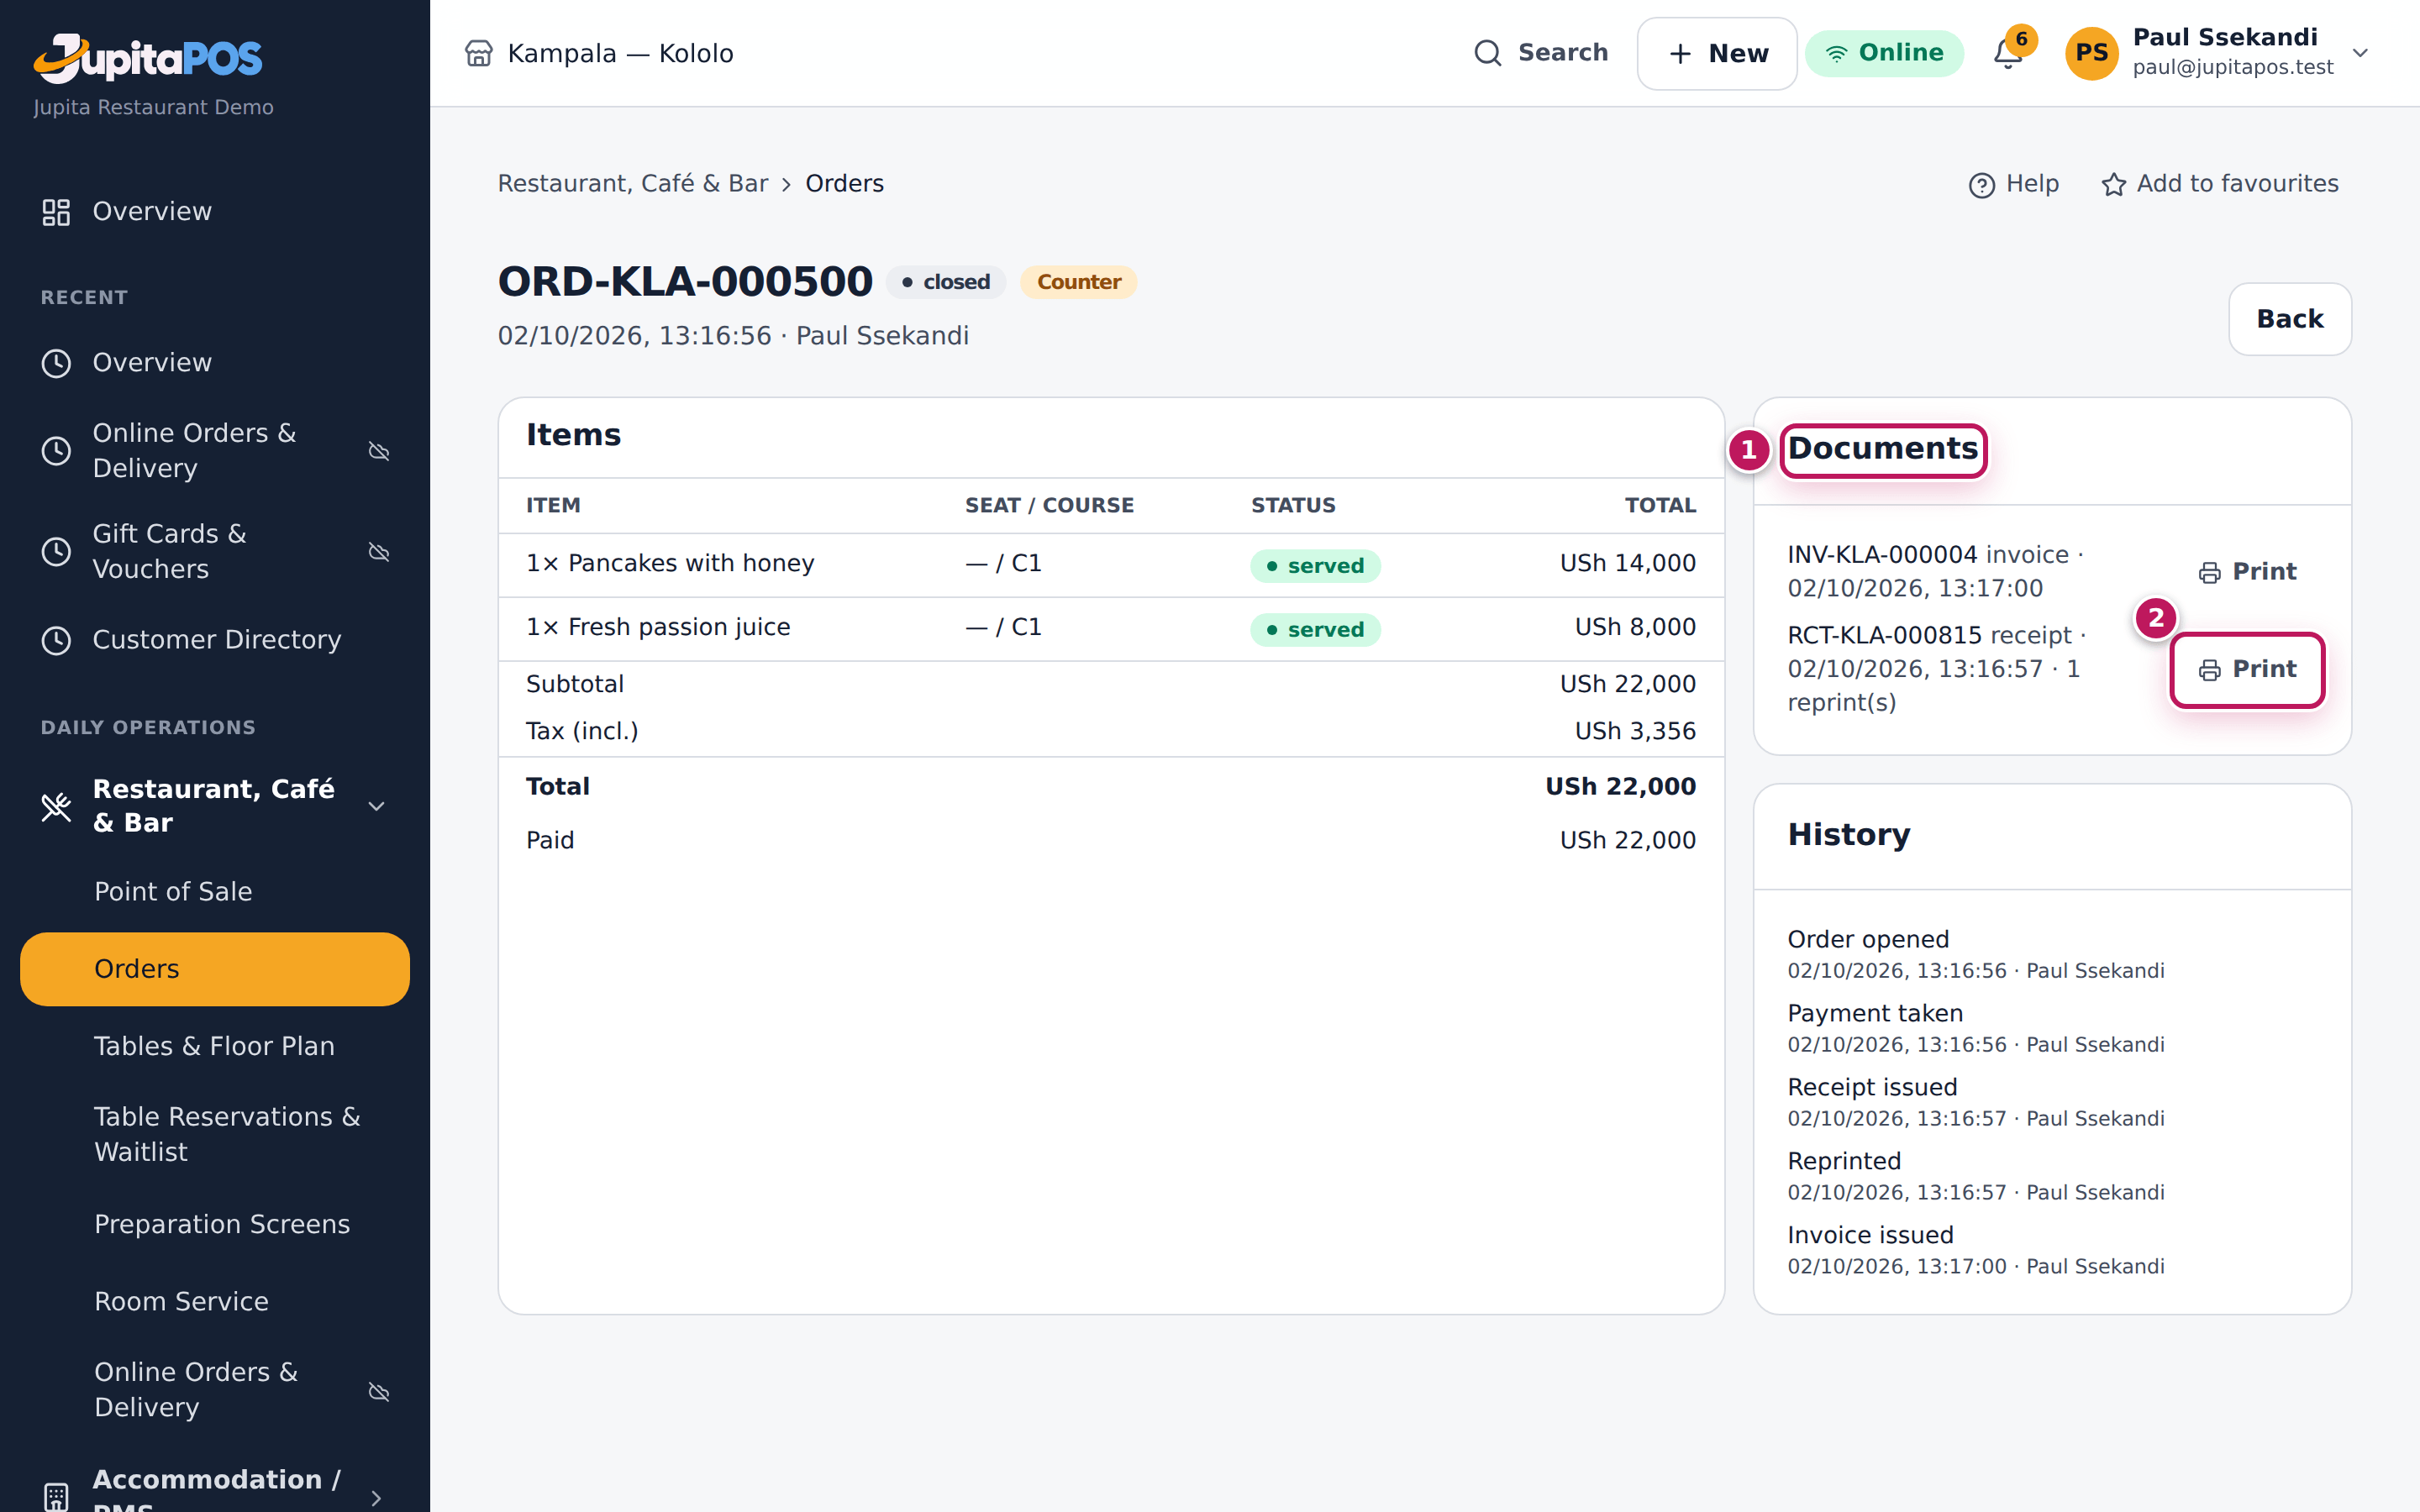
- For an order from another day, open its page in Orders: the Documents (1) list every receipt, bill and invoice issued for it; Print (2) opens one with the print dialog.
Expected result
The reprint has the same receipt number and contents as the first print,
marked *** REPRINT 1 *** (then 2, 3…). The invoice has its own number
(INV-KLA-…), Bill to Lakeview Tours Ltd, TIN 1000456789 and a due date.
The order’s page lists both documents — the receipt with 1 reprint(s) —
and its history records each one with the person and the time.
Screenshot
Common mistakes
- Taking the payment again to get a receipt. That charges the customer twice. Reprint instead.
- Issuing an invoice with a wrong TIN. The invoice is a tax document; check the TIN with the customer before you confirm.
Troubleshooting
- The reprint does not come out. Print it from the tab that opened. If no tab opened (a pop-up blocker), the till says so: tap Print.
- “This document has been tampered with and cannot be reprinted.” The stored document no longer matches what was issued. Do not reprint; tell the manager, who checks the audit trail.
- Invoice is missing. The order is not billed or paid yet.
FAQ
Can I e-mail the receipt? Not from the till: receipts and invoices are printed. Print to PDF from the print window if the customer needs a file.
What is Your number: 101? Counter and café orders get a call number, printed big on the receipt; call it when the order is ready (see Take a café order with a call number).
Find an order and read its history
Purpose
Find any order of the branch — open, paid, cancelled or voided — to answer a customer, reprint a document or see who did what to it and when.
Role / permission required
Anyone who can see orders (sales.view).
Prerequisites
- You know something about the order: its number (on the receipt), the customer’s name, its status or type.
Steps
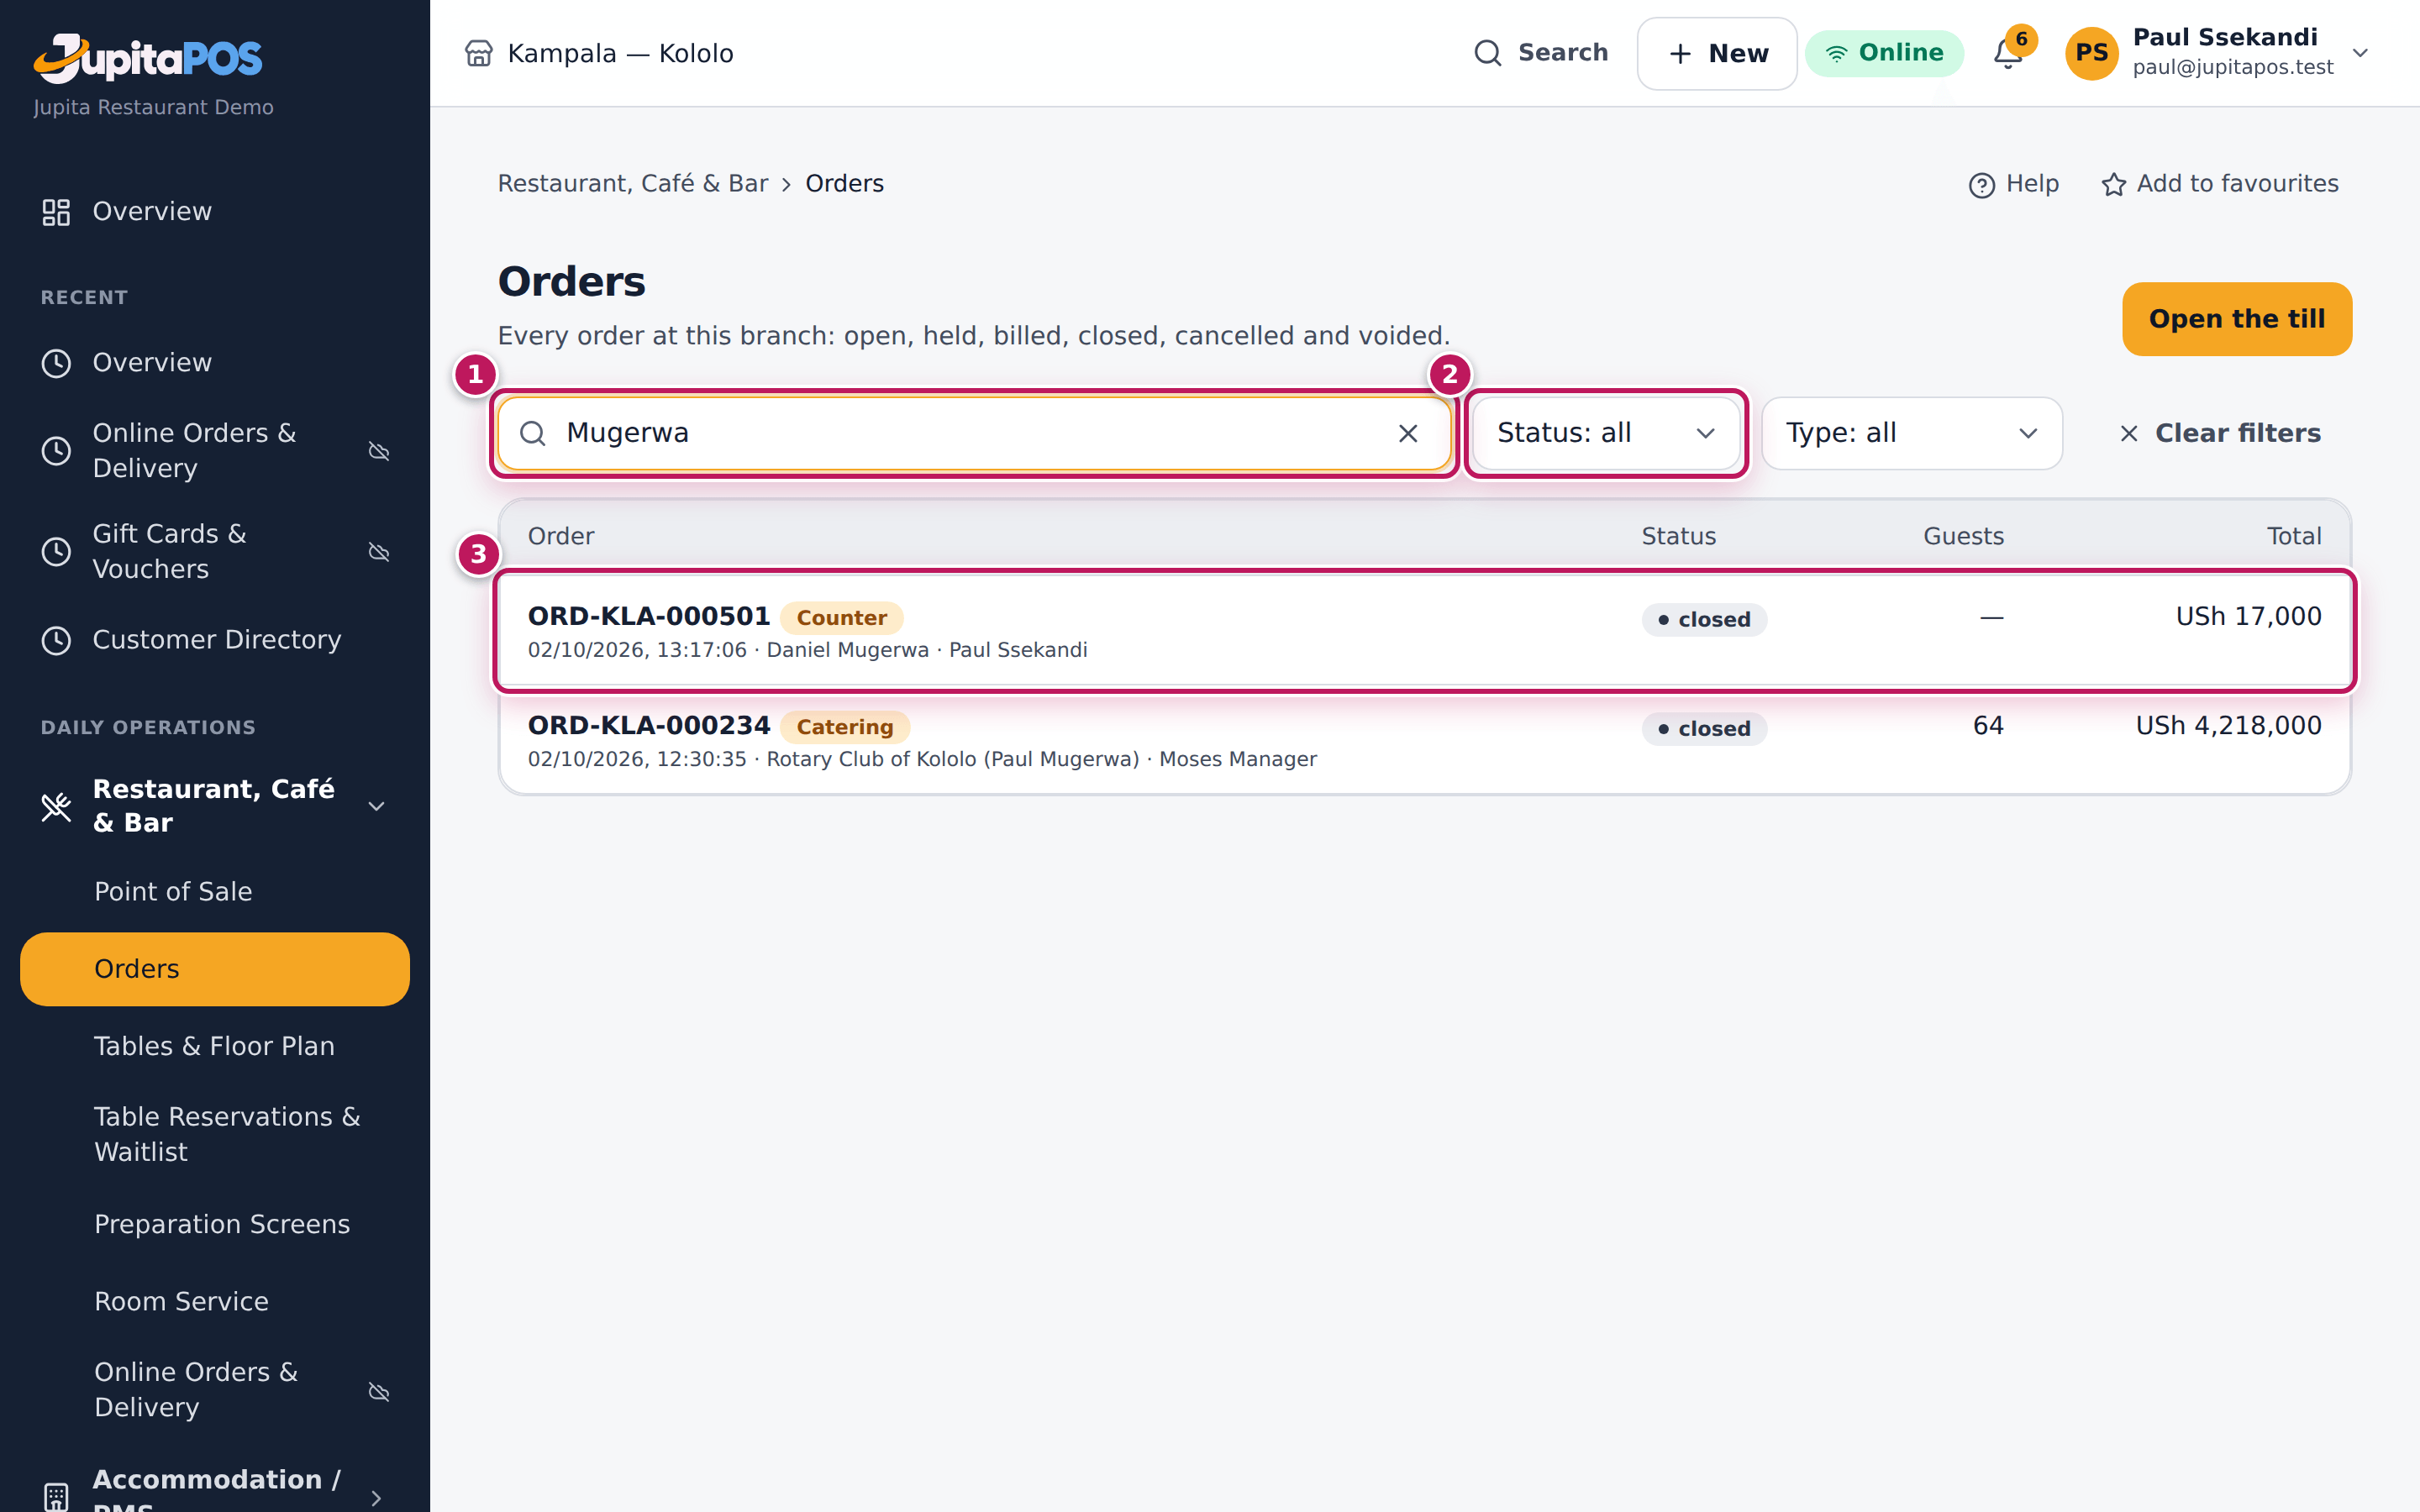
- Open Orders from the sidebar (
/pos/orders). The newest orders of the branch are at the top. - Type the order number or the customer’s name in the search box (1), for example Mugerwa.
- Narrow the list with the status (2) and the type filters, or tap Clear filters.
- Tap the order (3).
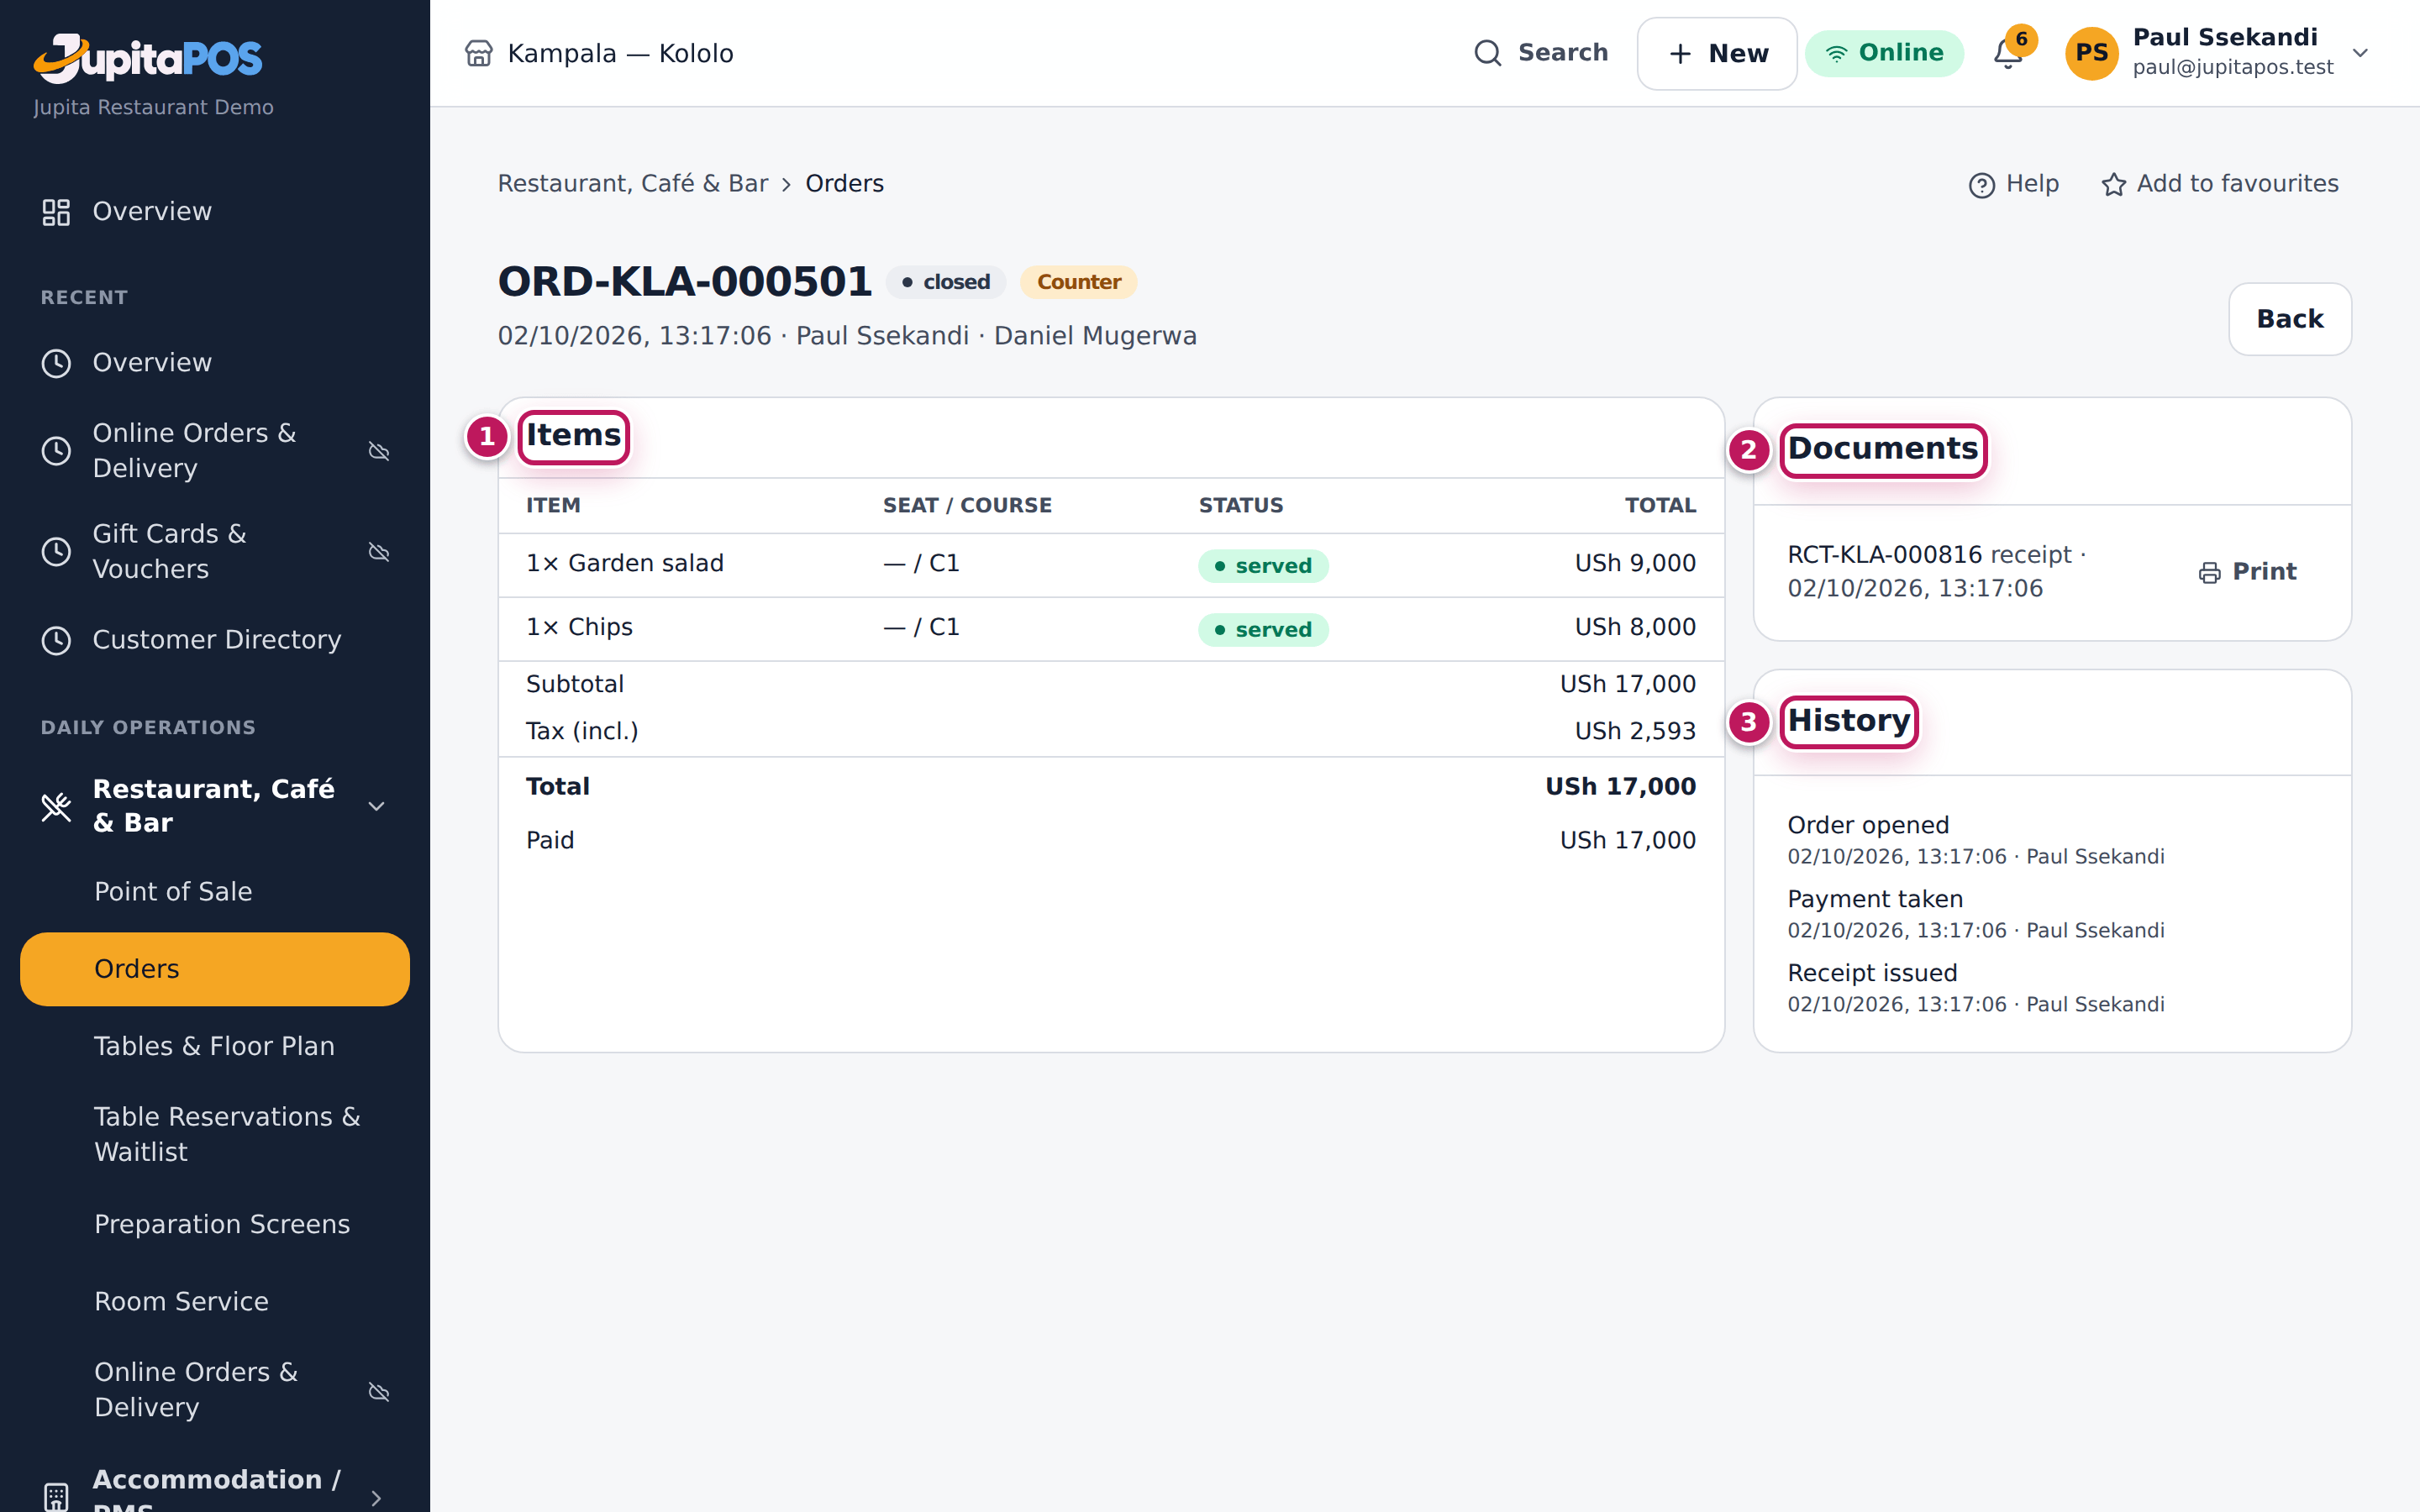
- On its page read the Items (1) with their status, the totals and what was paid, the Documents (2) issued for it and its History (3): every change, with who made it and when.
- On an open order tap Open in till to carry on with it; Back returns to the list.
Expected result
The search finds ORD-KLA-… · Counter, Daniel Mugerwa’s order, closed, USh 17,000. Its page shows the salad and the chips (served), the receipt under Documents, and in the History Order opened, Payment taken and Receipt issued, each with Paul Ssekandi’s name and the time. A paid order’s history ends with its payment: there is no separate “closed” line.
Screenshot
Common mistakes
- Searching at the wrong branch. The list shows the branch you work at now. Switch branch first (see Find your way).
- Searching for part of a customer’s phone number. The search matches order numbers and the customer’s name.
Troubleshooting
- “No orders match”. Check the spelling, clear the filters, or search by the order number on the receipt.
- The order is older than the list. The list shows 40 orders at a time; tap Older at the bottom (and Newer to come back).
FAQ
Can I void or reopen an order from its page? Supervisors and managers see Void there, managers also Reopen; both ask for a reason.
Verify mobile money and card payments
Purpose
Tick off the mobile money and card payments taken by hand against the business’s statement, so a payment that never arrived is found the same day and the order becomes unpaid again.
Role / permission required
Cashiers, supervisors and managers (payments.verify).
Prerequisites
- You have the mobile money statement (or the card machine’s report) for the day.
Steps
- Open Payments from the sidebar (
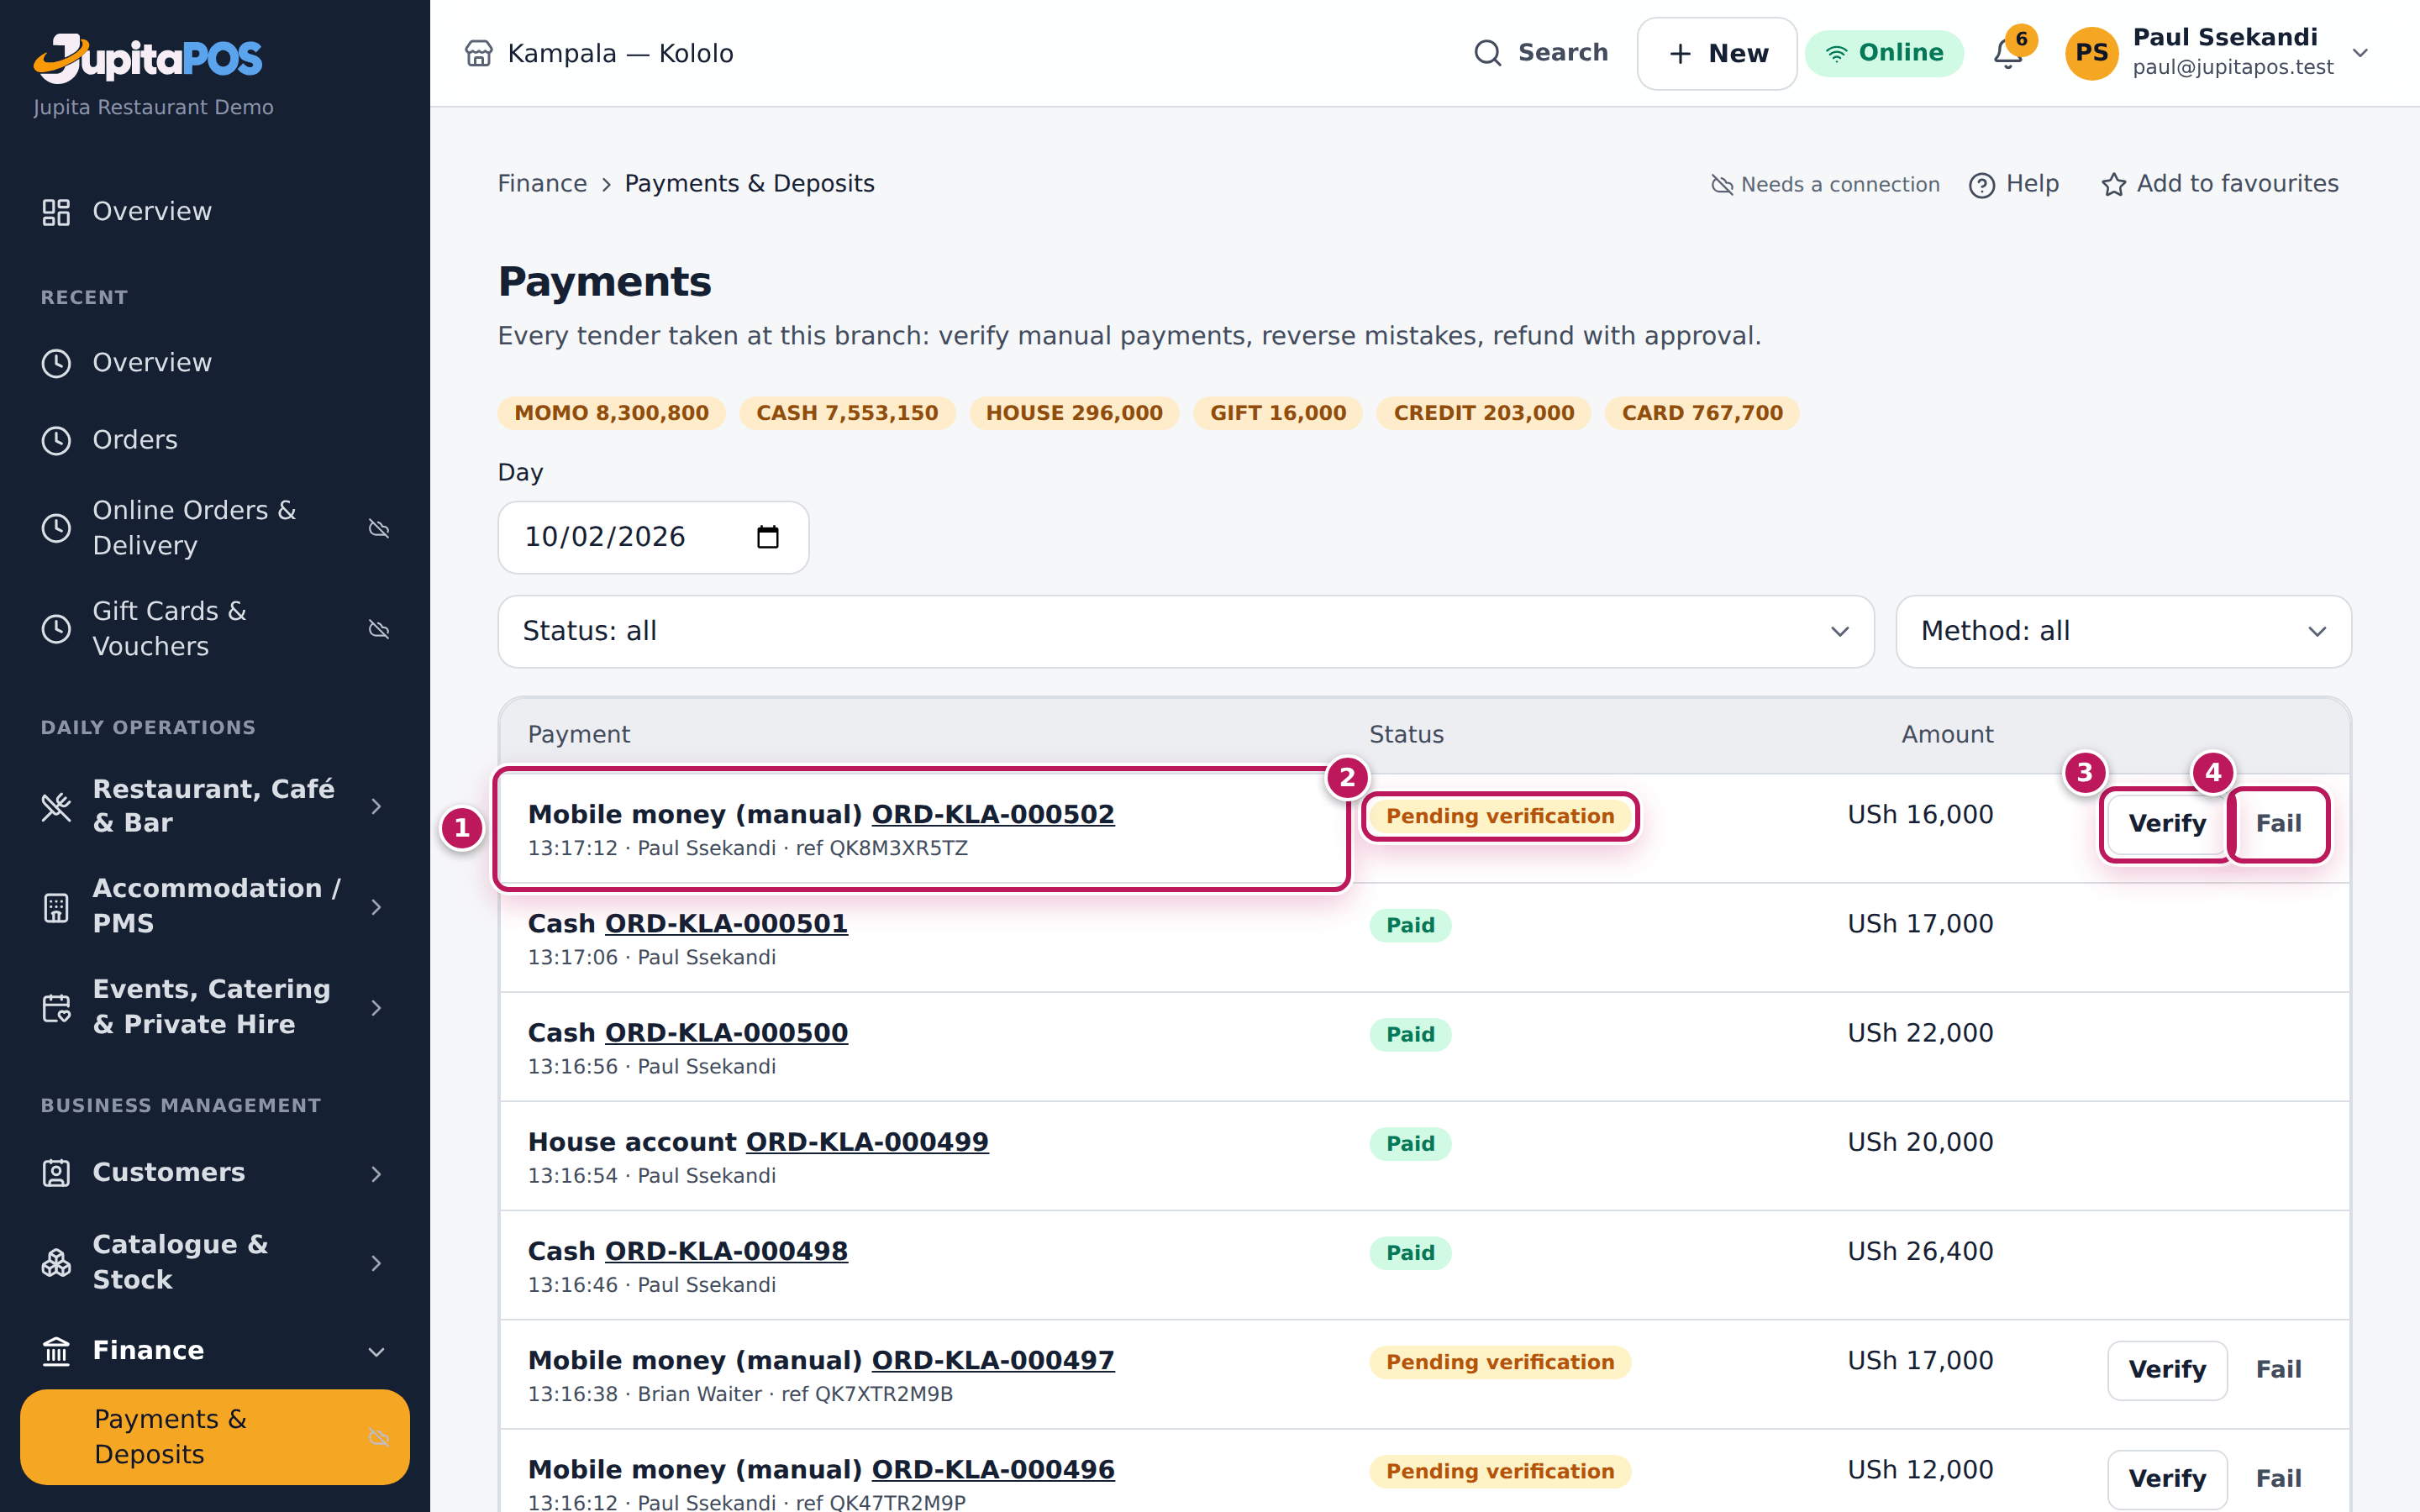
/payments). It lists every tender of the branch for the Day chosen, newest first. - Find each payment marked Pending verification (2). Its line shows the method, the order and the reference (1).
- Look for the reference and the amount on the statement.
- If it is there, tap Verify (3).
- If it is not, tap Fail (4), type the reason and tap Mark failed.
Expected result
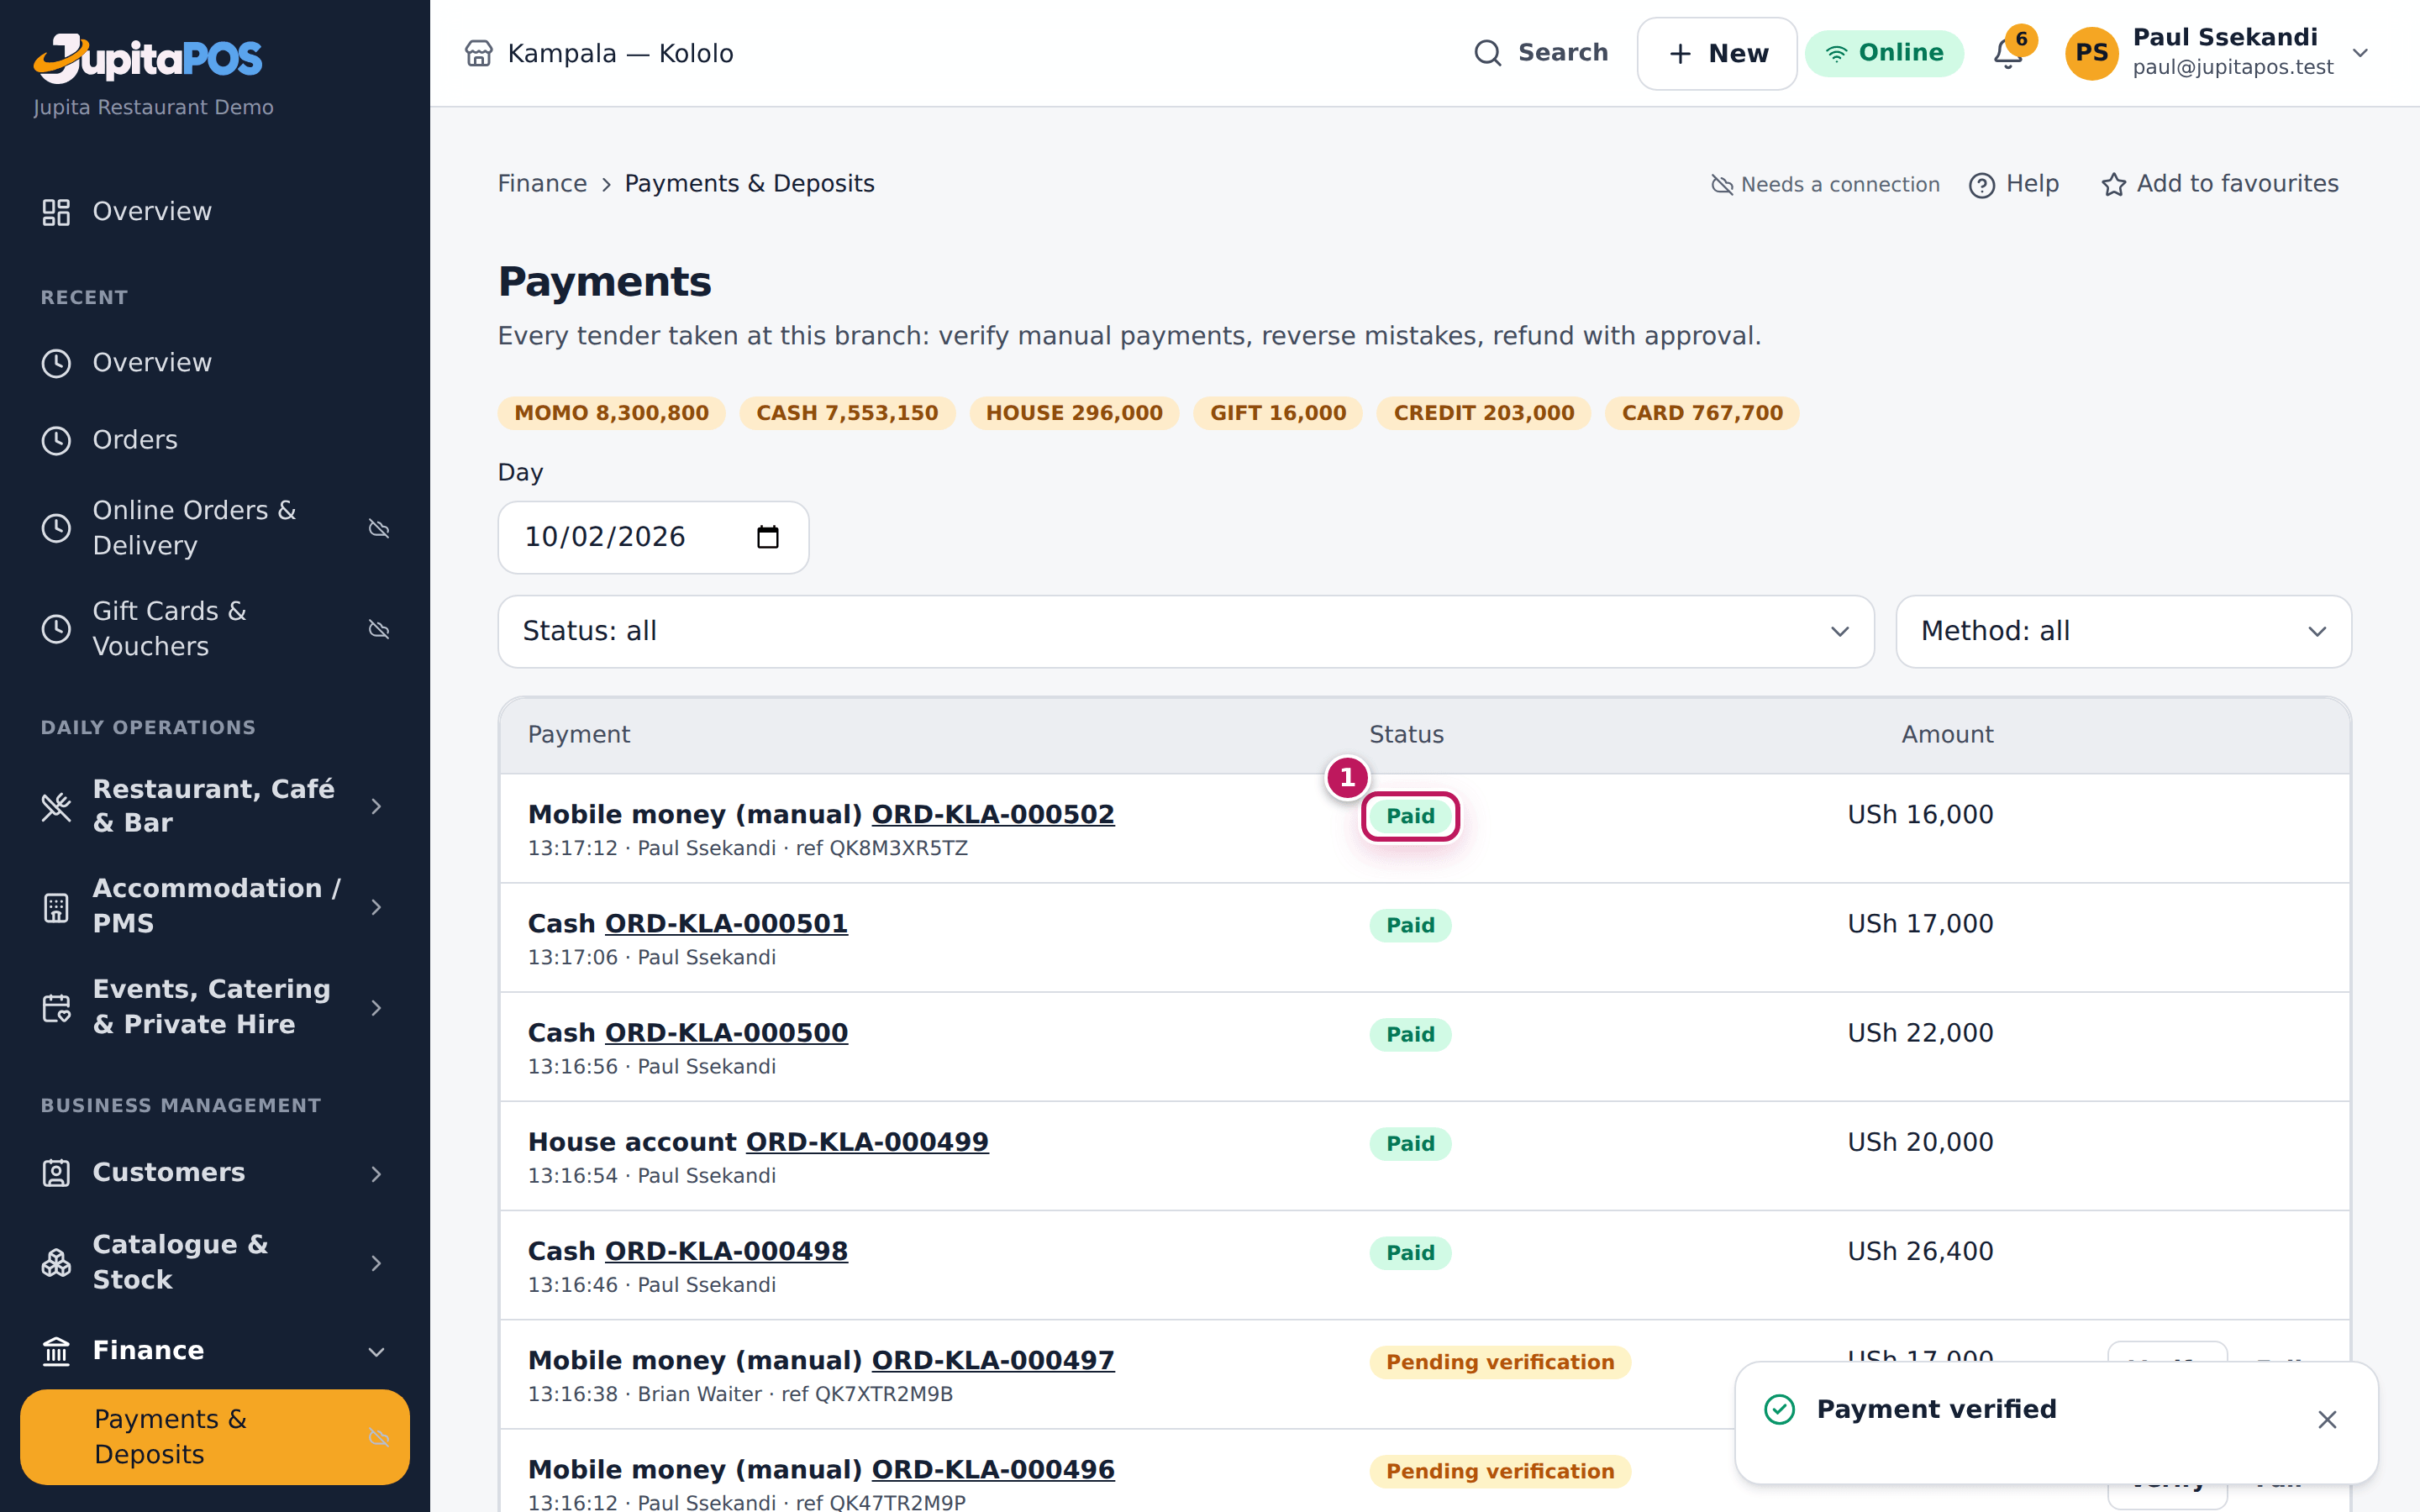
The verified payment is Paid (1). A failed one comes off its order, which becomes unpaid again with the amount due, so the money can be collected; the failure and its reason are in the audit trail.
Screenshot
Common mistakes
- Verifying from the till’s word. Verify only against the statement or the card report; that is the whole point.
- Failing a payment that arrived late. Mobile money can take minutes to show. Check again before you tap Fail.
Troubleshooting
- There is no Verify button. The payment is already paid, or it is a payment the provider confirms itself.
- The totals at the top do not match the statement. They add up the day’s settled tenders by method; look for a payment taken with the wrong method (see Reverse a payment taken by mistake).
Reverse a payment taken by mistake
Purpose
Undo a tender that was taken wrongly — the wrong method, the wrong amount — soon after it happened, so the order is open again and the cashier takes the payment the right way. Money the customer really paid is refunded instead.
Role / permission required
Supervisors and managers (payments.reverse), signed in with their e-mail
and password.
Prerequisites
- The payment was taken less than 2 hours ago and, for cash, its till is still open.
- It has not been refunded, even in part.
Steps
- Open Payments from the sidebar and find the payment.
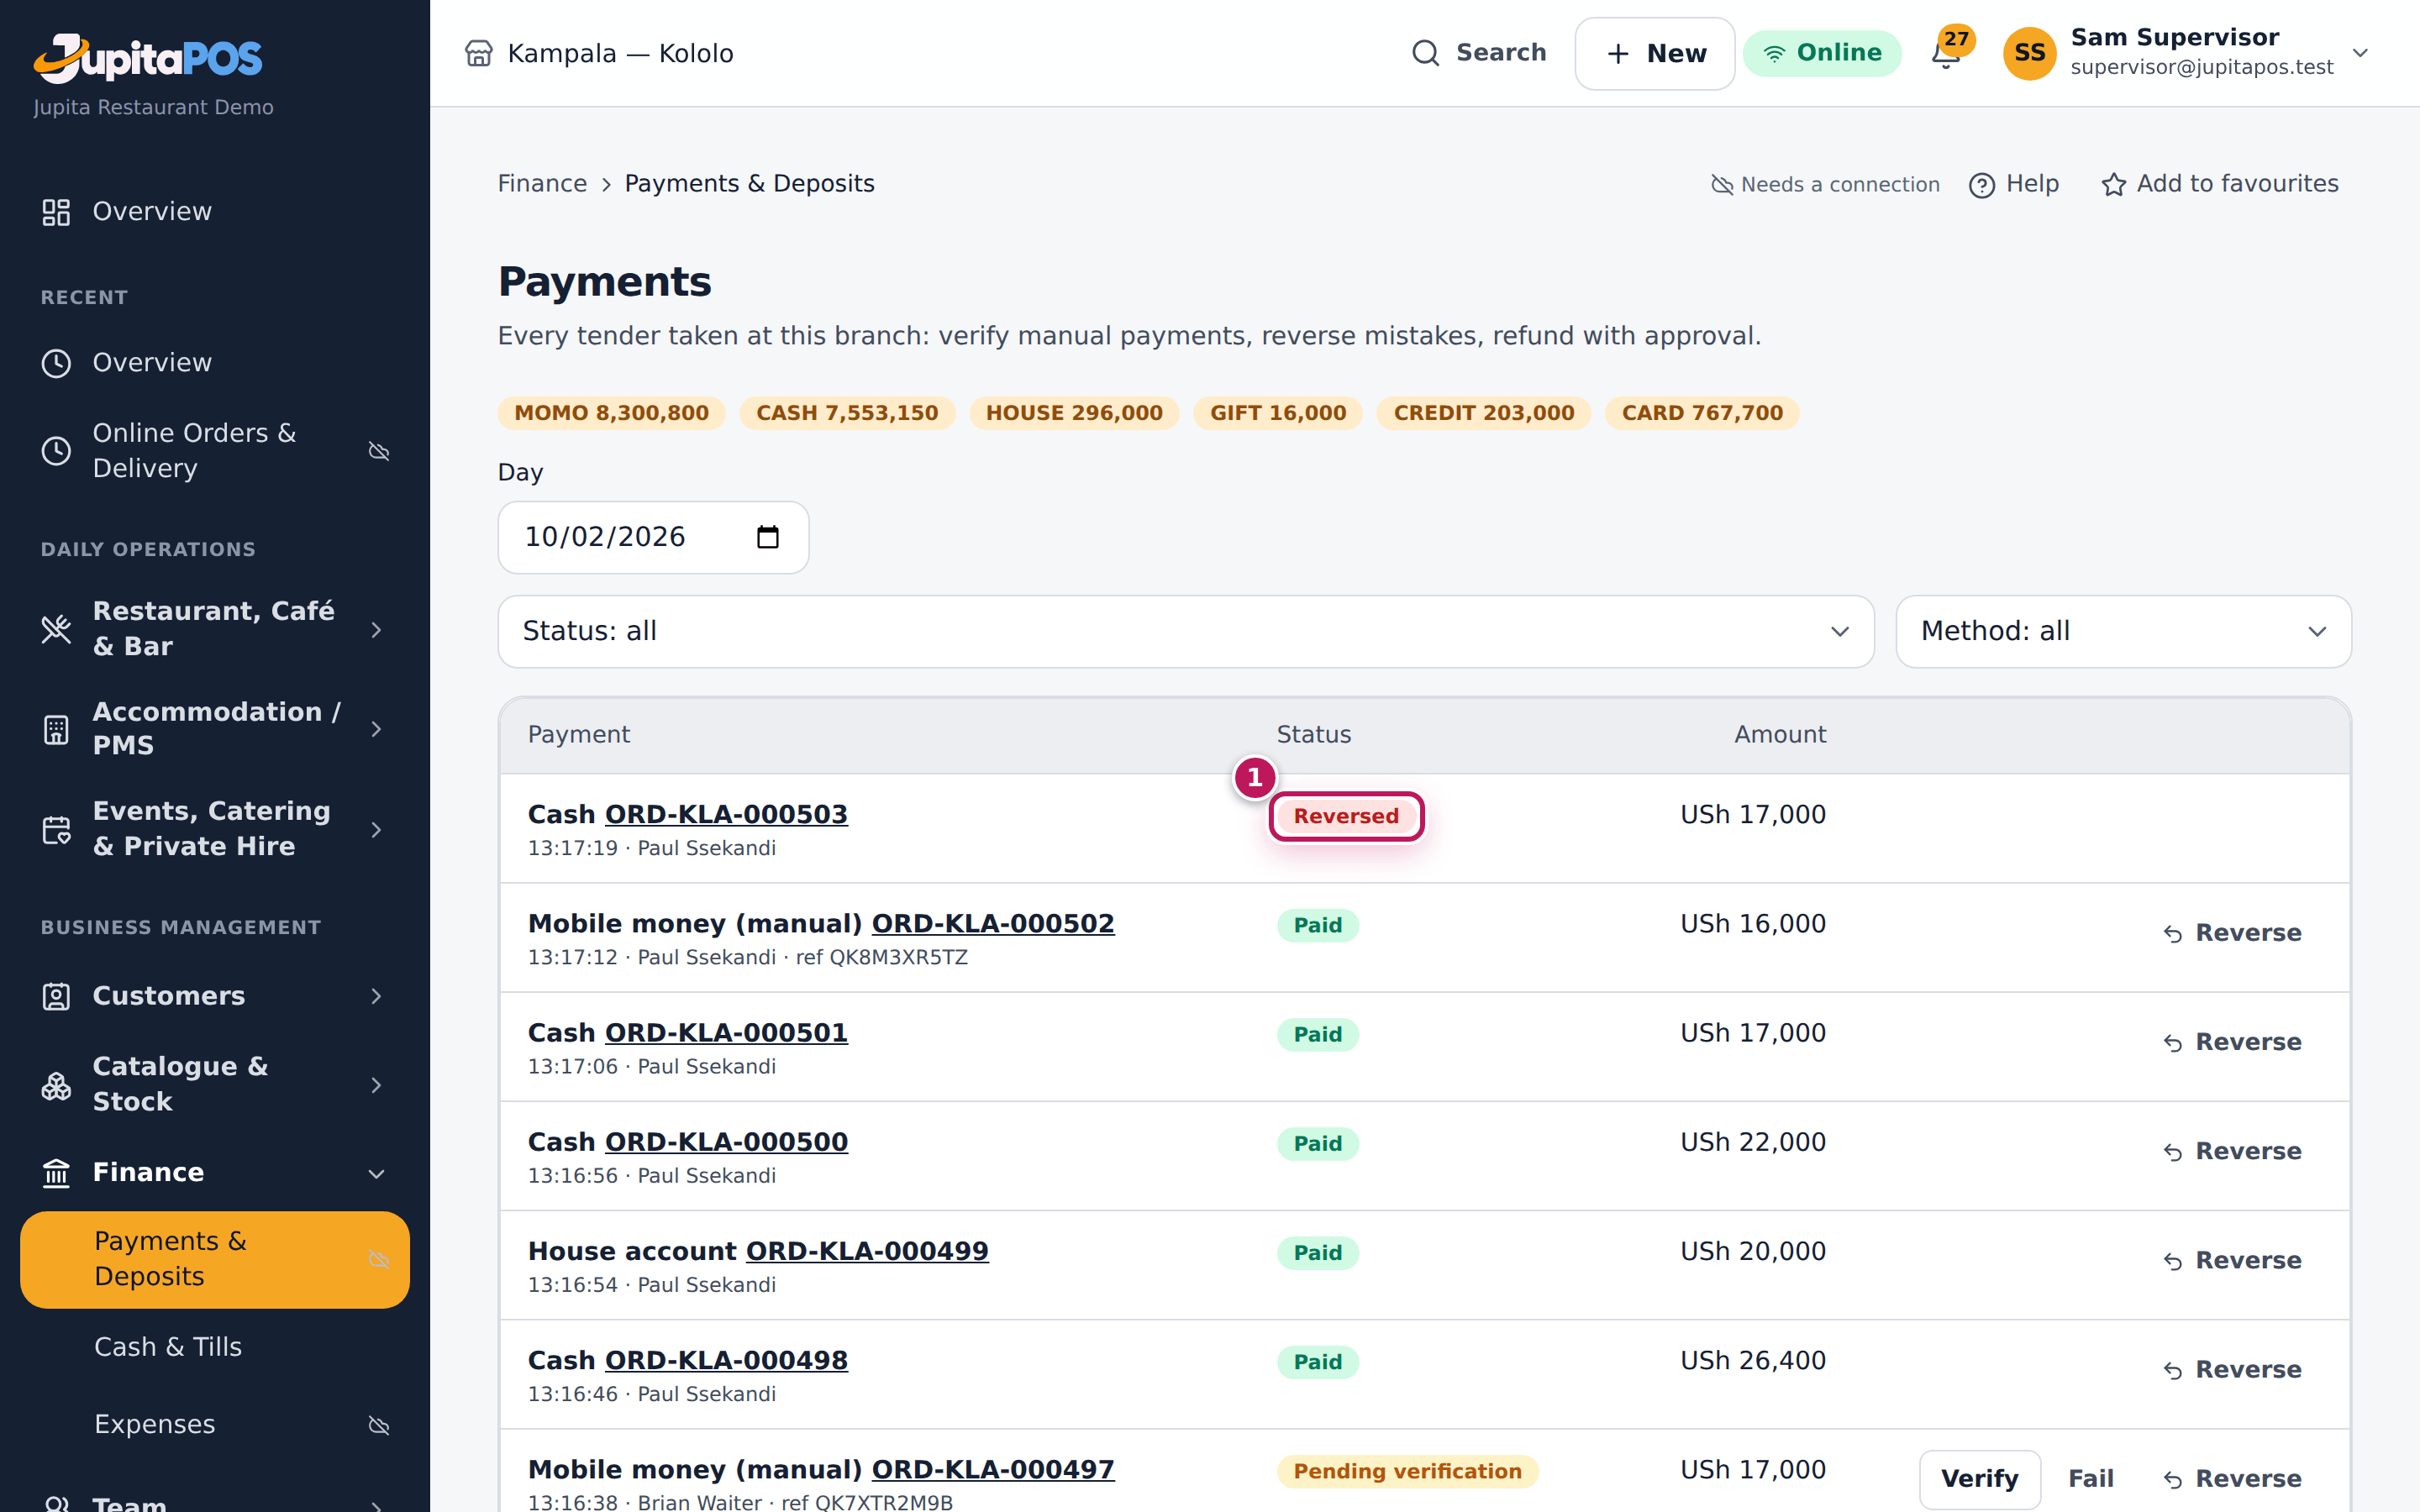
- Tap Reverse on its line.
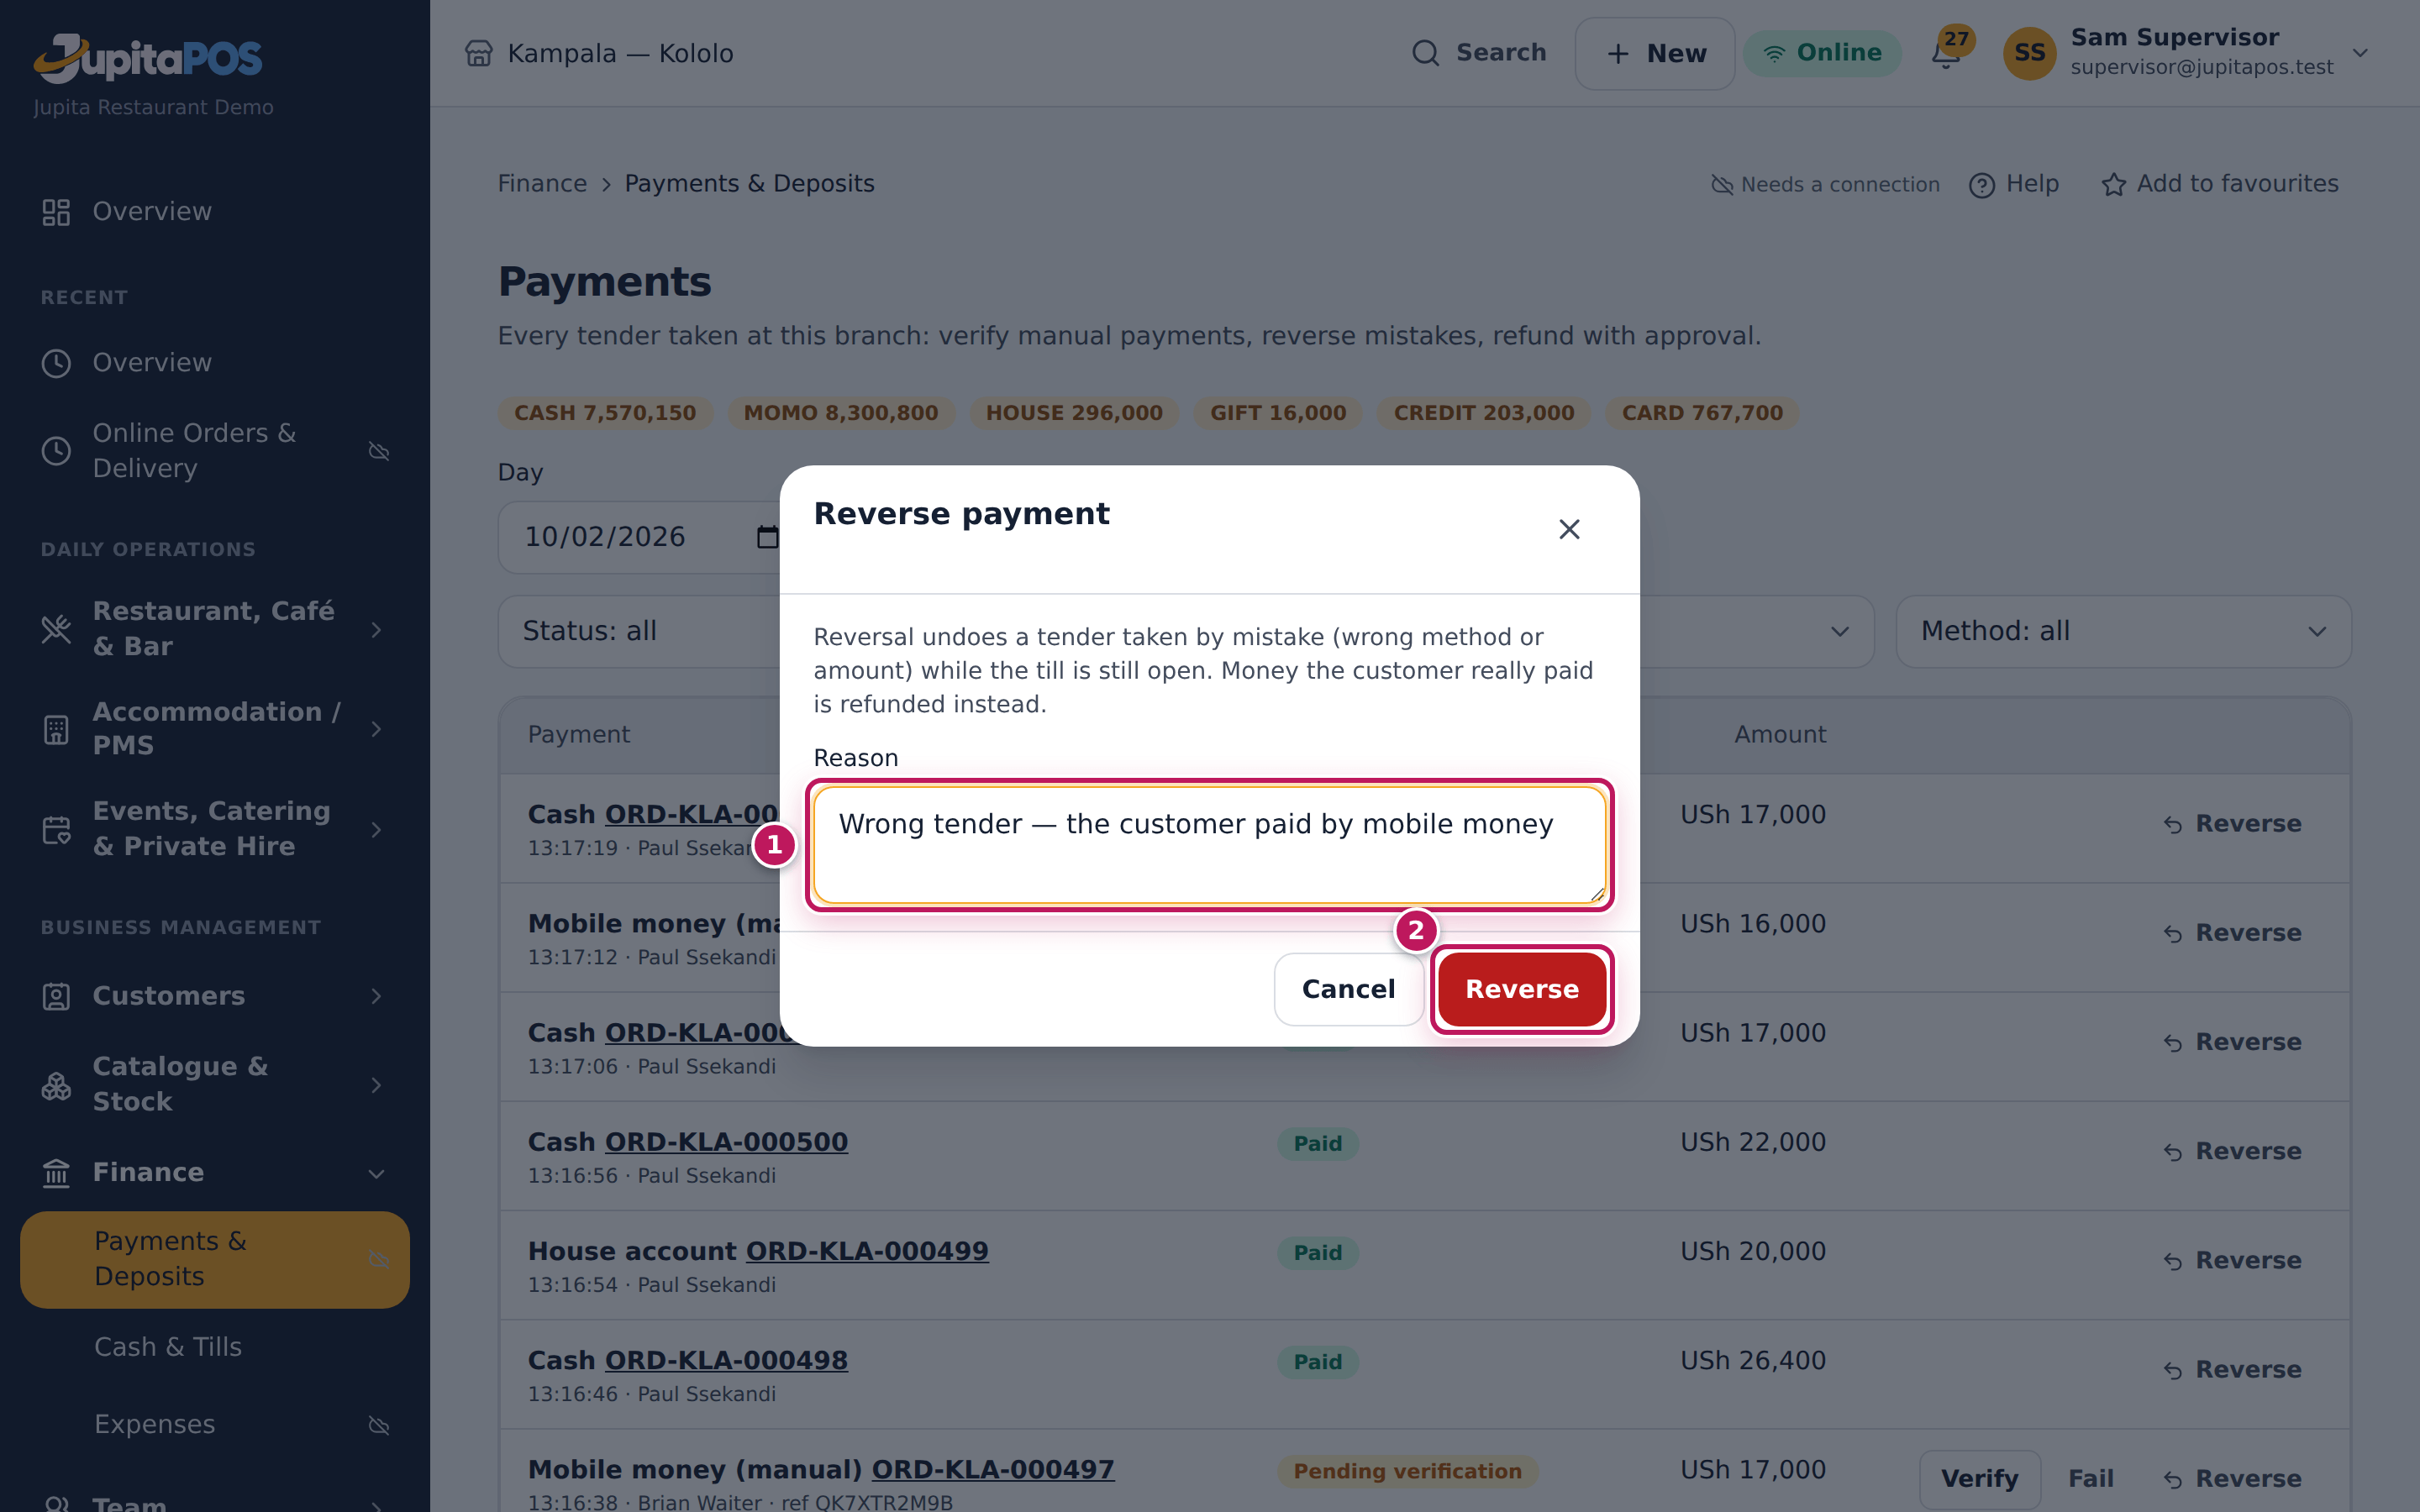
- Type the Reason (1), for example Wrong tender — the customer paid by mobile money.
- Tap Reverse (2).
- The cashier opens the order again on the till and takes the payment with the right method.
Expected result
The payment is Reversed (1). The order is open again with its full amount due (17,000 for a salad and a passion juice). For cash, the amount leaves the drawer as a Reversal in its movements, so the drawer still adds up. The reversal and its reason are in the audit trail.
Screenshot
Common mistakes
- Reversing to give money back. A reversal says the tender never happened. If the customer gets money back, refund it (see Refund a paid order).
- Waiting until the cash-up. After the till is closed a cash tender cannot be reversed any more.
Troubleshooting
- “Reversals are allowed within 120 minutes; refund instead.” It is too late for a reversal; refund the payment.
- “The till this cash went into is closed; refund instead.” The drawer was closed; refund the payment.
- “A partly refunded payment cannot be reversed.” Refund the rest instead.
- Reverse is not on the line. The payment is already reversed, refunded or not settled, or your role cannot reverse.
Refund a paid order, in full or in part
Purpose
Give money back to a customer for a paid order — a dish sent back, a double charge — against the payment it came from, with the amount and the reason recorded and approved.
Role / permission required
Managers (sales.refund), signed in with their e-mail and password. Above
the business’s auto-approve limit a refund also needs someone who may
approve payments (payments.approve): if you may, it is recorded at once;
if not, it waits until a supervisor or manager approves it.
Prerequisites
- The order is paid.
- For a cash refund, a till is open in your name with enough cash in it (see Open the till).
Steps
- Open Payments from the sidebar and find the payment (the order number is on the line).
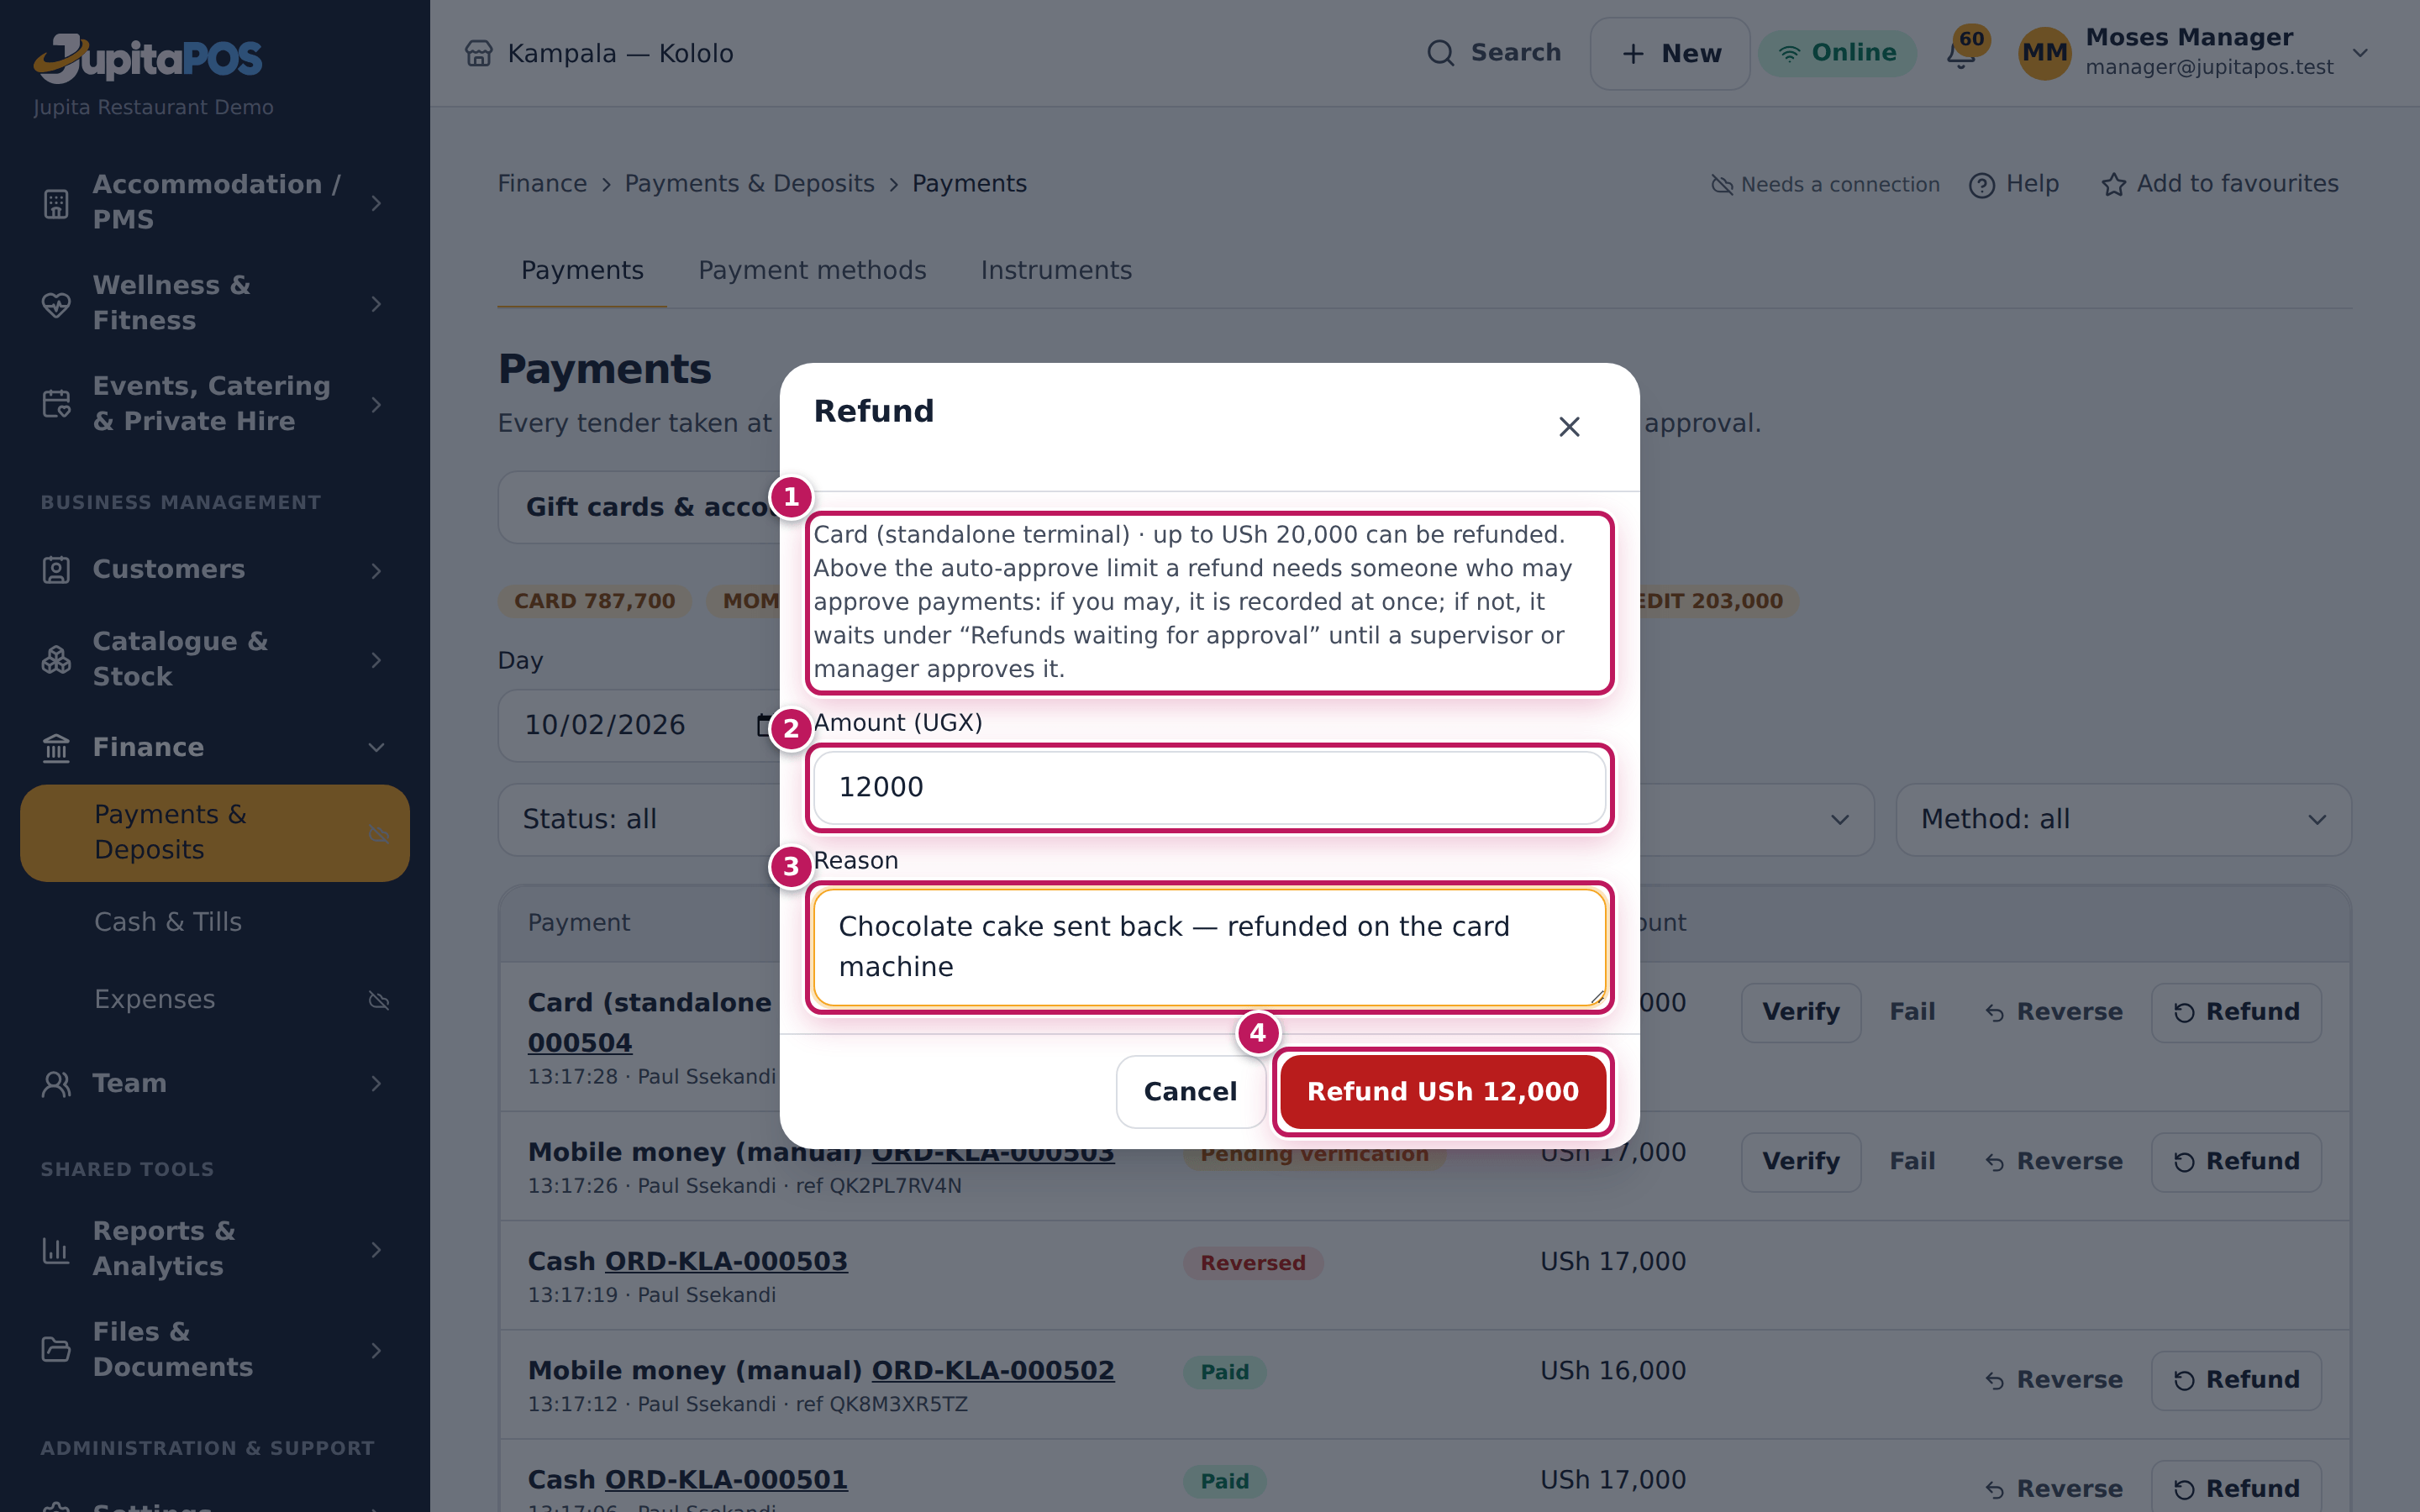
- Tap Refund on its line. The dialog says how much can still be refunded (1).
- The Amount (UGX) (2) is filled with all of it. For a part, type the amount — here 12,000 of a 20,000 card payment.
- Type the Reason (3), for example Chocolate cake sent back.
- Tap Refund USh 12,000 (4).
- Give the money back the way it came. Cash comes out of your drawer (the till records it). A card or mobile money payment taken by hand is refunded by you on the card machine or phone — JupitaPos records it. Gift cards, customer credit and house accounts are put back by the system, and providers that took the payment refund it themselves.
Expected result
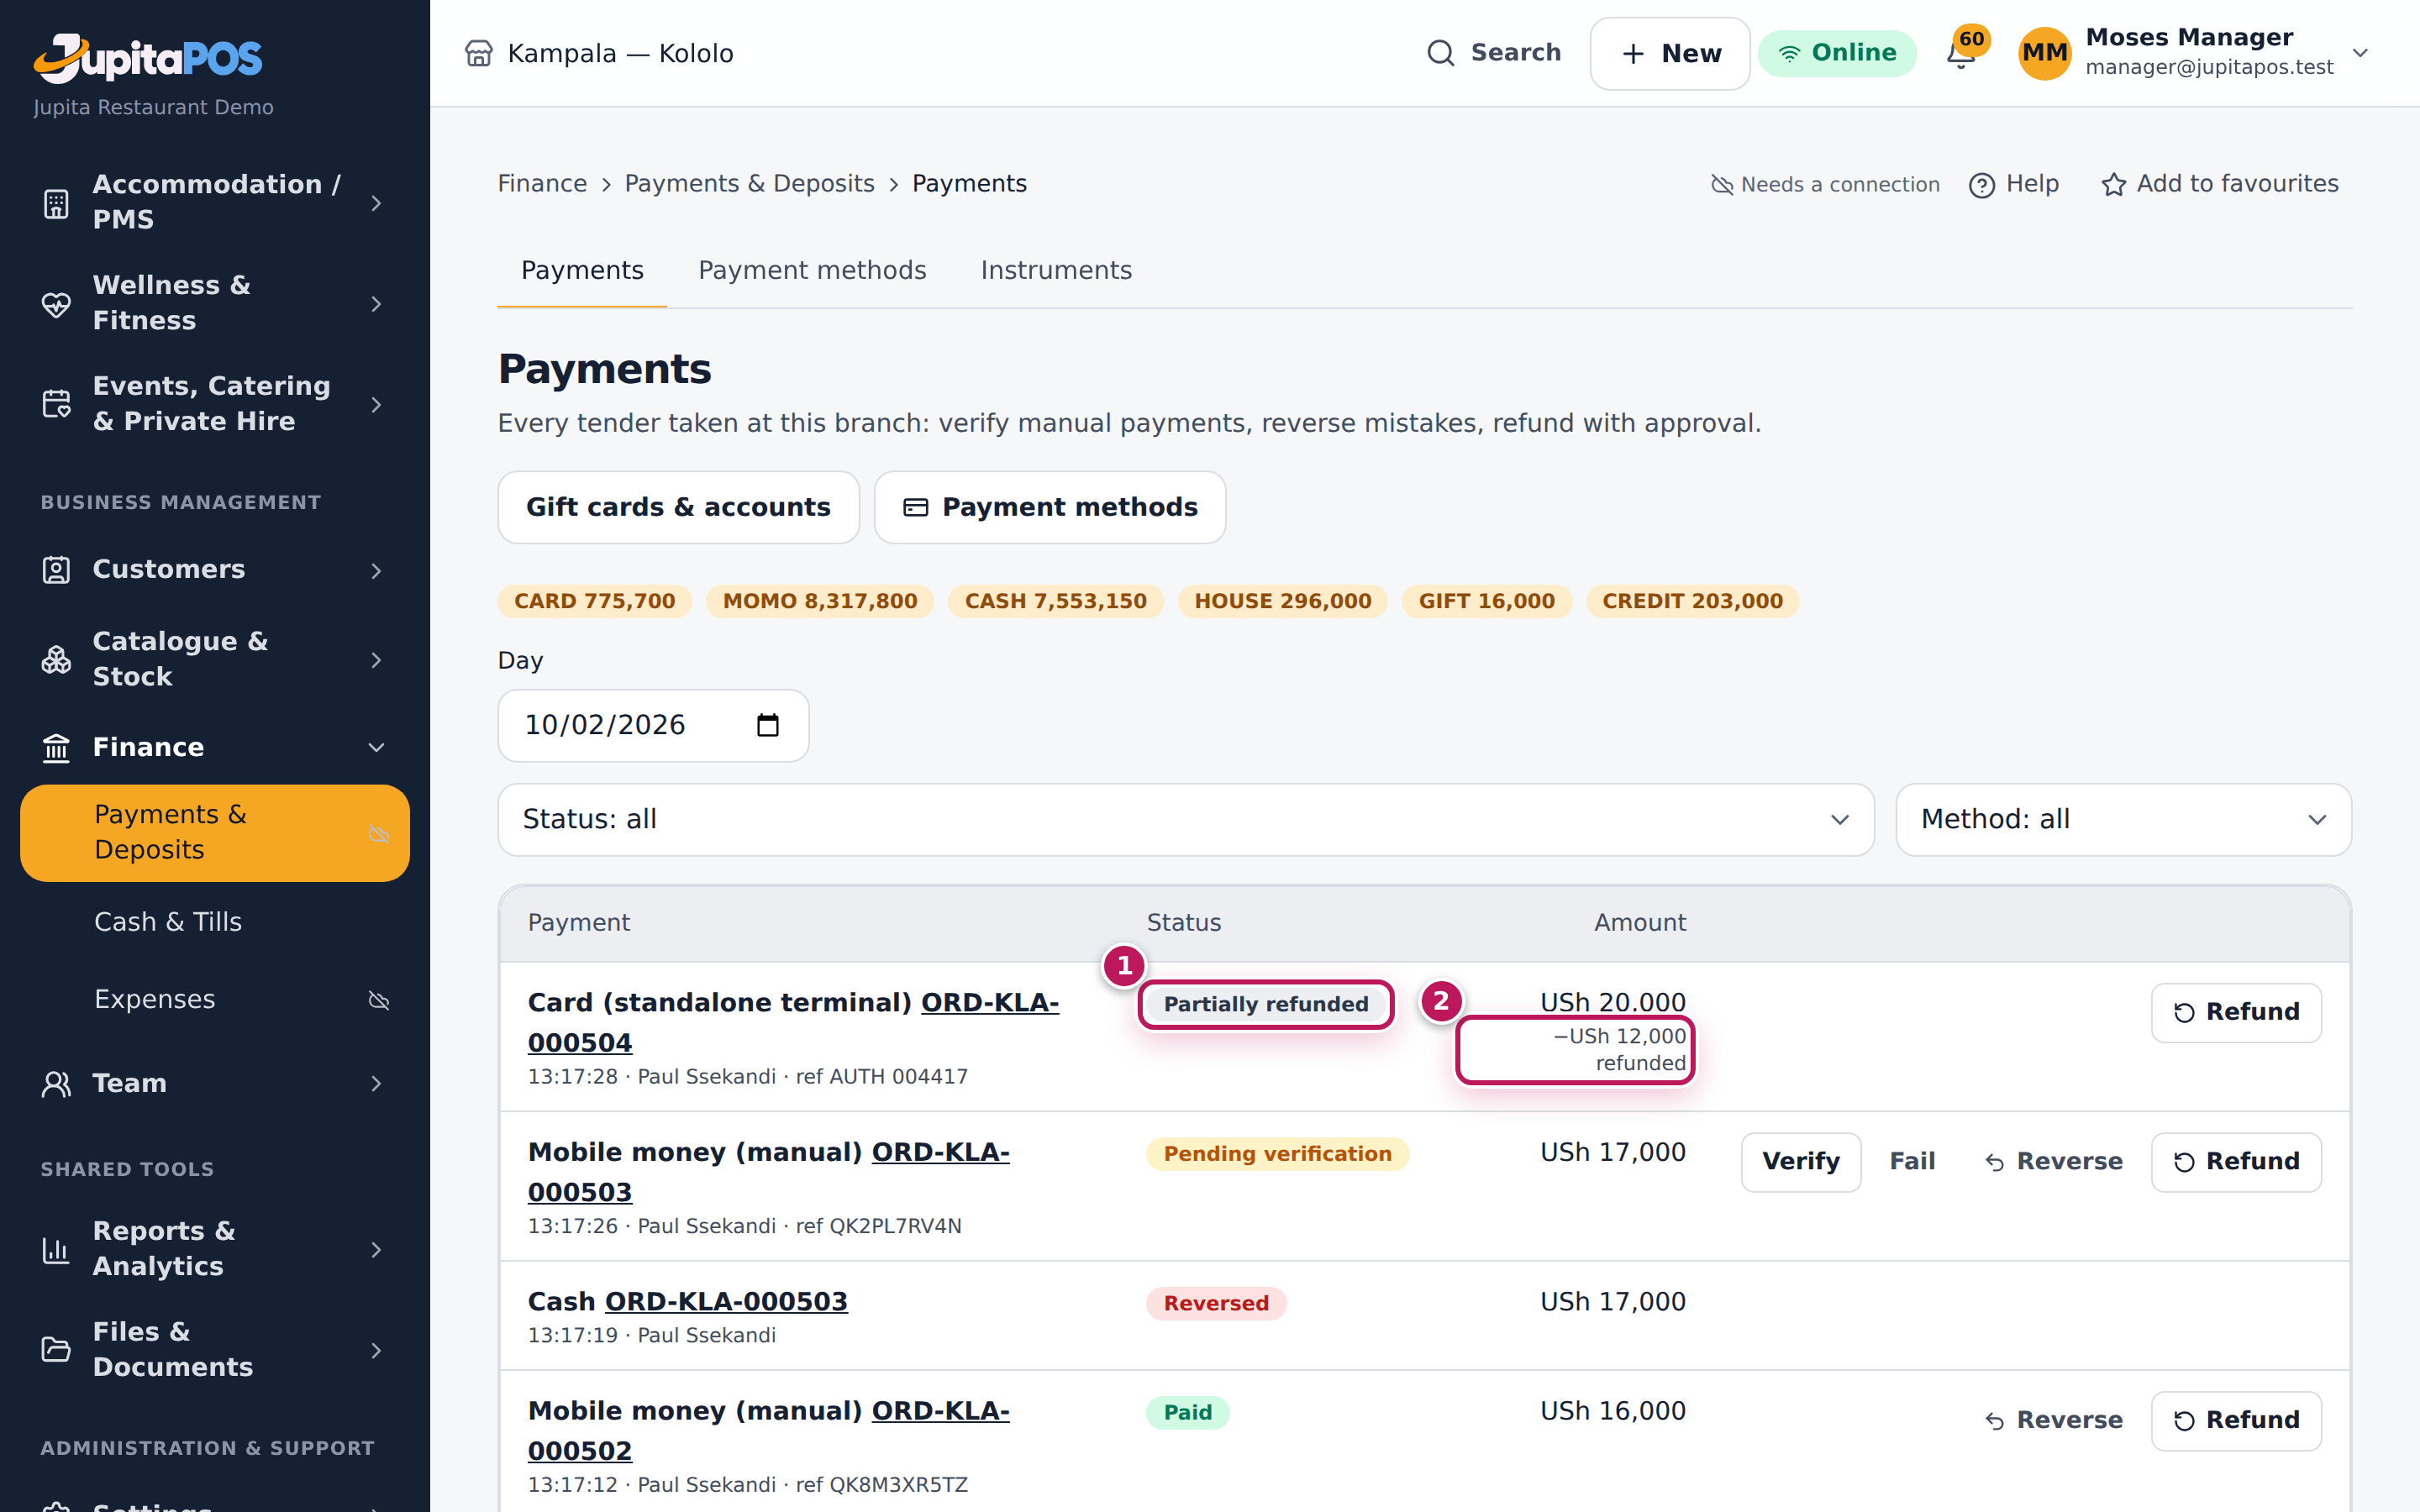
The payment is Partially refunded (1) with −USh 12,000 refunded (2) under its amount, and the refund is listed under Refunds with its kind (partial), reason, who did it and who approved it. The order stays closed; the refund is in the accounts and in the audit trail with its approver.
Screenshot
Common mistakes
- Refunding the wrong tender of a split payment. Refund the tender the money really goes back to — cash from the cash tender, card from the card.
- Refunding a mistake made minutes ago. If the tender was simply wrong, a supervisor reverses it instead (see Reverse a payment taken by mistake).
Troubleshooting
- “Open a till to refund cash.” Open a till in your name first.
- “Not enough cash in the till for this refund.” Refund from a drawer that holds enough, or bring cash in first (see Record cash in, cash out and safe drops).
- “Voucher payments cannot be refunded.” Vouchers are single-use promotions; give the value another way with the manager’s agreement.
- “Refund requested — waiting for approval”. The refund is above the auto-approve limit and you may not approve payments. Nothing is paid back yet: a supervisor or manager taps Approve (or Reject) under Refunds waiting for approval. Give the money back only once it is approved.
Open the till with a float
Purpose
Start a cash drawer for your shift with the float counted, so every cash sale, pay-out and drop is recorded against it and the cash-up can say exactly what should be in it.
Role / permission required
Cashiers, bartenders, baristas, supervisors and managers (cash.open).
Prerequisites
- You have the drawer’s float from the safe or the office and have counted it.
- The drawer is not open in someone else’s name.
Steps
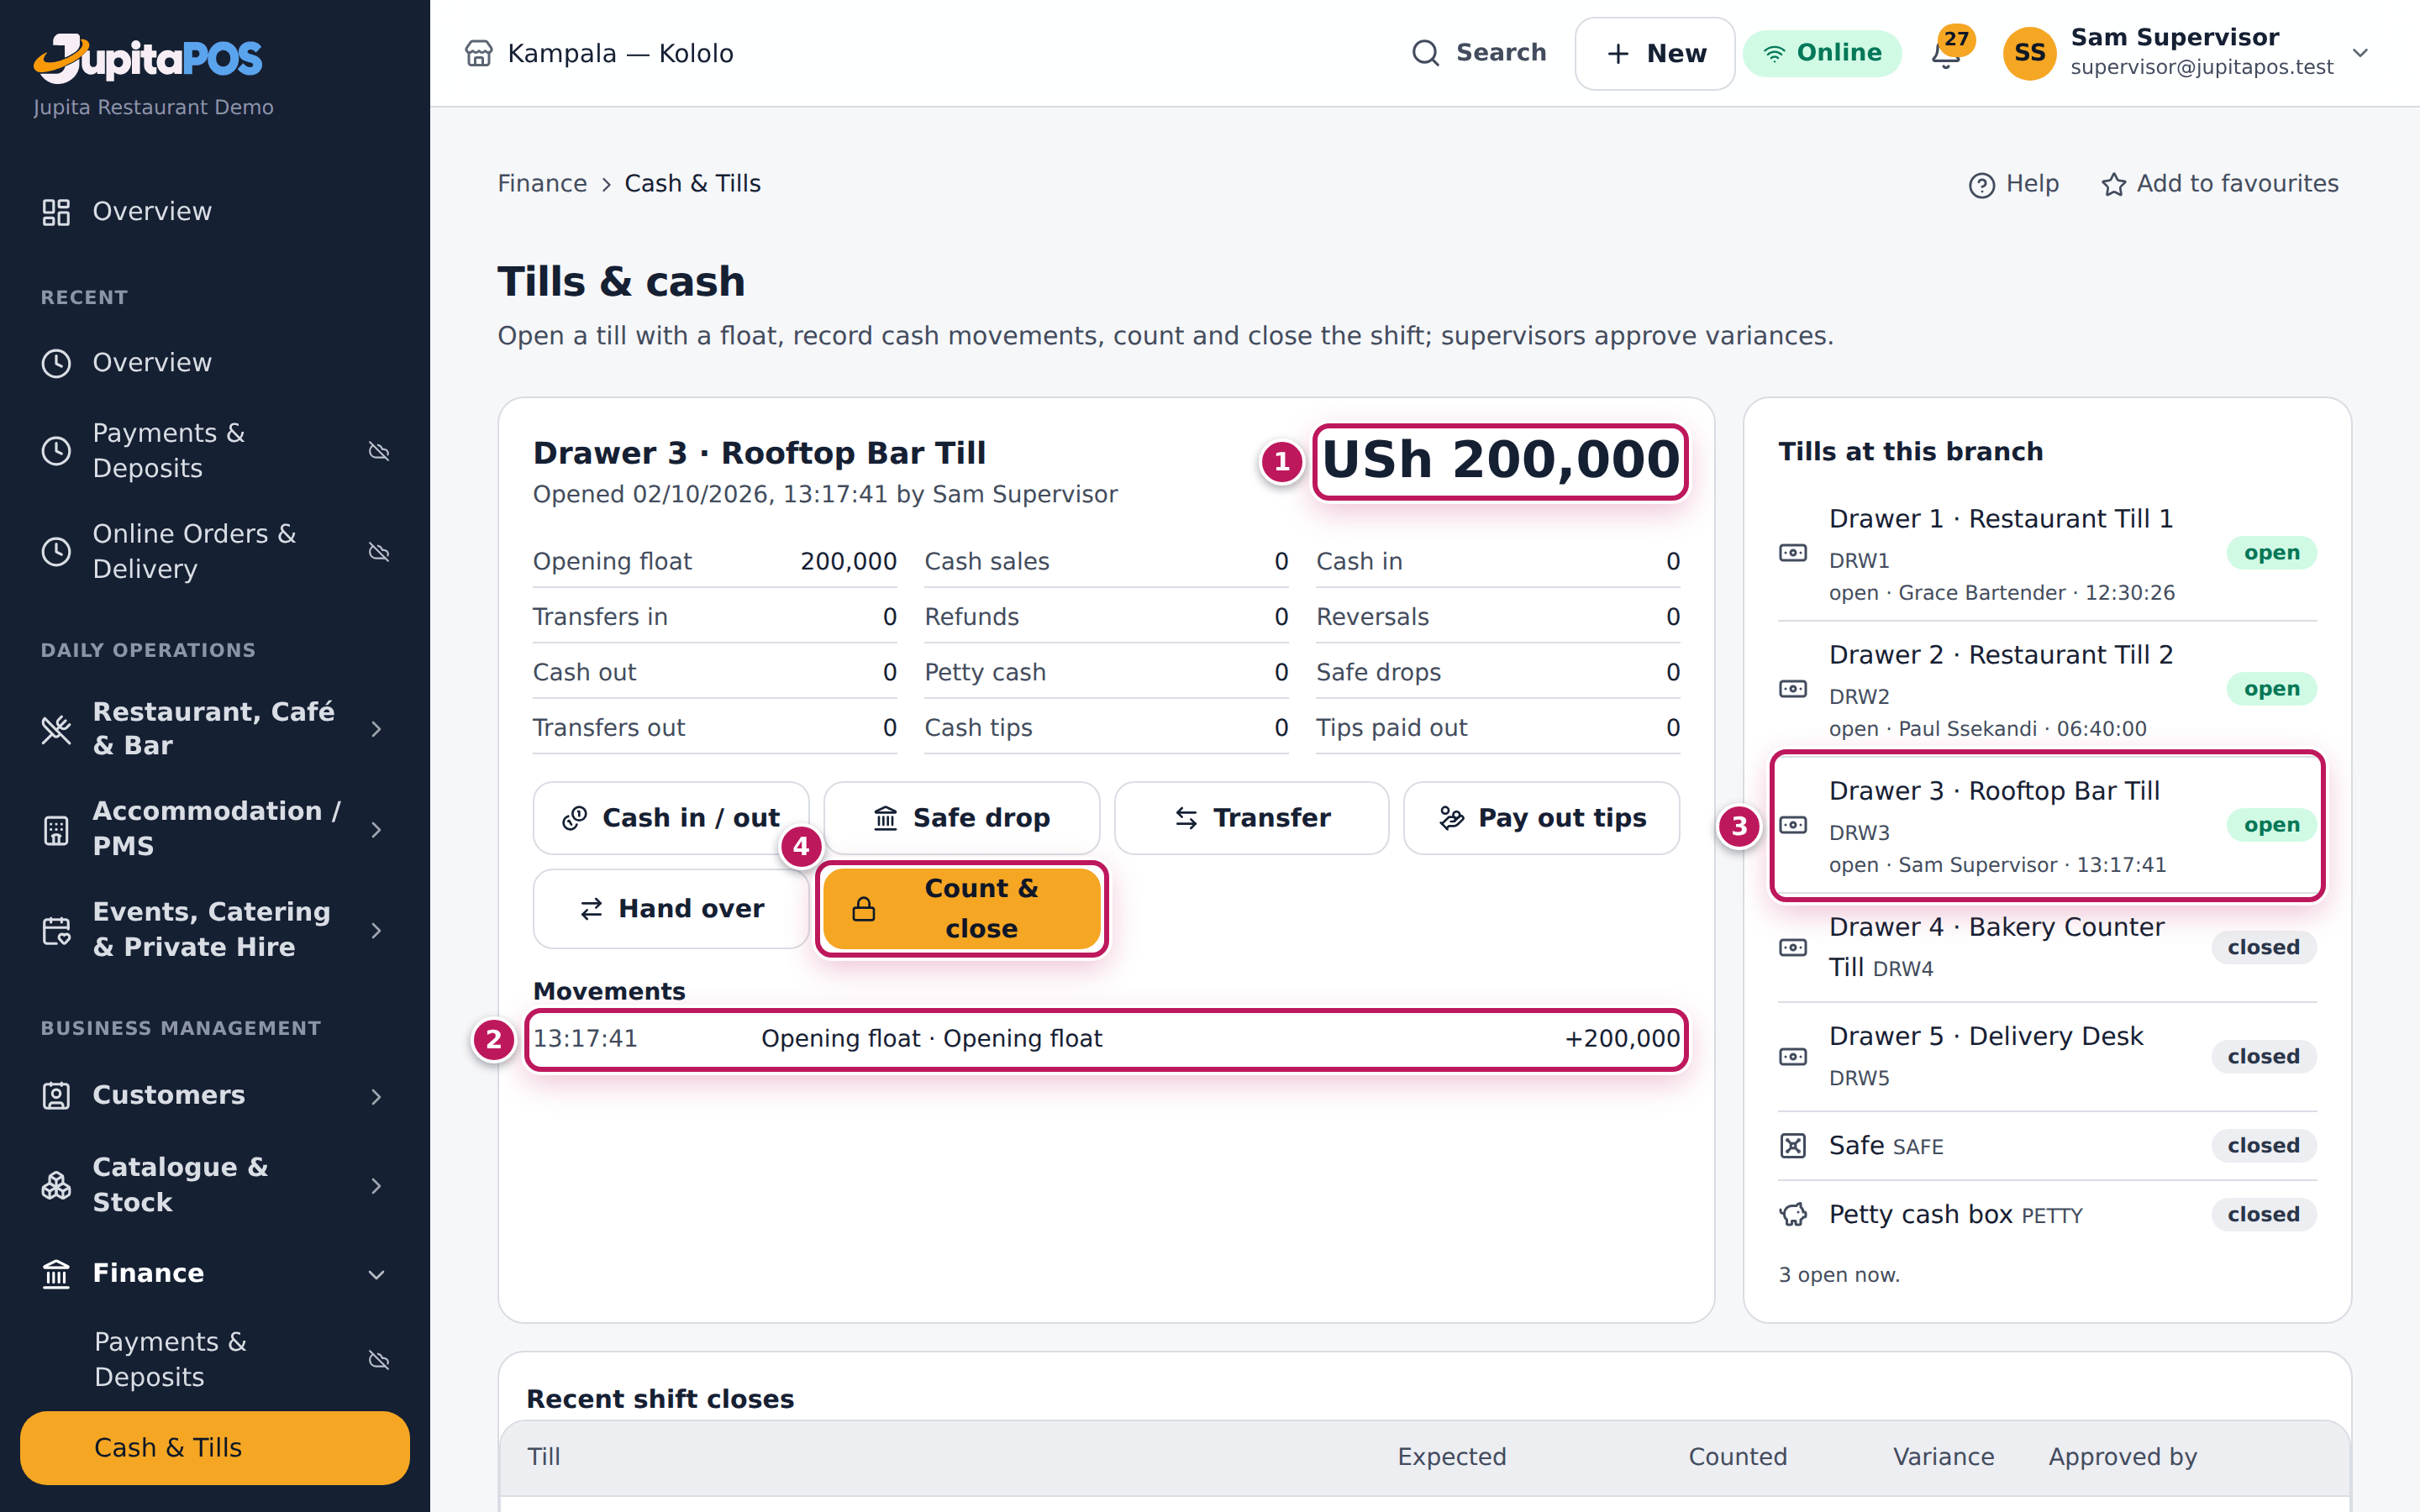
- Open Tills & cash from the sidebar (
/cash/tills). No till open on this terminal means you have none open yet. - Tap Open till.
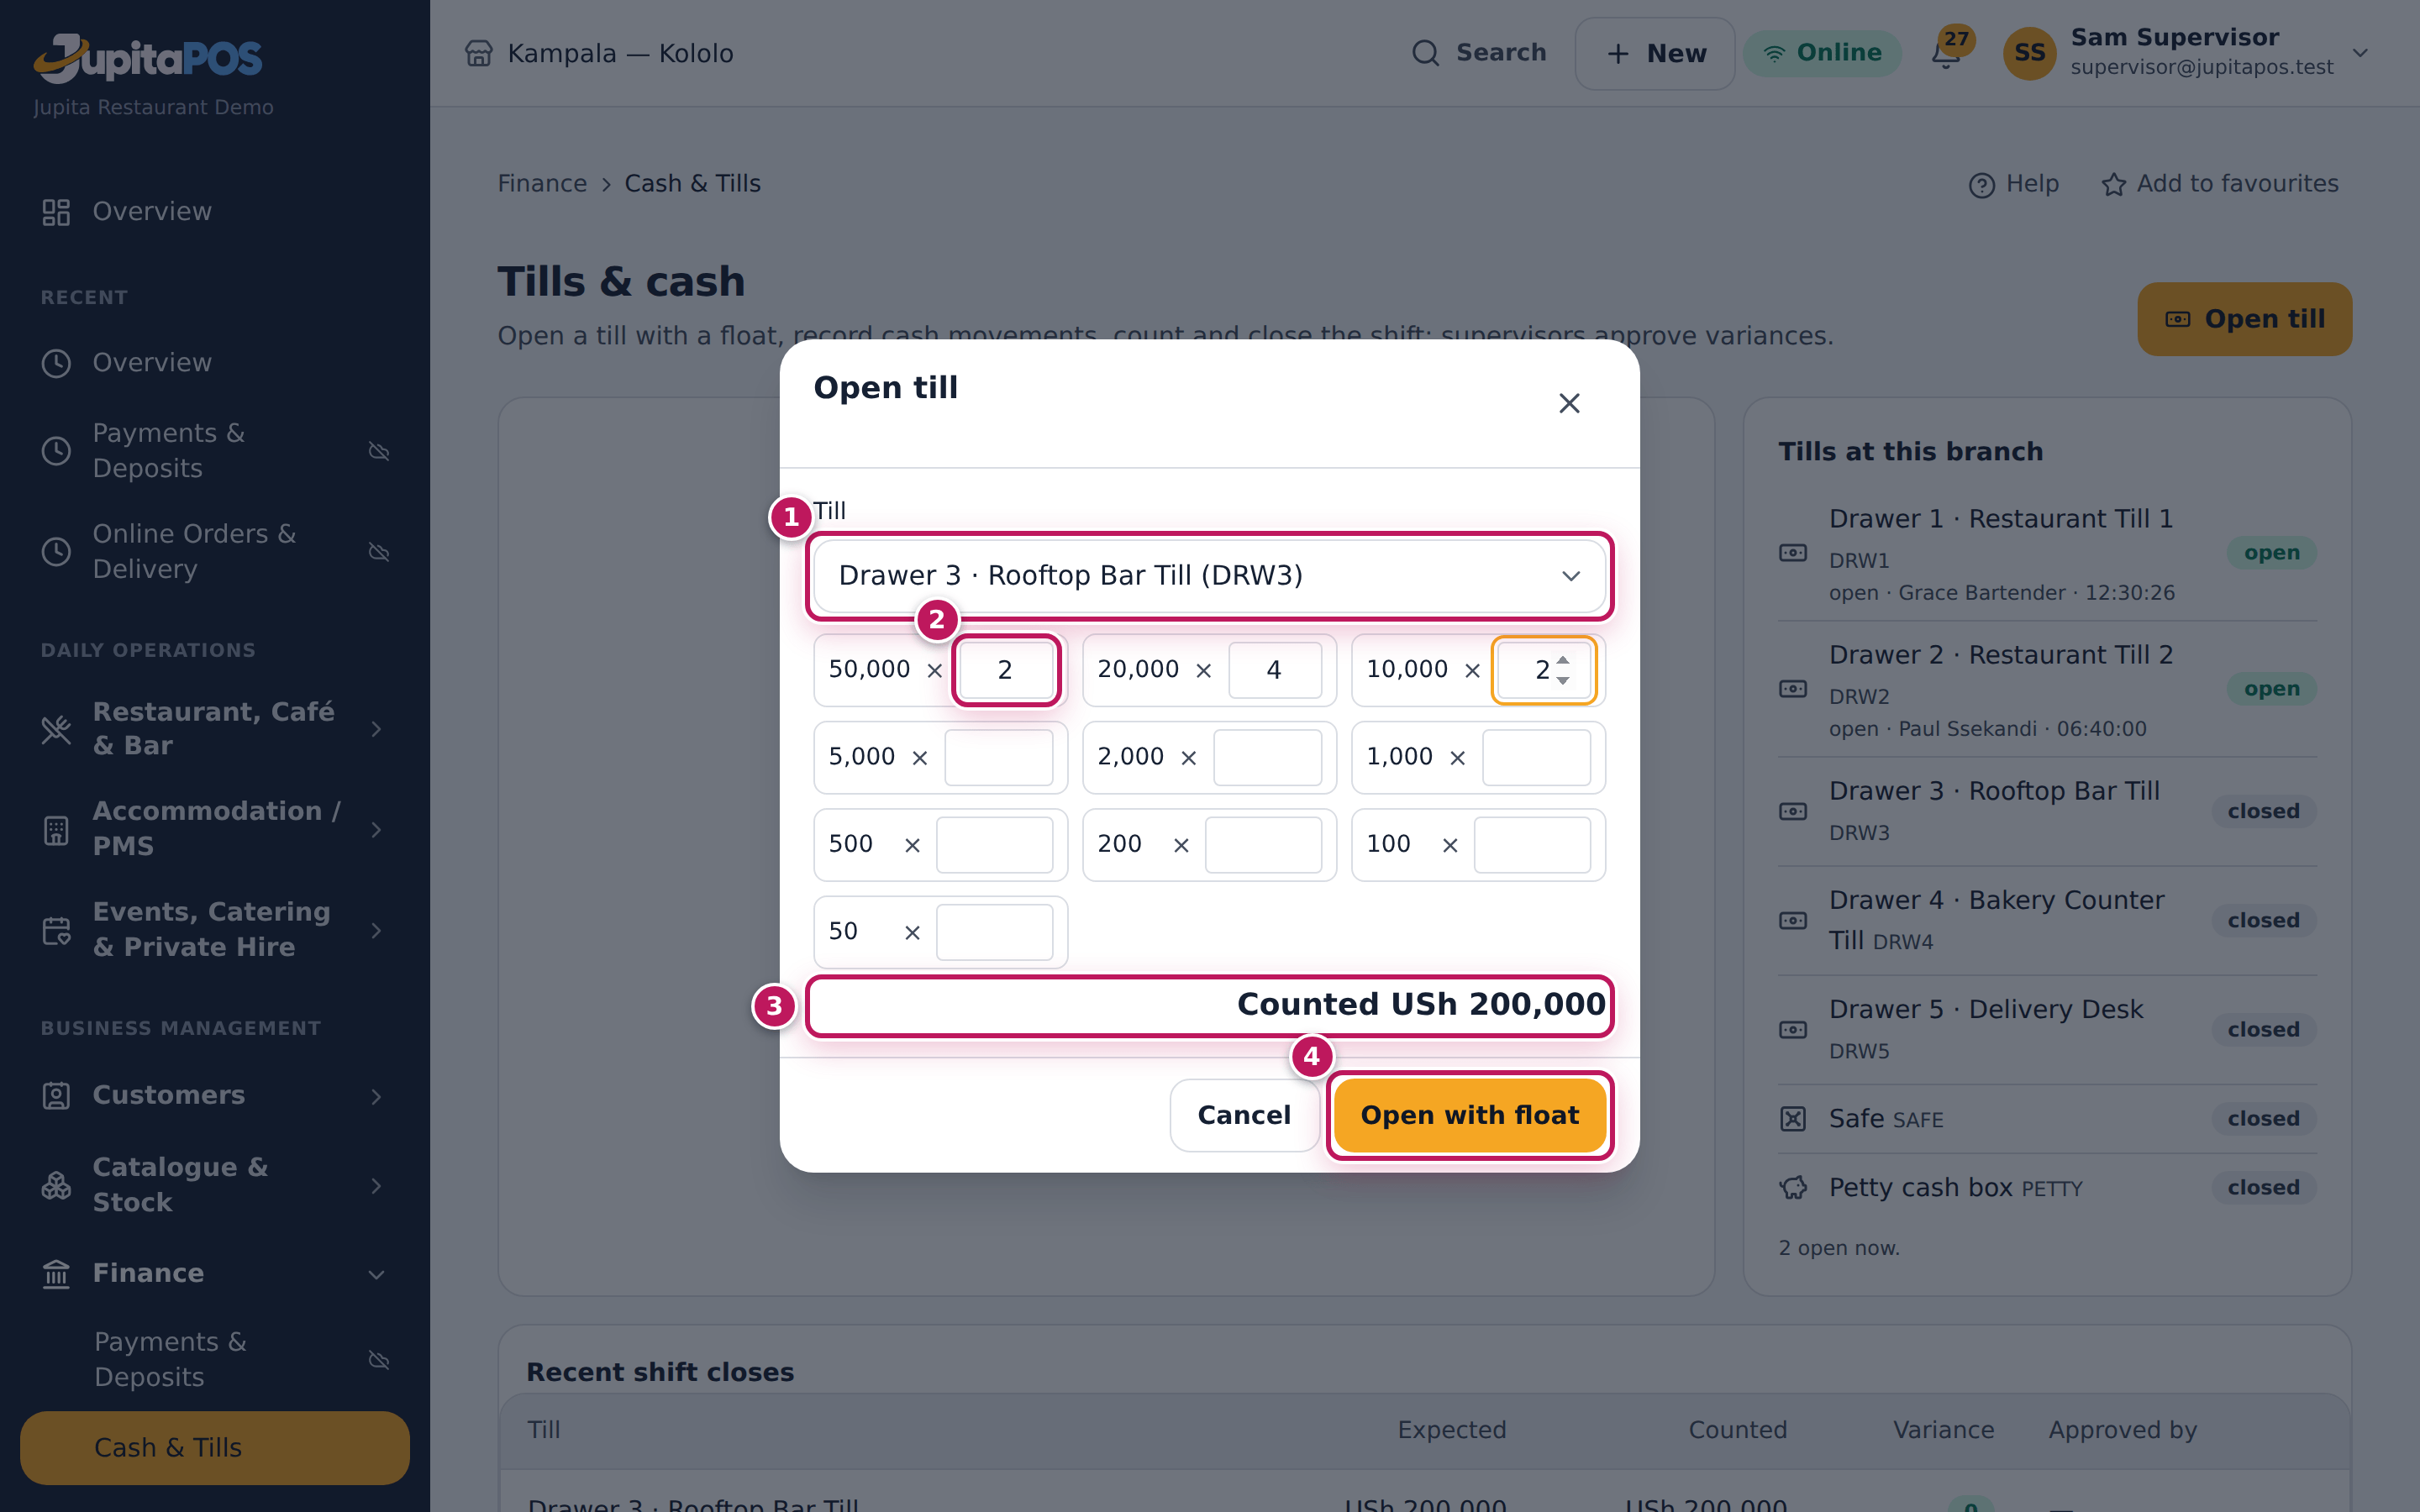
- Choose the Till (1), for example Drawer 3 · Rooftop Bar Till (DRW3). The drawer’s usual float is filled in under Opening float (UGX).
- Better: tap Count by denomination instead and type how many of each note and coin you have (2) — here 2 × 50,000, 4 × 20,000 and 2 × 10,000.
- Check that Counted (3) is the float in the drawer: USh 200,000.
- Tap Open with float (4).
Expected result
Till opened. Your till’s card shows the drawer, the expected cash of USh 200,000 (1) and the Opening float in its Movements (2). In Tills at this branch the drawer is open in your name with the time (3). From now on your cash sales go into it; Count & close (4) ends the shift (see Count and close the till).
Screenshot
Common mistakes
- Opening someone else’s drawer. Choose the drawer you really work from; everything taken in it is yours to count at the end.
- Accepting the usual float without counting. Count the notes: a float that was short from the start becomes your shortage at the cash-up.
Troubleshooting
- Open till is greyed out. Every till of the branch is already open. Ask your supervisor which one to take over (see Hand the drawer over).
- “… is already open.” Someone opened that drawer a moment ago. Choose another one.
- “This terminal already has an open till.” This device already has a drawer open; use it, or close it first.
- “Drawer 3 · Rooftop Bar Till’s last close is waiting for a supervisor’s approval…” The drawer’s last count is not approved yet. It can be opened again once a supervisor approves the close, or recounted if they send it back (see Approve or send back a till close). Choose another drawer meanwhile.
- “The denomination count does not add up to the float.” Count again; the notes typed must make the float.
FAQ
Do card and mobile money need a till? No. Only cash goes into a drawer, but the day’s card and mobile money payments are shown with your shift.
What are the Safe and the Petty cash box? Tills too: the safe receives the drops from the drawers, and the petty cash box pays small expenses. Managers add tills with Till.
Record cash in, cash out and safe drops
Purpose
Record every note that goes into or out of the drawer other than a sale — a float top-up, a supplier paid at the door, notes taken to the safe — so the cash-up still adds up and the books know what the money was for.
Role / permission required
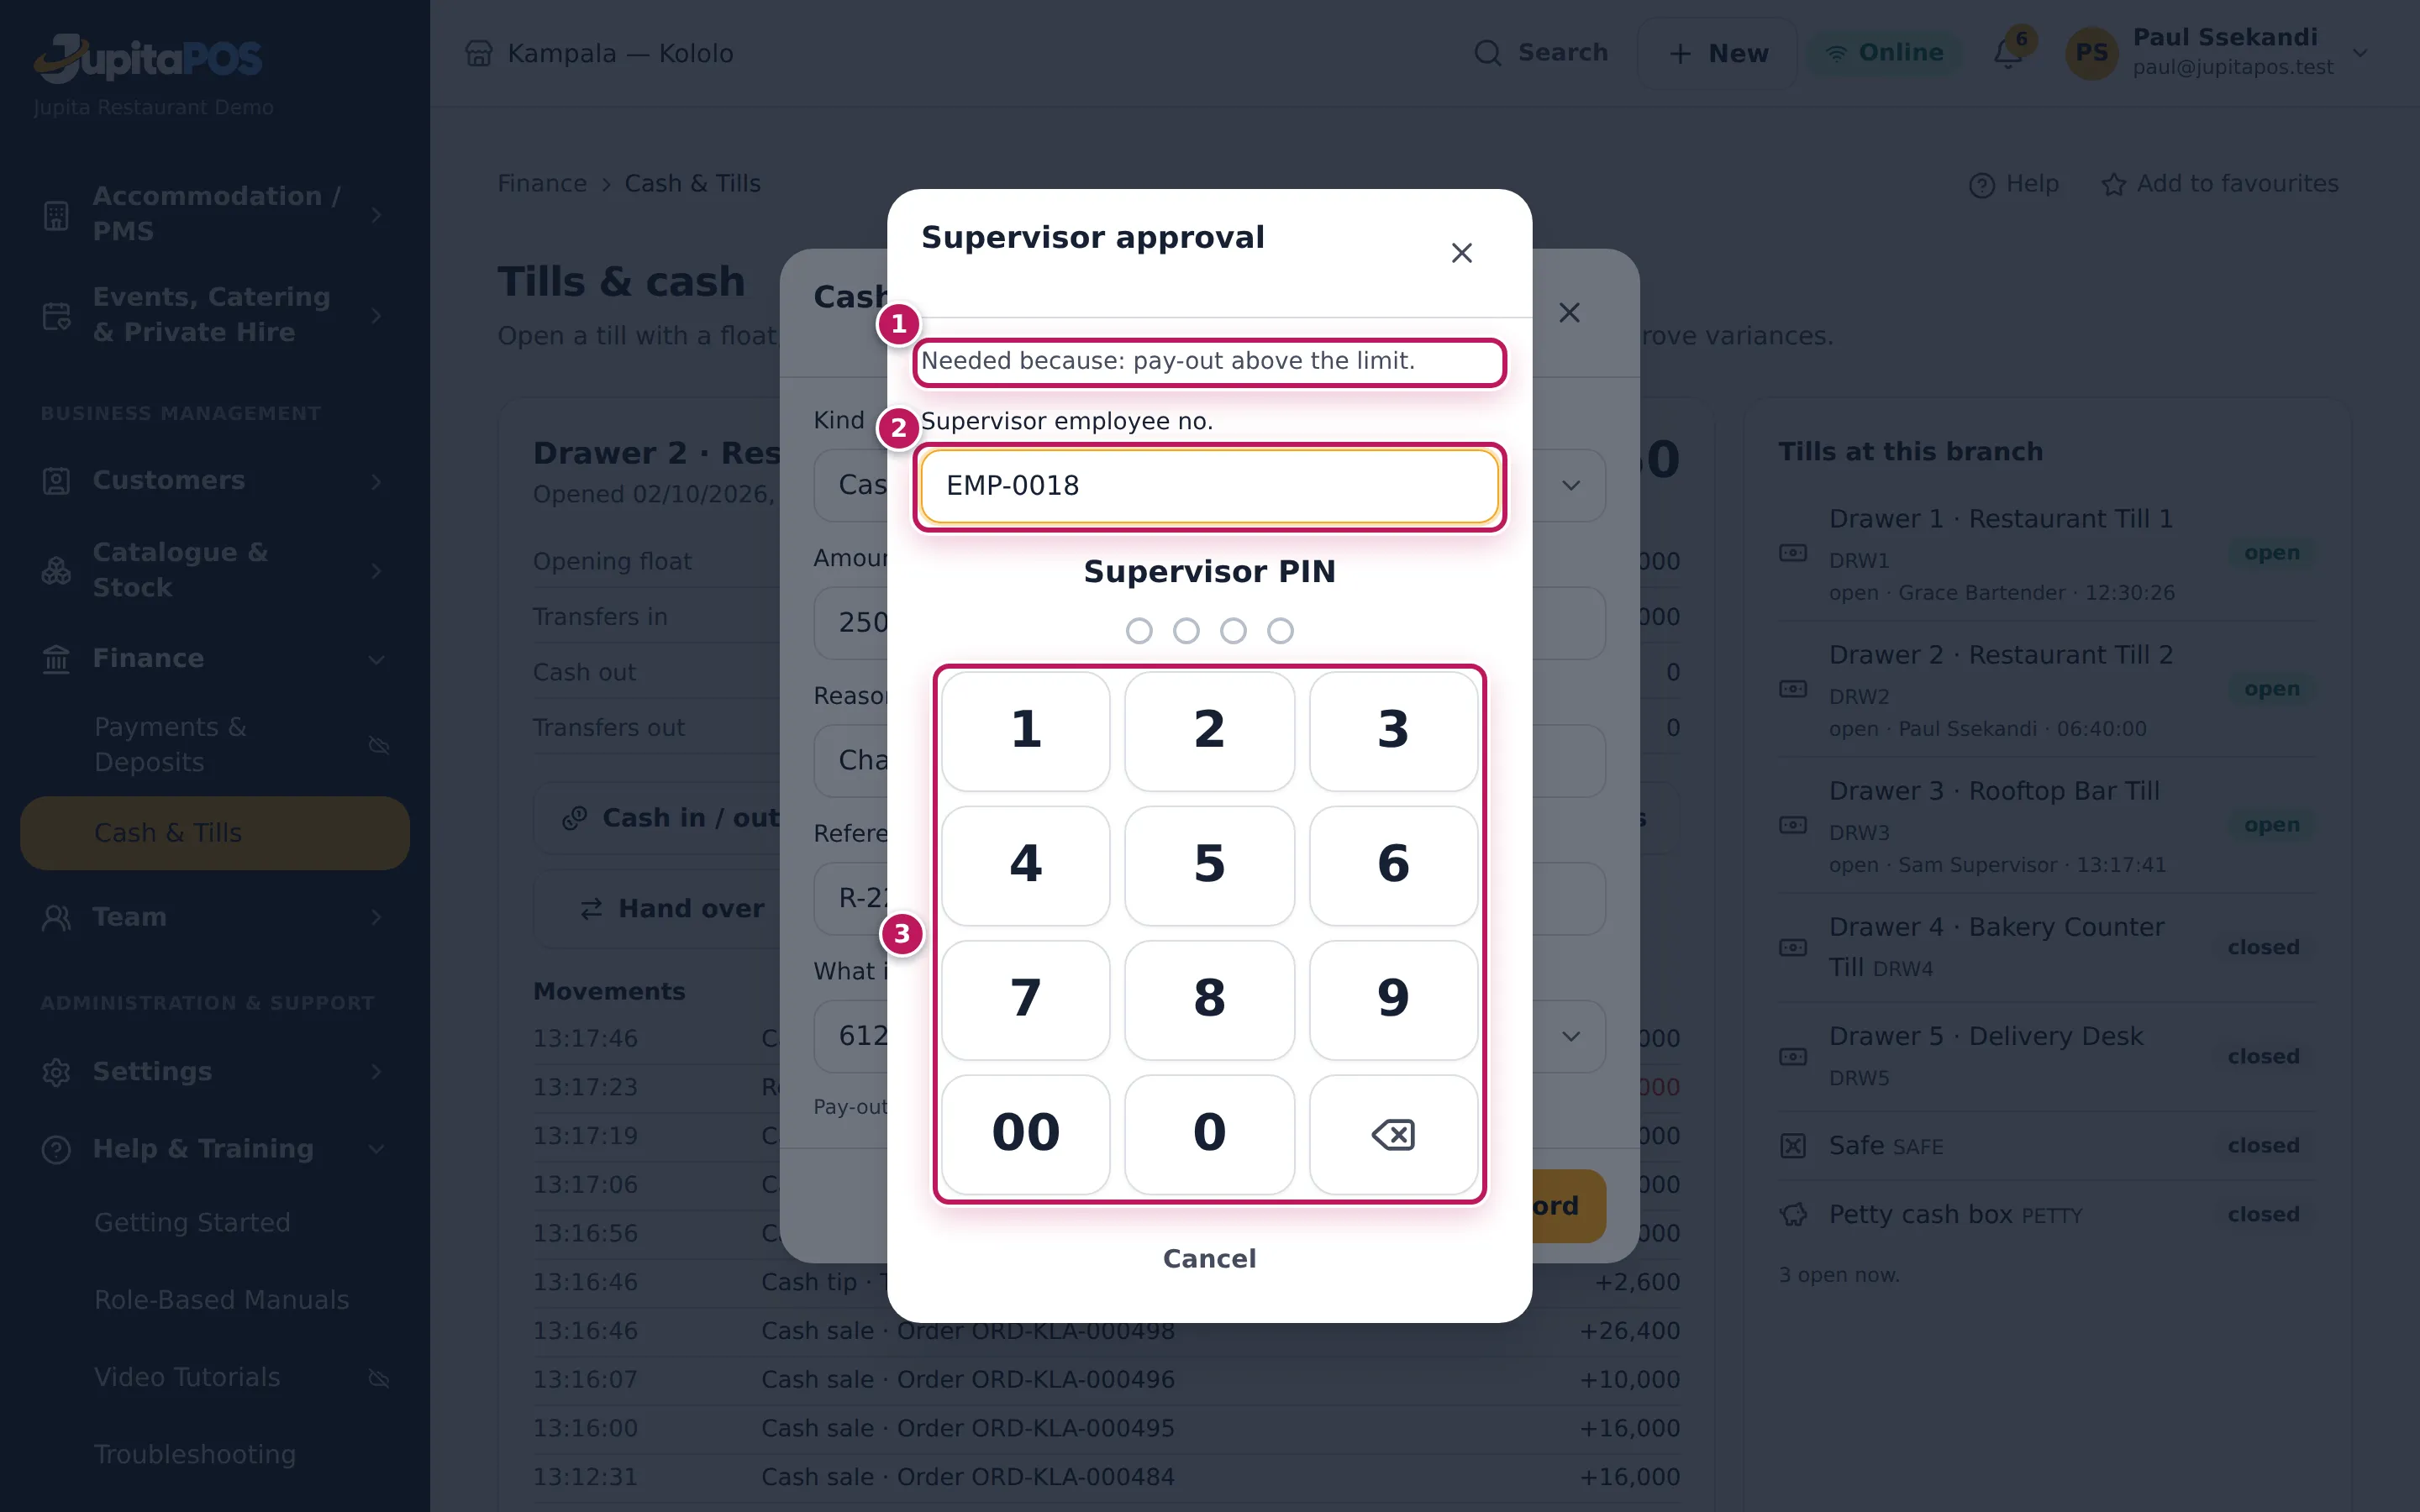
Cashiers, bartenders, supervisors and managers (cash.movement). A pay-out above
200,000 is approved by a supervisor or manager
(cash.approve) with their employee number and PIN.
Prerequisites
- Your till is open (see Open the till).
- For a pay-out, you have the supplier’s receipt.
Steps
Cash in (a float top-up, change from the bank):
- On Tills & cash, tap Cash in / out. The Kind is already Cash in (float top-up, change).
- Type the Amount (UGX) and the Reason — for example 300,000, Float top-up from the office — and tap Record.
Cash out (a pay-out):
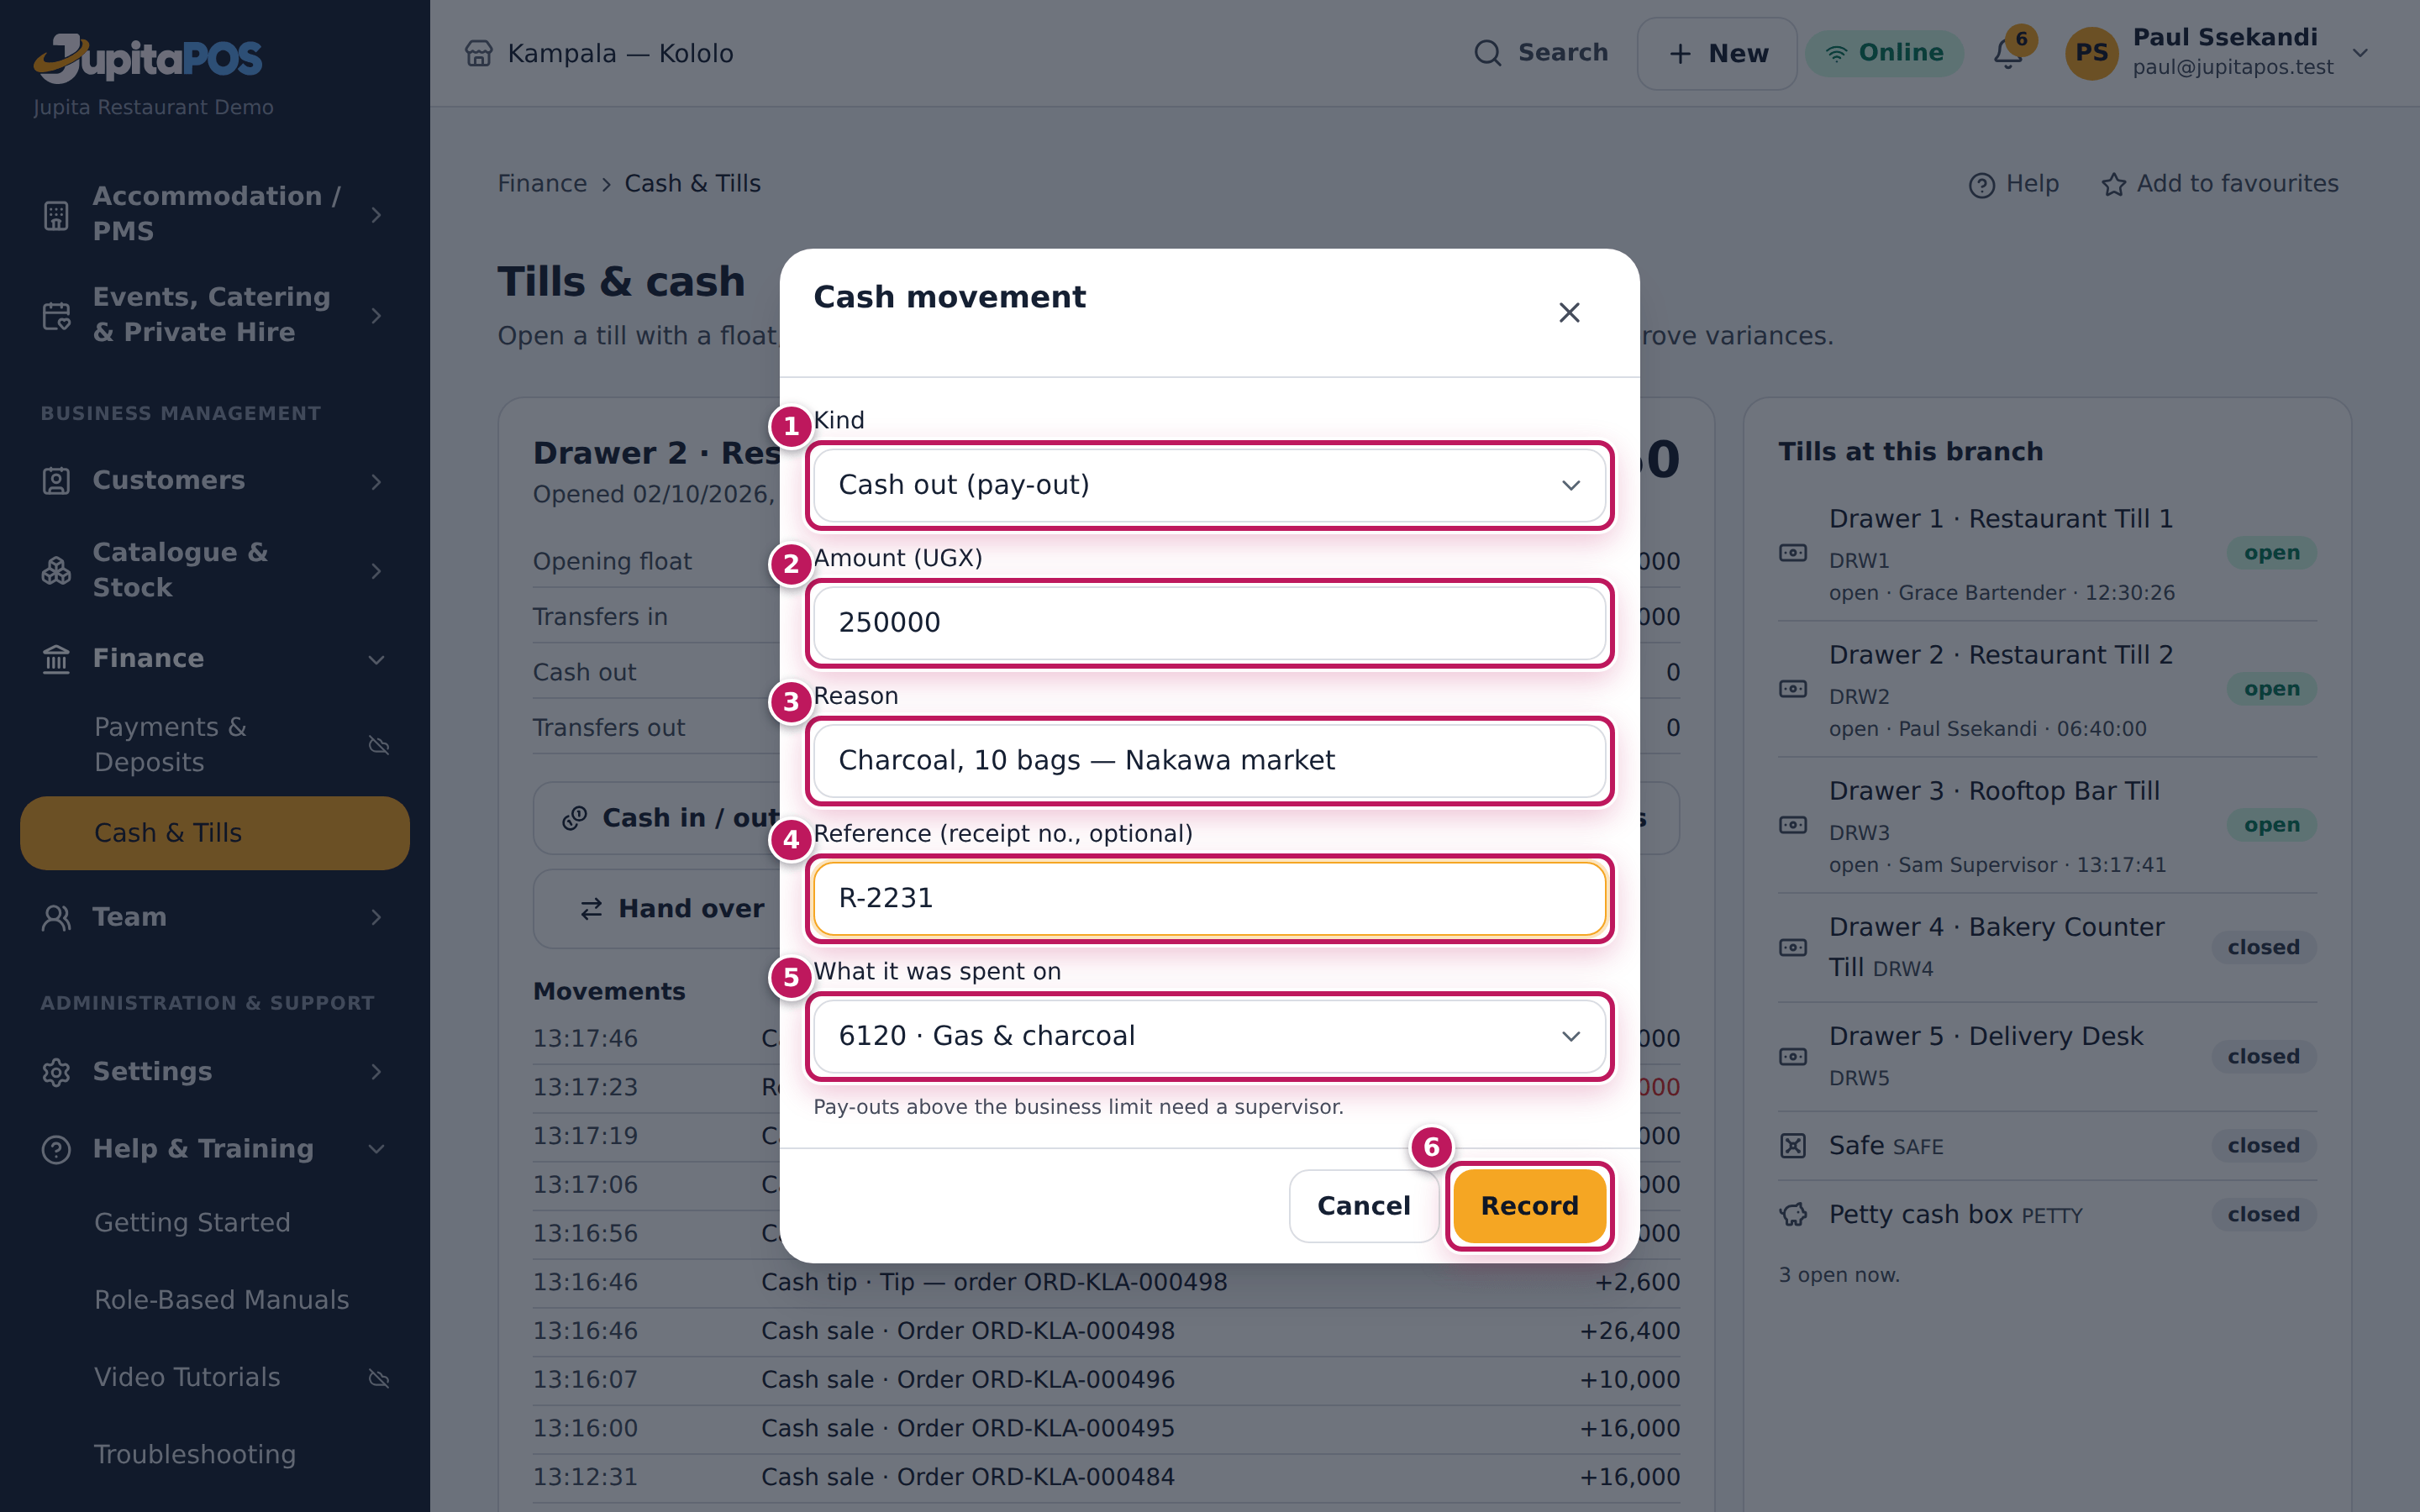
- Tap Cash in / out and choose Cash out (pay-out) as the Kind (1).
- Type the Amount (UGX) (2) and the Reason (3) — here 250,000, Charcoal, 10 bags — Nakawa market.
- Type the receipt number in Reference (receipt no., optional) (4).
- Choose What it was spent on (5), for example 6120 · Gas & charcoal, or leave Not sure — the accountant classifies it.
- Tap Record (6). Above 200,000 the Supervisor approval dialog opens (1): the supervisor types their Supervisor employee no. (2) and their PIN (3).
Safe drop (too many notes in the drawer):
- Tap Safe drop, type the Amount (UGX) — here 50,000 — and tap Record. Put the notes in the safe.
For a small expense choose Petty cash (expense) as the kind; for one with a VAT receipt, use Record it as an expense (see Record an expense or petty cash). To move cash to another open till, tap Transfer.
Expected result
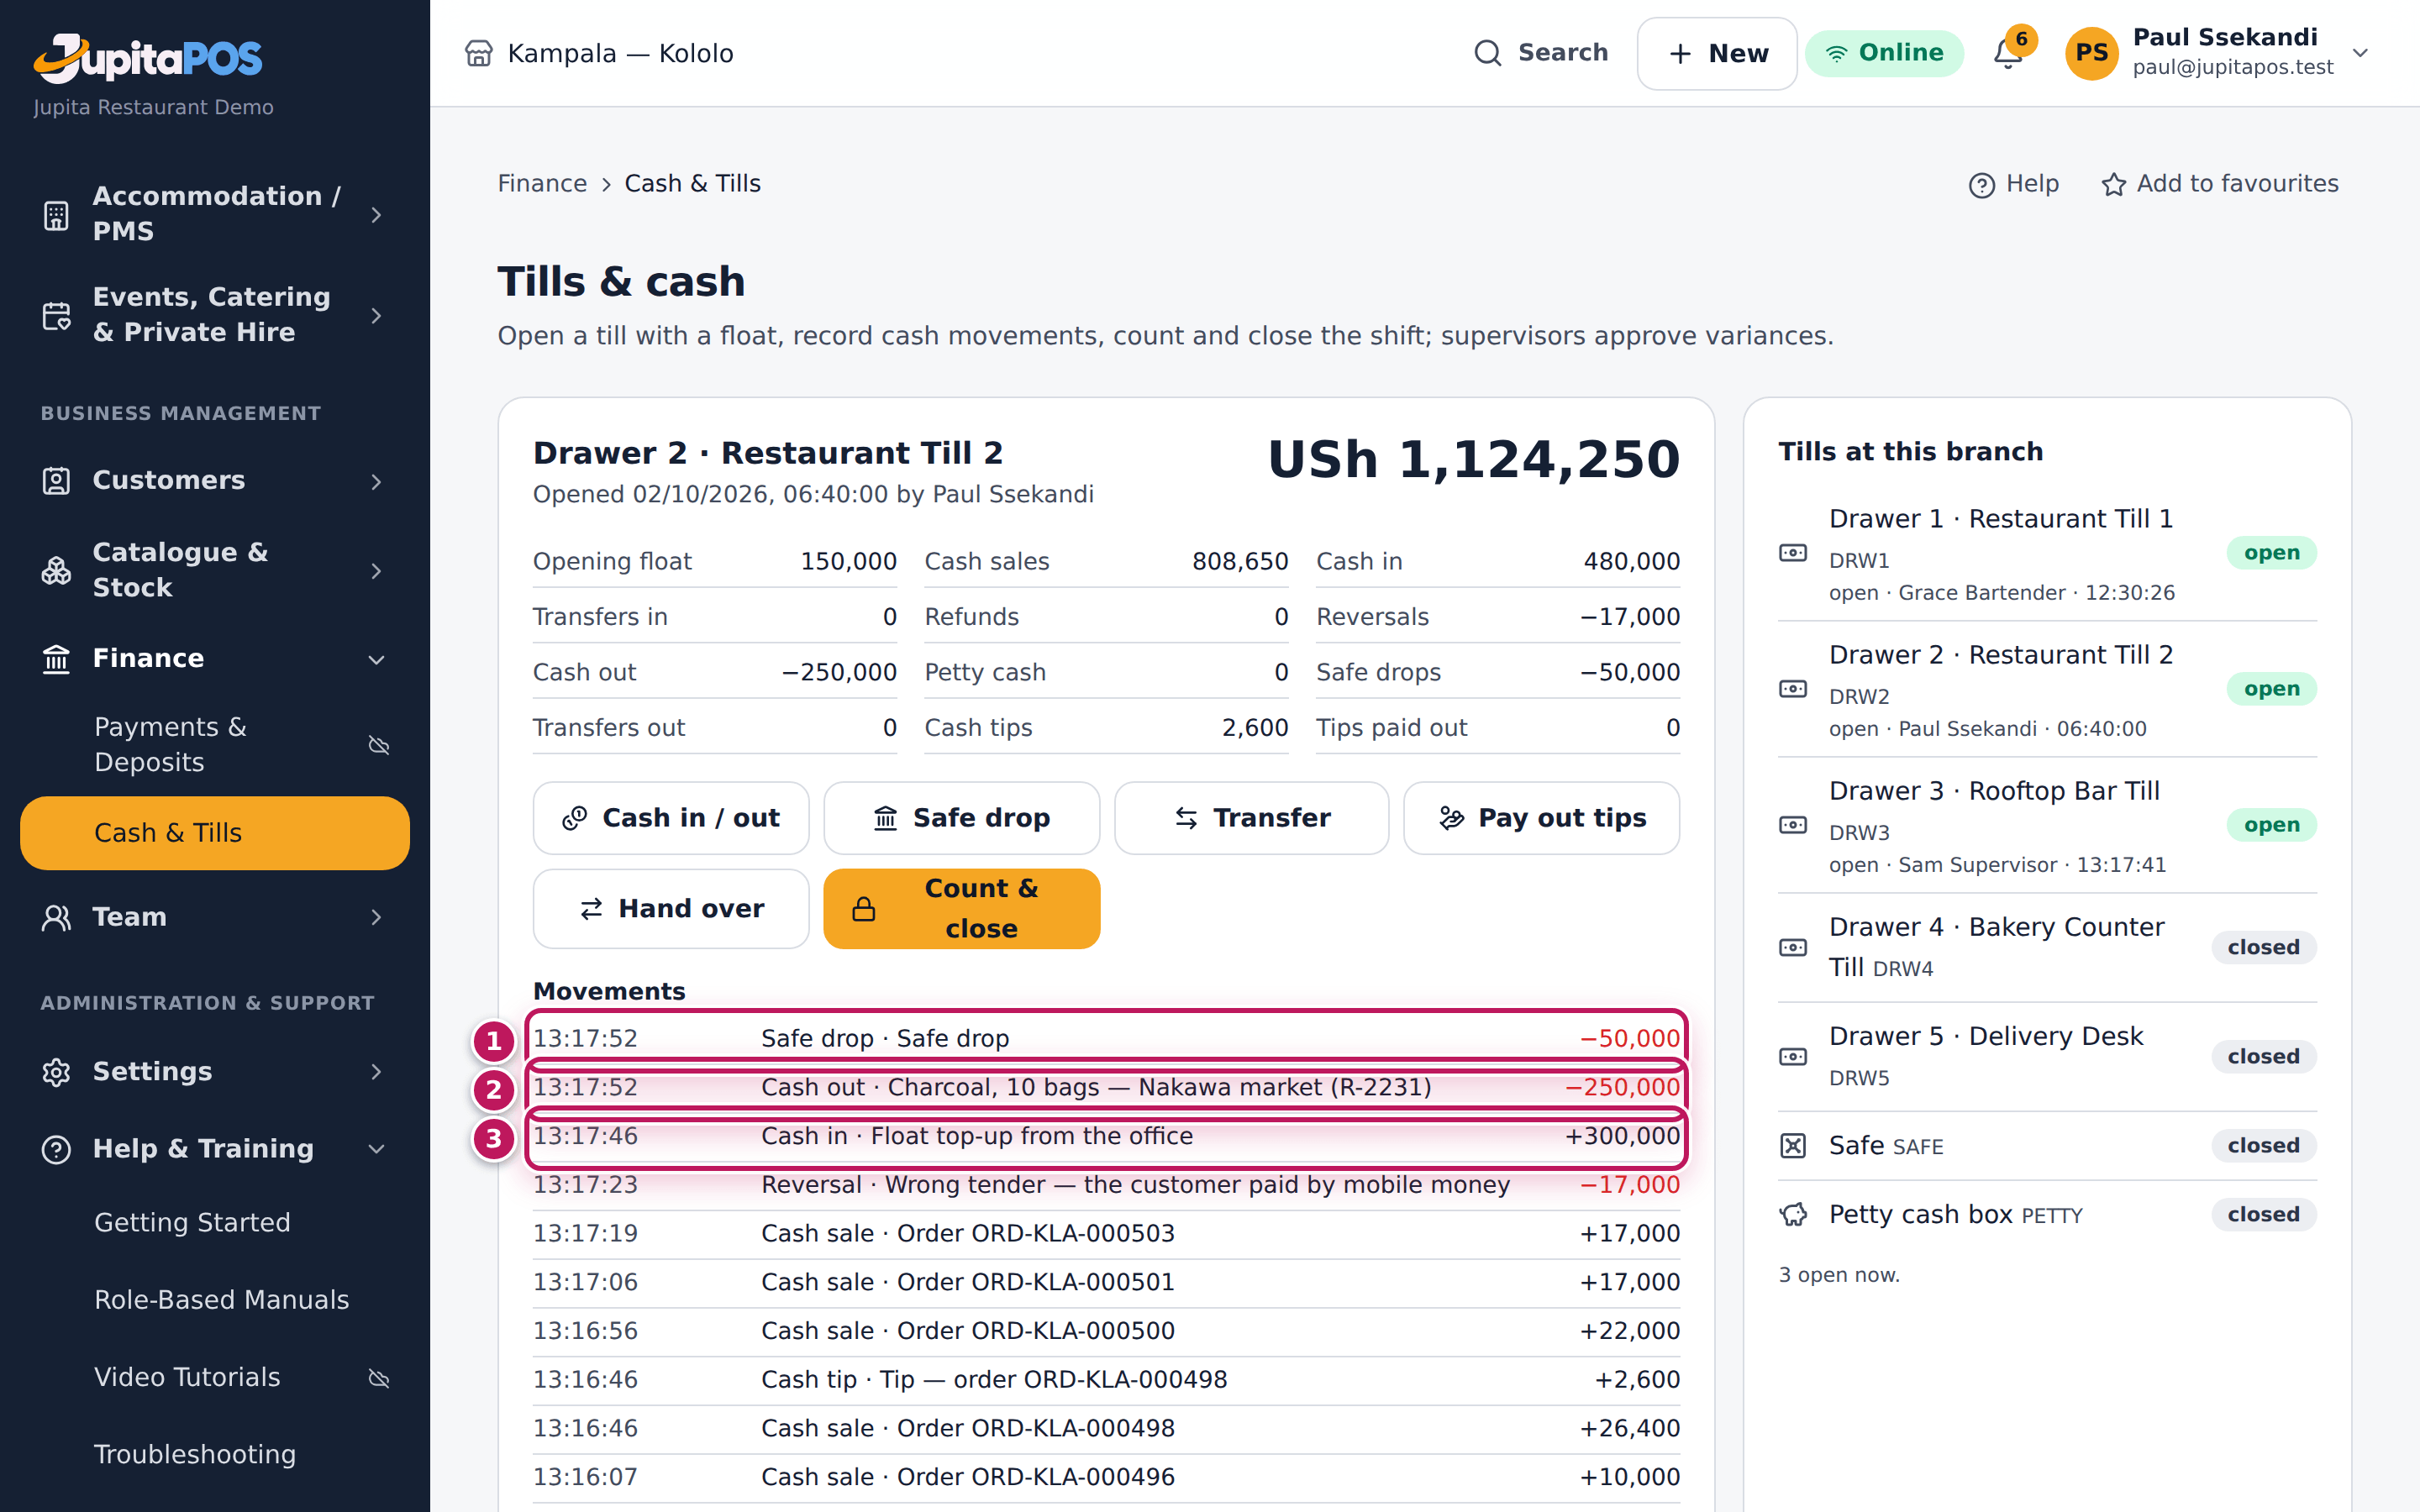
Each movement is in the drawer’s Movements, newest first: Safe drop −50,000 (1), Cash out · Charcoal, 10 bags — Nakawa market (R-2231) −250,000 (2) with the supervisor recorded as its approver, and Cash in · Float top-up from the office +300,000 (3). The expected cash moves with them, and the summary shows them under Cash in, Cash out and Safe drops.
Screenshot
Common mistakes
- Paying a supplier from the drawer without recording it. The drawer is then short at the cash-up, and the purchase is missing from the books.
- Recording a safe drop as a cash out. A safe drop is your money moved to the safe, not spent. Use Safe drop.
- One big “misc” pay-out. Record each pay-out with its own receipt number and what it was spent on.
Troubleshooting
- Record stays greyed out. Type an amount and a reason of at least two letters.
- “Not enough cash in the till for that.” The drawer does not hold that much. Check the amount.
- “Wrong PIN.” or “You cannot approve your own action.” The supervisor types their own number and PIN; you cannot approve your own pay-out.
- “Both tills must be open.” A transfer goes only to another open till.
Pay tips out to the waiters
Purpose
Pay each waiter the tips customers left for them, from the drawer the cash tips went into, so what they are owed is cleared and the drawer still adds up.
Role / permission required
Cashiers, bartenders, supervisors and managers (cash.movement).
Prerequisites
- Your till is open, and someone is owed tips (see Add a tip to the payment). Pay out tips shows only then.
Steps
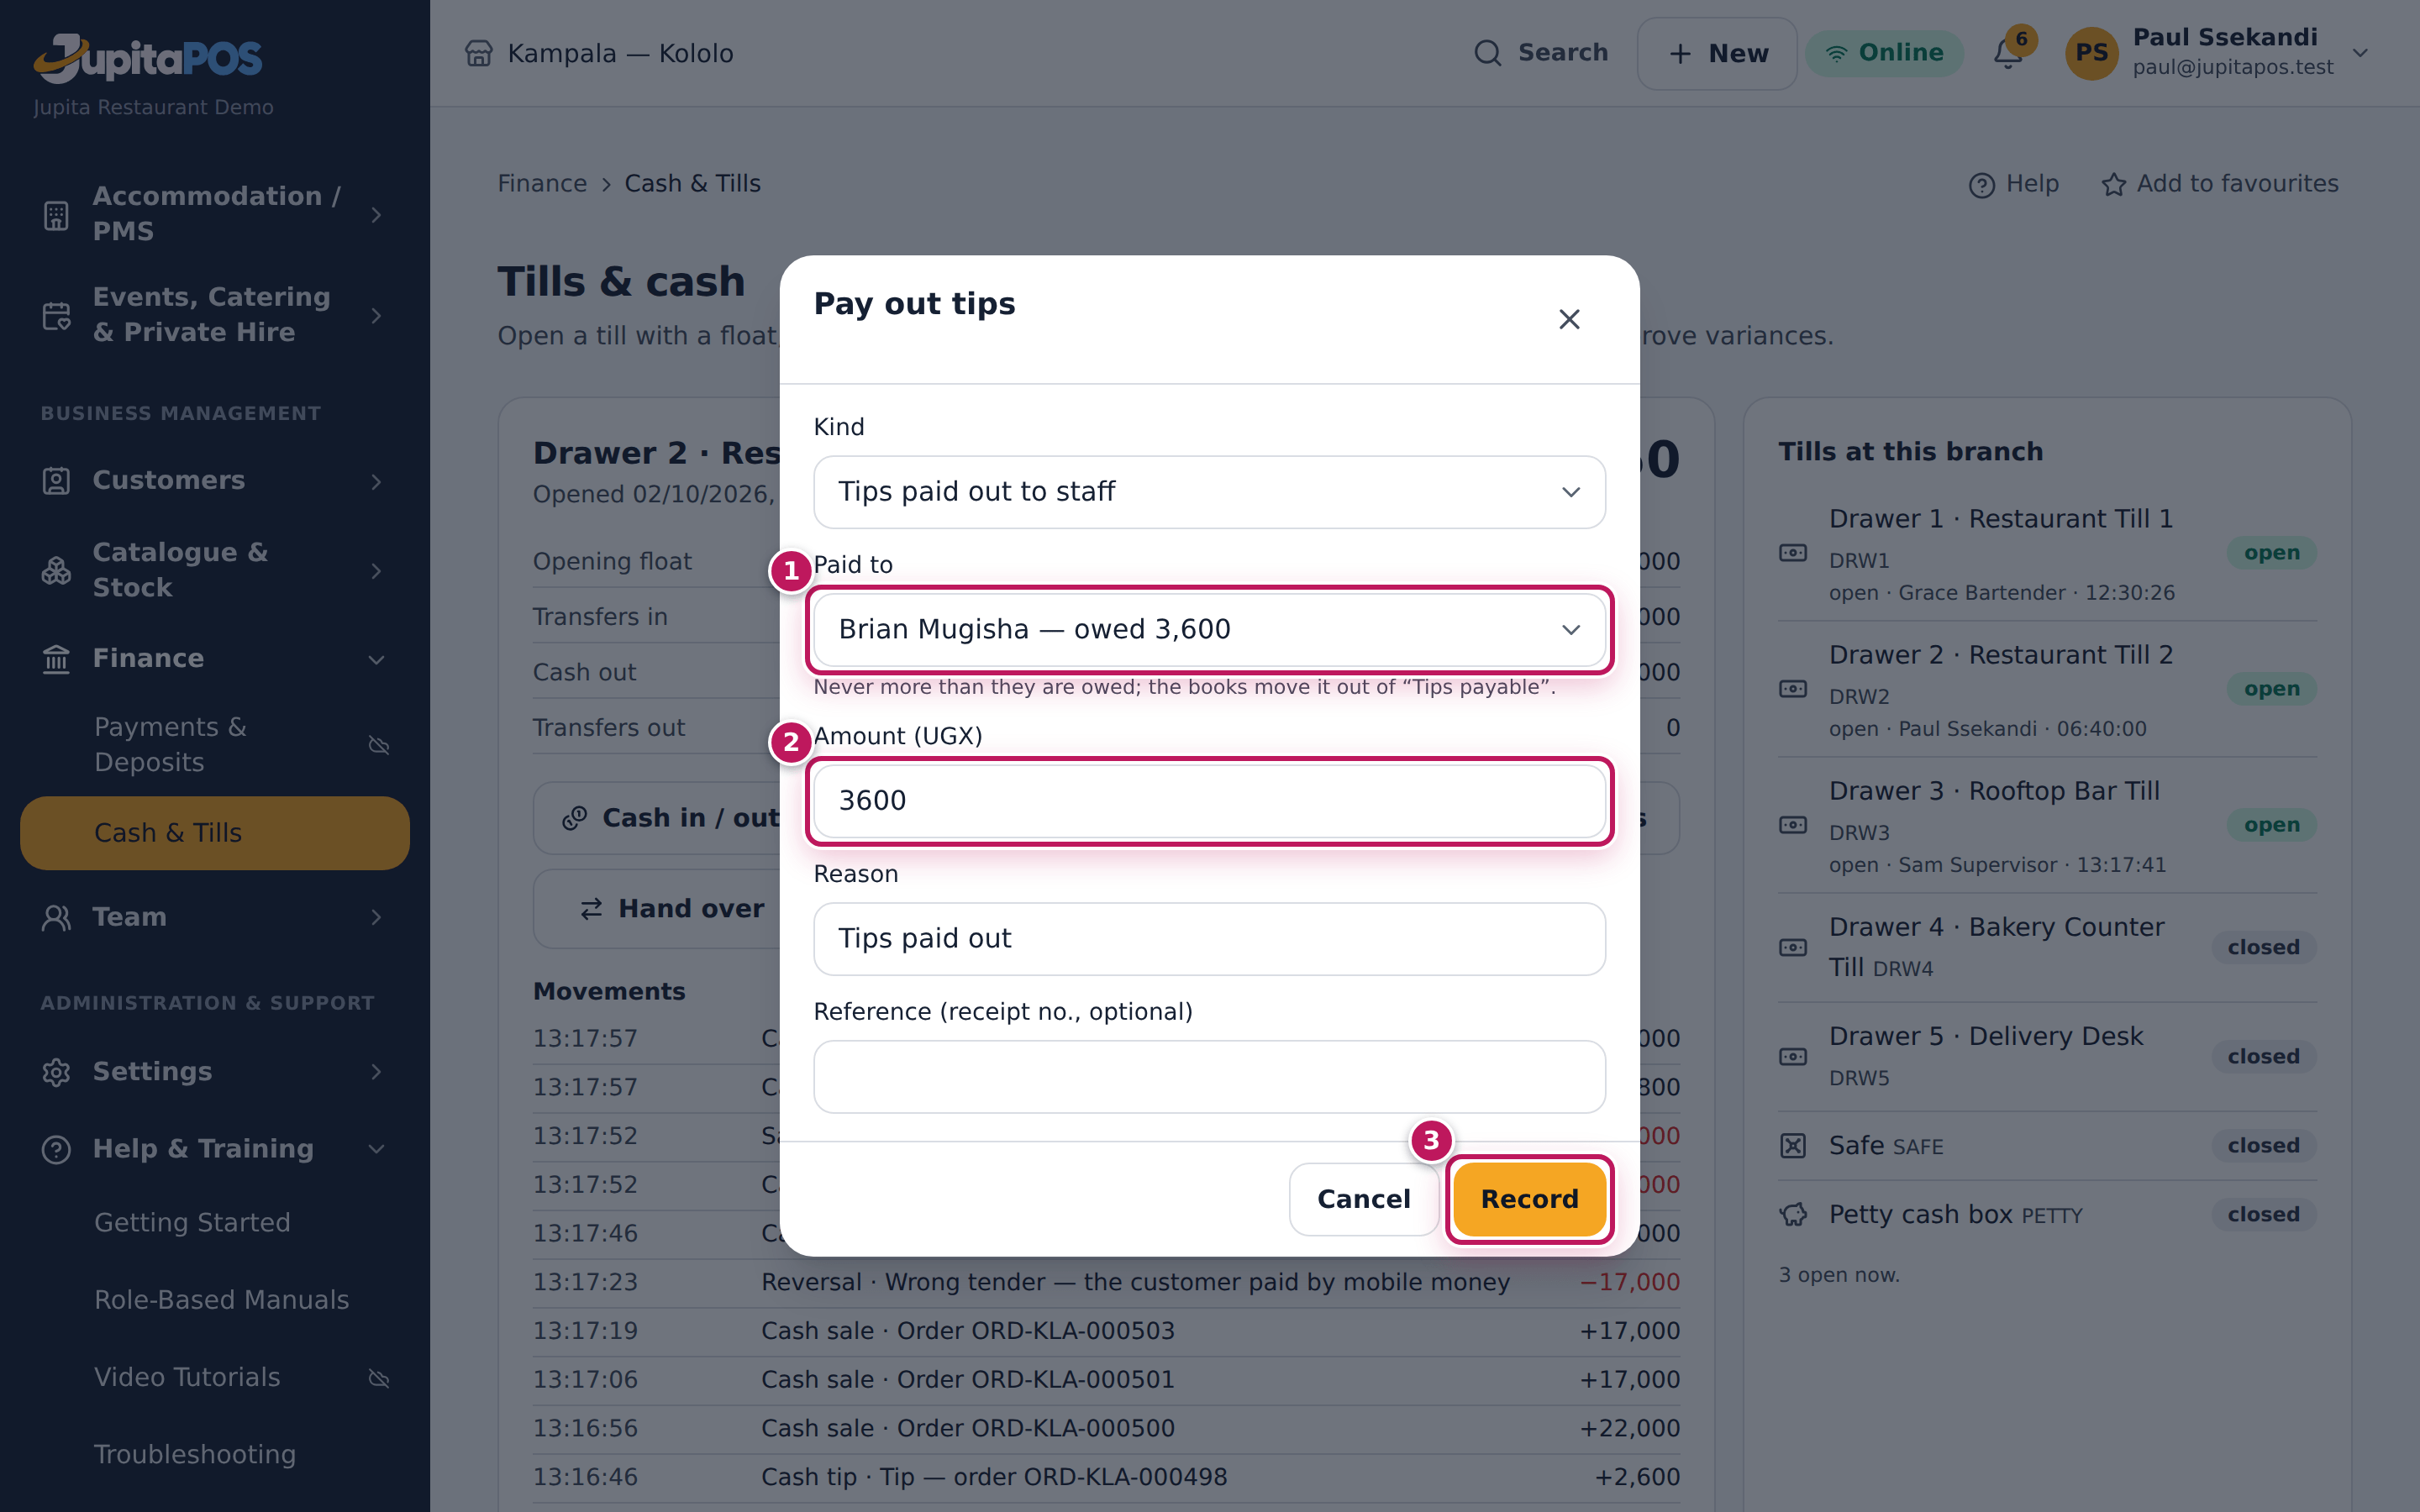
- On Tills & cash, tap Pay out tips.
- Choose the person in Paid to (1). The list shows staff by their staff record’s name — Brian Waiter is Brian Mugisha — with what they are owed.
- The Amount (UGX) (2) is filled with what they are owed. Lower it if you pay only a part.
- Tap Record (3) and hand over the cash.
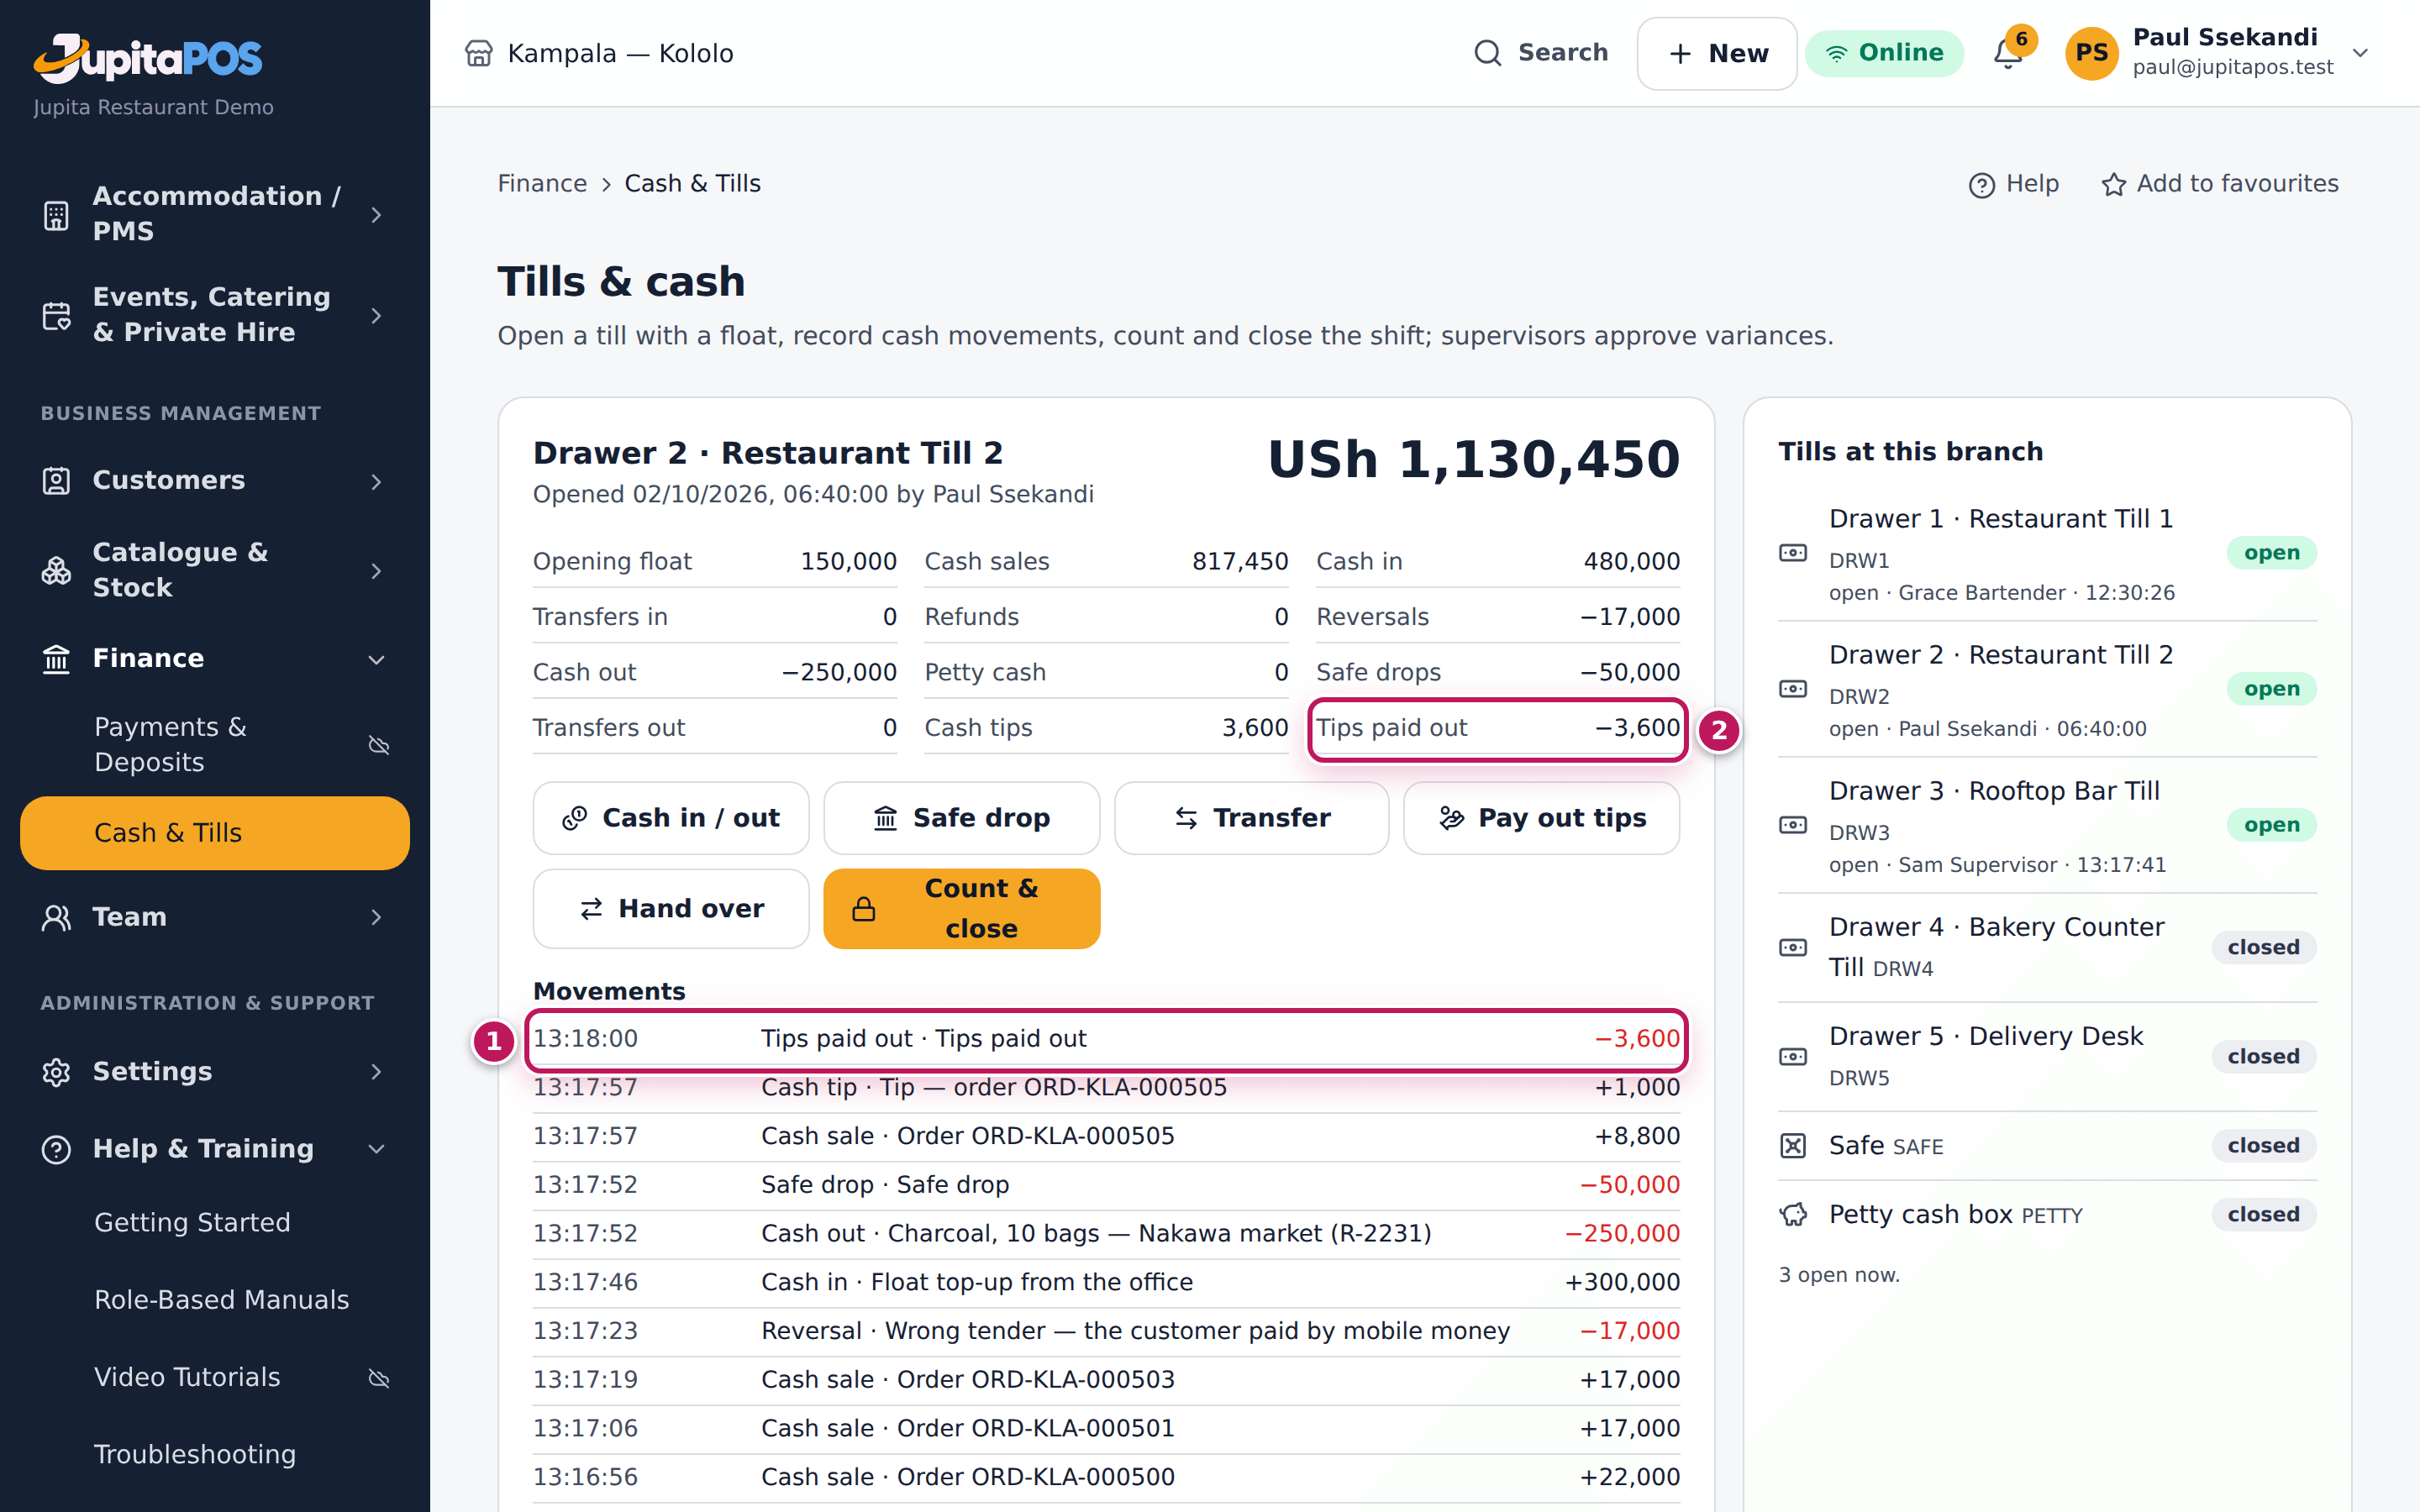
Expected result
A Tips paid out movement is at the top of the drawer’s movements (1), and the Tips paid out line of the drawer’s summary (2) grows by the amount. Brian is no longer owed that amount; the books move it out of Tips payable.
Screenshot
Common mistakes
- Paying tips from your own pocket or from the takings without recording it. The drawer is then over by the tips at the cash-up.
- Paying one waiter another’s tips. Choose the right name; each person is owed their own tips.
Troubleshooting
- “Brian is owed … in tips — that is more.” You typed more than they are owed.
- There is no Pay out tips button. Nobody is owed tips right now.
Hand the drawer over to the next cashier
Purpose
Change cashiers in the middle of a shift without closing the drawer: you both count the same cash, your part is closed with its difference, and the next cashier carries on from what was counted.
Role / permission required
The cashier who has the drawer, or a supervisor (cash.close), signed in
with e-mail and password. The incoming cashier needs a sign-in, cash.open
and their PIN.
Prerequisites
- Your till is open.
- The incoming cashier is with you, and has no drawer of their own open.
Steps
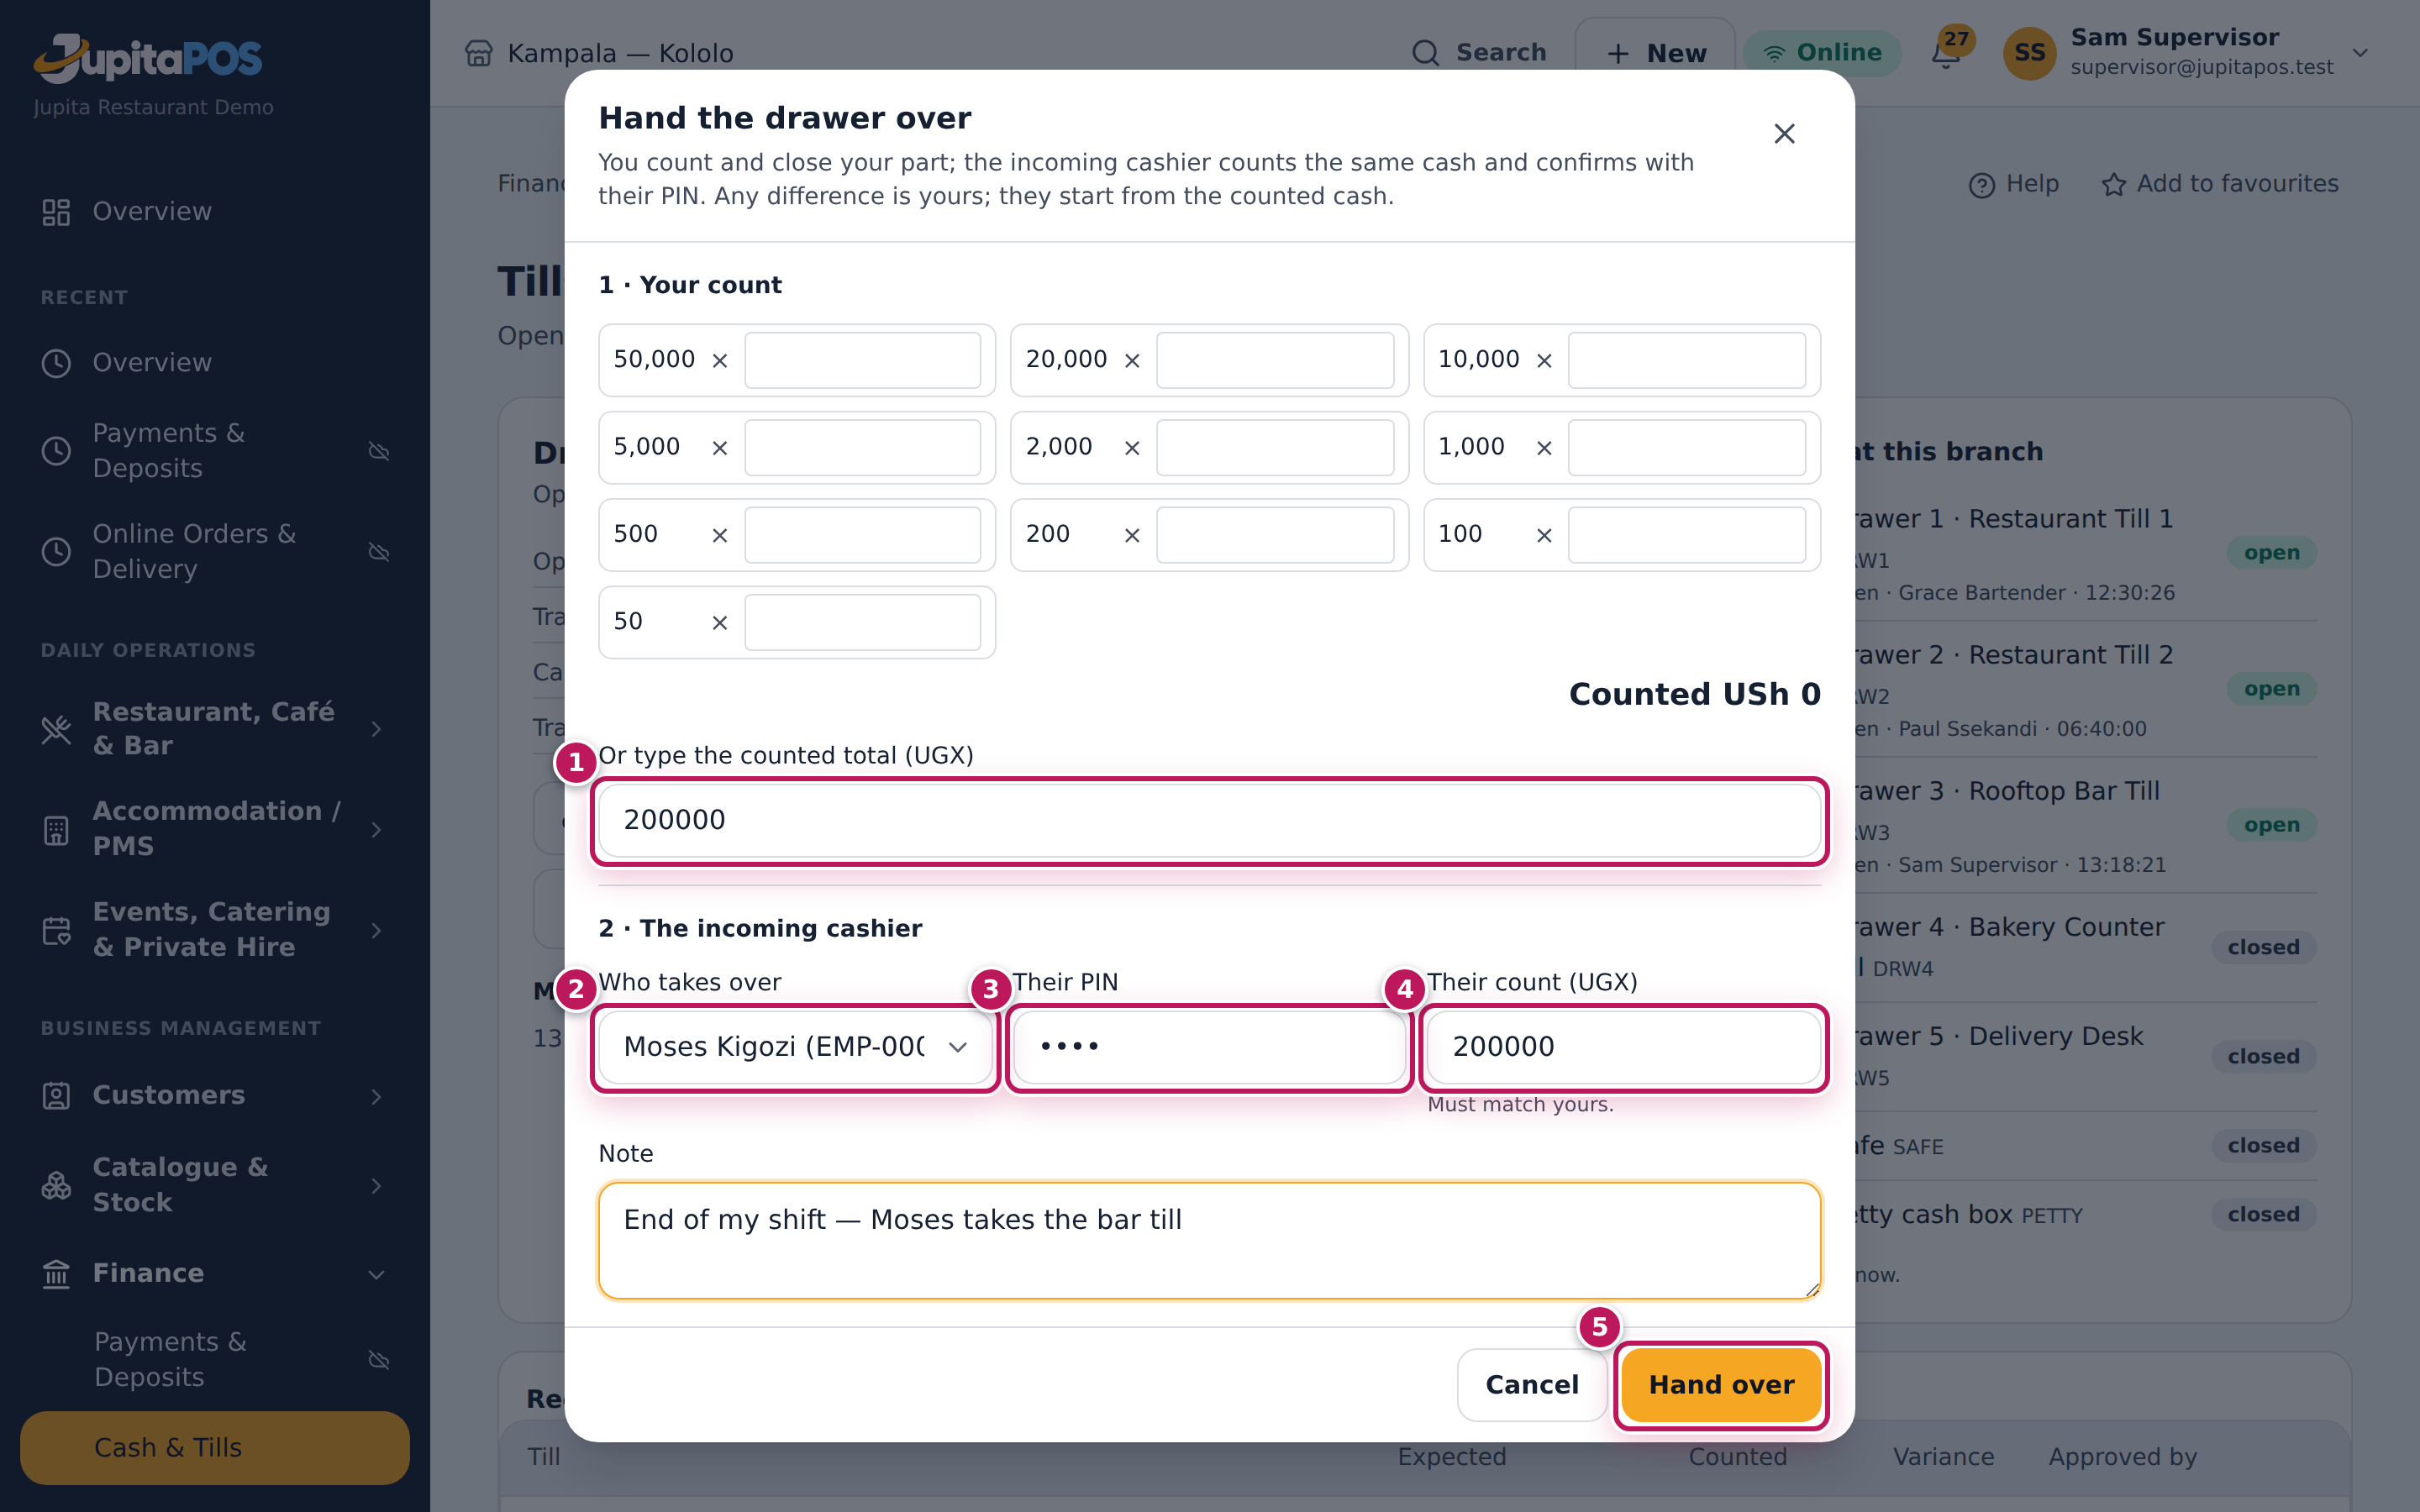
- On Tills & cash, tap Hand over.
- Under 1 · Your count, count the drawer by note, or type the total in Or type the counted total (UGX) (1) — here 200,000.
- Under 2 · The incoming cashier, choose Who takes over (2) — here Moses (EMP-0002).
- The incoming cashier types Their PIN (3) and Their count (UGX) (4). Both counts must be the same.
- Add a Note if needed, then tap Hand over (5).
Expected result
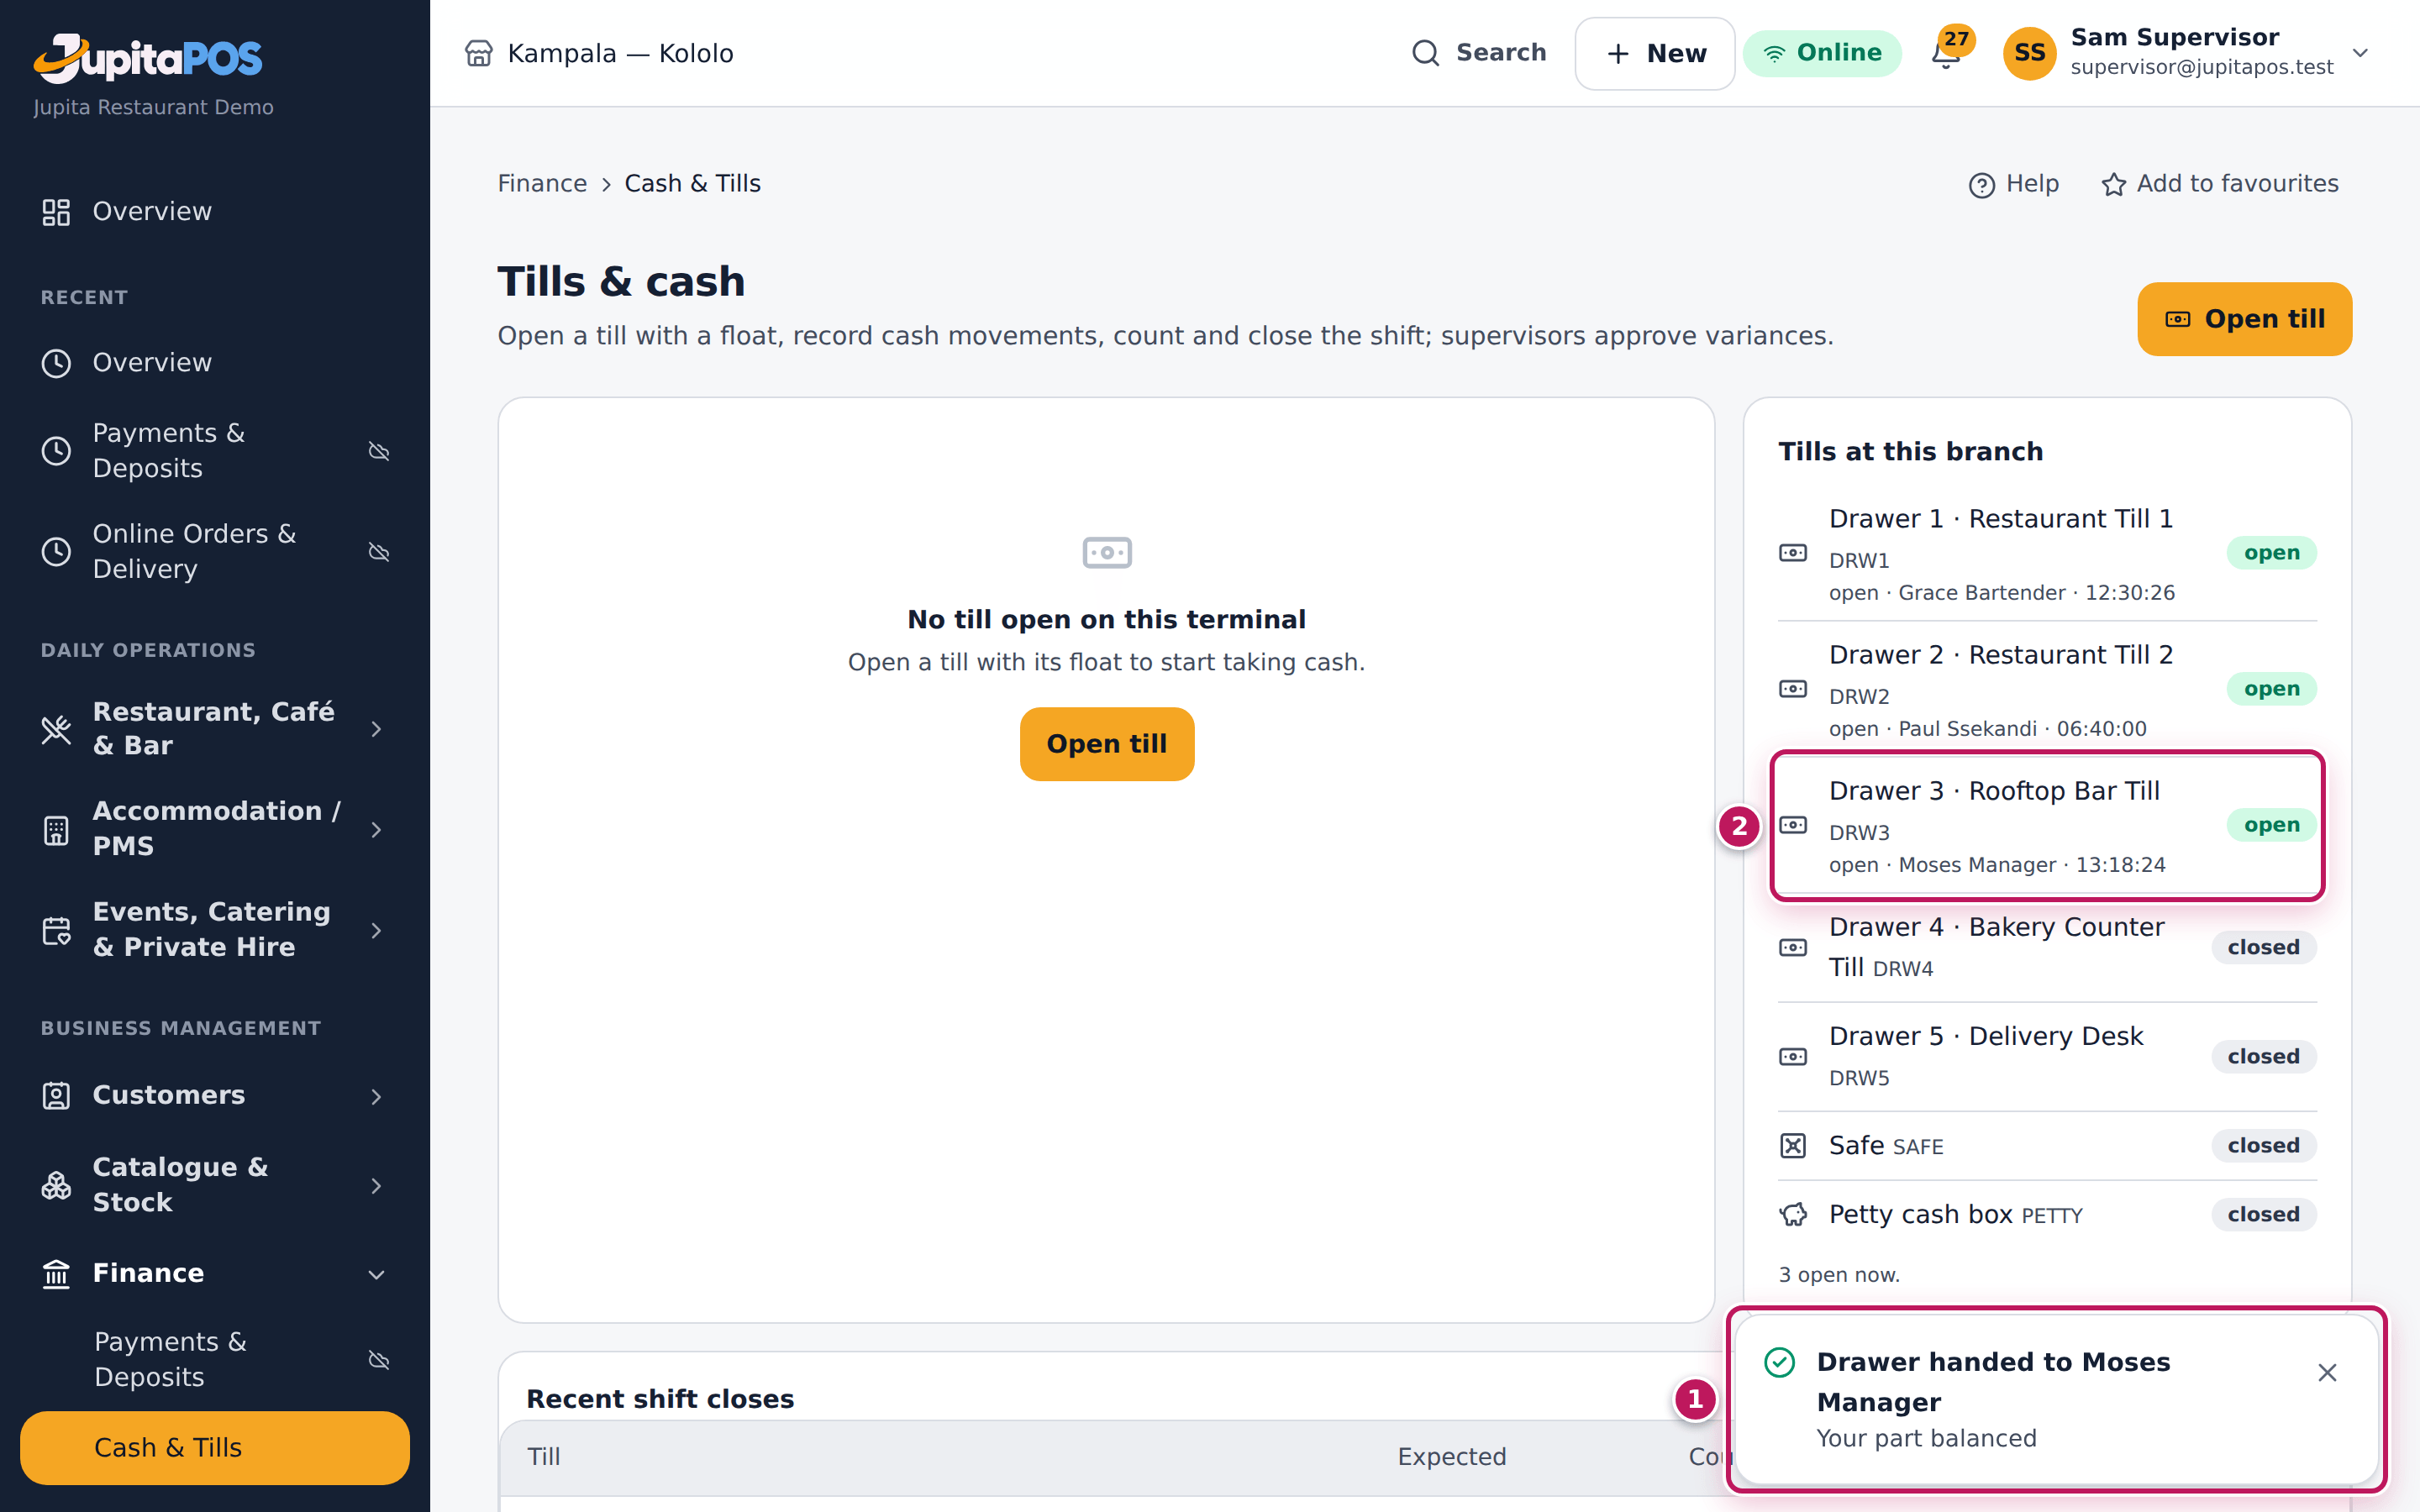
Drawer handed to Moses Manager — Your part balanced (1). Your part of the drawer is closed with its difference (none here), and the drawer is now open in Moses’s name (2), starting from the 200,000 you both counted. The shift report shows the drawer as handed over.
Screenshot
Common mistakes
- Counting separately at different times. Count together, from the same drawer, then type the counts.
- Handing over without counting. Any difference found later is the new cashier’s; count now so it stays yours.
Troubleshooting
- “The two counts differ (…) — count together again, or ask a supervisor to count.” Count again together.
- “Wrong PIN for the incoming cashier.” They type their PIN again.
- “… already has a drawer open — hand that one over or close it first.” The incoming cashier must close their own drawer first.
- “… cannot take a till (cash.open).” Their role does not allow a drawer; choose another person.
FAQ
What if my part is short? The shortage is recorded on your part, and a supervisor approves it as for a close (see Approve or send back a till close); it cannot be sent back, because the drawer is already in use.
Count and close the till
Purpose
End your shift by counting the drawer, so the business knows what is in it and any difference between what is there and what should be is recorded and explained.
Role / permission required
Cashiers, bartenders, baristas, supervisors and managers (cash.close),
signed in with their e-mail and password.
Prerequisites
- Your till is open and the shift’s orders are paid.
- You have done your safe drops and tip pay-outs (see Record cash in, cash out and safe drops).
Steps
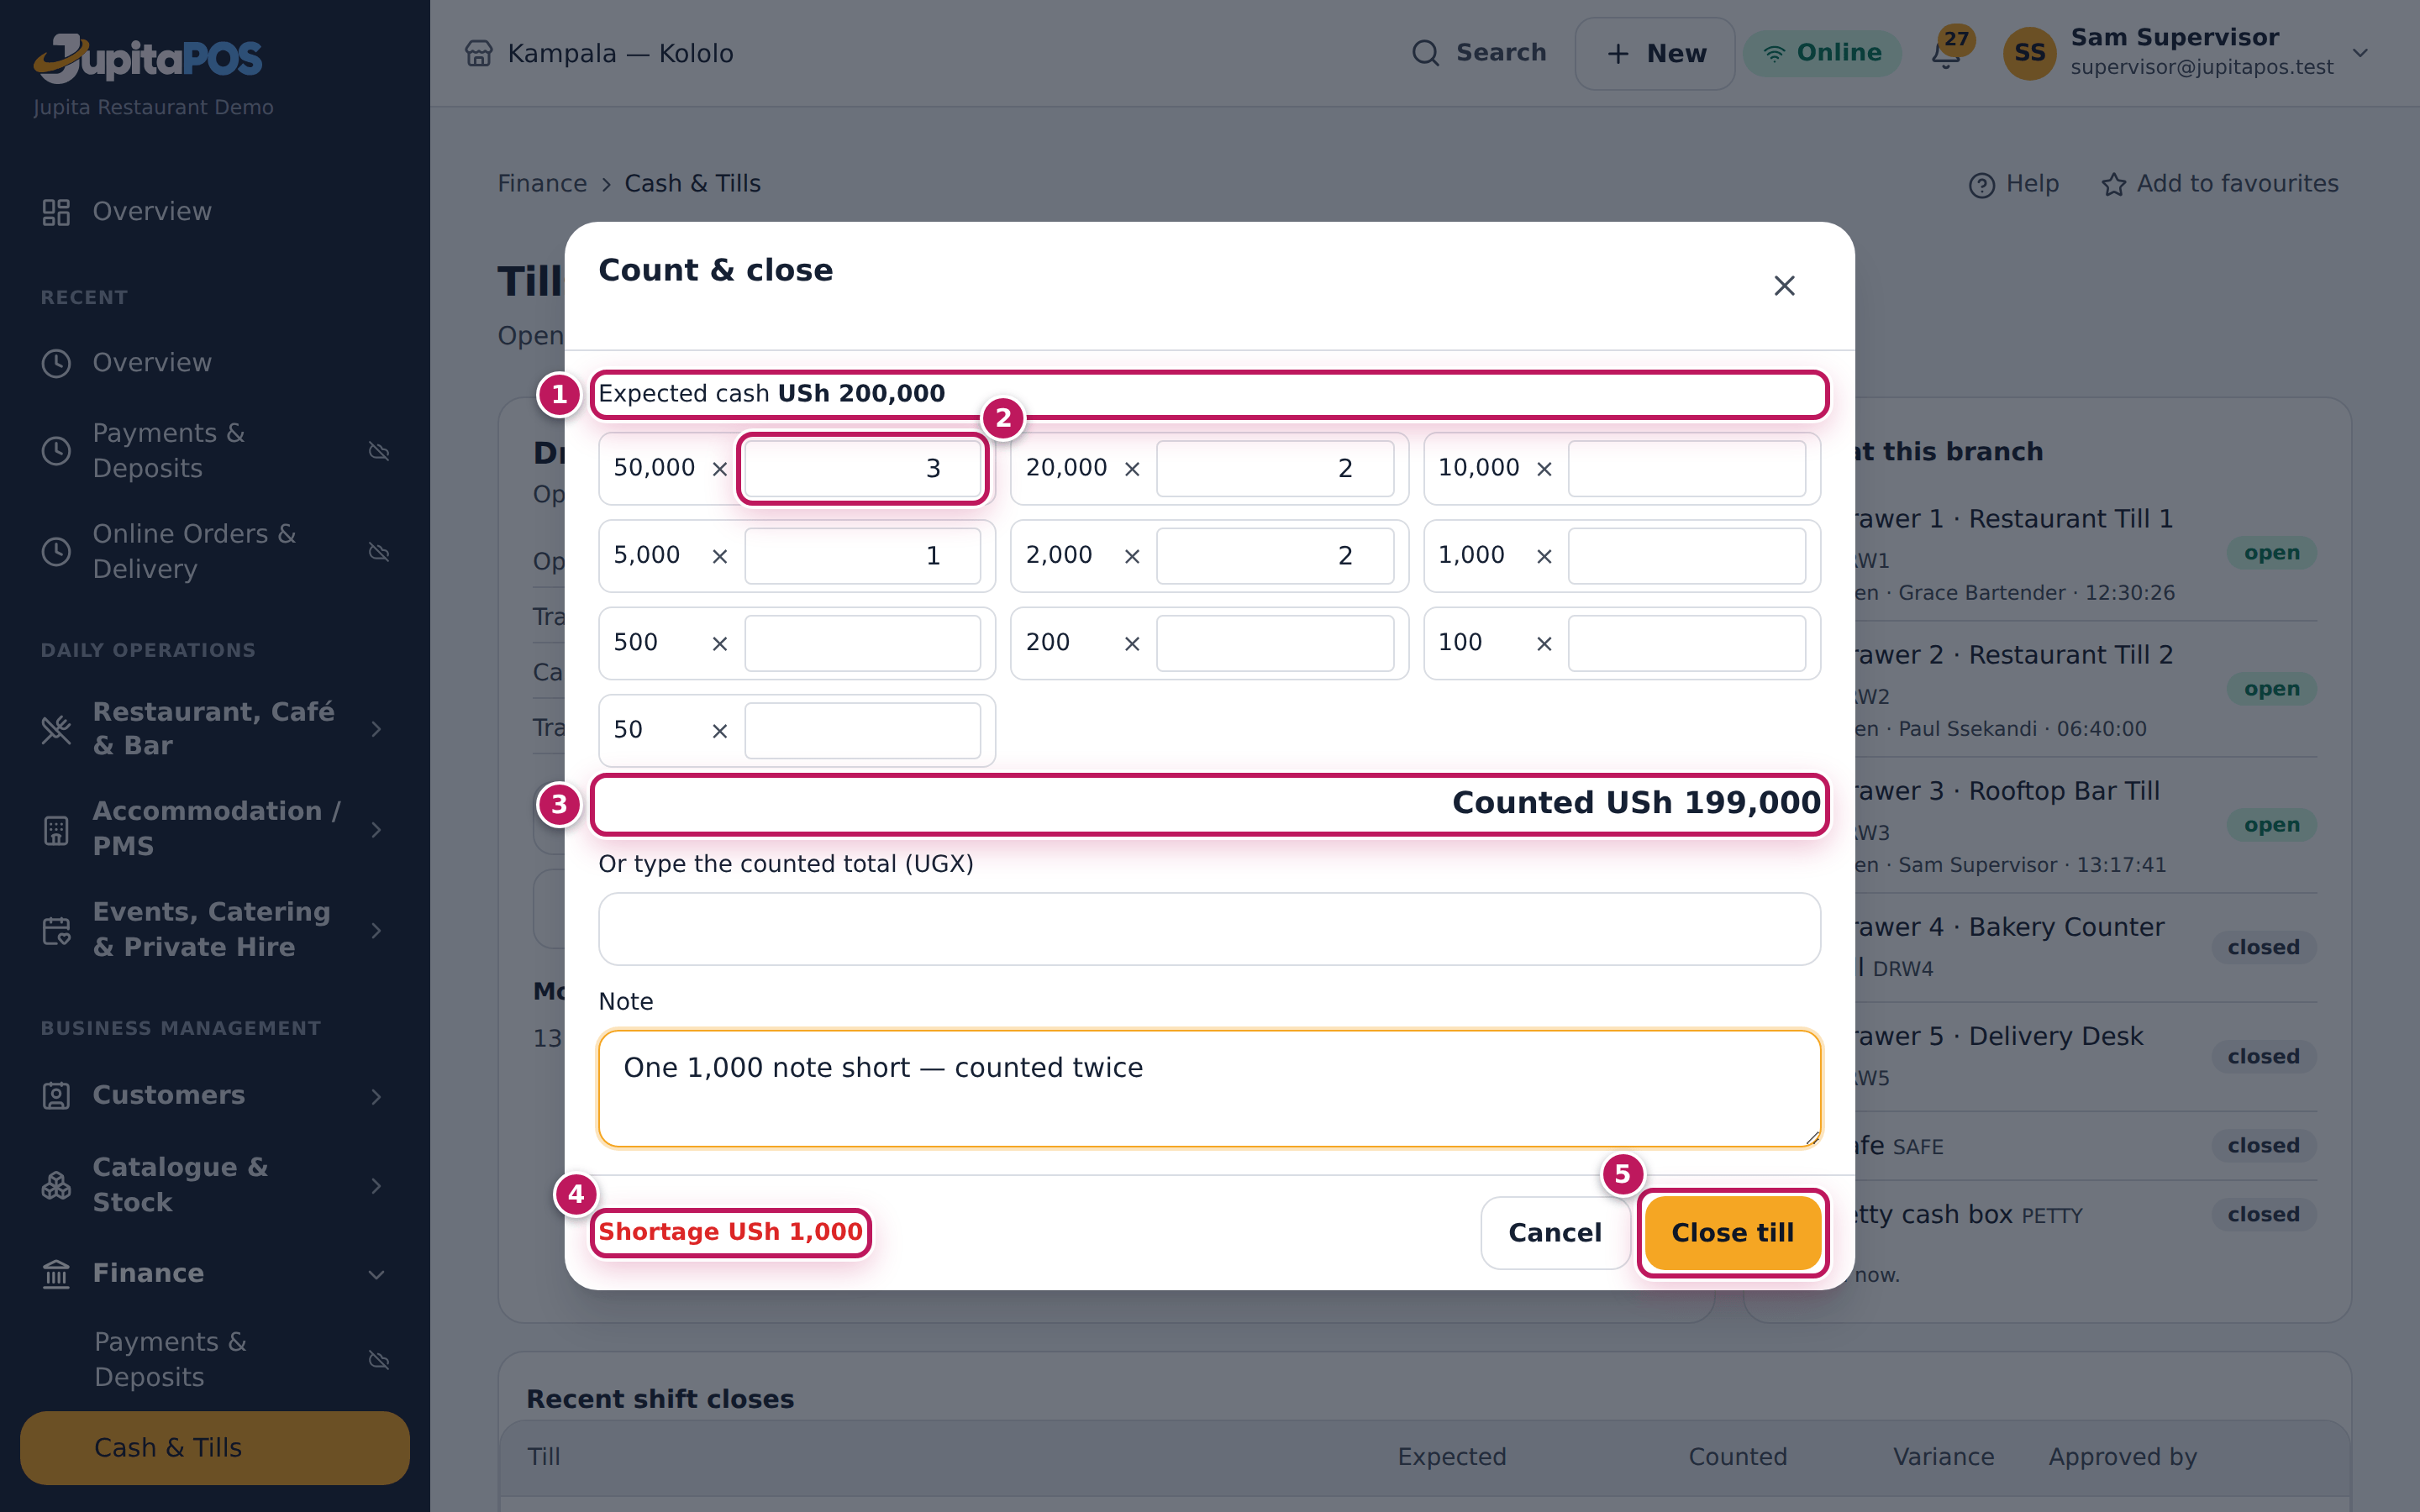
- On Tills & cash, tap Count & close.
- Read the Expected cash (1) — here USh 200,000.
- Count the drawer and type how many of each note and coin (2), or type the total in Or type the counted total (UGX).
- Check Counted (3) and the result at the bottom (4): Balanced, a Shortage or an Overage with the amount.
- Explain any difference in the Note.
- Tap Close till (5).
Expected result
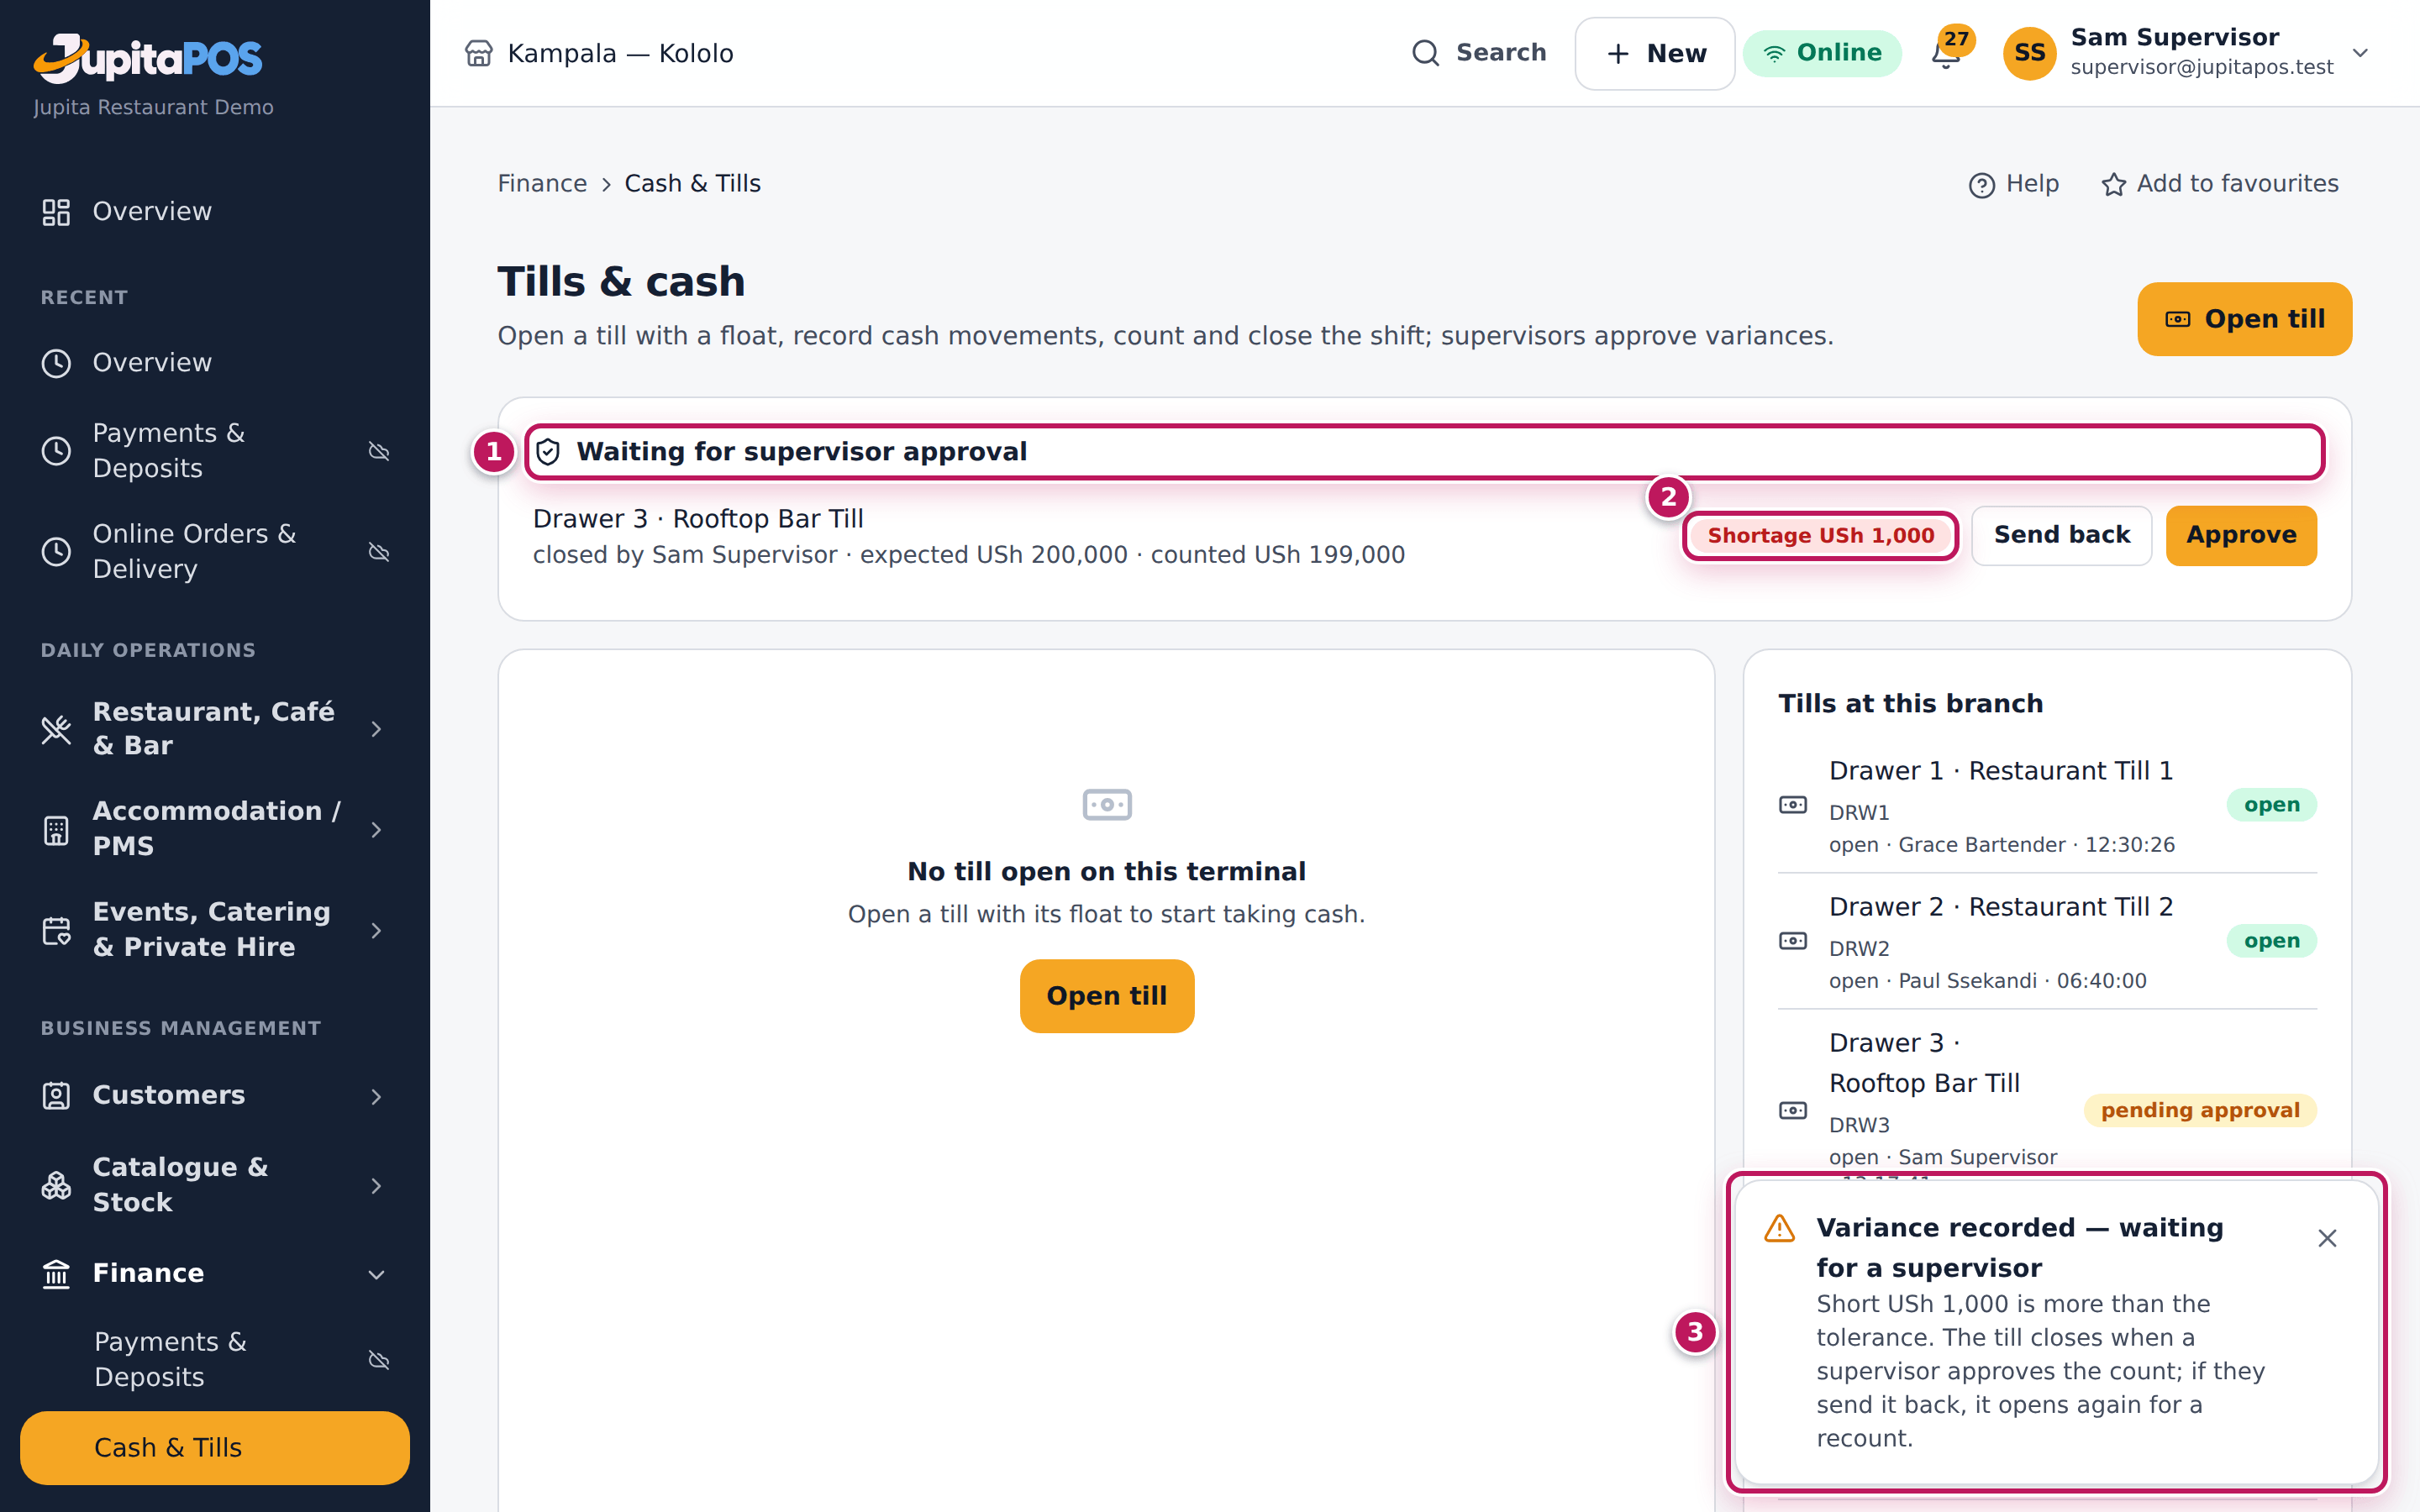
When it balances, the till closes at once with one message, Till closed — The count balanced., and appears under Recent shift closes with expected, counted and variance. A difference within the business’s tolerance (none in the demo) also closes at once, saying for example Short USh 500, within the tolerance. With a bigger difference — here Shortage USh 1,000 (199,000 counted of 200,000) — the till says Variance recorded — waiting for a supervisor (3) and the drawer waits under Waiting for supervisor approval (1) with its shortage (2). A supervisor approves it (see Approve or send back a till close).
Screenshot
Common mistakes
- Closing before the last order is paid. A cash payment taken after the close cannot go into this drawer.
- Filling both the notes and the total. Use one or the other; if both, they must be the same.
- Hiding a difference. Type what you counted, not what is expected. A difference explained today is a note; one found later is a problem.
Troubleshooting
- “The denomination count does not add up.” The notes typed and the total typed differ. Clear one of them.
- A Blind count badge instead of the expected cash. Your business counts blind: count what is in the drawer; the expected amount and any difference are shown to the supervisor.
- The till is open again after the close. The supervisor sent it back for a recount. Count again and close again.
FAQ
Can I approve my own shortage? No. Even a supervisor’s own close is approved by someone else.
Approve or send back a till close
Purpose
Check a drawer that closed short or over, then accept the difference with a note or send the drawer back for a recount, so every variance has an approver and an explanation.
Role / permission required
Supervisors and managers (cash.approve), signed in with their e-mail and
password — never the person who counted the drawer.
Prerequisites
- A drawer is under Waiting for supervisor approval on Tills & cash (see Count and close the till).
Steps
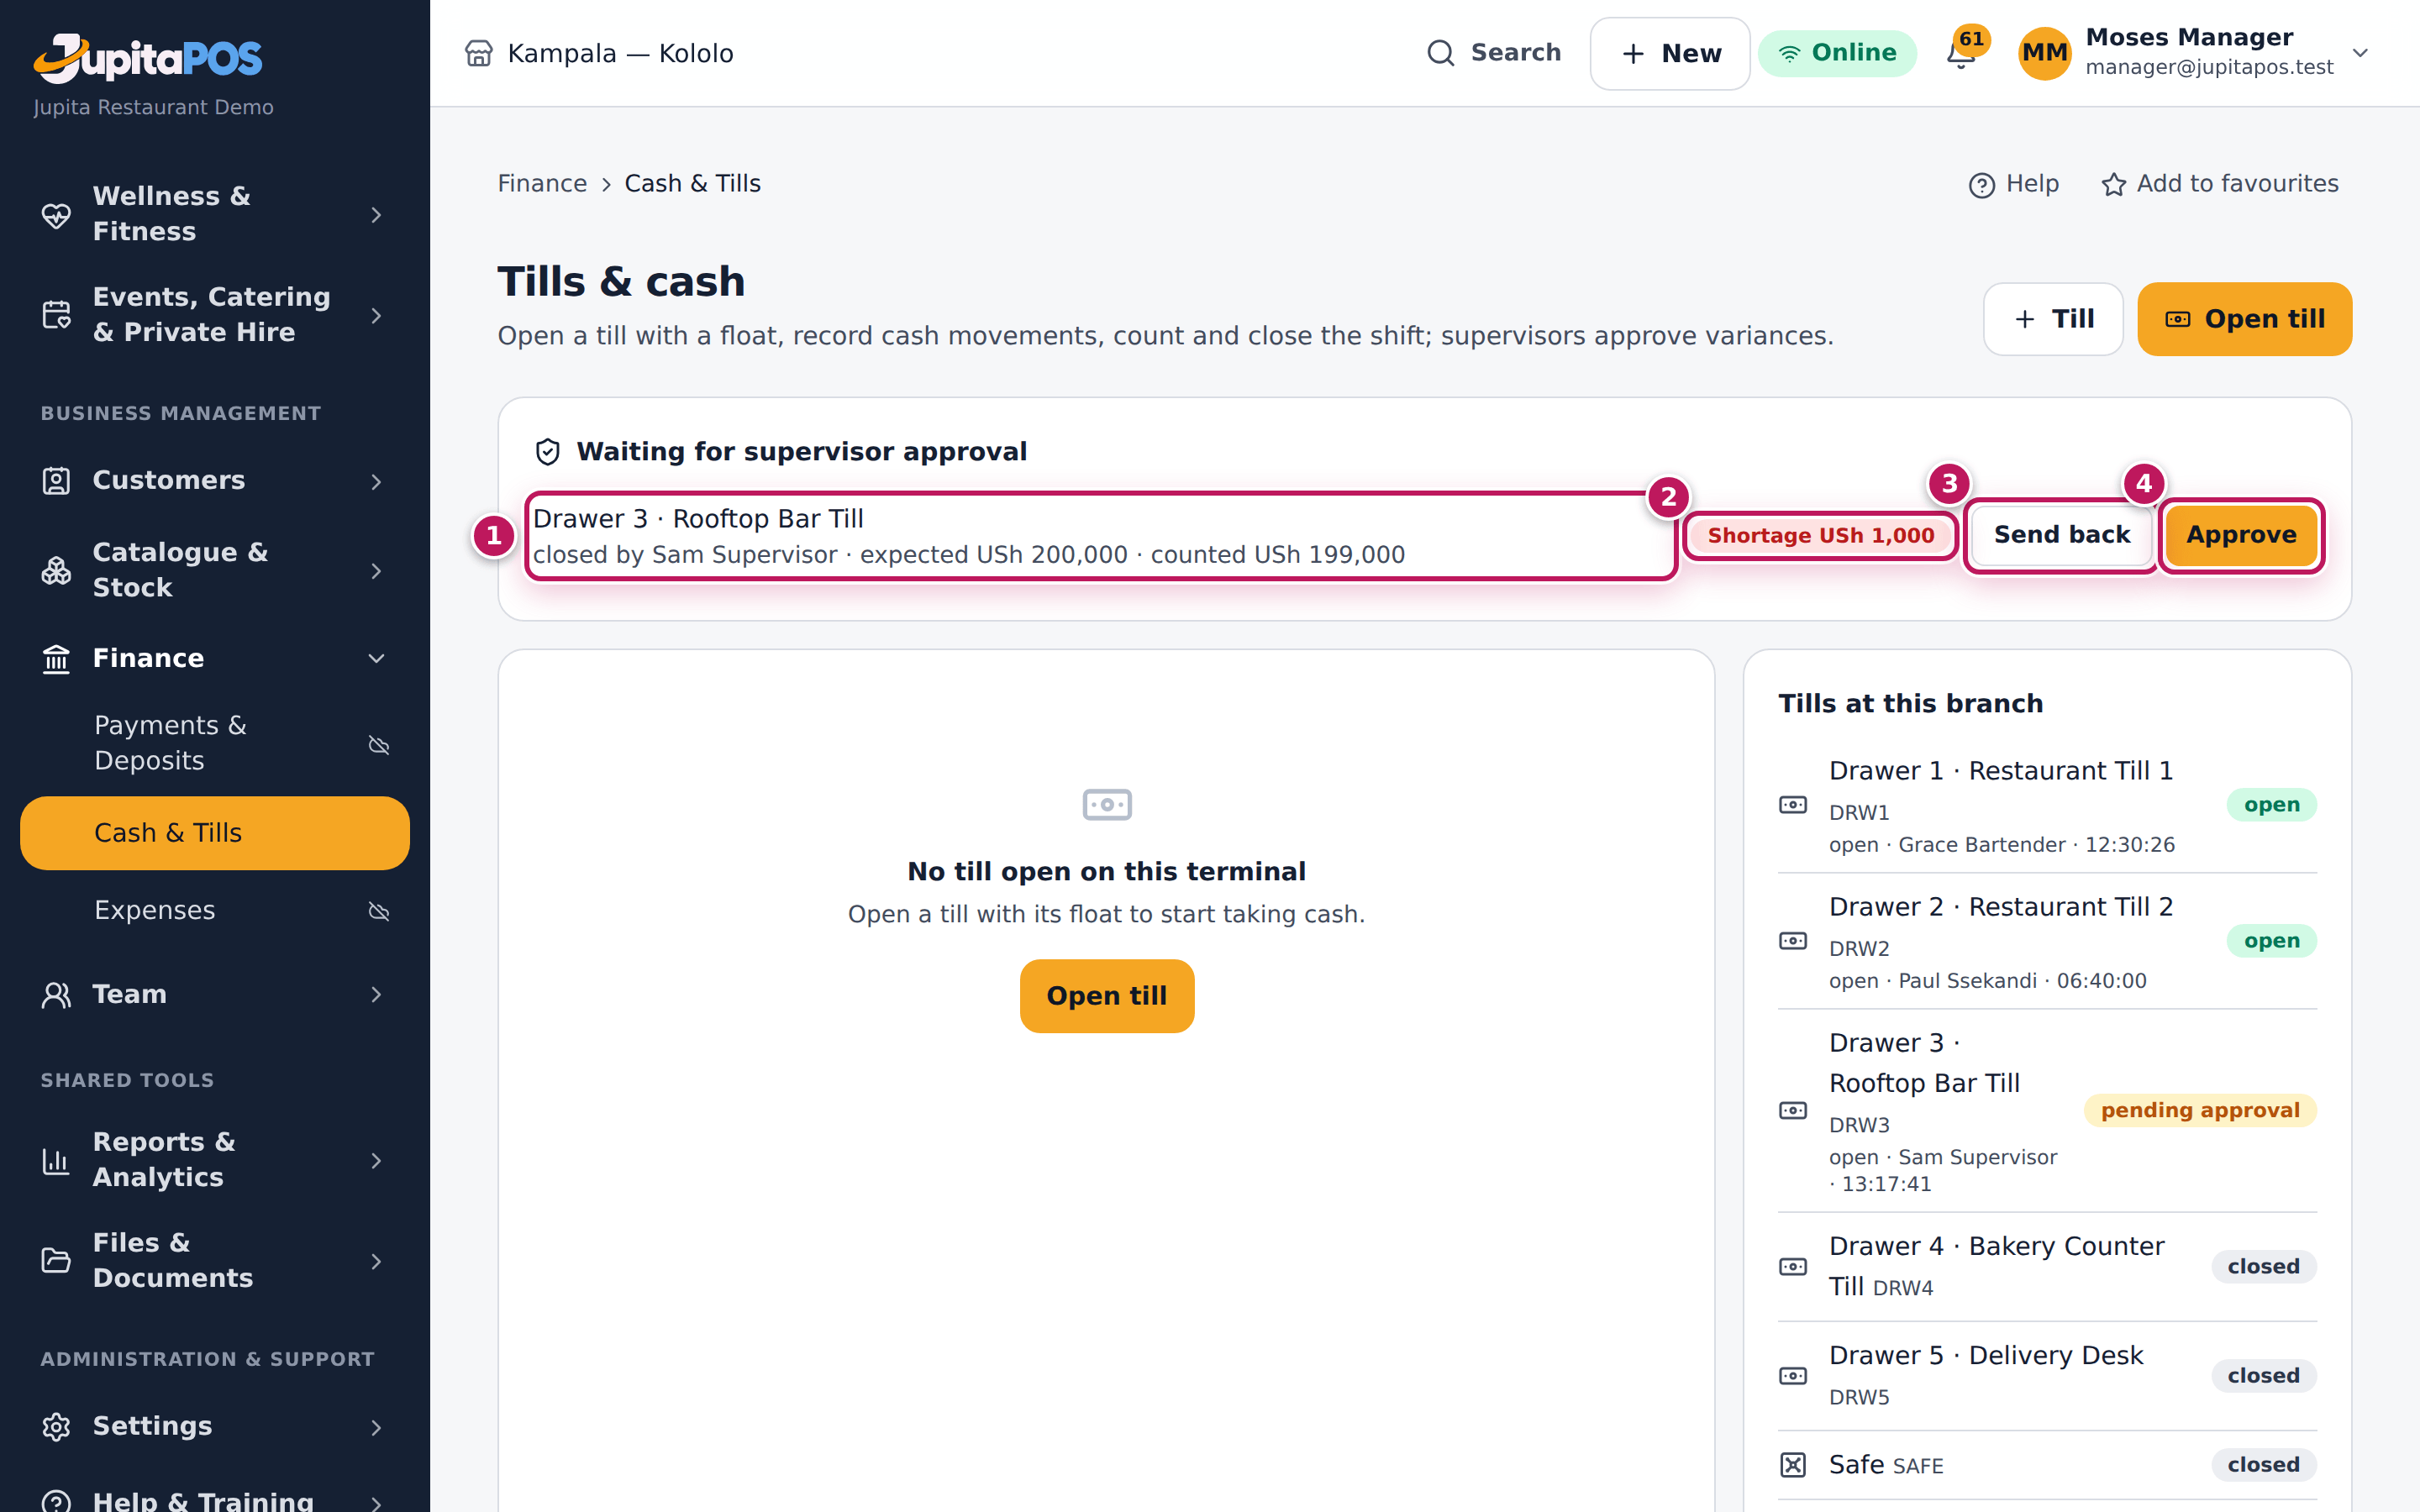
- Open Tills & cash. Under Waiting for supervisor approval, read the drawer’s line (1): who closed it, what was expected and what was counted, and the Shortage or Overage (2).
- Talk to the cashier; recount the drawer together if needed.
- To send it back for a recount, tap Send back (3): the drawer opens again for the cashier.
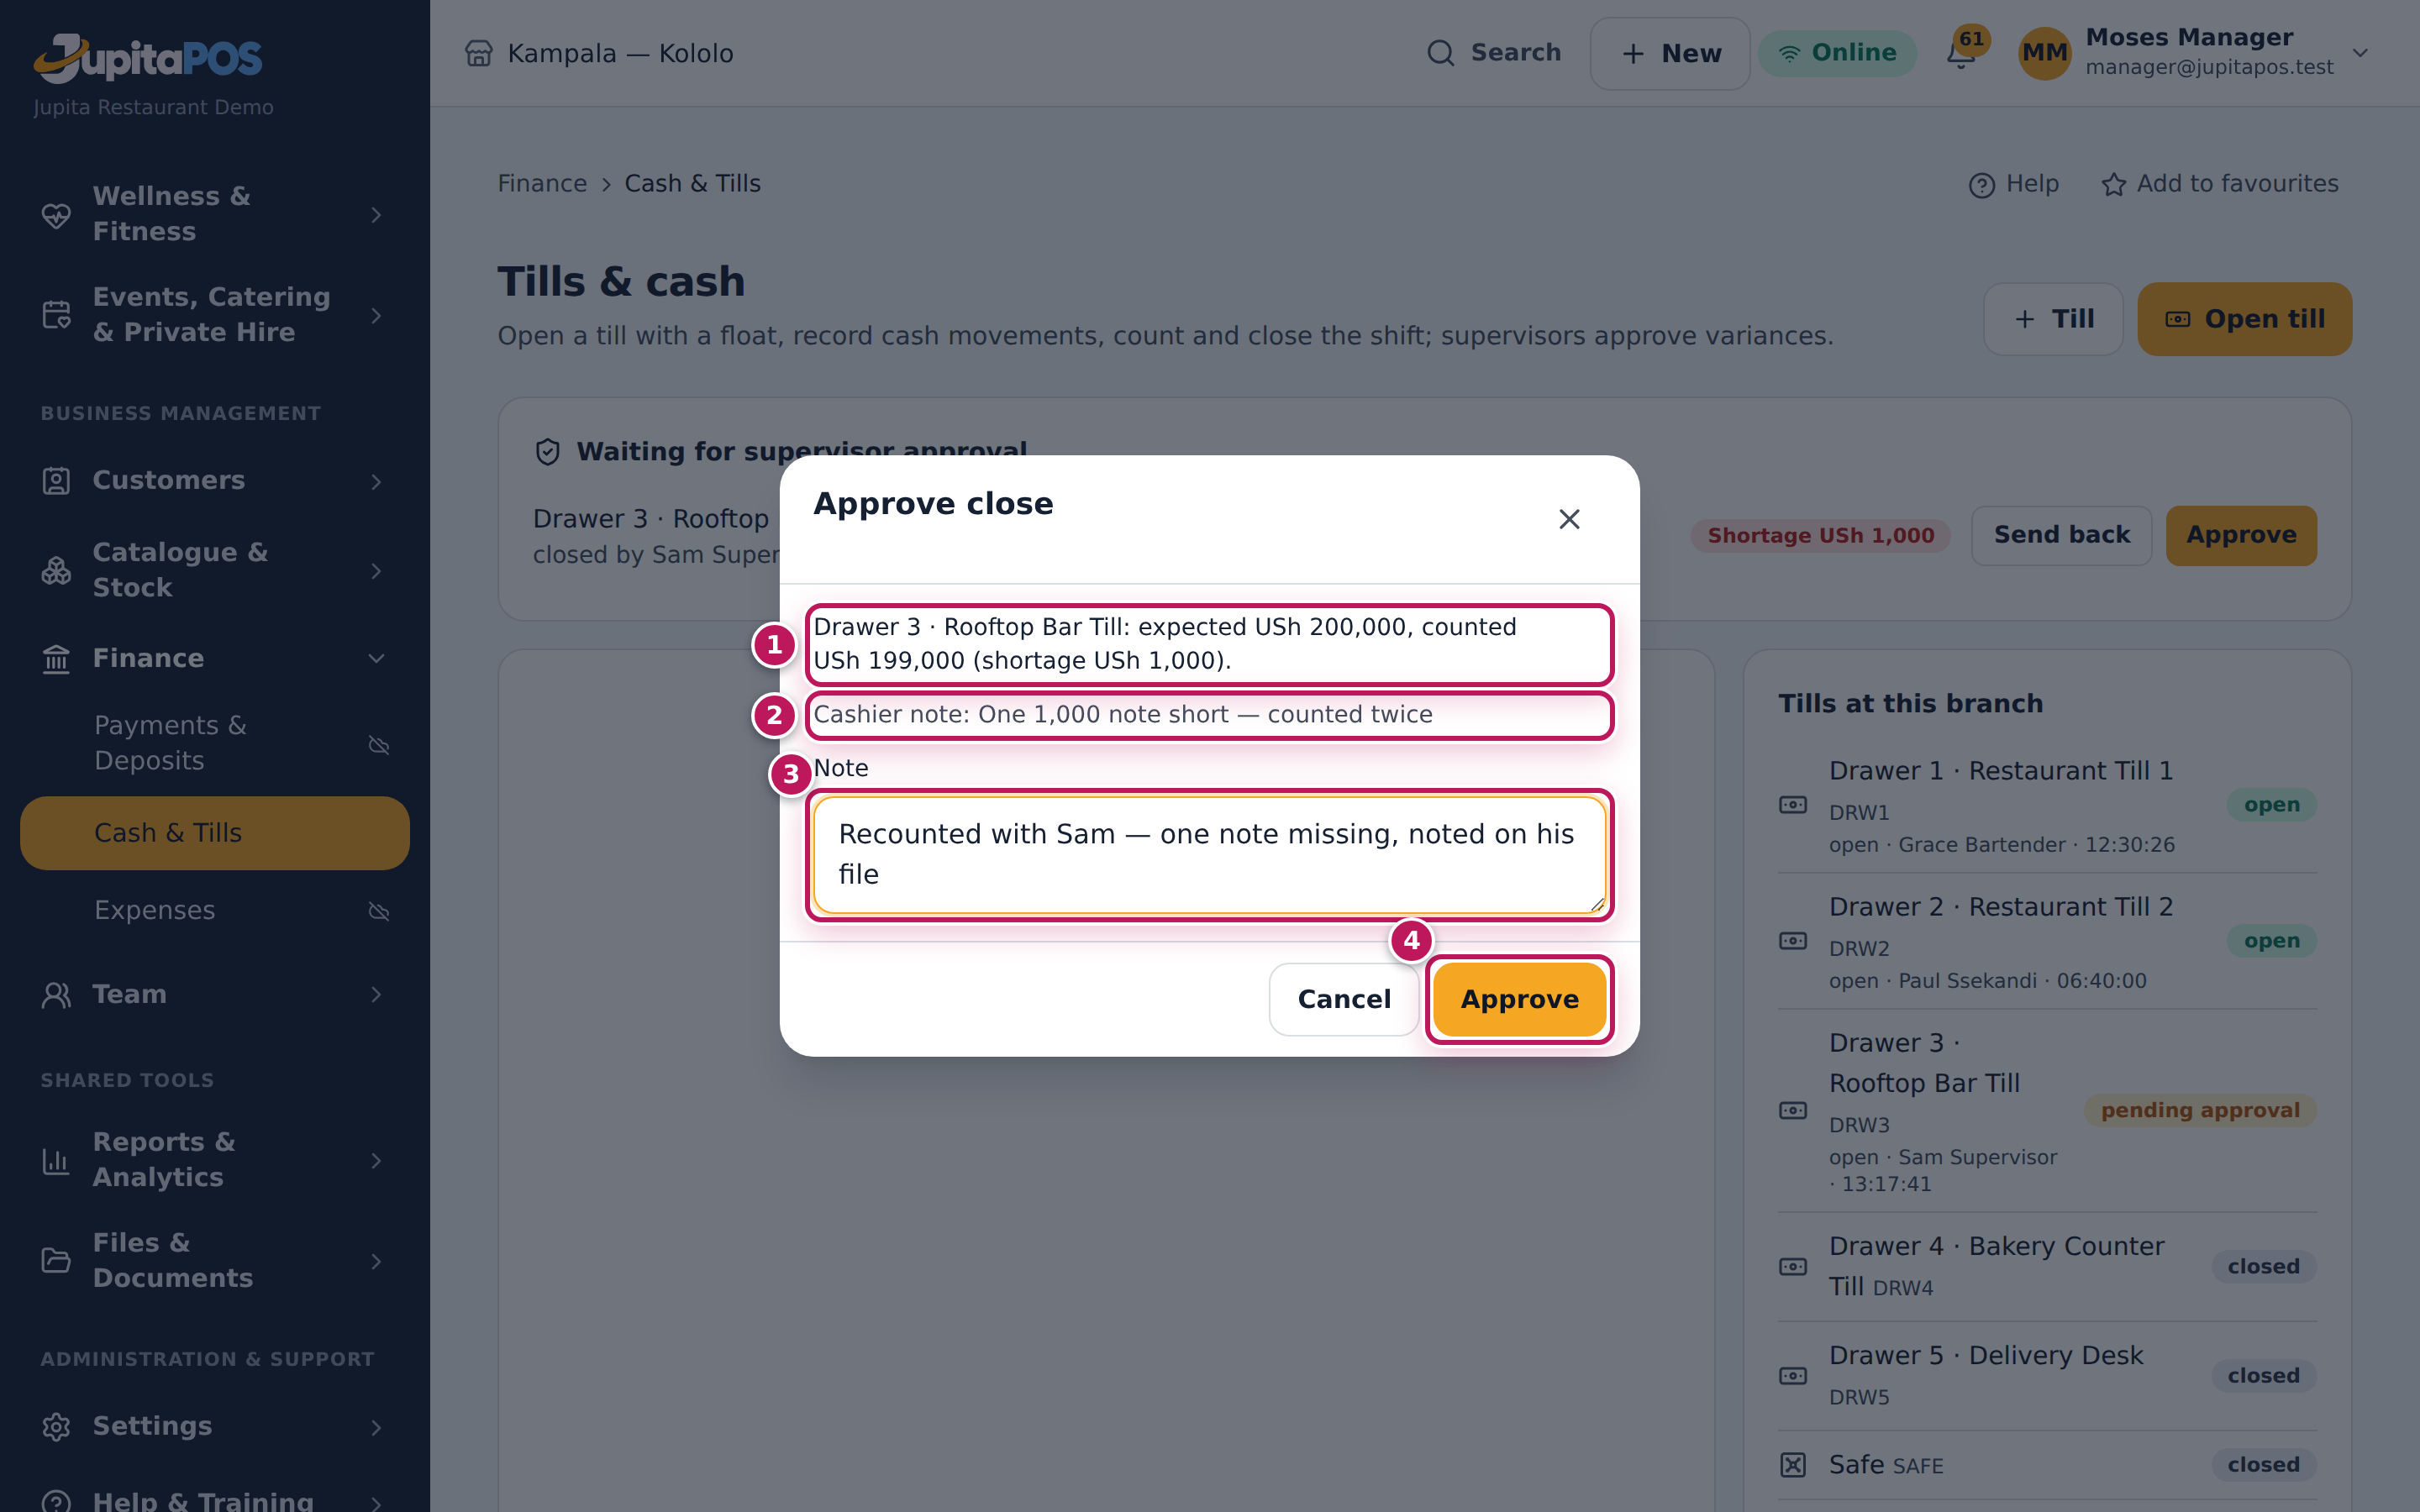
- To accept the difference, tap Approve (4).
- Read the figures (1) and the Cashier note (2), type your own Note (3), and tap Approve (4).
Expected result
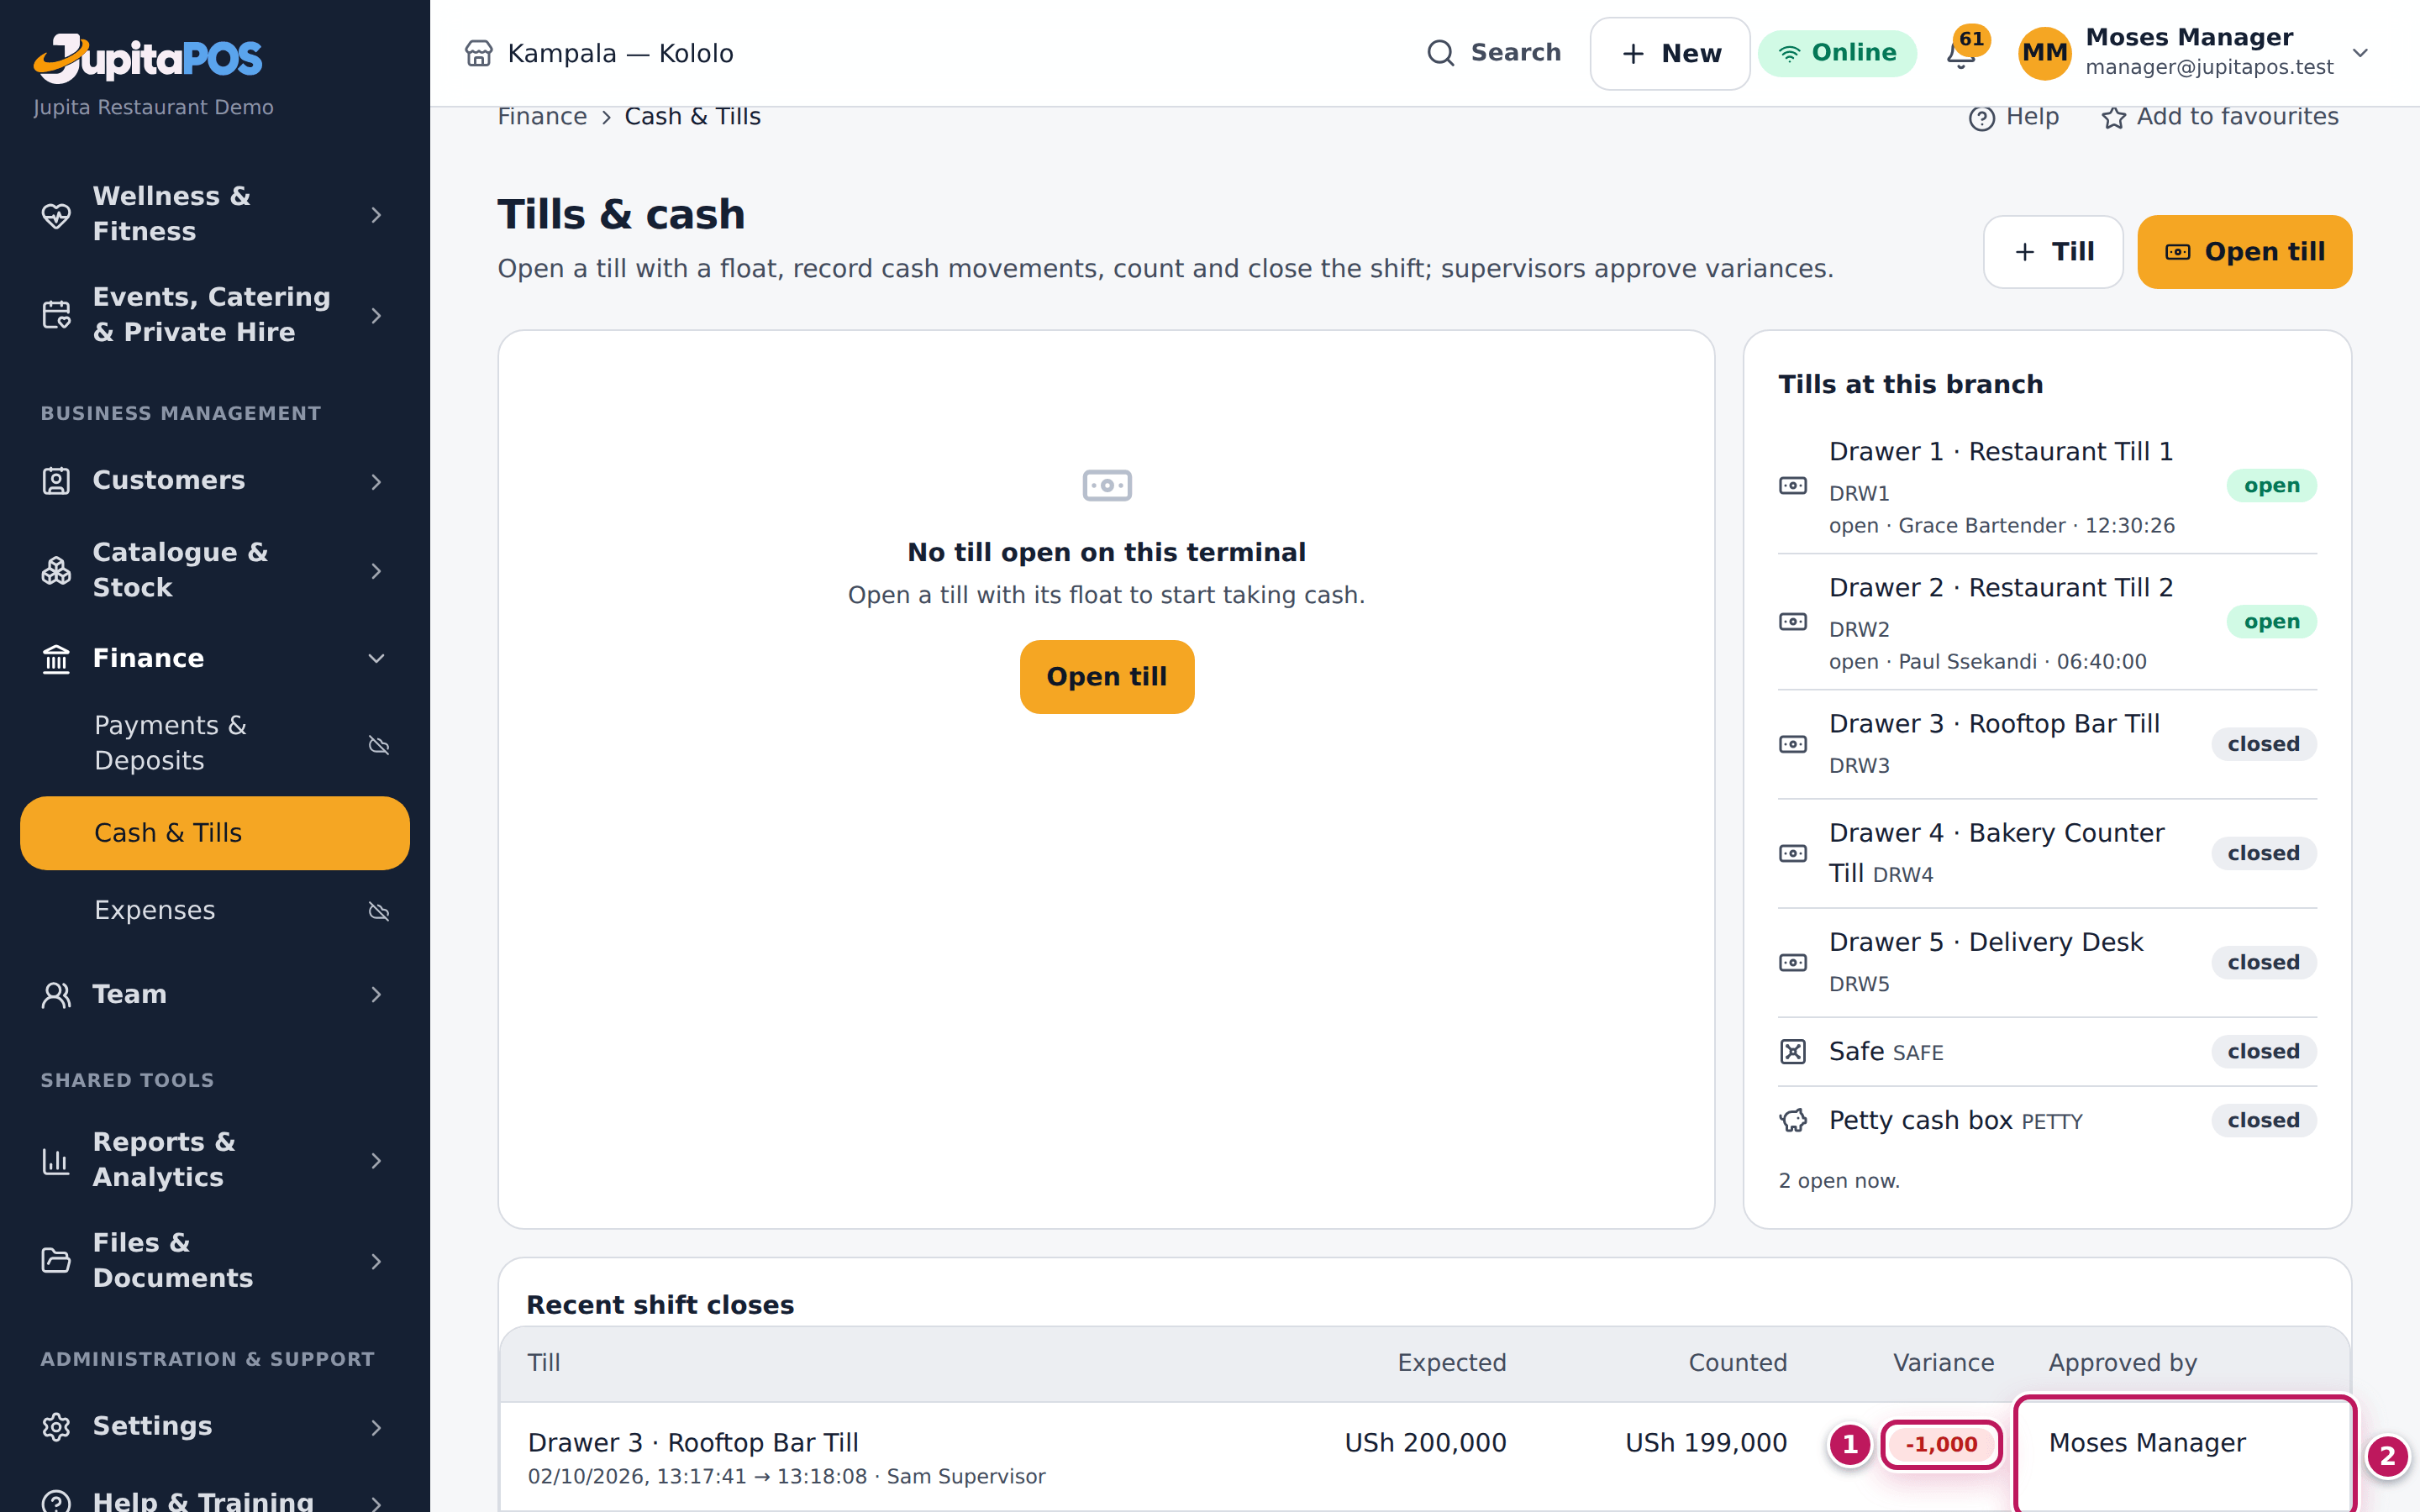
Close approved. The drawer leaves the waiting list and appears under Recent shift closes with its variance, -1,000 (1), and Moses Manager as the approver (2). The approval and both notes are in the audit trail; the shortage is booked in the accounts.
Screenshot
Common mistakes
- Approving without a note. A variance without an explanation is approved blind; write what you found.
- Sending back a drawer that was handed over. It is already in the next cashier’s hands; approve it with a note.
Troubleshooting
- “The person who closed the till cannot approve it.” Another supervisor or the manager approves.
- “This drawer was handed over and is in use — it cannot go back for a recount. Approve the variance with a note.” Approve it instead.
- The Approve and Send back buttons are missing. Your role cannot approve cash, or you signed in with a PIN.