

On this page
JupitaPos is a web app that installs like an ordinary app: an icon on the desktop or the home screen, its own window without the browser’s address bar, and quick links to Point of sale, Floor plan and Offline sync when you press and hold (or right-click) the icon. There is no app store and no download: the browser installs it from your JupitaPos address, and it updates itself.
Installing is recommended for every till, tablet and phone that sells: the installed app starts faster, stays full screen, and is what keeps a till selling when the internet drops (see Offline mode).
A device that sells, or that staff sign in to with a PIN, must also be registered as a till and approved by a manager. The pictures show the demo business, Jupita Restaurant Demo, at its Kampala — Kololo branch.
RetailPOS, PharmacyPOS and Route SalesPOS install the same way, from their own address. Each installs under its own name — JupitaPOS RetailPOS, JupitaPOS PharmacyPOS, JupitaPOS Route SalesPOS — with its own quick links when you press and hold the icon:
| Product | Quick links |
|---|---|
| RetailPOS | Checkout, Offline till, Orders & sales |
| PharmacyPOS | Till, Prescriptions, Stock by batch |
| Route SalesPOS | My journey, Sales on the road, Sync |
A RetailPOS till that sells offline is registered and approved like any till. A Route SalesPOS agent installs the app on their phone: it is the phone that records sales and new customers where there is no network (see Route SalesPOS).
Some steps happen in the browser’s or the phone’s own windows — Chrome’s install question, Android’s and Apple’s home-screen menus. Those windows belong to the browser, not to JupitaPos, so this manual describes them in words; the pictures show JupitaPos itself.
Install JupitaPos on a Windows till or laptop
Purpose
Give a counter till or an office laptop its own JupitaPos app: one click to open, full screen, and ready to keep selling offline.
Role / permission required
Everyone who can sign in: installing is done by the browser and needs no permission. The person who sets up the till is usually a supervisor or a manager.
Prerequisites
- Google Chrome or Microsoft Edge, up to date, on Windows (a Chromebook or a Mac works the same way).
- Your JupitaPos address, for example
https://pos.your-restaurant.com. - A user account to sign in with (see Sign in).
Steps
- Open Chrome or Edge and go to your JupitaPos address.
- Sign in with your e-mail and password.
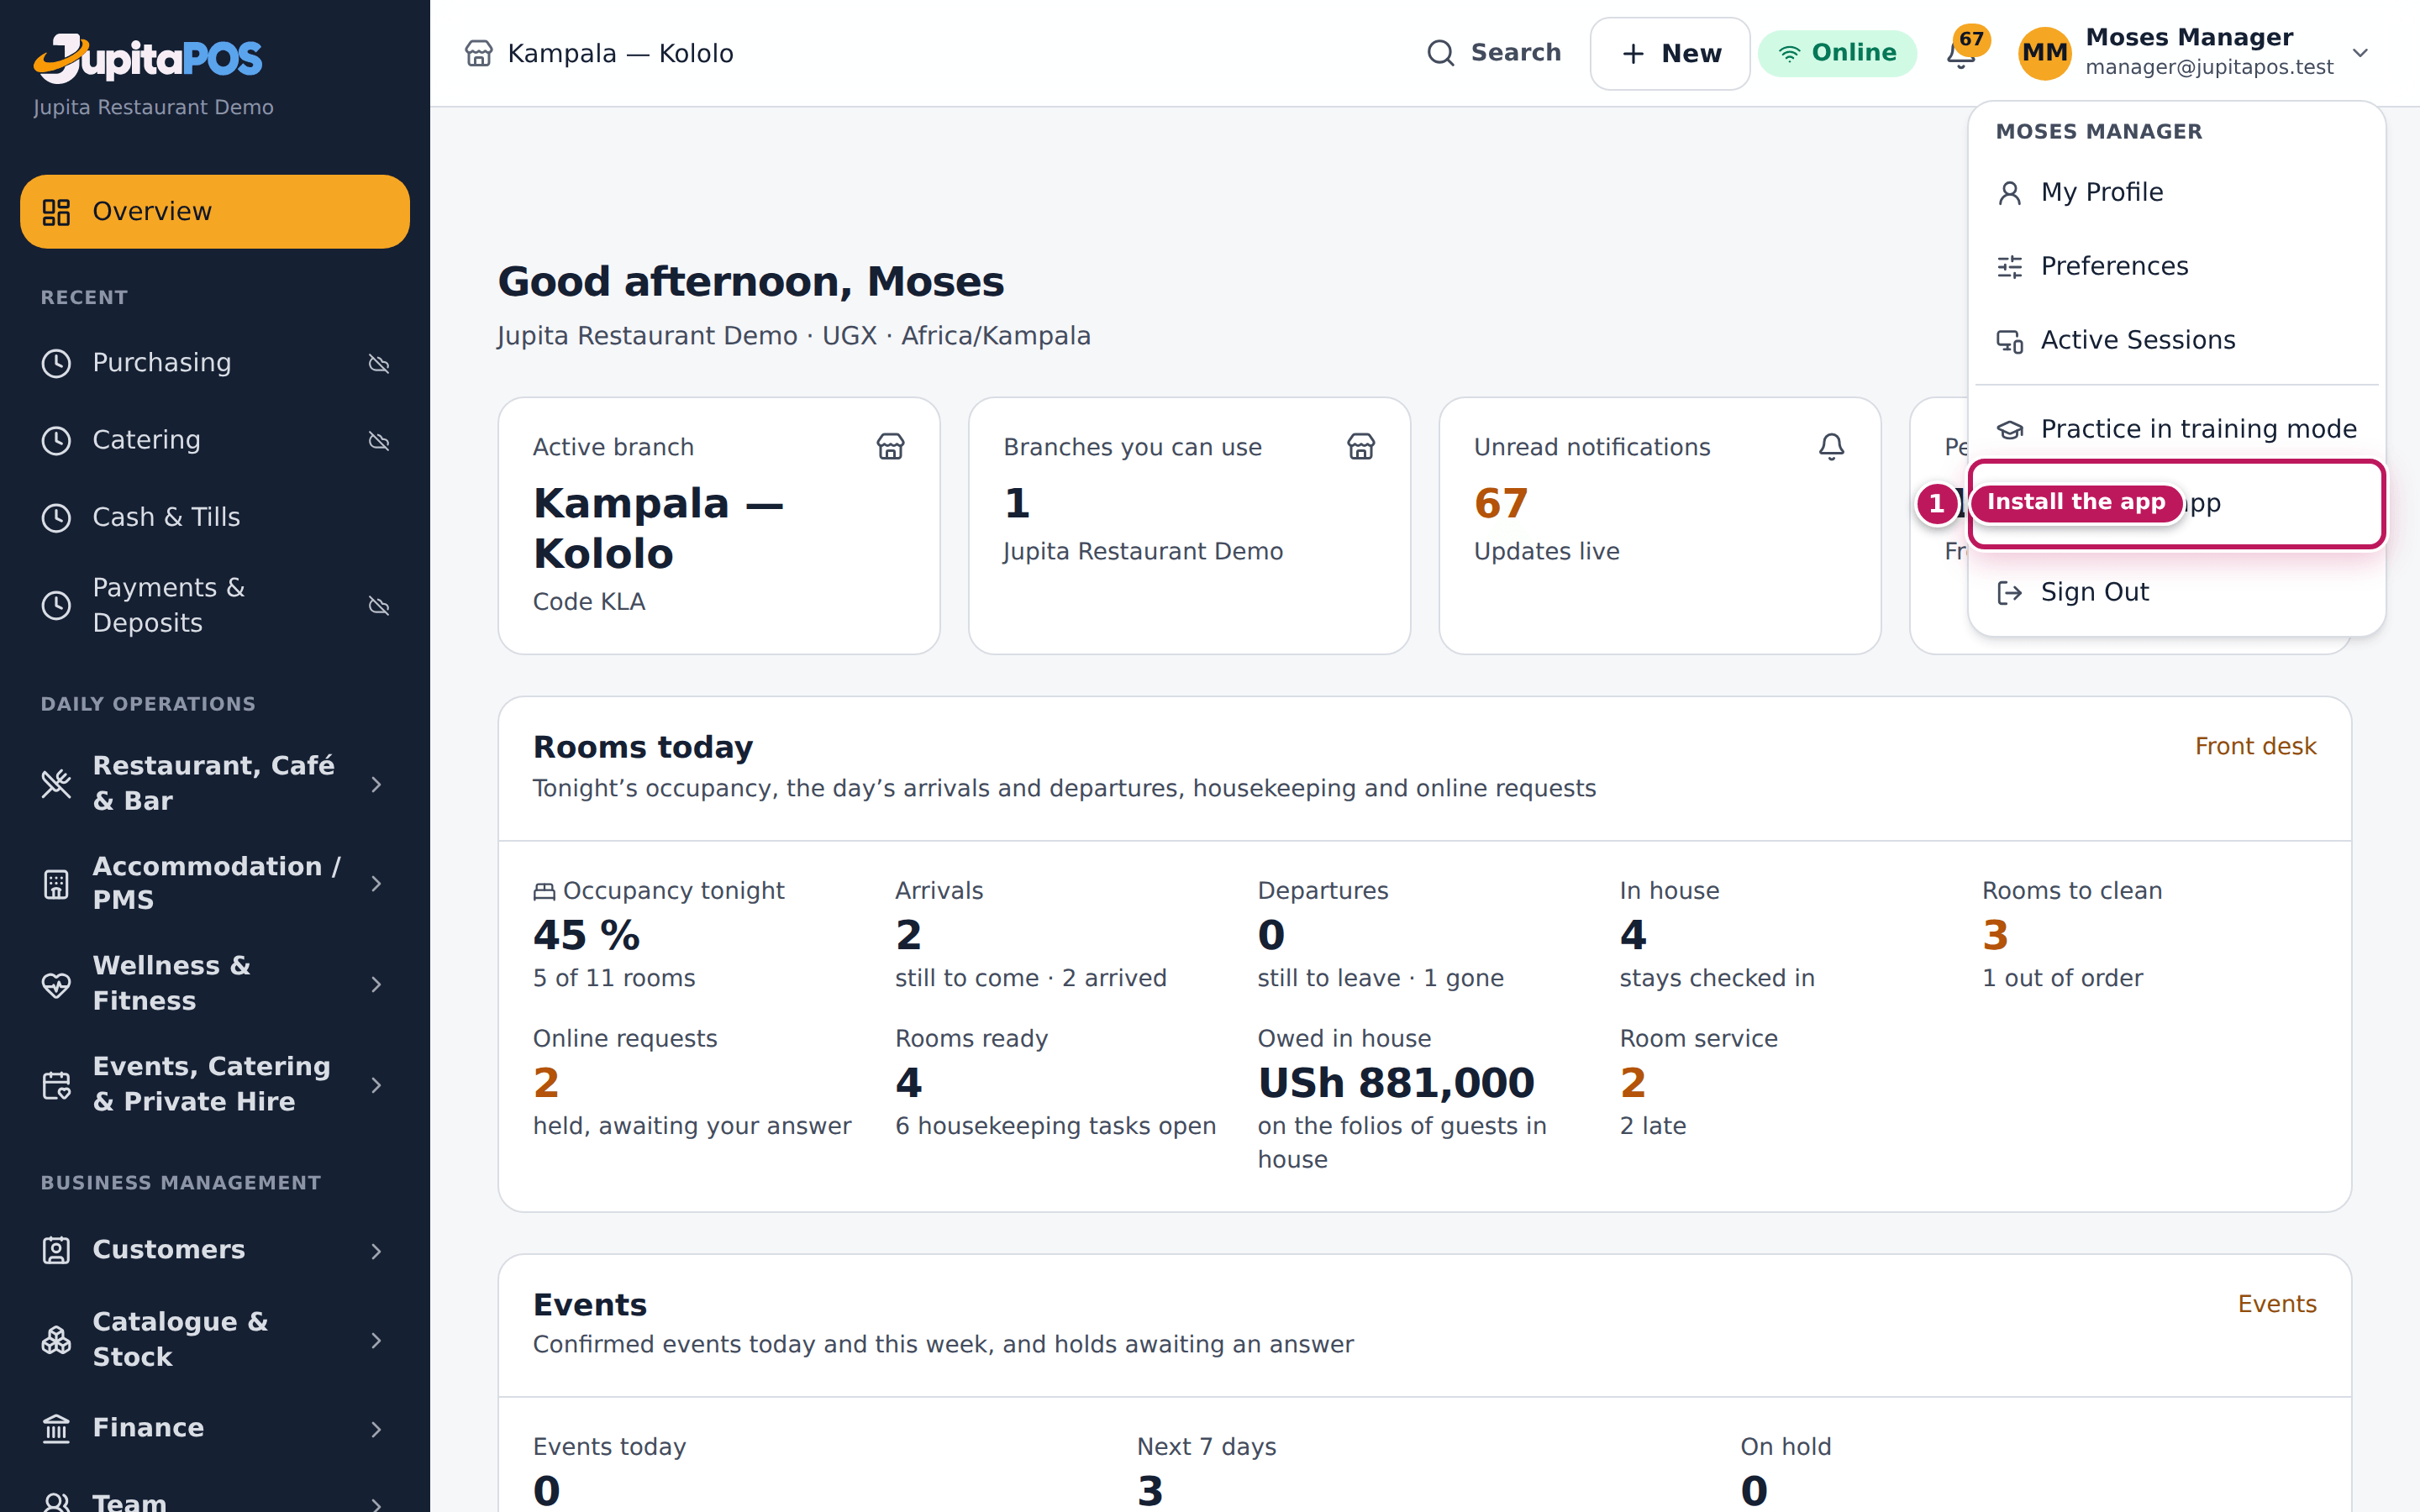
- Click your name at the top right and choose Install the app (1). The entry appears when the browser can install the app; on a till’s full screen the same offer is the download arrow, Install JupitaPos Hospitality Suite as an app, next to your name. (In Chrome you can also click the install icon at the right end of the address bar; in Edge, Apps → Install this site as an app.)
- The browser asks whether to install JupitaPos. Click Install.
- JupitaPos opens in its own window. Close the browser tab you started from.
- Pin the app to the taskbar: right-click the JupitaPos icon on the taskbar and choose Pin to taskbar.
Expected result
JupitaPos has its own icon on the desktop, in the Start menu and on the taskbar, and opens in its own window without an address bar. Right-clicking the icon offers Point of sale, Floor plan and Offline sync (the installed app’s own shortcuts). Install the app no longer shows in the profile menu.
Screenshot
Common mistakes
- Using a private (incognito) window. A private window cannot install apps and forgets everything when it closes — including a till’s registration. Use a normal window.
- Installing in a different Windows user or browser profile from the one staff use. The app, its offline data and the till’s registration belong to one browser profile. Install and register in the profile the till will always use.
- Keeping the browser tab open next to the app. Use only the app, so that there is one till, not two.
Troubleshooting
- There is no Install button. The app is already installed (open it
from the Start menu), the browser is not Chrome or Edge, or the page is
not on its secure
httpsaddress. Check the address with your manager. - The app opens the sign-in page every morning. Sign-ins last up to 12 hours. Staff sign in again at the start of each shift, or use their PIN on an approved till.
FAQ
How do I remove the app? In the app, open the menu at the top right of its window (⋮) and choose to uninstall; or remove it like any Windows app. Removing the app does not delete anything on the server, but sales still waiting to be sent from an offline till would be lost — check Offline sync first.
Install on an Android tablet or phone
Purpose
Put JupitaPos on the home screen of a waiter’s phone or a counter tablet, so it opens full screen with one tap.
Role / permission required
Everyone who can sign in: installing needs no permission.
Prerequisites
- Google Chrome on Android, up to date.
- Your JupitaPos address and a user account.
Steps
- Open Chrome on the phone or tablet and go to your JupitaPos address.
- Sign in.
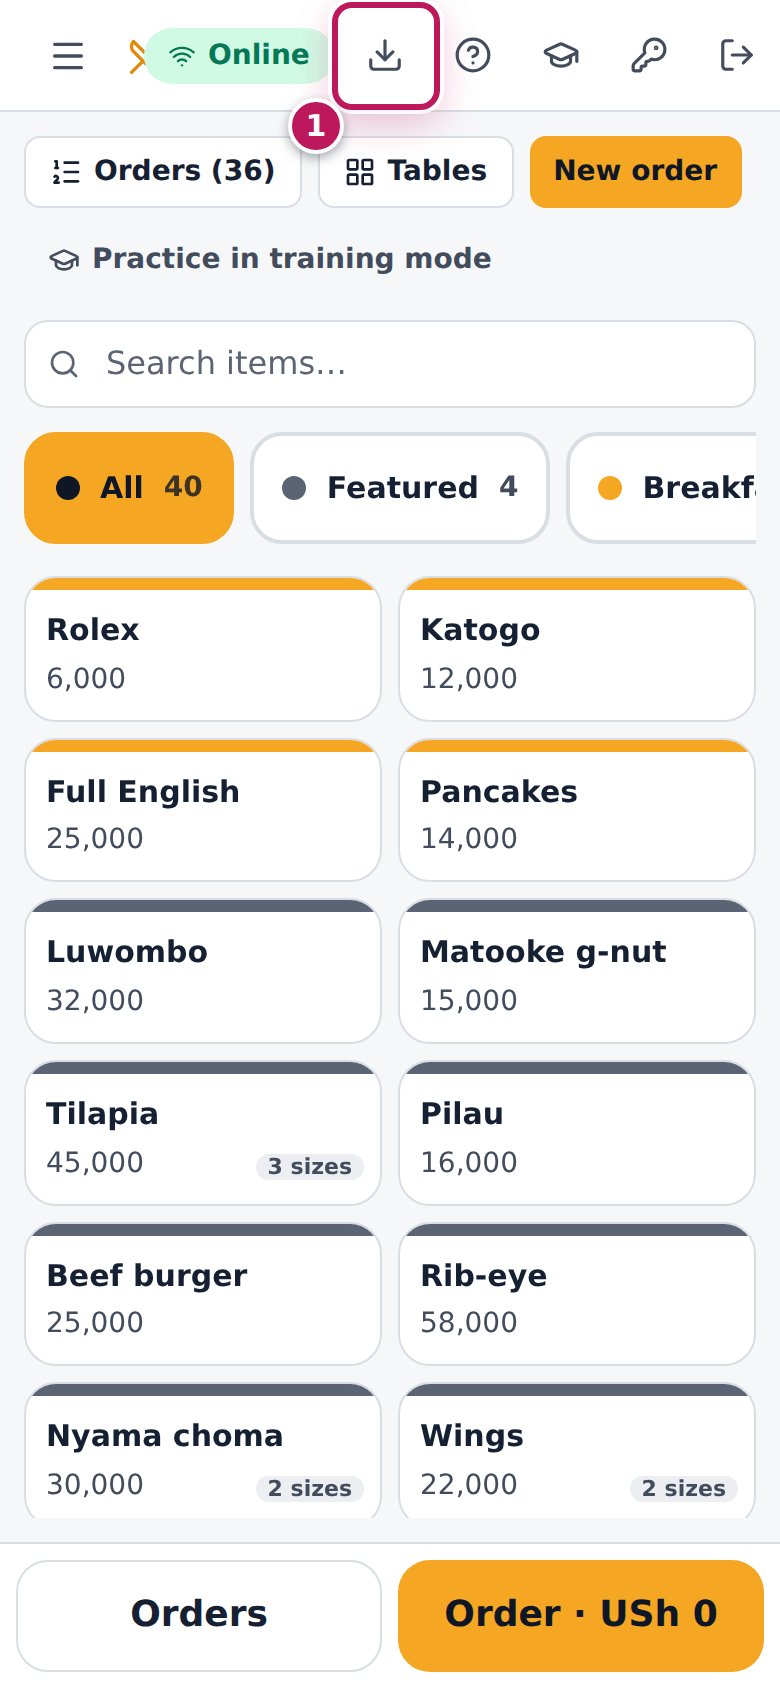
- Tap Install JupitaPos Hospitality Suite as an app (1), the download arrow at the top right of the till (on a back-office page: your name, then Install the app). If you do not see it, open Chrome’s menu (⋮ at the top right) and tap Install app or Add to Home screen.
- Chrome asks whether to install JupitaPos. Tap Install.
- Find the JupitaPos icon on the home screen or in the app drawer, and move it where staff will find it.
Expected result
Tapping the JupitaPos icon opens the app full screen, without Chrome’s address bar. Pressing and holding the icon offers Point of sale, Floor plan and Offline sync.
Screenshot
Common mistakes
- Adding a bookmark instead of installing. A bookmark opens a browser tab; the installed app is full screen and keeps its offline data. Use Install app.
- Installing on a phone with battery saving that closes Chrome. An app that is closed in the background cannot send offline sales. Exclude Chrome from battery optimisation on tills and waiters’ phones.
Troubleshooting
- Chrome’s menu has only Add to Home screen. Some phones name it so; it installs the same app.
- The icon opens a normal Chrome tab. It is a shortcut, not the app. Remove it and install again from Chrome’s menu.
Add to the Home Screen on an iPad or iPhone
Purpose
Put JupitaPos on the Home Screen of an iPad at the counter or a waiter’s iPhone, so it opens full screen like an app.
Role / permission required
Everyone who can sign in: adding it needs no permission.
Prerequisites
- Safari on the iPad or iPhone, up to date. Other browsers on Apple devices may not offer Add to Home Screen.
- Your JupitaPos address and a user account.
Steps
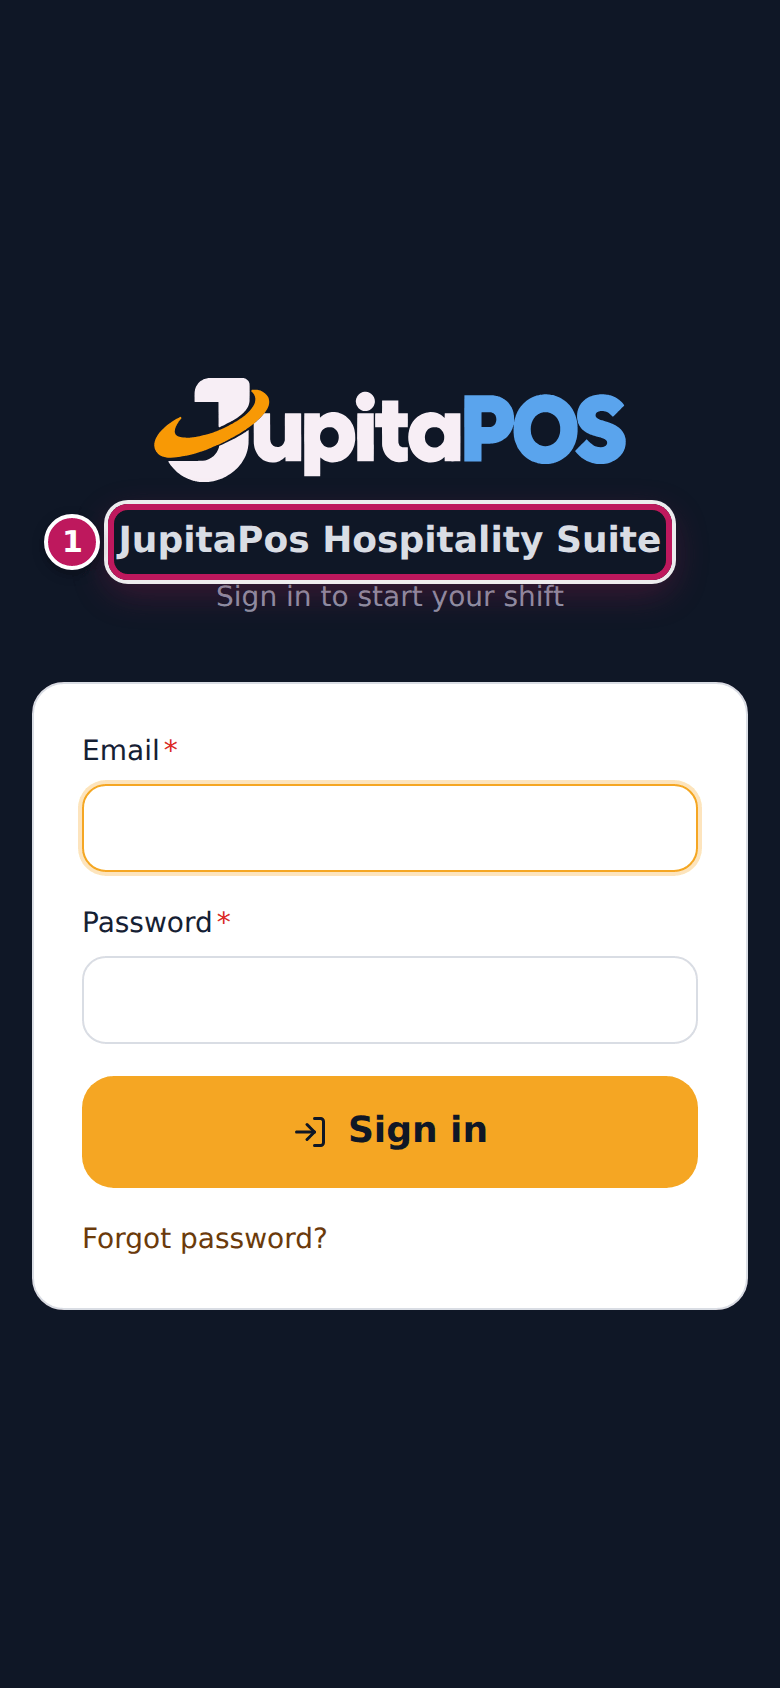
- Open Safari and go to your JupitaPos address. The Sign in page opens (1).
- Tap Safari’s Share button (the square with an arrow pointing up).
- Scroll down and tap Add to Home Screen.
- Keep the name JupitaPos and tap Add.
- Close Safari and open JupitaPos from its new Home Screen icon.
- Sign in.
Expected result
JupitaPos opens full screen from its Home Screen icon, without Safari’s address bar, on the same Sign in page. There is no Install the app entry and no download arrow on an iPad or iPhone: Safari installs only from its Share menu.
Screenshot
Common mistakes
- Adding a bookmark or a Safari tab group instead. Only Add to Home Screen gives the full-screen app with its own icon.
- Signing in in Safari and expecting the app to be signed in too. The Home Screen app keeps its own sign-in and offline data, separate from Safari. Sign in in the app.
Troubleshooting
- There is no Add to Home Screen in the Share menu. Scroll the list down, or tap Edit Actions to add it. If it is still missing, open the address in Safari rather than in another browser.
- The Home Screen app shows the sign-in page although Safari is signed in. The app and Safari keep separate sign-ins. Sign in in the app.
Register this device as a till
Purpose
Tell JupitaPos that this tablet, till or phone is one of the restaurant’s devices, so that a manager can approve it for PIN sign-in, the lock screen and selling offline.
Role / permission required
Supervisors and managers (terminals.register). Only a manager can then
approve it (see Approve a new till).
Prerequisites
- JupitaPos is installed on the device (see Install on Windows, Android or iPad and iPhone).
- You are signed in on the device itself, in the branch the till will work in.
Steps
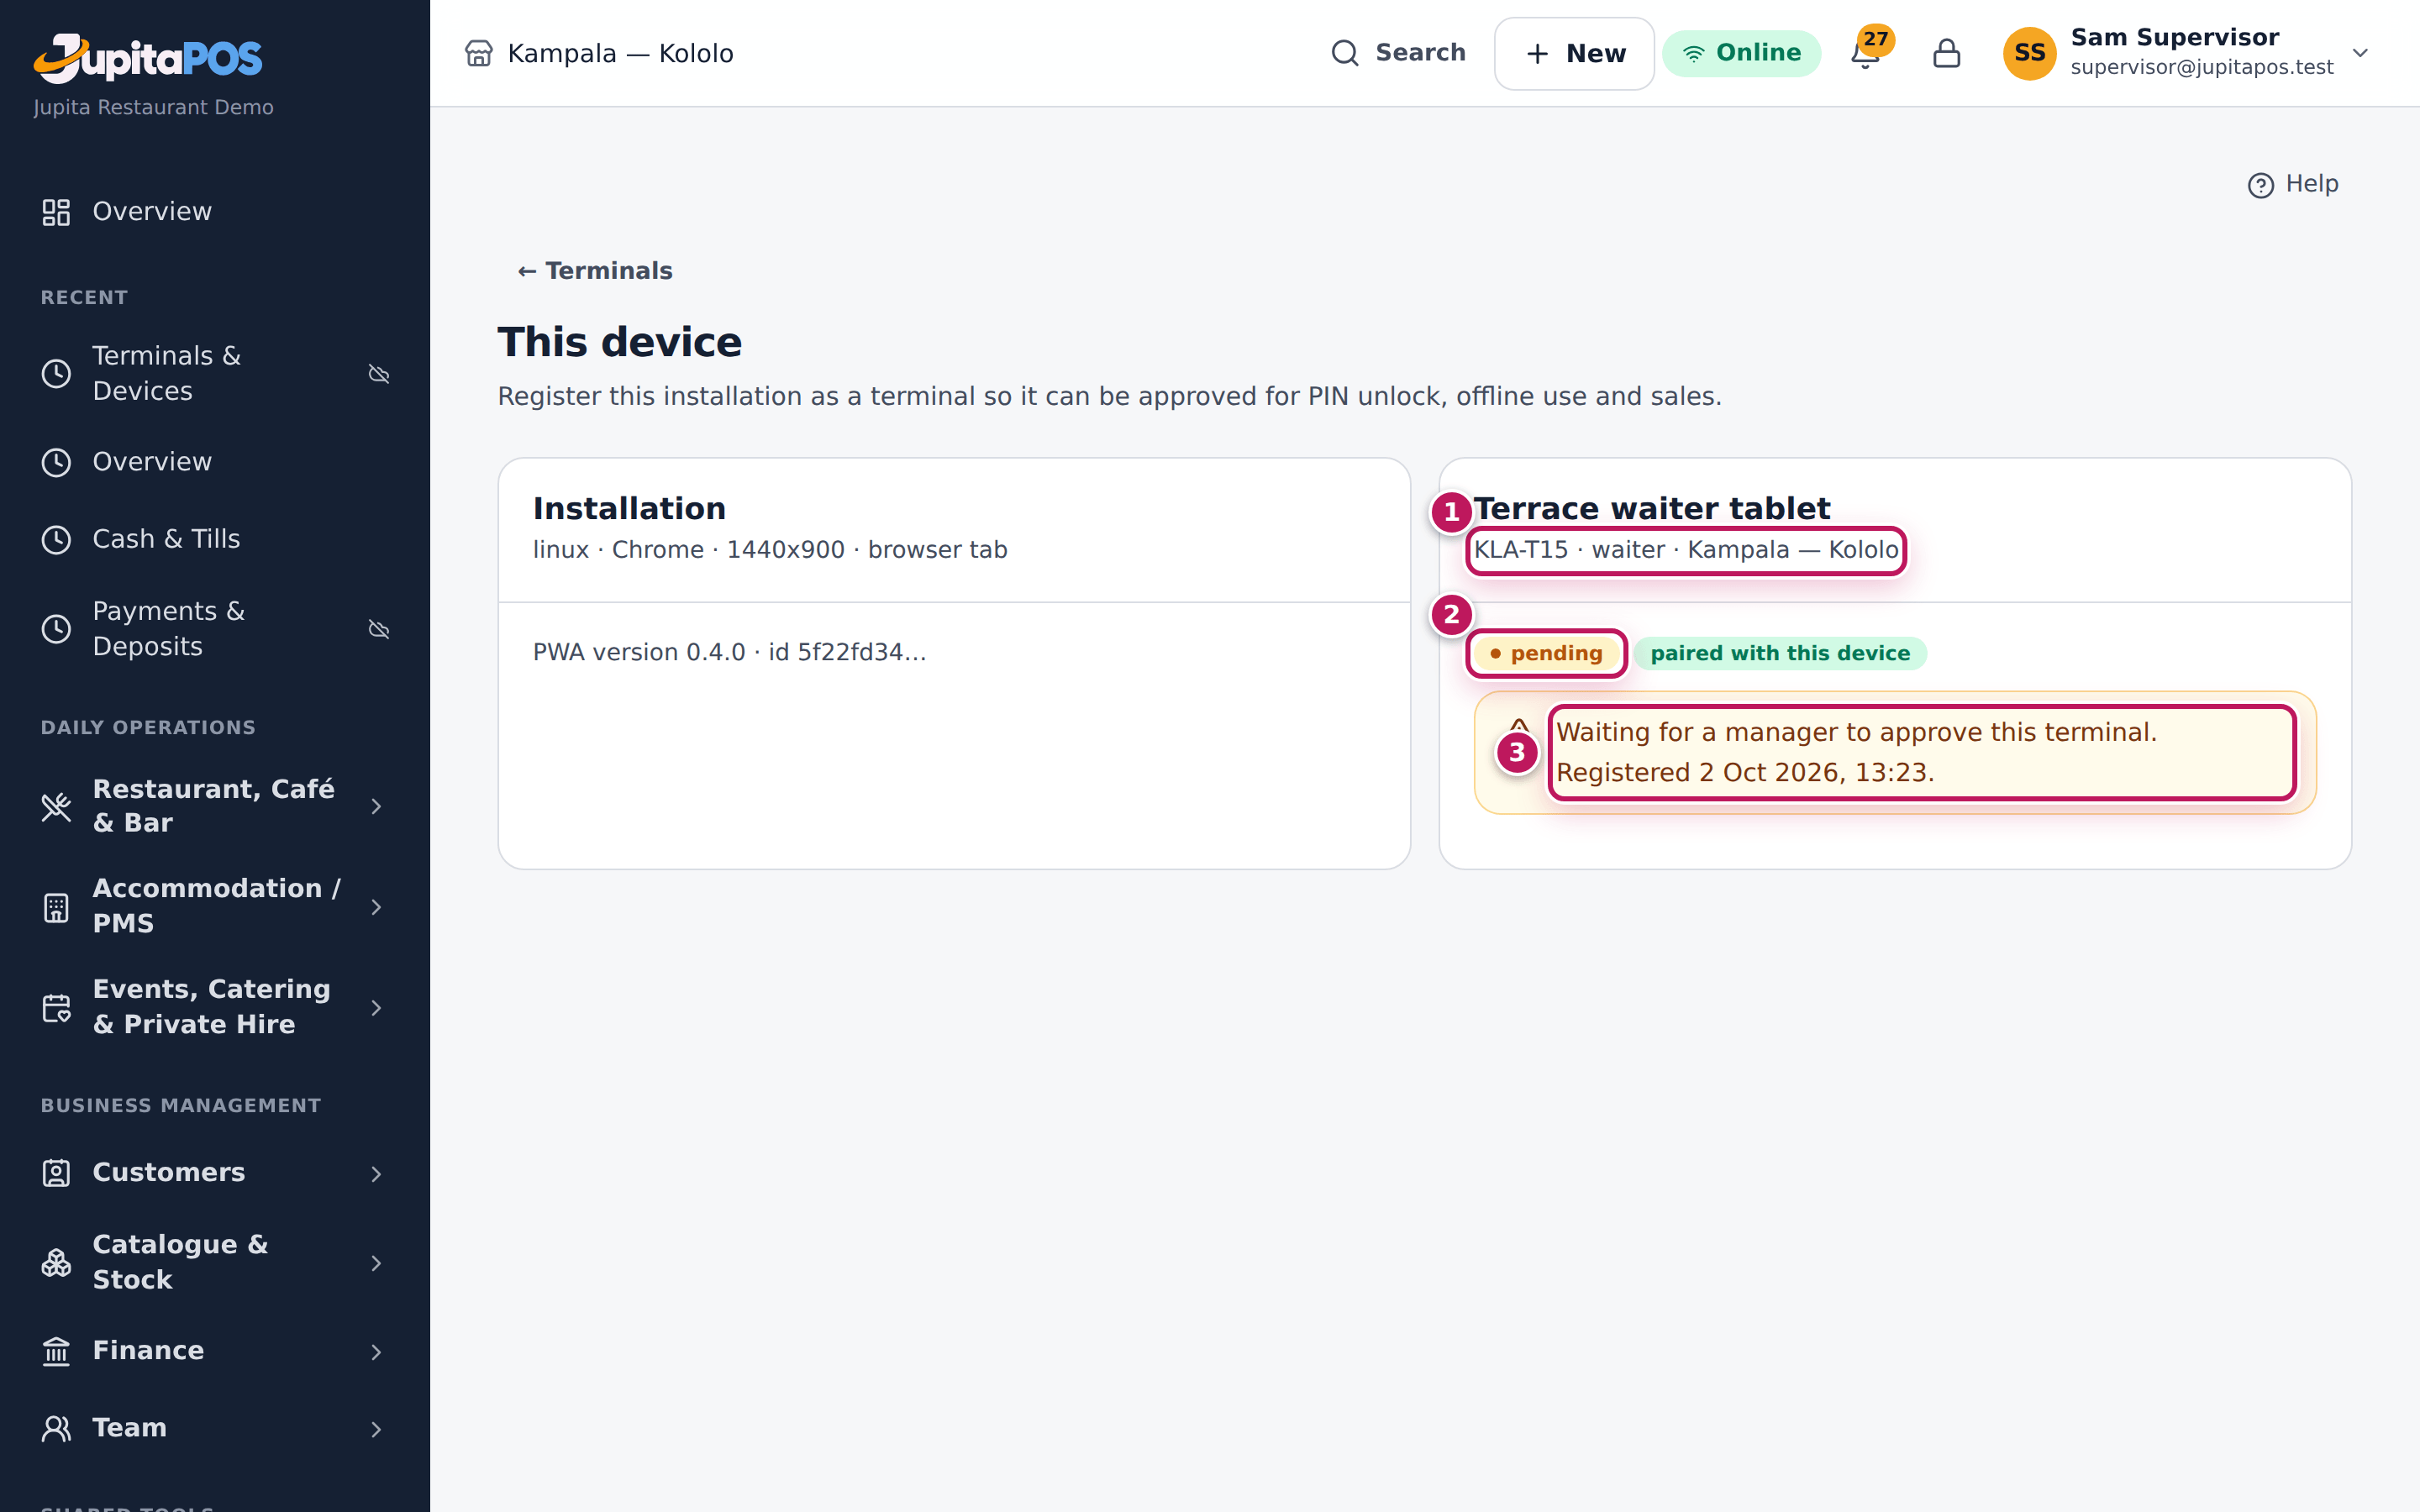
- On the device, open Terminals from the menu and tap
This device at the top right (or open
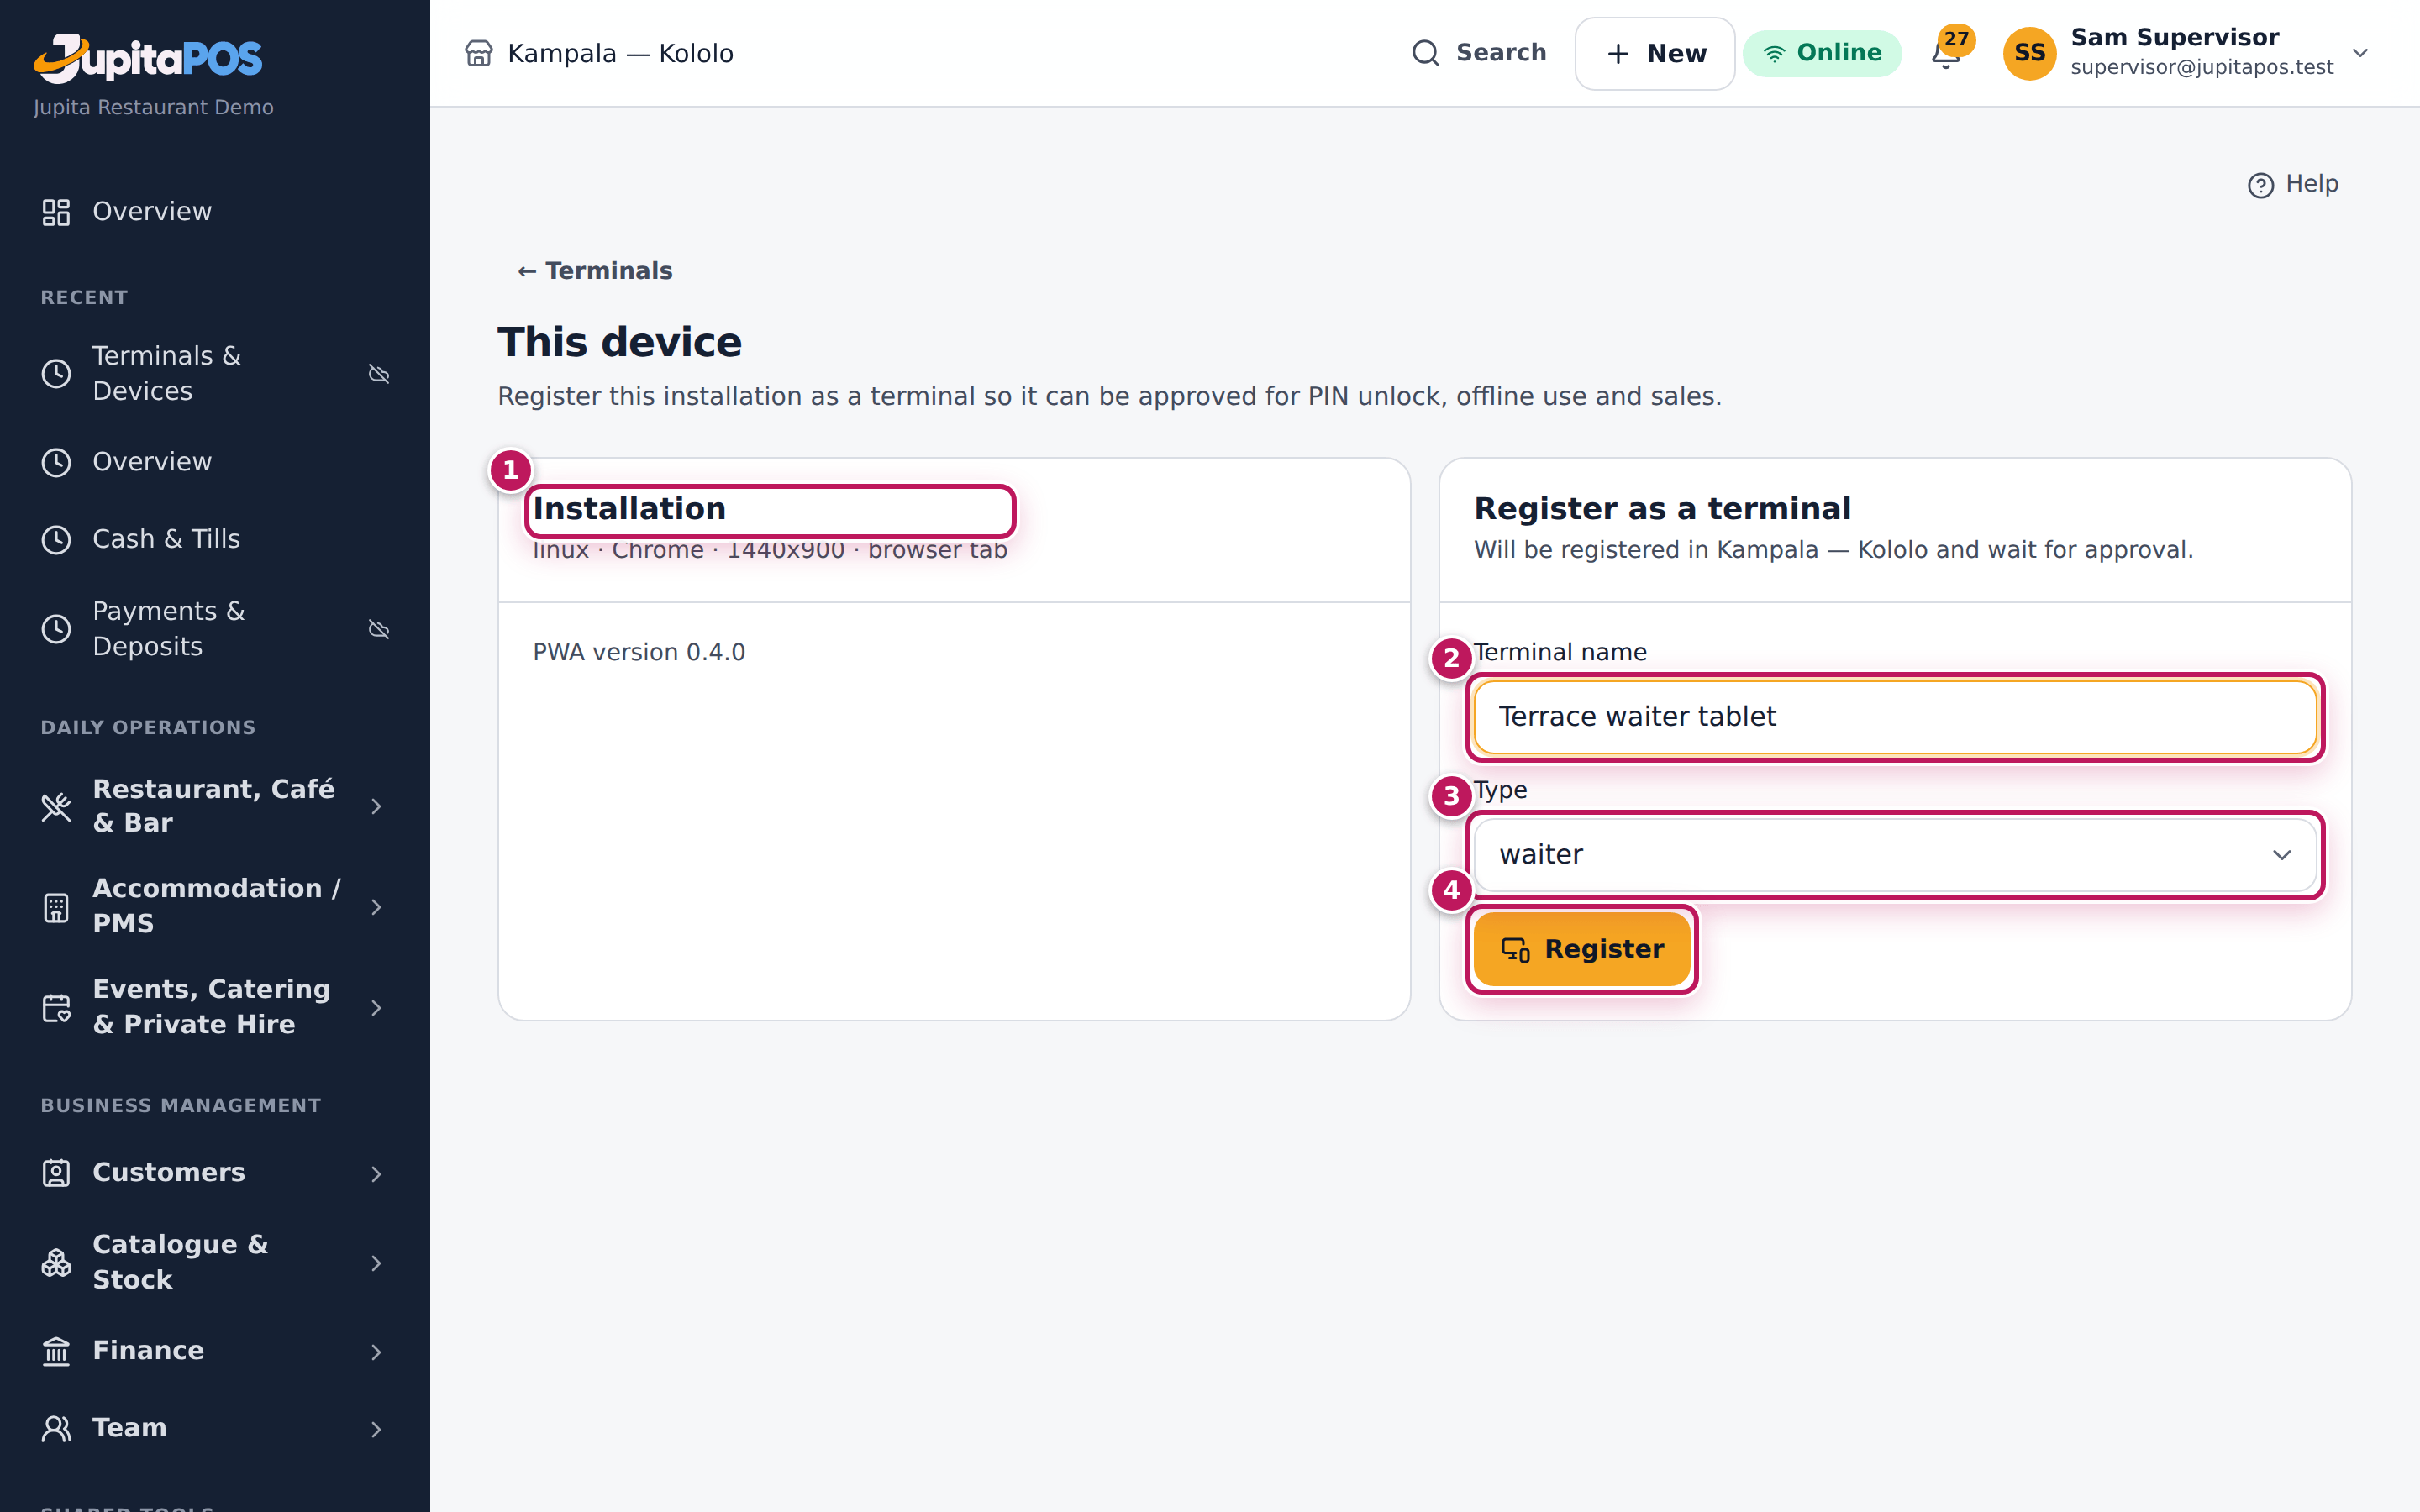
/terminal). - Check the Installation card (1): it describes this device and browser, and whether it runs as the installed app.
- Under Register as a terminal, type a clear name in Terminal name (2), for example Terrace waiter tablet: staff and managers will see it on every screen and report.
- Choose the Type (3): pos for a till, waiter for a waiter’s tablet or phone, kds for a kitchen screen, back office for an office PC.
- Tap Register (4).
Expected result
The card now shows the till’s code, its type and branch — for example KLA-T12 · waiter · Kampala — Kololo (1) — with pending (2), paired with this device, and Waiting for a manager to approve this terminal (3). A manager sees it at the top of Terminals.
Screenshot
Common mistakes
- Registering from another computer. Registration belongs to the device and browser it is done on. Do it on the till itself.
- Registering in the wrong branch. The till is registered in the branch shown on the card (Will be registered in …). Switch branch first if needed; a manager can also move it when approving.
- Giving tills vague names. “Tablet” says nothing on a report. Name it after its place and use: Rooftop bar till, Terrace waiter tablet.
Troubleshooting
- “Your role cannot register terminals. Ask a supervisor or manager to do it on this device.” You are signed in as a cashier or waiter. A supervisor or manager signs in on the device to register it.
- “This terminal was registered before device pairing. Pair it now so PIN sign-in, offline sales and sync keep working.” Tap Pair this device.
- “This terminal is paired with another device.” Another device holds this till’s key — the app was reinstalled or the browser profile copied. Tap Forget this registration and register this device as a new till.
- “The terminal this device was registered as has been revoked.” A manager revoked it. Tap Forget registration and register again if the device should still be used.
Approve a new till
Purpose
Decide which devices may work as the restaurant’s tills: approve a newly registered tablet or till, choose its branch, allow it to sell offline and, if you want, limit who may use it.
Role / permission required
Branch managers, general managers and owners (terminals.approve, a
sensitive permission: sign in with your password, not a PIN).
Prerequisites
- The device has been registered and is pending (see Register this device as a till).
Steps
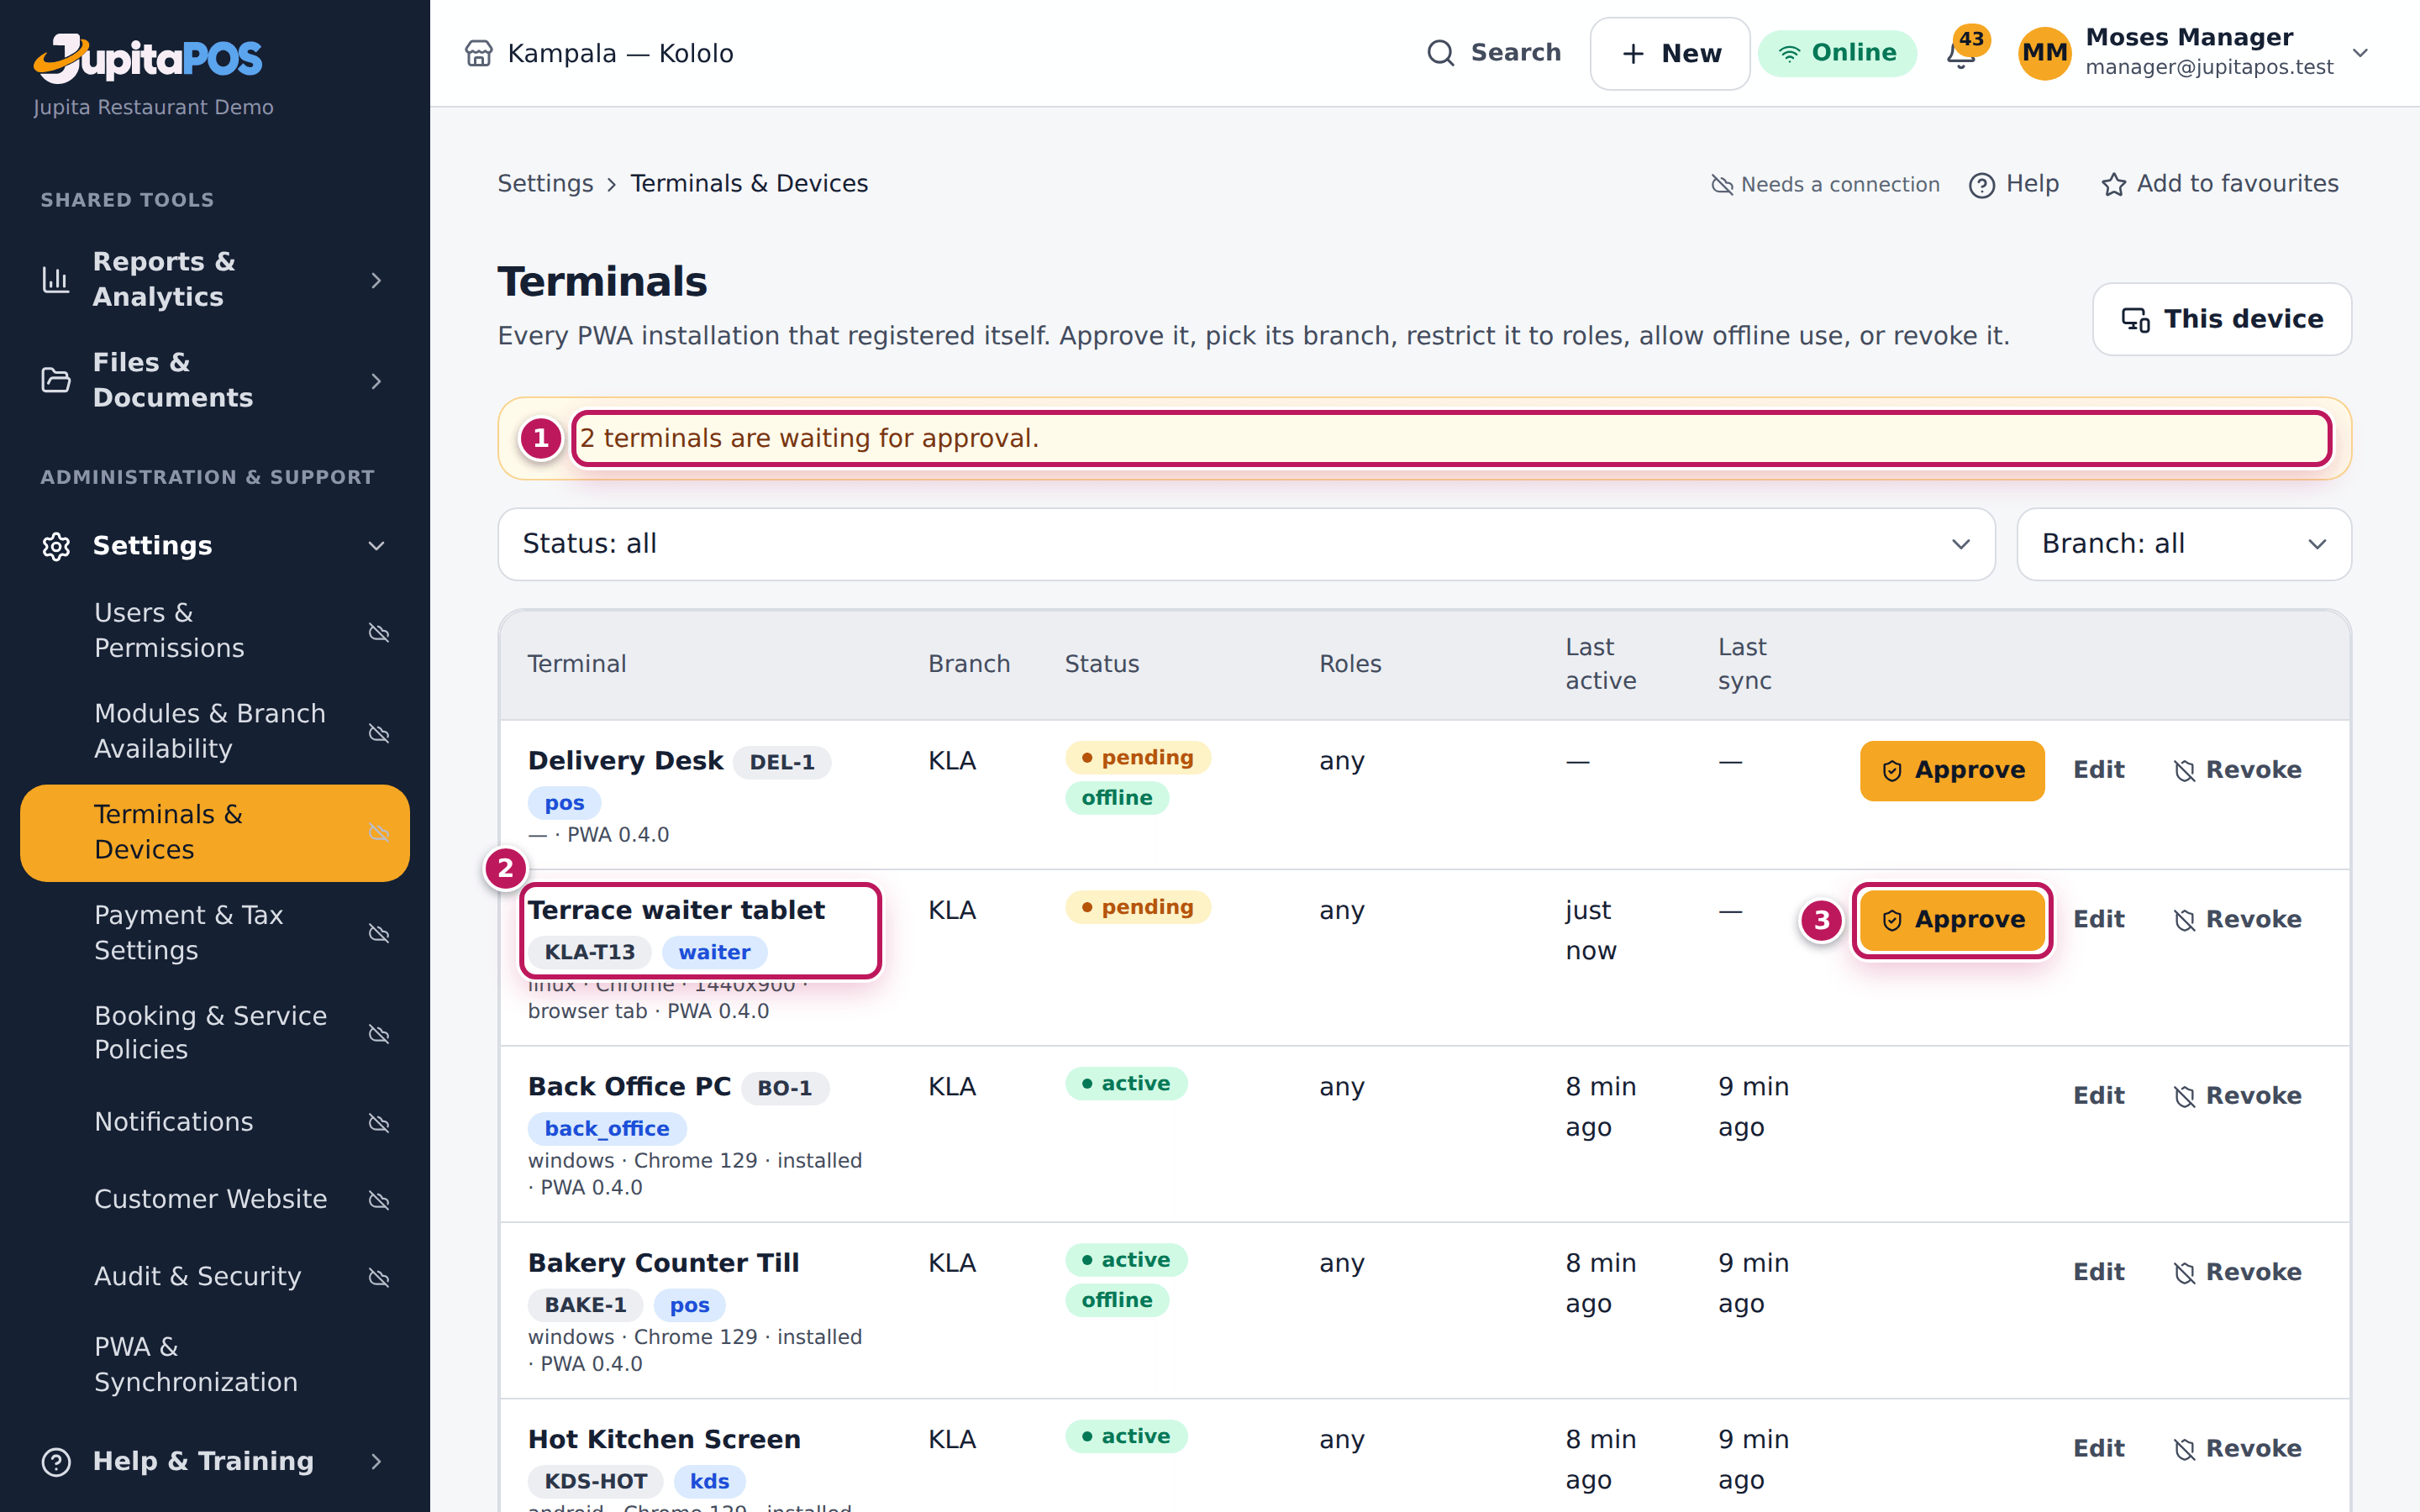
- Open Terminals from the menu. A yellow message says how many terminals are waiting for approval (1).
- Find the new till, Terrace waiter tablet (2), marked pending, and tap Approve (3).
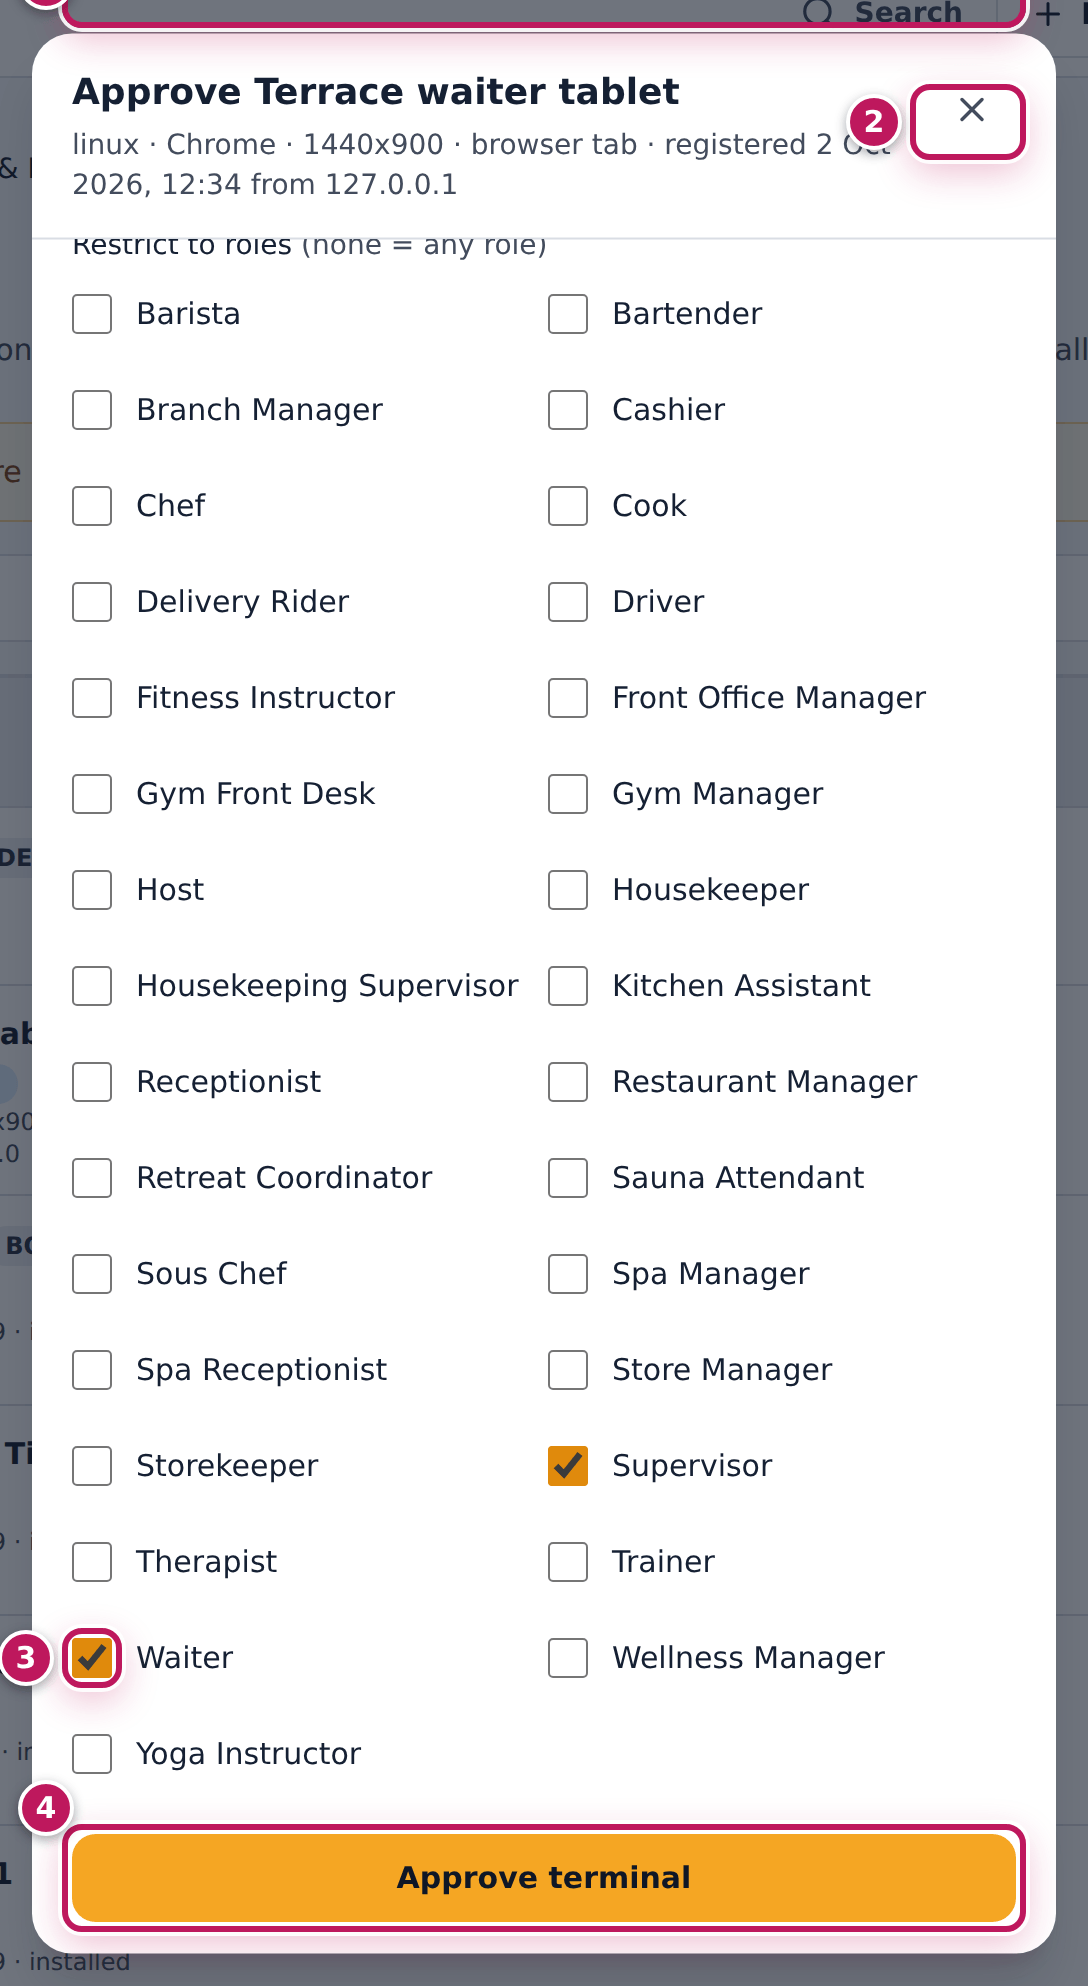
- Check the Branch (1).
- Leave Offline enabled on (2) for a till or a waiter’s tablet, so staff keep selling when the internet drops. It is already on for the types pos and waiter.
- To limit who may use this device, tick roles under Restrict to roles (3) — here Waiter and Supervisor. Leave all unticked to allow every role.
- Tap Approve terminal (4).
Expected result
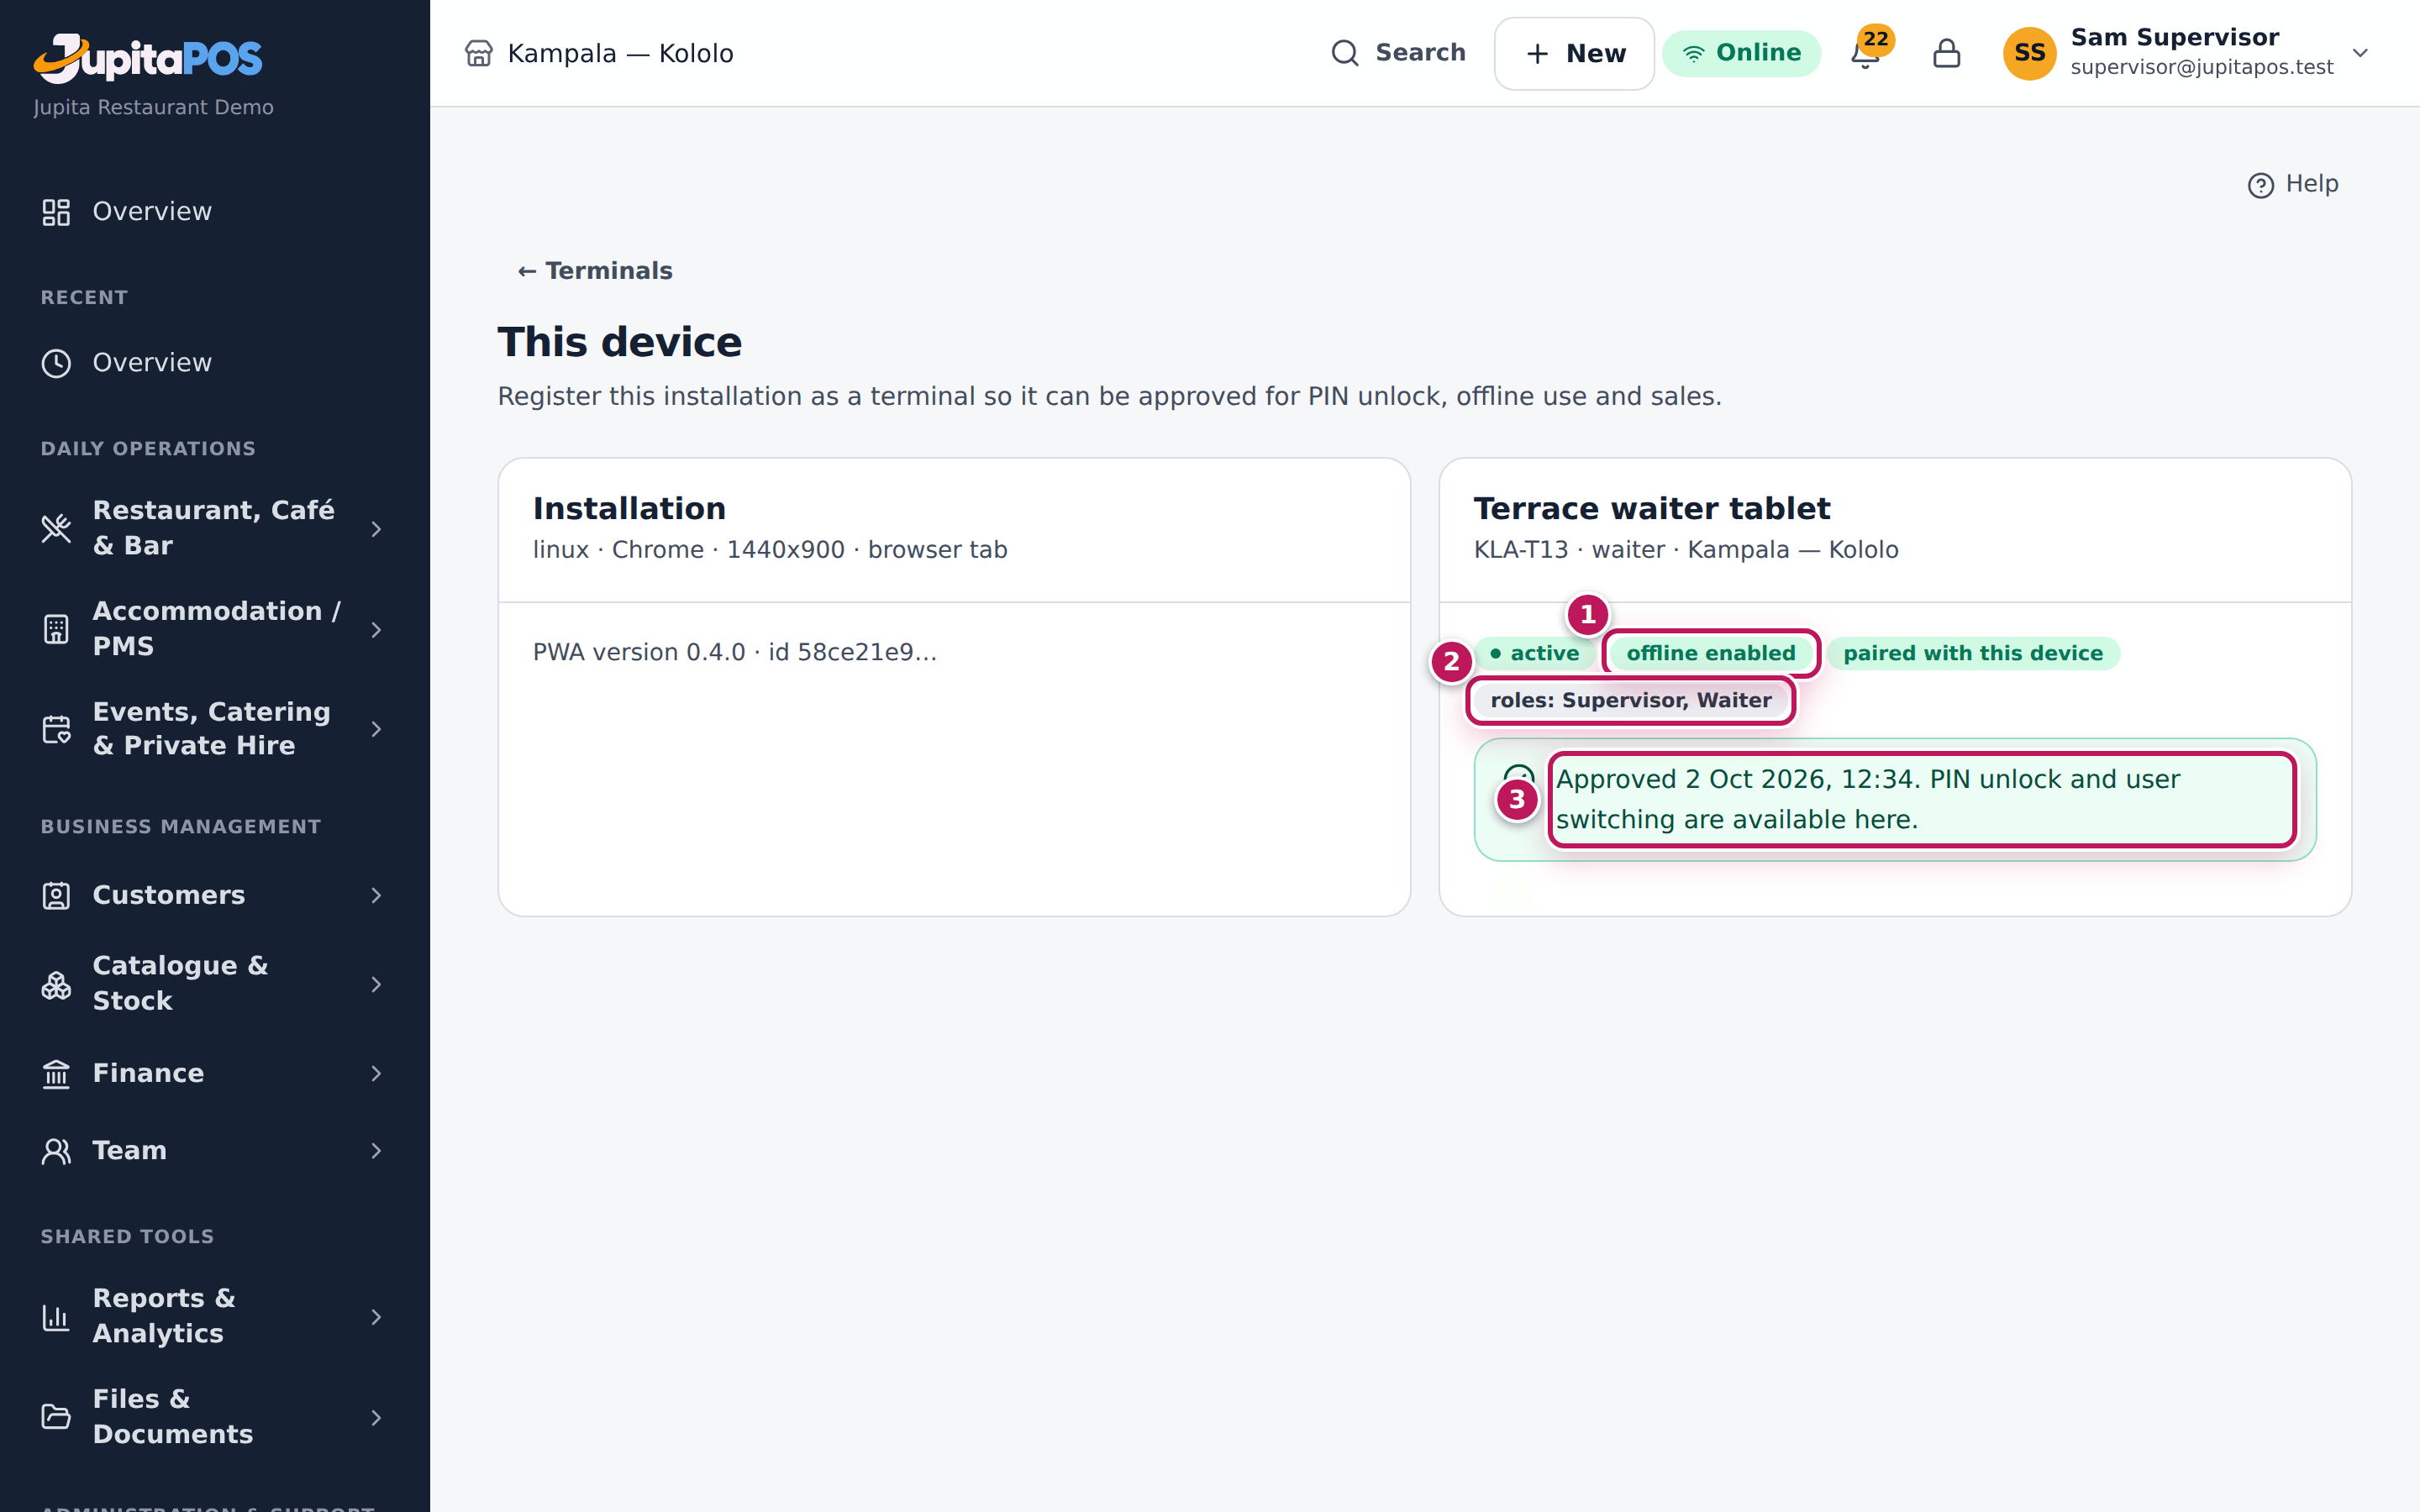
JupitaPos says Terrace waiter tablet approved.; the till shows active and offline in the list. On the tablet, This device now shows offline enabled (1), the roles (2) and Approved … PIN unlock and user switching are available here. (3). Staff can sign in there with their PIN (see Sign in with your PIN).
Screenshot
Common mistakes
- Approving a device you do not recognise. The dialog shows the device, browser, time and network it registered from. If you did not expect it, tap Revoke instead.
- Restricting a till to one role and locking out the supervisor. A restricted till refuses everyone else’s PIN. Tick every role that needs it — often the supervisor too.
- Switching Offline enabled off on a till that sells. It then stops selling when the internet drops.
Troubleshooting
- There is no Approve button. Your role cannot approve tills. Ask your branch manager.
- “This action needs a password sign-in.” You signed in with a PIN. Sign out and sign in with your e-mail and password.
- Staff get “Wrong number or PIN.” only on this till. The till is restricted to other roles. Tap Edit and change Restrict to roles.
FAQ
How do I take a till out of use? Tap Revoke on its row, give a reason and tap Revoke terminal. Every session on it ends at once and its offline data stops working. This cannot be undone: register the device again if it comes back.
Can I move a till to another branch? Yes: Edit → Branch. Moving a terminal ends its sessions and offline snapshots; staff sign in again.
Update to a new version
Purpose
Move a till to a new version of JupitaPos when it is released, safely — never in the middle of a sale and never with offline sales still on the till.
Role / permission required
Everyone signed in on the device. Updating needs no permission.
Prerequisites
- A new version has been released on your JupitaPos server (your system administrator does this).
- The till is online and has no offline sales waiting to be sent.
Steps
- Keep working: the new version downloads in the background by itself.
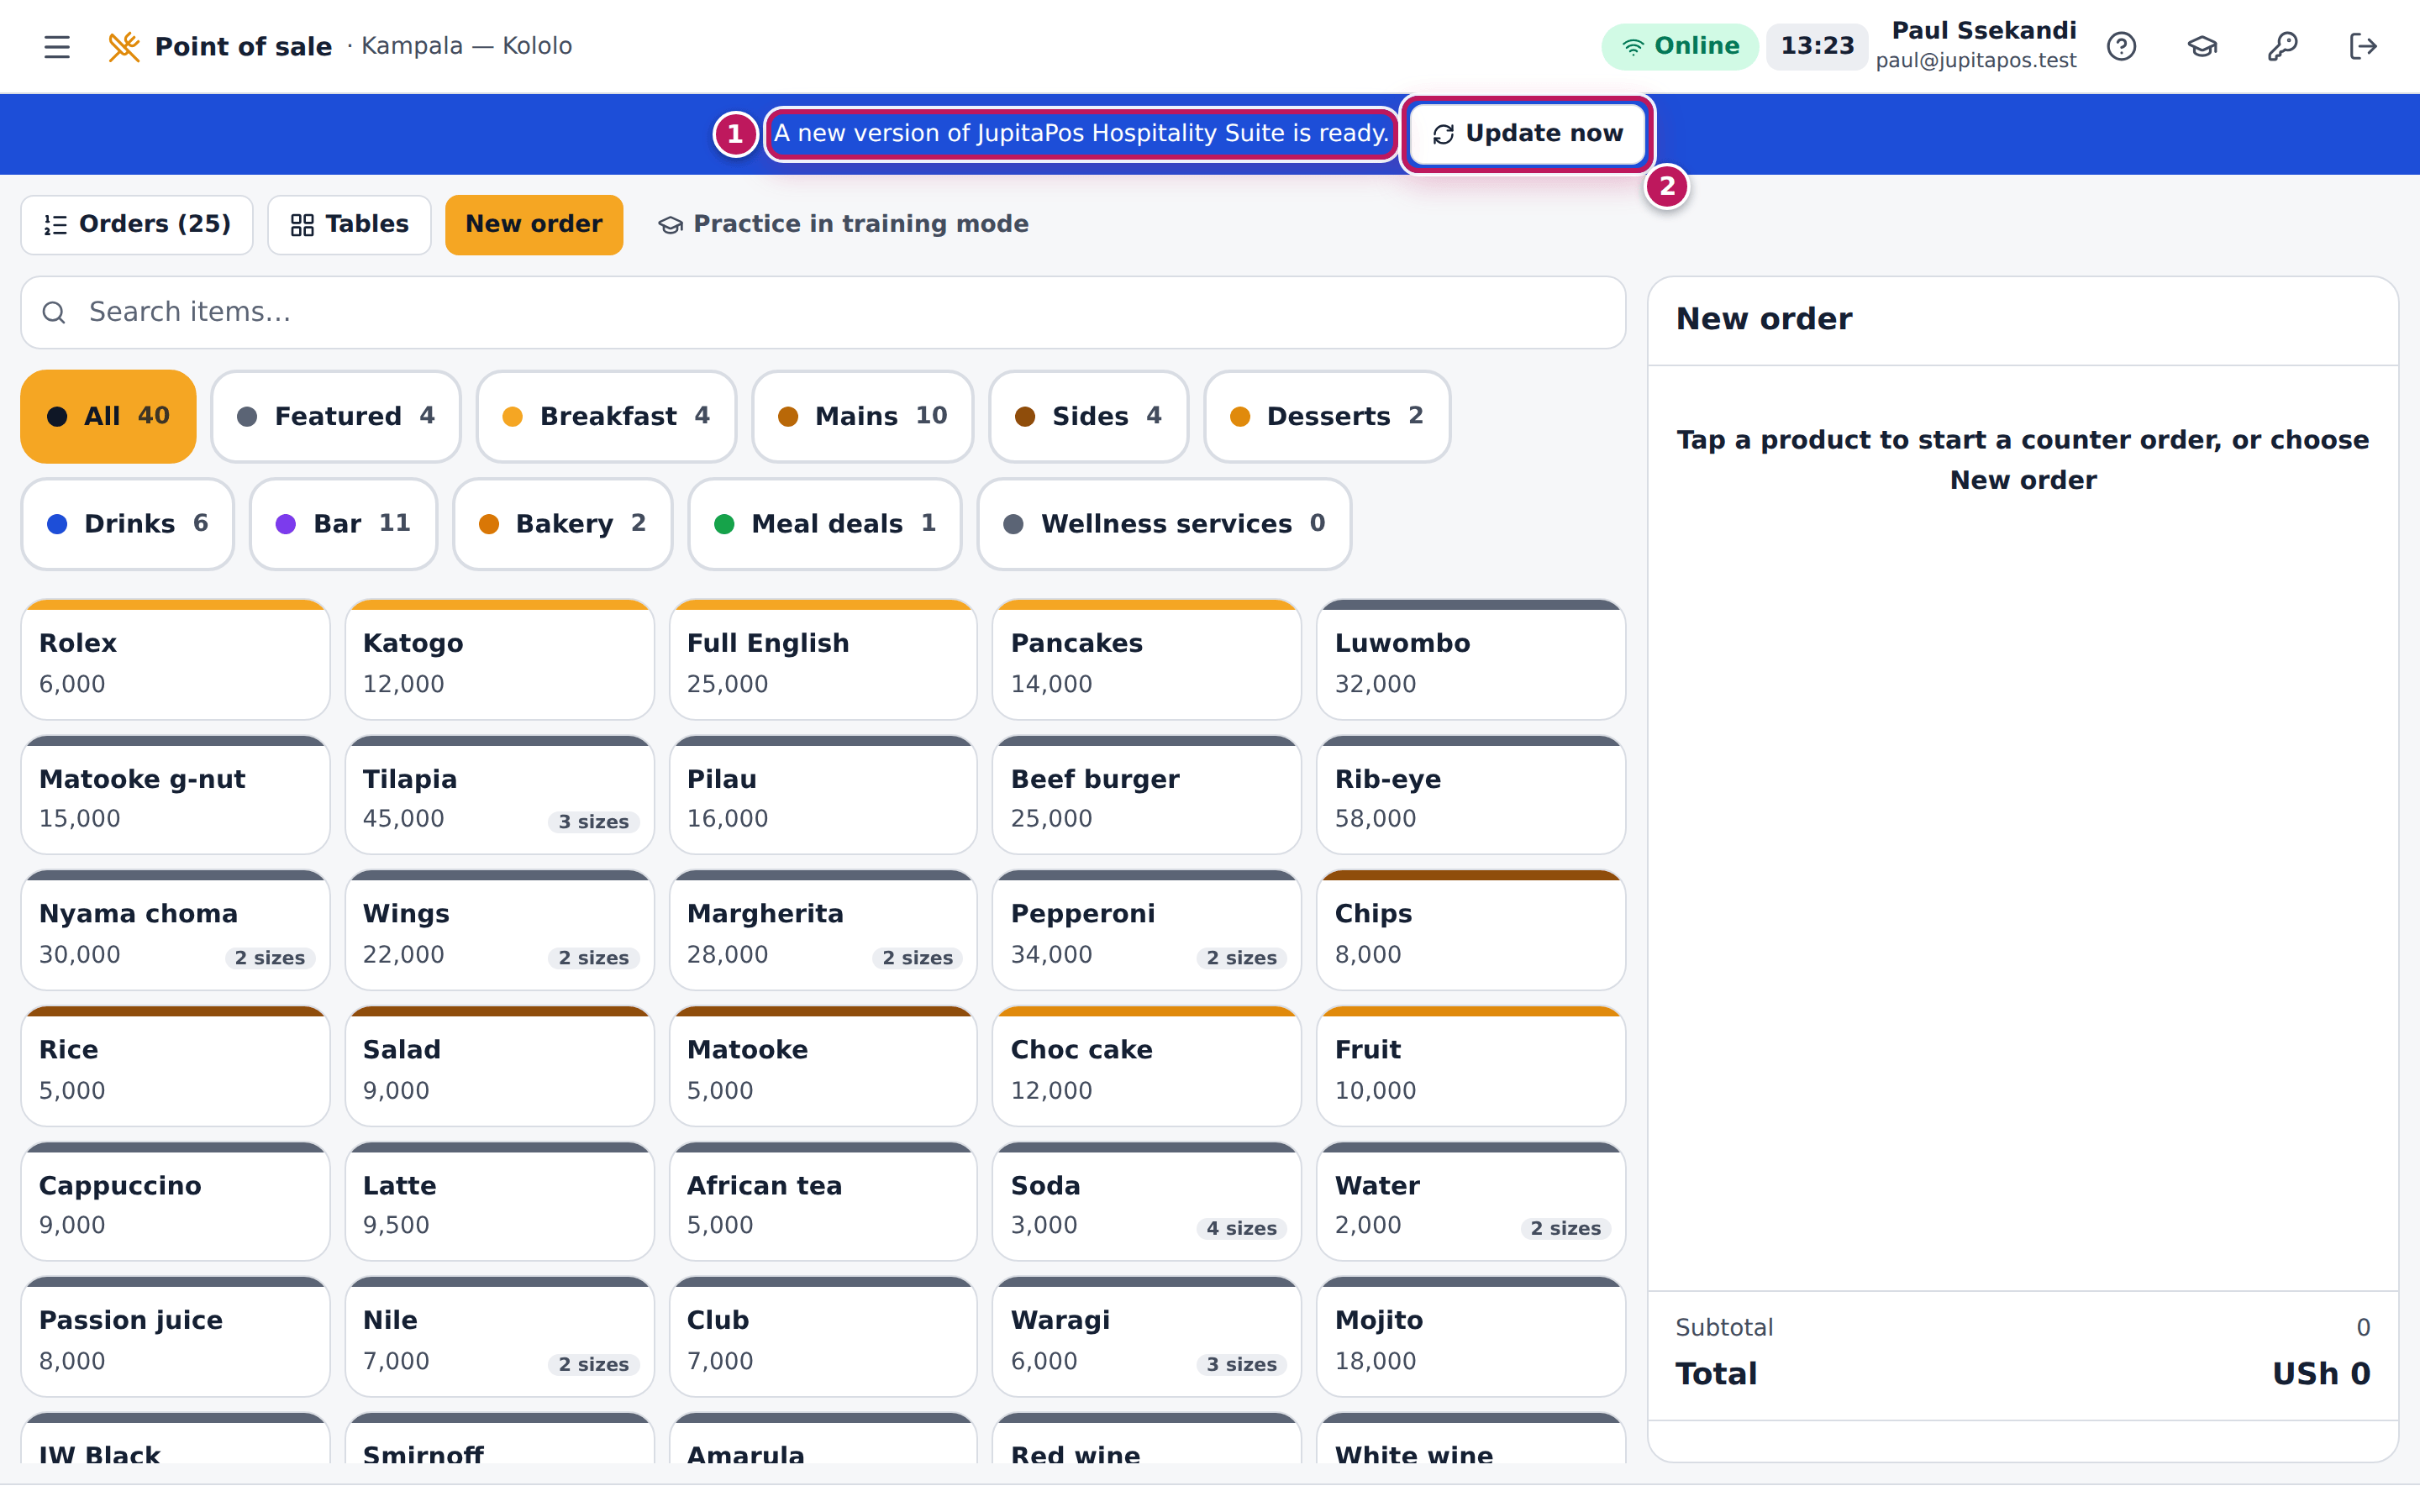
- When it is ready, a blue banner says A new version of JupitaPos is ready. (1).
- Finish the order you are on.
- Tap Update now (2).
- The app reloads on the new version in a few seconds.
Expected result
The till reloads on the new version and the banner is gone. Your sign-in, the order you had saved and the till’s offline data are kept.
Screenshot
Common mistakes
- Closing and reopening the app to “force” the update. The new version waits until someone taps Update now; closing the app does not skip that. Tap the button between two customers.
- Waiting days to update. A till on an old version can miss fixes the other tills already have. Update the same day.
Troubleshooting
- The banner says … it can be installed once offline work has synced. and Update now is greyed out. The till is offline, or sales taken offline are still waiting to be sent. The update waits so that nothing is lost. When the connection is back and the sync has finished, the button works (see What happens when the connection returns).
- No banner, but colleagues have the new version. The till checks for updates when it comes back to the screen and every hour. Close and reopen the app, then wait a minute.
FAQ
Which version is this till on? This device shows it on the Installation card (PWA version …); Terminals shows it for every till.