

On this page
- Read the floor plan
- Start a table order
- Send to the kitchen and fire courses
- Move a table or hand it to another waiter
- Merge tables for a big party
- Split the bill by seat or items
- Print the bill for the table
- Change a table’s status: reserve, clean, block
- Take orders on your phone
- Design the floor plan
Table service in JupitaPos starts on the floor plan: every table of the branch, live, in the colour of its status. From a table you seat guests, open their order on the till, move them, join tables for a big party and, at the end, print the bill and take payment.
The till itself — ringing up items, choices, payment, receipts — is in Point of sale. This manual covers what is special about tables. The pictures show the demo business, Jupita Restaurant Demo, in the Main Hall of its Kampala — Kololo branch on a Friday lunchtime. Prices include 18 % VAT; the Main Hall adds a 10 % service charge.
Read the floor plan
Purpose
See at a glance which tables are free, which are eating, which want the bill and which are booked — so that hosts seat guests quickly and waiters know where they are needed.
Role / permission required
Waiters, cashiers, hosts, supervisors and managers (tables.view).
Prerequisites
- You are signed in on a till, tablet or phone (see Sign in).
Steps
- Open Restaurant, Café & Bar › Tables & Floor Plan from the menu, or tap Tables on the till.
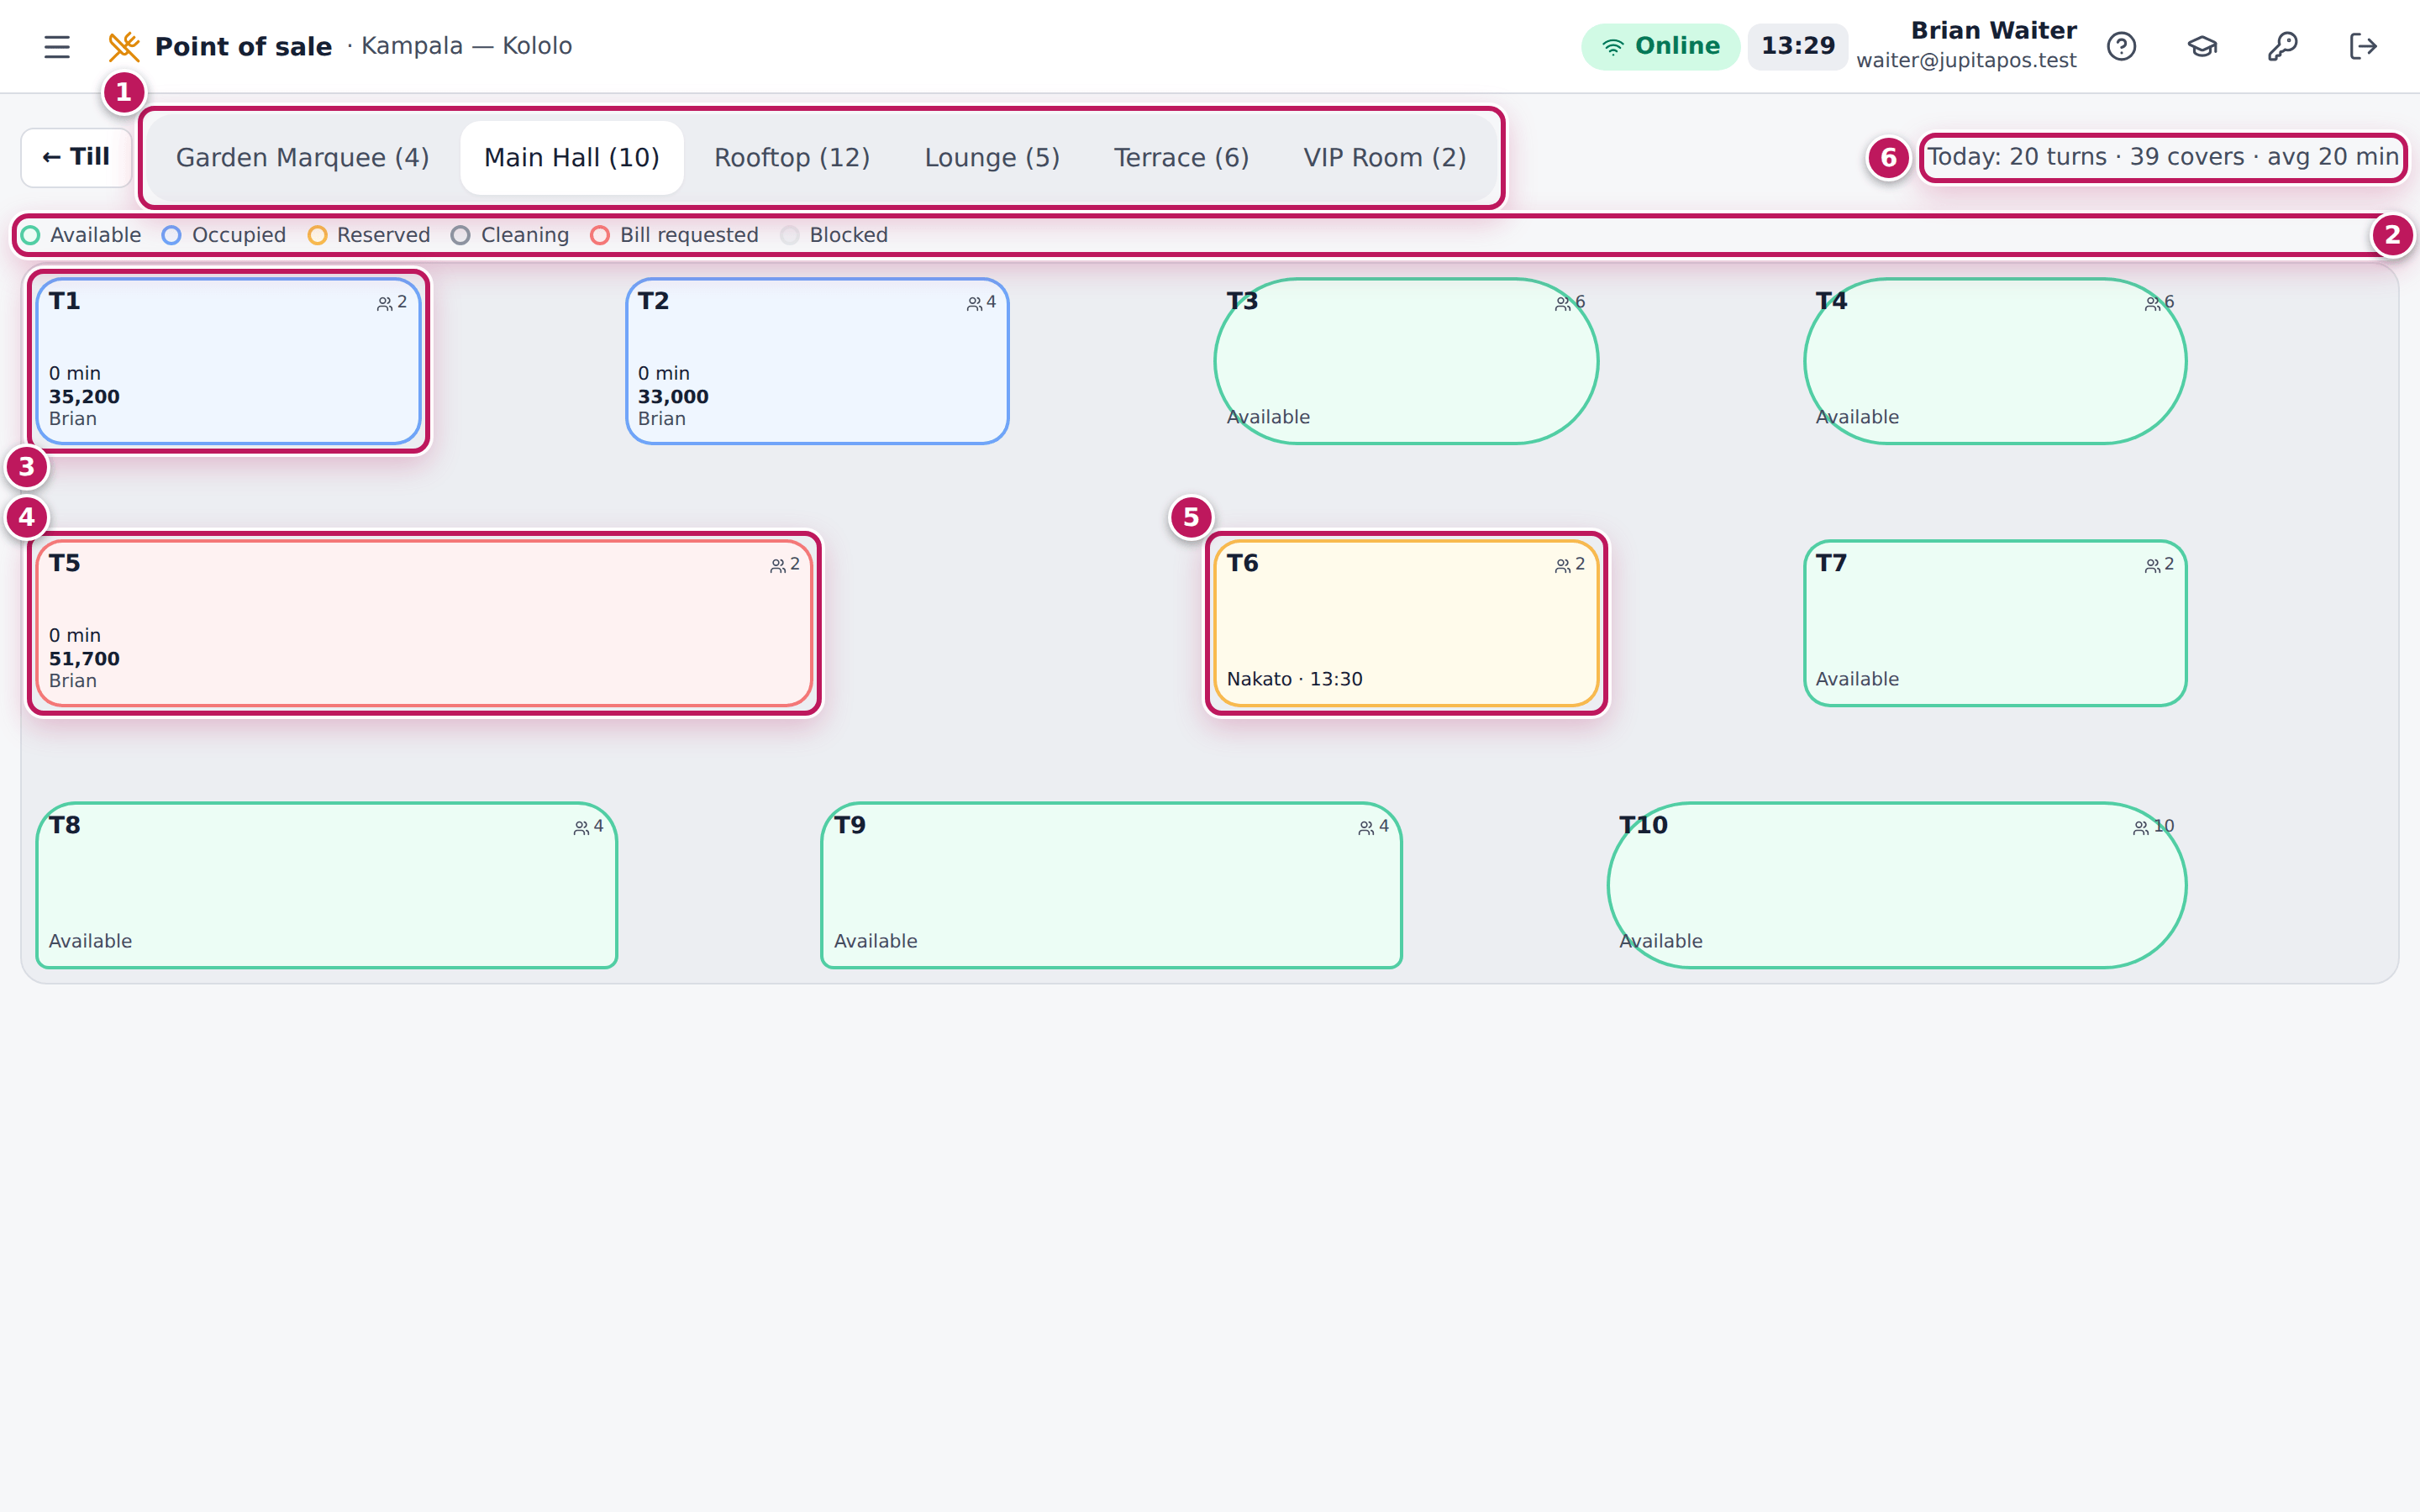
- Choose the dining area (1): each tab shows the area and how many tables it has, for example Main Hall (10).
- Read the colours with the legend (2): Available, Occupied, Reserved, Cleaning, Bill requested and Blocked.
- Read a table’s tile: its code and seats at the top; for a table in use (3) how long it has been open, the amount so far and the waiter’s first name; for a bill requested (4) the same in red; for a reserved table (5) who it is reserved for.
- Check today’s turnover (6): turns, covers and the average time a table is used.
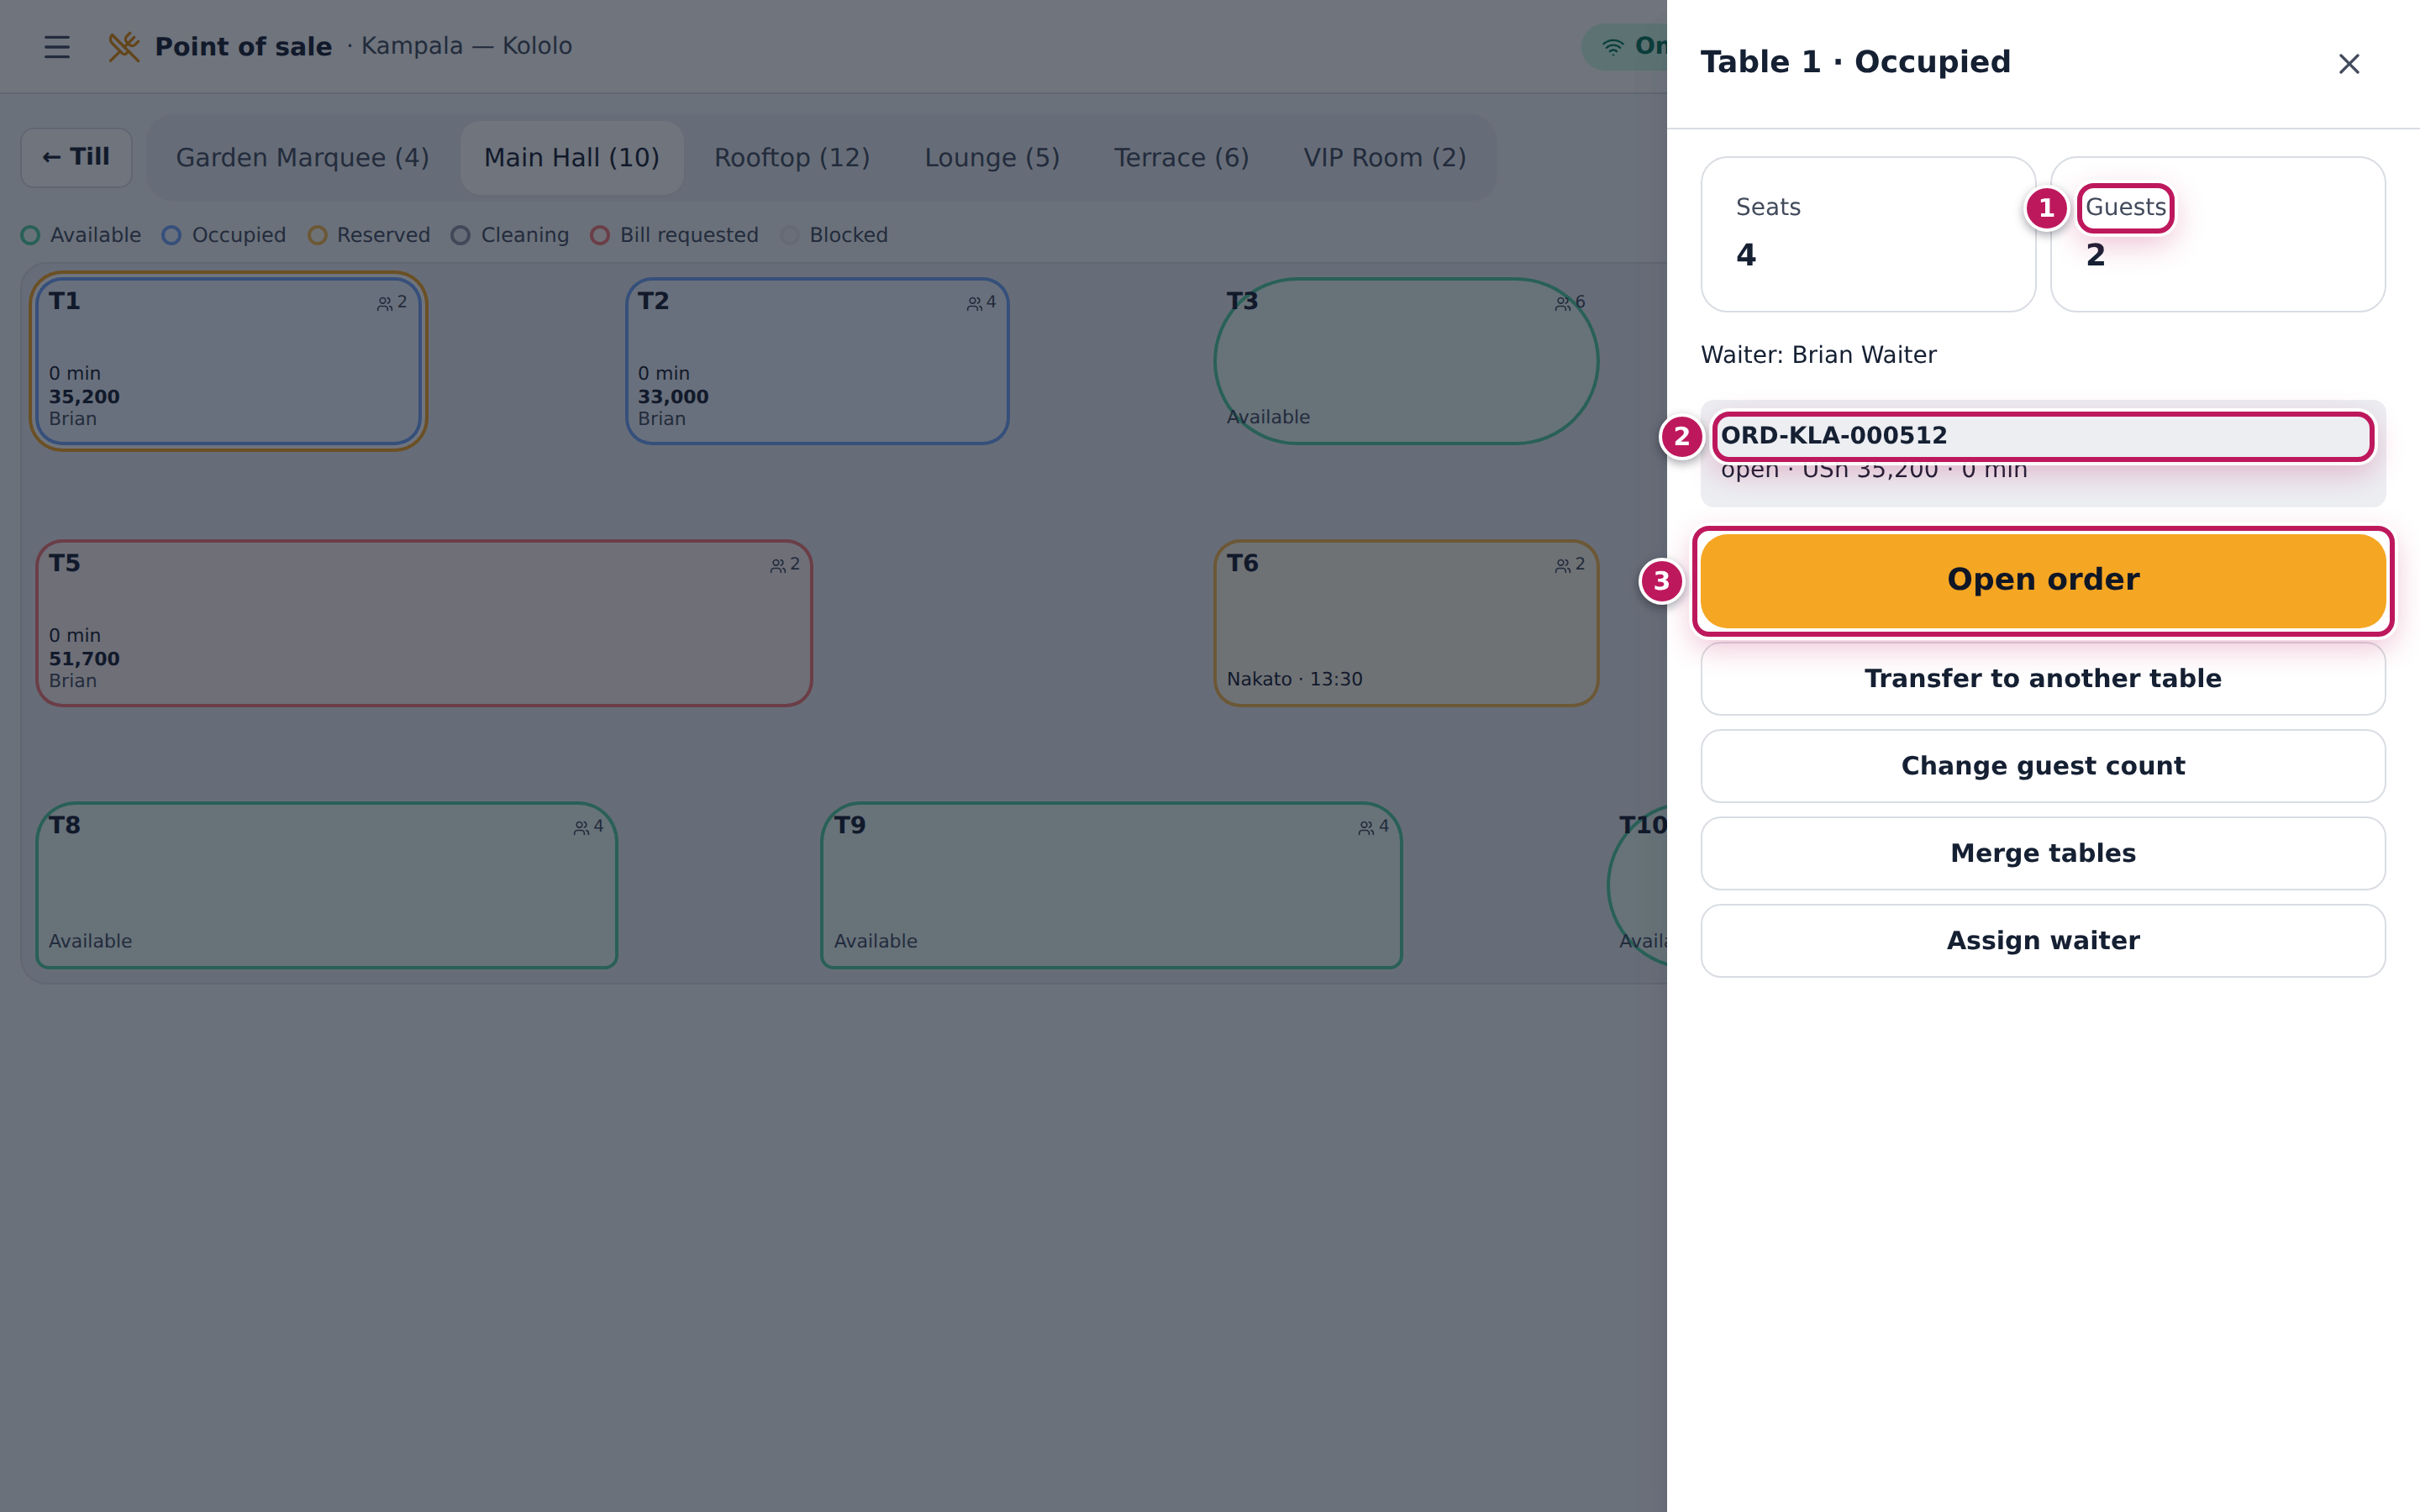
- Tap a table to open it (see below). The panel shows its Seats and Guests (1), the order number (2) with its status, amount and time, and what you can do: Open order (3), Transfer to another table, Change guest count, Merge tables and Assign waiter.
Expected result
Table 1 is Occupied (blue) with its time, amount and Brian; Table 5 is Bill requested (red); Table 6 is Reserved for Nakato · 13:30; the other tables are Available (green). The plan changes by itself when anyone in the branch seats, pays or moves a table — you never need to reload it.
Screenshot
Common mistakes
- Seating guests at a reserved table. A reserved table is held for a booking; seating clears the reservation. Check the name and time on the tile first.
- Reading an old screenshot of the floor. The plan is live; a printed or photographed plan is out of date in minutes.
Troubleshooting
- A table I expect is missing. It is in another area tab, or a manager switched it off (see Design the floor plan).
- Tables do not change colour when a colleague seats guests. The connection is down: check the connection status at the top (see See whether the till is online).
FAQ
What does “with T8” on a table mean? The table is merged into T8 for a big party (see Merge tables).
When does a table become Available again? At once when its order is cancelled or moved to another table. After payment it turns Cleaning until someone taps Mark available (see Change a table’s status).
Start a table order
Purpose
Seat guests at a table and take their order with the number of guests and who sits where, so that the kitchen, the bill and the reports know the table, the covers and each guest’s items.
Role / permission required
Waiters, cashiers, bartenders, supervisors and managers (sales.create).
Prerequisites
- The table is Available or Reserved on the floor plan.
- The till is open for the day’s service (see Ring up a counter order).
Steps
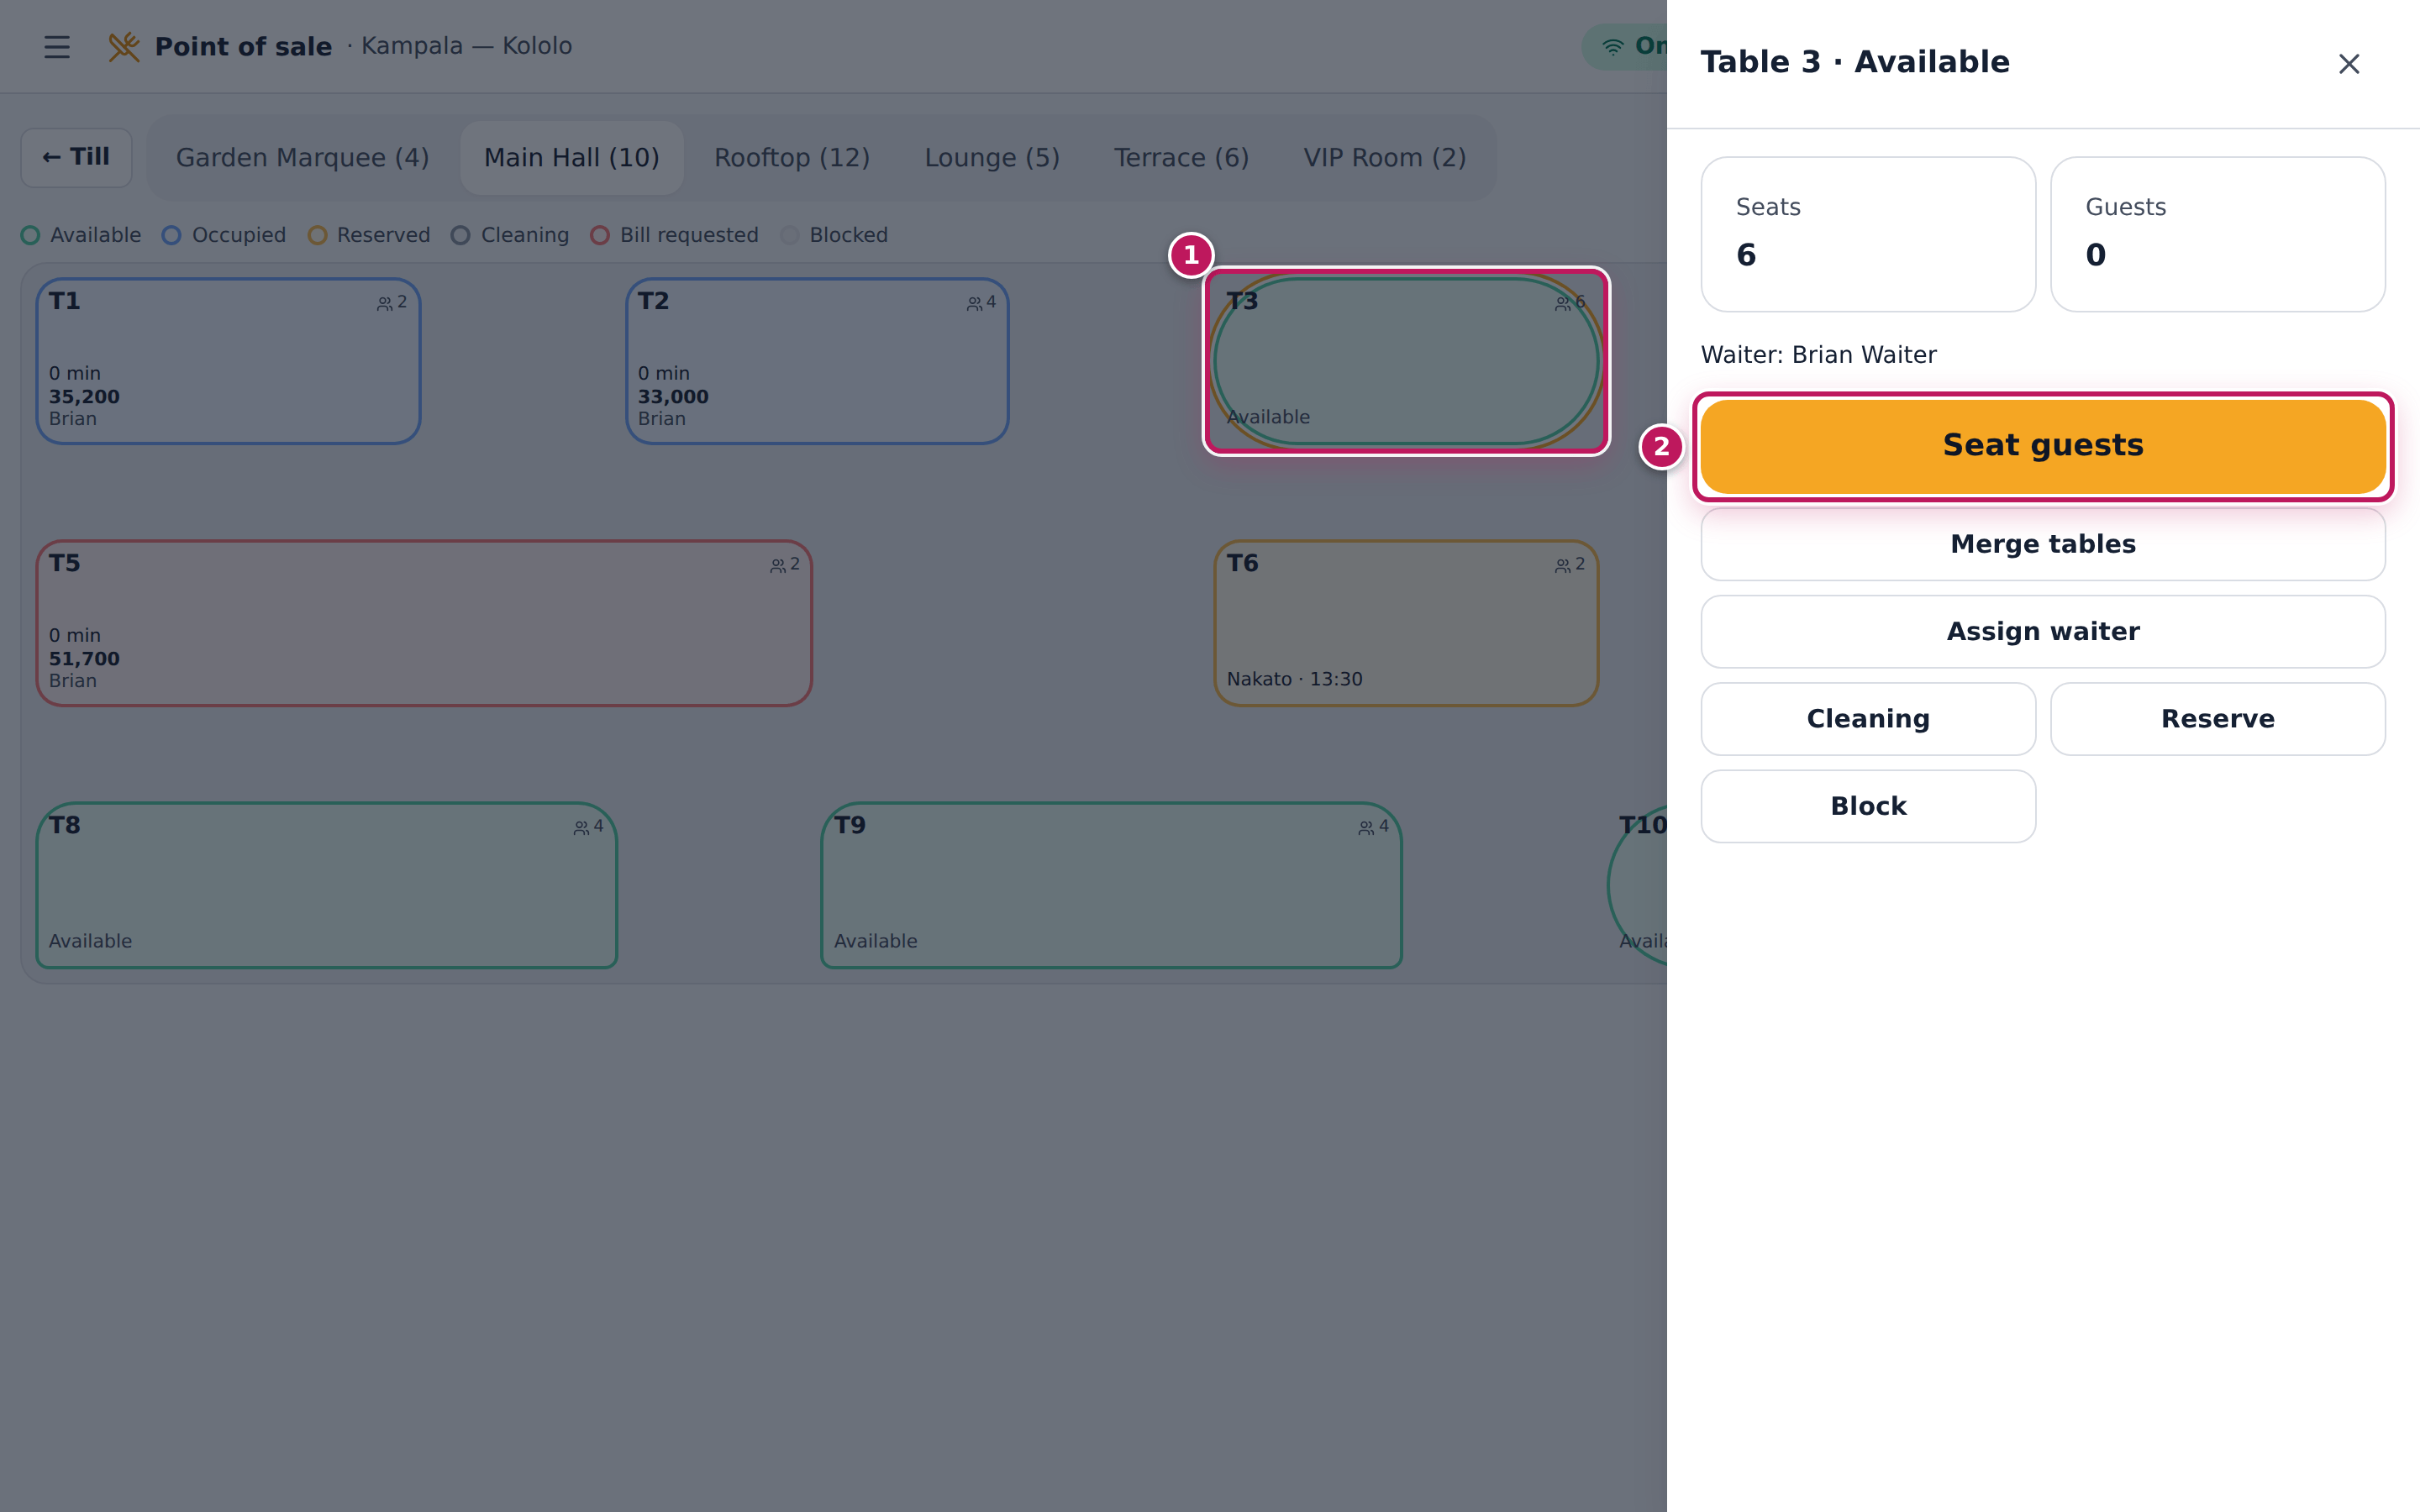
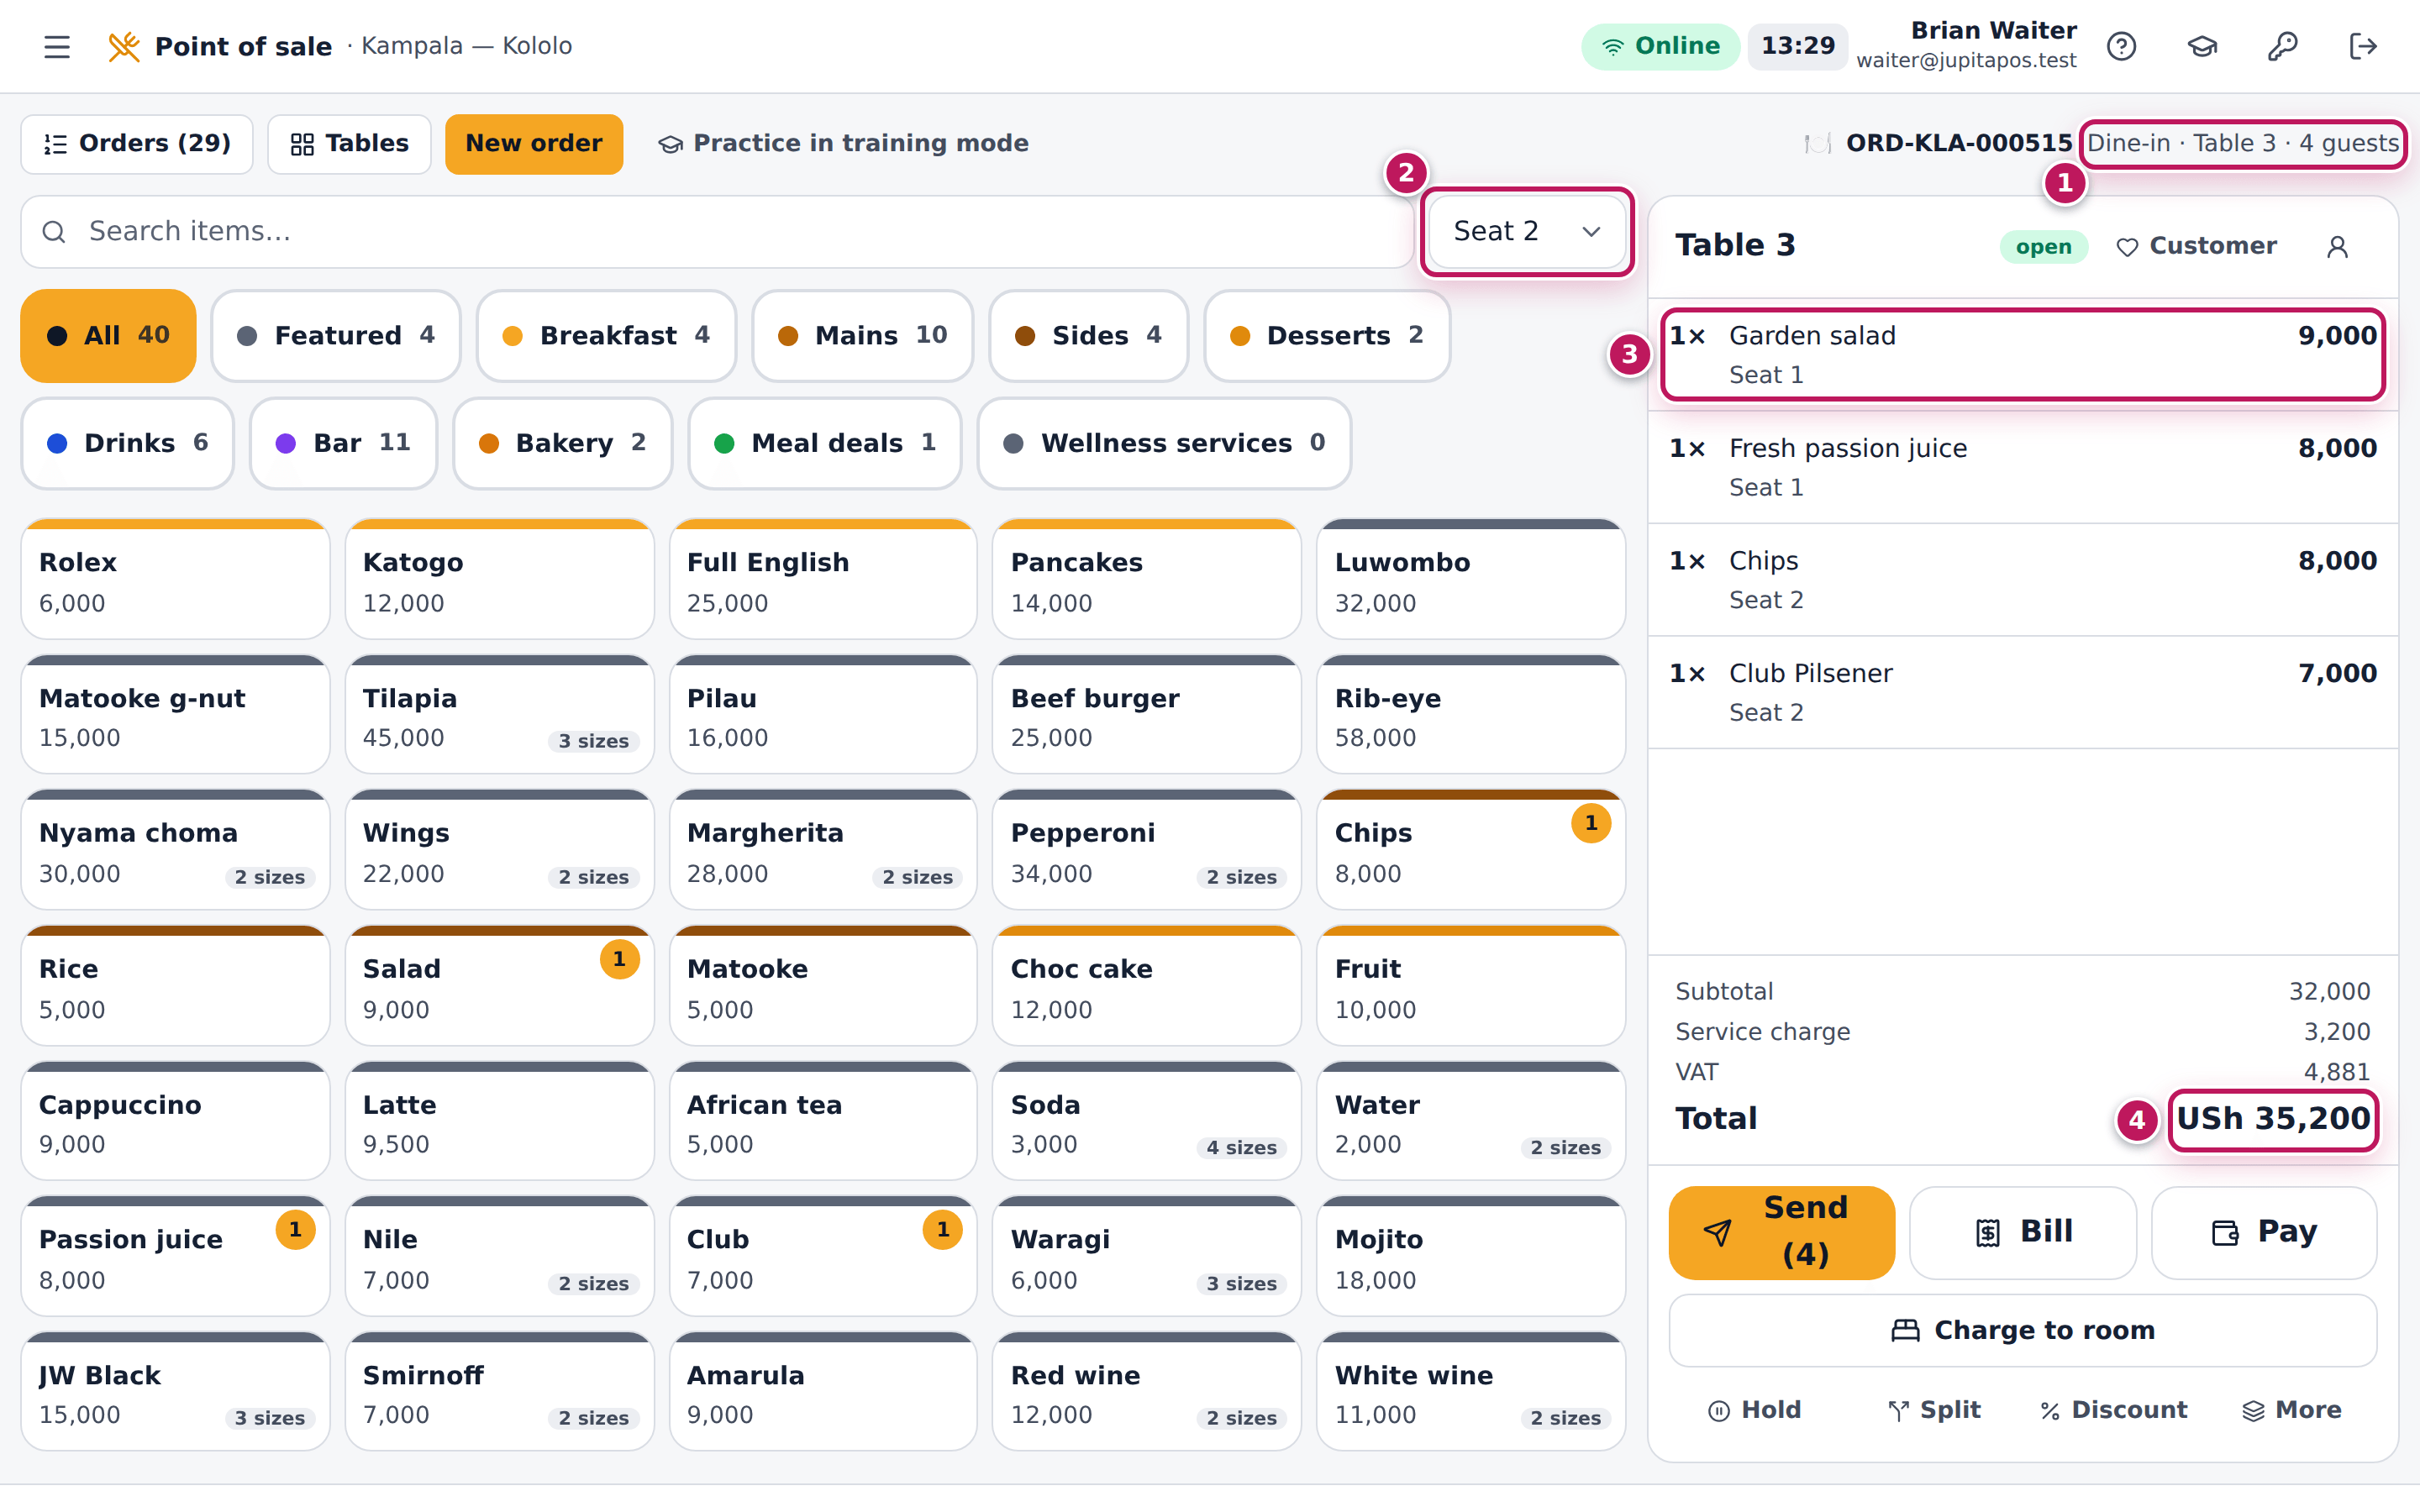
- On the floor plan, tap the table (1), here Table 3.
- Tap Seat guests (2).
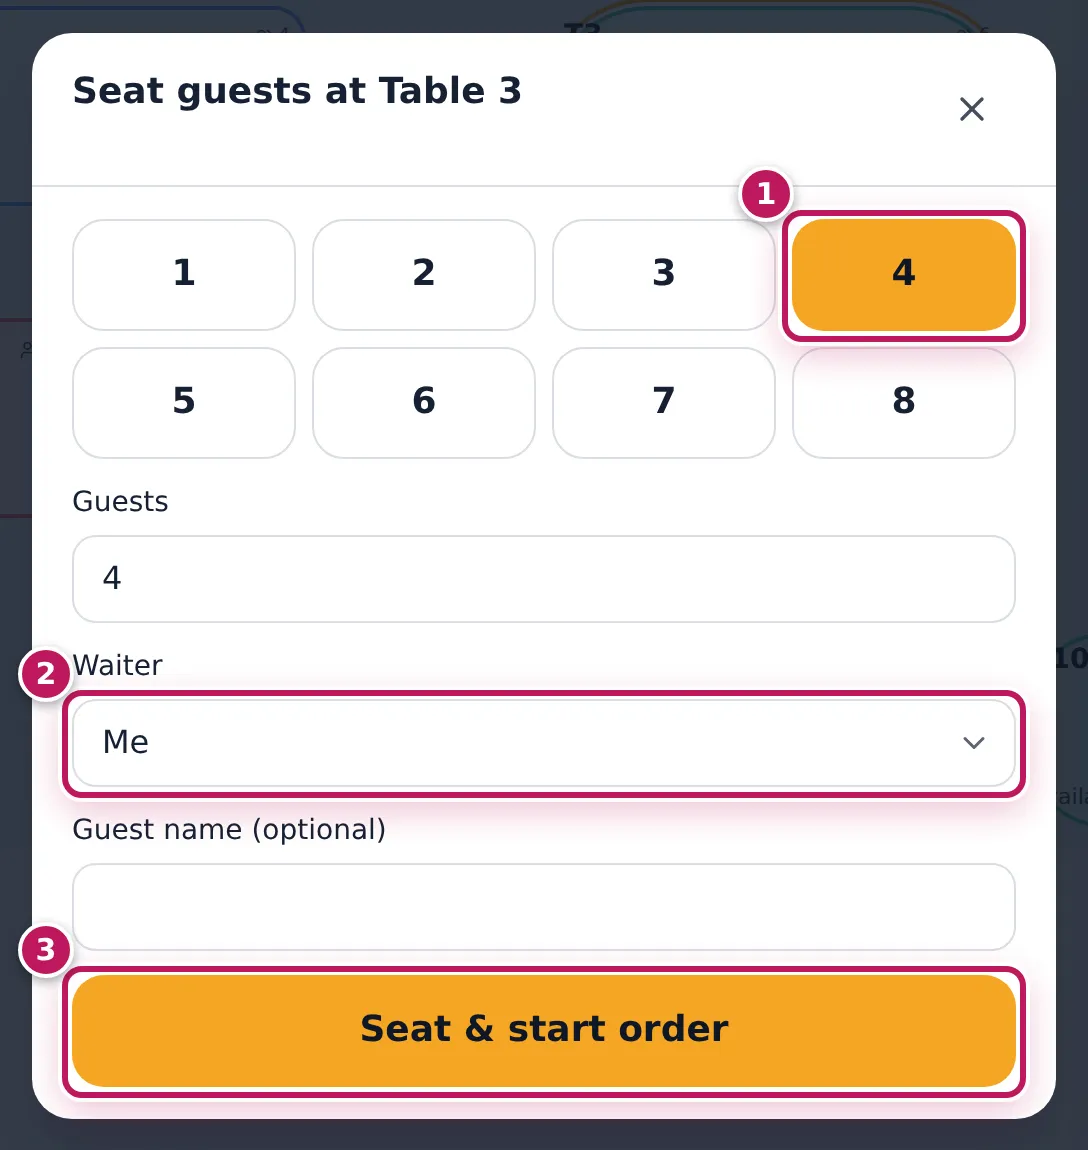
- Tap the number of guests (1), here 4, or type it in Guests.
- Leave Waiter (2) on Me, or choose the colleague who serves the table. Type the guest’s name in Guest name (optional) if you like.
- Tap Seat & start order (3). The till opens on the new order; the top says Dine-in · Table 3 · 4 guests (1).
- Choose the seat in the seat picker (2), for example Seat 1, and tap that guest’s items. Every item you tap now goes to seat 1.
- Choose Seat 2 and tap that guest’s items, and so on. For shared items choose No seat.
- Check the lines (3): each shows its seat. Send the order to the kitchen when you are ready (see Send to the kitchen and fire courses).
Expected result
For a garden salad and a passion juice on seat 1 and chips and a Club on seat 2, the order shows four lines with their seats; the subtotal is 32,000, the service charge 3,200 and the total USh 35,200 (4). On the floor plan Table 3 turns blue with 4 guests, the time, the amount and your first name.
Screenshot
Common mistakes
- Forgetting to change the seat. The seat picker stays where you left it; items keep going to the same seat. Change it before each guest’s items.
- Starting a counter order for a table. Tapping an item before seating the table starts a Counter order with no table. Seat the table first, or use New order → Dine-in and choose the Table.
- Seating more guests than the table has seats. Merge tables for a big party instead (see Merge tables).
Troubleshooting
- “Table 3 seats 6; that many guests need a merge.” More than twice the table’s seats were entered. Merge a second table.
- Seat guests is not offered. The table already has an order: tap Open order instead. A blocked or cleaning table must be marked available first (see Change a table’s status).
- “Table 3 already has an open order.” A colleague seated the table at the same moment. The floor plan shows their order; open it.
FAQ
Can I start a table order from the till? Yes: tap New order, choose Dine-in, then the Table, the Guests and the Waiter, and tap Start order.
Can I change the number of guests later? Yes: on the floor plan tap the table and Change guest count, or on the till More → Customer, guests & notes.
Send to the kitchen and fire courses
Purpose
Get the order to the kitchen and the bar, with starters first and mains later: the kitchen cooks course 1 at once and holds course 2 until the pass says the table is ready for it.
Role / permission required
Waiters and anyone who sells (sales.create) send orders. Firing a held
course is done on the Expeditor screen by the supervisor or chef at the
pass (expeditor.dispatch).
Prerequisites
- The table’s order is open with its items (see Start a table order).
Steps
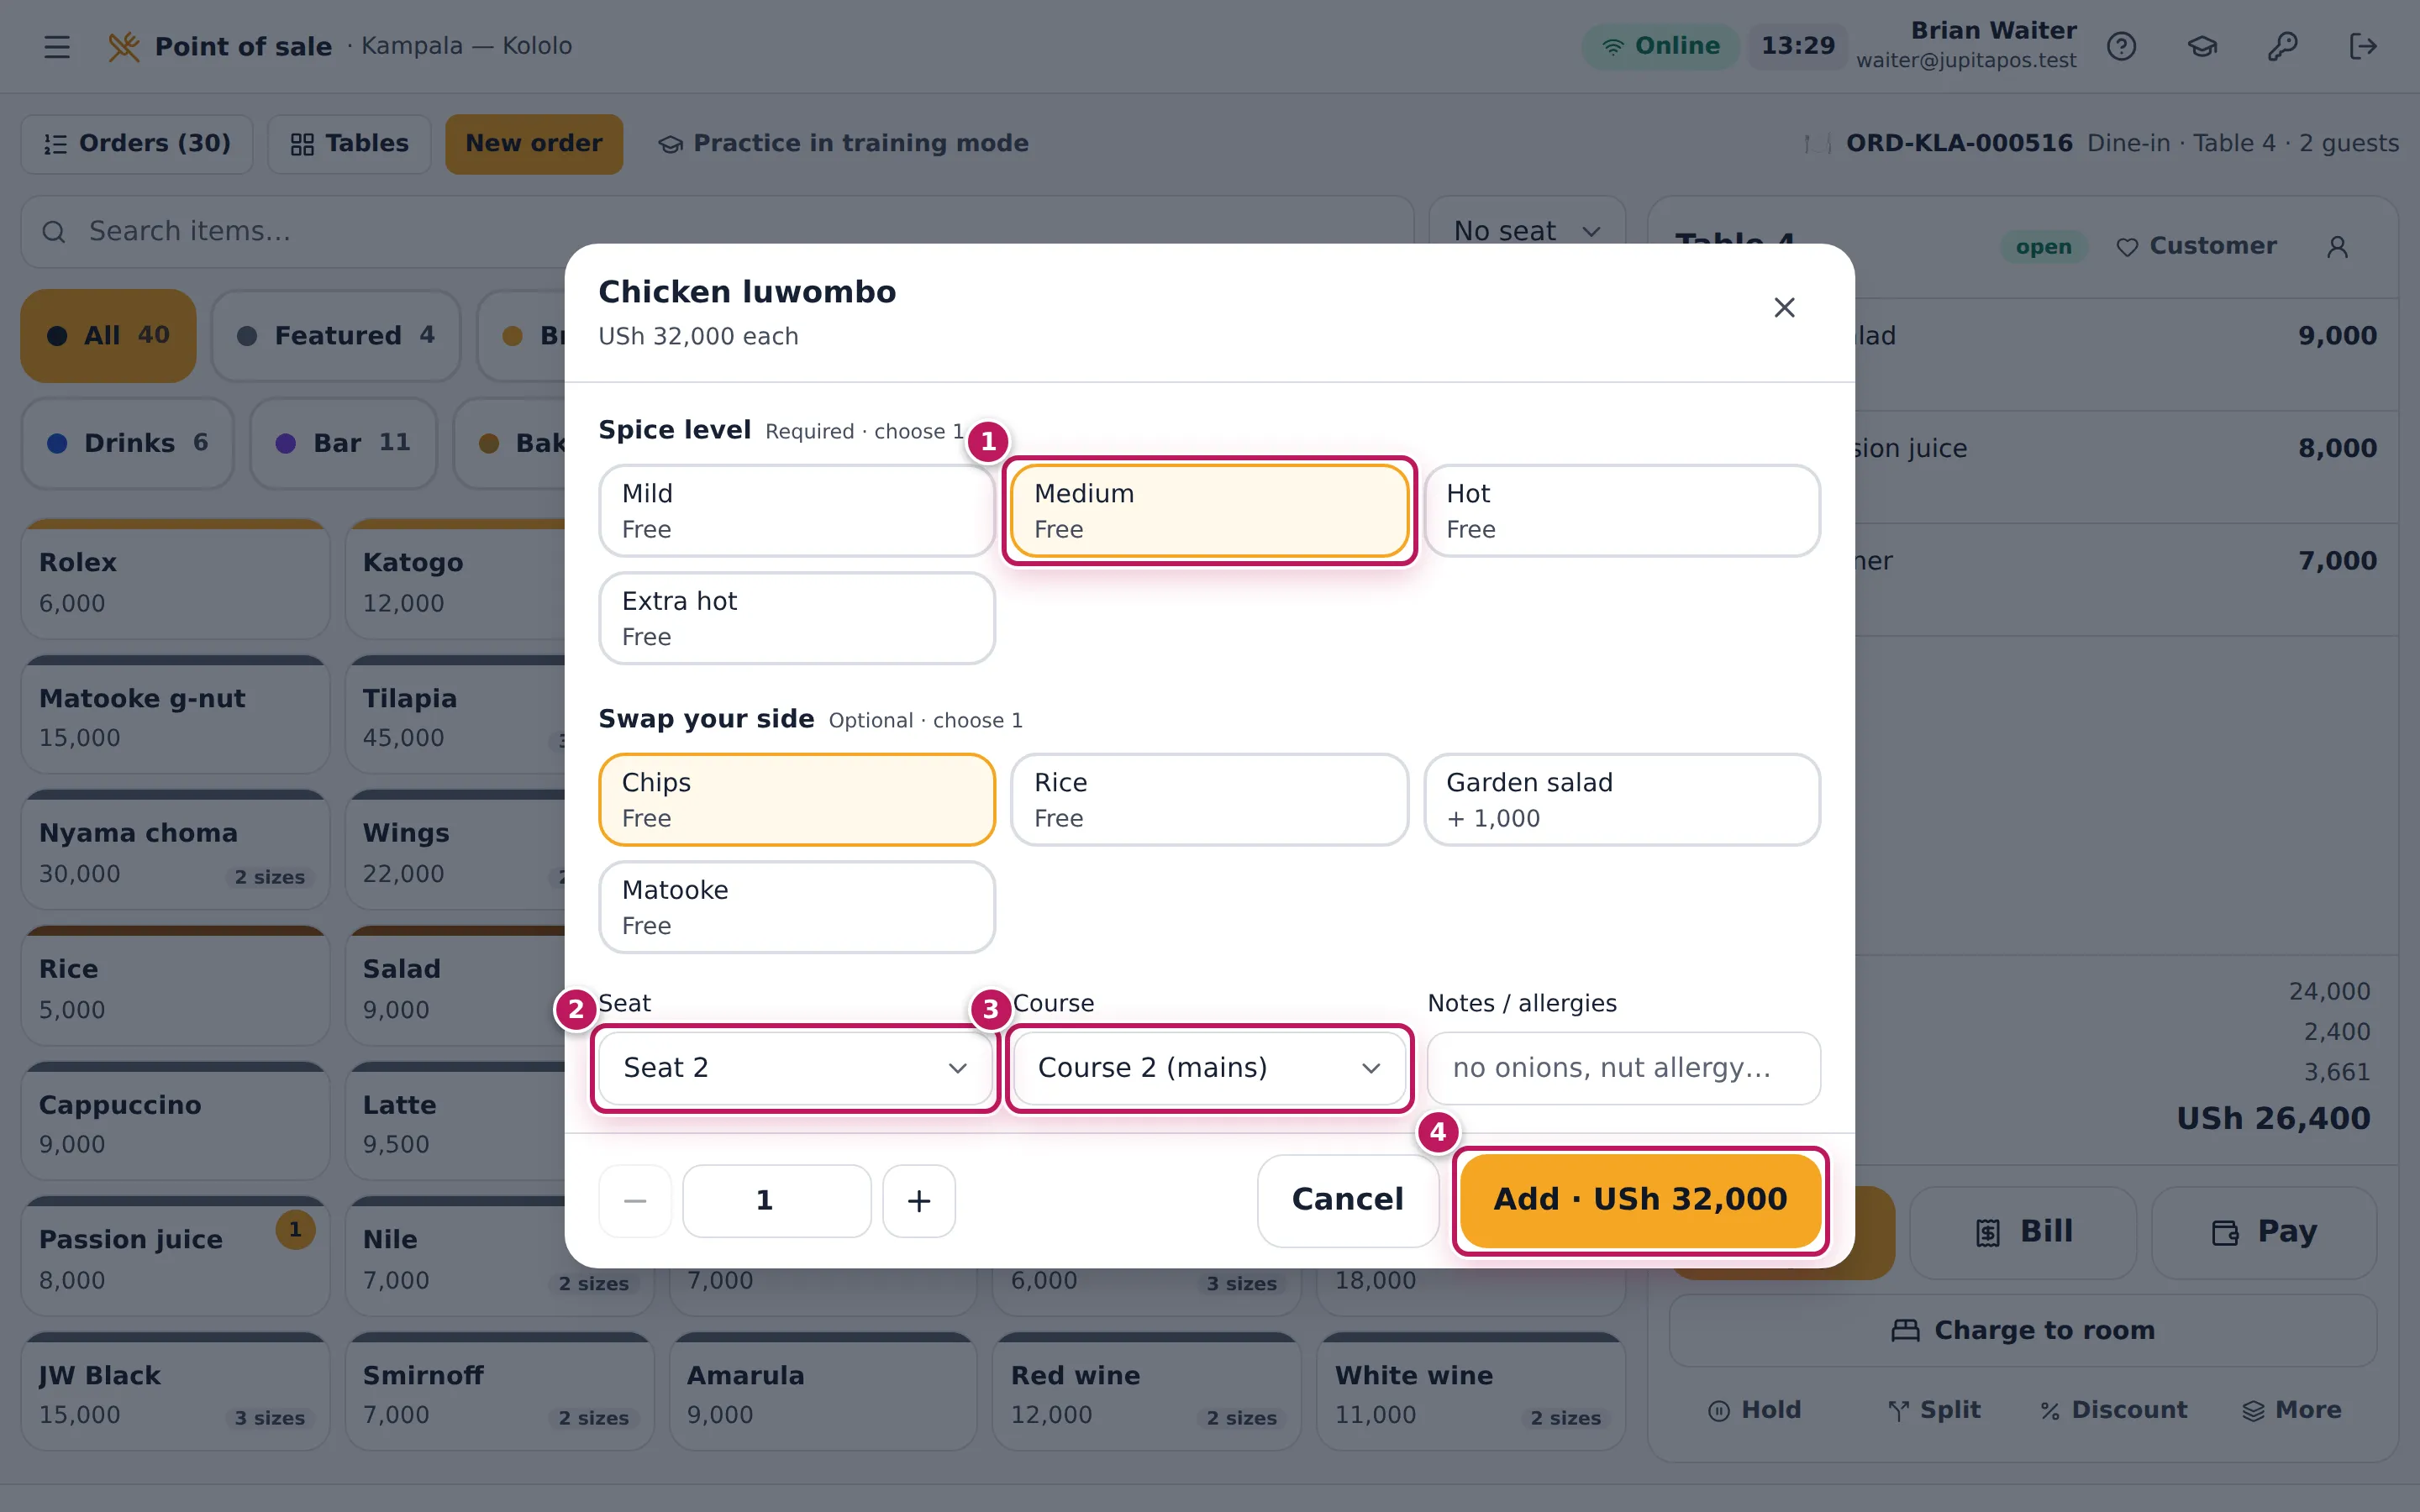
- For an item of a later course, open its dialog: tap the item (items with choices open it by themselves) or, for a line already in the order, tap the line and Edit.
- Make the choices (1), then choose the Seat (2) and the Course (3): Course 1 (starters), Course 2 (mains), Course 3…
- Tap Add (4).
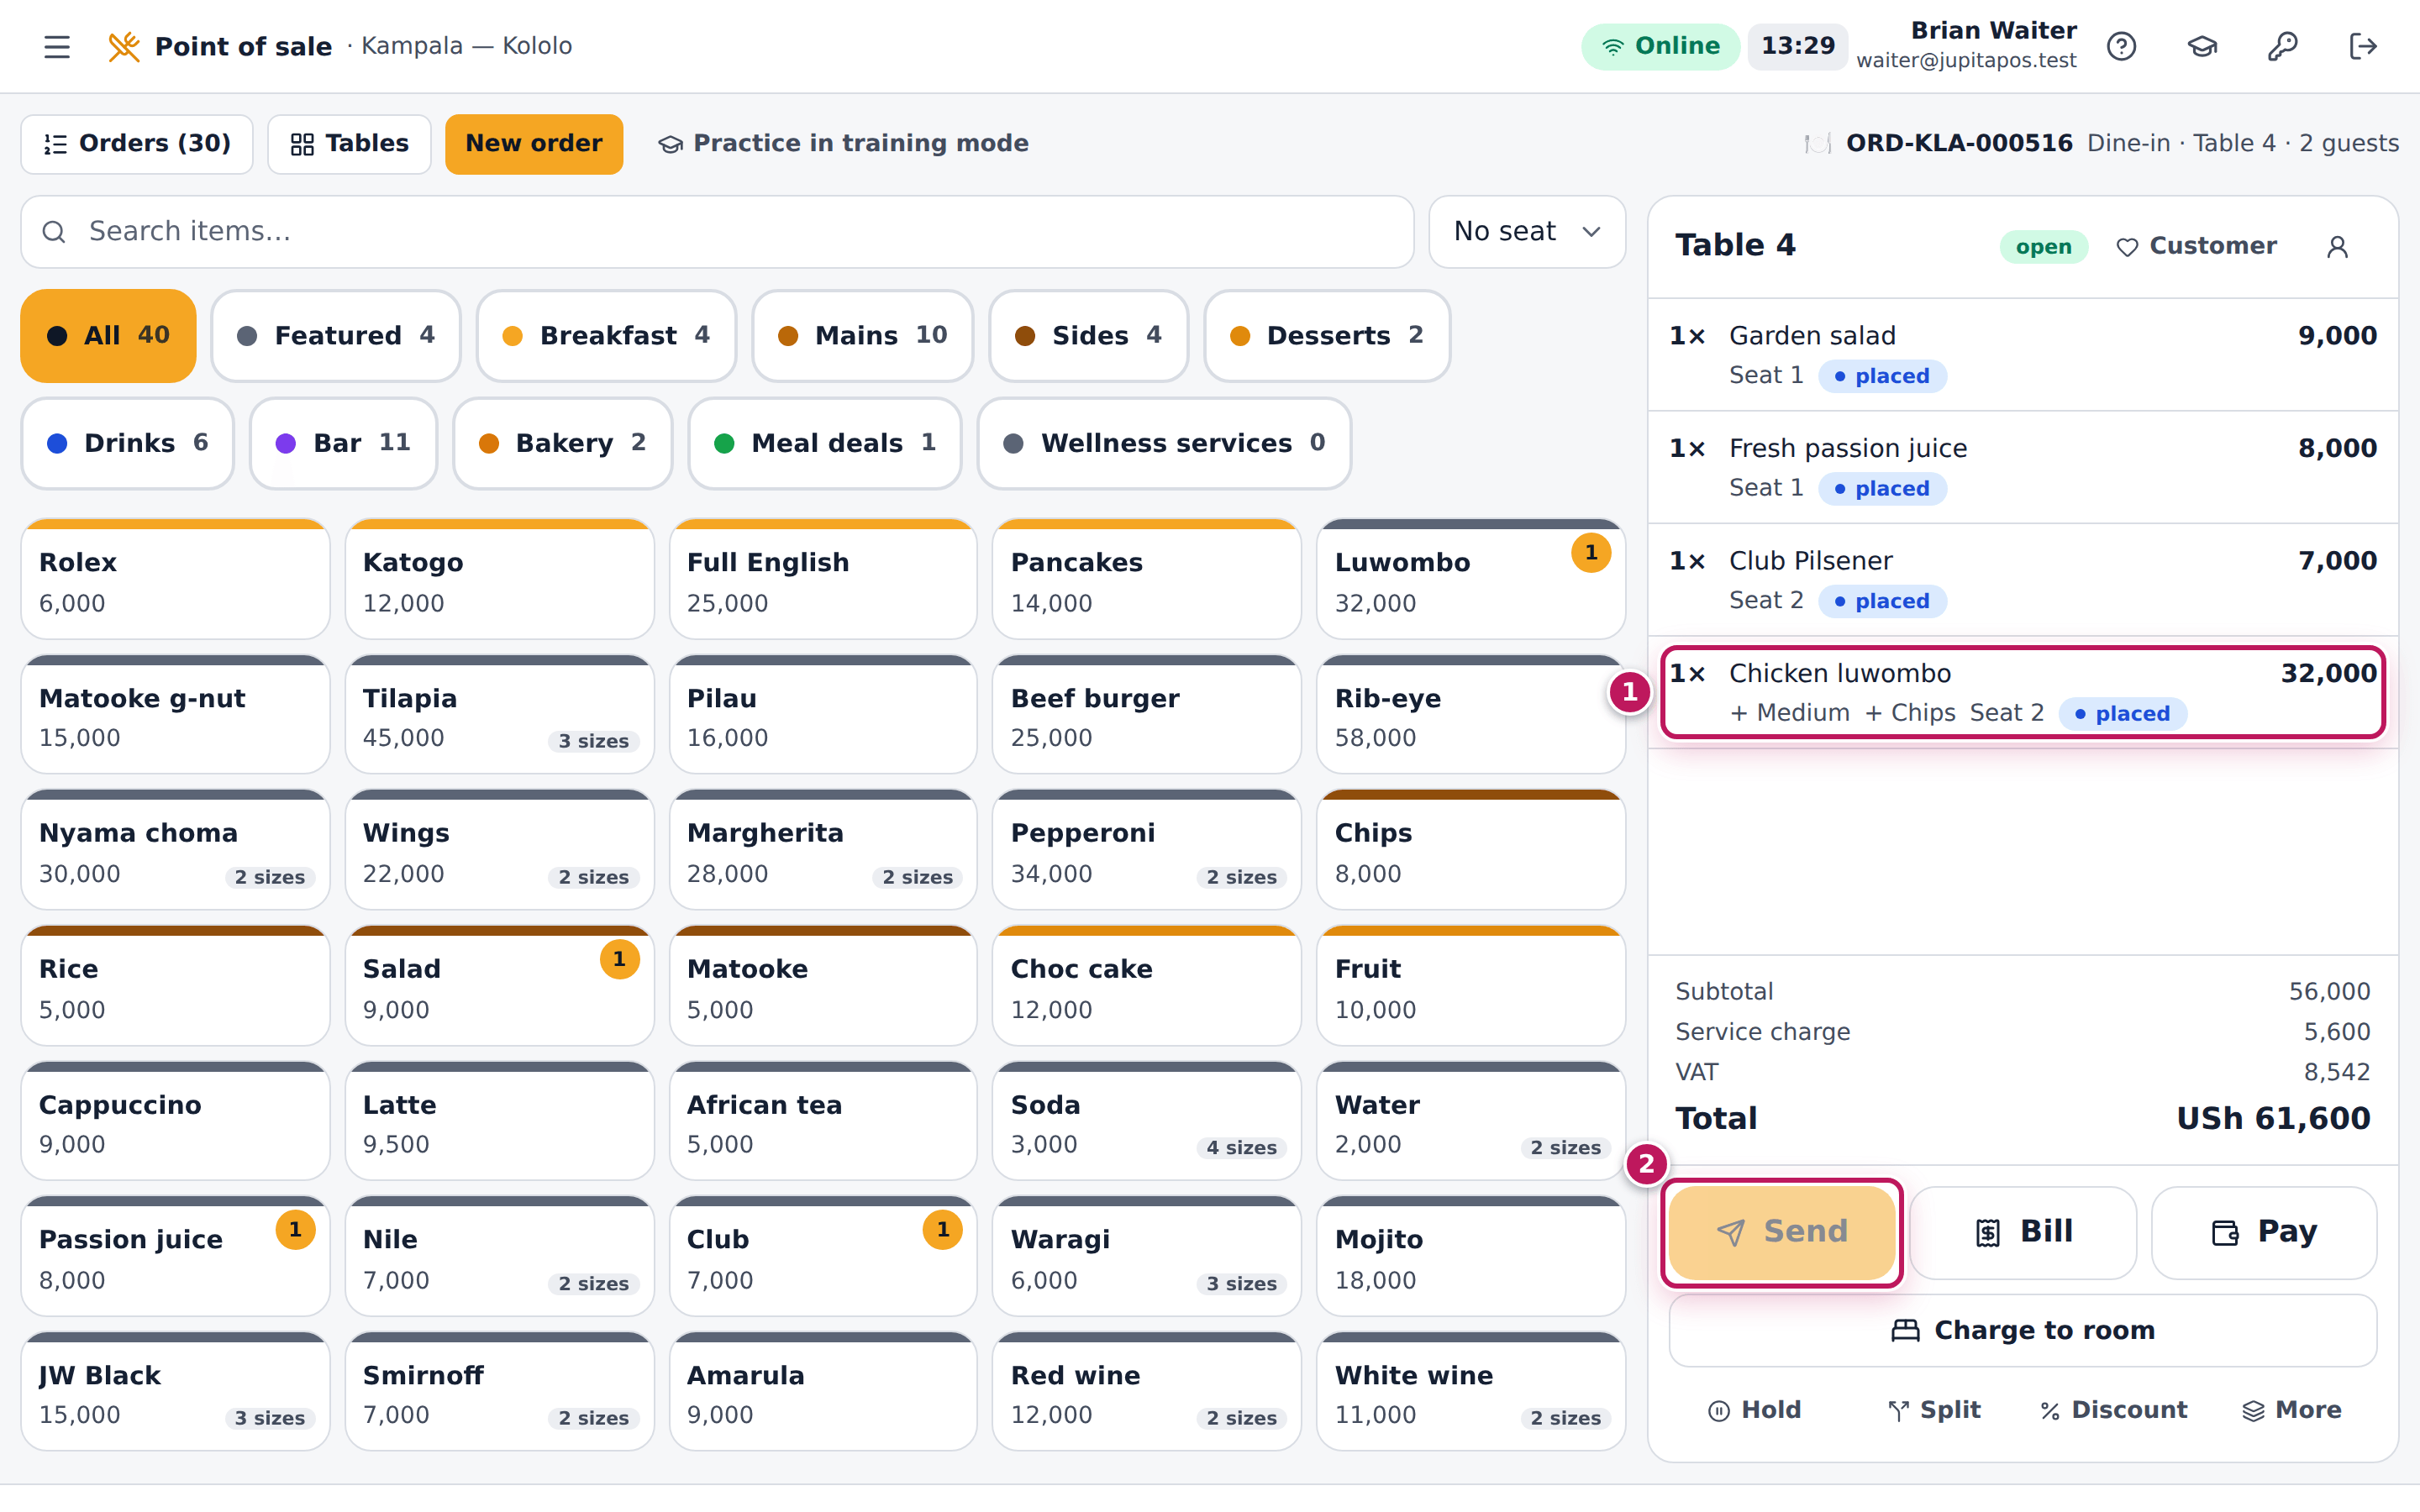
- Tap Send under the order. The button shows how many lines are waiting, for example Send (4).
- The lines now show placed (1) and are locked; Send is greyed out (2) until you add something new.
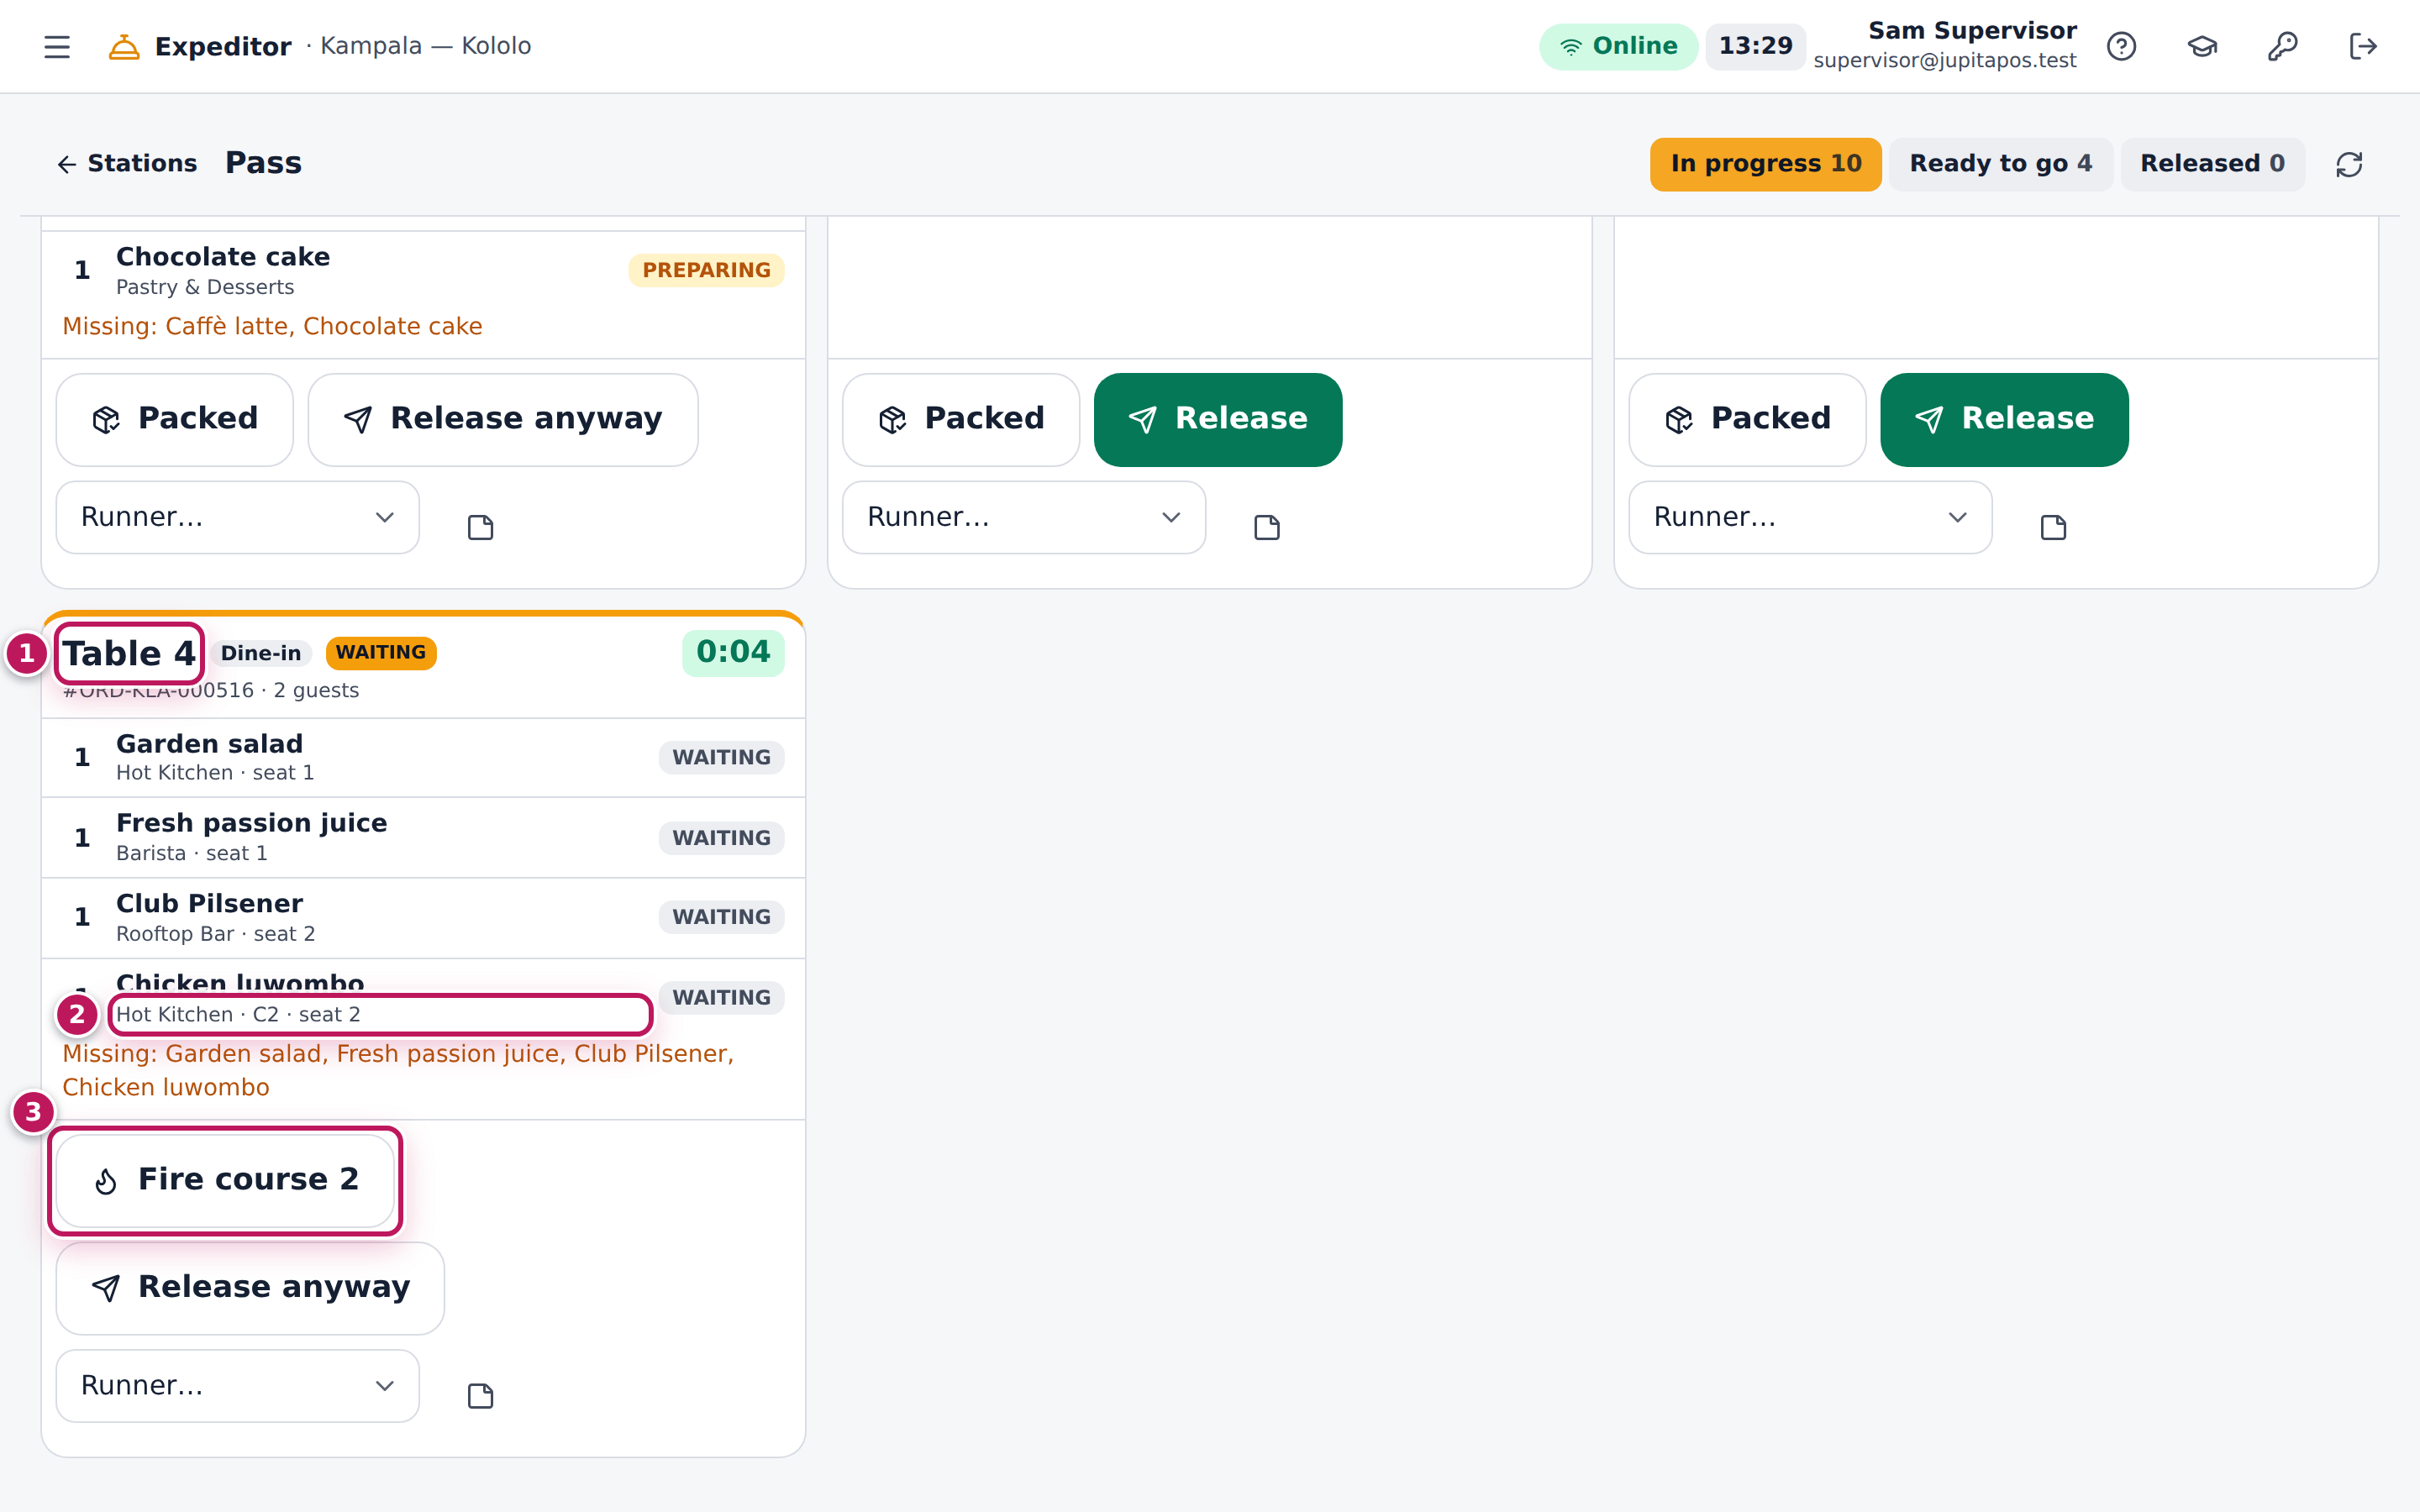
- At the pass, when the table has finished its starters, the supervisor or chef opens Expeditor, finds the table’s card (1) — the held item is marked C2 (2) — and taps Fire course 2 (3).
Expected result
The kitchen and the bar get course 1 at once (salad, drinks). The luwombo waits on the kitchen board as a held, dashed ticket; after Fire course 2 the pass sees Course 2 fired and the kitchen starts it, with its own timer. The table’s lines move from placed to in progress and ready as the kitchen works.
Screenshot
Common mistakes
- Leaving mains on course 1. Everything on course 1 is cooked at once, so the mains arrive with the starters. Set Course 2 (mains) in the item’s dialog before you tap Add.
- Holding the whole order on the till instead of sending. Nothing reaches the kitchen until you tap Send. Send the order, and let the courses hold the mains.
- Changing a line after it was sent. Sent lines are locked; changing one means voiding it, which a supervisor approves with their employee number and PIN on the till (see Remove a line that was sent).
Troubleshooting
- Send is greyed out. Nothing new is waiting: every line was already sent.
- There is no Fire course 2 button at the pass. The course was already fired, or your business sends every course at once (no held courses).
- The kitchen did not get the drinks. Drinks go to the bar or the barista screen, not the kitchen board; check that screen.
FAQ
Can the waiter fire a course from the till? No; firing is done at the pass on Expeditor, where the supervisor or chef sees when the table is ready.
Move a table or hand it to another waiter
Purpose
Move guests who change tables — to the lounge, outside, a bigger table — and hand a table to a colleague at the end of your shift, with the order, the bill and the kitchen tickets following them.
Role / permission required
Waiters, cashiers, supervisors and managers (sales.transfer; on the floor
plan tables.manage).
Prerequisites
- The table has an open order.
- The table you move to is Available or Reserved.
Steps
- Open the table’s order on the till (floor plan → the table → Open order).
- Tap More under the order, then Transfer table / waiter.
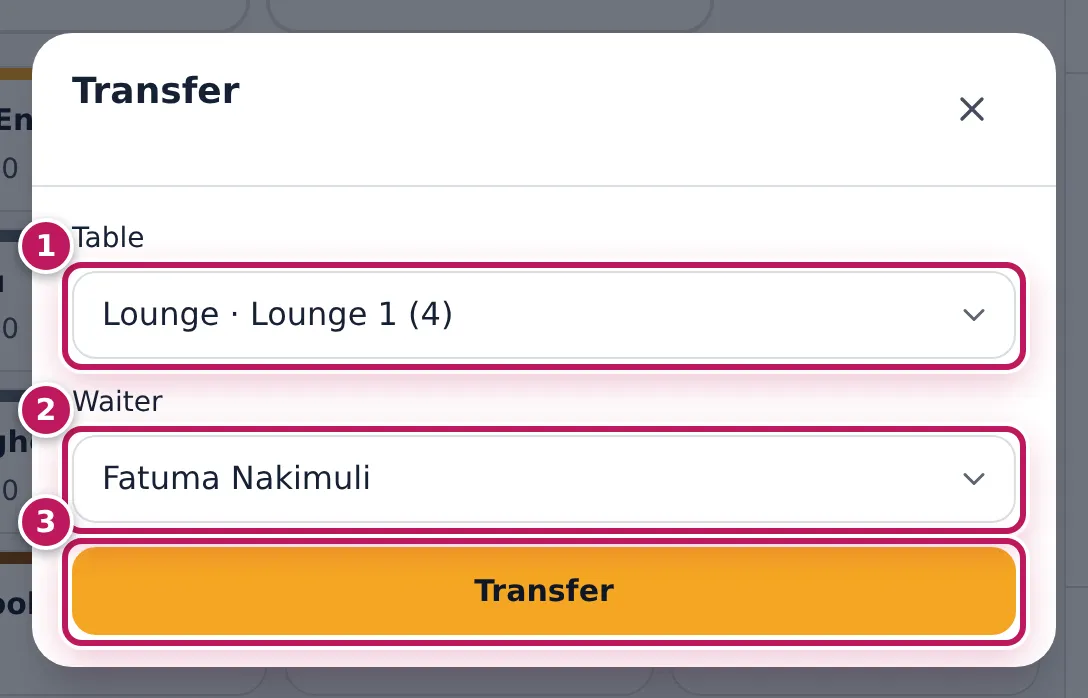
- Choose the new Table (1), here Lounge · Lounge 1 (4). Leave it as it is to change only the waiter.
- Choose the new Waiter (2), here Fatuma Nakimuli.
- Tap Transfer (3).
Expected result
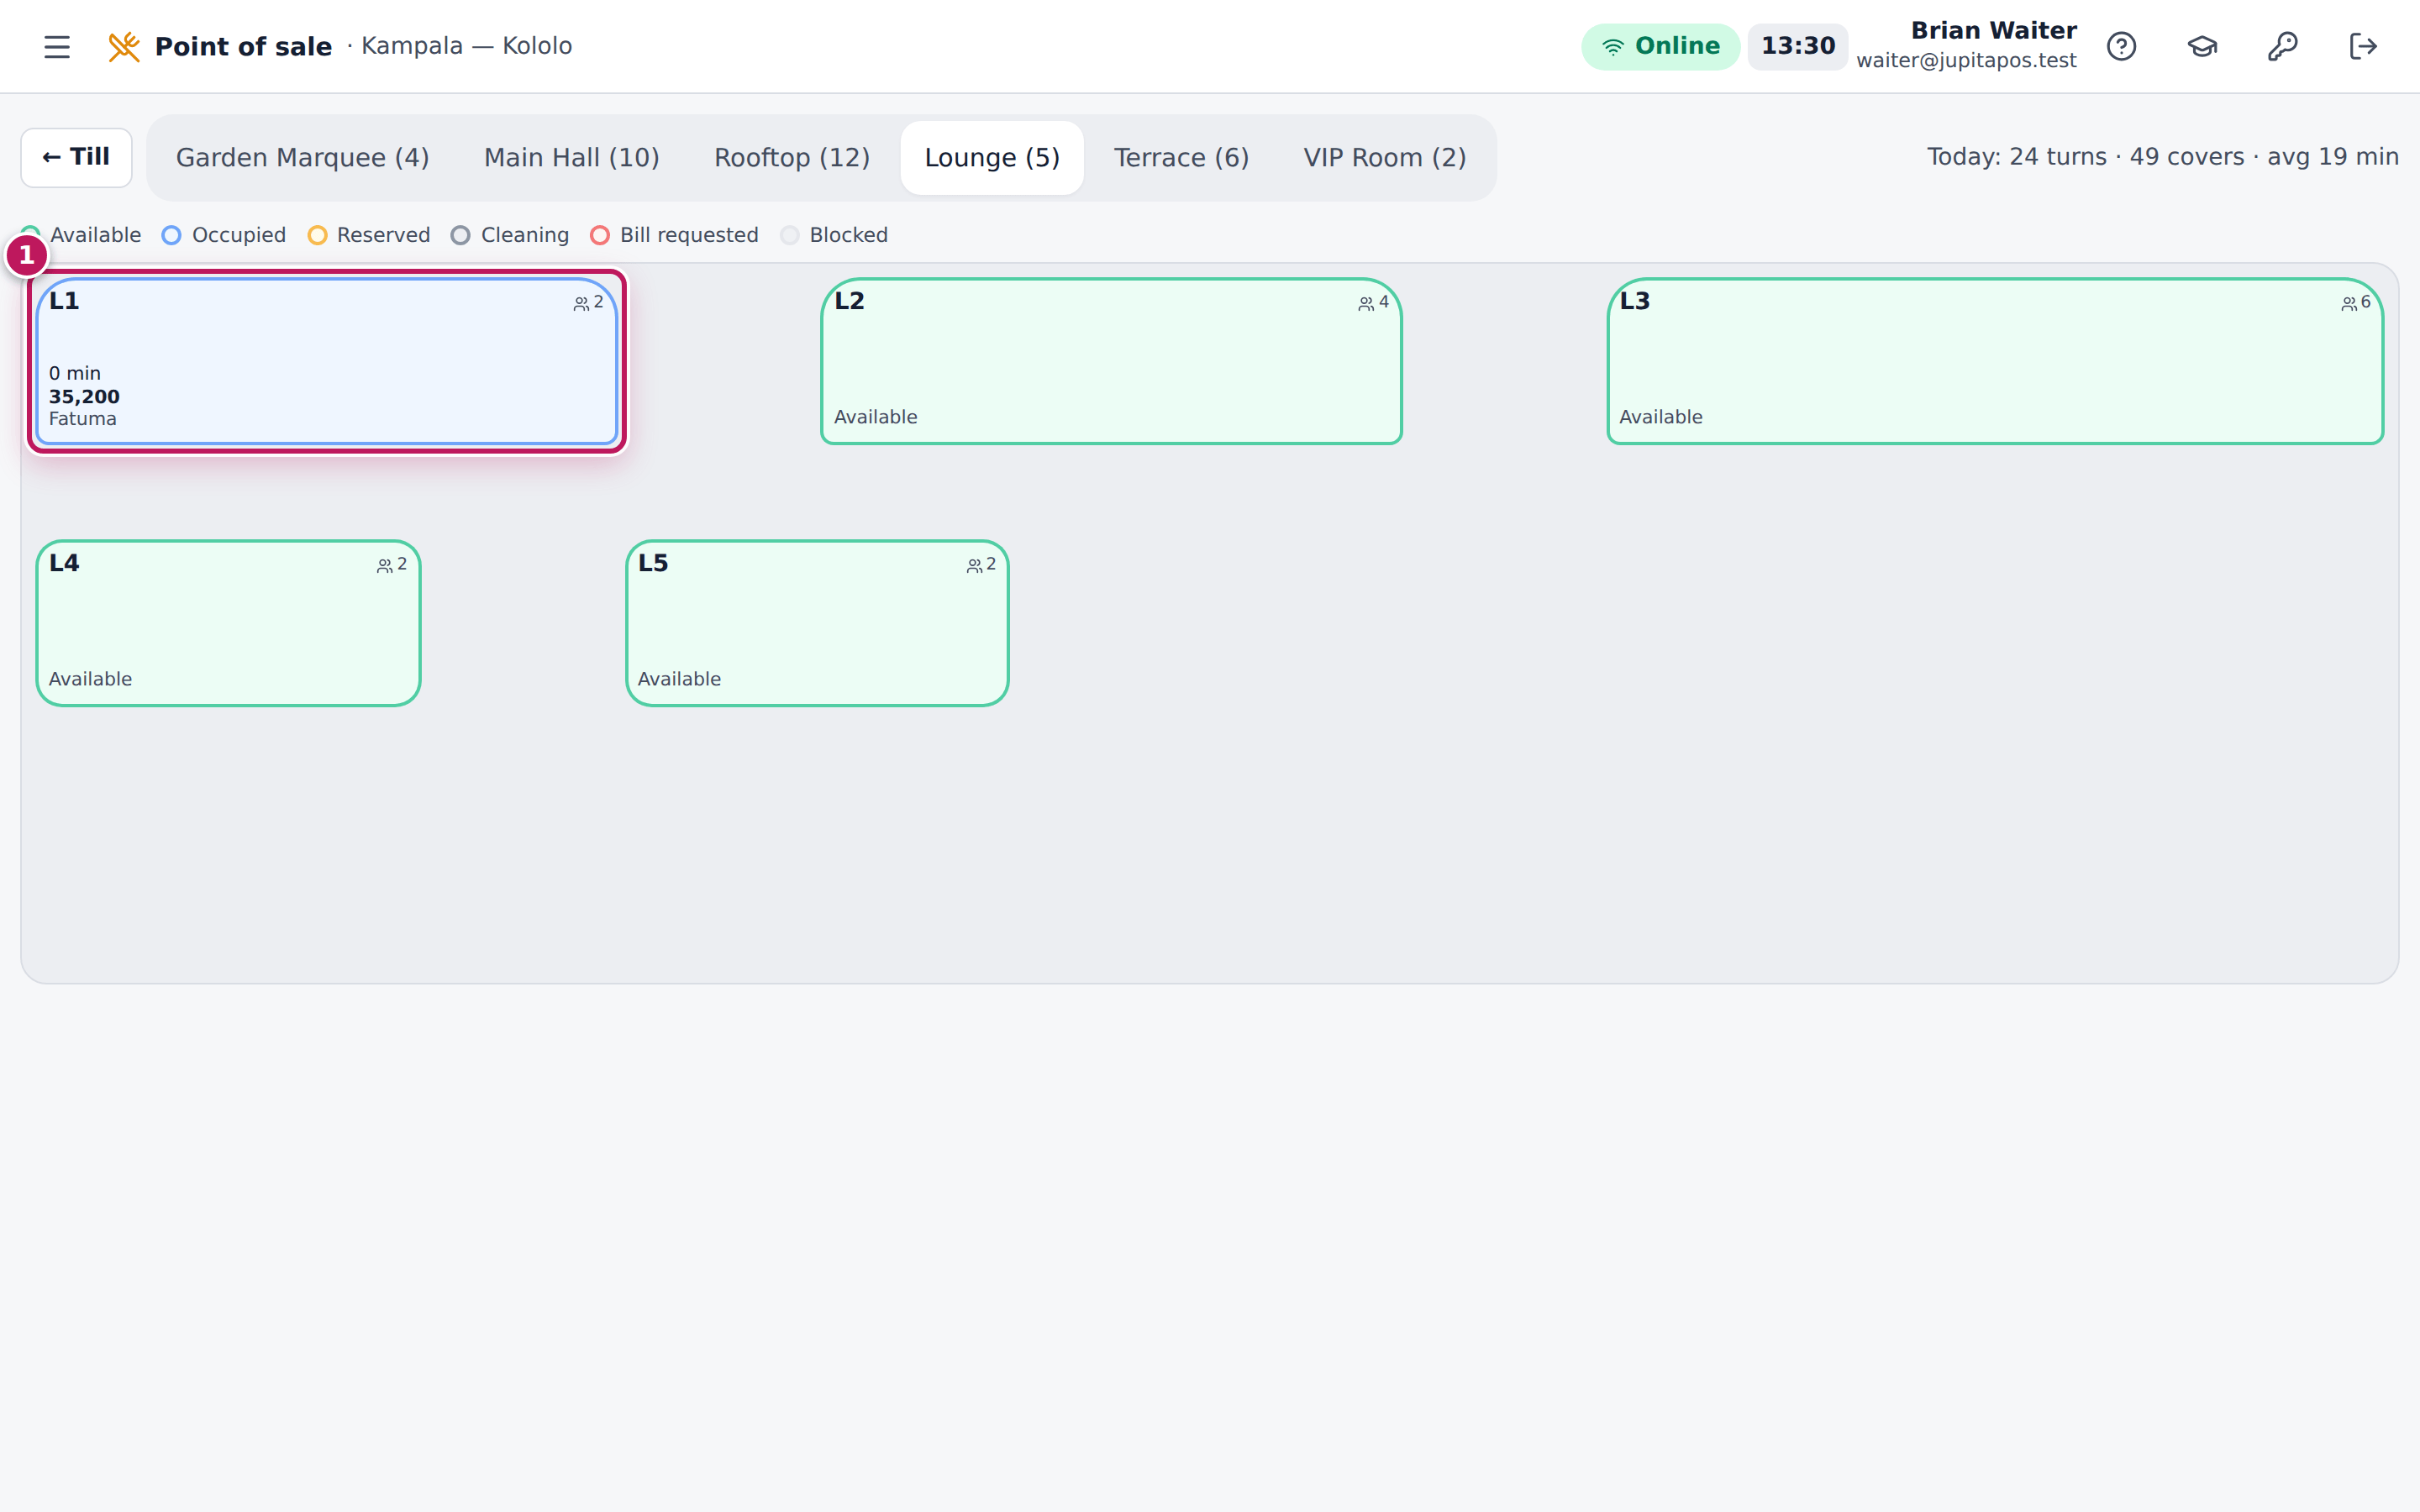
The till shows Dine-in · Lounge 1 · 2 guests. On the floor plan Lounge 1 is now occupied with Fatuma as its waiter (1), and Table 7 is free again. The order, its lines and its kitchen tickets are unchanged.
Screenshot
Common mistakes
- Starting a new order at the new table. The guests’ first order would stay open on the old table. Always transfer the existing order.
- Handing tables over by word of mouth only. The colleague’s name must be on the table so that tips, performance and questions go to the right person.
Troubleshooting
- The table I want is not in the list. It is occupied, merged, blocked or being cleaned. Free it first, or merge it (see Merge tables).
- Transfer table / waiter is greyed out. Your role cannot transfer
orders (
sales.transfer). Ask a supervisor.
FAQ
Can I do it from the floor plan? Yes: tap the table, then Transfer to another table and tap the new table; Assign waiter changes only the waiter.
Merge tables for a big party
Purpose
Seat a party that needs more than one table as one table: one order, one bill, and the joined tables shown together on the floor plan.
Role / permission required
Waiters, hosts, cashiers, supervisors and managers (tables.manage).
Prerequisites
- The main table is seated or available; the tables to join are not blocked, being cleaned or merged elsewhere.
Steps
- On the floor plan, tap the main table, here Table 8.
- Tap Merge tables.
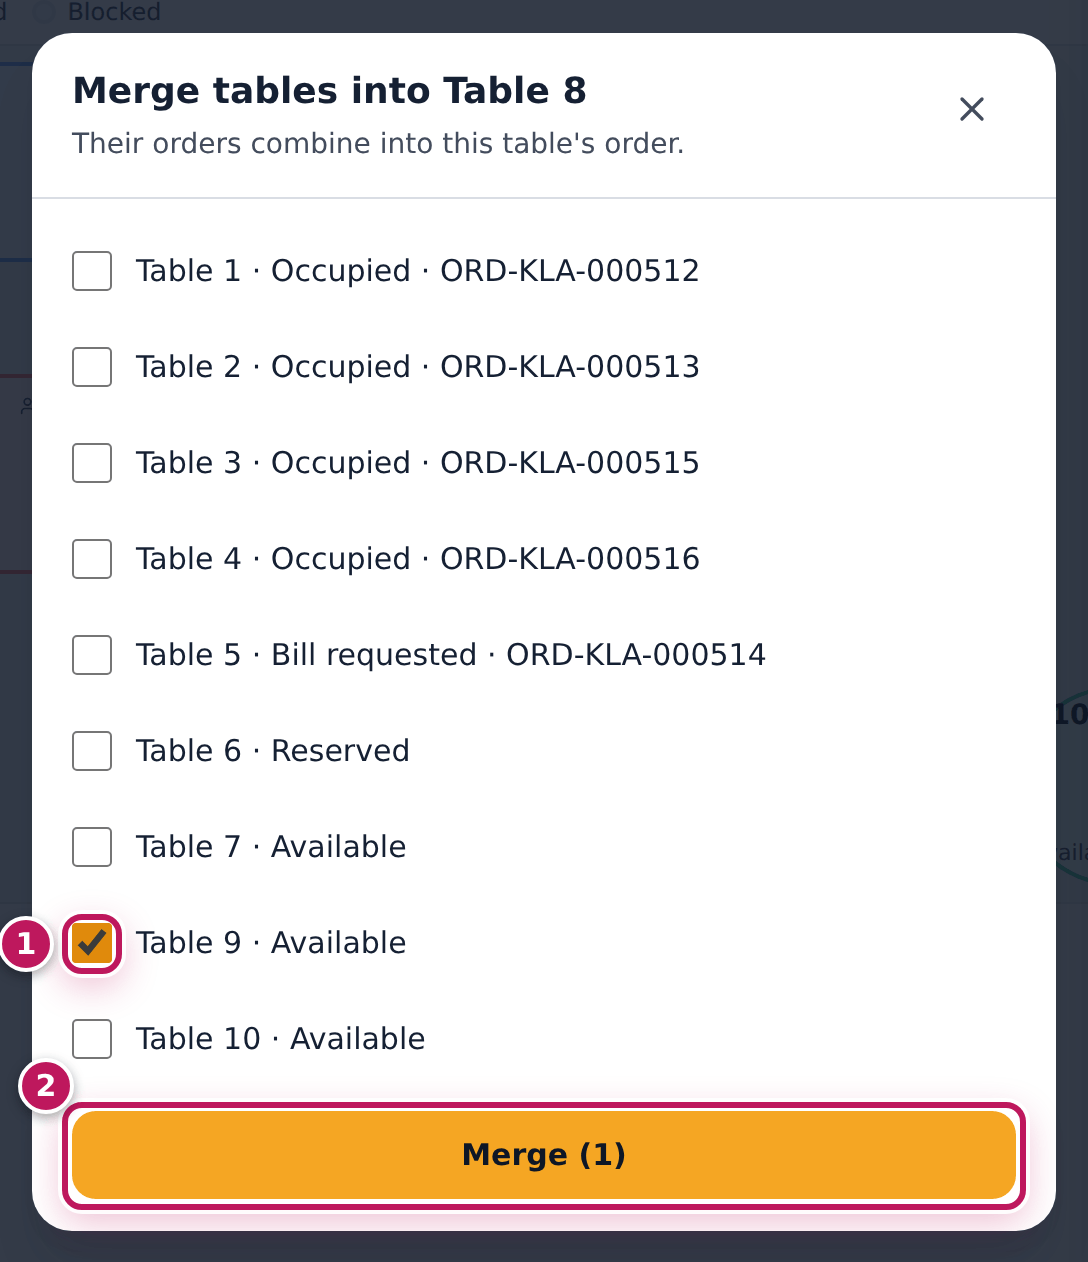
- Tick the tables to join (1), here Table 9 · Available. A table that has its own order can be ticked too: its order is added to this one.
- Tap Merge (1) (2); the number is how many tables you ticked.
Expected result
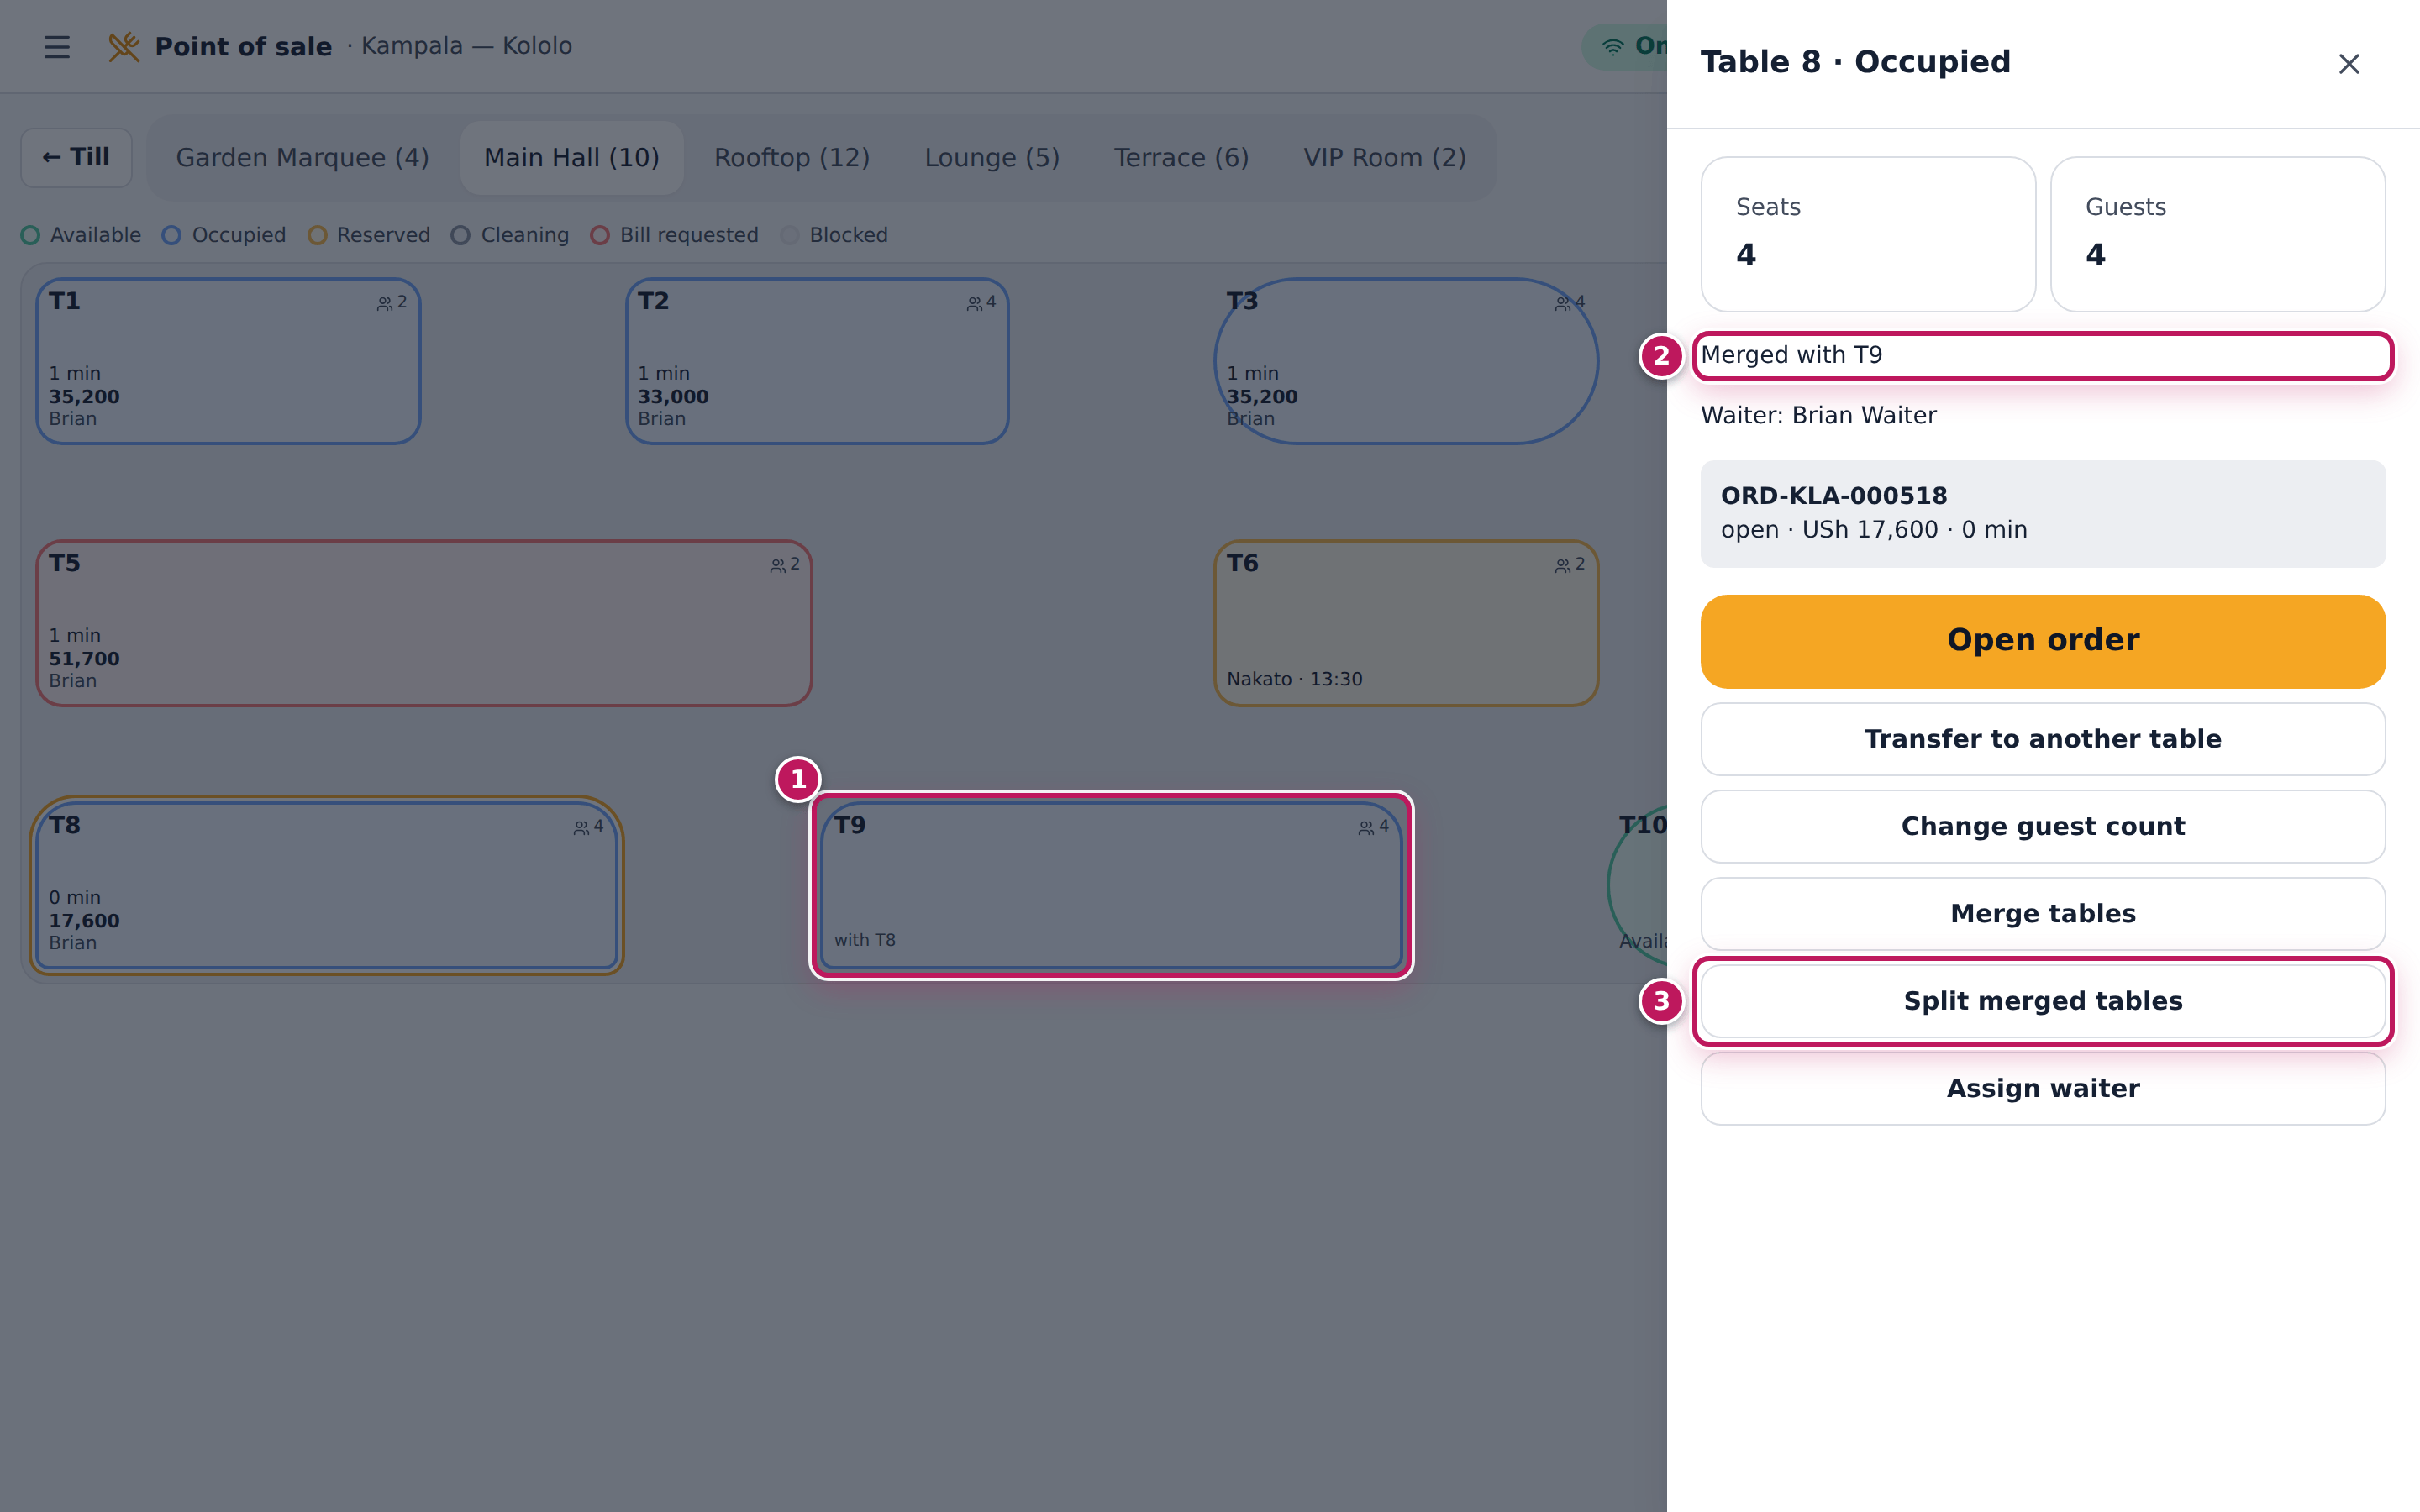
Table 9’s tile shows with T8 (1) in Table 8’s colour; Table 8’s panel says Merged with T9 (2). The party has one order on Table 8. When the order is paid, both tables turn Cleaning and stay joined. Split merged tables (3) separates them at any time; an open order stays on Table 8.
Screenshot
Common mistakes
- Merging before deciding who pays. A merged party has one order. If they will pay separately, split the bill by seat later (see Split the bill); do not keep two orders.
- Forgetting to split after the party leaves. The tables stay joined after payment, and a joined table cannot be seated on its own. Tap Split merged tables, then Mark available on the main table.
Troubleshooting
- “Table 9 is cleaning.” or “… is blocked.” Mark it available first (see Change a table’s status).
- “Table 8 is already merged.” Table 8 is joined to another main table. Open that one, or split first.
- Merge is greyed out. No table is ticked.
Split the bill by seat or items
Purpose
Let guests at one table pay separately — each for what they had, or an equal share — without re-ringing anything.
Role / permission required
Waiters, cashiers, supervisors and managers (sales.edit); taking the
payments needs payments.take.
Prerequisites
- The table’s order has its items, with seats where guests pay for their own (see Start a table order).
Steps
- Open the table’s order and tap Split under it.
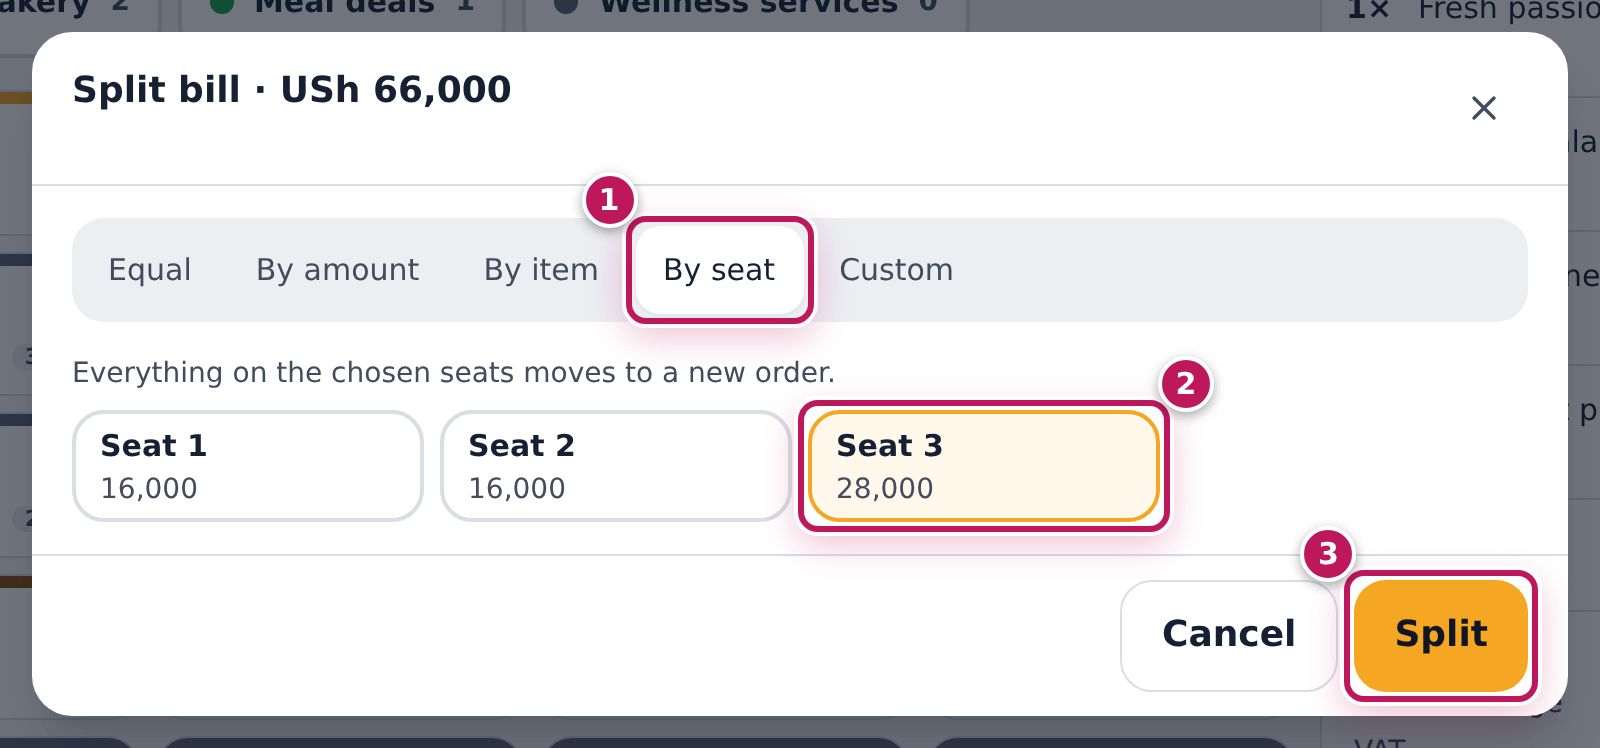
- Choose how to split (1):
- Equal — the total divided by the number of Guests;
- By amount — parts of a fixed amount, the last one takes the rest;
- By item — ticked items move to a new order for this table;
- By seat — everything on the chosen seats moves to a new order;
- Custom — named parts with amounts that add up to the total.
- For By seat, tap the seats that pay on their own (2), here Seat 3. Each seat shows its amount.
- Tap Split (3). JupitaPos says New order ORD-… created for the split items.; tap Open it in the message to take that guest’s payment.
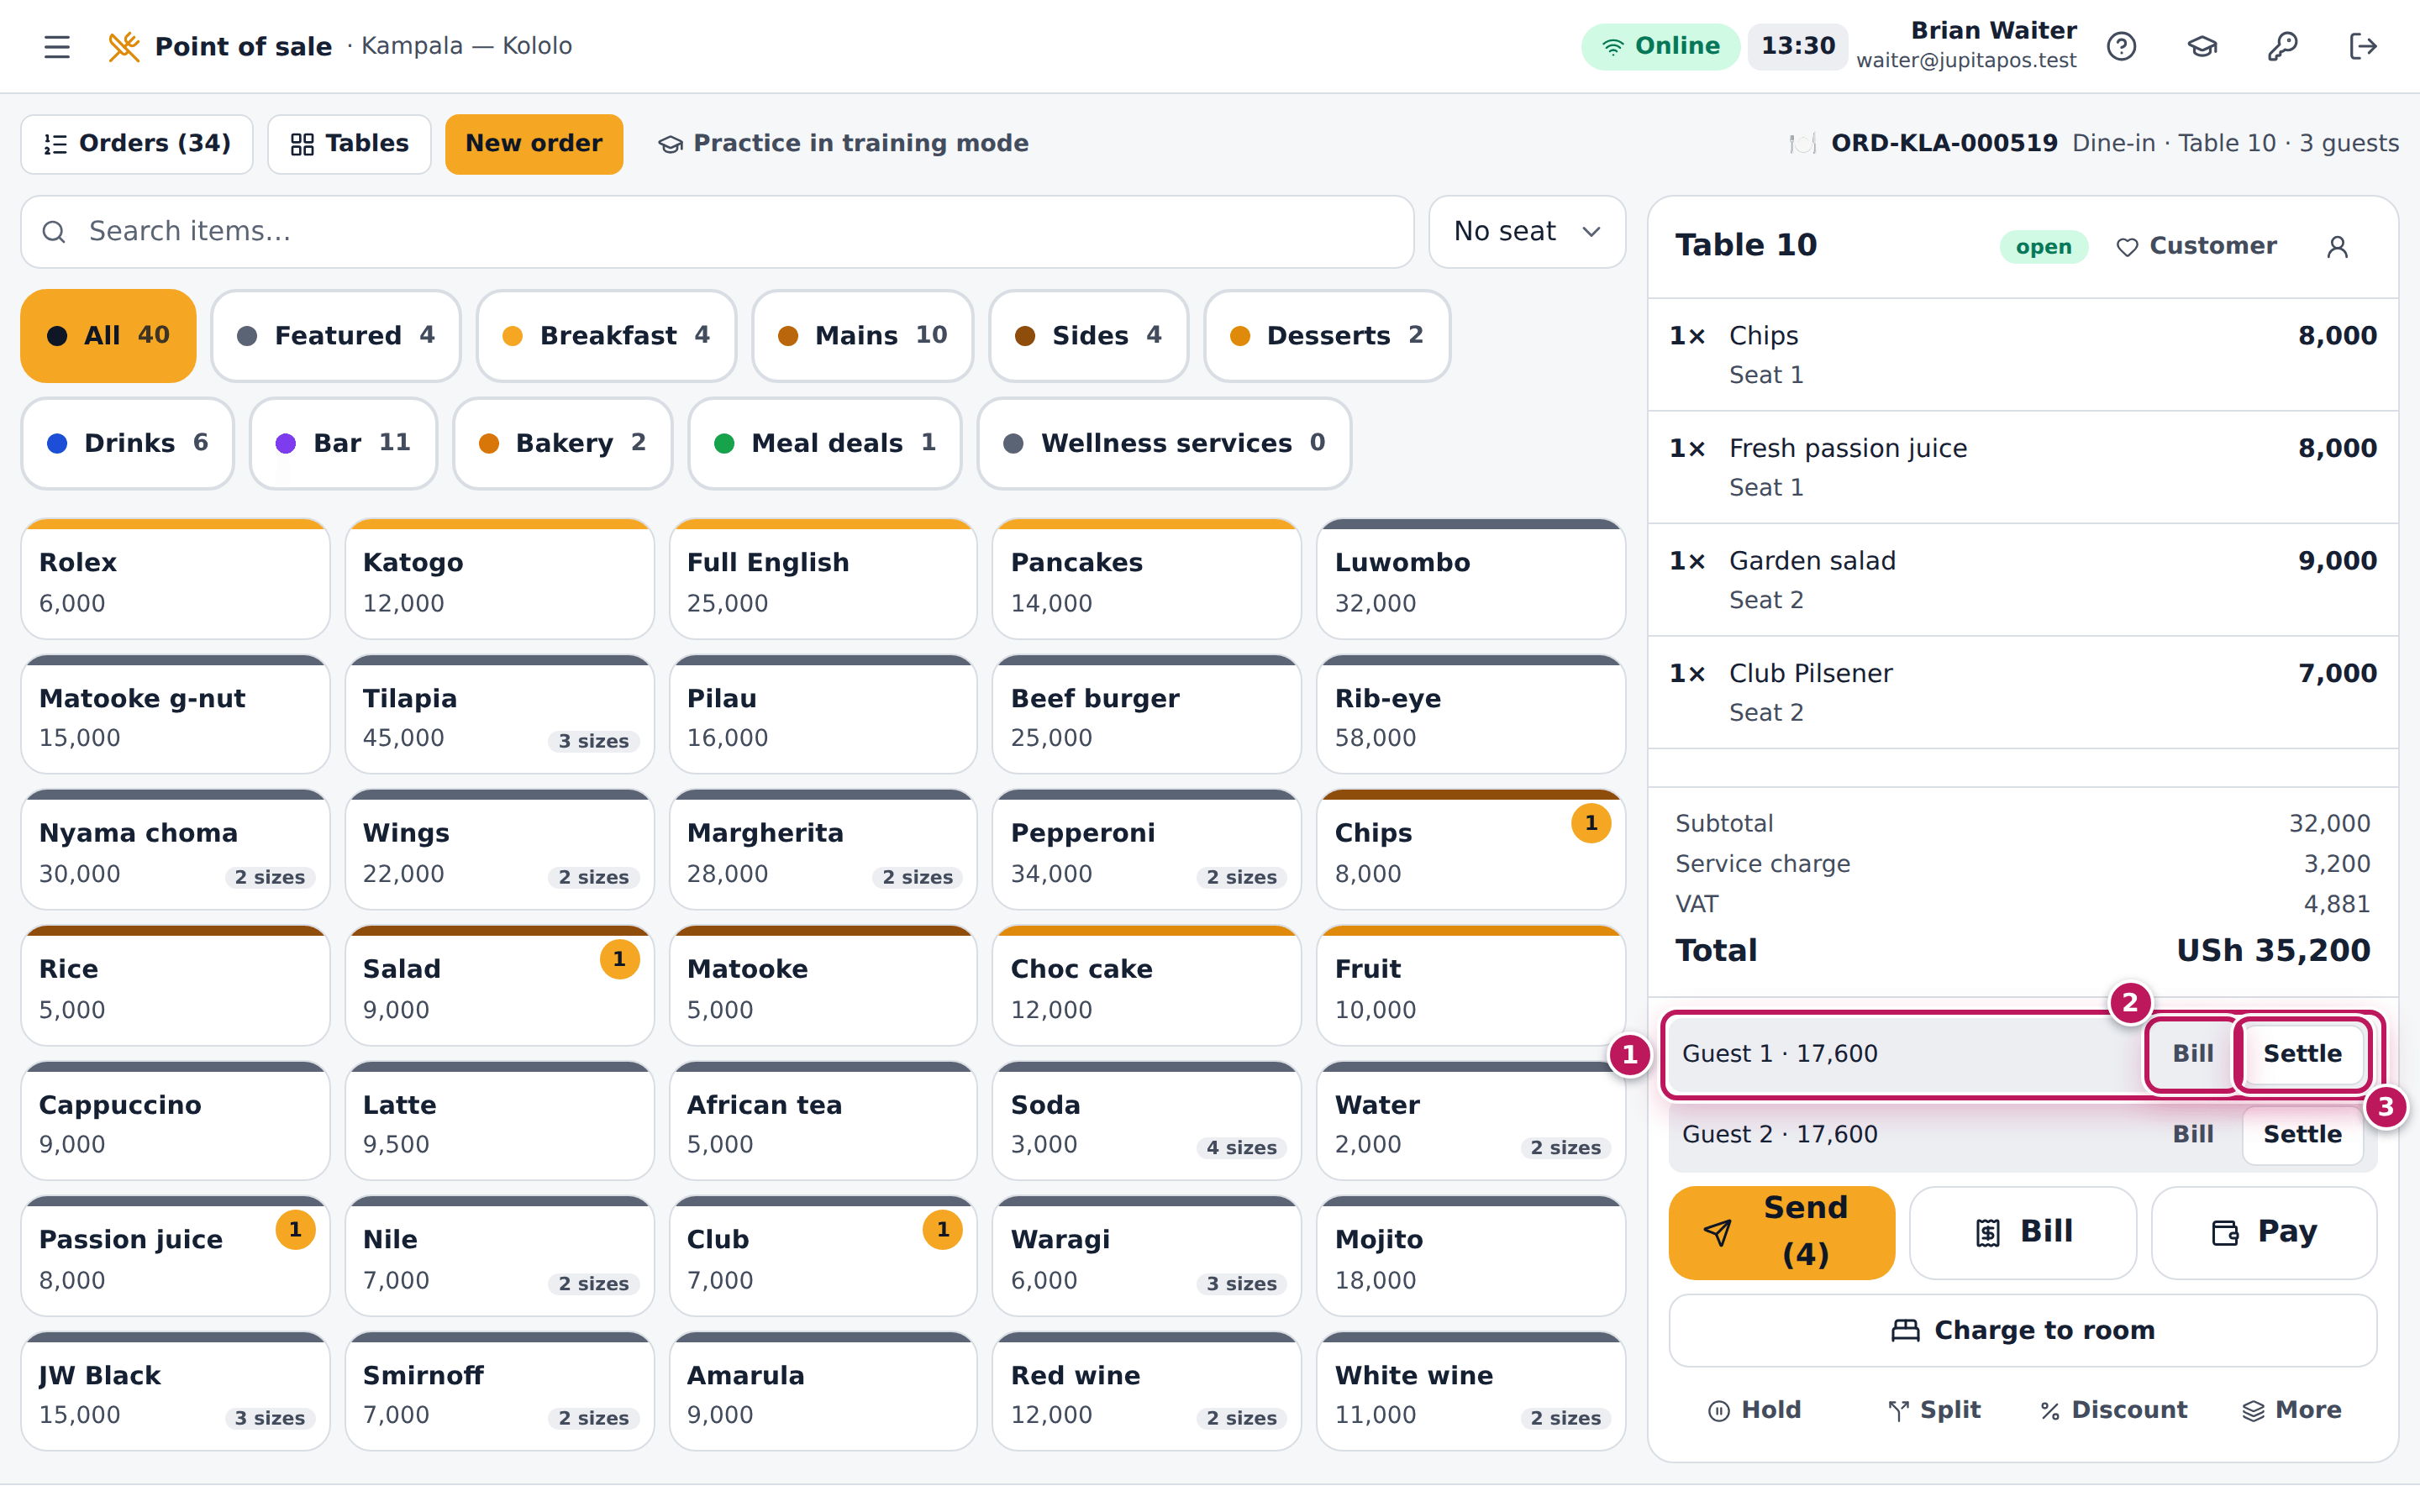
- To share the rest equally, tap Split again, choose Equal, set Guests to 2 and tap Split. The order now lists its parts (1).
- For each part, tap Bill (2) to print that guest’s bill, and Settle (3) to take their payment (see Take a cash payment).
Expected result
Seat 3’s fruit platter and mojito (USh 28,000) are on their own order; Table 10 keeps seats 1 and 2 — USh 35,200 with the service charge — split into two equal parts, Guest 1 · 17,600 and Guest 2 · 17,600, each with Bill and Settle. The order closes when every part is paid, and the table is freed when both orders are paid.
Screenshot
Common mistakes
- Splitting by seat when items have no seat. Items rung without a seat are not offered; the dialog says No lines have a seat number. Use By item instead.
- Taking one payment for the whole order after an equal split. Use Settle on each part, so that each guest gets their own receipt.
Troubleshooting
- Split is greyed out. The order has no items yet.
- The Custom split’s Split button stays grey. The parts do not add up to the total; the figure under them turns green when they do.
FAQ
Can I undo a split by item or seat? The new order is an ordinary order on the same table. Merge it back with More → Merge another order into this one.
Print the bill for the table
Purpose
Give the table its bill when the guests ask for it, and let the floor know the table is finishing.
Role / permission required
Anyone who sells (sales.create).
Prerequisites
- The table’s order has all its items.
Steps
- Open the table’s order on the till.
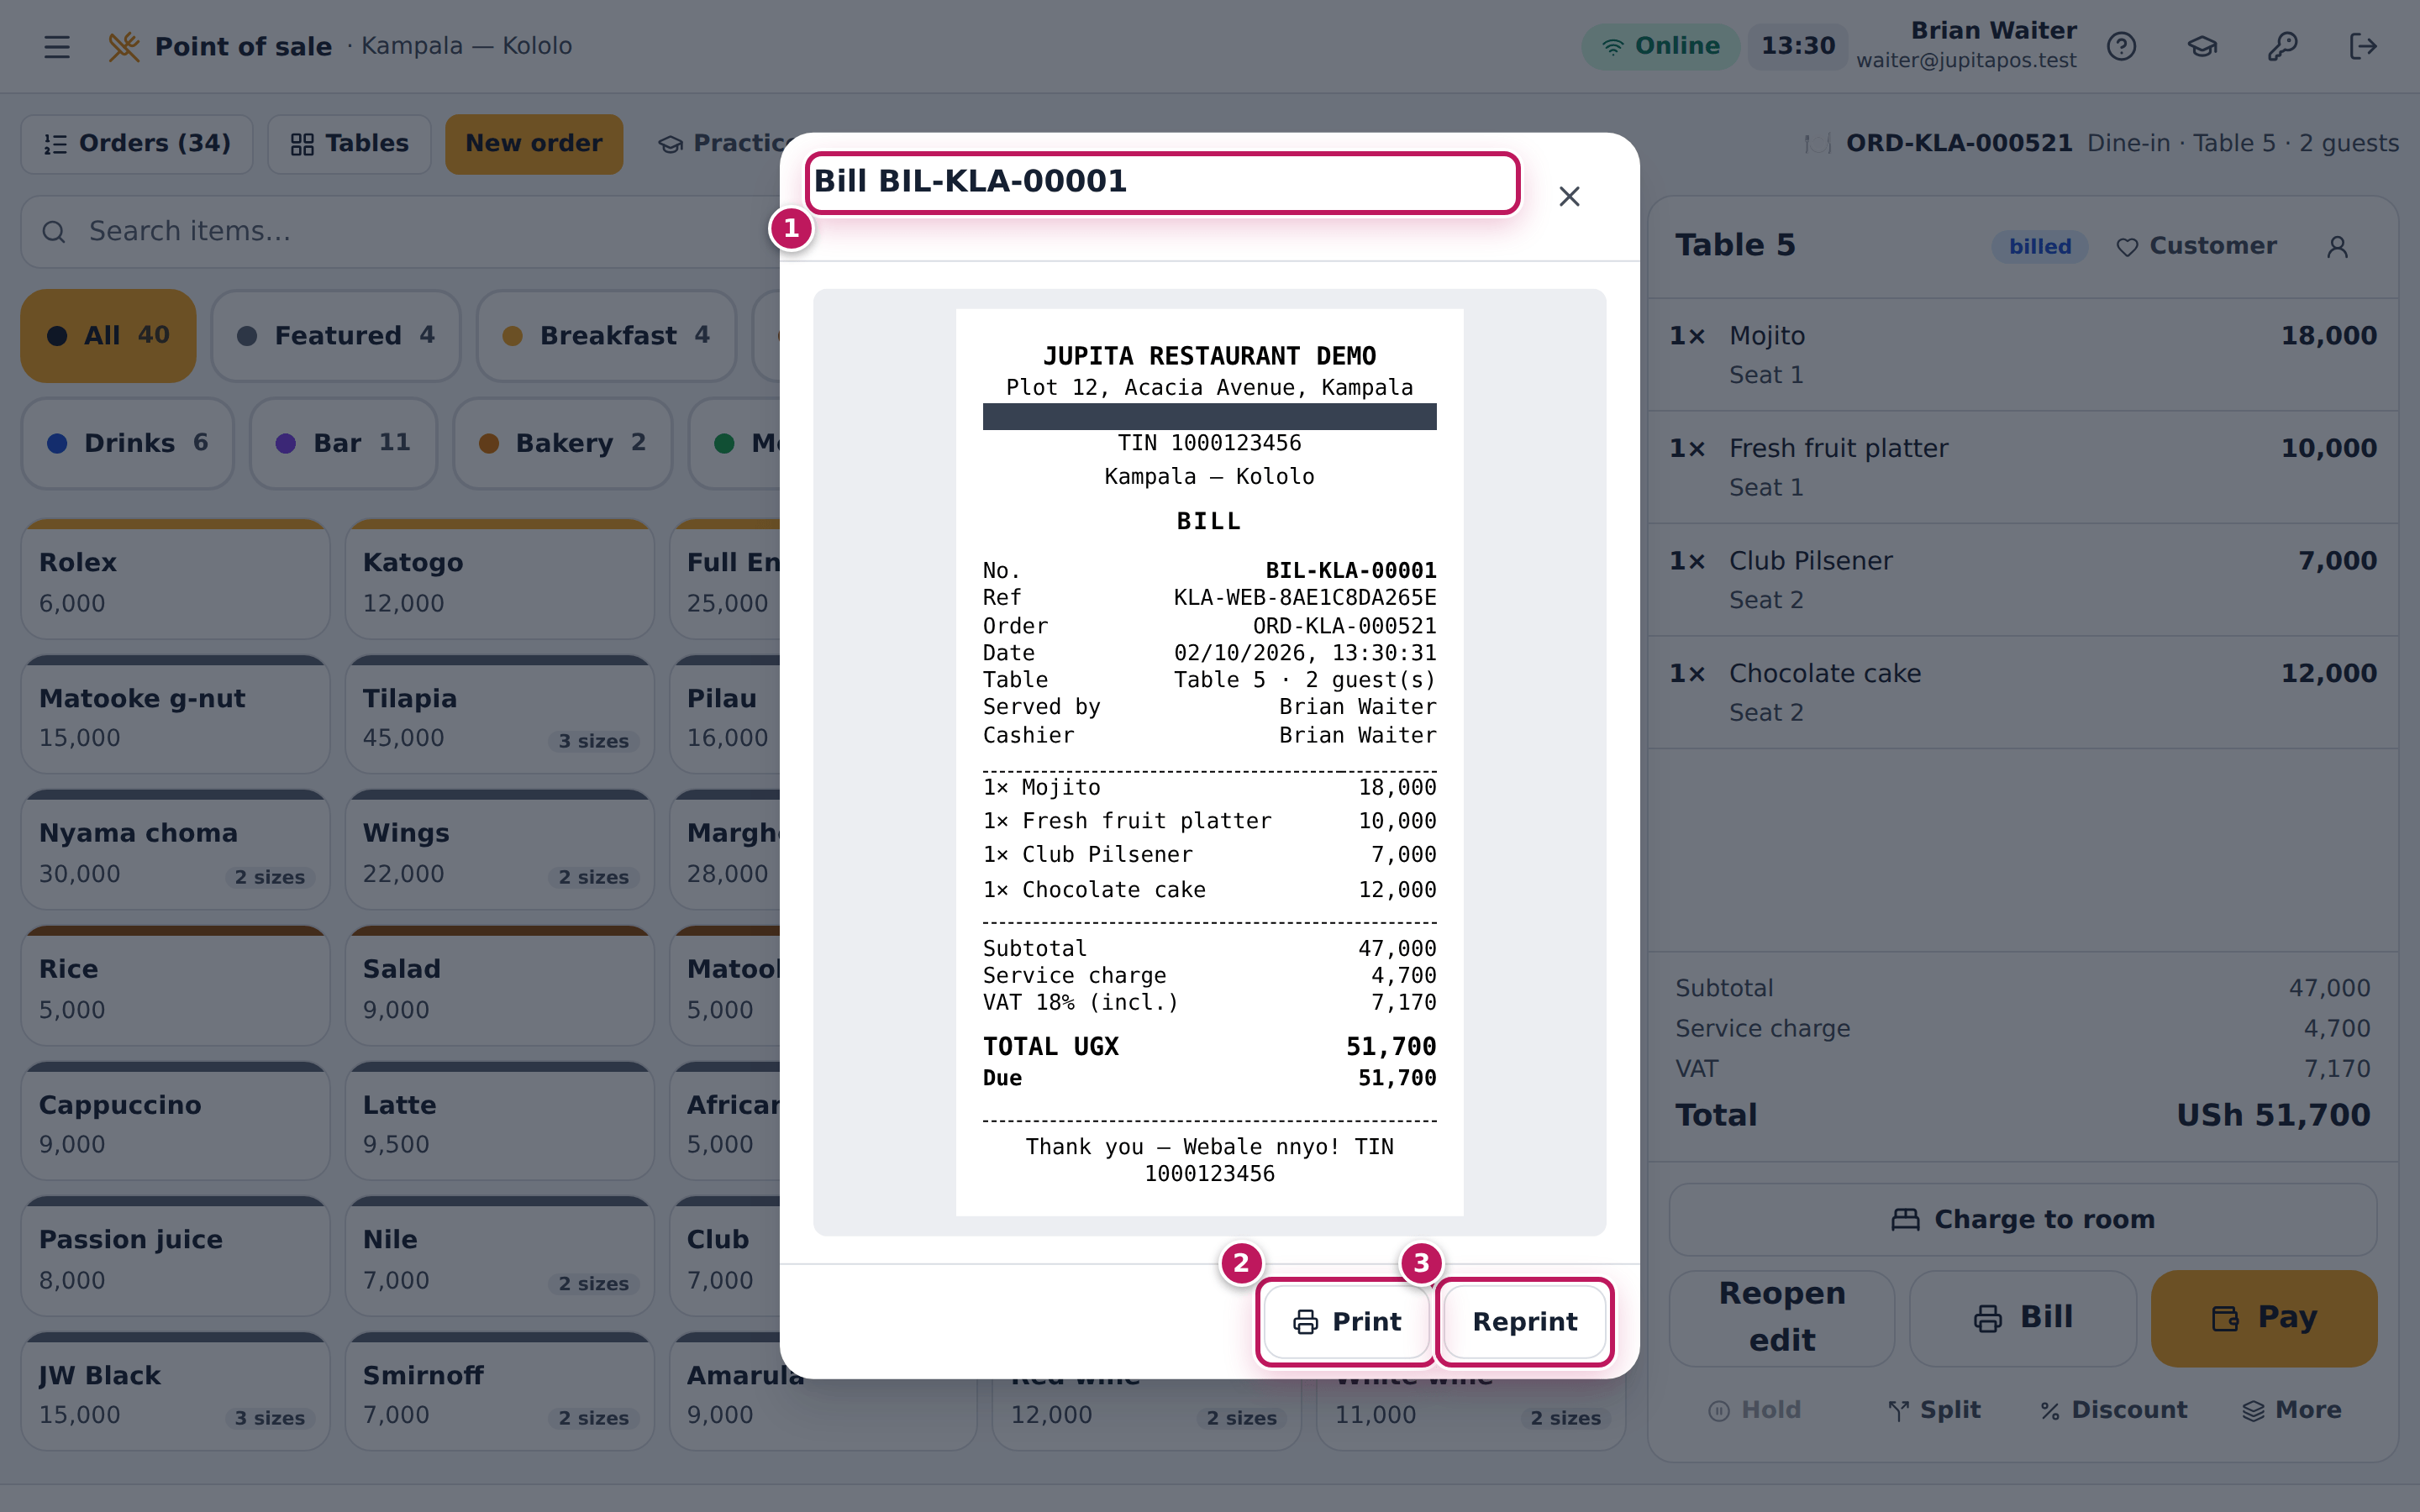
- Tap Bill under the order.
- The bill opens: Bill BIL-KLA-… (1) with the items, the service charge, the VAT and the total. Tap Print (2) to print it; Reprint (3) prints another copy.
- Close the bill. The order shows billed.
- When the guests pay, tap Pay (see Take a cash payment).
Expected result
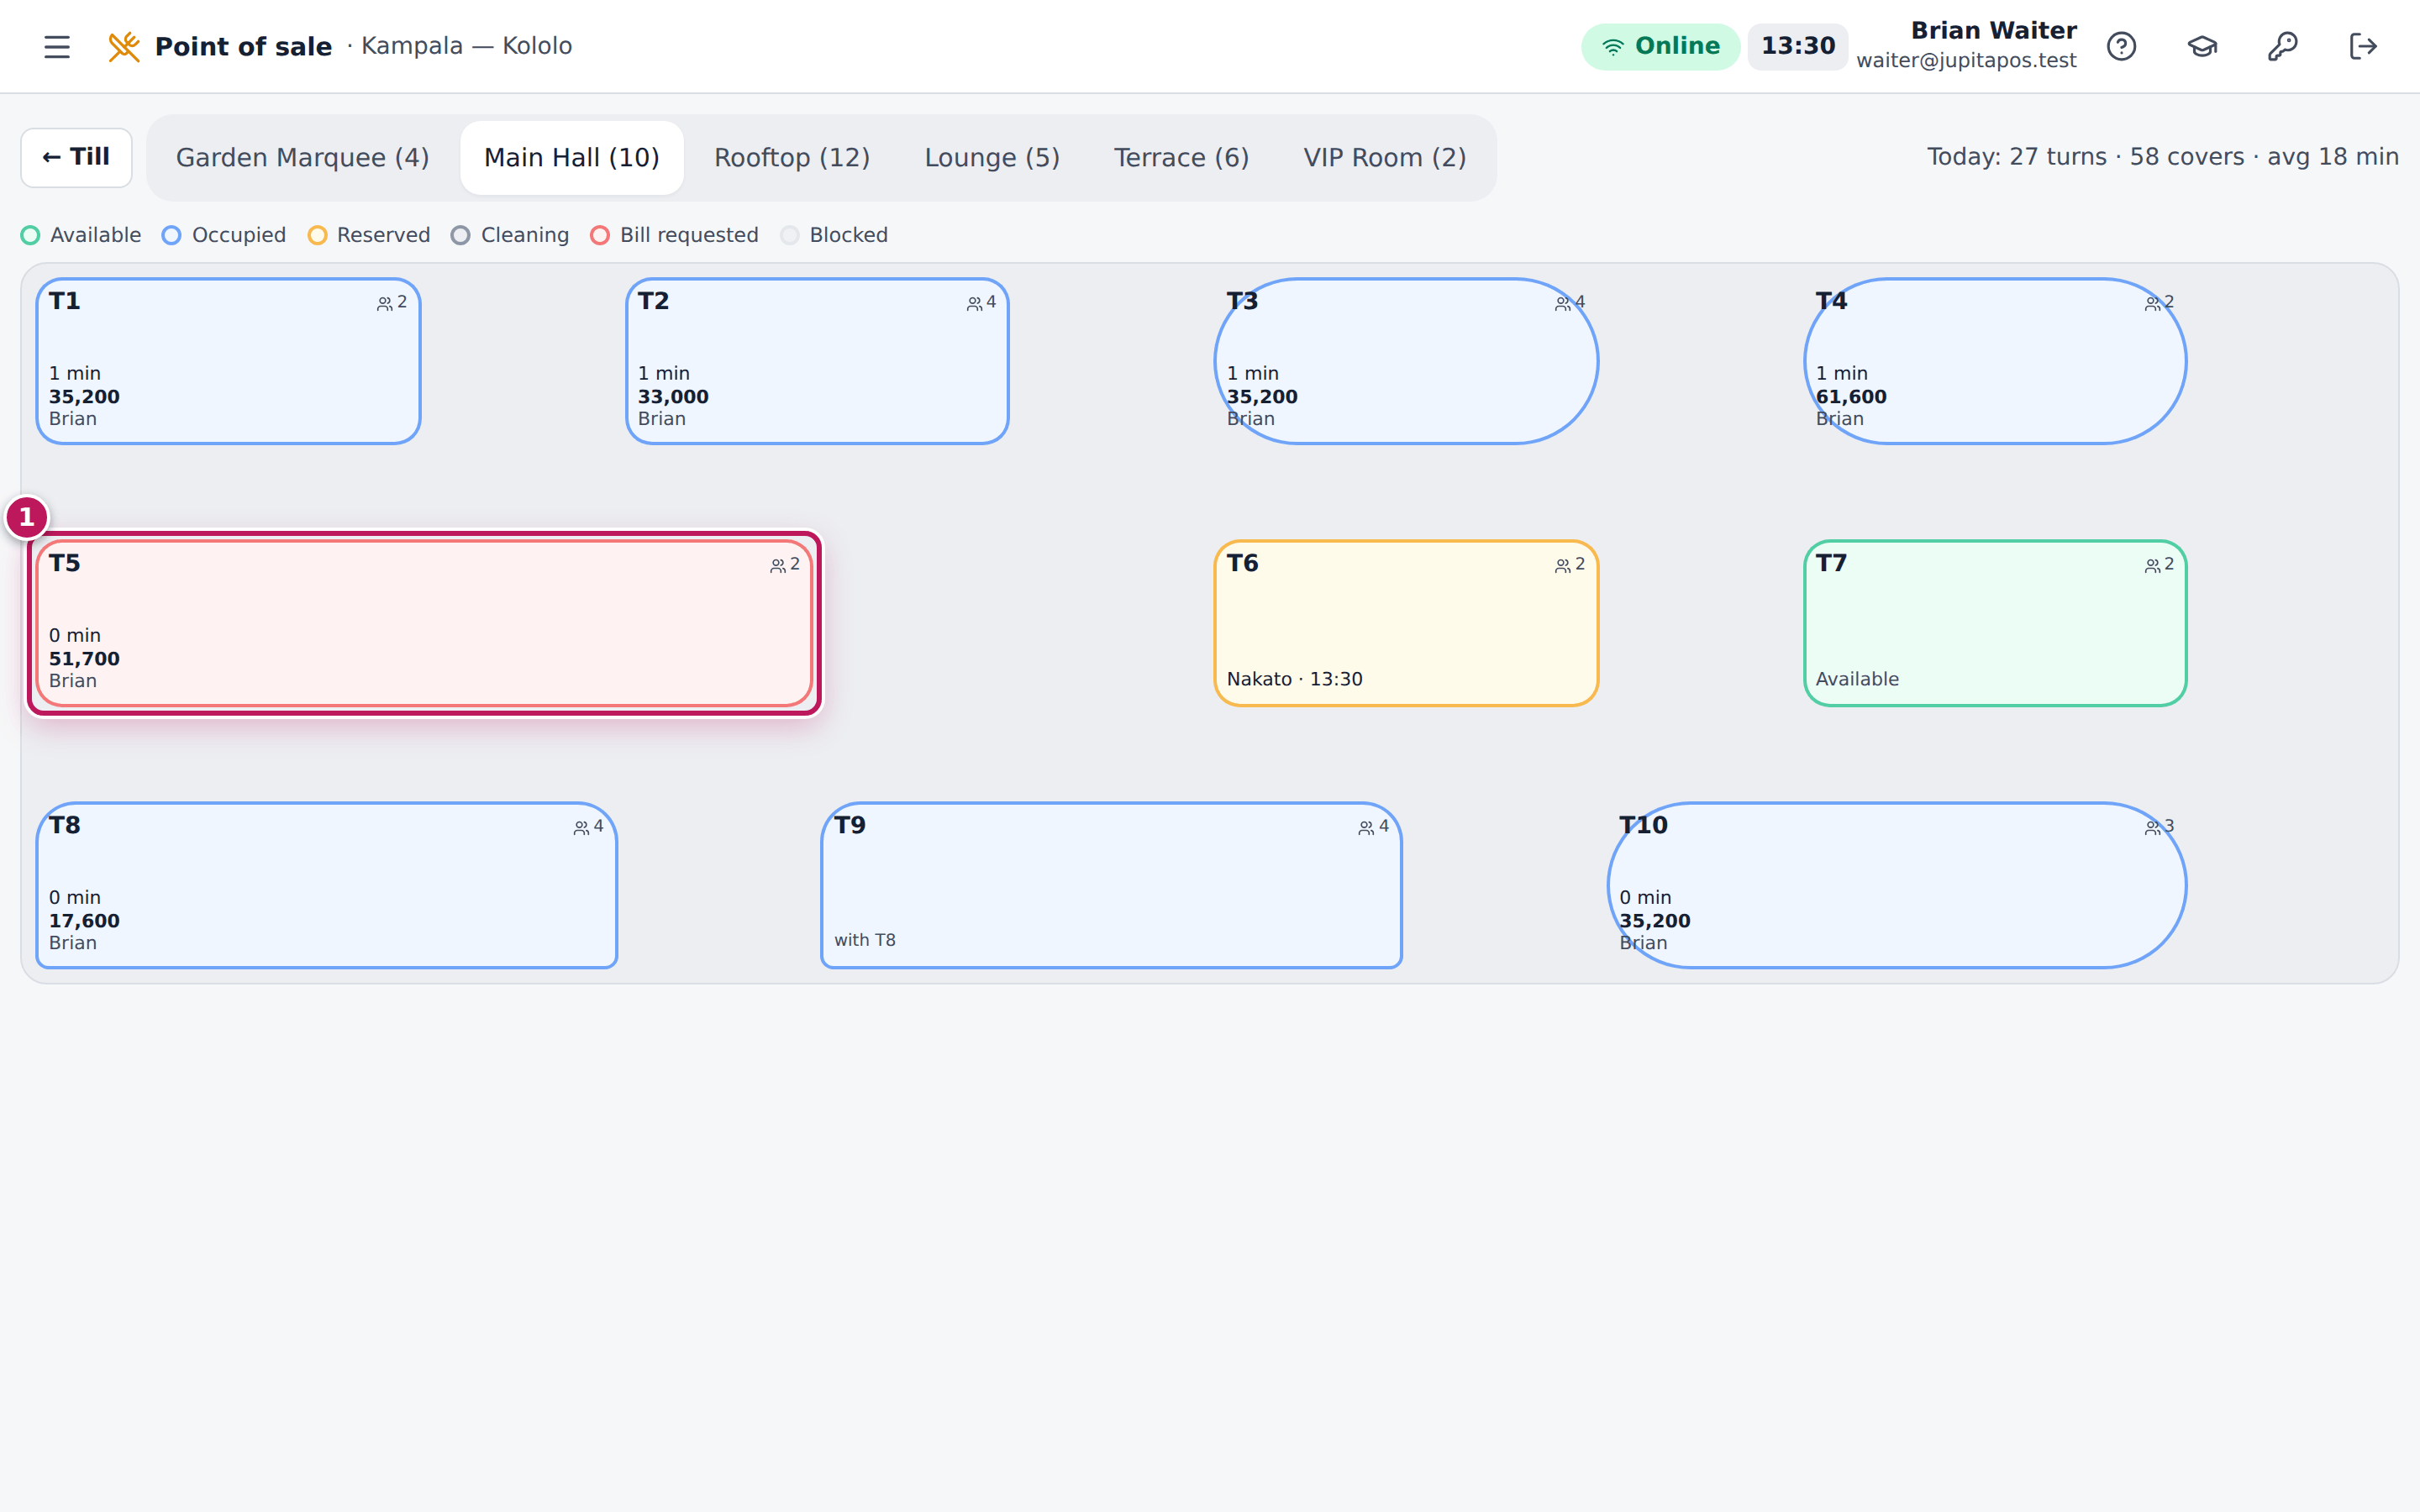
The table’s tile turns red, Bill requested (1), on every floor plan in the branch. The bill has its own number (for example BIL-KLA-000123); it is not a receipt — the receipt is issued when the order is paid.
Screenshot
Common mistakes
- Adding items after the bill without telling the guests. The printed bill no longer matches. Tap Reopen edit, add the items and print the bill again.
- Giving the bill as a receipt. A bill shows what is due; only the receipt after payment proves the guest paid.
Troubleshooting
- The bill does not print. It is still issued: tap Reprint once the printer has paper and power.
- I need to add a dessert after billing. Tap Reopen edit, add it, then Bill again.
Change a table’s status: reserve, clean, block
Purpose
Keep the floor plan true: hold a table for a booking, show that it is being cleaned, take a broken table out of service, and make it available again.
Role / permission required
Waiters, hosts, cashiers, supervisors and managers (tables.manage).
Prerequisites
- The table has no open order. A table in use changes status by itself (seated, bill, paid).
Steps
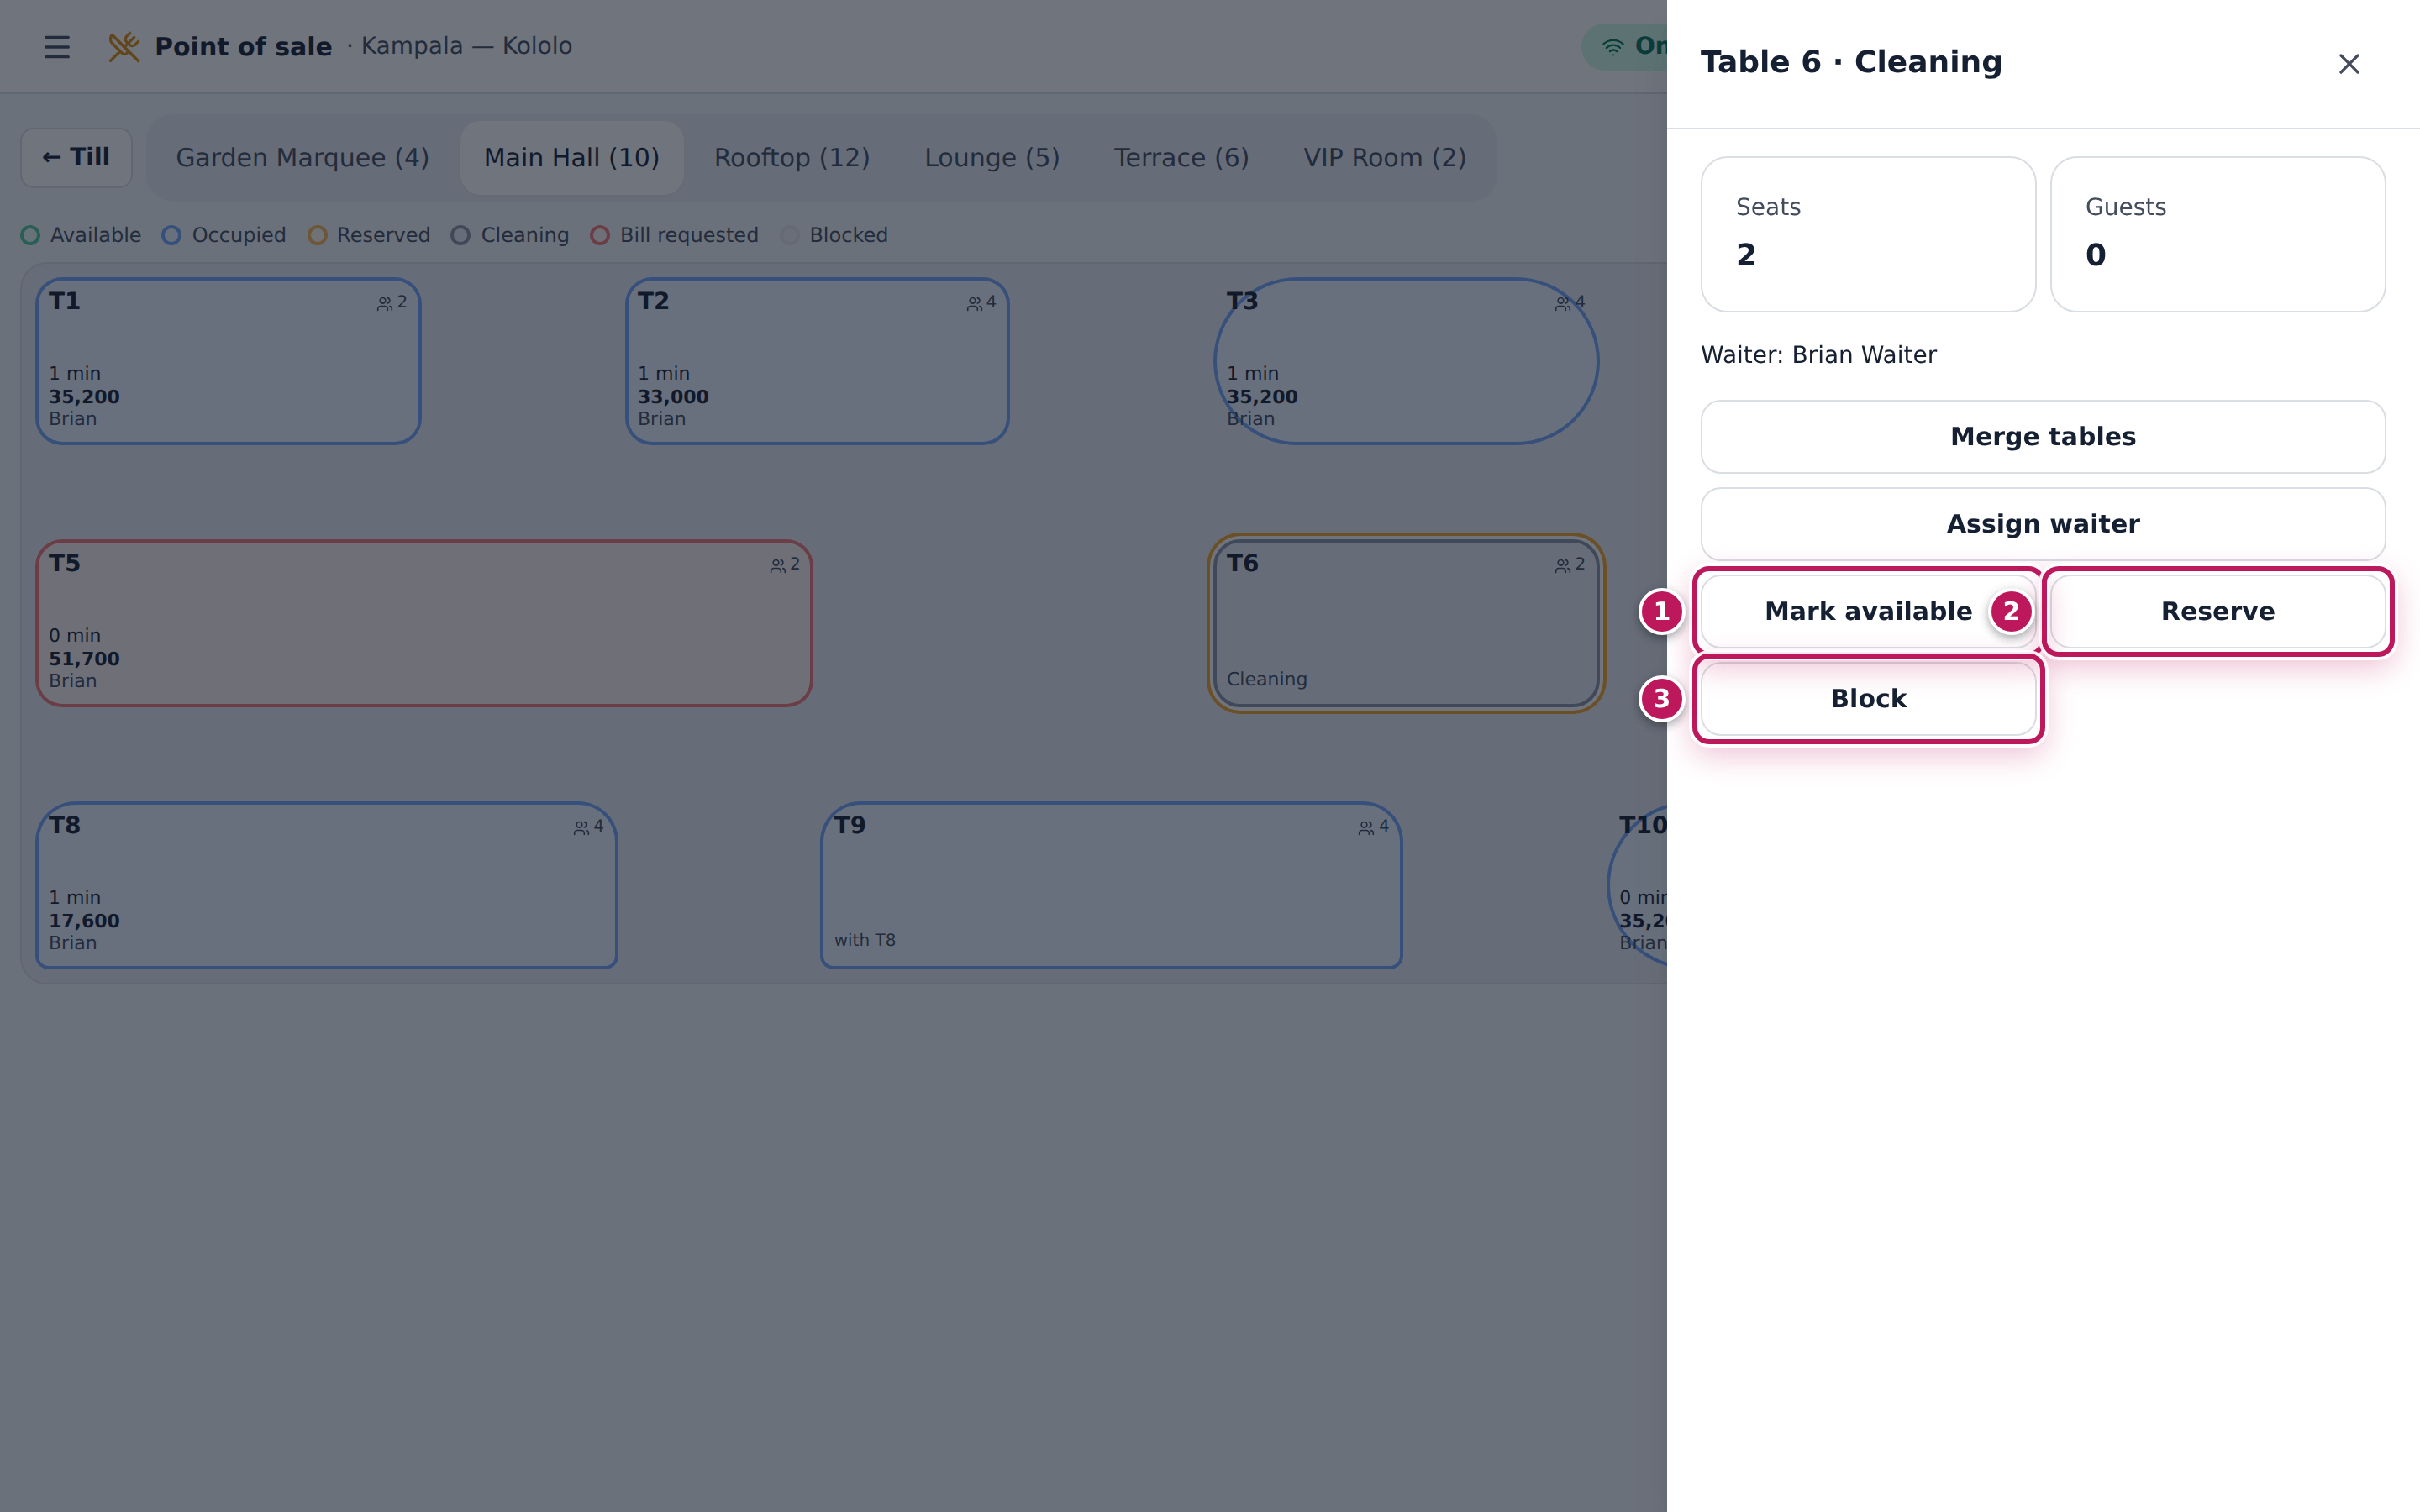
- On the floor plan, tap the table, here Table 6 while it is being cleaned.
- Tap what is true now:
- Mark available (1) — cleared and ready for guests;
- Cleaning — the guests left and it is being cleared;
- Reserve (2) — held for a booking;
- Block (3) — out of service (broken, closed section).
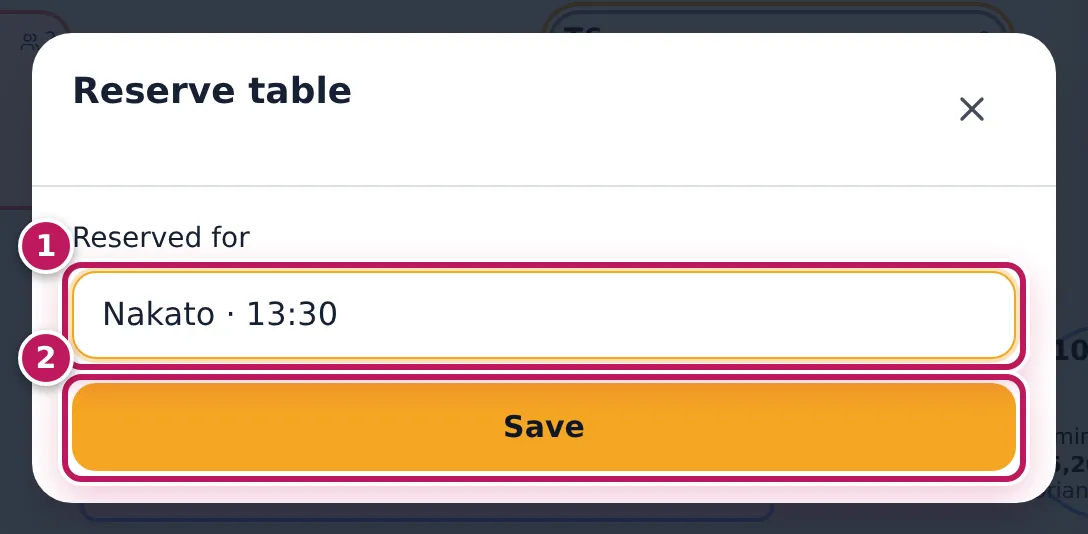
- For Reserve, type who it is for in Reserved for (1), for example Nakato · 13:30, and tap Save (2).
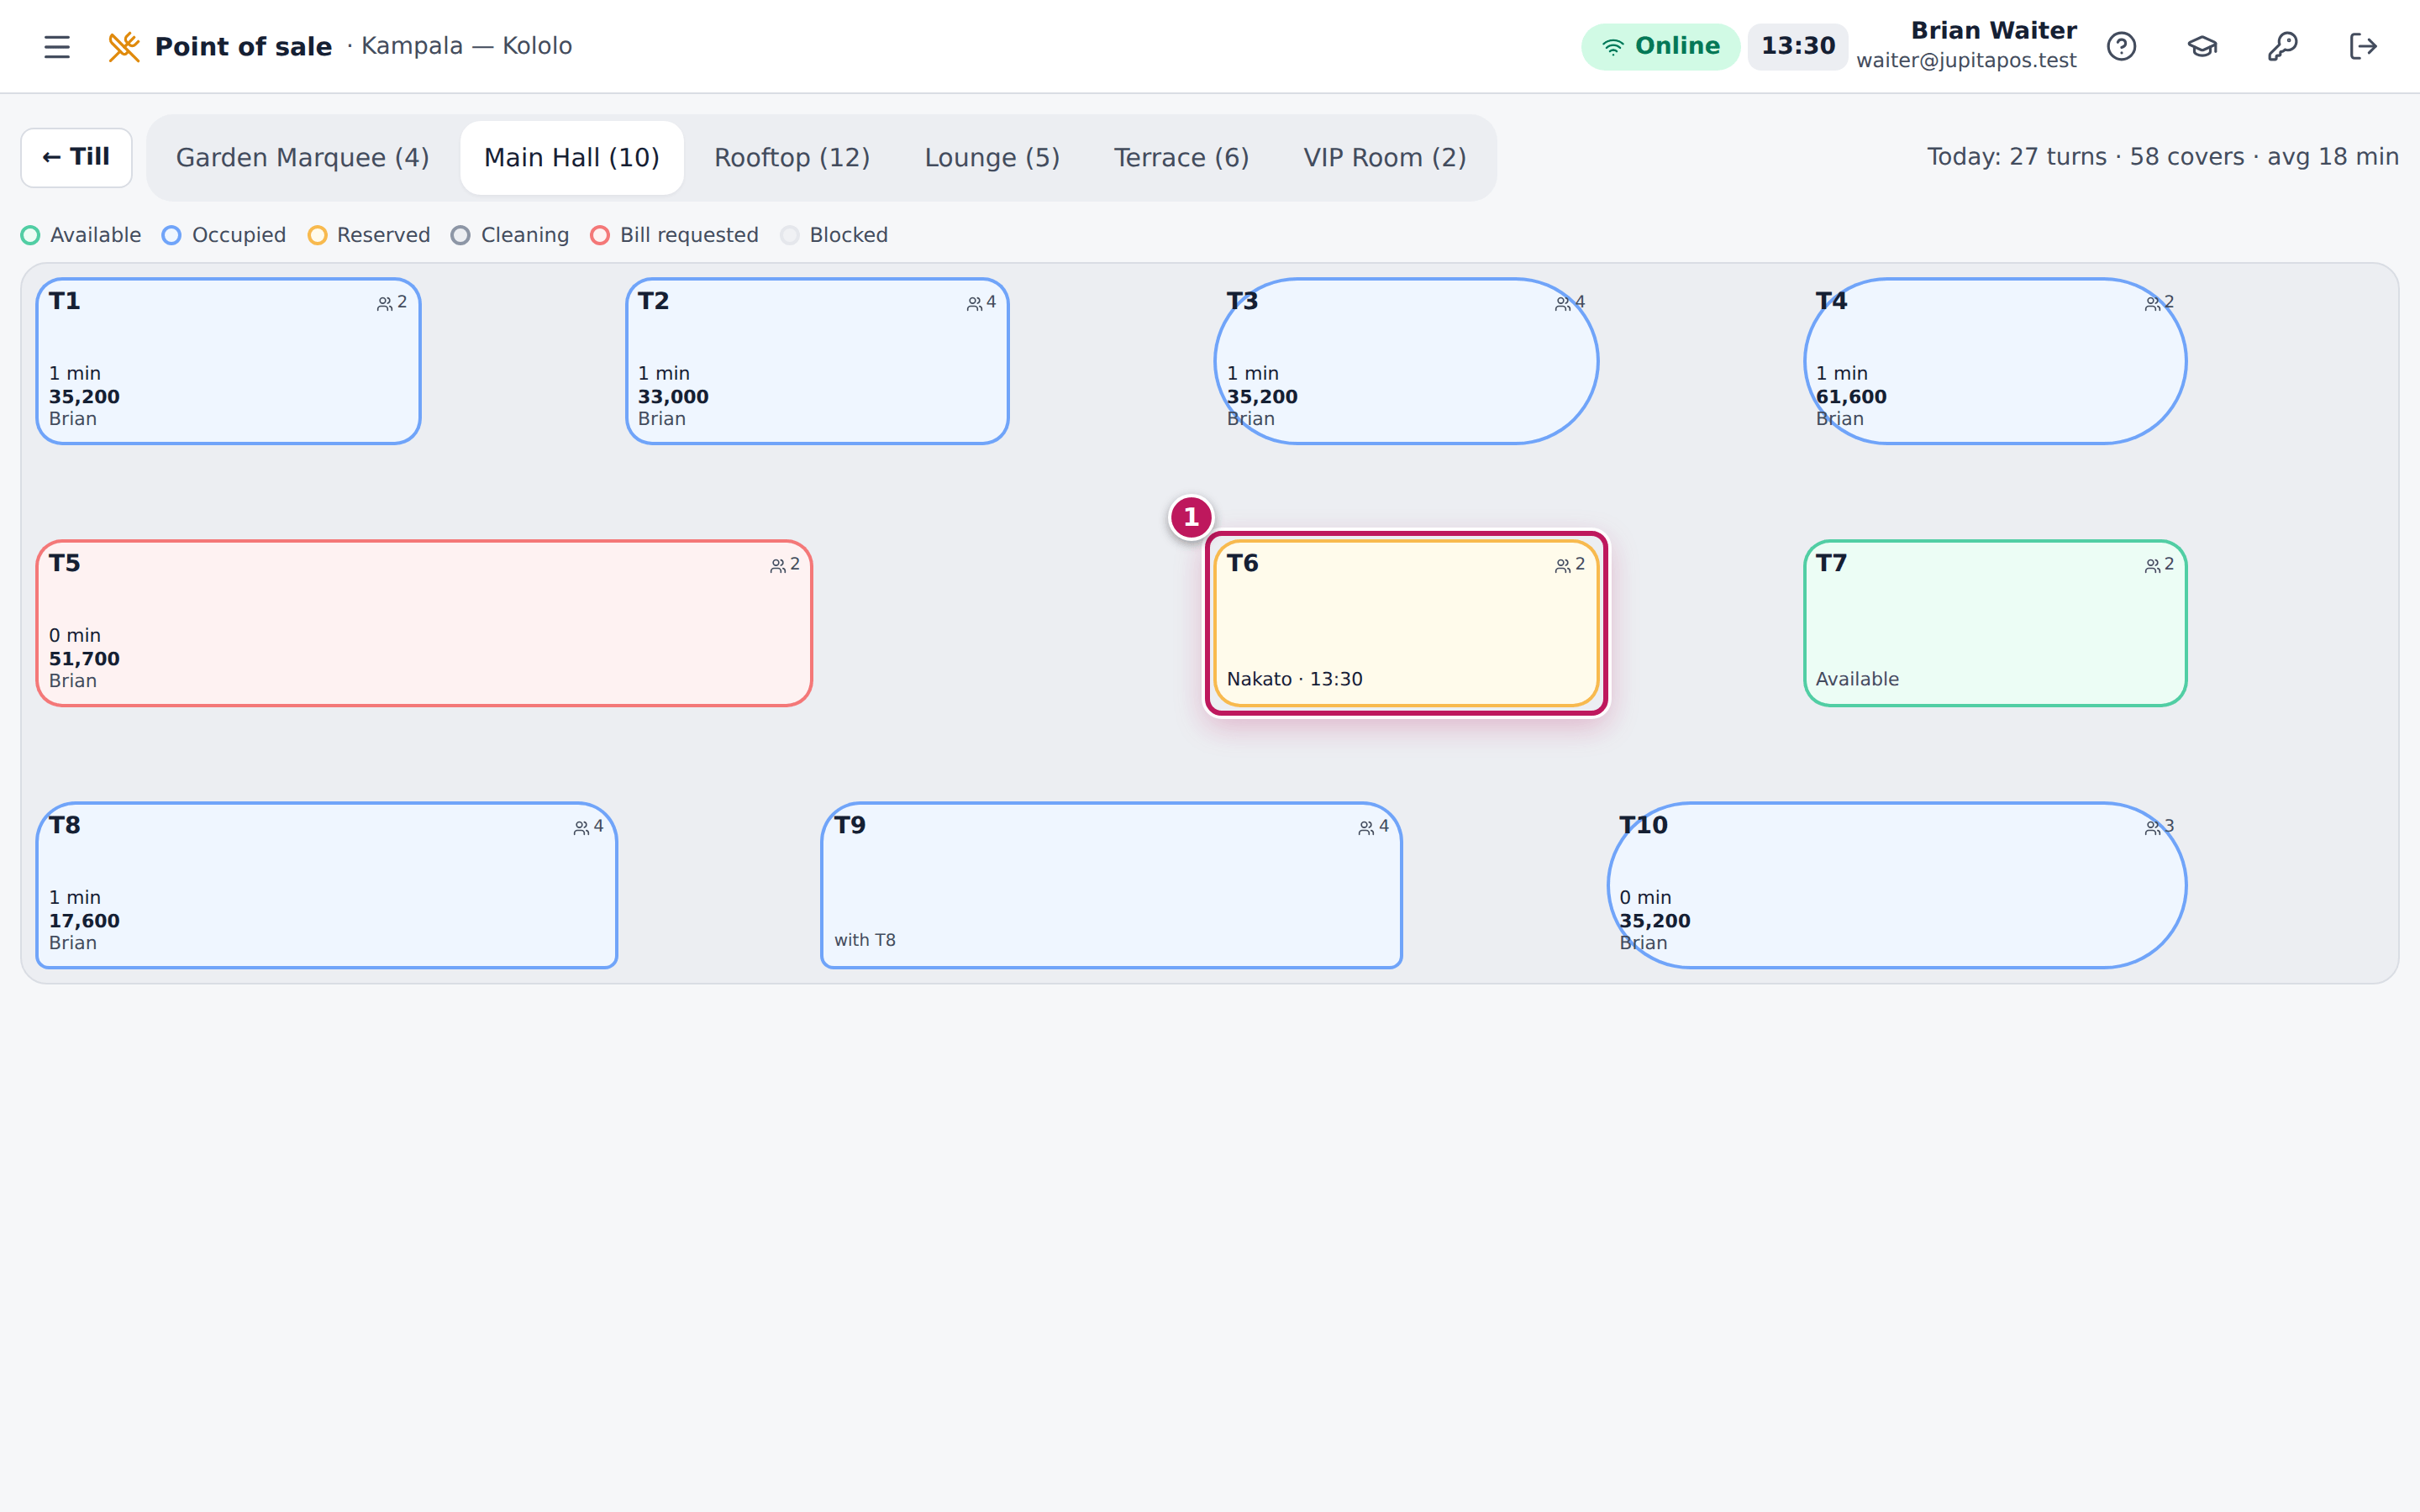
Expected result
Table 6 turns Reserved (orange) and shows Nakato · 13:30 on its tile (1). Seating the table later clears the reservation.
Screenshot
Common mistakes
- Leaving paid tables in Cleaning. A paid table turns Cleaning; it stays that way until someone taps Mark available. Do it as soon as the table is laid again.
- Reserving without a time. Write the name and the time, so that colleagues know when the table is free before then.
Troubleshooting
- “Table 6 has an open order — close or transfer it first.” Guests are still on the order. Pay, cancel or transfer it first.
- “Table 9 is merged; split the tables first.” Split the merged tables, then change the status.
FAQ
Is this the same as a booking in Reservations? No. Reserve only marks the table on the floor plan. A booking with the guest’s details, deposit and reminders is made in Table Reservations & Waitlist (see Take a new booking).
Take orders on your phone
Purpose
Serve the terrace or the garden without walking back to the till: seat the table, take the order and send it to the kitchen from your phone.
Role / permission required
Waiters (sales.create, tables.view).
Prerequisites
- JupitaPos is installed on your phone (see Install on Android or Add to the Home Screen) and you are signed in.
Steps
- Open Point of sale and tap Tables.
- Swipe the area tabs and choose the area, here Terrace.
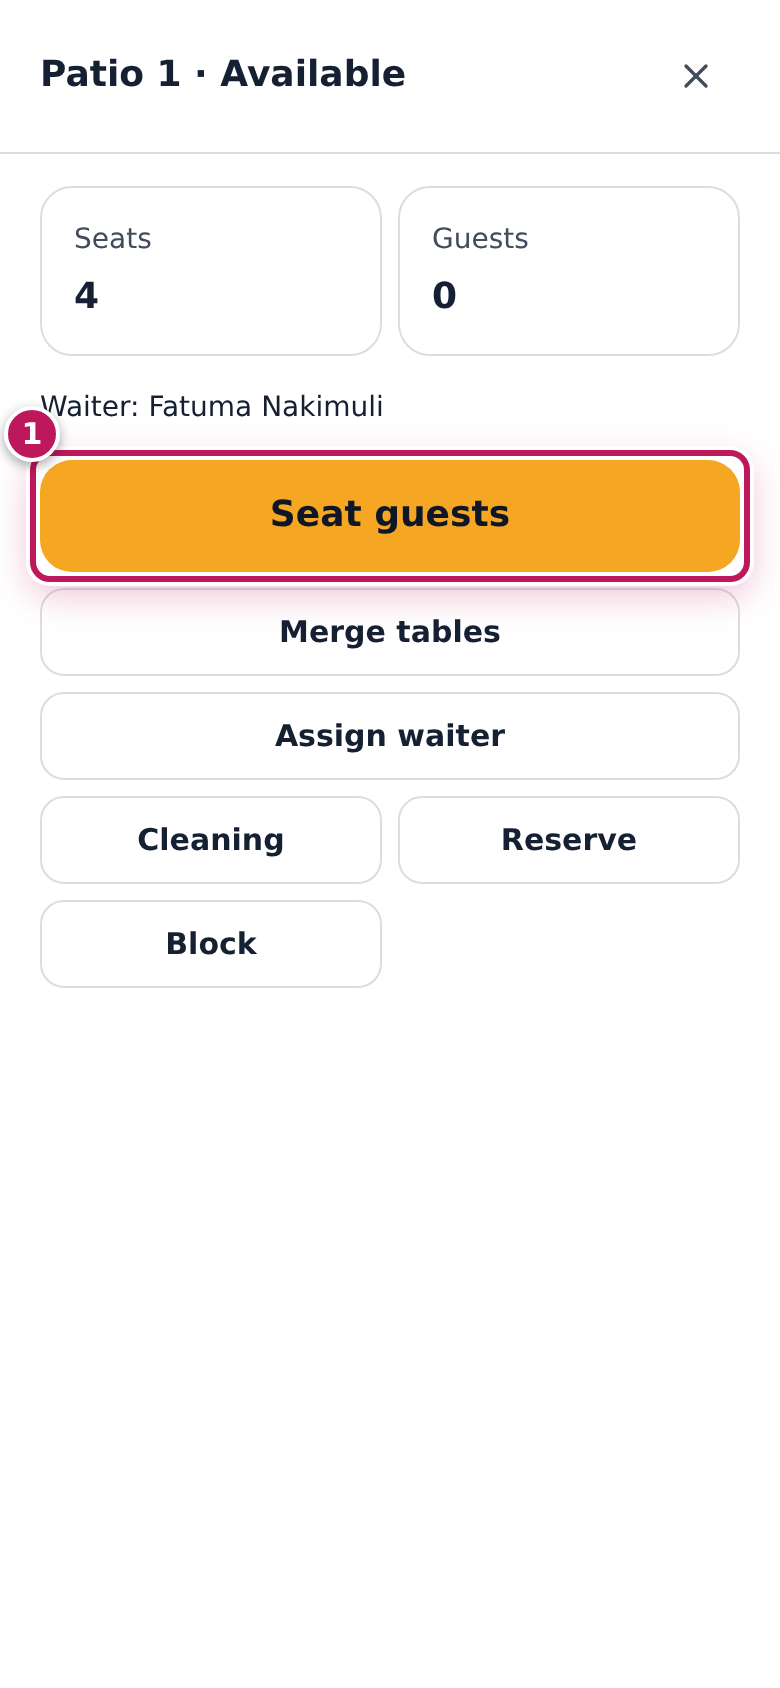
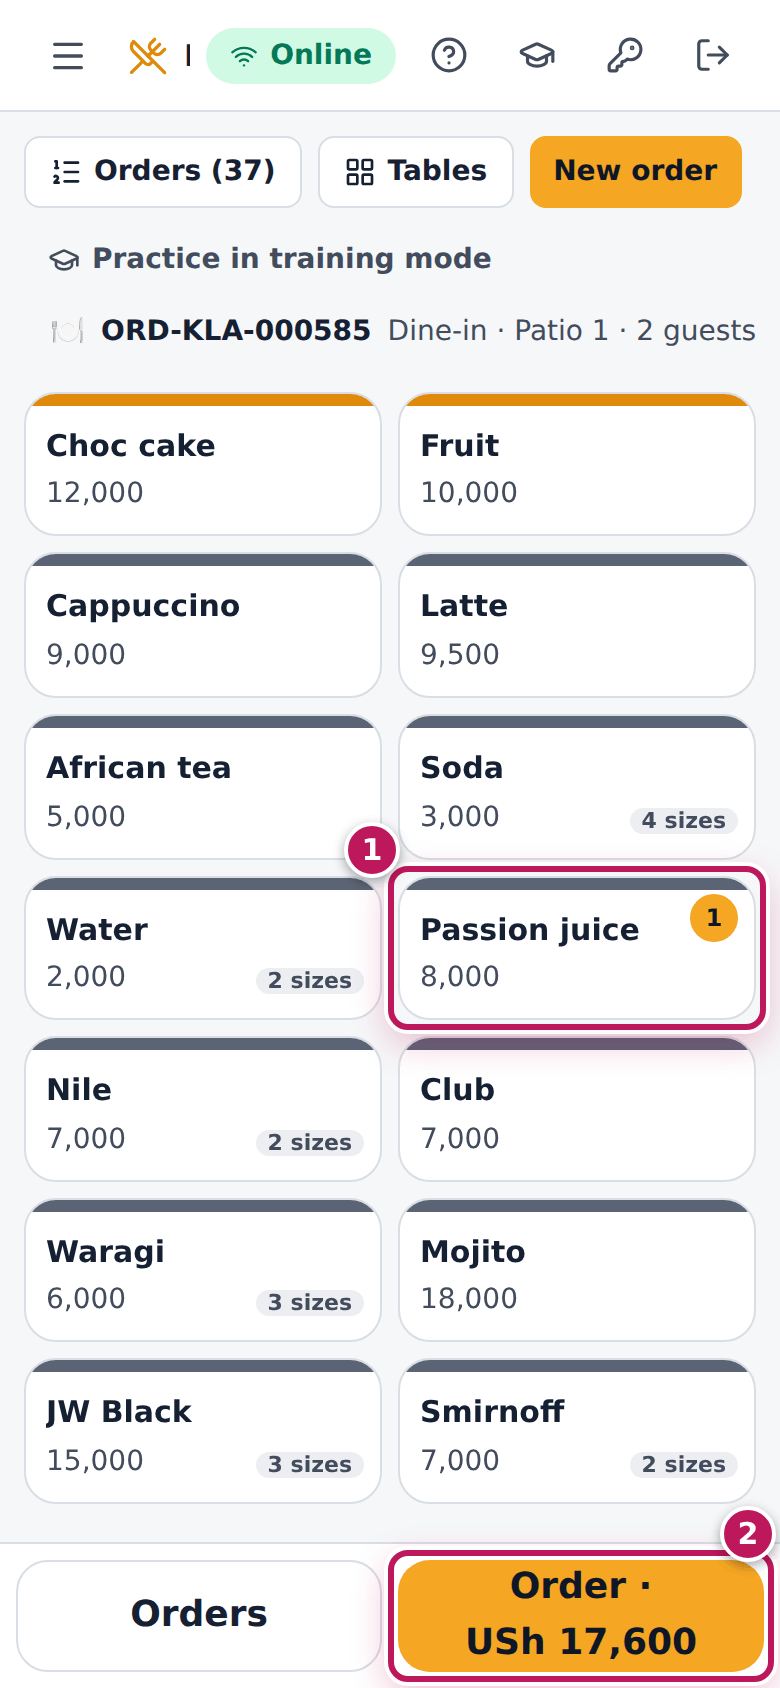
- Tap the table, here Patio 1, then Seat guests (1).
- Tap the number of guests and Seat & start order.
- Tap the items. Each tile shows how many are in the order (1).
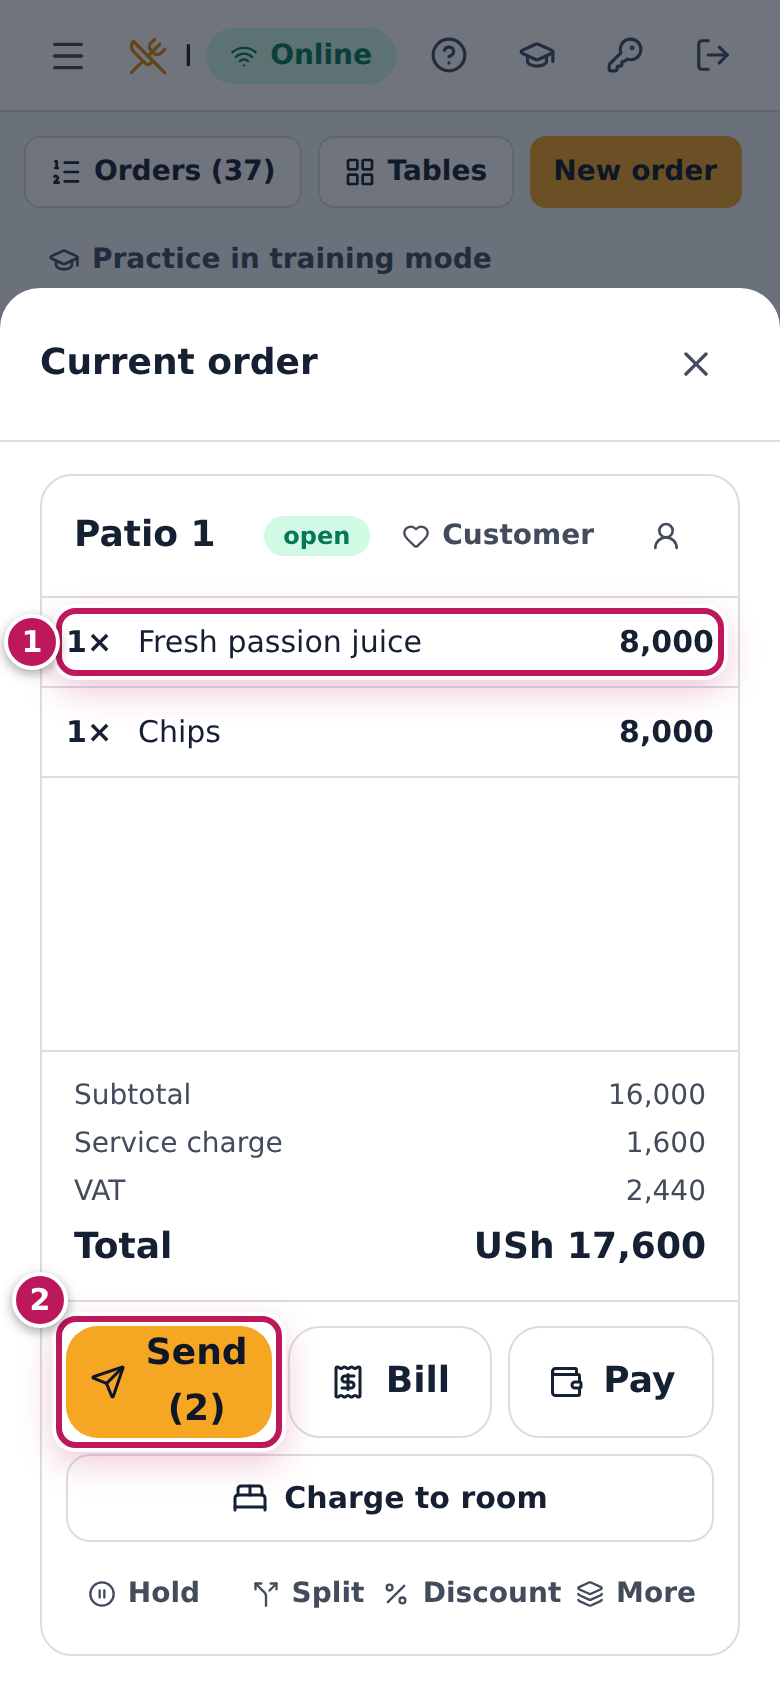
- Tap the orange button at the bottom (2), for example Order · USh 17,600, to see the order.
- Check the lines (1) and tap Send (2) — here Send (2).
Expected result
The lines show placed and the kitchen and bar get the ticket. Patio 1 is occupied on every floor plan, with your name. Close the order panel with the cross and carry on.
Screenshot
Common mistakes
- Sending from the phone and again from the till. Every tap on Send sends only what is new; but ringing the same items again on the till doubles them. One person, one device, per table.
- Letting the phone lock in your pocket with the order unsent. The lines are saved, but the kitchen does not have them. Send before you leave the table.
Troubleshooting
- The buttons are too small to tap. Turn the phone upright; the till arranges itself for the width of the screen.
- “You’re offline” at the top. The terrace Wi-Fi dropped. The phone keeps taking orders offline if it is an approved till (see Sell while the internet is down).
Design the floor plan
Purpose
Make the floor plan look like the restaurant: add dining areas and tables, place them where they really stand, and keep seats and names right, so that hosts can find tables at a glance.
Role / permission required
Branch and restaurant managers (tables.configure, a sensitive permission:
sign in with your password).
Prerequisites
- You are on the floor plan of the branch you are designing.
Steps
- Open Tables & Floor Plan and choose the area, here Main Hall.
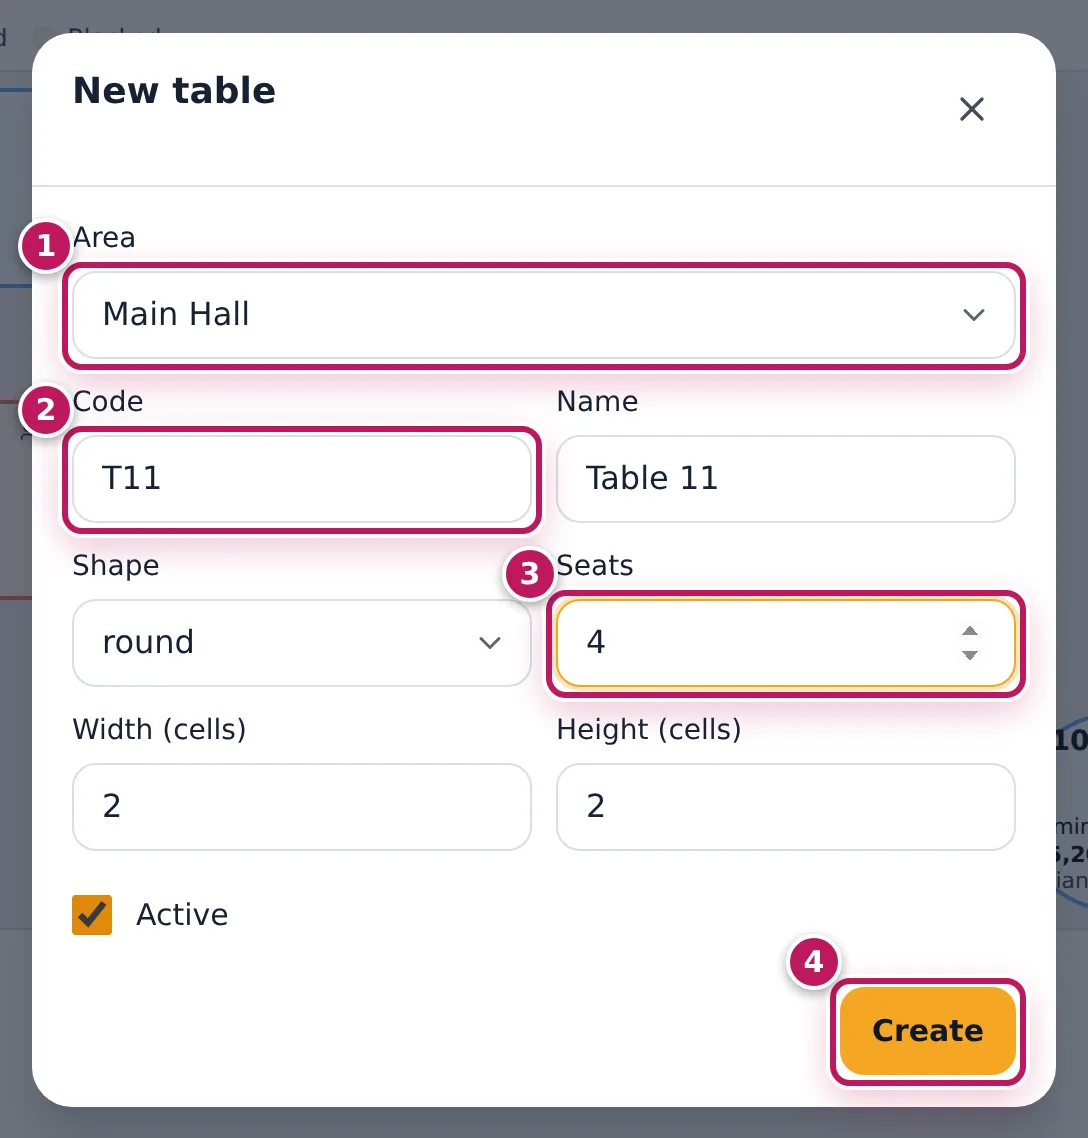
- To add a table, tap Table. In New table, check the Area (1), type the Code (2) — short and unique in the area, like T11 — and the Name guests see on receipts, like Table 11.
- Choose the Shape and the number of Seats (3), and the size in grid cells (Width (cells), Height (cells)).
- Tap Create (4). The table appears at the top left of the area.
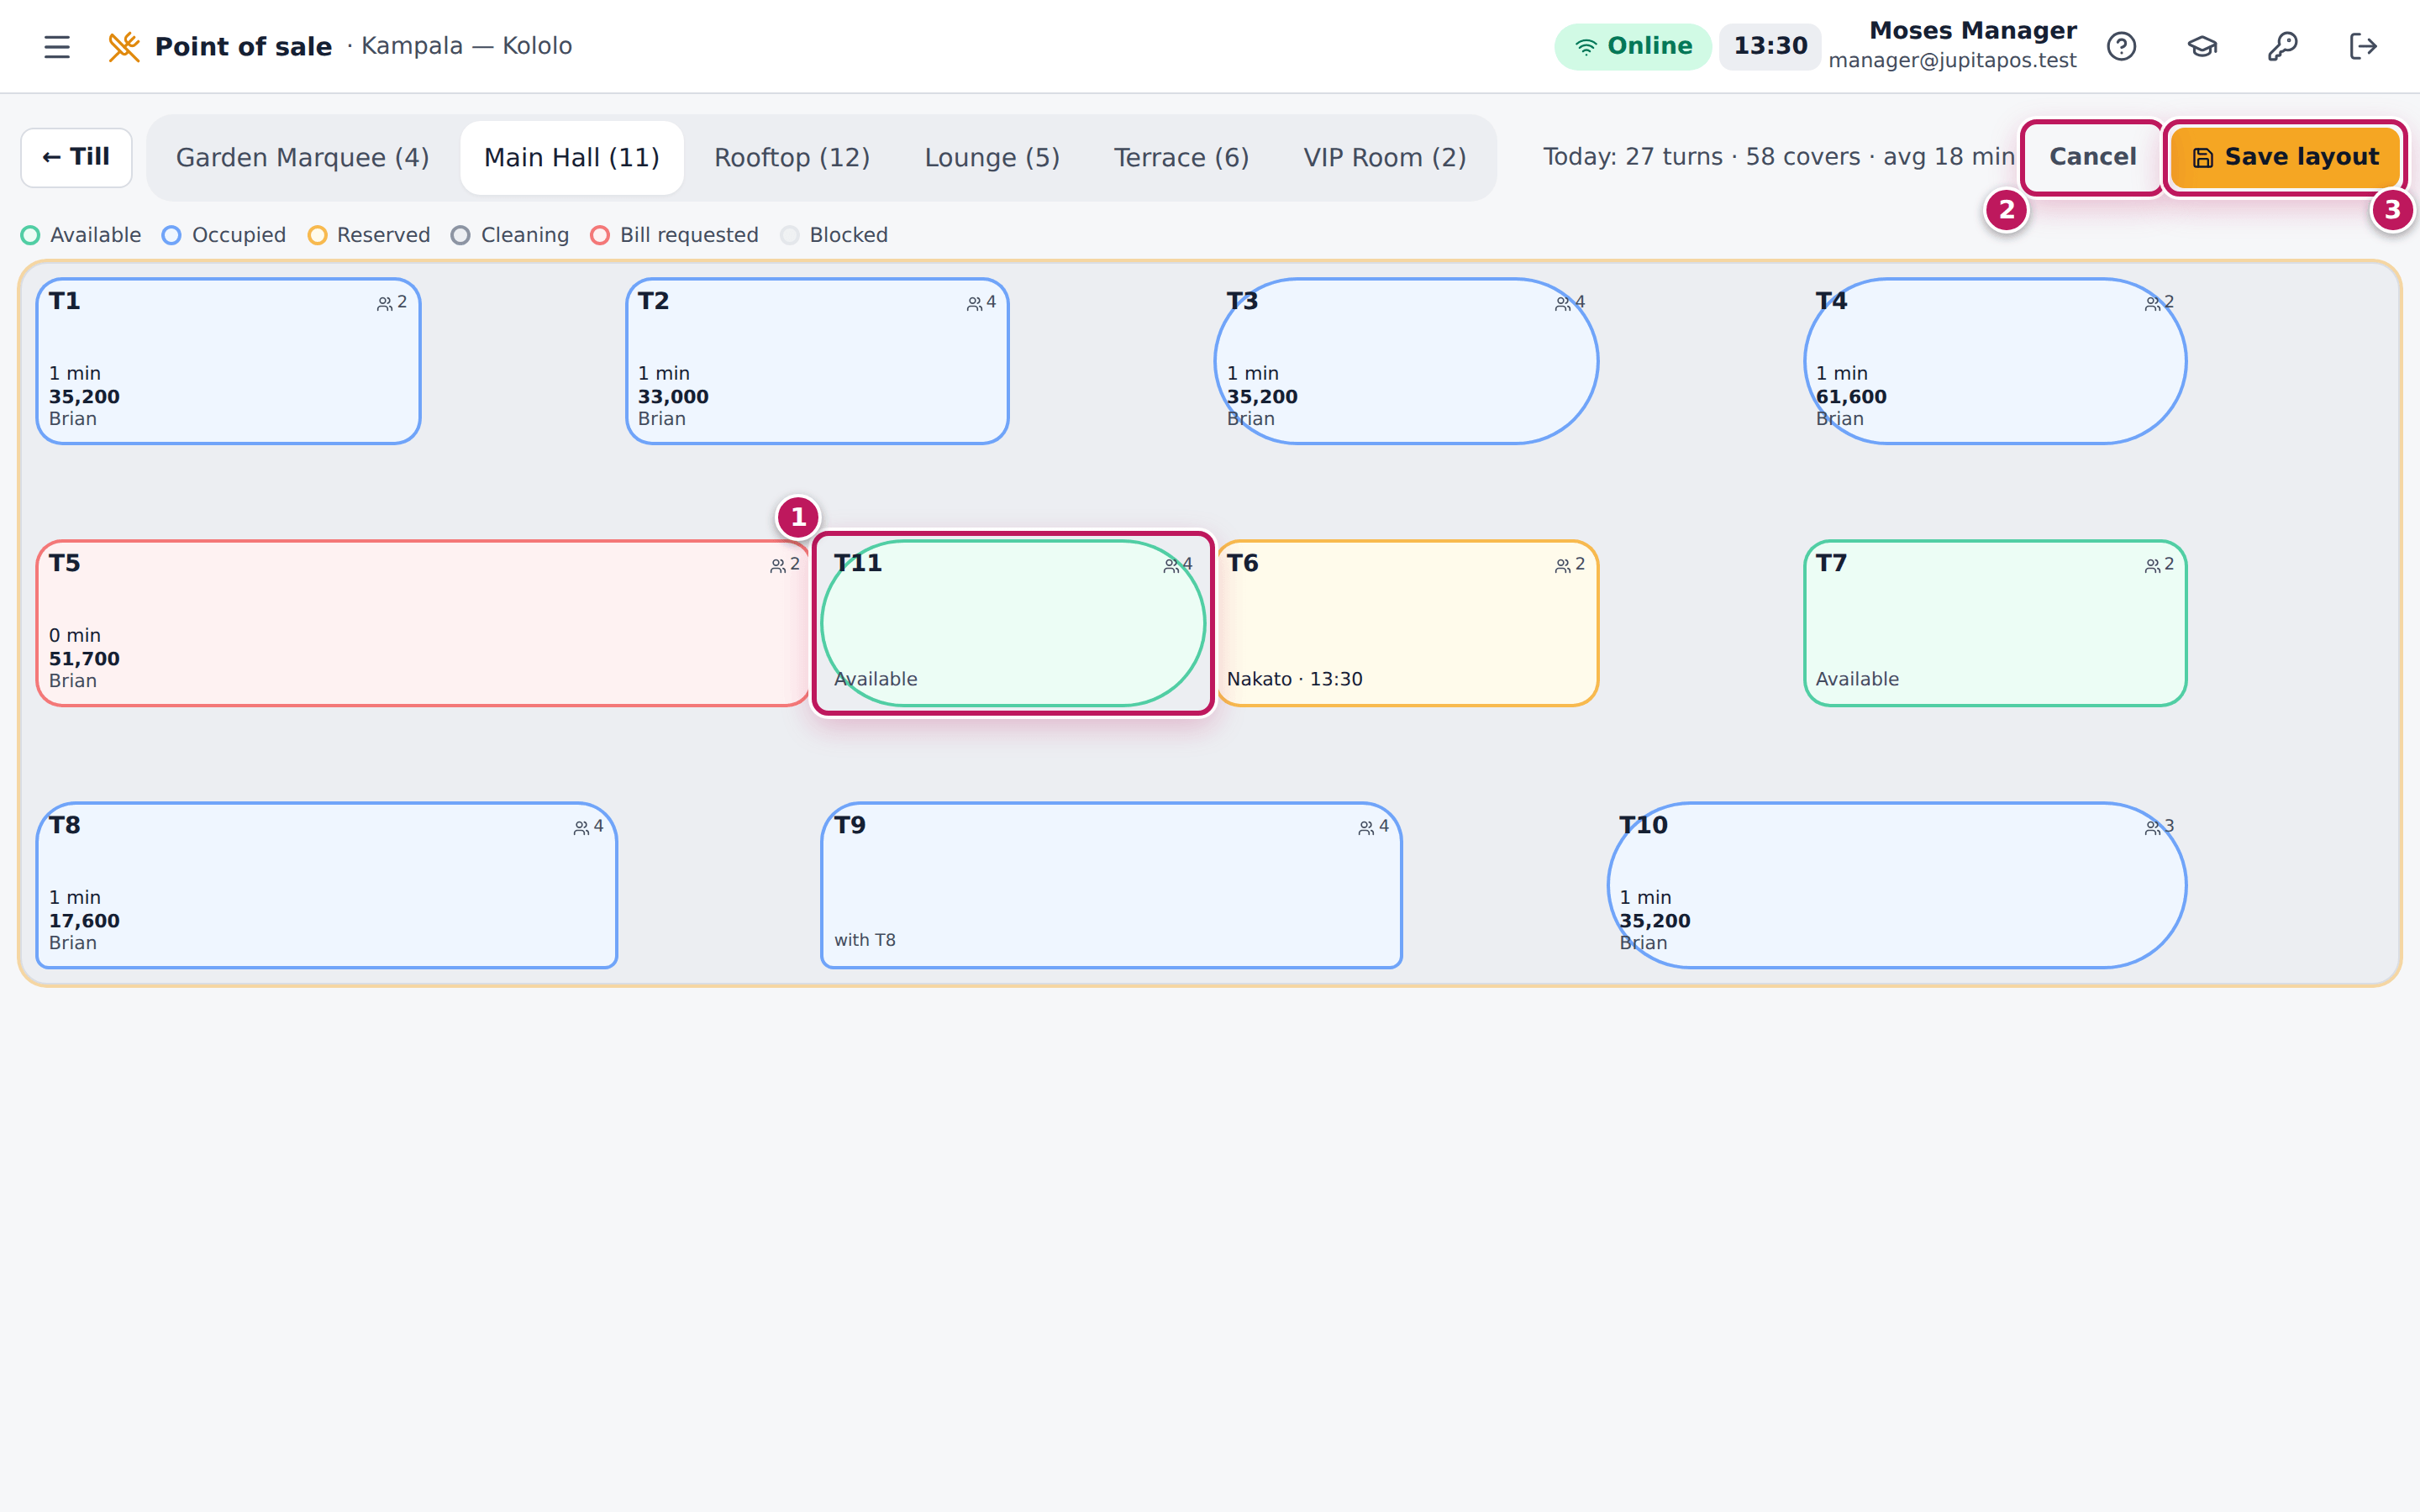
- Tap Design. Drag each table to its place (1); tables snap to the grid.
- Tap Save layout (3) to keep the new places, or Cancel (2) to drop them.
- To change or remove a table, tap it and Edit table; in the dialog, Save keeps the changes and Archive removes it from the plan.
- To add a whole area (a terrace, a private room), tap Area, fill in Code, Name, Kind, Capacity, the grid size and the Service charge, and tap Create area.
Expected result
JupitaPos says Layout saved; Table 11 stands where you dropped it, on every till and phone of the branch.
Screenshot
Common mistakes
- Reusing a code. Codes are unique in an area, even for archived tables. Choose a new code.
- Designing during service. Moving tables is safe, but staff see the plan change under their fingers. Design before opening.
- Archiving a table instead of blocking it for a day. Archive removes the table for good; Block (see Change a table’s status) takes it out of service for now.
Troubleshooting
- “Code T11 is already used in Main Hall.” Choose another code.
- “Close the open order on this table first.” A table with guests cannot be archived.
- There are no Area, Table or Design buttons. Your role cannot configure tables, or you signed in with a PIN; sign in with your password.