

On this page
The café counter is the quickest way to sell coffee, tea, cakes and light meals: tap the products, choose how the customer takes them, write their name for the cup, charge — and the drinks are already on the barista’s screen while the customer pays. Every order gets a call number for the day (“47 — Sarah!”), printed on the receipt, shown to the barista and on the collection board.
A café order is an ordinary order: it has an order number, prints the same receipt, appears in the till’s open orders and counts in every report.
The café also knows what each drink uses — a large oat-milk cappuccino to take away is 36 g of beans, oat milk, a 16 oz cup, a lid and a sleeve — so its waste, reports and costs are exact. The pictures show the demo business, Jupita Restaurant Demo, at its Kampala — Kololo branch, with Bella, the barista, and Moses, the branch manager.
Take a café order with a call number
Purpose
Serve the counter quickly: the customer’s drinks and cakes, how they take them and their name for the cup — sent to the barista at once, paid, and called by number when ready.
Role / permission required
Baristas, cashiers, waiters and supervisors (cafe.view and
sales.create); taking payment needs payments.take.
Prerequisites
- Café products have a café type (see Set up the café).
- To take cash, your till is open (see Open the till). Mobile money and cards need no till.
Steps
- Open Café counter from the menu (
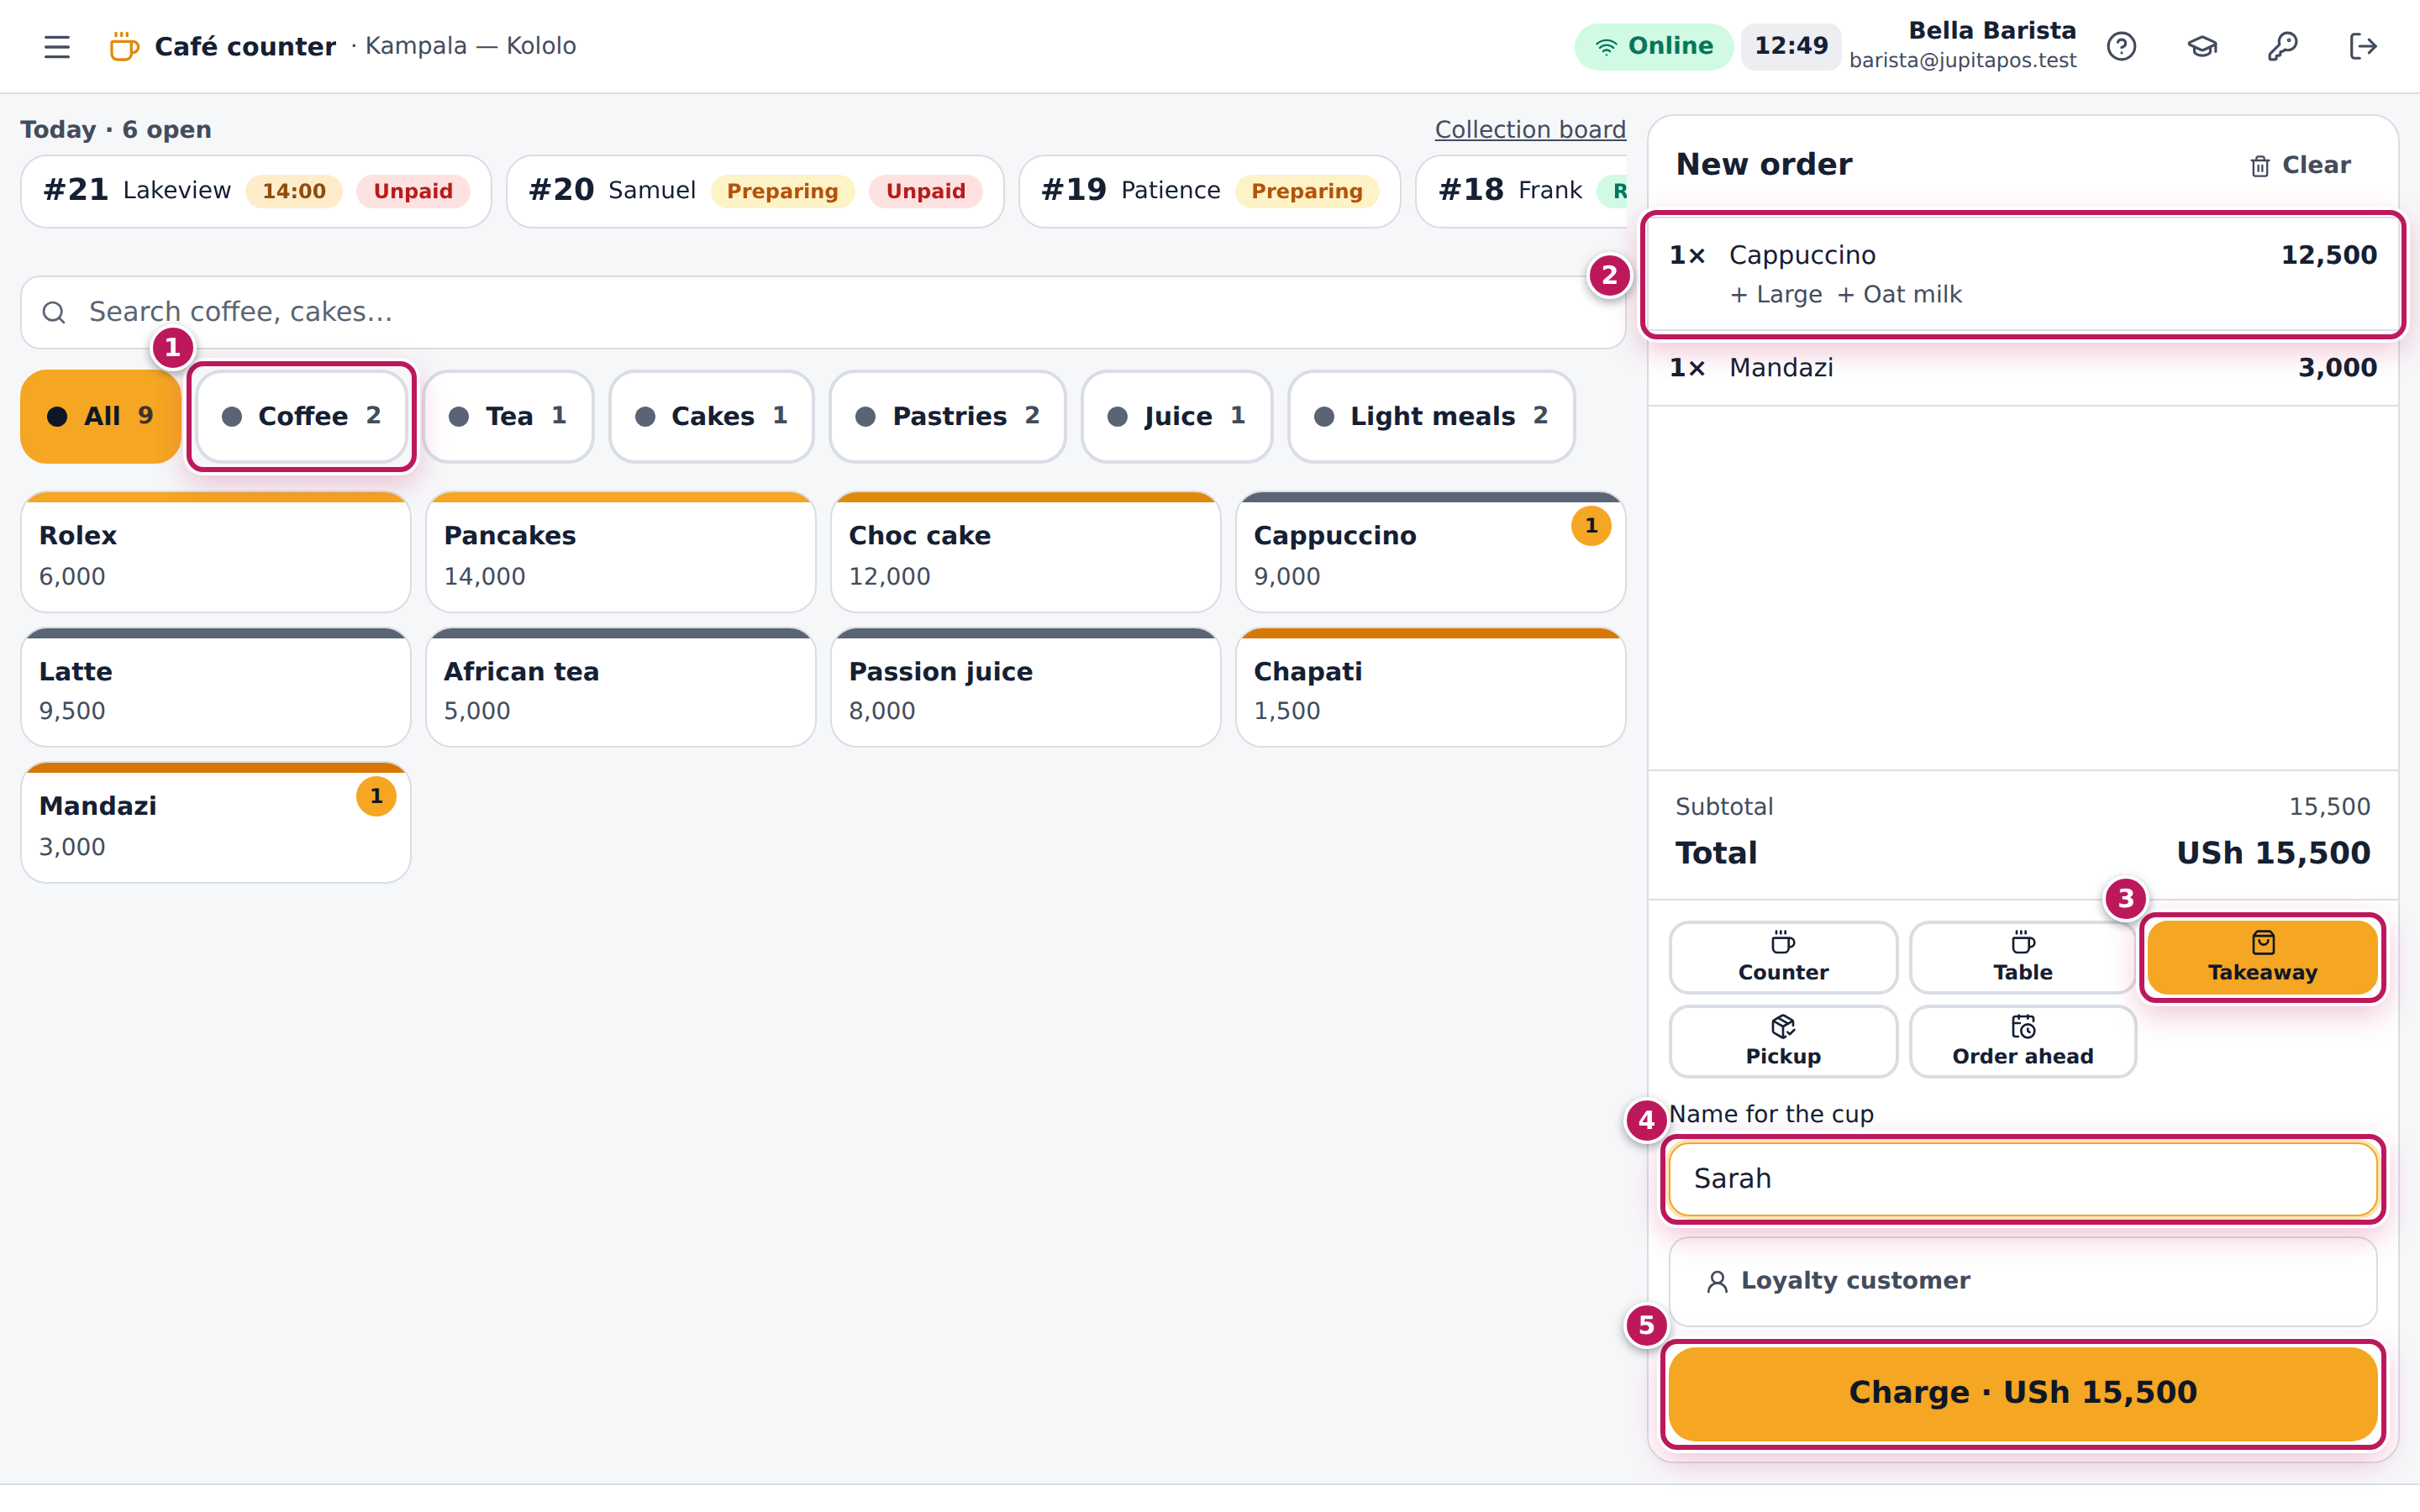
/cafe). - Tap a product type to filter, such as Coffee (1), or search.
- Tap the products. A drink with choices opens its dialog: choose the Size, the milk or Alternative milk, extra shots, syrup… and tap Add. The line (2) shows the choices.
- Tap the service (3): Counter (drunk here), Table, Takeaway, Pickup (paid now, collected shortly) or Order ahead (see Take an order ahead).
- Type the customer’s name in Name for the cup (4). It is required for takeaway, pickup and orders ahead.
- Tap Charge (5). The order is created with its call number and the drinks go to the barista.
- The payment opens. Take the payment as on the till — here Mobile money (manual) with the Transaction reference of the customer’s payment, then Charge (see Take a mobile money payment).
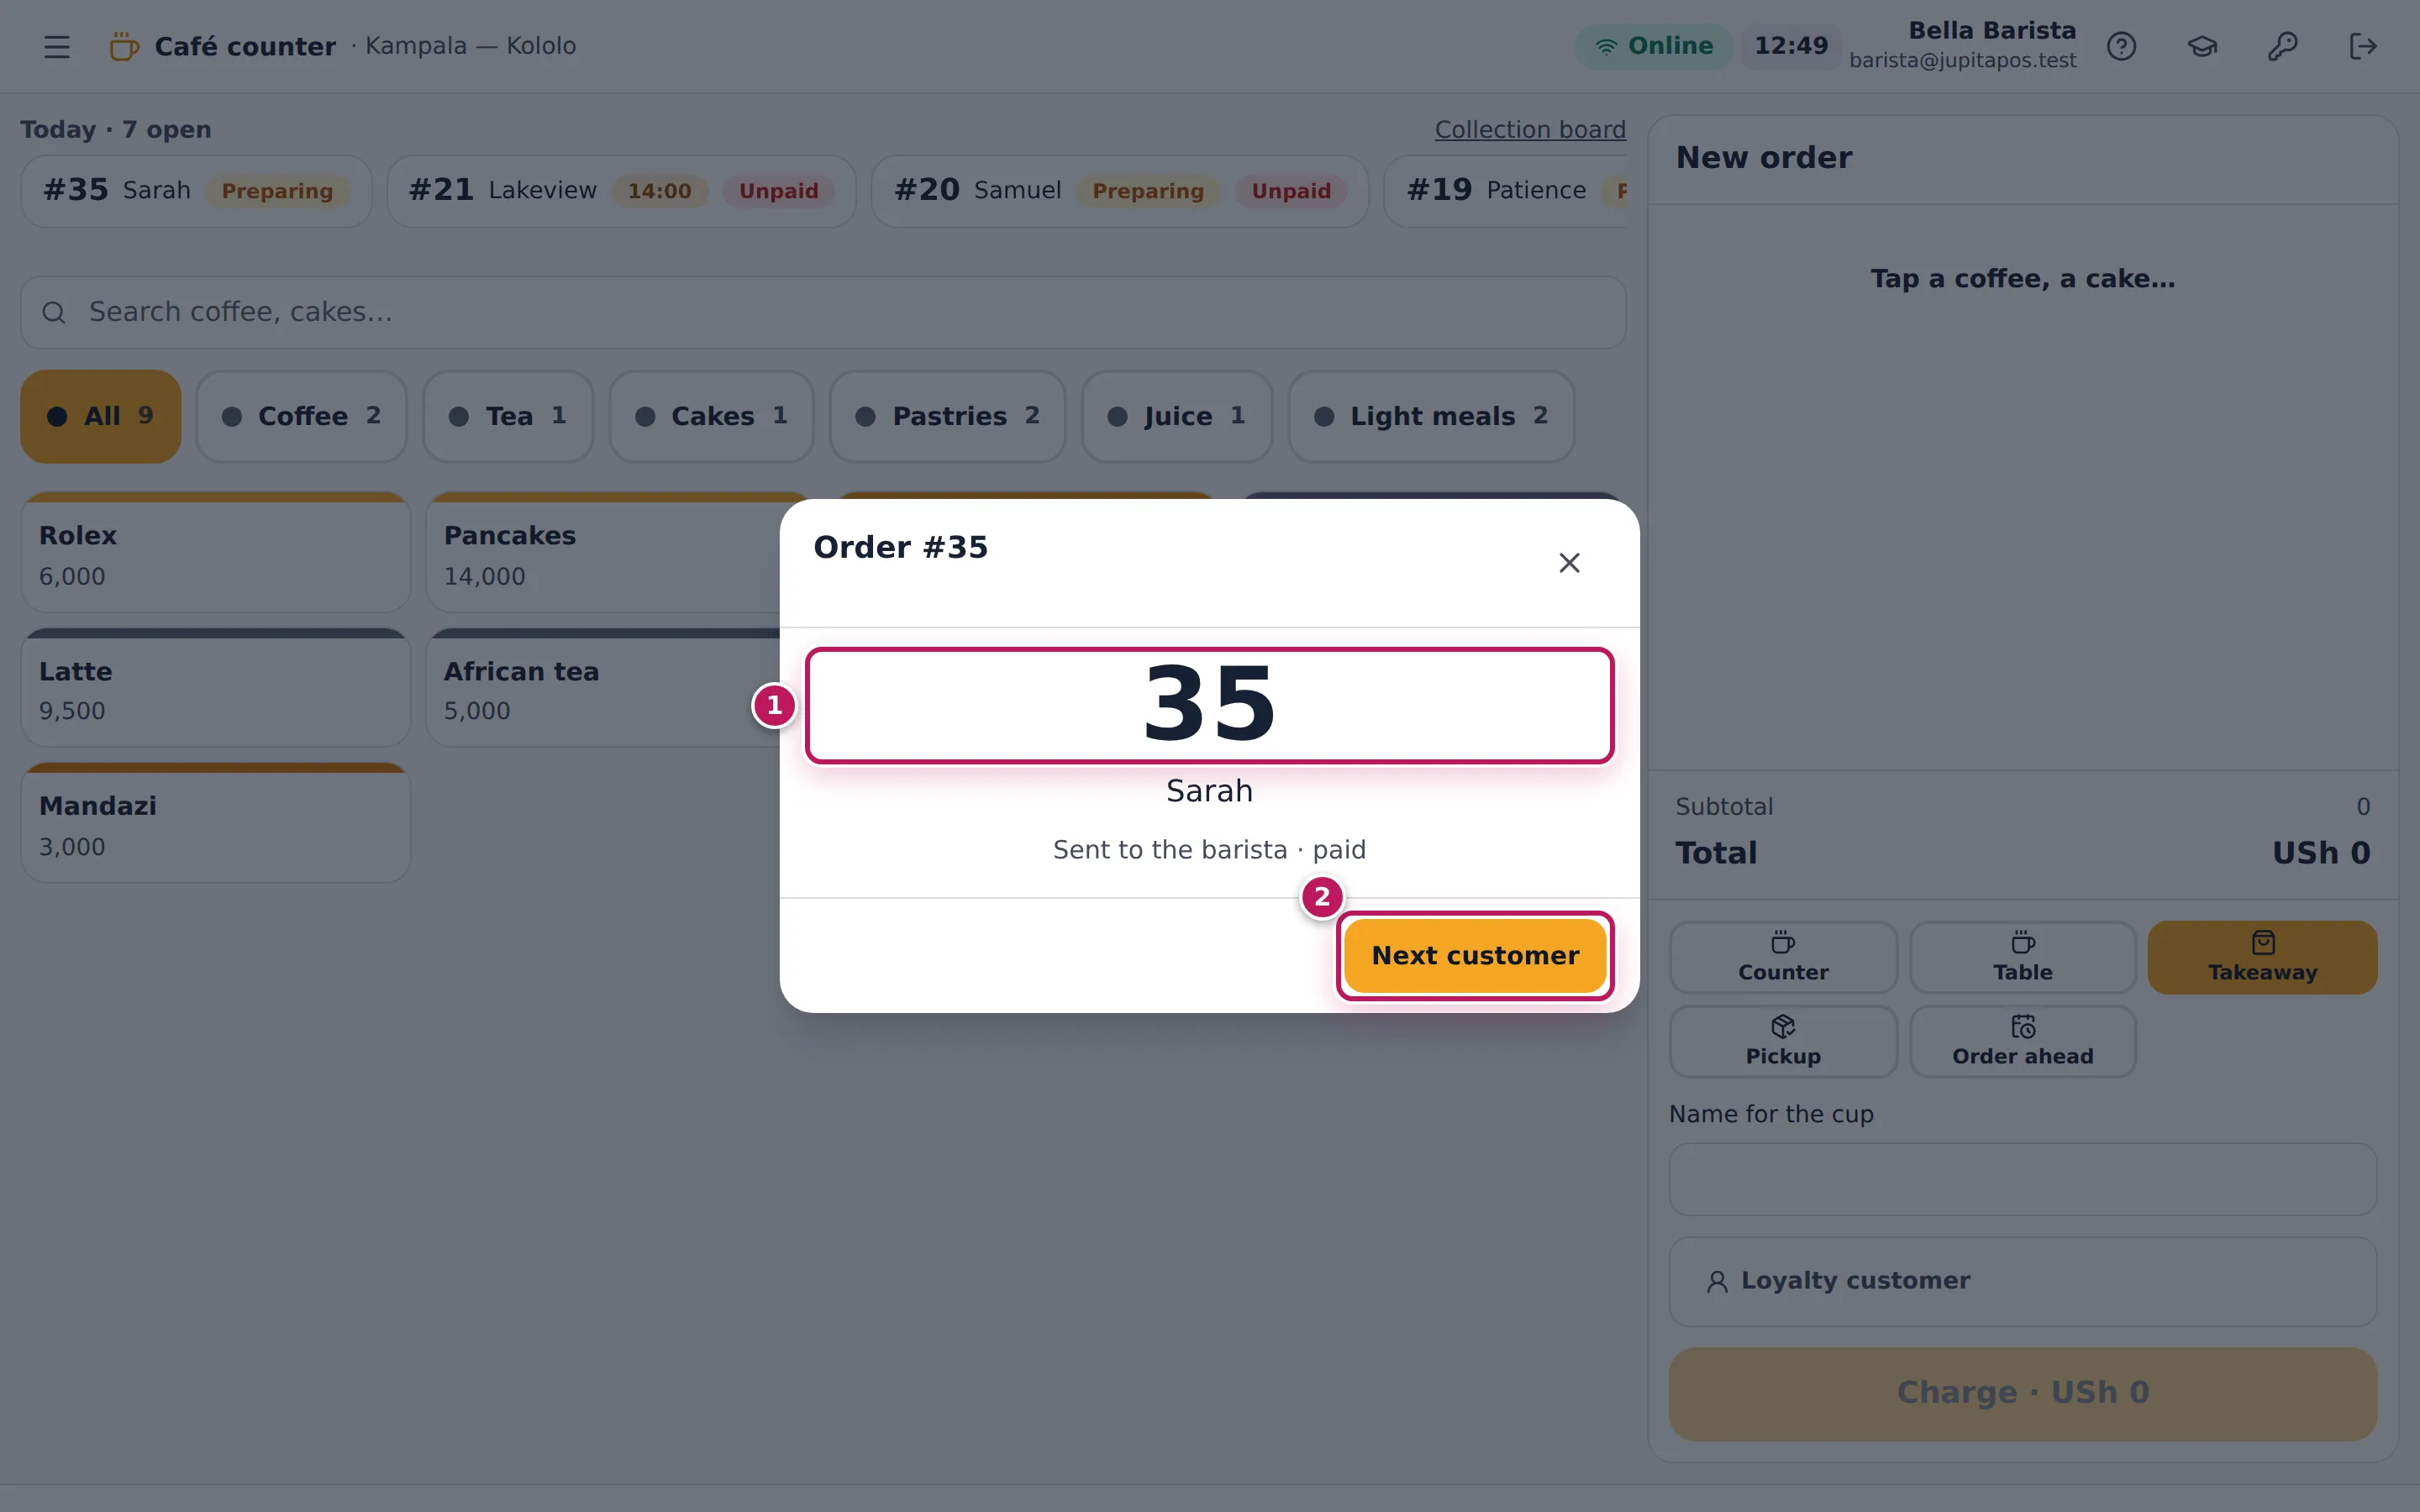
- Tell the customer their number: it fills the screen (1). Tap Next customer (2).
Expected result
Here the large oat cappuccino (USh 12,500) and the mandazi (USh 3,000) come to Charge · USh 15,500. The order has its call number for the day and the name Sarah; the screen says Sent to the barista · paid. The order appears at the top of the counter under Today with its number, and on the collection board under Preparing. The receipt says Your number: ….
Screenshot
Common mistakes
- Writing “oat milk” or “large” in a note. Choices typed as notes are not charged and not taken out of stock. Tap them in the dialog.
- Choosing Counter for a takeaway. Counter means a mug and a plate; Takeaway takes out the cup, lid and sleeve. The stock and the reports follow the service you tap.
- Closing the payment “to pay later” by mistake. The order stays in today’s queue marked Unpaid. Open it there and tap Take payment.
Troubleshooting
- “Ask for the customer’s name — it goes on the cup.” The service needs a name. Type it in Name for the cup.
- “No café products yet”. No menu item has a café type. A manager sets them in Café setup → Products.
- A product is greyed out. It is sold out for this branch (see Mark an item sold out).
FAQ
When do call numbers start again? At 1 every morning for each branch, and after 999.
Can I use the ordinary till for café orders? Yes. Counter, takeaway and pickup orders on the till get call numbers too; the café counter is simply faster and adds the name and the service. Catering and event orders never get one.
Take an order ahead
Purpose
Let a regular or an office order now for a pickup time later today or this week: the drinks are made just in time and are waiting, hot, when they arrive.
Role / permission required
Baristas, cashiers and supervisors (cafe.view, sales.create).
Prerequisites
- The café counter is open (see Take a café order).
Steps
- Tap the products as for any café order.
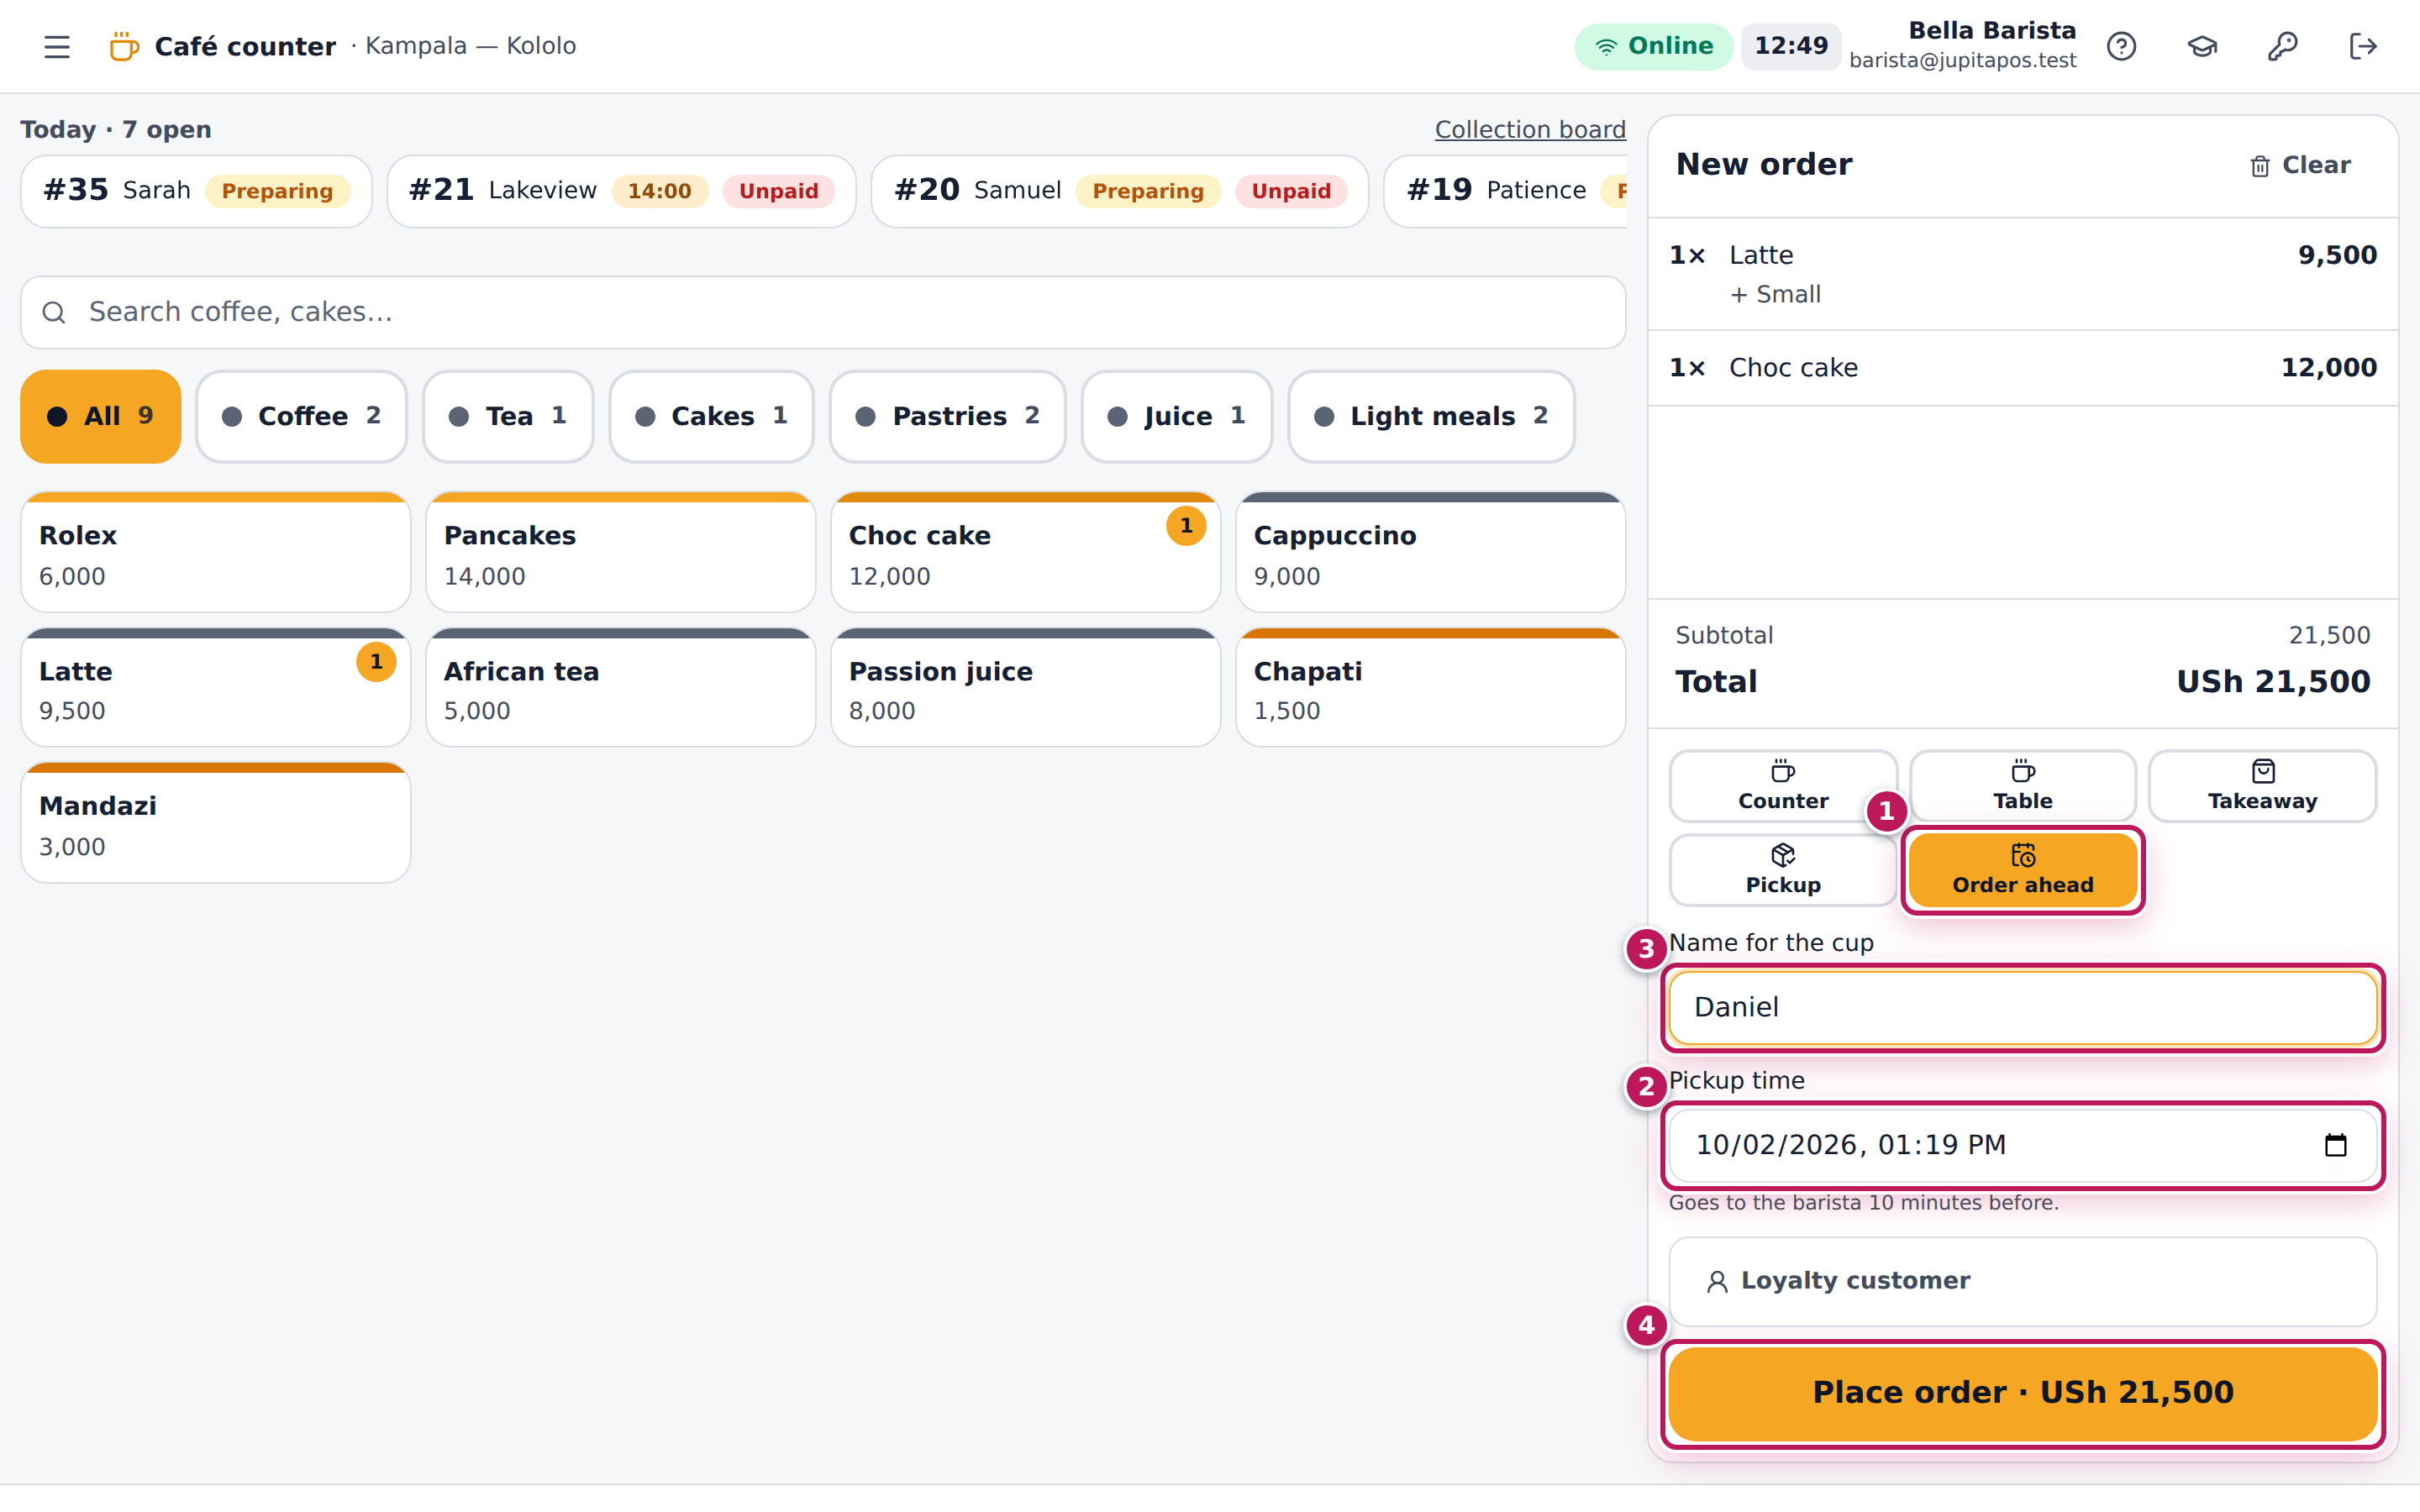
- Tap Order ahead (1).
- Set the Pickup time (2). JupitaPos suggests a time 30 minutes from now; the earliest allowed is the preparation time from now, the latest a week ahead. The drinks go to the barista that many minutes before the pickup — 10 minutes in the demo business.
- Type the name in Name for the cup (3).
- Tap Place order (4).
- Take the payment now, or close the payment if the customer pays when they collect.
- Tell the customer their number and the pickup time, and tap Next customer.
Expected result
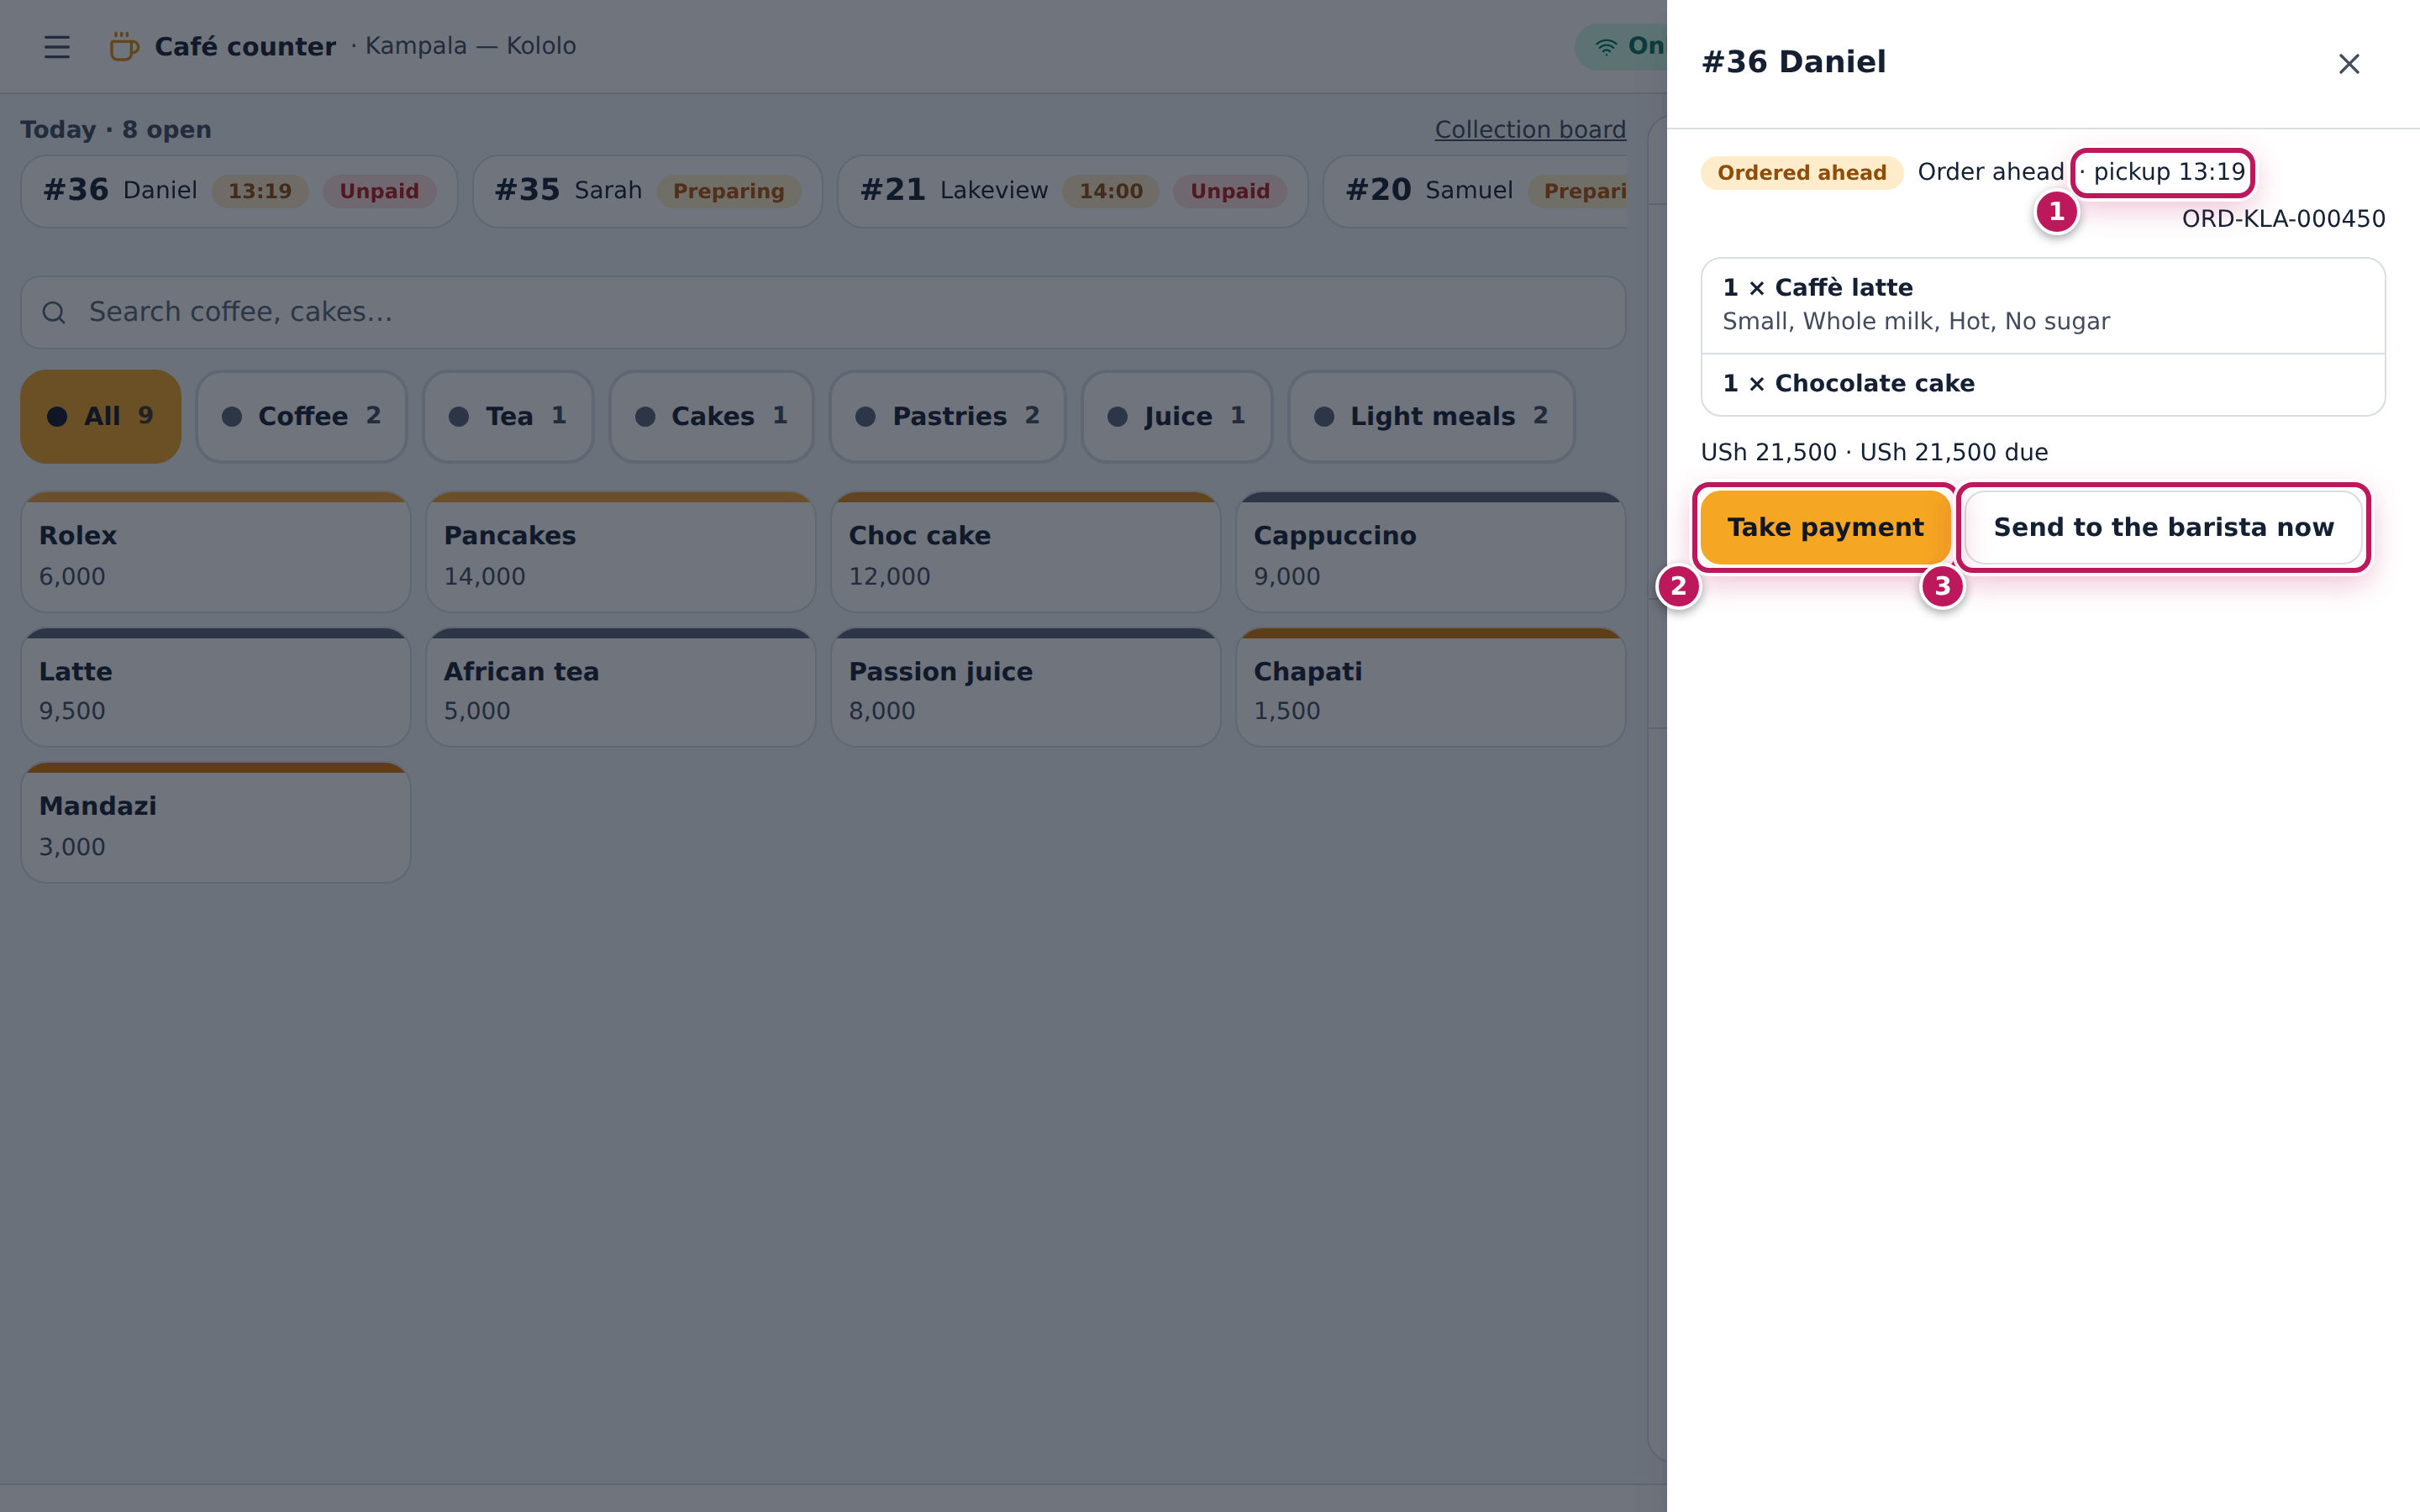
The order waits in today’s queue with its number, the name and the pickup time, and Unpaid if nothing was paid. Tapping it (1) shows the pickup time, Take payment (2) and Send to the barista now (3). It goes to the barista by itself before the pickup time and stays open until it is handed over.
Screenshot
Common mistakes
- Taking an order ahead for “now”. For a customer who waits at the counter use Pickup; order ahead is for later.
- Forgetting the unpaid order at pickup. When the customer collects, tap their number in the queue and Take payment before you hand over.
Troubleshooting
- The customer arrived early. Tap their number in the queue and Send to the barista now.
- The pickup time is refused. It is sooner than the preparation time or more than a week ahead.
Call and hand over orders on the collection board
Purpose
Show customers where their order is — preparing or ready — call their number when it is ready, and record when they have it.
Role / permission required
Baristas, cashiers, waiters and supervisors (cafe.view).
Prerequisites
- Orders are placed at the café counter or the till.
- For the customers’ screen: a TV or tablet facing the counter, signed in with a café account.
Steps
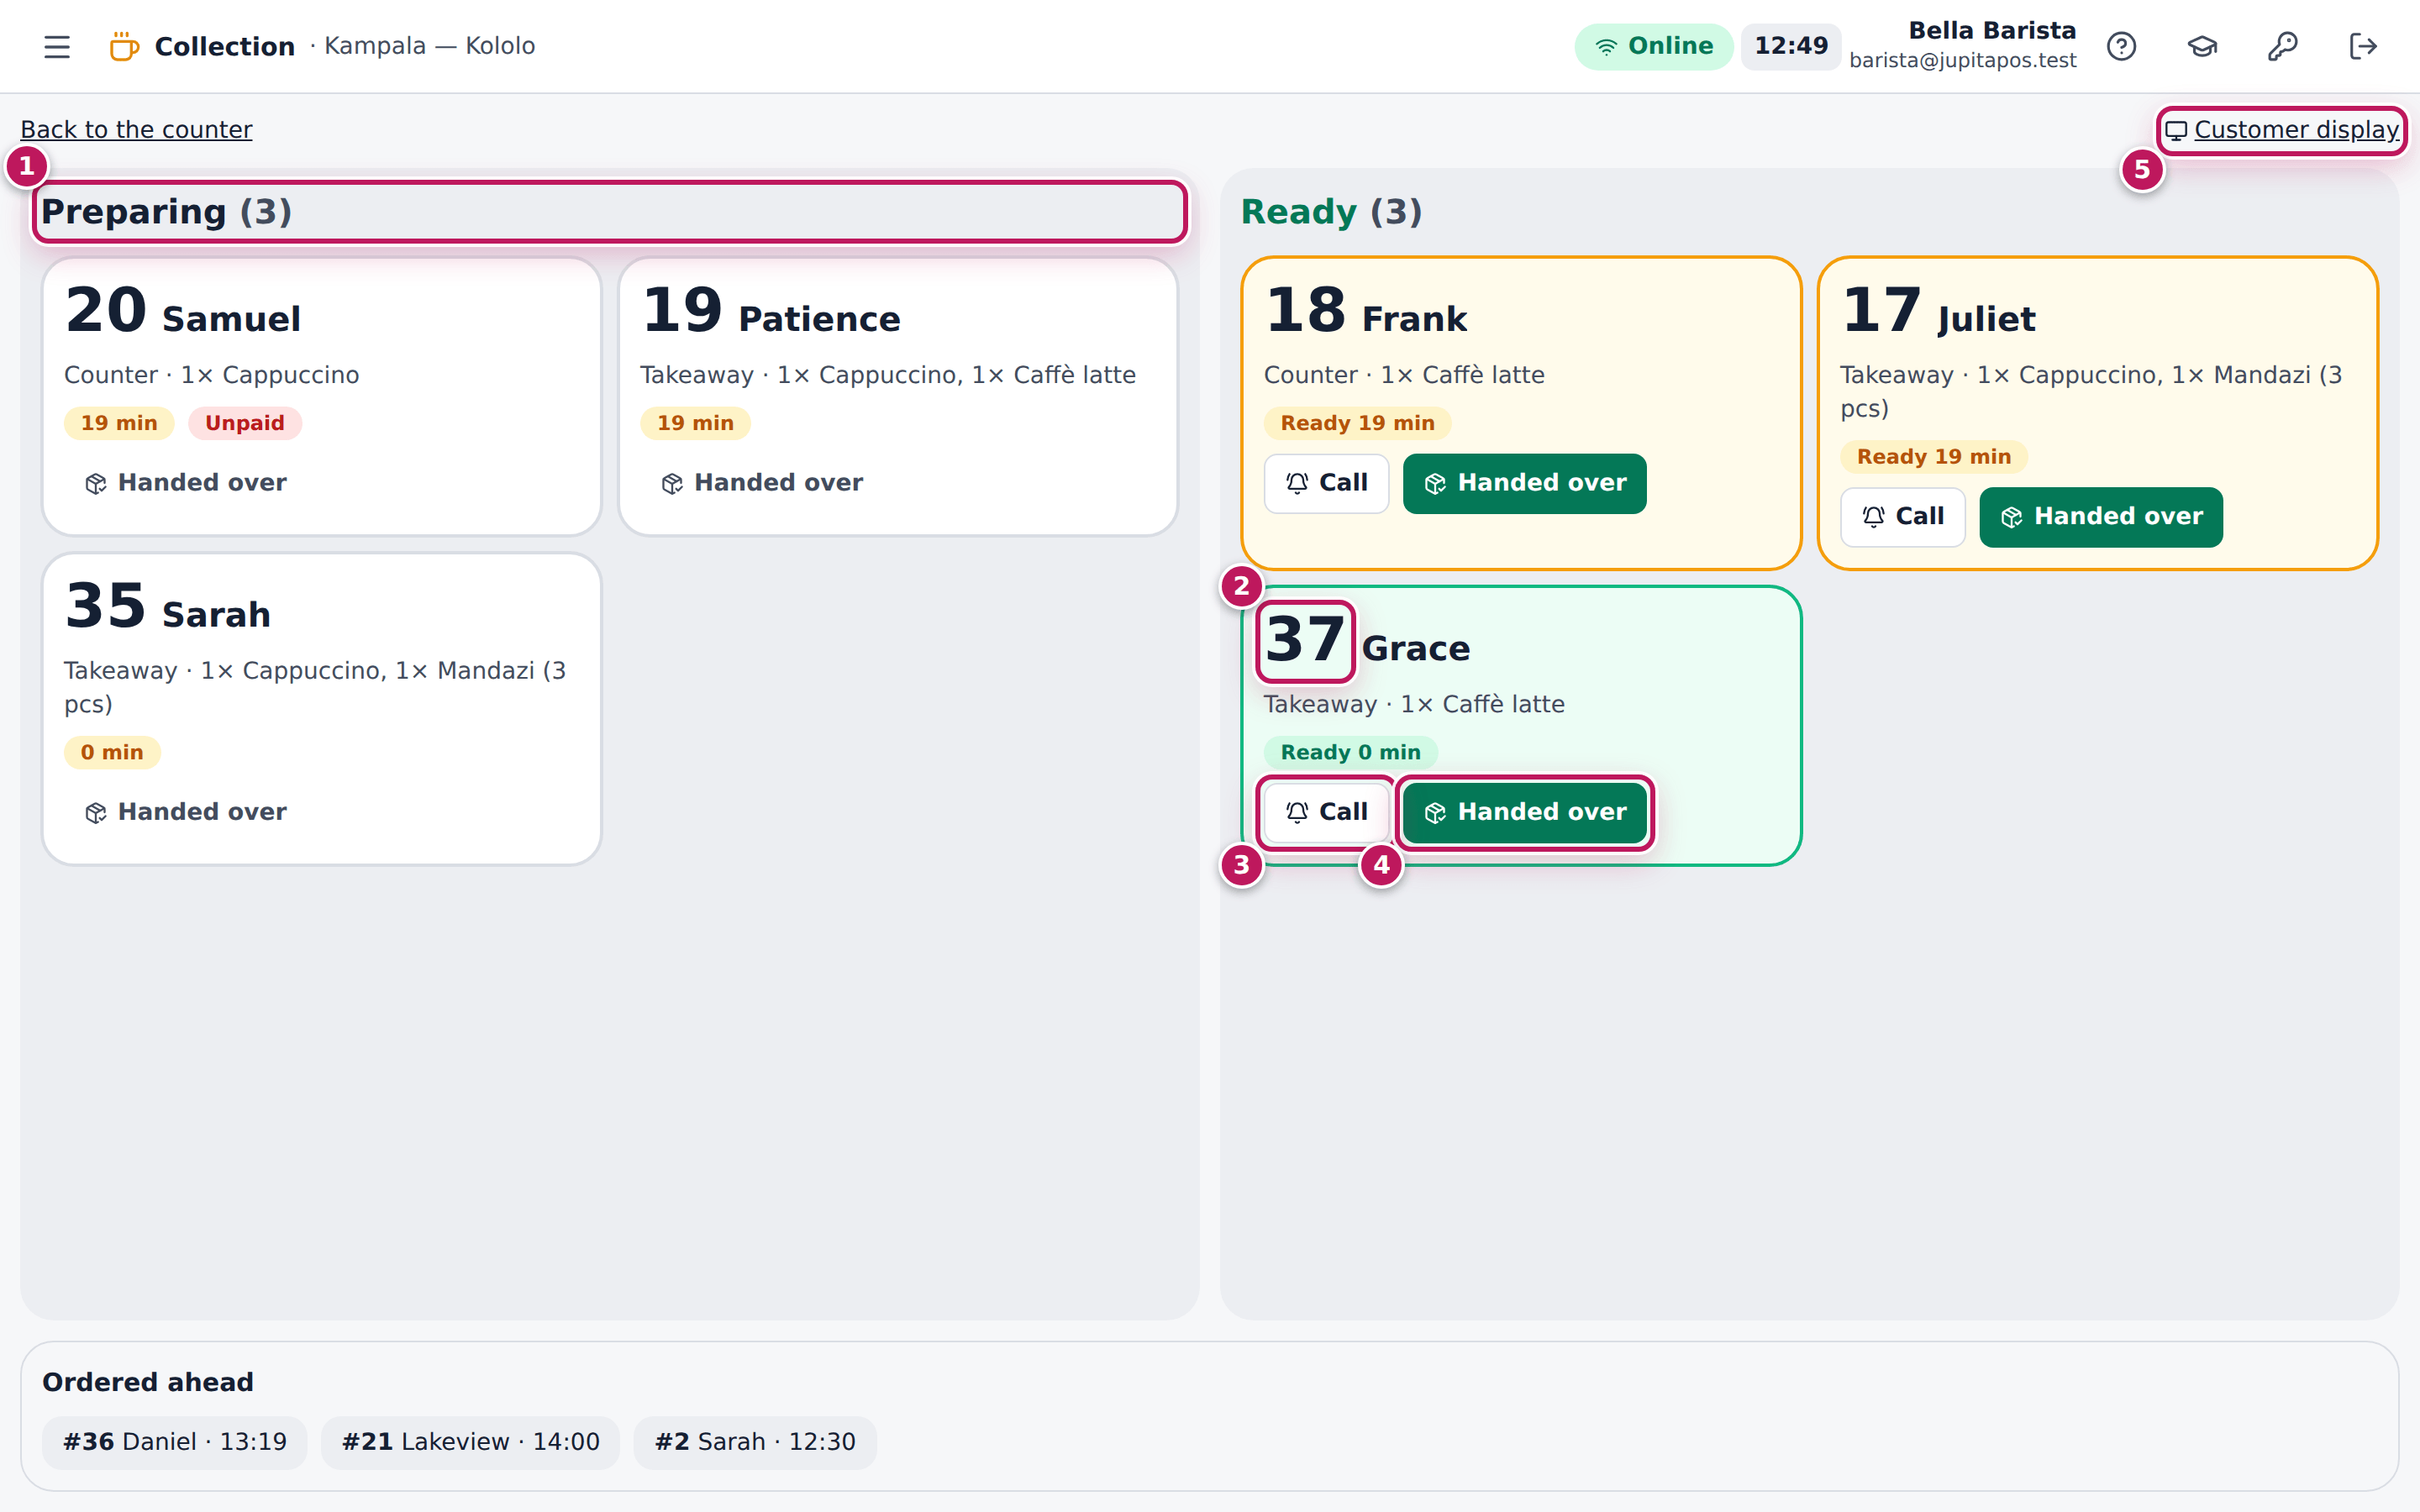
- Open the board: Collection board at the top of the café counter, or
/cafe/collection. - Read the two columns: Preparing (1) — orders being made, with how long they have waited — and Ready, with the call number (2) and the first name. A ready order turns amber when it has waited longer than your café allows (10 minutes in the demo).
- The barista marks the order ready on the barista board (see Call the customer’s number); it moves to Ready.
- When an order is ready and the customer is not at the counter, tap Call (3): the number flashes across the customers’ screen.
- When the customer has it, tap Handed over (4).
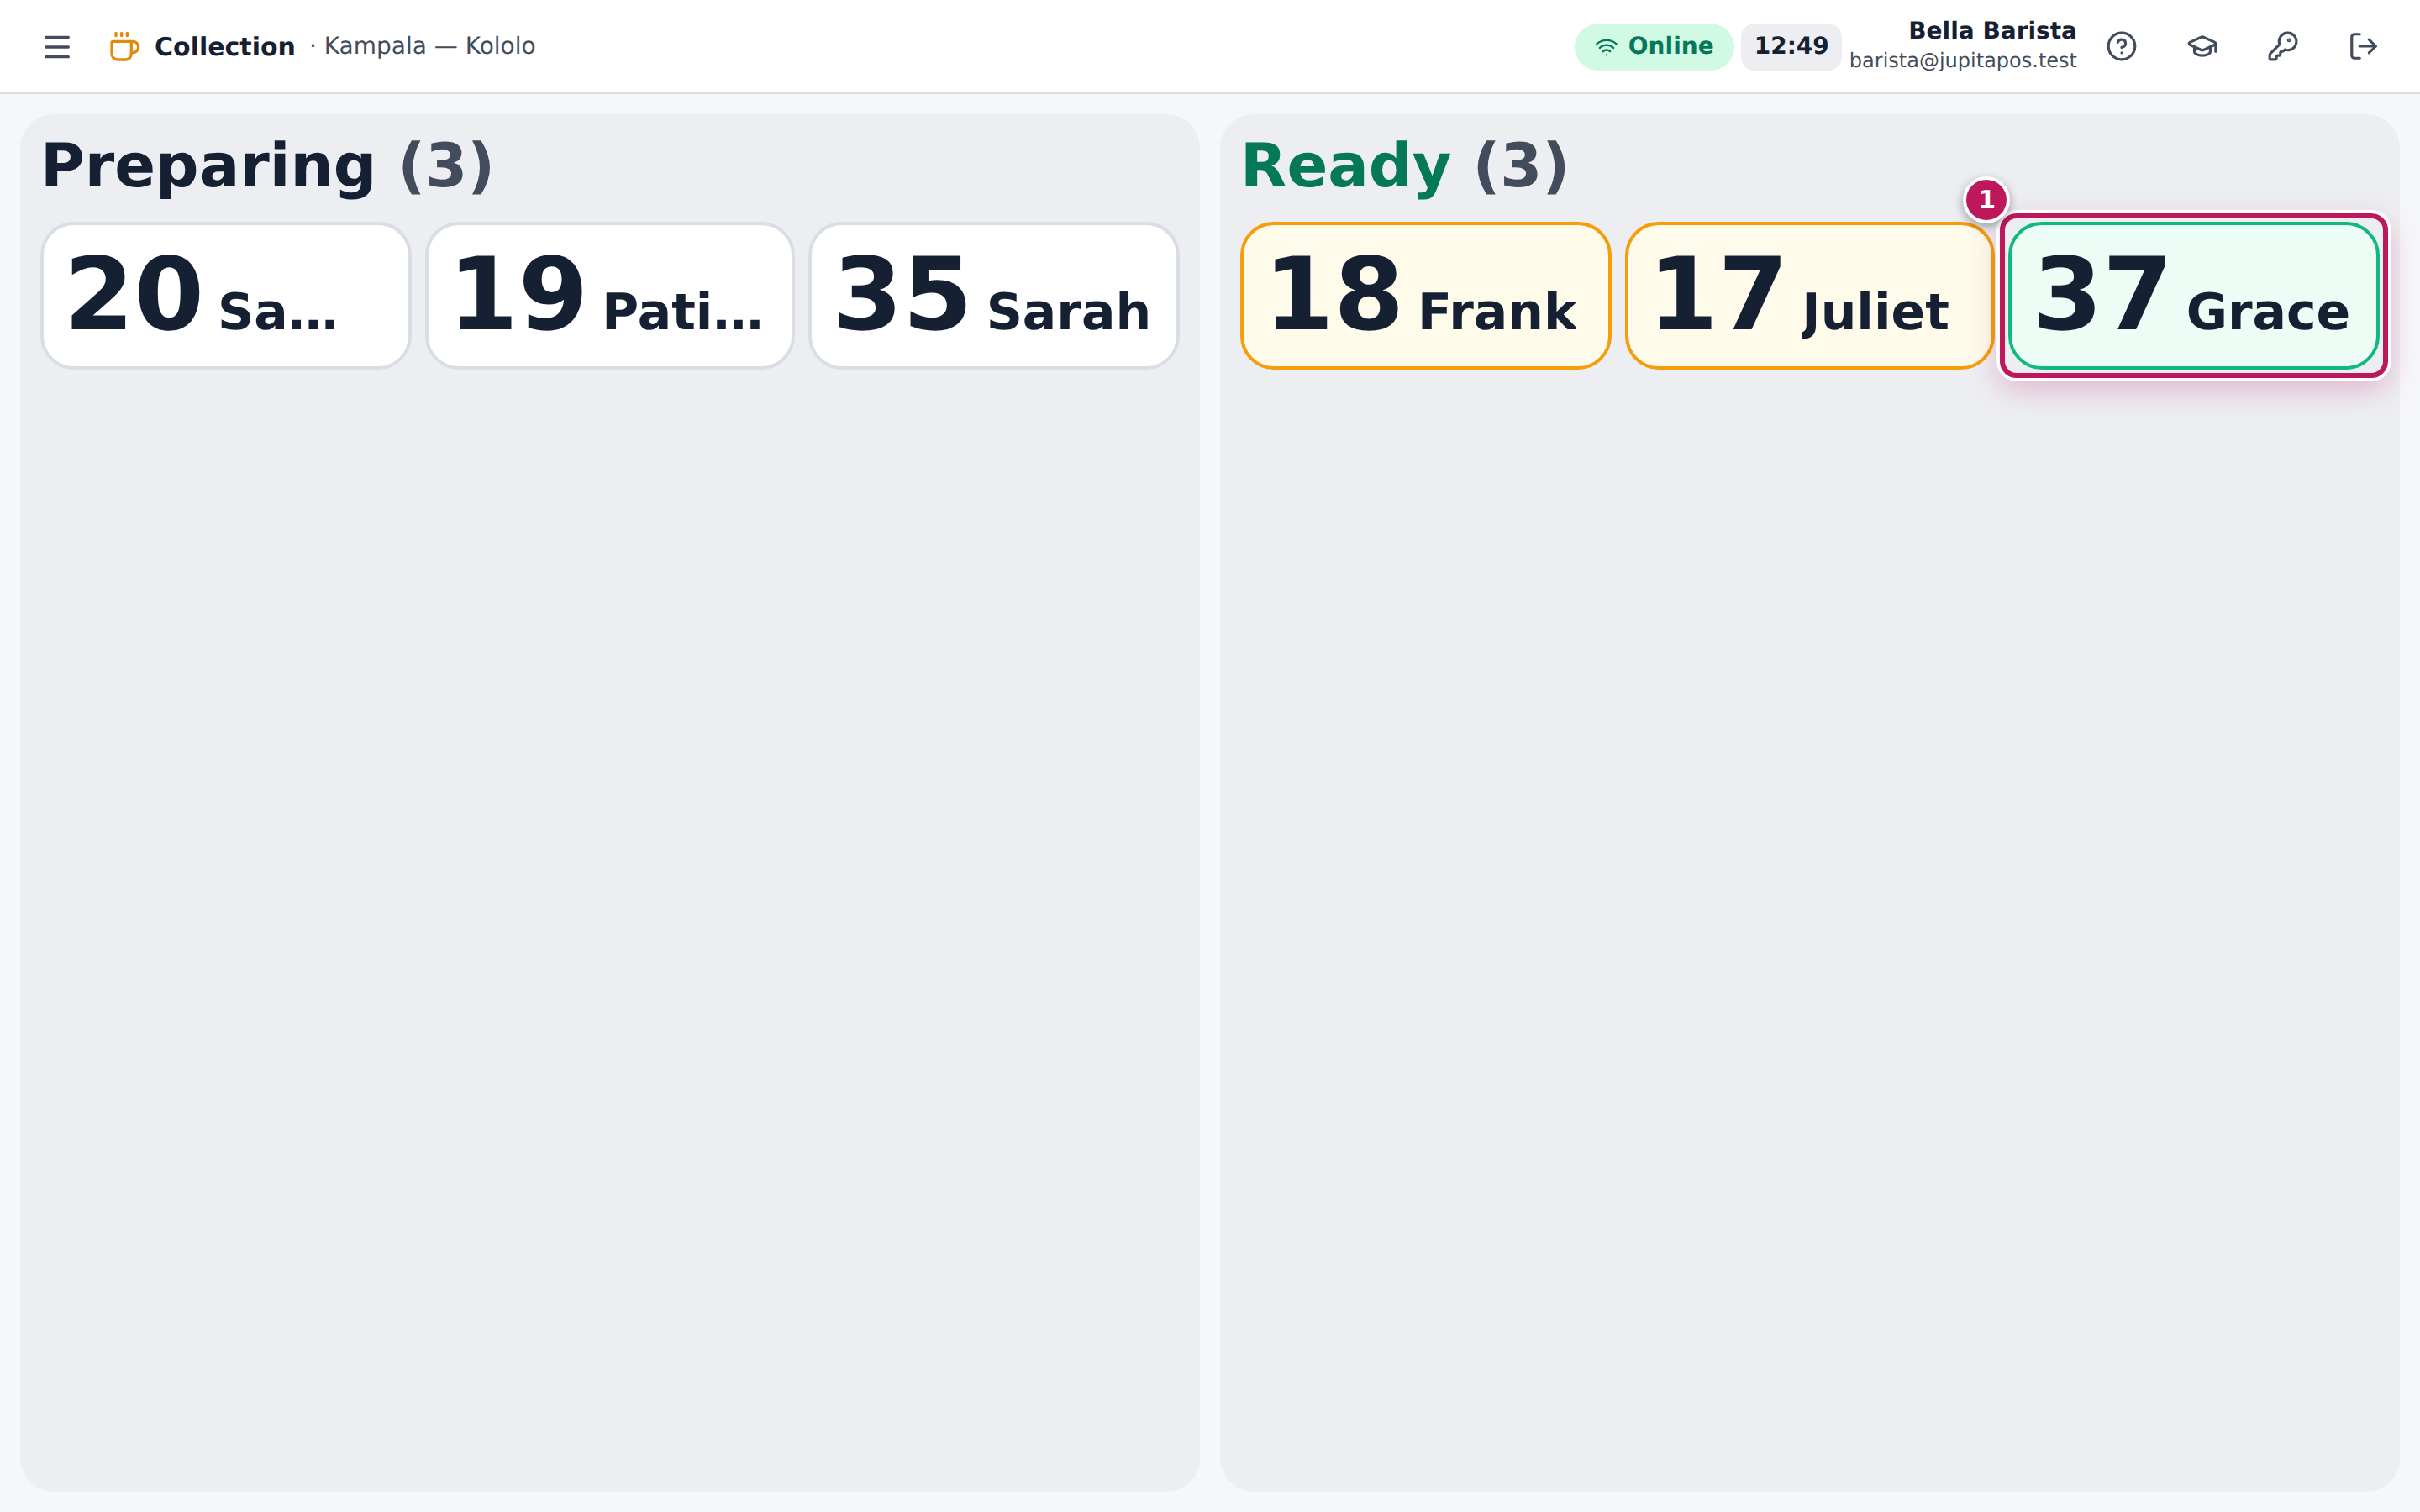
- On the screen that faces the customers, open Customer display (5): numbers and first names only, no buttons (1).
Expected result
After Call, JupitaPos says Calling #… and the customers’ screen flashes the number under Now collecting. After Handed over the order leaves the board (#… handed over). Orders ahead are listed at the bottom with their pickup time.
Screenshot
Common mistakes
- Handing over without tapping Handed over. The order stays on the board as ready and turns amber; customers think they are forgotten.
- Using the staff board on the customers’ TV. Customers would see totals and buttons. Use Customer display there.
Troubleshooting
- An order stays in Preparing although it was made. The barista has not marked it ready on the barista screen (see Call the customer’s number).
- An order with a call number is not on the board. The board, the counter’s Today list and the customer display show only orders with drinks at the barista (or juice and smoothie) station, and orders ahead waiting to go. A food-only counter order gets a number but no place on the board: hand it over from the till.
- Orders from the till appear on the board. Counter, takeaway and pickup orders rung on the till with a coffee or a juice get a call number too, so they are shown with the café’s own. Call and hand them over the same way. Catering and event orders never get a call number.
Earn stamps and use loyalty at the counter
Purpose
Reward regulars: attach the customer so their coffee stamps and points are earned, their subscription pays for the coffee of the day, and their prepaid balance can pay.
Role / permission required
Baristas, cashiers and supervisors (cafe.view); using a subscription
needs loyalty.redeem, a top-up giftcards.sell.
Prerequisites
- The customer is in Customers and enrolled in the loyalty programme (see Enrol a customer).
Steps
- Tap the products as usual.
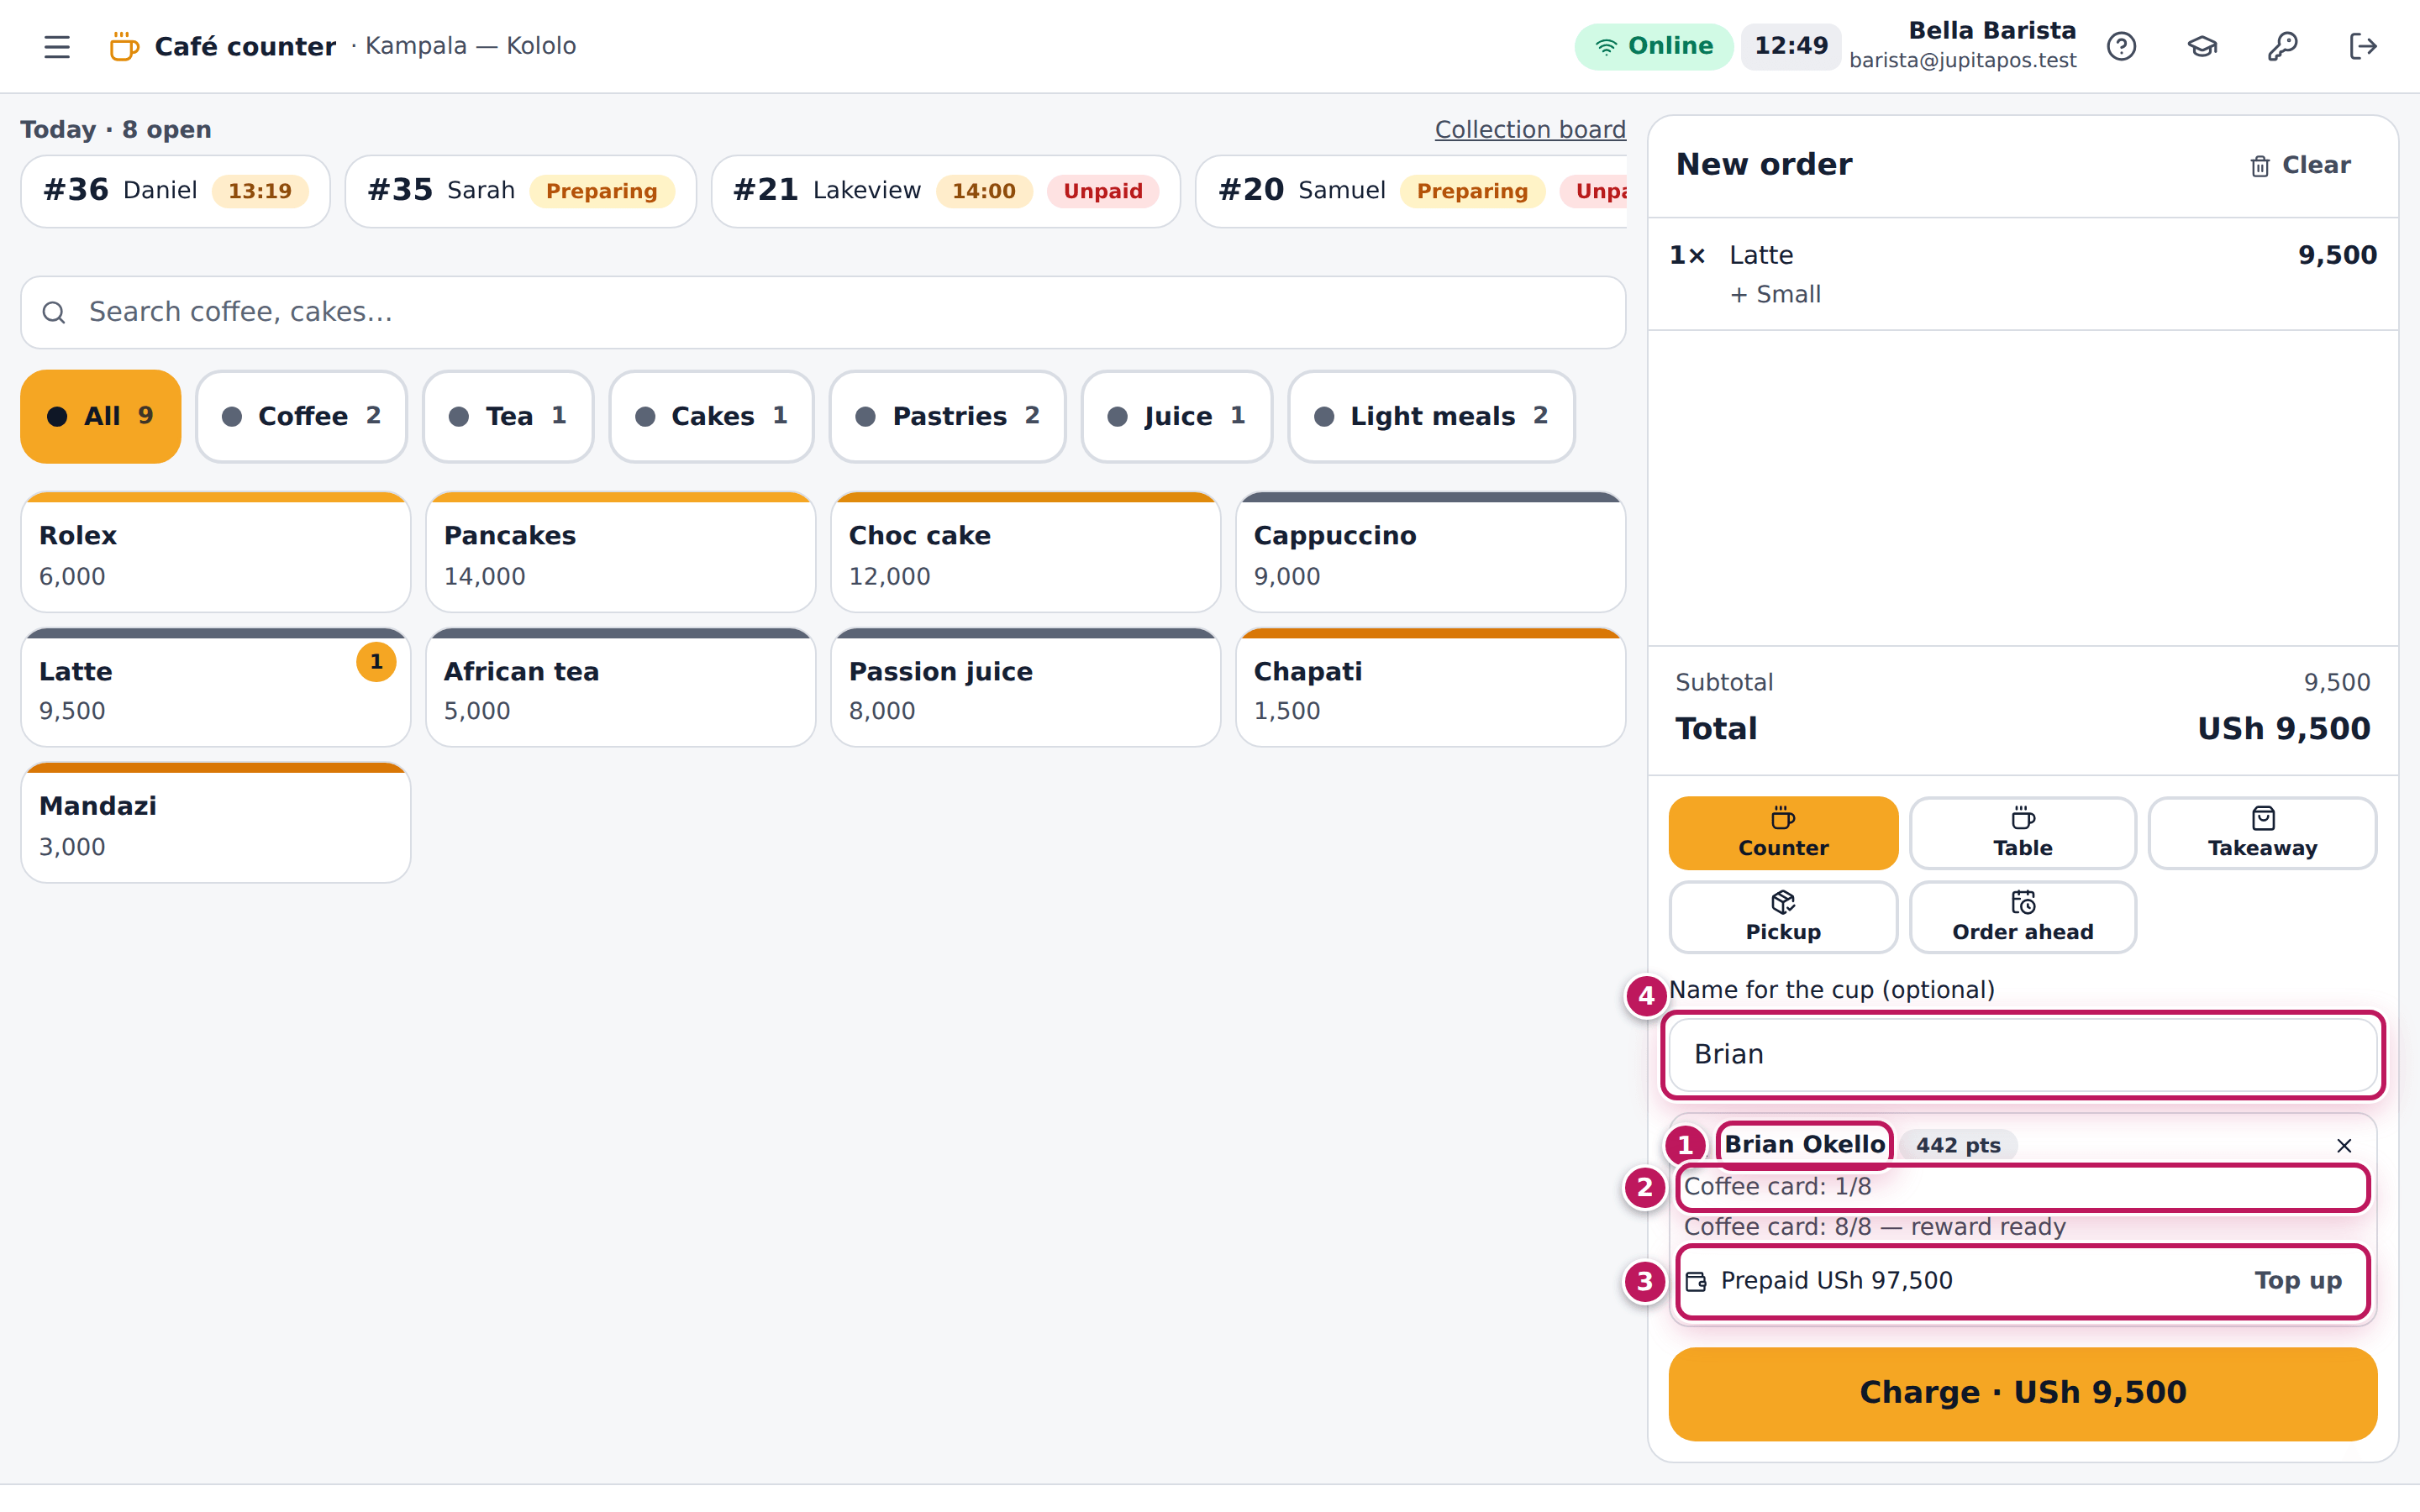
- Tap Loyalty customer, then search by name, phone, e-mail or code — here Brian Okello — and tap the customer.
- Read the panel (1): the points, each coffee card with its stamps out of 8 (2), a full card marked reward ready, a subscription with what is left today, and the prepaid balance (3). The customer’s first name fills Name for the cup (4).
- Tap Charge and take the payment.
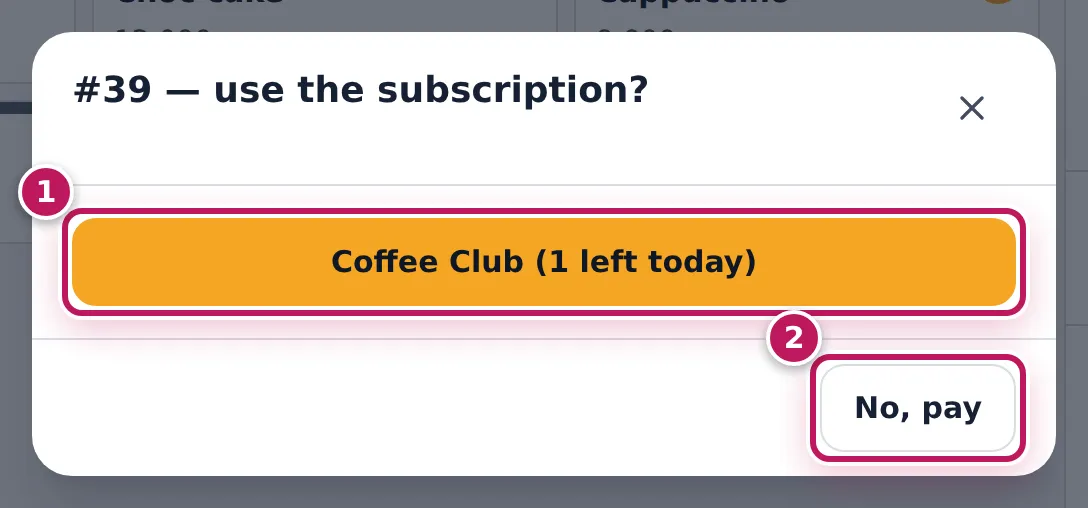
- If the customer has a subscription with something left today, JupitaPos first asks … use the subscription?: tap the plan (1) to let it pay for the eligible items, or No, pay (2) to pay as usual.
Expected result
When the order is paid, Brian’s coffee card has one more stamp. A subscription used pays for the dearest eligible items; if it covers everything the order closes as paid at once. A completed stamp card is redeemed from the till’s customer panel (see Redeem a reward).
Screenshot
Common mistakes
- Attaching the customer after charging. Stamps and points follow the order; attach the customer before Charge.
- Picking the wrong customer. Names can be alike — the demo has a Brian Okello and a Brian Okelo. Check the code or the phone number in the search results.
Troubleshooting
- The subscription is not offered. Today’s allowance is used, the items are not covered by the plan, or your role cannot redeem.
- The prepaid balance cannot pay. In the payment choose Customer credit: its code is filled in for you. If the balance is too low, top it up (see Top up a prepaid balance).
Top up a prepaid balance
Purpose
Sell prepaid credit to a regular — with the bonus your café offers — so they pay for their coffee from their balance.
Role / permission required
Baristas, cashiers and supervisors (giftcards.sell). Only where your café
has switched prepaid balances on.
Prerequisites
- Prepaid balances are on (see Set up the café).
- The customer is attached at the counter (see Earn stamps and use loyalty).
Steps
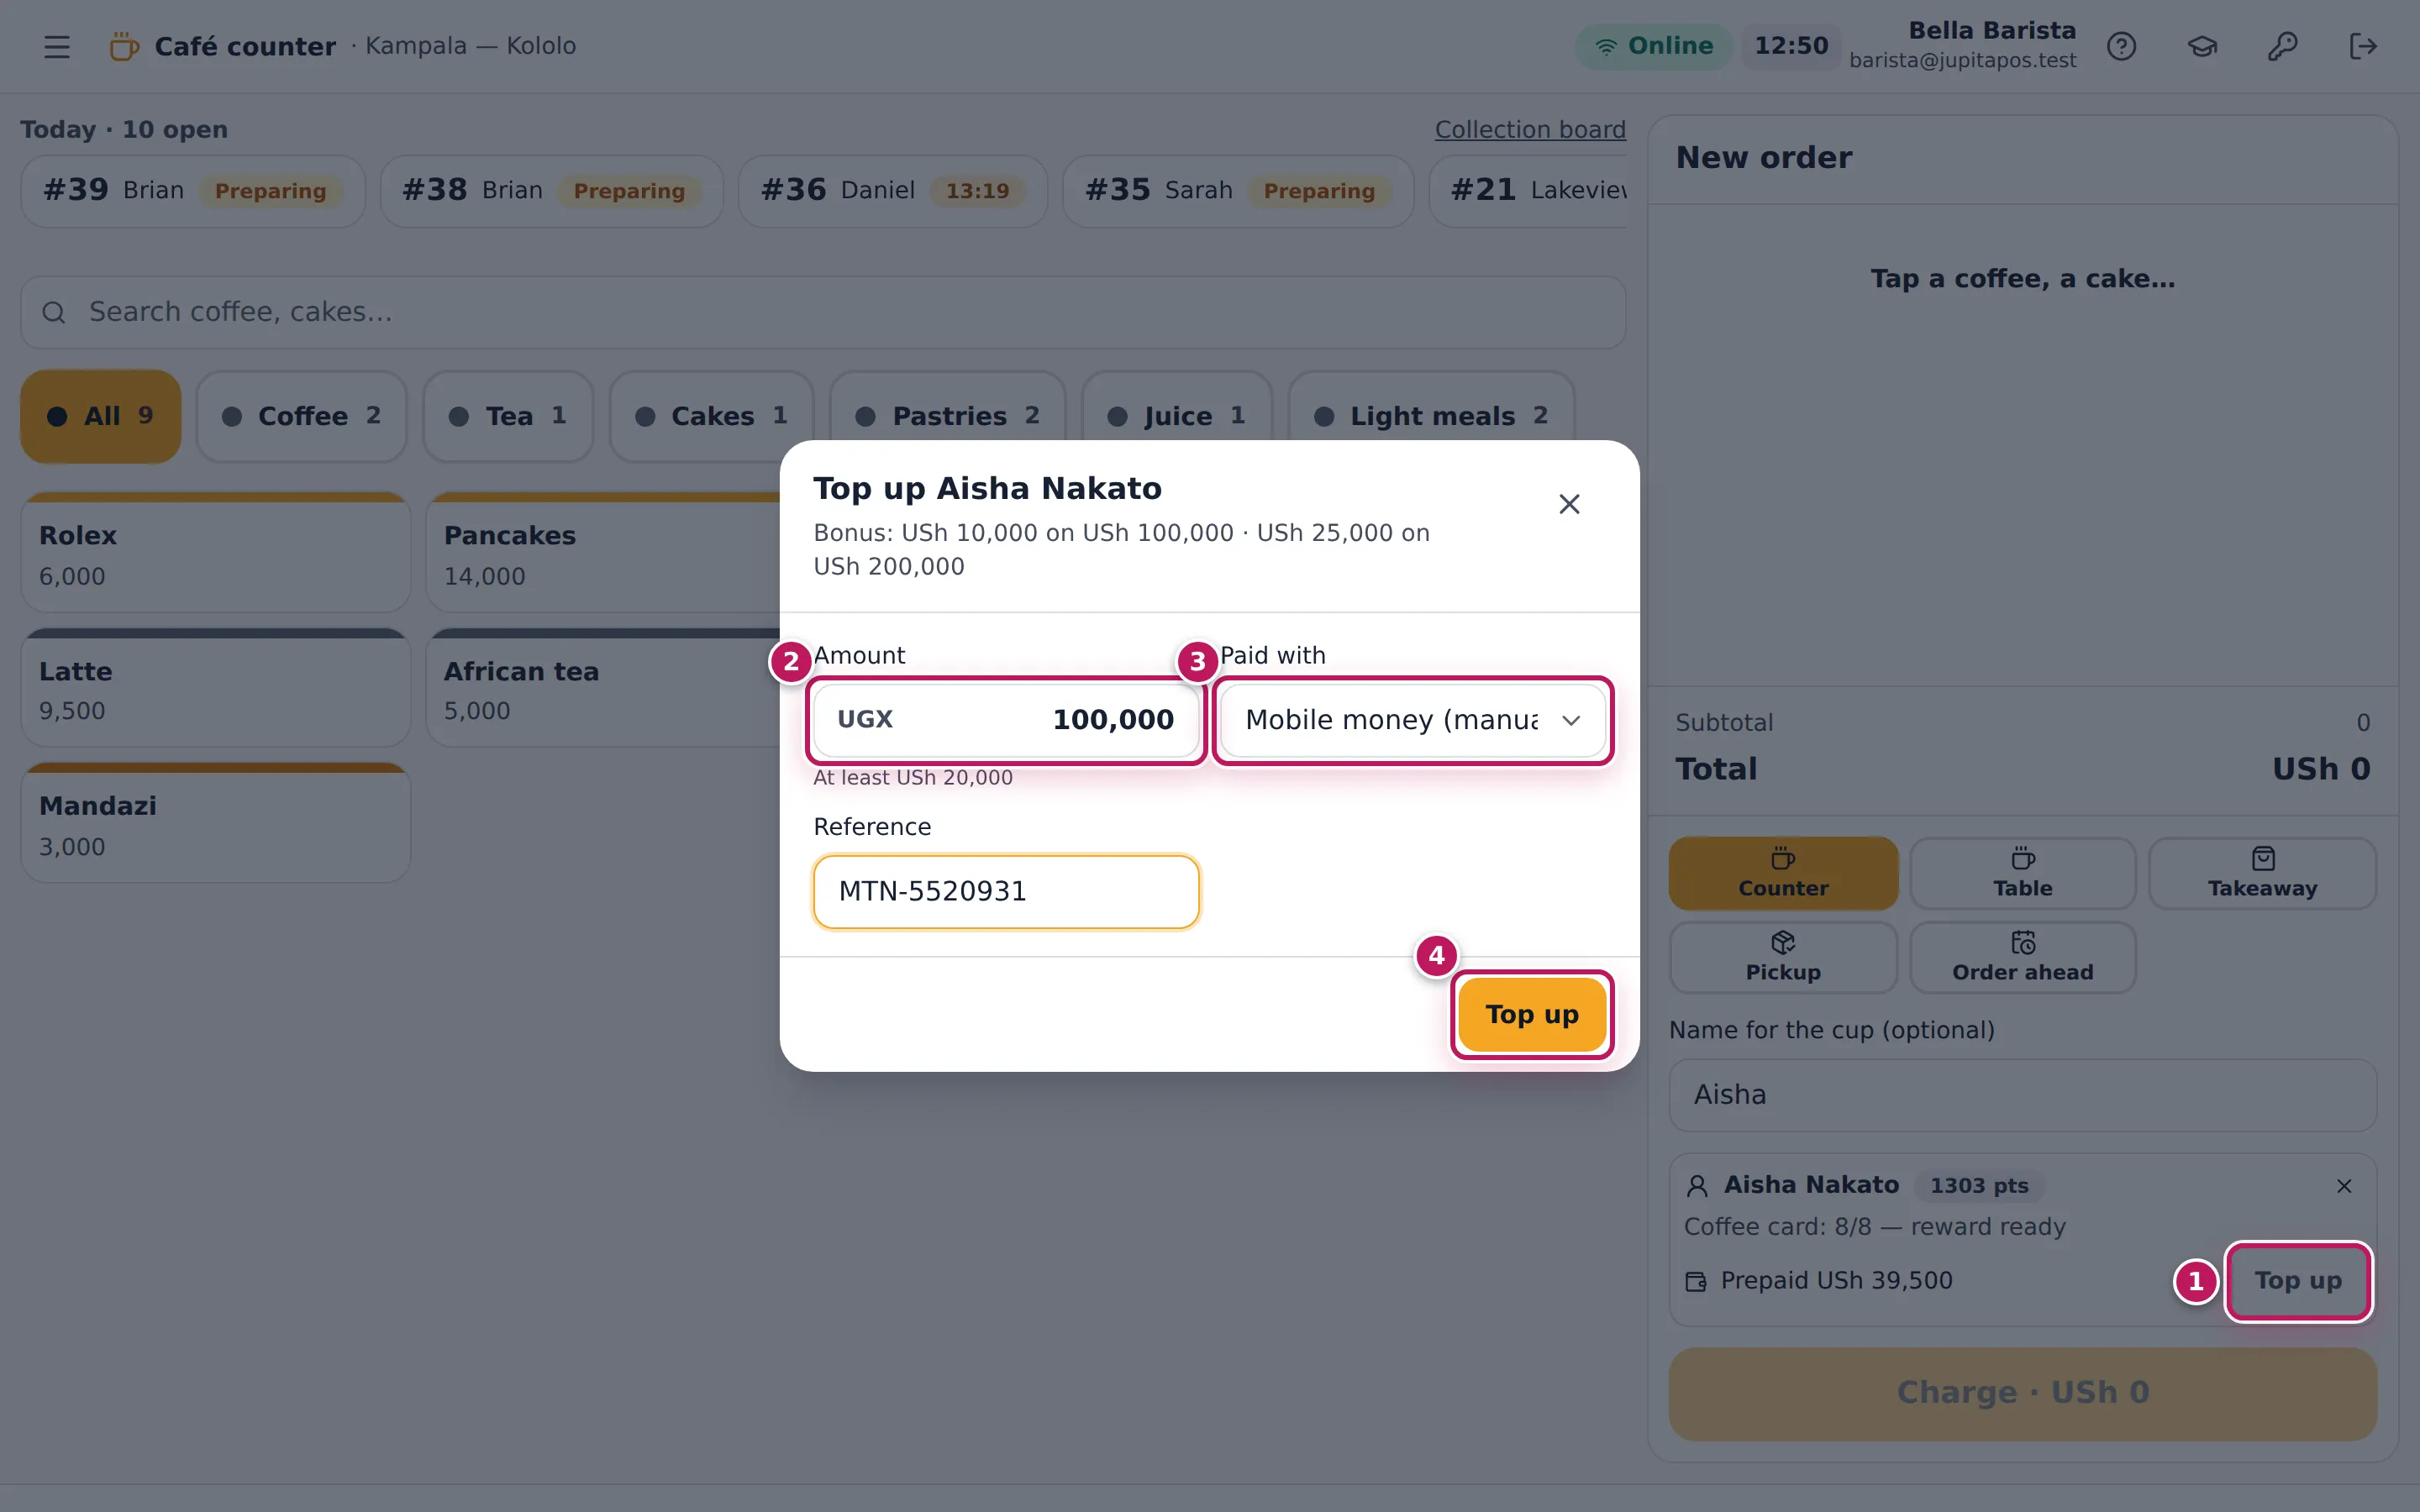
- In the customer panel, tap Top up (1) next to Prepaid.
- Type the Amount (2): at least the smallest top-up shown under it. The dialog lists the bonus tiers, for example USh 10,000 on USh 100,000.
- Choose how it is paid in Paid with (3) and type the Reference when the method needs one.
- Tap Top up (4).
Expected result
JupitaPos says Topped up — balance USh … (incl. USh 10,000 bonus) and the panel shows the new balance: Aisha’s USh 100,000 reaches the first tier, so her balance goes up by USh 110,000. Cash goes into your open till.
Screenshot
Common mistakes
- Topping up by cash with no till open. Cash must go into a drawer; open your till first, or take mobile money.
- Giving the bonus by hand. The bonus is added by itself when the amount reaches a tier.
Troubleshooting
- There is no Top up button. Prepaid balances are off in the café settings, or your role cannot sell credit.
- The top-up is refused. The amount is below the smallest top-up, or the reference is missing.
Record café waste
Purpose
Record every drink, cake or ingredient that is thrown away — dial-in shots, a spilt latte, milk poured away, unsold cakes — so that stock is right and the café can see what waste costs.
Role / permission required
Baristas, supervisors and managers (cafe.waste).
Prerequisites
- The products and ingredients have recipes (see Write a recipe).
Steps
- Open Café waste from the menu.
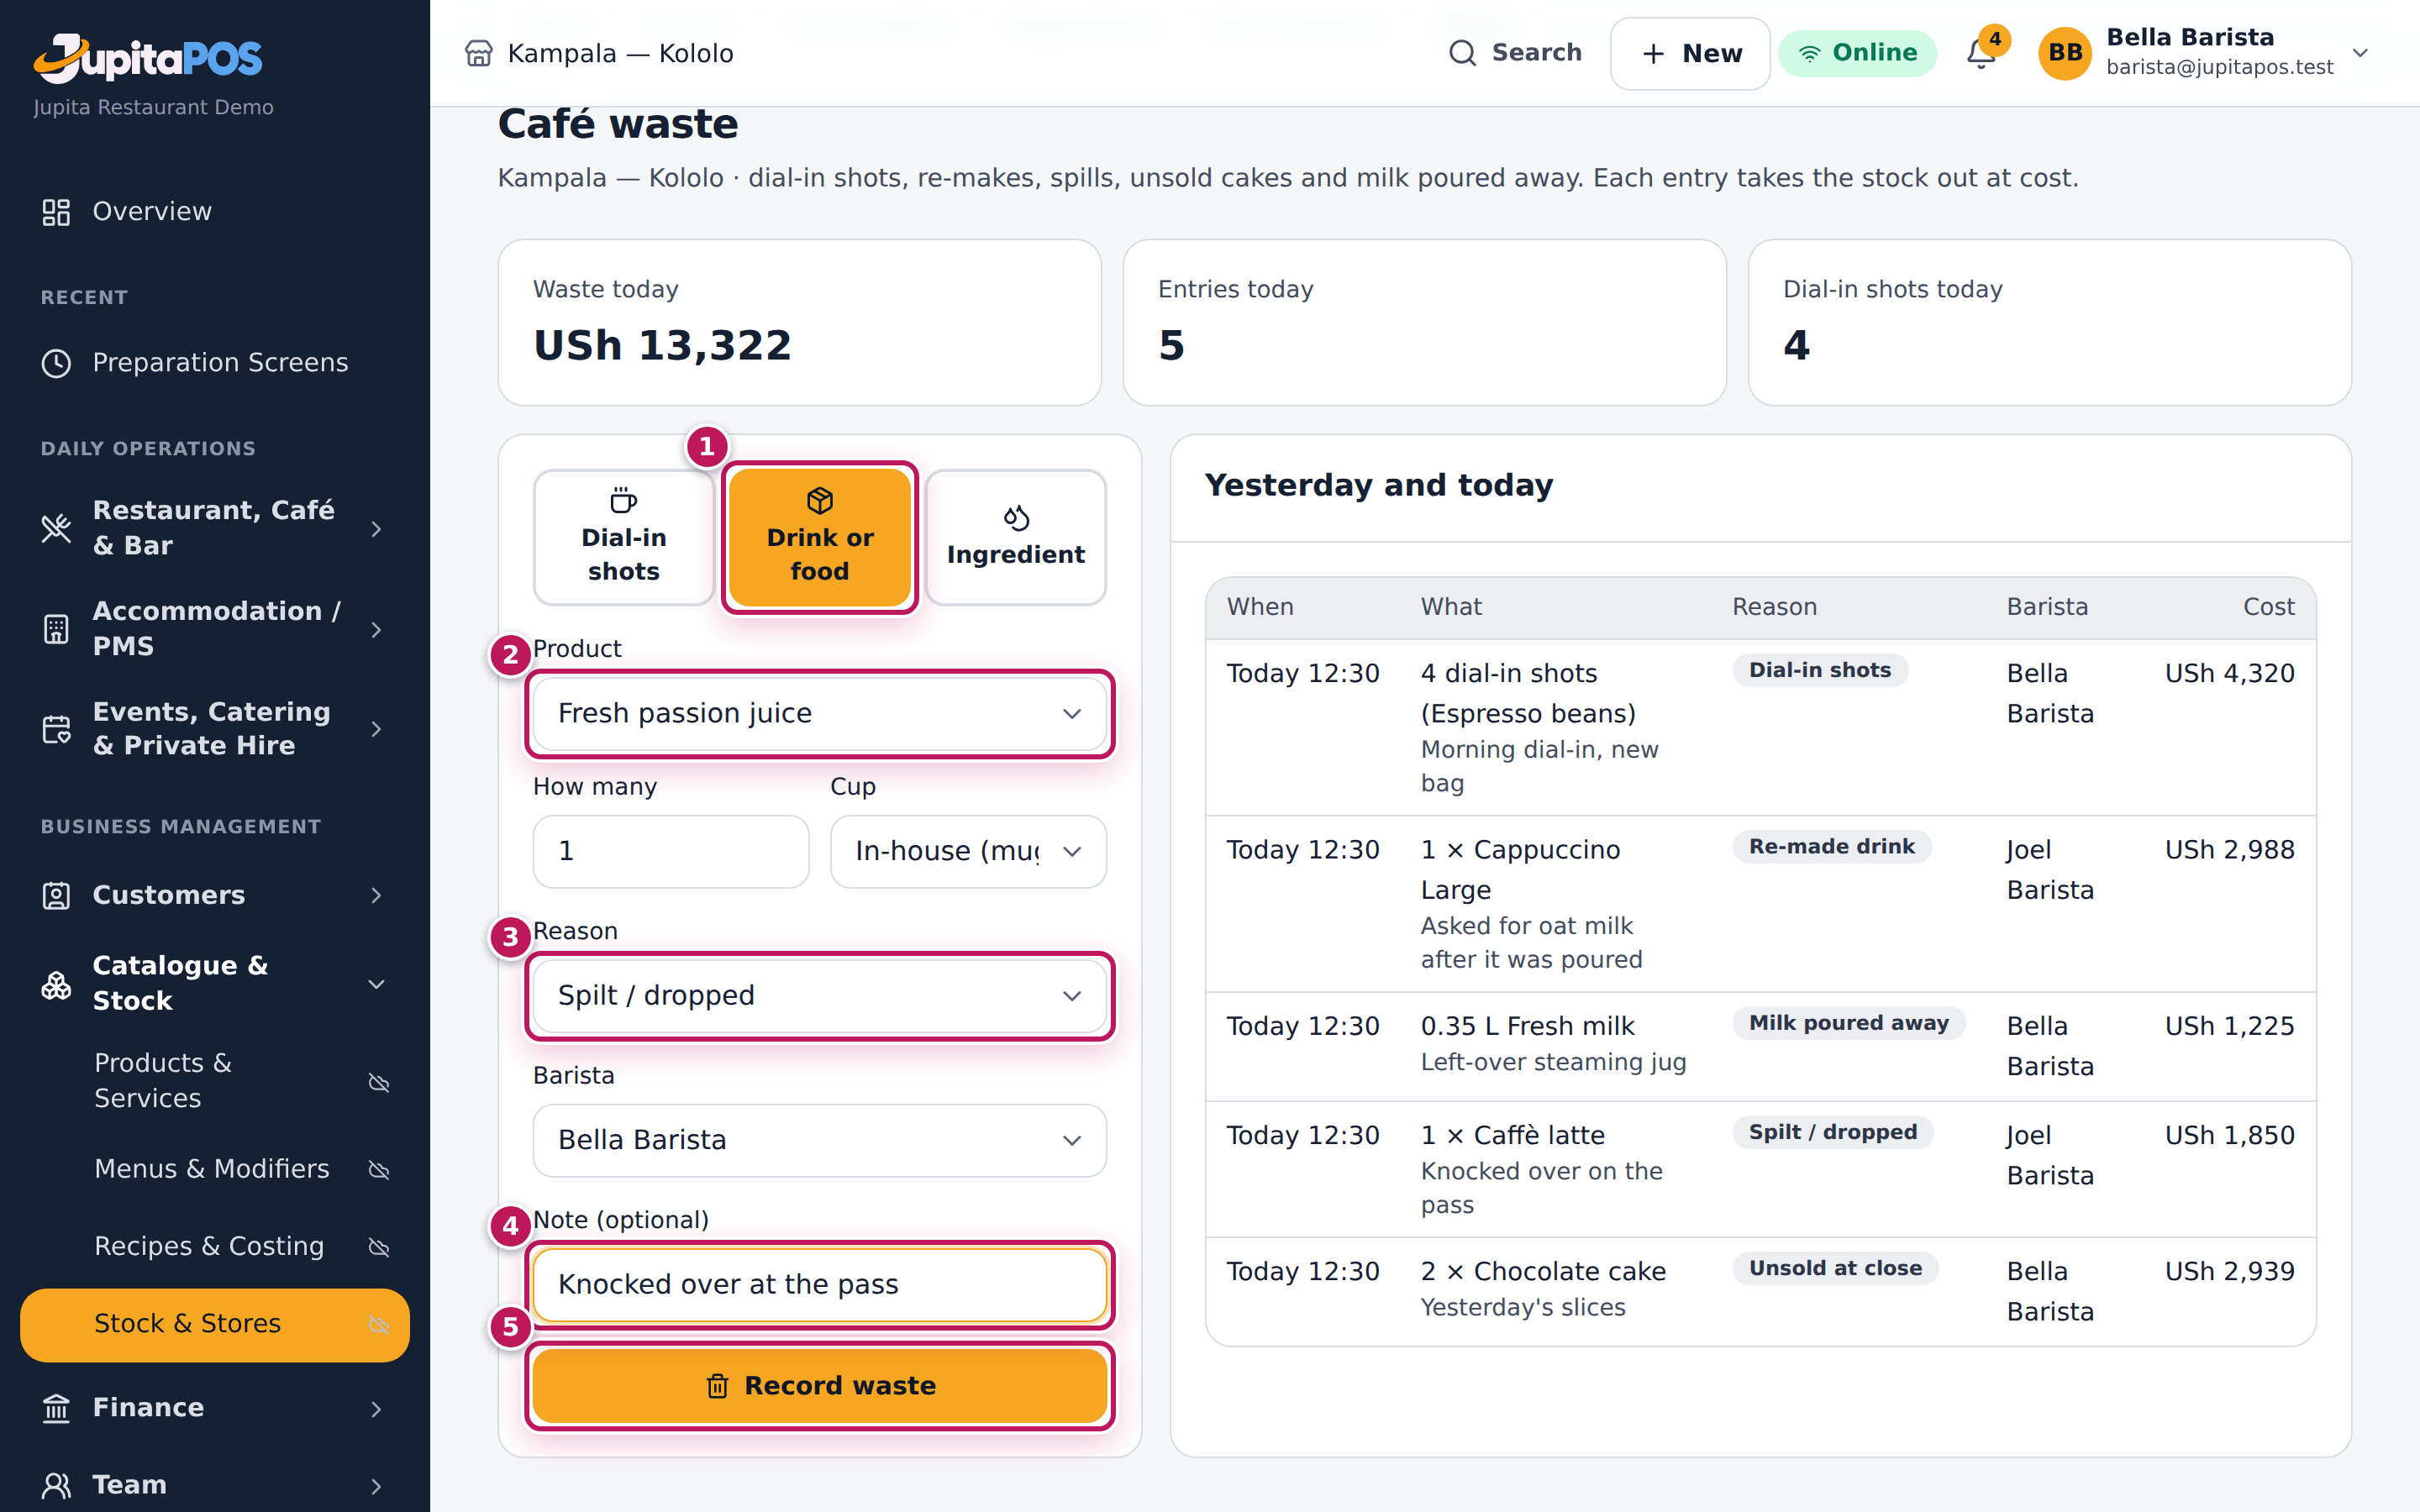
- Choose what was wasted:
- Dial-in shots — shots pulled to set the grinder: choose the Beans and the Shots pulled;
- Drink or food (1) — a re-made or spilt drink, unsold cakes, a staff drink: choose the Product (2), its size and options, How many and the Cup;
- Ingredient — milk left in the jug, expired cream: choose the Ingredient, How much and the Unit.
- Choose the Reason (3), for example Spilt / dropped.
- Check the Barista and add a note in Note (optional) (4).
- Tap Record waste (5).
Expected result
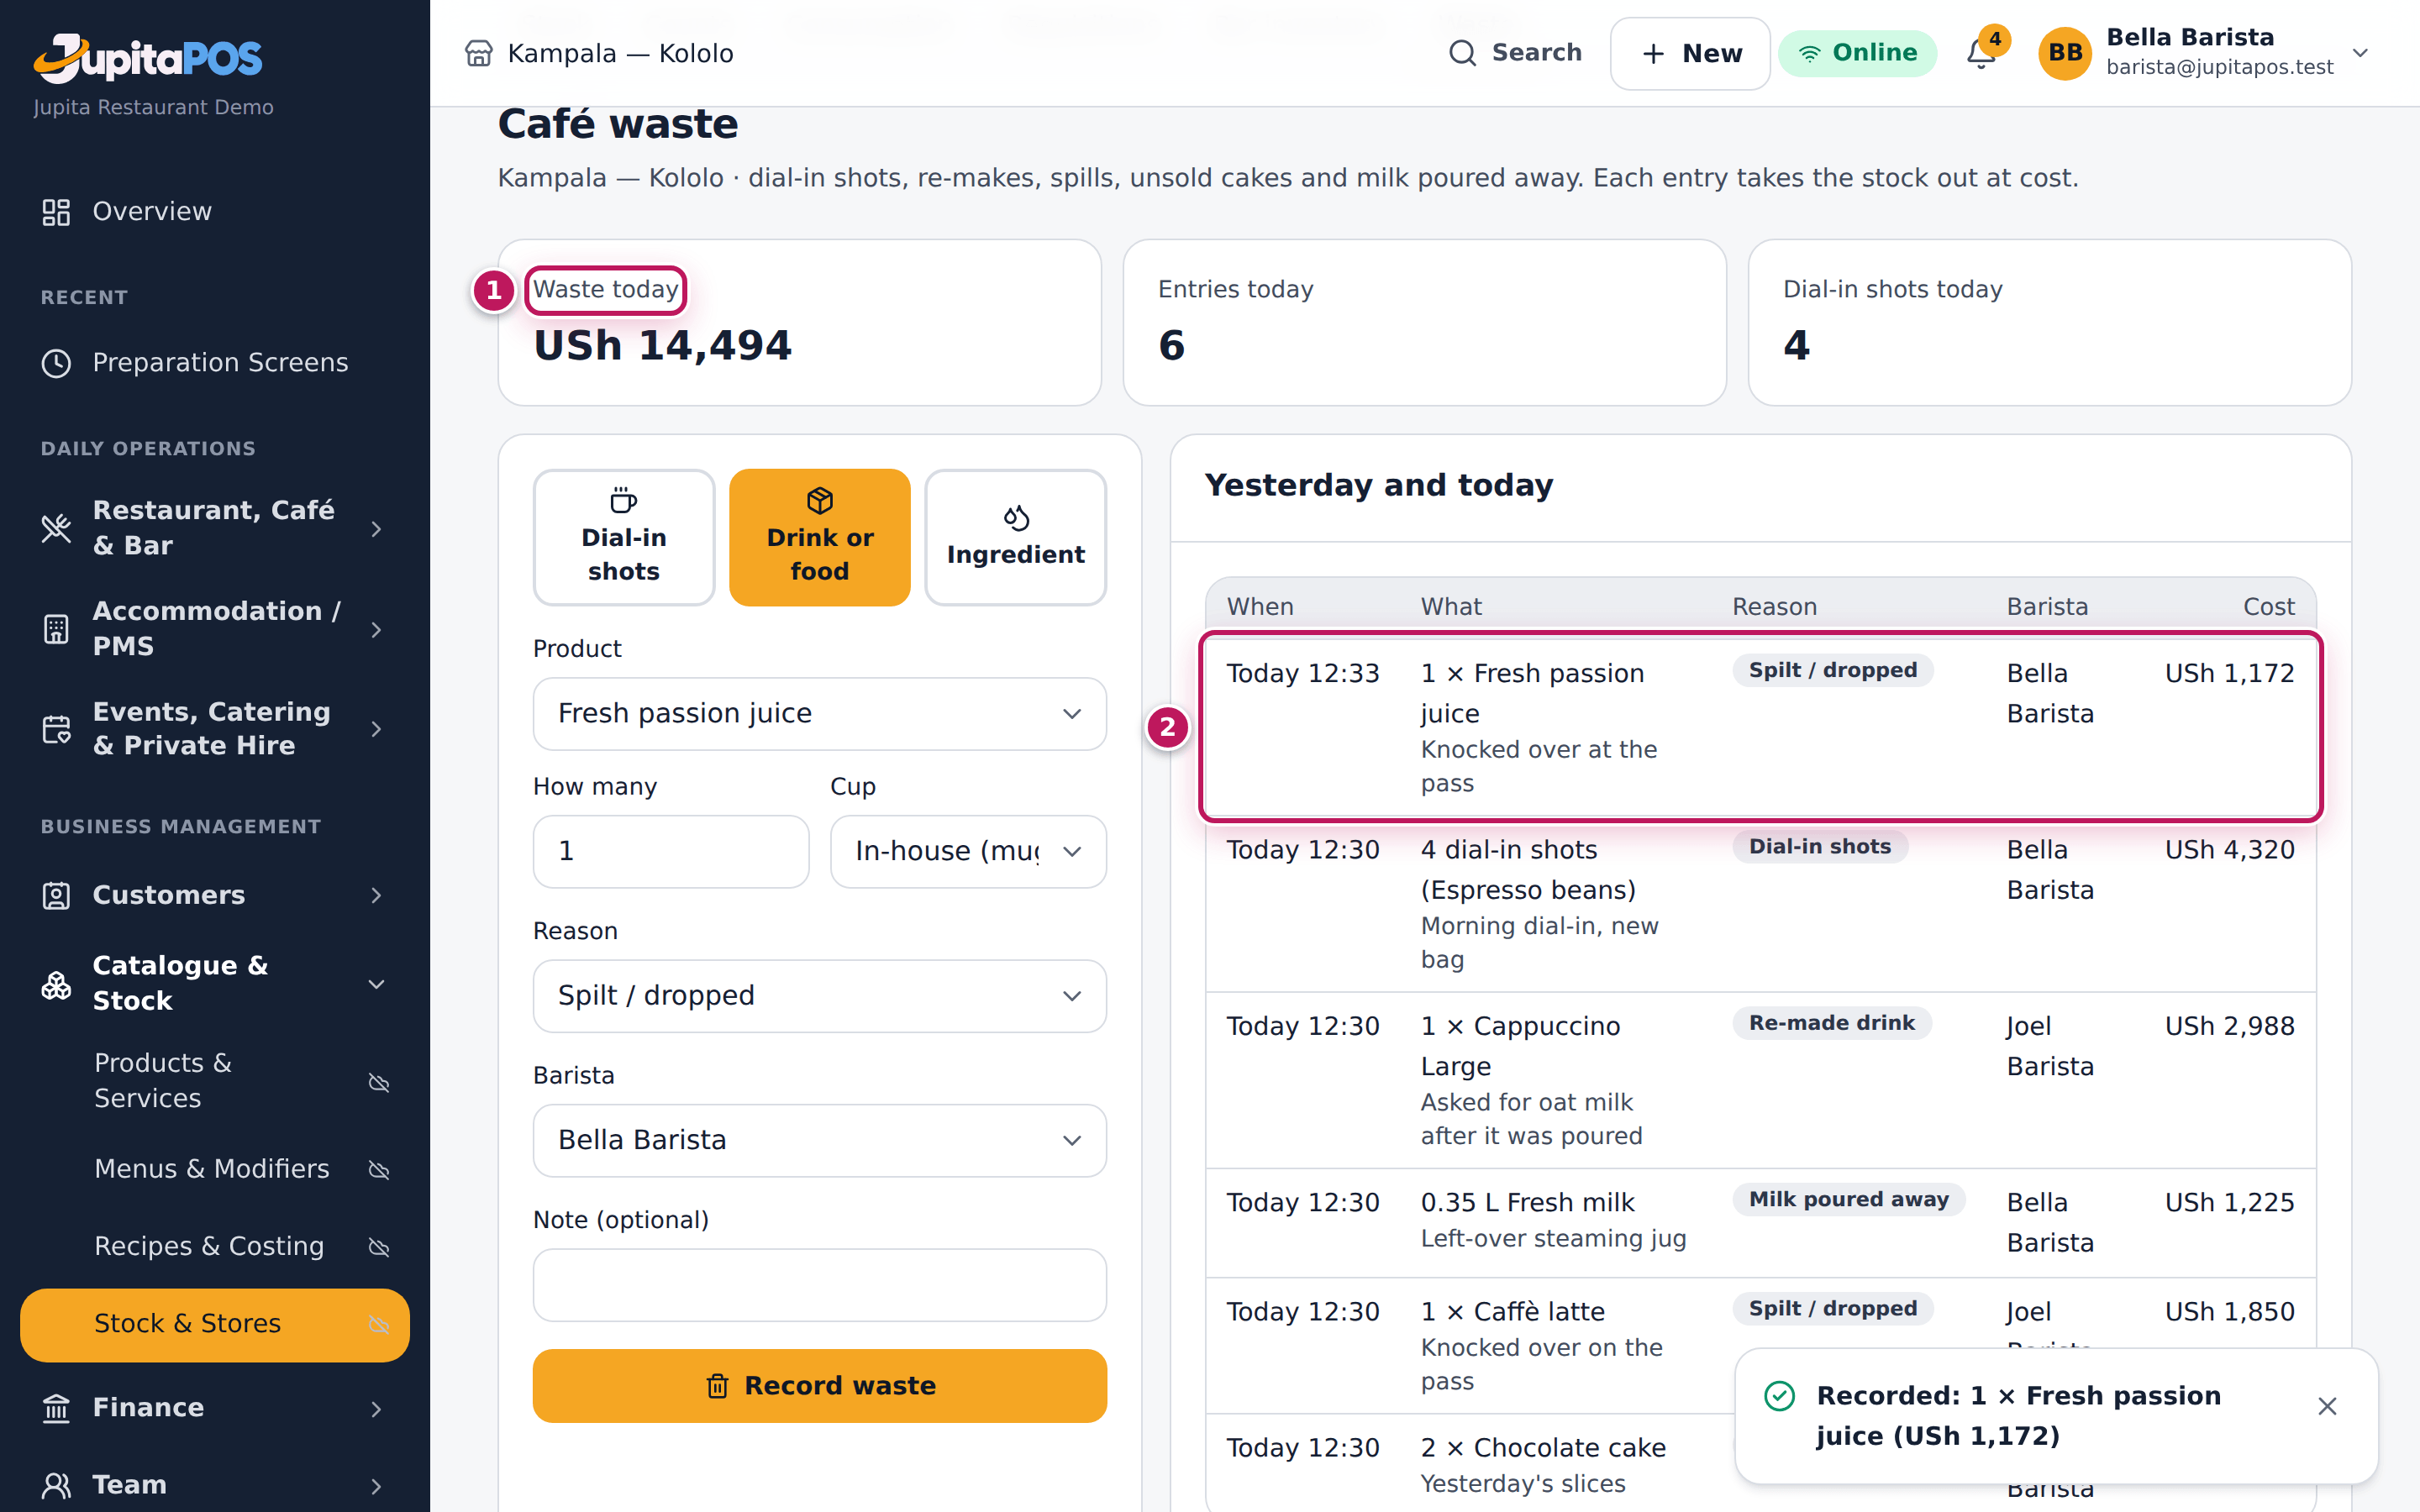
JupitaPos says Recorded: 1 × Fresh passion juice (USh …) with the cost at stock price. The entry is first in Yesterday and today (2), dated Today with its time, and Waste today (1) goes up by its cost. The stock of its ingredients — here the passion fruit — is reduced. For a coffee, the recipe takes out the beans and the milk; choose Take-away (cup, lid) under Cup when a take-away cup was used too.
Screenshot
Common mistakes
- Recording a re-make twice. A re-make or spillage marked on the barista screen is recorded here by itself (see Remake a drink). Do not enter it again.
- Using Ingredient for a whole drink. Choose Drink or food: the recipe then takes out exactly the beans, milk and cup.
Troubleshooting
- Record waste is greyed out. The product, ingredient or amount is missing.
- The cost is 0. The product has no recipe, or its ingredients have no stock price.
Read the café reports
Purpose
Know how the café is doing: what sells, how many cups a kilo of beans really gives, which milks are chosen, how fast the baristas are, what each cup earns and what is wasted.
Role / permission required
Supervisors, café and branch managers, accountants (cafe.reports);
Export CSV also needs reports.export.
Prerequisites
- Café sales for the dates you choose.
Steps
- Open Café reports from the menu.
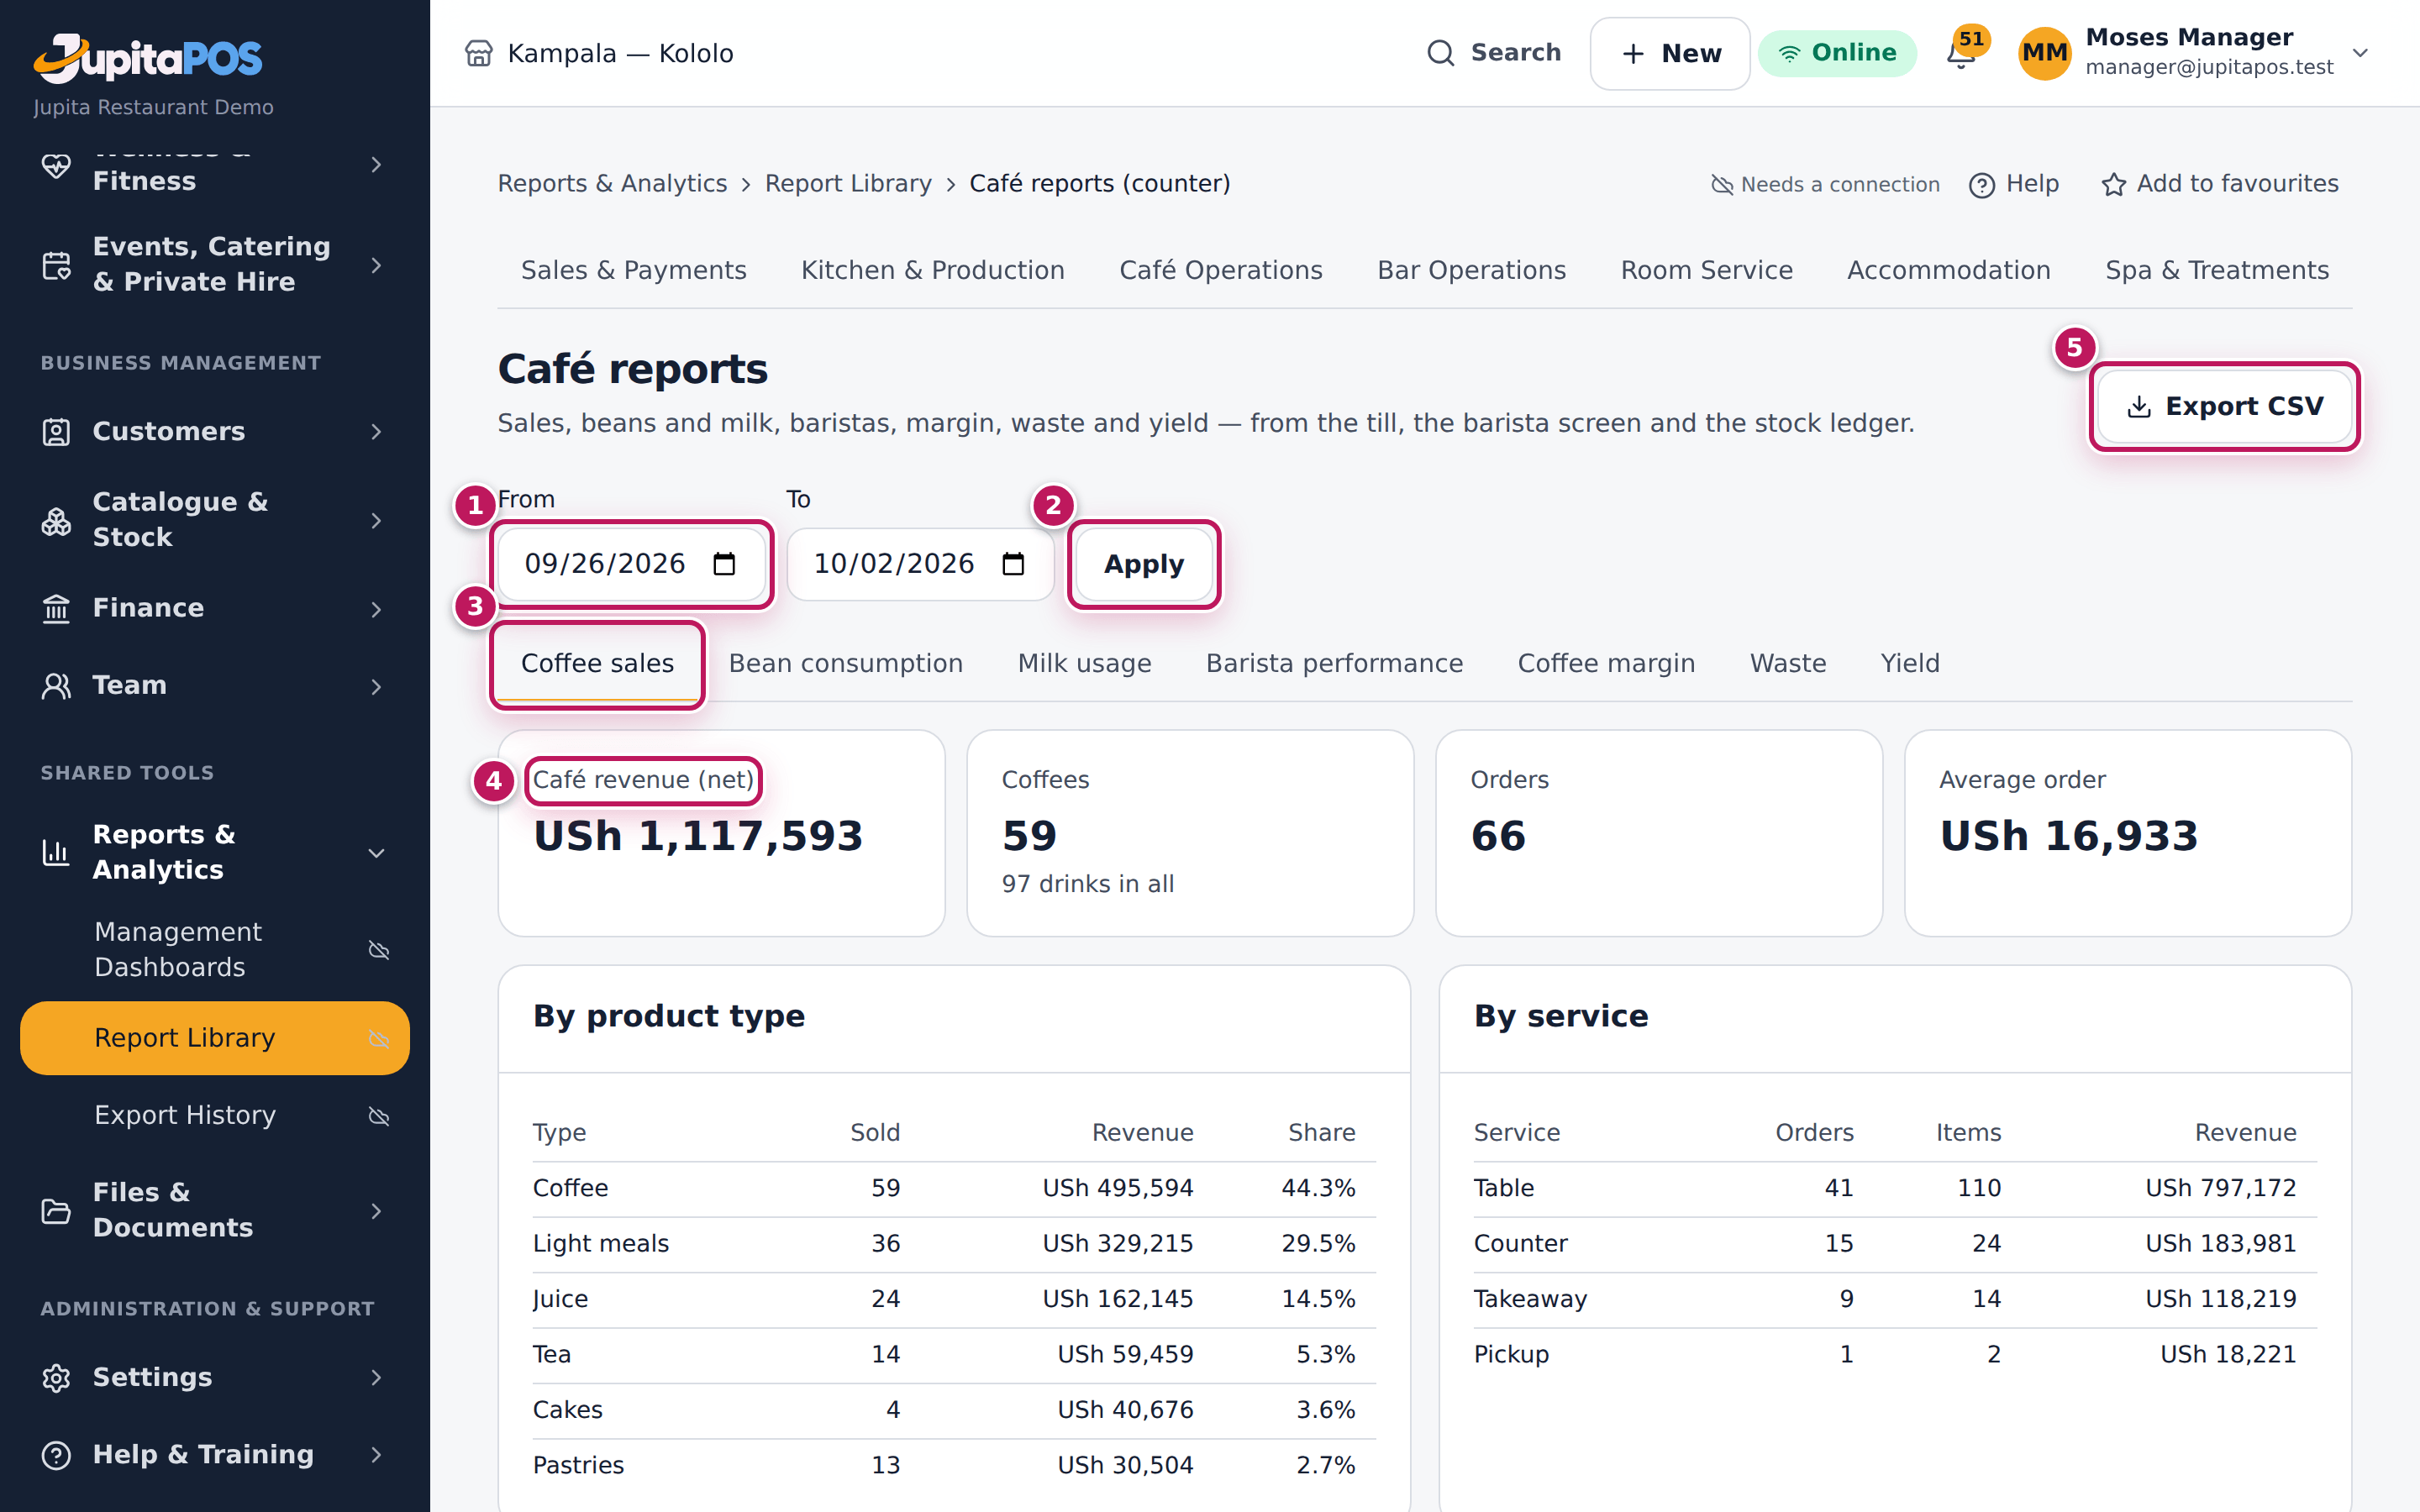
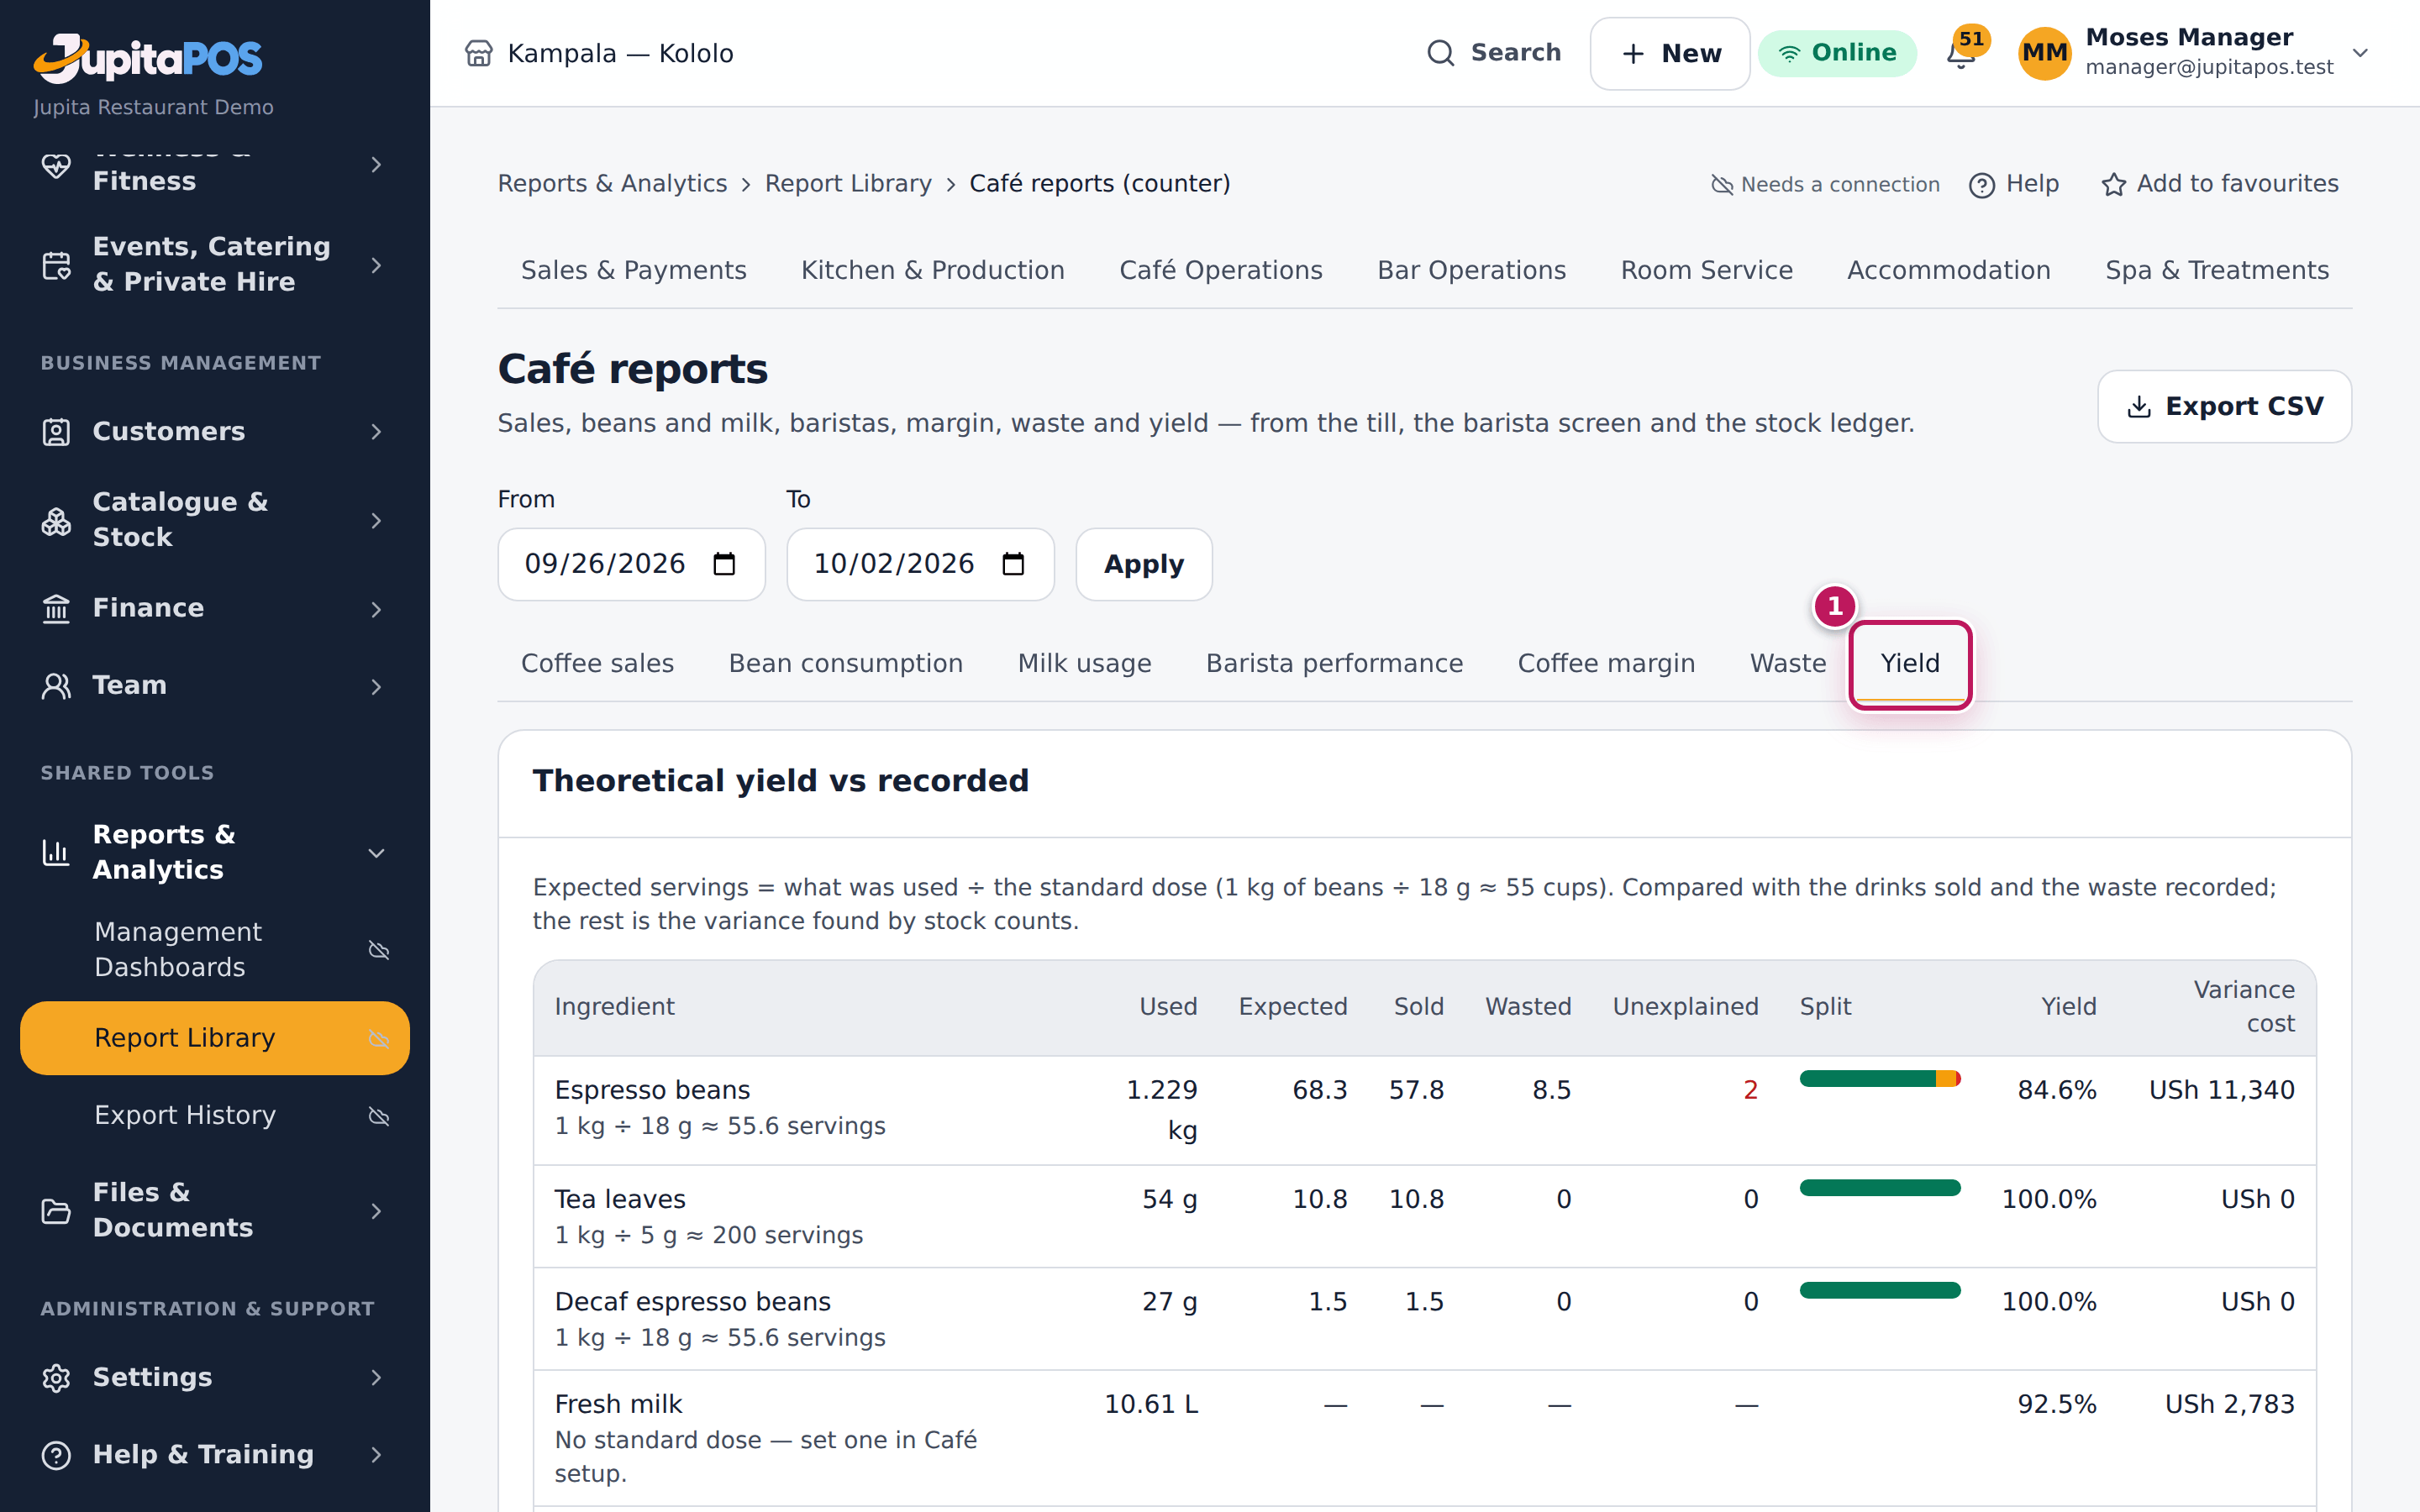
- Set From (1) and To and tap Apply (2). The last 7 days are shown at first.
- Choose a report tab (3):
- Coffee sales — café revenue (4), coffees, orders, average order; by product type, by service, coffee sizes, milk choice, busiest hours, paid extras and products;
- Bean consumption — beans used, expected cups, cups sold, waste, what is unexplained, and the yield;
- Milk usage — each milk, how much per drink, its share and waste;
- Barista performance — drinks made, time from order to ready, on-time share, re-makes and waste per barista;
- Coffee margin — revenue, cost, margin and cost per cup;
- Waste — waste by reason and item, cakes sold against thrown away;
- Yield (1) — beans, milks, cups and lids side by side.
- Tap Export CSV (5) to download the report’s main table.
Expected result
The report shows the chosen dates for your branch. Reading the yield: with 1 kg of beans and an 18 g dose you expect 55.6 cups; if 48 were sold, 5 were recorded as waste and 2.6 are unexplained, the yield is 86 %. Recorded waste is a training matter; unexplained loss is what a stock count found and nobody recorded.
Screenshot
Common mistakes
- Comparing a week with a month. Set the same number of days when you compare periods.
- Reading unexplained loss as waste. Waste is what staff recorded; unexplained is what they did not. Ask about the second.
Troubleshooting
- The yield is empty. No stock count was done for the period, or the beans have no café role and dose (see Set up the café).
- Export CSV does not appear. Your role cannot export reports.
Set up the café
Purpose
Decide what is sold at the café counter and how it works: which products are café products, call numbers, the customer’s name, orders ahead, when ready orders turn amber and prepaid balances.
Role / permission required
Branch and café managers, owners (cafe.manage, a sensitive permission:
sign in with your password).
Prerequisites
- The products are on the menu (see Add a menu item).
Steps
- Open Café setup from the menu. The tabs are Products, Ingredients & doses, Modifier recipes, Drink costs and Settings.
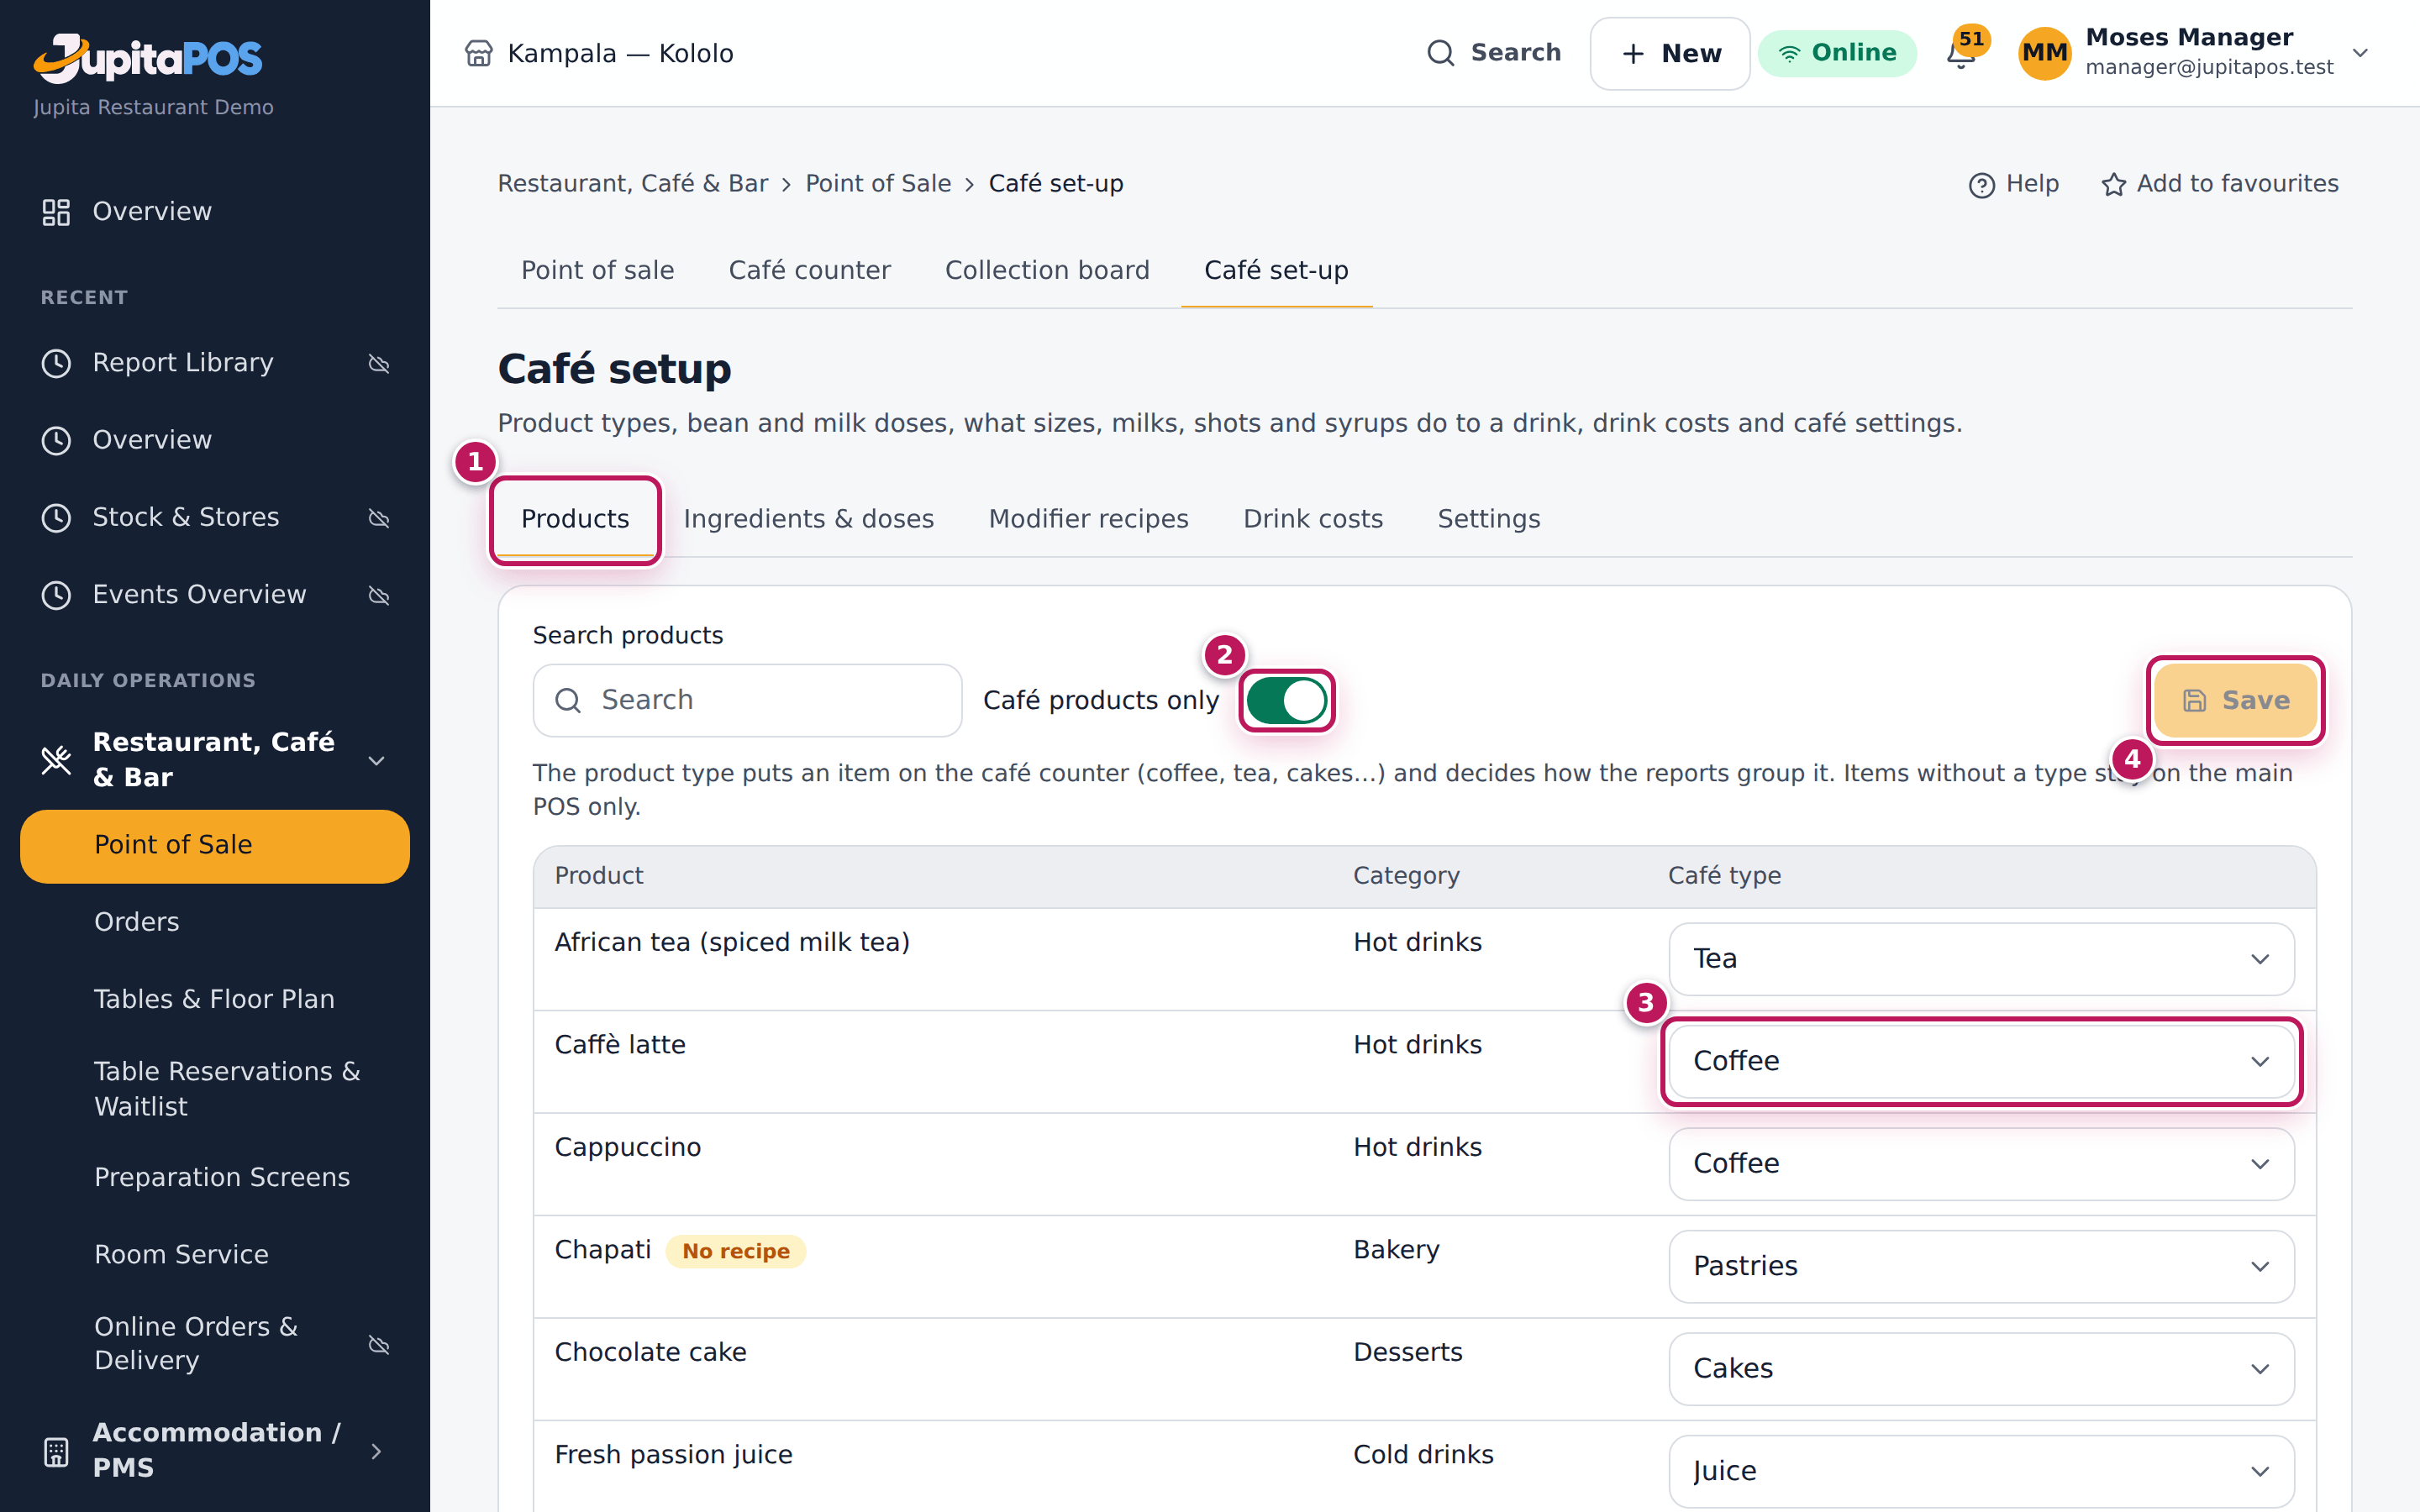
- On Products (1), switch Café products only (2) on or off to see the café products or all products.
- Give each café product its café type (3) — Coffee, Tea, Cakes, Pastries, Sandwiches, Smoothies, Juice, Light meals — and tap Save (4). Products that are Not a café product stay on the main till only.
- On Ingredients & doses, give the beans, milks, cups and lids their café role and the standard dose (for example 18 g of beans a shot).
- On Modifier recipes, say what each option does to the drink — Large scales the recipe by 1.5, Oat milk replaces the milk, Extra shot adds 9 g of beans — with Edit on the option.
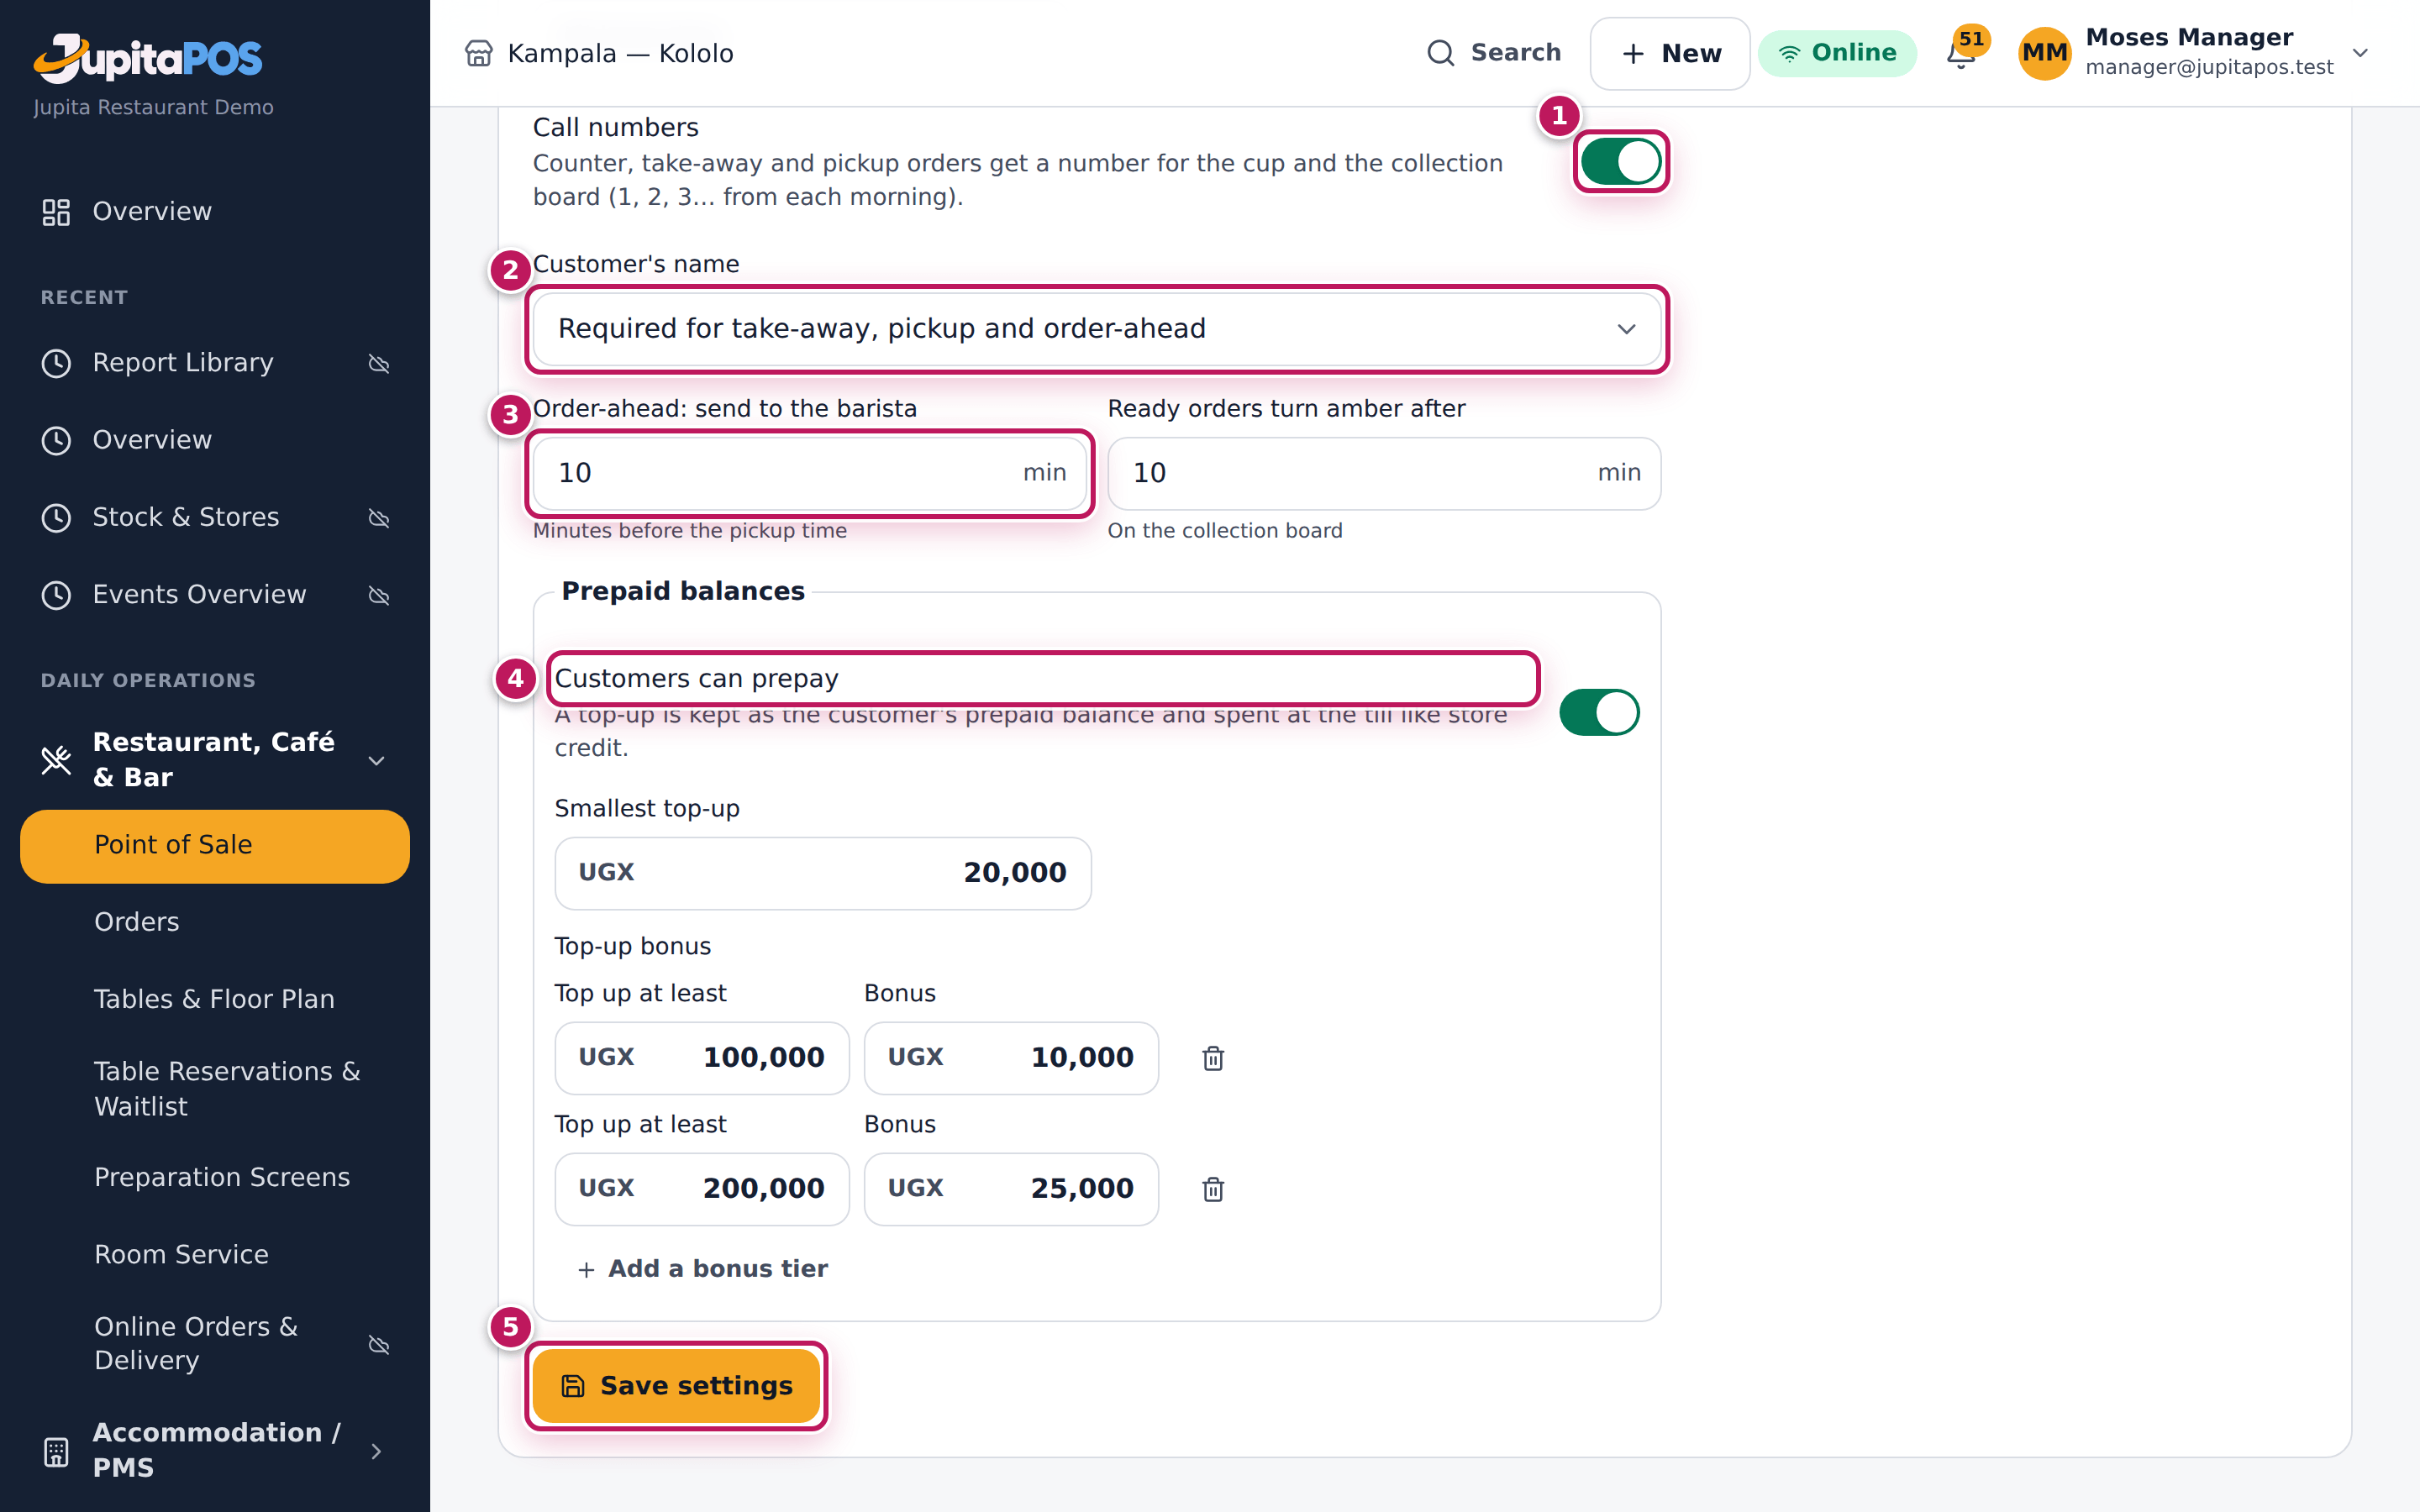
- On Settings, choose Call numbers (1), when the Customer’s name is required (2), how many minutes before the pickup an order ahead goes to the barista (3), when ready orders turn amber, and whether Customers can prepay (4) with the smallest top-up and the bonus tiers.
- Tap Save settings (5).
Expected result
The café counter shows the café products under their types, and the settings apply to every order from then on. The demo business has call numbers on, the name required for take-away, pickup and order-ahead, 10 minutes for orders ahead, and prepaid balances with bonuses from USh 100,000.
Screenshot
Common mistakes
- Giving a meal a café type by mistake. It then appears on the café counter and in the coffee reports. Set it back to Not a café product.
- Setting a dose in the wrong unit. Doses are in g or ml even when the ingredient is stocked in kg or l; the page shows how many servings a kilo or a litre gives — check that it looks right.
Troubleshooting
- A rule on Modifier recipes is refused with a line number. The rule names no ingredient, uses a unit that cannot be converted, or a share over 1. Correct that line.
- The café counter does not show a product. It has no café type, or it is not on a menu active at this branch now.
Check what a drink costs
Purpose
Know the cost and the margin of every drink exactly as it is sold — size, milk, extra shots, in-house or take-away — before you set a price.
Role / permission required
Branch and café managers, owners (cafe.manage).
Prerequisites
- The drink has a recipe and its ingredients have stock prices (see Read an item’s cost and margin).
Steps
- Open Café setup → Drink costs.
- Choose the drink in Drink or product, here Cappuccino. The table Every size, in-house and take-away shows the cost, net price, margin, beans, cups per kg and milk of each size — a large take-away cappuccino, for example, has a net price of USh 9,322.
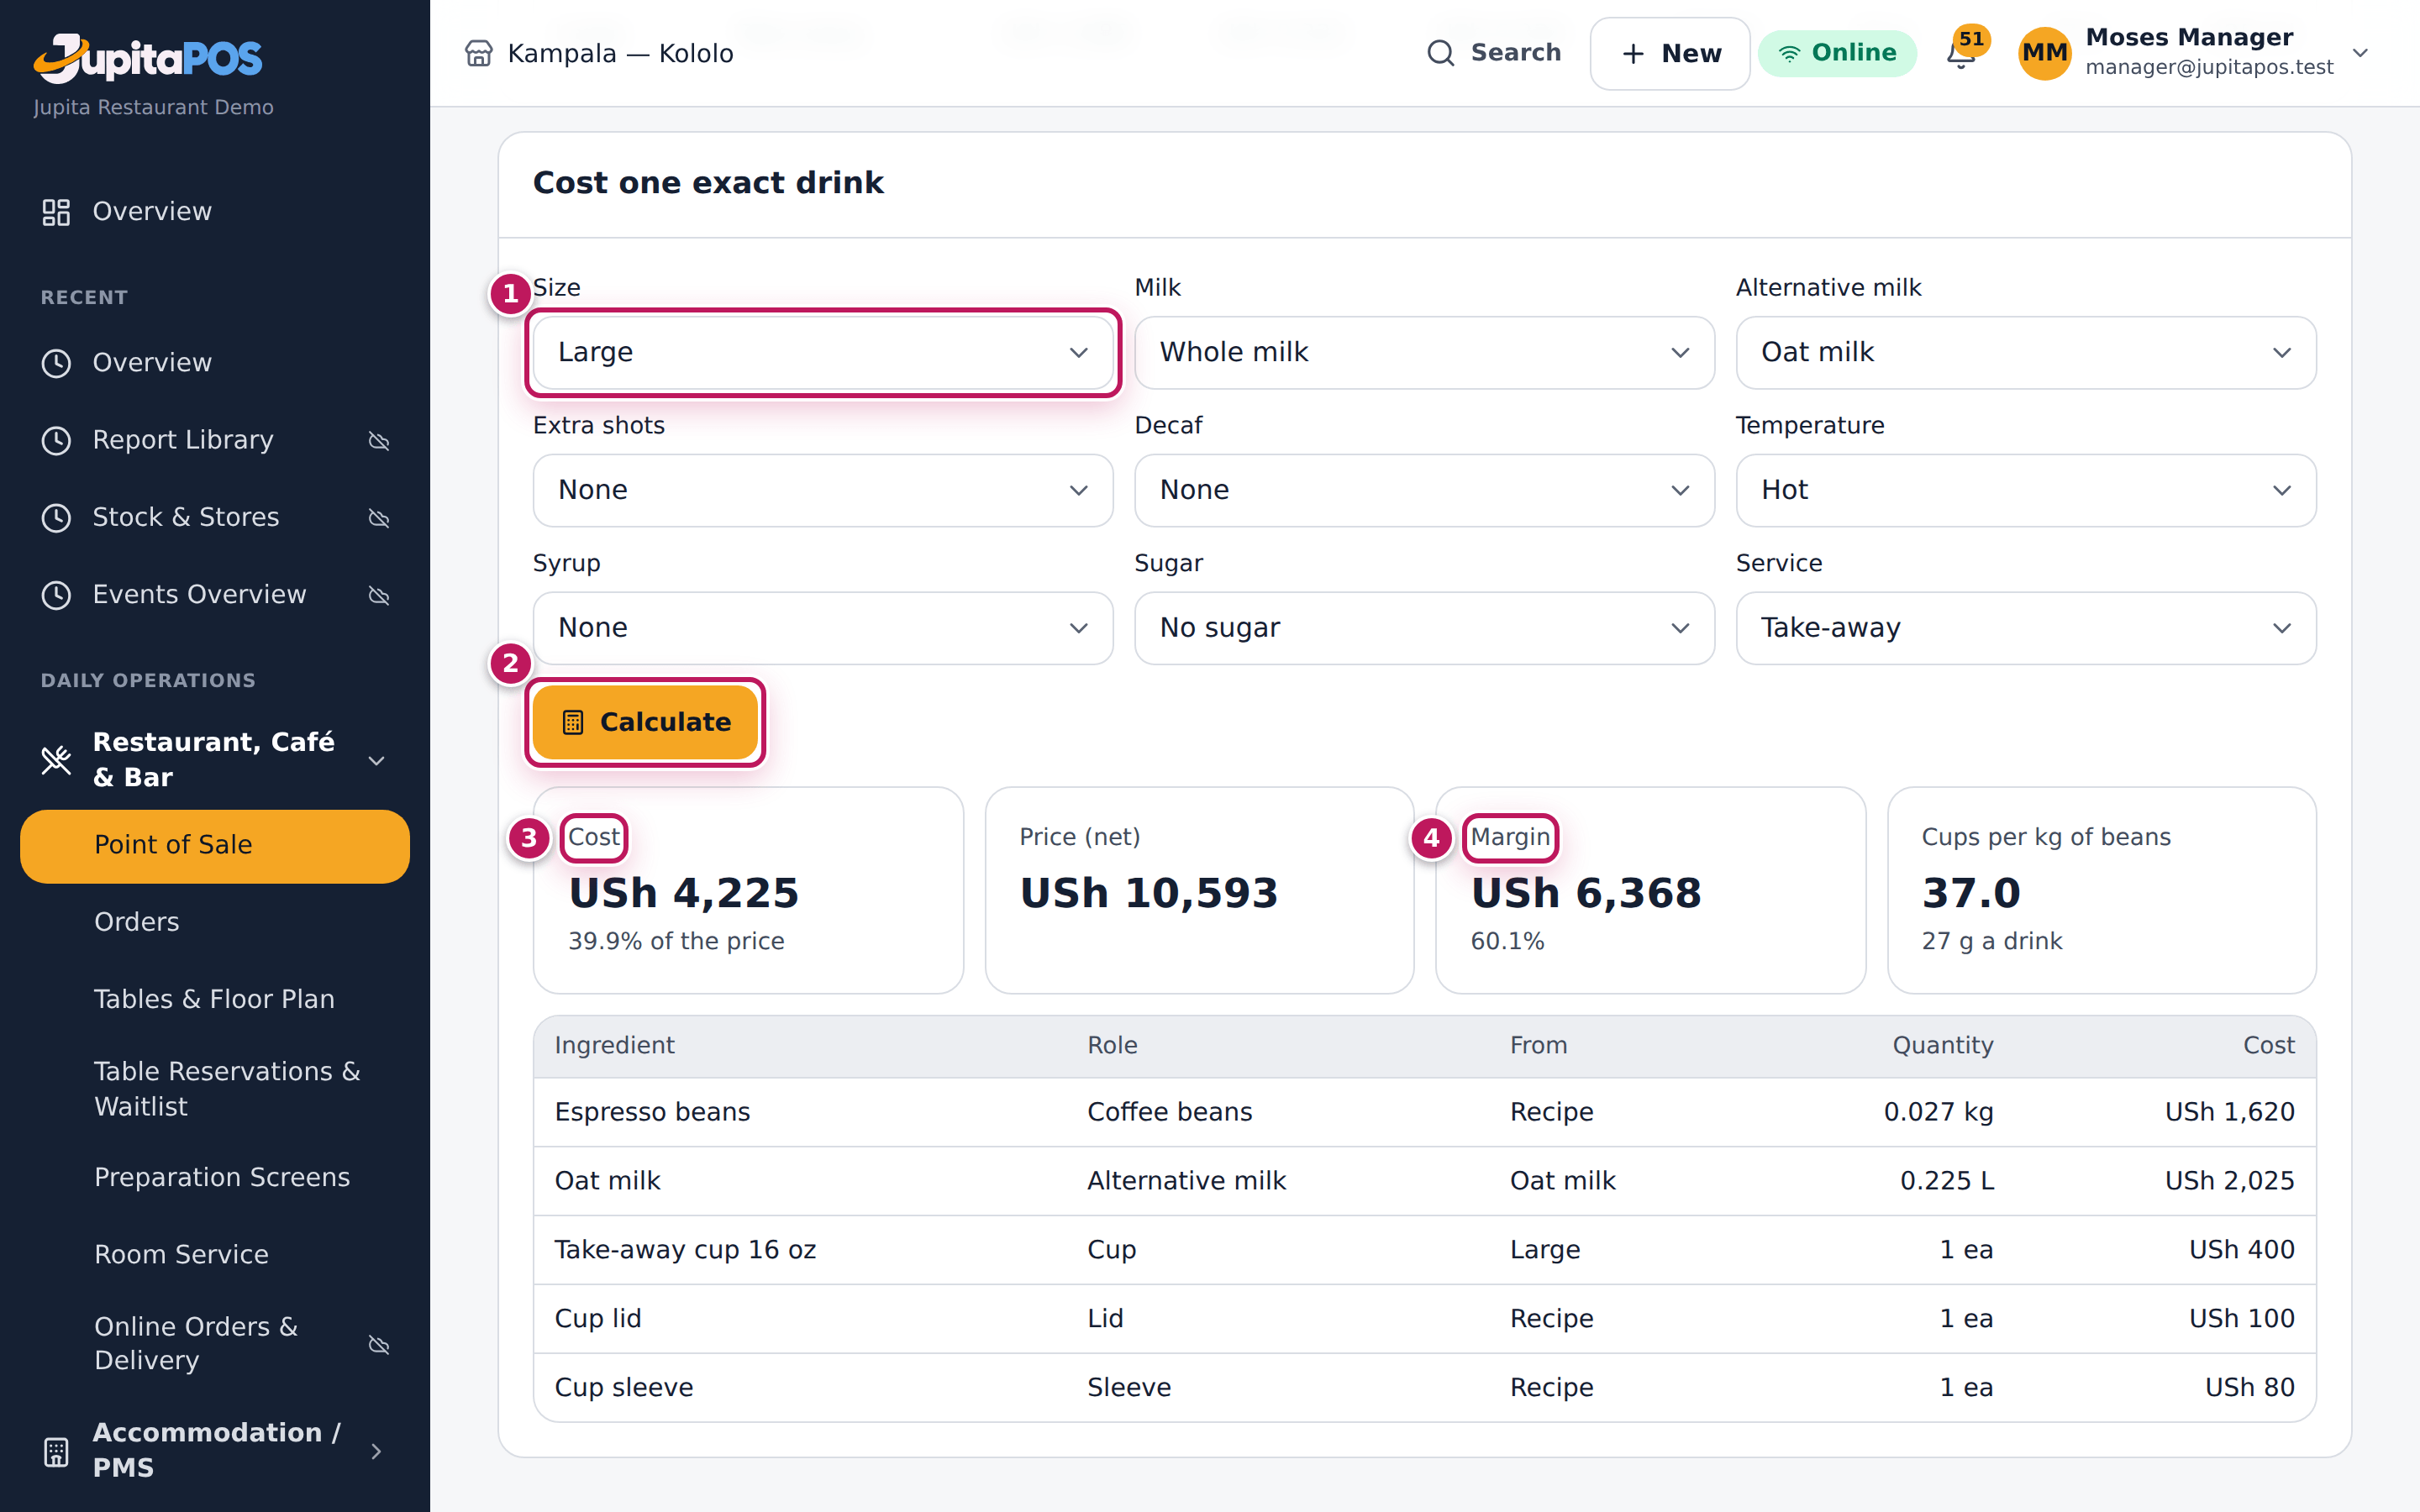
- Under Cost one exact drink, choose the Size (1) and the other options — here Large with Oat milk — and the Service (Take-away).
- Tap Calculate (2).
Expected result
The cards show the Cost (3) with its share of the price, the Price (net), the Margin (4) and the Cups per kg of beans; the table under them lists each ingredient with its quantity and cost.
Screenshot
Common mistakes
- Comparing the cost with the price including VAT. The price here is net of VAT, as the margin must be.
Troubleshooting
- “No café products”. Give products a café type on Products first.
- The cost looks too low. An ingredient has no stock price or an option has no modifier recipe; check Modifier recipes.